Luke Beno
-
Bridging Arduino to MQTT using NodeJS
09/06/2015 at 12:47 • 0 commentsHere's a quick update and a neat little trick for quickly prototyping internet connected devices. If you are anything like me, your typical development process is to write your code using something like the Arduino IDE and then use the serial console to debug your code.
Let's say that your code is reading a ds18b20 temperature sensor and you are simply dumping this value out the serial port of your dev kit. With about 25 lines of NodeJS, this data could be whisked off to the wonderful land of MQTT.
Here's how it is done, first I have some hardware reading a ds18b20 and sending the temperature to the serial console:
#include <OneWire.h>
OneWire  ds(10);  // on pin 10 (a 4.7K resistor is necessary)
byte ow_addr[8] = {0x28,0x01,0xB6,0x88,0x06,0x00,0x00,0xEE};

byte data[12];
byte present = 0;
int i;

void setup()
{
  // put your setup code here, to run once:
  Serial.begin(9600);
}

void loop()
{
  radio.print("{\"temp\":");
  radio.print(getTemp(ow_addr));
  radio.print("}");
  sleepSeconds(5);
}

float getTemp(byte* addr) {
  // put your main code here, to run repeatedly:
  ds.reset();
  ds.select(addr);
  ds.write(0x44, 1);        // start conversion, with parasite power on at the end

  delay(50);     // maybe 750ms is enough, maybe not
  // we might do a ds.depower() here, but the reset will take care of it.

  present = ds.reset();
  ds.select(addr);
  ds.write(0xBE);         // Read Scratchpad

  for ( i = 0; i < 9; i++) {           // we need 9 bytes
    data[i] = ds.read();
  }

  // Convert the data to actual temperature
  // because the result is a 16 bit signed integer, it should
  // be stored to an "int16_t" type, which is always 16 bits
  // even when compiled on a 32 bit processor.
  int16_t raw = (data[1] << 8) | data[0];
  byte cfg = (data[4] & 0x60);
  // at lower res, the low bits are undefined, so let's zero them
  if (cfg == 0x00) raw = raw & ~7;  // 9 bit resolution, 93.75 ms
  else if (cfg == 0x20) raw = raw & ~3; // 10 bit res, 187.5 ms
  else if (cfg == 0x40) raw = raw & ~1; // 11 bit res, 375 ms
  //// default is 12 bit resolution, 750 ms conversion time
  return ((float)raw / 16.0) * 1.8 + 32.0;
}
Compile and program this into the device and we can see messages start coming in. All that is left is to close the terminal from the IDE and run this NodeJS from the terminal:
var serialport = require("serialport");
var mqtt = require('mqtt')

var SerialPort = serialport.SerialPort;

var keychain = {};

topic='input/<public_key>/<private_key>';

var serialPort = new SerialPort("/dev/tty.uart-AEFF467AF9C4494B", {
  baudrate: 9600,
  parser: serialport.parsers.readline("\n")
});

client = mqtt.createClient(1883, 'test.mosquitto.org');

serialPort.on("open", function () {
  serialPort.on('data', function(data) {
    console.log(data);
    client.publish(topic, data);
  });
});
By the way, this code requires 'serialport' and 'mutt' libs loaded from npm, you can do this by typing the following commands into the terminal:$ npm install serialport $ npm install mqttEnjoy, add comments if you have any questions. Skulls are always very appreciated :) -
A Sparkfun Blog Feature from the past
09/01/2015 at 07:32 • 0 commentsThis isn't current news but I figured that I would write a post about it. Back in April I was very honored to be featured in a blog post from Sparkfun.
https://www.sparkfun.com/news/1808
I really enjoy working with everyone at Sparkfun, they've given me a lot of encouragement with analog.io and there are a decent number of employees using the app and doing really cool things. Here are some fun projects by the Sparkfun team:
Finally, it just makes me so proud to see a tweet like this:
https://twitter.com/mikekuniavsky/status/627620108790149124
analog.io mentioned in a presentation at the Biosphere 2!
Thanks Mike & Nate! Thanks to everyone for being awesome users of the site!
-
Measuring Plant Moisture in analog.io
08/30/2015 at 06:25 • 0 commentsAs mentioned in the project description, analog.io is a powerful tool that could be used to solve a variety of world problems. Today there are two challenges that are very important for humanity, the first is improvement of the food supply and the second is water conservation. A lot of water is used to irrigate crops but there is the fundamental question of what the optimal amount of water necessary.
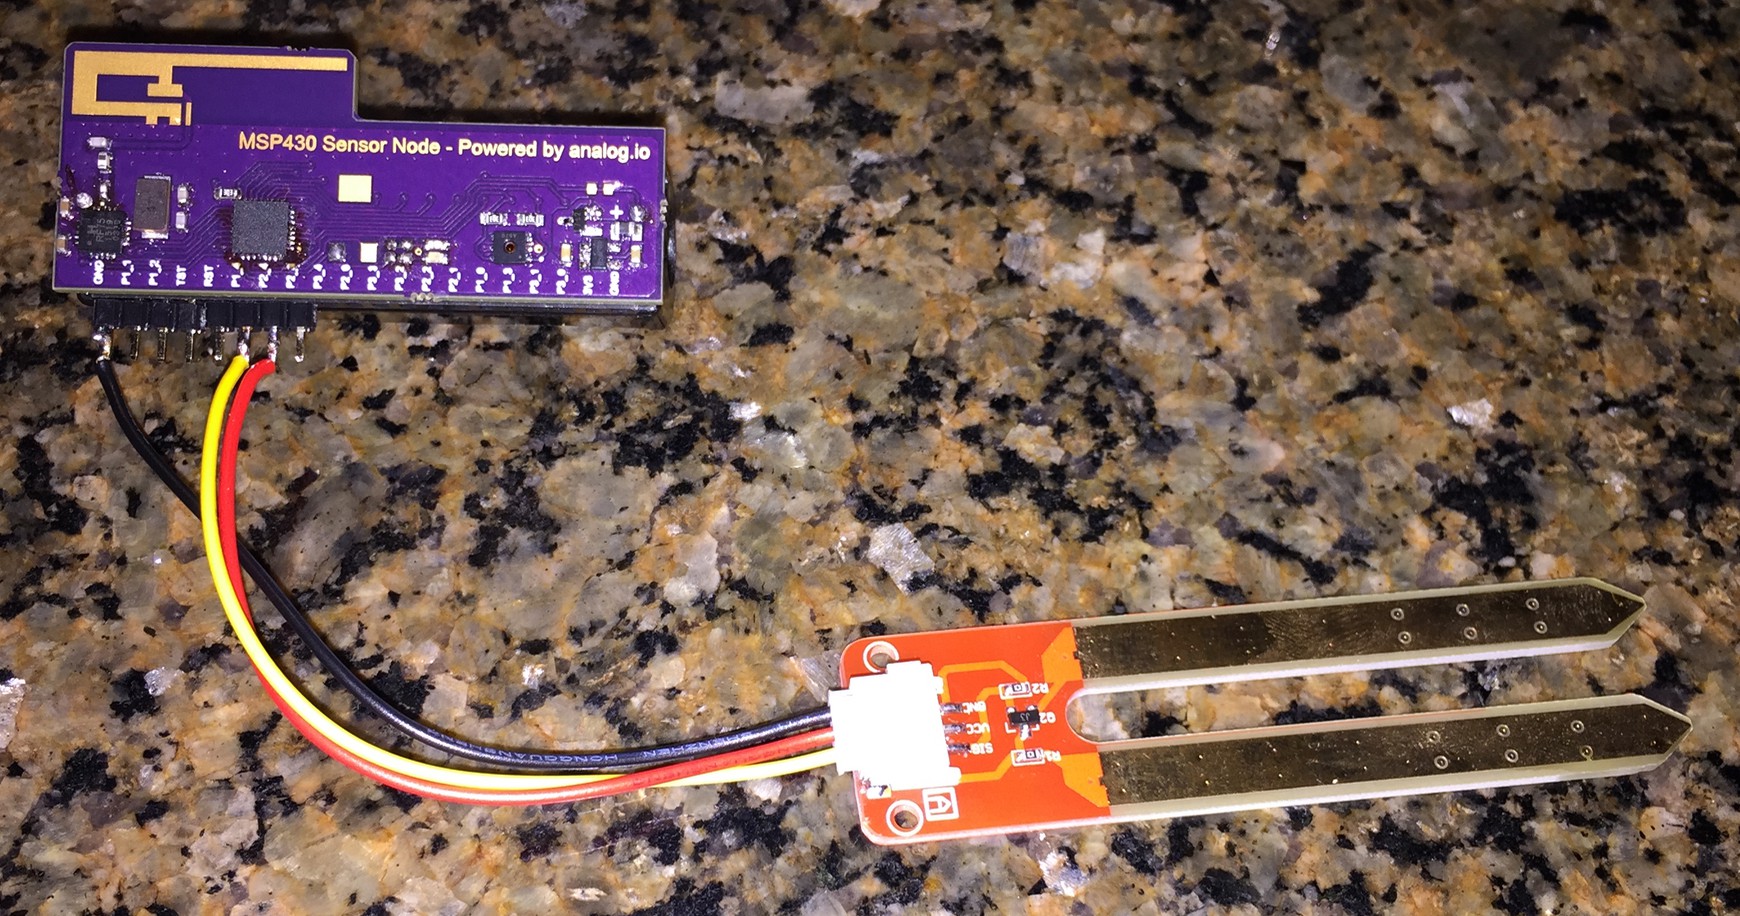
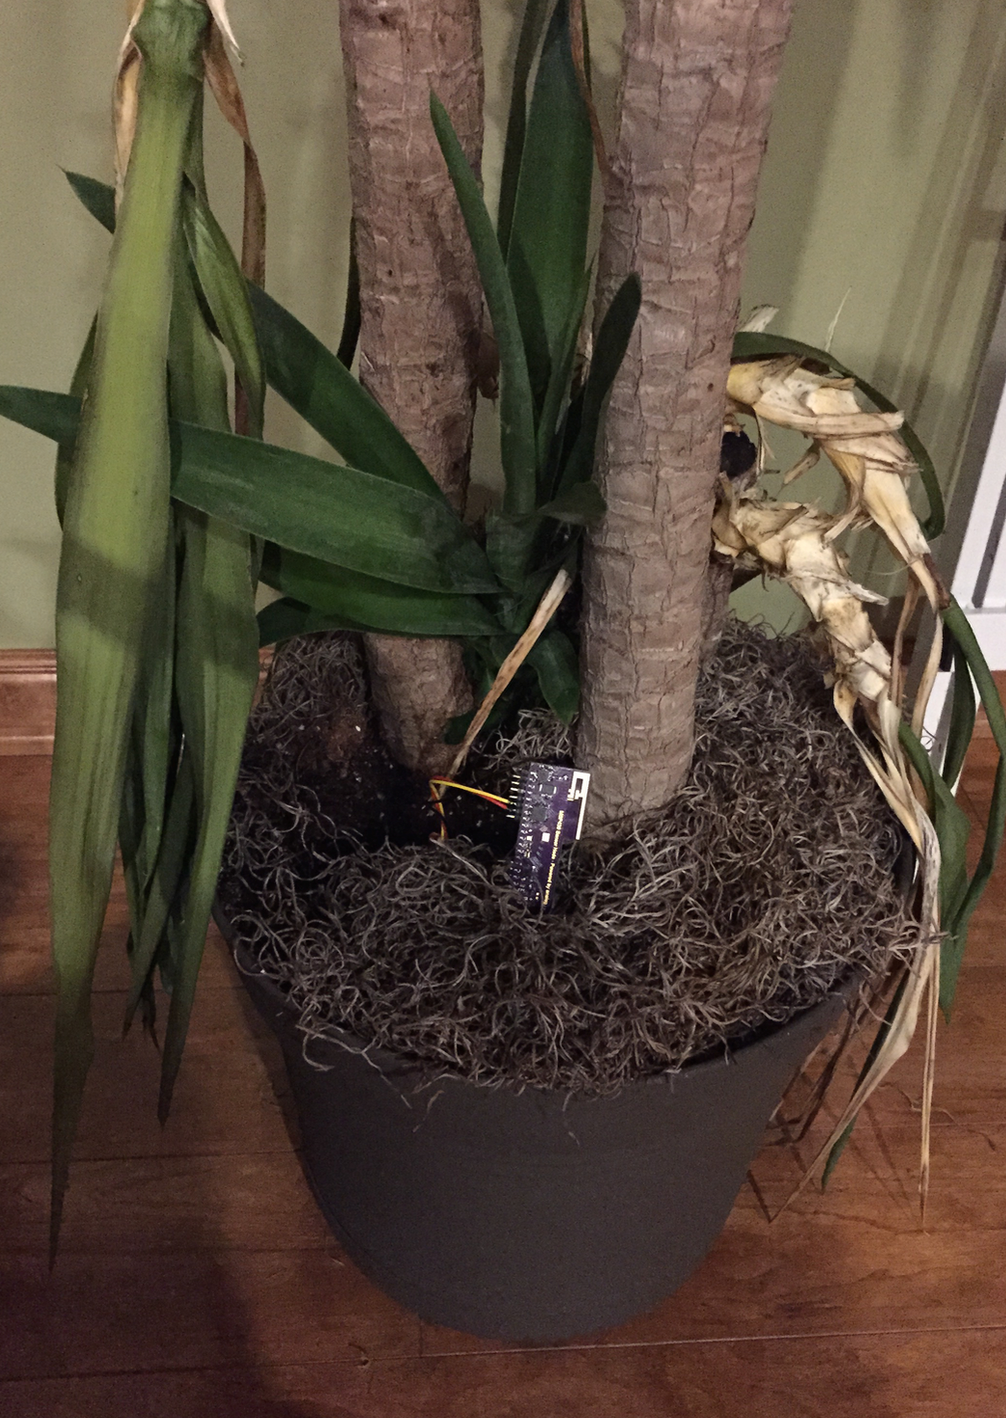
Here is a quick and easy IoT water sensor system that I setup using a Sensor from Elecrow, myMSP430 Sensor Node and it is connected using the nRF24 - ESP8266 Hub that I wrote about.
![]()
![]()
Here's the code:
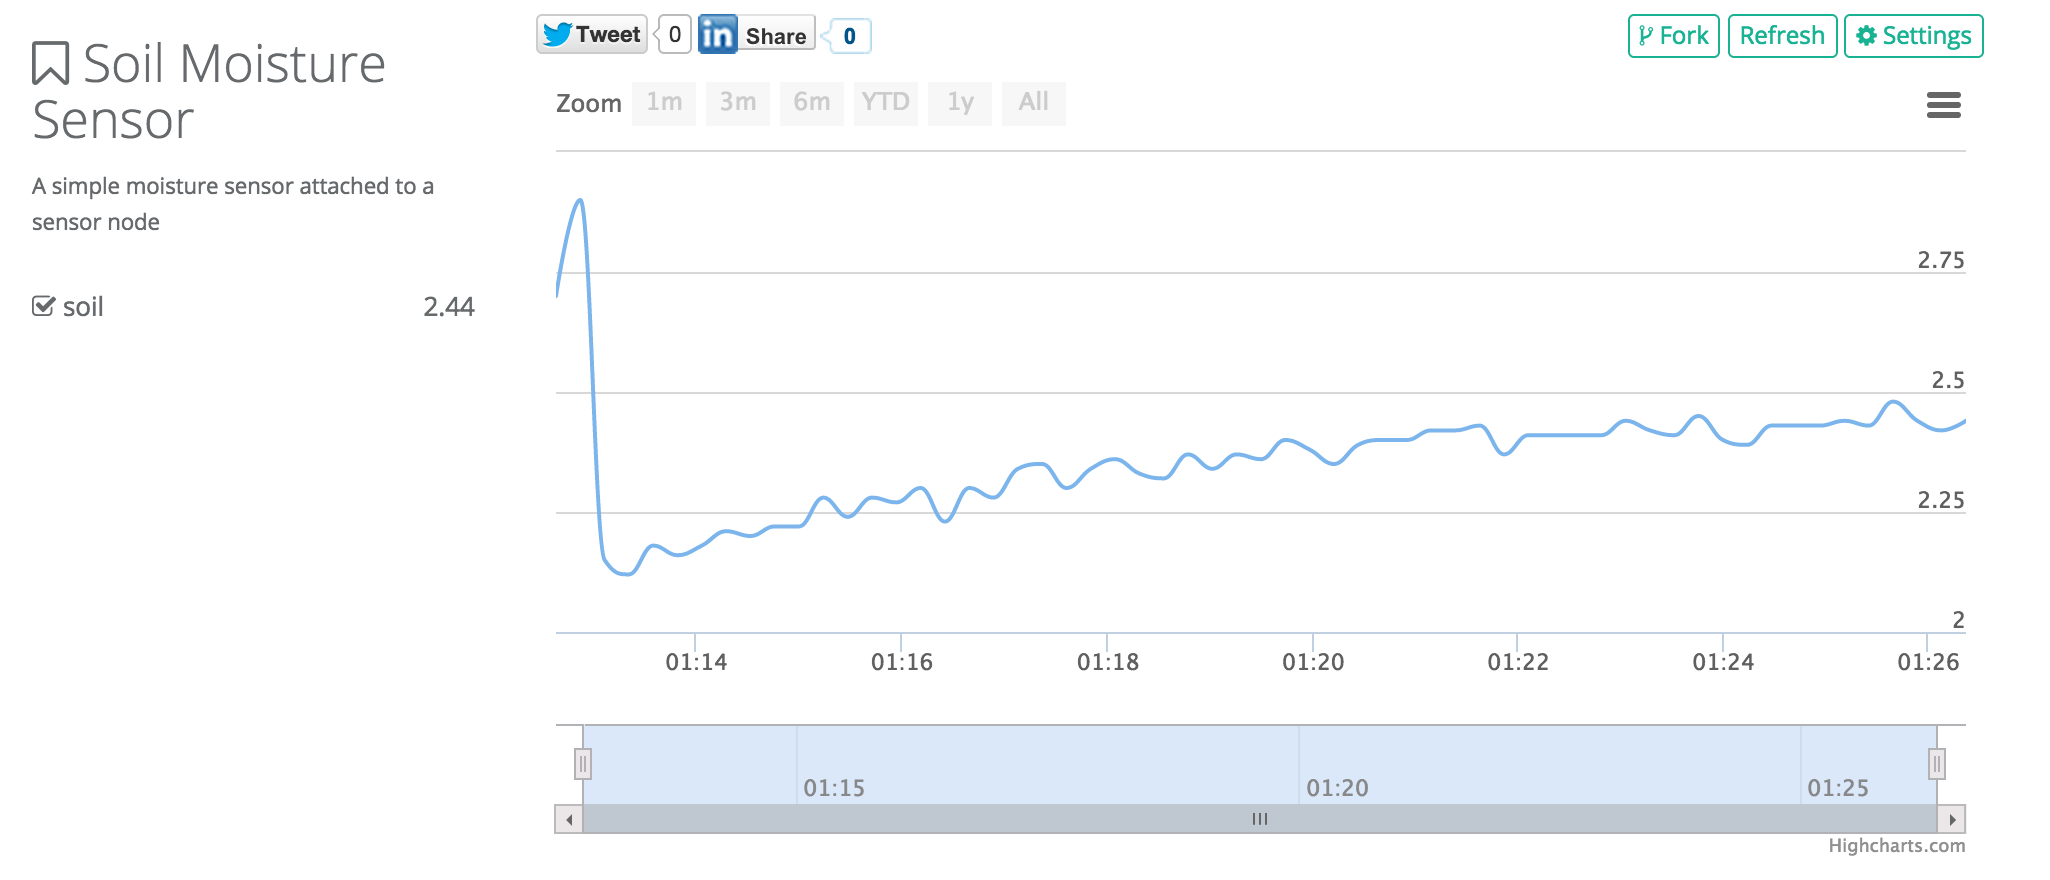
#include <analog_io.h>
#include <SPI.h>

#define SENSOR_PWR P2_4

uint8_t x = 0;
analog_io radio(P3_5, P3_6, P2_5);

const uint8_t txaddr[] = { 0xDE, 0xAD, 0xBE, 0xEF, 0x01 };

void setup()
{
  Serial.begin(9600);
  analogReference(INTERNAL2V5);
  pinMode(SENSOR_PWR, OUTPUT);
  digitalWrite(SENSOR_PWR, LOW);

  SPI.begin();
  SPI.setDataMode(SPI_MODE0);
  SPI.setBitOrder(MSBFIRST);

  radio.begin();  // Defaults 1Mbps, channel 0, max TX power

  radio.setTXaddress((void*)txaddr);
}

void loop()
{

  digitalWrite(SENSOR_PWR, HIGH);
  sleep(500);
  long data = map(analogRead(A4), 0, 1023, 0, 500);
  digitalWrite(SENSOR_PWR, LOW);
  radio.print("{\"soil\":");
  radio.print (data/100);
  radio.print (".");
  radio.print (data%100+5); // this is wrong if the tens are 0
  radio.print ("}");

  radio.flush();

  delay(100);

  radio.print (data/100);
  radio.print (".");
  radio.print (data%100+5); // this is wrong if the tens are 0
  radio.flushBle();

  radio.deepsleep();
  sleep(10000);
}
And the data so far:
![]()
I will update more as time goes on :)
-
ESP8266 MQTT Support :)
08/30/2015 at 04:42 • 0 commentsLast night I talked about my adventures with ESP8266. In that project, I used the analog_io_lib to receive RF packets from a sensor node and forward them on to data.sparkfun.com using a http get request. This approach is ok, but I really much prefer MQTT for this sort of transaction. With MQTT, there are just so many more interesting things that I can do with message routing so I started to dig in.
As referenced all over the Interwebs, the goto library for MQTT on Arduino is PubSub. I also found a very useful github gist that did exactly what I was looking for!
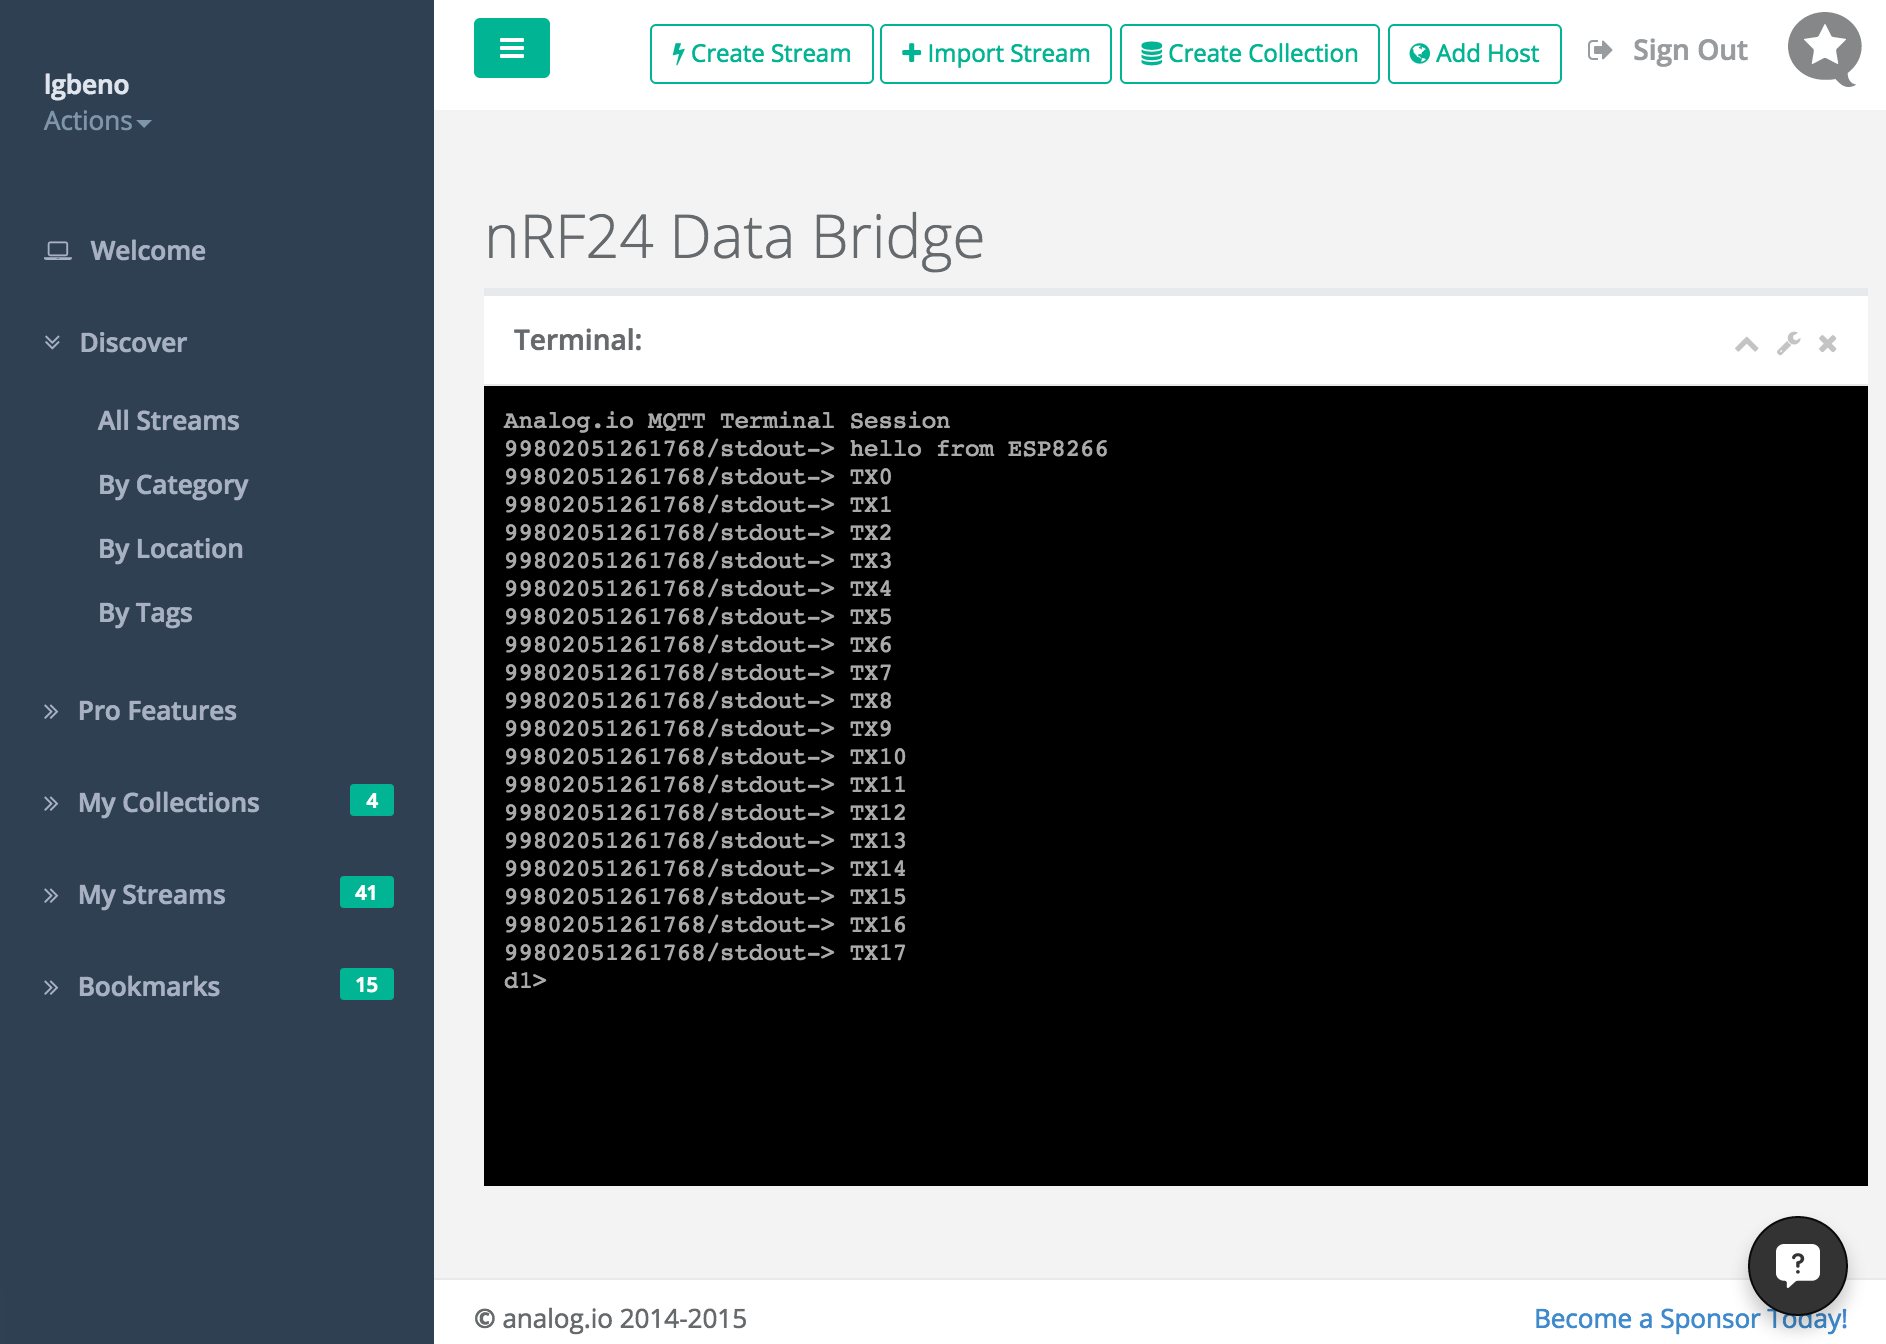
So swapping in my WiFi credentials and MQTT broker info, I was able to very quickly put a neat example together. In this example, I have a Sensor node transmitting packets by proprietary RF, these packets are received by the nRF24<->ESP8266 bridge and then forwarded on to MQTT. On the analog.io web application, I created a terminal emulator that subscribes to the same MQTT topic and dumps it to the terminal. Heres a screen grab:
![]()
Heres the ESP8266 code:
#include <PubSubClient.h>
#include <ESP8266WiFi.h>
#include <analog_io.h>
#include <SPI.h>

const char* ssid = "...";
const char* password = "...";

char* topic = "99802051261768/stdout";
char* sub_topic = "99802051261768/stdin";
char* server = "lgbeno.analog.io";

analog_io radio(2, 15, 18); // CE, CSN, IRQ pins
const uint8_t rxaddr[] = { 0xDE, 0xAD, 0xBE, 0xEF, 0x01 };
char inbuf[33];

WiFiClient wifiClient;
PubSubClient client(server, 1883, callback, wifiClient);

void callback(char* topic, byte* payload, unsigned int length) {
  Serial.println("---------msg rx-----------");
  Serial.print("Topic: ");
  Serial.println((char*) topic);
  Serial.print("Payload: ");
  Serial.println((char*) payload);
}


String macToStr(const uint8_t* mac)
{
  String result;
  for (int i = 0; i < 6; ++i) {
    result += String(mac[i], 16);
    if (i < 5)
      result += ':';
  }
  return result;
}

void setup() {
  Serial.begin(115200);
  delay(10);

  SPI.begin();
  SPI.setDataMode(SPI_MODE0);
  SPI.setBitOrder(MSBFIRST);

  Serial.println();
  Serial.println();
  Serial.print("connecting to ");
  Serial.println(ssid);

  WiFi.begin(ssid, password);

  while (WiFi.status() != WL_CONNECTED) {
    delay(500);
    Serial.print(".");
  }
  Serial.println("");
  Serial.println("WiFi connected");
  Serial.println("IP address: ");
  Serial.println(WiFi.localIP());

  // Generate client name based on MAC address and last 8 bits of microsecond counter
  String clientName;
  clientName += "esp8266";
  //uint8_t mac[6];
  //WiFi.macAddress(mac);
  //clientName += macToStr(mac);
  //clientName += "-";
  //clientName += String(micros() & 0xff, 16);

  Serial.print("connecting to ");
  Serial.print(server);
  Serial.print(" as ");
  Serial.println(clientName);

  if (client.connect((char*) clientName.c_str())) {
    Serial.println("connected to MQTT broker");
    client.subscribe(sub_topic);
    Serial.print("Topic is: ");
    Serial.println(topic);

    if (client.publish(topic, "hello from ESP8266")) {
      Serial.println("Publish ok");
    }
    else {
      Serial.println("Publish failed");
    }
  }
  else {
    Serial.println("MQTT connect failed");
    Serial.println("Will reset and try again...");
    abort();
  }

  radio.begin();  // Defaults 1Mbps, channel 0, max TX power

  radio.setRXaddress((void*)rxaddr);

  radio.enableRX();  // Start listening
}

void loop() {
  while (!radio.available(true))
  {
    delay(10);
  }
  if (radio.read(inbuf)) {
    Serial.print("Received packet: ");
    Serial.println(inbuf);
    String payload = inbuf;

    if (client.connected()){
      Serial.print("Sending payload: ");
      Serial.println(payload);

      if (client.publish(topic, (char*) payload.c_str())) {
        Serial.println("Publish ok");
      }
      else {
        Serial.println("Publish failed");
      }
    }
  }
}
Anyone is welcome to give the terminal a try! Please just be respectful.
-
An Epic Water Meter Fail
08/30/2015 at 03:24 • 0 commentsOk so an interesting side story here. 12 days ago I wrote a little blurb about my water meter project. Well I learned one valuable lesson this past weekend. We were away from our home Thursday through Sunday spending some time up north at a cabin. When I got back home I walked in the house and heard a familiar noise, what was it, it sounded like the water was running...
So I wish that I took a picture but long story short, a fitting on out outside garden hose had come loose and popped out. Since faucet that this hose was attached to was turned on, the hose happily started pouring out water onto the ground, 1 ft from my basement wall.
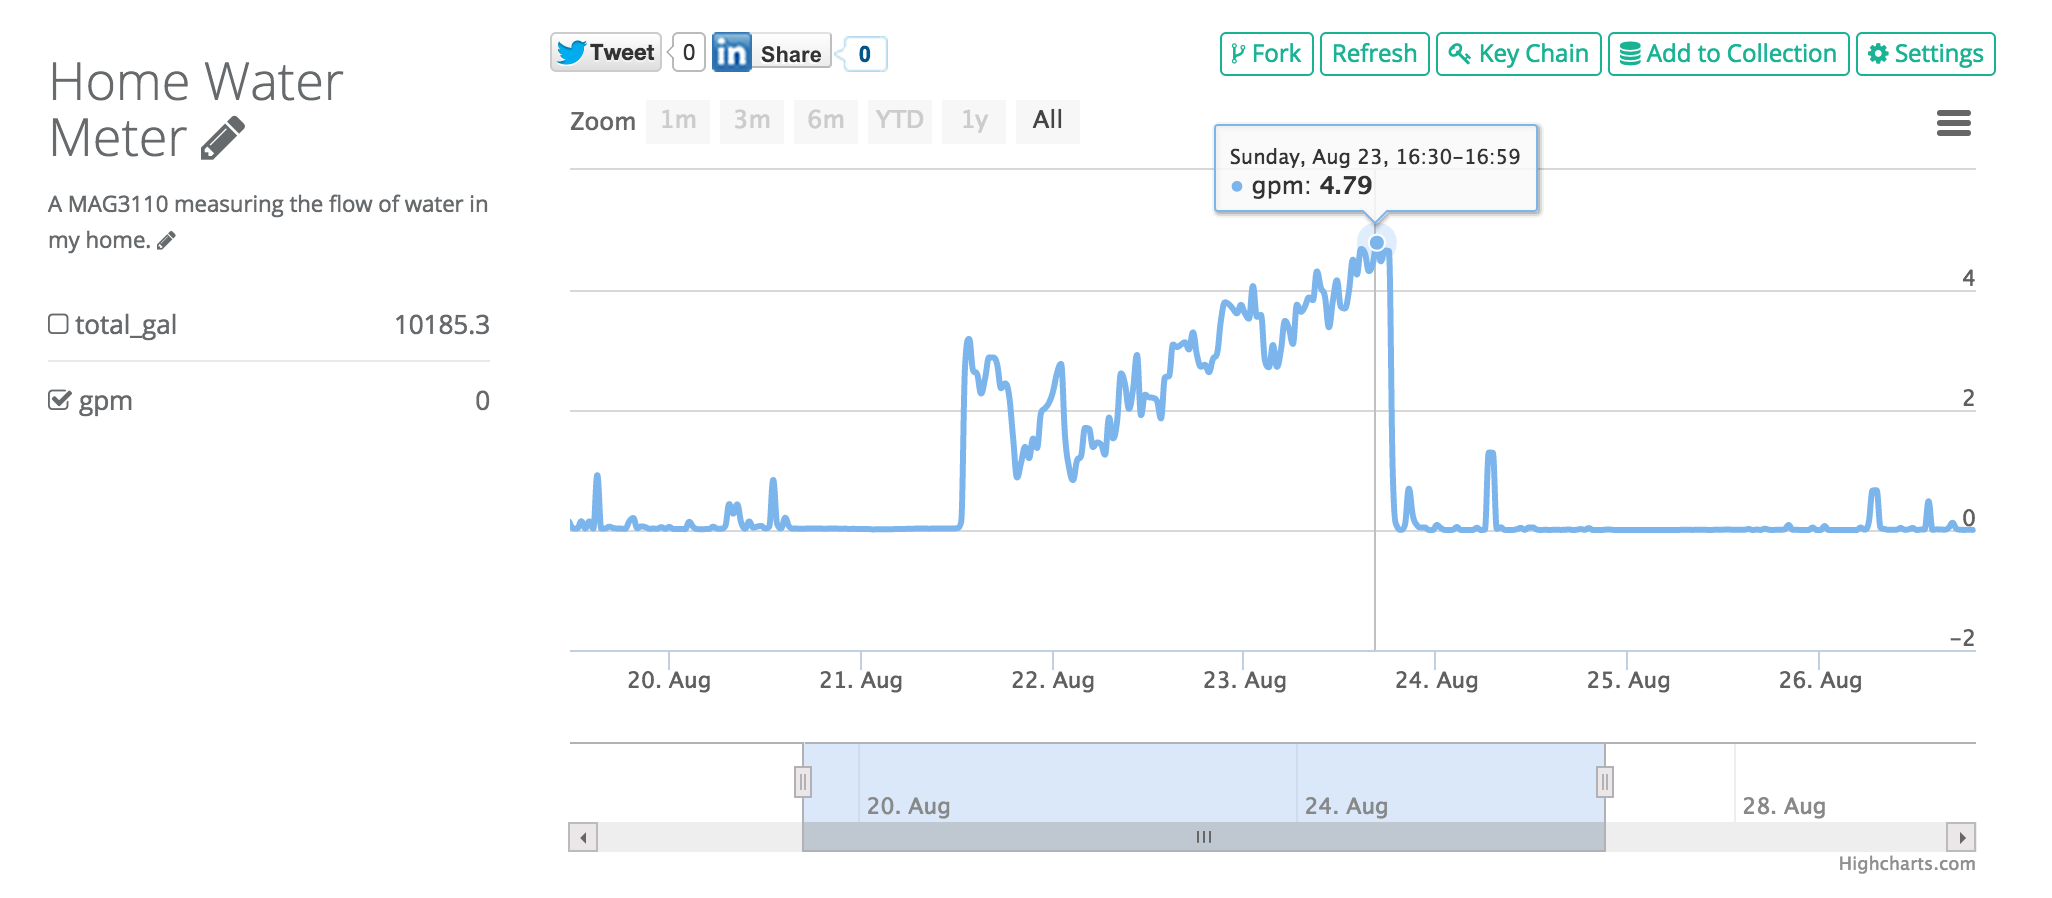
Going back to analog.io and looking at the data, it left little to the imagination:
![]()
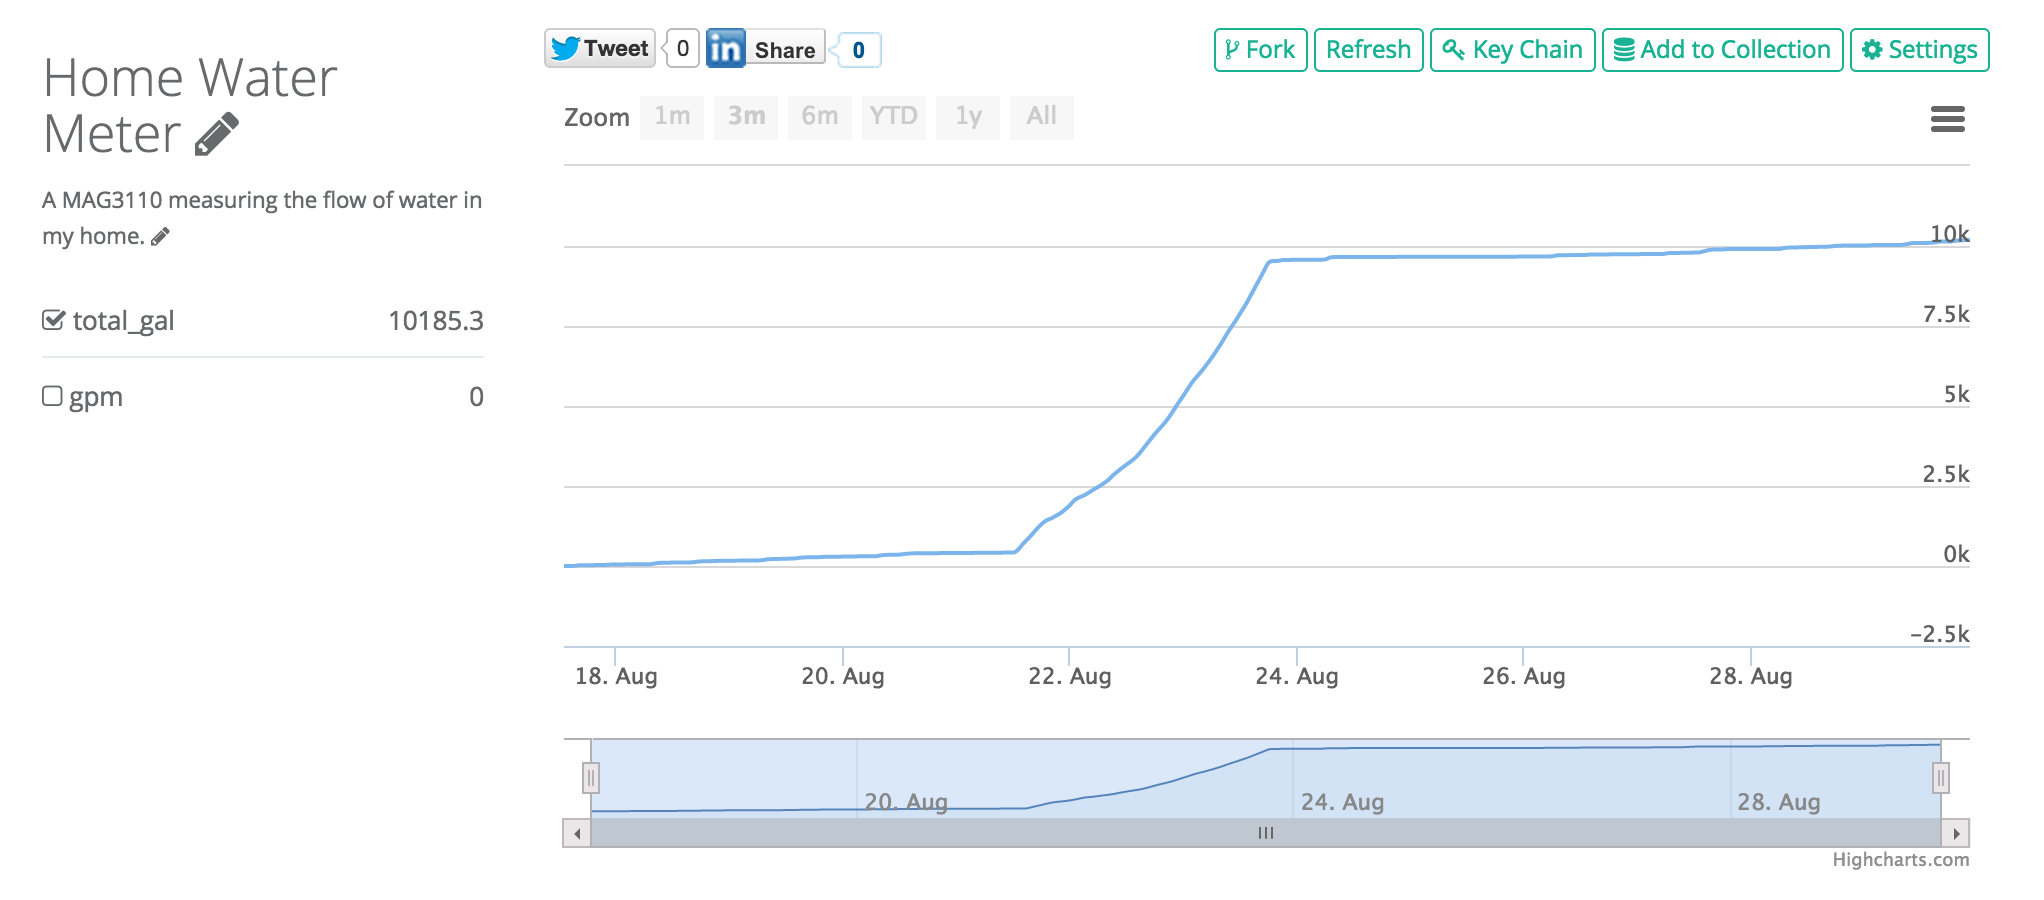
Yep, it looks like this happened at about 1pm on Friday and water continued to flow out of the hose at around 3-4 Gallons per minute for at least 48 hours. Overall totalling over 9100 gallons of water lost! Here is the cumulative chart:
![]()
Over the last 6 days, my family of 4 consumed just 653 gallons, but due to this leak, the bill is going to be a little higher this month.
The moral of the story, I need to take some time to add a alert feature to my code!
-
nRF24 <-> ESP8266 Hub Development
08/29/2015 at 15:00 • 3 commentsSo at this point the MSP430 Sensor nodes are coming along quite well. This week I built and shipped off 10 units to other members of the 43oh.com forum. The first revision of the analog_io_lib was also released and other people are starting to play around with it.
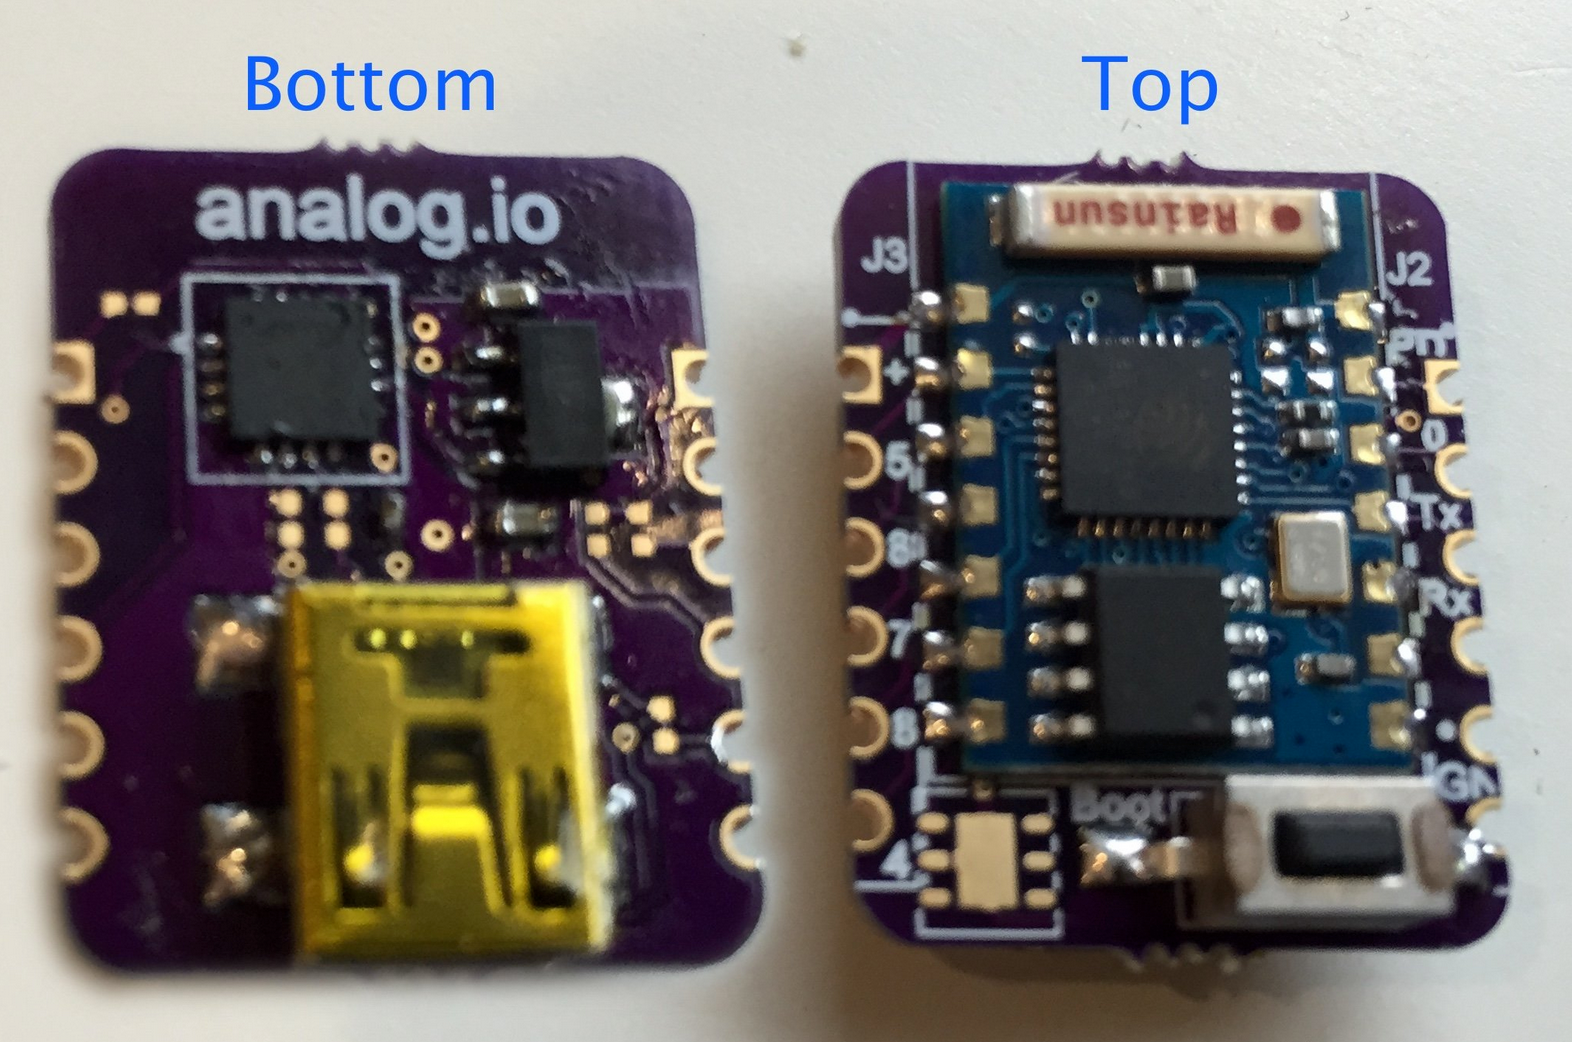
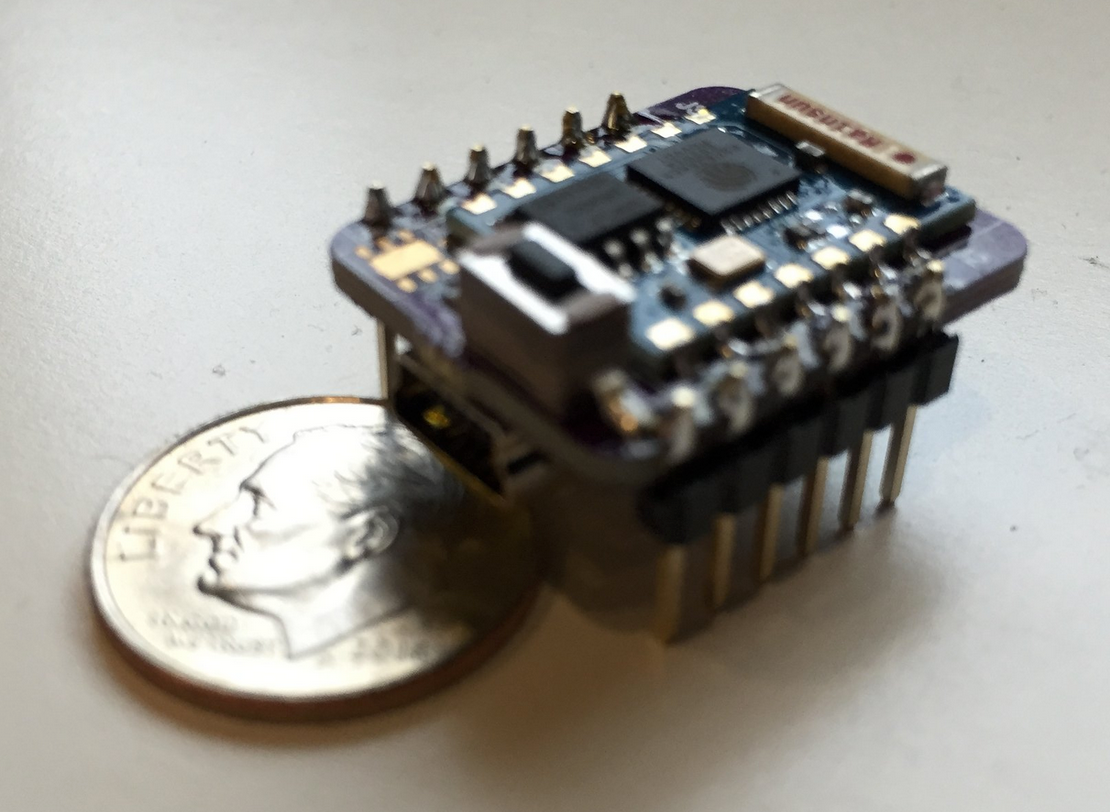
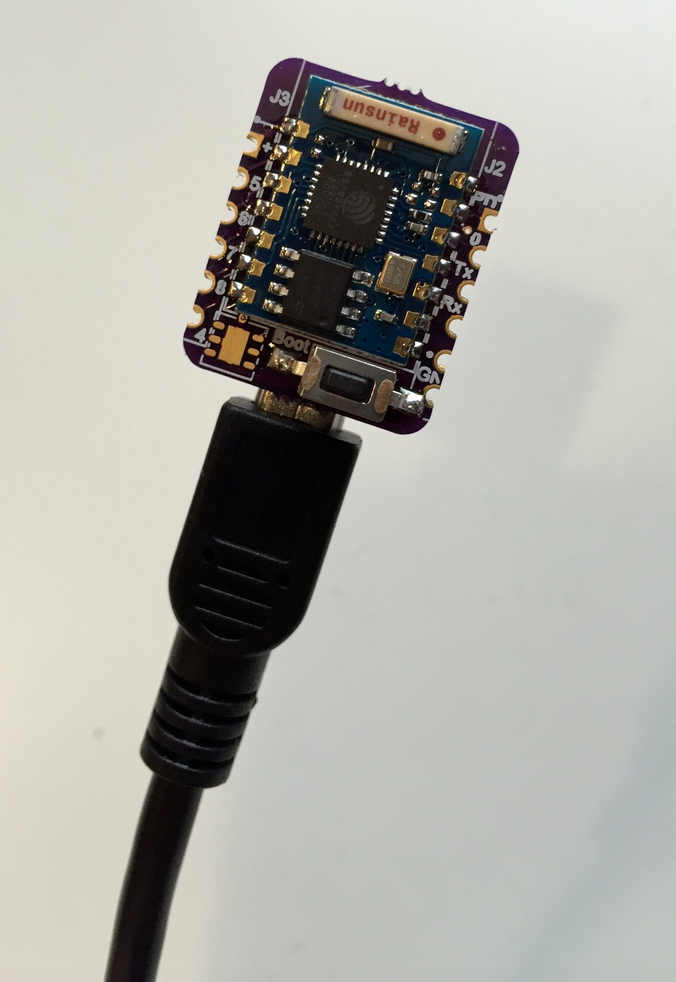
Back in April I released this ESP8266 Mini Dev Kit on Tindie, it is intended to be a ultra compact and convenient way to develop for ESP8266 (pics below).
![]()
![]()
![]()
At that time I was doing development with NodeMCU which is also a great environment! I was looking for a lower cost alternative to Electric Imp and something that was easier to deploy with customers. One thing that I came to realize with NodeMCU was that it wasn't the most reliable thing, it tended to run out of heap space very often when doing simple WiFi transactions. I determined then that if I was going to do a product, that I would need to program directly in C/C++.
After reading about it setting up a ESP8266 dev environment for awhile, I realized that it was going to be a lot of fiddling around. I really don't enjoy setting up toolchains, especially when there are such low friction alternatives like Arduino, Energia, Simplicity Studio, etc, etc. So I started working on something else instead...
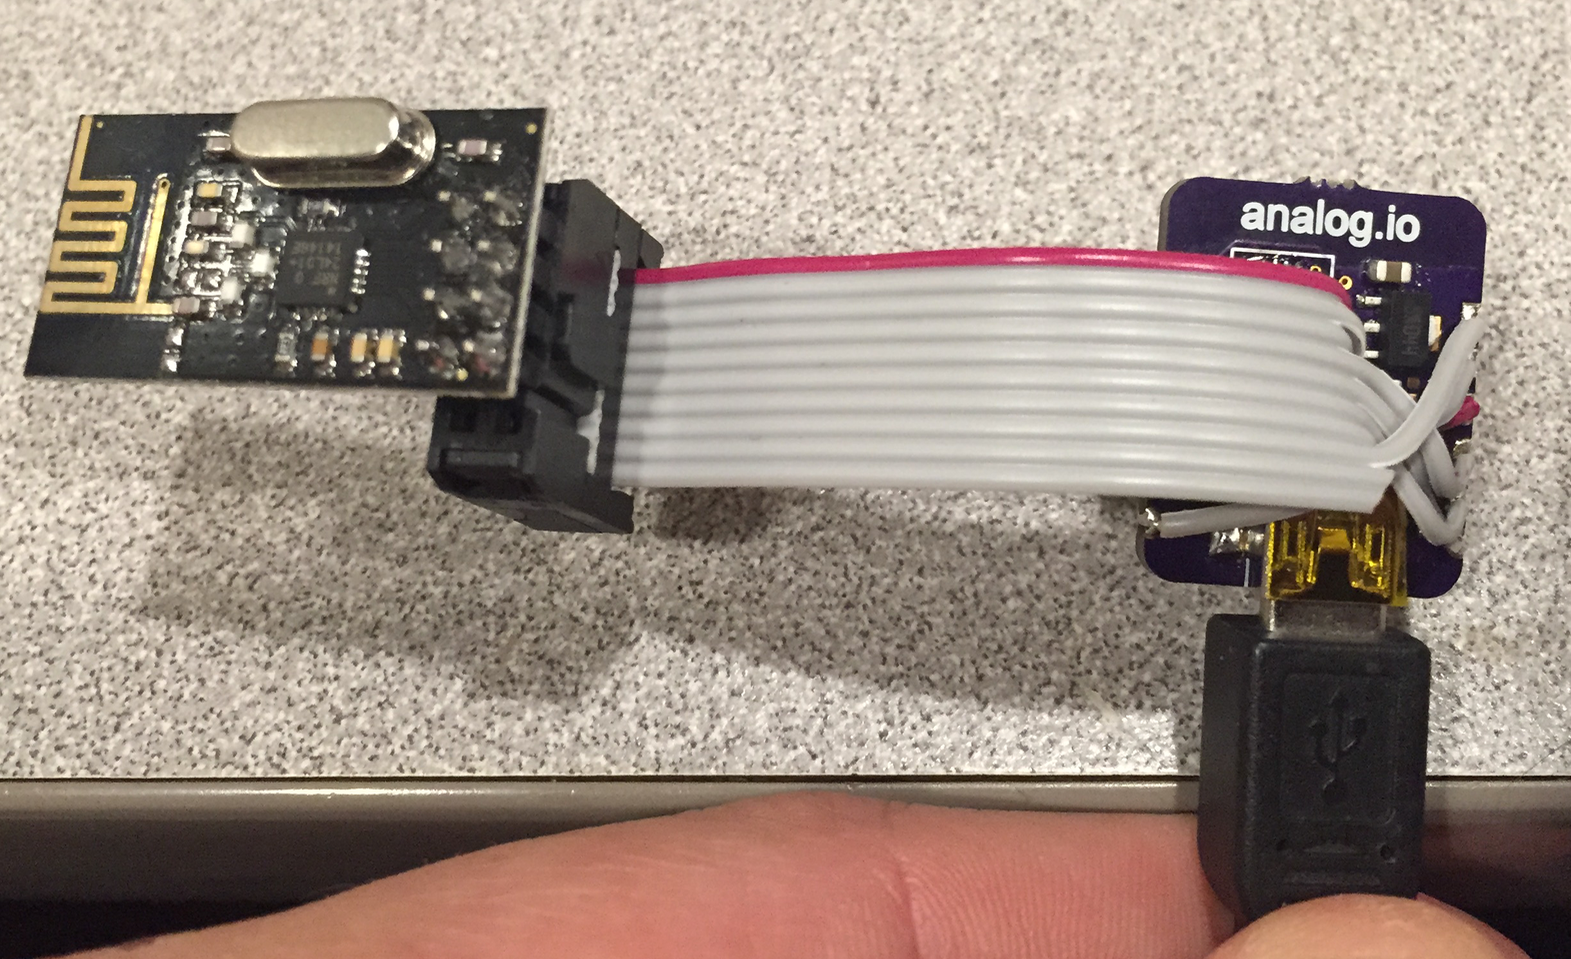
Fast forward to August and there is now this beautiful Arduino port for ESP8266! Last night I took a chance to sit down a explore. Very quickly I was able to solder up a nRF24 module to the dev kit:
![]()
Merging some of the demo code from the ESP8266WiFi lib and my own, I was able to quickly merge this demo where the ESP8266 talks directly to nRF24 via SPI, takes packets received from the a MSP430 sensor node and pushes them directly to data.sparkfun.com!
Very cool, heres my code:
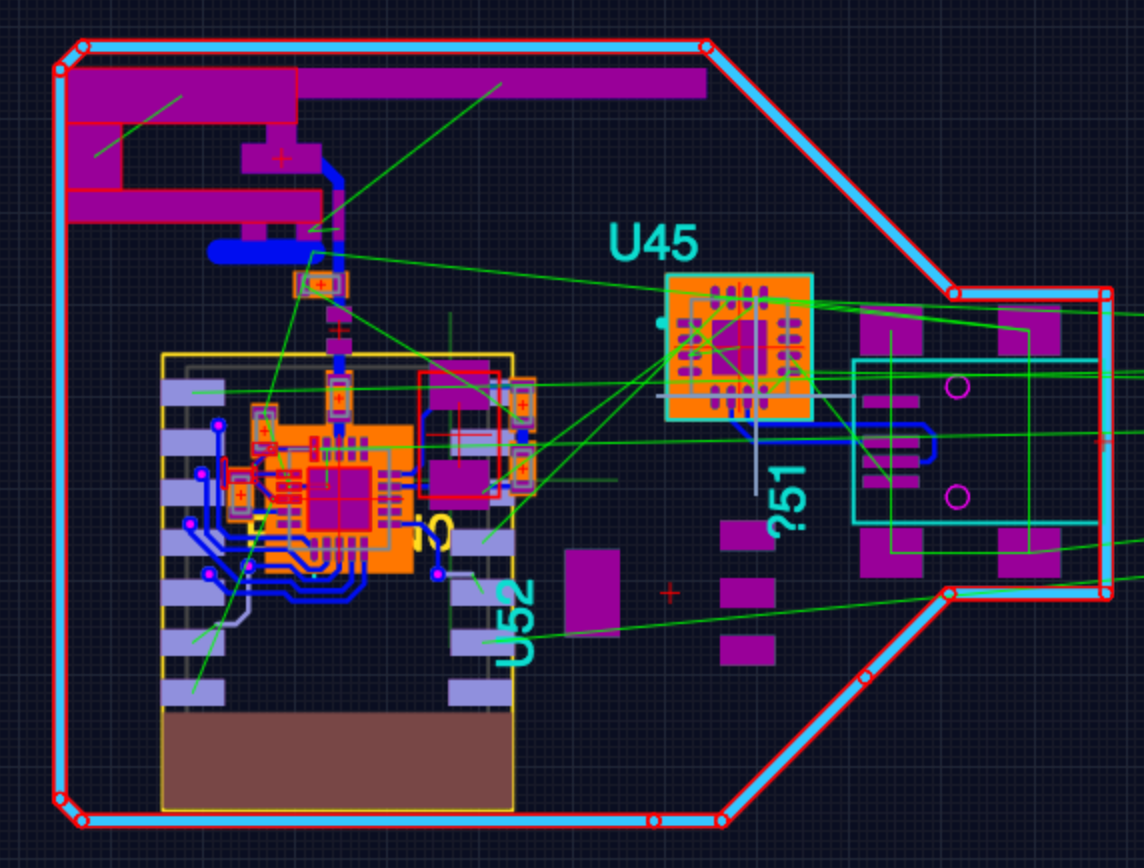
/*
 *  This sketch sends data via HTTP GET requests to data.sparkfun.com service.
 *
 *  You need to get streamId and privateKey at data.sparkfun.com and paste them
 *  below. Or just customize this script to talk to other HTTP servers.
 *
 */
#include <analog_io.h>
#include <SPI.h>
#include <ESP8266WiFi.h>

const char* ssid     = "...";
const char* password = "...";

const char* host = "data.sparkfun.com";
const char* streamId   = "VGQ7n2Ww2Mhx5NNnVooE";
const char* privateKey = "...................................................";

analog_io radio(2, 15, 18); // CE, CSN, IRQ pins
const uint8_t rxaddr[] = { 0xDE, 0xAD, 0xBE, 0xEF, 0x01 };
char inbuf[33];

void setup() {
  Serial.begin(115200);
  delay(10);

  SPI.begin();
  SPI.setDataMode(SPI_MODE0);
  SPI.setBitOrder(MSBFIRST);

  // We start by connecting to a WiFi network

  Serial.println();
  Serial.println();
  Serial.print("Connecting to ");
  Serial.println(ssid);

  WiFi.begin(ssid, password);

  while (WiFi.status() != WL_CONNECTED) {
    delay(500);
    Serial.print(".");
  }

  Serial.println("");
  Serial.println("WiFi connected");
  Serial.println("IP address: ");
  Serial.println(WiFi.localIP());

  radio.begin();  // Defaults 1Mbps, channel 0, max TX power

  radio.setRXaddress((void*)rxaddr);

  radio.enableRX();  // Start listening
}

int value = 0;

void loop() {
  while (!radio.available(true))
  {
    delay(10);
  }
  if (radio.read(inbuf)) {
    Serial.print("Received packet: ");
    Serial.println(inbuf);
  }

  Serial.print("connecting to ");
  Serial.println(host);

  // Use WiFiClient class to create TCP connections
  WiFiClient client;
  const int httpPort = 80;
  if (!client.connect(host, httpPort)) {
    Serial.println("connection failed");
    return;
  }

  // We now create a URI for the request
  String url = "/input/";
  url += streamId;
  url += "?private_key=";
  url += privateKey;
  url += "&value=";
  url += inbuf;

  Serial.print("Requesting URL: ");
  Serial.println(url);

  // This will send the request to the server
  client.print(String("GET ") + url + " HTTP/1.1\r\n" +
               "Host: " + host + "\r\n" +
               "Connection: close\r\n\r\n");
  delay(10);

  // Read all the lines of the reply from server and print them to Serial
  while(client.available()){
    String line = client.readStringUntil('\r');
    Serial.print(line);
  }

  Serial.println();
  Serial.println("closing connection");
}
Lots more of code to write here but this is extremely promising towards creating a super low cost IoT hub and bridging the sensor nodes to the analog.io web service! I even started a new board for it (work in progress).
More to come on this one :)![]()
-
First Library Released
08/29/2015 at 14:25 • 1 commentA very quick update on this. I recently pushed the first release of the analog_io_lib to Github. With this library you are now able to simultaneously transmit Bluetooth Low Energy packets with nRF24 proprietary RF packets.
The interface is the same as the Serial.print API in Arduino so it is super simple to use. Check out the sample code:
Dual Mode Tx Example:
#include <analog_io.h>
#include <SPI.h>

uint8_t x = 0;
analog_io radio(P3_5, P3_6, P2_5); // CE, CSN, IRQ

const uint8_t txaddr[] = { 0xDE, 0xAD, 0xBE, 0xEF, 0x01 };

void setup()
{
  SPI.begin();
  SPI.setDataMode(SPI_MODE0);
  SPI.setBitOrder(MSBFIRST);

  radio.begin();  // Defaults 1Mbps, channel 0, max TX power

  radio.setTXaddress((void*)txaddr);
}

void loop()
{
  // put your main code here, to run repeatedly:
  radio.print("TX #");
  radio.print(x);
  radio.flush();

  delay(250);

  radio.print("Beacon #");
  radio.print(x);
  radio.flushBle();
  x++;
  delay(250);
}
RF Receive Example:
#include <analog_io.h>
#include <SPI.h>

analog_io radio(P3_5, P3_6, P2_5); // CE, CSN, IRQ
const uint8_t rxaddr[] = { 0xDE, 0xAD, 0xBE, 0xEF, 0x01 };

void setup() {
  Serial.begin(9600);

  SPI.begin();
  SPI.setDataMode(SPI_MODE0);
  SPI.setBitOrder(MSBFIRST);

  radio.begin();  // Defaults 1Mbps, channel 0, max TX power

  radio.setRXaddress((void*)rxaddr);

  radio.enableRX();  // Start listening
}

void loop() {
  char inbuf[33];

  while (!radio.available(true))
    ;
  if (radio.read(inbuf)) {
    Serial.print("Received packet: ");
    Serial.println(inbuf);
  }
}
The library works both with Arduino+a nRF24 module or Energia and my MSP430 Sensor Node hardware. Check it out here:
https://github.com/analog-io/analog_io_lib
Also if you are using a MSP430 Sensor node, here is info on adding support for this hardware to Energia:
-
Excited about the Semifinals
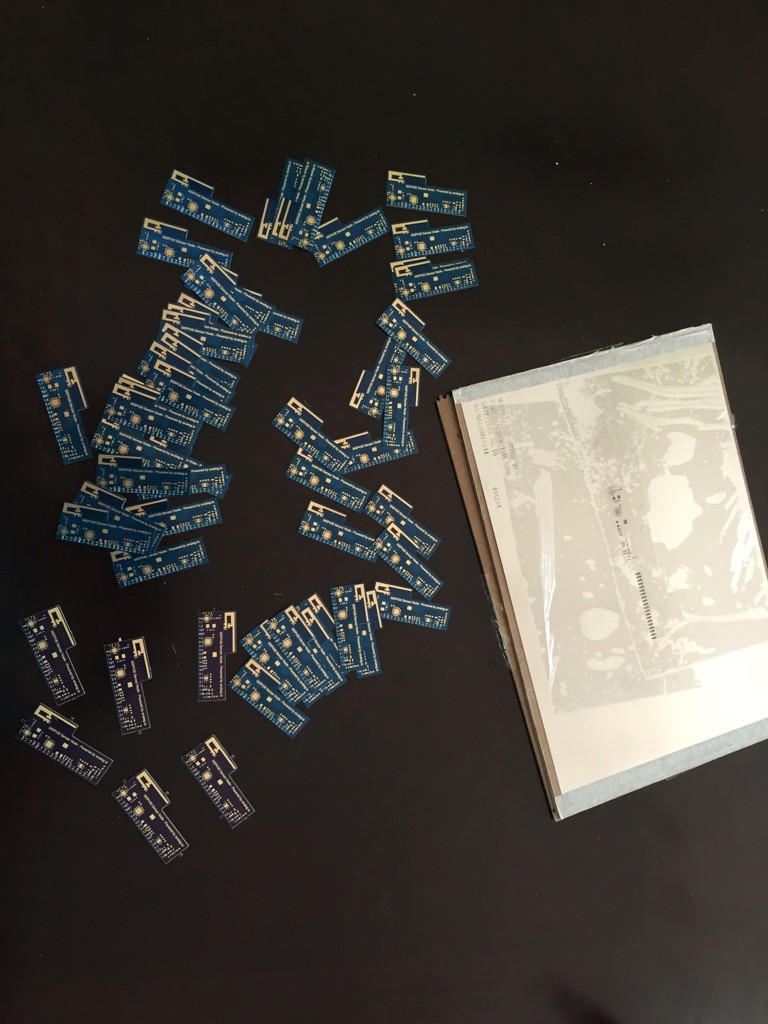
08/25/2015 at 03:31 • 0 commentsWell I was pretty excited to hear that analog.io made it to the next round for the Hackaday Prize! It is a great honor and I'll be making a big push to continuously add valuable updates and keep improving the project. Right now I'm very excited to have received all of this in the mail today:
![]()
Next update will be a close look at how the sensors are built. Then they go into the hands of patiently awaiting people who have placed pre-orders. Send me a message if you would like to purchase!
-
Hacking BLE & RF into an EEVBLOG uCurrent Gold
08/20/2015 at 06:56 • 0 commentsWell just because we all know Dave Jones' opinion of "The Internet of Things", it is time to bring his uCurrent to the dark side! Just kidding, Dave if you are reading this, I just thought that it would be a fun project :)
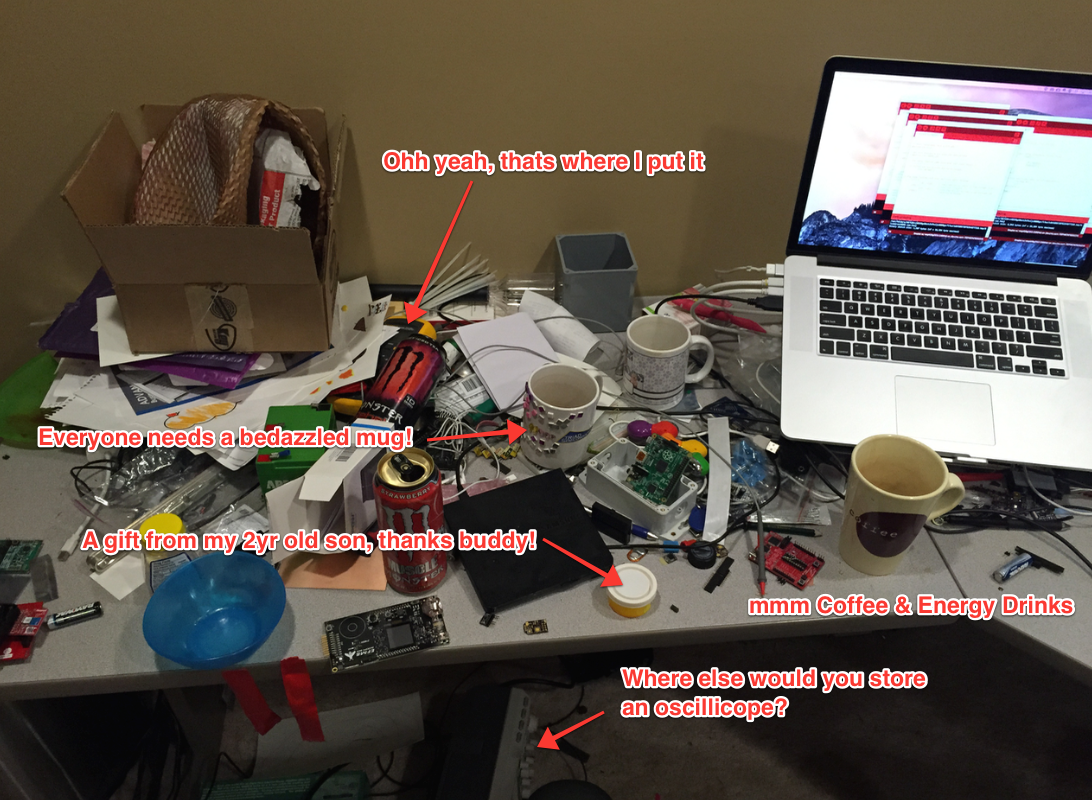
I love my uCurrent and use it all of the time for measuring power consumption of small low power devices. I've been working on some solar stuff where I want to measure current over a long period & a wireless interface/data logging would be handy. There are some other instances where I just can't be bothered to get out (or find) my DMM, untangle the leads and get it all together. Not to mention my desk ALWAYS looks like this!
![]()
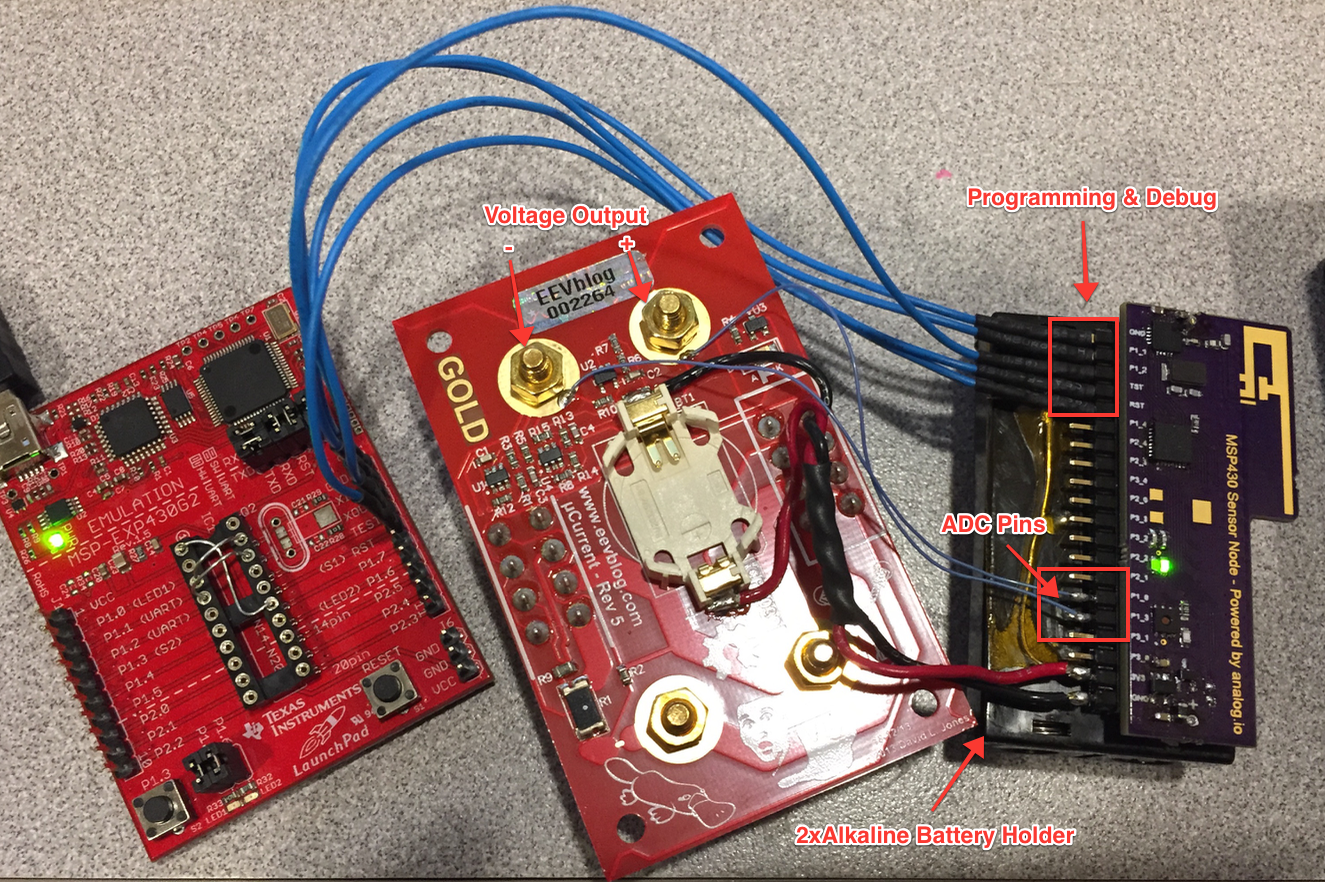
Anyway from my other updates You'll find that I've been working on a new low cost sensor node that supports BLE as well as the standard Nordic Enhanced Shockburst protocol. The size of this node is small so I figured it would be a perfect marriage to put them together. There are just 4 connections:
![]()
Here's the code, apologies in advance for the egregious use of floats, it is a hack after all...
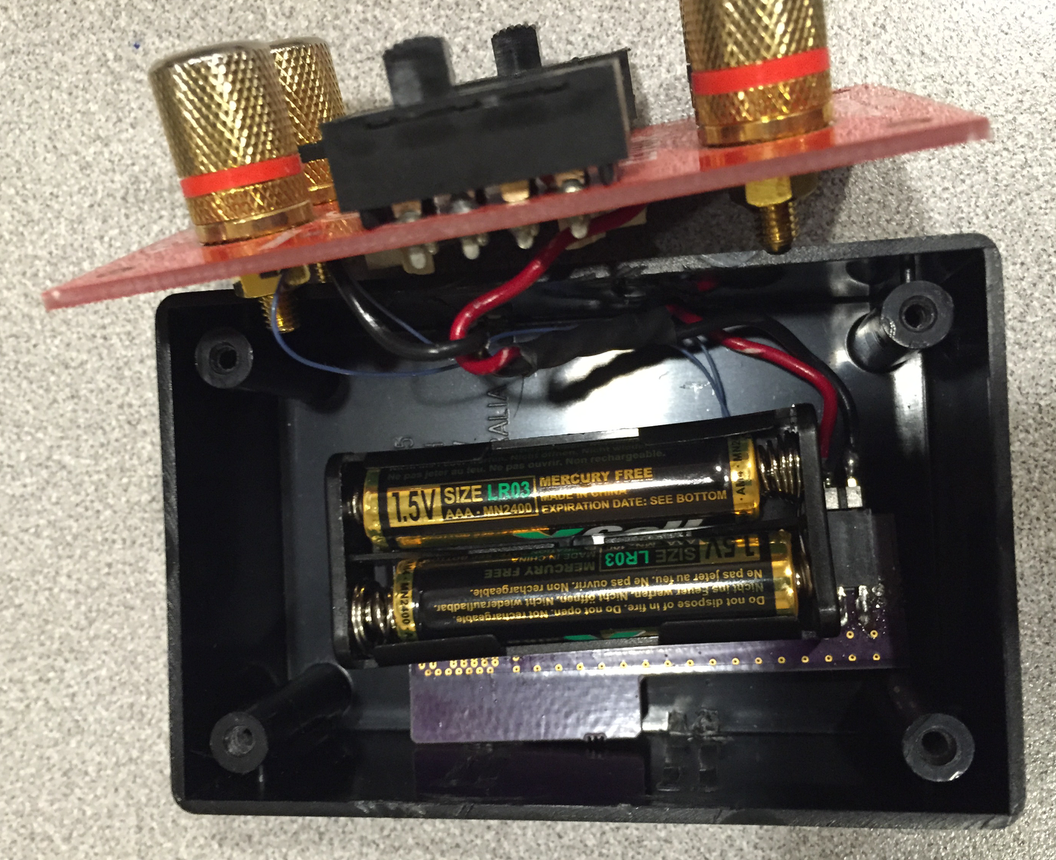
#include <analog_io.h>
#include <SPI.h>

uint8_t x = 0;
analog_io radio(P3_5, P3_6, P2_5);

float ref, I;
float Current;
uint16_t batt,lp_ref;

const uint8_t txaddr[] = { 0xDE, 0xAD, 0xBE, 0xEF, 0x01 };

void setup()
{
  SPI.begin();
  SPI.setDataMode(SPI_MODE0);
  SPI.setBitOrder(MSBFIRST);
  radio.begin();  // Defaults 1Mbps, channel 0, max TX power
  radio.setTXaddress((void*)txaddr);
  analogReference(INTERNAL2V5);
}

void loop()
{
  lp_ref = analogRead(A0);
  batt = analogRead(11)>>1;

  if (lp_ref-batt>100) {
    for (int k=1;k<=100;k++) {
      ref -= ref/k;
      ref += analogRead(A0)/k;

      I -= I/k;
      I += analogRead(A3)/k;
    }

    Current = (I-ref)*0.00244140625;
    radio.print(Current,3);
    radio.flush();
    delay(250);

    radio.print(Current,3);
    radio.flushBle();
    delay(250);
  }
  else {
    sleep(5000);
  }
}
By the way, you can find the analog_io library here. The Rx code is straight from the "proprietaryRfRx" example.All that is left is to put it back together:
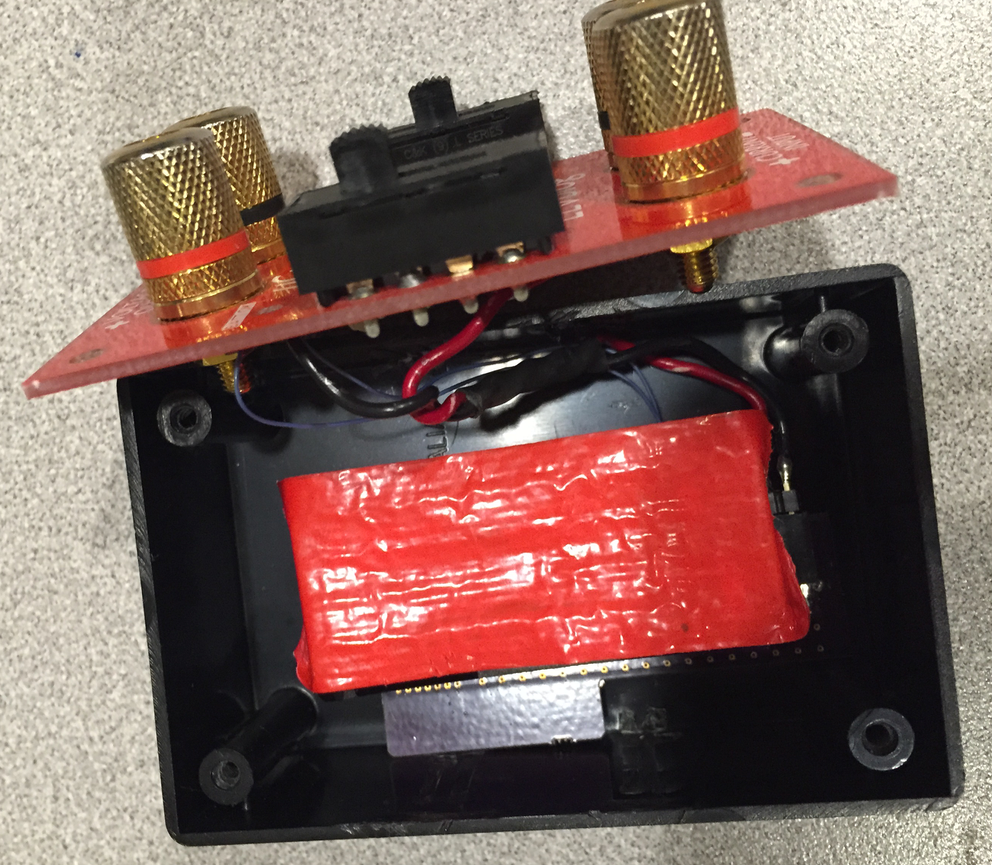
Add some tape for good measure![]()
![]()
There is one more thing to consider, I'm using the 2.5V reference in the MSP430. That means that I can't measure voltages greater than 2.5V from GND. The way that the uCurrent works is that in order to do bi-directional current measurements, it sets the virtual reference at VCC/2, about 1.5 V. So the measurement range is degraded to, -1.5mA to +1.0mA. Nothing quite works close to the rails either so be advised.
Since I don't really use the bi-directional aspect of my uCurrent, I'm tempted to lower the virtual ground to something like 200mV and get more range. I digress...
Feel free to comment, send a skull my way or follow the project! Sensor nodes are for sale too, send me a message it you would like to purchase. $15 for the node, an extra $5 if you want a Si7020 Temp & Humidity sensor soldered on. $5 Shipping world wide (except for a few countries).
-
Measuring Water Consumption
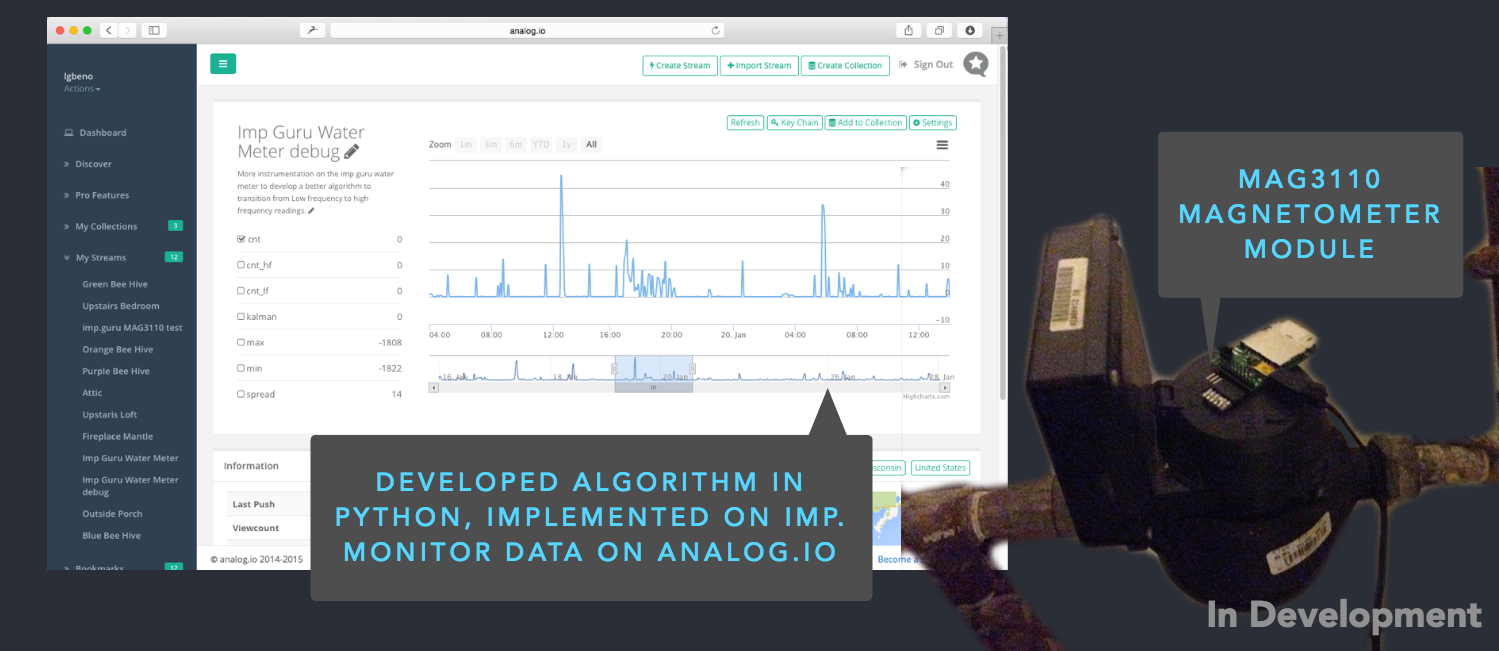
08/17/2015 at 20:47 • 0 commentsJust a very quick note on a sensor that I have up and running in my home. It was inspired by John Schuch's Remote Water Consumption project last year. I'm using his same concept with using the MAG3110 Digital compass to measure the spinning magnet in my homes water meter. Here's a picture with some data.
![]()
The basic operation of the device is that it measures the oscillating magnetic field inside the meter and counts the number of oscillations. The through a calibration cycle I calculated the number of oscillations per gallon and that is how water consumption is measured.
The technique could be used to monitor for leaks or in general just to help home owners understand what activities that they are doing which drive water usage.
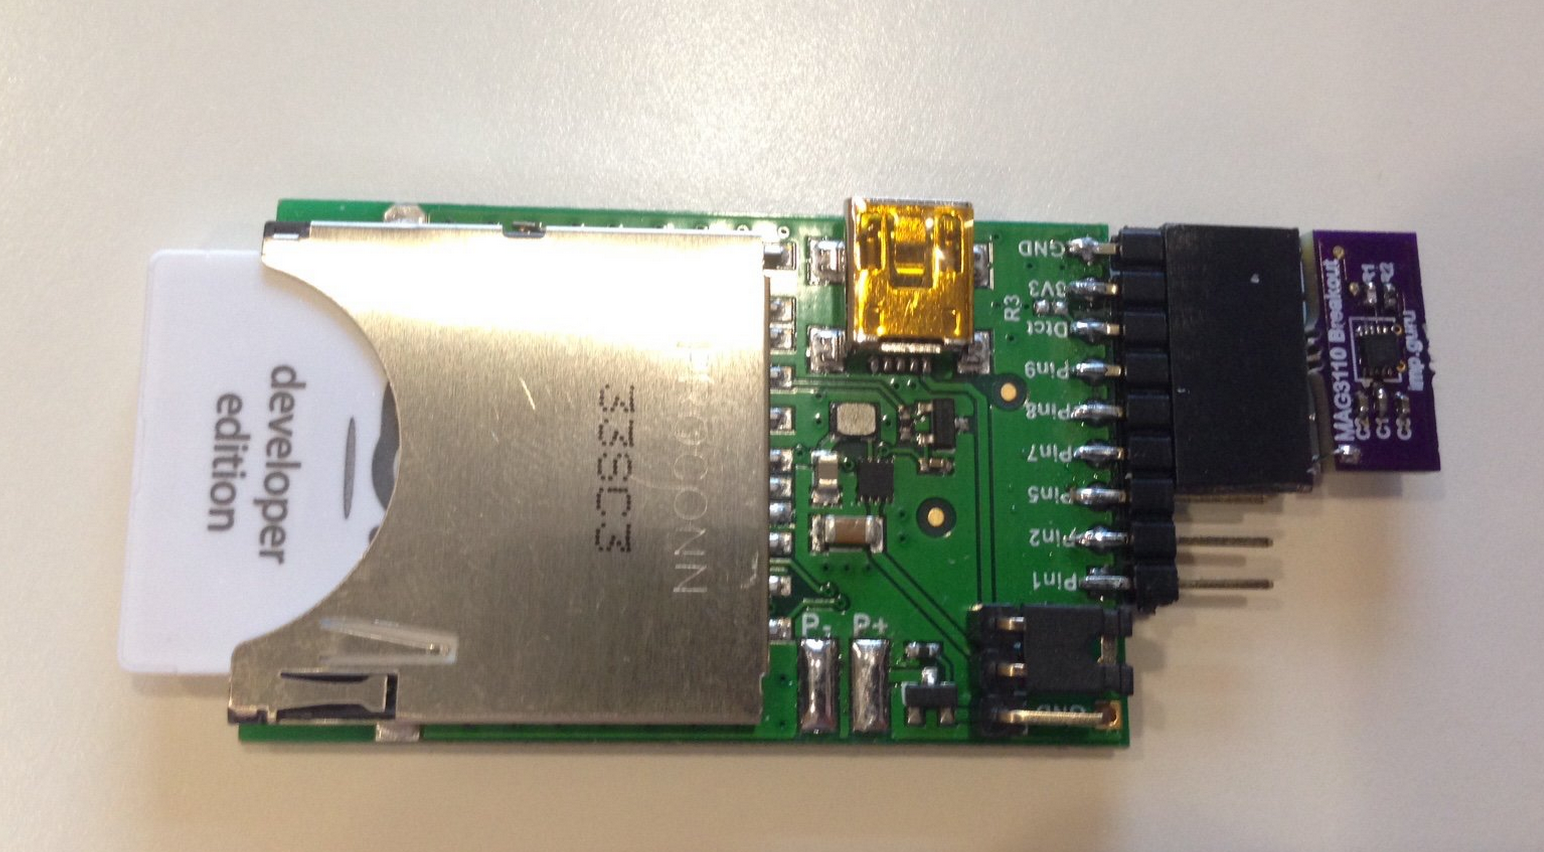
The hardware setup uses one of these sensors that I sell on Tinde:
![]()
Here's the Electric Imp Device code:
// Define a class for a ring buffer object with some analysis functions
class ring_buffer {
  _depth = 0
  _index = 0
  _data = 0
  _buff = 0
  _fill = 0

  constructor(depth) {
    _depth = depth
    _data = array(depth,0)
    _index = 0
  }


  function insert(value) {
    if (_index < _depth)
    {
      _data[_index] = value
      _index++
    }
    else
    {
      _data[0] = value
      _index = 1
    }
    if (_fill<=_depth){
      _fill++
    }
  }

  function z(relative_index){
    if ((_index-1-relative_index)>=0)
    {
      return _data[_index-1-relative_index]
    }
    else
    {
      return _data[_index-1-relative_index+_depth]
    }
  }

  function dump(){
    local i = 0
    local buff = array(_fill,0)

    for (i=0;i<_fill;i++) {
      buff[i] = z(i)
    }
    return buff
  }

  function stringify(){
    local d = dump()
    local string = ""
    local i=0
    for (i=0;i<d.len();i++) {
       string += d[i]+" "
    }
    return string
  }

  function stats(d){
    local min = 32767
    local max = -32767
    local i
    for (i=0;i<d;i++) {
      local t = z(i)
      if (t>max){max=t}
      if (t<min){min=t}
    }
    return [min,max,max-min]
  }

  function fill(){
    return _fill
  }

  function rolled_over(){
    return _fill>_depth
  }

  function reset(){
    _index = 0
    _fill = 0
  }
}

// Define the Sensor Address
const ADDR = 0x1C;

// Define register map
const OUT_X_MSB = "\x01";
const CTRL_REG1 = "\x10";
const CTRL_REG2 = "\x11";

// Some useful bitmasks
const ACTIVE = "\x01";
const AUTO_MRST_EN = "\x80";

// Define the i2c periphrial being used
i2c <- hardware.i2c89;

// Interupt pin
int <- hardware.pin7;

// Config the i2c periph
i2c.configure(CLOCK_SPEED_400_KHZ);

// Set to auto reset int flag on read
i2c.write(ADDR,CTRL_REG2+AUTO_MRST_EN)

// Activate the MAG3110, sample at 80Hz
i2c.write(ADDR,CTRL_REG1+ACTIVE)

// Read the initial data to clear the isr flag
local data = i2c.read(ADDR,OUT_X_MSB,6);

// create a buffer for storing data
data_buffer <- ring_buffer(800);

// We're going to do some global min and max calculations
// So init the variables
min <- 32767
max <- -32767

// Initialize the threshriold
thresh <- 0
spread_thresh <- 100

// Debouncing parameter
debounce <- 120

// Some bools for oneshots
x_lf <- false
x_hf <- false

// Counters for counting the number of triggers
trigs <- 0
x_trigs_lf <- 0
x_trigs_hf <- 0
k <- 0

x_int <- 0
x_int_neg <- 0

// Interupt routine for getting MAG3110 measurements
function mag_isr() {
  // Check for the rising edge
  if (int.read()==1)
  {
    // Read data from i2c
    local data = i2c.read(ADDR,OUT_X_MSB,6);

    // Combine the MSB and LSB into a 16bit value
    local x = data[0]<<8 | data[1]

    // Convert 2's compliment
    if (x & 0x8000) {x = -((~x & 0x7FFF) + 1);}

    // Detect for min and max, then calculate a new threshold
    if (x<min) {min = x; thresh = min + (max-min)/2}
    if (x>max) {max = x; thresh = min + (max-min)/2}

    // Put data in buffer
    data_buffer.insert(x)

    // Get the count spread from the last 20 items
    local stats = data_buffer.stats(20)
    local spread = stats[2]

    // Detect if measured value is above or below the threshold
    if (x>thresh) {
      // Logic for oneshot to count the crossing
      if (!x_hf){
        x_hf = true

        // Increment the high frequency counter
        x_trigs_hf++

        if (spread > spread_thresh){trigs++}
      }

      // Integrate the measurement, this is for the debounce algorithim
      x_int += (x-thresh)

      // If integral exceeds the debounce parameter, time for the lf count
      if (x_int>debounce) {
        // Logic for oneshot to count the crossing
        if (!x_lf) {
          x_lf=true

            // Increment the high frequency counter
            x_trigs_lf++

            if (spread <= spread_thresh){trigs++}

            // Reset the negative integral
            x_int_neg = 0
          }
        }
      }
    else {
      // Reset the hf oneshot
      x_hf = false

      // Integrate the measurement under the threshold
      x_int_neg += (thresh-x)

      // If integral exceeds the threshold, time to reset the lf oneshot
      if (x_int_neg>debounce) {
        x_lf = false

        // Reset the positive integral
        x_int = 0
      }
    }

    //determine if buffer has reached the end
    if (data_buffer.rolled_over())
    {

      if (spread>spread_thresh) {
        k = x_trigs_hf
      }
      else {
        k = x_trigs_lf
      }

      // Make sure min, max and threshold are stabilized before sending data
      if ((max-min)>spread_thresh)
      {
        // buffer is at end, send the data back to the agent
        agent.send("buffer",[data_buffer.dump(),[trigs,x_trigs_hf,x_trigs_lf,k,stats[1],stats[0],stats[2],max,min,thresh]])
      }

      // Reset the trigger counters
      x_trigs_hf = 0
      x_trigs_lf = 0
      trigs = 0

      //reset the buffer and start all over again
      data_buffer.reset()
    }
  }
}

// Configure the interrupt pin to run the mag_isr callback
int.configure(DIGITAL_IN, mag_isr)
And the Agent Code:// Create a data stream at data.sparkfun.com, then enter your keys here: local publicKey = "dAb2YJaZkKhz4kV53qla" local privateKey = "...................." data_array <- array(800,[0,0,0,0]) name_array <- ["x","y","z"] total <- 0 conversion <- 4.95/476 local req = http.get("https://data.sparkfun.com/output/"+publicKey+"/latest.json"); local response = req.sendsync() local data = http.jsondecode(response.body) total = data[0].total_gal.tointeger() server.log(total) function bufferRx(data) { data_array <- data local gpm = data_array[1][0].tofloat()*conversion*6.0 local total_gal = total.tofloat()*conversion // Prepare the phant headers local phantHeaders = {"Phant-Private-Key": privateKey, "connection": "close"}; // Create a post request local req = http.post("http://data.sparkfun.com/input/"+publicKey, phantHeaders,"gpm="+gpm+"&total_gal="+total_gal); total += data_array[1][0] //Send out the request! server.log(gpm+" | "+total_gal+" | "+total+" | "+data_array[1][0]+" | "+data_array[1][1]+" | "+data_array[1][2]+" | "+req.sendsync().statuscode); } device.on("buffer",bufferRx);
analog.io - A full stack IoT platform
A full stack project dedicated to easily collecting, analyzing and sharing IoT sensor data.