-
Video!
08/17/2015 at 20:33 • 0 comments -
Building the Charging Station Pt. 2
07/29/2015 at 19:25 • 0 commentshttp://www.backwoodshome.com/articles2/yago116.html
I'll be using the above link as reference for some parts of the system and may refer and link to it through out this post as it develops.
So you have a grounded and hopefully mounted solar panel system charging some batteries, now to connect that to a power supply for a computer system and the charging ports for the bots.
-
I ♥ Deadlines
07/29/2015 at 18:43 • 0 commentsmy favorite excuse for procrastination is that I work better under pressure. HA! This post is mostly just to prove that I'm still alive and lay out some goals for myself.
OK, now I actually have to get some stuff done:
- Line diagrams for charging station and one robot
-Video
-Full component list
-Complete list of everything left to do
yaaay
-
Robot #2 : The Nose
03/30/2015 at 19:13 • 0 commentsTo accurately map a pollution problem some way of differentiating between chemicals present in the environment must be used. Normal vision will not provide all the information needed as sometimes pollutants are invisible to the naked eye(bot). Spectrometry offers a deeper insight into an environment and will be a valuable addition to the info about a cleanup site.
I'll be investigating a number of options and will probably choose the cheapest one for the first build.
Here are a couple possibilities I have come across:
C12666MA Micro-Spectrometer
-
Building the Charging Station
03/30/2015 at 08:26 • 0 commentsThe first build will be relatively simple. One solar panel and one battery. Only the charging ports to begin with so the robots will not be connected to anything yet as far as data sharing goes.
Electricity is dangerous, grounding is important. Make sure this device is grounded before everything is patched together into a circuit.
Build the Solar circuit-
- Start with your Racking system.
- I will go into further detail in the future but make sure your bots have sufficient space and shade(mostly from the panel) and you have space to implement the onboard computer.
- 2x4s will work work to mount the racking system for your solar panel.
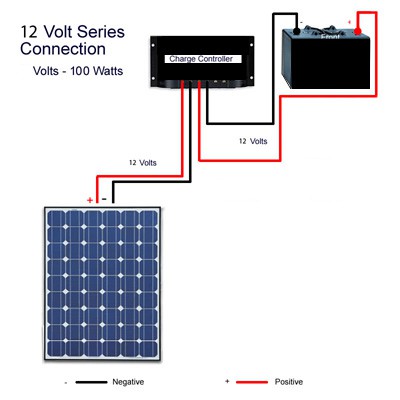
- attach solar panel. In this example it is a 100 Watt 12 Volt panel.
- Attach the panel to the racking system.
- Wire it to your charge controller and wire the controller to the battery like so:
![]()
- Start with your Racking system.
-
Robot #1 : The Eyes
03/30/2015 at 07:23 • 0 comments -
2015
03/25/2015 at 01:53 • 0 commentsSo I figure I'll throw my hat in the ring for the 2015 prize and see what happens. It's still very barebones on this page but I'll be beefing it up as the week goes along.
I welcome any suggestions and constructive criticism as I am certainly an amateur at this point. On that note, I'd be interested in putting together a team, ideally a 2-6 person team with individuals who can specialize on certain elements. I myself am becoming fairly well versed in solar technology and can put that together no problem. Designing and programming robots is something I'm very interested in but have no experience in.
Team or no I am going to get rolling with this now, stay tuned!
M.R. E.T. C.E.T.E.R.A #0
Modular Robotic Ecosytem To Clean EveryThing Even(tually) RadioActivity
 Dylan James Carr