pastcompute
-
Update
10/26/2015 at 13:50 • 0 commentsCongratulations to all the top 10 finalists, you well deserved it!
We've had a bit of a break, and will be progressing our experiments a little more leisurely for the next while.
Next task is to deal with power issues. I need to do some repairs and design a more reliable power feed, so we can deploy a reliable operational sensor in time for harvest to see how it compares with actual working measurements. By the end of things we were having a lot of trouble with nodes crashing and having to drive out and cycle the power, yet working fine in the lab. I put it down to overloading the regulator in the USB converter, which was not really the best solution by a long shot, but we ran out of time to do it properly.
As part of evaluating the microcontroller architectures we used, I may have a spin off soon too
-
SentriFarm Semifinal Video
09/21/2015 at 19:23 • 0 commentsThe video entry for the semifinals for SentriFarm can be found on YouTube at the following location:
-
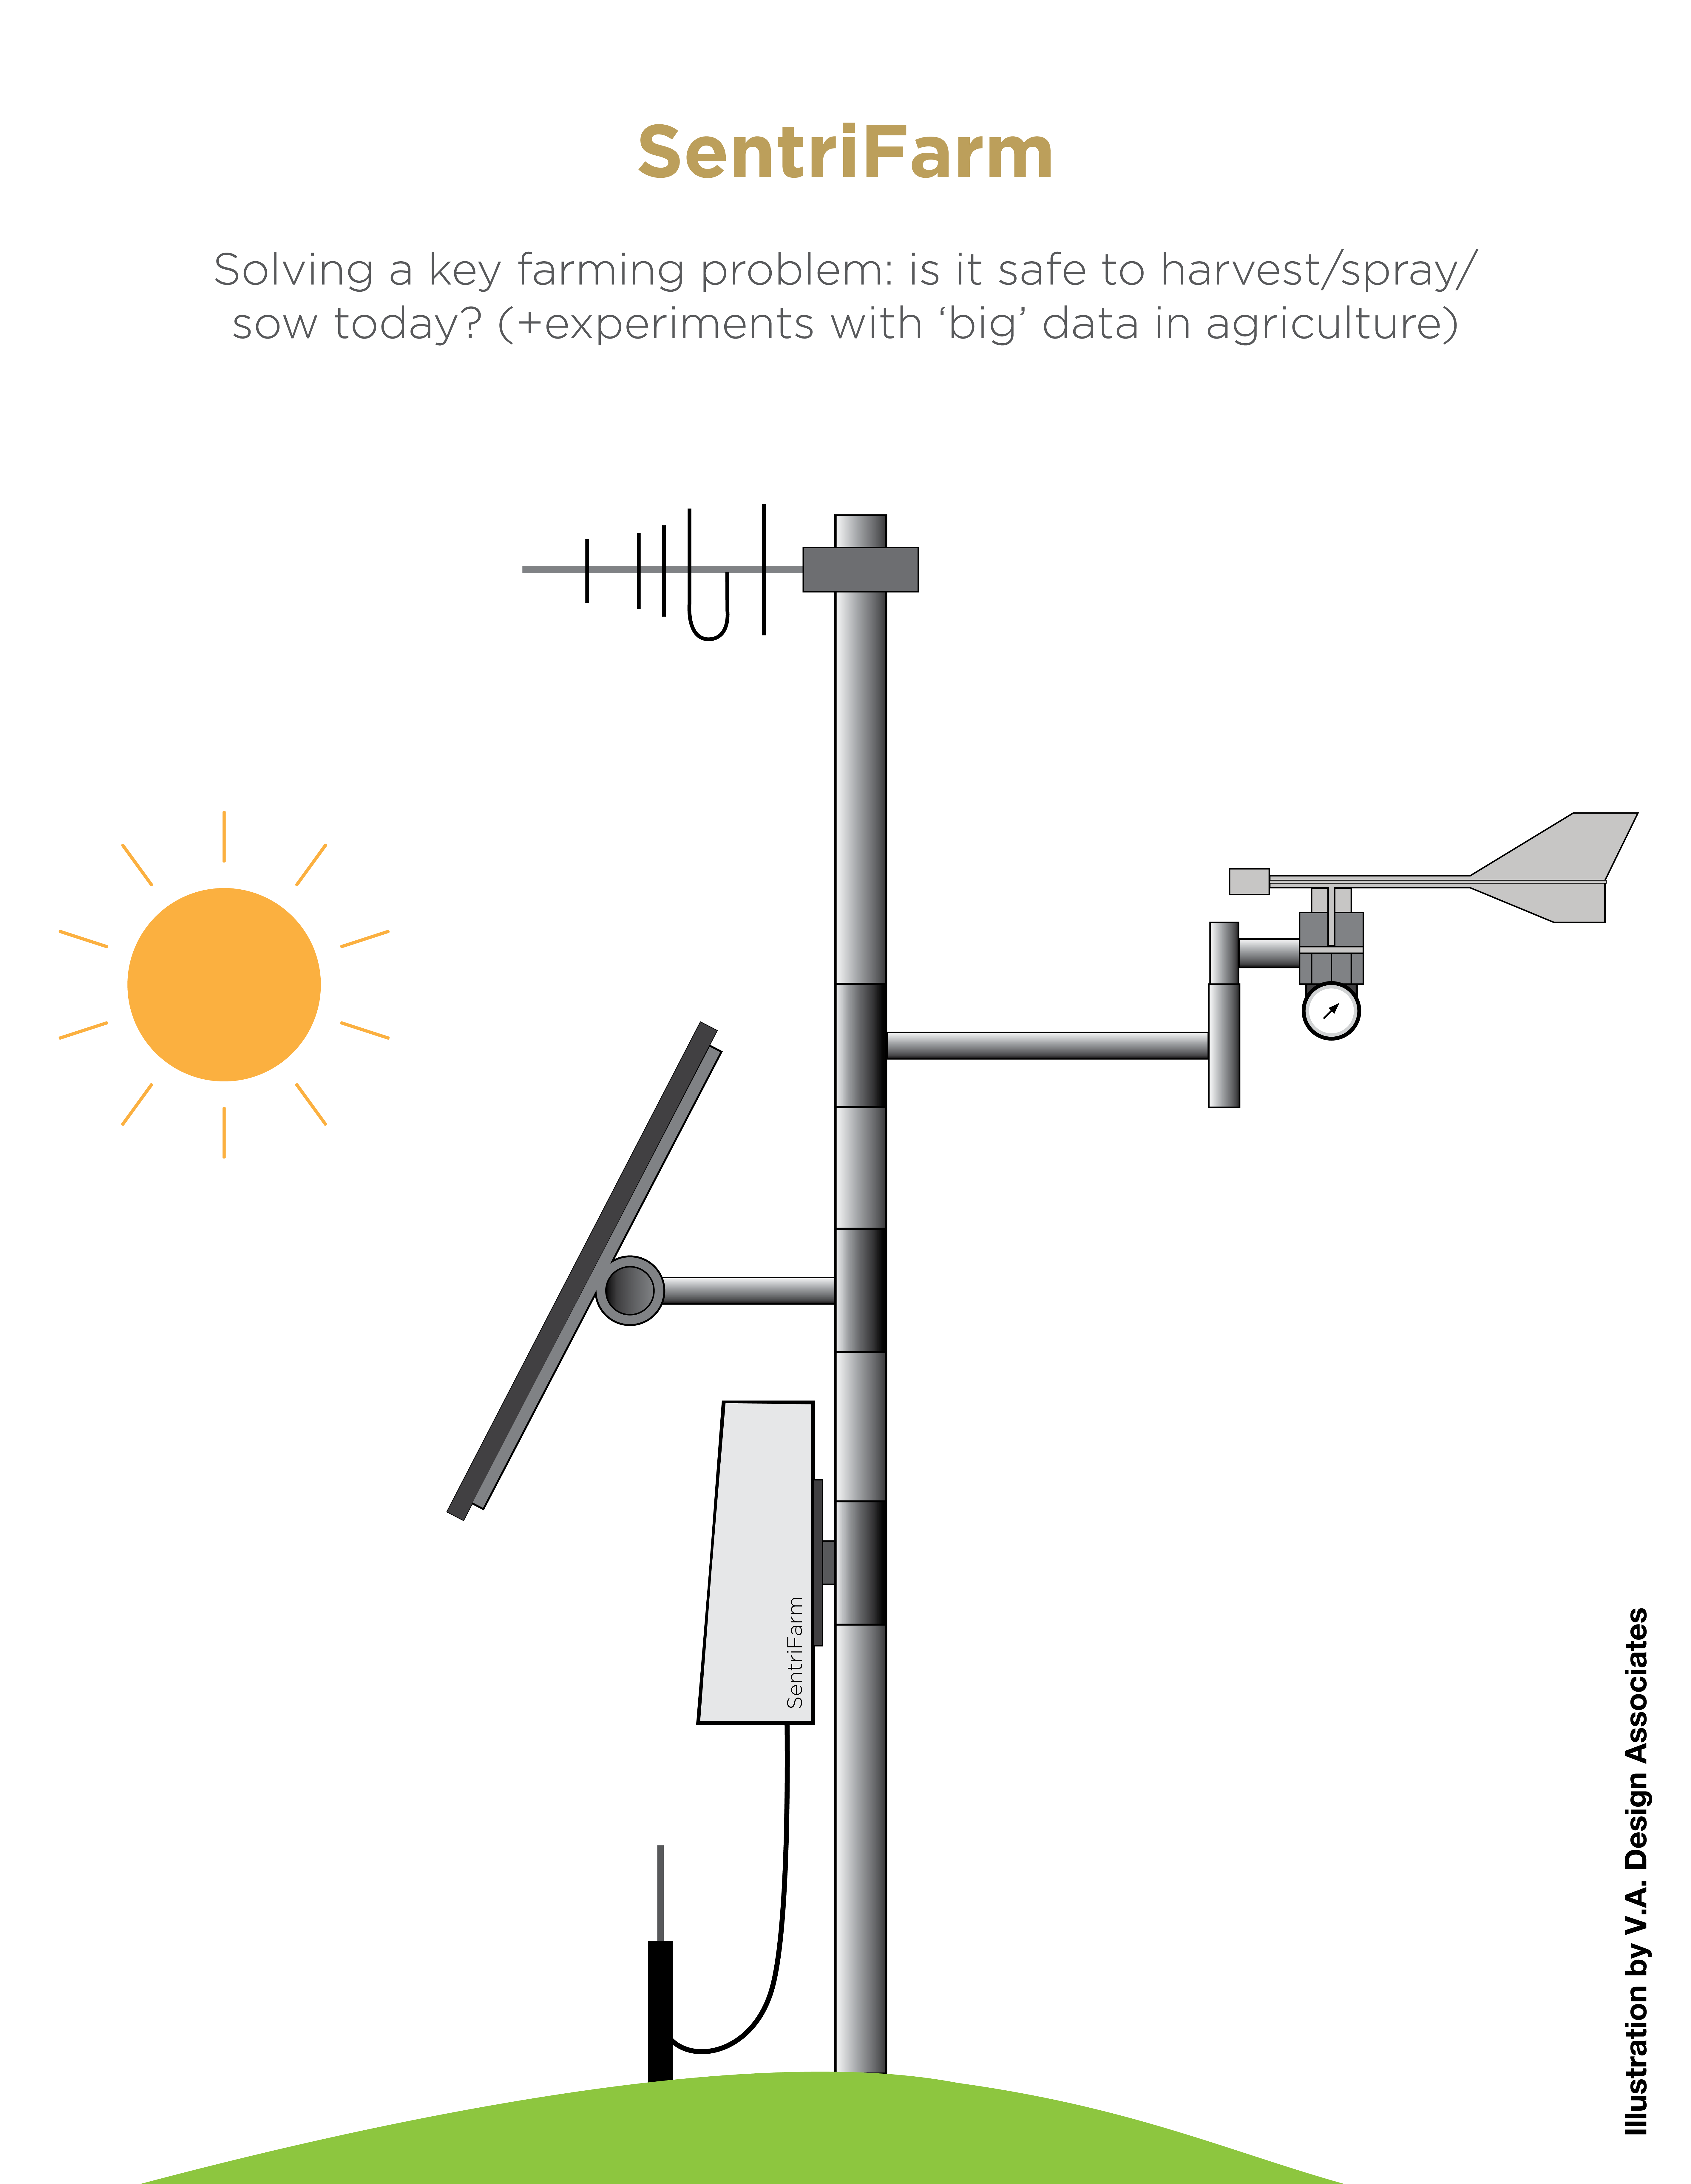
Artistic Impression & General Design Notes
09/20/2015 at 11:02 • 0 commentsA friend of mine completed an artists impression as required for the semi final submission.
Things to note:
- The production system as envisaged, hides all the cabling within pipe work
- The pipe work needs to be strong enough to withstand strong wind gusts
- The far end could be the same, apart from the use of a Linux module internally; after all there is nothing to lose from logging conditions concurrently at the farm house. Although, the components may split as the antenna would likely be mounted on a radio tower or windmill to make range
- We can run cabling down to measure soil temperature and moisture; although my ideal would be for those sensors to be wireless connected somehow
![]() An important factor not obvious from the picture is the need to protect the electronics from full afternoon sun in late summer on 40+C days.
An important factor not obvious from the picture is the need to protect the electronics from full afternoon sun in late summer on 40+C days.So using an enclosure that might be double insulated, reflective, and the addition of shaders, and placement relative to the solar panel helping with that.
-
Murphy, inevitably
09/20/2015 at 10:52 • 0 commentsSo right at the time when everything needs to work. everything goes wrong.
- The one and only wind gauge self destructed as I was attempting to wire it up. This is especially frustrating!
Where I live, I cant just hop in the car and buy another part like that, Jaycar are 45 minutes away and don't carry those specialised parts, and I would not have time to even try and reverse engineer their weather stations, nor pay the money. Nearest arrival time would be Tuesday if I stumped up for express post. So that means going into the semi final submission we will be having to simulate wind. I'll probably just feed in data from the BOM past data. Its also annoying because I spent a day making an i2c slave using a ATtiny85 to be the interface to the wind gauge so the node can stay asleep instead of pulse counting. - I also purchased metal boxes that were too small and didn't get enough of various adaptors for SMA to BNC for antenna feeds. So ended up repurposing enclosures, so the whole thing looks dodgey again.
- While attempting to tidy up the circuitry I damaged the ESP-201 module that was to be used with the deployment, and couldn't get the spare flashed. (Luckily, it turned out because I wired a jumper wrong.) So I spent Saturday getting the TeensyLC version finished off instead and had that working perfectly by 1am, along with mounting the Carambola2 base station.
- But during the night the TeensyLC stopped. And hasn't flashed its LED since. So I now have a dead teensy. I'll need to contact the Hackaday store for advice on that one. So I had to go to the ESP-201 spare instead which I did get working.
- Except the ESP now ran out of room in its flash as I added final touches, so spend more hours debugging and tweaking things to fit.
- The ESP-201 after running flawlessly for months is now experiencing hangs requiring a push button reset after coming out of deep sleep. The main suspect is the humidity sensor which had only been integrated yesterday. But I am now stuck with it, humidity is one of the three critical ingredients of the Grass Fire Danger index.
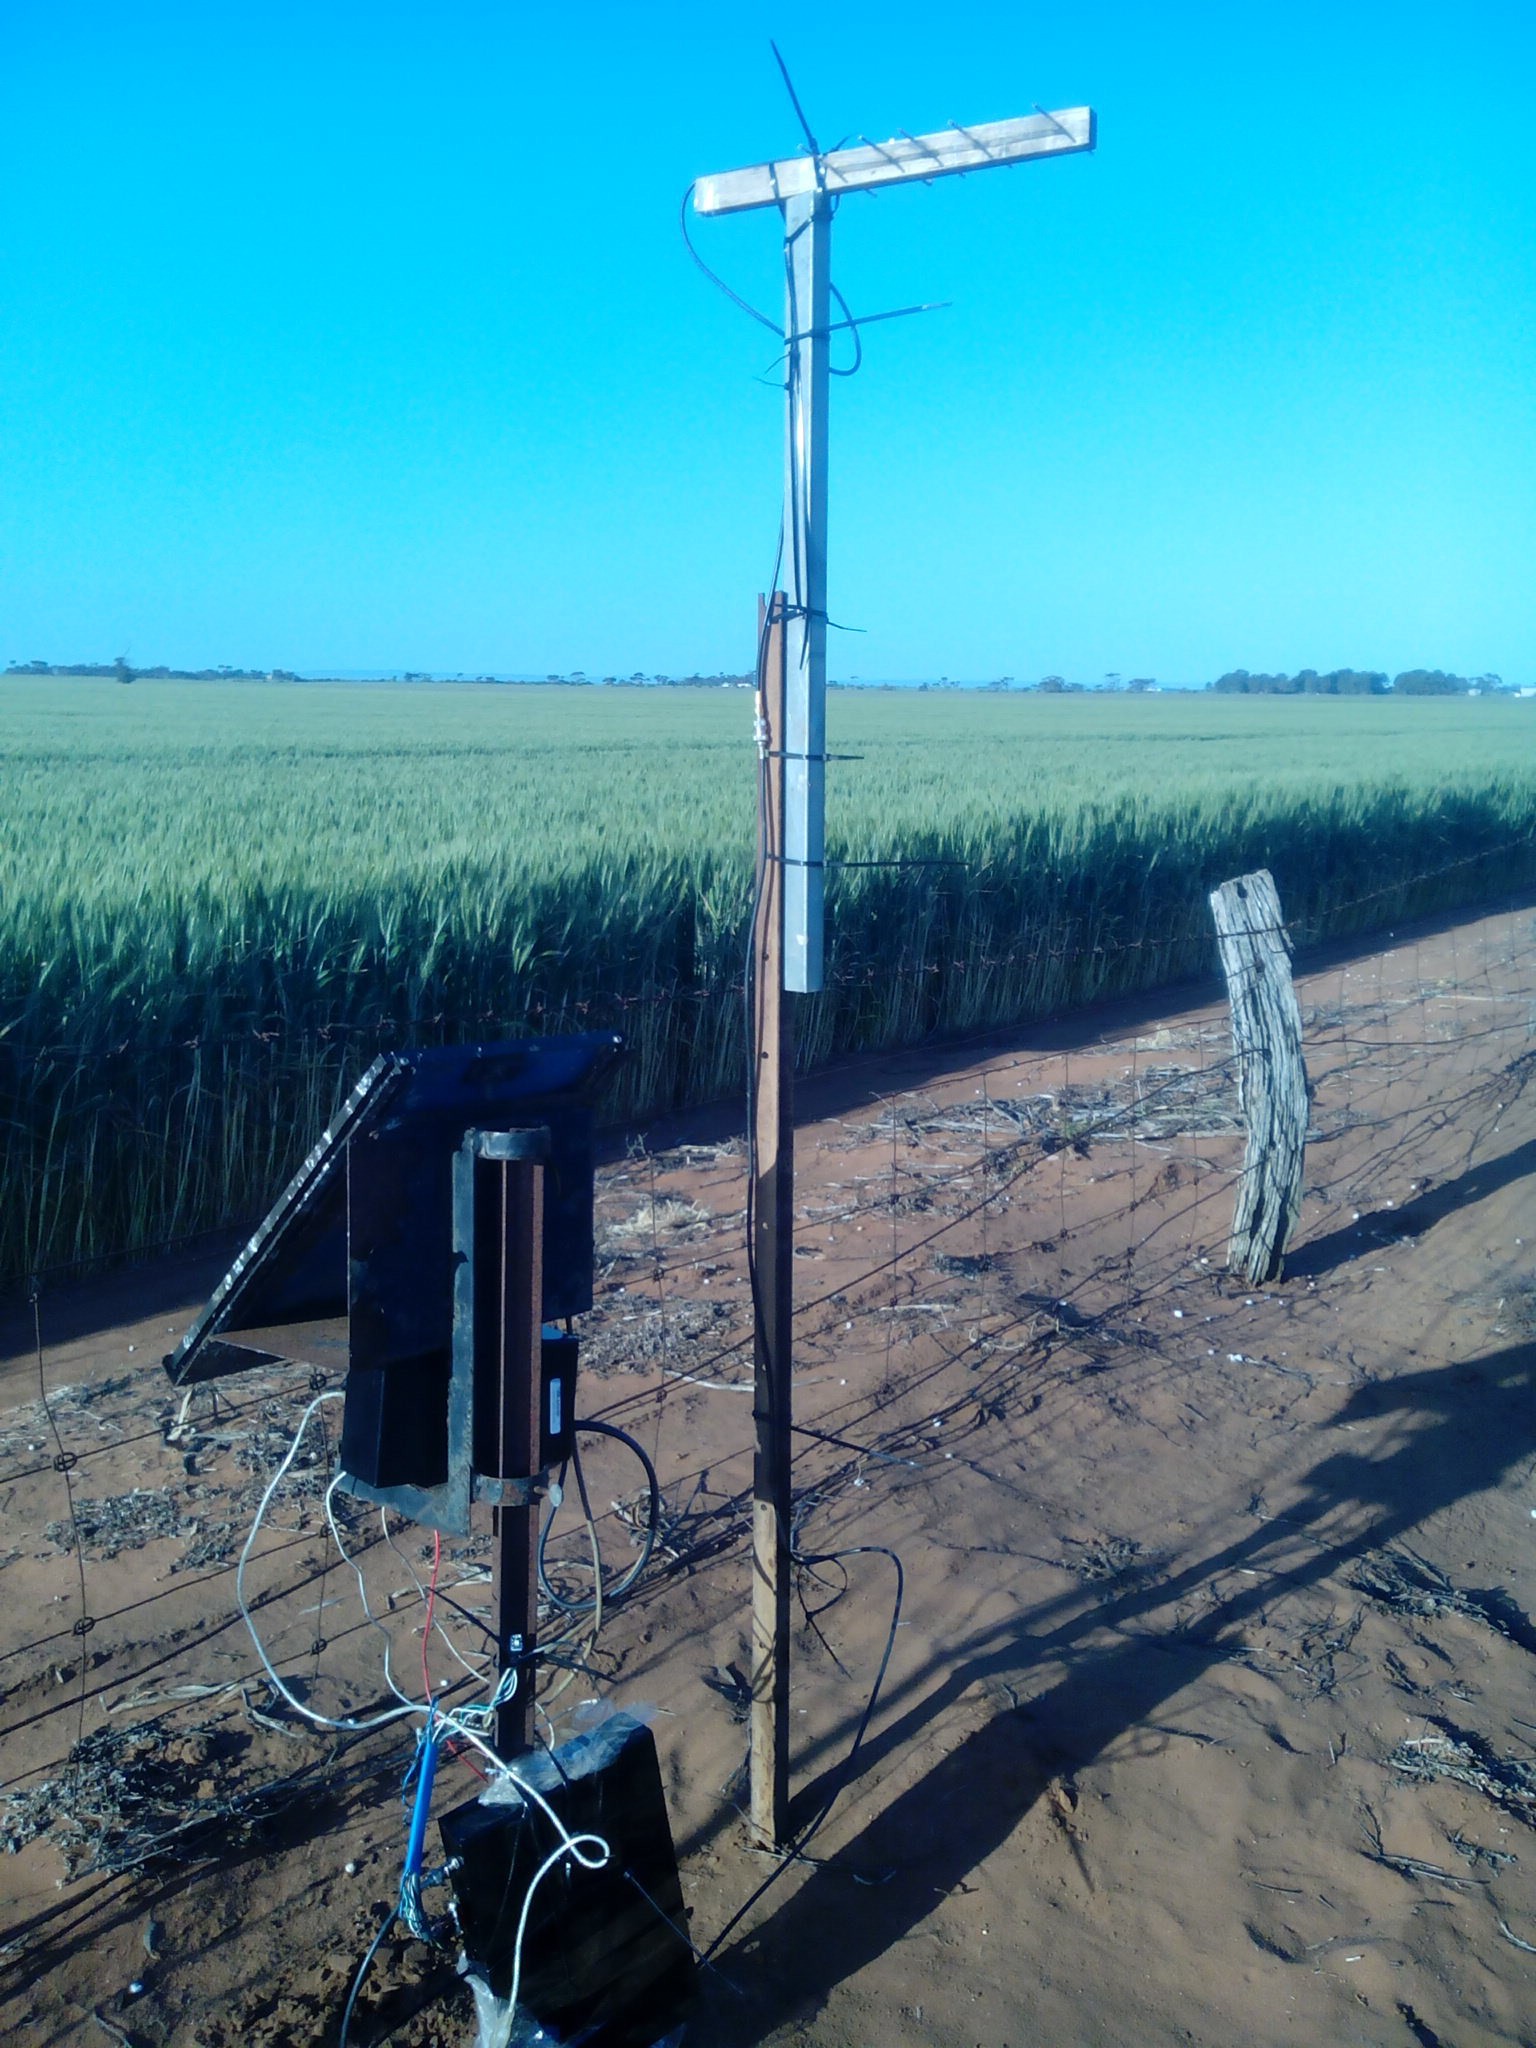
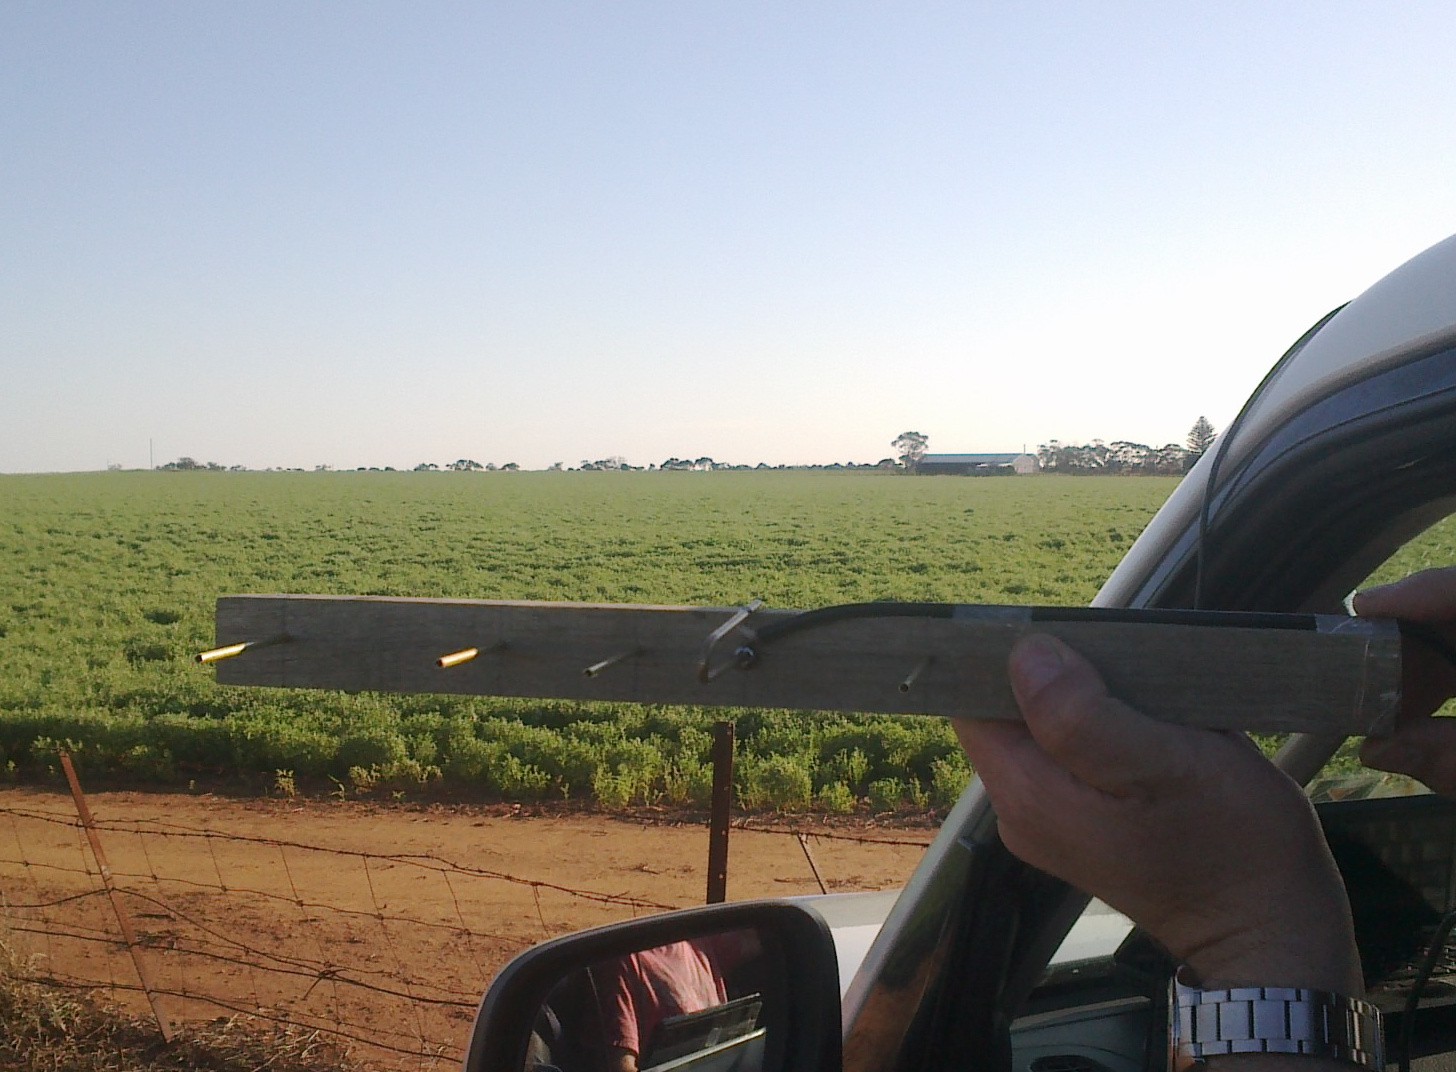
In spite of all the above, last thing I wanted was to give up this close to the end so keep pushing through, and we have a working system at the moment, used to produce the "operating" video.
![]()
So we have a 1km shot logging weather data out in the paddock. In the photo below, the trees on the horizon is "the other end". Just try not to look at all the cable ties...
![]()
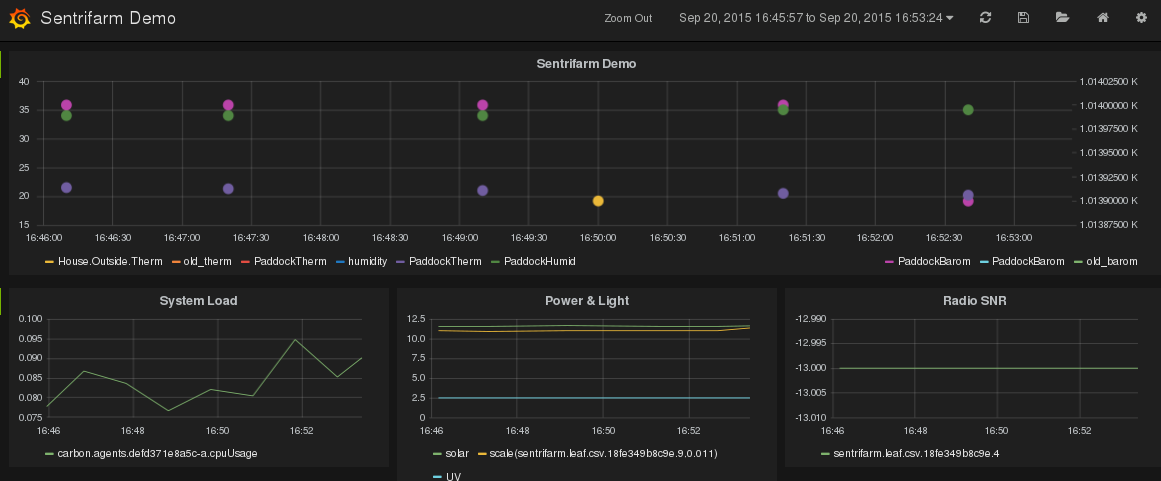
After switching power from the laptop to the solar charger, it was a nervous 10 minute drive back to the house to check the logs. I could see activity on the serial LED but had no idea if the sensor had crashed or not...
And behold, we had a live feed!
![]()
Thus, all the ingredients needed to calculate Grass Fire Danger Index - pending wind, after perusing online electronics retailers next week - plus additional information pertaining to cropping, including daylight progression and solar UV.
- The one and only wind gauge self destructed as I was attempting to wire it up. This is especially frustrating!
-
Up towers and through scrub!
09/14/2015 at 12:10 • 1 commentHaving already achieved our goal of reception at the distant end of the large test paddock we went for a drive.
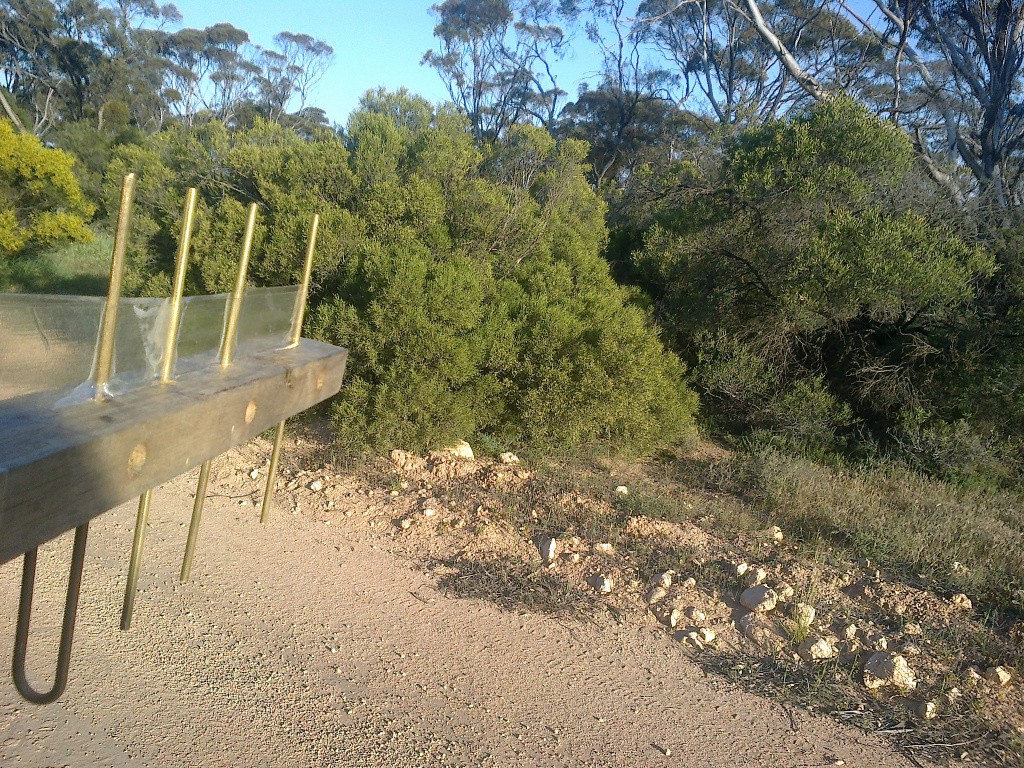
So remember yesterday, I mentioned a scrub plot 2km distant...
![]()
I could get a signal through this! (note:beacon time was offset ~09:48 behind local time) The range to the transmitter is 2100m.
[DBUG] RX rssi_pkt=-100 snr_pkt=-14 stat=38 sz=37 ptr=38 hdrcnt=564 pktcnt=534
[RX] 37 bytes, crc=0 rssi=-100 DATA=54582042
TX BEACON   6658 13-09-2015 06:56:00
Well, we just got a signal; the RSSI was just on the edge. But with digital thats all you need.
Just down the road, we met these felllers:
![]()
unfortunately, my phone camera is not high quality - those brown splodges near the fence are Kangaroos.
And we kept driving. After driving north a while, we lost the signal, not unexpectedly. So we took a right turn. After moving back into the beam coverage, we had signal again at 4100m, and kept driving. At our furthest range, still from the car, we finally logged the last beacon at 6100m. All this time, the only elevation on the receiver was me holding my arm up and out the car window! Remember, the transmitter was only 1m above the ground as well.
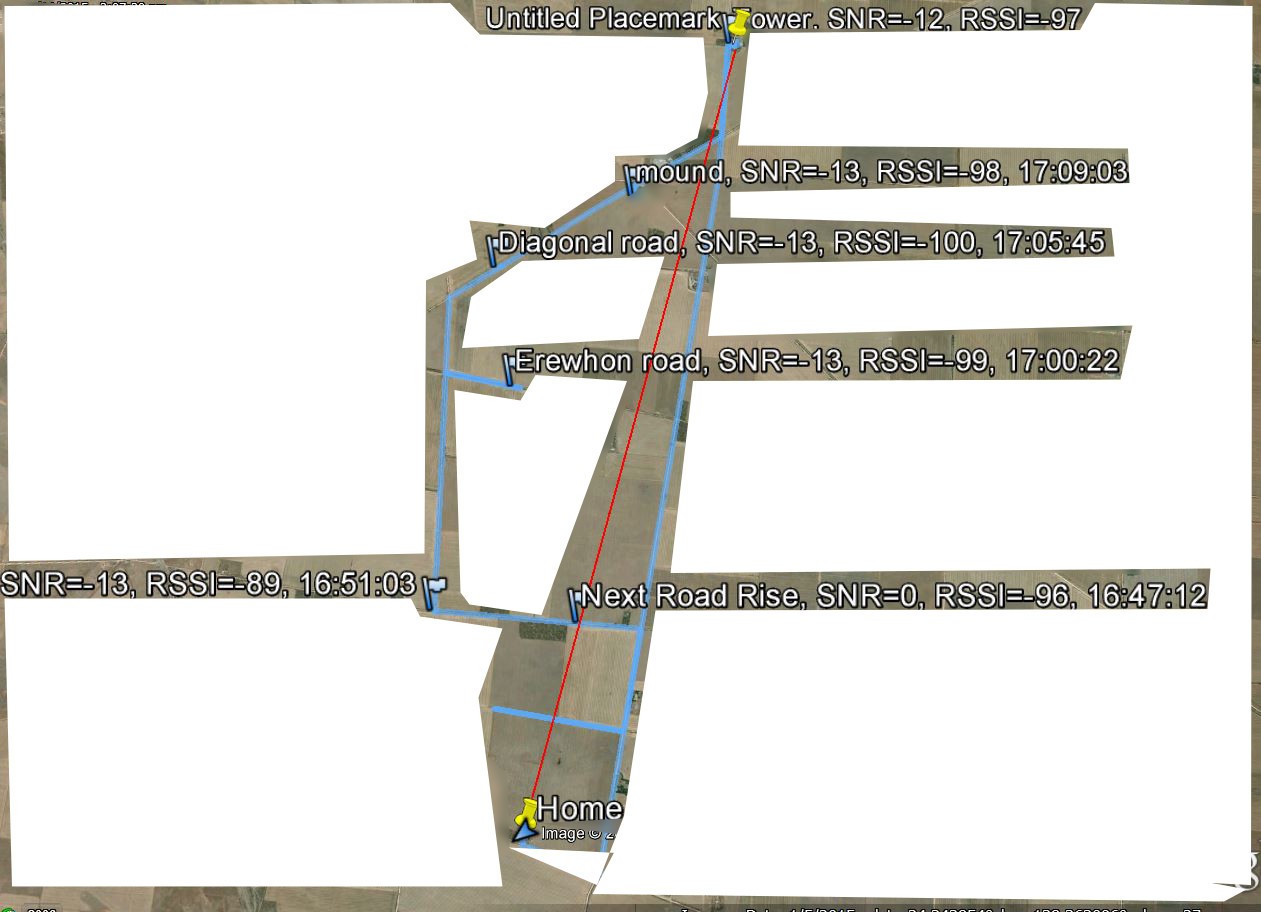
Beyond that range, we needed a bit more help. A mound at the local club gained us some height, perhaps 3m. And another signal. Range: 7000m!
As the map shows, all our reception was roughly in the expected beam of the transmitter. Which is fine!
![]()
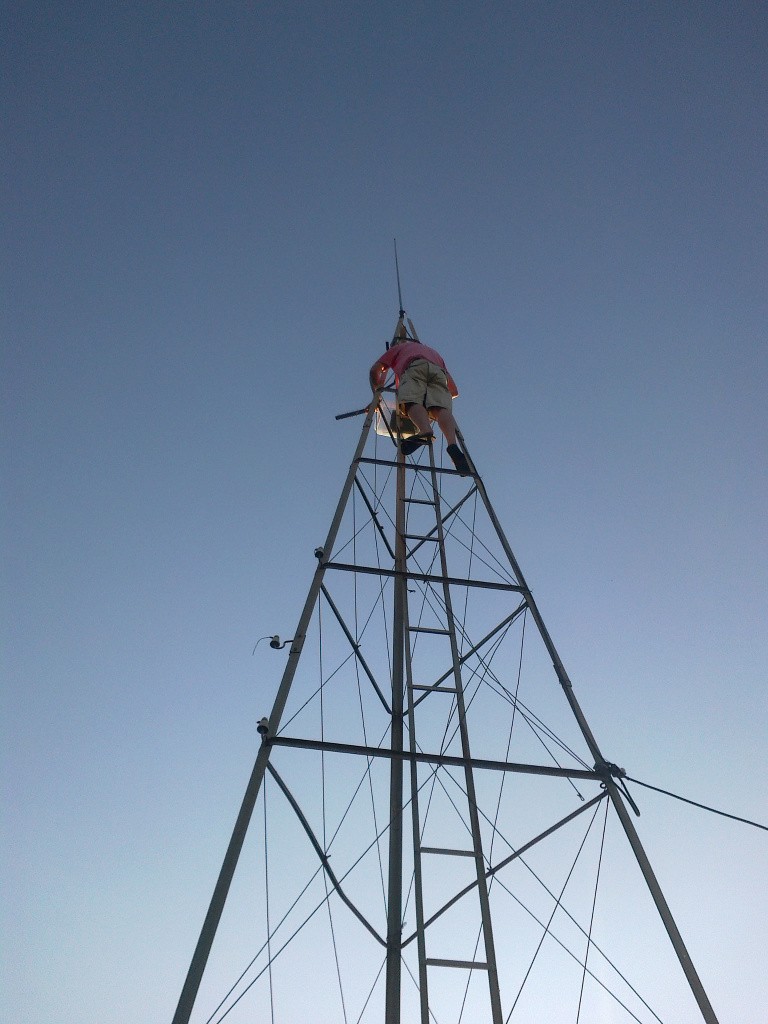
Finally, this is Australia, so we did what we had to do. Well, our intrepid farmer did, anyway, and climbed up the tower at his place. It took a bit of fiddling, because at this range with directional antenna the sensitivity is quite fine.
![]()
But finally, several meters up, he was able to receive the beacon. At a grand distance of 9300m. Woot!
So, the day exceeded our expectations completely. I was expecting to have to tweak the radio settings (increase bit error correction, lower bit rate) and require more elevation of the transmitter to get beyond a couple of K's. So those little inAir9 modules pack a punch!
-
Great weather for Fox Hunting at last...
09/13/2015 at 13:22 • 0 commentsSo today the local weather skipped right over spring and surged into summer, the dial in the car showing 30C, so we picked a great day to finally get out and see how well these inair9 radios would really work.
Kim had a 915MHz PCB Yagi in his stash.
![]()
We deployed this with a Sentrifarm module with the firmware modified to be a TX beacon. In this case it was a carambola2 with no sensors (or enclosure for that matter :-)
![]()
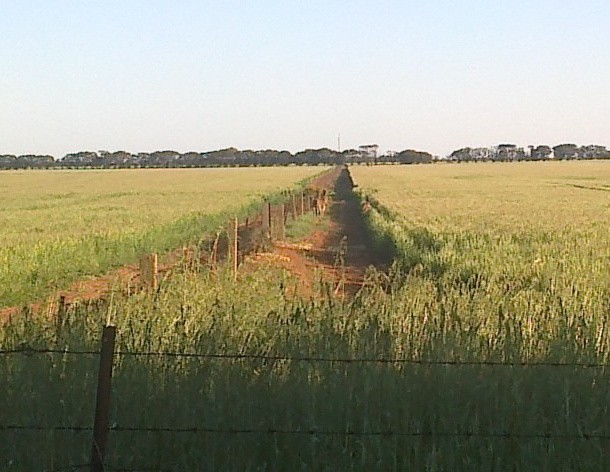
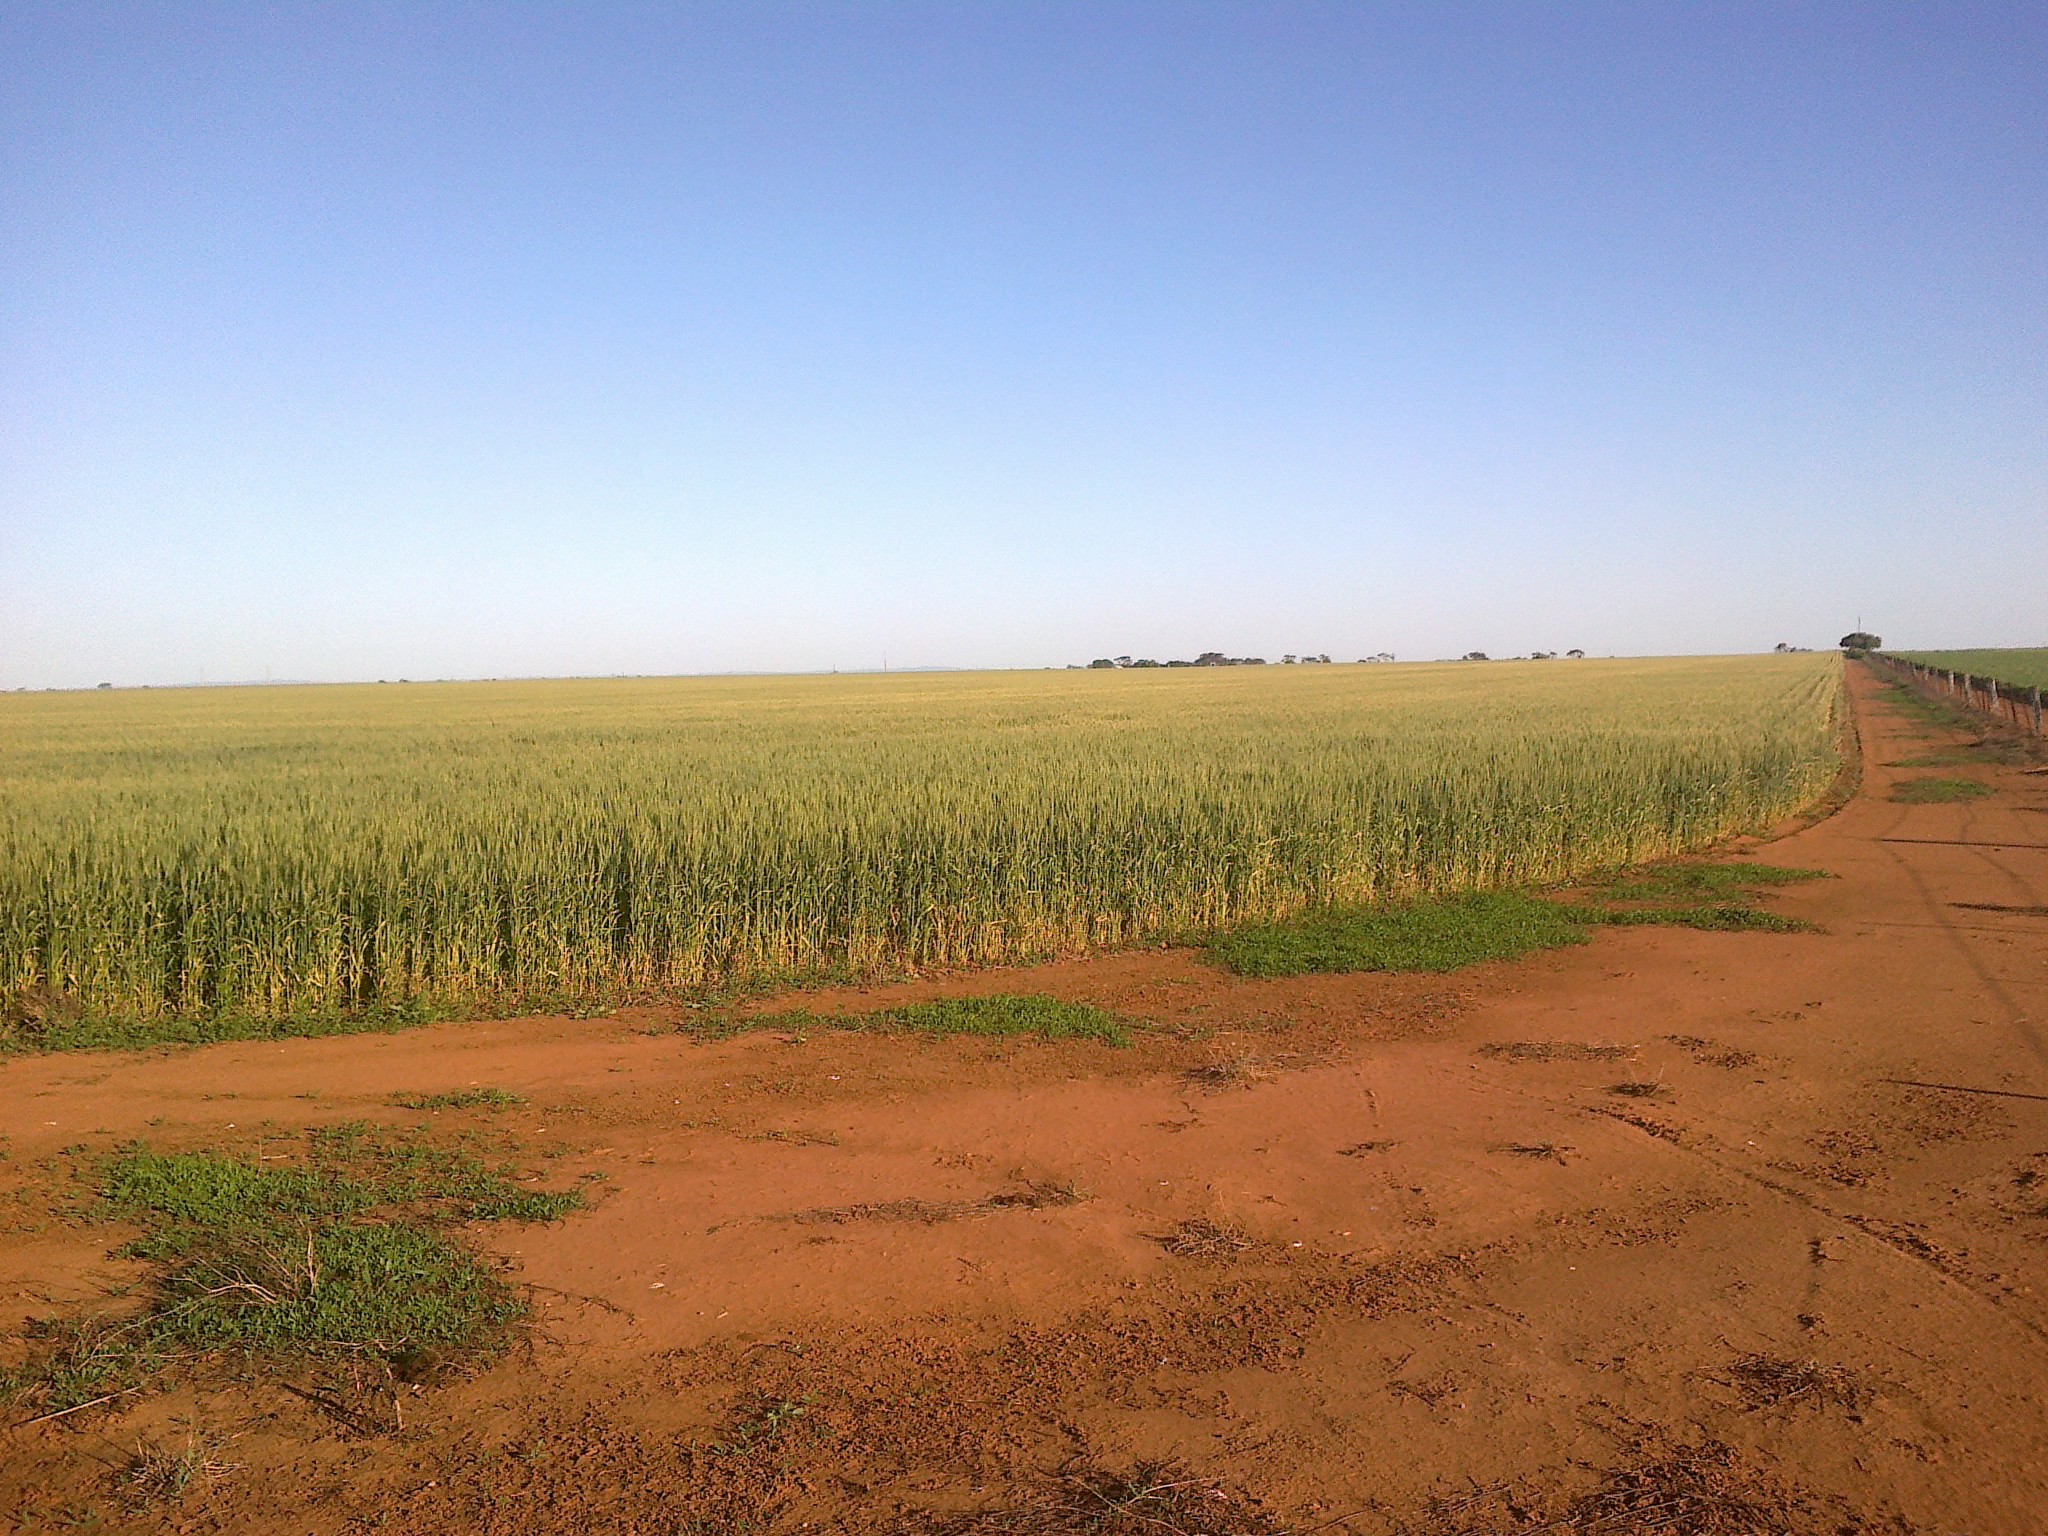
Take note on the horizon, the long dark green patch in the left half is a scrub block about 2km away...
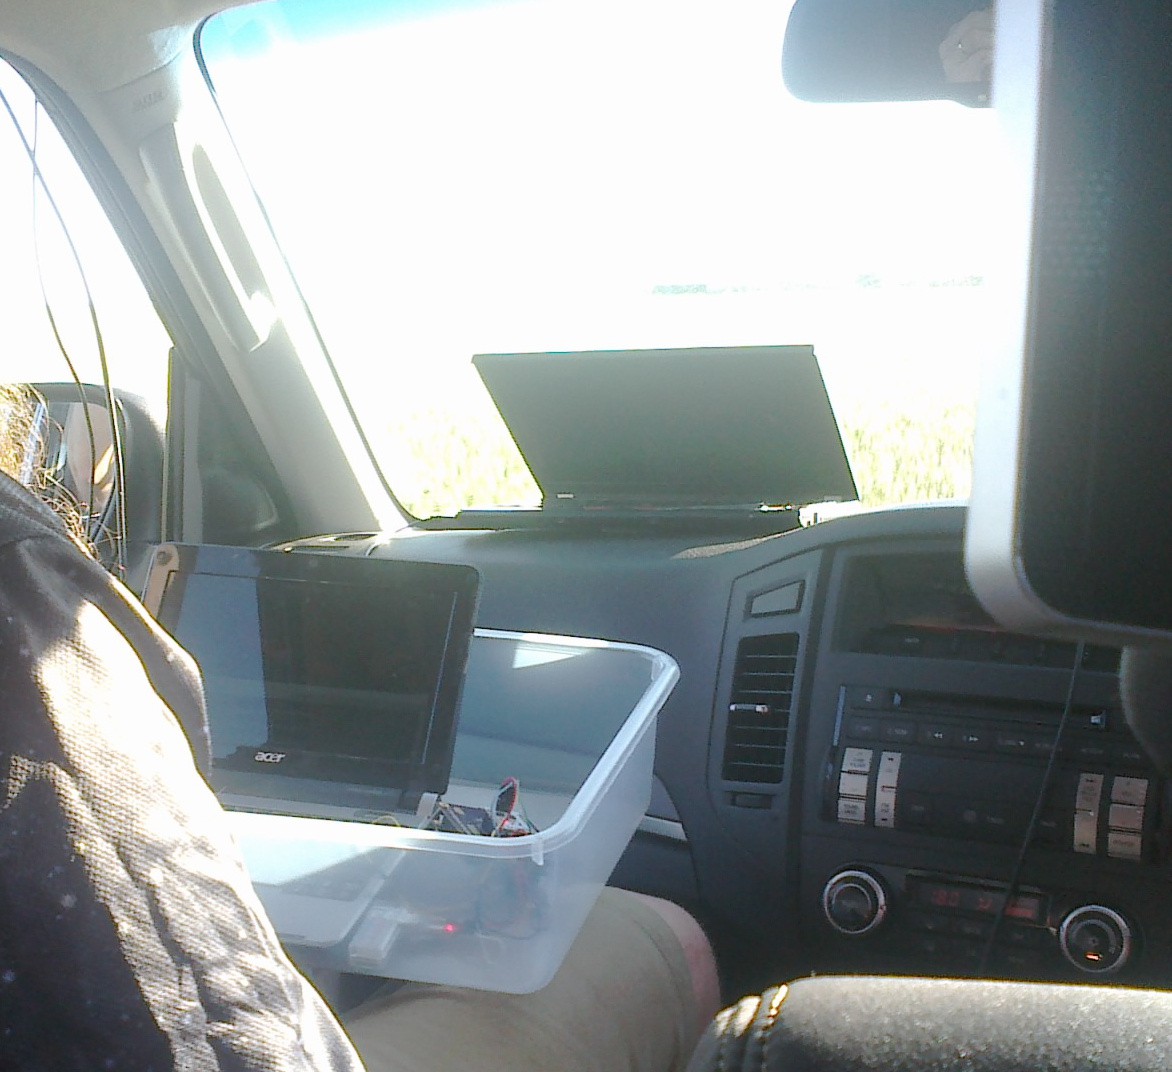
Then we got in the car, using a Sentrifarm leaf node powered from my netbook and recording receipt of the beacon with timestamps and radio SNR data. Kim had a GPS logging on his laptop.
![]()
As we drive along we hold the antenna out the window.
![]()
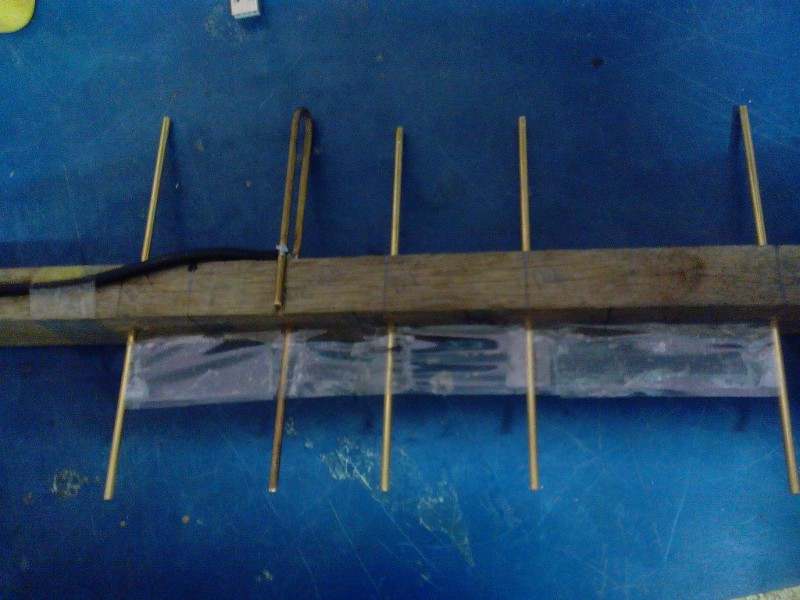
Before we left, while I was still mucking around with last minute firmware tweaks, Kim made a high gain directional Yagi from brass and scrap wood & tape. He's pretty good with antennas!
![]()
So we drove around the test paddock. It turns out the radios perform pretty well. We had signal all along the far side of the test paddock, not just directly in front of the TX beam, which we would have hoped, but way off of the edges.
![]()
That green clump just to the right of the middle is the TX beacon site. And we were receiving the beacon just fine at this point. This was already a great result, around 1200m from the beacon.
We could have packed up and gone home right now, well satisfied...
-
Another short term pivot
09/11/2015 at 12:06 • 0 commentsA secondary aim was to experiment with a distributed smoke / hydrocarbon sensor. This is still on the cards but has been deferred to some future time as we need to give further thought to power / operational execution.
The MQ2 smoke / hydrocarbon sensor has a 'heater' which needs to run for at least 3 minutes before values settle. The present design for the leaf nodes wakes up from deep sleep, reads sensors, performs an MQTT transaction over the radio and goes back to sleep within 30 seconds. Therefore using the MQ2 in the current configuration will impact on the amount of power used by the node.
For the MQ2 to be useful as some kind of fire alert sensor it would need to be checked continuously as well. Logging smoke/gas at (say) 15 minute intervals would be of academic interest in charting progression of dust / smoke from afar bushfires or pollution but less exciting.
Of course in-house smoke alarms can run off a 9V battery for years so there are ways and means of solving this problem, it just doesn't have to be done to meet the next video submission deadline.
We'll hopefully still put an MQ2 on the radio tower, given there will be sufficient power there, just to see how it works.
-
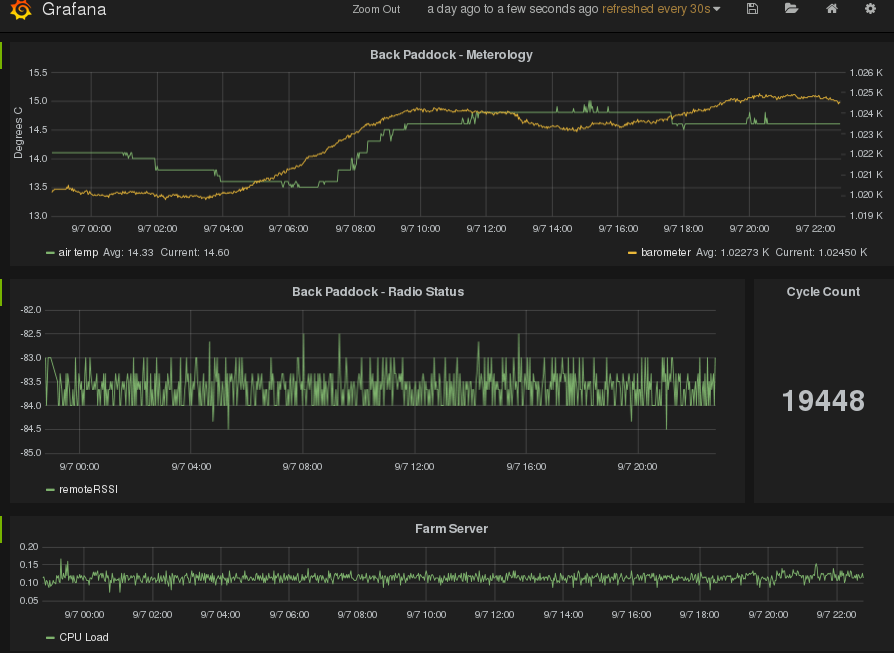
First 24 hours of data
09/07/2015 at 13:32 • 0 comments![]()
Not really that interesting yet, other than it shows the BMP180 sensor and the microcontroller operating correctly.
-
The elbow is connected to the wrist bone...
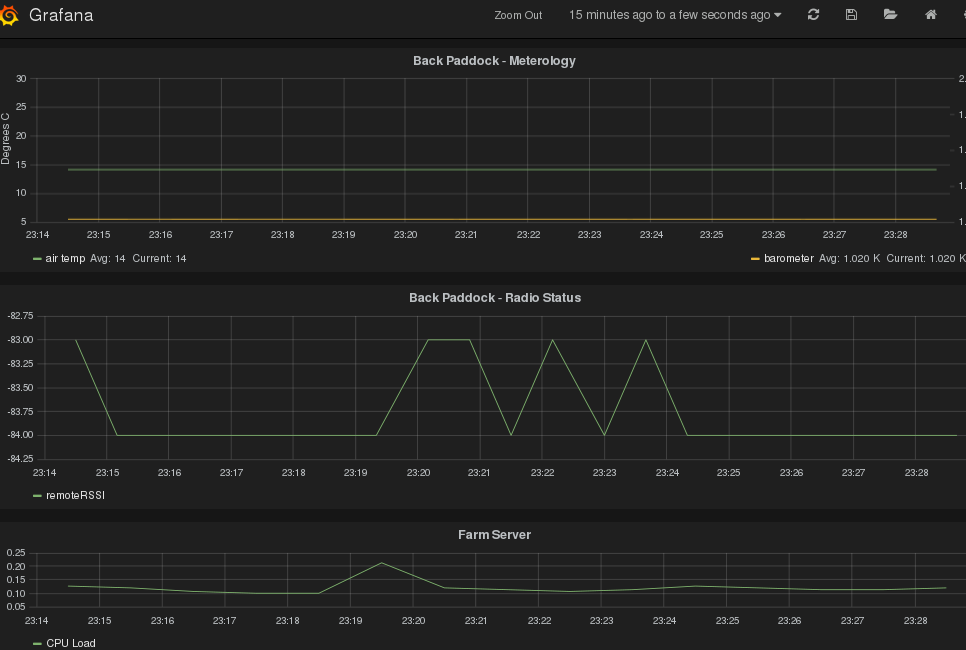
09/06/2015 at 14:04 • 0 commentsFinally. After a bit of a frustrating slog I have managed to sort out a scalable data logging and visualisation solution.
I started by at OpenHAB and then EmonCMS, which both promised a lot, but I wanted something a bit turnkey, having spent so much time in the past wasting time learning about how to build and deploy software when I just wanted to use it; and I don't know if I was looking at the wrong tutorials or what, but I couldn't get traction on either of those with an MQTT feed after spending a couple of hours... then I stumbled over Grafana.
Grafana is a a cool browser based app that provides nice visualisations on top of a graphite/carbon logging infrastructure and whisper datastore. The whole thing runs in a docker instance making it easy to experiment with and maintain. Whats really good is ti can take in other feeds as well as exporting data out and can have alerting functionality integrated as required.
So finally, we have an end to end software and hardware stack:
Microcontroller and sensors -> MQTT-SN over inAir9 LoRa 915MHz -> Embedded Linux with MQTT-SN/MQTT broker -> farm central logging on graphite with a nice and very customisable and flexible but also easy to use web interface
![]()
I couldn't wait for a few hours to get a more interesting graph... will need to post one soon though :-)
-
Backend
09/04/2015 at 14:32 • 0 commentsBeen working on sorting out the back end for collecting all the data. We were originally looking at OpenHAB but I'm now looking at something called EmonCMS which looks like it might be slightly quicker to make it do what we want with charts and logging from MQTT for the next project milestone. Note that doesnt mean we wont use openhab either in the future. Ideally, Sentrifarm will be able to send data to either system by virtue of using MQTT.
Along the way, I discovered docker. I'm impressed at how, once an image is built, how fast it is to modify it. It does a very good job of caching all the dependencies previously downloaded. So I was able to add in, then remove, modules from an EcomCMS instance in seconds. Why haven't I used this before!
SentriFarm
Solving a key farming problem: is it safe to harvest / spray / sow today? (+experiments with 'big' data in agriculture)
 An important factor not obvious from the picture is the need to protect the electronics from full afternoon sun in late summer on 40+C days.