Close
0%
0%

Thotcon 0x06 Badge Hacking

I attended Thotcon for the first time this year, largely in part to participate in badge hacking. I was not disappointed!

Similar projects worth following
The stock badge firmware runs a small interactive terminal game on its 2400 baud serial port, including an EPROM editor and LED display tool. The badges communicate with each other via IR for some sort of "infection" game. After spending a few hours, and unlocking the few secrets hidden within the EPROM data, including an IR Shark tool to dump TV remote IR codes, I moved on to re-purposing the Arduino Leonardo compatible board with some different code.

On board is an Atmel Atmega32u4 with the Arduino bootloader burned in, 6 x Adafruit RGB NeoPixels connected to Arduino digital pin 4, an IR receiver (Vishay TSOP36236TT) connected to Arduino analog pin A0, and an IR emitter (Vishay TSML1020) connected to Arduino digital pin 10.

One of the improvements I made at home over night between the two days of the Con was to replace the power source.

The badges were handed out along with 2 x CR2032 coin cell batteries. Most of the badges started to dim and eventually freeze all together by the end of Day 1 after their voltage dropped below the brownout voltage of the Atmega chip.

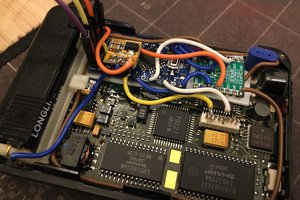
My solution to this was to solder in a few super caps I had lying around (See the image gallery for a shot of the back of the badge with the 4 supercaps hot glued on). I had a number of 2.7v 34F AA sized super caps left over from another project, and wired 2 of them up in series for a max voltage of 5.4v. I wanted a little more capacity than what the 2 caps provided, so I added a second set of caps in parallel with the first 2, which resulted in a 2s2p configuration, still with a max voltage of 5.4v.

Running the stock firmware that came with the badge, it ran for about 2 hours before the supercaps voltage dropped below the brownout voltage. In the future, I might put some sort of boost converter in between the caps and the badge, as there is currently a lot of un-usable capacity left after the microcontroller shuts down.

I also included a JST connector which is connected directly to the supercaps. This allowed me to quickly (2 - 3 minutes) recharge the supercaps with a portable USB battery.

  • Pin Mappings

    Gigawatts05/23/2015 at 06:41 0 comments

    I took some time tonight with a multimeter to map out what pins on the microcontroller connect to everything on the badge. Here is what I found:

    ### Badge Pinout ###
    chip | Arduino | Connection / Function
    
    20     0         nc (Serial1 RXD1)
    21     1         nc (Serial1 TXD1)
    19     2         nc
    18     3         nc
    25     4         neopixel data
    31     5         nc
    27     6         nc
    1      7         nc
    28     8         nc
    29     9         nc
    30     10        Data Out to IR emitter
    12     11        nc
    26     12        nc
    32     13        nc
    41     A5        nc
    40     A4        nc
    39     A3        nc
    38     A2        nc
    37     A1        nc
    36     A0        Data in from IR Reciever

    I found this awesome graphic that maps out all the Arduino compatible pin mappings for the Atmega32u4 microprocessor. This helped a lot in tracing out the above pins.


    I ran a basic IR hex dump sketch with pin A0 configured as my IR receive pin, pointed a random IR remote at the badge, and it spit out numbers!

    I then loaded up another sketch I've used in the past with an IR LED that triggers the shutter on my Nikon DSLR, set it to blast out on pin 10 and [click!], it took some pictures of itself!

    The IR receiver is a Vishay TSOP36236TT (36khz Carrier frequency) and the IR emitter is a Vishay TSML1020.

    And with that, I consider this badge fully hacked (well, hardware wise, anyway. I'm sure there are still more goodies to find in the stock badge firmware).

    Let me know if you build anything cool with this information. Happy Hacking!

  • Neopixel Demo

    Gigawatts05/17/2015 at 23:31 0 comments

    A few of you may have seen me walking around the after party with a blindingly bright flashy demo running on my badge. More than a few people stopped me to ask me how I managed to do that. Here is a very brief tutorial on how to get the Adafruit NeoPixel "strandtest" demo up and running on your badge. Be aware, if you continue to run the badge on the stock CR2032 lithium coin cells, this sketch will kill your batteries pretty quick. That's why I opted to install the supercaps, as mentioned in the project details page.

    • First things first, go get and install the Arduino IDE from arduino.cc. I've tried version 1.6.4 on both a WIndows 7 desktop and an Ubuntu 14.04 laptop for this process.
    • Then go get the Adafruit NeoPixel library from github (click the "Download ZIP" button on the left hand side of the page)
    • Extract the contents of the ZIP, and dump the resulting directory into your Arduino libraries directory (Note that you may need to rename the Adafruit_NeoPixel-master directory to just "Adafruit_NeoPixel" ). A great guide for doing this can be found here.
    • Open the Arduino IDE, click File > Examples > Adafruit Neopixel > strandtest. This should open a new window with the example code we will use.
    • Edit the 3rd line to change "#define PIN 6" to say "#define PIN 4". The LEDs are connected to pin 4 of the Atmega32u4 on the Thotcon 0x6 badge. If you are using a different arduino board, it may be on another pin.
    • Plug your badge into your computer with a micro USB cable. If your coin cells are dead (most likely at this point), the badge will switch over to being powered by the USB port. Don't forget to take those dead coin cells out of the badge so they don't start corroding and damage your badge.
    • Depending on what OS you are using, you may need to install the Arduino Leonardo USB drivers before your badge is recognized. Take a look at this guide.
    • Once your badge shows up as a usb serial device, you are ready to upload the example code to your badge.
    • Click Tools > Board > Arduino Leonardo
    • Click Tools > Port > COMx (COMx on windows, /dev/ttyACMx on Linux, /dev/tty.usbmodemXXXX on OSX)
    • Click File > Upload
    • If all goes well, the black log box at the bottom should display some messages, and eventually say "Done uploading", and your badge should spring to life, flashing lots of bright colorful patterns on its 6 forward facing LEDs.
    • Feel free to edit the example code to make new patterns, or find other Neopixel examples online.
    • Welcome to the world of microcontrollers! It's a lot of fun, there are a lot of great resources online, and there are a limitless number of cool things you can build. Don't forget to share your experiences with others if you build something cool!

View all 2 project logs

Enjoy this project?

Share

Discussions

monkee13 wrote 05/23/2015 at 00:54 point

What PINS are the IR sensors on?

  Are you sure? yes | no

Gigawatts wrote 05/23/2015 at 00:56 point

Haven't traced them out yet, I'm also not sure what part numbers they are.

  Are you sure? yes | no

Gigawatts wrote 05/23/2015 at 06:43 point

Take a look at my new update here:  https://hackaday.io/project/5862-thotcon-0x06-badge-hacking/log/18366-pin-mappings

That should provide all the information you were looking for.

  Are you sure? yes | no

monkee13 wrote 05/23/2015 at 15:59 point

This is great, thanks a lot.

  Are you sure? yes | no

Jolly Jester wrote 05/20/2015 at 21:40 point

A few notes:

Thotcon 06 badge walkthrough (Linux):
# change directory to your avrdude/bin folder:

click reset button and, wait for the ligts to start circling, then quickly run this script
./avrdude -p atmega32u4 -c avr109 -P /dev/ttyACM0 -U flash:r:flash.bin:r -C ../etc/avrdude.conf -vvv

To look for hints in the code:

strings flash.bin

        [Serial:Connected] |  VT100 |  2400 8N1 |

write flash back to the card:
./avrdude -p atmega32u4 -c avr109 -P /dev/ttyACM0 -U flash:w:flash.bin:r -C ../etc/avrdude.conf -vvv

## terminal into the badge (from Windows)
Use device manager to find out which com port you are using
Putty in with serial at 2400 baud

click reset and wait for the lights to circle around until you connect
(you have a small window to get in)


# linux tty
screen /dev/ttyACM0 2400


or use arduino serial interface (have to time clicking reset)

  Are you sure? yes | no

thyrymn wrote 05/20/2015 at 01:35 point

So.  I can't upload on iOS or Windows.  Both OS's find the Arduino on the com ports though.  Any ideas on how to get it into upload mode?

  Are you sure? yes | no

Gigawatts wrote 05/20/2015 at 02:20 point

If you haven't already, try removing the coin cell batteries, then plugging it into USB. Make sure you select your Arduino type as "Leonardo". You can also try hitting the reset button right as the program starts trying to upload. The timing can be tricky though.

  Are you sure? yes | no

thyrymn wrote 05/20/2015 at 11:17 point

Ok, the coin cells have been out and Leonardo was selected.  

What is the reset pushing do?  

  Are you sure? yes | no

Gigawatts wrote 05/20/2015 at 21:49 point

The badge is running the arduino boot loader, meaning for a very short time after resetting the micro, it is listening for a programming sequence. It is a very short amount off time though, maybe a second or two, so timing is critical.

  Are you sure? yes | no

thyrymn wrote 05/21/2015 at 01:02 point

Got it!  Thanks!

  Are you sure? yes | no

dschuetz wrote 05/19/2015 at 16:34 point

When I try to activate IR Shark, it just sits there. No further prompts, and no response from IR commands played at the badge.

Also, have you been able to see the protocol as the badges talk to each other? I'm trying to figure out what the end of the "infection" game is supposed to be, but haven't made any progress on that. Using a Saleae analyzer, I can see inbound IR traffic (so I know it's working) but can't ever see anything ever emitted.

  Are you sure? yes | no

Gigawatts wrote 05/19/2015 at 17:05 point

Yeah, I got to the same point. One of the Workshop88 guys told me it should decode Sony codes, but I haven't tried that yet. I know it did not decode anything from my HTC One's IR blaster, for any TV brand. I pointed it at a few "infected" badges, but didn't see any output. I'm waiting for them to post the sketch source so we can see what's hidden in there.

  Are you sure? yes | no

dschuetz wrote 05/19/2015 at 17:35 point

I left two badges pointed at each other for a while, and over time, the 0x03 byte would increment. Every 1-3 minutes or so, a badge will "sparkle" with a bunch of random colors, and I'm suspecting this is when the IR infection is supposed to happen (and when the byte increments), but I haven't been able to capture any data.  But it only seems to increment if the value wasn't 00 to begin with.

I dumped the flash and found several strings related to IR Shark, but none of those appear when entering the mode, making me think the image is broken, or we haven't fully enabled something. It did appear that the VIP image was different from the other three, but I'm pretty sure I had the same problem with that image too (but can't remember -- may need to explicitly re-flash just to be sure).

  Are you sure? yes | no

Gigawatts wrote 05/19/2015 at 18:18 point

cool, good progress! Keep me informed with what else you find. Since I wiped mine out with my own sketch, I can't continue playing with the stock one unless I got a copy of the compiled sketch to reflash. 

I did also see one of those bytes self incrementing, but I don't recall which it was. 0x3 or 0x4 sounds right.

  Are you sure? yes | no

Gigawatts wrote 05/19/2015 at 18:21 point

Oh, one other thing I head from the 88 guys was that only certain ground zero badges could cause infection. Possibly staff (red) badges only, or transmitters at the Con. How its transmitted beyond that I did not determine.

  Are you sure? yes | no

Michael Goetzman wrote 05/19/2015 at 20:13 point

I have a speaker badge & gold badge - curious what they do...

  Are you sure? yes | no

joelmt wrote 05/19/2015 at 15:21 point

How were you able to unlock sysop access for IR Shark?

  Are you sure? yes | no

Gigawatts wrote 05/19/2015 at 15:36 point

Using the EPROM editor, set your position to the first editable byte by entering:   d0,0 [enter].  Then   "s". This should land you at address 0x3, and stock value should show the byte as "00". Enter anything between "80" and "FF" and hit enter. It will move on to address 0x4. Hit  "k" a few times to back out to the main menu. Hit * to enter the sysops menu, and it shark should be available under option "s". You can also change the number of messages at address 0x3FF. If there is a way to "read" the messages, I never found that. Let me know if you did :) Oh, BTW, even though the EPROM tool displays addresses 0 - 32767, every block of 1024 (0x400) is a repeat of the first 1024. Hope that helps!

  Are you sure? yes | no

joelmt wrote 05/19/2015 at 16:09 point

Thanks!

  Are you sure? yes | no

Rich Bagurdes wrote 05/18/2015 at 00:53 point

great write up.  

  Are you sure? yes | no

Similar Projects

Does this project spark your interest?

Become a member to follow this project and never miss any updates