-
1Step 1
What you should consider when choosing an amplifier:
- First you should consider the number of inputs and outputs you want;
- Then after you should consider the output power;
- Power supply get quickly expensive when you want more than 100W output and you might want to buy a power supply that is a little bit more powerful than your amplifier.
What you should consider when choosing a power supply:- The power supply should output enough power to power up the amplifier, the raspberry pi and some of the accessories you will add.
- Having only one power supply is easier. Try to use converters if you need other voltages. Most of the amplifiers are 12V and the Raspberry Pi uses 5V, you don't need to be a genius to know that you will need a converter or another power supply, so you better make a choice. "This is your last chance. After this, there is no turning back."
Calculating the needed power can be done quickly. For our example:- Amplifier: 80W
- Rapsberry Pi: it will get as much as the converter can give: 10W (but that won't happen since we're not using power-sucking components)
- Accessories (as the plasma ball): about 2W maximum
This gave us 92W maximum so we took a 100W power supply.
The choice of the structure is up to you. Avoid metal as much as you can if you don't want to mess with electricity. Choose wood if you can. It's well insulated, is easy to use and it have some good looking.
When buying the cables, keep in mind how much you need and what kind of cables (for example, the outputs have two phases and the input have three phases). For outputs, you need as much cables as the number of outputs you got. For inputs: you probably need one cable for auxiliary input and one cable to connect the Raspberry Pi to the main input of the amplifier.
These are all the advices we could give you. In a more general way, you should refer to our component list to see what you need if you use the same amplifier. Audio connectors can be the size and the kind you want except for the auxiliary input on the amplifier and the main input on the Raspberry Pi. These should absolutely be 3.5mm stereo jack connectors. -
2Step 2
Go to the Raspberry Download Page and download N.O.O.B.S. Follow the documentation to install N.O.O.B.S on your SD Card. When it's done plug it into your Raspberry Pi, power it up and choose your Operating System to install.
For the rest of the instructions, we will use Arch Linux as it's our favorite Linux distribution. If you are using Arch Linux, you will probably use yaourt in order to install packages from the AUR. If this is the case, you should fix your clock to the right date and time (the Raspberry doesn't have an RTC so it won't keep the right date and time) manually or using NTP. We advise you to install and start NTP right after having setup the network (see next step).
-
3Step 3
After installing Arch Linux using N.O.O.B.S, you can start and login with the account root and the password root.
The first thing you should do is set up the network and update your system. You could plug it on a wired connection or launch wifi-menu if you already want to use the wifi dongle.
WARNING: NetworkManager can conflict with netctl YOU WON'T BE ABLE TO SET UP CORRECTLY THE NETWORK IF YOU TRY TO USE BOTH OF THEM AT THE SAME TIME.
For your first wireless connection, we will use the command wifi-menu. Wifi-menu is part of the netctl package, so you can use it right after installation, this will be required for package installation and for connecting the device when not in access point mode. Using wifi-menu to connect to a wireless network will create a netctl profile into /etc/netctl. This profile will be named this way: <interface>-<SSID>. It will allow you to start/stop the connection using netctl start <profile> and netctl stop <profile>. You can get the list of saved profiles by doing netctl list.
When it seems that you are connected, you should check if an IP is assigned to your network device in ifconfig and try to ping some DNS server as 8.8.8.8 (Google DNS server). If you are connected, you can update your system and add the necessary for building packages later:
# pacman -Syu

# pacman -S base-devel
Now it's up to you to configure the rest of your system (like adding NTP) before going to the next step. Remember that you can use netctl start <profile> in case you need to reconnect after rebooting.
-
4Step 4
It's time to get into setting your media server. We will start by installing and configuring minidlna which is a DLNA Server. DLNA is used to stream media over the network through a variety of devices.
Note that here we use the 'yaourt' package from the [alarmpi] repository which is natively available on Arch Linux for Rasberry Pi, you may also use pacman.
Install dependencies, yaourt, git and minidlna. For others systems (that rely on systemd), keep in mind that you should install git and minidlna.
# pacman -S base-devel yaourt git minidlna
You need to create a simple user that minidlna will use to start:
# useradd -g users -m -s /bin/bash <your_new_user>
You need to install minidlna-autoconfig that we especially created for the project.
This includes a script to generate a config file from the original configuration file located in /etc/minidlna.conf, a systemd service to start minidlna as a normal user and a systemd service to start minidlna-autoconfig, which creates configuration files and directories if necessary for a simple user.
You can get it on GitHub and install it with the makefile:
# git clone https://github.com/rodolpheh/minidlna-autoconfig

# cd minidlna-autoconfig

# make install
Or if you use Arch Linux and you have installed yaourt, you can get it from the AUR:
# yaourt -S minidlna-autoconfig
Then it's just a matter of enabling our minidlna-autoconfig@.service and minidlna@.service
# systemctl enable minidlna-autoconfig@<your_new_user>

# systemctl enable minidlna@<your_new_user>
After enabling, you should restart in order to start the services.
If you want to start them immediately and check their status, you can make:# systemctl start minidlna-autoconfig@<your_new_user> # systemctl status minidlna-autoconfig@<your_new_user> # systemctl start minidlna@<your_new_user> # systemctl status minidlna@<your_new_user>
If everything went fine, the systemctl status ... from above command should echo Active (running) and no error messages should be displayed.
Now, if you add media content in /home/<your_new_user>/Music, /home/<your_new_user>/Pictures or /home/<your_new_user>/Videos, you should be able to watch/listen to these media using a DLNA controller (there is controllers for every OS).
You can also check if the files and other devices are correctly detected at http://localhost:8200 -
5Step 5
At this point, you should have minidlna working. But you may want to use your Raspberry not only as a DLNA client but also as a DLNA renderer. For this purpose, we will install gmrender-resurrect which is available in the AUR under the name gmrender-resurrect-git:
# yaourt -S gmrender-resurrect-git
If you don't use Arch Linux, you can install it from GitHub but by default, gmrender-resurrect isn't shipped with a systemd service. You must find one that fits to your OS if you want to be able to start it using systemd. You could test the one which is shipped with the AUR package but we can't guarantee it will work for your OS.
If you have installed gmrender-resurrect-git using yaourt, you can enable it on boot and start it immediately if you want to test it:
# systemctl enable gmediarender

# systemctl start gmediarender
-
6Step 6
In order to add wireless access point capability to your media server, you need to install hostapd (hostapd_8192cu from AUR if your wifi dongle is based on a rtl8192cu chipset) and dhcp.
If you have installed yaourt as stated in an upper Build Instruction, you could follow these instructions. If you don't have yaourt installed, install it or you won't be able to install hostapd_8192cu directly. If you don't need hostapd_8192cu, you don't need to install yaourt and you can replace it with pacman.
# yaourt -S dhcp hostapd
or
# yaourt -S dhcp hostapd_8192cu
Then we need to configure hostapd. Edit /etc/hostapd/hostpad.conf with your favorite text editor and add (or replace) these variables:
- "interface=" put the interface you use (you will likely have wlan0 if you only have a WiFi dongle)
- "driver=" put 'rtl8741xdrv' if you use a rtl8192cu based dongle. If not, use one of the other drivers available for hostapd accordingly to your network device.
- "ssid=" put the SSID you want to be displayed (you can also enable hidden SSID if you want)
- "hw_mode=" put the WiFi type you want (b/g/n)
- "channel=" put a channel accordingly to your local radiofrequency regulation.
- "auth_algs=" set to 1 to enable open WiFi networking. Refer to the comments in the config file to see how to use it and how to configure authentification.
Now we need to configure and start a dhcp server in order to attribute IP addresses. We have already installed dhcp so all you need to do is renaming the original config file which is full of useless examples (doing a simple mv /etc/dhcpd.conf /etc/dhcpd.conf.original should be enough) and create the file /etc/dhcpd.conf with your favorite text editor and add:subnet 10.0.0.0 netmask 255.255.255.0 { option routers 10.0.0.1; option subnet-mask 255.255.255.0; option broadcast-address 10.0.0.0; option domain-name-servers 10.0.0.1; range dynamic-bootp 10.0.0.2 10.0.0.30; }This will enable dhcp to manage the subdomain 10.0.0.0 by attributing addresses in the range 10.0.0.2-10.0.0.30.
Now, if you want to start a wifi access point, you should disconnect your wifi network. If you have continuously followed the Build Instructions above, you could disconnect by using netctl stop <profil>
Start the wifi device and attribute an IP address:
# ip link set up dev wlan0

# ip addr add 10.0.0.1/24 dev wlan0
Start dhcpd:# systemctl start dhcpd4
Start hostapd:
# systemctl start hostapd
Your wifi access point should now be discoverable through any wifi device and you should be able to connect and ping the host (ping 10.0.0.1).
-
7Step 7
If you're still connected to the internet, you should install whc-switch, a python script we made especially for our project (but it can be used for other projects). It is actually designed to handle the WiFi mode of our Jack Dispenser with (as its name says) a physical switch. When switched on the Jack Dispenser will turn into a hotspot (currently, the configuration isn't made to bridge the network, you're only broadcasting your own local network) people will access to use the device. When switched off, it will turn into a client and will connect to the nearest configured network.
whc-switch stand for "WiFi Host/Client Switch". It includes the whc-switch python script, a systemd service for whc-switch, a configuration file and a systemd service for dhcpd4 which lets you start it on a specific interface.
First you need to install python 2.7 and its dependencies (python2-raspberry-gpio need to be compiled from the AUR so here we are using yaourt again):
# yaourt -S python2 python2-distribute python2-raspberry-gpio
You can find whc-switch on GitHub and install it using the makefile included:
# git clone https://github.com/rodolpheh/whc-switch.git

# cd whc-switch

# make install
Now you could configure whc-switch to add gmrender-resurrect to the services that are restarted when switching. With your favorite text editor, open /etc/whc-switch.conf and add gmediarender to the both= option.
-
8Step 8
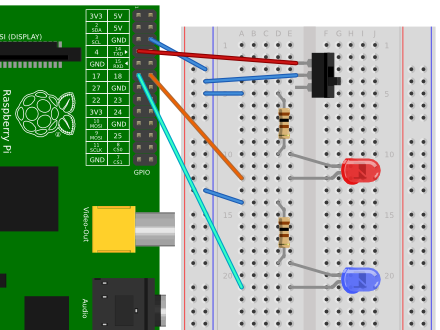
Before starting the whc-switch service, you should add some components. You need a simple switch, a blue led, a red led and some resistors to match your led voltage.
![]()
It is as simple as it looks like. After everything has been connected , you can start the whc-switch service:
# systemctl enable whc-switch@<interface>
<interface> should be your wireless device. You can list them using ifconfig. Your wireless device will likely start with a w (and that could probably be wlan0 if you're using only a WiFi dongle).
After rebooting, you should see one of the led light up, indicating the WiFi mode (blue blinking: host mode, blue on: client mode, red on: error). If you get an error (red led on), it should be fixed by switching back to the previous WiFi mode. It is advised to check, using a screen and a keyboard, what happened by launching the script using python2 /usr/share/whc-switch/whc-switch.py <interface>.
-
9Step 9
If you want to add a webui for whc-switch, that will allow you to add/remove netctl profiles, you first need to install a webserver as the webui doesn't have a standalone webserver at this moment. We choosed lighttpd as it is light and easy to install (and more powerful on a Raspberry Pi than Apache). You also need php to make the webui works. As usual we will use pacman/yaourt to install all the packages we need:
# pacman -S lighttpd php
Now open /etc/lighttpd.conf with your favorite text editor and add THIS CONFIGURATION
This is a minimal configuration for lighttpd that works with our WebUI. It uses http on the port 80. If you want, you're free to add https support to lighttpd.
Be sure to add /etc/netctl to your open_basedir option in /etc/php/php.ini. You should also grant write access to /etc/netctl for the user http (which is basically lighttpd):# chgrp http /etc/netctl # chmod 775 /etc/netctl
It's time to get the webui:
# cd /srv/http

# git clone https://github.com/rodolpheh/whc-switch-webui.git .

# chown -R http:http .
Now you should be able to start and enable lighttpd on start:
# systemctl start lighttpd

# systemctl enable lighttpd
We advise you that we aren't web coders so the WebUI could be highly unstable. For example, the modify doesn't work for now. There also known bugs on the lock when the time is not set.
-
10Step 10
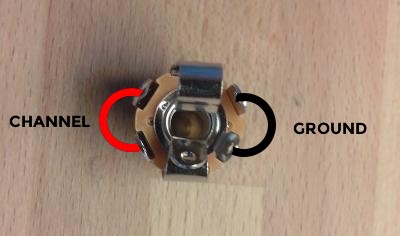
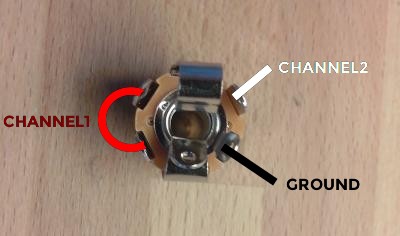
Now you can start building your device using the materials you choosed. If, like us, you could only get stereo jacks but you want to use them as mono, you can refer to this picture for how to solder it:
![]()
Mono version
![]()
Stereo version
We can't get you so much advices about building your structure. We helped you for preparing the core component (Raspberry Pi) of your own Jack Dispenser so the rest is up to you. We won't tell you how to make an exact replica of our project because we don't consider it as polished as it would be needed to make a cool replica. If you want to make a Jack Dispenser like us, you should better contact us or try to find your own way to make it better ;).
If you want to know how we made our structure, you should get a look to the Project logs we posted and to the pictures we made.
 RodolpheH


Discussions
Become a Hackaday.io Member
Create an account to leave a comment. Already have an account? Log In.