Close
0%
0%

Rapidly Deployable Automation System

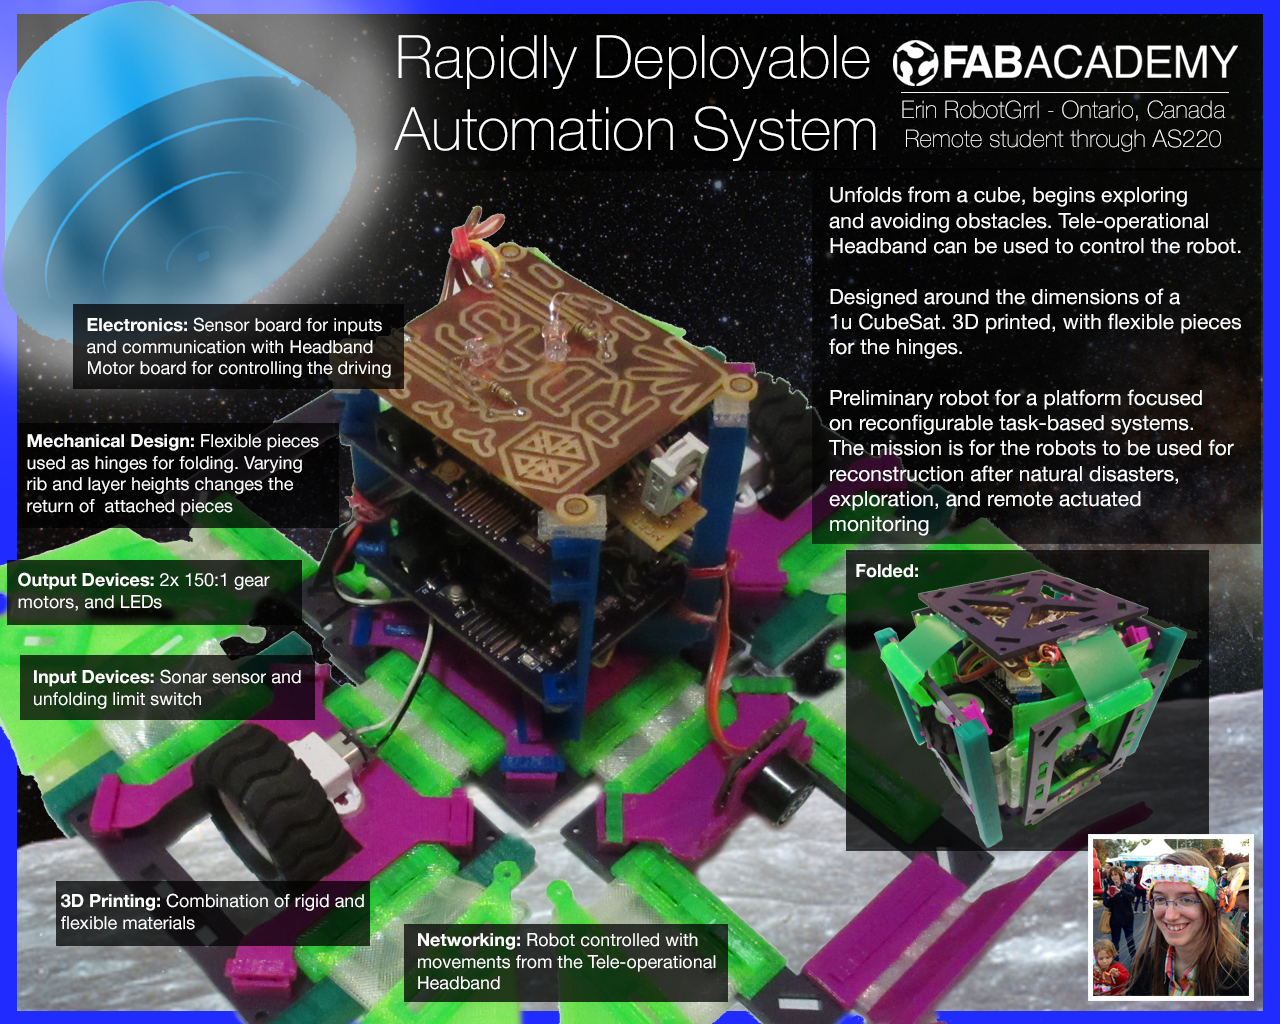
Unfolding CubeSat rover. Mission: construction on Mars & re-construction after natural disasters on Earth. Tele-op Headband control.

ekEK
Similar projects worth following
The overall problem that we are trying to solve is being able to rapidly deploy a system of automated movement.

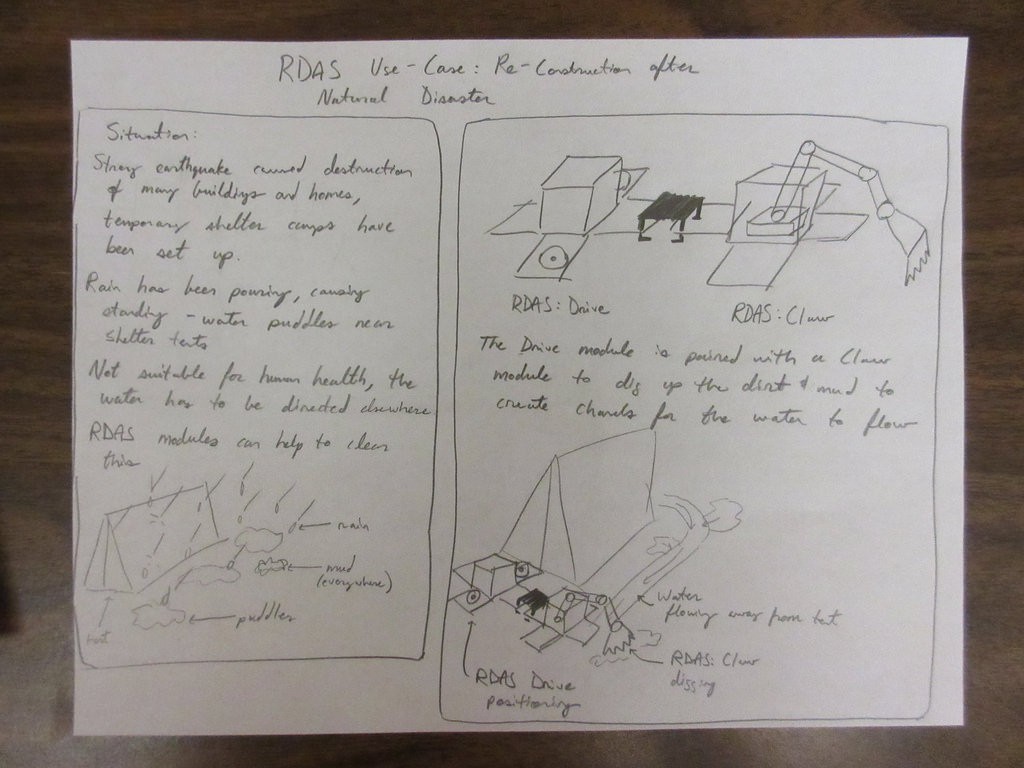
An example mission of this would be for use in natural disaster settings during the humanitarian efforts. The robot modules would be unpacked from a backpack, then configured and linked together to perform a task. Tasks can vary depending on the scenario, such as sorting supplies to go to a specific area, or even digging out areas to let standing water flow away from shelter locations. By having the robots help with tasks the effort is in parallel with the human, freeing up time for the human to do complex decision making jobs.

The first step towards working on the problem is to create one of the robot modules. This project is about the RDAS Drive module.

Video:


How it works

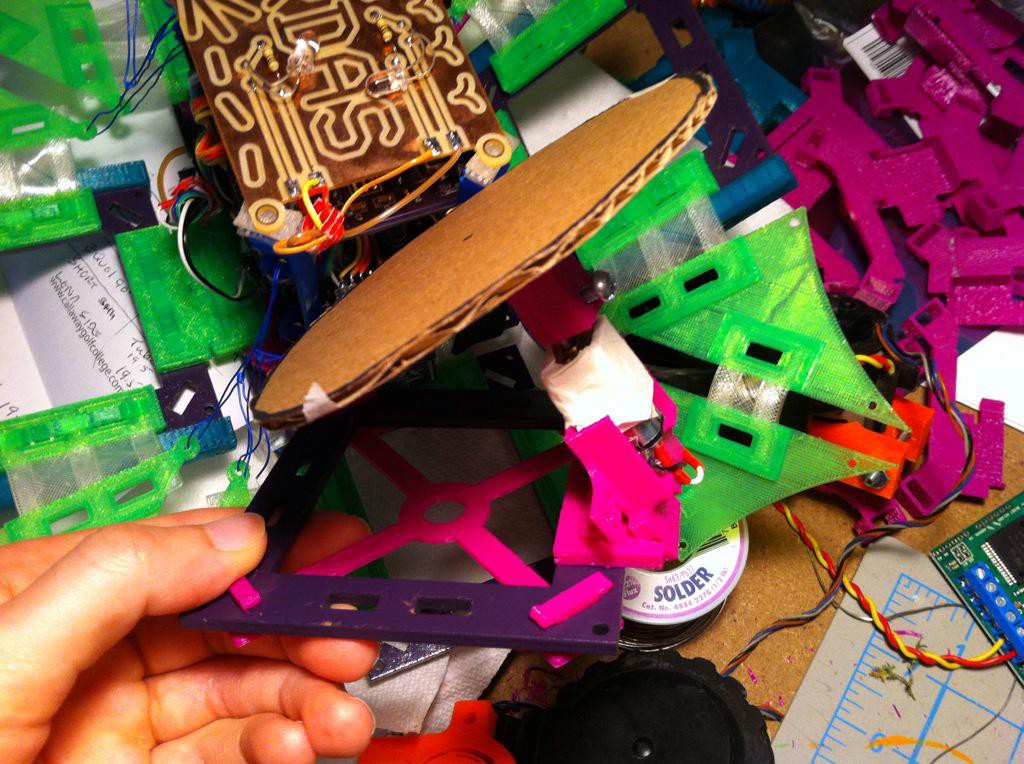
The robot is unfolded from its transportation cube shape. The green pieces will eventually be solar panels to harvest some energy. The sides with the wheels touch down and move the robot. The distance sensor in front detects and obstacles and avoids them.

Tele-operational control from the human is possible with a hands-free wearable headband with haptic feedback. The headband tracks the movements of the human's head and moves the robot accordingly.

Problem

Continuing from the description above, these robots are meant to be able to do tasks in parallel with the human. This way they can focus on more complex jobs.

Being able to achieve the level of parallelization is a key part to the problem; the robots won’t be very helpful if they have to be controlled all the time. They have to be able to do their task as autonomously as possible and when there is human input they have to understand what is trying to be communicated.

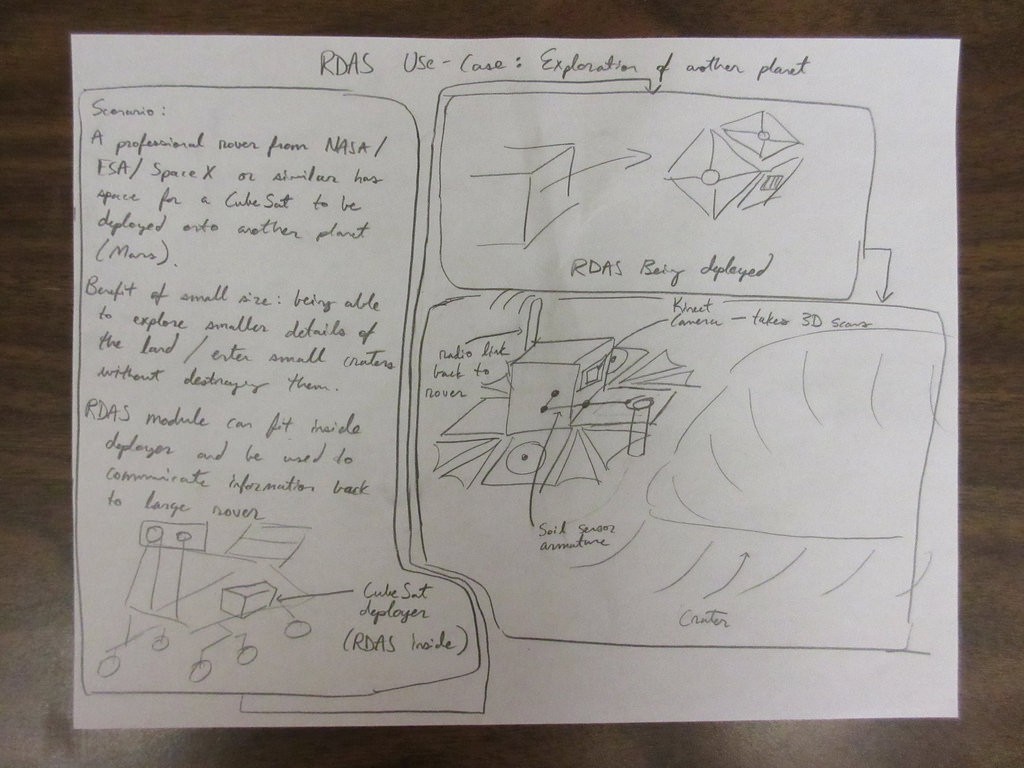
The goal of this is to eventually get the robots out in the field helping. It will take a long time with a lot of failures to get to that point. It’s all with another moonshot in mind: if the robots will be good enough for Earth, then what is stopping us from making them good enough for other planets as well. The robots could be tasked with starting to build structures on Mars, or go exploring, try to grow a plant (challenging in difficult environments).

Applications

* Reconstruction after natural disasters

* Exploration

* Remote actuated monitoring


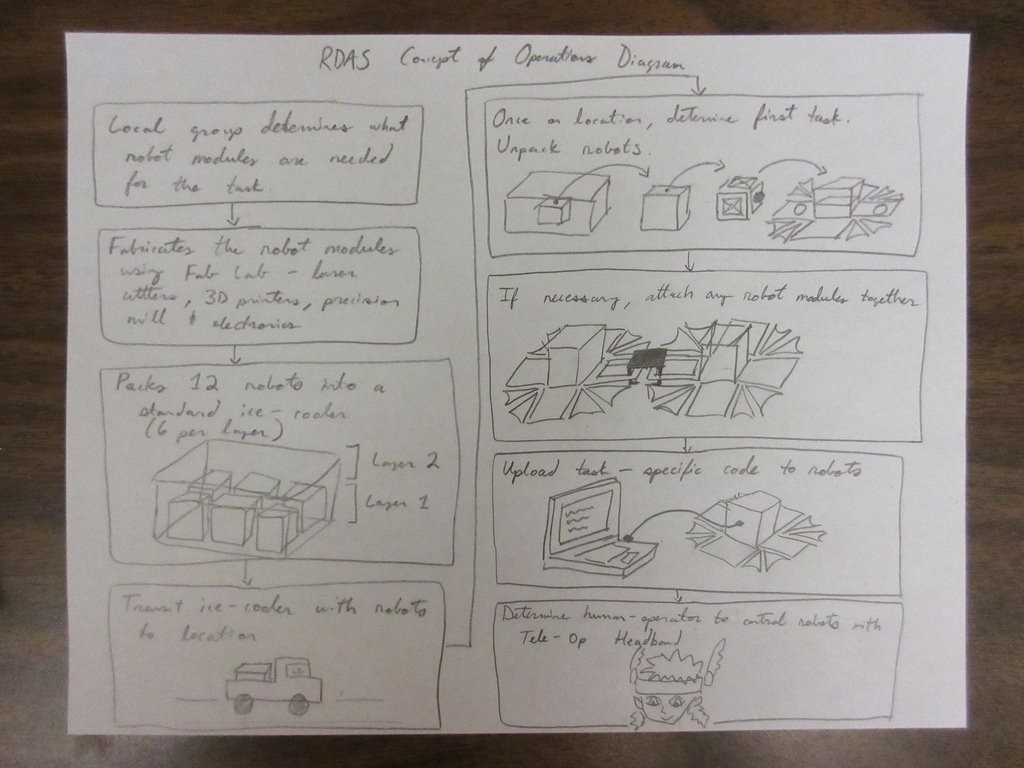
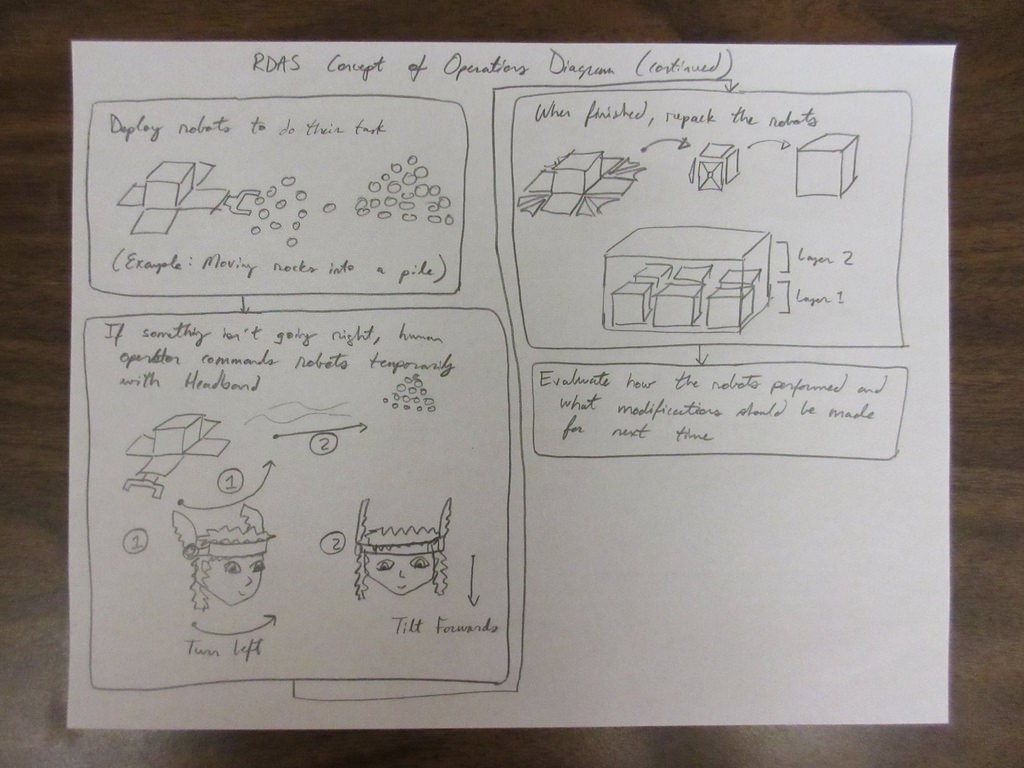
Concept of Operations

Click here for larger version of diagram 1

Click here for larger version of diagram 2


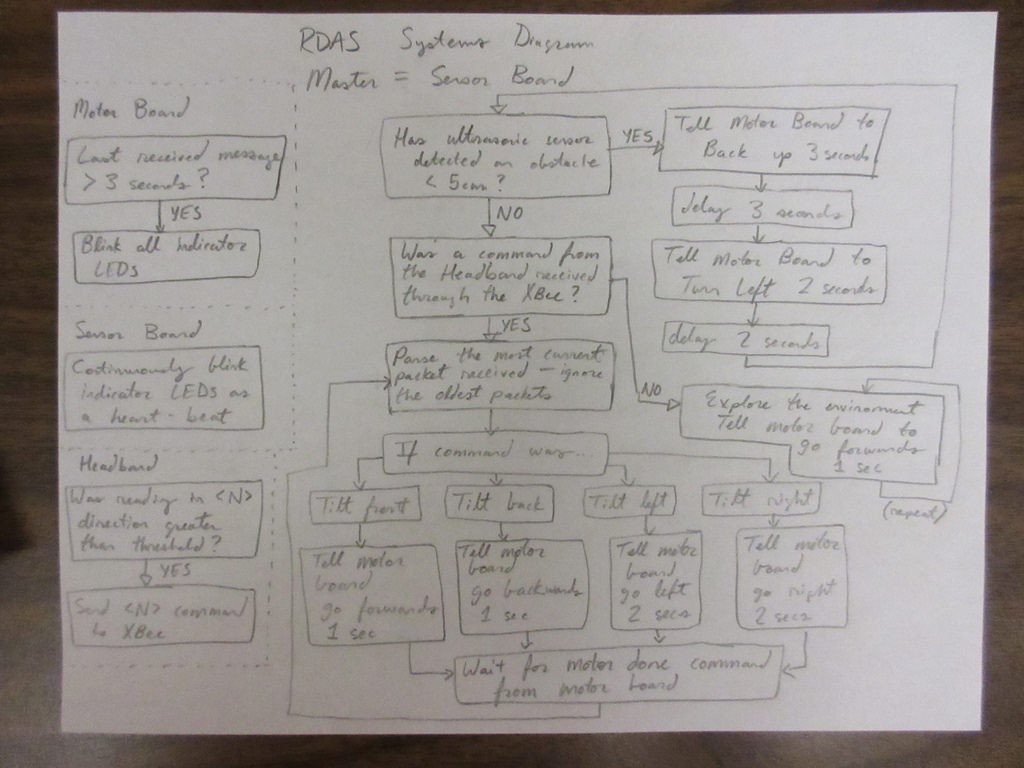
Systems

There are two main systems in RDAS:
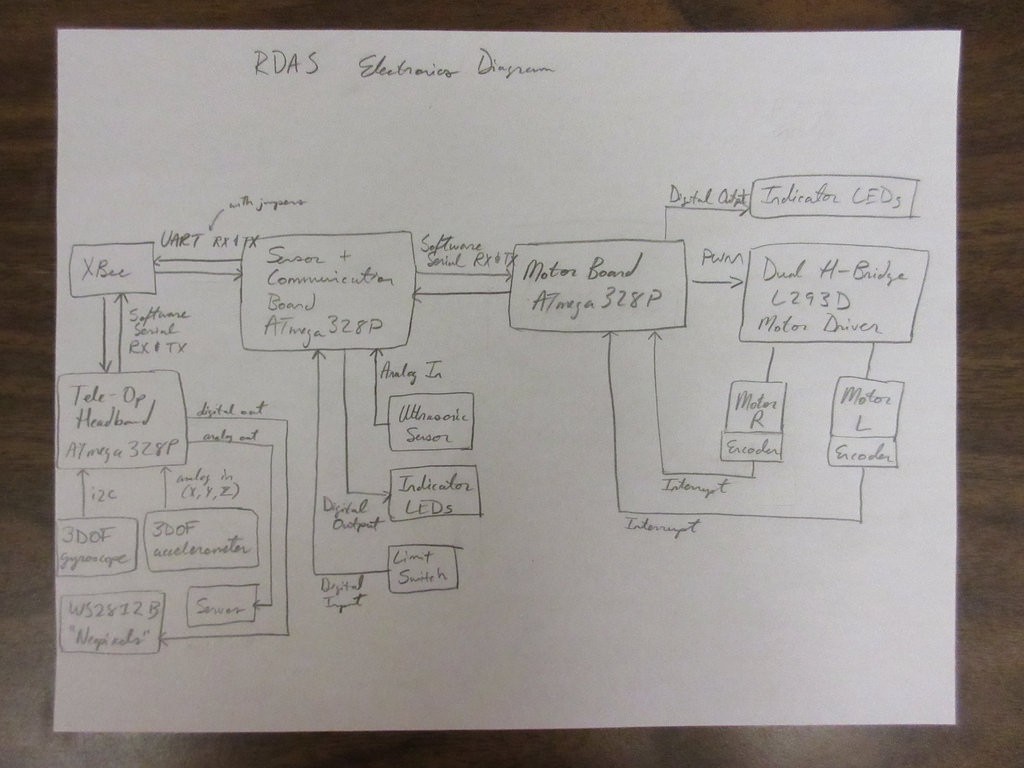
* Motor system
* Sensor system + communications

Systems diagram click here for larger version

Example Application Diagram 1

Click here for larger version

Example Application Diagram 2

Click here for larger version

Developers

Another one of the goals of RDAS is to have groups developing on it, so that the robots could be deployed locally if there is a scenario where the robots can help. The experience could then be shared globally and go to all of the other labs working with RDAS, to improve an action plan for how the robots can be used to help in various scenarios.


Milestones

There are a few milestones to hit before getting RDAS into people’s hands:

Generic RDAS Chassis Design

The first of which would be to create a generic RDAS chassis, based off of the CubeSat dimensions. The work done here with making RDAS Drive module is helpful towards going to this milestone.

Field Testing

The ultimate tests will be to see how well the robot modules perform outdoors, in the real environment. It has to be able to work! Trying, failing, fixing things, will be the way this milestone is accomplished.

Weather Balloon Payload

Here is a goal along the horizon that I am racing to try to meet. That is evaluating the performance of the robot as used in a weather balloon payload. This would introduce it to different temperatures and conditions, as well as test how the robot can function at a high altitude.

Electronics

RDAS uses a Motor board and a Sensor board, here are both Bill of Materials

Motor board:

gEDA and Gerbers

Pinout

Connectors

Sensor board:

gEDA and Gerbers

Pinout

Connectors

Electronics diagram click here for larger version


Structure

Download the .stl and Autodesk Inventor files here

Follow the Bill of Materials here for how many pieces to print and suggestions on how to print

Assemble the chassis- Scroll down to the "Assembling" heading here for a rough guide


Programming

The code for the Motor board is here

The code for the Sensor board is here

Note: This code was for the boards that were hand soldered with wire wrapping wire and perf board, so the pinouts in the code will be different than the pinouts listed in the BOM for the pcb boards


Optional: Tele-op Headband

This step is optional- if you want to make the Tele-op Headband to control the robot!

Download the laser cut pieces template

(Note: Some of the pieces need to be duplicated, refer to photos on this...

Read more »

  • 6 × Laser cut structure pieces
  • 4 × Flex-rigid panel assembly pieces
  • 12 × 3DP snap fit connectors
  • 4 × Slide rails for CubeSat deployer
  • 1 × Motor board

View all 10 components

  • Workshop @ Hackaday Hardware Superconference

    EK10/24/2015 at 00:55 0 comments

    I'm giving a workshop at the Hackaday Hardware Superconference!

    Designing with Antimony for use with custom skeleton-physics simulation

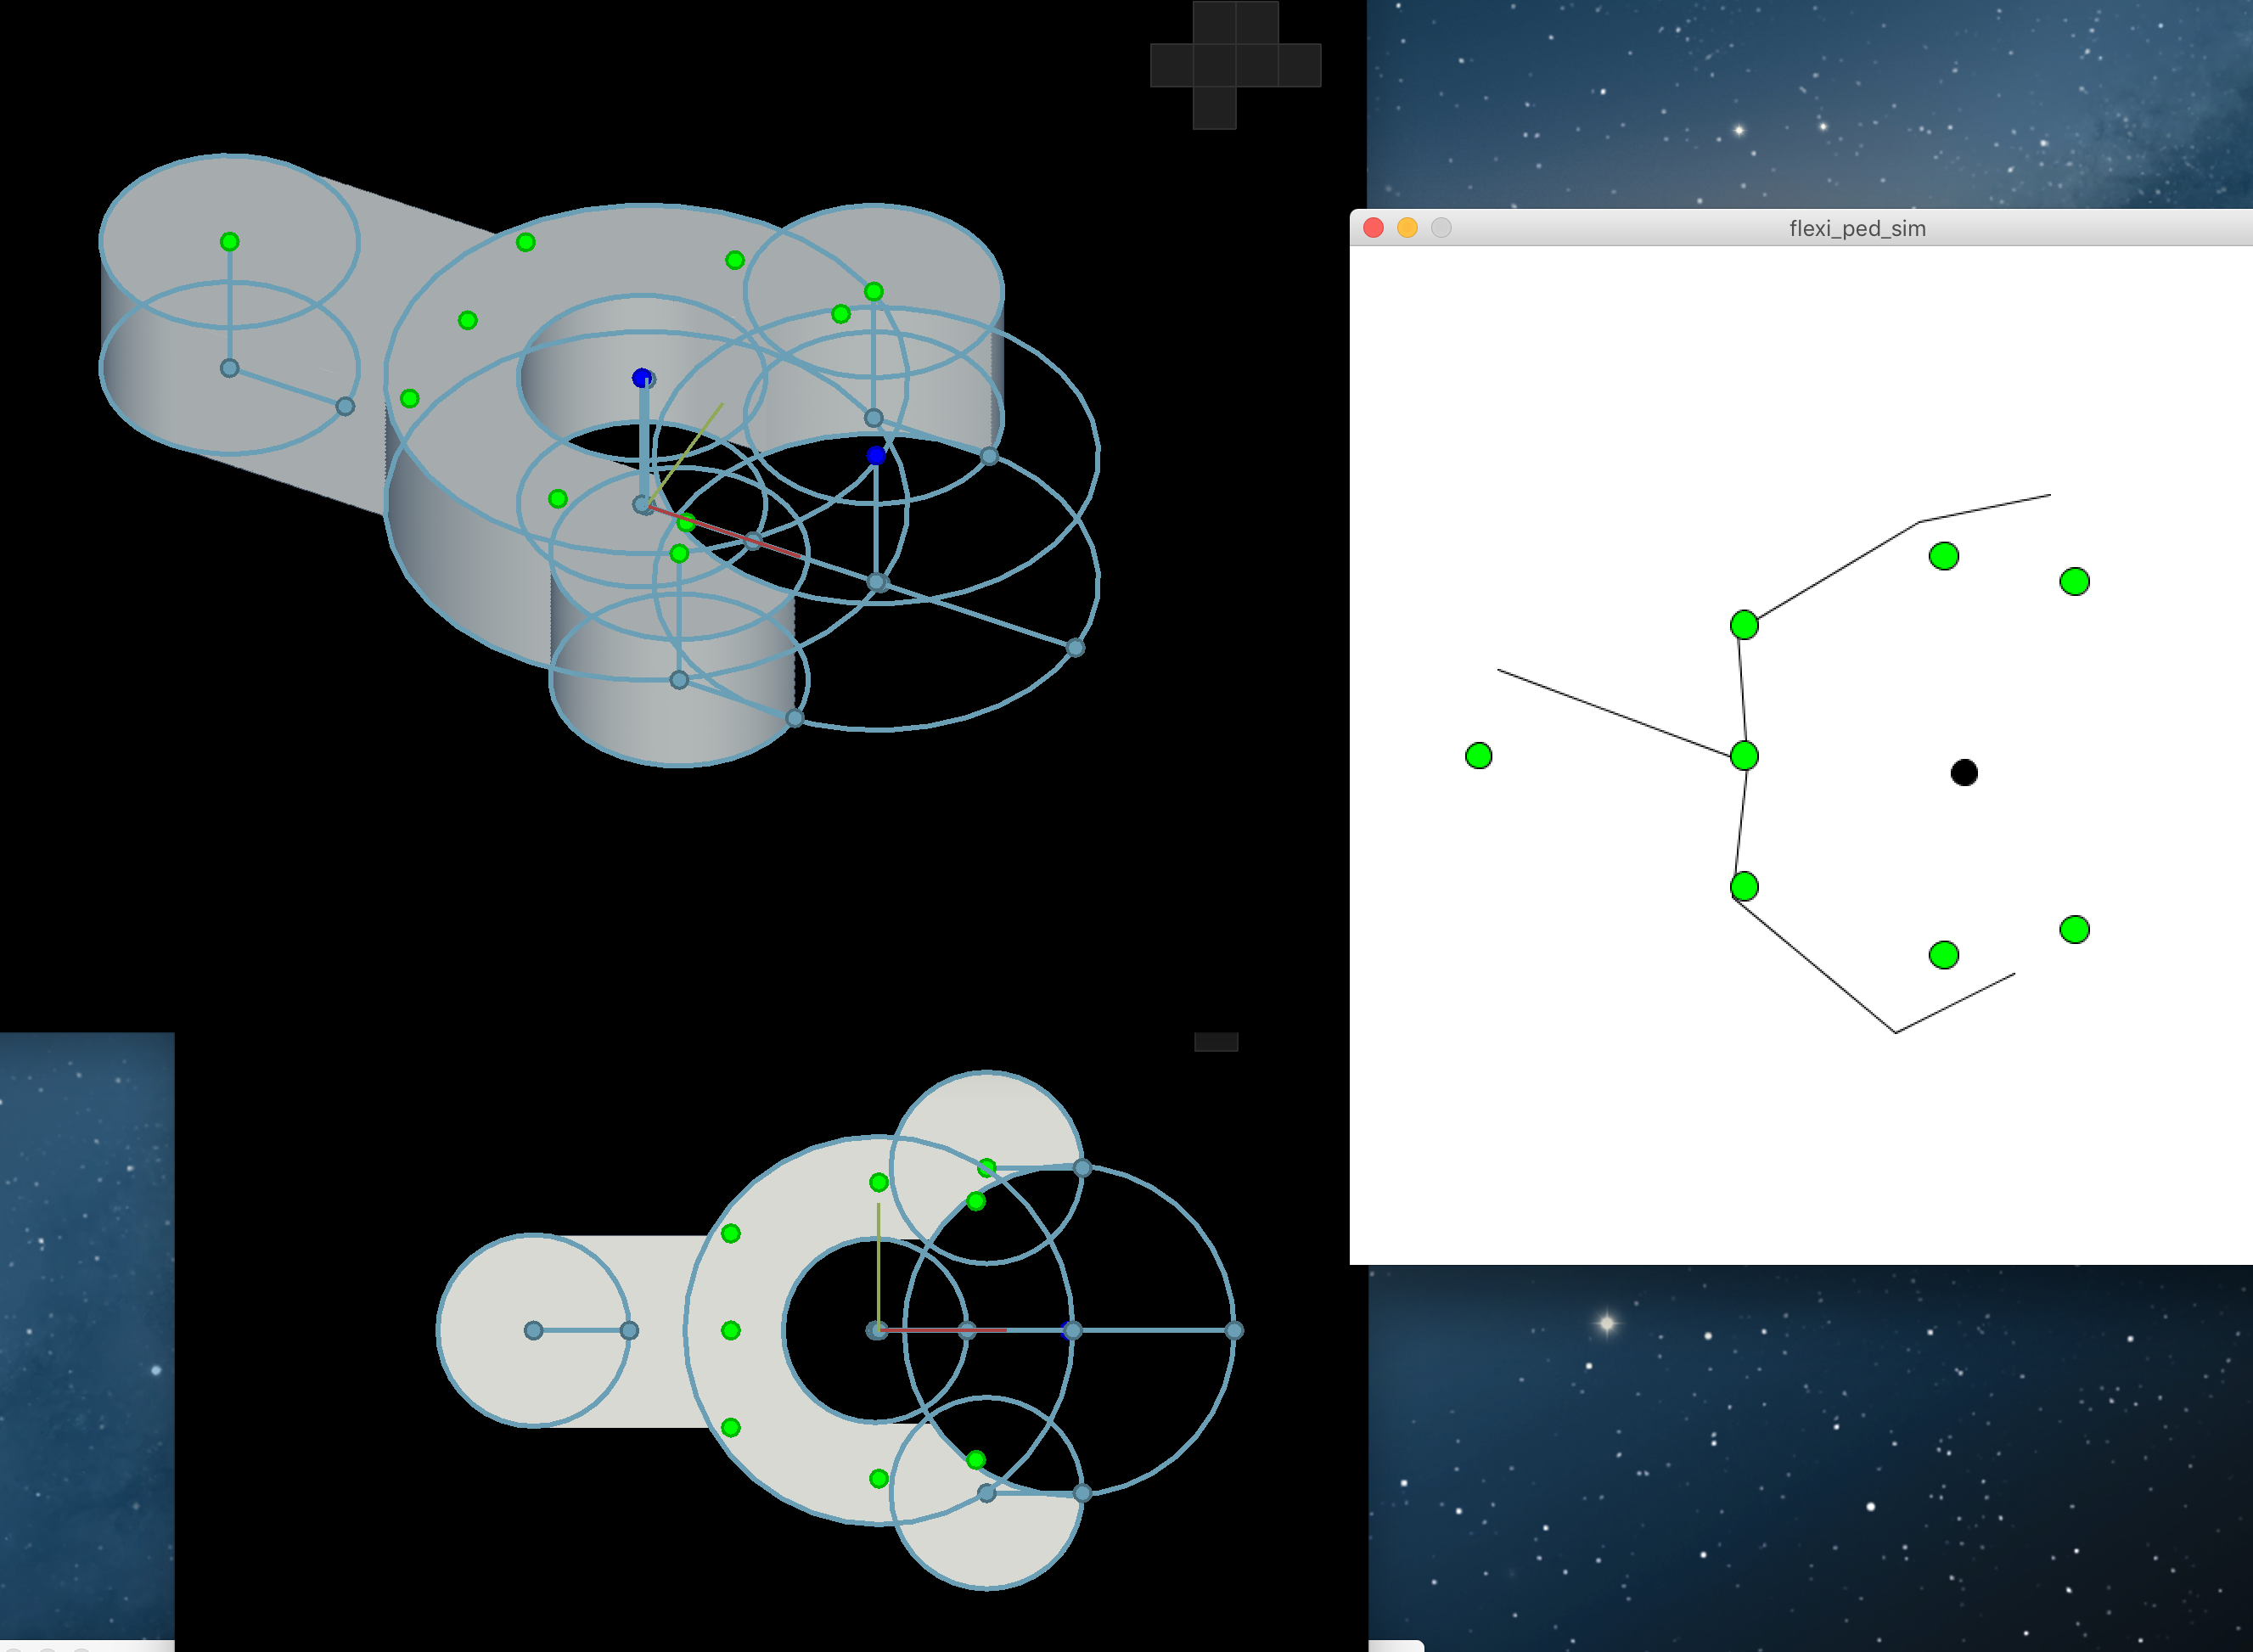
    Learn how to design parametric models in Antimony to make your prototyping process faster by spending less time tinkering your design with each iteration. Create complex geometric sculptures in Antimony with scripts. We will then dive into selecting key points on the geometry for use in a custom-made skeleton based physics simulation. This is helpful if you are using new materials for fabrication and need to develop your own way to simulate how it will behave under certain forces.

    If you have not heard of Antimony yet, check it out! It's developed by Matt Keeter. During Fab Academy 2015 all of us students used it a lot- I became addicted to it! =)

    Working on the details this weekend- will post with updates! Hope to see you there!

  • Started Studio[Y] at MaRS Discovery District

    EK10/24/2015 at 00:38 2 comments

    Hi everyone!

    If you were following this project throughout the Hackaday Prize, and maybe before that with Fab Academy, you might have noticed that there were not so many updates once September rolled around. Read on for the details!

    Read more »

  • Field test: Cleaning shores of debris w/ RDAS v0.5

    EK10/24/2015 at 00:17 5 comments

    Mini field test showing how RDAS v0.5 can move some debris on the shores of this beach! What a rush it was to see the bot working in action out in the field (and it was raining a bit too)! Check out the video

    Great to have the ducks there while I was testing the bot. It definitely gave a broader scope to why I'm trying to make these robots.

    *Note: This was recorded around September 10. The development of the prototype has advanced since then.


  • (Accidentally) Breaking a robot while recording — Update of RDAS v0.5

    EK10/24/2015 at 00:15 0 comments

    Transformation from RDAS v0.4 to v0.5 was quite drastic! Here are the details on what has changed. Check out the video

    I'm excited to improve the magnetic coupling piece.

    *Note: This video was recorded back around September 10. The development has progressed since then


  • RDAS Field Testing - Trials 1 & 2

    EK10/24/2015 at 00:13 0 comments

    An overview of what RDAS is, the type of terrain a locomotion module should be able to work on, and video clips from field tests 1 & 2. Check out the video

    *Note: This was originally created on September 2. The prototype is a bit farther along now.

  • Quick update - "Sometimes by almost starting over"

    EK09/01/2015 at 14:11 3 comments

    Last week I took RDAS out on a few field tests to try it on different terrains and see how it would work in the real world.

    There will be a video up soon showing how exactly it behaved.

    Since then I've been improving how it all works together, made a few modifications and tested again.

    Luckily with these tests and rapid prototyping it makes it fast to evaluate how the bot works and improve it — sometimes by almost starting over. Here's a new idea that is being prototyped:

    Now back to the prototyping! Have some laser cutting to do today, excited!

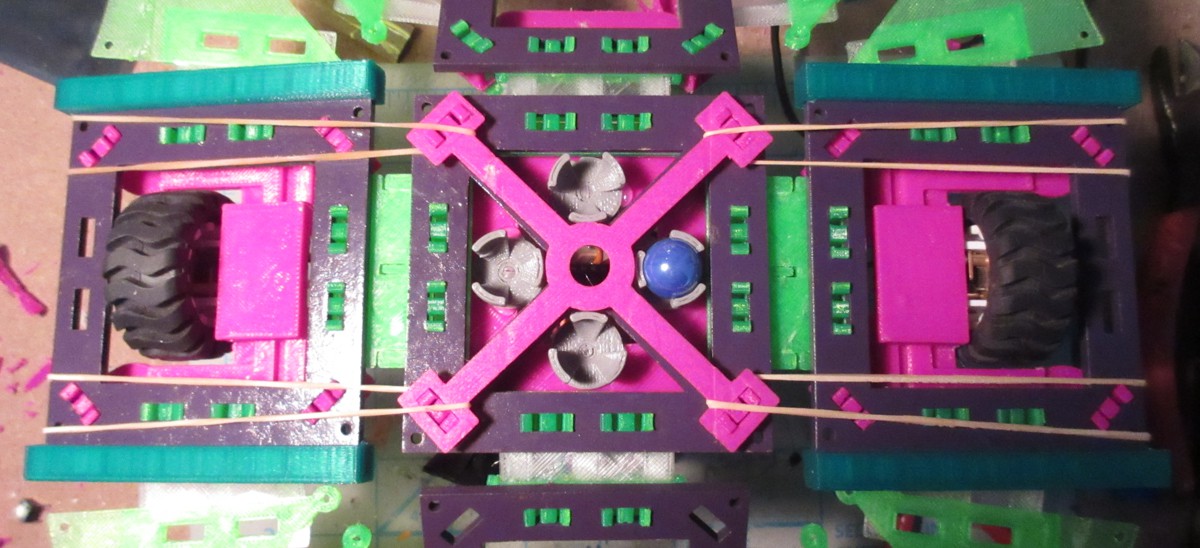
  • Wheel Improvements (with 4 Elastic Bands!)

    EK08/27/2015 at 13:22 0 comments

    Here are some improvements that were made to the bot to fix the issues diagnosed previously.

    https://vine.co/v/ejj0Bmxrb01

    Read more to see all the details

    Read more »

  • Diagnosing the Wheel Problem

    EK08/27/2015 at 02:07 8 comments

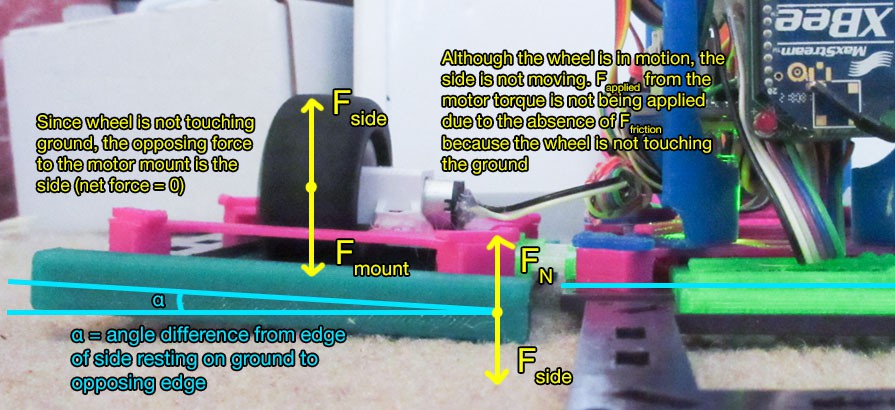
    In the video showing the latest prototype of RDAS (v0.4), you might have wondered why I had to hold down the sides of the robot for it to move. Especially when it's supposed to be hands free -- it just seems contradictory! Time to investigate further.

    Read more for explanations of the observations and the next steps.

    Read more »

  • RDAS at the lake

    EK08/17/2015 at 20:19 0 comments

    Here's a video I made showing the latest version of RDAS. Check it out:

    It was nice to take the robot out in the field.

    One of the things you might notice in the vid is that I have to push down on the sides of the robot so it can move. The reason why is because the extension piece that the motors are attached to tends to flex, so when the motors are trying to push onto the ground, it ends up flexing. This means that the wheels don't have good contact.

    In the next revision I'll be evaluating if making the extension piece stronger will help. If it doesn't, I'll add a similar locking mechanism to a folding table. It would extend from the inner structure to the motor panels.

    There are also new diagrams up in the project details. These give a clearer overview of my idea. Please check them out if you have time!

  • Video update: Adding on the extension panels, getting ready for motors!

    EK08/16/2015 at 15:58 0 comments

View all 14 project logs

Enjoy this project?

Share

Discussions

AVR wrote 10/23/2015 at 20:38 point

Hi, IDK if you saw this new post on Hackaday but now you can get raditation hardened atmegas, now you can make your robot radiation hardened!

http://hackaday.com/2015/10/23/atmel-introduces-rad-hard-microcontrollers/

  Are you sure? yes | no

Eric Wiiliam wrote 09/04/2015 at 22:23 point

Very cool project!  Can't wait to see it refined/developed.  Best of luck

  Are you sure? yes | no

DeepSOIC wrote 08/24/2015 at 16:06 point

I don't find anything fascinating about the whole idea, but this project is crazy addictive to watch in action.

  Are you sure? yes | no

Charles Lakins wrote 07/08/2015 at 19:27 point

Are you using stepper motors? 

  Are you sure? yes | no

EK wrote 07/13/2015 at 18:10 point

Hobby DC geared motors in current design (v0.2) -- used metal ones in previous design (v0.1), and will be using metal ones going forward (v0.3+)

  Are you sure? yes | no

Charles Lakins wrote 07/13/2015 at 18:20 point

you could use brushless gimbal motors also and maybe need less current draw  depending on the drivers used

  Are you sure? yes | no

frankstripod wrote 07/08/2015 at 19:22 point

Definitely Hackaday Prize worthy! 

  Are you sure? yes | no

zuul wrote 07/06/2015 at 01:21 point

Robots,.... INNN SPAAAAACCCEEEE

  Are you sure? yes | no

Similar Projects

Does this project spark your interest?

Become a member to follow this project and never miss any updates