Close
0%
0%

2.5-3D thing

a tiny-but-scalable three-ish axis-system *from* laser-cuts

Similar projects worth following
Thanks to HaD, its sponsors, and Ponoko, I've got a $100 custom laser-cut order coming my way!

So I thought I'd see if I could make a cartesian-thing, probably a plotter, possibly a DVD-laserer, maybe a PCB-thing if it's strong enough... plausibly a wonky 3D printer... most-likely just a glorified etch-a-sketch with pen-up/down.

It's kinda proof-of-concept, really. I'm not much of a mechanical-engineer, but was always fascinated by an old pen-plotter given to me years ago. Years after we parted-ways, I figured-out how they managed to drive two axes with stationarily-mounted motors, pulleys, and cables. I managed to extend that same concept to three-axes to surprising-precision with Legos. And now, on-paper, I'm pretty certain I could even manage four completely independent pulley-driven axes. Kinda cool.

Not sure I'll get that far, but four axes could include both pen-up/down and pen-select...

While I like the "etch-a-sketch" idea, being hand-drivable, this is definitely intended to be motor-driveable. Part of the goal is to aid in the porting of the motion-control aspects of #commonCode (not exclusively for AVRs) over to the PIC32...

This could be considered a continuation, of sorts, from #operation: Learn The MIPS (PIC32MX1xx/2xx) which has been a reasonable success; its heartbeat fades based on a timer, and I've even managed to finally get the LED pin shared with a pushbutton. In other words: the default 'heartbeat' commonCode starting-point/example is now fully-functional on PIC32, which also implies several other commonThings--'tcnter', 'hfmodulation', 'bithandling'--are also functioning on this new MCU architecture. WOOT! The next step is usually the bitbanged-UART 'polled_uar/t', which is really just a tiny extension from heartbeat; using tcnter for precision-timing, and bithandling for... guess. (done and done). After polled_uar/t I usually begin a new project.

So, here we are... a new project! Again, this'll be a porting to PIC32 (aka 'abstracting') of several additional commonThings, including:

  • 'pwm' (can this be "ported", really? As-written It's pretty specific to AVRs' timer/counters)
  • 'coordStuff' (32-bit integer-coordinate system for up to 255 axes)
  • motorPoxn (designed for DC-motors with an encoder)
    • (I didn't commonFile 'encoderDirect'?!)
  • polled_uar/t

At which point I'll be able to control the positions of the motors via a computer's serial-port... Later, I might even implement the full motion-system which includes syncrhonization of ramped-axes, arcs, etc... from several other commonThings including:

  • sineTable (a lookup table of Sine values, specifically designed for integer-math)
  • sineTravel (for arcs and ramping)
  • xyTracker (which creates integer-based linear motion along several axes)
  • gotoPoxn (which synchronizes motion between motors on up to 255 different axes, regardless of unpredictable/varying loading)
  • gotoRamped (which uses sineTravel for ramping/accelerating/decelerating linear motions)

This project has taken on a new life as early design-goals were motivated, in part, by limited prototyping-budget. I visualize an entire (tiny) 2-axis Cartesian system requiring little more than:

  • a single 7.1in x 7.1in sheet of laser-cut acrylic (or plywood, etc)
  • cable (braided fishing-line)
  • pins (for laser-cut wheels/pulleys, most likely just snippings from paper-clips)
  • and possibly glue (though, ultimately it'd be pretty cool if it was entirely snap-together)

I visualize a kit, of sorts, distributed in a single 7.1in x 7.1in sheet of material, and a baggie with paper-clips and cable... A 'business-card', maybe?

A separate add-on could then be snapped to it with motors, etc. for computer-control.

Of course, for the purposes of porting the motion-control system to PIC32, that motor-add-on is necessary early-on ;)

Log Highlights:

PWM vs Pulse-Density Modulation: Power Supplies and Big-Ass Capacitors

  • 1 × laser-cut material 7.1in x 7.1in modelling plywood, or acrylic
  • 1 × pins Most-likely just snippings from paper-clips
  • 1 × cable braided-fishing-line
  • 1 × PIC32MX170F256B Microprocessors, Microcontrollers, DSPs / ARM, RISC-Based Microcontrollers
  • 1 × associated support-components capacitors, resistors, LED(s), etc

View all 8 components

  • project crossover, again...

    Eric Hertz09/15/2015 at 08:07 0 comments

    I've said it before, and I'll say it again... most of my projects tend to feed into each other.

    So, this time, we've got #CD/DVD mechanisms and cartesian thinggie[s?]

    which has taken-on some of the porting of my motion-control code that started here (the porting of the code, not the code itself. started here.).

    Here're some logs from that project which are related to this project:

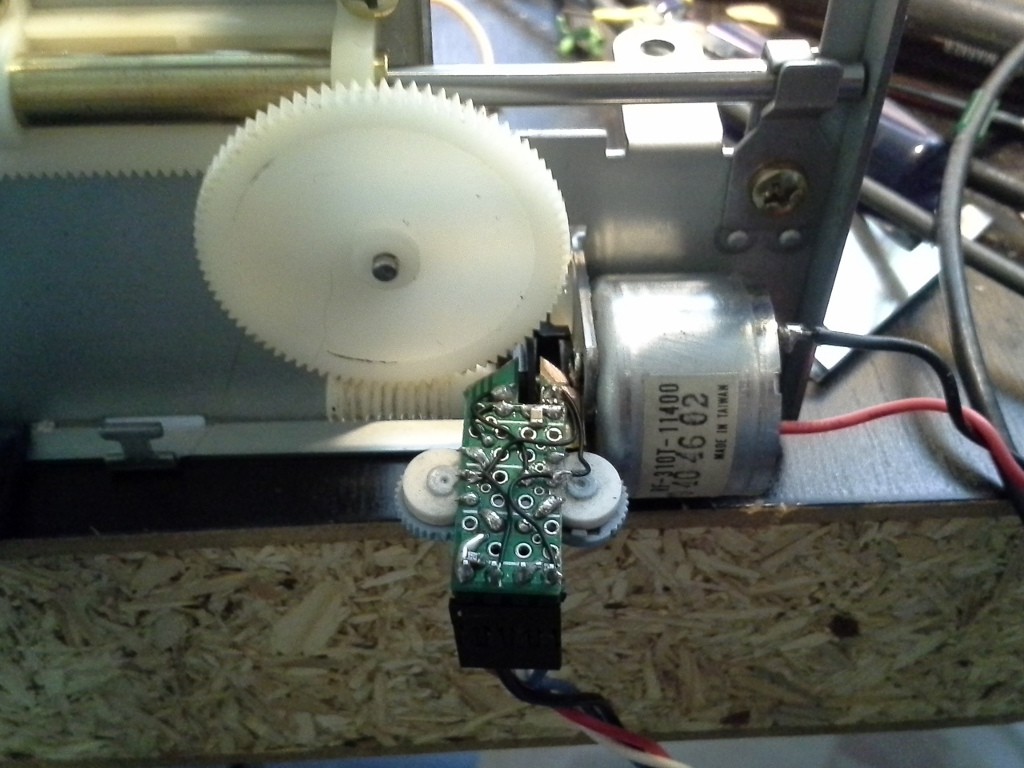
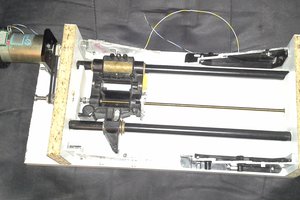
    Here's an image from the second link... Managed to attach another mouse-encoder to a CD mechanism. This motor is *definitely* smoother than the "hobby"/"toy" motor I used earlier.

  • PWM vs Pulse-Density Modulation: Power Supply

    Eric Hertz09/02/2015 at 13:30 12 comments

    Update (9-19-15):

    Adding another pseudo-related hypothesis to the end...

    Update (9-8-15):

    @RoGeorge has a great project-page dedicated to comparing PWM and PDM aka "Delta-Sigma Modulation." #Delta-Sigma versus PWM. His project-page discusses the differences, and has some excellent graphics.

    And Thanks to @Al Williams (or is it @Al Williams, 'if that is your real name...') for the writeup on the HaD Blog! http://hackaday.com/2015/09/08/pulse-density-modulation/

    Update (9-8-15 2.0):

    Adding a groovy image and description at the bottom...

    Update (9-9-15):

    Another, in ascii-art, at the bottom.

    Adding a different fraction to the drawings, where cyclical nature is more evident.

    A few TODOs added in the original text...

    Adding disclaimer at the top... (right below the line, below...)

    Update (9-9-15 2.0):

    Adding a summary of and link to the hfModulation code

    ---------------

    NOTE: I'm no expert on Pulse-Density Modulation, Pulse-Frequency Modulation, nor Delta-Sigma Modulation. In fact, I have a difficult time understanding their wikipedia articles. AS FAR AS I'M AWARE, these are all the same, or very similar. My so-called "High[est]-Frequency Modulation" (hfM) is something I came up with on my own, and used for years before discovering these terms for it (PDM, PFM, DSM). It's my [minimal] understanding, again, that these are all pretty much the same thing, and I've slowly (after years of using and improving hfM) started referring to it as PDM. THAT MAY BE A MISTAKE. Again, I don't fully understand the wikipedia articles on these things. It has been my intent, ever since I discovered the terms, to eventually figure out their differences and possibly rename hfM appropriately. In Other Words: TAKE THE INFORMATION HERE as nothing more than *my understanding* of PDM... Where I say "PDM" below, I'm referring, specifically, and plausibly mistakenly, to my hfM implementation....

    NEW VIDEO:

    Here, for this project, I have a motor rated for 3-6V... I'm using a 12V power-supply with PWM (or PDM).

    At full-power (PWM = 100%, should be 12V) the motor draws more current than the power-supply can supply. The supply drops-down to 6V.

    BUT: There's a big-ass capacitor where the power-supply enters the circuit.

    PWM and PDM recap:
    (I call my implementation of PDM "HFM",
     "highest-frequency modulation")
    
    PWM: (cycle period = 6 counts)      >| |<--- one PWM "count"
     _._         _._          _._._       _._._
    |   |_._._._|   |_...    |     |_._._|     |_...
    ^-----------^            ^-----------^
    one PWM cycle            one PWM cycle
     33% power                50% power
         = 2 counts               = 3 counts
    
    HFM: (max power = 6 counts):      >| |<--- one "HFM" "count"
     _     _     _            _   _   _   _
    | |_._| |_._| |_...      | |_| |_| |_| |....
    ^-----------^            ^-----------^
    one HFM "cycle"          one HFM "cycle"
    power = 2 (33%)          power = 3 (50%)
    
    
    UPDATE 9-9-15: Adding a different fraction, e.g. 2/5 and 3/5, 
          where cyclical nature is more evident
    
    PWM: (cycle period = 5 counts)    >| |<--- one PWM "count"
     _._       _._          _._._     _._._
    |   |_._._|   |_...    |     |_._|     |_...
    ^---------^            ^---------^
    one PWM cycle            one PWM cycle
     40% power                60% power
         = 2 counts               = 3 counts
    
    HFM: (max power = 5 counts):      >| |<--- one "HFM" "count"
     _   _     _            _._   _   _._   _
    | |_| |_._| |_...      |   |_| |_|   |_| |....
    ^---------^            ^---------^
    one HFM "cycle"          one HFM "cycle"
    power = 2 (40%)          power = 3 (60%)


    Where was I going with this, again...? Hmm, big-ass capacitor...

    So, I intend to run the motor at no more than 33% power, using 12V and one of these modulation-schemes. That's roughly the equivalent of running the motor off 4V...

    But (as I discovered late in the game) the power-supply drops-out at the current required by this motor at 12V. And, using one of these modulation schemes, the motor is *actually* given 12V quite regularly... So why isn't the power-supply dropping-out (to 6V) on every pulse of 12V? Well, in part, because of that big-ass capacitor.

    And, in part, because my first attempts with this motor were done using "HFM"/PDM.

    I didn't notice the effects of the power-supply dropping-out until experimenting with output powers >50%. With output powers >50%,...

    Read more »

  • life-size

    Eric Hertz08/27/2015 at 02:57 9 comments

    ah.

    So this is roughly life-size...

    The teeth, then, are like... *maybe* 1mm at their widest. and, unless I do everything *just* right (yeah, right... especially not from a [low-resolution] photograph) it seems most-likely I'll only really have one tooth making contact at a time... starting to seem a little bit ridiculous.

    I am proud, however; I used a different technique to get real-world measurements from the image for the motor-assembly than for the gear/tooth-spacing, and they seem to align.

    As far as material... I dunno what to think. I haven't worked with "modeller's plywood" before, but it's hard to imagine the grains crossing the teeth wouldn't be tempted to fall out at these tiny sizes. And, acrylic, well, that's known to be brittle, so probably all the force on a single tooth jutting out at nearly 90deg isn't such a great idea.

  • BEWARE THE ALI-EXPRESS, ETC!

    Eric Hertz08/25/2015 at 12:14 0 comments

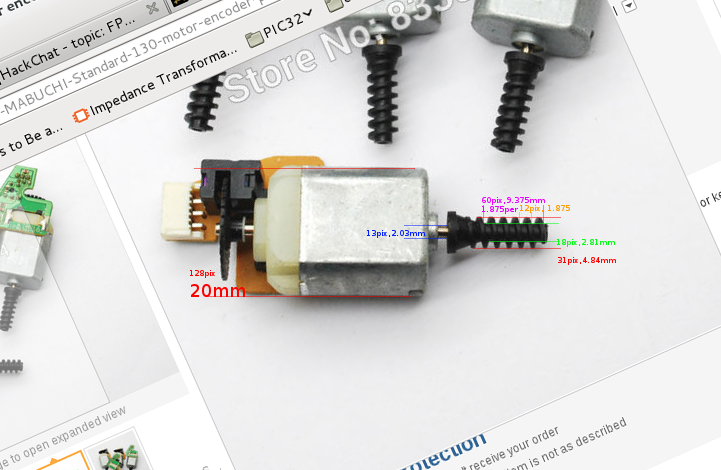
    Been doing some measurements for the gear...

    The seller claims:

    "outside diameter of gear 8.7mm/ screw diameter 6.5mm length 19mm"

    right...

    Anyways, none of those measurements seemed to match anything in the photo. Finally looked up the specs on this otherwise standard-sized motor (and compared to one I have here) 20mm diameter. Judging by that, the *only* measurement that matches those listed is "screw diameter 6.5mm" which is actually the diameter of the flange. "length 19mm" *might* correspond to the total length of the screw to the body of the motor (including shaft and bearing), but that's more like 17-18mm... So... really not much to go on, here. 20mm diameter on the motor seems pretty standard, so I could try to base all measurements off that. Realistically, I guess I'd have to wait till I get these before I can design around 'em. :/

    I think this is the answer: There seem to be several styles...

    This page is *great* as it gives specs for one, but actually shows three entirely different styles in various pictures (including the style I based the gear on). This picture seems to show worm-gears that might actually match the measurements they claimed.

    http://www.aliexpress.com/item/20pc-6V-4000rpm-12v-8000rpm-Standard-130-motor-Green-Micro-DC-motor-with-encoder/1698459475.html

    90853

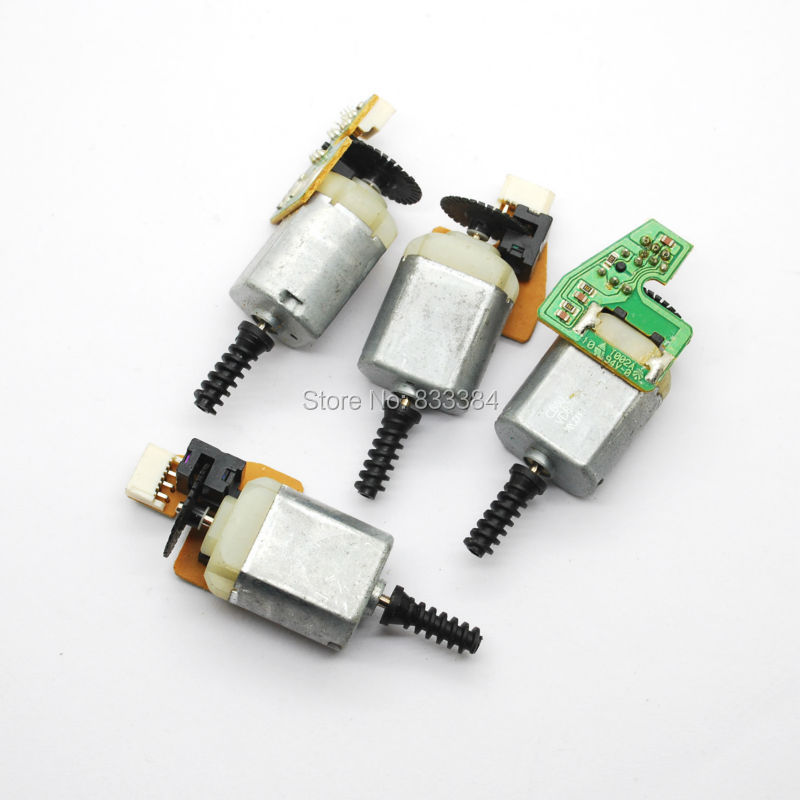
    The next image, again, is the one I based my gear on... different seller altogether, none of their products show the straight-worm-gear (seen above) which probably matches the measurements claimed by the seller showing this picture:

    http://www.aliexpress.com/item/Great-10pcs-Speed-motor-MABUCHI-Standard-130-motor-encoder-photoelectric-encoder-DC-motor-high-quality/1903700249.html

    92581

    Frankly, I think this worm-gear would be easier to mate with a gear (as opposed to, maybe, a linear glider, which the other seems well-suited for), as this has sloped-sides which would work with the rotation of a gear. But, I don't even know if these are the ones they're selling!

  • Gear Cutting

    Eric Hertz08/25/2015 at 04:49 9 comments

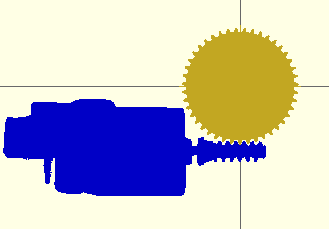
    Found an image of the motors/worm-gear that seemed to be pretty much straight-on... so cropped and cleaned it a bit in gimp, then traced the bitmap into a path in inkscape, then output SCAD code via Make a 3D print from a 2D drawing...

    Did some math... and I think I could actually cut a mating gear with a bit more math and measurements:

    (Of course, this is the cutout-piece that will be subtracted from a cylinder)


  • Crazy Motor Driver and Crazy Motors Revisited

    Eric Hertz08/23/2015 at 12:10 0 comments

    Interesting experiments this evening...

    The other day I found these: http://www.aliexpress.com/item/Great-10pcs-Speed-motor-MABUCHI-Standard-130-motor-encoder-photoelectric-encoder-DC-motor-high-quality/1903700249.html


    Actually, I was looking to see if prices had come down on the higher-quality motors with attached-encoders... I had no idea I'd basically find the wonky setup I've cobbled-together for extreme-worst-case-testing as a prebuilt item! OK, the higher-quality motors are running about $30 apiece, so that's not really an option. But these are only $1.50! They look to be darn-near identical to my setup, right down to the encoder-disk and quadrature detector which look pretty much identical to those found in old ball-mice. Kinda funny.

    Actually, the motor I was using (described in detail in the last log) is a little bit better-suited for position-control than these, I think. My experience with these style of motors is that they're well-suited for high-speeds, but have very distinct snapping-action when rotated by hand.

    So, I had to try it...

    (Clarification: I did this experiment with a similar-looking motor I had on-hand, and the mouse's encoder/disk, *not* with the motors shown in the picture, which I do not yet own).

    The current setup is such that the motor attempts to resist any external force; tries to maintain its position. Sure-nough I can actually drive 'em with the feedback loop! There exists that distinct snapping action, which means the motor seems to snap between -10 and +10 encoder "ticks" away from where it's intended to be, when external force is applied. (The setup is kinda hard to describe... I'm rotating the motor while the encoder stays stationary, and the disk tries to stay stationary with the encoder. The motor's shaft/disk "snaps" as the motor is rotated, about 1/10th of a turn). But, really, that's minor, especially considering these have worm-drive. (I wonder if I could laser-cut a matching gear for that... maybe right on the drum-pulley?).

    And on to the crazy motor driver (L9947, described in a previous log, as well)

    So, the motor I've got seems to be working well at about 1/4 to 1/3rd power... which kinda makes sense... alot of these motors are designed to be used *in toys* which are usually powered by a couple AA's... (3V... and I'm using a 12V supply)

    And then something hit me... If these things work fine at 1/3 power... then the "crazy motor driver" might actually be usable to its full-extent... It's designed to handle *3* motors, just that only one can be powered at a time. So, if I do some time-division-multiplexing *of* the (essentially) PWM signal... Then maybe I could actually run all three axes "simultaneously" from this one (crazy) motor-driver chip that appears to have not been designed for PWM nor simultaneous motion in the first place!

    There're a few caveats to be considered... the motor-driver is heating up quite a bit with this style motor, despite running at only 30% power... I hear they've got nice inductive-spiking abilities, so maybe it's not because they draw a lot of current, but that the motor-driver's diodes are heating up... or maybe because of slow switching-times on its mosfets (though that would've been a problem with the other motor as well, right?). Possible it's the diodes, anyhow... and kinda preferable, because the "crazy motor-driver" is rated for 3A on one motor, but only 0.5A for the other two motors.

    Regardless of the motor-driver, these cheap/small motors with attached-encoders (and worm-gear) could be quite handy for this "tiny" system, even if they tend to snap to 36.5-degree increments.

    Not sure what to do about "homing", though... which was part of the reason I was considering those multi-turn servos, but those, too, seem to run about $30 apiece, which is way out of my budget. Don't *really* want to install limit-switches/opto-sensors on each axis of this tiny thing, but it may have to happen.

  • a bit ridiculous...

    Eric Hertz08/19/2015 at 12:24 0 comments

    Believe it or not:

    From the pictures/vids--wonky breadboarding, using a mouse for an encoder, the old Lego system, surely more--one might think this dude's motion-control software to be as flakey as his setups... There may be truth in this.

    Indeed, the motion-control software I've written over the years is entirely self-taught. I tried taking a controls class a while back and dropped out in the first week; all that math, all at once, and so much theory... too much for me. But, I have been working on this software for quite some time, and it has worked quite well in systems I didn't build.

    So, yeah, this setup appears a bit ridiculous. That's part of what's making it "fun"-ish, this time 'round, rather than just the bore of getting a previously-working system working on a new chip.

    In the process I'm working first-hand with much lower-quality parts than before... (quality, at least, in regards to the purpose they're being applied to).

    We'll start with the motor (wherein I begin to ramble):

    The motor connected to the mouse-encoder is, I think, from an old [cassette] tape-deck. It was never intended to do anything other than run at two speeds in each direction, and was intended to be gear-reduced a bit. This presents an interesting learning-experience... Applying a small voltage (or low-power modulation) to get a slow speed results in something I haven't experienced first-hand... At slow speeds this motor speeds up and slows down at different points in the rotation. It makes sense, from a physics-sense, something to do with the pull-strength of the magnets' based on their alignment. Nevermind the brushes... (@davedarko once fell-victim to much hypothesizing on these matters). But, anyways, now I'm seeing it first-hand, and it's quite apparent.

    At one (small) power-level, I can get the motor to rotate at roughly one [mouse] encoder-count per second... that's *really slow* and in fact almost impossible to see. It'll run like that for several seconds, several encoder-counts, then suddenly go really quick for a fraction of a second, and return to slow... It's actually quite interesting to look at on the 'scope in "roll" mode. (I should insert a picture, or maybe a vid). It definitely seems to have a specific periodicity which I assume is related to the poles of the motor.

    Again, I haven't really experienced this effect before, as I'd been using DC-motors which were designed for positional control via feedback-loops... They may have had similar effects, but much smaller. And, of course, since they've been running *with* feedback-loops, in my code, these effects would be accounted-for by adjusting the power accordingly. I have no idea, however, whether this tape-deck motor could be driven with such (positional) precision even with a/my feedback-loop. Also, again, these are designed to run at much higher RPM than the positional-controllable-motors, so rotating at only a few degrees per second, or attempting to rotate just a few encoder "ticks," is expecting a lot from them. This'll be an interesting experiment. Albeit, a little bit ridiculous, as surely they'll need gear-reduction before they can drive anything, with any strength...(?) (If nothing else, what kind of shaft-attachment is there for such tiny shafts? Most any set-screw would be bigger than the shaft itself! And most of the pulleys/gears I've seen attached to these motors are merely press-fit nylon, which surely would slip under much load).

    As far as the encoders: I haven't counted, but it looks like these mouse-encoders have somewhere on the order of 50-100 slots... That's not much when compared to most of the motors-with-encoders I've worked with. It's not so much that you need that much *positioning* resolution, but more that the extra ticks allow for easier math(?).

    E.G. Say I want the motor to be positioned at one of four positions, 90 degrees apart, and there's 4 encoder slots... With four slots (as-implemented), the computer only knows if it's ~90, ~180, or ~-90 degrees away...

    Read more »

  • Vids! Ball-Mice! Crazy Motor Drivers!

    Eric Hertz08/18/2015 at 12:36 0 comments

    Here's the video submitted for the 2015 quarterfinals, I decided to use it for #commonCode (not exclusively for AVRs)... (see the previous post, regarding how these projects all kinda feed into each other).

    I decided to use a strange motor-driver for this project, the ST L9947. This motor driver uses a bus-interface, as in a microcontroller's multiplexed data-bus, as in it uses Data, Read/Write, and Strobe pins, rather than Direction and PWM (or similar) used on most "normal" H-bridges. As a result, it doesn't lend itself well to PWM. In fact, the highest rate it seems to be able to toggle the output is about 3kHz, which is pretty low, and would result in a really slow PWM frequency, if implemented the normal way. For now, iInstead of PWM, I'm using commonCode's 'hfModulation', (I think the official name is Pulse Density Modulation?) which toggles the output as quickly as possible, (3kHz, max) in order to achieve the desired power. This is the same code used for fading the 'heartbeat' LED. It seems to work, but as you can see in the above video, it is quite audible on some motors (especially when mounted to a 'resonating chamber' like a hollow tabletop!). I may try to push this chip's limits further, but before then I need some positional-feedback.

    For positional-feedback, again, I decided to go a strange route... I do have DC-Motors with encoders built-in, but wanted to try something new... So I took out the box of old ball-mice (remember those?). I thought about a few other options. I have a beautiful old continuous-turn rheostat that's designed for the purpose, that will have to get used at some point! I also have a cool multi-turn inductor-tuner from an old radio that could be quite cool to implement at some point. But, for the sake of this project, I need something I can reproduce at least two, probably three times (for each axis), or more if I actually produce more than one of this thing...

    Anyways, some initial experimenting with the mouse's encoder-disks and phototransistors looks promising. The most difficult part, I guess, will be attaching the disks to the shaft and still having enough shaft left-over to drive the drum pulleys (most-likely would need to be gear-reduced, as well... so we'll see. Thoughts on pulleying the cables directly around the shaft already attached to the encoder-disks, but I'm not sure about slippage...).

    The output of the phototransistors is analog, of course... the signal is roughly sinusoidal. The obvious choice would be to feed this signal into comparators, and the PIC32 has several. There are also thoughts about using ADCs and trying to get more resolution that way. Interestingly, I've looked up the datasheet for the PIC16C57 used in the mouse, and it seems its inputs are TTL-level, not schmitt-triggered... So, I guess, I could maybe just treat the signals as digital. That analog-effect is accentuated by running the circuitry at 3.3V (PIC32) rather than the 5V of the original mouse, so maybe changing some resistor-values would help square things up.

    The other thought was to use the mouse-circuitry as the decoder. Connect the PIC32 to it via the PS/2 protocol. This seems reasonable, except apparently PS/2 is limited to about 17kbps, at 3 bytes per packet, that'd be pretty slow. And, it seems, the fastest reporting-rate for mice is 200S/s, which isn't much, considering as I recall the AVR version updated the motion-control loop around 30,000 times per second.

    For this project (as opposed to the porting of my existing motion-control code to PIC32, which is the current goal) there's also the possibility of multi-turn R/C servos (typically used for winches on R/C sailboats, apparently). They would lend themselves well to this system, because they wouldn't require a "homing" routine nor limit-switches, which would be nice.

    OTOH, I don't know much about their precision.

    Anyways, here's the video:

  • This is getting confusing!

    Eric Hertz08/17/2015 at 16:48 0 comments

    A summary of the "big three", no not the big-three commonThings, the big-three projects currently highly-involved in their development:

    https://hackaday.io/project/3828/log/23266-this-is-getting-confusing-video

  • motion-control, here we come!

    Eric Hertz08/11/2015 at 14:37 0 comments

    The 'main three' are finally running on PIC32: 'heartbeat', 'polled-uat' and 'polled-uar'...

    so we have I/O, timers, and a bitbanged UART. Now, finally, on to motion-control: #2.5-3D thing

    See more about the PIC32 porting-process at: https://hackaday.io/project/6450/log/22496-finally and #operation: Learn The MIPS (PIC32MX1xx/2xx)

View all 17 project logs

Enjoy this project?

Share

Discussions

PointyOintment wrote 03/18/2016 at 05:31 point

> an old pen-plotter given to me years ago. Years after we parted-ways, I figured-out how they managed to drive two axes with stationarily-mounted motors, pulleys, and cables.

I've disassembled a few and always found the cable system interesting. I don't know if it works the same way, but it reminds me of CoreXY.

  Are you sure? yes | no

Eric Hertz wrote 03/18/2016 at 07:08 point

Hey, PO, long time no chat!

The other-way for me... <soapbox>The first plotter I took apart was long before CoreXY had a website, or likely even the glimmer in the eye of an AOL-forum-post, so CoreXY reminds me of that first scrapped-plotter and who gave it to me, but (I'd prefer that it remains) definitely NOT the other way 'round. (Photocopies don't remind me of Xerox, either. Though, I 'spose if I was close to someone who worked at/for/with Xerox/CoreXY, it wouldn't be so bad. Ironically, wads of paper filled with snot definitely *does* remind me of Kleenex... And, I'm actually kinda OK with that... Though better'd be toilet-paper.)</soapbox> But I digress... ;)

I'm certain the ones I took apart were not CoreXY. There was one single X motor and a definitely separate/independent Y motor. That was my goal, here, (and with the lego-based system)... to intentionally see if it was possible to extend that logic, keeping the three(+) axes' motors stationarily-mounted and their motions independent, like an etch-a-sketch with additional axes.

One cool thing I learned in the process is that some of the railing/gliders can actually be removed completely, and the system will still work, as long as the mounting of the pulleys is still able to keep the cabling tight. So, for example, if you wanted a Gigantic 2-axis system, say hanging in a workshop of some sort, and don't particularly care about precision positioning... (since gravity has some effect on the cabling) ...you could mount pulleys at the four corners of the room, and all you'd need is a mobile frame to hold the pulleys for the second axis. (again, a *frame,* not rails). 

And, then, some thoughts reinspired (thanks) as to whether that could be extended such that even the mobile-frame would be unnecessary... E.G. adding some more pulleys to replace compressional-forces with tensional...

Mad-props to the CoreXY folk for having figured out probably the ultimate-minimal cabling-setup, but that wasn't my goal, here. Although, at some point, I had spent a little time (unfruitfully) trying to figure out how to extend the logic of those two-axis *hanging*/vertical plotters to a system that'd work horizontally... I guess that's exactly what CoreXY figured out! And, madder-props, for how many doors that opened-up for the maker-scene!

  Are you sure? yes | no

Eric Hertz wrote 03/20/2016 at 06:40 point

Maybe a better response would be "Yeah, they're quite interesting to look at and learn from :)" :)

  Are you sure? yes | no

Similar Projects

Does this project spark your interest?

Become a member to follow this project and never miss any updates