Mike Szczys
-
Labels and Out the Door
01/11/2014 at 00:12 • 0 comments![]()
Here's the test. The LEDs are waaaaay too bright. I sanded the clear domes on them down which helped a bit. This LCD display doesn't ahve the best visibility, but it looks better in person than shown above.
![]()
This is the final picture I took before removing the base and bubble-wrapping it for shipping to The Gathering in LA. I heard today that the package arrived which is great. I should have no problem fixing anything that might have broken. If it had been lost in shipping that would be a different story.
-
Soldering Complete
01/10/2014 at 22:44 • 0 comments![]()
So here's the deal. One of my prejudices against Arduino is that it's an expensive board to leave with a project. But this is kind of a one-time thing so I was happy to find the Seeed Studio protoype shield for like $7.95 at the local Radio Shack. What I didn't bank on is the shield is larger than the Arduino footprint. No worried, I grabbed my tin snips and hacked off the left side of the board (beveled teh corners to get around the LCD mounting hardware).
From there it was just a matter of point-to-point soldering. I did the LCD first since there are mutliple voltage and ground connections for that one. From there it was pretty simple to finish up the rest of the wiring. This did end up taking around two hours. But mostly because I was trying to be nice and neat with my cable routing.
I used the header sockets that came with the prototyping shield as a connector for the LCD and NFC reader. I just bend over the PCB mount tails and soldered the wires directly to them.
![]()
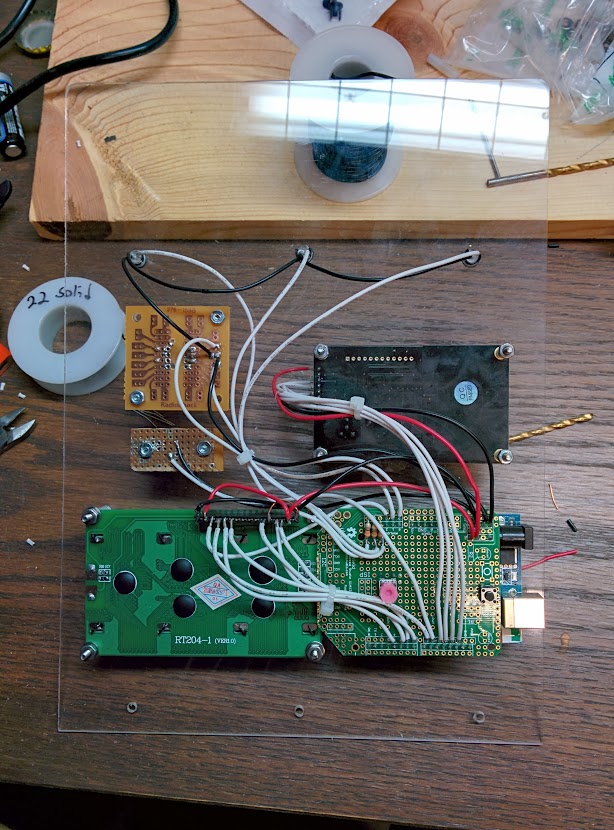
Not bad, of course I forgot to clean the fingerprints off of the LCD screen and underside of the acrylic before I got this far. I can't get a cotton swab in between there so I'll just have to deal with that imperfection.
![]()
Here it is attached to the base. I did fire it up after soldering each component just to make sure I didn't hook anything up wrong. I just need to tweak the firmware. The dial adjusts the LEDs reverse of what it should. I'm not certain if this was a mistake in wiring the rotary encoder, or the LEDs, but it's an easy fix.
-
Let's build this thing
01/10/2014 at 22:28 • 0 commentsMechanical assembly always takes longer than I think it will. I figured one evening would be all it takes to build this thing, but by the time I figured out the size of the acrylic, cut a wood base for it, tested the layout of the components, then drilled and mounted everything I had run out of time.
![]()
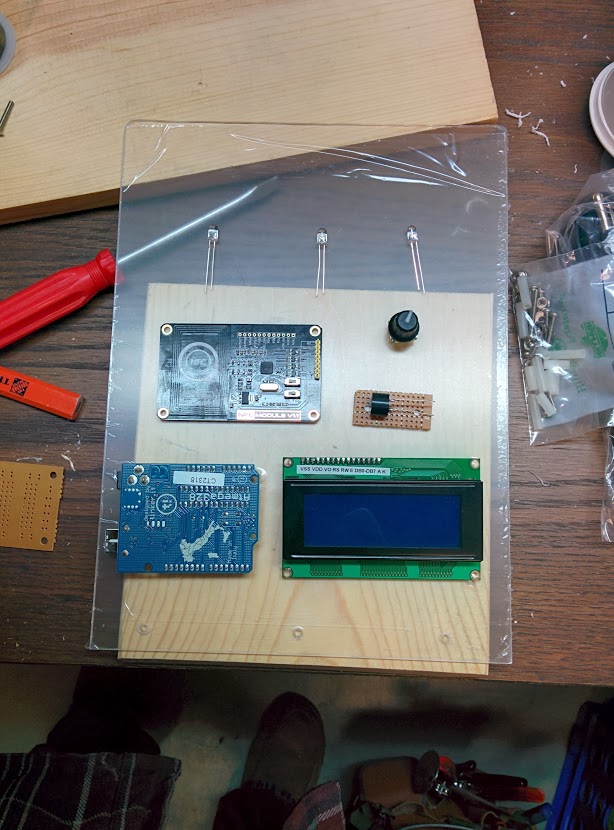
I reclaimed a chunk of protoboard for the Piezo. The IC breakout board on the left will be used for the rotary encoder. In this image you can see the three holes at the bottom of the acrylic for screwing it to he wooden base (there's a 15 degree bevel on that piece of wood).
![]()
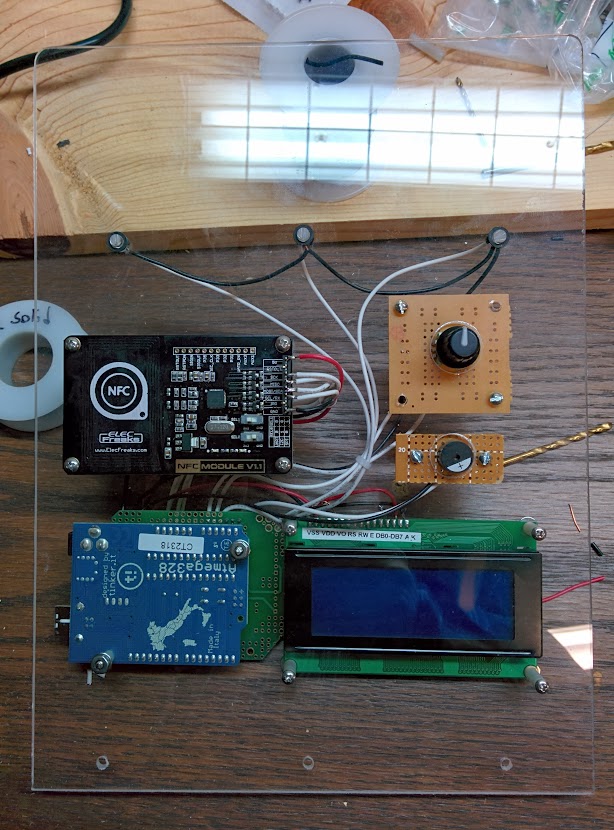
Much later in the evening I have everything mounted using nylon stand-offs (easy to cut with a utility knife and cheap at the hardware store) and 40-4 machine screws, washers, lock washers, and nuts. My hardware store only sells this stuff in stainless so it's a bit more expensive but still worth it to source them just down the street.
You have to look closely to see the 3 LEDs. Radio Shack sells some plastic grommets for a 1/4" hole that the 5mm LEDs just snap into. Off to bed, soldering will happen tomorrow (full disclosure, I'm writing this up after the fact as build mode was all consuming of my time).
-
Prototype and Firmware Complete
01/03/2014 at 23:33 • 0 commentsI'm happy to report that I have finished the hardware prototype and have the first full version of the firmware done.
![]()
That turns out to be a lot of wires. From left to right is the PN532 NFC reader, Arduino, and breadboard. On the breadboard form bottom to top is the 20x4 character LCD (not the pretty pink trimpot), rotary encoder, piezo buzzer, and three LEDs.
The firmware is close to done. I need to do some more output for the utility functions (scanning tags before the voting begins, etc.). But for now it recognizes tags from a header file of pre-approved UIDs. It will let you vote just one, notating the activity in the EEPROM so that you can't vote twice. "Chad" will also reject a tag that is not in the header file, and a tag that is not an NTAG203 format.
This is the first in-depth project I've done with Arduino (I'm more of a bare-metal guy). I must say, they are useful. Having the no-nonsense terminal interface is really nice. I did find the EEPROM libraries to be a joke. They only have functions to read and write bytes. That's probably to get around the need to cast pointer types, but I just ended up using hte AVR-GCC library and got what I needed (reading and writing uint16_t for the ballout counts).
I probably wouldn't have included sound if I had been programming bare-metal. The Tone library is super simple. But then again, I'm sure there are C piezo libraries out there I've just never looked for one.
-
Full Proof of Concept
12/31/2013 at 17:09 • 0 commentsDays until deadline: 13
I have had a few productive nights of coding and now have a working proof of concept. After arriving home from holiday at in-laws house I was happy to see the NTAG203 samples I had ordered had arrived while I was gone. This is the tag format that will be used in the final project.
Alas, I could find no libraries capable of writing the tags using the PN532 based hardware. And I don't have the time write one myself (maybe I do but fear of missing the deadline prevents me from starting that journey). But there is another solution which came as a shower thought (if you can't figure out your project go take a shower and it'll probably come to you!).
I can't read or write the NDEF messages using the libraries I have availalbe, but I can read the unique hardware identification (UID) of each tag. With this in hand I wrote a program that has a few different user options:
- Read UID of any tag that is scanned to the reader and dump the 7-byte value to the serial terminal in a C header format.
- Flash the complete C header file back to the chip as a PROGMEM array
- When voting, check scanned UID against this array. If found, check against a bit-packed array using the index of the UID. The bit-patcked array is stored in 64 bytes of EEPROM (512 possible voting tokens) as a 0 if this tag has not yet been used as a voting token. It is then stored as a 1 once a vote has been cast. This technique prevents multiple voting
I have implemented all of this as described. Not it's just a matter of a simple physical build: adding an LCD to display instructions and the vote totals, adding a knob to select the different voting options, adding LEDs to indicate which option is currently selected, adding a piezo for audible feedback, and actually building the physical device. This is an afternoon of work at most. Yay!
- Read UID of any tag that is scanned to the reader and dump the 7-byte value to the serial terminal in a C header format.
-
MiFare Write/Read Success
12/29/2013 at 02:47 • 0 commentsDays until deadline: 16
I still don't have the correct tag in hand yet (ntag203). But today I was able to write an NDEF formatted message to the MiFare Classic tag that came witdh the NFC reader. This was all thanks to the Seeed Studio PN532 library which includes the NDEF library which https://github.com/don/NDEF.
I also took the time to write a Python script that is able to generate the unique strings. It also formats these as a C header file to be stored in PROGMEM of an Arduino. These is also a test sketch to make sure this is working with the Arduino. This is available at the GitHub repo.
-
PN532 Reader
12/28/2013 at 03:03 • 0 commentsProject deadline is 17 days away.
The ElecFreaks PN532 based NFC reader arrived today. Had I realized that all their software samples are derived from the Adafruit board I would have ordered that one to support the open source effort (sorry Phil and Limor).
![]()
Right off the bat I gave this a try with and Arduino and it worked like a champ. The reader shipped with a Mifare Classic 1K tag which works with this reader. The tags I plan to use are ntag203, because the mifare classic cards don't work with Nexus phones (I understand the ntag203 is the most widely compatible).
The plan is/was to use an STM32 ARM chip --- in preparation for this I connected my Bus Pirate with the reader in I2C mode. After more than an hour of nothing I hooked it up in SPI mode and still more of nothing. I then pulled out an FTDI adapter and tried to drive the reader with libnfc. Again, nothing. This is very frustrating. At this point I probably need to focus on making the Arduino proof-of-concept work for my needs just to ensure I can make my deadline.
TODO:
- Make an NDEF test write (use: https://github.com/don/Ndef)
- Figure out how to use a script (Python?) to push NDEF strings to the Arduino for writing
-
Dev Tools
12/26/2013 at 20:32 • 0 commentsI'm exploring the STM32 F3 for this project:
Linux Setup
- Toolchain: GNU Tools for ARM
- OpenOCD Git repo: git://git.code.sf.net/p/openocd/code
Texane Repo:
- sudo cp 49-stlinkv2.rules /etc/udev/rules.d/.
- sudo restart udev