Michael Ratcliffe
-
Home Page Has Moved
10/19/2015 at 17:51 • 0 commentsSee my other Blog over at Element14:
All Updates will be published there.
-
The Test Greenhouse
09/21/2015 at 07:31 • 0 commentsHere is a Quick Youtube Walkaround the Greenhouse used for proof's of concepts:
-
More Background
09/21/2015 at 07:28 • 0 commentsabout me: Graduated with a Degree in Mechanical Engineering and a Masters in Electrical Engineering currently finishing my gap year and taking some time to design an automated greenhouse and small allotment type garden to provide a yearlong hassle free supply of food and a test bed for novel nutrient sourcing Aquaponics grow system.
Until the age of 21 I would consider myself a computer-phoebe, using my laptop mainly as a coffee matt, Then I saw a tutor flying a Quadcopter and got hooked! with a lot of help from the tutor [Bob Mackin of Lancaster university] I overcame the phobia and five years later I have automated and optimized many of the time consuming jobs on the farm and house, moving my area of expertise from mechanical engineering to control system engineering [Its much more Fun].
Shameless Plug
I am looking for a PhD/Job in automation and control systems, preferably in regard to farming but open to offers. Willing to commute/relocate worldwide for the right position.
Take a look at the website below for CV, Reference and examples of work:
Want to Fund me ? I am in need of the many electronics components [drop me an message].
Take a look at some of my other projects:
>Automated Green House Blog's Home Page [Updated: 21/9/2015 < British Format]
-
Licences
09/21/2015 at 07:25 • 0 commentsAll Codes/Scrips are hosted at: www.MichaelRatcliffe.com/projects
[Will be updated before the 22/9/2015]
All of the content of this blog is writen by myself including the scrips/codes and design tutorials unless specificaly stated otherwise.
Everything is released as Copy Left:
![]()
Use it as you wish, please reference me if you use any large parts of my work [Michael Ratcliffe] Modify it, make it better etc. but as always you do so at your own risk.
Scripts/codes under GNU:
This program is free software: you can redistribute it and/or modify
it under the terms of the GNU General Public License as published by
the Free Software Foundation, either version 3 of the License, or
(at your option) any later version.
This program is distributed in the hope that it will be useful,
but WITHOUT ANY WARRANTY; without even the implied warranty of
MERCHANTABILITY or FITNESS FOR A PARTICULAR PURPOSE. See the
GNU General Public License for more details.
You should have received a copy of the GNU General Public License
along with this program. If not, see .
-
Familiarising yourself with the Feeders
09/21/2015 at 07:09 • 0 commentsHere is a How To use the Products:
-
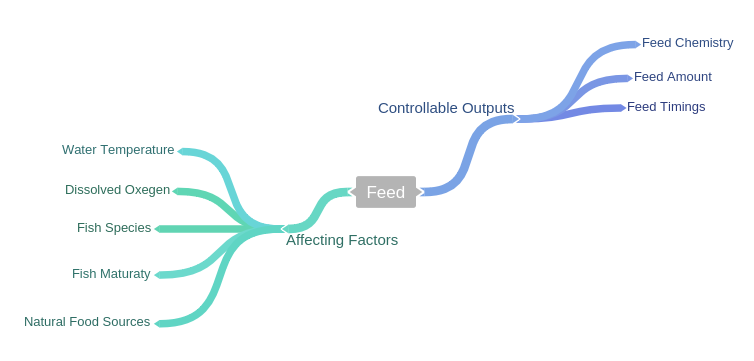
Fish Feeding Basics
09/21/2015 at 07:00 • 0 commentsFeeding Fish Is a very time consuming task, taking skilled operators to visit sites multiple times a day and is prone to human error or implementation of inefficient feeding routines to save time. A computer could perform this task day in day out repeatable, efficiently and without human interaction, saving time, food and increasing yields from a system drastically.
If the potential benefits are so good, then why has no one already done this? I can only give you my opinion on this. The task of feeding fish is a complicated one, many variables and environmental factors effect the feeding of fish [see below] and fish farming is a pretty boring subject.
![]()
As you can see from the chart above the variables are numerous and sometimes hard to measure. Luckily a lot of these can be defined/measured and represented mathematical.
Feed Spacing/Timings: The optimum time between feeding of fish depends on the size of the stomach of the fish, when they are young they require feeding regularly, decreasing as they grow larger.
Feed Amount: The amount in percent body weight to feed the fish daily is largley influenced by the water temperature and the age of the fish. These are the inputs needed for the open loop controller. The vision based feedback does not need to know this, it will use the rate of food consumption to mimic a skilled human feeder.
Feed Chemistry: the percent of protein you fed fish is related to the age of the fish and the water temperatures.
A Note On DO: Dissolved Oxygen measurements are expensive, measuring probes need constant calibration and as such we will be assuming the pond has adequate oxygenation for growing fish. Spreading the feed serving over the day will spread the demand for DO over the day also. So in short, feeding multiple times a day decrease the peak demands for dissolved oxygen of the system. [this is a good thing]
Useful Links for the Automated Feeders:
>DIY Feeder Mechanical Proportion
Open-Loop
Work Done:
>Code for Feed Amount vs Temperature
>Wiring Diagram
>How-to measure the feed-rate of your feeder
>Sourced housing for final product prototype
Work To Do:
>Implement gps to allow feed timings implementation
>Build into the housing
>Increase type of fish from just Tilapia
Camera Feed-Back
Work Done:
>Proved that food can be identified by the camera and OpenCv on Raspberry Pi
>Proved that Feed Delivery Rate can be changed by PWM
Work to Do:
>Control loop to keep constant amount of food in pond, making note of duty cycle
>Test at what time during decrease in PWM the fish are full for optimum growth
>Implement a simpler arduino version for the IBC Aquaponic growers out there
-
Human Urine and Hydroponics [Working Proof]
09/21/2015 at 06:22 • 0 commentsThere is a lot of people hungry in the world today this could be reduced by the application of technology. Lots of the main areas of food shortages have lots of sunlight and a surprising abundance of well water [even the sahara desert] the limiting factor is poor nutrient sources and soil. Hmm I have been growing with Aquaponics for years now, problem solved?
Maybe not, in Aquaponics the food to feed the fish is relatively expensive for a person surviving on two dollars a day. What else can we use as a nutrient source instead of fish food, human pee will be a good source [its free, easily available]. It is possible, maybe considered disgusting in the west, but if you are hungry your definition of disgusting changes pretty quickly.
The problem with using urine is that a person will never output more nutrients than he eats, so we are really only reducing the nutrient cycle waste and not having a real input to it. It’s a great start but we need to add to this solution. What is a plentiful and free nutrient source? [Later blogs will cover this]
Here is a quick video showing a variate of plants growing from a fish less aquaponics unit instead dosed with pasteurised human urine, it was made as a basic proof of concept, no real scientific data here yet. The good data will be coming from the growing competition.
I was unable to have a full spectrum carried out on the proof of concept human urine test and lacked a decent standard I could compare too, but here are some basic measurements compared to a natural healthy pond:
![Readout]()
There is little concrete data I can pull from these readings apart from:
>I really need to keep a closer eye on the PH of my system [looks like yet another broken probe, these things are making me poor]
>The carbon water Filter is working well and stopping chlorine from entering the system
For the competition grow [starting in two weeks] there will be two identical systems for comparison and access to a full spectrum analysis of the water samples. One pure human urine and the other a commercial nutrient, from this comparison we should be able to make more confident proof's.
There will be a few blogs to carry on this topic, mainly:
>What is in Human urine and why it is a good idea to use it
>How and Why to pasteurise/sterilise the urine before use
>Automated self learning Doser [also suited to general hydroponics]
>The layout for the final grow test, what we will be measuring and why
-
Self Optimising Automated Arduino Nutrient Doser
09/21/2015 at 06:08 • 14 commentsThis Blog is about making a nutrient dosing system for hydroponics that is plug and play, I didnt quite get it to the full stage of plug and play with this version. But it is almost there. Because the change of nutrient strength of our systems can be modelled as a linear system with respect to nutrient delivery it should be possible to implement a very simple self tuning control system based on the system model. Why a Self Learning system:
>System only needs to be roughly defined
>Adapt for pump wear
>Adapt for a change in nutrient source strength
>Plug and Play for a wide variate of Systems
>No problem dealing with the Lag between delivery and stable reading
I made this control system with Urine as a nutrient source and because the concentration of urine can vary we need a system that can take this into account. A traditional PID controller will struggle here [Or at least I would struggle to implement a good one] because of the large lag between input and output measurement due to the mixing of nutrients in the system [Tank mixing+Grow beds fill+drain time]. It will also work for traditional liquid fertalizer.
Main Variables in the script
>Tank size in L
>Nutient Strength [Stick with 100 or follow hints in the code]
>Pump Size [L.Second-1]
Variables input by LCD Screen:
>EC Set point
>Probe Calibration
The only real choices hardware wise:
Pump sizing
Although this is a self learning system we still need to choose a nutrient pump of a suitable size so the pumping interval is quite large to reduce the effect of pump priming and post pumping discharge [Fancy words for the pump acts weirdly when we first turn it on and just after we turn it off].
I have not included the maths here to fine tune your pump size because it doesnt matter that much, just pick a pump with a flow rate of less than 10% of your main tank volume per minute.
EC Probe
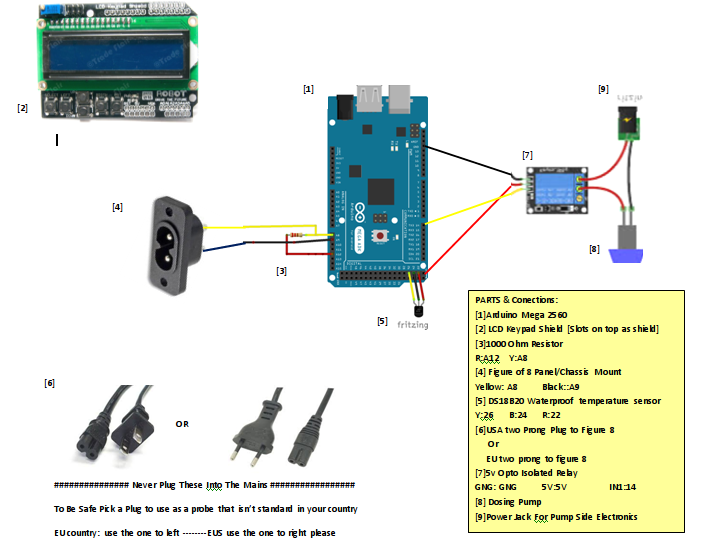
Using the Cheap DIY Probe: Pick a plug as a probe that isnt used in your country [currently supports EU and USA two prong]
[This will also work with a comercial ec probe, just change the getec() to your Ec meter]
Pinout:
![]()
Code:
/* ElCheapo Arduino EC-PPM measurments and Nutrient Doser Script This scrip uses a common USA two prong plug and a 1Kohm Resistor to measure the EC/PPM of a Aquaponics/Hydroponics Sytem. Then It Increases the Nutrient content until the set point is reached It Also Estimates the EC of the nutrient Source [For when you are using Urine/ unknown Nutrient EC] 28/8/2015 Michael Ratcliffe Mike@MichaelRatcliffe.com This program is free software: you can redistribute it and/or modify it under the terms of the GNU General Public License as published by the Free Software Foundation, either version 3 of the License, or (at your option) any later version. This program is distributed in the hope that it will be useful, but WITHOUT ANY WARRANTY; without even the implied warranty of MERCHANTABILITY or FITNESS FOR A PARTICULAR PURPOSE. See the GNU General Public License for more details. You should have received a copy of the GNU General Public License along with this program. If not, see . Parts: -Arduino - Uno/Mega -Standard American two prong plug -1 kohm resistor -DS18B20 Waterproof Temperature Sensor -FluidPump [Smaller is better]; Limitations: -Cell Constant [K] and ECSetpoint must be less than 5.0 or it will Mess with the way we save values in EEPROM -A reset will change your set point and kell constant slightly, but not to a great extent -EEPROM seems to survive a reflash, so changing values in the code will not change them in the flashed software. you will need to do it via the LCD See www.MichaelRatcliffe.com/Projects for a Pinout and user guide or consult the Zip you got this code from */ //************************** Libraries Needed To Compile The Script [See Read me In Download] ***************// // Both below Library are custom ones [ SEE READ ME In Downloaded Zip If You Dont Know how To install] Use them or add a pull up resistor to the temp probe #include #include #include //Standard LCD Lbrary #include //Standard EEPROM Library //************************* User Defined Variables ******************************************************// // Rememebr to ad .0 after any float definition or it will return to an initiger, ie 1.0 not 1 //********************** System Information *************************************// float TankSize =10; //SystemVolume in Liters float PumpRate=0.; //Flow rate of dosing pump in L per min long DosingInterval =60; //How often you want to dose the tank in minutes, hour intervals will be fine for most systems long MixingTime =30; //The time for mixing of nutrients in minutes [I have a lot of water flow so 60 seonds is fine for me, if in doubt increase it to half a hour] int Pump =14; //Pin Controlling relay for nutrient Pump int OFF =0; int ON=1; //****************************** System EC Value *******************************// //Changes for what plants you are growing, sun intensity and temperature //###If you are using urine in a system and have not yet got a established Bacteria bed set this to ECSetpoint=0.7 for a week to let the bacteria become established## float ECSetpoint =1.0; // How Strong you want the water system to be nutrient wise //******************** Nut Tank EC *********************************************// //the code will optimise this number after every dosing, so we are selecting the highest end and allowing the arduino to work the rest out its self //You are using a nutrient that states the NPK and not a overpriced one that used the words "Boost" "flower" "Super" but hides the important NPK ratios? //If not Save yourself a fortune and switch to a cheap one that is honest about its NPK //We need to put in a estimated start point for the controller to start with //For an estimate take the EC Estimate= (N*20) + (P*8.8) +(K*16) float ECFluidEstimate =100.0; //if you dont know the value stick with 1000, it will sort itself out //***********************************EC Meter **********************************// //################################################################################## //----------- Do not Replace R1 with a resistor lower than 300 ohms ------------ //################################################################################## int R1= 1000; //The resitor we placed in voltage divider int Ra=25; //Resistance of Arduino Digital Pins //float Rp=0; //Resistance of figure 8 connector int ECPin= A8; int ECGround=A9; int ECPower =A12; //************ Temp Probe Related *********************************************// #define ONE_WIRE_BUS 26 // Data wire For Temp Probe is plugged into pin 10 on the Arduino const int TempProbePossitive =22; //Temp Probe power connected to pin 9 const int TempProbeNegative=24; //Temp Probe Negative connected to pin 8 float MinT=100; float MaxT=0; float Temperature=0.0; //************************* User Defined Variables ********************************************************// float CalibrationEC=1.380; //EC value of Calibration solution is s/cm //*********** Converting to ppm [Learn to use EC it is much better**************// // Hana [USA] PPMconverion: 0.5 // Eutech [EU] PPMconversion: 0.64 //Tranchen [Australia] PPMconversion: 0.7 // Why didnt anyone standardise this? float PPMconversion=0.5; //********************** Cell Constant For Ec Measurements *********************// //Mine was around 2.9 , with plugs being a standard size they should all be the same //I Recommend Calibrating your probe but if that is not an option at this time the following cell constants [K] will give a good estimated readout: //EU plug: K= 1.76 //US Plug K= 2.88 float K=2.88; //*************Compensating for temperature ************************************// //The value below will change depending on what chemical solution we are measuring //0.019 is generaly considered the standard for plant nutrients [google "Temperature compensation EC" for more info float TemperatureCoef = 0.02; //this changes depending on what chemical we are measuring //***************************** END Of Recomended User Inputs *****************************************************************// //********************************************************// // select the pins used on the LCD panel LiquidCrystal lcd(8, 9, 4, 5, 6, 7); // define some values used by the panel and buttons int lcd_key = 0; int adc_key_in = 0; int button =0; #define btnRIGHT 1 #define btnUP 2 #define btnDOWN 3 #define btnLEFT 4 #define btnSELECT 5 #define btnNONE 6 int Screen =1; //Max number of screens on lcd const int Last_Screen_no =6; //used to debounce input button int buttonLast=0; OneWire oneWire(ONE_WIRE_BUS);// Setup a oneWire instance to communicate with any OneWire devices DallasTemperature sensors(&oneWire);// Pass our oneWire reference to Dallas Temperature. float EC=0; float EC25 =0; int ppm =0; float raw= 0; float Vin= 5; float Vdrop= 0; float Rc= 0; float PumpTime=0; //Variable for pumping duration long MixingInterval=0; //variable for when to check new EC float PostDocingEC=0; float PreDosingEC =0; long StartDosingMillis =0; int NutesAdded=0; long time=0; //********************** Some Variables For Loging Min/Max Values ********************************// float MinEC=100; float MaxEC=0; //************************** Just Some basic Definitions used for the Up Time LOgger ************// long Day=0; int Hour =0; int Minute=0; int Second=0; int HighMillis=0; int Rollover=0; //**************************Some Stuff For Calibration ******************************************// float TemperatureFinish=0; float TemperatureStart=0; int i=0; float buffer=0; float Kt=0; //***********************Some Stuff for Self Learning and Errors********************************// float LastGoodEstimate= 0; float PumECRateStart=0; float PumECRate=0; int error=6; // 6 means no error long Doses=0; long LastRun=0; int ECHold=0; //*********************** EPROM Stuff [So SetPoint and Cal Survive a reboot] ******************// int value; int addresSetpoint=10; int addresCalibration=0; //*********************************Setup - runs Once and sets pins etc ******************************************************// void setup() { Serial.begin(9600); Splash_Screen(); Read_Eprom(); pinMode(TempProbeNegative , OUTPUT ); //seting ground pin as output for tmp probe digitalWrite(TempProbeNegative , LOW );//Seting it to ground so it can sink current pinMode(TempProbePossitive , OUTPUT );//ditto but for positive digitalWrite(TempProbePossitive , HIGH ); pinMode(ECPin,INPUT); pinMode(ECPower,OUTPUT);//Setting pin for sourcing current pinMode(ECGround,OUTPUT);//setting pin for sinking current pinMode(Pump,OUTPUT);//setting pin for sinking current digitalWrite(Pump,OFF); //makes sure we are starting from a stop digitalWrite(ECGround,LOW);//We can leave the ground connected permanantly delay(100);// gives sensor time to settle sensors.begin(); //****************Converting to milli seconds********************// DosingInterval =DosingInterval*60000; //Coveerting to milliseconds MixingTime =MixingTime*60000; // Converting to milliseconds MixingInterval=DosingInterval+MixingTime; PumpRate=PumpRate/60.0; //converting to L.Second-1 //***************Converting to MCU related units ****************// PumECRate=ECFluidEstimate*(PumpRate/TankSize); // EC.Second-1 PumECRate=PumECRate*2.0;//Just incase people overestimated some values LastGoodEstimate=PumECRate; PumECRateStart=PumECRate; R1=(R1+Ra); //Taking into acount Digital Pin Resitance GetEC(); //gets first reading for LCD and then resets max/min MinEC=100.0; MaxEC=0.0; MinT=100.0; MaxT=0.0; }; //******************************************* End of Setup **********************************************************************// //************************************* Main Loop - Runs Forever ***************************************************************// //Moved Heavy Work To subroutines so you can call them from main loop without cluttering the main loop //Dont Measure the EC more than once every five second "GetEC()" or you will get bad readings and wear your probe out void loop() { //*********Takes care of millis rolover**************// if(millis()<=5000){ NutesAdded=0; digitalWrite(Pump,OFF); delay(5000); }; //*********Check if it is time to dose the system, we wont dose it if the probe is broken or if we are colse to the setppoint ********// if( (button==1 || millis()%DosingInterval<=1000) && (error>=4 && EC25<=(ECSetpoint-0.1) && NutesAdded==0) ){ NutrientAddition(); NutesAdded=1; Doses++; }; //********This fine tunes for the perticular system **************// if((millis()>=(PumpTime+MixingTime+StartDosingMillis)) && NutesAdded==1){ EstimateEC(); // Goes to the script to estimate the nutrient source EC NutesAdded=0; }; //********** Runs the Function to estimate the EC of the hydroponics system **********// if (millis()%5000<=1000 && ECHold==0){ GetEC(); ECHold=1; }; if (millis()%5000>=1000){ ECHold=0; }; //**************** Turns the pump off at the end of the pumping time********************// if (millis()>=StartDosingMillis+PumpTime){ //Still need to take care of millis rollover!? digitalWrite(Pump,OFF); }; read_LCD_buttons(); read_Temp(); Log_Min_MaxTemp(); uptime(); Calibration(); ChangeECSetpoint(); Error(); PrintReadings(); // Cals Print routine [below main loop] //************* Stopinf Funky Readings From unmixed solution**********// if(NutesAdded==0) Log_Min_MaxEC(); delay(50); } //************************************** End Of Main Loop **********************************************************************// //***************************** Function to read temperature ********************************// void read_Temp(){ sensors.requestTemperatures();// Send the command to get temperatures Temperature=sensors.getTempCByIndex(0); //Stores Value in Variable } //*******************************Turns on Pump To Dose System *********************************// void NutrientAddition(){ PreDosingEC =EC25; //Makes note of the initial EC PumpTime=1000*((ECSetpoint-PreDosingEC)/PumECRate); StartDosingMillis=millis(); digitalWrite(Pump,ON); }; //******************************** System Automatd Learning ************************************// //This Function optimises the dosing volume for the main tank volume and Strength of Nutrient tank void EstimateEC(){ PostDocingEC=EC25; //Makes Note of the EC at the end of the addition //*********Rapidly change EC Estimation on startup************// if(PostDocingEC>=(PreDosingEC+0.05)){ PumECRate =(1000.0*((PostDocingEC-PreDosingEC)/PumpTime)); LastGoodEstimate=PumECRate; } else PumECRate=PumECRate/2.0; }; //************ This Loop Is called From Main Loop************************// void GetEC(){ //*********Reading Temperature Of Solution *******************// raw= analogRead(ECPin); //************Estimates Resistance of Liquid ****************// digitalWrite(ECPower,HIGH); //raw= analogRead(ECPin); raw= analogRead(ECPin);// This is not a mistake, First reading will be low beause if charged a capacitor digitalWrite(ECPower,LOW); //***************** Converts to EC **************************// Vdrop= (Vin*raw)/1024.0; Rc=(Vdrop*R1)/(Vin-Vdrop); Rc=Rc-Ra; EC = 1000/(Rc*K); //*************Compensating For Temperaure********************// EC25 = EC/ (1.0+ TemperatureCoef*(Temperature-25.0)); ppm=(EC25)*(PPMconversion*1000); ;} //***********This Loop Is called From Else Where- Prints to serial usefull info **************// void PrintReadings(){ Serial.print("EC: "); Serial.print(EC25); Serial.print(" Simens "); Serial.print(ppm); Serial.print(" ppm "); Serial.print(Temperature); Serial.print(" *C "); Serial.print("PumpRate EC/s: "); Serial.println( PumECRate); //** First Screen Shows Temp and EC **// if(Screen==1){ lcd.setCursor(0,0); lcd.print("Arduino EC-PPM "); lcd.setCursor(0,1); lcd.print("EC: "); lcd.setCursor(3,1); lcd.print(EC25); lcd.setCursor(9,1); lcd.print(Temperature); lcd.print("'C"); } //** Second Screen Shows PPM **// else if(Screen==2){ lcd.setCursor(0,0); lcd.print("Arduino EC-PPM "); lcd.setCursor(0,1); lcd.print("PPM: "); lcd.setCursor(4,1); lcd.print(ppm); lcd.setCursor(9,1); lcd.print(Temperature); lcd.print("'C"); } //**Third Screen Shows Min and Max **// else if(Screen==3){ lcd.setCursor(0,0); lcd.print("Min: "); lcd.setCursor(4,0); lcd.print(MinEC); lcd.setCursor(9,0); lcd.print(MinT); lcd.print("'C"); lcd.setCursor(0,1); lcd.print("Max: "); lcd.setCursor(4,1); lcd.print(MaxEC); lcd.setCursor(9,1); lcd.print(MaxT); lcd.print("'C"); } else if(Screen==4){ lcd.setCursor(0,0); lcd.print("Uptime Counter: "); lcd.setCursor(0,1); lcd.print(" ");//Clearing LCD lcd.setCursor(0,1); lcd.print(Day); lcd.setCursor(3,1); lcd.print("Day"); lcd.setCursor(8,1); lcd.print(Hour); lcd.setCursor(10,1); lcd.print(":"); lcd.setCursor(11,1); lcd.print(Minute); lcd.setCursor(13,1); lcd.print(":"); lcd.setCursor(14,1); lcd.print(Second); } else if(Screen==5){ lcd.setCursor(0,0); lcd.print("Factors "); lcd.setCursor(8,0); lcd.print("PPMC:"); lcd.setCursor(13,0); lcd.print(PPMconversion); lcd.setCursor(0,1); lcd.print("K: "); lcd.setCursor(2,1); lcd.print(K); lcd.setCursor(9,1); lcd.print("a:"); lcd.setCursor(11,1); lcd.print(TemperatureCoef); } else if(Screen==6){ lcd.setCursor(0,0); lcd.print("EC.Sec-1: "); lcd.setCursor(10,0); lcd.print(PumECRate,5); lcd.setCursor(0,1); lcd.print("Doses: "); lcd.setCursor(10,1); lcd.print(Doses); } else if(Screen==7){ lcd.setCursor(0,0); lcd.print("EC Setpoint: "); lcd.setCursor(12,0); lcd.print(ECSetpoint,3); lcd.setCursor(0,1); lcd.print("Hold Select Change "); } if((millis()%6000)<=3000){ //************************* Printing any errors we have ***********// if (error==1) {lcd.setCursor(0,0); lcd.print("Error: "); lcd.setCursor(8,0); lcd.print(error); lcd.setCursor(0,1); lcd.print("Probe Problem "); } else if (error==2) {lcd.setCursor(0,0); lcd.print("Error: "); lcd.setCursor(8,0); lcd.print(error); lcd.setCursor(0,1); lcd.print("Large Overshoot "); } else if (error==3) {lcd.setCursor(0,0); lcd.print("Error: "); lcd.setCursor(8,0); lcd.print(error); lcd.setCursor(0,1); lcd.print("Temp Problem "); } else if (error==4) {lcd.setCursor(0,0); lcd.print("Error: "); lcd.setCursor(8,0); lcd.print(error); lcd.setCursor(0,1); lcd.print("Pump Problem "); } else if (error==5 ) {lcd.setCursor(0,0); lcd.print("Error: "); lcd.setCursor(8,0); lcd.print(error); lcd.setCursor(0,1); lcd.print("System Learning "); } else; }; /* //********** Usued for Debugging ************ Serial.print("Vdrop: "); Serial.println(Vdrop); Serial.print("Rc: "); Serial.println(Rc); Serial.print(EC); Serial.println("Siemens"); //********** end of Debugging Prints ********* */ }; //****************************** Reading LCd Buttons ****************************// void read_LCD_buttons(){ adc_key_in = analogRead(0); // read the value from the sensor // my buttons when read are centered at these valies: 0, 144, 329, 504, 741 // we add approx 50 to those values and check to see if we are close if (adc_key_in > 1000) button =0; else if (adc_key_in < 50) button =1; else if (adc_key_in < 250) button =2; else if (adc_key_in < 450) button =3; else if (adc_key_in < 650) button =4; else if (adc_key_in < 850) button =5; //Second bit stops us changing screen multiple times per input if(button==2&&buttonLast!=button){ Screen++; } else if (button==3&&buttonLast!=button){ Screen--; }; if (Screen>=Last_Screen_no) Screen=Last_Screen_no; if(Screen<=1) Screen=1; buttonLast=button; }; //******************************* LOGS Min/MAX Values*******************************// void Log_Min_MaxEC(){ //**********So We dont Get First Few Readings**********// if( Doses==5){ MinEC=100.0; MaxEC=0.0; }; if(EC25>=MaxEC) MaxEC=EC25; if(EC25<=MinEC) MinEC=EC25; }; //******************************* LOGS Min/MAX Values*******************************// void Log_Min_MaxTemp(){ if(Temperature>=MaxT) MaxT=Temperature; if(Temperature<=MinT) MinT=Temperature; }; //******************************* Checks if Select button is held down and enters Calibration routine if it is ************************************// void Calibration(){ if(Screen!=5) return; if(button!=5) return; else delay(1000); read_LCD_buttons(); if(button!=5) return; while(1){ read_LCD_buttons(); lcd.setCursor(0,0); lcd.print("Set Calibration EC "); lcd.setCursor(0,1); lcd.print("EC: "); lcd.setCursor(3,1); lcd.print(CalibrationEC); if (button==2) CalibrationEC=CalibrationEC+0.01 ; if(button==3) CalibrationEC=CalibrationEC-0.01; if(button==1) break; delay(100); }; lcd.setCursor(0,0); lcd.print("Calibrating "); lcd.setCursor(0,1); lcd.print("EC: "); lcd.setCursor(3,1); lcd.print(CalibrationEC); i=1; buffer=0; sensors.requestTemperatures();// Send the command to get temperatures TemperatureStart=sensors.getTempCByIndex(0); //Stores Value in Variable //************Estimates Resistance of Liquid ****************// while(i<=10){ digitalWrite(ECPower,HIGH); raw= analogRead(ECPin); digitalWrite(ECPower,LOW); buffer=buffer+raw; i++; delay(5000); }; raw=(buffer/10.0); sensors.requestTemperatures();// Send the command to get temperatures TemperatureFinish=sensors.getTempCByIndex(0); //Stores Value in Variable //*************Compensating For Temperaure********************// EC =CalibrationEC*(1+(TemperatureCoef*(TemperatureFinish-25.0))) ; //***************** Calculates R relating to Calibration fluid **************************// Vdrop= (((Vin)*(raw))/1024.0); Rc=(Vdrop*R1)/(Vin-Vdrop); Rc=Rc-Ra; //Taking into account pin resistance Kt= 1000/(Rc*EC); if (TemperatureStart==TemperatureFinish ){ Serial.println(" Results are Trustworthy"); Serial.print("Calibration Fluid EC: "); Serial.print(CalibrationEC); Serial.print(" S "); //add units here Serial.print("Cell Constant K"); Serial.print(K); lcd.setCursor(0,0); lcd.print("GoodResults "); lcd.setCursor(0,1); lcd.print("EC: "); lcd.setCursor(3,1); lcd.print(CalibrationEC); lcd.setCursor(9,1); lcd.print("K:"); lcd.setCursor(11,1); lcd.print(Kt); while (1) { // wee need to keep this function running until user opts out with return function read_LCD_buttons(); if(button==4) return; //exits the loop without saving becauser user asked so if (button==5){ K=Kt; //saving the new cell constant //******8*Saving the new value to EEprom**********// value=K/0.02; EEPROM.write(addresCalibration, value); lcd.setCursor(0,0); lcd.print("Saved Calibration "); lcd.setCursor(0,1); lcd.print("K: "); lcd.setCursor(3,1); lcd.print(Kt); delay(2000); return; } if(millis()%4000>=2000){ lcd.setCursor(0,0); lcd.print("GoodResults "); lcd.setCursor(0,1); lcd.print("EC: "); lcd.setCursor(2,1); lcd.print(CalibrationEC); lcd.setCursor(9,1); lcd.print("K:"); lcd.setCursor(11,1); lcd.print(Kt); } else{ lcd.setCursor(0,0); lcd.print("Select To Save "); lcd.setCursor(0,1); lcd.print("Down to Exit "); }; } } else{ Serial.println(" Error Wait For Temperature To settle"); while (1) { read_LCD_buttons(); if(button==2) Calibration(); if(button==3) return; lcd.setCursor(0,0); lcd.print("Bad Results "); lcd.setCursor(0,1); lcd.print("Press DWN Exit "); } } }; //**************************************** End OF CALIBRATION ROUTINE ******************************// //**************************************Start OF Function To Change EC Setpoint*********************// void ChangeECSetpoint(){ if(Screen!=7) return; if(button!=5) return; else delay(1000); read_LCD_buttons(); if(button!=5) return; while(1){ read_LCD_buttons(); lcd.setCursor(0,0); lcd.print("Set EC SetPoint "); lcd.setCursor(0,1); lcd.print("R:exit EC: "); lcd.setCursor(11,1); lcd.print(ECSetpoint); if (button==2) ECSetpoint=ECSetpoint+0.01 ; if(button==3) ECSetpoint=ECSetpoint-0.01; if(button==1) { value=ECSetpoint/0.02; EEPROM.write(addresSetpoint, value); break; } delay(100); }; }; //*******************************End OF Change EC Setpoint *********************************************// //*********************************Function to Check for any errors**************************************// void Error(){ error=6; //For Some Reason the Errors are not refreshing like they shoud, this fixes it //*********Checking if the Probe is in the Solution********// if(EC25<=0.05){ Serial.println("Probe Problem: Check it is in the liquid and not shorted "); error=1; } //***********Checking if we seriosly overshot the setpoint**// else if((EC25>=(ECSetpoint*1.3))&& NutesAdded==0){ Serial.println("Dosing Problem: We overshot the setpoint, Will attempt to fix its self "); error=2; } //******** Checking Temp Probe is In range ****************// else if((Temperature>=50.0) || (Temperature<=0.5)){ Serial.println("Temperature Problem: Check Wiring [Also Check Probe has pull up] "); error=3; } //****** Checking Dosing Pump Is working******************// else if( (PostDocingEC<=(PreDosingEC+0.05) ) && (NutesAdded==0 && EC25<=ECSetpoint-0.2) ){ Serial.println("Dosing Problem: Check Nute Tank is full and pump is not broken "); if(Doses<=10){ //Still Geting a good estimate for the EC //error=5; }; if(Doses>=11) { //Proberbly a pump problem error=4; }; } else error=6; }; //************************** Printing somthing useful to LCd on start up **************************// void Splash_Screen(){ lcd.begin(16, 2); // start the library lcd.setCursor(0,0); delay(1000); lcd.print("Nutrient Doser"); lcd.setCursor(0,1); delay(1000); lcd.print("Mike Ratcliffe"); lcd.setCursor(0,1); delay(1000); lcd.setCursor(0,1); lcd.print("Free Software "); delay(1000); lcd.setCursor(0,1); lcd.print("Mike Ratcliffe"); delay(1000); lcd.setCursor(0,1); lcd.print("Free Software "); delay(1000); lcd.setCursor(0,0); lcd.print("To Calibrate "); lcd.setCursor(0,1); lcd.print("Hold Select "); delay(3000); lcd.setCursor(0,0); lcd.print("To Navigate "); lcd.setCursor(0,1); lcd.print("Use Up-Down "); delay(3000); } //********************************************* Check what values we have stored in eprom ******************************// void Read_Eprom(){ //************** Restart Protection Stuff ********************// //Setpoint value = EEPROM.read(addresSetpoint); //the 254 bit checks that the adress has something stored to read [we dont want noise do we?] if (value <=254) ECSetpoint=value*0.02; //Calibration value = EEPROM.read(addresCalibration); if (value <=254) K=value*0.02; }; //************************ Uptime Code - Makes a count of the total up time since last start ****************// void uptime(){ //** Making Note of an expected rollover *****// if(millis()>=3000000000){ HighMillis=1; } //** Making note of actual rollover **// if(millis()<=100000&&HighMillis==1){ Rollover++; HighMillis=0; } long secsUp = millis()/1000; Second = secsUp%60; Minute = (secsUp/60)%60; Hour = (secsUp/(60*60))%24; Day = (Rollover*50)+(secsUp/(60*60*24)); //First portion takes care of a rollover [around 50 days] }; -
When Things Go Wrong: NFT vs Media Bed Hydroponics
09/20/2015 at 18:08 • 0 commentsThe last test comparison has come to an end and it gave a chance to simulate a water system failure. The video below shows the effects of water loss for 24 hours both immediately and after a 48 hour period for NFT and media beds. You may be surprised at how fast the plants recover from the drought.
The humidity misters were still operational keeping the relative humidity at 60-70%, so results may vary depending on air humidity, temperature and sun intensity. If it is in a well stocked aquaponics system you will need to act fast to oxygenate the water tank the fish are in, and reduce feeding to stop ammonia spikes until you have fixed the water flow problem.
-
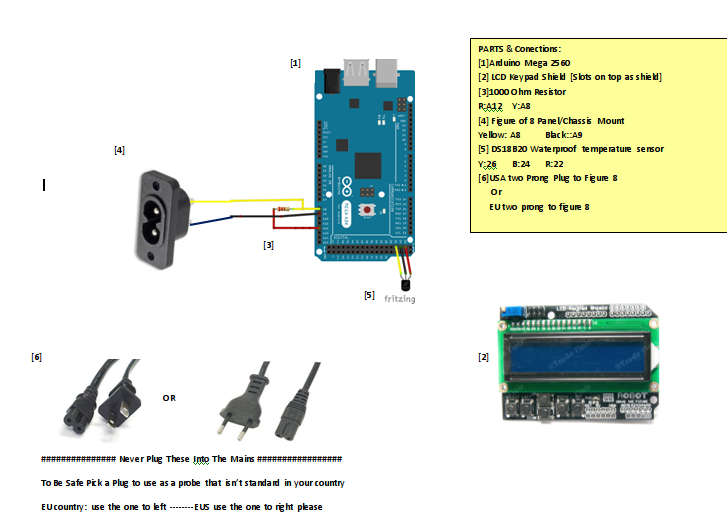
Update Code For Three Dollar EC PPM Meter for MCU [Arduino]
09/19/2015 at 19:29 • 3 commentsThis code is a slight update of the last one, updated:
>Better Uptime Counter
>LCD Shield
>New Pin out Diagram
>Restart Protected Calibration Details
>EU and US Plug Calibrated Probe
Also a quick update to the code so the calibration value will survive a power cut, we are storing the cell constant K [a float] in EEPROM as a scaled int, so there may be a slight change in the value following a reboot [but that small it wont make much difference].
Cell Constants
I Recommend Calibrating your probe but if that is not an option at this time the following cell constants [K] will give a good estimated readout:
EU plug: K= 1.76
US Plug K= 2.88
Calibration
If it needs instructions to be operated someone engineered it wrong, the lcd should explain itself to you at start up. If you are still stuck watch the youtube video to see how I calibrate it.
Calibrate with an EC of about 50% your maximum expected reading for best results.
The NEW Pinout:
![]()
/*
   ElCheapo Arduino EC-PPM measurments

   This scrip uses a common USA two prong plug and a 47Kohm Resistor to measure the EC/PPM of a Aquaponics/Hydroponics Sytem.
   You could modift this code to Measure other liquids if you change the resitor and values at the top of the code.

   This Program will give you a temperature based feed controller. See Read me in download file for more info.

   28/8/2015  Michael Ratcliffe  Mike@MichaelRatcliffe.com


          This program is free software: you can redistribute it and/or modify
    it under the terms of the GNU General Public License as published by
    the Free Software Foundation, either version 3 of the License, or
    (at your option) any later version.


    This program is distributed in the hope that it will be useful,
    but WITHOUT ANY WARRANTY; without even the implied warranty of
    MERCHANTABILITY or FITNESS FOR A PARTICULAR PURPOSE.  See the
    GNU General Public License for more details.


    You should have received a copy of the GNU General Public License
    along with this program.  If not, see .

    Parts:
    -Arduino - Uno/Mega
    -Standard American two prong plug
    -1 kohm resistor
    -DS18B20 Waterproof Temperature Sensor

    Limitations:
    -Cell Constant [K]  must be less than 5.0 or it will Mess with the way we save values in EEPROM
    -A reset will change your kell constant slightly, but not to a great extent
    -EEPROM seems to survive a reflash, so changing values in the code will not change them in the flashed software. you will need to do it via the LCD

    See www.MichaelRatcliffe.com/Projects for a Pinout and user guide or consult the Zip you got this code from

*/


//************************** Libraries Needed To Compile The Script [See Read me In Download] ***************//
// Both below Library are custom ones [ SEE READ ME In Downloaded Zip If You Dont Know how To install] Use them or add a pull up resistor to the temp probe


#include <OneWire.h>
#include <DallasTemperature.h>
#include <LiquidCrystal.h> //Standard LCD Lbrary
#include <EEPROM.h> //Standard EEPROM Library


//************************* User Defined Variables ********************************************************//


//##################################################################################
//-----------  Do not Replace R1 with a resistor lower than 300 ohms    ------------
//##################################################################################


int R1= 1000;
int Ra=25; //Resitance of Digital Pin, 25 ohms for mega/uno
int ECPin= A15;
int ECGround=A14;
int ECPower =A11;


//************************* User Defined Variables ********************************************************//


float CalibrationEC=1.38; //EC value of Calibration solution is s/cm


//*********** Converting to ppm [Learn to use EC it is much better**************//
// Hana      [USA]         PPMconverion:   0.5
// Eutech    [EU]          PPMconversion:  0.64
//Tranchen   [Australia]   PPMconversion:  0.7
// Why didnt anyone standardise this?


float PPMconversion=0.5;


//*************Compensating for temperature ************************************//
//The value below will change depending on what chemical solution we are measuring
//0.019 is generaly considered the standard for plant nutrients [google "Temperature compensation EC" for more info
float TemperatureCoef = 0.019; //this changes depending on what chemical we are measuring


//********************** Cell Constant For Ec Measurements *********************//
//Mine was around 2.9 with plugs being a standard size they should all be around the same
//But If you get bad readings you can use the calibration script and fluid to get a better estimate for K
float K=2.88;


//************ Temp Probe Related *********************************************//
#define ONE_WIRE_BUS 26           // Data wire For Temp Probe is plugged into pin 10 on the Arduino
const int TempProbePossitive =22;  //Temp Probe power connected to pin 9
const int TempProbeNegative=24;    //Temp Probe Negative connected to pin 8


//***************************** END Of Recomended User Inputs *****************************************************************//


//********************************************************//


// select the pins used on the LCD panel
LiquidCrystal lcd(8, 9, 4, 5, 6, 7);


// define some values used by the panel and buttons
int lcd_key     = 0;
int adc_key_in  = 0;
int button =0;
#define btnRIGHT  1
#define btnUP     2
#define btnDOWN   3
#define btnLEFT   4
#define btnSELECT 5
#define btnNONE   6


int Screen =1;


OneWire oneWire(ONE_WIRE_BUS);// Setup a oneWire instance to communicate with any OneWire devices
DallasTemperature sensors(&oneWire);// Pass our oneWire reference to Dallas Temperature.


float Temperature=10;
float EC=0;
float EC25 =0;
int ppm =0;


float raw= 0;
float Vin= 5;
float Vdrop= 0;
float Rc= 0;
int Readings=0;


//********************** Some Variables For Loging Min/Max Values ********************************//
float MinEC=100;
float MaxEC=0;
float MinT=100;
float MaxT=0;


//************************** Just Some basic Definitions used for the Up Time LOgger ************//
long Day=0;
int Hour =0;
int Minute=0;
int Second=0;
int SecondStamp=0;
int Once=0;

//**************************Some Stuff For Calibration ******************************************//
float TemperatureFinish=0;
float TemperatureStart=0;
int i=0;
float buffer=0;
float Kt=0;


//*********************** EPROM Stuff [So SetPoint and Cal Survive a reboot] ******************//
int value;
int addresCalibration=0;


//*********************************Setup - runs Once and sets pins etc ******************************************************//
void setup()
{
  Serial.begin(9600);
  pinMode(TempProbeNegative , OUTPUT ); //seting ground pin as output for tmp probe
  digitalWrite(TempProbeNegative , LOW );//Seting it to ground so it can sink current
  pinMode(TempProbePossitive , OUTPUT );//ditto but for positive
  digitalWrite(TempProbePossitive , HIGH );
  pinMode(ECPin,INPUT);
  pinMode(ECPower,OUTPUT);//Setting pin for sourcing current
  pinMode(ECGround,OUTPUT);//setting pin for sinking current
  digitalWrite(ECGround,LOW);//We can leave the ground connected permanantly

  delay(100);// gives sensor time to settle
  sensors.begin();
  delay(100);
  //** Adding Digital Pin Resistance to [25 ohm] to the static Resistor *********//
  // Consult Read-Me for Why, or just accept it as true
  R1=(R1+Ra);


  //************** Restart Protection Stuff ********************//
   //Setpoint
     value = EEPROM.read(addresCalibration);
   if (value <=254) K=value*0.02;


  Serial.println("ElCheapo Arduino EC-PPM measurments");
  Serial.println("By: Michael Ratcliffe  Mike@MichaelRatcliffe.com");
  Serial.println("Free software: you can redistribute it and/or modify it under GNU ");
  Serial.println("");
  Serial.println("Make sure Probe and Temp Sensor are in Solution and solution is well mixed");
  Serial.println("");
  Serial.println("Measurments at 5's Second intervals [Dont read Ec morre than once every 5 seconds]:");

lcd.begin(16, 2);              // start the library
lcd.setCursor(0,0);
delay(1000);
lcd.print("Arduino EC-PPM");
lcd.setCursor(0,1);
delay(1000);
lcd.print("Mike Ratcliffe");
lcd.setCursor(0,1);
delay(1000);
lcd.setCursor(0,1);
lcd.print("Free Software   ");
delay(1000);
lcd.setCursor(0,1);
lcd.print("Mike Ratcliffe");
delay(1000);
lcd.setCursor(0,1);
lcd.print("Free Software   ");
delay(1000);
lcd.setCursor(0,0);
lcd.print("To Calibrate      ");
  lcd.setCursor(0,1);
lcd.print("Hold Select       ");
delay(3000);
  lcd.setCursor(0,0);
lcd.print("To Navigate         ");
  lcd.setCursor(0,1);
lcd.print("Use Up-Down     ");
delay(3000);


GetEC(); //gets first reading for LCD and then resets max/min
MinEC=100;
MaxEC=0;
MinT=100;
MaxT=0;
};


//******************************************* End of Setup **********************************************************************//


//************************************* Main Loop - Runs Forever ***************************************************************//
//Moved Heavy Work To subroutines so you can call them from main loop without cluttering the main loop
void loop()
{

if((millis()%10000)<=100){
GetEC();           //Calls Code to Go into GetEC() Loop [Below Main Loop] dont call this more that 1/5 hhz [once every five seconds] or you will polarise the water
};
LogEC();
read_LCD_buttons();
Calibration();
PrintReadings();   // Cals Print routine [below main loop]
delay(100); //Stops us entering the GETEC loop twice


}
//************************************** End Of Main Loop **********************************************************************//


//************ This Loop Is called From Main Loop************************//
void GetEC(){
Readings=1; //makes note of new readings avliable
//*********Reading Temperature Of Solution *******************//
LogEC();


sensors.requestTemperatures();// Send the command to get temperatures
Temperature=sensors.getTempCByIndex(0); //Stores Value in Variable


//************Estimates Resistance of Liquid ****************//
digitalWrite(ECPower,HIGH);
raw= analogRead(ECPin);
raw= analogRead(ECPin);// This is not a mistake, First reading will be low beause if charged a capacitor
digitalWrite(ECPower,LOW);


LogEC();
//***************** Converts to EC **************************//
Vdrop= (Vin*raw)/1024.0;
Rc=(Vdrop*R1)/(Vin-Vdrop);
Rc=Rc-Ra;
EC = 1000/(Rc*K);
LogEC();
//*************Compensating For Temperaure********************//
EC25   =  EC/ (1+ TemperatureCoef*(Temperature-25.0));
ppm=(EC25)*(PPMconversion*1000);


;}
//************************** End OF EC Function ***************************//


//***This Loop Is called From Main Loop- Prints to serial usefull info ***//
void PrintReadings(){
Serial.print("Rc: ");
Serial.print(Rc);
Serial.print(" EC: ");
Serial.print(EC25);
Serial.print(" Simens  ");
Serial.print(ppm);
Serial.print(" ppm  ");
Serial.print(Temperature);
Serial.println(" *C ");


if (button>=1||Readings==1) {
  Readings=0;

                      if(Screen==1){
                      lcd.setCursor(0,0);
                      lcd.print("Arduino EC-PPM   ");
                      lcd.setCursor(0,1);
                      lcd.print("EC:               ");
                      lcd.setCursor(3,1);
                      lcd.print(EC25);
                      lcd.setCursor(9,1);
                      lcd.print(Temperature);
                      lcd.print("'C");
                      }

                      else if(Screen==2){
                      lcd.setCursor(0,0);
                      lcd.print("Arduino EC-PPM   ");
                      lcd.setCursor(0,1);
                      lcd.print("PPM:         ");
                      lcd.setCursor(4,1);
                      lcd.print(ppm);
                      lcd.setCursor(9,1);
                      lcd.print(Temperature);
                      lcd.print("'C");

                      }
                       else if(Screen==3){
                      lcd.setCursor(0,0);
                      lcd.print("Min:              ");
                       lcd.setCursor(4,0);
                       lcd.print(MinEC);
                       lcd.setCursor(9,0);
                      lcd.print(MinT);
                      lcd.print("'C");
                      lcd.setCursor(0,1);
                      lcd.print("Max:               ");
                      lcd.setCursor(4,1);
                      lcd.print(MaxEC);
                      lcd.setCursor(9,1);
                      lcd.print(MaxT);
                      lcd.print("'C");

                       }
                        else if(Screen==4){

                      lcd.setCursor(0,0);
                      lcd.print("Uptime Counter:              ");

                      lcd.setCursor(0,1);
                      lcd.print("                                     ");//Clearing LCD
                      lcd.setCursor(0,1);
                      lcd.print(Day);
                      lcd.setCursor(3,1);
                      lcd.print("Day");
                      lcd.setCursor(8,1);
                      lcd.print(Hour);
                      lcd.setCursor(10,1);
                      lcd.print(":");
                      lcd.setCursor(11,1);
                      lcd.print(Minute);
                      lcd.setCursor(13,1);
                      lcd.print(":");
                      lcd.setCursor(14,1);
                      lcd.print(Second);


                       }


                      else if(Screen==5){

                      lcd.setCursor(0,0);
                      lcd.print("Factors          ");
                      lcd.setCursor(8,0);
                      lcd.print("PPMC:");
                      lcd.setCursor(13,0);
                      lcd.print(PPMconversion);

                      lcd.setCursor(0,1);
                      lcd.print("K:               ");
                      lcd.setCursor(2,1);
                      lcd.print(K);
                      lcd.setCursor(9,1);
                      lcd.print("a:");
                      lcd.setCursor(11,1);
                      lcd.print(TemperatureCoef);
                      };


};


/*
//********** Usued for Debugging ************
Serial.print("Vdrop: ");
Serial.println(Vdrop);
Serial.print("Rc: ");
Serial.println(Rc);
Serial.print(EC);
Serial.println("Siemens");
//********** end of Debugging Prints *********
*/
};


void read_LCD_buttons(){
  adc_key_in = analogRead(0);      // read the value from the sensor
// my buttons when read are centered at these valies: 0, 144, 329, 504, 741
// we add approx 50 to those values and check to see if we are close
if (adc_key_in > 1000)  button =0;


else if (adc_key_in < 50)   button =1;
else if (adc_key_in < 250)  button =2;
else  if (adc_key_in < 450)  button =3;
else if (adc_key_in < 650)  button =4;
else if (adc_key_in < 850)  button =5;


if(button==2){
Screen++;


}
else if (button==3){
Screen--;
};


if (Screen>=6) Screen=5;
if(Screen<=1) Screen=1;
};


//******************************* LOGS Min/MAX Values and Uptime Counter*******************************//
void LogEC(){

  if(EC25>=MaxEC)  MaxEC=EC25;
  if(EC25<=MinEC)  MinEC=EC25;

  if(Temperature>=MaxT) MaxT=Temperature;
  if(Temperature<=MinT) MinT=Temperature;

//** Checks For a Second Change *****//
if((millis()%1000)<=500&&Once==0){
SecondStamp=1;
Once=1;
};
//** Makes Sure Second Count doesnt happen more than once a Second **//
if((millis()%1000)>500){
Once=0;
}
                         if(SecondStamp==1){
                           Second++;
                           SecondStamp=0;
                           Readings=1;

                         if (Second==60){
                          Minute++;
                          Second=0;
                          if (Minute==60){
                          Minute=0;
                          Hour++;

                         if (Hour==24){
                          Hour=0;
                          Day++;
                         }
                         }
                         }
                         };


};

//******************************* Checks if Select button is held down and enters Calibration routine if it is ************************************//
void Calibration(){


if(button!=5) return;
else delay(1000);
read_LCD_buttons();
if(button!=5) return;


while(1){
read_LCD_buttons();
lcd.setCursor(0,0);
lcd.print("Set Calibration EC  ");
lcd.setCursor(0,1);
lcd.print("EC:                 ");
lcd.setCursor(3,1);
lcd.print(CalibrationEC);


if (button==2) CalibrationEC=CalibrationEC+0.01 ;
if(button==3)  CalibrationEC=CalibrationEC-0.01;
if(button==1) break;
delay(100);
       };


lcd.setCursor(0,0);
lcd.print("Calibrating         ");
lcd.setCursor(0,1);
lcd.print("EC:                 ");
lcd.setCursor(3,1);
lcd.print(CalibrationEC);


i=1;
buffer=0;
sensors.requestTemperatures();// Send the command to get temperatures
TemperatureStart=sensors.getTempCByIndex(0); //Stores Value in Variable


//************Estimates Resistance of Liquid ****************//
            while(i<=10){


            digitalWrite(ECPower,HIGH);
            raw= analogRead(ECPin);
            raw= analogRead(ECPin);// This is not a mistake, First reading will be low
            digitalWrite(ECPower,LOW);
            buffer=buffer+raw;
            i++;
            delay(5000);
            };


raw=(buffer/10);
sensors.requestTemperatures();// Send the command to get temperatures
TemperatureFinish=sensors.getTempCByIndex(0); //Stores Value in Variable


//*************Compensating For Temperaure********************//
EC =CalibrationEC*(1+(TemperatureCoef*(TemperatureFinish-25.0))) ;

//***************** Calculates R relating to Calibration fluid **************************//
Vdrop= (((Vin)*(raw))/1024.0);
Rc=(Vdrop*R1)/(Vin-Vdrop);
Rc=Rc-Ra; //Taking into account pin resistance
Kt= 1000/(Rc*EC);


                    if (TemperatureStart==TemperatureFinish){
                      Serial.println("   Results are Trustworthy");
                      Serial.print("Calibration Fluid EC: ");
                      Serial.print(CalibrationEC);
                      Serial.print(" S  ");  //add units here
                      Serial.print("Cell Constant K");
                      Serial.print(K);


                      lcd.setCursor(0,0);
                      lcd.print("GoodResults         ");


                      lcd.setCursor(0,1);
                      lcd.print("EC:                    ");
                      lcd.setCursor(3,1);
                      lcd.print(CalibrationEC);
                      lcd.setCursor(9,1);
                      lcd.print("K:");
                      lcd.setCursor(11,1);
                      lcd.print(Kt);

                              while (1) { // wee need to keep this function running until user opts out with return function

                              read_LCD_buttons();
                              if(button==4) return; //exits the loop without saving becauser user asked so
                              if (button==5){


                              K=Kt; //saving the new cell constant

                           //********Saving the new value to EEprom**********//
                            value=K/0.02;
                            EEPROM.write(addresCalibration, value);


                              lcd.setCursor(0,0);
                              lcd.print("Saved Calibration        ");

                              lcd.setCursor(0,1);
                              lcd.print("K:                        ");
                              lcd.setCursor(3,1);
                              lcd.print(Kt);
                              delay(2000);
                              return;
                              }

                              if(millis()%4000>=2000){
                              lcd.setCursor(0,0);
                              lcd.print("GoodResults         ");


                              lcd.setCursor(0,1);
                              lcd.print("EC:                  ");
                              lcd.setCursor(2,1);
                              lcd.print(CalibrationEC);
                              lcd.setCursor(9,1);
                              lcd.print("K:");
                              lcd.setCursor(11,1);
                              lcd.print(Kt);

                              }
                              else{

                              lcd.setCursor(0,0);
                              lcd.print("Select To Save       ");

                              lcd.setCursor(0,1);
                              lcd.print("Down to Exit           ");
                              };


                              }


                      }

                              else{
                               Serial.println("   Error Wait For Temperature To settle");

                                        while (1) {
                                        read_LCD_buttons();
                                        if(button==2) Calibration();
                                        if(button==3) return;

                                        lcd.setCursor(0,0);
                                        lcd.print("Bad Results         ");
                                         lcd.setCursor(0,1);
                                        lcd.print("Press Up Exit           ");


                                  }

                            }


};
As Always the code will shortly be avaliable at www.michaelratcliffe.com/projects
This is an update to the blog:
Hacking the way to growing food
Using Technology And A Hackers Mindset To Grow Food. Last Updated [16/01/2021]