-
!DANGER! Don't use at home!
02/29/2016 at 11:54 • 0 comments!DANGER!
A Lasercutter is a very dangerous device. Not only the laser can destroy your eyes if you handle it the wrong way. The fumes, especially while cutting or engraving wood, contain carbon monoxide. Carbon monoxide is known as "silent killer". The colorless gas doesn't smell. It's not aching in your throat while inhaling. It can diffuse though walls and is more or less the same weight as air which means it can go everywhere.
I now attached a filter and a blower to my laser cutter. The char coal filter is doing a great job. Most fumes are adsorbing to the char coal there is no smell anymore at the exhaust. Especially this makes the fume extractor dangerous if it's not completely air tight and being operated indoors. Unfortunately I was a little bit careless at saturday and inhaled a little bit of the carbon monoxide gas. I became dizzy immediately and felt awkward. I immediately turned off the cutter by pushing the emergency stop button and ran away from that machine. That was a really unpleasant feeling - and dangerous!
So please be advised, that a laser cutter provides visible and invisible danger and can harm you really bad! If you want to filter the gas using char coal filters, please use a CO - Detector or any monitoring of CO gas (carbon monoxide) while working. Never ever use a laser cutter at home. After a cutting or engraving process was done give the fume extractor some time to remove all fumes. Never open the lid while cutting else you could be exposed to poisonous gas.
Only work outside and use a blower to get the fumes out of the device as quickly as possible. Stay away from the exhaust pipe. This is nothing for children to play with.
-
Lasercutter smells like hell
02/22/2016 at 12:26 • 4 commentsSomething which I was afraid of before now happened: The fumes of the laser cutter smell like hell and as far as I know are really toxic. That means I have to build an extractor and filter for it.
A chemist helps me with the filters. I will use an old vacuum cleaner as base (casing and motor) to build a good filter.
I think this is so important that I opened a new project:
-
Progress: Machine is working!
02/17/2016 at 13:36 • 1 commentSuccess!
Yesterday for the first time I've had a successful run of my machine using 'grbl'. I know, I promised that I would us a raspberryPi only. And I started with that. Unfortunately the gpio library is not able to generate the needed I/O port frequency which I would need to get a good speed of the machine axes. Another problem is that raspberryPi gpio pins offer only 3.3V. For controlling standard TTL lasers there would be additional electronics needed.
After thinking for a long time I now decided to proceed with grbl and arduino. I still want to develop a cool firmware for raspberryPI. But this will take a long time for development and I think it's very unpleasant having a laser cutter at home which is not working because software needs to be done.
What does that mean for this project?
The basic idea was to build a laser cutter which will run only with a 12V power supply to be connectable to a home solar kit. Fortunately this has nothing to do with the toolchain but only the power supply.
I bought a "cheap" 100W DC-DC converter for Laptops. These converters are available for both AC input and DC input using a cigar lighter jack. These converters have a configurable output voltage. For my setup I use a solar battery as input. If the battery is full it has approx. 13V, if its empty it's about 10-11V. This converter give me 15V output voltage, which is my reference voltage for the setup.
You could use a DC-DC Step-Up converter instead. I use the Laptop adaptor because I've already had it at home.
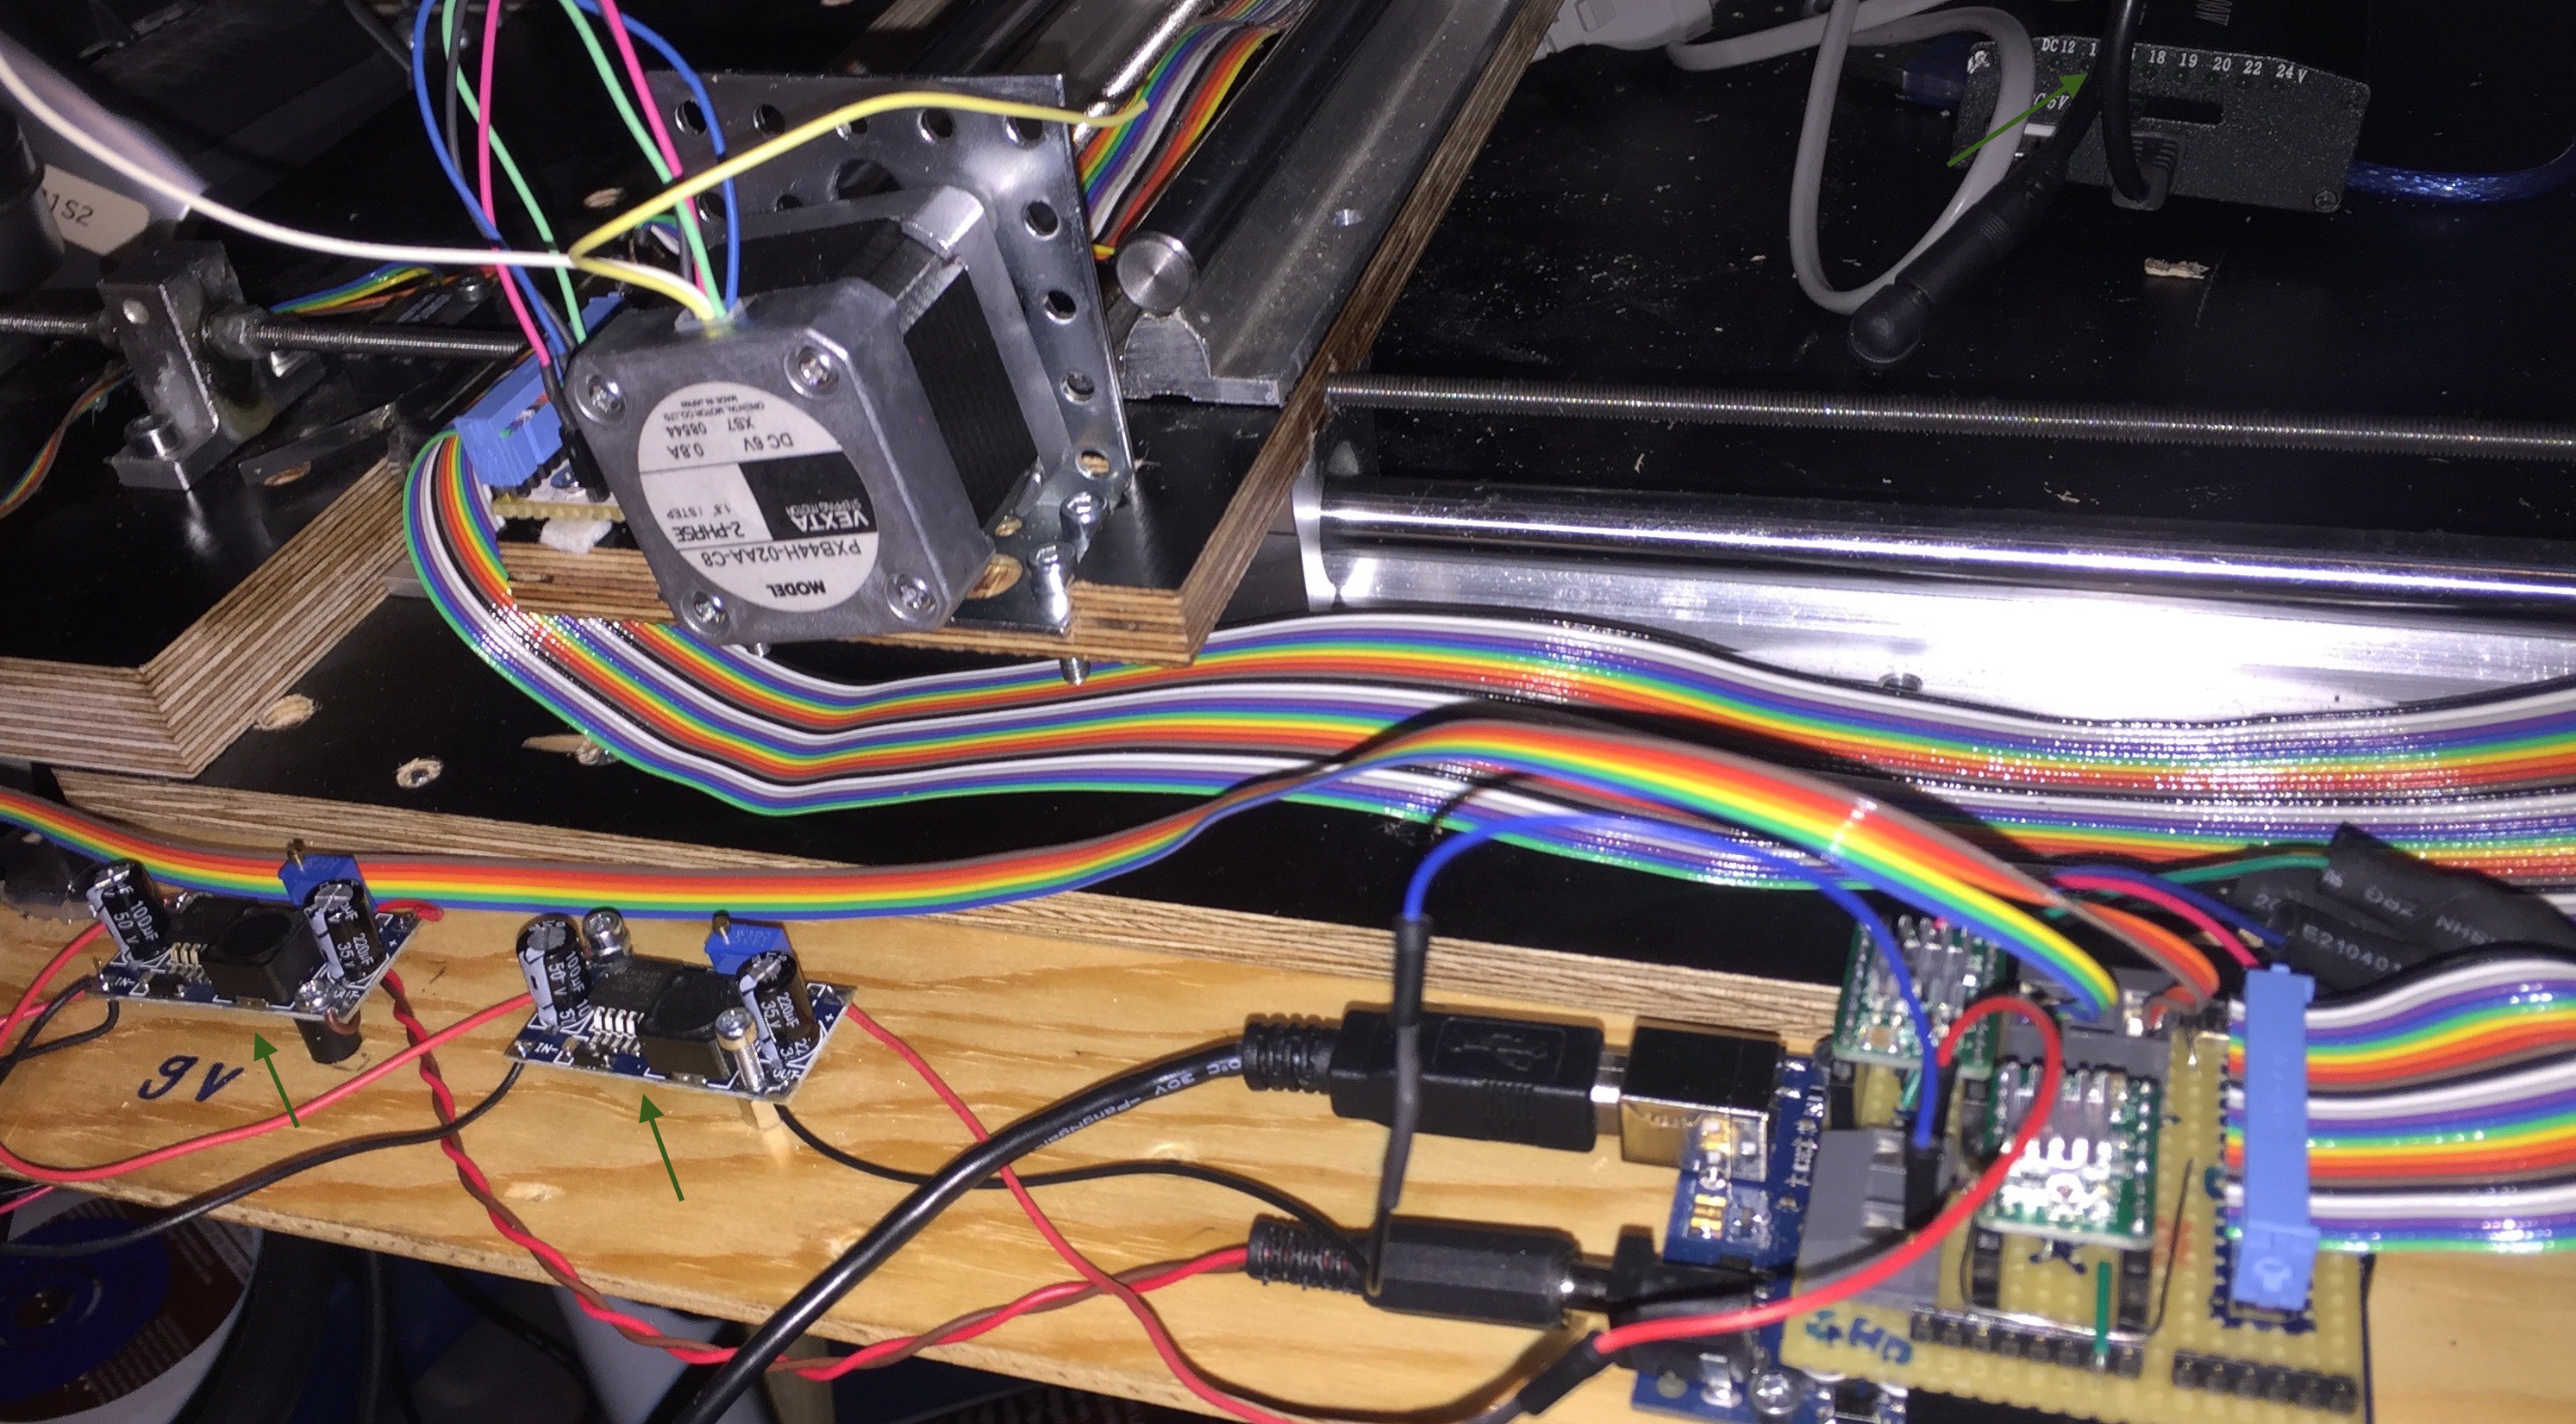
Then I use two step down converters for creating all necessary voltages for my circuit. The first converter was adjusted to 9V to power the arduino, the second converter was adjusted to 12V to power the laser and the steppers.
My laser module has a modulation input of 0..5V. It was connected directly to the grbl v0.9 PWM output pin. In G-Code M03 turns the spindle on and M05 turns it off. These commands are used to turn the laser on and off. The Parameter S0 ... S255 is used to set the laser intensity.
![]()
A nice grbl frontend is available: It's written in java and will be my reference tool for configuring and executing G-Code on my machine: https://github.com/winder/Universal-G-Code-Sender
![]()
On my Mac I could successfully install LaserWeb: https://github.com/openhardwarecoza/LaserWeb
LaserWeb is still under heavy development and runs in the browser. On Mac OS the tricky part is installing 'node.js'. After a lot of tries I figured out that node is available on home-brew for mac which works great!
Use the terminal: > brew install node
The installation instruction can be found on the project page of LaserWeb. I could successfully install it on the raspberryPi, too.
Unfortunately I was not able to control the grbl using LaserWeb for now. A lot of machine controls are (still) missing. For now I use LaserWeb only to convert svg files to G-Code. LaserWeb is the only tool which I could find, which is really converting svg to code in a usable way (!). Again: Thanks to Paul Kocyla for this hint :-)
According to my project goal the first part is completed: Now there is a working laser cutter which can be connected to a solar battery and it works!
![]()
Conclusion
Now the long term development part begins. Creating a good g-code free software for RaspberryPi which will driv the Lasercutter as an embedded firmware. However: Together with grbl and the DC-DC converters, I can use a laser cutter outdoors. It supports any input voltage from 10V to 31V. With the laptop converter it can be used with 110V or 230V DC input, too. I wish you a happy solar powered fabbing ;-)
Let's see how long the development of the new software might take ...
Outlook
A lot of calibration work is still to be done. Then I start producing the first laser cuts. I will post a video here and will complete the build-instructions. After that is done, I will maybe build another laser cutter for my makerspace Digitac.
Then the raspberryPi development is to be done. This will take a lot of time, so be patient. If you need a solar powered laser cutter, start using grbl. Nice grbl v0.9 shields are available, which means there is not so much work to be done. (You don't really need to make your own circuit using a bread board)
You can buy the "Arduino CNC Shield V3.51 - GRBL v0.9 compatible" shield and save a lot of soldering work. The toolchain svg-editor -> LaserWeb -> Universal-G-Code-Sender enables you to create beautiful laser cuts.
Have Fun!
-
LaserWeb is out there
01/27/2016 at 13:12 • 0 commentsPaul today showed me this:
http://hackaday.com/2016/01/26/stop-driving-laser-cutters-with-3d-printer-software/
So I will implement that to the raspberryPI 2 as a PC and then use an arduino using GRBL to control the laser cutter.
I still think that G-Code is deprecated.
-
Reset and rewrite
01/25/2016 at 13:37 • 0 commentsOkay folks. It's 2016 now and christmas time is over. That means it's project time!
My raspberryPi software which I started earlier was developed for the RaspberryPi 1. Now I struggled with some small issues why I changed my mind. I will now use the raspberryPI 2.
Here are the reasons:
- RaspberryPi one has not so much I/O pins. For producing a raspberryPi-only laser cutter controller without external port multiplexers Pi one is enough if you don't want to configure micro stepping.
- RaspberryPi two is a "normal" computer. That means one can install any linux distribution like debian or ubuntu without any problems.
- I decided to use objective C / swift as development language, because it's a really elegant language and available on debian and ubuntu. It's compatible to C, C++ and objective C. That means I can recycle a lot of my ready made code.
- RaspberryPi 2 is using multiple CPU kernels. That means that dispatch queues and multithreading are working nice.
- I will use DMA and direct access to the I/O ports. This makes it possible to control the motors without using a realtime kernel. I just want to make it able to completely run the whole thing on an ordinary raspberryPi with a standard distribution!
Please be patient. There is still a lot of work to be done. In February I will move the laser cutter to the workshop of Digitales Aachen e.V. where I will do the testing and development of the software.
After a long time of thinking about G-Code I now decided to drop it. All G-Code generators I have found on the network are ugly. The results are not smooth enough, a lot of post processing is necessary. The G-Code is not a real standard which means that every machine treats g-code differently.
This project should be a laser cutter. The best thing for laser cutters is vector graphics. The best tools for vector graphics I have seen so far are Affinity Designer, Illustrator and Inkscape. All these tools are able to export svg vector format.
My goal is now to read and interpret real svg files. There will be some restrictions at the beginning, but svg seems to be the right format for laser cutters. G-Code for me is deprecatedwhy I won't use it anymore.
-
Replaced motors
10/20/2015 at 12:53 • 0 commentsDeveloping software takes time. For now the driver and G-Code software is a quick and dirty work in progress. It's working, but still very early stage for testing. I created a small gear geometry using inkskape. Then I used the g-code-tool from inkscape to convert it in to code my machine can process. I turned the laser on, using protection glasses(!). A very bright yellow point was cutting the gear into a small piece of wood. So it's working pretty well.
But there is one thing that bothered me: The motors became very hot. So I had to reduce the current by adjusting the motor drivers. Then the motors had no power. I lost steps and the geometry was bad. Thank's to Paul Kocyla for the hint that my motors have a high inner resistance (27 Ohm). These motors have been produced for other purposes than mine. I replaced the motors with new ones with an inner resistance of 7 Ohms. Now the motors could break my fingers.
The next step will be to build a casing around the whole printer, because the laser is too strong to operate it without protection.
-
DC/DC power
09/30/2015 at 11:16 • 0 commentsAs I promised the cutter will be connectable to a home solar kit. That means that you want to connect it to a 12V or 24V DC power source. Unfortunately lead batteries vary their voltage depending on their stored energy. A full battery has a voltage of approx. 13V, an empty battery has a voltage of about 10V.
I use two DC/DC converters to get the voltage down to 5V for operating the raspberry PI.
You can use any DC/DC breakout board. An Example is this one: https://www.sparkfun.com/products/9370
I purchased these: http://www.ebay.com/itm/5Pcs-Output-1-23V-30V-DC-DC-Buck-Converter-Step-Down-Module-LM2596-Power-Supply-/321476590827?hash=item4ad97f7ceb which are based on the LM2596.
-
Magnetic pen clamp turns laser cutter into plotter
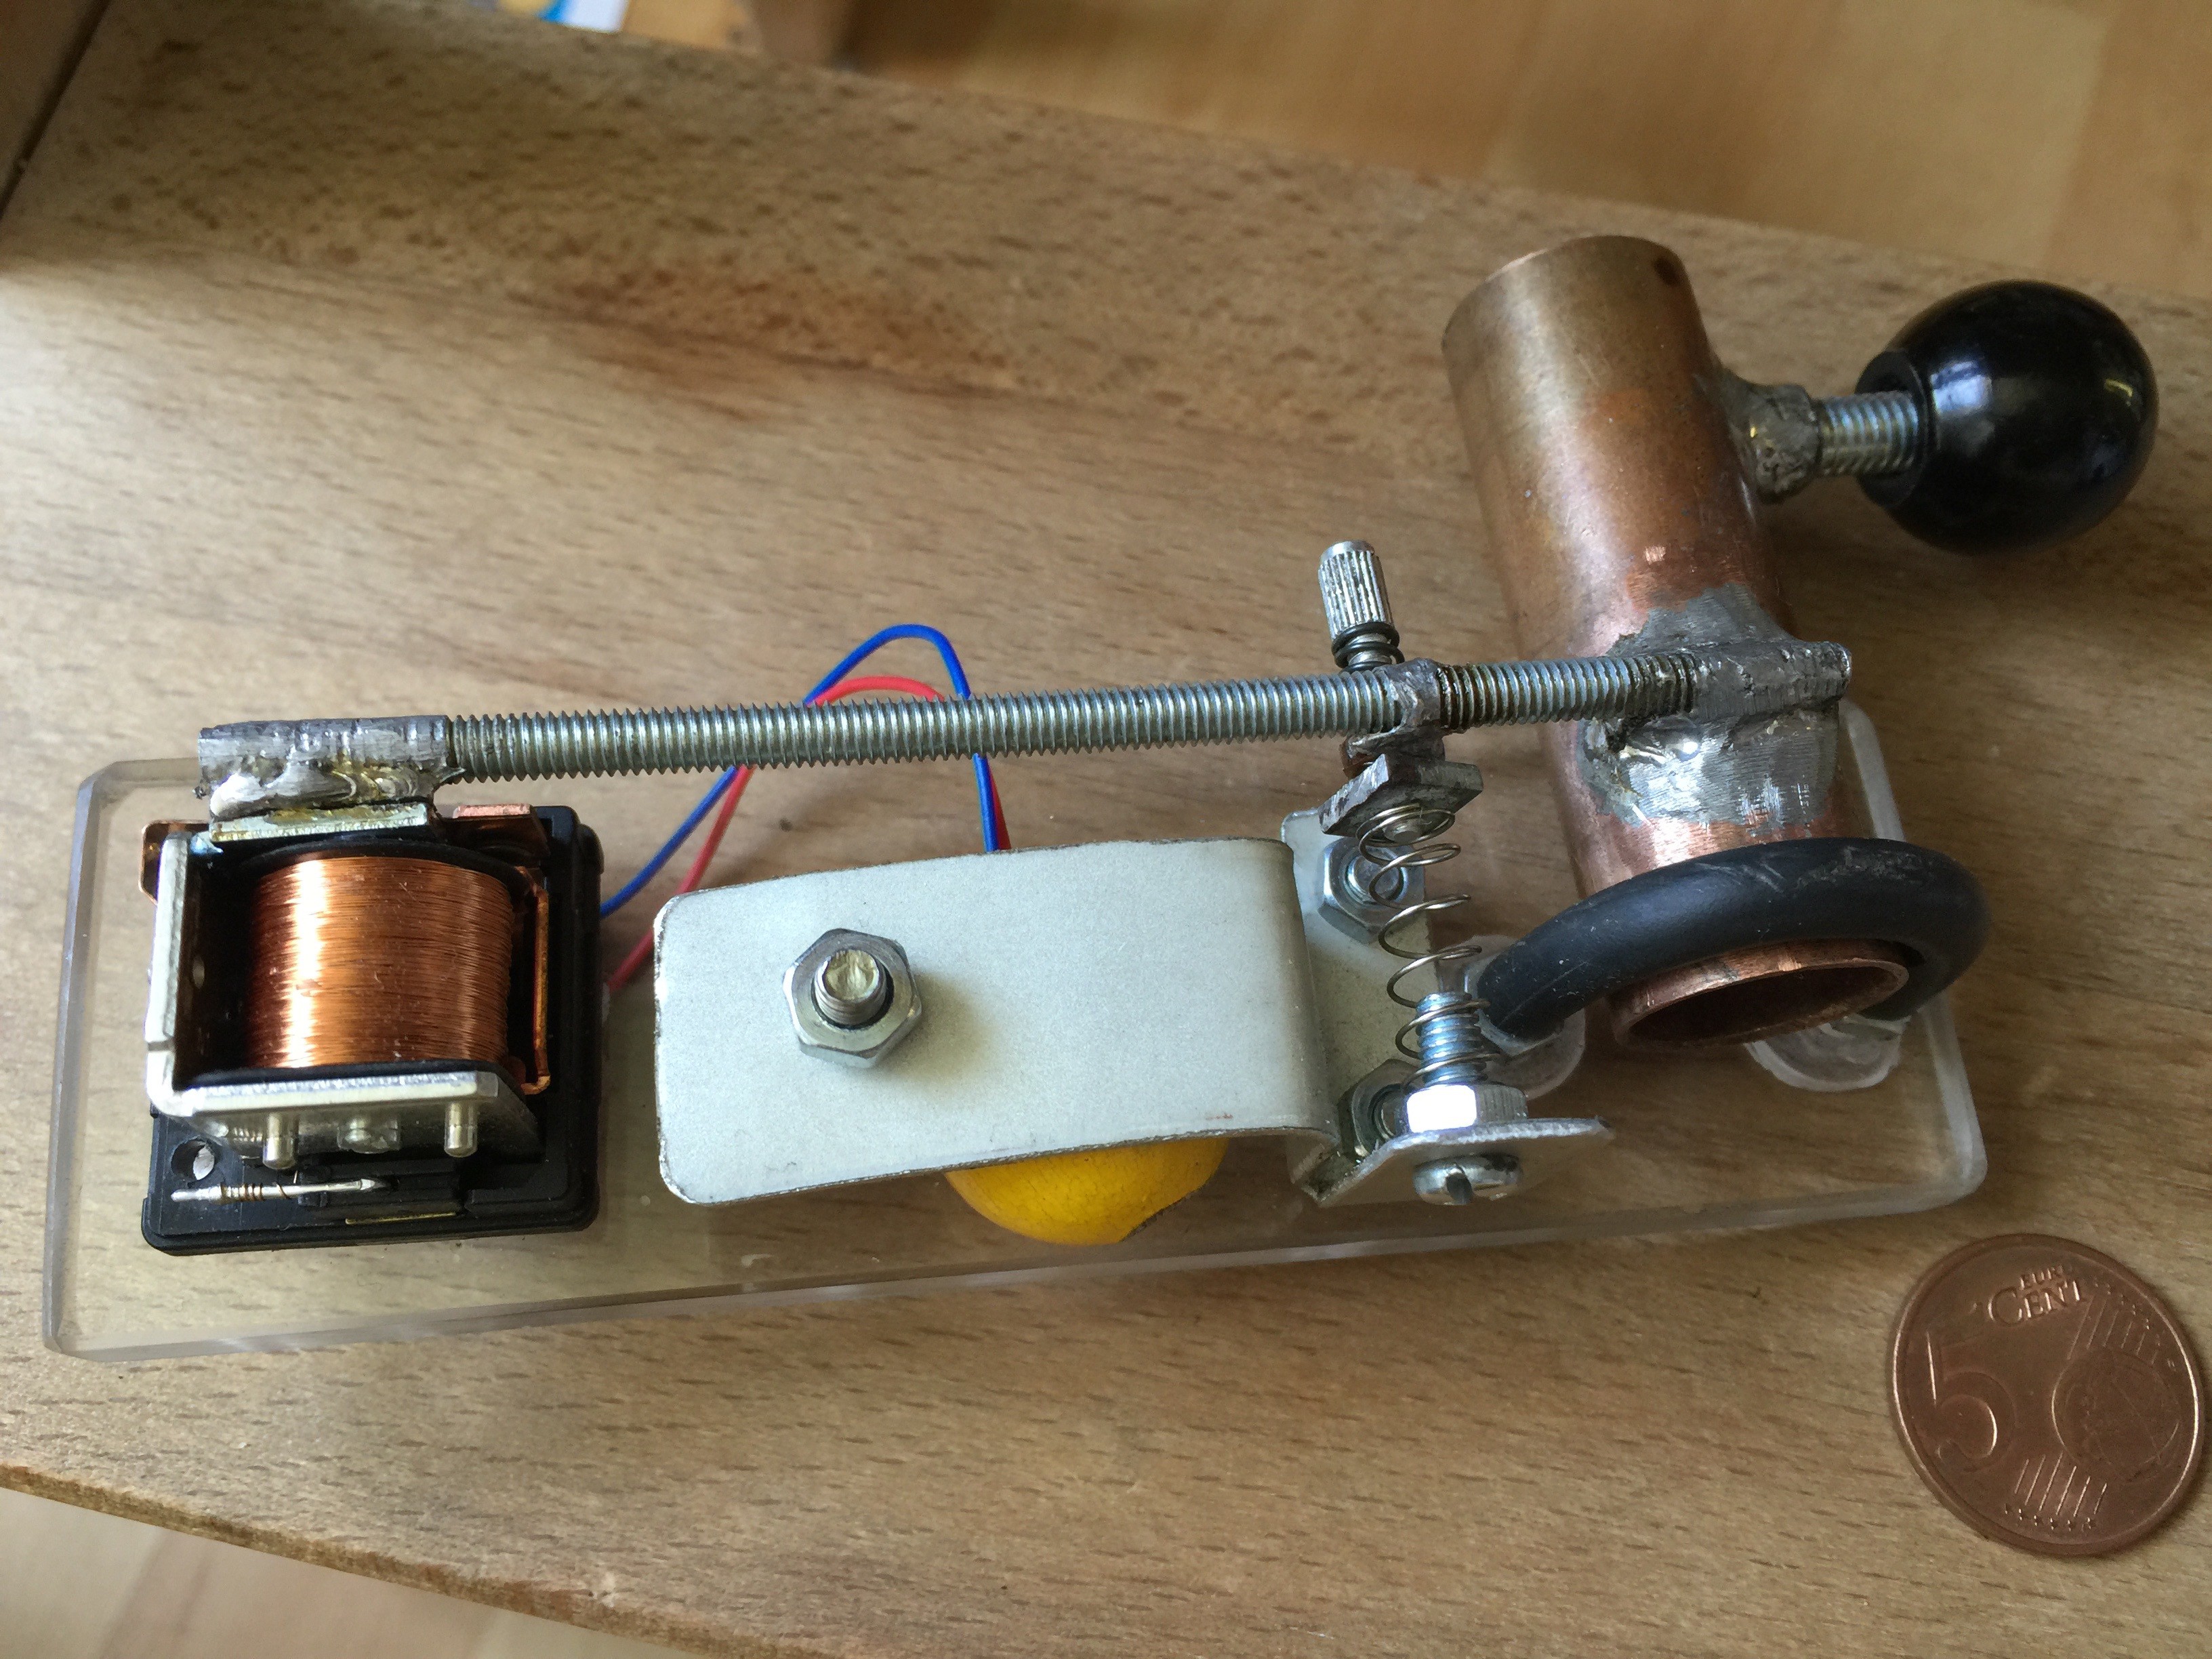
08/26/2015 at 10:41 • 0 commentsMy Digitac pal Uwe Reisinger could not be stopped to help me with the pen for the public presentation. Lasers are way too dangerous to expose the radiation publicly. Therefore he built a penholder head which will be connected instead of the laser module. Uwe is a maniac in hacking. Give him a box with scrap parts and he will do something useful with it.
![]()
For the pen holder he used an old relais a threaded rod a copper pipe and some screws. A spring balances the axis, so that the relays is strong enough to move the pen up and down. The pen will be clamped into the pipe which makes it possible to adjust the height anytime.
If there's enough time at friday, I will provide a short video for you to see it in action.
-
First test successful
08/26/2015 at 10:26 • 0 commentsThe first version is working . G-Code interpreter can read G-Code now. However, just linear interpolation is implemented yet. I used a pen and paper to make the geometry visible. The free software InkScape was used to generate the g-code. Inkscape is delivered with a gear generator. I taped a pen to the laser mounting to see the results. The laser will be turned on if I have laser protection glasses.
![]()
My spindle is a threaded rod which I purchased at the hardware store. It's a cheap one with a very small thread pitch. Therefore I use the steppers in Full step mode (speed). Right now the software comes without acceleration ramps. Because of the setup this doesn't matter there is no measurable step loss. In future there will be acceleration ramps, too. My Hackerspace Digitac celebrates it's 7th birthday this weekend. We will show a small exhibition. Therefore I try to finish the arc's of G-Code till friday, so that visitors can play around with it. My g-code implementation will stay very basic, I am more interested in the png-burning module and the implementation of logo and svg. This will be a huge load of work, therefore I will open source the project if the first setup is working. I am using arch linux on raspberry pi because of its minimalism.
12V Lasercutter
This laser cutter is made of a wooden base and some metal rails. It's very cheap and uses RaspberryPi for all, data and control.
 Jack Pearse


