Close
0%
0%

Weather Display

A WiFi-enabled wall-mounted lighted display for current weather conditions

Similar projects worth following
The goal of this project is to build a wall-mounted display for current weather conditions. Weather data will be pulled from the internet by an esp8266, and displayed with RGB LEDs driven by a TLC5940. Inspired by Jason Rolfe's Weather Icon Display.

After seeing Jason Rolfe's Weather Icon Display featured on HaD, I wanted to try to improve on the aesthetics of the design. My thought was instead of having separate icons to light up for each weather condition, to design a single icon that would light individual segments in proper colours to show current conditions. Current conditions will be pulled from NOAA METAR raw data by an ESP8266. The RGB LEDs for each segment of the icon will be driven by a TLC5940.

  • 1 × ESP-12E WiFi Microprocessor Breakout Board
  • 1 × TLC5940 Interface and IO ICs / Display Interface
  • 1 × TCRT5000 Sensors / Angle, Position

  • Assembly Part 1

    techav12/08/2015 at 03:05 0 comments

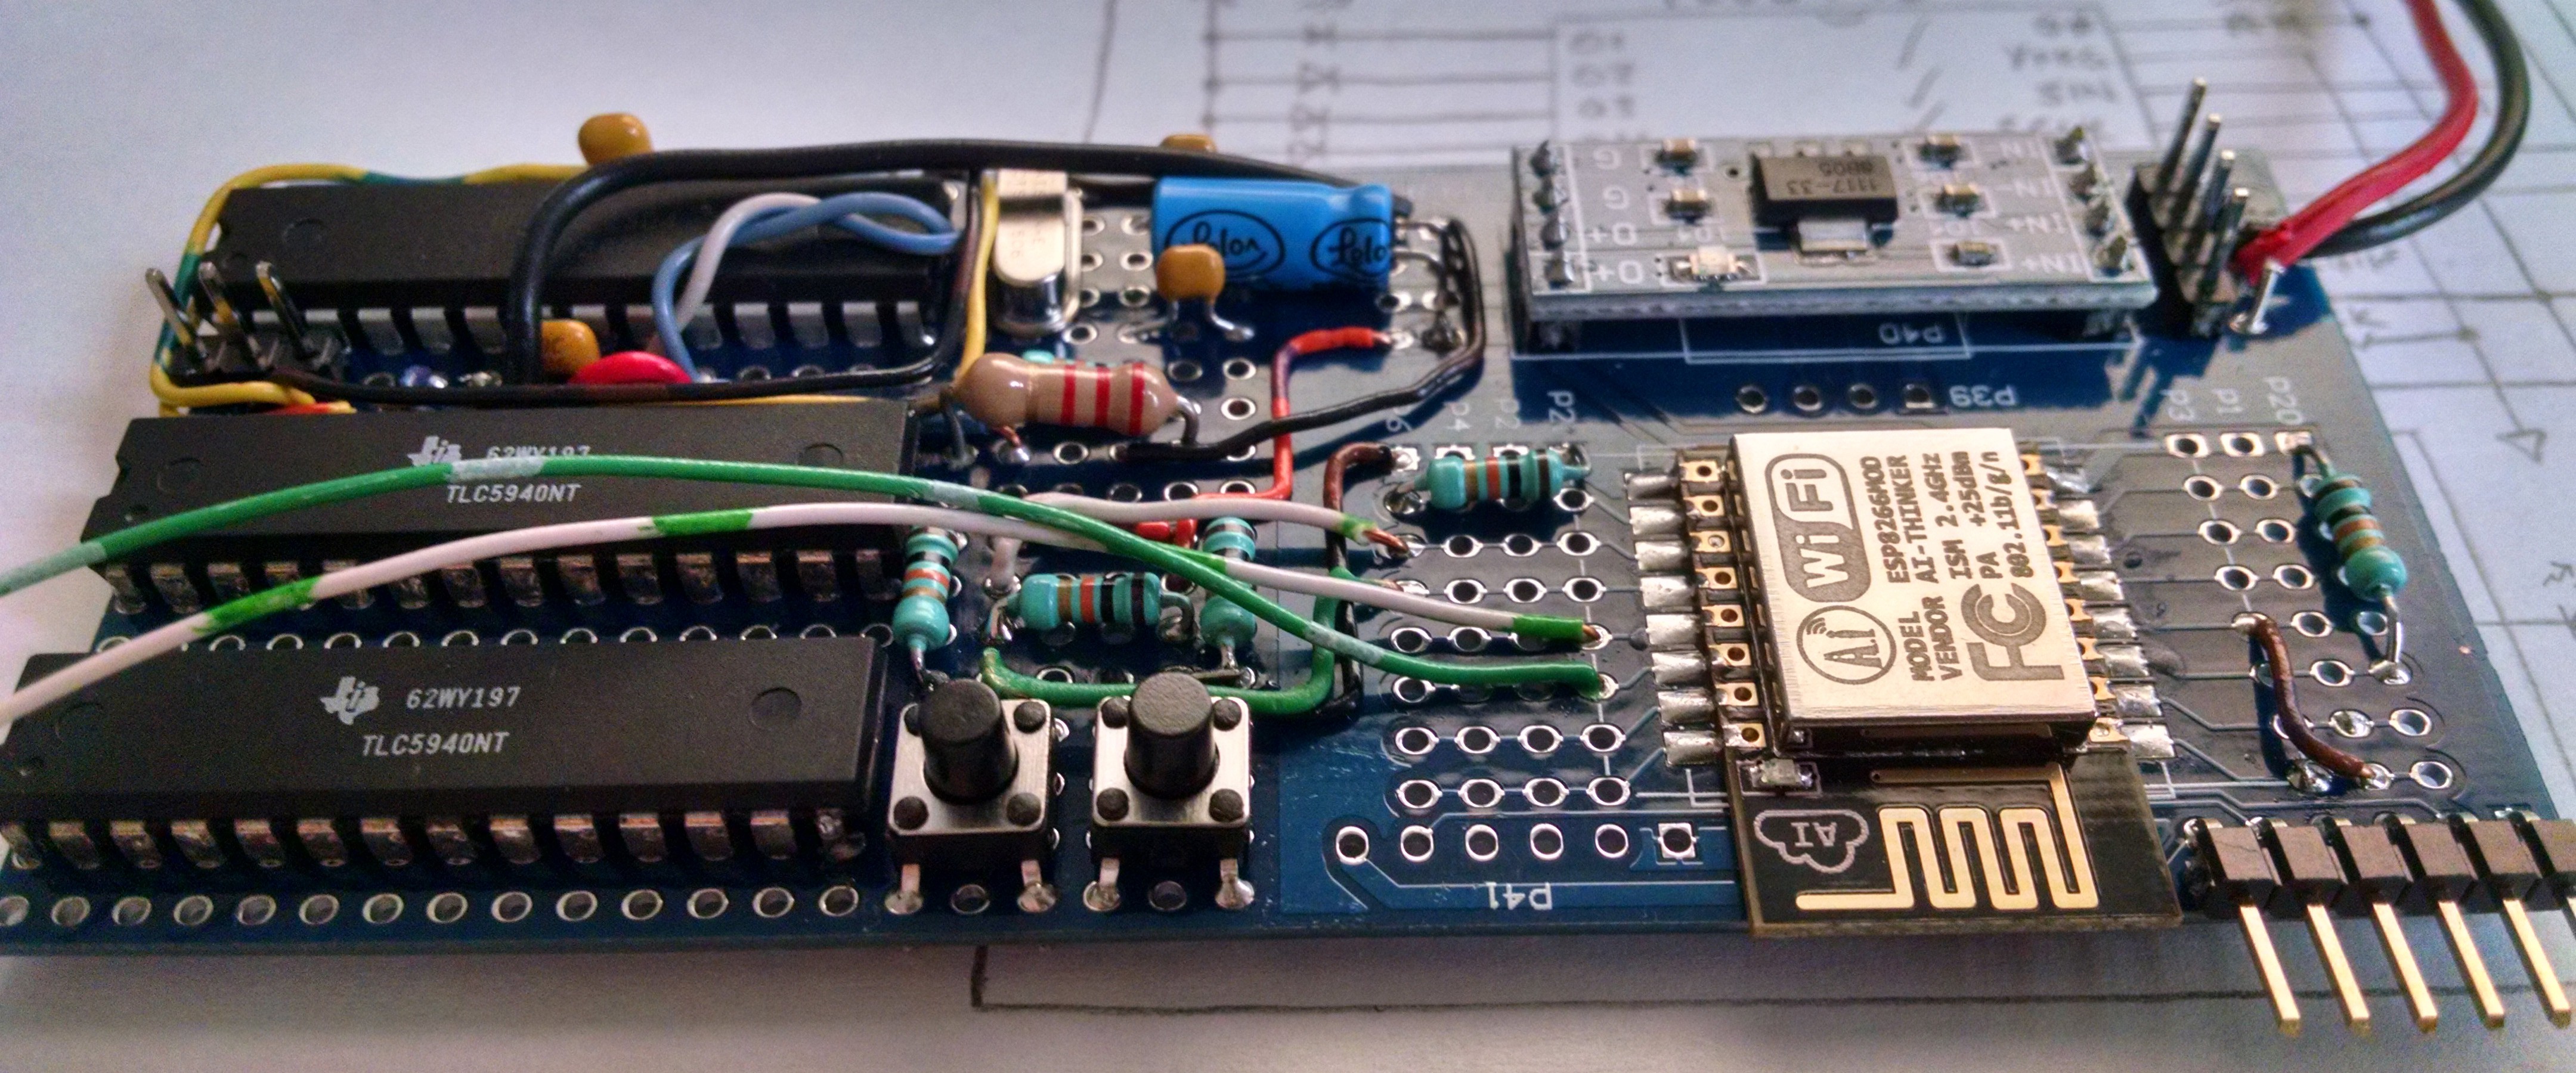
    Pieces are starting to come together. I have the circuit around 2/3rds completed. The ESP8266 side of the circuit has been working on-board, since that was the only way I could test it. The AVR is running and responding to serial commands and properly outputting the various clock and control signals. I've wired the AVR to the first TLC5940 and need to test its LED outputs before wiring in the second TLC5940. I've not yet updated the code for driving two TLC5940 chips, so I've added a header to Reset, TxD, and RxD to ease code updates (and testing/debugging). The board is looking pretty full, but I have just enough room to add the four remaining pull-up/down resistors my schematic calls for. I'm anxious to get all the pieces communicating together, but for once I'm trying to really take my time and test as I go. Still though, that green/white pair coming from the ESP8266 (Data and Clock to the AVR) is just begging to be routed to final positions.

    For curiosity's sake, I want to try laying out a board for this in Eagle to see if I can a double-sided board more compact than this.

    Read more »

  • The Inevitable Design Oversight

    techav11/30/2015 at 04:30 0 comments

    It was my intention all along to use two or three RGB LEDs per segment of the weather icon. The TLC5940 is perfect for driving multiple LEDs—constant current outputs capable of sinking up to 30 volts. But of course this assumes discrete LEDs. Common anode RGB LEDs cannot be wired in series to the different outputs. I wasn't thinking about that when drew out the schematic, wrote the display driver code, tested the display driver on the breadboard. This means I will need two TLC5940 chips so I can put two LEDs in each icon segment. The protoboard I'm working on will fit two 28-pin DIPs with plenty of room for supporting components. Three 28-pin DIPs is a very tight fit. If I could drive the TLC5940 from the ESP8266, this wouldn't be a problem at all. I am definitely not going to be figuring that out any time soon though.

    From what I've read so far, there's still quite a lot of debate over whether the ESP8266 has one PWM pin, or four PWM pins or no hardware PWM. At any rate, the PWM pins listed are the same as the SPI pins, and the SPI pins would be needed for shifting in the pixel data to the TLC5940. I'm sure it could be done, but again, programming is not my strong suit.

    So, I will be attempting to fit three 28-pin DIPs into a 17 by 14 protoboard space, with 9x6 left to the side for support components like the crystal for the AVR, pull-up resistors, etc. It will definitely push my point-to-point wiring skills. I think some of the things I learned wiring my Z80 computer will help though.

    I've drawn up my working schematic in Eagle and inserted it after the break.

    Read more »

  • Building the Display Driver

    techav11/28/2015 at 18:55 0 comments

    I definitely should have gone for another PWM chip. The TLC5940 has very specific clock requirements. It needs a steady clock on the GSCLK pin, and every 4096 clock pulses it needs a pulse on the BLANK pin. The ESP8266 is powerful enough that I'm sure that in the hands of a good programmer, it could handle this with ease. I am not a strong programmer. So I've decided to divide the control into two sections. The ESP8266 will download and parse the METAR data, encode it for display, then go into deep sleep when idle. I'll use an AVR for driving the display; it will receive the encoded data from the ESP8266 and use it to drive the TLC5940.

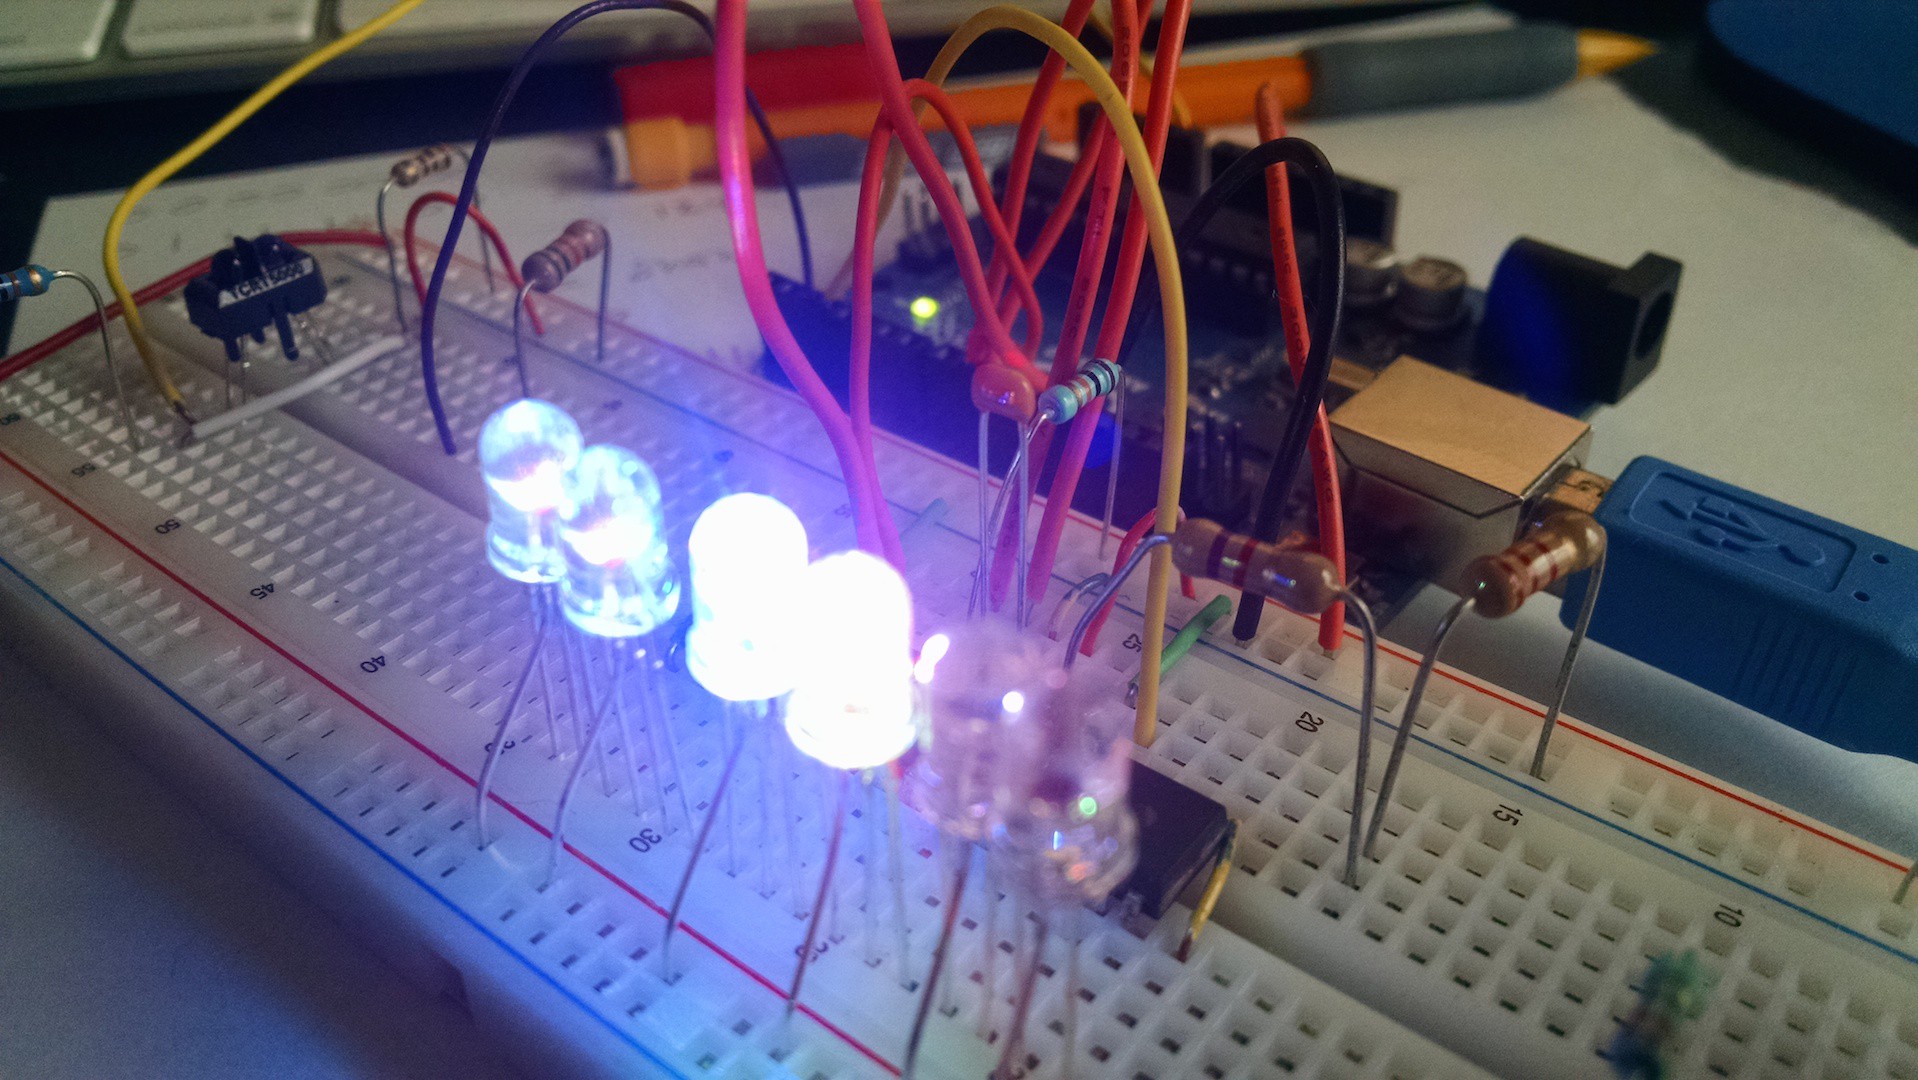
    I'm using everyone's favorite - the Arduino Uno for prototyping the display driver. The TLC5940 library is dead simple to use, and it took no time at all to have five RGB LEDs fading beautifully between colors. I also have a TCRT5000 optical sensor on the AVR to use as a proximity sensor. I don't want the LEDs to be lit all the time, but I also don't like the idea of having a visible button for triggering the display. I had considered attempting a capacitive button behind the glass of the display, but previous experiments with capacitive buttons were not very promising. I stumbled on the TCRT5000 looking through the eBay listings of the seller from whom I purchased the TLC5940. So to trigger the display, I'll have an IR proximity sensor.

    At this point, I have the AVR code just about ready. Since the TLC5940 library uses the hardware SDI, and I wanted to leave the UART free for debugging purposes, I've built an interrupt-driven soft SDI. The AVR INT0 is the clock; on each rising edge it will shift in one bit from PB0, and when 8 bits have shifted in, it will update the display with the new data. This arrangement lets the ESP8266 send the data to the AVR at any time without the need for stepping down any 5V signals from the AVR down to 3V3 for the ESP. For testing the display, I've added a crude serial menu and command system that allows directly setting individual channels on the TLC5940, or sending a data byte as though it came from the ESP.

    The next step from here will be programming the ESP8266 and getting it to interact with the AVR.

  • Beginnings

    techav11/25/2015 at 18:53 0 comments

    This is an odd step for me. Planning a project, drawing each piece, designing the schematic, and then actually ordering parts and building it. Usually I stop short of actually ordering anything. Hard to beat the price of the ESP8266 though.

    I've drawn out the icon, revised, revised, redrawn, redrawn, and finally I think I've got a decent icon that is compact enough to be a clean design, but still has all the essentials to give a good read of the various weather conditions possible. I'm using black matte board as the mask. Without anything so fancy as a laser cutter, a trusty x-acto suits me just fine.

    The first layer of the display will be a sheet of glass. I'm still searching for the best treatment for the glass. As much as possible I would like the segments of the icon to not be visible unless they are currently lighted. The best thing would be heavy window tint or even a 2-way mirror. So far though, I've not been able to find either in a form or price point suitable for this project.

    Behind the glass will be the icon mask and then a sheet of vellum to help diffuse the LEDs. Behind that is another matte board mask to separate sections from each other. The final layer will be foam core board which will hold the LEDs in place. Circuit boards will be mounted on the back of the foam board, and the whole thing placed in a black frame.

    So, currently I have the icon mask and the light mask cut, and the ESP-12E kit from ebay has come in, so I have that assembled. I've ordered a TLC5940 to drive the LEDs, but I'm concerned it may not be so easy to drive from the ESP8266. I probably should have looked for a PWM driver that doesn't have such specific clock requirements. I suppose if it comes to it, I can always throw in an AVR to handle the display, and let the ESP sleep whenever it's not pulling data.

View all 4 project logs

Enjoy this project?

Share

Discussions

JahFyahh wrote 05/13/2017 at 22:02 point

Hi, I was wondering, did you ever finish this project? I am curious about the code and how you did the interaction between the AVR and the ESP.

  Are you sure? yes | no

techav wrote 05/14/2017 at 04:52 point

This project got shelved when I realized one of my TLC5940 chips was bad. I've not had time to revisit and come up with a better plan.

The AVR was programmed to shift in a single byte from the ESP over an SPI-like interface. The AVR would decode that byte into the desired status for the LEDs. I got the decoding working, but had not fully debugged the interface between AVR and ESP before hitting my roadblock 

  Are you sure? yes | no

JahFyahh wrote 05/14/2017 at 08:31 point

That is unfortunate, would it be possible to share what you have so far? That way I have a starting point. I am planning to build a led stairs with it and use the ESP to change the modes

  Are you sure? yes | no

techav wrote 05/14/2017 at 20:02 point

I would not recommend my approach - especially since I never got it working. I'd recommend just going with serial communication between ESP and AVR. 

  Are you sure? yes | no

Jeroen van der Velden wrote 11/30/2015 at 08:11 point

Fun project, I will keep an eye on your progress!

  Are you sure? yes | no

Similar Projects

Does this project spark your interest?

Become a member to follow this project and never miss any updates