Open Autonomous Domestic Robots
Open Autonomous Domestic Robots – An open source system for domestic cleaning robots using low-cost hardware
Open Autonomous Domestic Robots – An open source system for domestic cleaning robots using low-cost hardware
To make the experience fit your profile, pick a username and tell us what interests you.
We found and based on your interests.
While I'm putting the design for the OpenADR mop module together, I decided to do a quick test of the 3D printed pump I'll be using to move the water/cleaning solution from the internal reservoir to the floor. The pump I am planning to use is a 3D printed peristaltic pump from Thingiverse.

For my test setup, I used the another of the cheap, yellow motors that I powered the wheels on the main chassis and the brushes on the vacuum module to drive the pump. I threaded some surgical tubing from a full glass of water, through the pump, and into an empty glass. I then ran the motor off of 5V.
Overall the pump ran great, albeit a little slower than I anticipated. The next step is integrating it into the mop!As I stated in my post on mop design decisions, the maximum water capacity (and by extension the area that can be mopped by the robot) is heavily dependent on the how much of water the mop can absorb. Ideally, the water tank should run out just when the mop head is saturated with water (and thus not leave dirty water that it can't suck up behind on the floor). To figure what kind of a range I'm working with, I decided to measure the absorbency of the microfiber cloths I purchased to use as my mop head. The product page says the cloth can carry up to 8x its weight in water, but I've been burned before and wanted to put that to the test.
The way I tested the absorbency was by measuring the weight of the microfiber cloth at various levels of wetness; dry, damp, saturated, and oversaturated. I performed the dry measurement by weighing the cloth fresh out of the packaging; the damp measurement was performed by soaking the cloth in water and wringing it out; for the saturated measurement I simply held the soaked cloth over the sink until it no longer dripped; and lastly the oversaturated measurement was taken by weighing the cloth immediately after soaking it in water.
The most likely wetness of the cloth in a real-world scenario is probably somewhere between damp and saturated, since a dripping mop head would still leave dirty water on the floor.
The dry cloth weighed in around 33g, in line with the data found on Amazon. If I trust the advertising, this cloth should hold around 250mL of water. Let's see about that...
The wet cloth was 106g, so roughly 75mL of water was absorbed (since 1 mL of water weighs a gram).
In the saturated case, the cloth weighed 207g and held about 175mL of water.
Even the unrealistically oversaturated cloth held only 200mL of water, which is still less than product's claim of 8x its weight.
While this microfiber cloth clearly is not as absorbent as was promised, the 175mL of water held by the saturated cloth still bodes well for the overall capacity of the mop module. It would only take a single cloth to match the capacity of the Braava Jet, and four or five to match the capacity of the Scooba, assuming that the entire cloth gets saturated during cleaning. I still have to design the mop module and determine how I'll arrange the cloths and attach them to the module, thus dictating how many cloths I can fit in the design, but these initial results seem promising.
In my last post, I described the beginnings of the first module for OpenADR, the vacuum. With the Automation round of the Hackaday Prize contest ending this weekend, though, I decided to start working on a second module, a mop, before perfecting the vacuum module. The market for robotic vacuum cleaners is looking pretty crowded these days, and most of the design kinks have been worked out by the major manufacturers. Robotic mops, on the other hand, are far less common with the only major ones being the Scooba and Braava series by iRobot. Both of these robots seem to have little market penetration at this point, so the jury's still out on what consumers want in a robotic mop.
I've been thinking through the design of this module for a while now. The design for the vacuum module was simple enough; all it required was a roller to disturb dirt and a fan to suck it in. Comparatively, the mop module will be much more complex. I don't plan on having any strict design goals yet for the mop like I did with the vacuum given that the market is still so new. Instead, I'll be laying out some basic design ideas for my first implementation.
The basic design I envision is as follows: water/cleaning solution gets pumped from a tank onto the floor, where it mixes with dirt and grime. This dirty liquid is then scrubbed and mopped up with an absorbent cloth. I know that probably sounds fairly cryptic now, but I'll describe my plans for each stage of this process below.
Both the Scooba 450 and Braava Jet have tanks (750mL and 150mL, respectively) that they use to store cleaning solution or water for wetting the floor. The simplest way to add a tank to the mop module would be to just integrate a tank into the module's 3D printed design that I described in an earlier post. This is a little risky, however, as 3D printed parts can be difficult to make water tight (as evidenced by my struggles with sustainable sculptures). Placing the robot's electronics and batteries near a reservoir of water has to potential to be disastrous. A much safer bet would be to use a pre-made container or even a cut plastic bottle.
Being an optimist, however, I'd rather take the risk on the 3D printed tank to take advantage of the customizability and integration that it would provide. In the case of the sculptures, I wanted to keep the walls thin and transparent. I won't have such strict constraints in this case and can use a much more effective sealant to waterproof the tank. And just to be on the safe side, I can include small holes in the bottom of the chassis (i.e., around the tank) near any possible leaks so the water drips out of the robot before it can reach any of the electronics.
The next design decision is determining how to actually get the water from the tank to the floor. While I looked for an easily sourceable water pump, I couldn't find a cheap one that was small enough to fit well in the chassis. Luckily there are some absolutely amazing, customizeable, 3D printed pumps on Thingiverse that I can use instead!
The biggest complaint when it comes to robot mops seem to be a lack of effectiveness when it comes to scrubbing dirt, especially with dirt trapped in the grout between tiles. The Braava uses a vibrating cloth pad to perform its scrubbing while the Scooba seems to use one of the brushed rollers from a Roomba. Both of these options seem to be lacking based on users' reviews; the best option would be to use scrubbing brushes designed especially for use with water (rather than the Roomba's, which are designed to disturb carpet fibers during vacuuming). As with the vacuum module, however, I had a hard time finding bristles or brushes to integrate into my design. Unfortunately using a roller made of flexible filament (i.e., my solution for the vacuum module) isn't an option in this case, since it's not capable of the same kind of scrubbing efficacy as a regular mop.
For my first version, I'm just going to use a microfiber...
Read more »Now that the vacuum module is mostly assembled, it's time for the first test! I basically just wanted to make sure that there was enough suction power generated by the fan to pull in dirt and debris. Here's how the module looks so far:

As I mentioned in my previous post, I didn't design a lid yet for the vacuum module because I wanted to use a clear coating on the top for now. Having the interior of the dust bin visible will make it easier to test and view what is going on inside. For now, I've sealed the top of the dust bin by taping on a cut up Ziploc bag.
The blower fan is rated for 12V, so I have it wired directly to my 12V bench supply using alligator clips.
The test itself was performed on standard dog hair (since I have so much of it lying around). I had to feed the hair directly into the dust bin input because the vacuum module isn't yet attached to the main robot chassis and so there's no direct airflow channel that passes through the roller assembly and into the dust bin. I'm considering integrating the roller assembly directly into the vacuum's body so the whole module is self-contained and the complete path of dust through the vacuum can be tested without having to attach it to the main chassis.
So the first test proved moderately successful! The hair did get slightly stuck, but that can mostly be attributed to the flexible Ziploc bag material being sucked downward, thereby decreasing the height of the opening where the hair entered the dust bin. For the next revision I'm probably going to curve the input air channel so hair and dust isn't making so any 90° turns. Next up, testing the whole thing as part of the main chassis!

Now that the navigation functionality of the main chassis is mostly up and running, I've transitioned to designing modules that will fit into the chassis and give OpenADR all the functions it needs (see my last post). The first module I've designed and built is the vacuum, since it's currently the most popular implementation of domestic robotics in the market. Because this is my first iteration of the vacuum (and because my wife is getting annoyed at the amount of dust and dog hair I've left accumulating on the floor "for testing purposes"), I kept the design very simplistic: just the roller, the body (which doubles as the dust bin), and the fan.

The brush assembly is the most complicated aspect of the vacuum. In lieu of finding an easily sourceable roller on eBay, I opted to design the entire assembly from scratch. I used the same type of plain yellow motors that power the wheels on the main chassis to drive the roller.
The rollers themselves consist of two parts, the brush and the center core. The brush is a flexible sleeve, printed with the same TPU filament used for the navigation chassis's tires, that has spiraling ridges on the outside to disturb the carpet and knock dust and dirt particles loose. The center core is a solid cylinder with a hole on one end for the motor shaft and a protruding smaller cylinder on the other that is used as an axle. One roller is mounted on either side of the module and are driven by the motor in the center.

To print the vacuum module, I had to modify the module base design that I described in my last post. I shortened the front, where the brush assembly will go, so that the dust will be sucked up between the back wall of the main chassis and the front of the vacuum module's dust bin and be deposited in the dust bin.

For the fan, I'll be using Sparkfun's squirrel blower. I plan to eventually build a 3D model of the fan so that it fits snugly in the module, but in the meantime, the blower mount is just a hole in the back of the module where the blower outlet will be inserted and hot-glued into place. In the final version, I will include a slot for a carbon filter in this mount, but given that I'm just working with a hole for the blower outlet in this first version, I cut up an extra carbon filter from my Desk Fume Extractor and taped that to where the air enters the blower to make sure dust doesn't get inside the fan.

The blower itself is positioned at the top of the dust bin with the inlet (where the air flows in) pointed downwards. Once the blower gets clogged, the vacuum will no longer suck (or will it now suck?), so I positioned the inlet as high as possible on the module to maximize the space for debris in the dust bin before it gets clogged.
The rest of the module is just empty space that serves as the vacuum's dust bin. I minimized the number of components inside this dust bin area to reduce the risk of dust and debris causing problems. With the roller assembly placed outside the bin on the front of the module, the only component that will be inside of the dust bin is the blower.
With a rough estimate of the dimensions of the dust bin, the vacuum module has the potential to hold up to a 1.7L! This is assuming that the entire dust bin is full, which might not be possible, but is still substantially more than the 0.6L of the Roomba 980 and 0.7L of the Neato Botvac.
There are a few things I'd like to improve in the next version of the vacuum module since this is really just alpha testing still. The first priority is designing a fan mount that fits the blower and provides the proper support. Going hand in hand with this, the filter needs an easily accessible slot to slide in before the fan input (as opposed to the duct tape I am using now).
I also want to design and test several different types of rollers in order to compare efficiency. The roller I'm using now turned out much stiffer than I'd like so, at the very least, I need to redesign them...
Read more »While I've been working primarily on the vacuum component of OpenADR, my eventual goal is for this to be just one of several, interchangeable modules that the robot can operate with. By making the whole thing modular, I can experiment with a range of functions without having to recreate the base hardware that handles movement and navigation (i.e., the hard stuff!). Today I wanted to share a bit more about how I'm building in this functionality, even though I'm only working on one module for now.

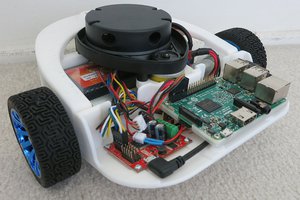
The OpenADR modules will plug into the opening that I have left in the main chassis. The modules will slide into the missing part of the chassis (shown in the picture above) to make the robot a circle when fully assembled. The slot where the module will be inserted is a 15o x 150 mm square in the center and a quarter of the 300 mm diameter circle of the whole robot. The picture below might give you a better sense of what I'm describing.

While each of the modules will be different, the underlying design will be the same. This way, regardless of which module you need to use (e.g., vacuuming, mopping, dusting), everything should fit nicely in the same main chassis with minimal modifications needed.
To aid in the design of the separate modules, I've created a baseline OpenSCAD model that fits into the main chassis. The model is broken up into four pieces in order to make printing the parts easier, and I've included bolt mounts to attach them together. The model also includes tracks that allow the module to slide into place against the ridges that I have added to the adjacent walls of the main chassis. I'll build off of this model to create each module to be sure that everything is easily interchangeable and fits smoothly (especially with my new filament!).
The great thing about OpenADR being modular is that I can always add new modules based on what would be useful to those using it. So this is where I need your help. What functionality would you like to see? Are there cleaning supplies or techniques you use regularly on your floors that could be automated?
Between the end of my development cycle at work and my vacation last week, I haven't had as much time as usual to work on OpenADR. I also hit a big snag as far as 3D printing the parts goes and learned a lesson about 3D printing in the process: invest in good quality filament.
A few weeks ago when I ran out of the black, PLA filament I was using and switched over to white Argos PLA given the lower cost. I started noticing my extruder making worrying noises a little later but did not immediately make the connection to the new, cheaper filament. The extruder motor had started skipping and made clicking noises as it unsuccessfully tried to feed plastic.
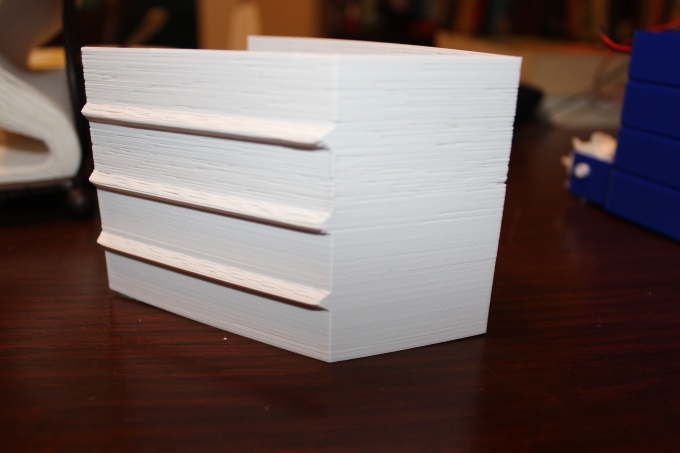
The print layers were unevenly laid down and even missing in places. Above is a picture of one of the navigation module's sidewalls printed using this filament.
Assuming something had gone wrong with the printer, I started searching online and trying to debug the issue with the extruder. I tightened it, loosened it, changed the hot end temperature, and added a cooling fan to the motor, but I was still unsuccessfully printing even at 10mm/s (the Printrbot Simple Metal is rated for 80mm/s). Finally, I ordered some new filament and, lo and behold, the problem went away! I was back to printing out parts at normal speed.
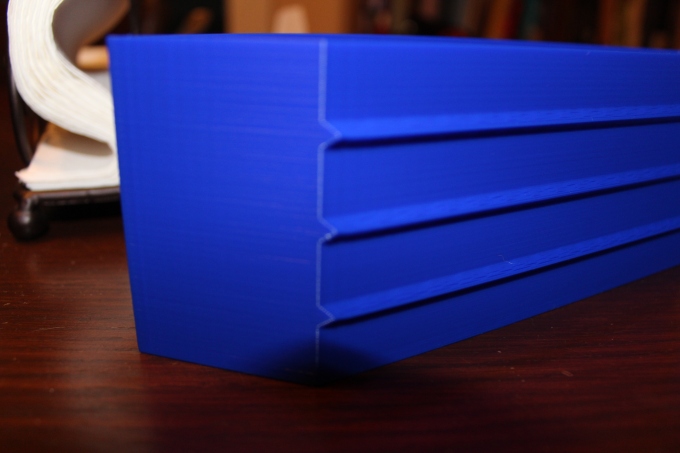
Above is the sidewall printed with the new filament. The layer lines are barely visible when printing with roughly the same settings as the white PLA.
So lesson learned, good quality filament is very important! I tried using cheap filament and paid for it. I've fallen a bit behind where I want to be on OpenADR, but unexpected delays are all part of the design process and I'll work to catch up before the contest ends on Monday.
With the previous version of the chassis in a working state, I only made two changes for version 0.3. The first change was a major one. As I mentioned previously, I was still a little unhappy with the ground clearance on the last version of the chassis. It ran well on hardwood and tile floors, but tended to get caught on the metal transition strips. It also still had some trouble on the medium-pile carpet in my apartment.
Increasing ground clearance required some significant changes to the chassis design due to the way I was connecting the motor. In my last revision of the chassis (0.1 to 0.2), all I had to do to increase the ground clearance was lower the motor mount so it was closer to the chassis base. However, since I already moved down the motor almost as far as it could go in the last revision, I didn’t have any more room to do the same here! Alternatively I could have just increased the diameter of the wheel, but I was concerned about the motors not having enough torque to move the robot.
The only option left was to no longer directly drive the wheels from the motors and instead use gears. Using gears makes it possible to offset the motor from the base of the chassis but still maintain a strong connection to the wheels. Another benefit is that it’s possible to increase the torque traveling to the wheels by sacrificing speed.
module gear(num_teeth)
{
    num_slices = 20;
    //rotate_angle = ((360 / num_teeth) / 2);
    rotate_angle = 0;
    union()
    {
        for (zScale = [-1, 1])
        {
            scale([1, 1, zScale])
            linear_extrude(height=5, center=false, convexity=10, twist=rotate_angle, slices=(num_slices / 2))
            {
                import (file = str("Gear_", num_teeth, ".dxf"), layer = "", origin = 0);
            }
        }
    }
}
To design the gears, I used a gear generator site to generate a 16-tooth and 8-tooth gear DXF file. Using OpenSCAD’s import function, I imported the DXF files and then projected them linearly to create the 3D gear object.

For the small gear, I subtracted the motor shaft out of the 3D object so it could mounted to the motor.

I merged the large gear with the wheel object so that the wheel could be easily driven. I’m now using a 2mm steel axle to mount the wheel and gear combo.


By slightly repositioning the motor, I was able to move the gears into place so the wheel was properly driven. By mounting the 8-tooth gear to the motor and the 16-tooth gear to the wheel, the wheel now sees a 2x increase in torque at the cost of running at 0.5x the speed. Additionally, with the wheel no longer directly mounted to the motor, I was able move the wheel axle lower. This allowed the wheel diameter to be decreased from 50mm to 40mm while still increasing the overall ground clearance from 7.5mm to 15mm.
I did the above calculations for the force and speed on version 0.2 of the chassis as well as the new force and speed based on the motor specs I pulled from Sparkfun’s version of this motor.
Another part of the chassis that had to change in order to increase ground clearance was the caster. As shown above, version 0.2 had a hole in the chassis to make room for a semi-spherical caster wheel directly mounted to the chassis floor. Doubling the ground clearance, however, would have necessitated the caster, and by extension the hole, increase to a much larger size.

To avoid this, I made the caster entirely separate from the chassis. With two mounts, a 2mm steel axle, and a ellipsoid wheel, the caster no longer needs large holes in the chassis and frees up some internal space. I’m a little concerned that these new casters won’t be able to handle the transitions between carpet and hardwood well, due to their smaller size, but I can always revert to using a hole in the chassis and make them much larger.
The second change I made to the chassis was a minor one. In my mind, the eventual modules that will go with the navigation chassis will be plug and play, meaning no need for screwing or unscrewing them just to swap modules. To accomplish this I knew I needed some sort of mounting method inherent...
Read more »
Above is the final circuit for the four cell LiFePO4 charger. I tweaked a few parts of the original design for safety, testing, and power considerations. A diode has been added after the main voltage output to allow for the capability to parallel multiple battery packs. Another thing is that I’m using generic PNP and power resistors so that the maximum charging current of the design can be adjusted as necessary. Since the charging current of a battery is loosely based on its capacity (see C Rating), allowing for a wide range of currents makes it theoretically possible to use any battery size. I also plan on using a charge current of ~100mA for my first go at this. Doing so allows the batteries to charge slower and give me more resolution when testing the charging circuitry.
The components I’m using from this design are as follows:

One last thing to note is that I purposefully chose to use through hole parts for the sake of debugging. The excess space and exposed connectors make it easier to use alligator clips to measure the voltages and signals, making sure that everything is operating as it’s supposed to.
Soldering, assembly and testing!
With the charging circuit already designed for the LiFePO4 battery charger, I had to figure out a way to simulate a battery in order to simulate the circuit. A battery is really just a voltage source with some internal resistance, so for the purposes of my simulation I just placed a .02 Ohm resistor in series with a voltage source.
To be realistic, I had the voltage source roughly follow the charging voltage curve of a LiFePO4 cell. Just to be thorough, I also slightly varied the voltages of each of the four cells so that they were always slightly out of balance. This better reflects real world conditions since cells are never identical and the circuit needs to be able to properly balance cells.

For each of the four duplicate cell circuits, I measured the current through the battery cell (using R2, R3, R10, & R14), the current through the TL431 (using R4, R7, R11, & R15), the current through the PNP transistor (using Q1, Q2, Q3, & Q4), and the voltage across each cell.

The results show almost identical voltage curves for each of the four circuits. The charging voltage of the constant current circuit follows the voltage of cell, maintaining a consistent 1A of current through each of the cells. Once the desired 3.65V is reached for each of the cells, the current rapidly tapers off and maintains that voltage, continually trickling top-off current to each cell. The transistor is then turned on and routes the excess current around the battery, correctly balancing each cell.
Overall everything looks correct and is performing as expected, so next up is putting this all on a PCB. My next post will show the final schematic and board layout for the charger.
Create an account to leave a comment. Already have an account? Log In.
Keith, I am amazed by reading through your thoughts and Power Packed Action. Are there any other updates to the project on Vaccum/Mopping?
Could you please provide URL for 3d cad drawing of chasis so I can try to order 3d printing?
Looks awesome! Love the chassis. Would we be able to get our hands on the 3D print files? in order to modify and print ourselves?
Surely! The files for the chassis are in the linked GitHub page under Nav/Mechanics. Let me know if you have any questions.
Do you mean the ultrasonic sensors? They have can be off by as much as 1cm in the worst cases, but it's possible to greatly increase the accuracy using a temperature sensor as explained in this instructable (http://www.instructables.com/id/Improve-Ultrasonic-Range-Sensor-Accuracy/?ALLSTEPS).
I've recently seen posts about roombas coming into contact with dog poop and then painting the town brown. Perhaps a moisture sensor in the vacuum area would prevent such things and put your project ahead of the competition.
This is something I've also been thinking about. My worry with humidity sensors is that if the robot doesn't encounter the poop for several hours, it'll dry out and won't be able to detect it. My current thoughts are using the floor color sensor to somehow detect sudden changes in floor color and use that to extrapolate if the robot is spreading something along the floor.
I need this in my life - we both have the same train of thought regarding hoovering!
I don't really have any 3D printing skills or facilities so I've been thinking of creating a chassis for one of those handheld vacuums, but I'm definitely interested in following your version!
I hope to start selling kits or raw 3D printed parts once I get the chassis to version 1.0, so stay tuned!
I think what you are doing is amazing. I've just recently "found" a Roomba sitting around in this house and put it to work every morning in my lab/room where it warms my heart. One thing you might keep in mind is that the leap from a household robot to a lawn mower is actually quite small. The commercial lawn robots ($1,000-$3,500) essentially map out the perimeters using a buried wire and then just go back and forth or simply bounce around like a roomba but kept in bounds by the wire.
They solve the clippings issue by simply assuming that they will be out every day trimming off one day's growth using their puny 1" blades ... The one problem with these machines is the inability to open a gate to go to the backyard and the fact that at $1K+ they have a habit of being stolen ...
Thanks David! I knew about the buried wire, and that's certainly something I wanted to find alternative solutions for when I develop the outdoor chassis, but I didn't consider the idea of daily trimmings. You're right, that would significantly reduce the complexity and make the step between the two chassis much smaller!
And I'll certainly keep in mind the issues of yard accessibility and theft when I start development. Thanks for your input!
This is really cool. Do you have a demo video as yet?
Hey Orlando! My "Data Visualization" and "Wall Following" log entries have good videos of the robot moving around my kitchen hallway, if that's what you mean.
Yes you're right! It will probably take to much room in the front.. You could some contact switches to get different distances from the floor, often the simplest solution is the best one.. anyway very nice project! If you change your mind about the boat I'll be happy to help if you need suggestions :)
That's a very nice project! Just wondering that maybe you can put an ultrasonic distance sensor even under the bot to make it able to "see" stairs or similar :) I'm working with ultrasonic distance sensors as well but on a boat lol https://hackaday.io/project/10652-green-powered-sailboat :)
Great idea! The only thing is the HC-SR04's have a minimum sensing distance of 2cm so it'd take up a lot of room in the front of the Nav Unit. I have been toying around with the idea of making a custom ultrasonic sensor, though. That way I can try and decrease the minimum distance and I could add some additional signal processing to detect how soft the ground is to identify whether the vacuum is on carpet or tile/hardwood floors.
And I love your project! At one point I was considering making an RC boat with a 3D printed hull, but I've put that idea on the backburner until this is finished.
Become a member to follow this project and never miss any updates
 Tim Wilkinson
 schuhumi
 Roger
Roger
 Audrey Robinel
Is this project still active?