Jeremy
-
Raspbian packages & upcoming features
05/08/2020 at 20:12 • 4 commentsFirst of all, I think it's worth mentioning that RaspiDrums, the predecessor of eXaDrums, was created exactly 5 years ago! To be fair, eXaDrums is a fork of RaspiDrums, and has been created in September 2015, with the intent to become a fully functional software drum module.
Five years later, eXaDrums is usable as a drum module, and can be entirely built at home, using eXaDrums-pcb, libexadrums, and eXaDrums. The PCB is available on OSHPark and the one I soldered has been working perfectly since September 2018. As for the software, Raspbian packages are available on the eXaDrums github repo. The software can be installed on Debian (unstable and testing) and Ubuntu since version 19.10.
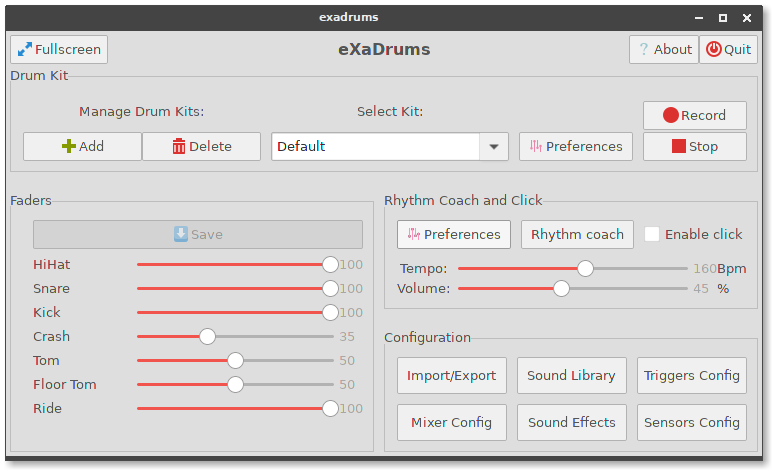
Right now, eXaDrums is stable, but not feature complete. The next version (0.5.0) will look like this:
![]()
A new important feature, is the fullscreen button. For years, eXaDrums has started in fullscreen mode on Raspberry Pi, and in a sort of popup on desktop. Now, on all systems it will start as a windowed program, just like any other software, and there will be two ways to get trigger the fullscreen mode.
The first method is simply to click or tap on the "Fullscreen" button. The second option, is to start exadrums with the -f or --fullscreen option directly.
Other features include a trigger gain, which will help if your sensors are not sensitive enough, as well as resetting, importing or exporting your module configuration. That includes all your kits, presets, and sounds!
Bug fixes also ship with version 0.5.0, and the user experience is improved, especially when using SPI sensors (like MCP3008, etc.).
Of course, you always get very low latency, and great sound quality!
-
eXaDrums available in debian
11/23/2019 at 19:08 • 0 commentsIt's been a while, actually, a year, since I last posted a log here...
The reason is that much work has been done on eXaDrums during that time. The GUI hasn't changed much, but the library has evolved quite a bit.
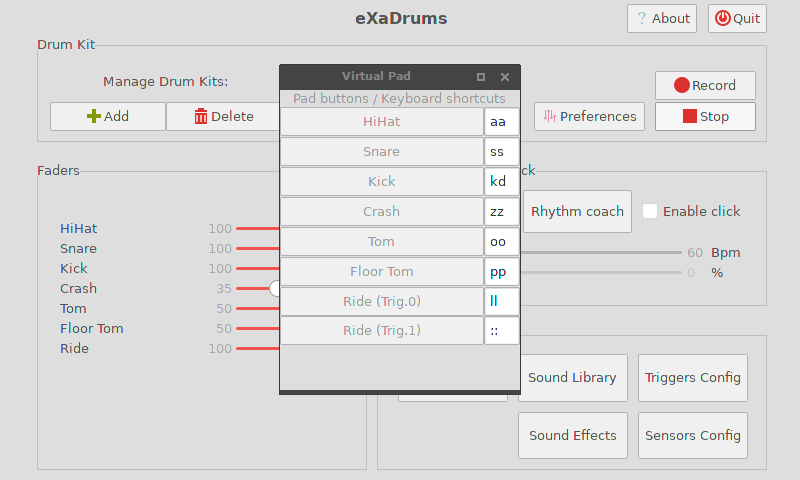
The first very important thing is a 'virtual instrument'. On the GUI side, it is called 'Virtual Pad', and this is how it looks:
![]()
Each instrument has its own button, so you can either use a mouse or tap your touchscreen to trigger it. If you're using a PC, you can assign shortcuts to the instruments (up to 2), so that they can be triggered by a keyboard.
This almost minor add-on was , in my opinion, necessary to have the packages (eXadrums and libexadrums) submitted to the debian repositories.
Both eXaDrums and libexadrums are available from debian sid (unstable) and bullseye (testing). In fact, they are also available from Ubuntu 19.10, and the next LTS release, 20.04.
Anyway, this should simplify exadrum's installation for debian and ubuntu users.
Hopefully, the next Raspbian release will also ship with exadrums in it's official packages!
-
eXaDrums: A Drum Module You Can Make (2)
11/18/2018 at 19:38 • 0 commentsIn the previous log (eXaDrums: A Drum Module You Can Make), I showed you how to make an eXaDrums module. However, there's one part that you can't quite make yourself: the enclosure.
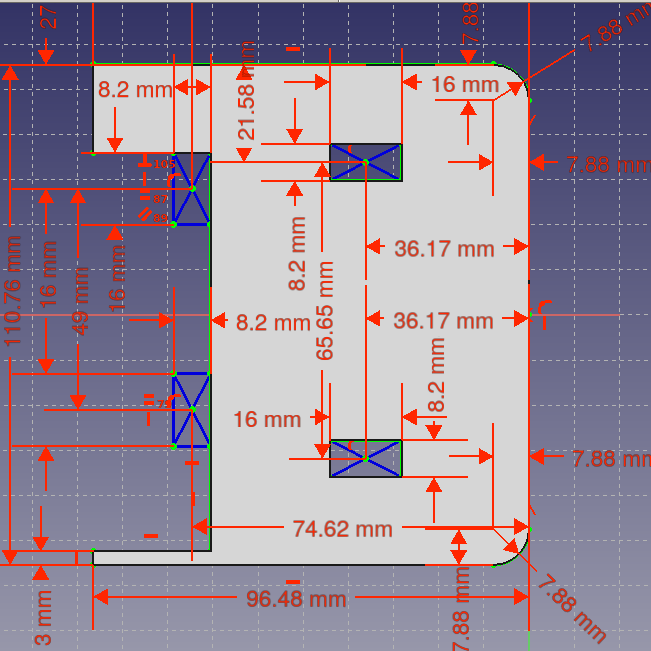
Don't worry though, I invested in a 3D printer and spent quite a bit of time modeling things on Freecad. As you can see, I'm now modeling a 3D-printable case for the module.
![]()
You may have noticed that the Raspberry Pi touchscreen's dimensions are a bit weird... Frankly, it takes so work to get everything aligned as it should be. Beware, if you try to design something for that touchscreen, that nothing is symmetric!
Anyhow, I've already printed two prototype parts, but I still have to design the most difficult parts. I also need to make sure that all the individual parts are smaller than 150x150mm as this is the size of my printer's bed...
This is the last step to make a completely open-source project, software and hardware. And of course, there will be a Github repository with all the files included.
-
eXaDrums: A Drum Module You Can Make
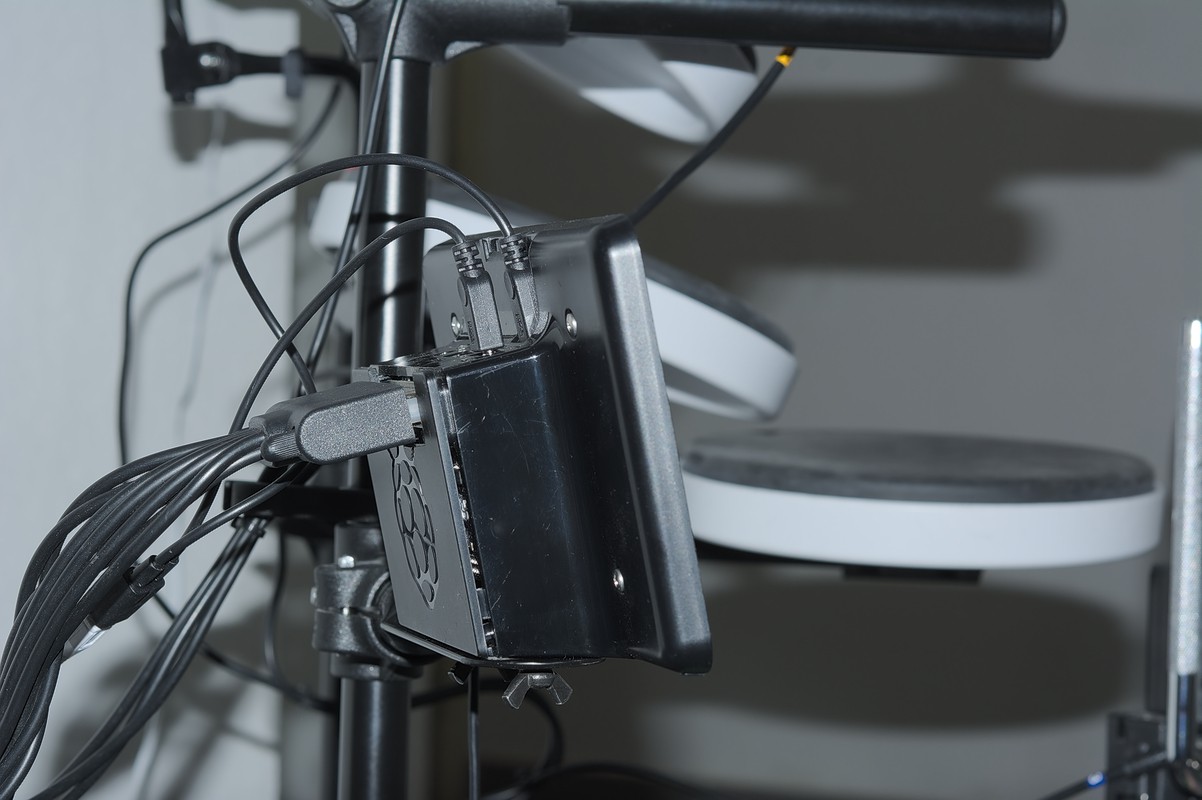
09/24/2018 at 13:53 • 1 commentI've always wanted to make sure that anyone could build their own eXaDrums module. But that's easier said than done, as an additional board is required to convert the signals of the drums' sensors (piezos) into data a Raspberry Pi understands.
I'm very happy to announce that you can now build your own eXaDrums module if you want to. In this log I'll explain you how. I'll assume that you have all the required components: Raspberry Pi, SD card, USB soundcard, power supply, etc.
ADC Board Prototype
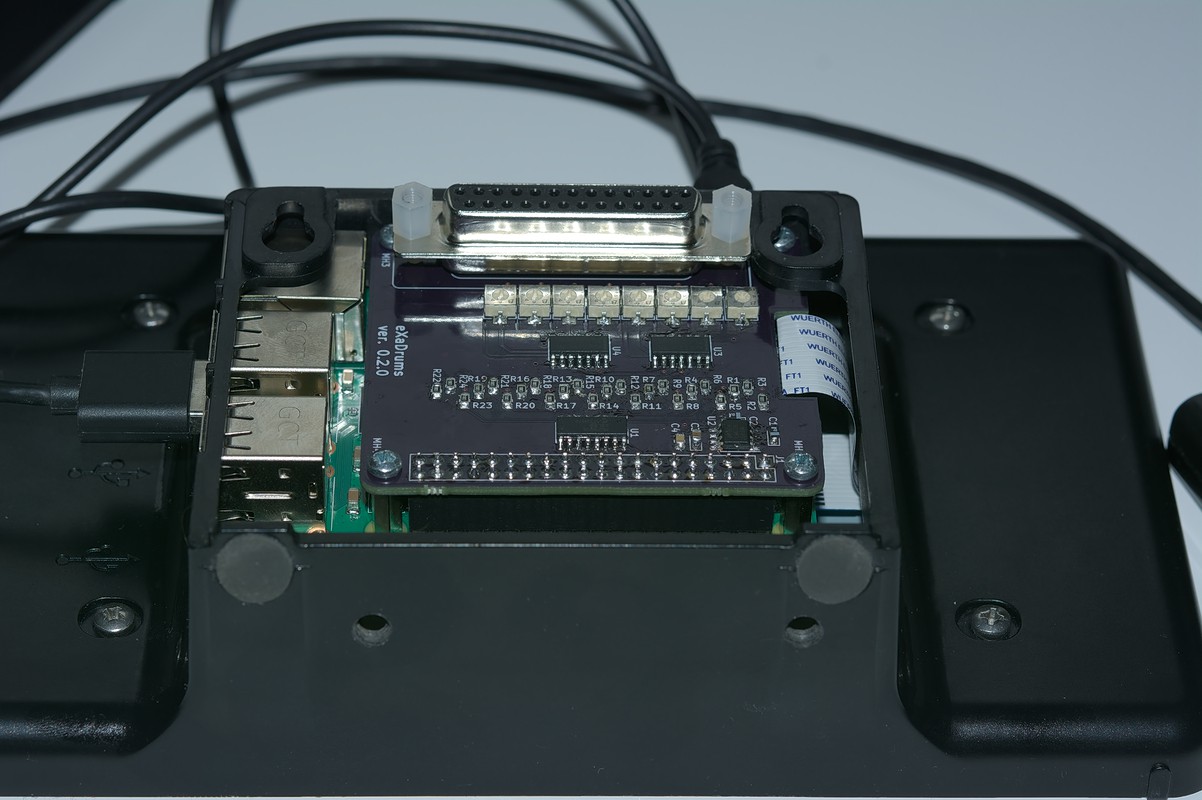
A Working Raspberry Pi ADC Board
![]()
Yes, the image that you see shows a prototype that I recently ordered from OSH Park. It fits pretty nicely in the enclosure I have, as the only modification I had to make was to cut a piece out of the back lid, and tap two holes underneath the enclosure.
You may be wondering why the board has a DB25 connector? There is a simple reason to that: the board is intended to be used with a Roland TD-4KP drum set, which uses a DB25 connector.
Two prototypes
Of course, the board can be modified in order to work with other drum kits. Which brings us to the boards that I made. The one shown on the first image is actually the second board that I got from OSH Park. I ordered a first one that includes the hi-hat pedal controller input, but it doesn't fit into the enclosure, so I also got this new one, with rounded corners. Both boards are open source, and available on Github, so you can modify them to get your own custom boards.
OSH Park Orders
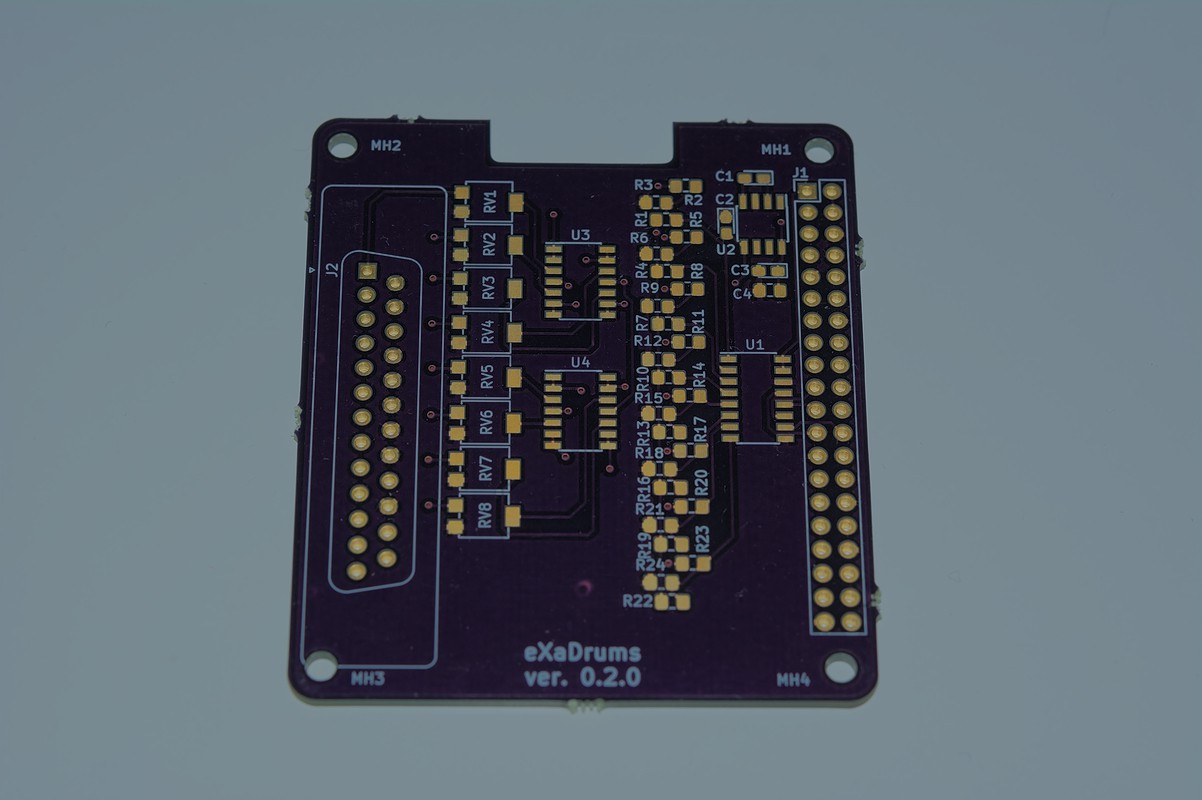
Below is a picture of one of the three boards that I received from OSH Park.
The project is shared on OSH Park, so you can order three boards like that one for $28.15.
![]()
Here's a brief description of the board, followed by more theoretical considerations in the next section.
From left to right, we have:
- A DB25 connector to be plugged into a Roland TD4-KP drum kit.
- 8x 1MΩ potentiometers (RV1 to RV8).
- 2x TLC2264 Low power consumption operational amplifiers (U3 and U4).
- A series of 24 100k resistors (R1 to R24).
- An MCP3008 ADC (U1).
- An LMC7660 voltage inverter (U2) and its capacitors (C1 to C4).
- The 40-pin header that goes on the Raspberry Pi.
A Little Bit Of Theory
Piezo sensor conditioning is a lot harder than it seems at first glance. The output voltage of a piezo sensors often varies between more than 10V and less than -10V. Mapping that kind of voltage to the input of an MCP3008, which is 0-3.3V is thus a bit of a challenge.
Lets take it step by step. First of all, the output of the sensor has to be scaled down while being connected to a high impedance in order to make sure that its dynamics isn't altered. To achieve that, a 1MΩ is used to create a voltage divider that feeds an voltage follower (op amp), as shown below.
![]()
This first step ensure that the input voltage V+ of the op amp is constrained between +Vcc and -Vcc (+/-5V in our case). The op amp input also guarantees a high impedance.
Then, the output of the op amp is connected to a three-resistor voltage mapping circuit that obeys to the following equation:
![]()
If the three resistors are the same, and Vbias = 5V, we get Vout = Vin/3 + Vbias/3 = Vin/3 + 1.67V.
Because Vin varies between +/-Vcc=+/-5V, Vout varies between 0V and 2*5/3V = 3.33V, a voltage that is perfect for the inputs of our MCP3008.
So now you understand how the board works. The 8 potentiometers are used to scale down the piezos voltages to +/-5V, then the two op amps ICs (U3 and U4) are used as 8 voltage followers, to feed the 24 resistors that are divided in 8 groups of 3 in order to scale the voltage to 0-3.33V, and feed the MCP3008 (U1). The voltage inverter (U2) is an LMC7660 and is used to create the -5V from the +5V of the Raspberry Pi's power supply. Two additional capacitors (C3 and C4) are there as bypass capacitors.
Testing The Drum Module
How To Order And Make The Board
First of all, you need to order the board itself from OSH Park. Then,you need to buy all the components and solder them to the board. All the required components are listed on Github, as well their references from Farnell. As far as soldering goes, I recommend the use of very good tweezers, a screwdriver iron tip, or thinner, and eventually a magnifier. If you're not too confident with soldering SMD, I recommend you watch a few tutorials on YouTube, and you'll see it's not that hard at all, although it takes a little bit of practice.
How To Assemble The Module
If you use the same enclosure that I have, things should be fairly easy, as you just need to cut a piece of the back cover of the enclosure to create an opening for the DB25 connector. The result is shown below.
![]()
Looks nice, doesn't it?
If you don't want to modify the enclosure, you can use it without the back cover.
Testing The Module
Perhaps the best way to get a feel of what it's like to play drums on eXaDrums is a short video, so here you go:
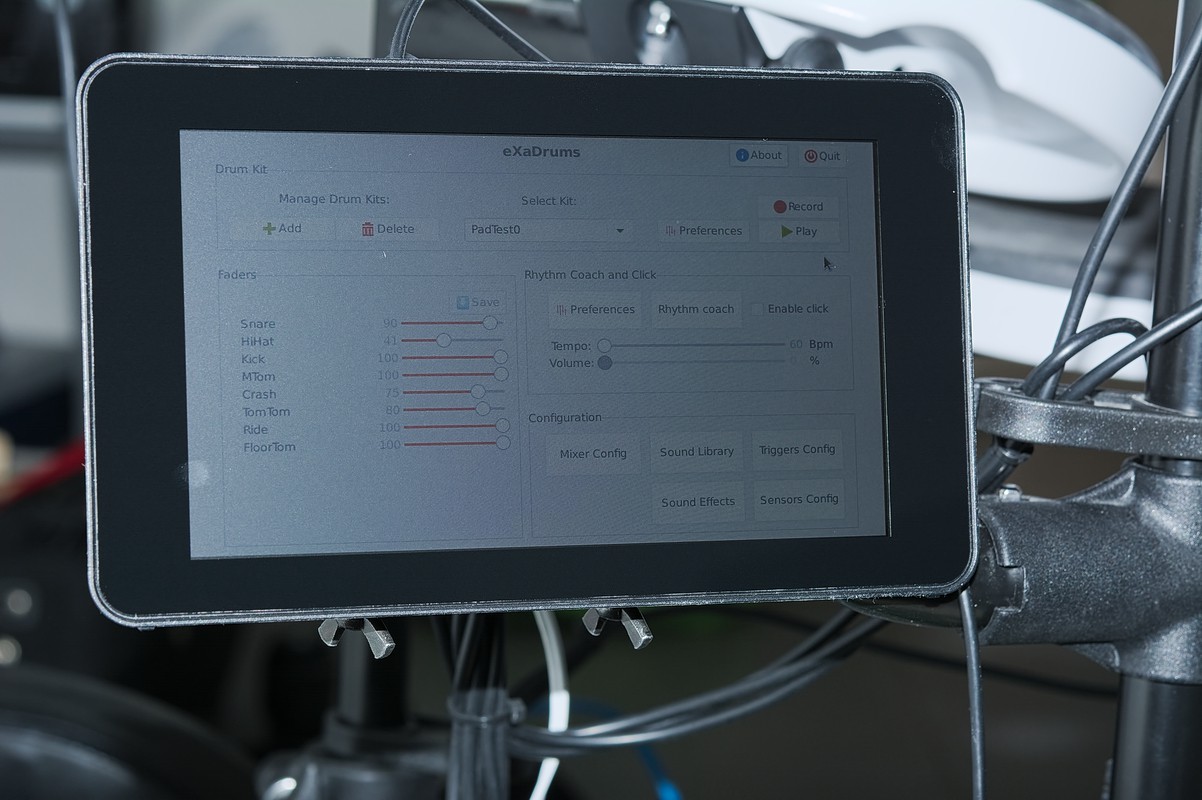
And in case you're wondering how the user interface looks like, here's a photo:
![]() Conclusion
ConclusionI wanted to do something a bit special for this 42nd log entry, so I thought I'd show that anyone can make an eXaDrums module. I hope you guys found this post interesting, and I'll make sure to show more features and demos in the future.
-
Official Packages Repository
09/02/2018 at 20:13 • 0 commentsIf you've read the previous log, you know that I successfully build Raspbian and Debian packages for eXaDrums and libeXaDrums. They are both available on Github by the way, in the Release section.
Because they are proper signed packages, if you wish to try them out, you'll have to add the gpg key first:
wget -O - http://freewebmaster.fr/deb/jeremoden.asc | apt-key add -Then, you just have to add the following line to your /etc/apt/sources.list:
deb http://freewebmaster.fr/deb/ ./
And that's it, run sudo apt update, and then you can install eXadrums as if it was part of your distribution, for instance: sudo apt install exadrums.
After you've installed eXaDrums, you'll notice two shortcuts in your applications menu. One of them starts eXaDrums as root. This is mainly for the Raspberry Pi, if you use a SPI ADC (MCP3008 or MCP3208 for example).
Note that you probably want to change the soundcard and sensor type, as the default values might not be adapted to your configuration.
-
EXaDrums Version 0.1.0 Released
07/25/2018 at 18:40 • 0 commentsA couple of days ago, I released the versions 0.1.0 of eXaDrums and libexadrums. The releases are both available on Github: eXaDrums, libexadrums.
As you may have seen if you clicked on the previous links, there are three .deb packages that are provided for each release.
One of the packages is for amd64 architecture, so that you can test eXaDrums on your PC.
The other two are for Raspberry Pi: the armhf is intended to be used with the official Raspbian Stretch distribution, and the arm64 one is to be used with a 64-bit distribution and has been tested with Pi64 (Debian Stretch).The libexadrums package has to be installed first (sudo dpkg -i libexadrums[...].deb), and if you're running eXaDrums on Raspberry Pi with your sensors connected to the SPI interface, you need to start eXaDrums as root. You can do that by typing sudo exadrums in a terminal, or from the startup menu.
Be aware that this is a pre-release, as error handling has not been integrated yet, so be careful when you use the software. In case you break something, you can restore the default configuration using exadrums -r. If you need more info, type exadrums --help-all.
Cheers.
-
Debian Packages Available
07/01/2018 at 18:20 • 0 commentsSo I was thinking about making eXaDrums easier to install and upgrade, and I realized it would be pretty cool to make a debian package out of it.
It's not as hard as you might think, as all it takes is to create a debian/ folder. That folder has been added to the git repositories today, and using the following script, you can build the debian pacakges yourself:
#!/bin/bash

git clone https://github.com/SpintroniK/libeXaDrums.git &&
git clone https://github.com/SpintroniK/eXaDrums.git &&
cd libeXaDrums/Release && make -j3 all &&
sudo cp libexadrums.so* /usr/lib/ &&
cd ../../ &&
cd eXaDrums/Release && make -j2 all &&
cd .. &&  dpkg-buildpackage -b -uc &&
cd ../libeXaDrums &&  dpkg-buildpackage -b -uc &&
sudo rm /usr/lib/libexadrums.so* &&
cd .. && lintian *.deb
Of course in order for that to work you'll need all the dependencies that both libexadrums and exadrums require (please refer to the github readmes for that), as well as the dpkg-dev package (that provides the dpkg-builpackage utility).
I'll be providing debian packages of exadrums and libexadrums in an official repository soon. That way upgrades will be easier than ever.
-
EXaDrums Server
06/01/2018 at 06:28 • 0 commentsEXaDrums Server is now available on Github.
Used together with eXaDrumsLite it allows you to use eXaDrums on a headless Raspberry Pi distribution. Although it's just a server, it has access to all the functionalities of eXaDrums. And even if only a few of them are currently implemented, I plan to make them all available so that the Android application can be used as a proper module.
![]() As you can see, eXaDrums Server communicates with eXaDrums Lite using Json RPC 2.0, which is quite fast to parse, and makes the server running decently on a Raspberry Pi Zero W.
As you can see, eXaDrums Server communicates with eXaDrums Lite using Json RPC 2.0, which is quite fast to parse, and makes the server running decently on a Raspberry Pi Zero W.
I'll keep posting logs about the Android app status, as I plan to develop it further and make it as complete as possible. -
Record your best beats!
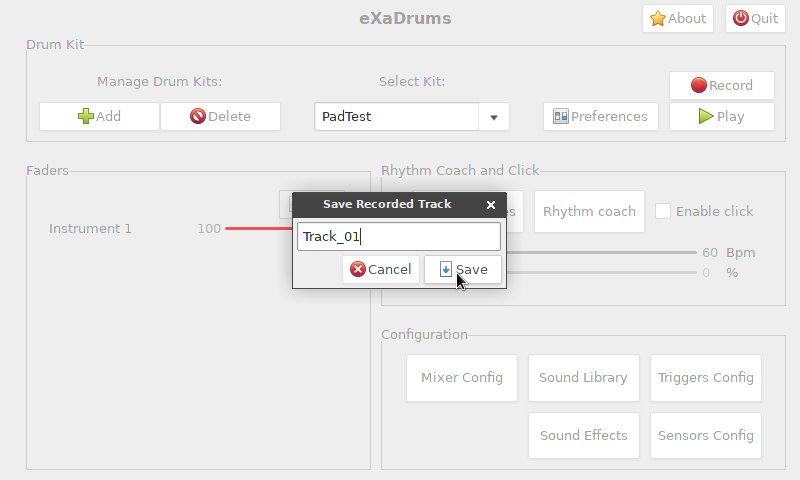
03/10/2018 at 18:25 • 0 commentsIt was one of the first features I thought about when I started the project: a drum beat recorder.
Although it's now finished yet, there's now a "Record" button that lets your record drums as you play. When you stop recording, you can export what you've just played to an xml file:
![]()
The file contains the sounds that you used to record the track as well as all the triggers parameters. It is not a sound file, it just contains all the information that's needed to generate a sound track.
This is an important feature for eXaDrums, and you'll see another one pretty soon.
-
Performance: the best you can get?
02/24/2018 at 13:51 • 0 commentsAs I develop eXaDrums, I sometimes wonder how to improve performance without impacting reliability. In my opinion, software robustness always comes first, even at the expense of performance.
Last time I measured the latency, I got about 8 ms. That's not too bad, as I was aiming for less than 10 ms.
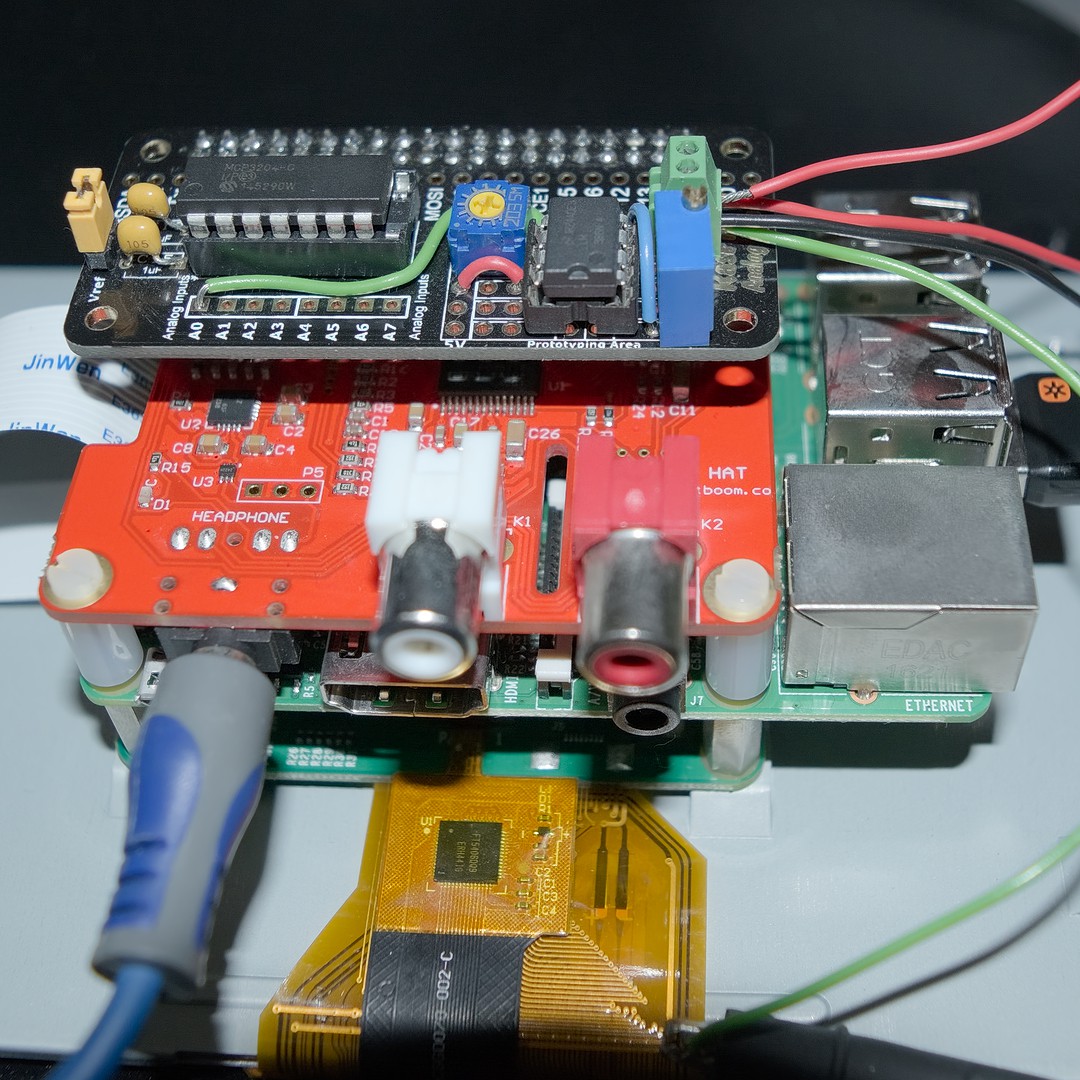
More recently I've measured latency again, but this time with a Raspberry Pi 3B and an audio DAC instead of my good old USB soundcard. I chose a JustBoom DAC, as shown on the picture:
![]()
All I had to do was to plug it in the GPIO, and it worked straight out of the box. The good thing about the JustBoom is that it doesn't need the Spi pins, and you can stack another board on top of it. So I stacked my ADC, and that was it, eXaDrums was working as before.
As for the configuration, I still use a trigger scan time of 2 ms, and the audio buffer was set to 1 ms.
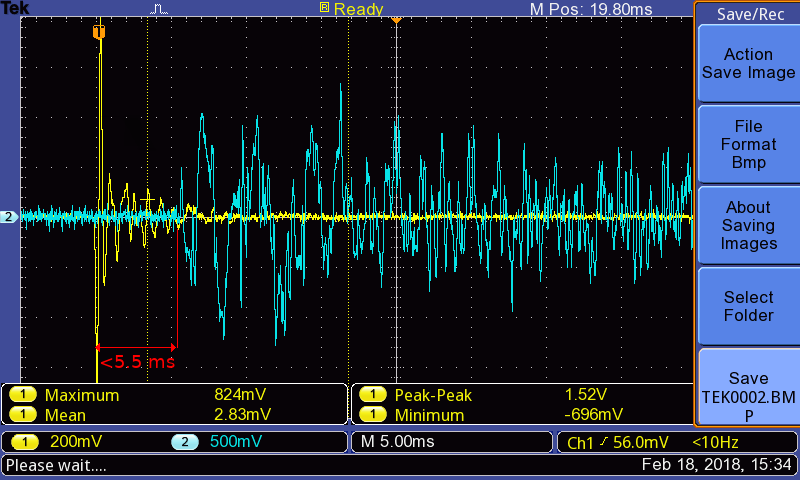
And just like that, without any software modification, I reduced the latency by almost 3 ms, and went down to 5 to 6 ms of latency:
![]()
Yellow curve: trigger's voltage, blue curve: output of the DAC.
So here we are, the latency is lower than 7 ms (that's what is usually considered as usable in a professional environment), and the sound quality is really great. Can we beat that? We'll see...
FYI, previous tests on a Raspberry Pi 2B are here: https://hackaday.io/project/7499-raspidrums/log/25077-latency-goes-below-10ms and more recently https://hackaday.io/project/9350-exadrums/log/58025-performance-the-best-you-can-get.

 Conclusion
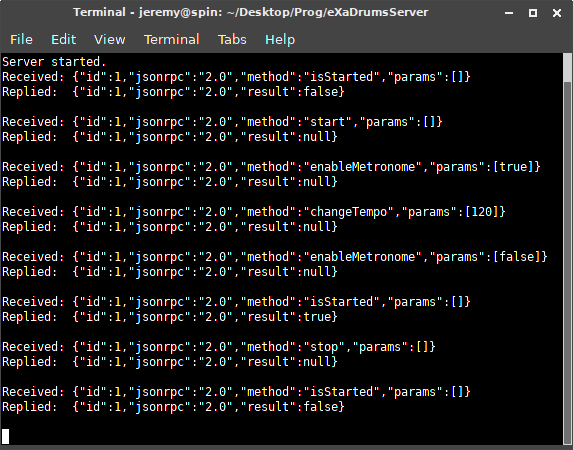 As you can see, eXaDrums Server communicates with eXaDrums Lite using Json RPC 2.0, which is quite fast to parse, and makes the server running decently on a Raspberry Pi Zero W.