Jeremy
-
Raspbian Pixel (x86) and VirtualBox
01/03/2017 at 20:56 • 0 commentsSo the Raspberry Pi foundation made Raspbian Pixel available for x86 architecture, and I was wondering why? And how could this be useful to me? Turns out that I found the answer by accident, when I tested eXaDrums on Raspbian Pixel x86 in VirtualBox...
Just before I explain what happened, here's how you can convert the Raspbian iso to a vdi for VirtualBox:
VBoxManage convertfromraw 2016-12-13-pixel-x86-jessie.iso Pixel.vdi
VBoxManage modifyhd Pixel.vdi --resize 8192
The second line is used to "simulate" a 8GB SD card.So I was away on holidays and I didn't take a Raspberry Pi with me. I saw the news on HaD, and decided to test Raspbian Pixel in VirtualBox. Then I tried to install and compile eXaDrums from scratch. No problems, everything seems to work fine...
I was testing the new features I added to allow the users to add new kits to the drum module, and I found out to things :
- Old versions of Gtkmm don't allow the use of the "=" operator to initialize a Gtk::Label. They have to be initialized in the constructor of the class that holds them instead. I completely forgot that detail, and Raspbian reminded it to me! (see related commit on Github)
- That one is even better... As I was testing, and adding new drum kits, everything was fine on Debian and Ubuntu MATE, but, I was getting occasional crashes on Raspbian Pixel (x86). I put a few std::cout to try to locate the problem, and it came from an std::mismatch call that I use to find the name of the newly added drum kit. Interesting, isn't it... Take a look at the commit on Github if you're interested to see how I fixed the problem.
I have to admit, having Raspbian Pixel x86 running in VirtualBox was very useful especially for testing, as I don't necessarily have a Raspberry Pi nearby. I already have another version running with Xfce installed!
-
Analog Zero, sensors, prototype.
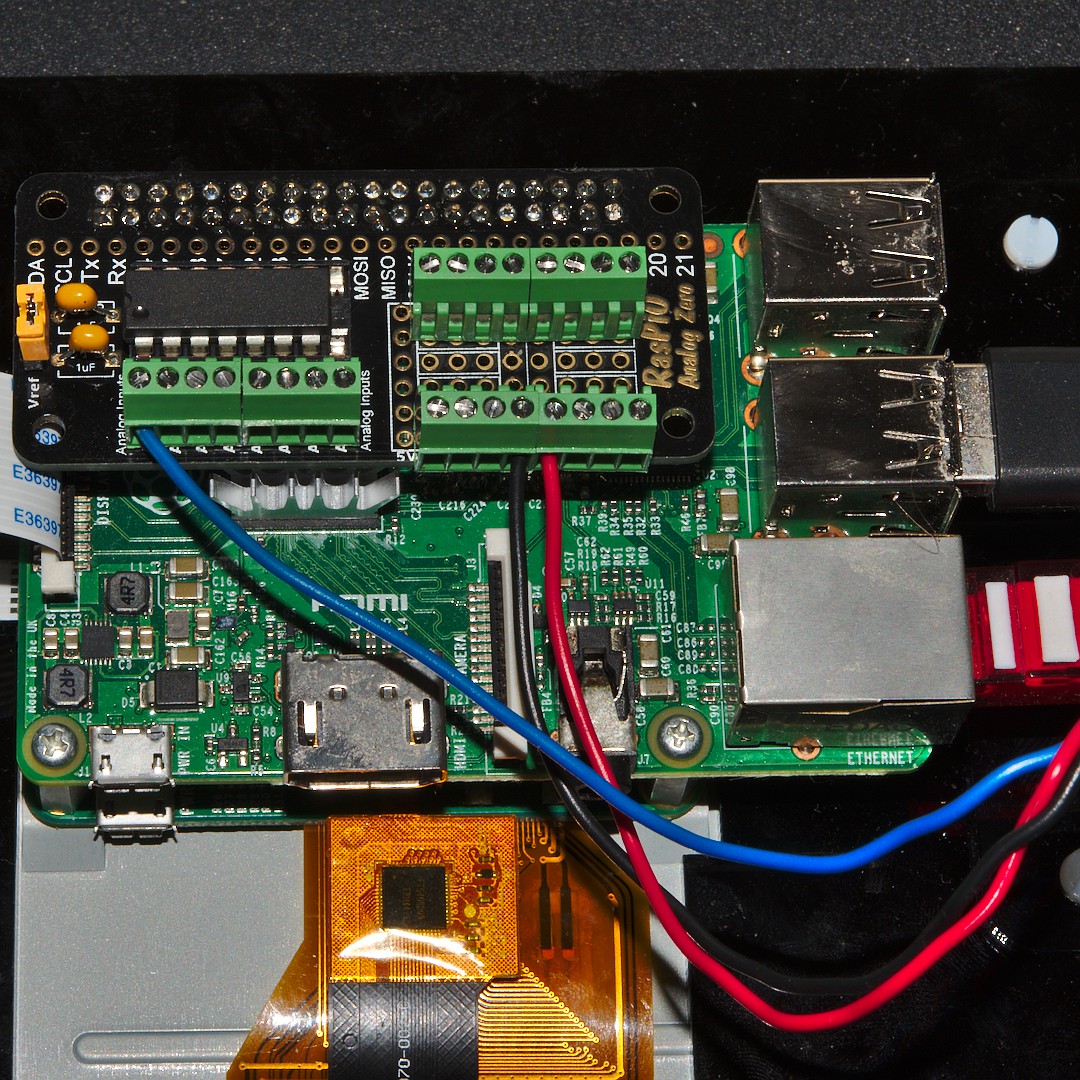
11/15/2016 at 21:33 • 0 commentsLast week I received and soldered my RasPiO Analog Zero. I can now have up to 8 sensors wired to my drum module! Here's what the back for the drum module looks like:
![]()
I only have 4 sensors right now, so I'm going to use an MCP3204 (tested with the Analog Zero). Two more terminal blocks are going to be soldered to the board in order to get the 5V of the touchscreen board, and the led used in the hi-hat pedal.
That will give us a prototype with a hi-hat (pedal + cymbal = 2 sensors), a snare drum, and a bass drum, which will be the perfect occasion to design a prototype and start thinking about the hardware (enclosure, making drums and cymbals, etc...).
-
ADC board + working hi-hat = prototype!
11/06/2016 at 10:03 • 0 commentsIt would be nice to get the parts, assemble everything, and play drums!
So far, the only thing I had to make myself was the ADC board. I found that someone already made an ADC board for the Pi. It's a kit, so you have to solder it yourself, but that's so much easier, and more professional than the one I made... The RaspPiO Analog Zero is available here: http://rasp.io/analogzero/, and it costs about £10, which isn't a lot. It comes with a MCP3008, which is compatible with eXaDrums, so that's perfect. I ordered one, and should get it next week (Tuesday or Wednesday).
Another good news is that the hi-hat tests are quite encouraging. Actually, it's fair to say that it works, as shown in this video in which you can hear the transition from the closed to opened hi-hat (audio only):
The pedal will be made of a photodiode and an led.For the video, I just moved the led around, to simulate and open/close state.
All of this means that we're well on our way to a real, proper usable drum module. It can already handle drums, cymbals, and hi-hat. Moreover, the "Analog Zero" board, has got a prototyping area to which I will solder the resistor and LED of the hi-hat pedal , so it is now oder, assemble, and play drums!
Obviously, I'll keep working on the software, to make a very complete drum module (including rhythm coach, etc...), but the easier hardware assembly is also a good opportunity to build a prototype, and test a "real" drum kit, with 8 sensors (for example a 2 toms + 1 snare + 1 bass drum + 1 hi-hat + 1 crash + 1 ride drum kit). I will start that shortly (need to order sensors first) and keep working on the software to make it all happen!
-
Sound effects, hi-hat, and videos!
10/24/2016 at 20:52 • 0 commentsYesterday I soldered a second terminal block to my board, so I can now use a second sensor!
It means that I will begin to start developing the hi-hat stuff very shortly. But for that, I need the sound effects to work, as the hi-hat sounds are generated by the sound processor. Thanks to all the work that has been done with the mixer, sound bank, sound, triggers and instrument classes, it's now going to be fairly easy.
Another thing worth mentioning is that I've been able to record Ubuntu MATE's desktop as I use eXaDrums, so I'll be able to make some new cool videos. Apparently the framerate seems to be limited to 10 fps... But that's looking quite decent anyway.
Here's a quick video to show you how the GUI currently works on my RasPi 3B + Ubuntu MATE:
There will be more videos pretty soon!!!
-
Installation script and tests
10/18/2016 at 17:53 • 0 commentsI'm currently adding instructions to the project page to make the installation and configuration of eXaDrums easy. To make it super easy, I created an installation script that you can download from the "files" section: https://cdn.hackaday.io/files/9350400030400/Install_eXaDrums.zip. Please read the instructions to install eXaDrums, the "configuration" section is to be written, but you will need to read it to get the software working!
The installation script has been tested on a lot of different devices and operating systems. Here's a list:
- Two laptops - Debian Sid and Xubuntu 16.04
- Another laptop - Xubuntu 16.04
- Raspberry Pi 3B - Ubuntu MATE 16.04 and Raspbian Jessie (Xfce)
- Raspberry Pi B+ - Raspbian Jessie (Xfce)
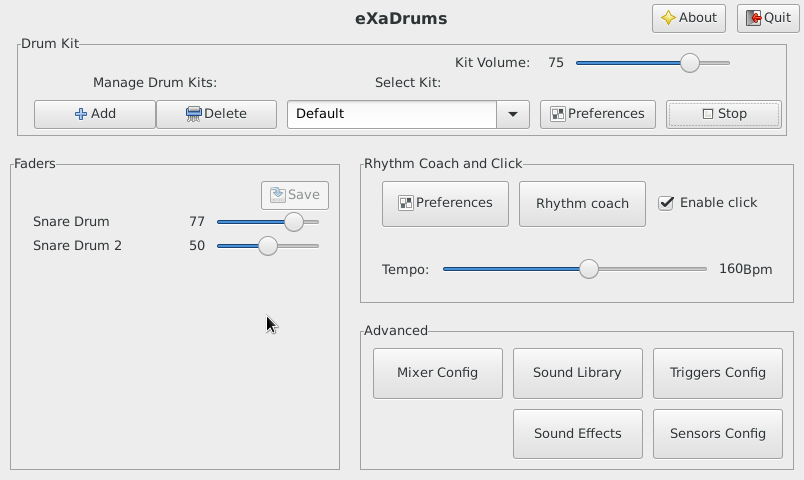
The very surprising thing is that it still works on the B+. The latency isn't even that bad! It's about 15 ms, which isn't spectacular, but still acceptable, so I'm well please with that. Here's a screenshot of eXaDrums running on the B+ (Raspbian + Xfce):
![]()
Thanks to a friend (Lee, the giant cat), I now have some LiPo batteries, and a voltage regulator, so I can use my drum module anywhere for a few hours! That's just a bonus, but it's very cool and exciting. Here's a pic of eXaDrums running on my Pi 3 (Ubuntu MATE), using the LiPo batteries:
![]()
It's all coming together!!!
-
Time to write a proper documentation
10/15/2016 at 15:24 • 0 commentseXaDrums is constantly improving and slowing getting close to a version 1.0.
It's time to write a proper documentation, but it's going to take a while to write That's why I plan to publish some instructions to explain how to install and use eXaDrums asap. Complementary information on the project page details will also be added pretty soon.
I think the user manual will be published on Github, as I intend to write a proper pdf manual in LaTeX.
-
Software documentation
10/15/2016 at 15:16 • 0 commentsThis project log is a brief software documentation and will be completed regularly until a user manual has been written.
eXaDrums Library
The eXaDrums library, or libeXaDrums, is a shared library (.so). It contains all the functions that are needed to run and control the drum module, kits manager, and more. As it will be explained in this section, if you can compile the library, it's really easy for you to use it in your own C++ program.
Dependencies
In order to compile and use libeXaDrums, you need to install some other libraries first. Don't worry, only one of them isn't included in Raspbian/Ubuntu. To install the dependencies that are part of your linux distribution, you need to execute this command line:
sudo apt-get install libasound2-dev libtinyxml2-devNow you need to install the bcm2835 library. It's relatively easy, you just have to download the library, and type the following into a terminal:
cd bcm2835-1.50
./configure
make
sudo make install
If you want to run the software on your laptop or PC instead of the Raspberry Pi, you need to patch the library first. To do so, you first need to download this patch (which works for version 1.46), and type the following into the terminal (replace path/to/patch by the patch's folder):
cd bcm2835-1.50
cp path/to/patch/bcm2835.patch src/
./configure
cd src
patch Makefile bcm2835.patch
cd ..
make
sudo make install
Get source code, and compile the library
The source code has been written in C++11, and compiled using Eclipse CDT. However, you don't need Eclipse to compile the library. So, first of all, you need to get the code. It's available on Github, where you can download the whole project as a zip file. Unzip the file, and open a terminal in the library's directory. Then, type this to compile the release version:
cd Release
make clean
make -j4 all
Alternatively, you can replace the first line by
cd Debug, to compile the debug version. The-j4option specifies how many threads should be used to compile the project, if you have a dual core CPU, it's usually 4, if it's a quad core, it probably is 8.Now in the Release directory (or Debug if you built the debug version), you should see a file named libeXaDrums.so. That's the library that contains all the functions of the eXaDrums software.
Use the library
It's a good thing to be able to compile the library, but it's even better to be able to use it. In order to use the Api, you need to compile the library, but also to get the eXaDrums.h file that contains the definition of the eXaDrums Api. This file is located in the Api folder, and needs to be included in your source code. By doing so, you get the namespace eXaDrumsApi that contains the class eXaDrums. You then just need to use that class. For more details, please refer to the Api Documentation section. There's one more thing that you need to do. At compile time you have to link libeXaDrums to your program. Example:
g++ -o "YourProgram" ./Source/file1.o ./Source/file2.o ./Source/file3.o -leXaDrumsThe '-leXaDrums' is where your link the library. That means that your linux distribution know where to find the library. So you have to add it to the path, or to copy 'libeXaDrums.so' to a known location. I usually do the following:
sudo cp libeXaDrums.so /usr/lib/Api Documentation
If you were able to compile the library, you can use it in your C++ programs. However, there are a few things that you need to know to use the library. These things are described below.
How to use the class
So, like I said before, the class in defined in the eXaDrumsApi namespace. It is actually pretty easy to use, but I recommend you declare the class as a private member of one of your classes, and you wrap it in a smart pointer. In the GUI, eXaDrums is a private member of the Gui class, and it is defined like that:
std::shared_ptr drumKit;
To instantiate the class, you need to specify the 'Data' folder's location which leads us to something like that:
std::string moduleLocation("./Data/");
drumKit = std::shared_ptr(new eXaDrums(moduleLocation.c_str()));
Start and stop drum module
Once you've loaded the drum kit, it's pretty easy, you just need to use the start and stop functions of the Api:
drumKit->Start();starts the drum kit, anddrumKit->Stop();stops it.Graphical User Interface
Because eXaDrums is a shared library, it's a lot easier to reuse in any other C++11 program. The Gui is also developed in C++11 and uses Gtkmm 3. That makes it compatible with a lot of linux distributions.
Dependencies
In addition to the eXaDrums library dependencies, you also need to install gtkmm developer's package:
sudo apt-get install libgtkmm-3.0-devAnd that's all you need. You can now compile the software.
Compile and use with the library
In order to compile the eXaDrums Gui, you need to have eXaDrums library compiled and installed. Once again, you can get the source code on Github. The program needs eXaDrums library, which you can download from Github as well. If you put both projects folders in the same directory, compiling eXaDrums is fairly easy. For instance, here's the script that I use to compile eXaDrums in release mode:
git clone https://github.com/SpintroniK/libeXaDrums.git
git clone https://github.com/SpintroniK/eXaDrums.git

cd libeXaDrums/Release/
make clean
make -j4 all
sudo cp libeXaDrums.so /usr/lib/
cd ../..
cd eXaDrums/Release/
make clean
make -j4 all
The executable file is then located in
eXaDrums/Release. -
Hardware progress
10/15/2016 at 15:14 • 0 commentsThis project log summaries my progress on hardware. It will be updated regularly....
Hardware: electronics
Schematics
Boards
Hardware: mechanics
Drum module's enclosure
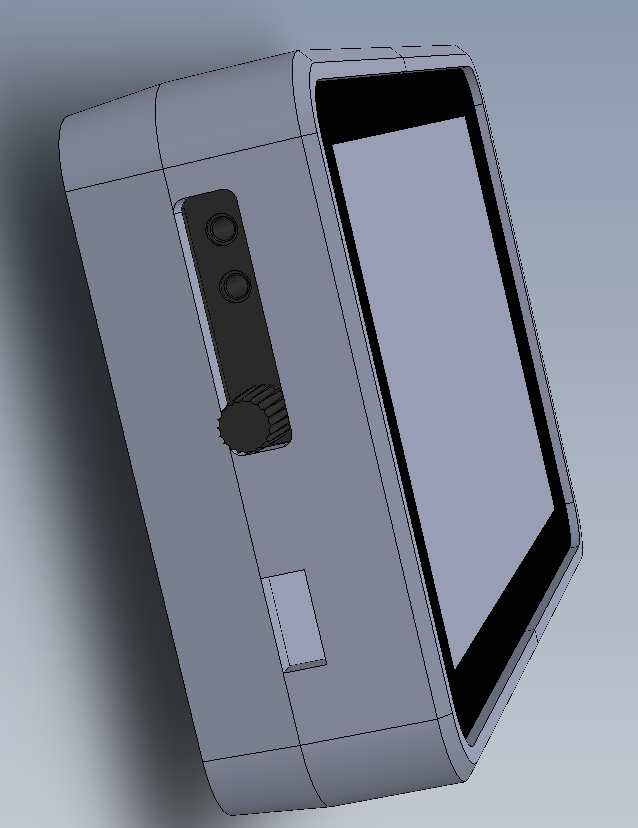
Having an enclosure for the drum module is necessary, and makes it easier to mount it on the frame. As discussed in a project log, a simple design have been made for the enclosure. Here's a 3D view of the result.
![]()
It is a first step, but thanks to that the drum module's dimensions are defined, which is going to help to design the rest of the drum kit.
How to build a drum?
-
Metronome, and other updates
10/10/2016 at 18:48 • 0 commentsQuick update since the last project log...
Faders values can be saved, so that eXaDrums remembers your settings next time your start the software.
A few code changes have also improved the whole software. For example, there's now a trigger manager, just like the kit manager. Another minor change is the new Enums class, located in the Util namespace. The Enums class just makes things so much easier. It helps loading and saving configuration files, but also converts enums to strings, etc.
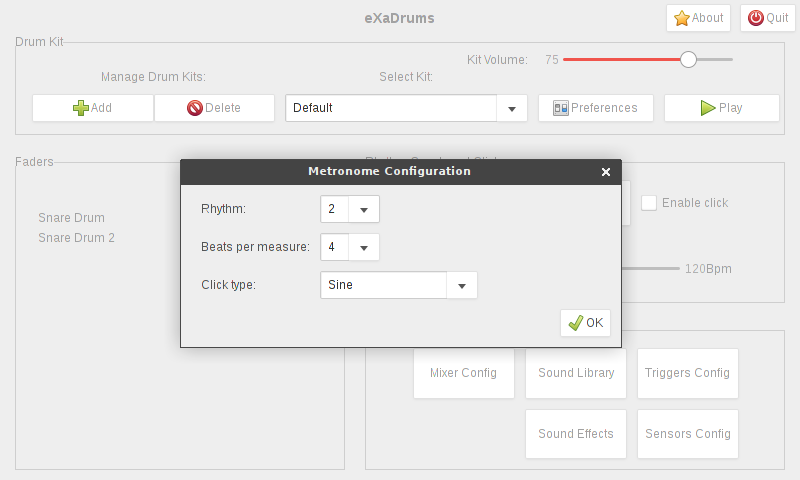
The metronome has changed quite a lot and is pretty advanced now. The changes are all visible on the GUI as well, and everything works quite well. As the next image shows (screenshot from my laptop, not the Raspberry Pi), you can change the rhythm, number of beats per measure, and the click (sound) type in the metronome configuration popup.
![]()
So far, I implemented two different click sounds. It doesn't save the configuration, but I'll integrate this soon.
The future things to do are to allow the user to add new drum kits, and configure them (preferences button). Then I'll probably focus on the rhythm coach and/or the advanced features.
-
Faders, metronome, progress!
08/30/2016 at 19:00 • 0 commentsThe faders (see previous log) now work perfectly! They are controlling the sound of the instruments, in real time.
The next big thing that's to be connected to the GUI, and work in real time is the metronome. Give the architecture of eXaDrums, it was a lot easier than expected. The metronome is going to be a class that generate a signal that depends on the chosen tempo, and add that sound to the sound bank. The sound only contains one bar, as the sound class will allow sounds to be played in a loop!
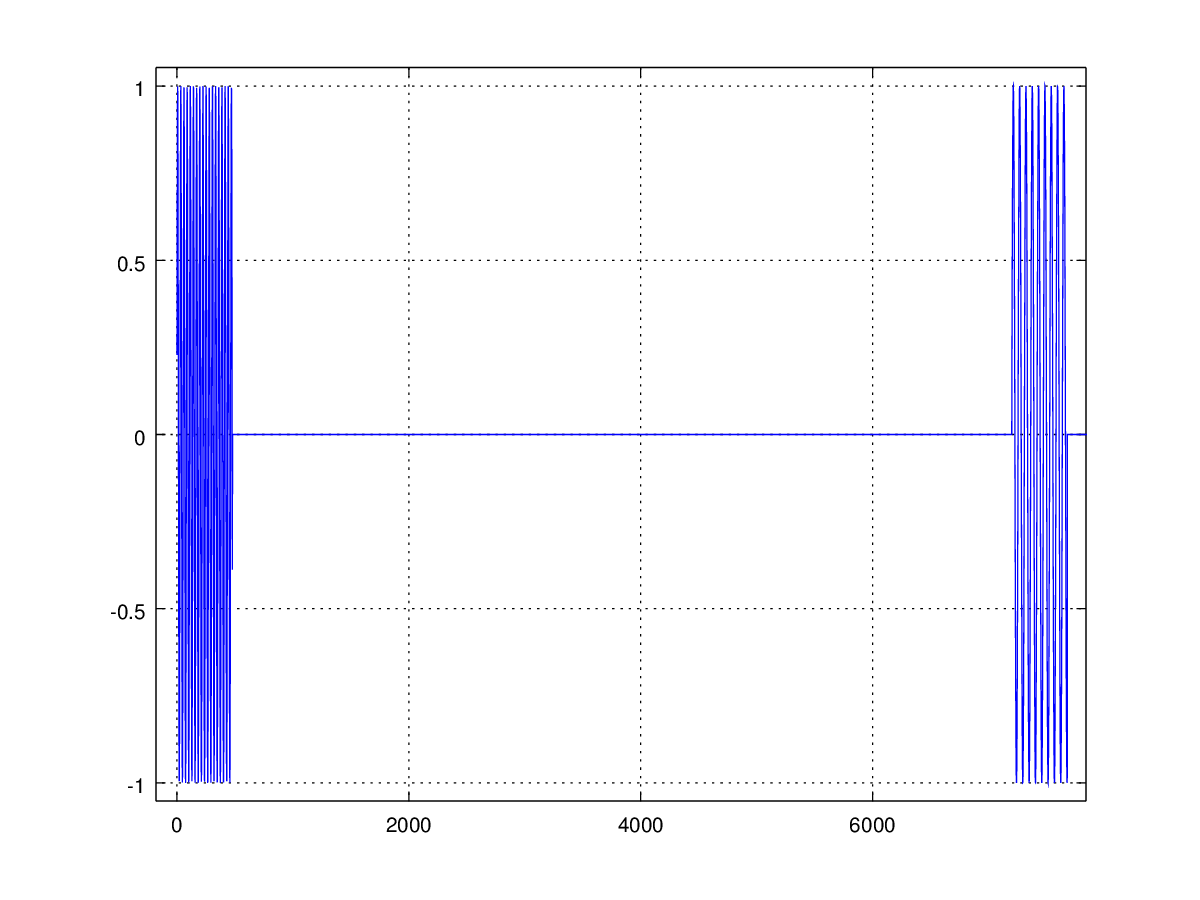
The prototyping (using Octave) looks quite promising. Here's the output what's going to become the GenerateSine function of the metronome class.
![]()
Since I usually share my code, here's the octave code (it even plays the sound!):
clear all;

% Metronome parameters
rhythm = 2;
timeSig = 4;
tempo = 120;
beatsPerMeasure = 4;

% Alsa parameters
sampleRate = 48000;
%bufferSize = 160;

% Calculate number of samples
beatsPerSecond = rhythm * tempo/60;
measureTime = beatsPerMeasure / beatsPerSecond;
numSamples = measureTime * sampleRate;

%nPeriods = numSamples / bufferSize
%offset = nPeriods - floor(nPeriods)
%correction = round(offset * bufferSize)

data = zeros(1, numSamples);

beatsFreq = 1/beatsPerSecond;
beatsRate = floor(sampleRate*beatsFreq);

% Sine parameters
fSineHz = 880;
radiansPerSample = fSineHz * 2*pi/sampleRate;
clickDuration = 10/1000;
clickSamples = sampleRate*clickDuration;

n = 0;
phase = 0;

for i = 1:length(data)

  click = n * beatsRate; % + correction

  if (i > click) && (i < click + clickSamples)

    if(mod(n+1, timeSig) == 1)
      mul = 2;
    else
      mul = 1;
    end

    phase += mul*radiansPerSample;
    data(i) = sin(phase);

  else

    data(i) = 0;
    phase = 0;

    if i == (click + clickSamples)

      n++;

    end
  end
end

sound(data, sampleRate);

plot(data)
Note that you can change the time signature, rhythm, and tempo.
Full C++ code to be found on Github pretty soon ;).