Colin O'Flynn
-
Working Auto-Script
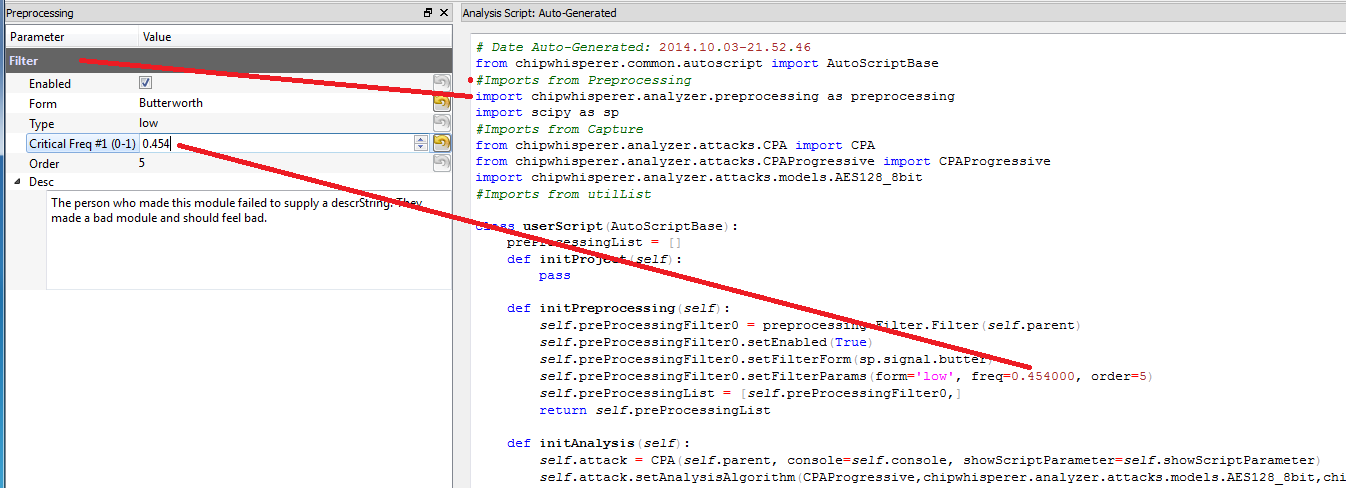
10/04/2014 at 01:09 • 0 commentsOne half-done feature I've had for the last release or two is this idea that analysis can be configured through the GUI, but in reality is just a Python script. So for example if you decide to use a low-pass filter in the GUI, you can see in the script all you are really doing is specifying some parameters to a standard scipy filter object:
![]()
Getting that working involved quite a bit behind the scenes. In particular for example note how imports are automatically pulled in depending what modules you are using, and it updates the parameters passed to the API based on your GUI inputs.
When it comes time to run the analysis, that text file is actually saved (it's just a .py file), and dynamically loaded. Those functions are then called. This means you could write Python code directly into that file, especially useful if you wanted to add your own preprocessing module or attack, without forcing you to jam everything into the GUI. In practice the GUI interface code can be a lot more work than the actual logic/algorithm.
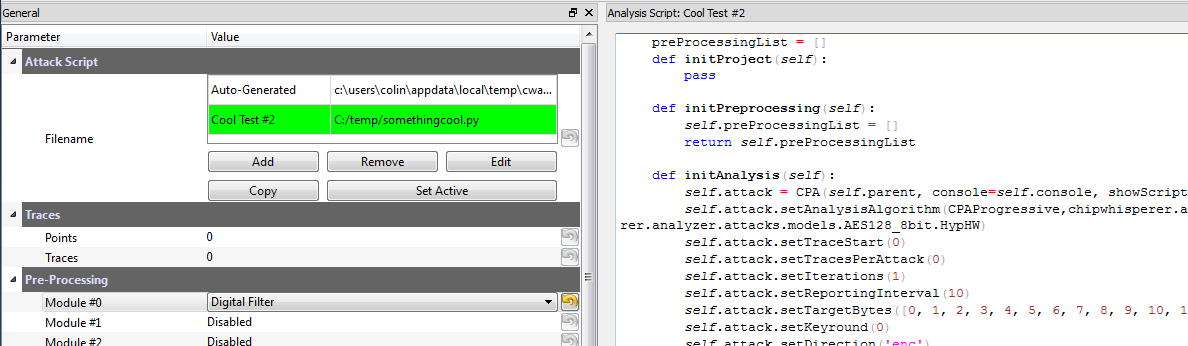
The latter point is important for more complex attacks: it's unrealistic to try and make everything accessible through the GUI. At some point you'll be generating your own models, and it's much much easier to do this directly inside of a Python environment. The one missing feature from the previous releases was the ability to run the script from any file, one that wasn't automatically generated. Now each project can have a bunch of script files you can switch between. There is the special one that is automatically generated from the GUI, but you can copy that base and then modify it without it being overwritten by changes in the GUI:
![]()
So you can set the 'active' script file, along with a name for what it does. I'll probably pull that out of a docstring eventually so it's embedded in the file itself, but small steps for now. One other thing that works is detecting when conflicting edits occurred, because for example you decided to modify the file in a real text editor:
![]()
As you can see I'm hoping to avoid the Abort, Retry, Fail error message that perplexed me on some of my original computers by keeping the choices as verbose as possible. These changes are in the 'scripteditor' branch still, but I'll probably merge that back to master shortly. With these changes in place I can complete my AES-256 tutorial now too, as I needed to hack some Python files directly for that attack to work (from my previous project log). That last log entry required me to modify the ChipWhisperer software files a little for the attack to work. Ideally as a user you shouldn't have to touch the core ChipWhisperer files, and it just gets out of your way! Which is now possible with the external scripts.
I've still got to save the script filenames in the chipwhisperer project file - right now you have to re-add them every time you restart the program. It's not that big a deal, but I'd prefer to have them load automatically. Once that's done I'll probably make a new release.
-
AES-256 Is Not Enough: Breaking a Bootloader
09/29/2014 at 00:54 • 1 commentI'd been pushing hard trying to get a demo of how you can break an AES-256 bootloader. This type of bootloader is often used in products for protecting firmware updates and a good demonstration of why you should care about side channel attacks as an embedded engineer.
It's not pretty but it does work, so I wanted to put some documentation and details up here. To start with, what bootloader should I target? I don’t want to give someone a bad name, since the point of this blog post is that any similar bootloader can be attacked. For this reason I’ve chosen to implement my own, but basing it on a number of real bootloaders I studied.
Hopefully this will demonstrate that it's not enough just to check the box that says 'AES', even if you've done everything else right (not using ECB mode, etc.).
Note: If you've linked directly to this page, check out my Complete ChipWhisperer project on Hackaday.io too for other interesting posts!
Background
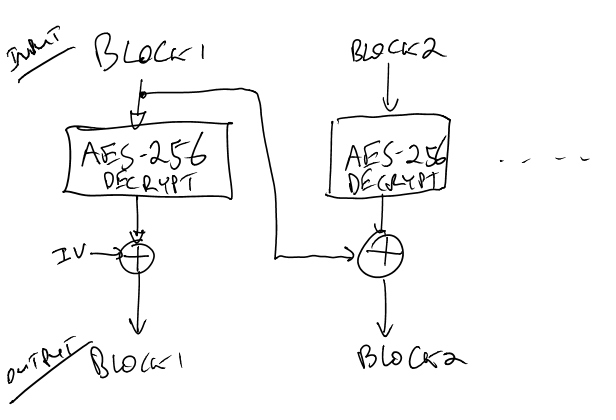
The bootloader uses AES-256 in CBC (Cipher Block Chaining) mode. The system is used like this:
![]()
A nice ‘feature’ of CBC mode from our perspective is that (A) we don’t need to worry about the secret Initialization Vector (IV) for performing the Channel Analysis (SCA), and (B) once we have the encryption key we only need the IV to decrypt the first block, since we use the ciphertext which we know as the other input to the XOR.
Anyway the complete AES-256 decryption looks like this (lifted from the AES implementation I'm using Ilya O. Levin, http://www.literatecode.com ):
    aes_addRoundKey_cpy(buf, ctx->deckey, ctx->key);
    aes_shiftRows_inv(buf);
    aes_subBytes_inv(buf);

    for (i = 14, rcon = 0x80; --i;)
    {
        if( ( i & 1 ) )
        {
            aes_expandDecKey(ctx->key, &rcon);
            aes_addRoundKey(buf, &ctx->key[16]);
        }
        else aes_addRoundKey(buf, ctx->key);
        aes_mixColumns_inv(buf);
        aes_shiftRows_inv(buf);
        aes_subBytes_inv(buf);
    }
    aes_addRoundKey( buf, ctx->key);
The XORing of the IV is done with the final output of that function, since that function is the 'Electronic Code Book (ECB)' implementation.
The critical thing to notice is that we’ll actually do a SCA attack twice in a row. The first time we target the output of the first S-Box. This gives us the first 128 bits of the decryption key. We then use that knowledge of the first 128-bits to target the next round of the decryption, which gives us the following 128-bits.
Getting the second half of the 256-bit key is a little tricky. The ‘mixColumns’ operation uses 4 bytes of input to generate 4 bytes of output, which at first would make it seem like we would need to be guessing 4 bytes. But due to the linear nature of mixcolumns, we can slide it further along in the algorithm. This means we won’t directly determine the next 128 bits, but instead will determine a version of the key, which when passed through mixcolumns generates the correct key.
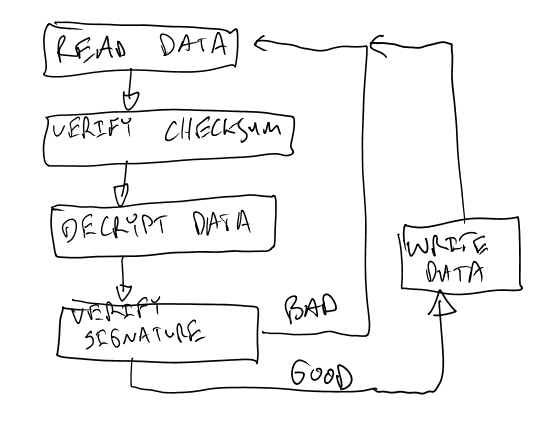
To obtain power measurement traces, we’ll just send some garbage data to the system. This works because most bootloaders look something like this:
![]()
The system will decrypt the garbage data. The signature will fail meaning the data is thrown away, we don’t care about that (yet). We’ll be able to get the correct signature later to force the system to accept our new image. We can obtain the encryption key without finding that signature.
Side Channel Analysis to Encryption Keys
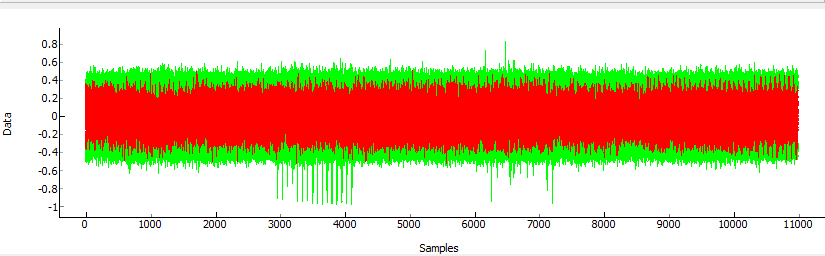
So when capturing traces, the power measurements look like this:
![]()
If we line up a bunch (say 20) traces we see the following:
![]()
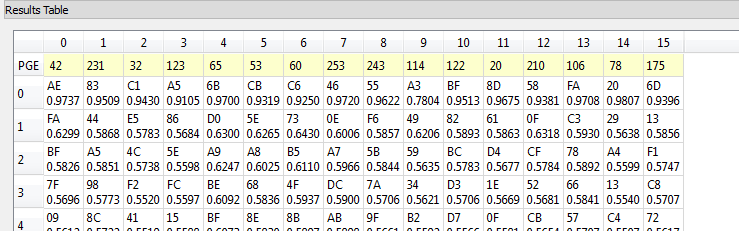
You can see they remain very well synchronized until about point 7100. At this point the AES actually has non-constant execution time, as this implementation has a timing side-channel as well! This will make our life a tiny bit harder, as I’ll need to resynchronize the last half of the traces. Anyway after running an attack as normal, the first 128 bits (16 bytes) of the decryption key are revealed after about 50 traces (i.e. I sent 50 packets to the device only):
![]()
The correct key is selected based on the output of the attack algorithm – notice the correlation metric has a very high value for the top ranked bytes (i.e. 0.9737 for AE in the byte 0), and a much lower value for wrong guesses. This lets us determine the system is working as expected, and we aren’t just getting random noise.
So this is telling us the first round decryption key (16 bytes of the full 32 byte key) are [AE 83 C1 A5 6B CB C6 46 55 A3 BF 8D 58 FA 20 6D]. We will use this guess to then try and get the remaining 16 bytes.
In the time domain we can see where exactly that decryption was happening:
![]()
With this knowledge we could go back and tweak our trigger event. The spikes around 3000-4000 samples are the S-Box operation that we targetted occurring. You can see there was a lot of useless data recorded, as I only needed from about point 2900 onward.
If you remember from before I needed to resynchronize the traces. This is done via a preprocessing module in the software (sum of difference Resynchronization). This module lines up a reference pattern in one trace with the same pattern in other traces. After running that notice how the traces line up perfectly after about point ~9000. Before then things are again unsynchronized, but I don’t care as am targeting only the next portion of the AES algorithm.
![]()
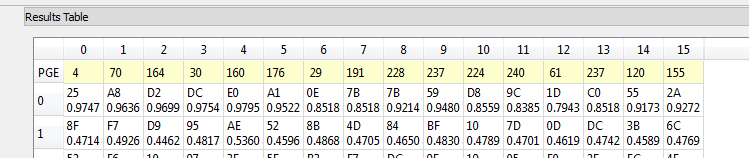
So running the attack again the next 16 bytes shows up like this:
![]()
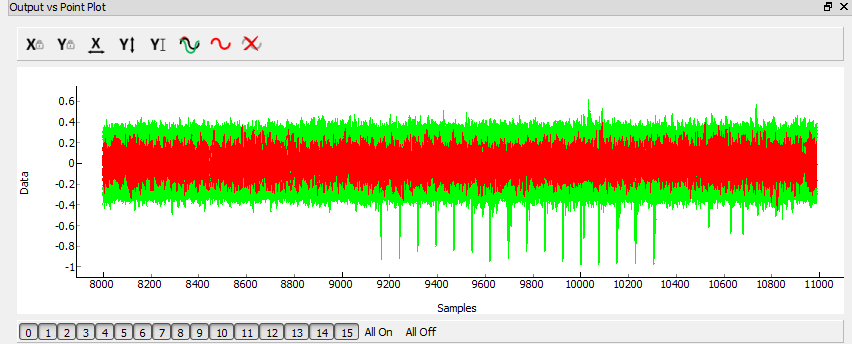
In the time domain we can see these spikes towards the end of the power trace – ignore the red highlight. Note this diagram starts at sample 8000, as I only performed the attack on the latter part of the power traces.
![]()
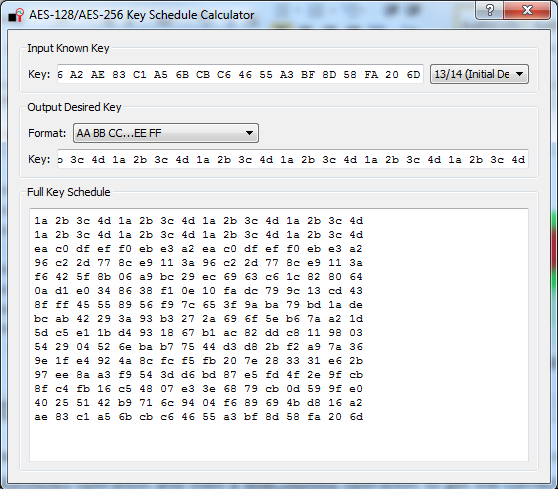
So the recovered bytes are [25 A8 D2 DC E0 A1 0E 7B 7B 59 D8 9C 1D C0 55 2A]. We need to pass this through first a ShiftRows operation and then a MixColumns operation to get the correct key bytes. This gives us [40 25 51 42 b9 71 6c 94 04 f6 89 69 4b d8 16 a2] as the next 16 bytes. At this point we have the full decryption-direction key: [40 25 51 42 B9 71 6C 94 04 F6 89 69 4B D8 16 A2 AE 83 C1 A5 6B CB C6 46 55 A3 BF 8D 58 FA 20 6D]. We need to ‘reverse’ this key to get a normal encryption key, as what we have actually obtained is a final-round key. A little widget built into ChipWhisperer gives us that key by allowing you to go from a final-round AES key to initial round:
![]()
Which is [1a 2b 3c 4d 1a 2b 3c 4d 1a 2b 3c 4d 1a 2b 3c 4d 1a 2b 3c 4d 1a 2b 3c 4d 1a 2b 3c 4d 1a 2b 3c 4d]. At this point we can take an encrypted bootloader file and decrypt everything but the first 16 bytes, since we still don’t know the IV. This will come later.
Signature
We now will figure out the signature. In this example bootloader (again this follows what some real ones do), the signature is just some fixed data prepended to each group of blocks before encryption. So assume you want to send [BA AD BE EF 15 50 50 60 0D] to the bootloader (9 bytes).
First, we add some bytes with fixed values out front, which is our signature. I’ll add 4 bytes in front of that with the fixed value of [1F 9F AB DD], so the message is now [1F 9F AB DD BA AD BE EF 15 50 50 60 0D]. Finally the message needs to be 16 bytes long (AES block size), so we add some garbage at the end: [1F 9F AB DD BA AD BE EF 15 50 50 60 0D AF 93 1B]. We encrypt that block and send to the bootloader.
The bootloader will decrypt the block, and verify the first four bytes were [1F 9F AB DD]. If we either used the wrong key or had sent random data, those four bytes will be something else. This signature check is a critical component of using encryption, as it ensures that both sides are using the same key.
What does this mean to us? Well the signature is at the front of every block already – thus if we have the encryption key (which we do have), we can then just read the signature directly! This is too easy.
If we didn’t have a file to read the signature out of, it is (probably) possible to do a timing attack against the signature check and brute-force it byte by byte.
Initialization Vector (IV)
So now we can get the (A) secret key and (B) signature. Finally we need the IV. This can be discovered a few ways: if we have an encrypted file, you can decrypt it with the known key. The IV will be whatever you need to XOR the first 16 bytes with for them to make sense. This might be a lot easier than you expect – those first 16 bytes probably include the signature (which we know), and might include known file headers or other known tables (jump tables say).
Without this, it’s also possible to do a side channel attack against the IV directly. This is a little more complicated and doesn’t give as good results as the attacks for the encryption keys, but it does work in my experimentation.
Final Notes
I know this blog post is a little light on details - but I plan on making this AES demo one of the full tutorials! You can already check out a number of them in the documentation, so expect to be led through the process step-by-step.
I also didn't mention the triggering of the measurements - the Sum of Absolute Difference (SAD) trigger is used. It's able to detect the start of the AES decryption operation based on the power measurements (i.e. looks for the pattern due to execution of the AES code). There's some experimentation required to get that stable, but once you're locked in it works very well.
-
Glitching an Android Smartphone
09/21/2014 at 01:06 • 0 commentsHere's another interesting glitch attack: a regular Smartphone. I've made a small demo video to show you what happens, I just presented this at the HTCIA Atlantic conference here in Halifax, NS, Canada. So I thought I'd share it more widely as I bet it's of interest to you. I couldn't get the embedded video to work on this project log, so here's a link to it on YouTube (you can't actually click the image sorry):
![]()
The details are similar to my Linux glitch demo from below, so I won't duplicate too much. It uses a MOSFET again to cause the glitch, which shorts the power pins to the SoC device on the android phone. My target code is again a double-loop which increments a variable.
Again I'm able to glitch the application without crashing the phone or causing other negative effects! This is pretty interesting as it shows you can cause incorrect data to be processed... this could cause anything from bypassing the lock screen to inserting faults in the encryption running on your phone.
-
Updated Build Instructions + BOM, New FPGA Programming
08/31/2014 at 18:45 • 0 commentsI've been working on a few things. The first is an updated support forum at https://newae.com/forum which will serve as a method of users discussing the project. This is not only for ChipWhisperer-specific stuff, but any general open-source side-channel analysis projects (or that's the idea).
I've also updated the main Wiki Page with a little more clear links to information. Along with this I went through & updated the BOM + Build instructions for the ChipWhisperer Baseboard, and added those for the LNA + Differential Probe. So it's not major updates but makes things a lot more useful I think!
Finally on the SW side: the FPGA Project is now programmed from a zip file with all the partial reconfiguration information present. No longer do you need to deal with ensuring two different files match or worry about changing line ends when getting a file from GIT. The zip system makes your life easy.
-
Say Goodbye to Java + RECON Video
08/14/2014 at 16:42 • 0 commentsA few little updates. #1 is that I've gotten rid of the Java requirement in the project - I was using a file provided by the FPGA board supplier (ZTEX) for loading the bitstream. This was written in Java and a great annoyance, as it required keeping a whole extra program running. I'm very happy to say that's been removed - the 0.07 release due out this week will have a native Python-based loader, but you can check out the git repo too. It now loads everything via the Python USB interface code (same one used during running), so it's a huge headache removed.
A video of my talk from RECON has been posted too, see a copy (MP4 format) here: http://recon.cx/2014/video/recon2014-24-colin-o-flynn-Power-Analysis-and-Clock-Glitching-with-the-Open-Source-ChipWhisperer-Platform.mp4
I can't seem to get the embedded version to work, so you've got to click that sorry. Appologies on all the 'ums' thrown throughout...
-
Version 0.04 Released, Find me at DEFCON/Blackhat
07/31/2014 at 13:31 • 0 commentsVarious updates of interest. First, version 0.04 of the code has been released. This integrates a lot of new material including the profiling attacks. The tutorials have been updated to reflect this. As before you can download some example traces so you don't really need the hardware to get started.
Speaking of hardware, I'll have a few PCBs with me at DEFCON/Blackhat next week which I'll be giving away as usual. And if you want to get your hands on a real device, the EFF Fundraiser called Vegas 2.0 will be raffling off an assembled ChipWhisperer unit.
You can see the new tutorials on the uploaded documentation, or go to the assembla page for the latest release. I haven't had time to fully test it so more things than usual are probably broken, oops.
Oh and I uploaded a fancy new block diagram which attempts to show some of the interconnections. There's a lot of mostly unrelated blocks in the project so even this vastly simplified one looks a little crazy, but what can you do.
-
Glitching a Linux Target
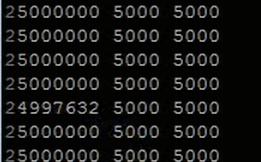
07/18/2014 at 00:45 • 0 commentsHere's an interesting update - I've just done some glitch attacks against a Raspberry Pi running a stock Linux kernel. I haven't done anything too interesting beyond just proving it works, but there's a lot of useful points you could glitch away. Basically I programmed a raspberry pi with this little chunk o code:
int main(void){
    int i,j,cnt;
    while(1){
     for(i=0; i<5000; i++){
       for(j=0; j<5000; j++){
          cnt++;
       }
     }
     printf("%d %d %d\n", cnt, i, j);
    }
}
Which if is working normally should print out "25000000 5000 5000". But by inserting glitches into the power lines of the chips (glitching done with a MOSFET crowbarring the 1.2V supply right at the underside of the BGA to GND), which gives you a power like this:
![]()
You can get incorrect results! Here's a print-out where I insert such a glitch event:
![]()
This simple code was chosen since it's easy to insert glitches 'anywhere'. You don't need to go out of your way to determine exact moment of glitching. Note that the glitches are not resetting the system or causing it to crash, or even crashing the specific code. They are just affecting a few instructions such that it counts wrong! If that count is part of something like a bounds check that means you could overwrite an array.
Anyway see the video for more details:
-
Updated with RECON Slides, DEFCON Annoucement
07/14/2014 at 17:29 • 0 commentsLots of good news. First off - for those interested I did post my RECON Slides online just after the conference. They are supposed to release video at some point so you'll be able to get that.
I'm also going to be at BlackHat and DEFCON! I plan on giving a talk in the hardware hacking village at DEFCON, I don't have anything on either of the official schedules this year though. As an additional bonus there will be a ChipWhisperer Complete Kit that I built going for auction at the Vegas 2.0 Fundariser for the EFF. It might save you a bundle! I'll be packing a few free PCBs as usual, but I'm normally limited in how much I can carry.
Speaking of EFF, the company I've started to spin up for selling assembled ChipWhisperers (NewAE Technology) is now a organizational member of the EFF, check it out on their thanks page.
I'm reworking how the analyzer software works right now, so still haven't pushed out a release. The system will now generate a script file & run the script file automatically, instead of hiding everything behind the GUI. This makes it a lot easier to both (A) save your setup and (B) hack in new moduels to test with. It should be a great improvement, and will let you play with the system even more.
I'm still posting new documentation to the Python Docs page (see links panel on left), so there's a few new tutorials there, including examples of both clock & power glitching. That's all for now anyway, back to work finishing off this code...
-
Template Attacks & Free PCBs at RECON
06/02/2014 at 16:18 • 0 commentsThere's been a flurry of activity on the GIT repo lately, as I'm adding support for template attacks. These attacks are exceedingly powerful (capable of breaking AES with a single trace), so I'm excited about support for this. It's not quite done yet so don't clone the repo & expect things not to break! With any luck all the bugs will be ironed out this week and a release will come shortly afterwards.
I'm also going to be giving a short (30-min) talk at Recon in Montreal at the end of June. If you'll be there be sure to say hello. As usual I'll be packing ChipWhisperer PCBs that I'll be giving out. It's the closest I can afford to 'free' open-source hardware ;-)
-
Analog Triggering Added, 2-Min Video
05/11/2014 at 18:49 • 0 commentsFirst off - I've got a 2-min overview video for the Hackaday Prize on Youtube. I've also finally released the public version of FPGA code to trigger on a pattern in the analog waveform. This is still super-beta, but working towards some pretty amazing capability. In particular the idea is you can detect when the target device is doing something based on the power signature, and then insert a glitch or whatnot with great precision. Releases are posted on ChipWhisperer.com.
ChipWhisperer®: Security Research
ChipWhisperer laughs at your AES-256 implementation. But it laughs with you, not at you.