-
1Step 1
Overview
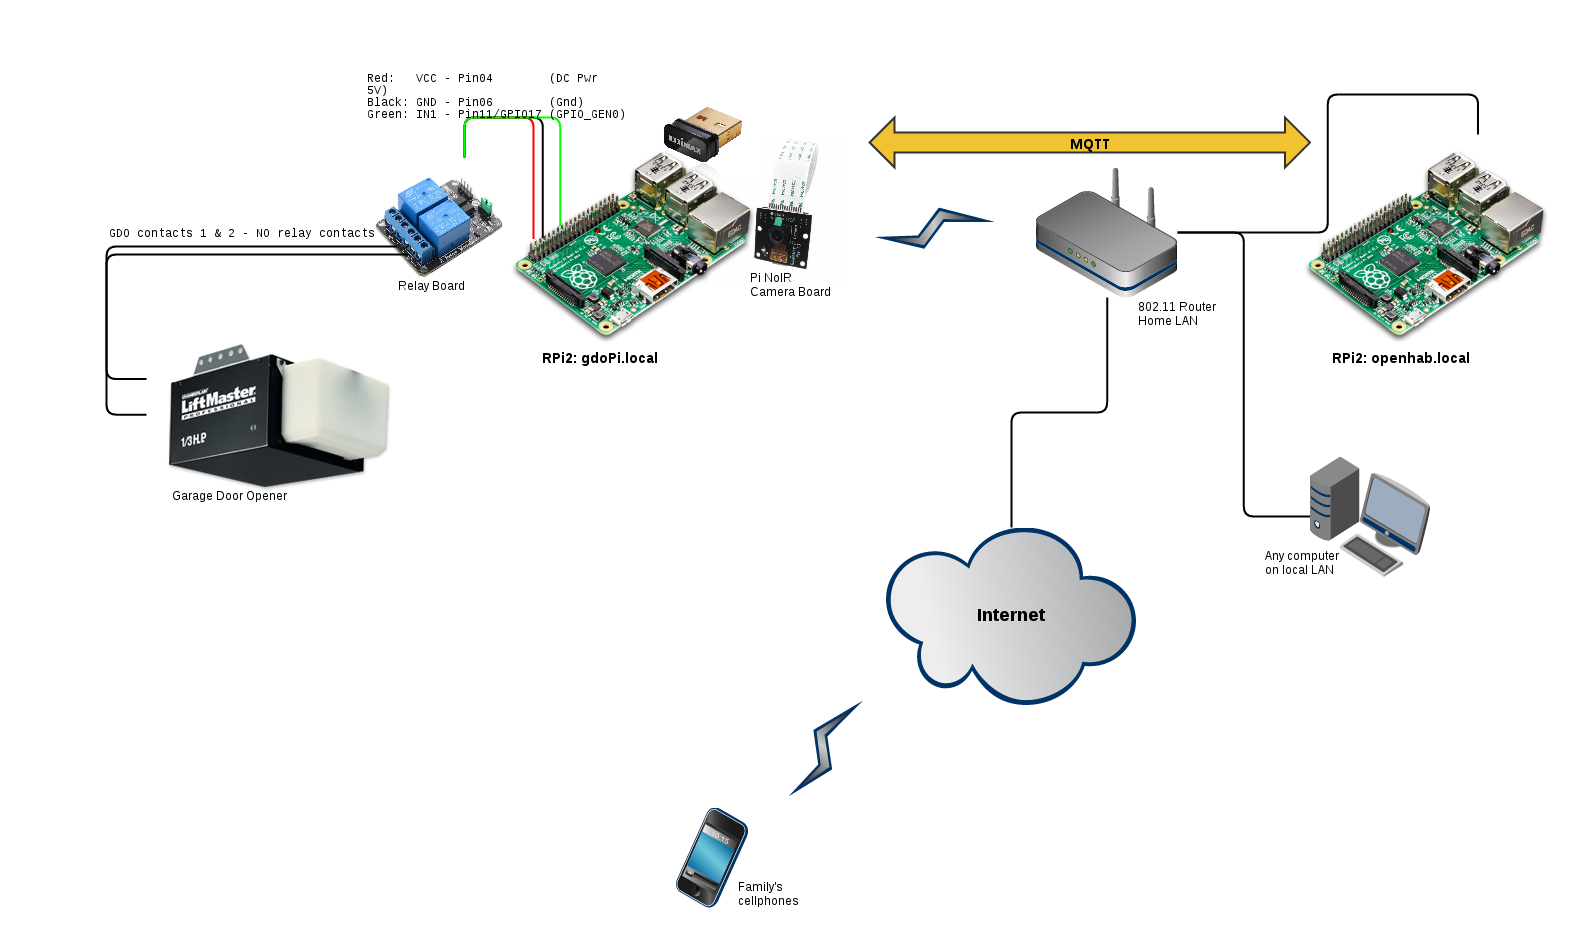
These steps will walk you through configuring one Raspberry Pi 2 model B as a Garage Door Opener RPi (gdoPi.local) wireless sensor node (WSN) and second RPi2 (openhab.local) as an openHAB automation control back-end w/ both webGUI and iOS/Android apps. It uses the MQTT sub/pub messaging protocol for the two to communicate over a mixed wired/wireless IP network.
![]()
-
2Step 2
gdoPi - Relay & Garage Door Opener Hookup
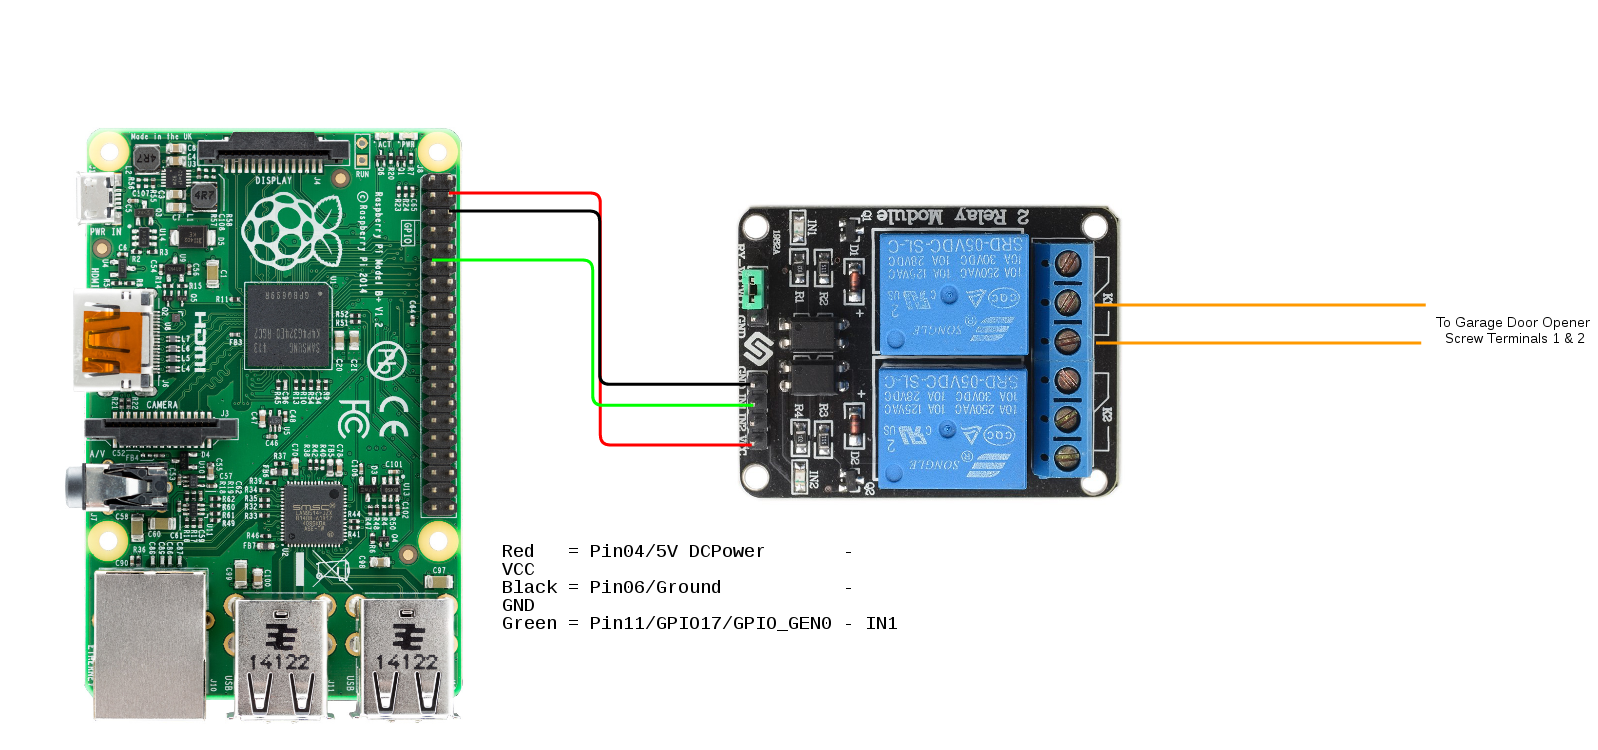
Before you apply power to the Raspberry Pi 2 that will be serving as your Garage Door Opener RPi ( hereafter referred to as gdoPi), wire up the relay to the GPIO via F-F jumper wires per the following diagram.
![]()
We will hookup the relay to the garage door opener in a later step.
-
3Step 3
Prepare Raspberry Pi (Repeat for both RPis)
- Download from http://raspberrypi.org the latest Raspbian full distro. In this case, 2016-03-18-raspbian-jessie.zip.
- Extract:
unzip 2016-03-18-raspbian-jessie.zip
- If not already formatted, use gparted to format the uSD as a single partition of FAT32 format.
- Copy Raspbian image to uSD (replace /dev/sdb w/ your device's ID):
sudo dd bs=4M if=2016-03-18-raspbian-jessie.img of=/dev/sdb status=progress
- Boot the RPi off uSD, and use the GUI's Menu>Preferences>Raspberry Pi Configuration to change these variables:
- Expand Filesystem
- Hostname - your call (I used "gdoPi" and "openhab"; whatever your choose will be automatically appended w/ .local for its FQDN.)
- Camera - Enable
- Set Locale... - your country (me: en, US, UTF-8)
- Set Timezone... - your timezone (me: America, Chicago)
- Set Keyboard... - your written language (me: United States, English (US))
- Set WiFi Country... - your country (me: US)
- Reboot
- Update/Upgrade Raspbian to latest versions of default packages:
sudo apt-get update; sudo apt-get upgrade -y
- Reboot
-
4Step 4
gdoPi.local - Twilio Support
Twilio.com is a paid broker/gateway for certain Simple Messaging Service (SMS), Multimedia Message Service (MMS), voice services. This was my best choice for servicing my text messaging needs from my RPi.
Use the "PIP Installs Python" package manager built into Python to grab the latest Twilio libraries needed for your Python code to interface w/ the Twilio API. Unfortunately, you must be root to install; so temporarily switch user into root, do the install, and exit back out.
sudo su -
pip install twilio
exit
You should see that the following packages were successfully installed: twliio, httplib2, pytzTest that you can now send SMS messages by copy-n-pasting Twilio's Python example script send_sms.py from https://www.twilio.com/docs/quickstart/python/sms/sending-via-rest into your own file by the same name and then executing via:
python send_sms.py
Be sure to follow the directions on said webpage on how to change the dummy values for the ones that represent your account credentials, your purchased Twilio phone number, and the phone number(s) you wish to text.
An Alternative...
An alternative solution might be the free Textbelt.com service, but it was not working for several weeks as of the time of this project development; see blog for why. I expect it to be back up and working at some point, but now I have to question whether I am willing to risk the service's availability.
-
5Step 5
gdoPi.local - MQTT Support
We will be using the well-established MQTT messaging protocol to communicate w/ our openHAB backend (to be built in follow-on steps.) The easiest way to implement MQTT on the RPi (because it's already available in the Raspbian repositories) is via Mosquitto.
sudo apt-get install mosquitto mosquitto-clients python-mosquitto -y
See my blog posts on how to test that this works against either a similar installation on another RPi or via the Java-based MQTT.fx utility on a desktop computer. -
6Step 6
gdoPi.local - PiCam & Apache Support
We will be using a Raspberry Pi Camera Board (your choice, IR-filtered or NoIR version) to provide visual status updates of the garage door and leveraging the Apache HTTP daemon, at least for this beta release, as means for openHAB to retrieve the images taken.
sudo apt-get install apache2 -y
We need to create a folder to store the image such that the user executing the gdoPi code has access to write and openhab has has access through http calls to read it. (There are better solutions than this that I will explore in the next release, but for now this gets the job done.)sudo mkdir /var/www/html/gdoCam chown pi:root /var/www/html/gdoCam chmod 754 /var/www/html/gdoCam
The Python library for accessing the PiCam should already be installed via the OS release, but double-check anyway:
sudo apt-get install python-picam
-
7Step 7
openhab.local - Install and Prep openHAB
Add newer repository for all things openHAB, then install openHAB runtime :
wget -qO - 'https://bintray.com/user/downloadSubjectPublicKey?username=openhab' | sudo apt-key add -'
echo "deb http://dl.bintray.com/openhab/apt-repo stable main" | sudo tee /etc/apt/sources.list.d/openhab.list
sudo apt-get update
sudo apt-get install openhab-runtime
sudo update-rc.d openhab defaults
Correct file ownership:sudo chown -hR openhab:openhab /etc/openhab sudo chown -hR openhab:openhab /usr/share/openhabOpen new window and start tracking log file:tail -f /var/log/openhab/openhab.log
Confirm OpenHAB is running and webpage is ready to work by opening a web browser and going to: http://openhab.local:8080(At this point we're still missing content, so expect to see an error listing. We just want to confirm the webserver backend is working.)
-
8Step 8
openhab.local - MQTT Support
Just like for gdoPi.local, install Mosquitto packages. However, unlike on gdoPi, we will actually use Mosquitto as a broker for the entire system on this RPi.
- mosquitto
- mosquitto-clients
- python-mosquitto
- (will automatically include: libmosquitto1...)
sudo apt-get install mosquitto mosquitto-clients python-mosquitto -yInstall MQTT bindings for openHAB. This will allow openHAB to speak to the underlying Mosquitto broker we just installed.
sudo apt-get install openhab-addon-binding-mqtt
sudo chown -hR openhab:openhab /usr/share/openlab/
Again, review the journal entry on how to test that your newly-installed MQTT packages work against either a similar installation on another RPi or via the Java-based MQTT.fx utility on a desktop computer. I would recommend testing back and forth on openhab.local vs gdoPi.local and vice versa to make sure you understand that these messages are properly communicating. It will also help you gain a better understanding of MQTT theory.
-
9Step 9
openhab.local - gdoPi Interface Support
Download the provided project files for openhab.local and install in their appropriate directories. Make sure to reset ownership to 'openhab' user.
- /etc/openhab/configurations/openhab.cfg
- /etc/openhab/configurations/items/default.items
- /etc/openhab/configurations/sitemaps/default.sitemap
sudo chown -hR openhab:openhab /etc/openhab
Edit openhab.cfg to correctly list your network ID in 'security:netmask=X.Y.Z.0/24', and review the "MQTT Transport" section. If you prefer renaming your broker and/or your clientId, do that here.
Just for good measure, restart openHAB to make sure everything changed takes effect. Generally speaking, openHAB is really good about automatically detecting when a sitemap or items file changes and refreshes accordingly. However, we've also changed the main CFG file and other tweaks with the binding addons.
sudo systemd restart openhab
Be sure to watch the /var/log/openhab/openhab.log terminal window you opened earlier to become familiar with what's going on. If any errors specific to openHAB occur, you are likely see them here.While you are at, open an additional terminal window and start watching the openHAB event logs:
tail -f /var/log/openhab/events.log
-
10Step 10
Test openHAB/MQTT Communications Chain Works
On your desktop computer, open a web browser and go to URL: http://raspberry.local:8080
You hope to see a Sitemap w/ two buttons. If all looks good, open up a terminal on each RPi, and start an MQTT subscription trace on the topic that openHAB will publish to when we begin testing your buttons.
mosquitto_sub -h openhab.local -v -t /house/#
Now, if we have everything right, you should be able to click on the web GUI and trigger a response on these two terminals. Each time you click a button, you should see one of the two responses (depending on which button you clicked.)
- /house/garage/gdoPi/doorRelay 1
- /house/garage/gdoPi/camera 1
NOTE:
Also notice that the button/message behavior is a little unique for openHAB. Our items and sitemap files are using a mapping trick to morph transform the standard openHAB On/Off toggle switch into a momentary switch, i.e. a non-latching push button.
That's what the ', autoupdate="false"}' piece is doing in .items, and the 'mappings=[ON="Toggle"]' piece is doing in .sitemap.
Home Automation - Garage Door Opener
Extract best practices from existing garage door projects. Build version that suites my needs; eventually integrate into other HA efforts.


Discussions
Become a Hackaday.io Member
Create an account to leave a comment. Already have an account? Log In.
Hi luffmanb,
If I don't need the SMS, can I leave out the Step 4? I am guessing the message from will still be delivered to the OPENHAB via the MQTT client?
Are you sure? yes | no