2018 Open Hardware Summit badge
electronic conference badge for 2018 Open Hardware Summit attendees
electronic conference badge for 2018 Open Hardware Summit attendees
To make the experience fit your profile, pick a username and tell us what interests you.
We found and based on your interests.
ohs18badge-j1-adapter_bb.pdfFritzing diagram of adapter board for J1 header to flash the ESP32 and connect to the serial console (MicroPython REPL)Adobe Portable Document Format - 644.02 kB - 10/05/2018 at 02:40 |
|
|
ohs18badge-j1-adapter.fzzFritzing diagram of adapter board for J1 header to flash the ESP32 and connect to the serial console (MicroPython REPL)x-fritzing-fzz - 6.44 kB - 10/05/2018 at 02:40 |
|
|
Rev 3 Production Digikey and Mouser orders for badge (1).xlsxsheet - 49.23 kB - 08/04/2018 at 04:51 |
|
|
Rev 3 Production Digikey and Mouser orders for badge - Sheet1.pdfAdobe Portable Document Format - 61.81 kB - 08/03/2018 at 08:29 |
|
|
mouser-bom-20180803.pdfAdobe Portable Document Format - 149.77 kB - 08/03/2018 at 07:59 |
|
|
@helenleigh More fun with microscopes: here’s what an e ink transition looks like up close. Having way too much fun with @pdp7, @talldarknweirdo, @shahselbe and @jlewallen
@helenleigh Okay so watching solder paste heat melt under a microscope is so insanely satisfying. I can’t believe I’ve never seen this before! Blissfully geeking out with @pdp7 and @talldarknweirdo in the @conservify office after #supercon
435 6:20 PM - Nov 6, 2018
Bring your Open Hardware Summit badge to Hackaday Supercon in Pasadena this weekend!
Drew Fustini will have the badge programming jig with updated firmware featuring like the MicroPython WebREPL, accelerometer demo, and Magic 8-Ball app by Steve Pomeroy
Drew Fustini will also have USB-to-serial adapter boards for the badge to share!
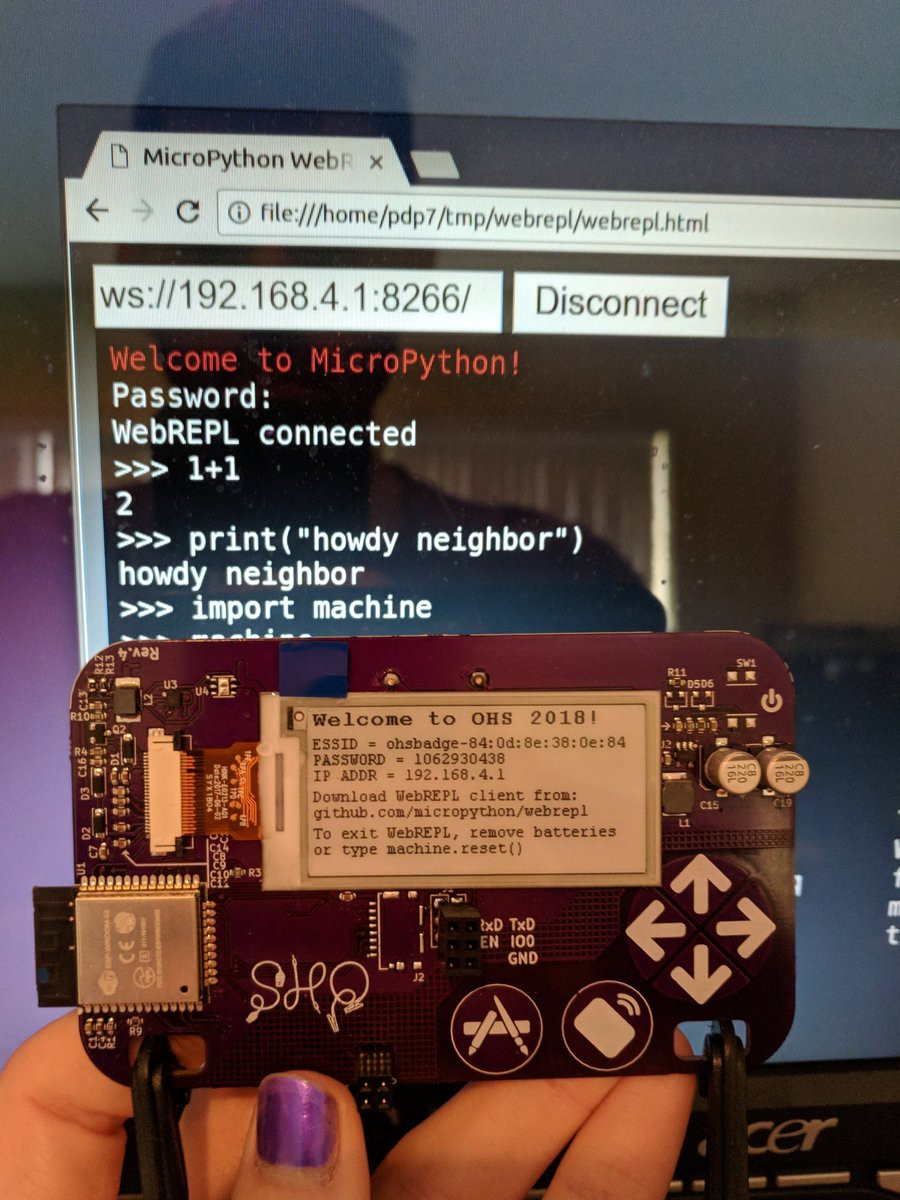
The 2018 Open Hardware Summit badge runs MicroPython firmware which allows for an interactive programming experience known as the REPL:
REPL stands for Read Evaluate Print Loop, and is the name given to the interactive MicroPython prompt that you can access on the ESP8266. Using the REPL is by far the easiest way to test out your code and run commands.
There is an USB-to-serial adapter board which be used to access the REPL on the badge via the serial port. However, a simpler option is to use the WebREPL:
WebREPL allows you to use the Python prompt over WiFi, connecting through a browser. The latest versions of Firefox and Chrome are supported.
For your convenience, WebREPL client is hosted at http://micropython.org/webrepl . Alternatively, you can install it locally from the the GitHub repository https://github.com/micropython/webrepl
Before connecting to WebREPL, you should set a password and enable it via a normal serial connection. Initial versions of MicroPython for ESP8266 came with WebREPL automatically enabled on the boot and with the ability to set a password via WiFi on the first connection, but as WebREPL was becoming more widely known and popular, the initial setup has switched to a wired connection for improved security:import webrepl_setupFollow the on-screen instructions and prompts. To make any changes active, you will need to reboot your device.
The MicroPython firmware for the badge has been updated to add WebREPL in the list of available apps.
You can order this USB to serial adapter board for the badge and then follow the instructions to build and flash the new firmware. The WebREPL option will turn on WiFi and put the badge into AP mode. Connect to it from your device, such as a laptop, and then connect to the badge using the WebREPL browser-based client.
Resources:
This adapter board to connects a USB-to-serial cable to the 2018 Open Hardware Summit badge.
The badge features an ESP32 microcontroller running MicroPython firmware. The firmware provides a Python interpreter prompt (REPL) on the serial port which allows interactive programming of the badge!
A previous blog post describes how to build and flash new MicroPython firmware to the badge:
The KiCad design files are shared on GitHub:
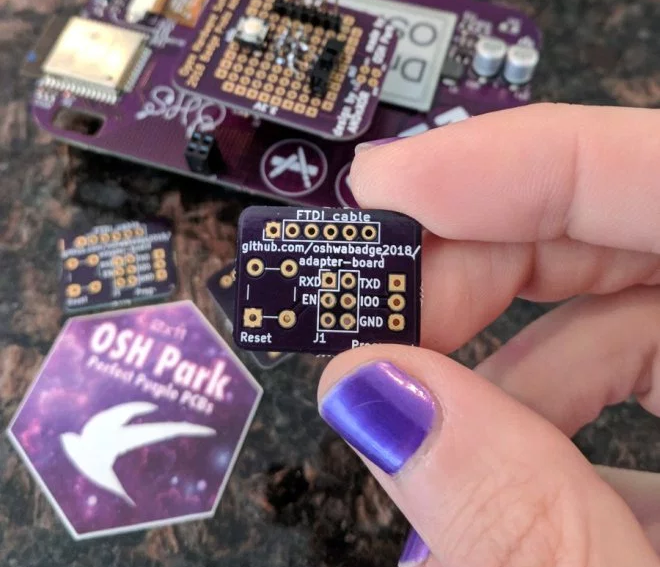 The board has been shared on OSH Park:
Want to use the KX122-1037 Accelerometer (datasheet) on the 2018 Open Hardware Summit badge?
Make sure that R12 and R13 are populated.
R12 and R13 are 2.2K Ohm resistors for the I2C bus. This is needed for the accelerometer to work. We mistakenly had DNP (do not place) on the BoM (Bill of Materials) for R12 and R13.
Awesome people at Artisan’s Asylum makerspace helped to solder these resistors on the badges right before Open Hardware Summit!
It is possible that some badges were not reworked. Please email drew@oshpark.com if they are missing from your badge.
This photo shows what is will look like when R12 and R13 are missing:
Download the Python file named accelerometer.py from the ohs18apps repository on GitHub:
Start the FTP server and connect to the SSID listed on the badge:
Open your FTP client application and connect to 192.168.4.1:

After the transfer completes, power cycle the badge by removing the batteries and reinserting.
Press the left application button (with the paintbrush and pencil icons) to enter the menu. accelerometer.py should then be listed under Available Apps menu. Press the down cursor until accelerometer.py is selected and then press the application button again.
The KX122-1037 Accelerometer datasheet describes the 3 different axis:
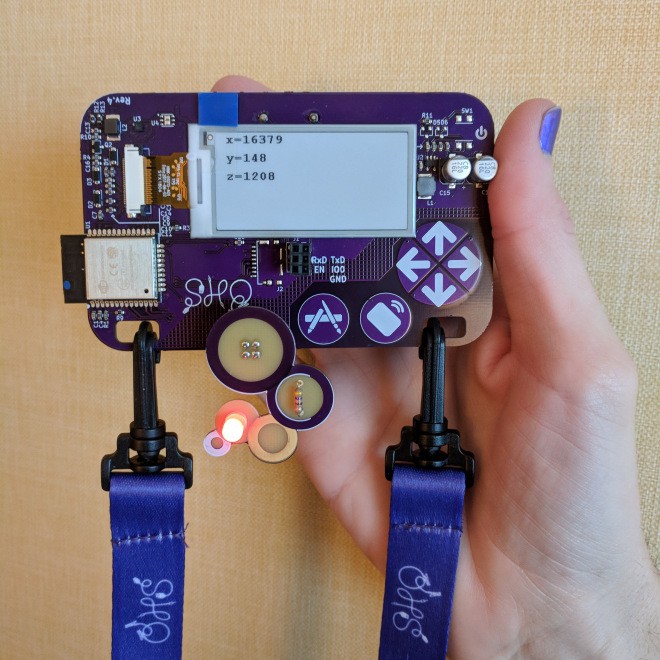
Here are examples of the X, Y and Z axis of the accelerometer for reference:

The 2018 Open Hardware Summit badge features an ESP32 microcontroller running MicroPython firmware. The firmware provides a Python interpreter prompt (REPL) on the serial port which allows interactive programming of the badge!
This post describes how to connect an FTDI 3.3V USB to serial cable to the J1 header on the badge. In addition to the serial console, this adapter board for the J1 header enable new MicroPython firmware to be flashed on to the badge.
First, solder a 2×3 pin header socket on to the badge at the J1. Alternatively, a strip of 0.1″ header sockets could be cut into two 1×3 pieces.
Here is a Fritzing diagram of how to solder this J1 adapter board onto a perf board:
Note: I re-purposed the OHS18 badge add-on proto dev board to act as a generic perf board.
The slide switch on the adapter board will allow the ESP32 to enter programming mode by connecting the IO0 pin on J1 to ground. The push button on the adapter board will reset the board by connecting EN pin on J1 to ground.
If you have the serial port open in a terminal emulator, then you should see this after switching into programming mode and pressing the reset push button:
Build the MicroPython firmware for the ESP32 on the badge by following these directions in the GitHub repo README.
To flash the ESP32, close your terminal emulator program so that esptool.py can open the serial port (which is /tty/USB0 on my Linux computer):
Switch from programming mode to serial console mode so that IO0 pin on J1 is no longer grounded. Then open the serial port in your terminal emulator again (115200 baud, 8-N-1) and press the reset push button:
You should see the output from MicroPython firmware running.
To use the interactive Python prompt (REPL), press the menu button on the badge (the icon with pencil and paintbrush) and select Serial REPL from the Available Apps menu:
The terminal emulator connected to the serial port should then display the interactive Python prompt (REPL). You can type in MicroPython code to experiment;
Here is an exmaple that displays text on the e-paper and prints that values from the accelerometer:
import gxgde0213b1
import font16
import machine
import struct
from ohsbadge import epd
from ohsbadge import fb
epd.clear_frame(fb)
epd.set_rotate(gxgde0213b1.ROTATE_270)
epd.display_string_at(fb, 0, 0, "Welcome to OHS 2018!", font16, gxgde0213b1.COLORED)
epd.display_frame(fb)
i2c = machine.I2C(scl=machine.Pin(22), sda=machine.Pin(21))
i2c.writeto_mem(30,0x18,b'\x80')
ACCX = struct.unpack("h",i2c.readfrom_mem(30,0x6,2))
ACCY = struct.unpack("h",i2c.readfrom_mem(30,0x8,2))
ACCZ = struct.unpack("h",i2c.readfrom_mem(30,0x10,2))
print("x={0} y={1} z={2}".format(ACCX[0], ACCY[0], ACCZ[0]))
Photo of the text displayed on the e-paper:
Resources:
Thanks to @Steve Pomeroy for creating this MicroPython demo app for the Open Hardware Summit badge:
https://github.com/oshwabadge2018/ohs18apps/blob/master/magic8ball.py
import gxgde0213b1
import font16
import font12
import urandom
import time

phrases = ["It is certain.", "It is decidedly so.", "Without a doubt.", "Yes - definitely.", "You may rely on it.", "As I see it, yes.", "Most likely.", "Outlook good.", "Yes.", "Signs point to yes.", "Reply hazy, try again", "Ask again later.", "Better not tell you now.", "Cannot predict now.", "Concentrate and ask again.", "Don't count on it.", "My reply is no.", "My sources say no.", "Outlook not so good.", "Very doubtful."]

epd.clear_frame(fb)
epd.set_rotate(gxgde0213b1.ROTATE_270)
epd.clear_frame(fb)
epd.display_string_at(fb, 0, 60, urandom.choice(phrases), font16, gxgde0213b1.COLORED)
epd.display_frame(fb)
time.sleep(2)
This Python file can be transfered to Open Hardware Summit badge using FTP server built into the MicroPython firmware: https://oshwabadge2018.github.io/docs.html#uploading-over-ftp
photo gallery: https://photos.app.goo.gl/f1y8PSHfYAaa4xTu7
Create an account to leave a comment. Already have an account? Log In.
I put together a quick sample app to try out the cap touch buttons and e-paper display. It's just a magic 8-ball :-) https://xxv.so/0x0558caab
I installed it by turning the badge to FTP mode, uploading it to the apps directory, then power-cycling the device.
this badge is boss af. 'grats to the team that got it all together, you are champions.
Is the full BOM including ePaper display available? The display doesn't seem to be in the Mouser and Digikey BOMs posted.
The display we sourced from good-display. You can also get them from waveshare. PN: GDEH0213B1 http://www.buy-lcd.com/index.php?route=product/product&product_id=50470
video of prototype designed by @Alex Camilo : https://www.youtube.com/watch?v=GLpCBzm6ff0
fyi - osh park logo files https://drive.google.com/open?id=17T_f1Wb-QYcmiL3nFeaOto6QjWWEH7PH
Open Source Hardware Summit Conference Badge Documentation Page https://github.com/oshwabadge2018/oshwabadge2018.github.io https://oshwabadge2018.github.io
fyi -
This email serves as official confirmation that your hardware
Open Hardware Summit 2018 badge
has now officially been certified as open source hardware by the Open Source Hardware Association. Congratulations!
Your UID is: US000133
A very nice writeup. I'm still reading the logs, but it really looks cool — especially since I considered a similar design for a while for my badge design. I would really recommend to include at least a few buttons, though — for cycling between several images, waking the badge up for programming, etc. — it feels better when it's interactive this way, and you can get more aggressive sleep modes this way.
It's not clear how you want to power it, in one place you mention 2xAAA, in another it's 3xAAA. I guess 3 batteries is easier (as you can drop it easily to 3.3V with an LDO), but that gets quite large and heavy.
Good point about the buttons. What surface mount buttons would you recommend?
I must have changed my mind over time. I would like to use 2x AAA and use a boost converter to output 3.3V.
I absolutely love the ALPS SKPMAPE010 (or rather their cheap Chinese clones) — they are soft and quiet, but still give tactile feedback. But in your case, I think I would go for side-mounted switches on the edge of the PCB, to keep the size the same. Something like the switch that the Wemos D1 Mini uses for reset.
One AAA and this boost converter? https://www.tindie.com/products/onehorse/tps610995-36-v-booster-board/
For least impact on wearer (lowest size and weight). I had assumed (perhaps mistakenly) that the badges are to be worn, so is capacity more relevant that size/weight??
1 AA. They cost the same per cell as AAA, but you get 2X capacity. Also lower internal impedance.
You might want to check out the sales BestBuy sometimes has on batteries. A good price is something around $0.20/cell. Amazon Basics is okay, but I know you can find something better.
Also figure out how you're going to ship the batteries. Realistically, the batteries will weigh as much as the badge itself. You'd probably just ship the batteries to Boston a week before.
Or order them and have them shipped directly to destination. i.e. hotel or the summit.
That would be awesome if you folks get the FE310s donated. Looking forward to seeing what comes out of this, I haven't played around with my #LoFive boards yet so this might be the kick in the pants I need. Don't make the PCB square, that is boring.
Thanks for your interest. Yes, I agree that whatever the functional design, we must have an interesting aesthetic using the board outline along with silkscreen and/or copper artwork. I would appreciate any suggestions! thanks, drew
I've found PCB outline design (and copper graphics too, for that matter) works best when considered after the components have been selected. I usually import all my footprints into Inkscape so I can spend a few hours really exploring different concepts. I do suggest using a tool that supports more complex outline creation compared to KiCad, then importing the board outline as a *.dxf.
Become a member to follow this project and never miss any updates
 Florian Schuetz
 Anool Mahidharia
 Florian Baumgartner
 oshpark
This is a programmable my name is badge? Or does it have other functions like RFID to access buildings etc.