frankstripod
-
Mouse Guts
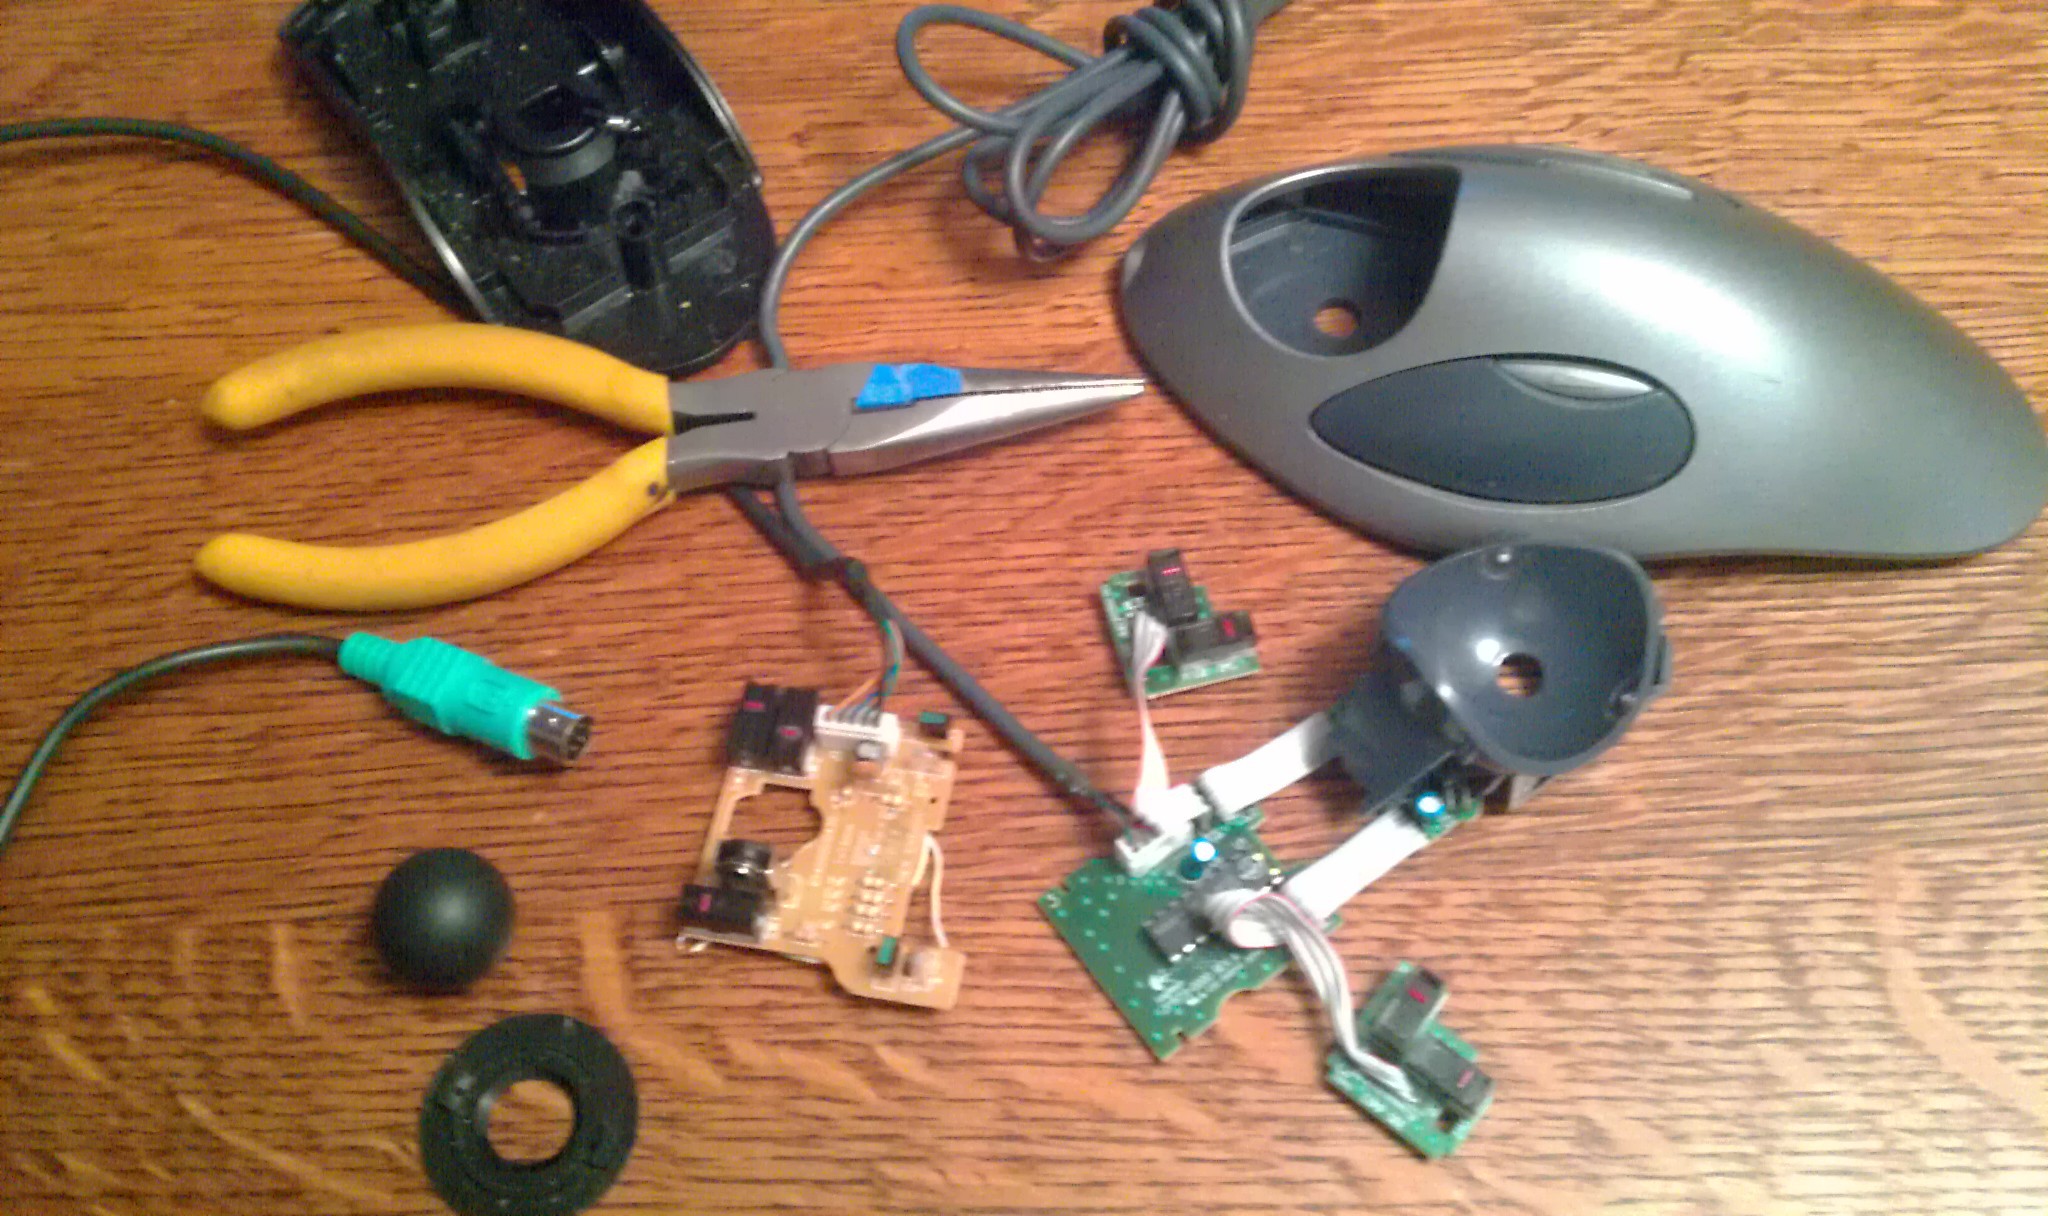
06/10/2014 at 09:11 • 0 commentsInside a Logitech Trackball Marble Mouse:
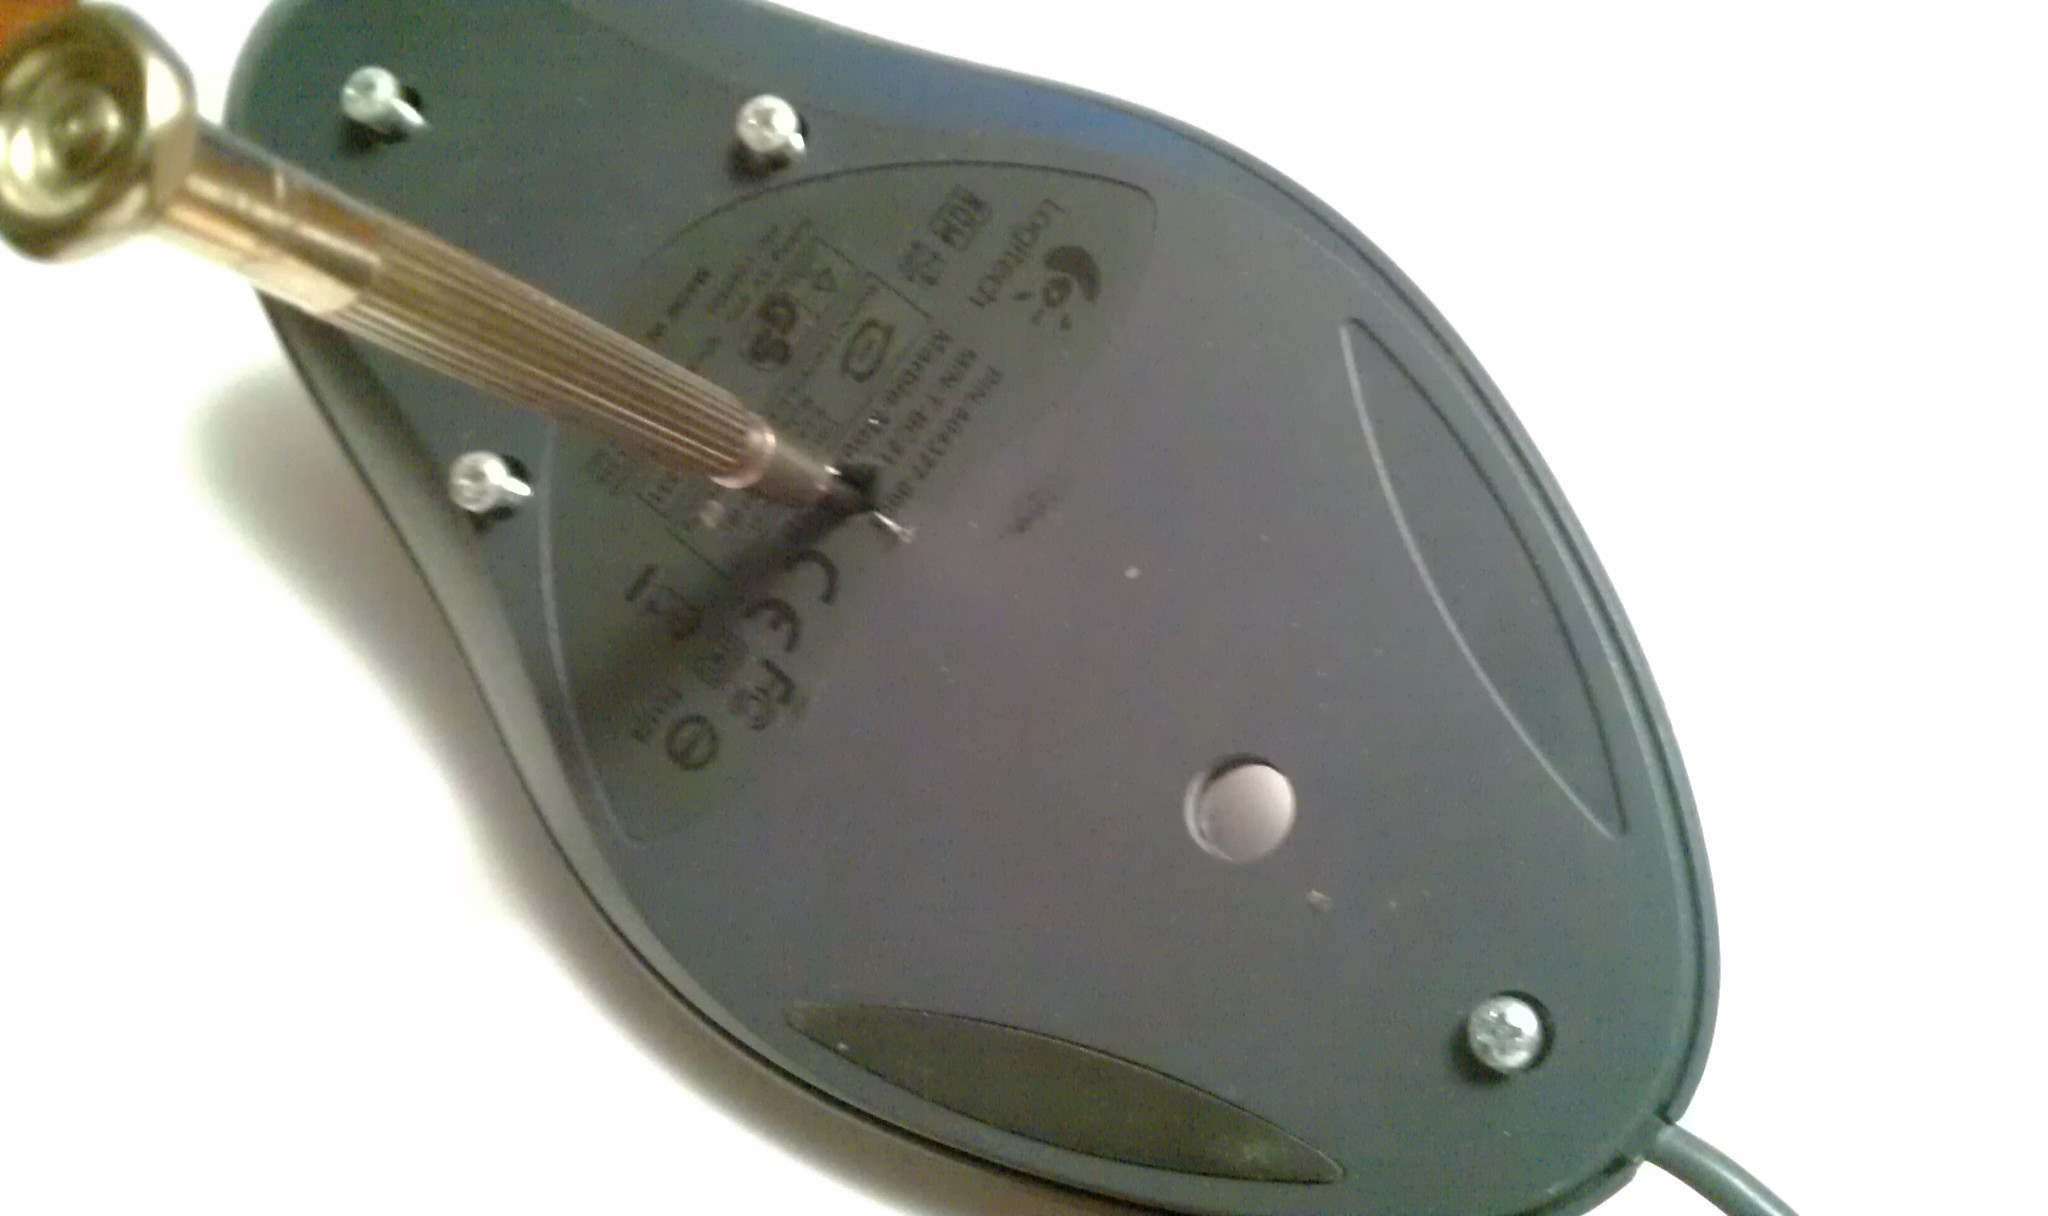
There are always hidden screws or tabs in everything :(
I bet just looking at a screw hidden under a label voids any warranty.
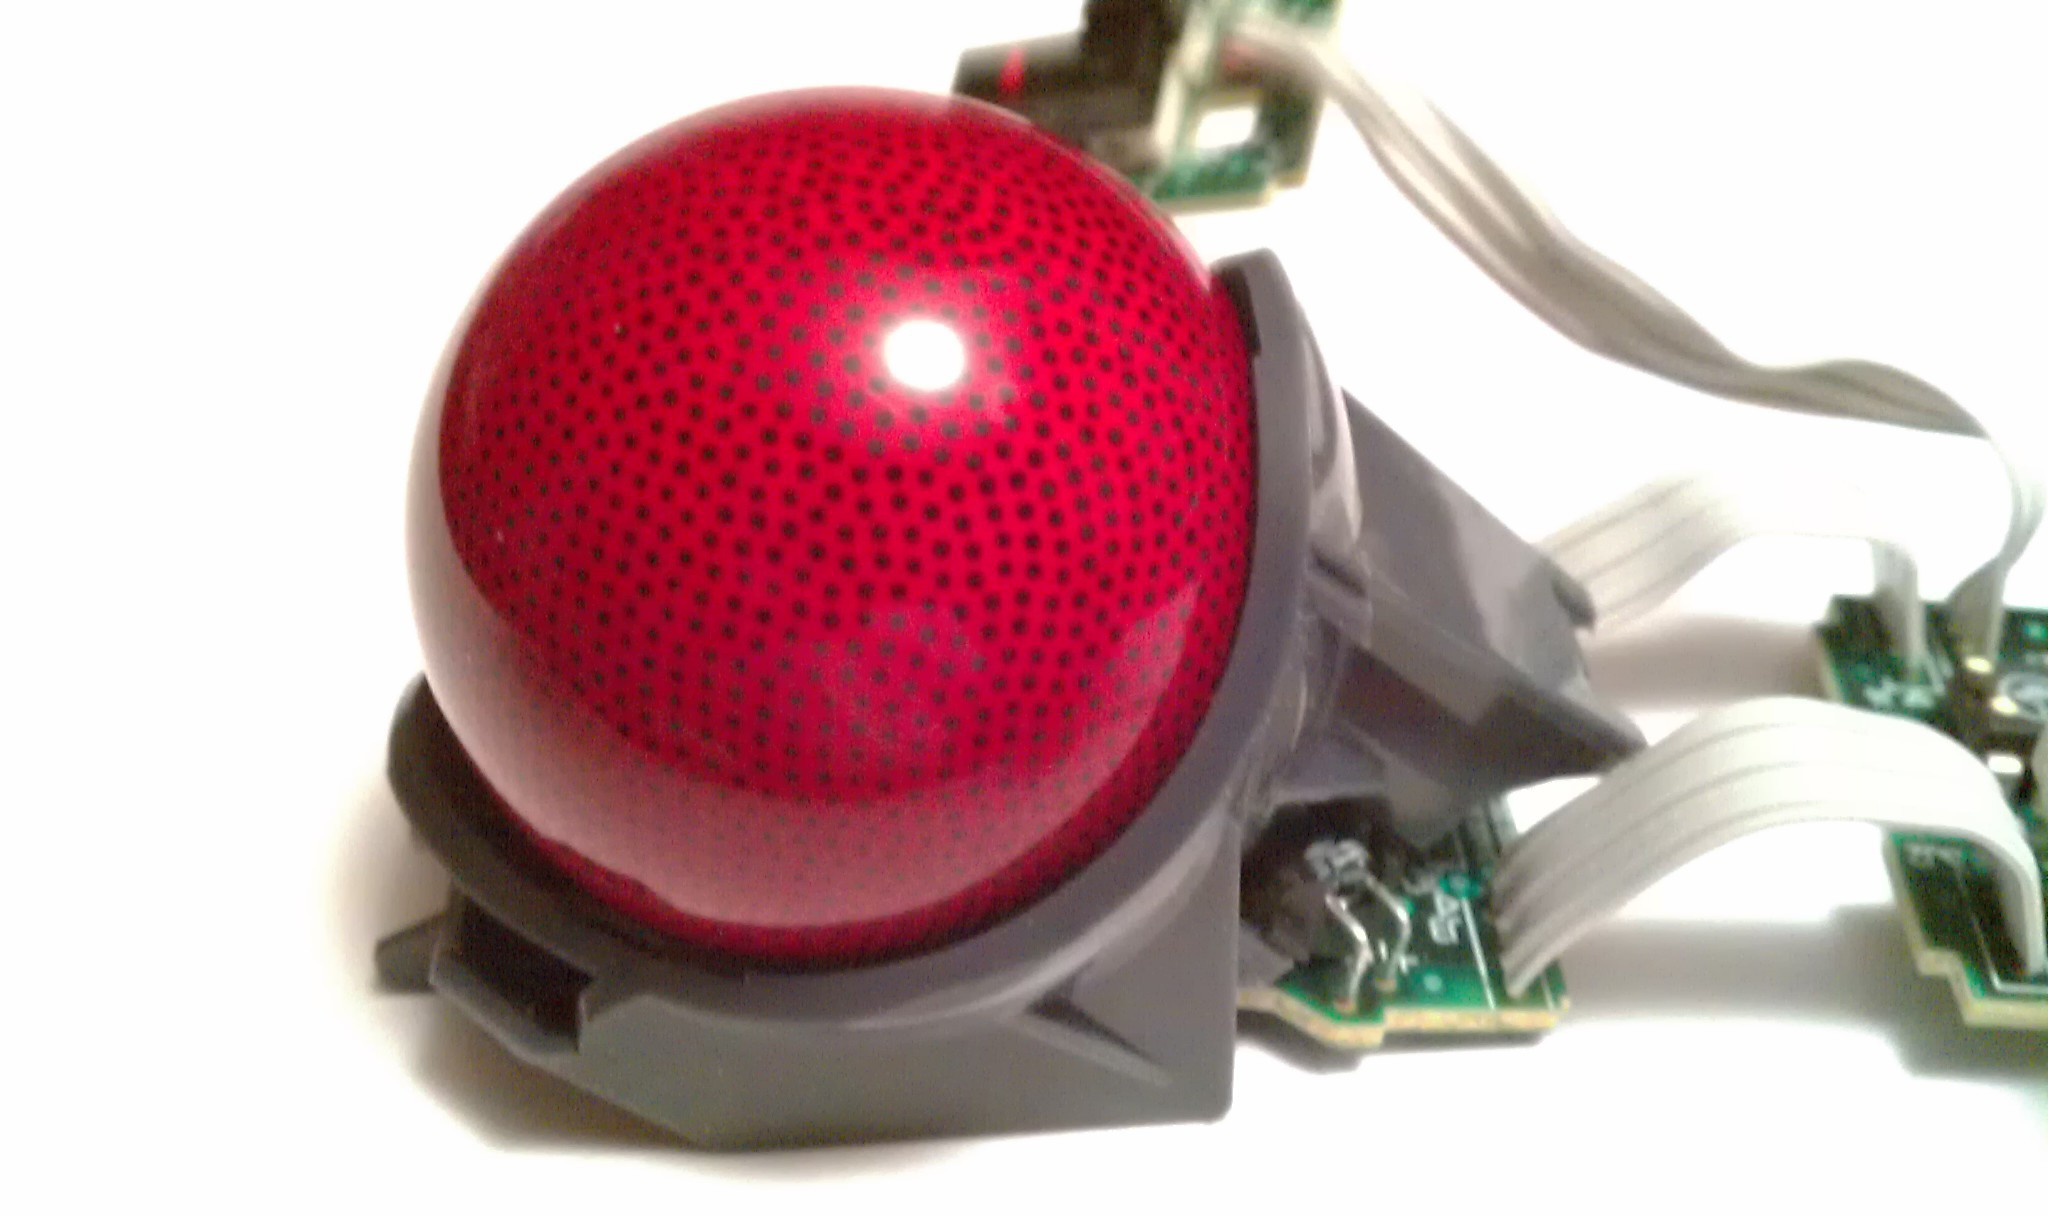
This mouse has a hidden screw deep behind the label and is long past any warranty.![]()
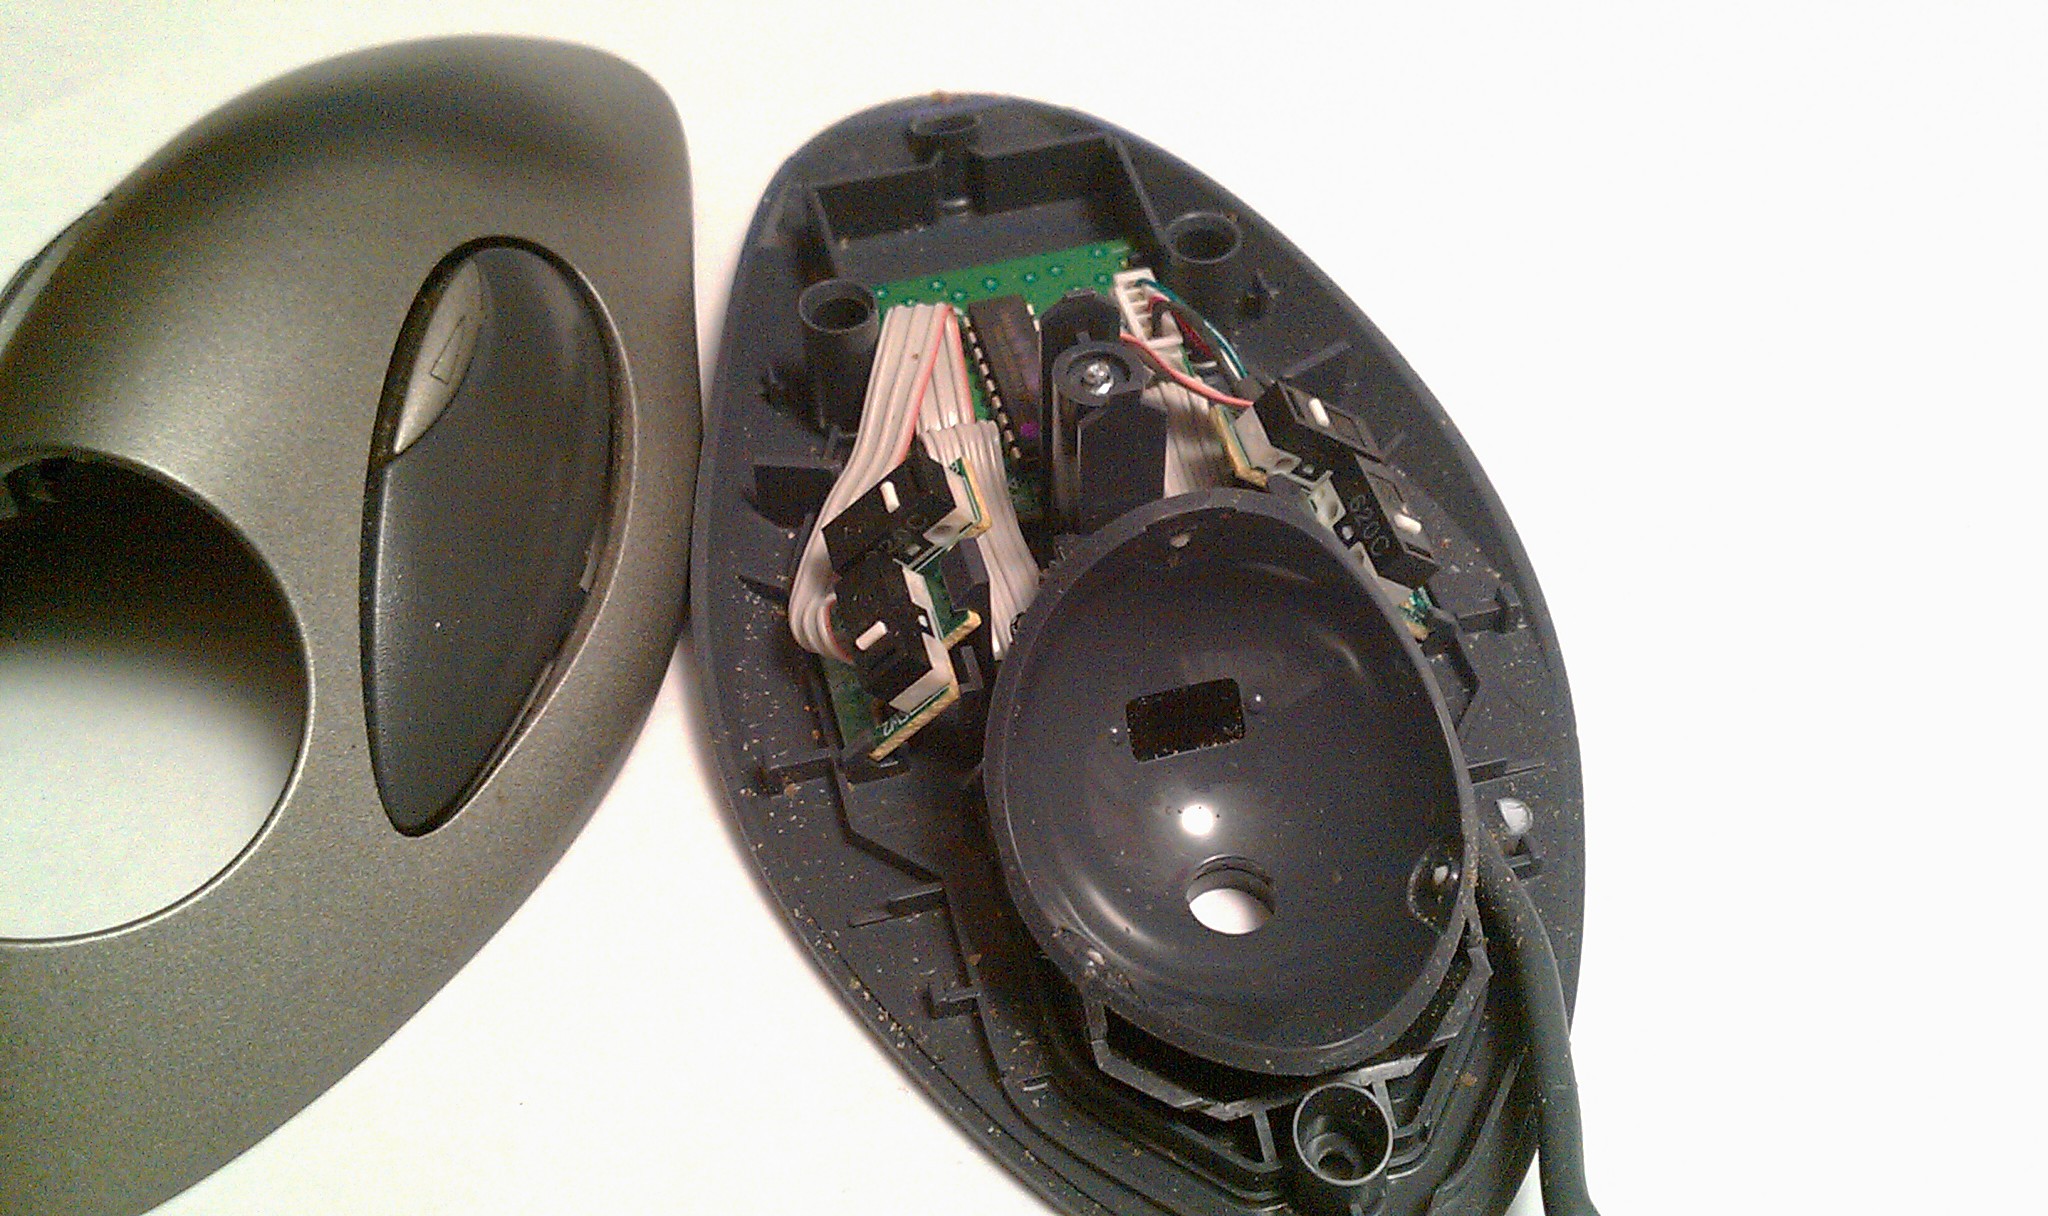
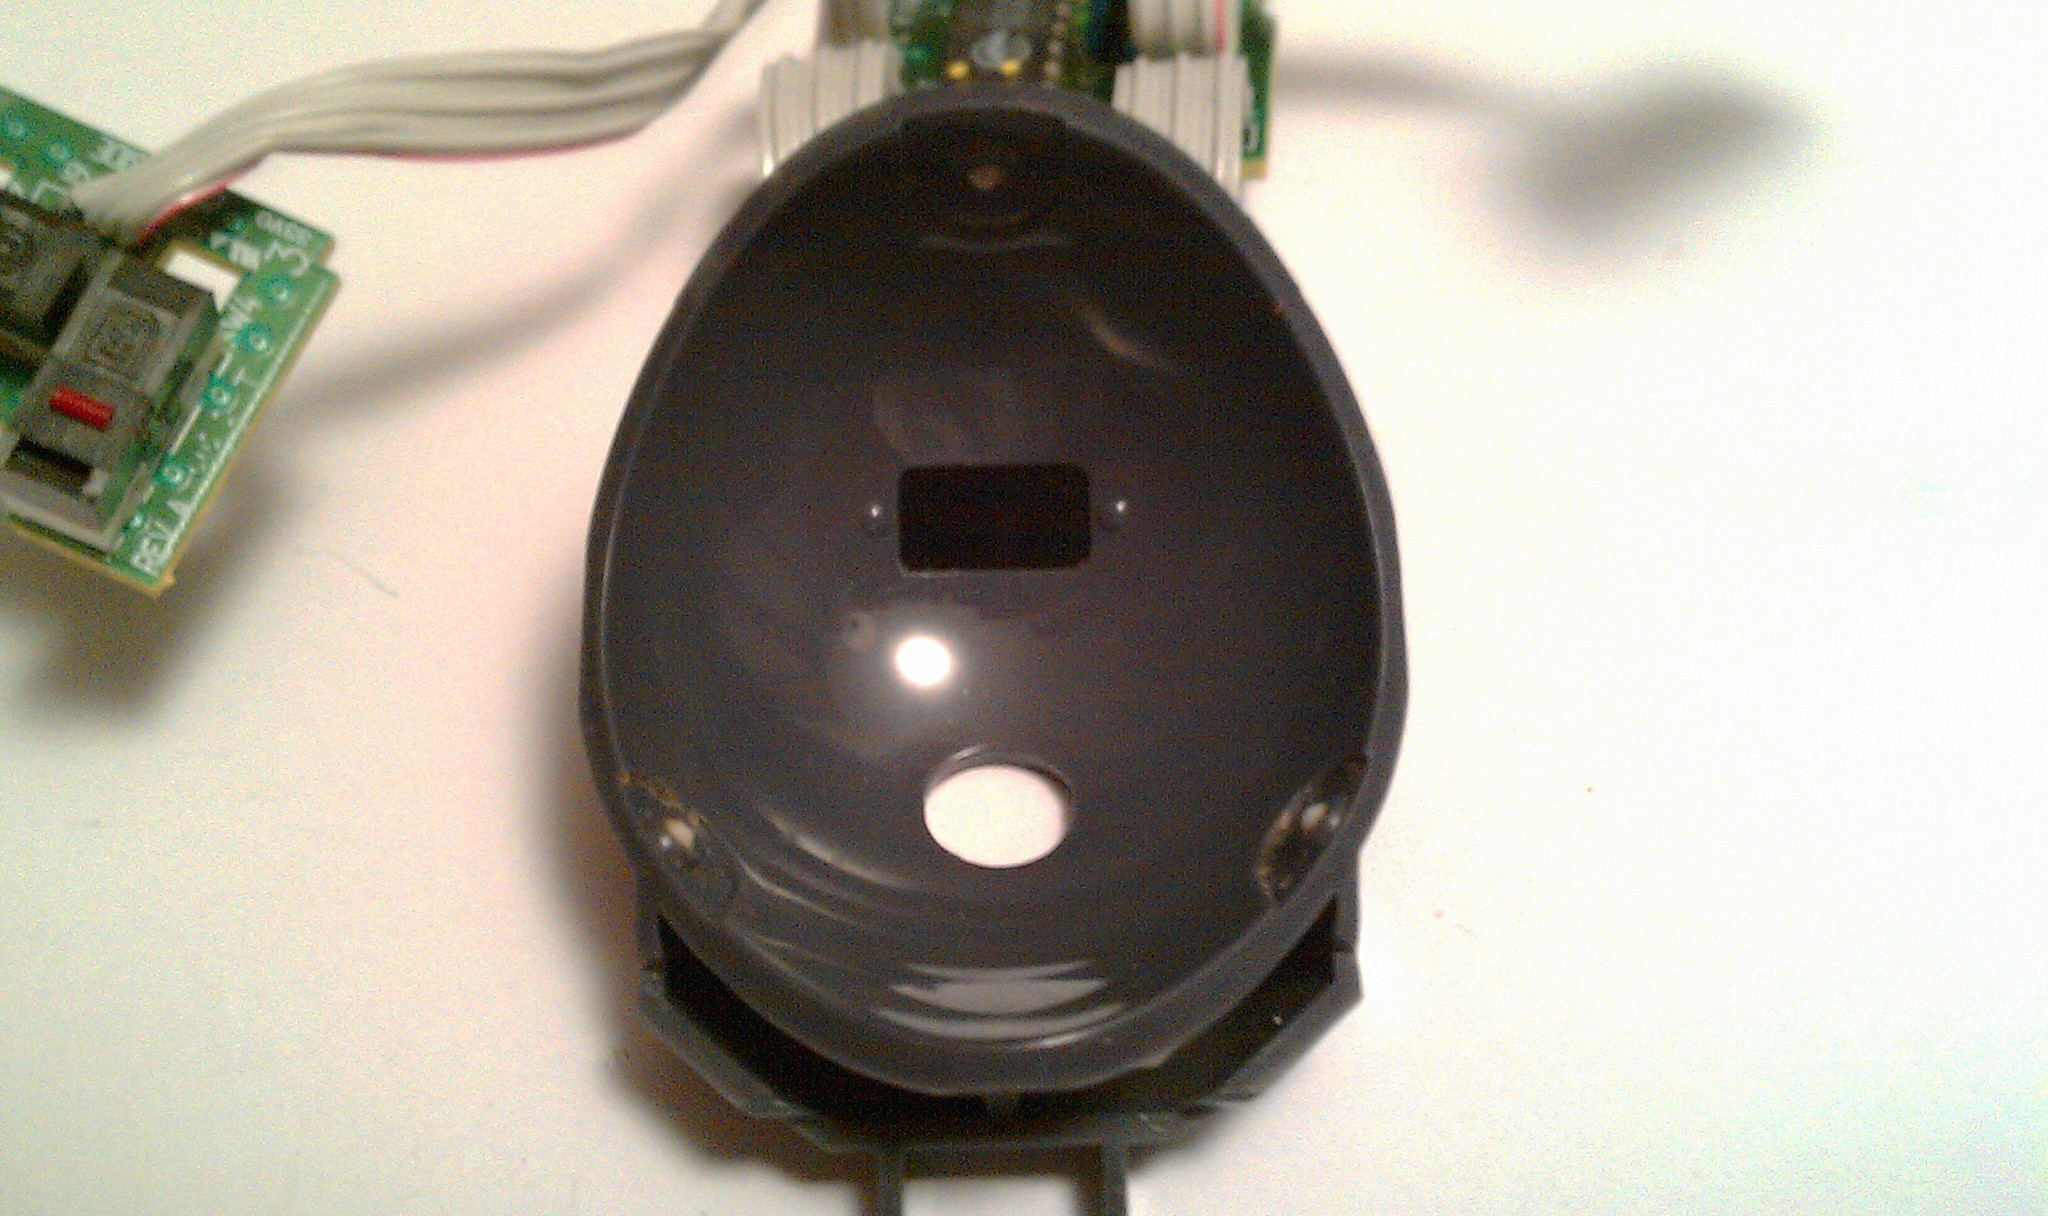
Under the cover, the cup that holds the ball has three tiny white knobs that the ball slides on, and a dark window in the back for the sensor.
![]()
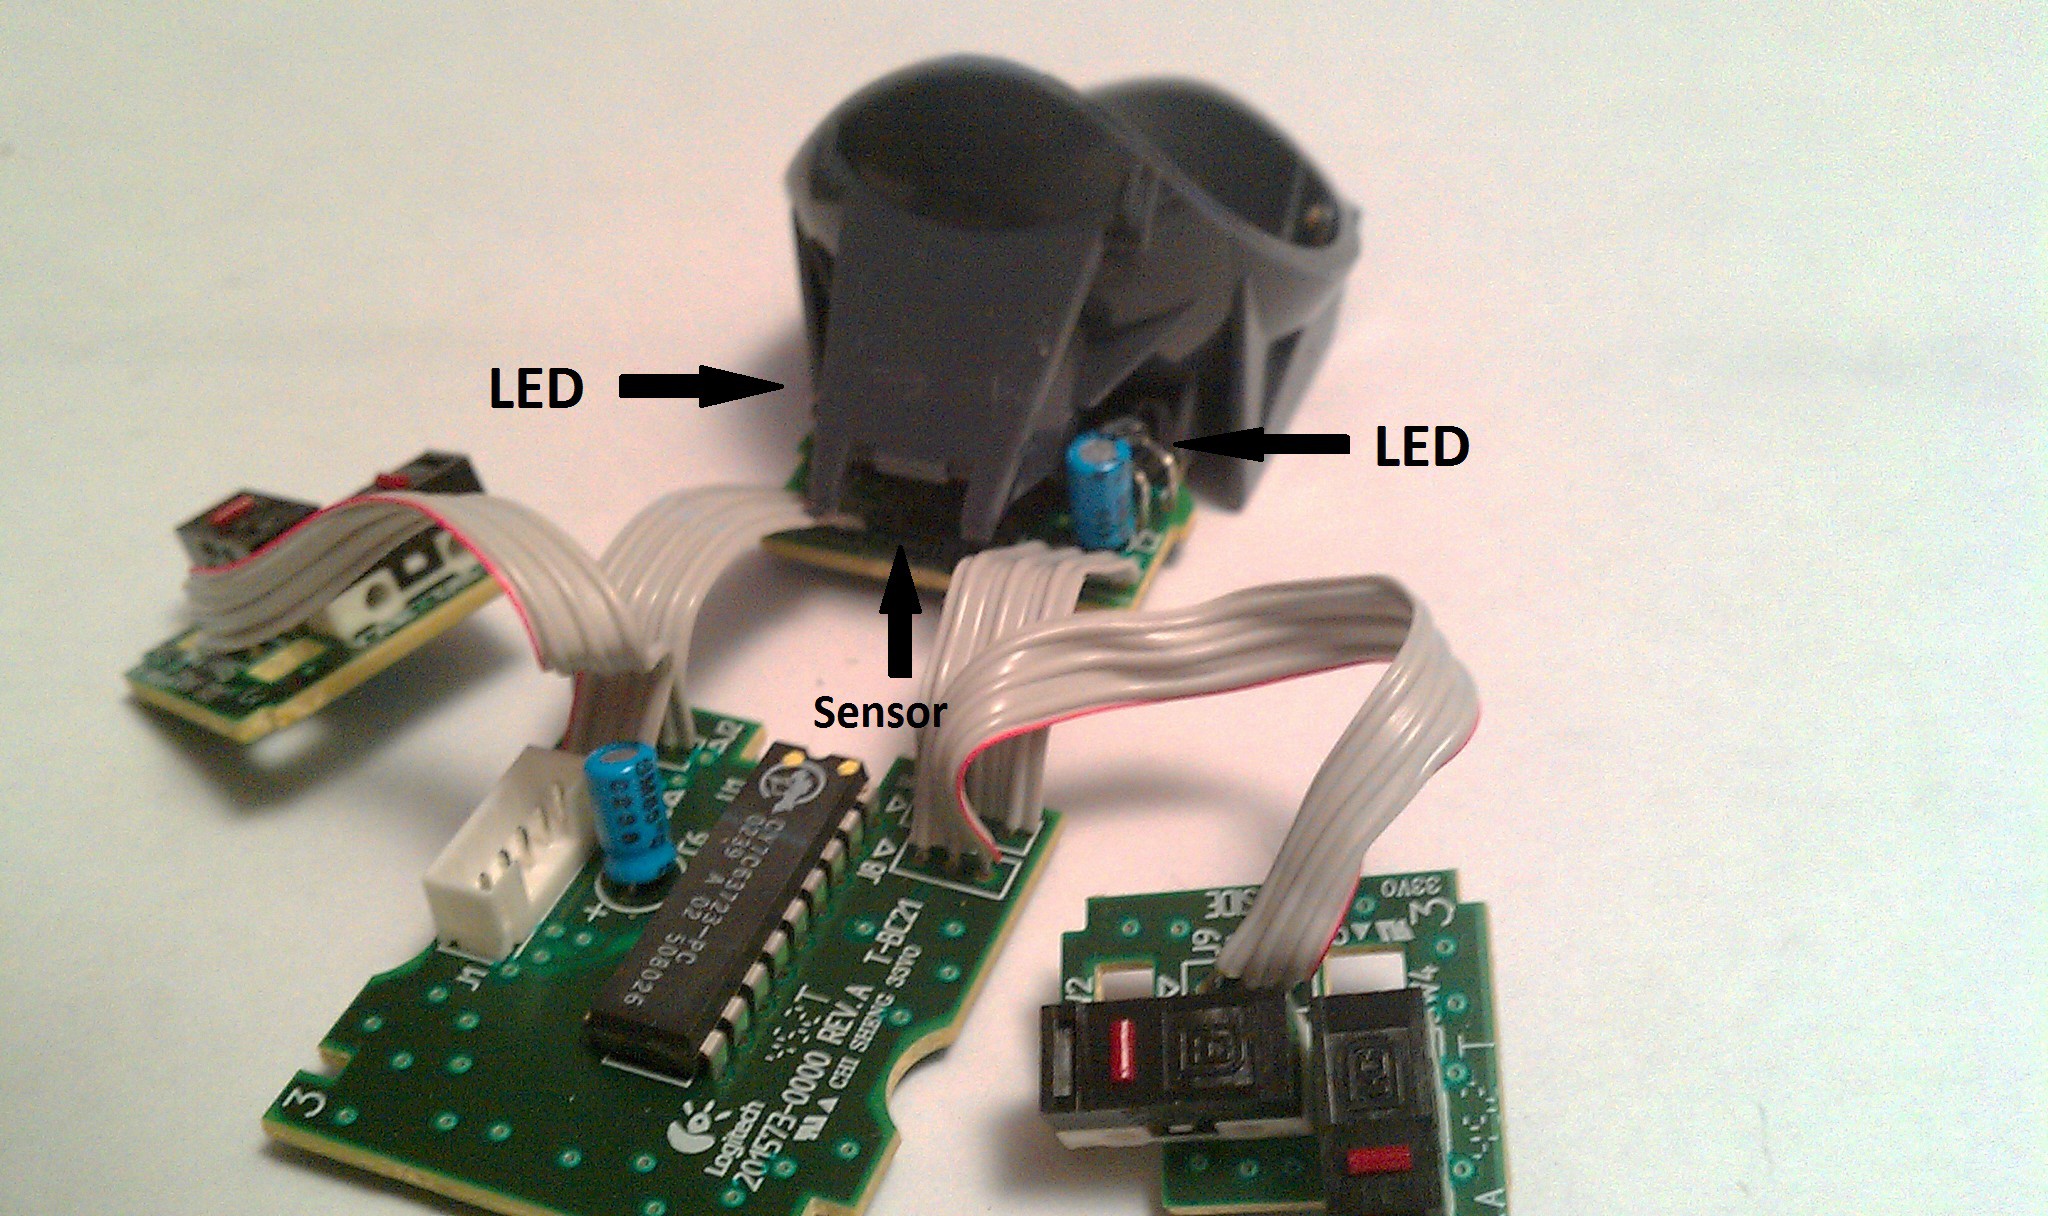
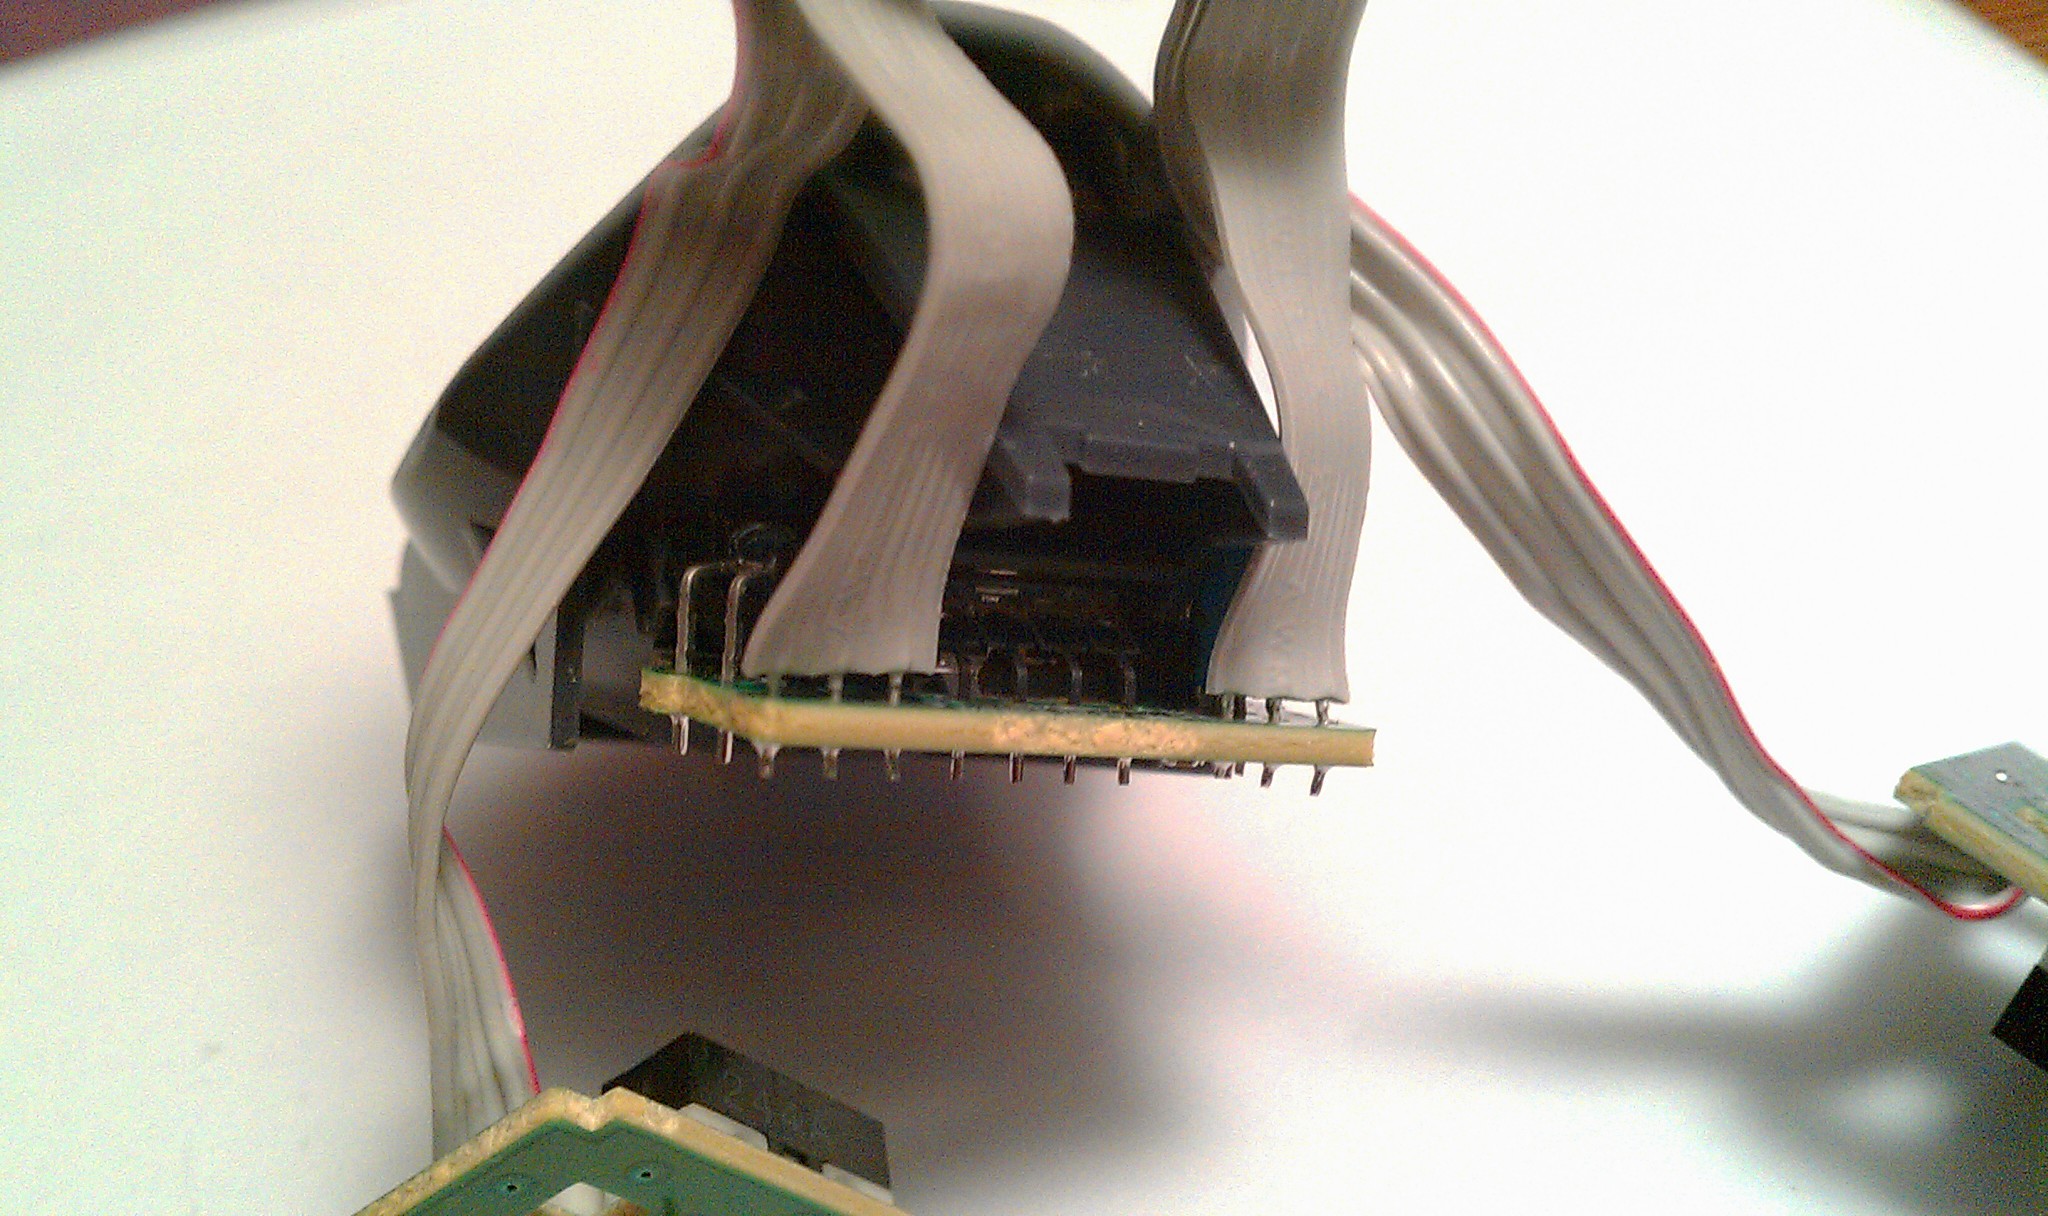
Seems simple; cup, chip, sensor, 2 capacitors, 4 buttons, 2 LEDs, USB socket.
![]()
Ok, not that simple...
At first glance, I didn't notice the surface mount components on the bottom due to the deceptive retro through hole top.
![]()
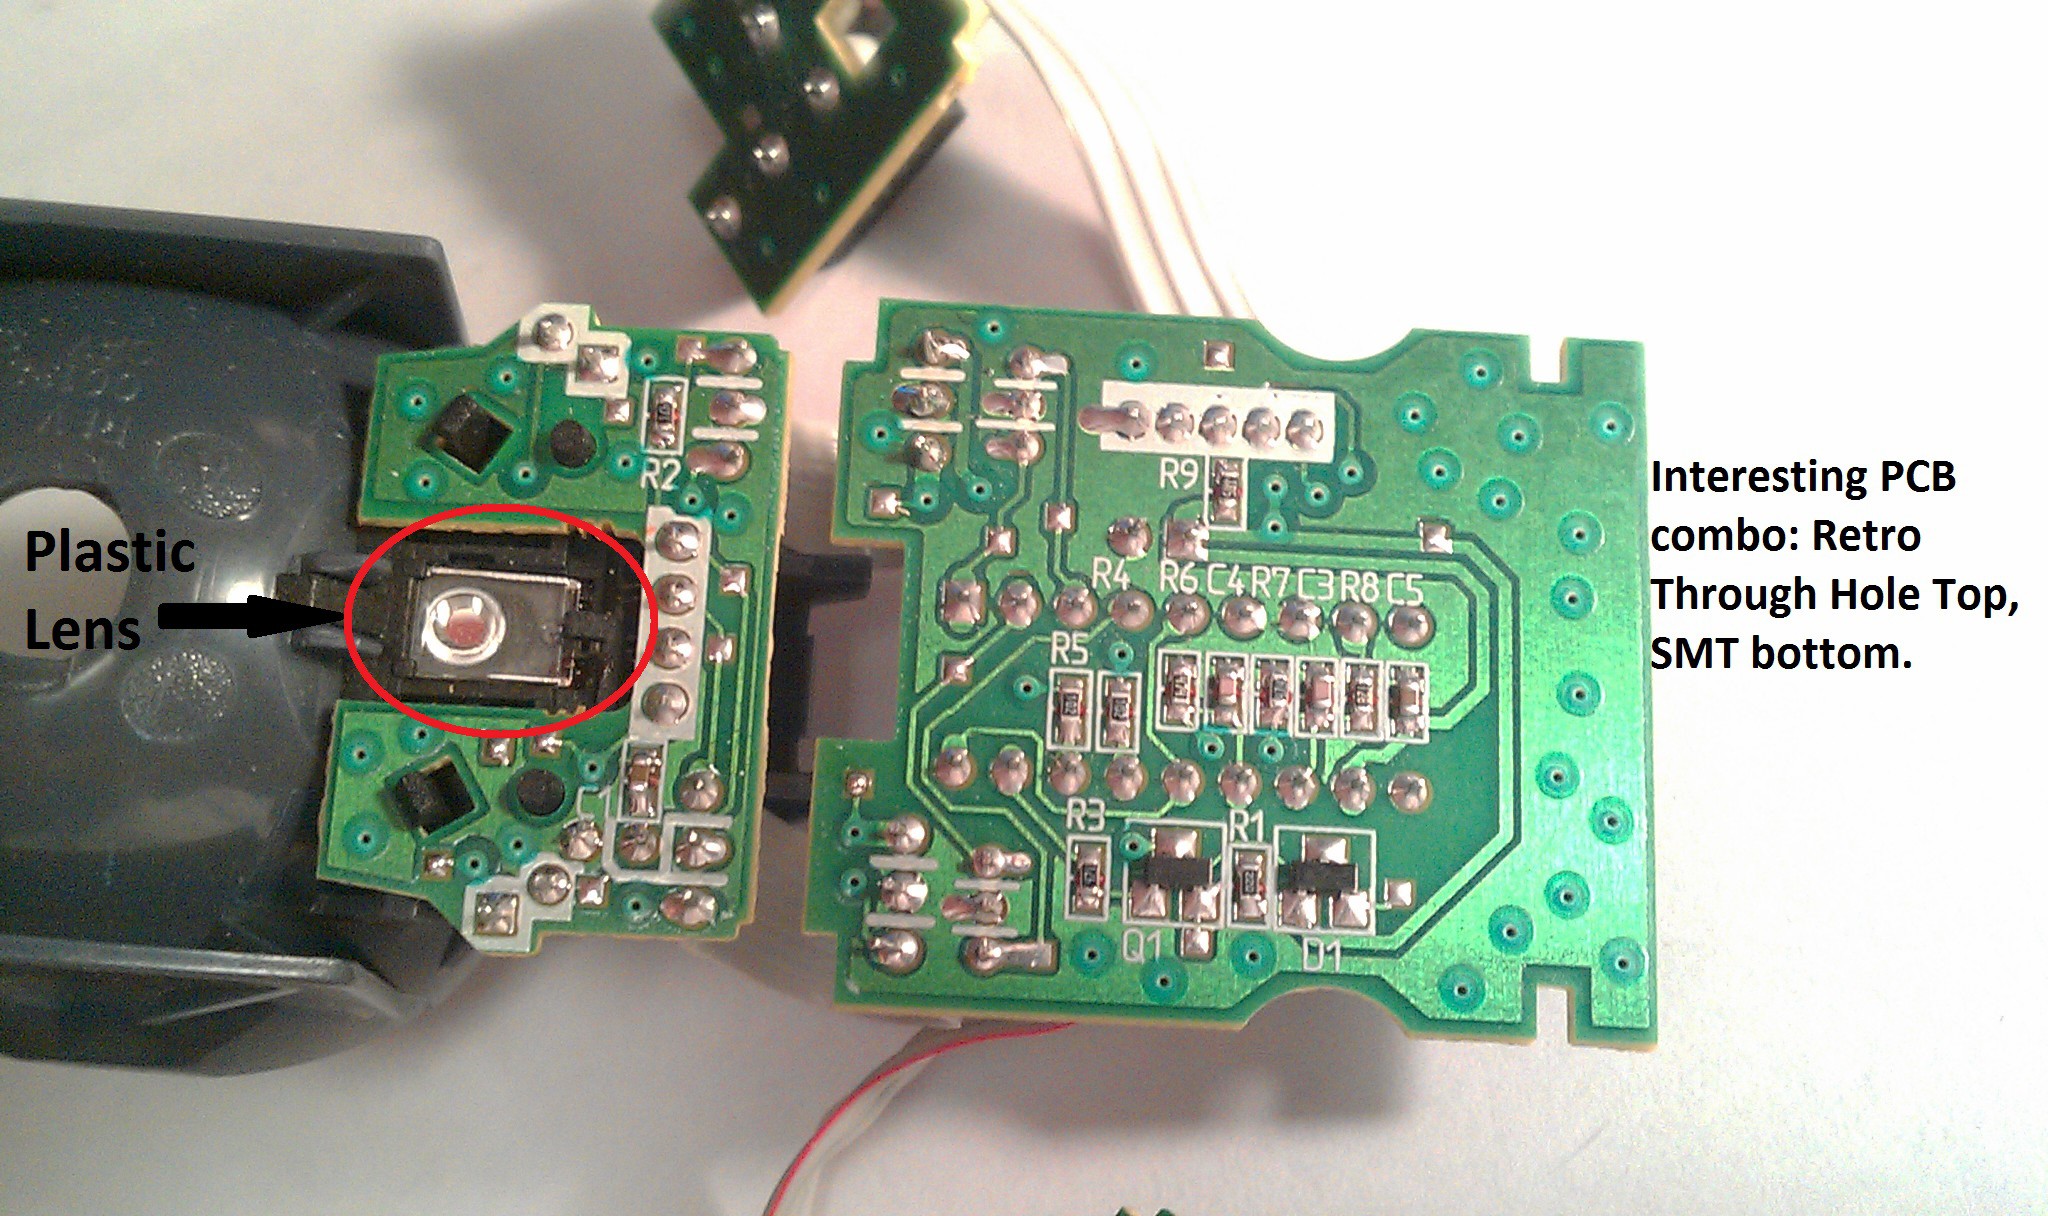
The clear plastic near the bottom of the cup is a lens, magnifying the printed pattern on the ball. I didn't expect to see a lens until I risked breaking the sensor first. Funny it faces down; probably used for calibration before it leaves the factory. The sensor and LEDs were installed into plastic holders behind the cup window, then the circuit board was soldered into place, making it seem removal of this assembly might possibly mess up its alignment.
![]()
In my lack of planning, I was thinking I could just rig up my own cup and sensor holder with a rotory tool, knife, glue, and figure the rest out later.
The long term plan is to make an Open Source Trackball from scratch and get away from product hacking. For now, using the inner assembly as seen here seems to match the mouse project well at this stage.
![]()
![]()
-
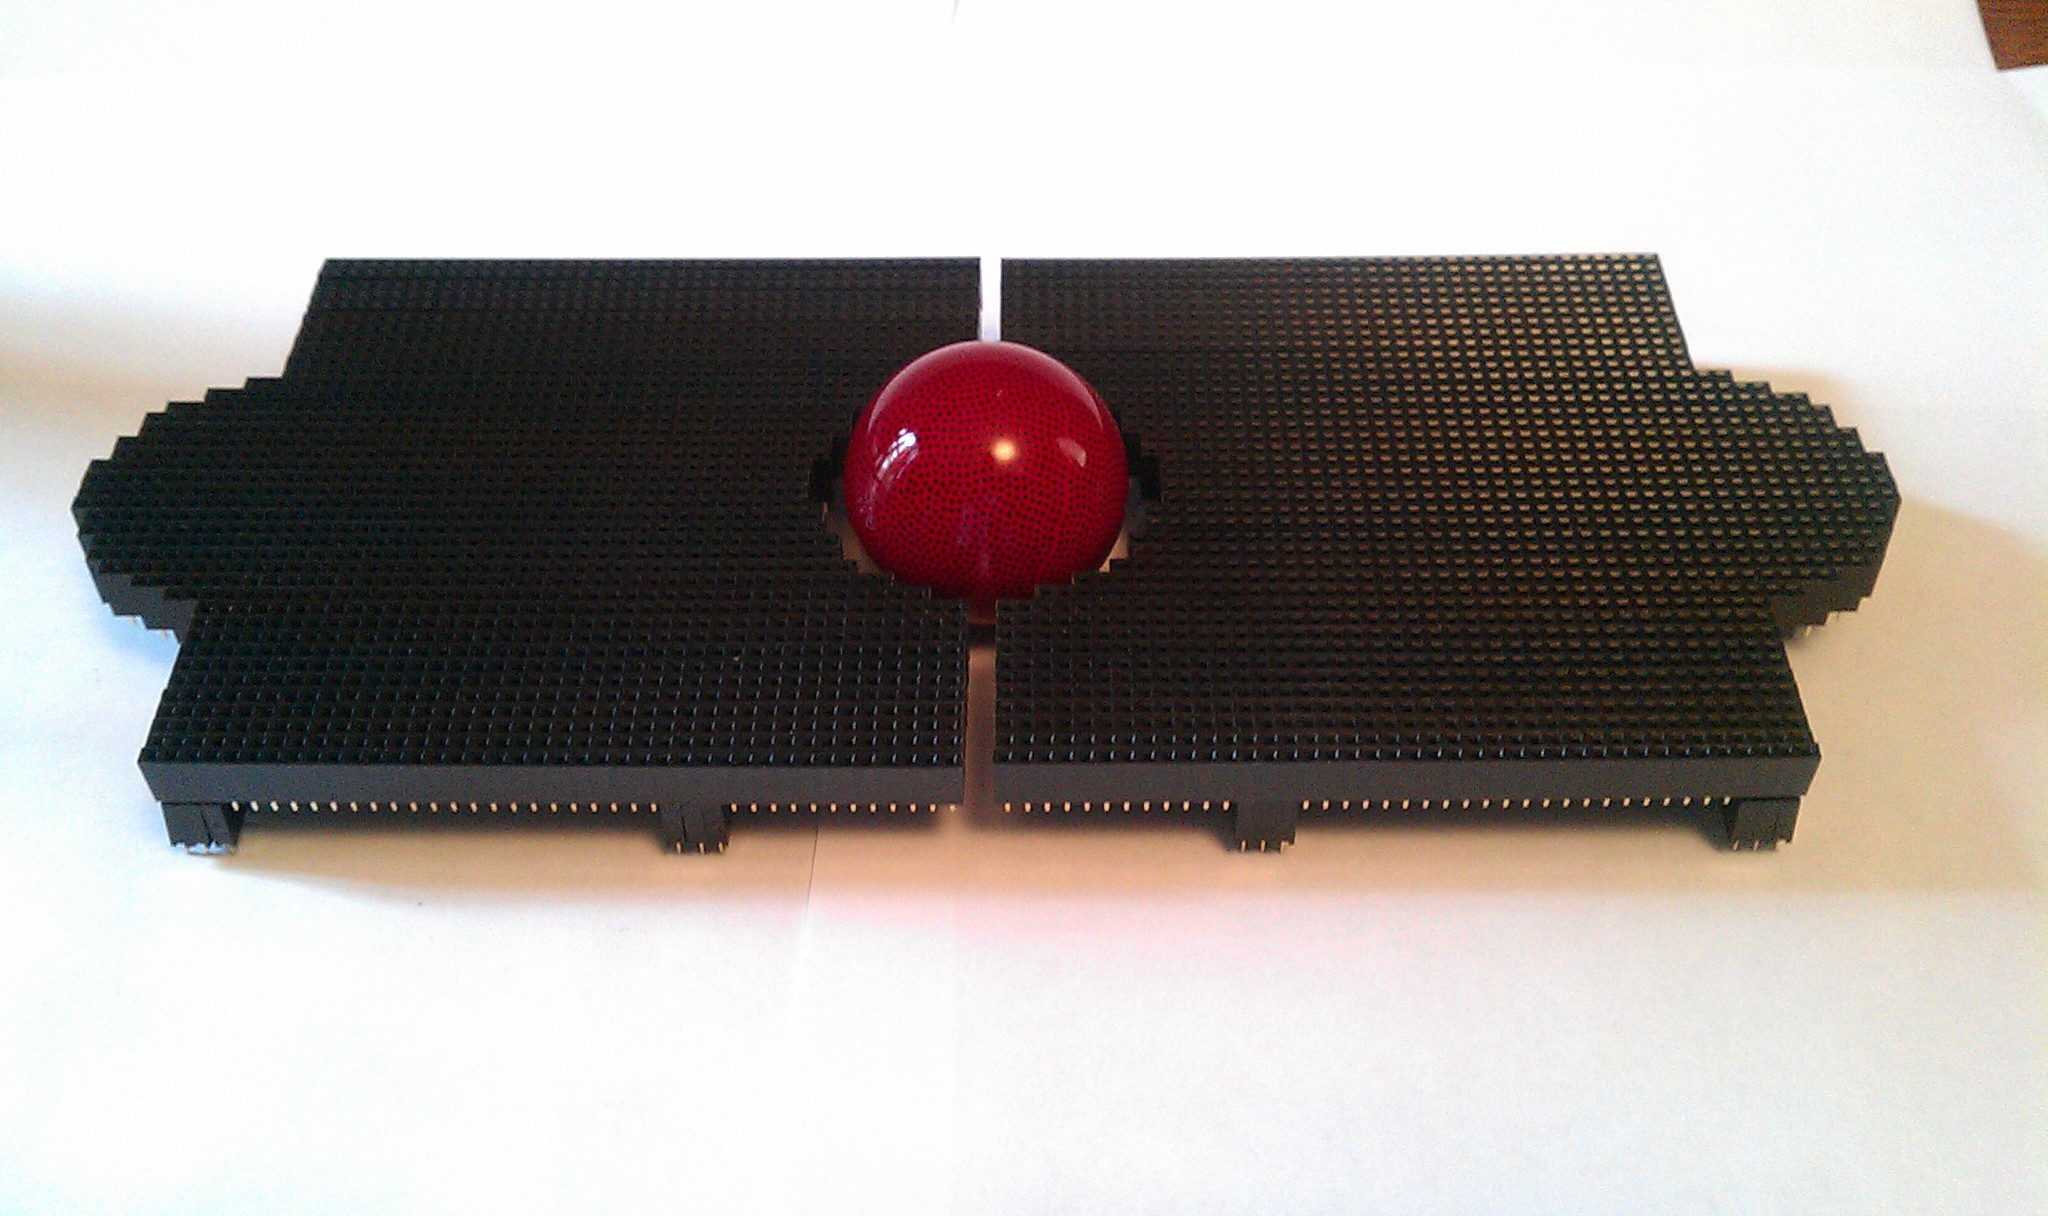
Getting Jiggy with Headers
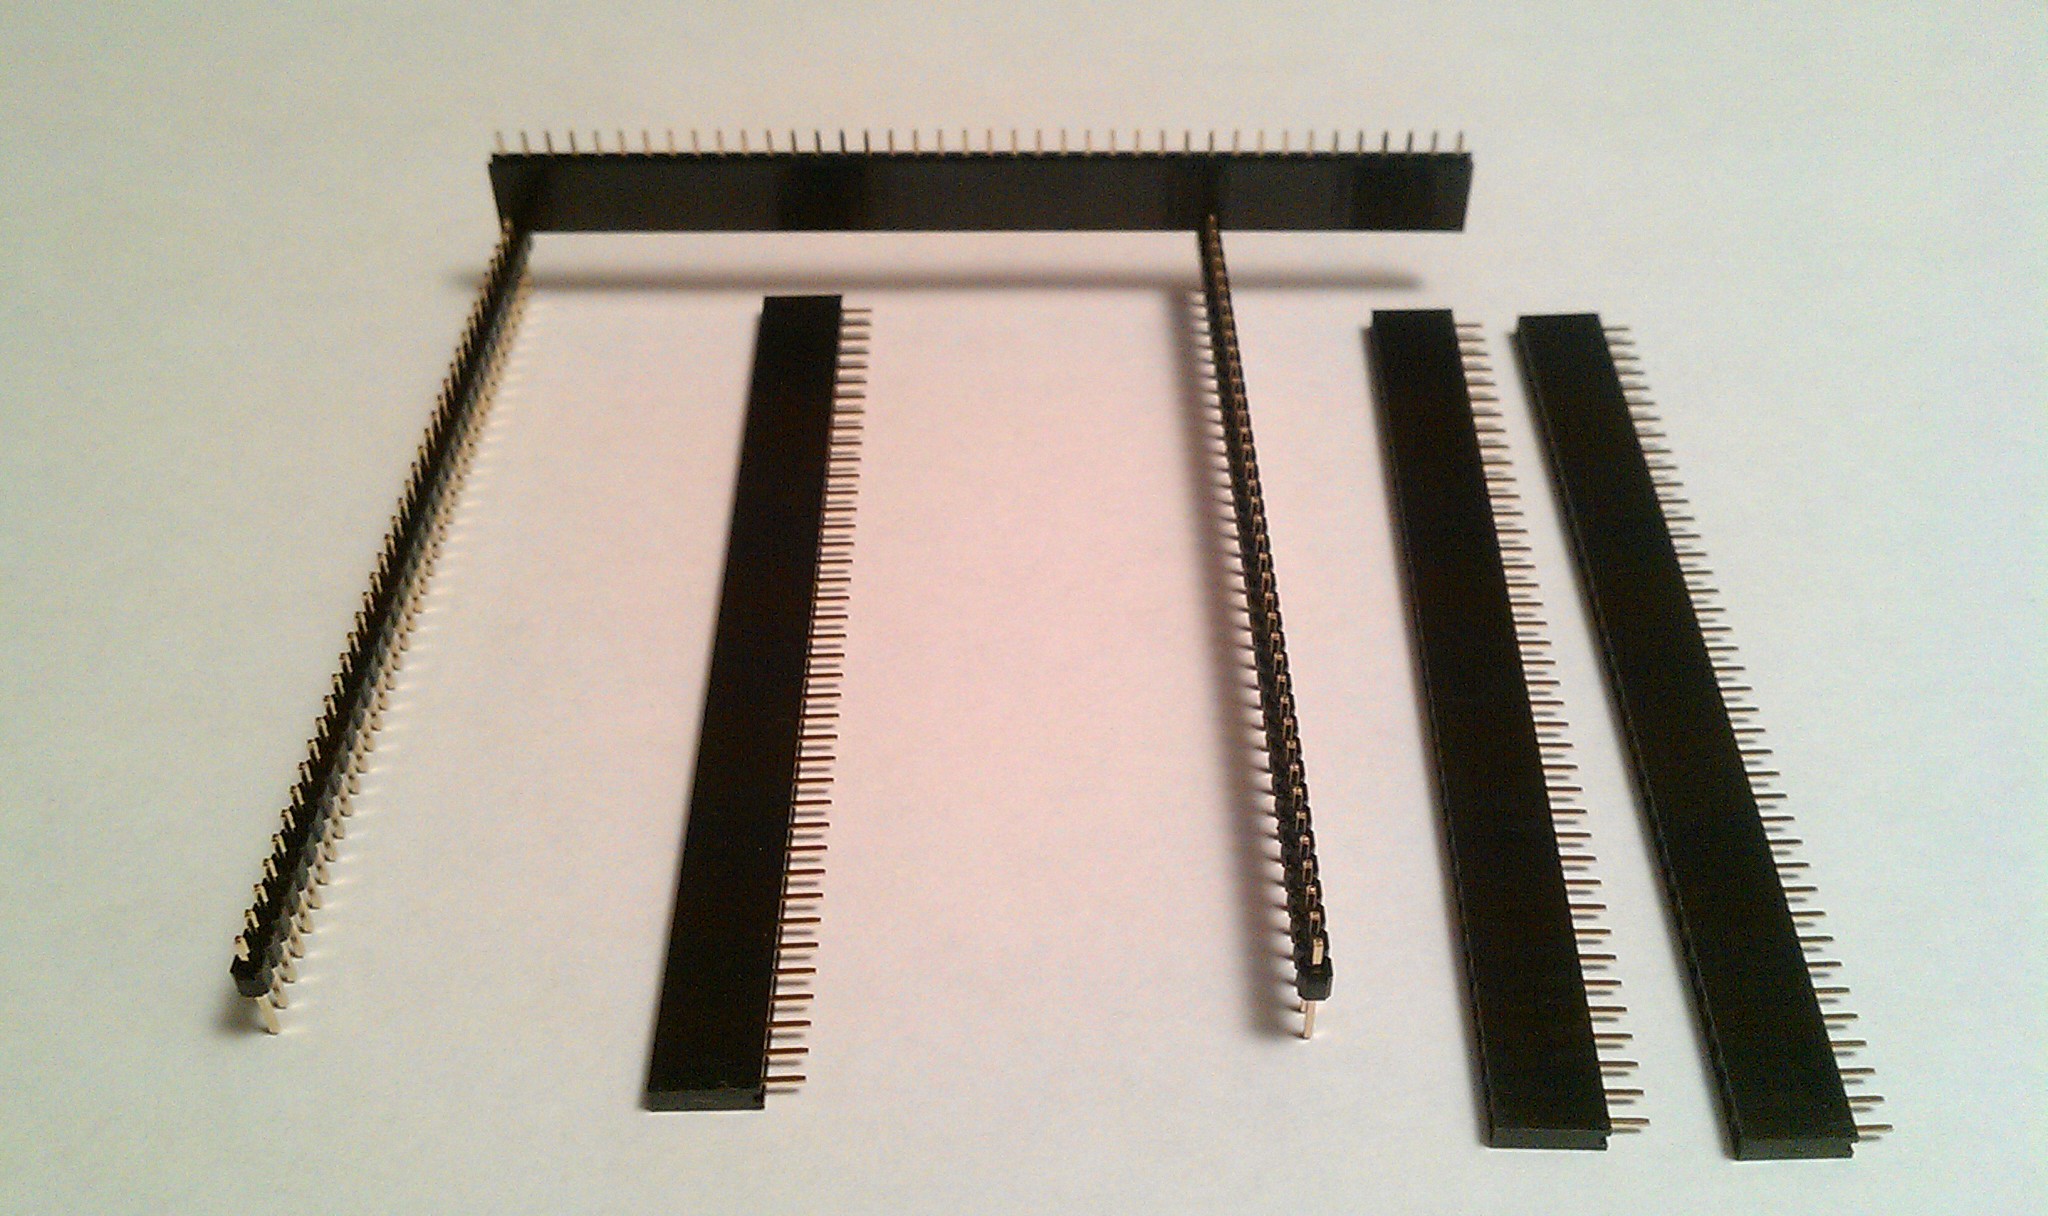
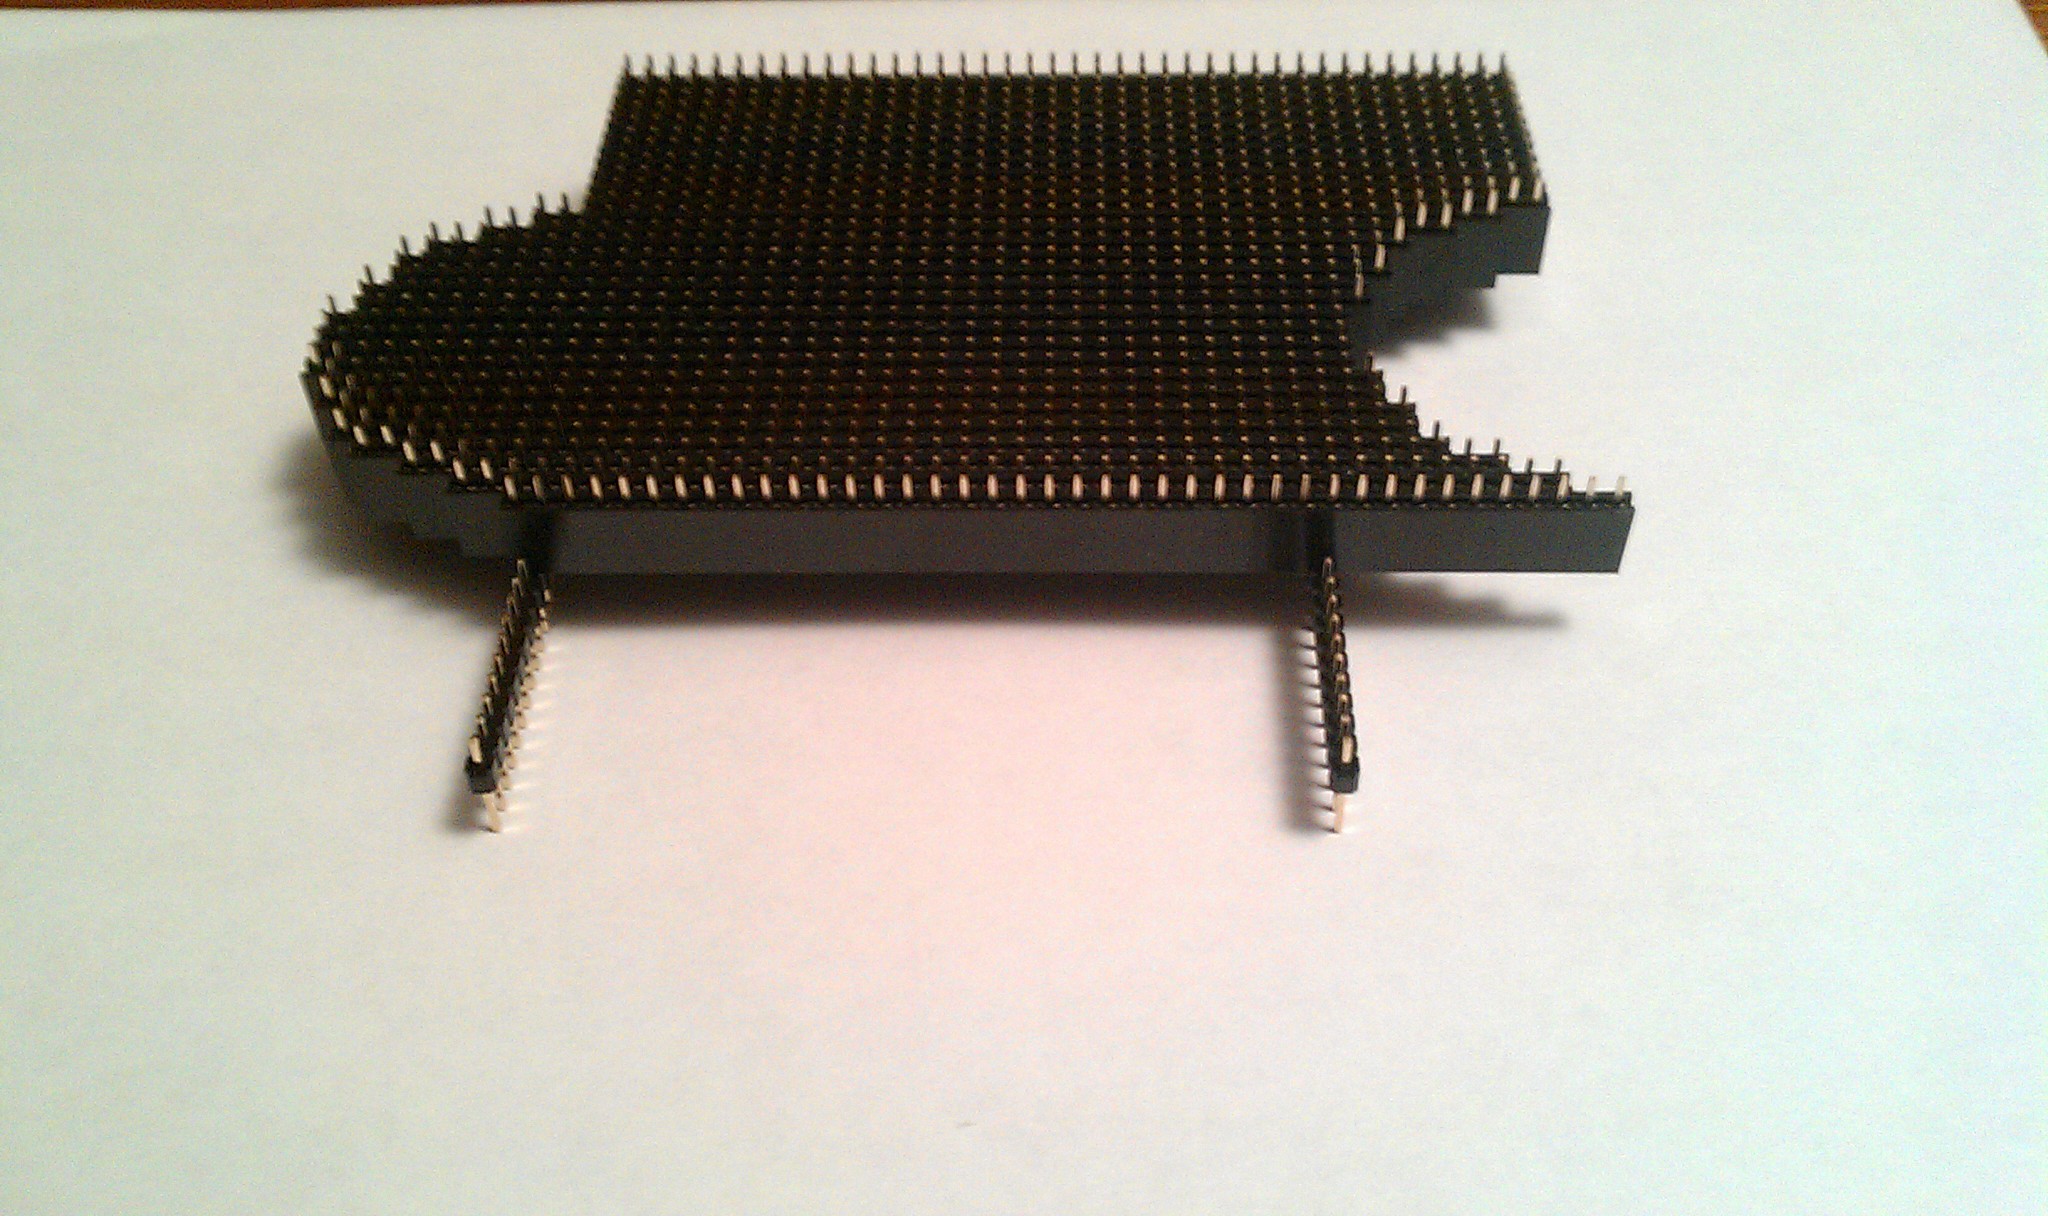
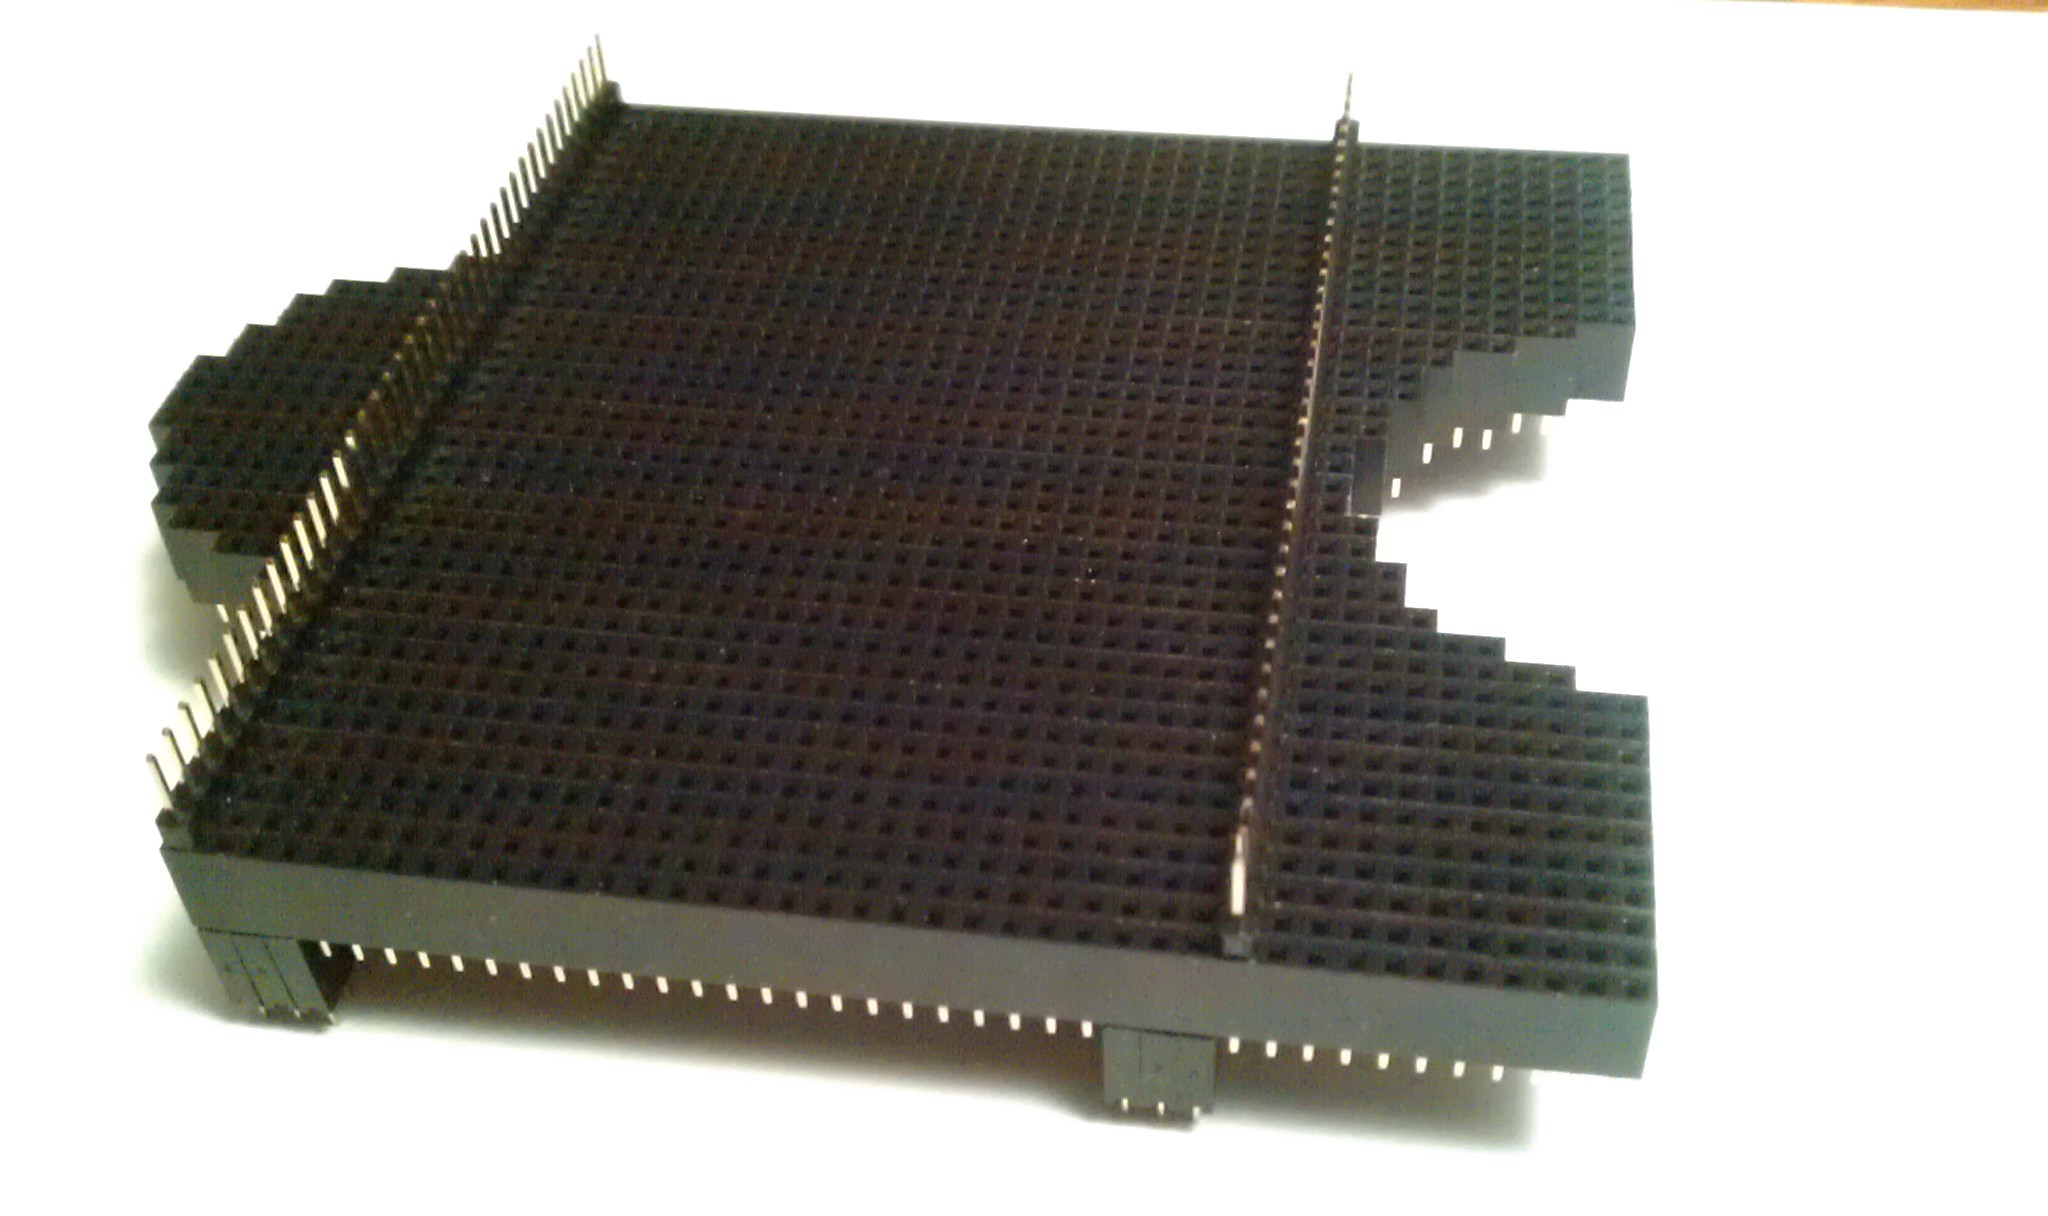
06/09/2014 at 04:46 • 0 commentsJust a few dry runs with 40 pin female headers. I set up some extra headers as temporary “jigs” to hold together the basic shape, before I commit to gluing it all together.
I was shocked how the first Sketchup drawings look like the dry run here. It is rare for my designs to look exactly like the finished product. My wife thought it was a trick and that I photoshopped it. Nope, it's real. Sizes are slightly different.
![]()
![]()
![]()
![]()
![]()
![]()
![]()
![]()
![]()
![]()
![]()
![]()
This one was just for fun:
![]()
Test build slide show:
![]()
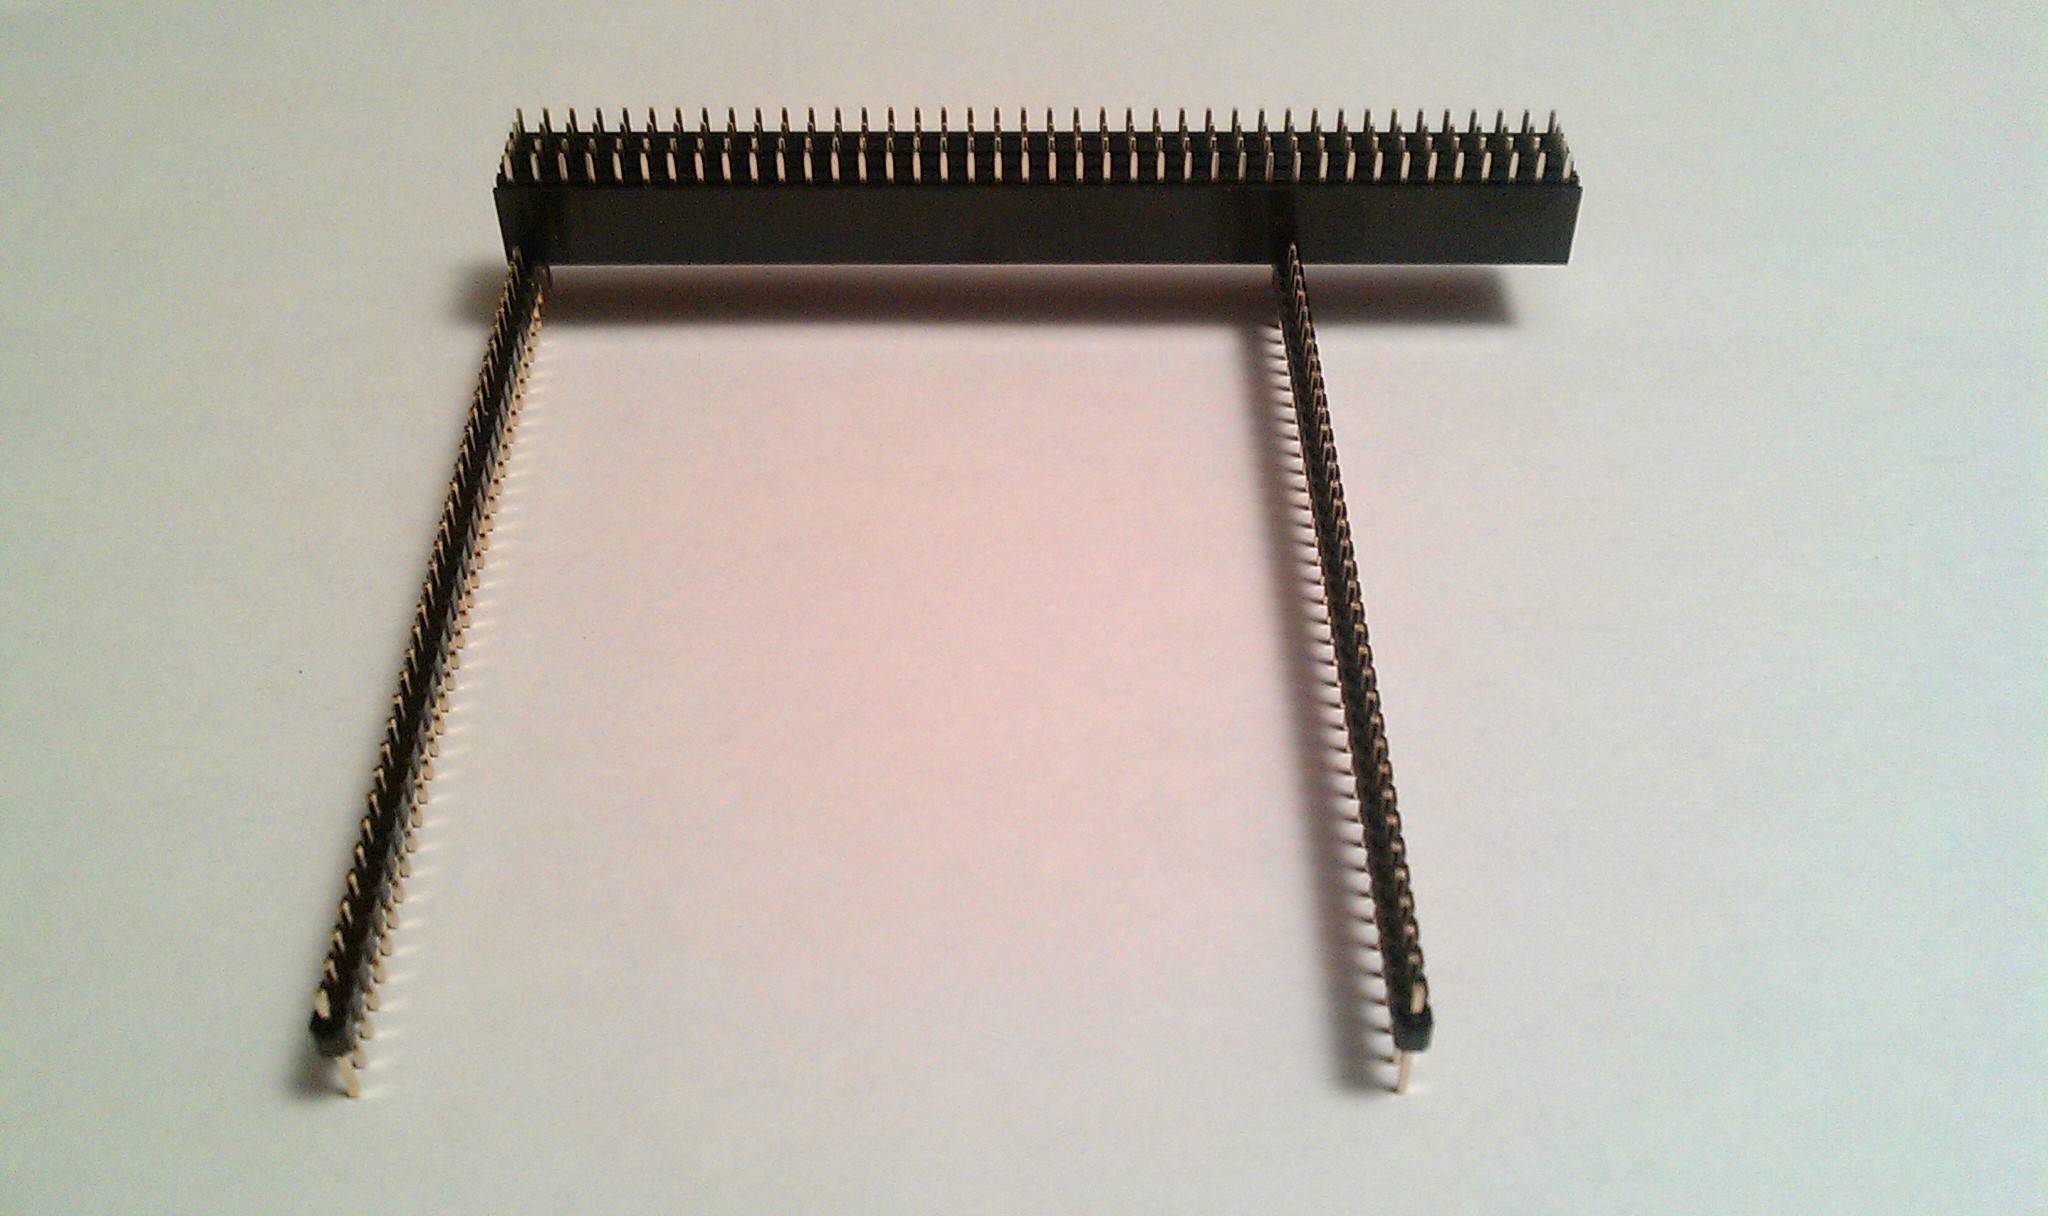
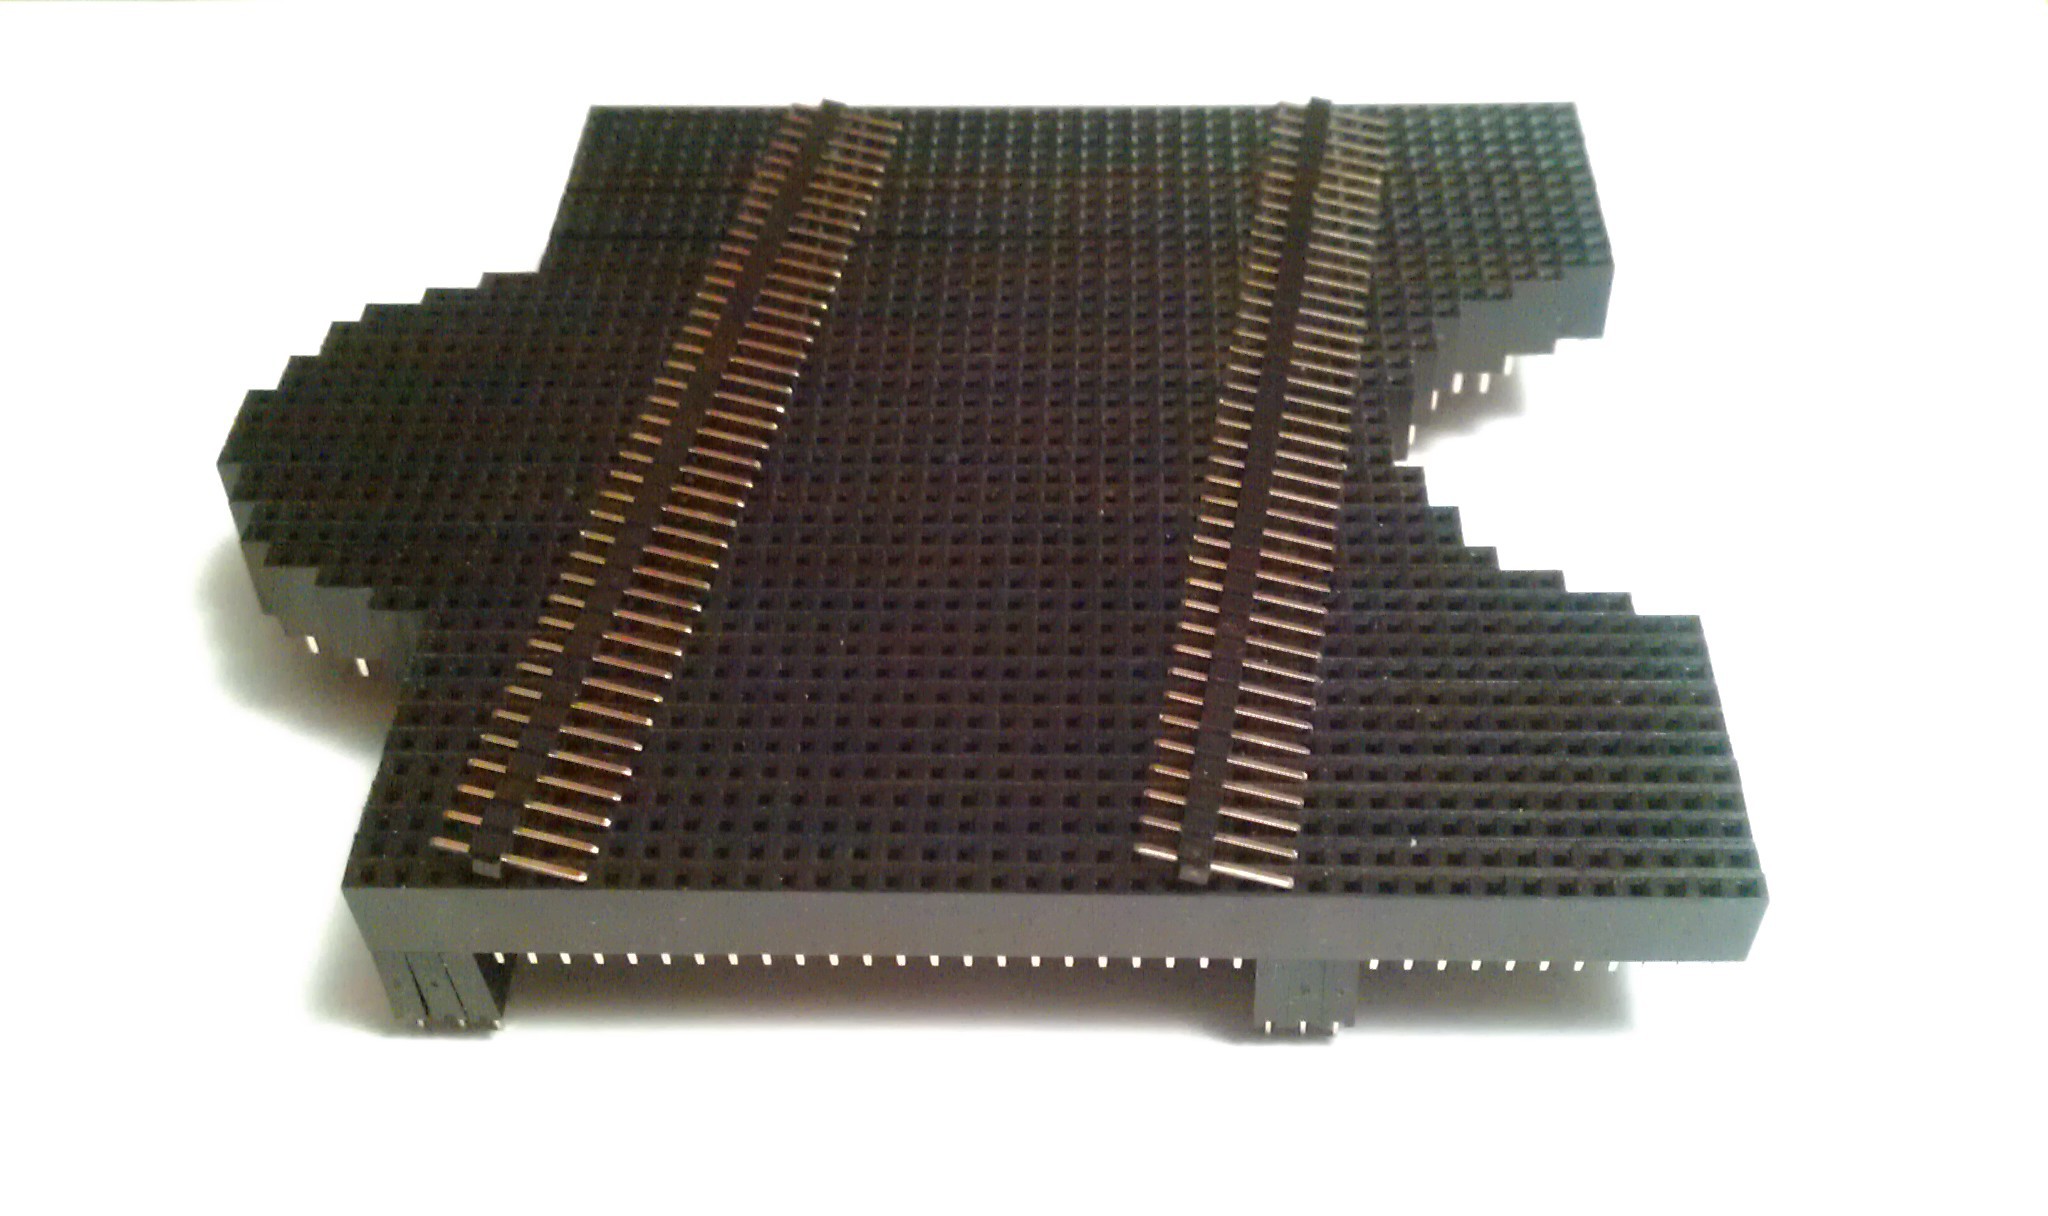
2 males, 40 females:
![]()
![]()
![]()
![]()
![]()
![]()
![]()
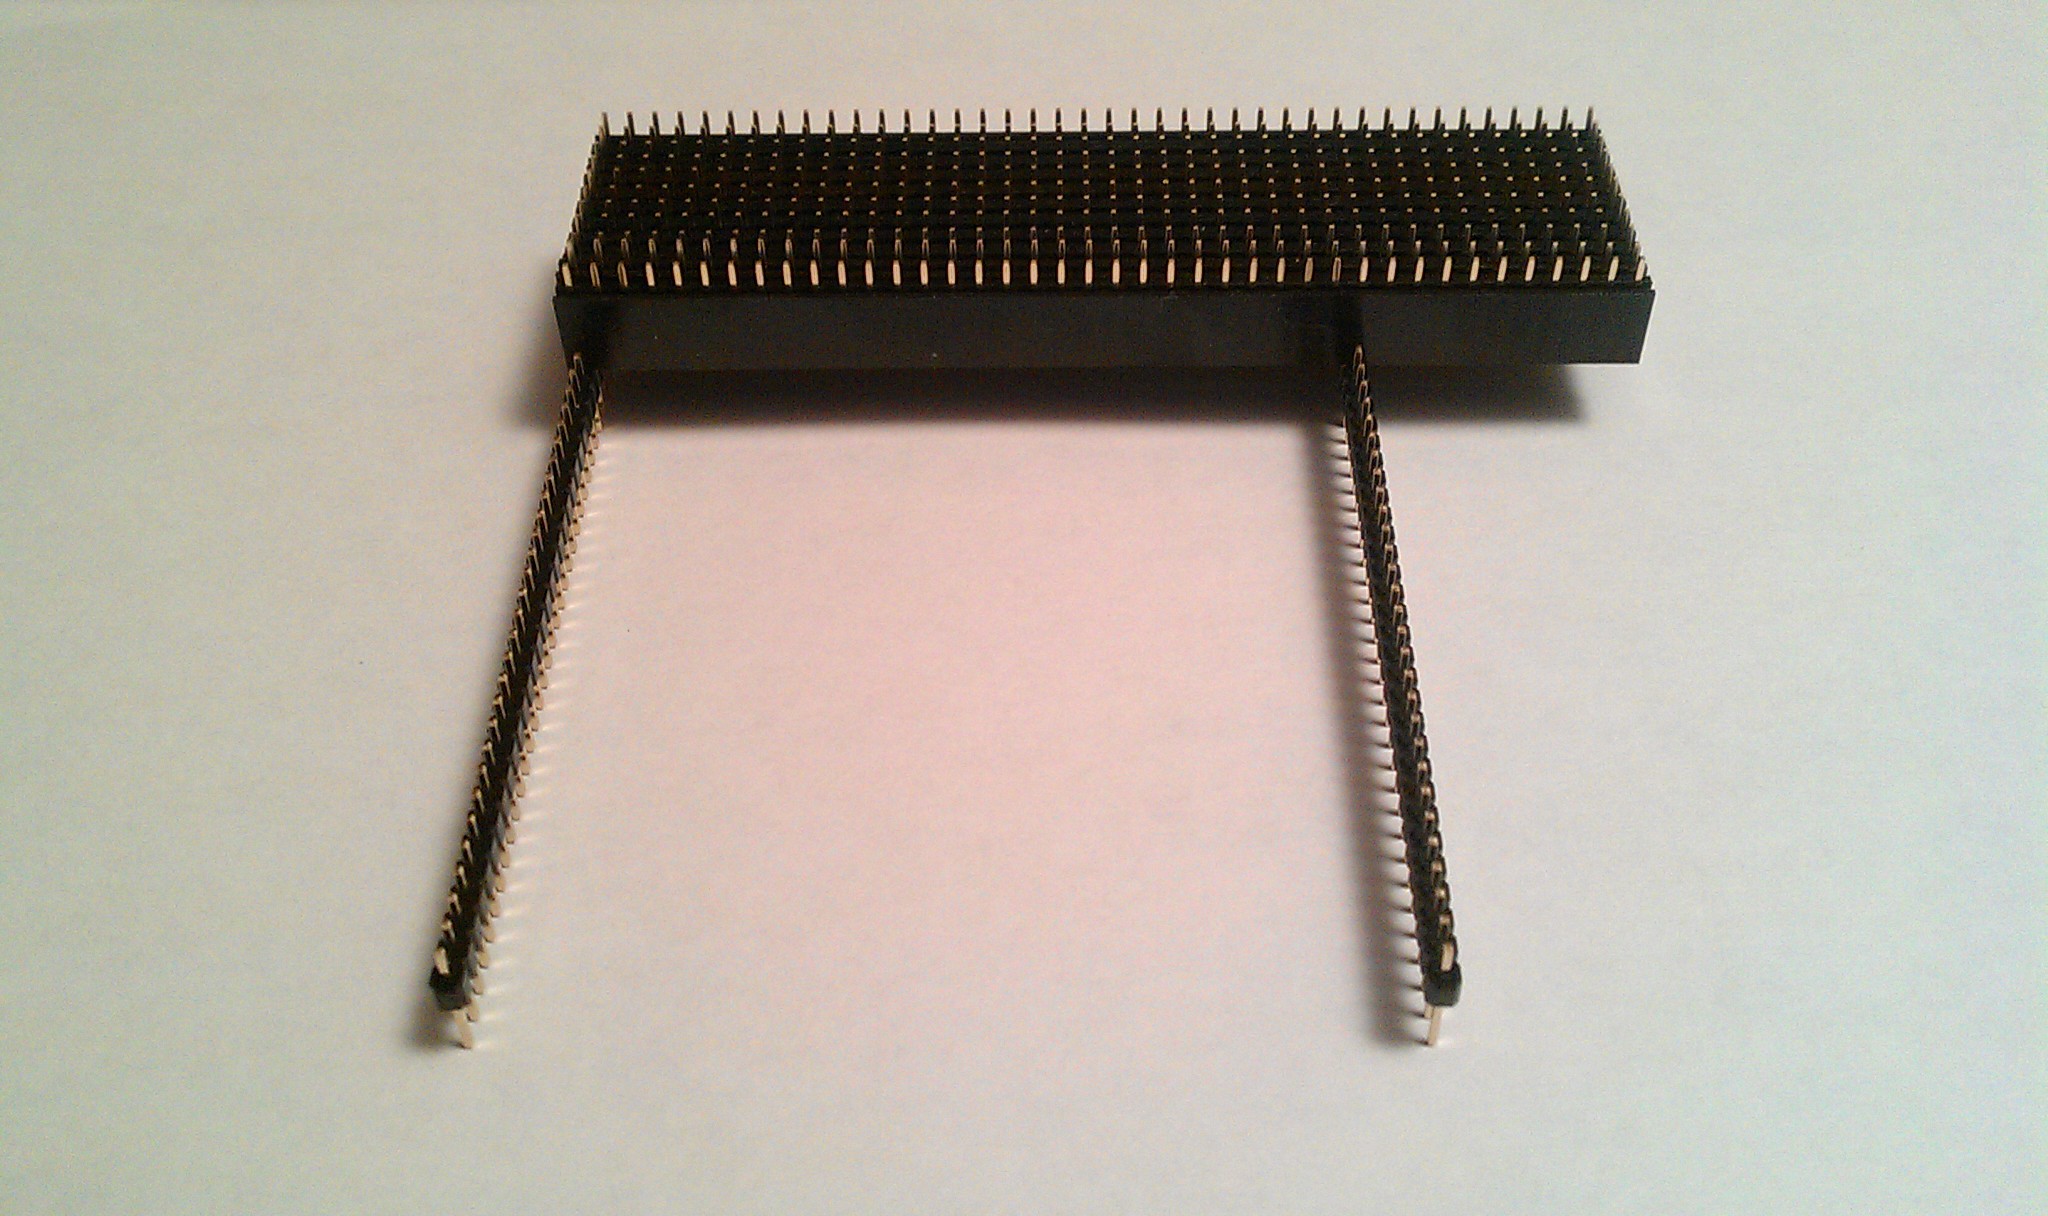
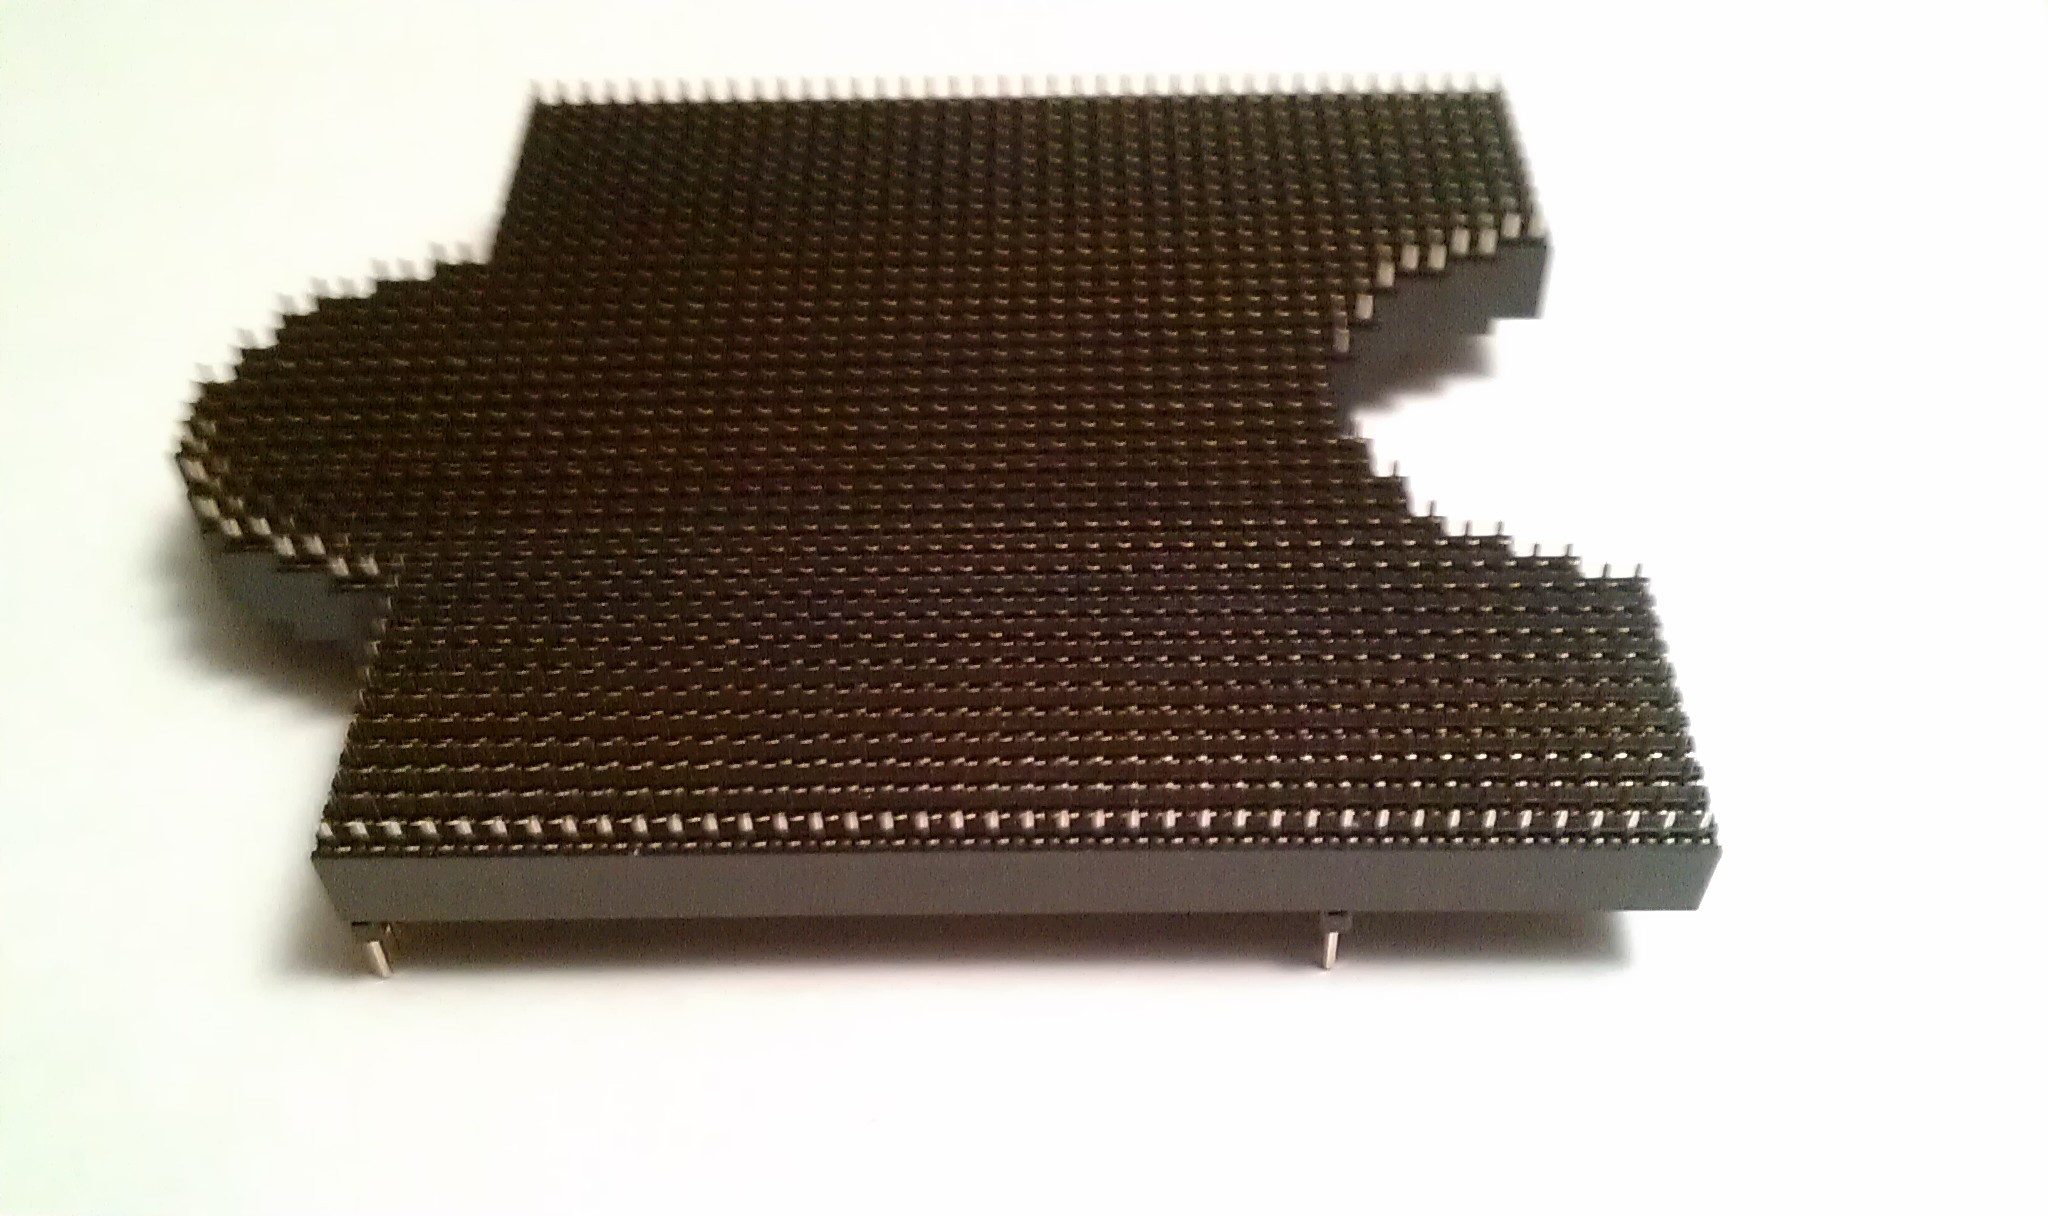
Six more females across hold bottom together:
![]()
![]()
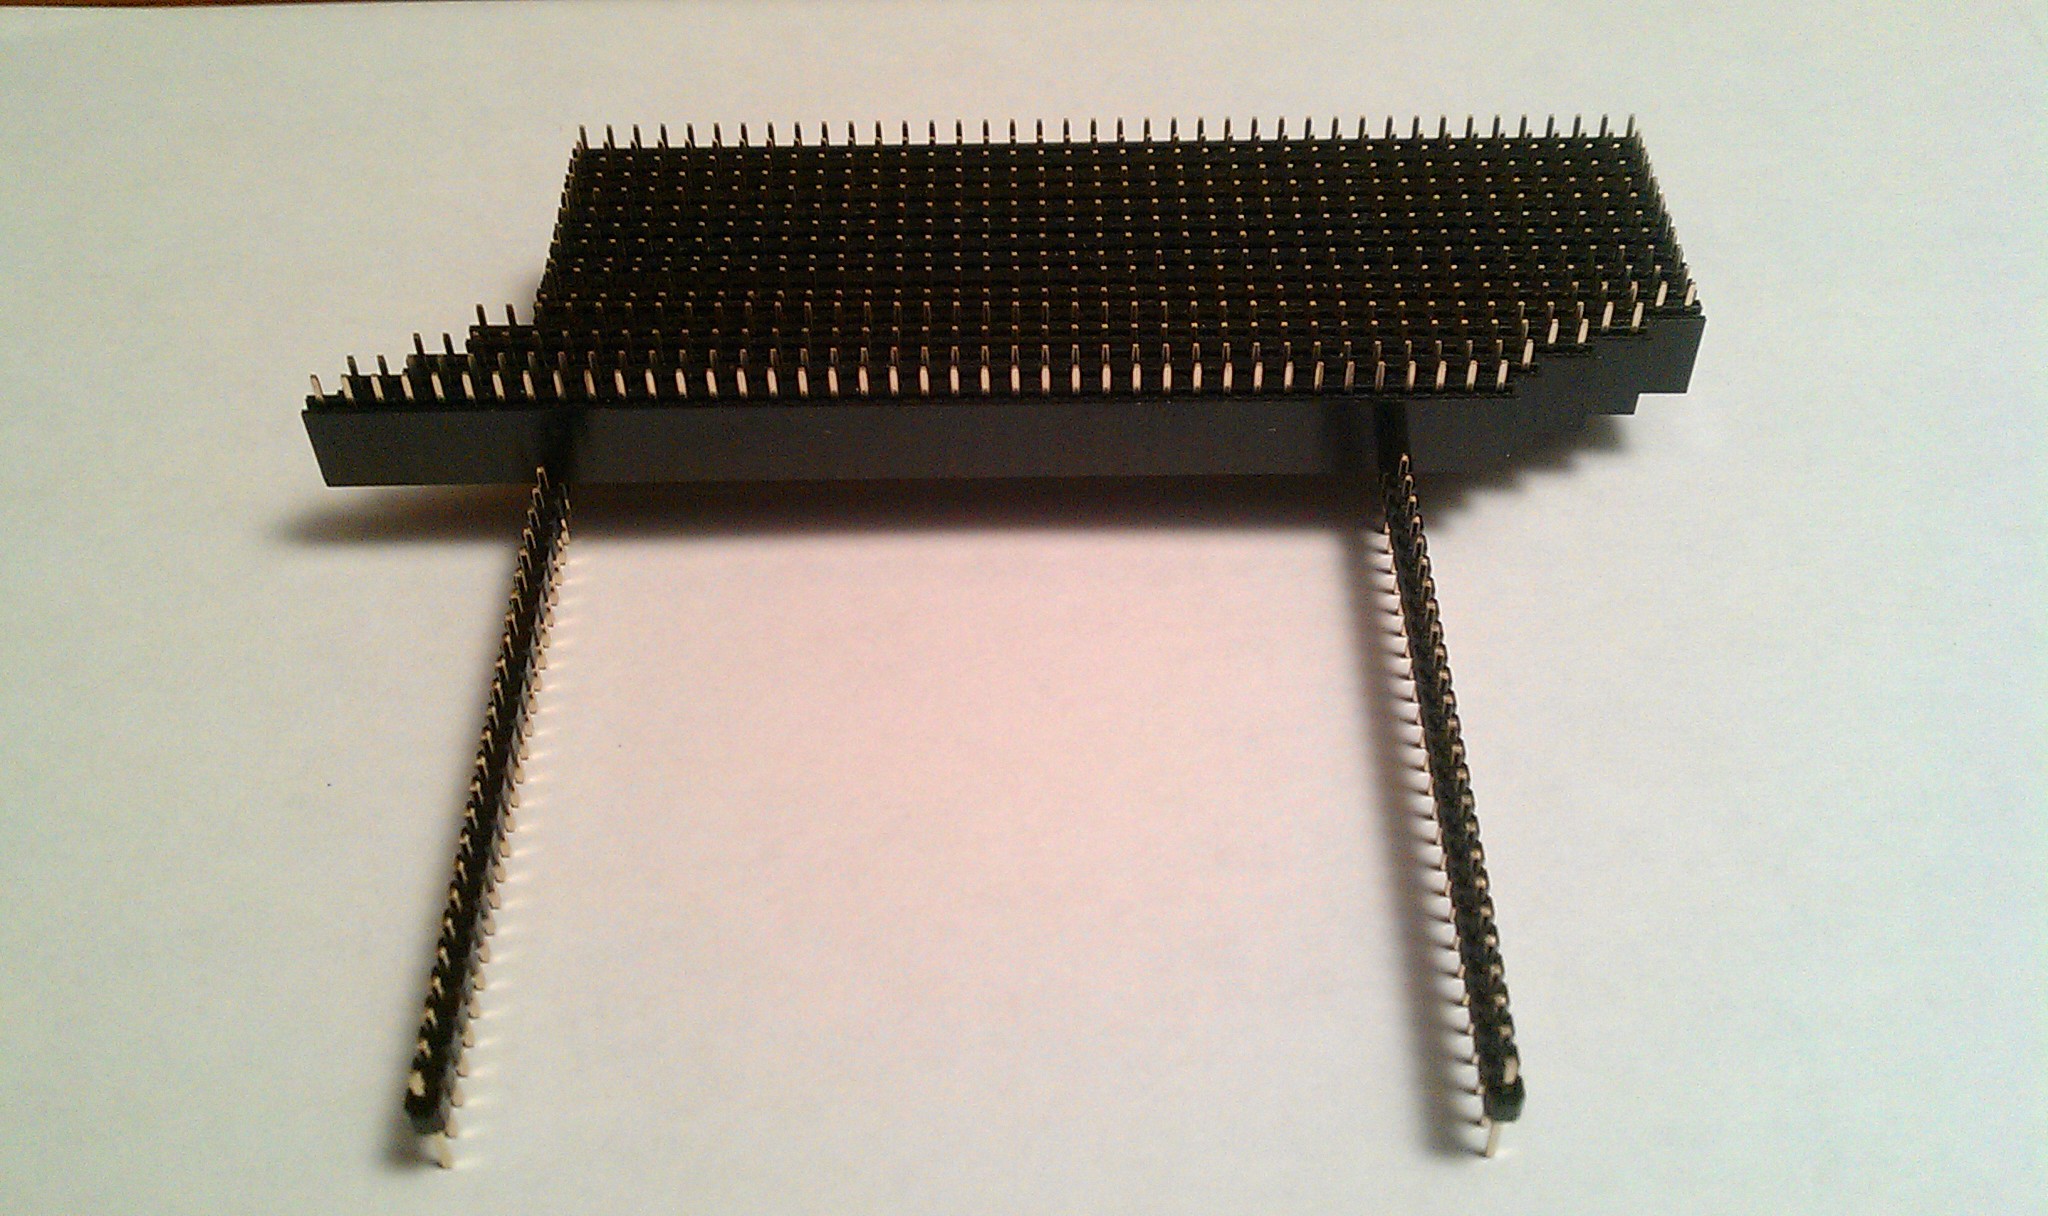
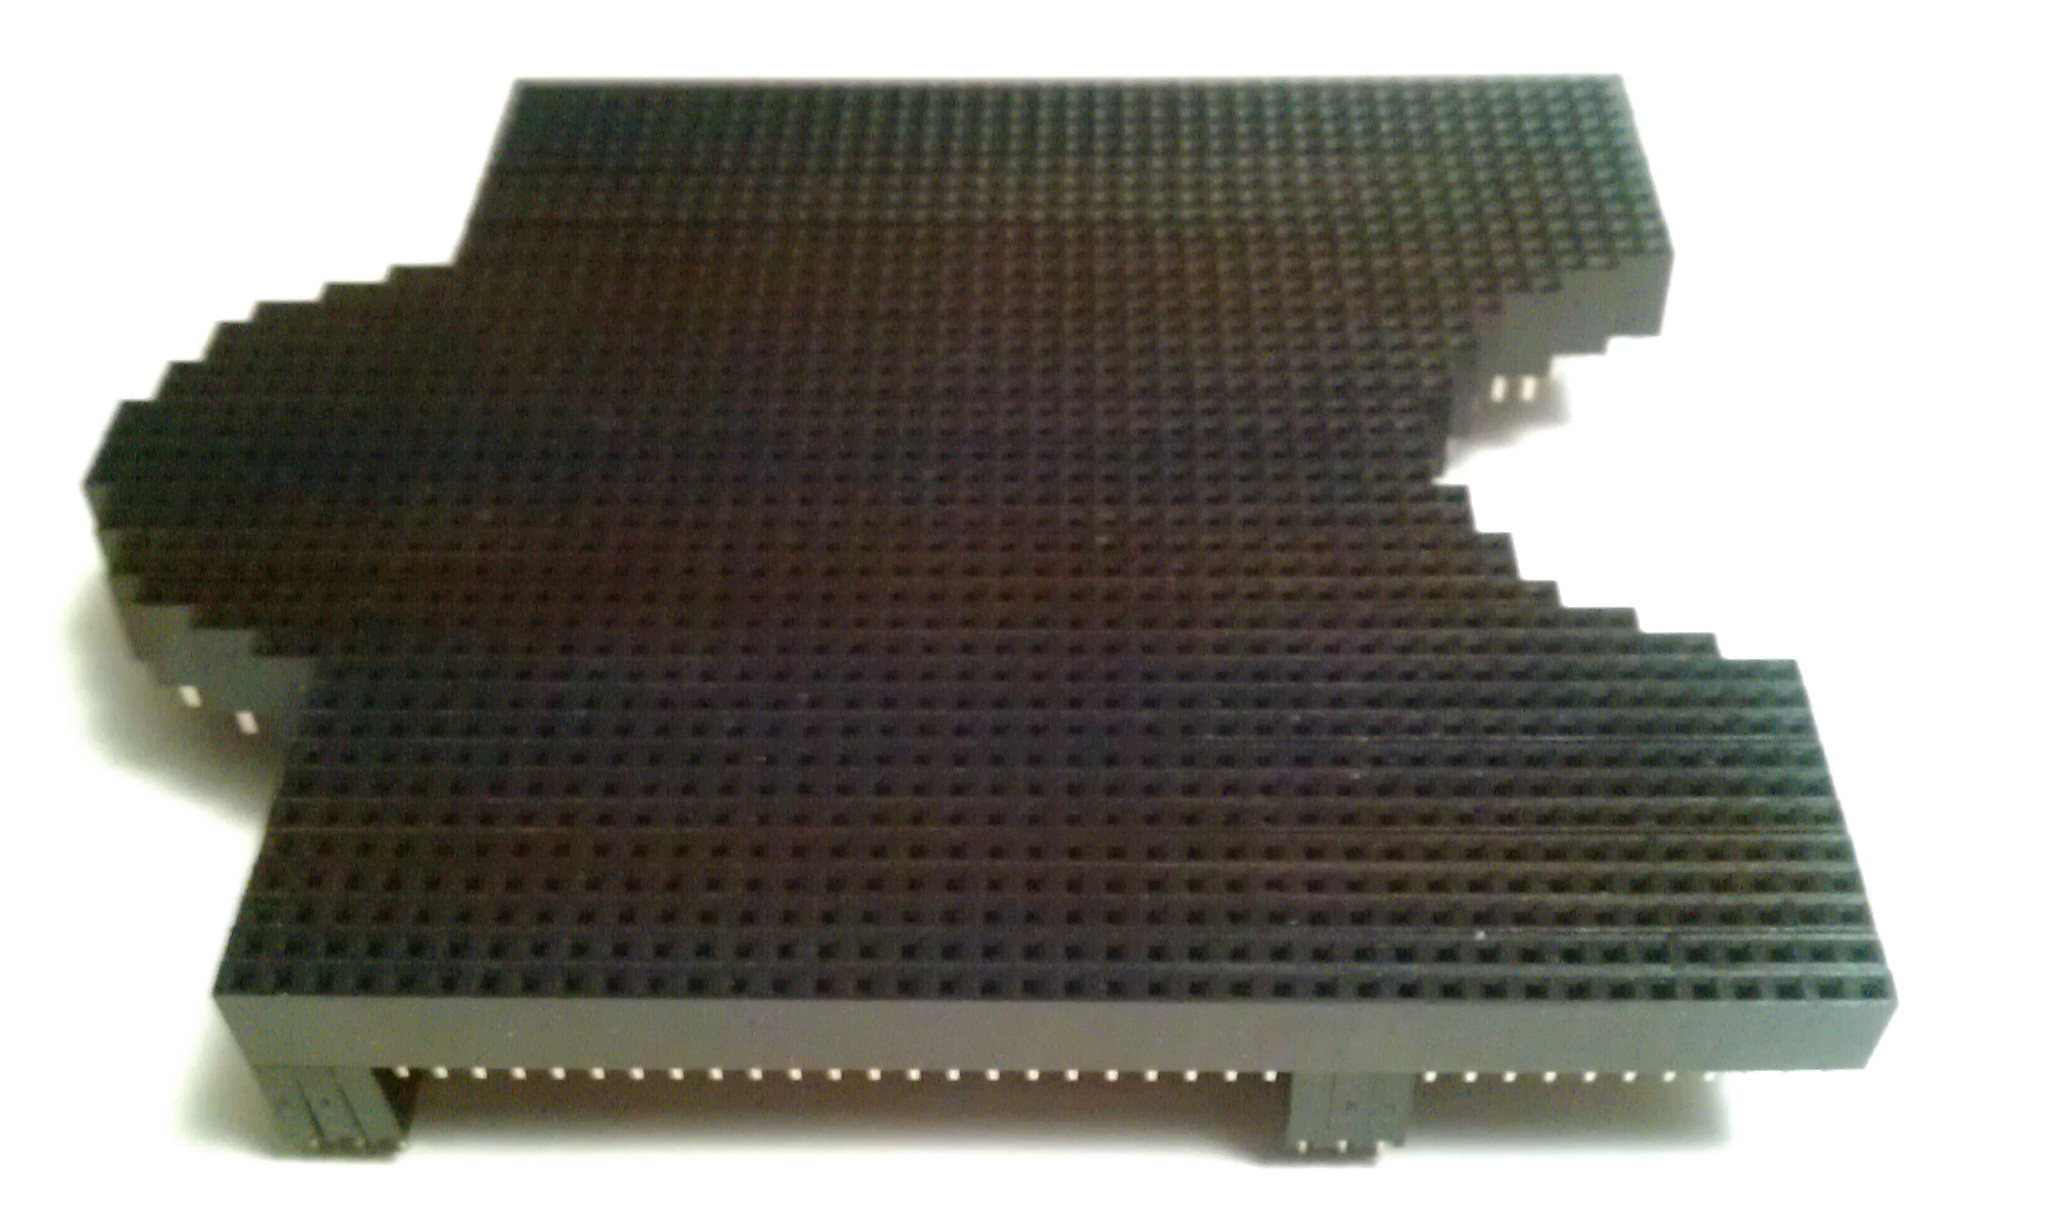
Flip it over:
![]()
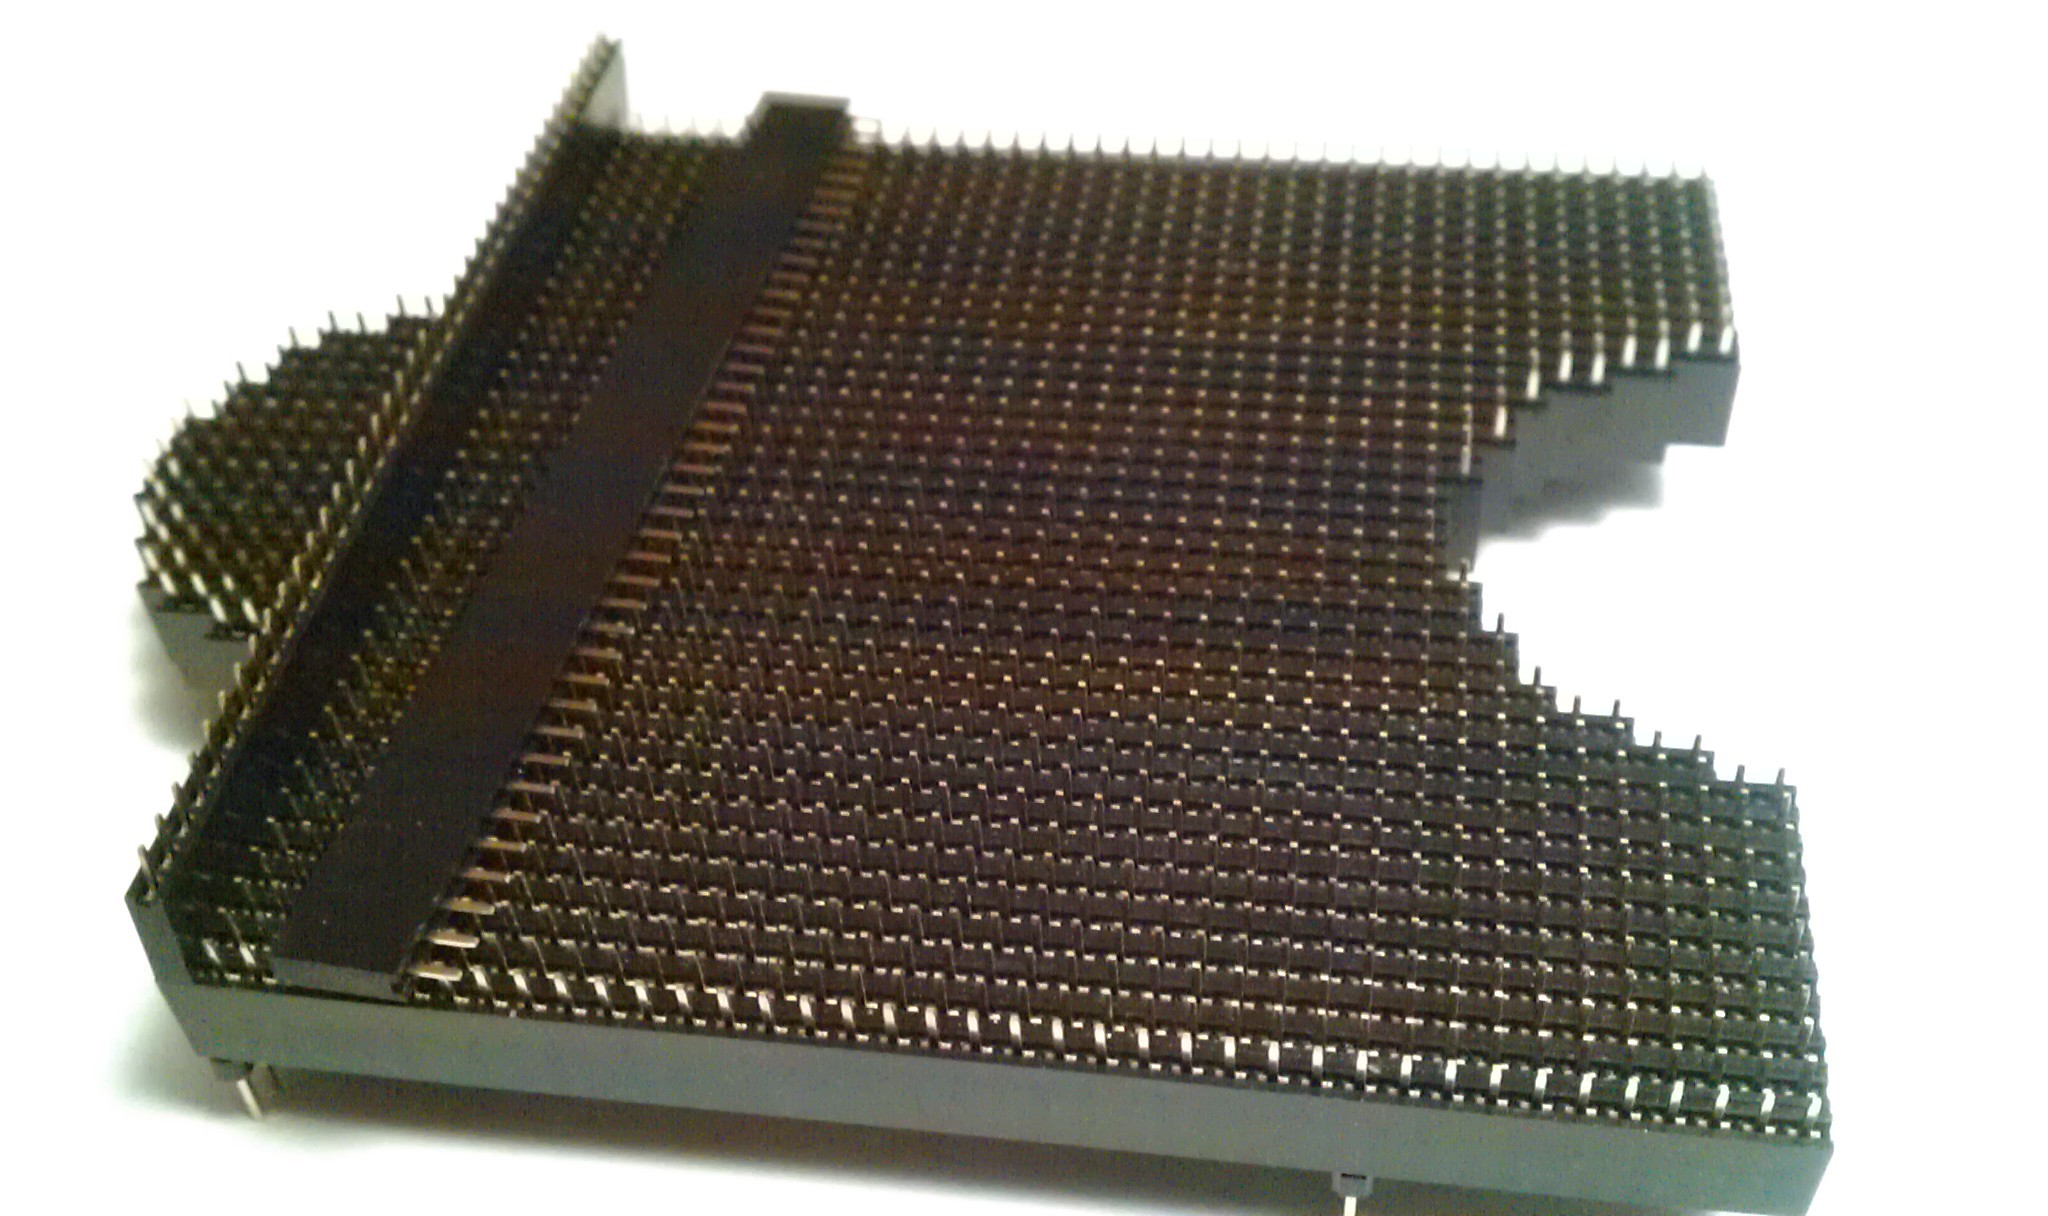
Remove males:
![]()
Left side:
![]()
Six females across will be removed, then I will add two layer edging, and a bottom plate. At first I was thinking crazy glue, but now I'm thinking hot glue.
-
Adafruit vs Futurlec Header to Header Grudge Match
06/09/2014 at 03:15 • 0 commentsIts really just a parts review and invoice breakdown, and I like playing with numbers.
Summary, in case your bored already.
Review by Tags:
Adafruit; Fast, Support, Tracking, Open Intentions.
7 days, Saved $5.10 vs FuturlecFuturlec; Price, Data Sheets, Don't Ask.
20 days, Saved $29.21 vs AdafruitConclusion: It's a tie! Both have advantages. I would order from either again.
*Switch reviews, parts problems and solutions far far below. All part number included. All prices $US.
Adafruit Invoice:
(1) Premium Female / Female Jumper Wires – 40x6” #266 $6.95
(1) Tactile Button switch (6mm) 20 pack #367 $2.50
(1) Colorful Square Tactile Button Switch Assortment 15 pack #1010 $5.95
(2) On-On Alternating Power Button / Pushbutton 3-Way Toggle Switch #1684 $1.95 x 2 = $3.90
Shipping to Colorado: $7.71
Total: $27.01
Prices on tactile switches were almost twice as much at Futurlec. Shipping was about the same.
Saved $5.10
Futurlec Invoice:
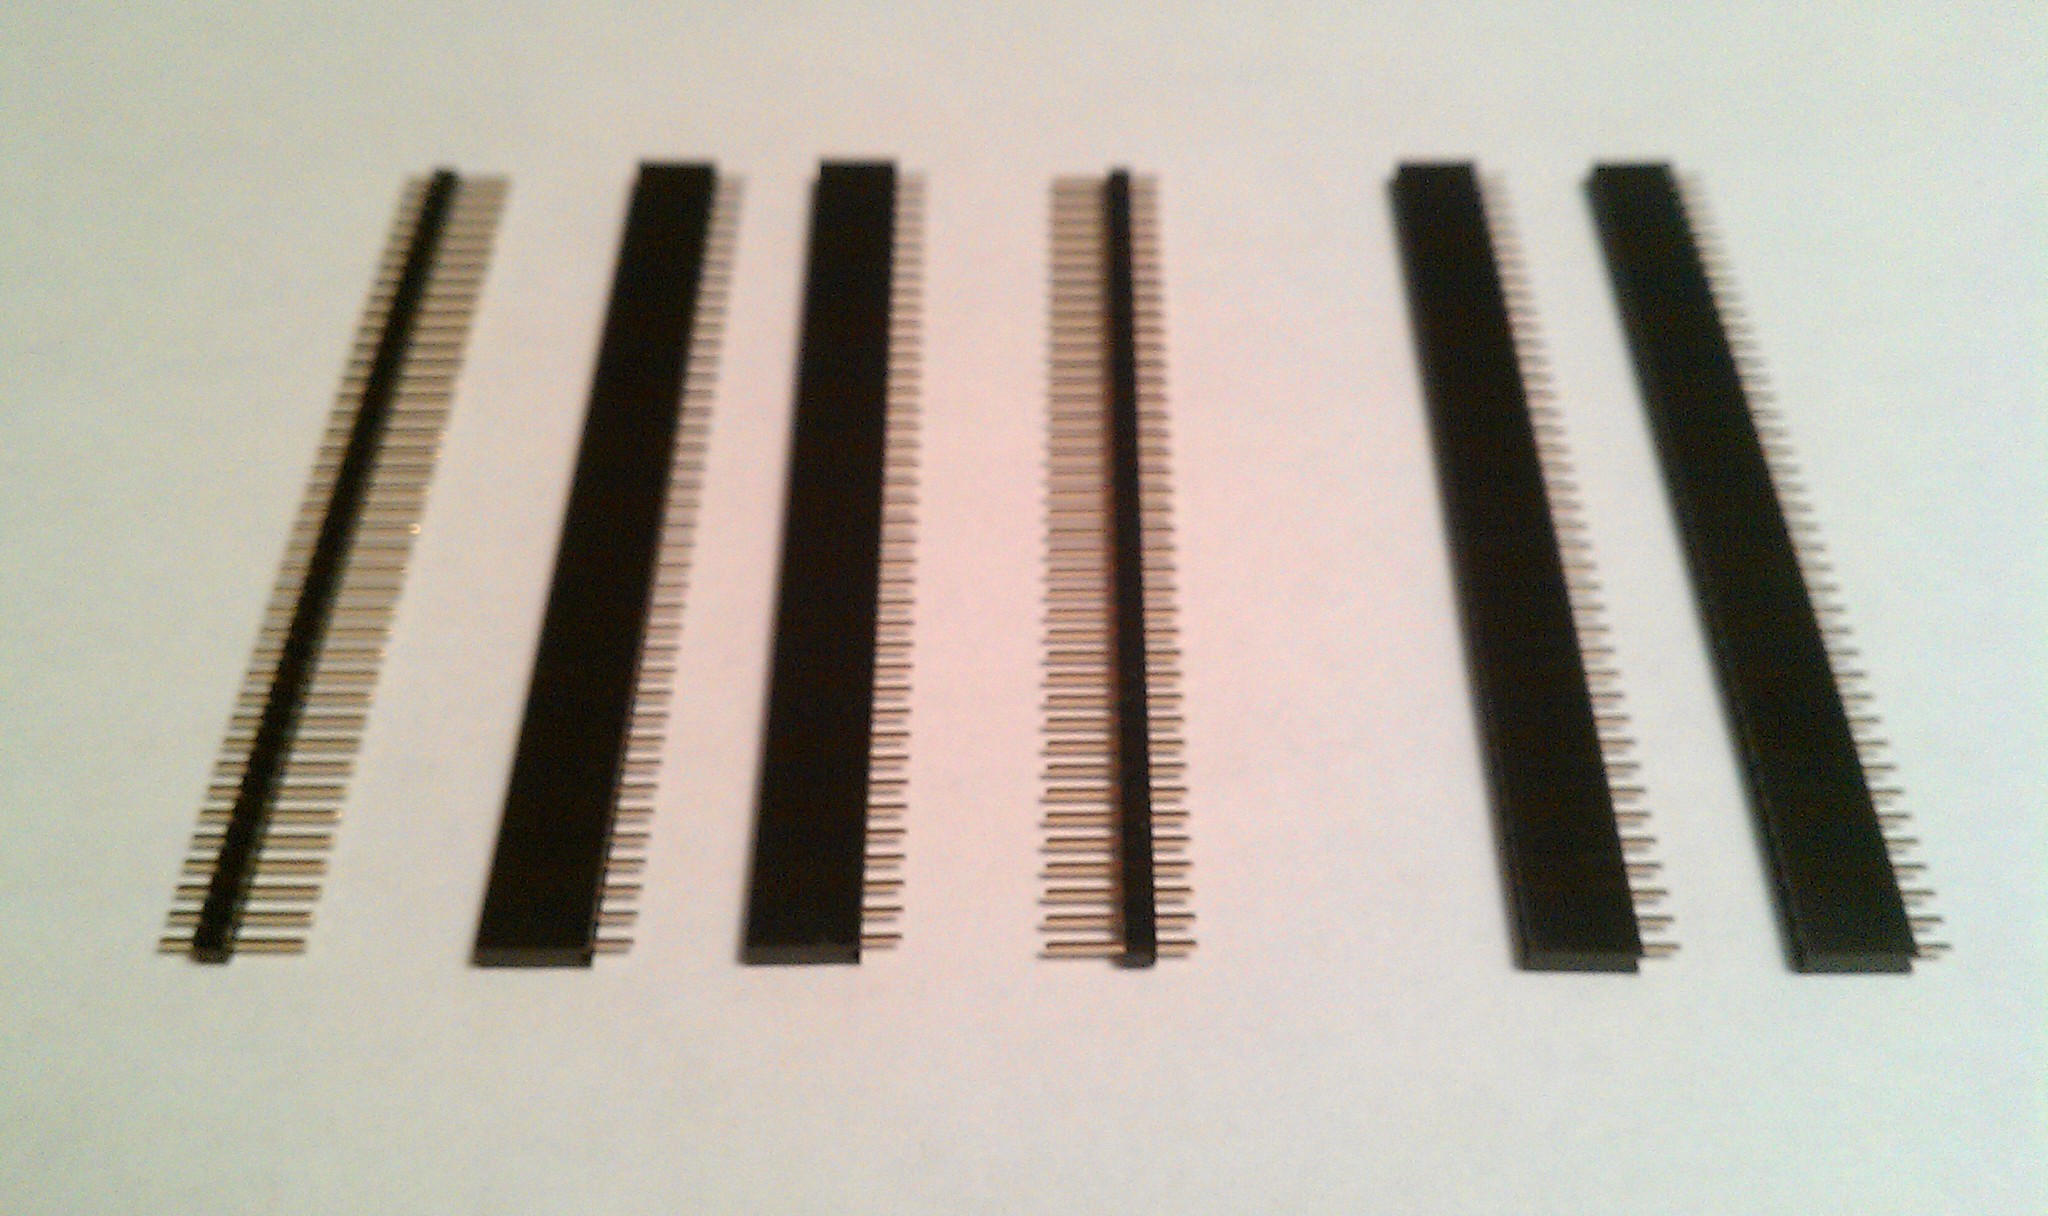
(10) HEADS40 – 40 Pin .100 Straight Male Headers $0.19ea $1.90
(100) FHEADS40 – 40 Pin .100 Straight Female Headers $0.35ea $35.00
(100) FHEADS2 – 2 Pin .100 Straight Female Headers $0.04ea $4.00
(100) FHEADS4 – 4 Pin .100 Straight Female Headers $0.08ea $3.20
Shipping to Colorado: $6.00
Total: $50.10
I wanted 36 pin single row female headers. Futurlec had pictures of the top socket side, exact dimensions and data sheets, but only had 32 pin or 40 pin. I got the 40 pin. I should have got the 32 pin because the 40's make the mouse 40mm wider (2.54mm x 8pins x two sides), but I am still happy with the decision.
![]()
Side by Side: Not a fair comparison because of sizes, but:
Futurlec (100) Single Row Female 40 pin, exact specs = $35.00
Futurlec (100) Single Row Female 32 pin, exact specs = $30.00
Adafruit (50) Double Row Female 36 pin #1544, unknown = $59.50
Futurlec (10) Single Row Male 40 pin, exact specs = $1.90
Adafruit (10) Single Row Male 36 pin #392, unknown = $4.95
I Saved $24.50 on the females, $3.00 on the males, $1.71 on shipping, plus got some other sizes I wanted from Futurlec.
Saved $29.21 (if it was a separate order. I could have saved $34.21 if I got the 32 pin like I should have.)
Shipping Times:
Adafruit:
Internet order 5/16/2014
Shipped from “Limor Fried” in New York City
Tracked and delivered by UPS 5/23/2014
Total: 7 daysFuturlec:
Internet order 5/16/2014
Headquarters in New York City
Suspected delivery from Thailand
Postmarked from Germany
Packing invoice from Australia
Delivered by US Mail 6/5/2014
Total: 20 daysTotal saved from ordering from both: $34.31.
*Switch and Part Reviews
Headers:
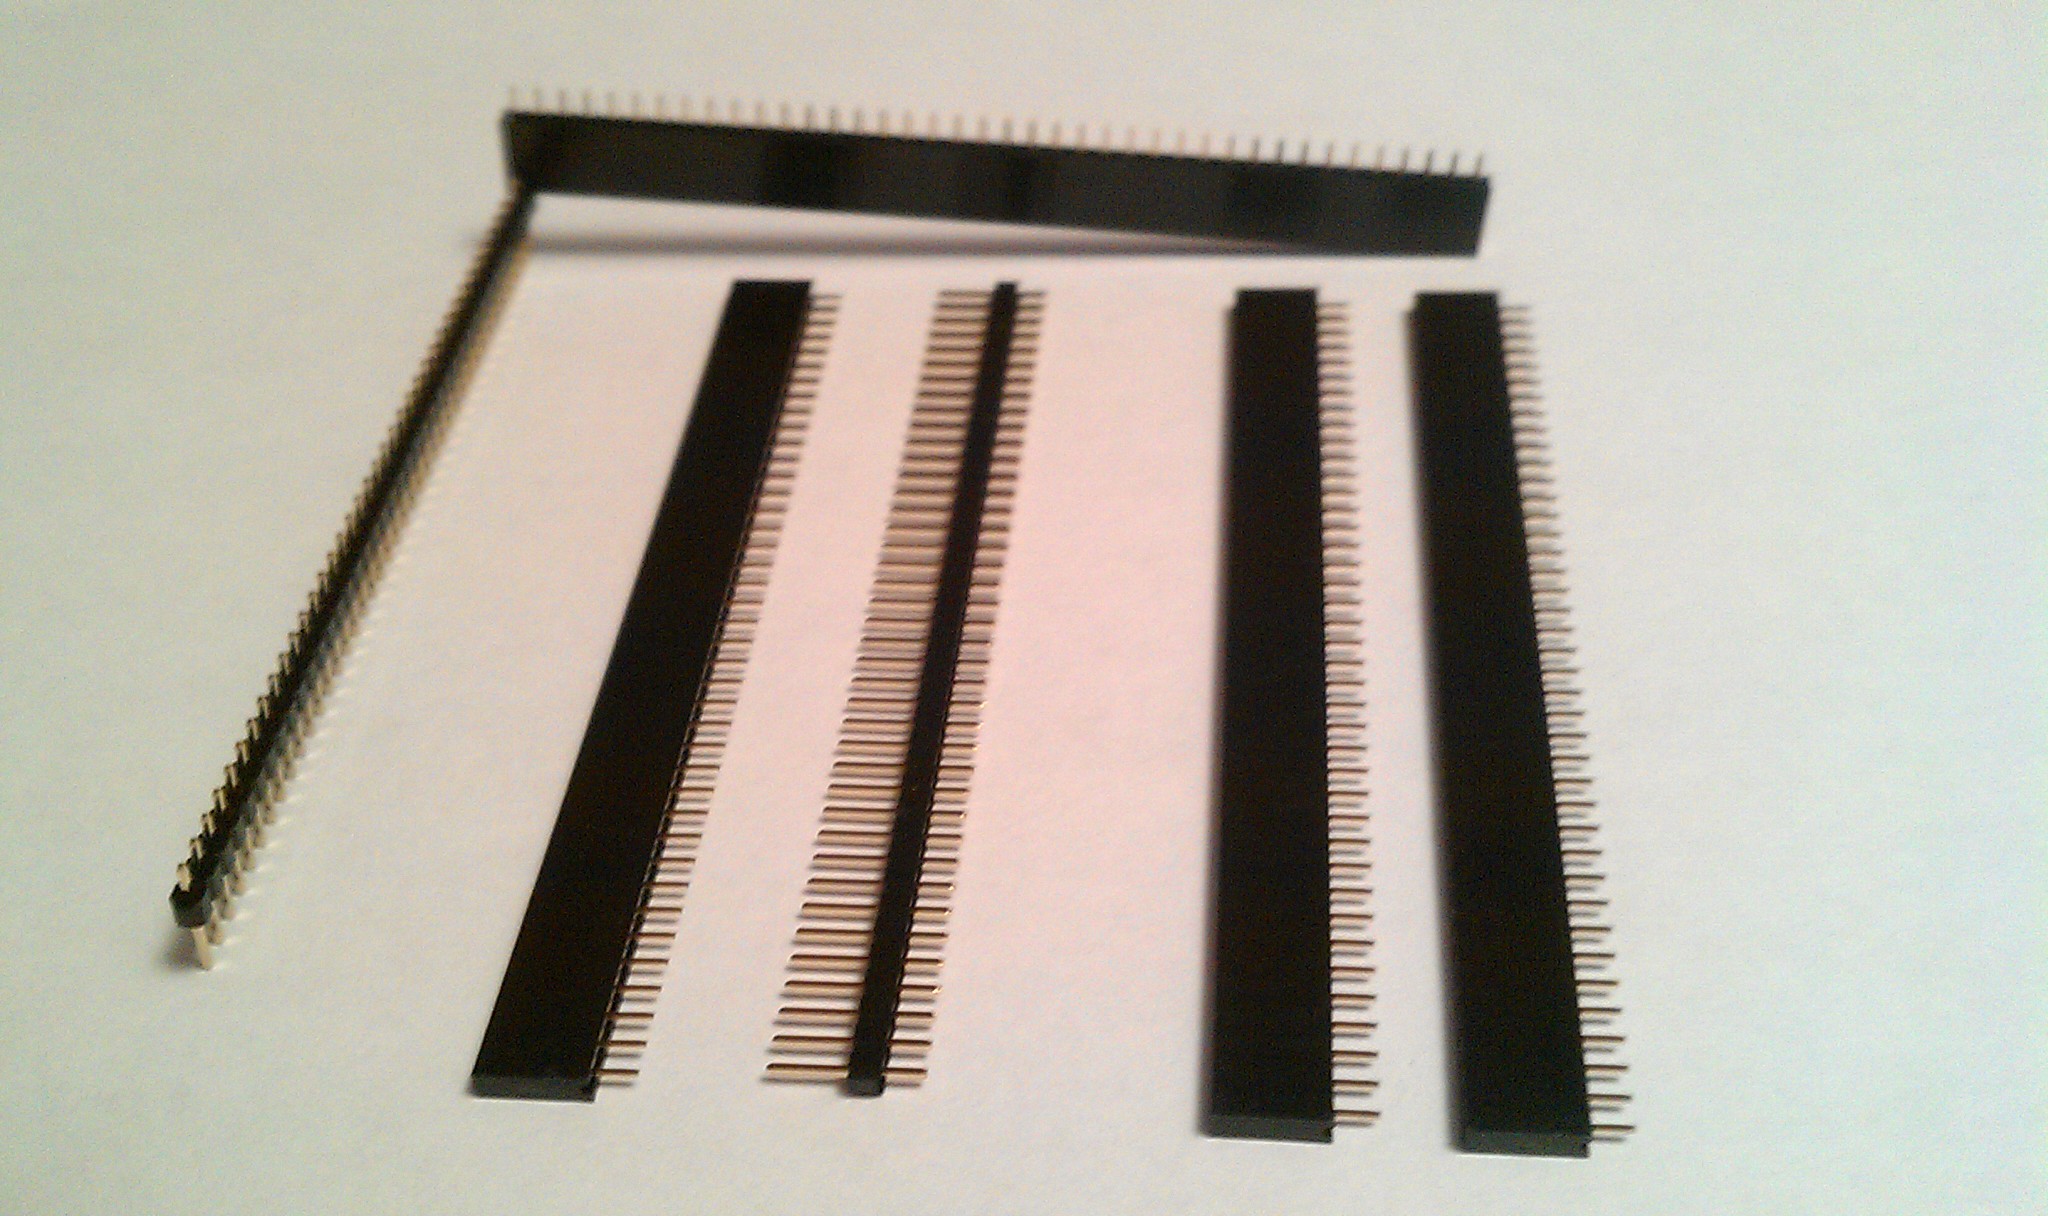
The headers from Futurlec look perfect! There will be awesome header pictures in the next log.
I am not entirely comfortable with ordering from Futurlec. I would think the cost of emails and paper trails running through four countries exceeds any profit on my order. The end result is this kept me in budget and kept the project going, but leaves me with a feeling like I ordered from DarthVadersDeathStarWorldManipulationAndEmporium.com. I would probably do it again.
I did try to source from Mouser, Digi-Key, SparkFun, and some other popular sites among builders, but found prices to be two to twelve times as much. Ebay came close on pricing, but a real lack of details to the point where I didn't know what I would get.
Switches:
Adafruit delivered as promised; no complaints there.
My complaints below are how the parts integrate with my project.
6mm Tactile Buttons:
![]()
Small convenient size. A good loud clicking sound provides positive tactile feedback. Great for occasional buttons, but not for left/right mouse buttons because it takes too much pressure to operate them.
Accessibility concerns:
If you require a large oversized surface area for your keycap, it could act as a lever for this switch. (I am thinking more than 50mm)
I am more concerned with ease of use for fatigue. I would like low pressure, short throw, quick response and soft click.
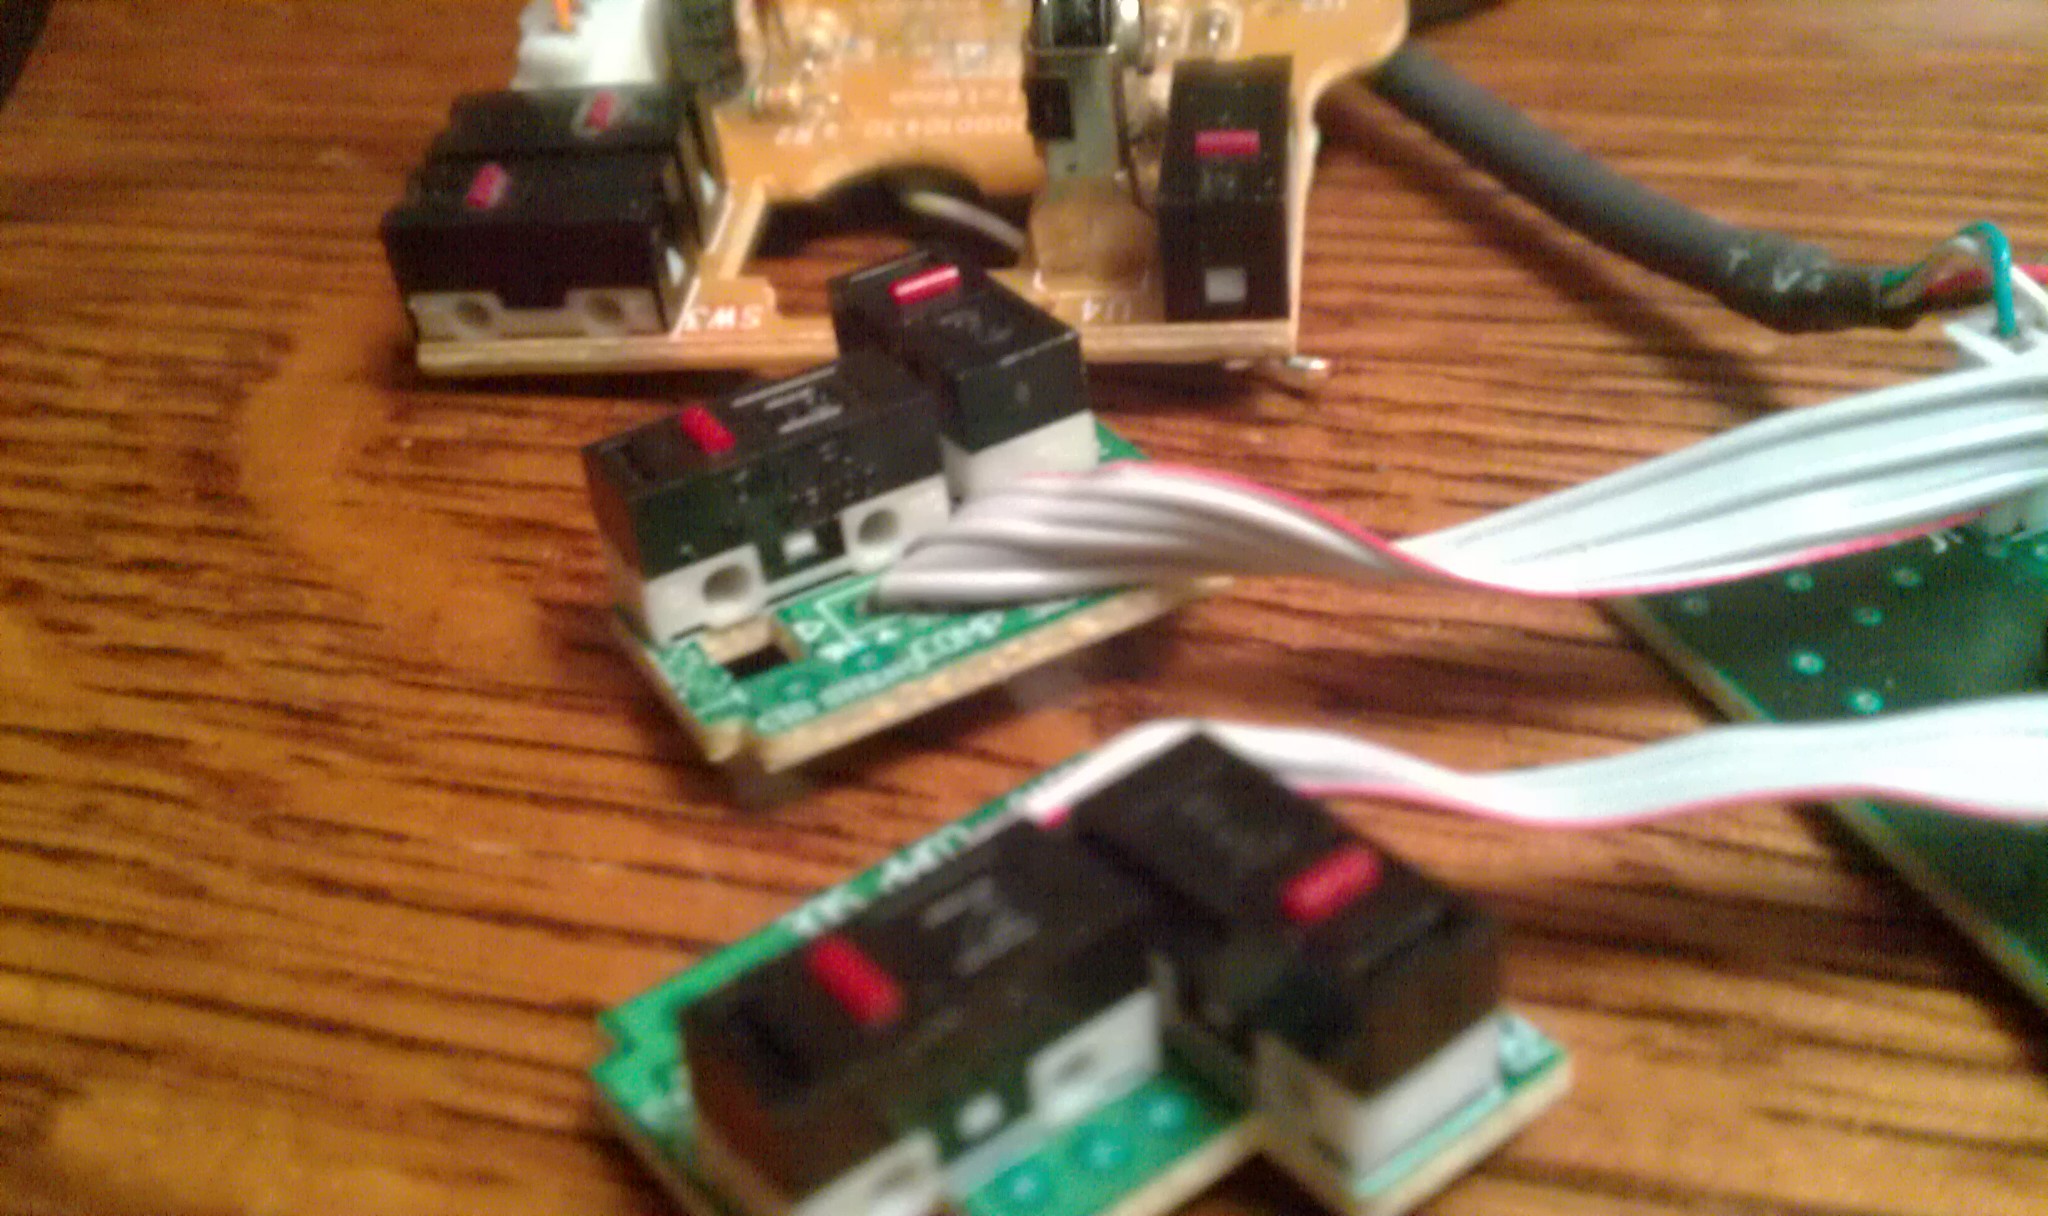
Solution: Dead mice!
![]()
These will desolder well, and meet all of my needs. I am hoping to hack together some special keycaps/covers for them.
![]()
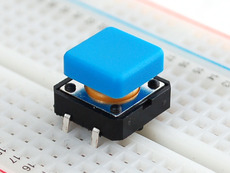
12mm Square Tactile Buttons:
![]()
They require a fair amount of pressure to operate, and they make a very loud clicking noise. The pressure and noise would make them inappropriate even for a QWERTY keyboard accessory. Getting the position and hole tolerances lined up for other panel type projects would be hard to get a finished look.
Possible solution: Custom keycaps for the 6mm buttons to make optional keys, and save the 12mm buttons for other heavy duty projects.
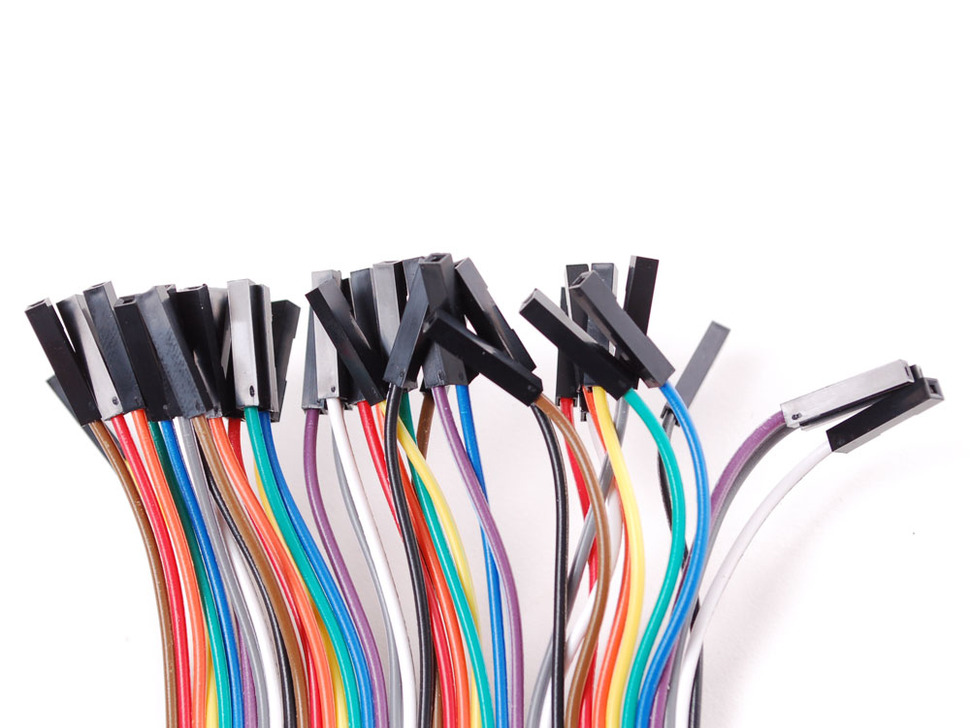
Female Jumper Wires:
![]()
I was hoping to use these as jumpers from the bottom of the female headers, but here is my problem:
All male and female headers have a 6mm pin and socket side, then a 3mm soldering side. The 6mm sockets don't quite reach the 3mm pins. I can't complain because because of the projects unique design, and this is not the intended purpose for headers and jumpers.
Solution: I am not unhappy with the purchase, and I am sure I can modify them by crimping and or cutting the socket inserts. I promise to document if I commit jumper surgery.
I would like to have a scale to measure switch pressures and calipers to measure switch throw distance. If I get something, I will go back and report all the specs I can.
I hope to acquire and test many more types of switches and key caps in the future, and try to apply them to accessibility solutions.
-
Much Better Scrolling
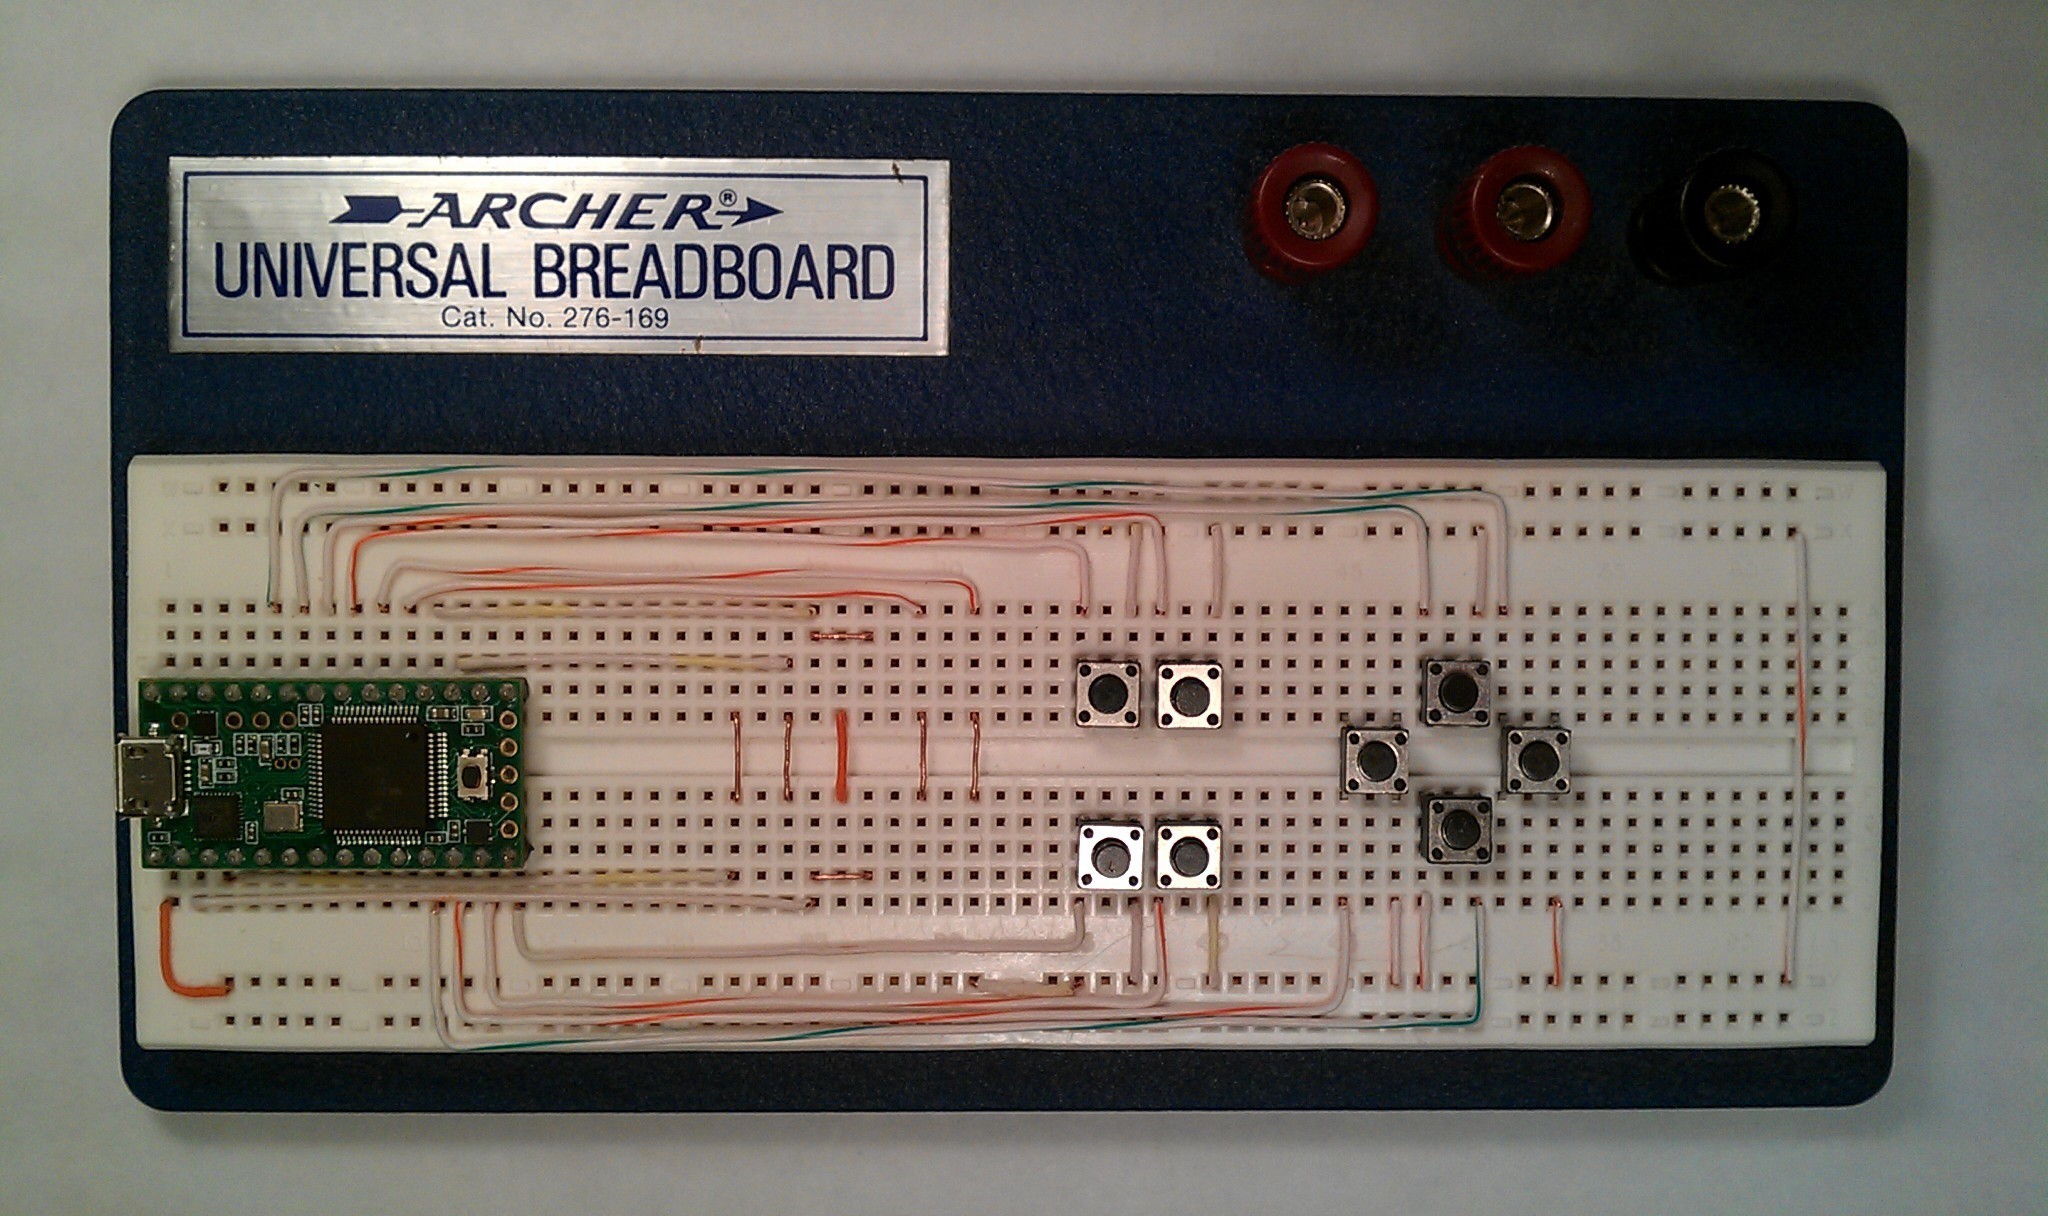
06/07/2014 at 09:15 • 0 commentsFour way scrolling, all easily done with one finger.
My first Arduino sketch attempt in the previous project log was awful, but a milestone for me. I really love the touch sensors now that I am more familiar with them. The Teensy 3.1 has twelve touch sensor pins, 9 on top, and 3 solder pads on the bottom of its PCB. (Unnecessary Teensy raving link... http://hackaday.io/project/1397-36-Touch-Sensor-Matrix ) The new touch sensor below that I have been developing is so much better that I have not been able to stop using it, even though it is not even close to my mouse. I like it so much better than any wheel I have tried. This will definitely be on the final Prototyping Mouse.
![]()
![]()
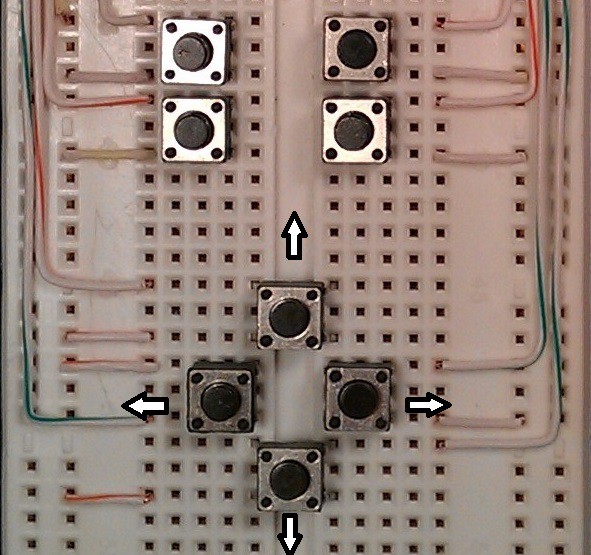
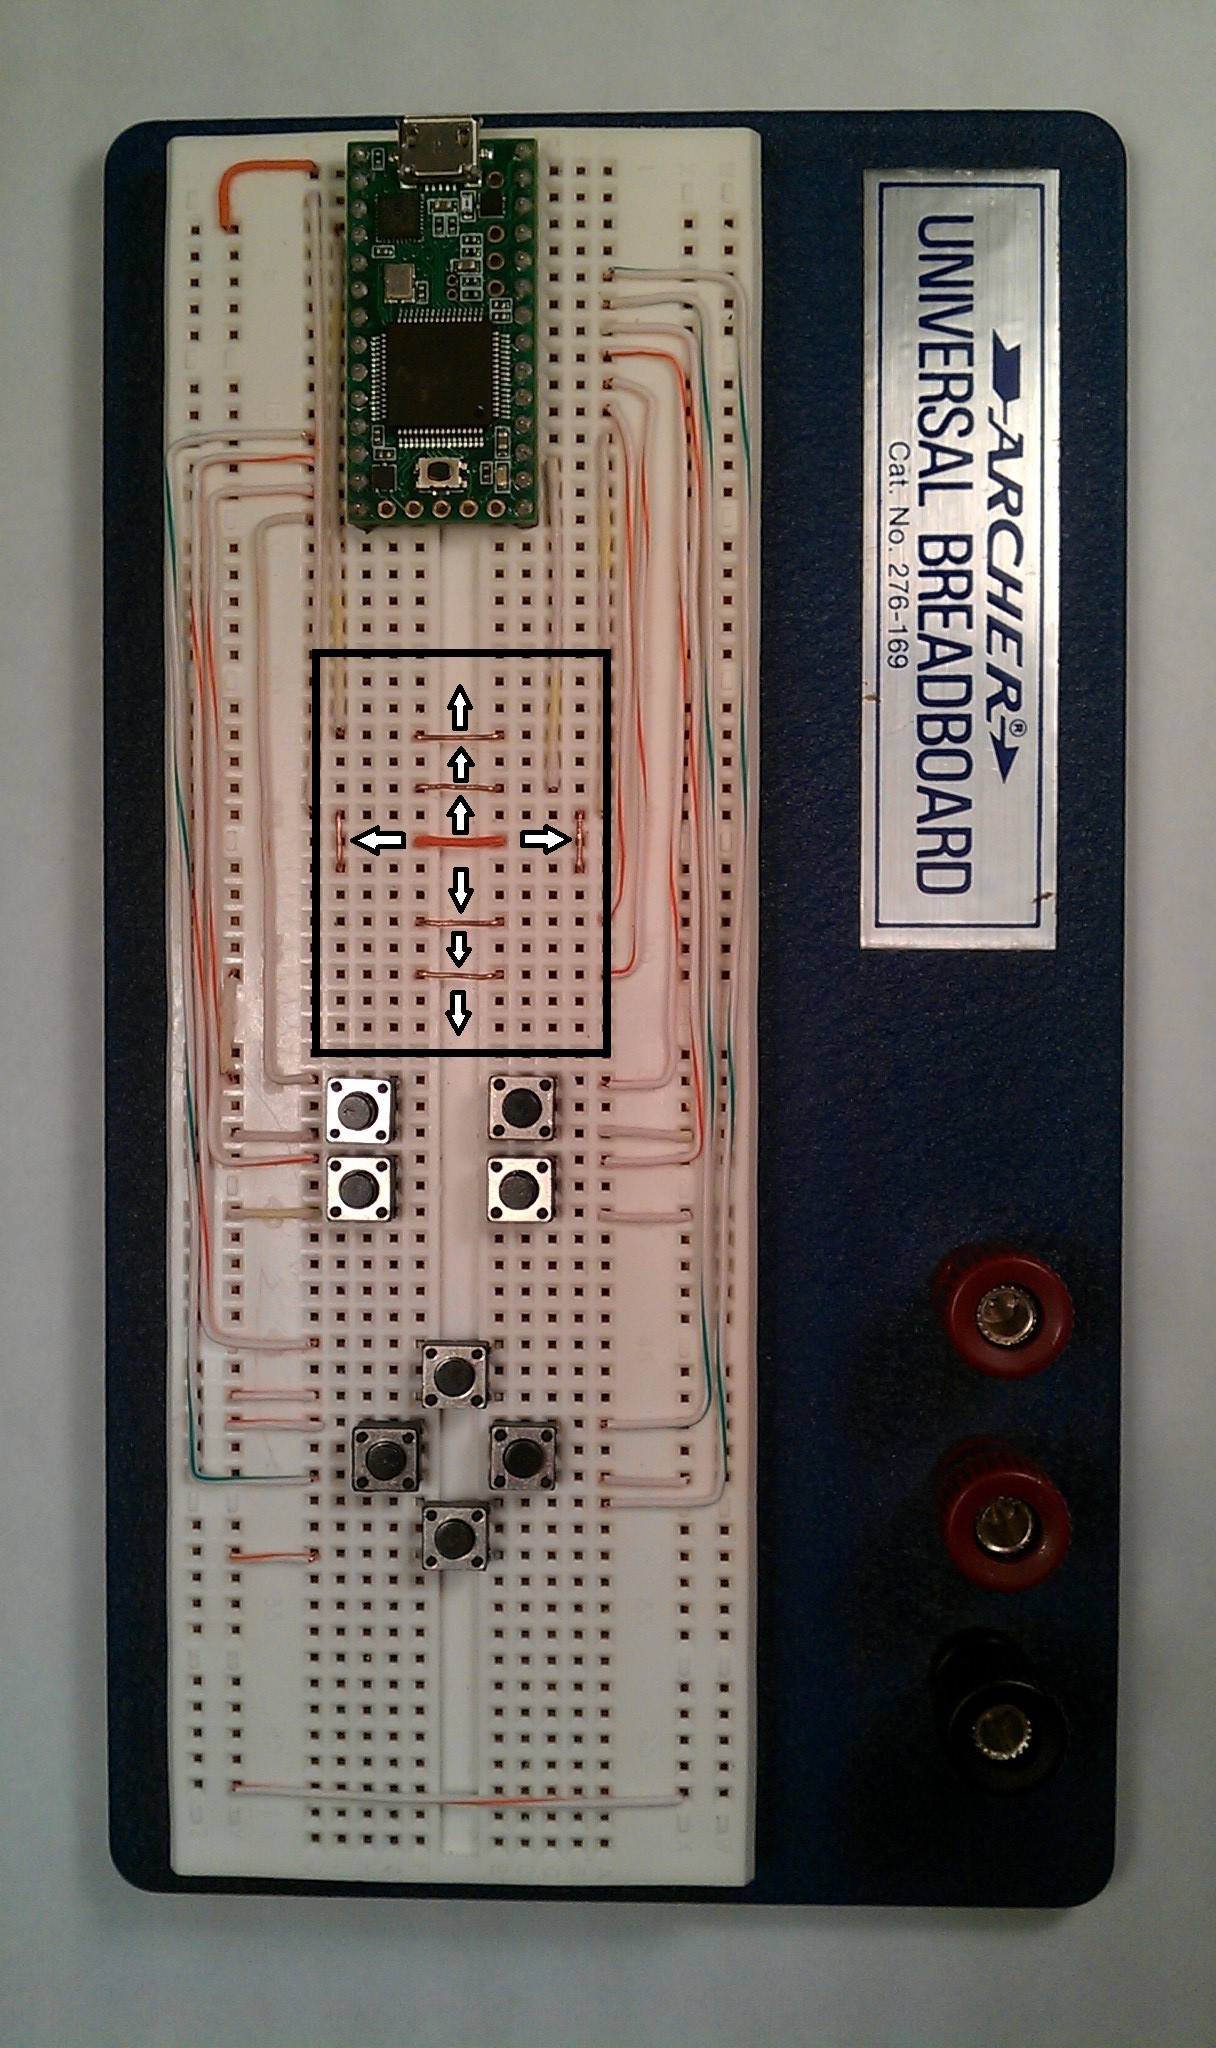
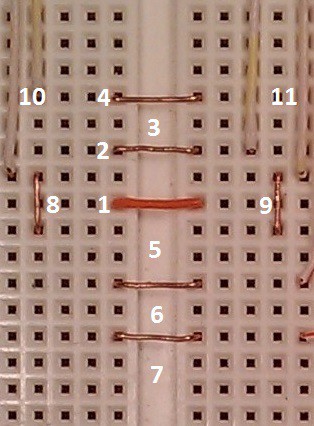
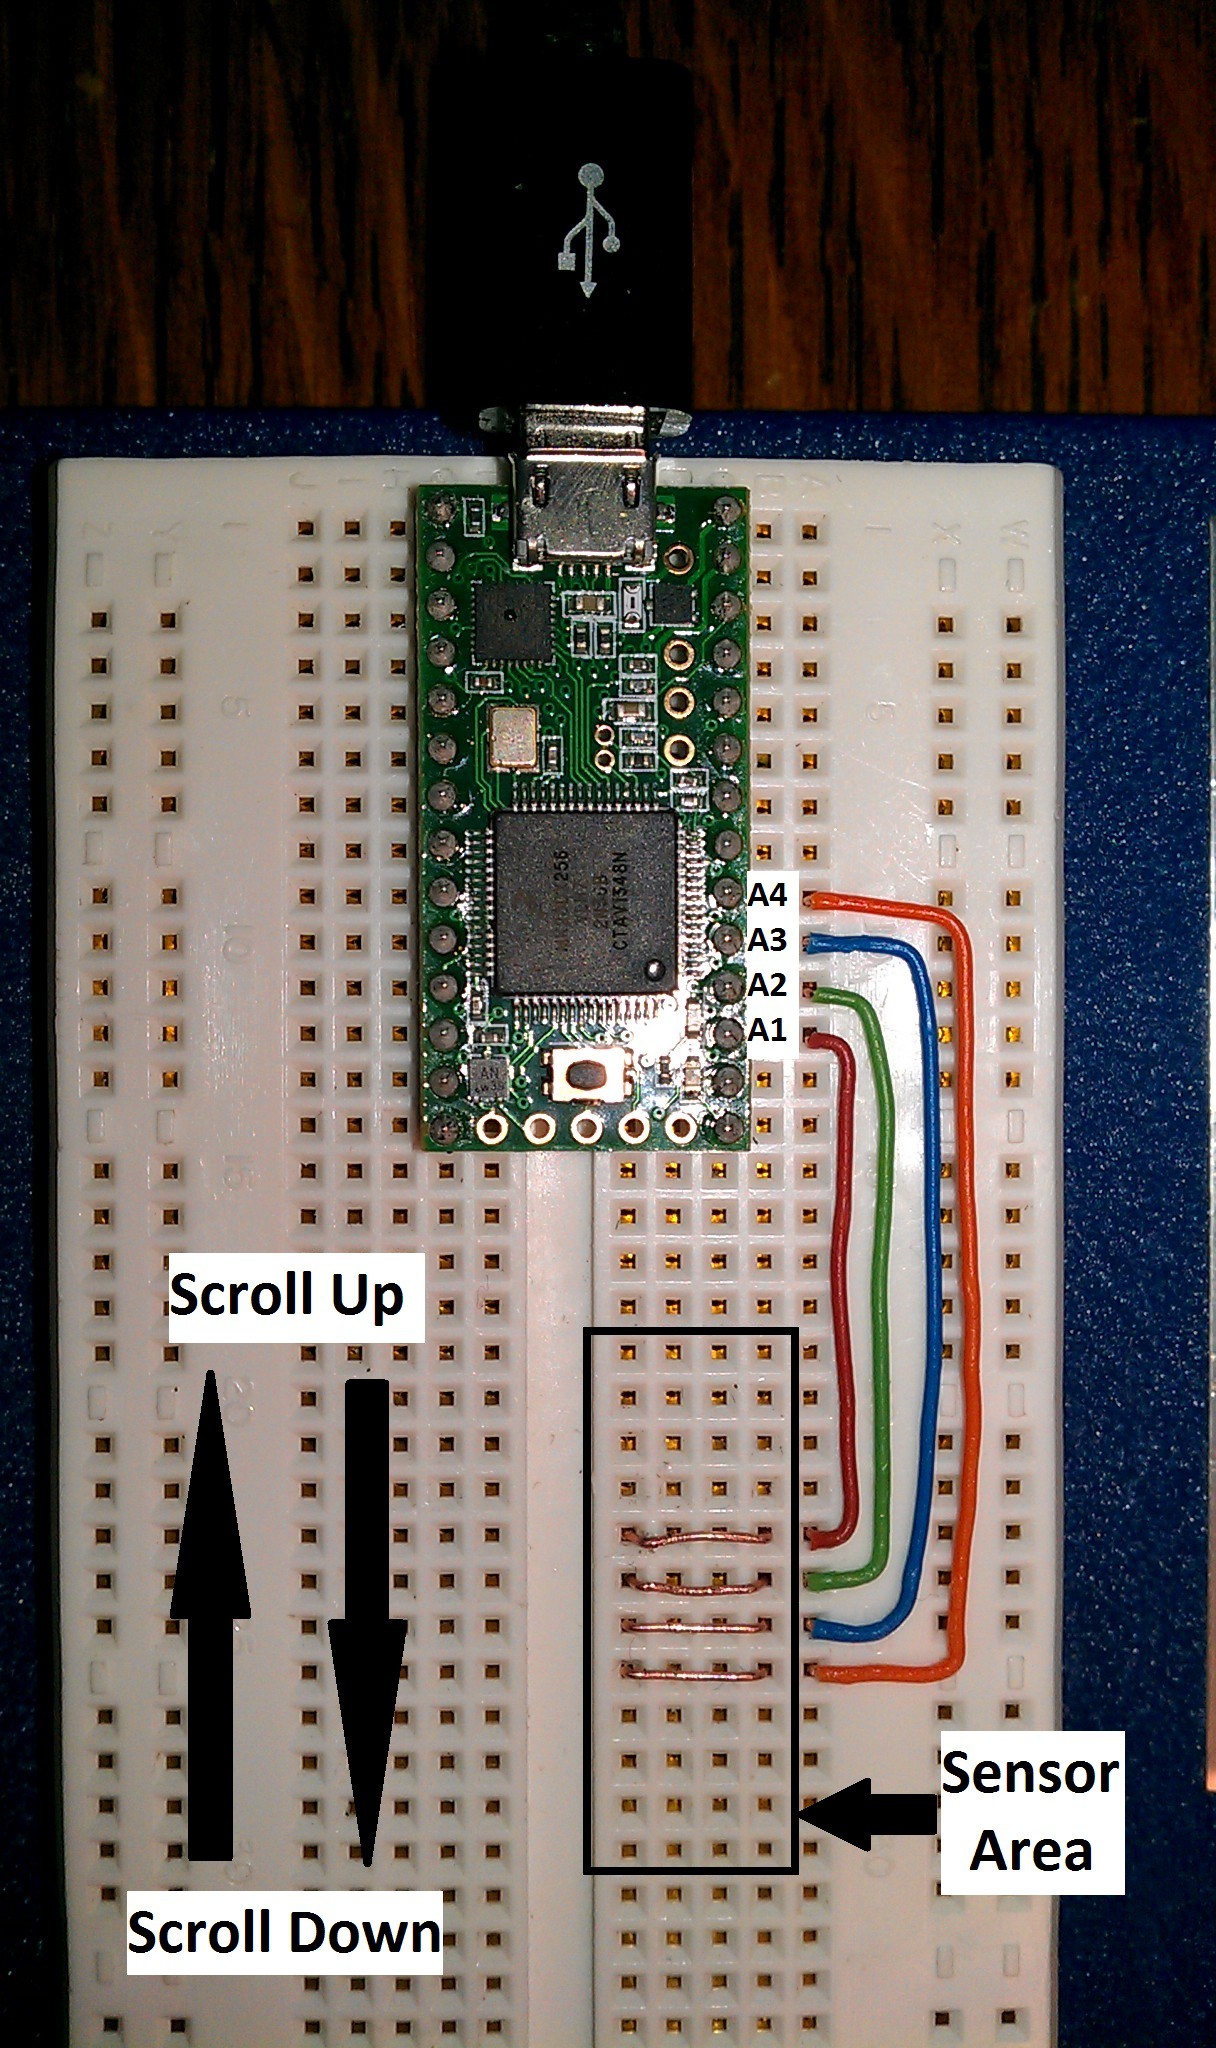
Layout from the middle of the picture below:
1. The center red insulated wire is not connected. It is used for tactile reference only.
2. Slow scroll up.
3. Touch both wires for medium scroll up. Can be done by rolling finger forward.
4. Fast scroll up.
5. A little extra space below for my lazy finger.
6 & 7. Slow, medium and fast down.
8. Left arrow key.
9. Right arrow key.
10. Future touch location for Ctlr Lock.
11. Future touch location for Shift Lock.
Ctrl Lock makes up and down zoom.
Shift Lock makes scroll up and down move a horizontal scroll bar left and right.
![]()
Low Vision Bonus:
The Ctrl lock feature, had an unexpected accessibility advantage as a magnifier for the visually impaired. Because it meets the requirement of no drivers it switched easily from Windows to Linux without being “Windows Magnifier” dependent.
Other ideas I am playing around with:
Ctrl Zero:
A touch location for normal zoom, in case I play around with zooming too much.
Scroll Speed:
The pictures above show the small black tactile switches I have been experimenting with. One was Ctrl Lock, which I plan to move to a touch location as mentioned above. Two others adjusted scroll speed, but after testing, I stayed on one set of lines per scroll: Slow = 1, Medium = 3, Fast = 5. So I am killing that idea.
Micro Move:
The four cross pattern tactile switches move the mouse pointer one pixel at a time. If you have a trembling hand, it is easy to get frustrated with photo and 3D software. This allows you to take your hand off, take a breath and fine tune, without having to release an object. This version may not make it to my final prototype. I need to upgrade this idea with a micro joystick or reluctantly integrating it into the trackball in the future.
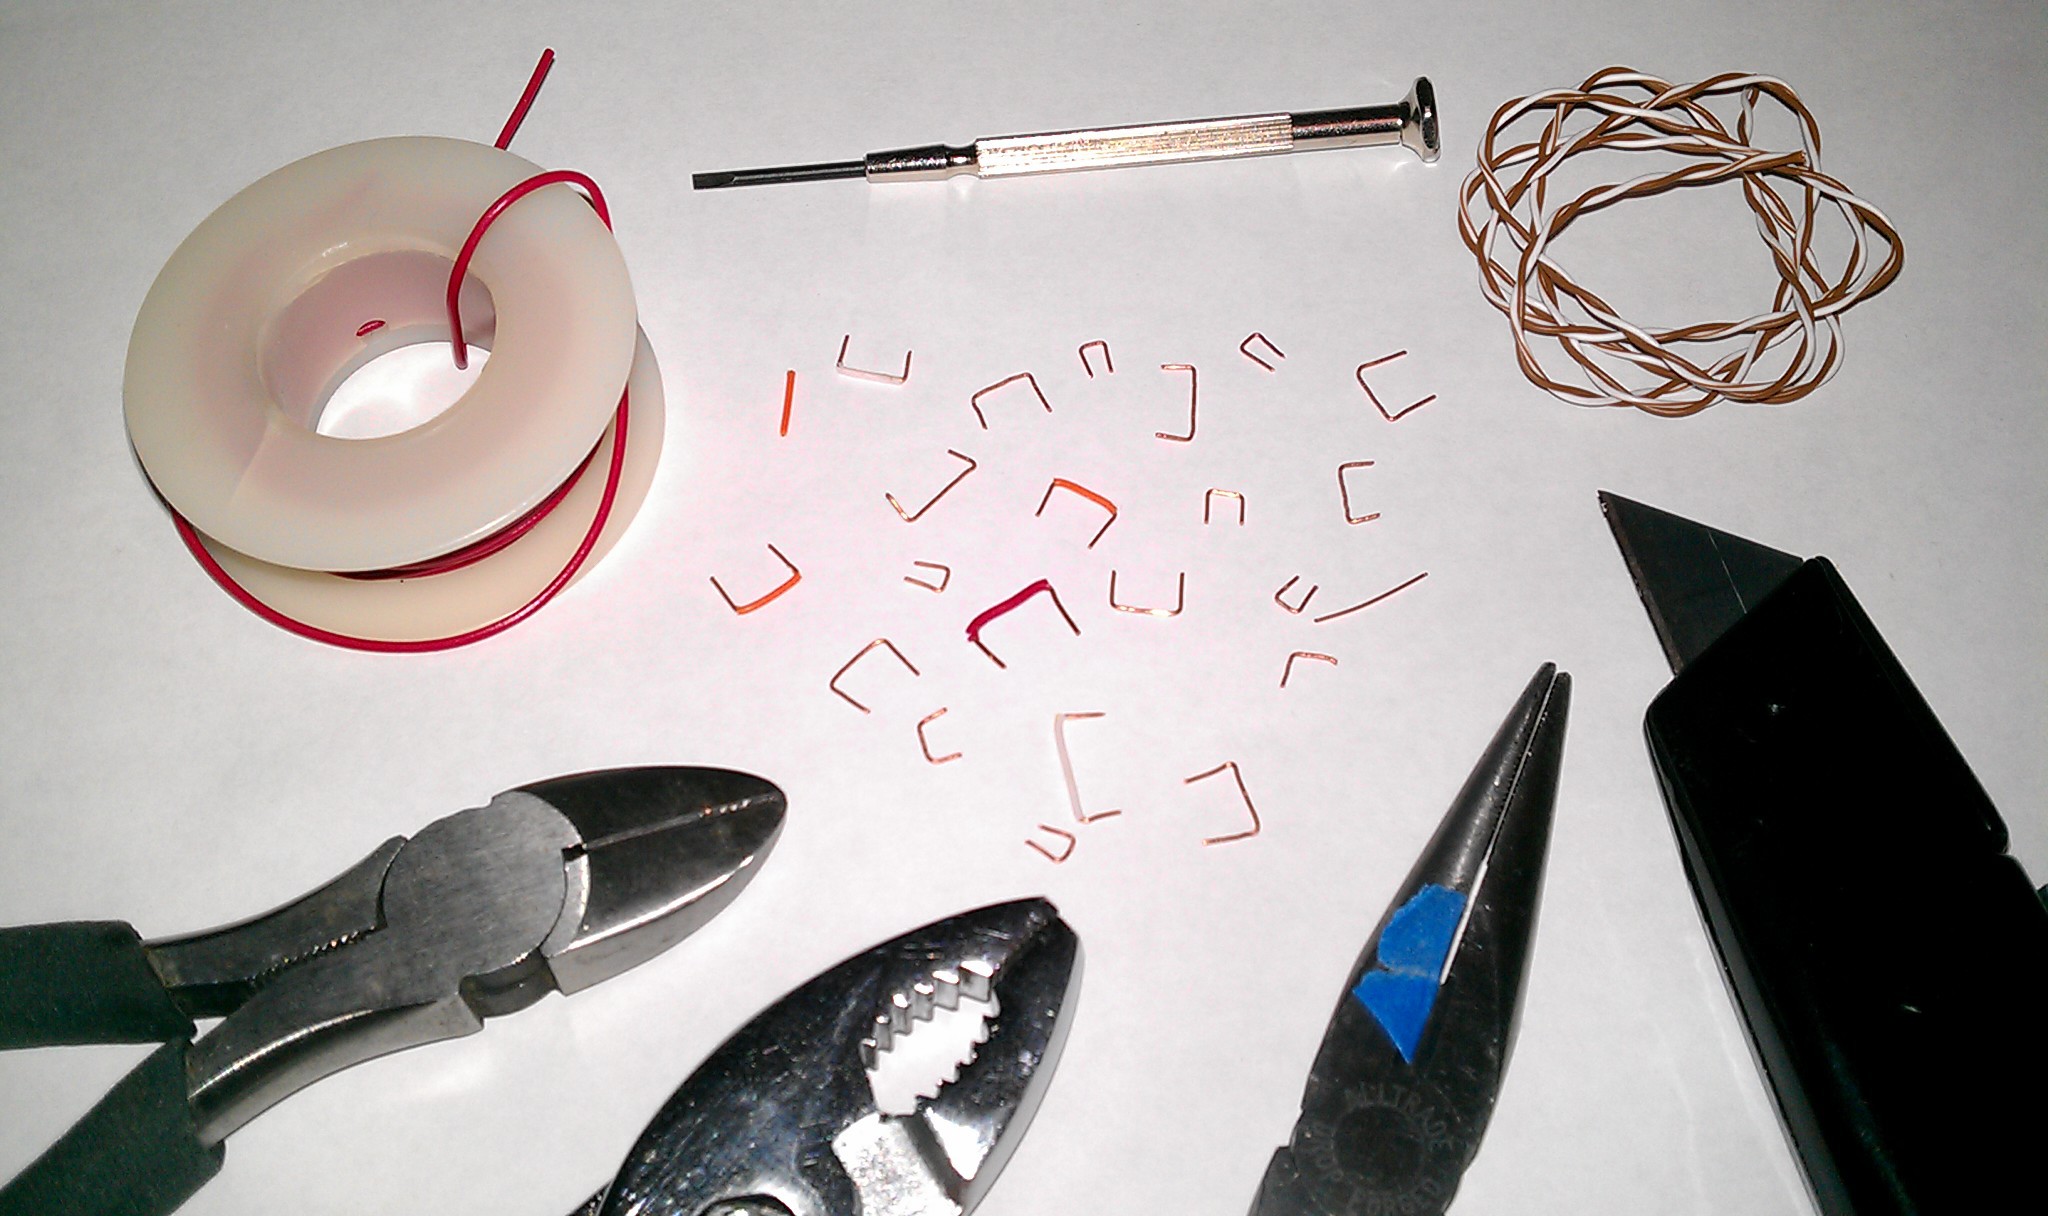
Brass Tacks:
Right now I am still using bare copper wire bent into staple shapes. I am looking for a better non-oxidizing conductive material that might be better to touch. I might murder a laptop touch pad for fun or resort to stainless steel. For single buttons, old fashion thumb tacks seem visually appealing right now for some reason. This needs more research.
![]()
(Picture may seam unrealistic, but contains no blood and has not been photoshopped :)
Much Better Code:
The code is more refined and stable now. This sets the foundation for all of the other switches and final sketch. The sample below will be upgraded in later logs as things move along. (Indenting ruined below. Ask if you want a real copy.)
//Button setup:<br>#include <Bounce.h><br>const int b = 8; // Number of pushbuttons used<br>int buttonPin[b]={12, 11, 19, 20, 10, 9, 21, 22}; // Pushbutton pin numbers:<br>Bounce touchDelayUp = Bounce(buttonPin[0], 10); // 10 ms debounce<br>Bounce touchDelayDown = Bounce(buttonPin[1], 10);<br>Bounce ctrlHold = Bounce(buttonPin[2], 10);<br>Bounce microMoveAdj = Bounce(buttonPin[3], 10);<br>Bounce microMoveUp = Bounce(buttonPin[4], 10);<br>Bounce microMoveLeft = Bounce(buttonPin[5], 10);<br>Bounce microMoveRight = Bounce(buttonPin[6], 10);<br>Bounce microMoveDown = Bounce(buttonPin[7], 10);<br><br>boolean ctrlToggle = false;<br>int microMove = 1; // Amount of positions moved at one time<br><br>// Touch scrolling setup:<br>const int t = 6; // Number of touch sensors used<br>int touch[t]={1, 15, 17, 18, 0, 16};<br> // Touch pin numbers in order:<br> // Top, Up, Down, Bottom, Left, Right<br>int base[t];<br>int reading[t];<br>boolean touched = false;<br><br>// Touch sensor adjustments:<br>int sensitivity = 130;<br>int slow = 1; // Scroll speed...<br>int medium = 3;<br>int fast = 5;<br>int touchDelay = 100;<br>int Delay = 100;<br><br>int c; // Generic counter<br>int led = 13; // Blink conformation<br><br>void setup() { <br> Serial.begin(38400);<br> for (c=0; c<b; c++) {<br> pinMode(buttonPin[c], INPUT_PULLUP);<br> }<br> for (c=0; c<t; c++) {<br> base[c]=touchRead(touch[c]); // Baseline calibration<br> }<br> pinMode(led, OUTPUT);<br>}<br><br>void loop() {<br><br>// Pushbutton section:<br><br> // Micro move the position of the mouse pionter<br> if (microMoveUp.update()) {<br> if (microMoveUp.fallingEdge()) {<br> while (!microMoveUp.risingEdge()) {<br> Mouse.move(0, -microMove);<br> microMoveUp.update();<br> delay(255);<br> }<br> }<br> }<br> if (microMoveLeft.update()) {<br> if (microMoveLeft.fallingEdge()) {<br> while (!microMoveLeft.risingEdge()) {<br> Mouse.move(-microMove, 0);<br> microMoveLeft.update();<br> delay(255);<br> }<br> }<br> }<br> if (microMoveRight.update()) {<br> if (microMoveRight.fallingEdge()) {<br> while (!microMoveRight.risingEdge()) {<br> Mouse.move(microMove, 0);<br> microMoveRight.update();<br> delay(255);<br> }<br> }<br> }<br> if (microMoveDown.update()) {<br> if (microMoveDown.fallingEdge()) {<br> while (!microMoveDown.risingEdge()) {<br> Mouse.move(0, microMove);<br> microMoveDown.update();<br> delay(255);<br> }<br> }<br> }<br> // Amount mouse pointer moves at one time<br> if (microMoveAdj.update()) {<br> if (microMoveAdj.fallingEdge()) {<br> if (microMove < 15) {<br> microMove = microMove + 3;<br> } else {<br> microMove = 1;<br> }<br> delay(150);<br> for (c=0; c < microMove; c=c+3) {<br> digitalWrite(led, HIGH);<br> delay(150);<br> digitalWrite(led, LOW);<br> delay(150);<br> }<br> }<br> }<br> // CTRL toggle: Flase= no modifier, True= CTRL always held down<br> if (ctrlHold.update()) {<br> if (ctrlHold.fallingEdge()) {<br> if (!ctrlToggle) {<br> Keyboard.set_modifier(MODIFIERKEY_CTRL);<br> Keyboard.send_now();<br> ctrlToggle = true;<br> } else {<br> Keyboard.set_modifier(0);<br> Keyboard.send_now();<br> ctrlToggle = false;<br> }<br> }<br> }<br><br>// Touch scrolling sections:<br><br> // Touch scroll speed buttons:<br> if (touchDelayUp.update()) {<br> if (touchDelayUp.fallingEdge()) {<br> if (touchDelay > 0) {<br> touchDelay = touchDelay - 10;<br> digitalWrite(led, HIGH);<br> delay(5);<br> digitalWrite(led, LOW);<br> }<br> }<br> }<br> if (touchDelayDown.update()) {<br> if (touchDelayDown.fallingEdge()) {<br> if (touchDelay < 200) {<br> touchDelay = touchDelay + 10;<br> digitalWrite(led, HIGH);<br> delay(5);<br> digitalWrite(led, LOW);<br> }<br> }<br> }<br> // Read all touch sensor wires:<br> touched = false;<br> for (c=0; c<t; c++) {<br> reading[c] = touchRead(touch[c]);<br> if (reading[c]-base[c] > sensitivity) {<br> touched = true;<br> }<br> }<br> // Comparing and delays do not happen if sensors are untouched:<br> if (touched); {<br> if (reading[0]-base[0] > sensitivity && reading[1]-base[1] < sensitivity) { // Top Only<br> Mouse.scroll(fast);<br> }<br> if (reading[0]-base[0] < sensitivity && reading[1]-base[1] > sensitivity) { // Up Only<br> Mouse.scroll(slow);<br> delay(touchDelay);<br> }<br> if (reading[0]-base[0] > sensitivity && reading[1]-base[1] > sensitivity) { // Top and Up <br> Mouse.scroll(medium);<br> delay(touchDelay);<br> }<br> if (reading[2]-base[2] > sensitivity && reading[3]-base[3] < sensitivity) { // Down Only<br> Mouse.scroll(-slow);<br> delay(touchDelay);<br> }<br> if (reading[2]-base[2] < sensitivity && reading[3]-base[3] > sensitivity) { // Bottom Only<br> Mouse.scroll(-fast);<br> }<br> if (reading[2]-base[2] > sensitivity && reading[3]-base[3] > sensitivity) { // Bottom and Down<br> Mouse.scroll(-medium);<br> delay(touchDelay);<br> }<br> if (reading[4]-base[4] > sensitivity) { // Left<br> Keyboard.press(KEY_LEFT);<br> Keyboard.release(KEY_LEFT);<br> }<br> if (reading[5]-base[5] > sensitivity) { // Right<br> Keyboard.press(KEY_RIGHT);<br> Keyboard.release(KEY_RIGHT);<br> }<br> delay(Delay);<br> }<br><br>} -
Solid State Teensy Mouse Scroll Wheel
05/28/2014 at 09:38 • 0 commentsA solid state mouse wheel with no moving parts and proportional speed control.
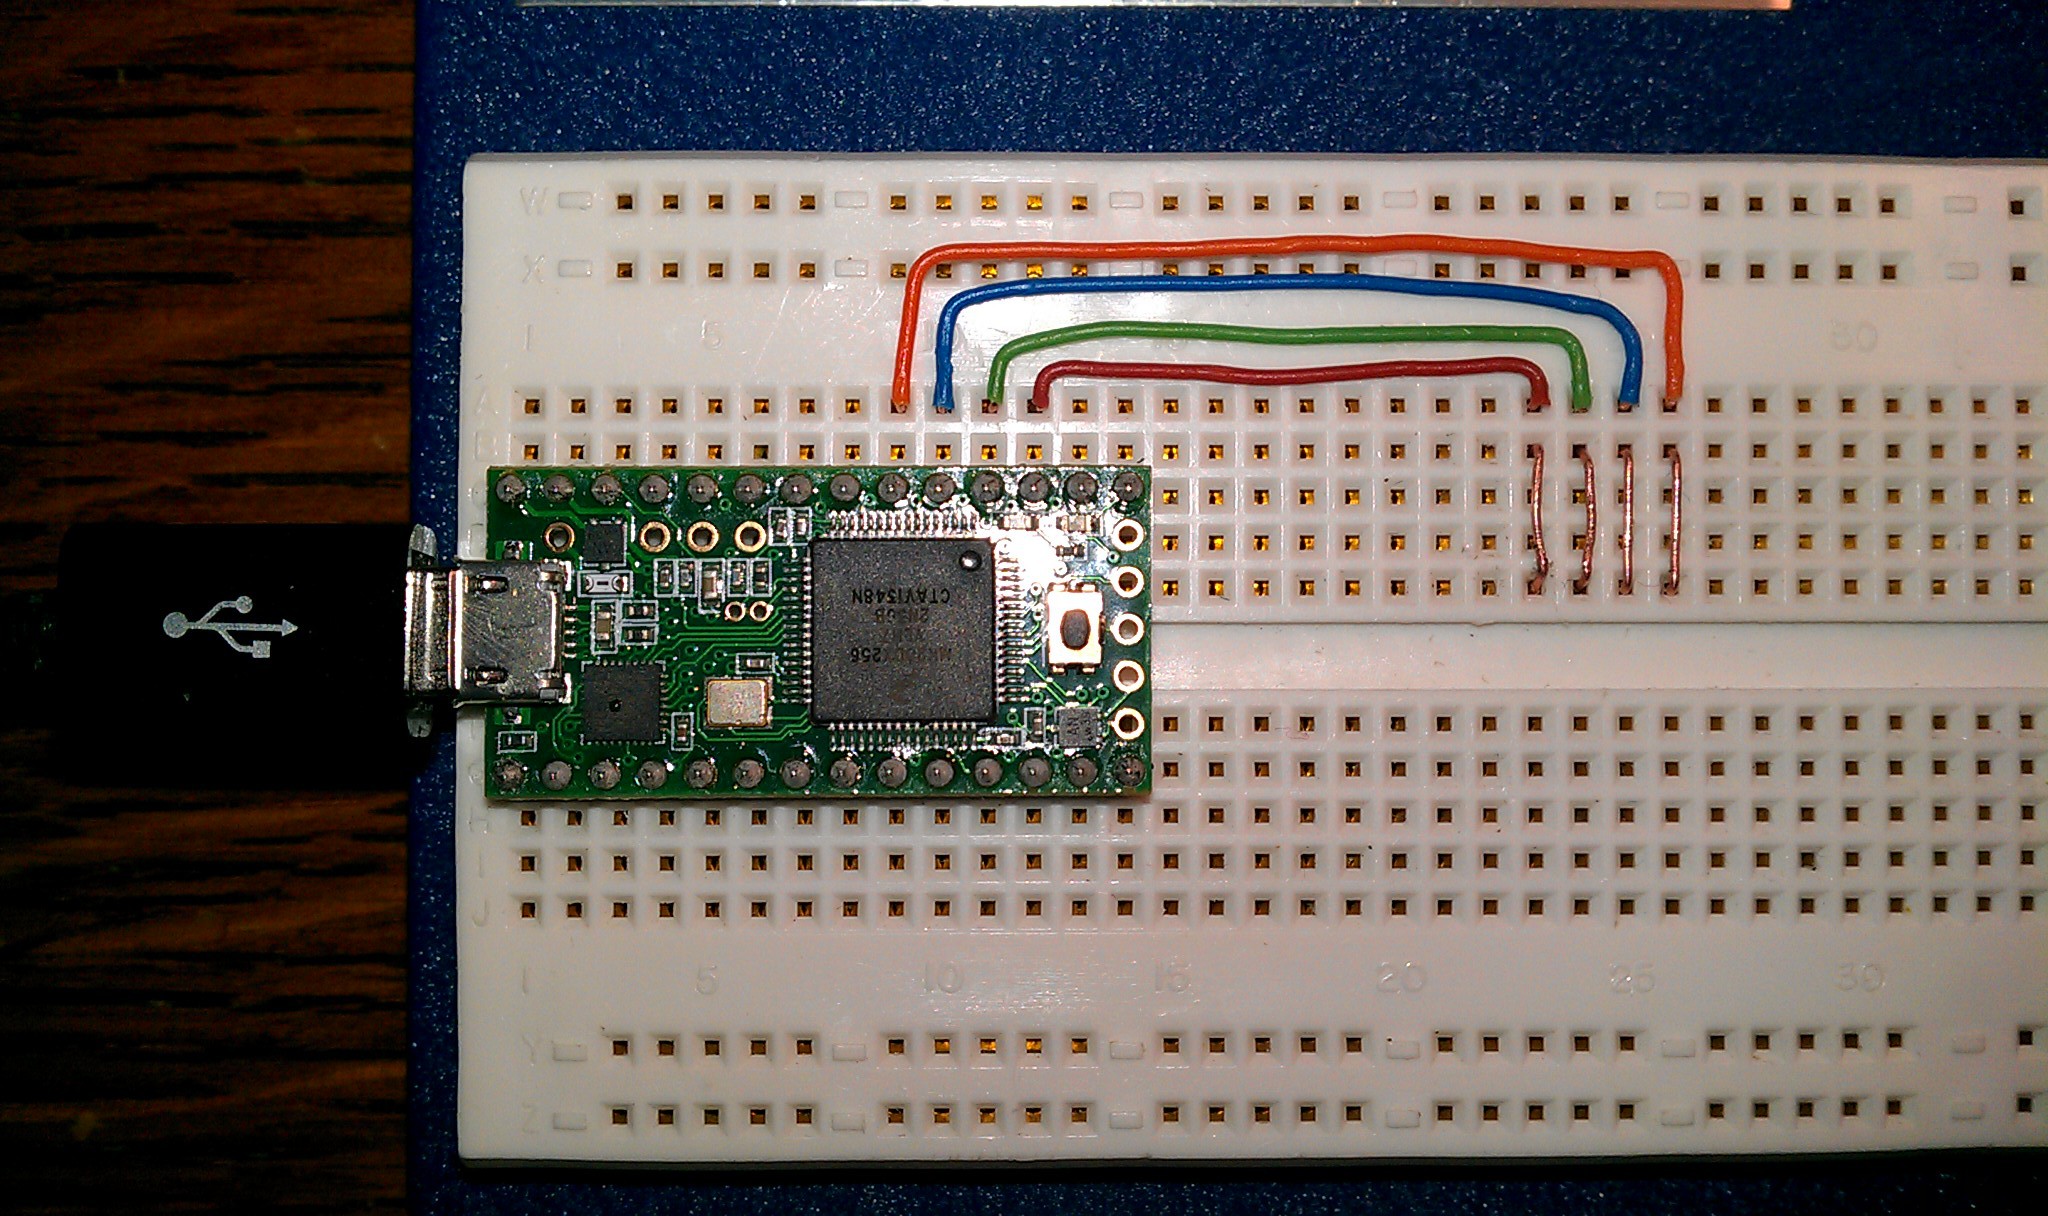
This is my first Arduino Sketch! (That wasn't copied, pasted and butchered from the internet.) It uses four of the touch sense pins on the Teensy 3.1 as a scroll wheel. This was a test and a good practice session while I wait for the last of the parts I ordered.
![]()
I cut and stripped four pieces copper wire, then shaped them like staples to plug into a breadboard. The four parallel bare wires make a sensor area to slide a finger up and down over.
![]()
The touch sensors detect finger direction and speed to control the scroll speed. The code can be adjusted for scroll increment and speed multiplier. This will this will fit nicely into my project later.
The code is amateur but I will continue to work on it. I had to keep removing more complex functions because the touch sensors are finicky. Later versions will be better.
-
Big Teensy Adventure!
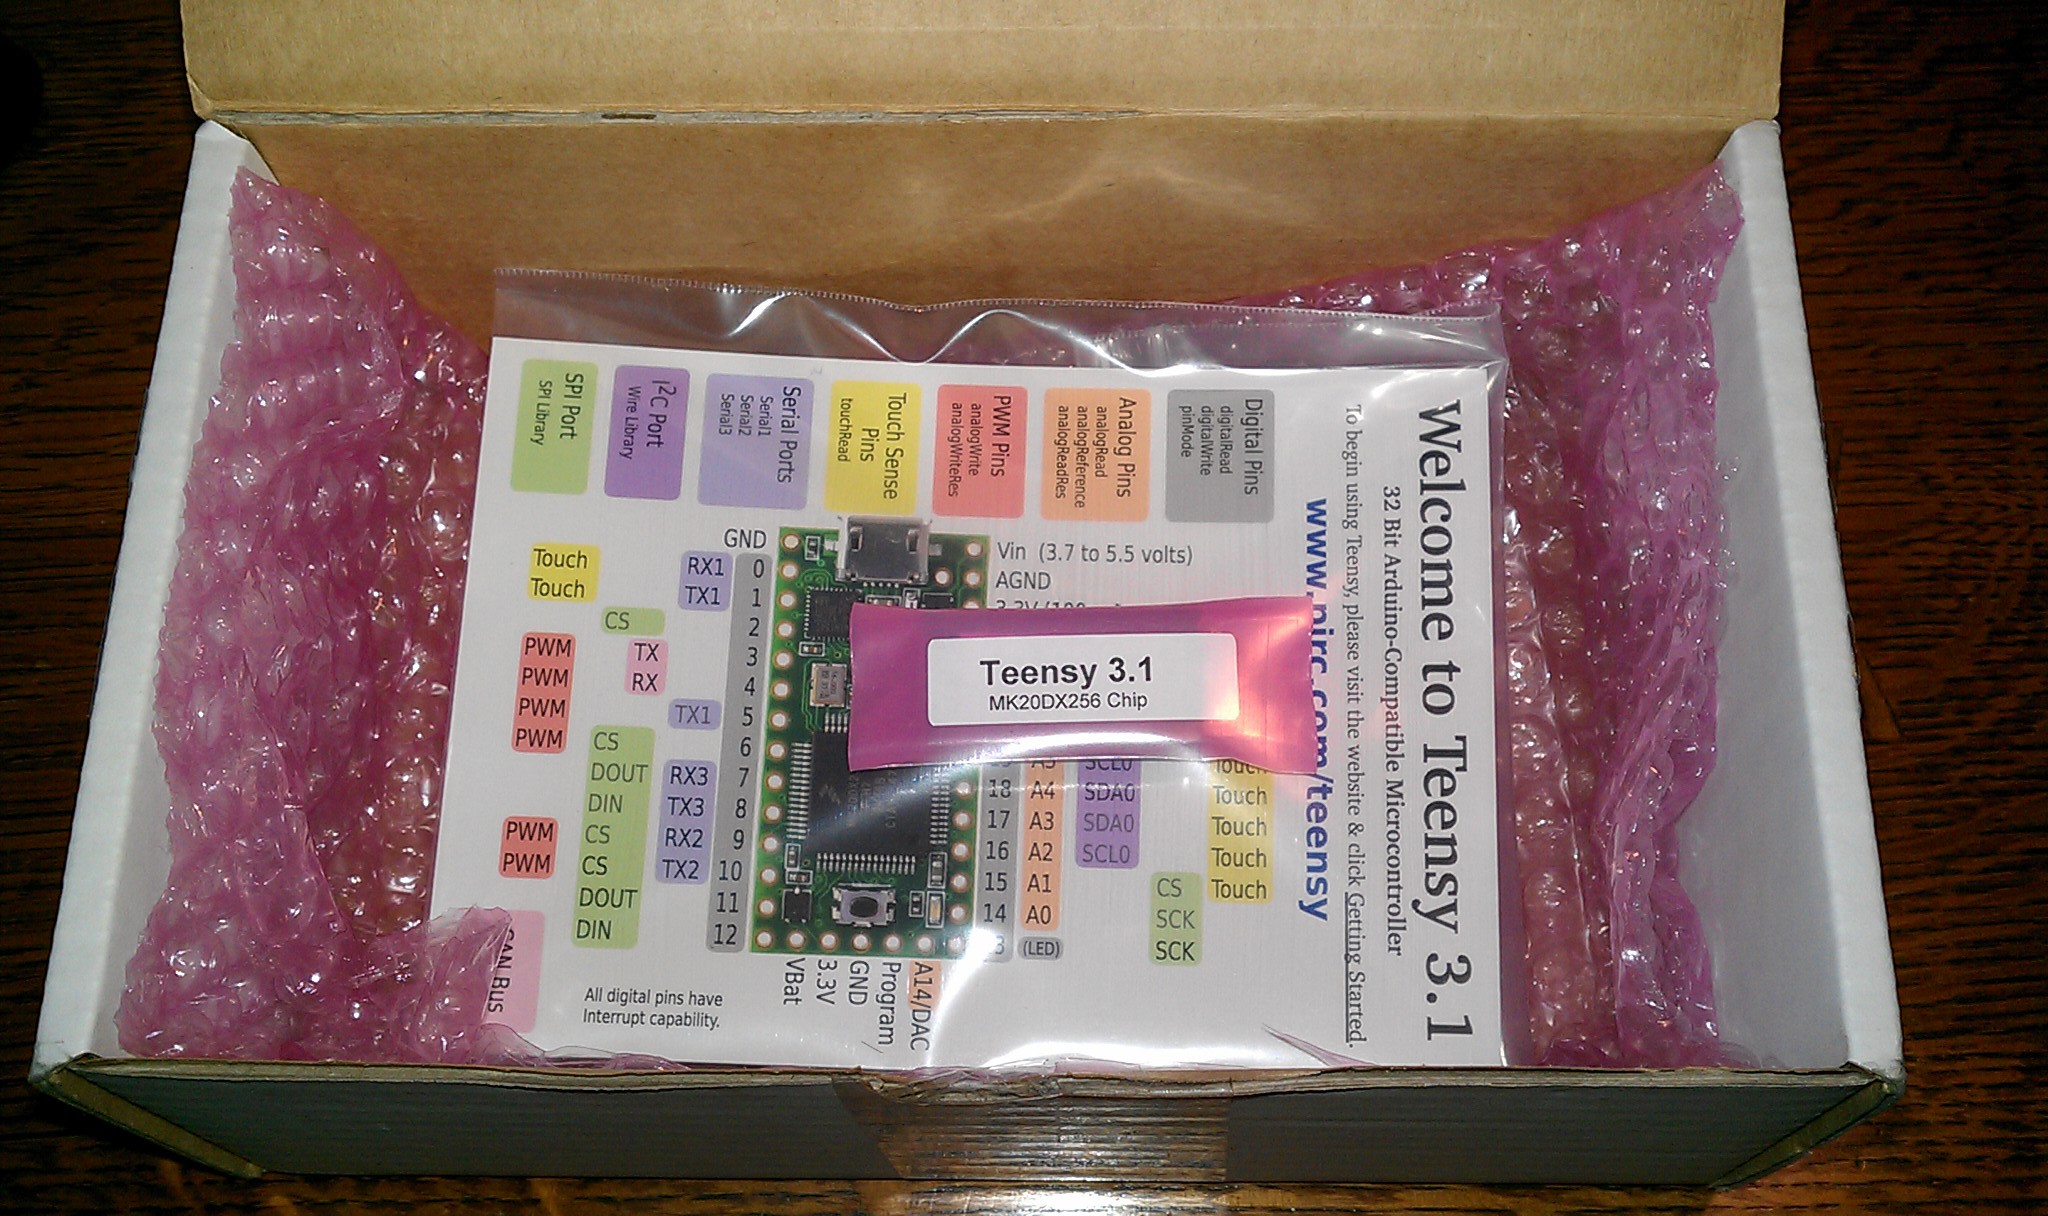
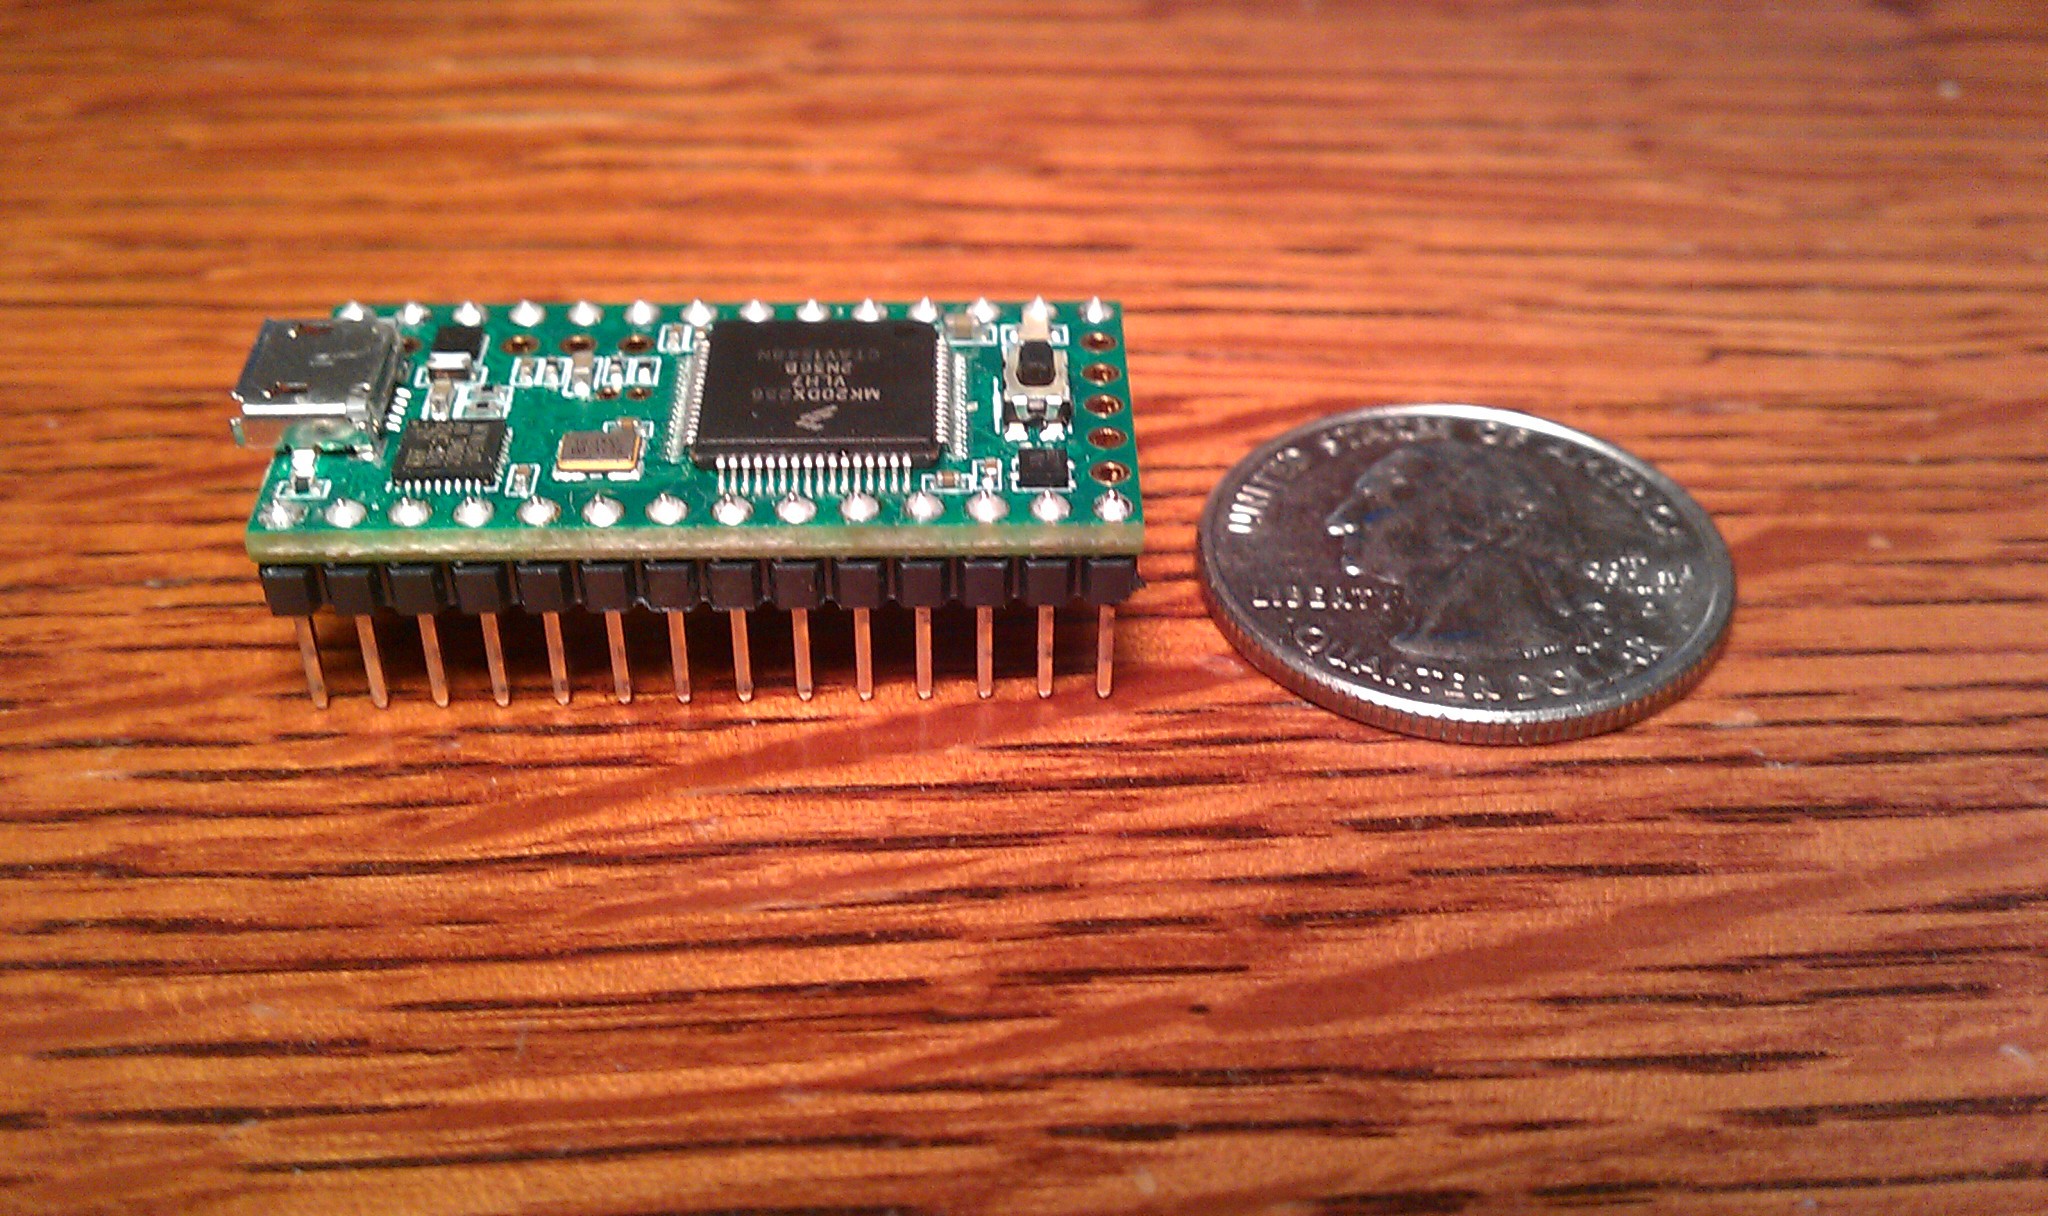
05/28/2014 at 07:50 • 0 commentsWelcome to the Teensy USB Development Board Bragging Project Log. My Teensy 3.1 was just delivered, and I love it so much that I am dedicating this project log to unboxing and testing.
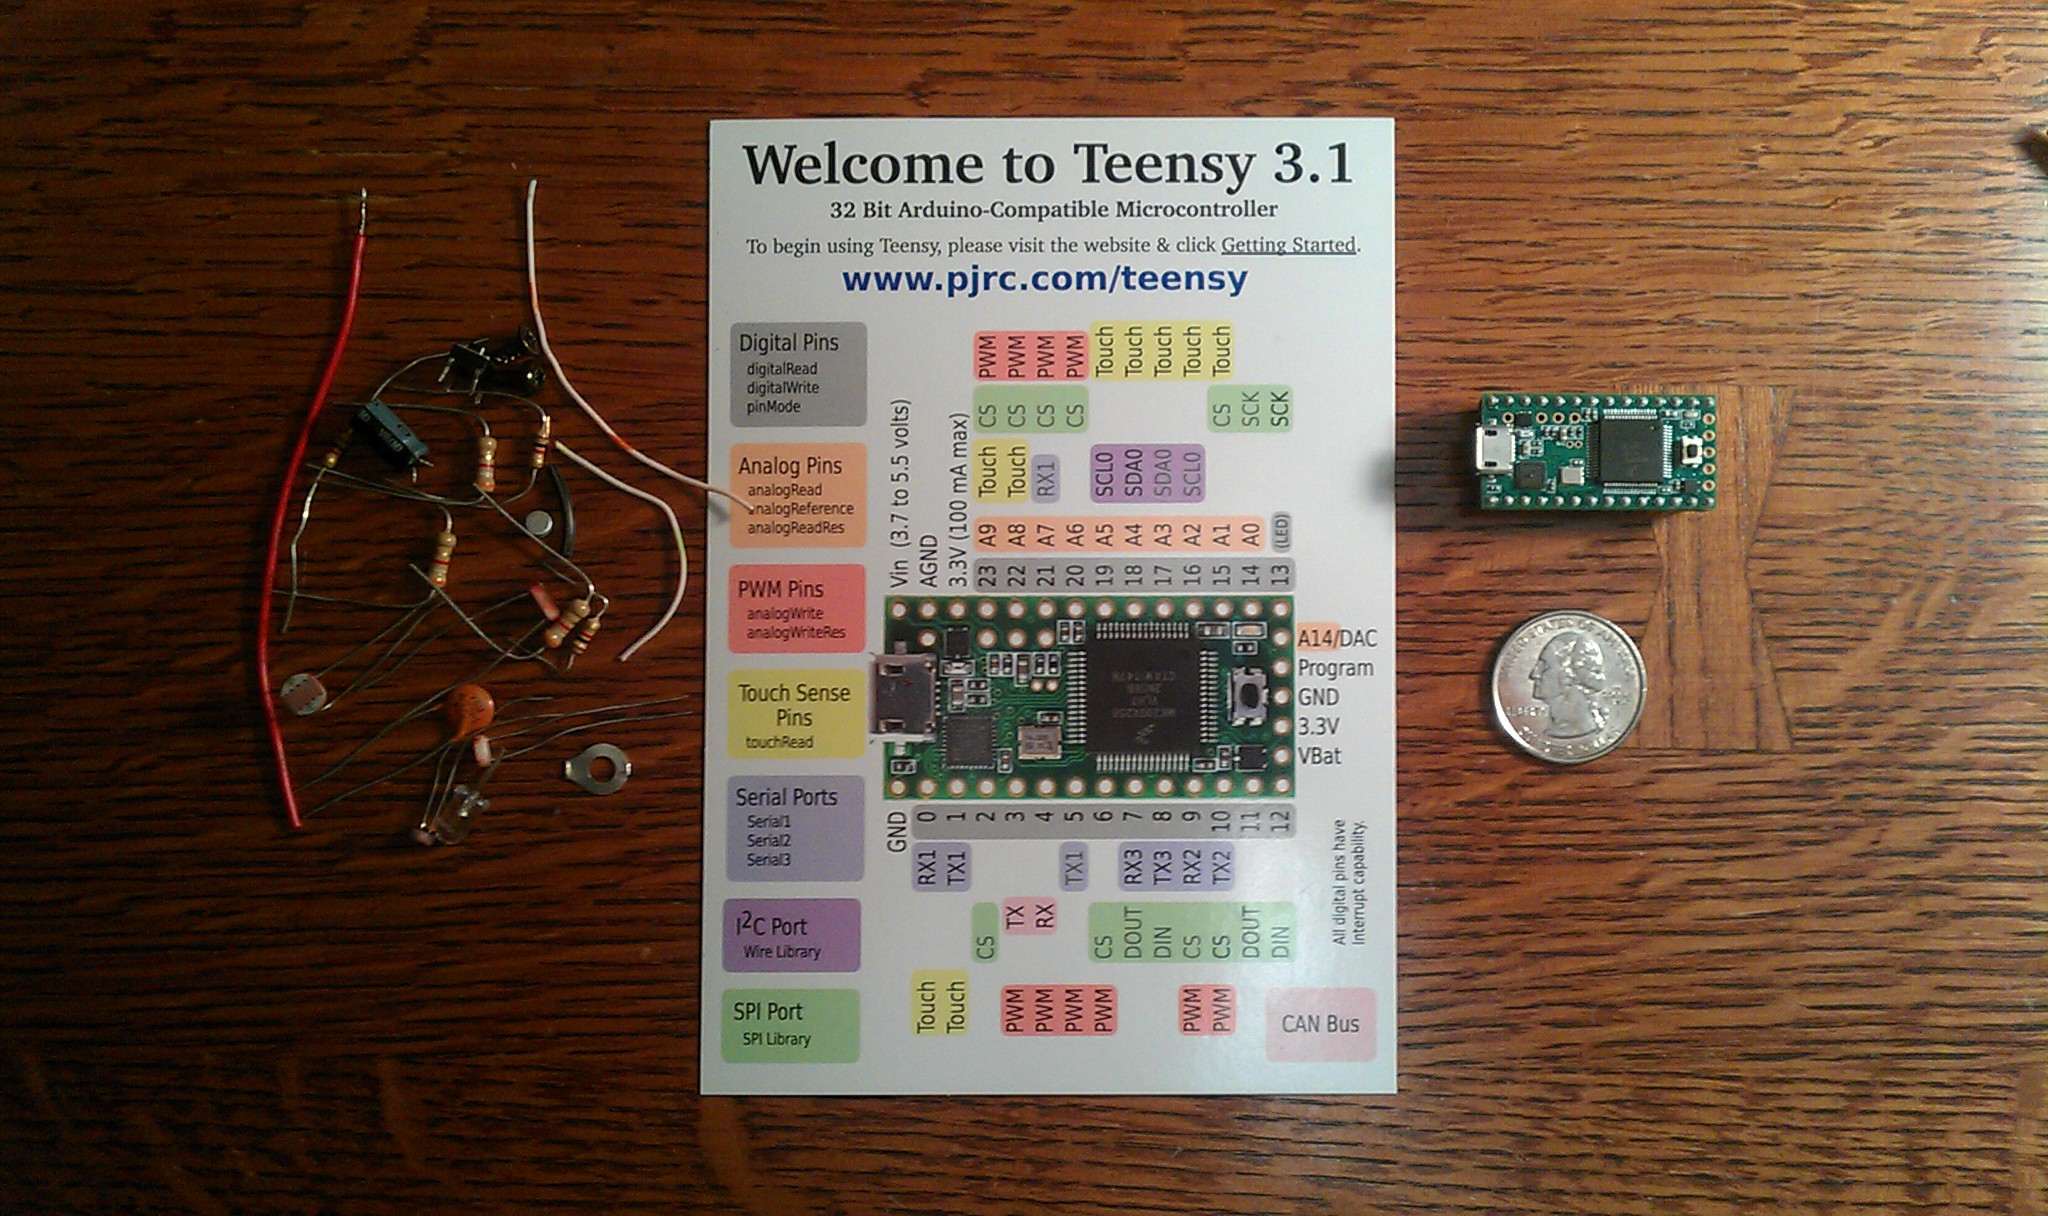
I ordered it direct from pjrc.com. Pictured below it arrived in its shipping box with plenty of packing, The contents were simple, just the Teensy, an invoice, and a laminated pinout card that was super handy on my desk.
![]()
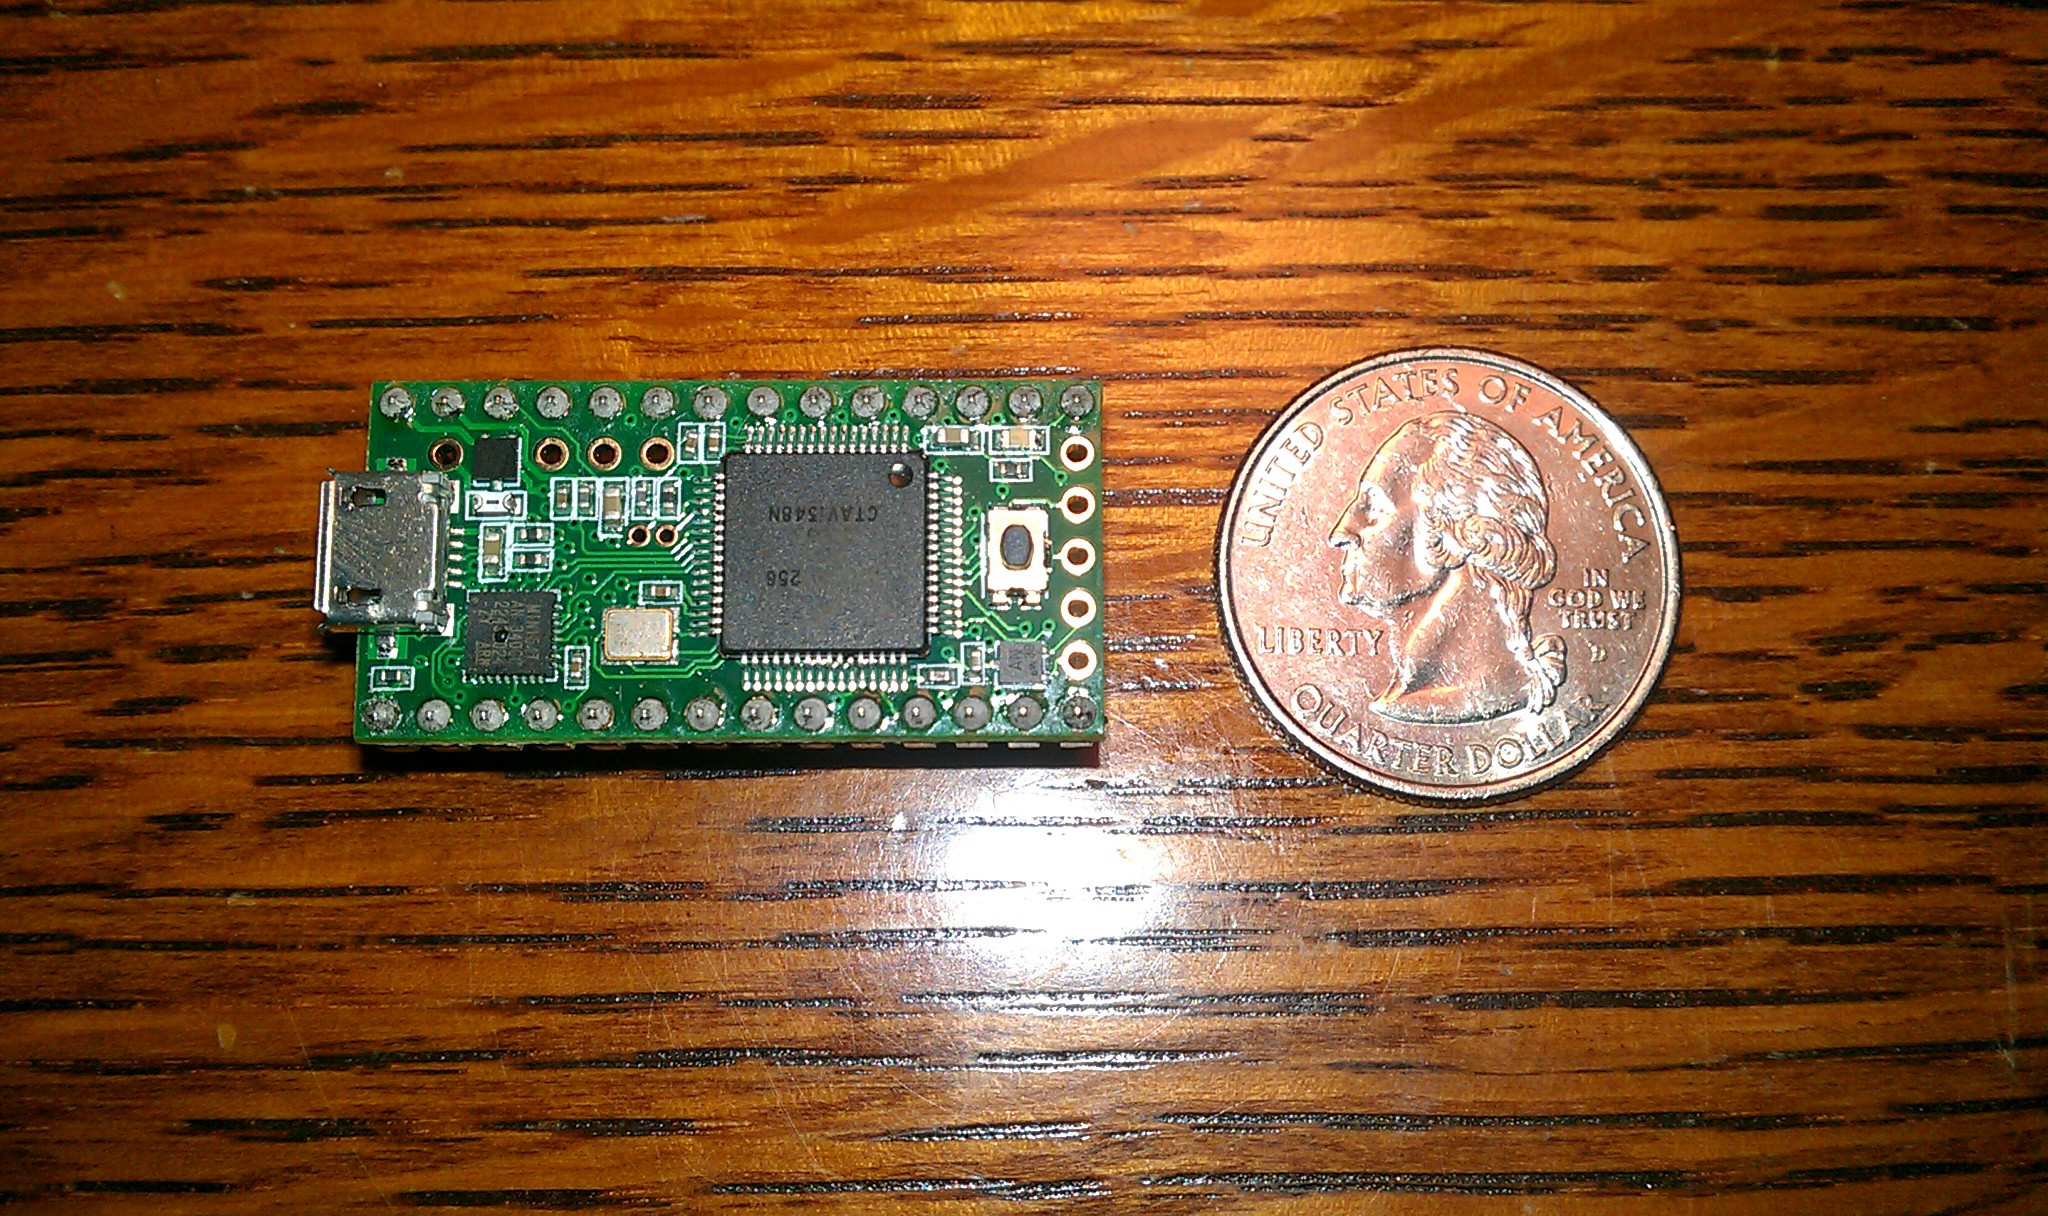
It is even more surprisingly teensy in real life. The size makes me think of concealing it in with other objects, like a TV remote, mouse, keyboard, multimeter, hard drive enclosure, or anything that has a little extra room inside it.
![]()
![]()
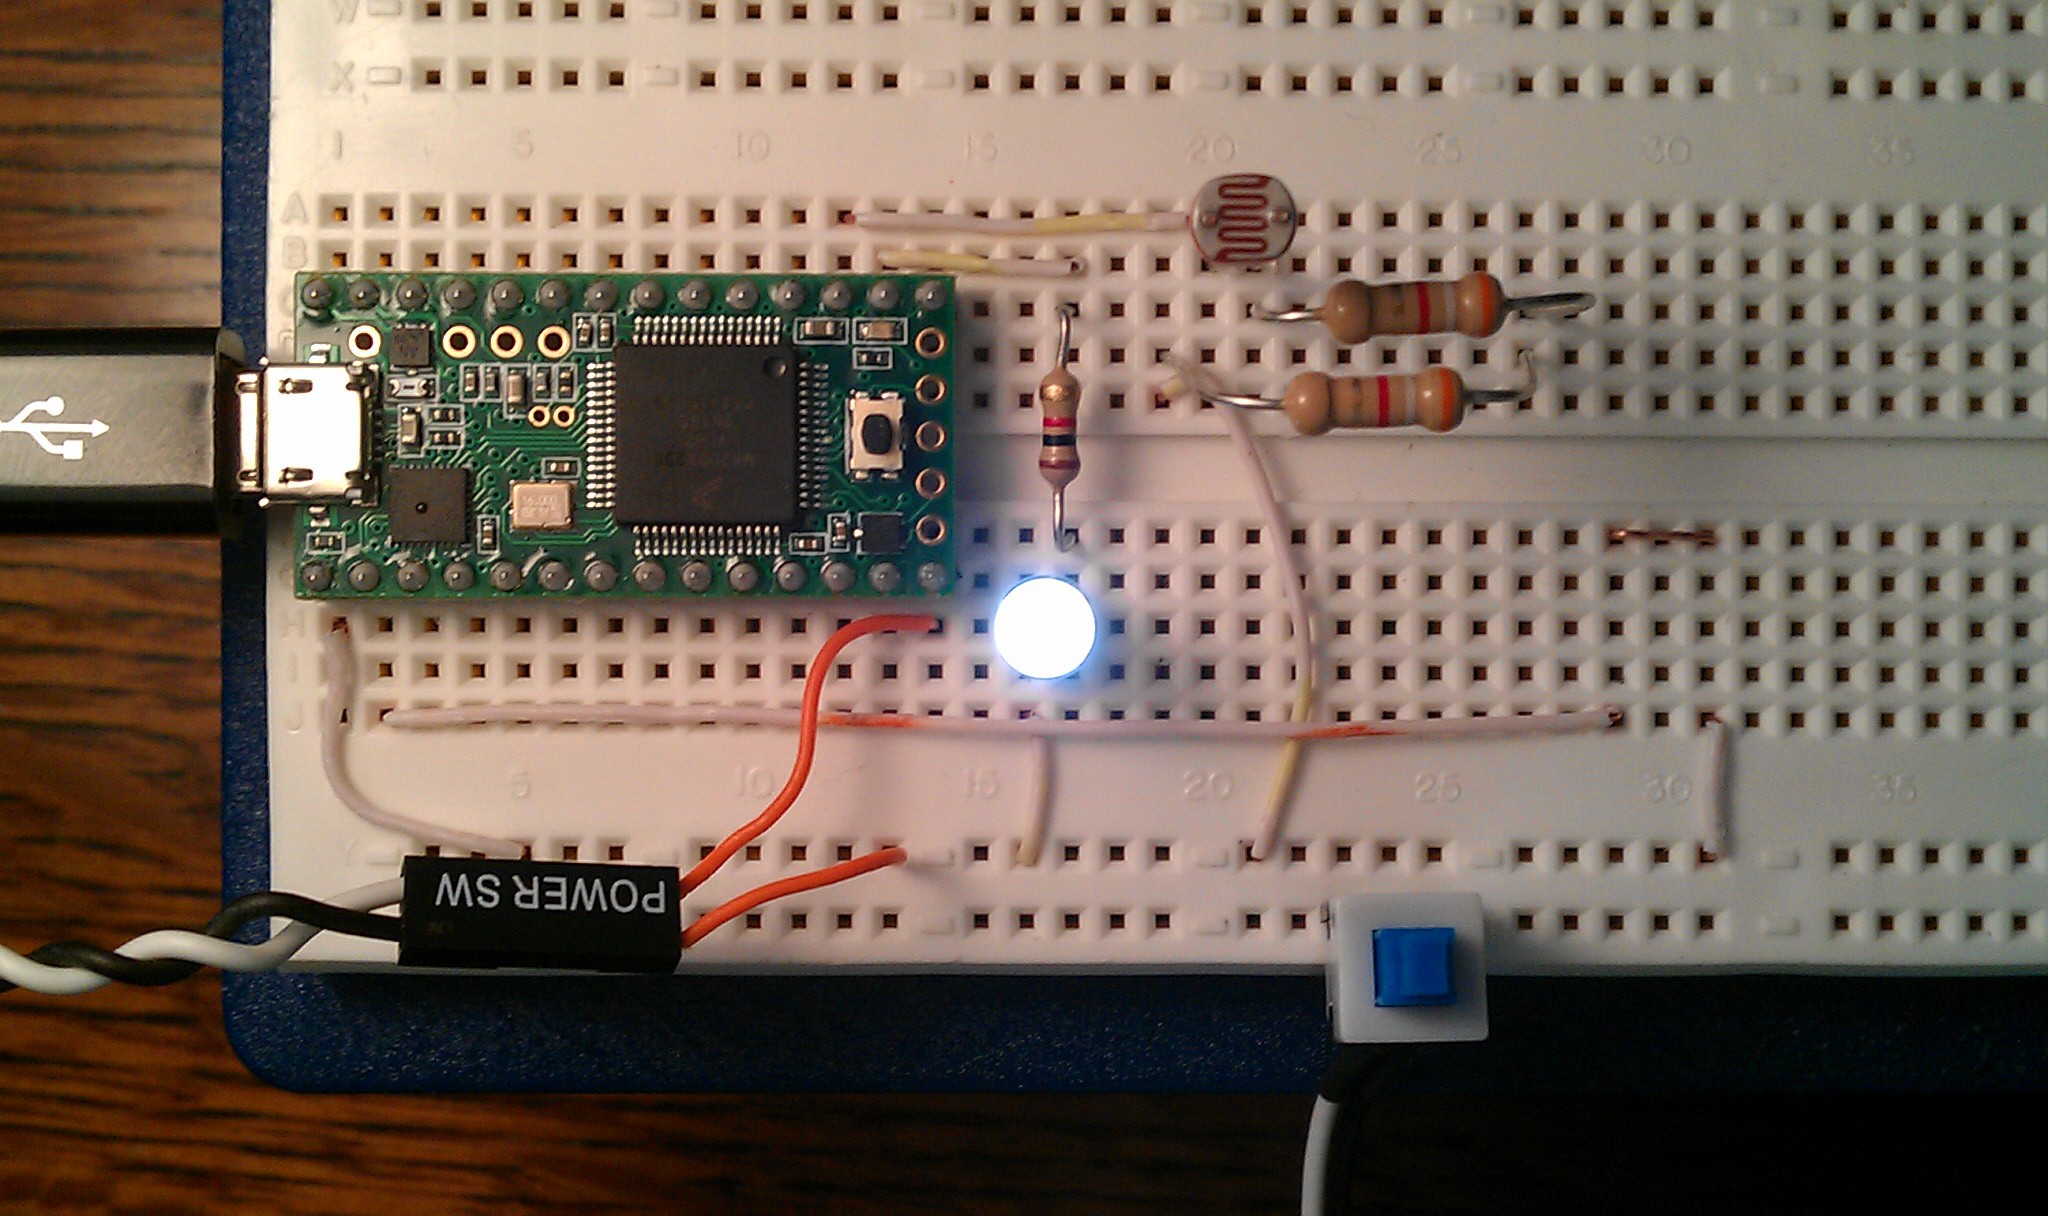
I ordered it with the pins already soldered on, so getting setup was really easy. I plugged it in my breadboard, found a USB cord and downloaded the software; Arduino 1.0.5 for Windows7, and teensyduino 1.18. I also had a multimeter and some scavenged electronic parts.
![]()
![]()
To get started, all I did was read the tutorials at pjrc.com, visited the forum, and skimmed thorough the getting started and reference at arduino.cc. After that I was copying and butchering code like a pro, and made more than a dozen working circuits and sketches all in a day. Pictured below is an LED toggled on or off by a momentary switch, the wave of a hand over a photoresistor, or the touch of a wire attached to one of the touch sensors.
![]()
While browsing the pjrc forum, I found a problem that could have killed my project. Paul was already working on it and has quickly posted a patch that solves all of my problems. This is going to be perfect for my mouse project.
Overall first impressions: easy to setup, easy to use, great support, very small and inexpensive. I would highly recommend it.
-
Ordered Parts
05/19/2014 at 19:09 • 1 commentI always try to get supplies free, used, and local first, but that was useless. I had to resolve to purchase what I needed online. Now I need to pretend to be patient while I wait for shipping.
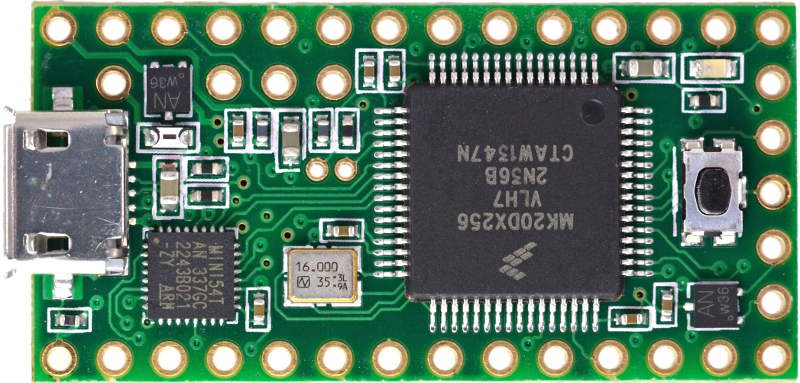
I ordered the Teensy 3.1 USB Development Board from PJRC.com. It may be overkill for this project, but I plan to have other fun with it (promise!:)
![]()
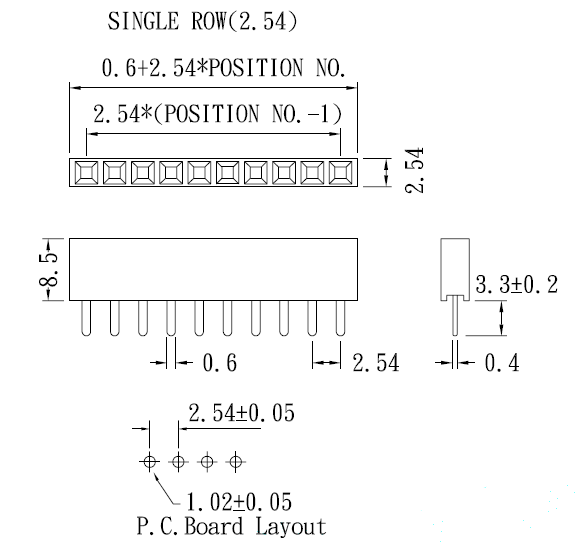
I ordered female headers from Futurlec.com. They not only had good prices, they had pictures and datasheets with the exact measurements I was looking for. Part number FHEADS40 - “40 Pin 0.100 Straight Female Single Headers” for only 35 cents each. Plus some other sizes.
![]()
I also ordered some jumpers and switches from Adafruit. I promise to get all the part numbers and details caught up later.
-
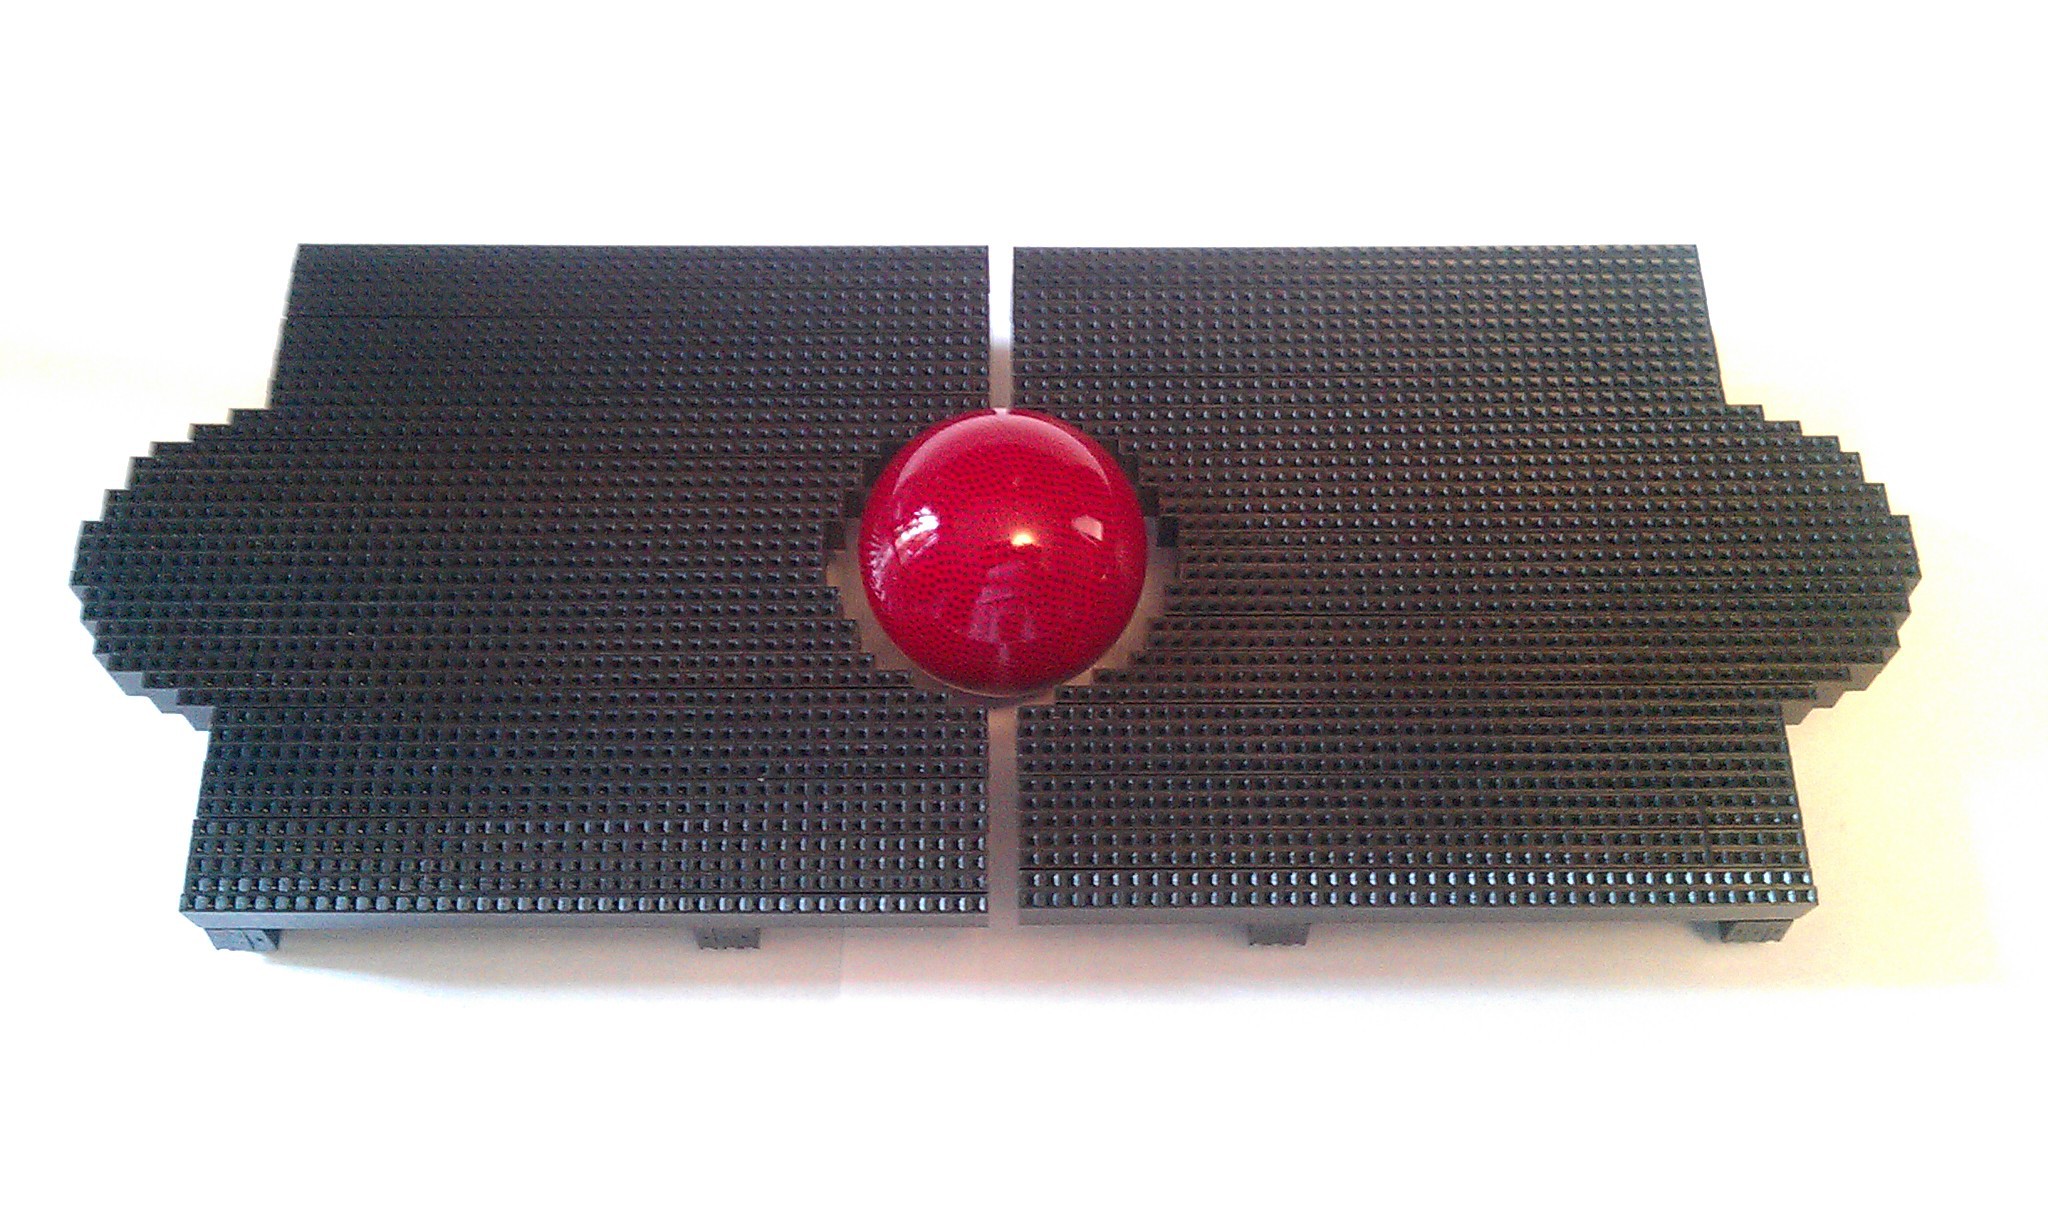
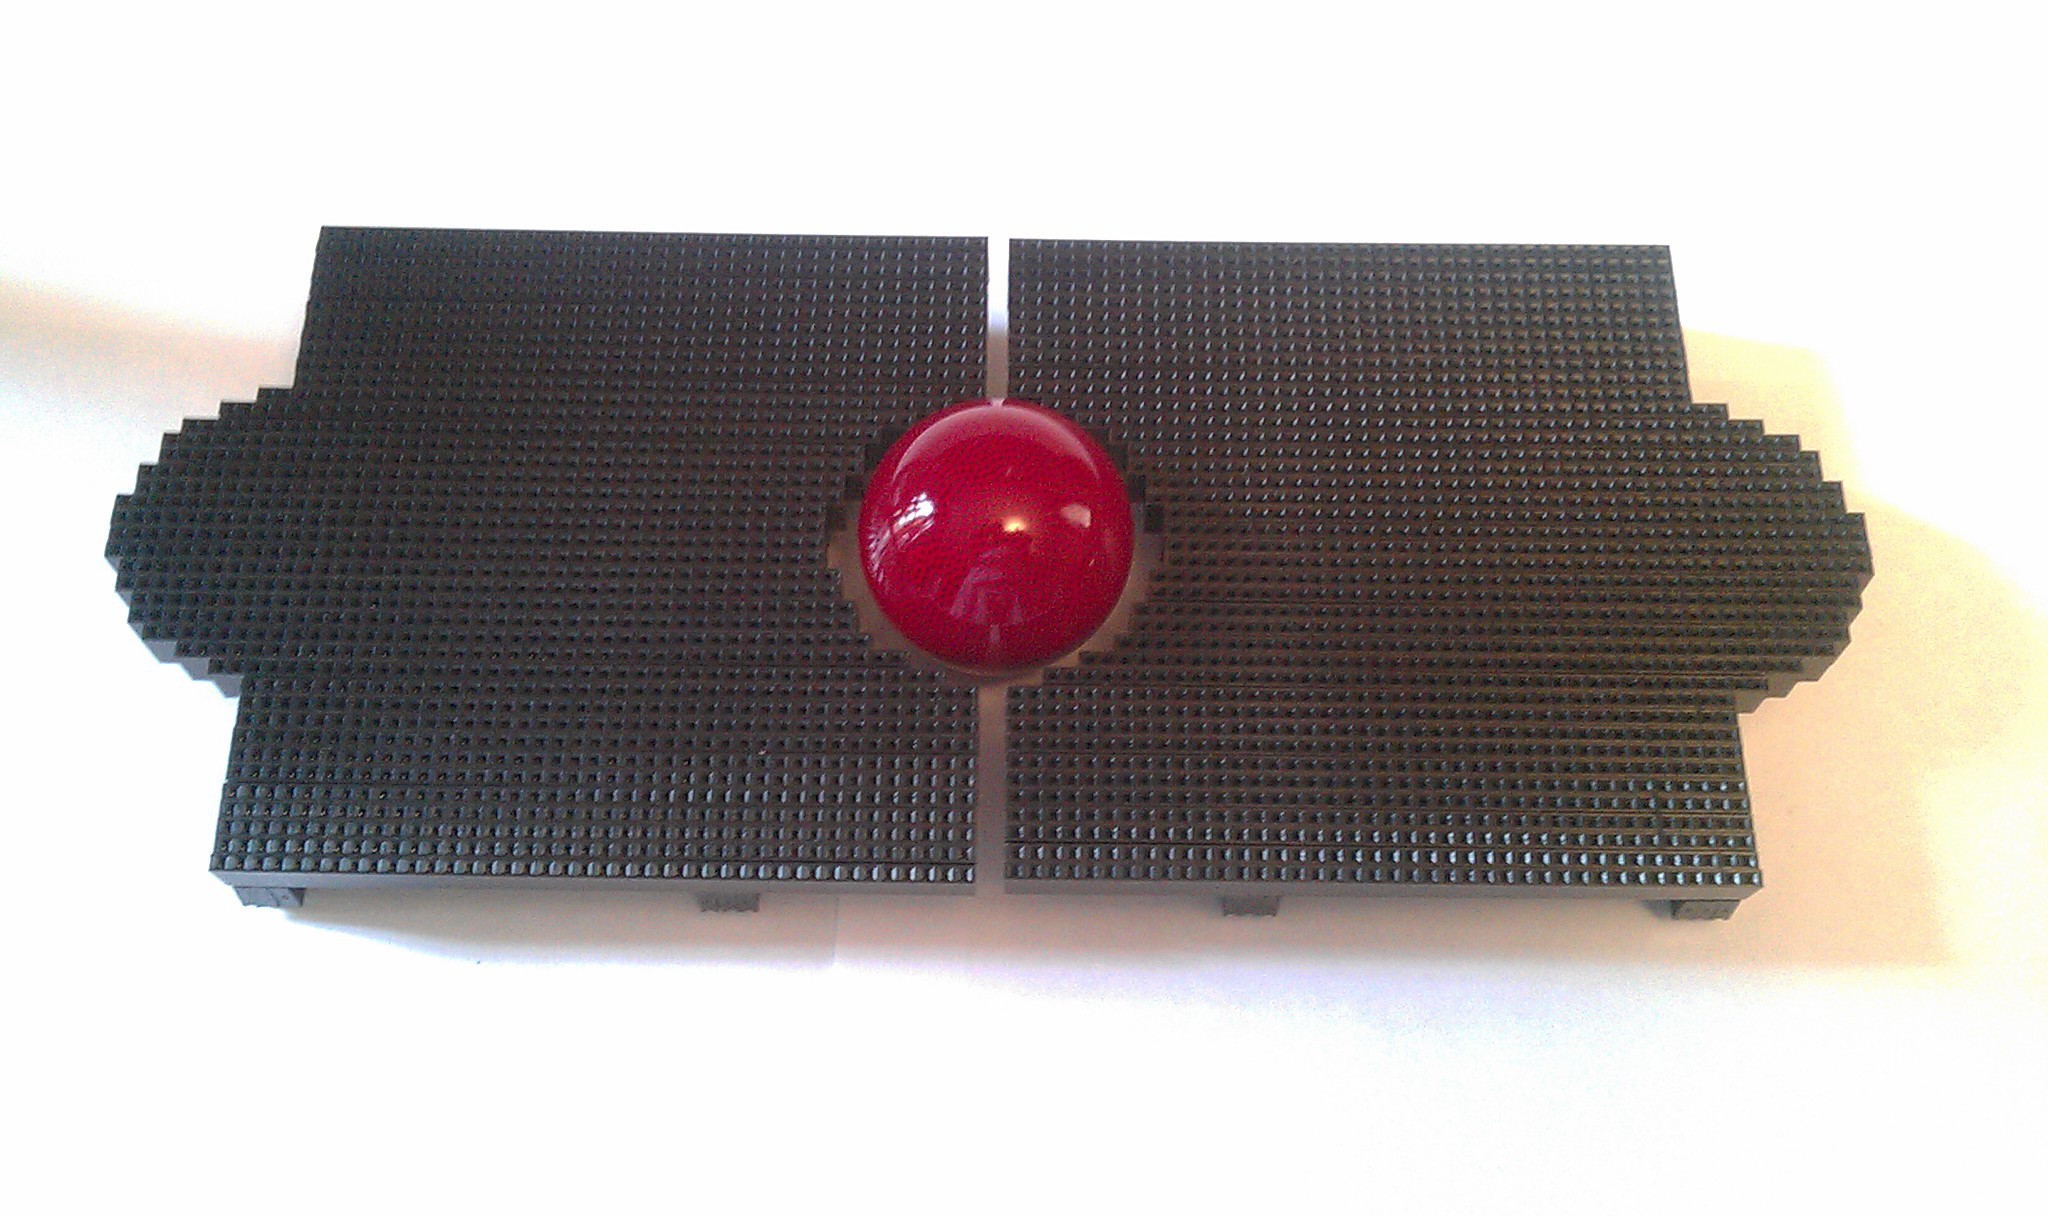
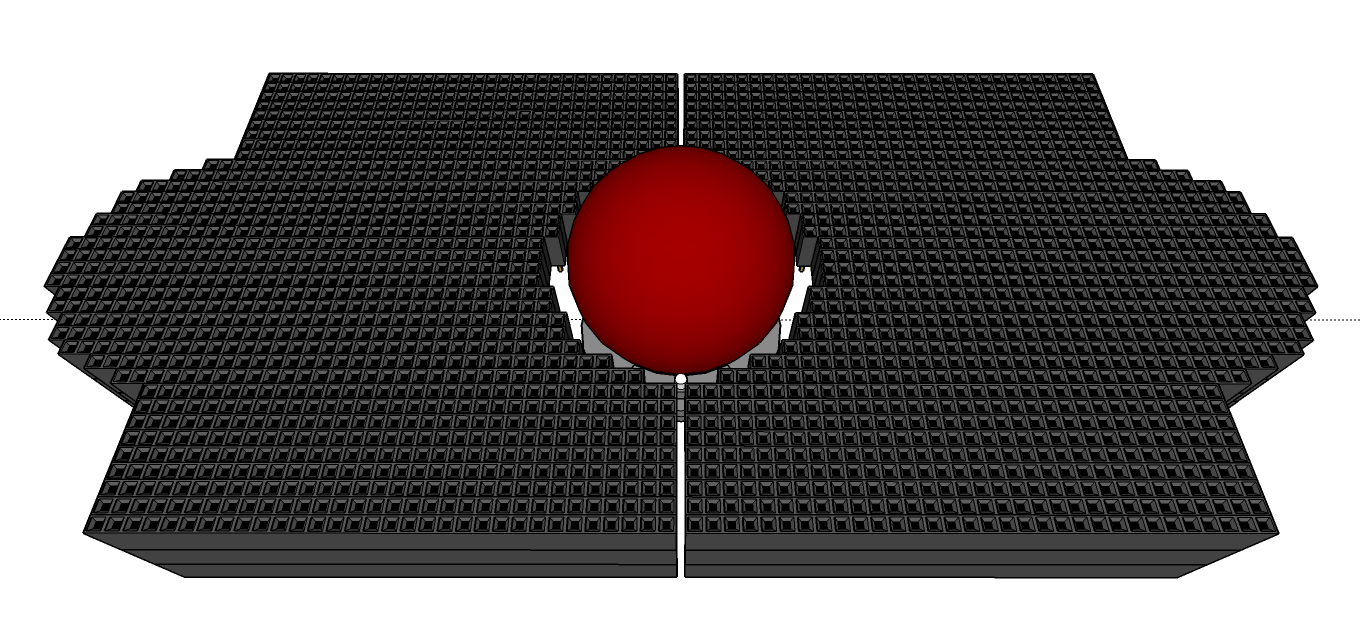
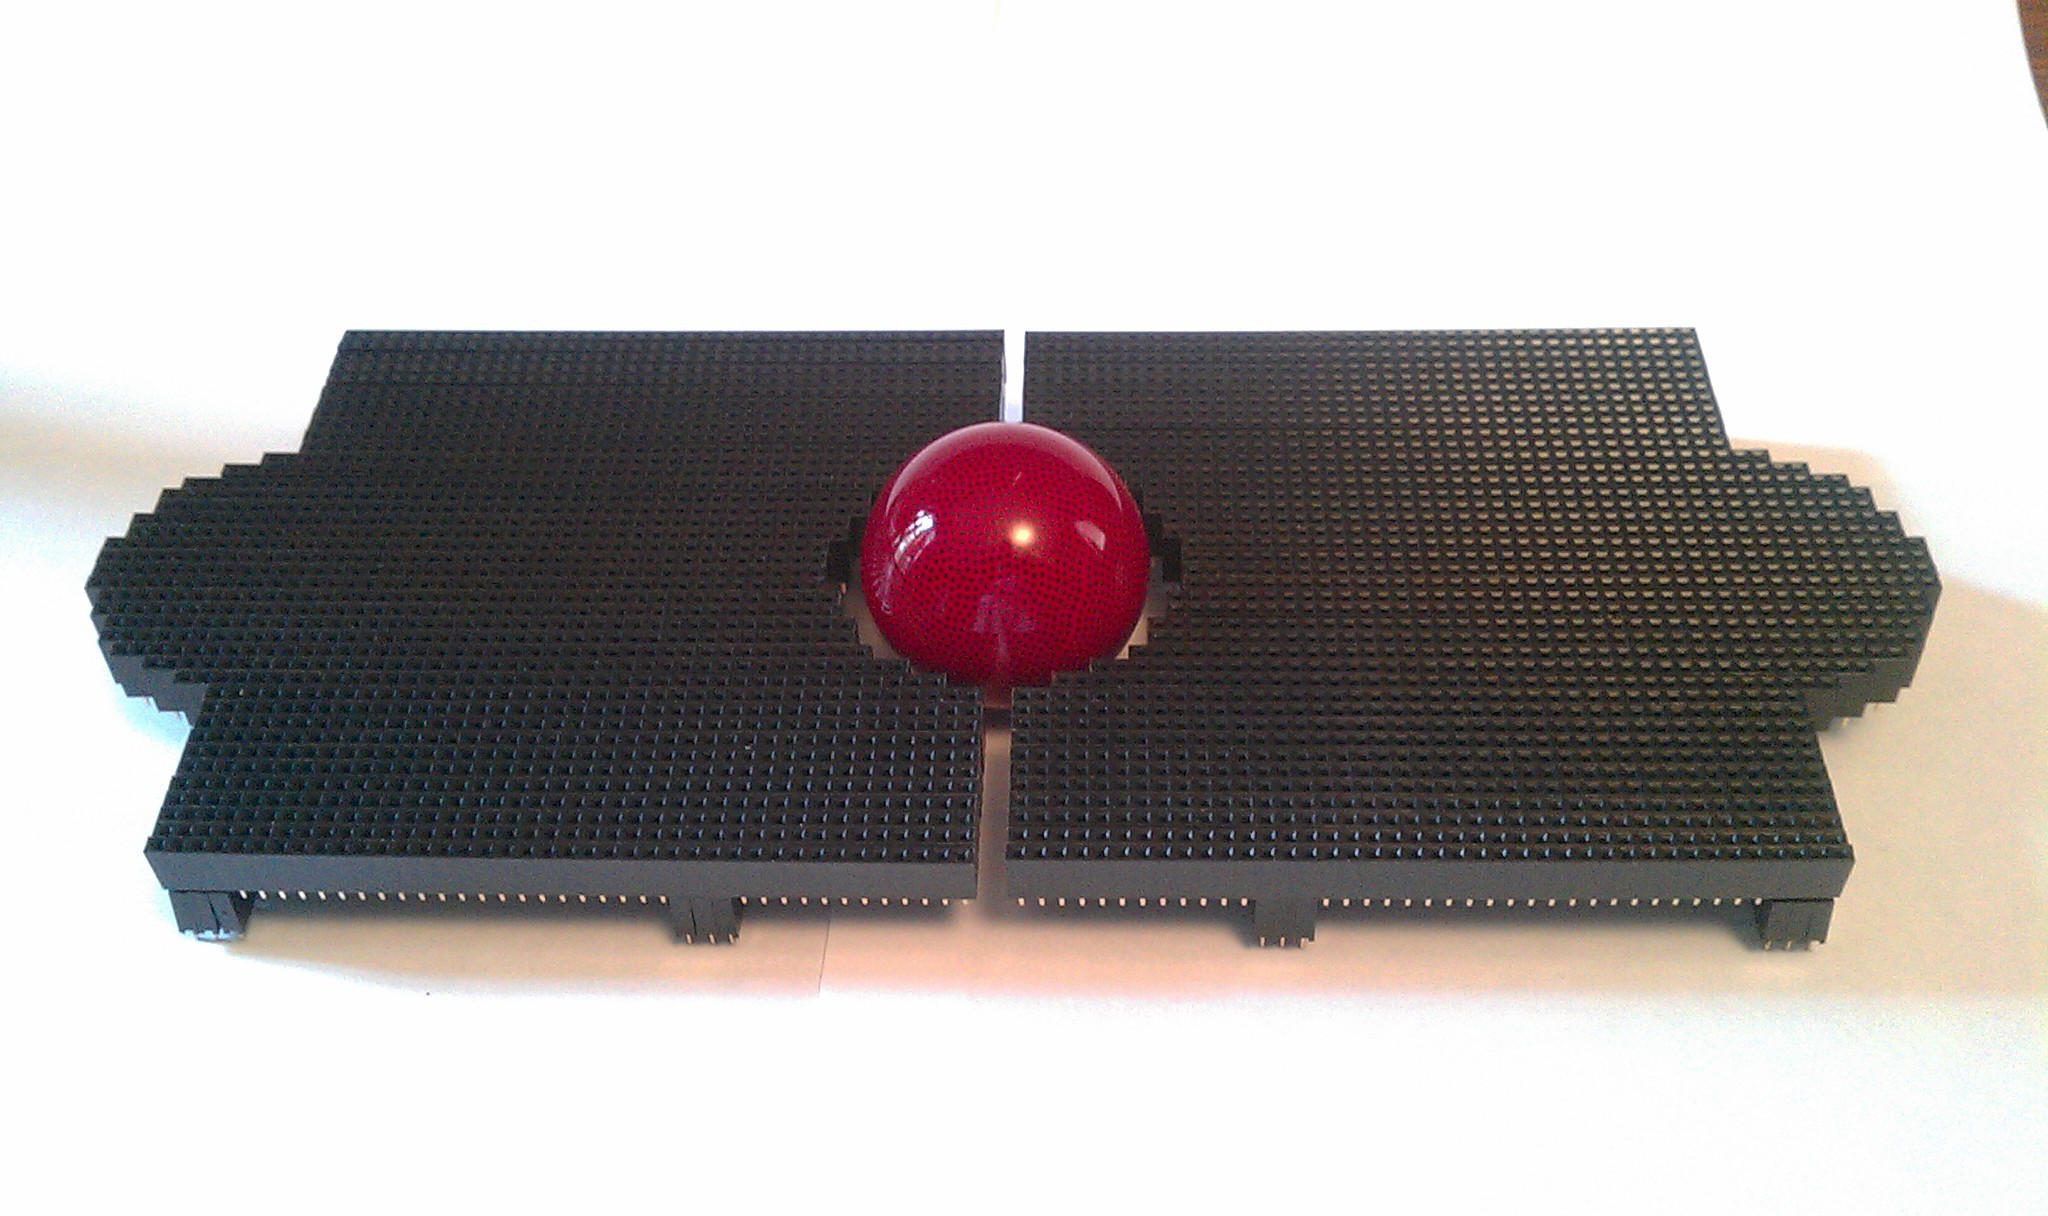
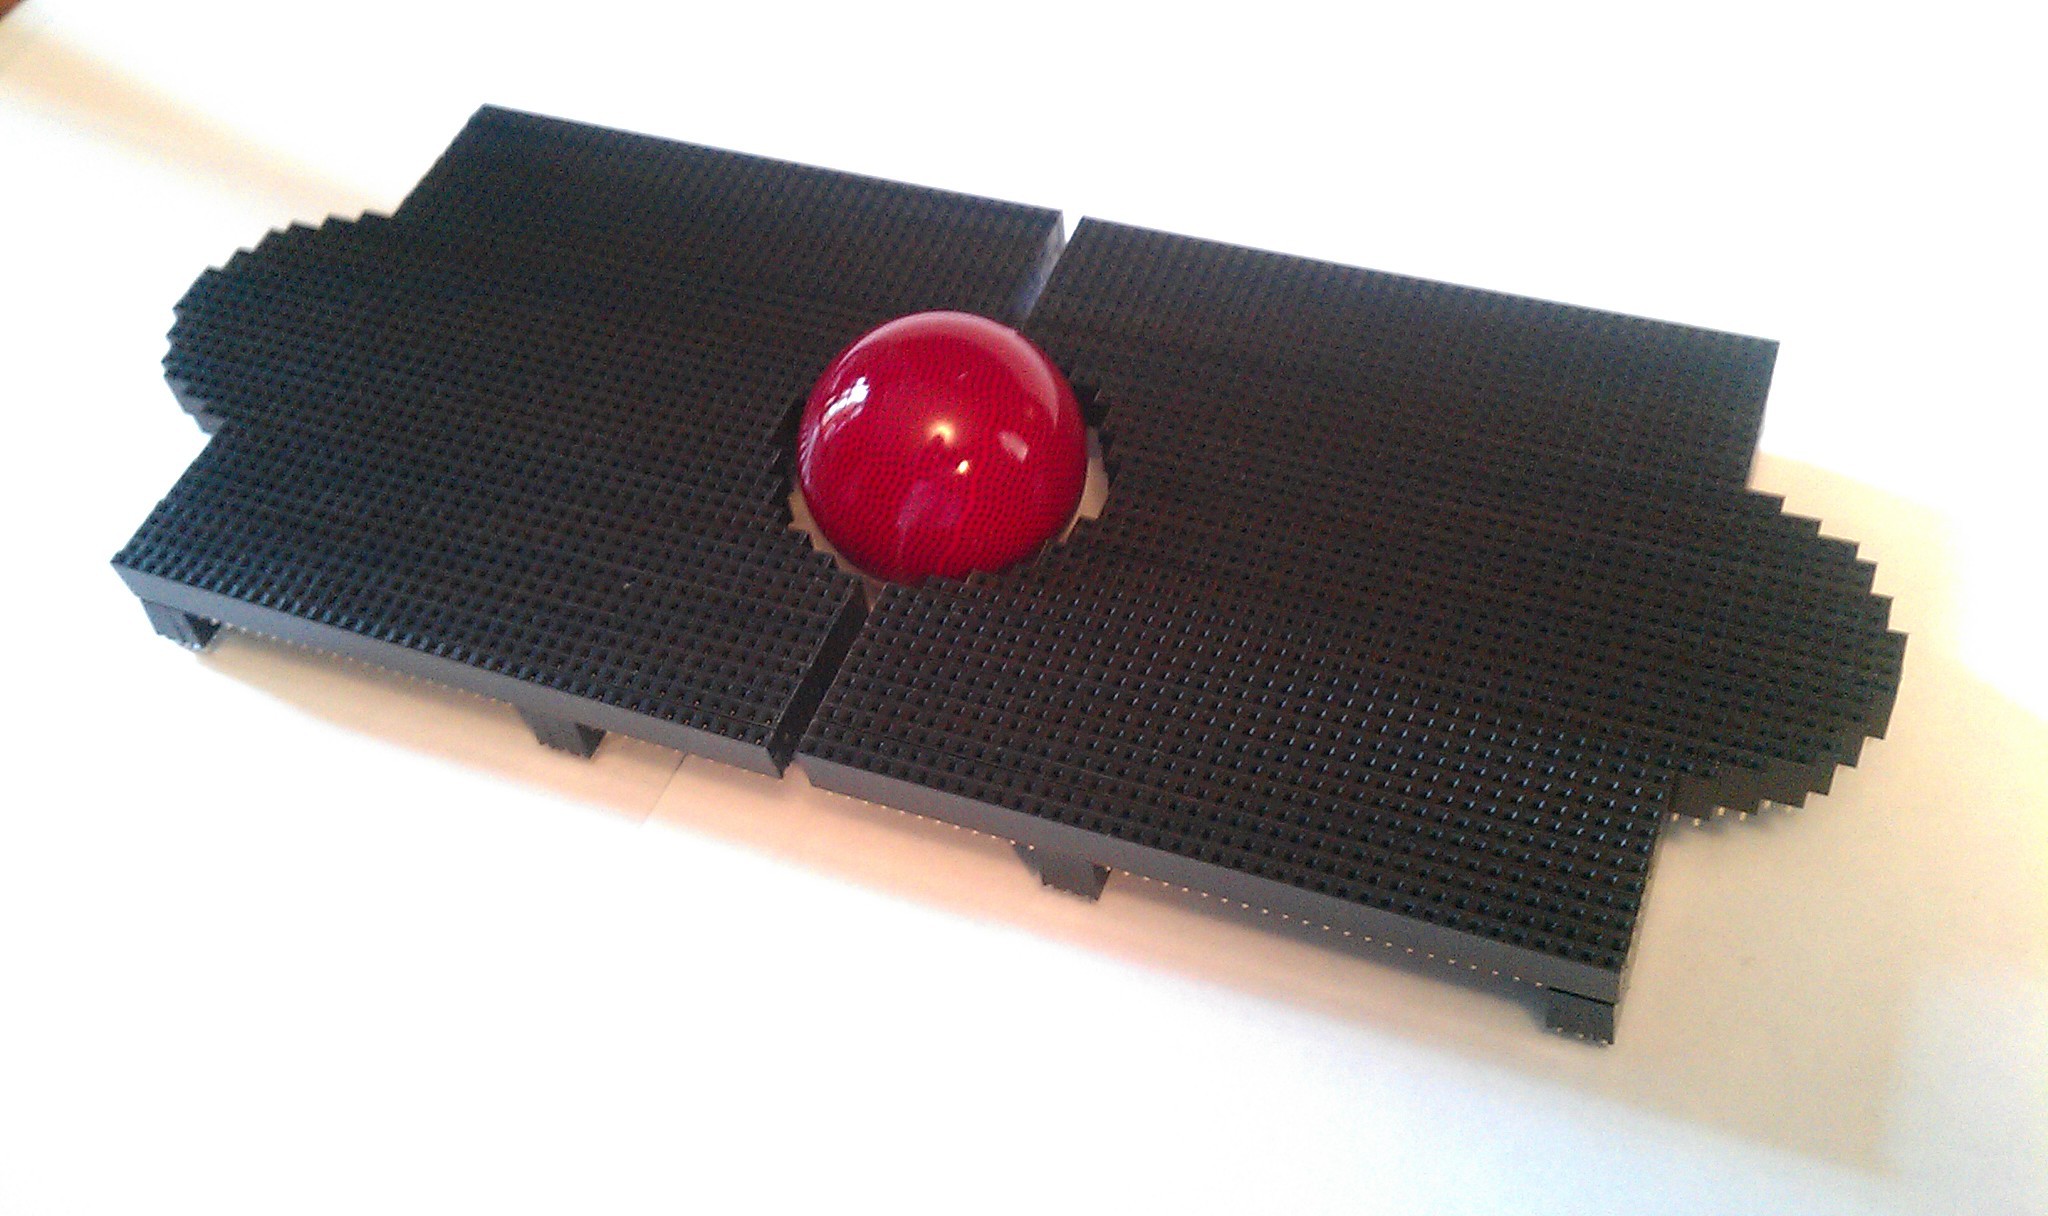
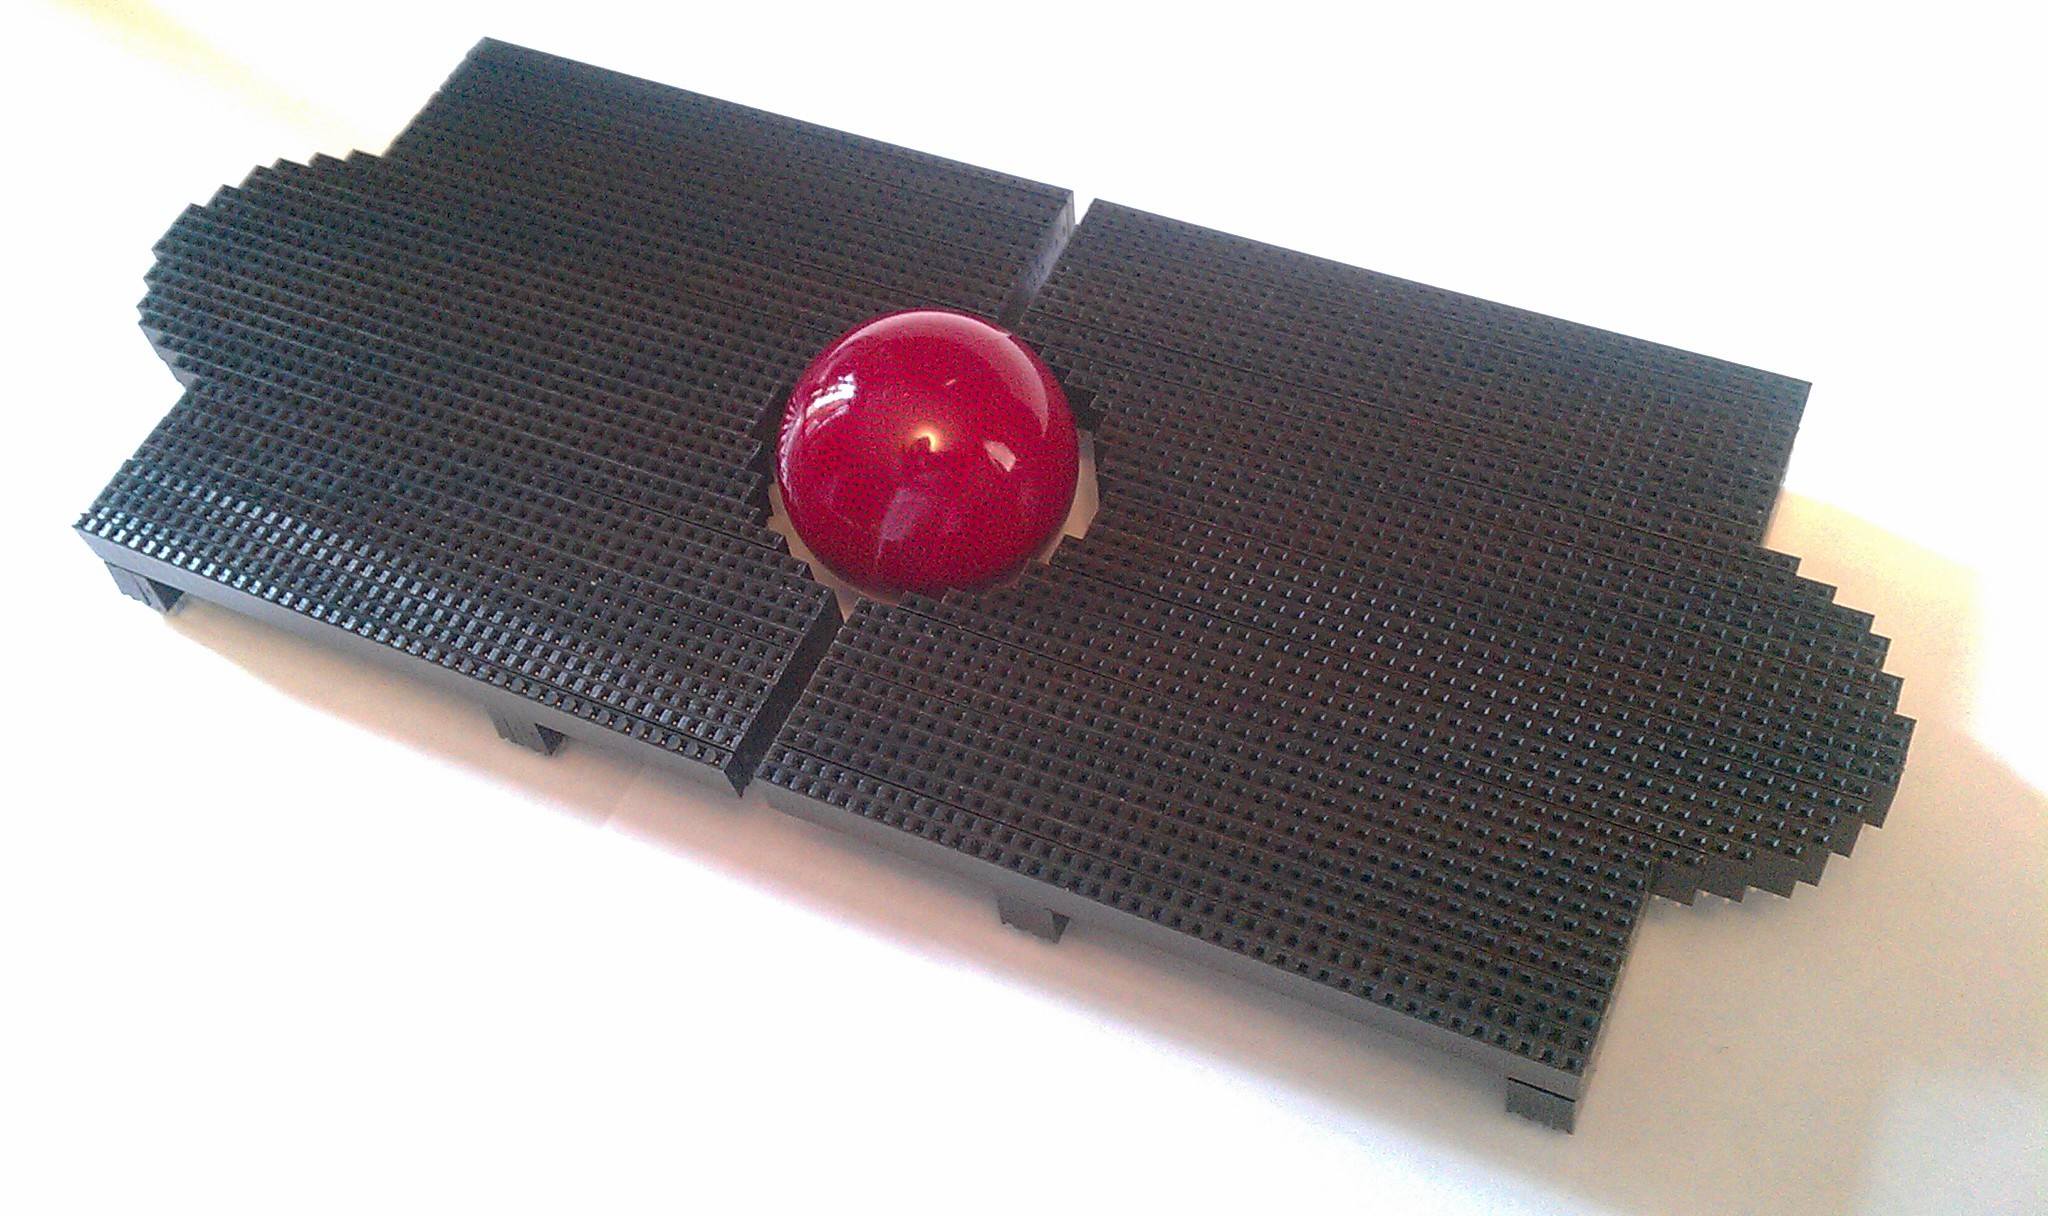
The Prototyping Mouse
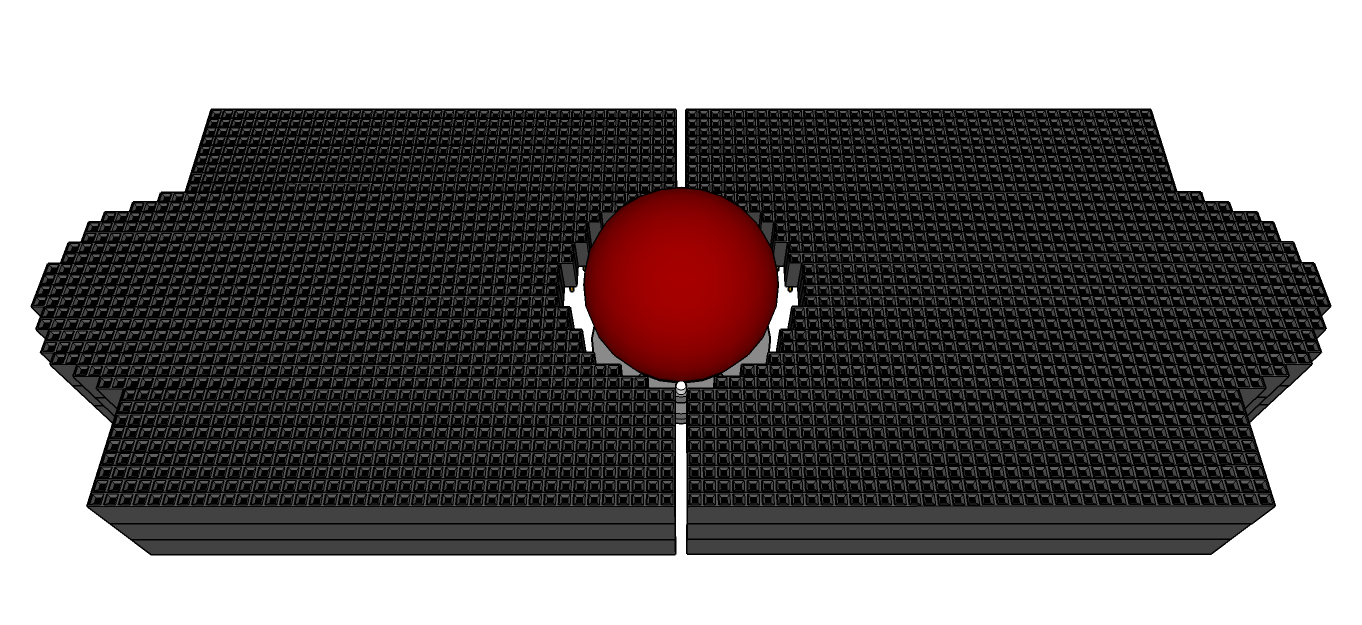
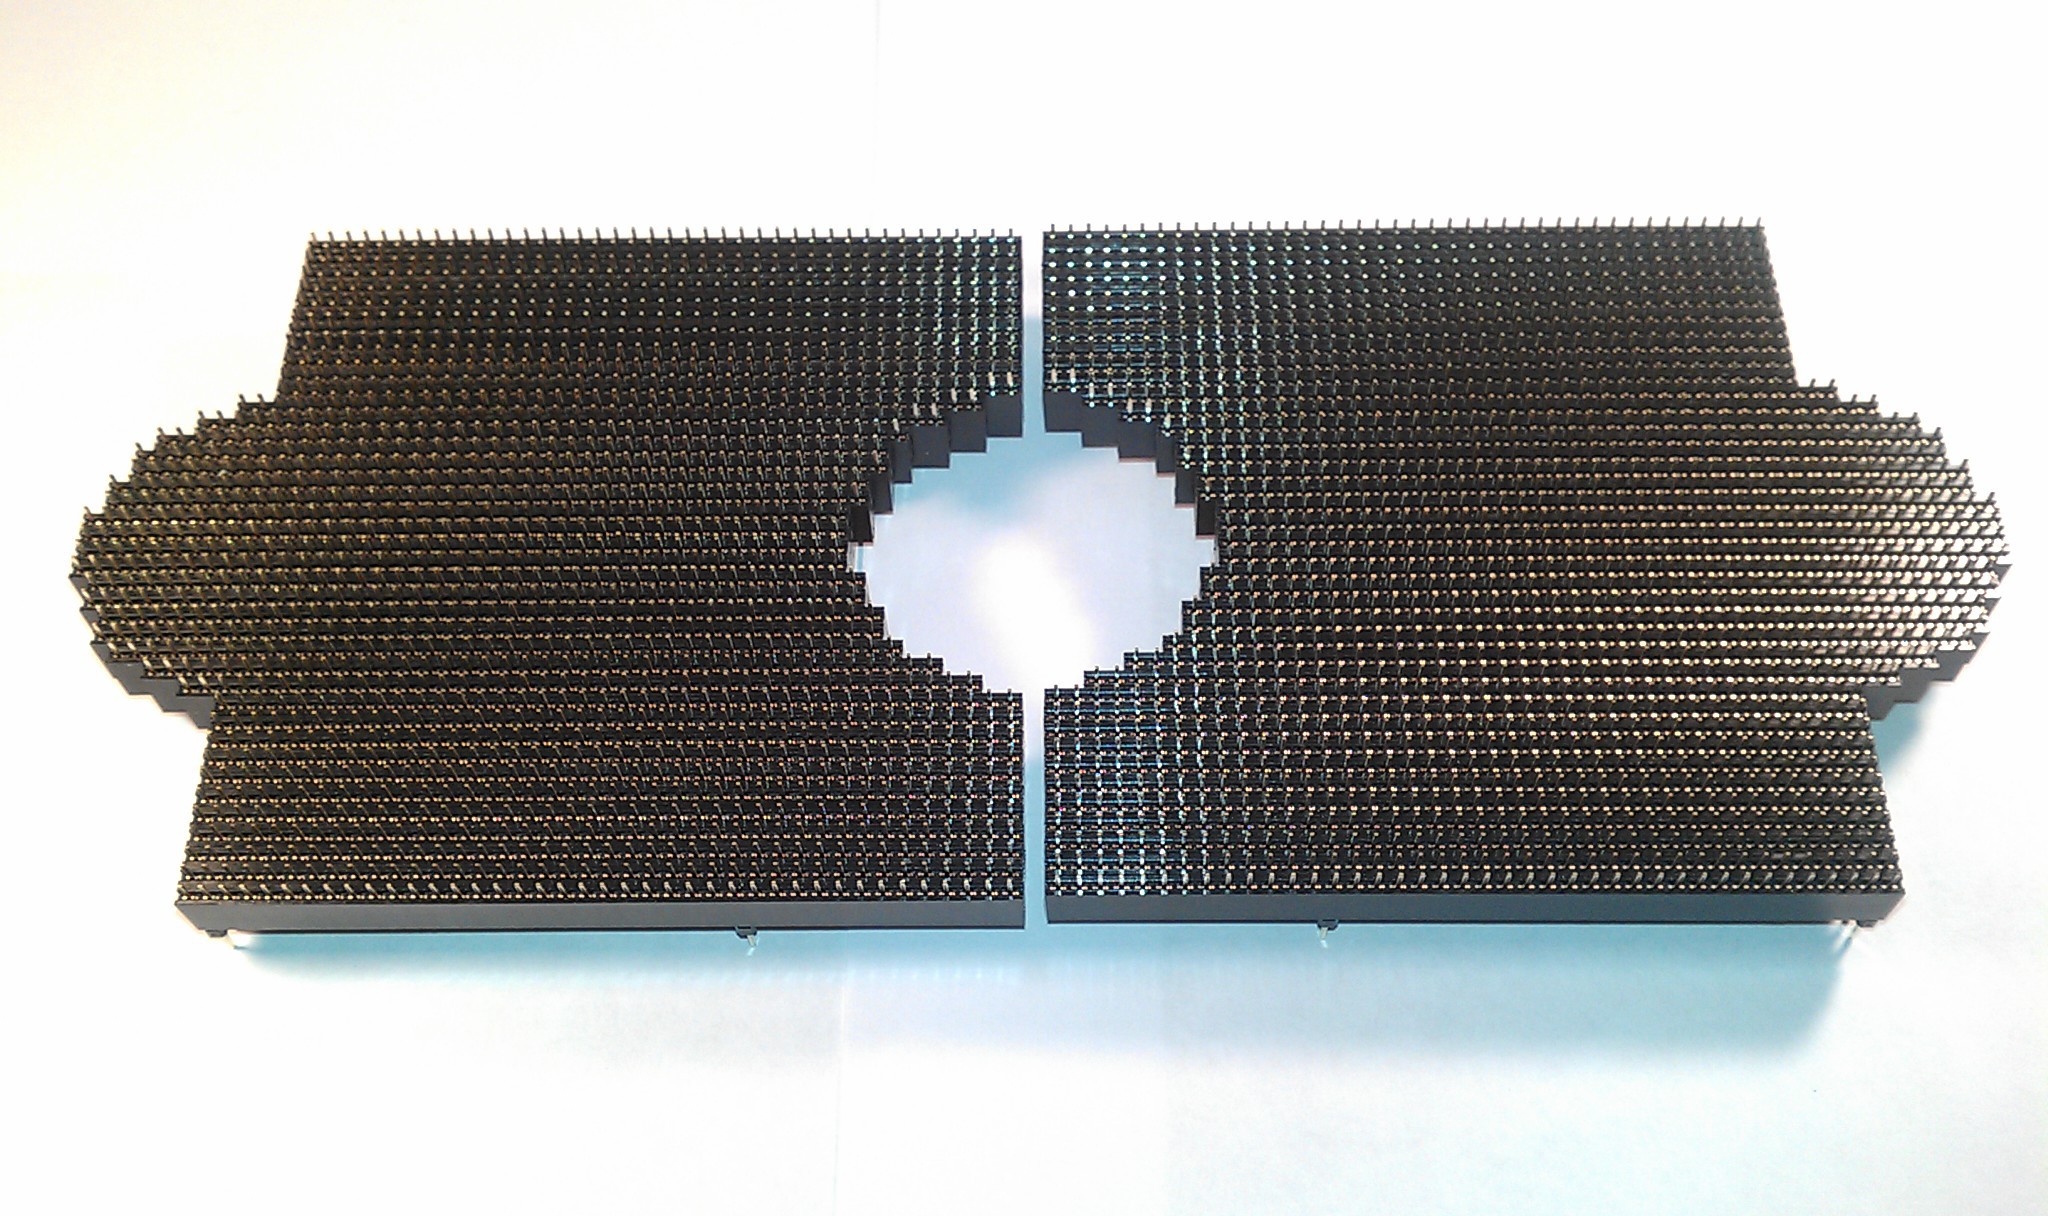
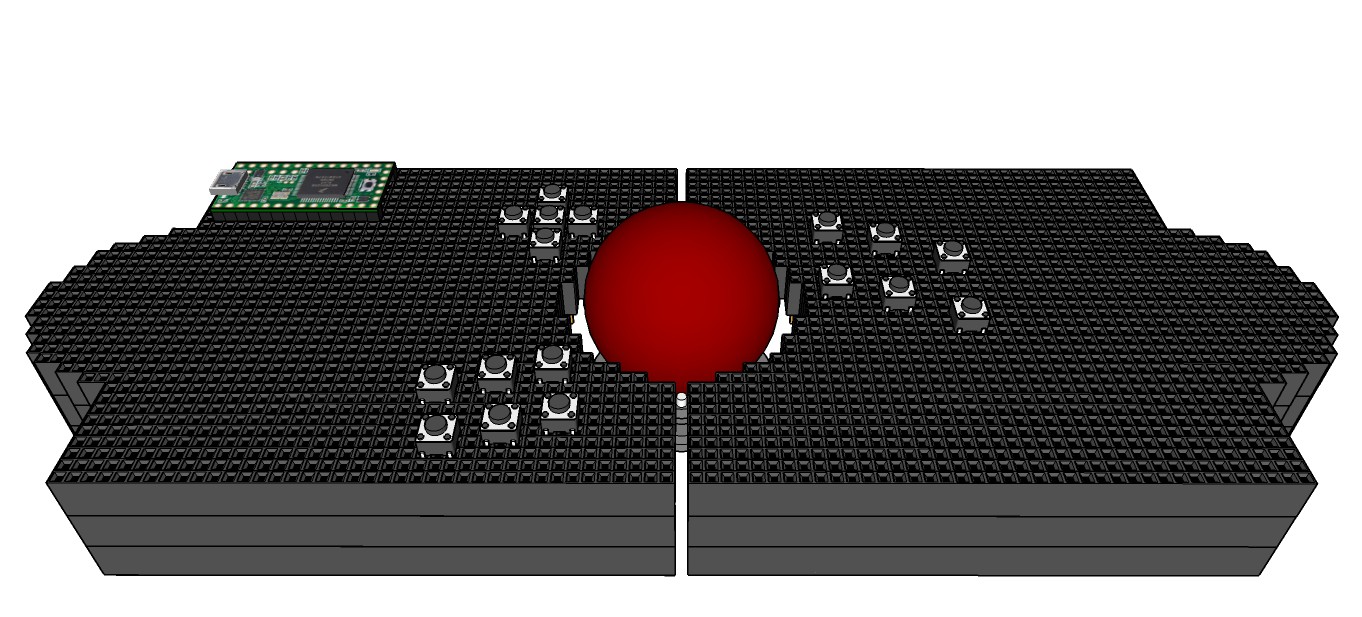
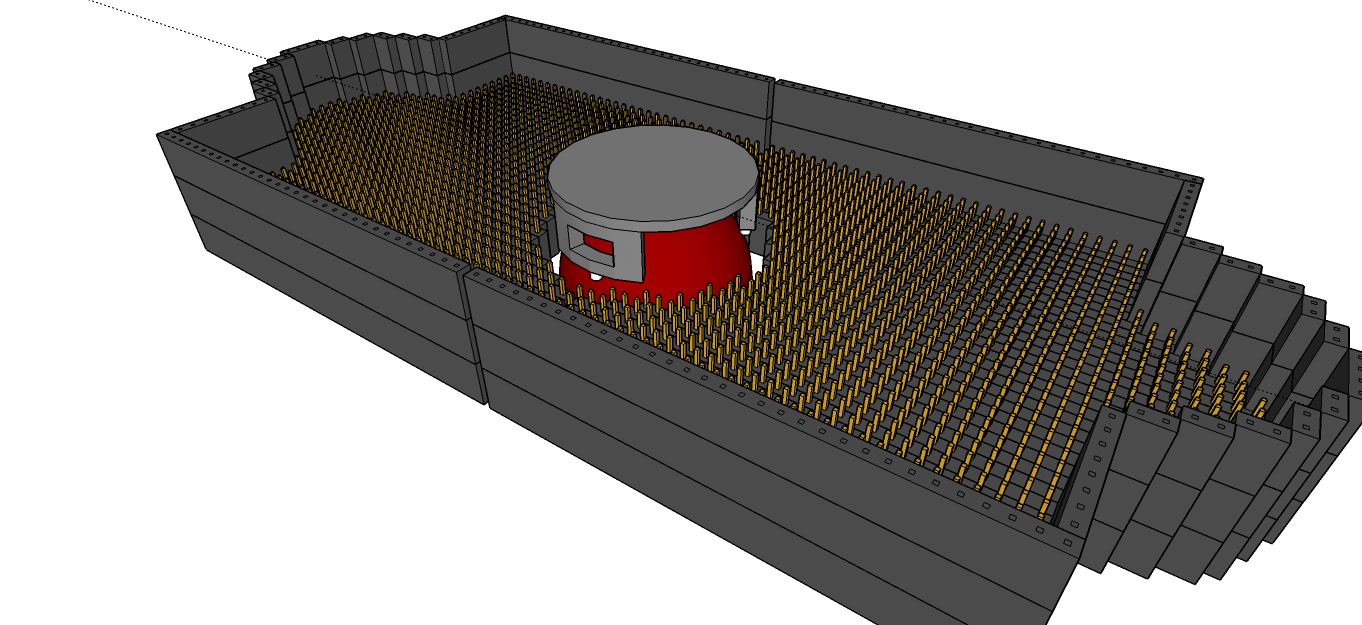
05/14/2014 at 15:56 • 0 commentsI call this one The Prototyping Mouse. I don't think this will be the final mouse (more below), but a fun project in the meantime. It is just a SketchUp now. I will update the parts list later, when I can get part sources I can afford. It combines a trackball with a breadboard, to allow any type of switch to be placed anywhere. Ideal for perfect mouse button placement, or cloned buttons to allow for quick hand position movement for people who develop pain in one position (e.g. trackball with forefinger, buttons on left/right, switch to trackball with thumb and extra left/right buttons to the right side.)
![]()
My mind thinks of endless examples to plug into it: different combinations of tactile switches, switches with labeled key caps, variable resistor, capacitive touch controller, a 555 timer circuit for rapid fire, motion sensor, LED's, TV remote circuit, jumpers to other projects, or anything that can be programed with a Teensy.
![]()
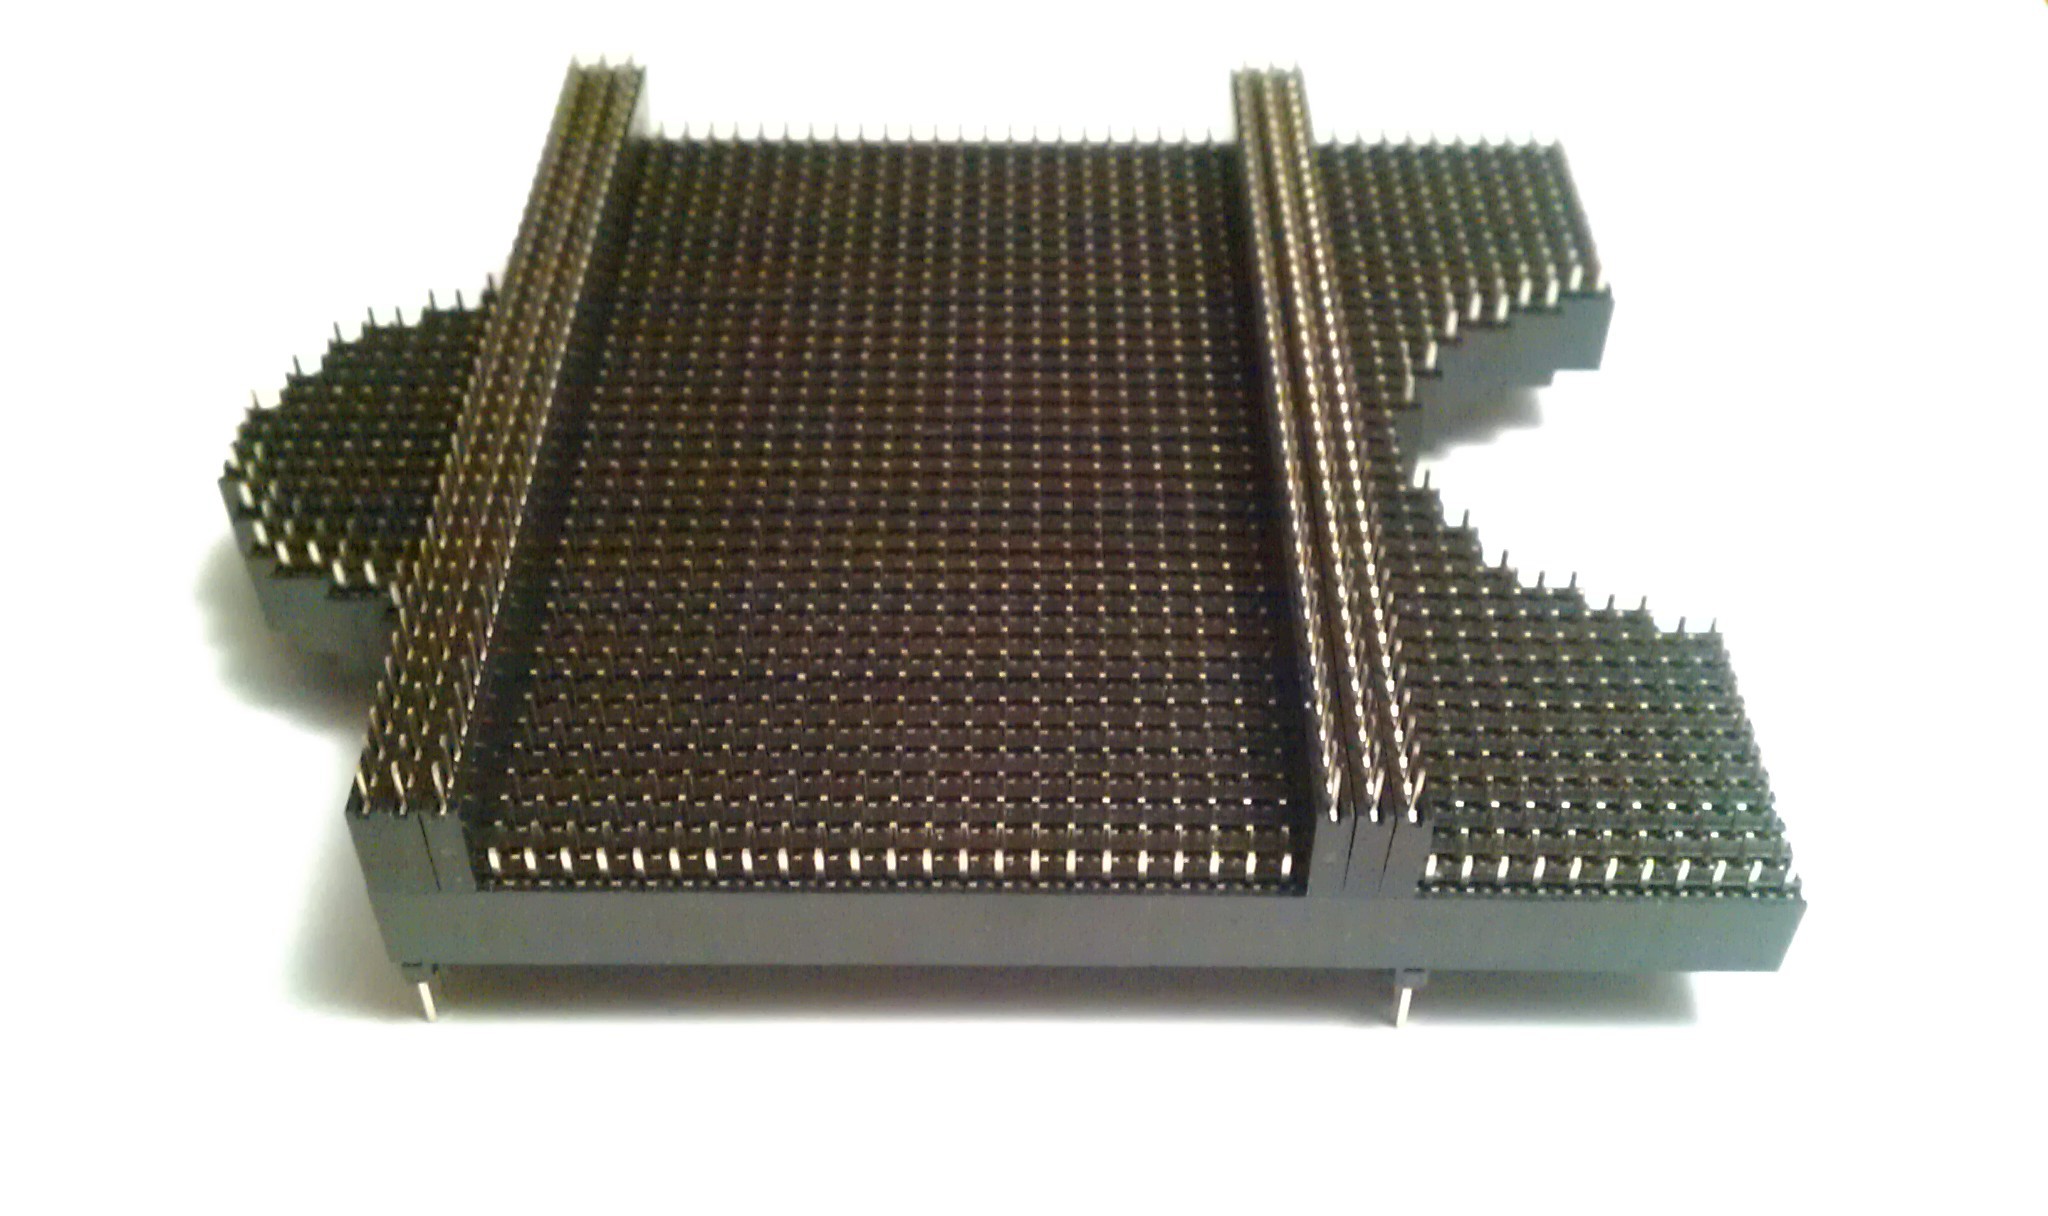
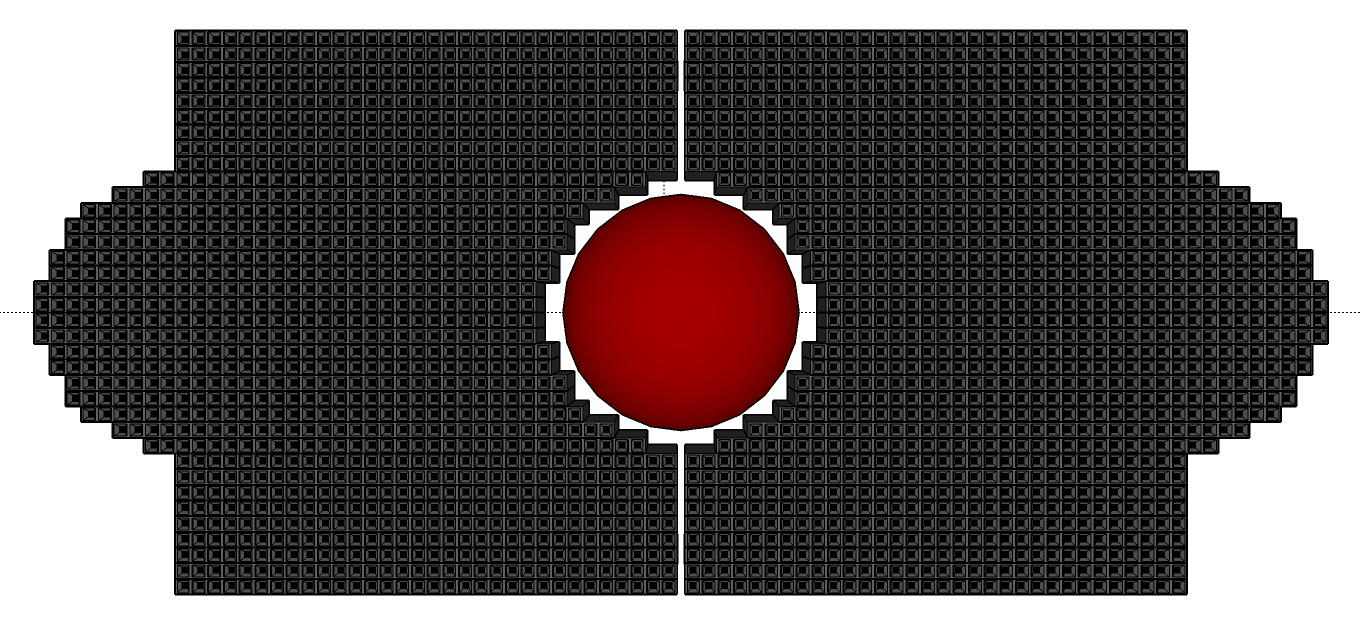
It has two arrays of 32 x 32 for 2048 possible connections. It is made up of more than 64 1x32 0.1” female headers.
![]()
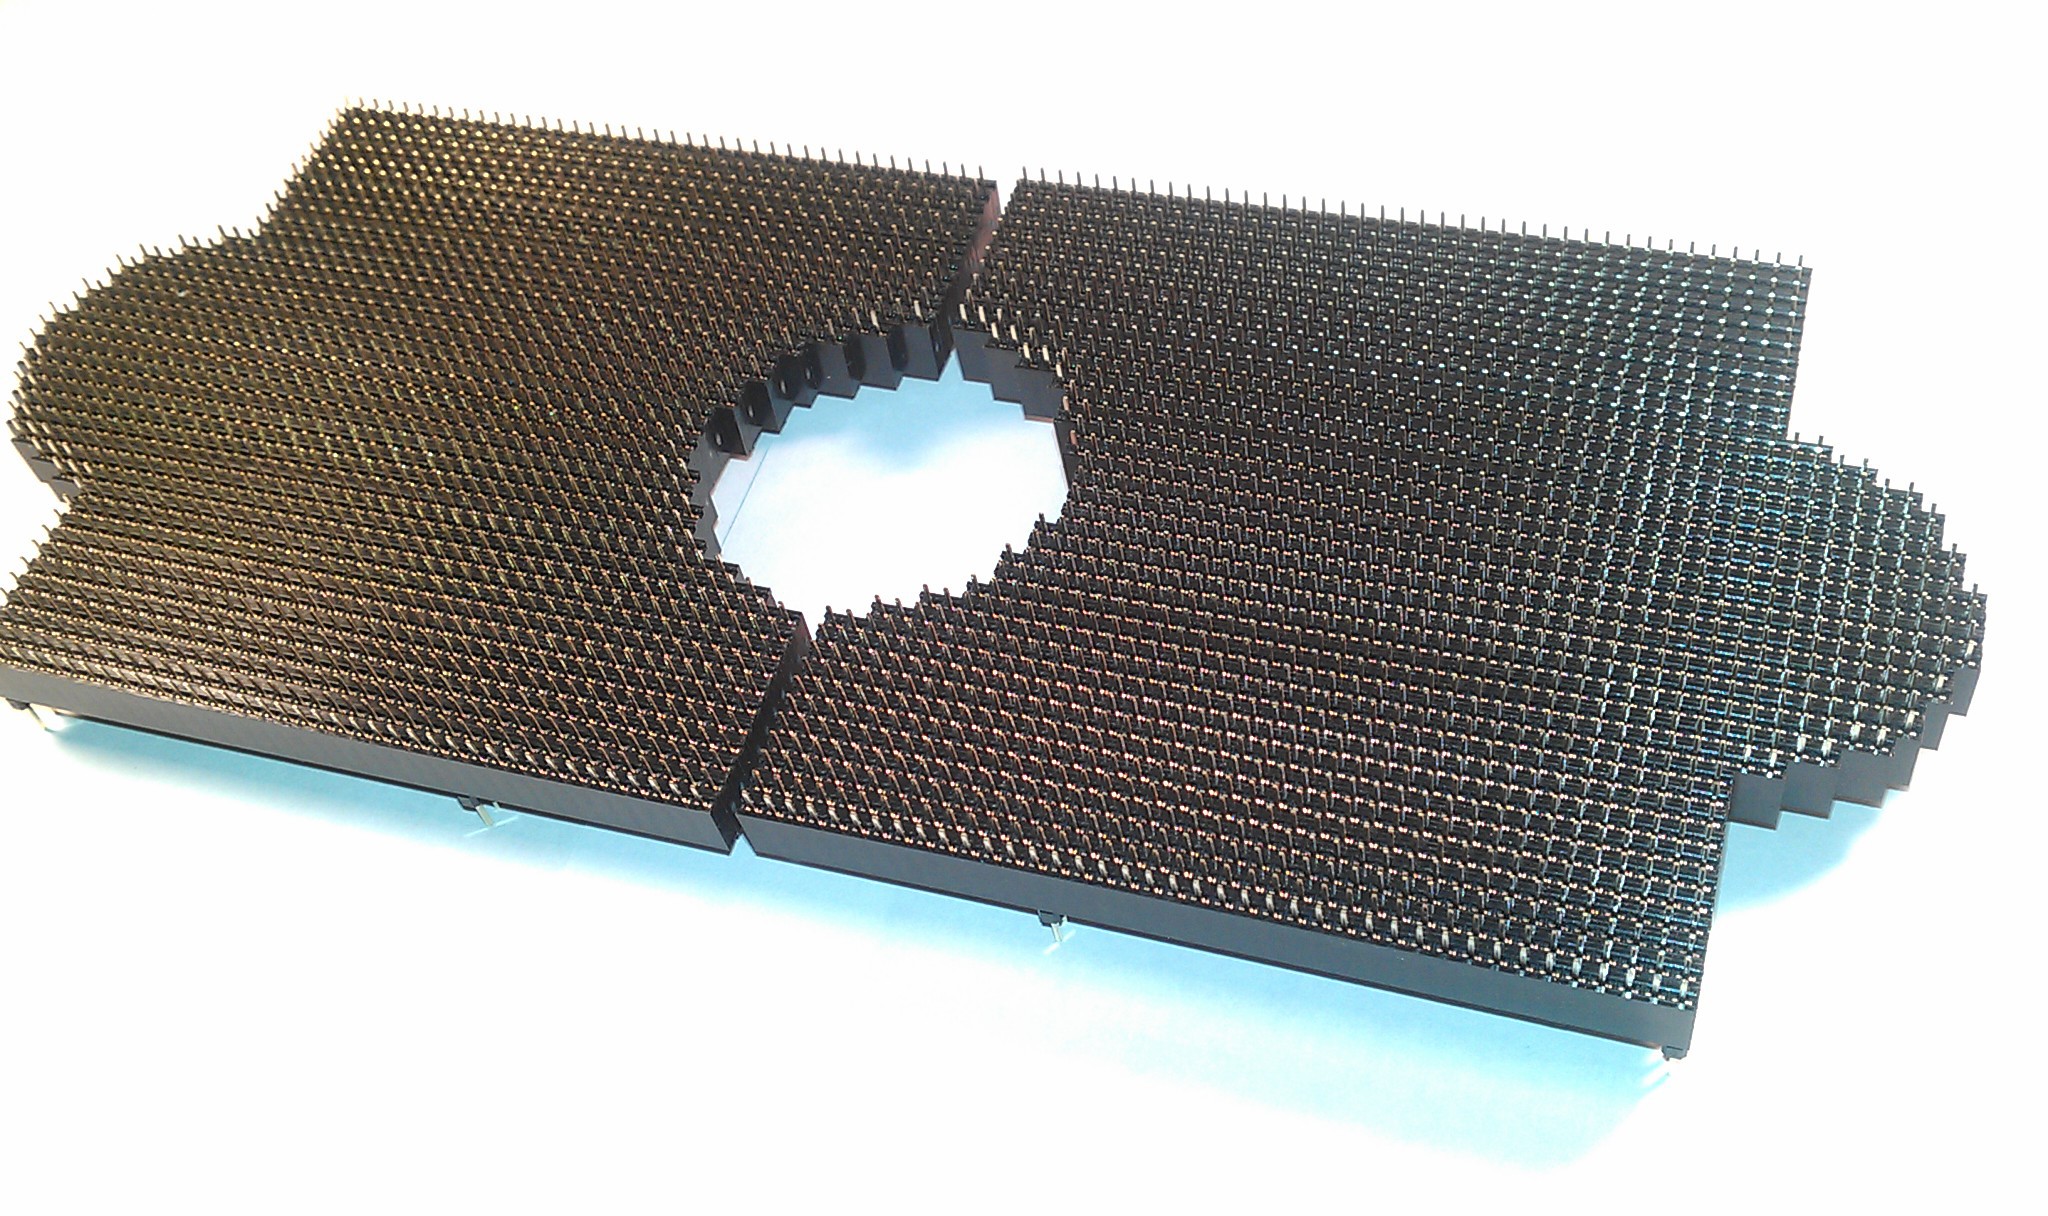
Bottom is a skeleton view without jumpers or Teensy circuit.
![]()
I split and left a gap down the middle so I could tilt the left and right sides for comfort, maybe spring loaded. I can't see this as the final project because of some ergonomic flaws. I am still brain storming about something contoured to my hand, but this looks too cool and will give me the experience I will need when I develop something better.
-
3D Fail! Back to step 1
05/14/2014 at 10:15 • 0 commentsDon't even bother reading this.
Log Goal: make the ultimate movable base of comfort, for my movable buttons.
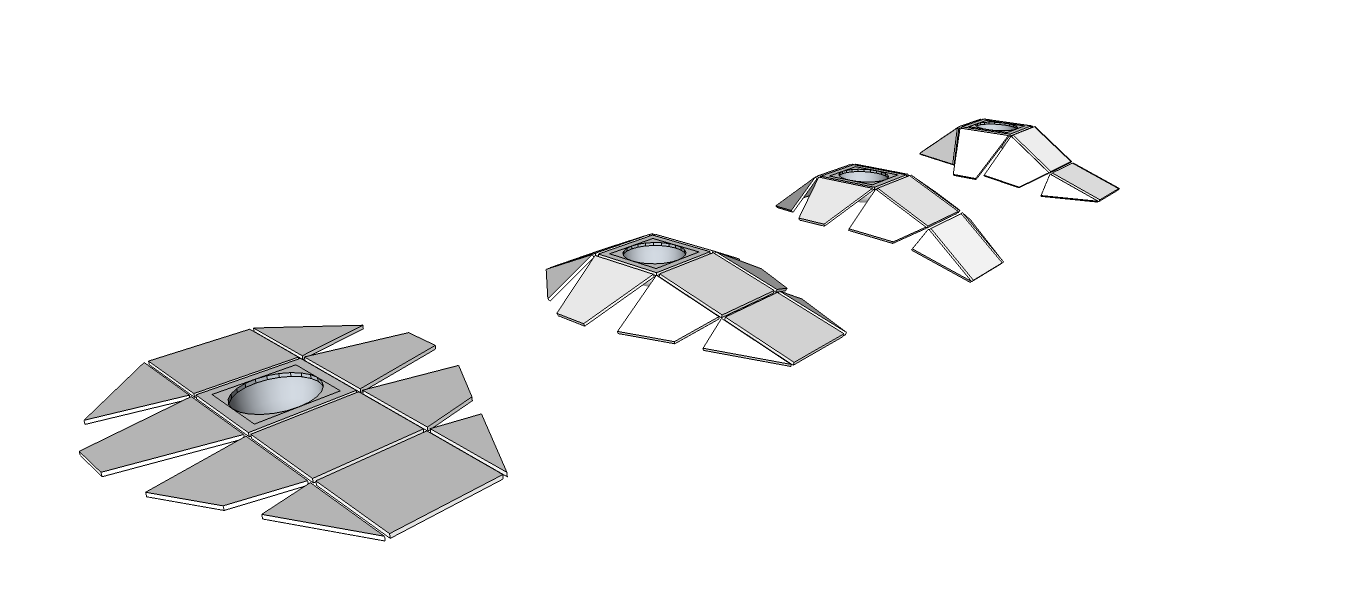
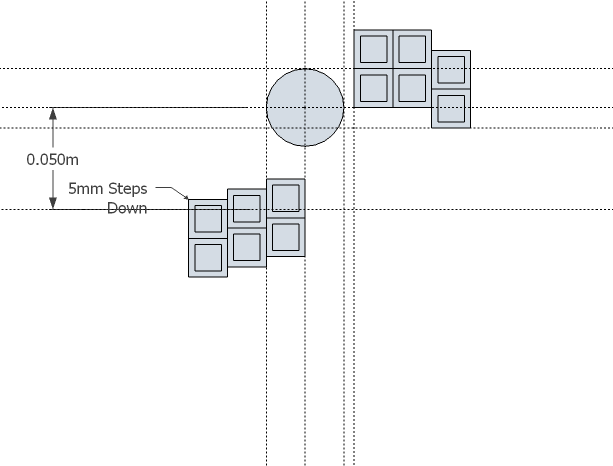
SketchUp measurements: Minimum 5mm material support around cup for ball. Minimum 2mm adhesive fabric hinge spacing. Ball 38mm. Minimum 40mm cup hole. Tapered cuts are for vertical movement.
1st row, Top
Middle: 50x50x2mm
Left/Right: 50x50 right angle then tapered 15deg bottom
2nd row, Cup row
Middle: 50x50x2mm
Left/Right: 50x50 then tapered 15deg top and15deg bottom
3rd row, structure row
Middle: 50x50x2mm
Left/Right: 50x50 reduced to half width at bottom then tapered 15deg
4th row, bottom row
Middle: 50x50x2mm
Left/Right: 50x25 reduced to 0 at bottom then tapered 15deg
Dimensions laid out flat:
154mmx206mm (6.06”x8.11”)
Argg! Too big!
Dimensions at smallest footprint
125x181 = 4.9”x7.1”Fail!
I could fit enough tactile buttons for 114-key keyboard and have room leftover for the scroll wheel and some snacks.
I am going to concentrate on the much better movable button idea, which is more realistic, then work a cool design around that.The good news is I came up with an idea to save space. Instead of a separate scroll wheel, program the Teensy to read the ball movement, and use one of the buttons as “temopoary scroll wheel”. Maybe with options for left click to exit, click again to exit, and automatic timeout.
![]()
-
Step 1: Scratching My Head
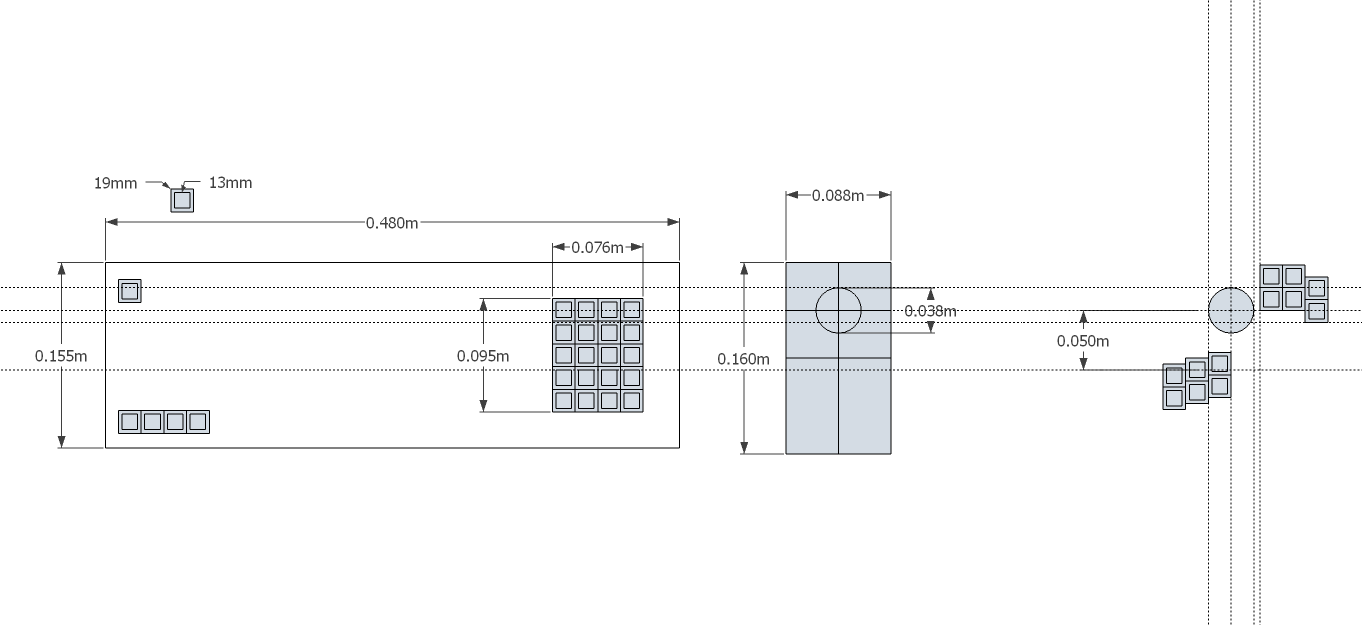
05/11/2014 at 16:04 • 0 commentsTrying to master some engineering plans, but ended up doodling in SetchUp. I got a basic 2D layout from paper to picture, that seemed comfortable to my hand. For the pictures I used keyboard button dimensions (13mm top, 19mm on center), and basic dimensions for the Logitech Trackball, all to scale, to get an idea for sizing. I'm going to need smaller key caps.
The more I think about this, the more I want the buttons to be movable, because I know I'm never comfortable in the same position for a long time, and I would hate to spend time on a project that would ultimately frustrate me. Plenty of homemade projects to google at, but few found with actual technical specs, or tactile switch and key cap part numbers. Before I move forward, I will need to play around with a 3D design that is movable, then decide if it is feasible in the real world.
![]()
![]()
Mouse Controller Project
USB trackball mouse controller inspired by Caleb's thecontrollerproject.com.