Close
0%
0%

TritiLED

Multi-year always-on LED replacements for gaseous tritium light sources

Similar projects worth following
TritiLEDs are always-on battery powered LED glow lights for general night-time marking use. Radioactive gaseous tritium light sources (GTLSs) are allowed in the United States in several consumer product categories, including watches, compasses, and gun sights, but general-purpose markers are considered "frivolous" and are prohibited. Leveraging advances in LED efficiency, battery capacity, and microcontroller technology, TritiLEDs run from 1 to 25 years depending on battery choice, and while larger than typical GTLSs, can replace expensive and sometimes illegal tritium lighting in a variety of applications (including the frivolous). Version 3.0 of the design is complete and released under an MIT license.

Concept

This is a project born of frustration. As an amateur astronomer and astrophotographer, I often find myself stumbling around expensive and fragile equipment in the dark. A few years ago, I went looking for glow-in-the-dark markers I could attach to tripod legs and other gear to avoid costly accidents. I quickly dismissed traditional glow-in-the-dark (phosphorescent) materials because of their short half-life and the need to "charge" them before use. Chemiluminescent markers (glow sticks) are better in this regard, but are too expensive to continually replace, and end up in landfills after one night's use. Radioactive markers (especially tritium-based), with their constant glow and multi-year half-life, are technically almost perfect for this application: you can stick them to equipment and you're done. The problem with tritium markers is that they're not legal for manufacture or sale as general-purpose consumer devices in the United States (watches, compasses, and gun sights are exceptions). Even where they are legal, they are still quite expensive. This leaves electronic markers, but these often share similar shortcomings with other glow-in-the-dark technologies: constantly charging or replacing batteries, short-duration illumination, or high long-term cost. What I wanted was a small constantly-glowing LED that I could put somewhere and not have to service for a year or more. Unfortunately, most portable LED lamps are designed as flashlights - they emit a relatively powerful beam for a short duration (hours or days) per battery or charge. There's a race in the industry to make brighter and brighter lights. I wanted to go the other way: relatively dim lights, useful in dark situations, that maximized runtime.

Hazards

Lithium battery powered devices are more dangerous than small tritium light sources, despite the NRC's paternalistic approach and the general public's fear of "radiation." According to the Energizer CR2032 datasheet, an ingested lithium battery can lead to serious injury or death in as little as 2 hours. Further, improperly stored coin cell batteries can short out and cause fires or burst and cause chemical damage. These batteries must be kept out of reach of children and pets at all times, and following Energizer's advice, batteries should be held in compartments with captive screws or other childproof latching devices. While the neat little glowing LEDs may look like a fun thing for a child to play with, children should not be allowed to play with these devices.

Version 3.0

Version 3.0 uses a new architecture with the PIC12LF1571's synchronized 16-bit PWM outputs controling a 74LVC1G123 monostable producing the current pulses.  This allows tuning the peak pulse current to optimize LED efficiency, while separately tuning the overall brightness (and associated battery life).

This version allows the use of three different LEDs, chosen for their unique characteristics.  Each runs for a configurable 1-10 years (or longer) from a CR2032 cell. At minimum brightness, the circuit is estimated to run from 17.6 to 20.2 years on a CR2032.

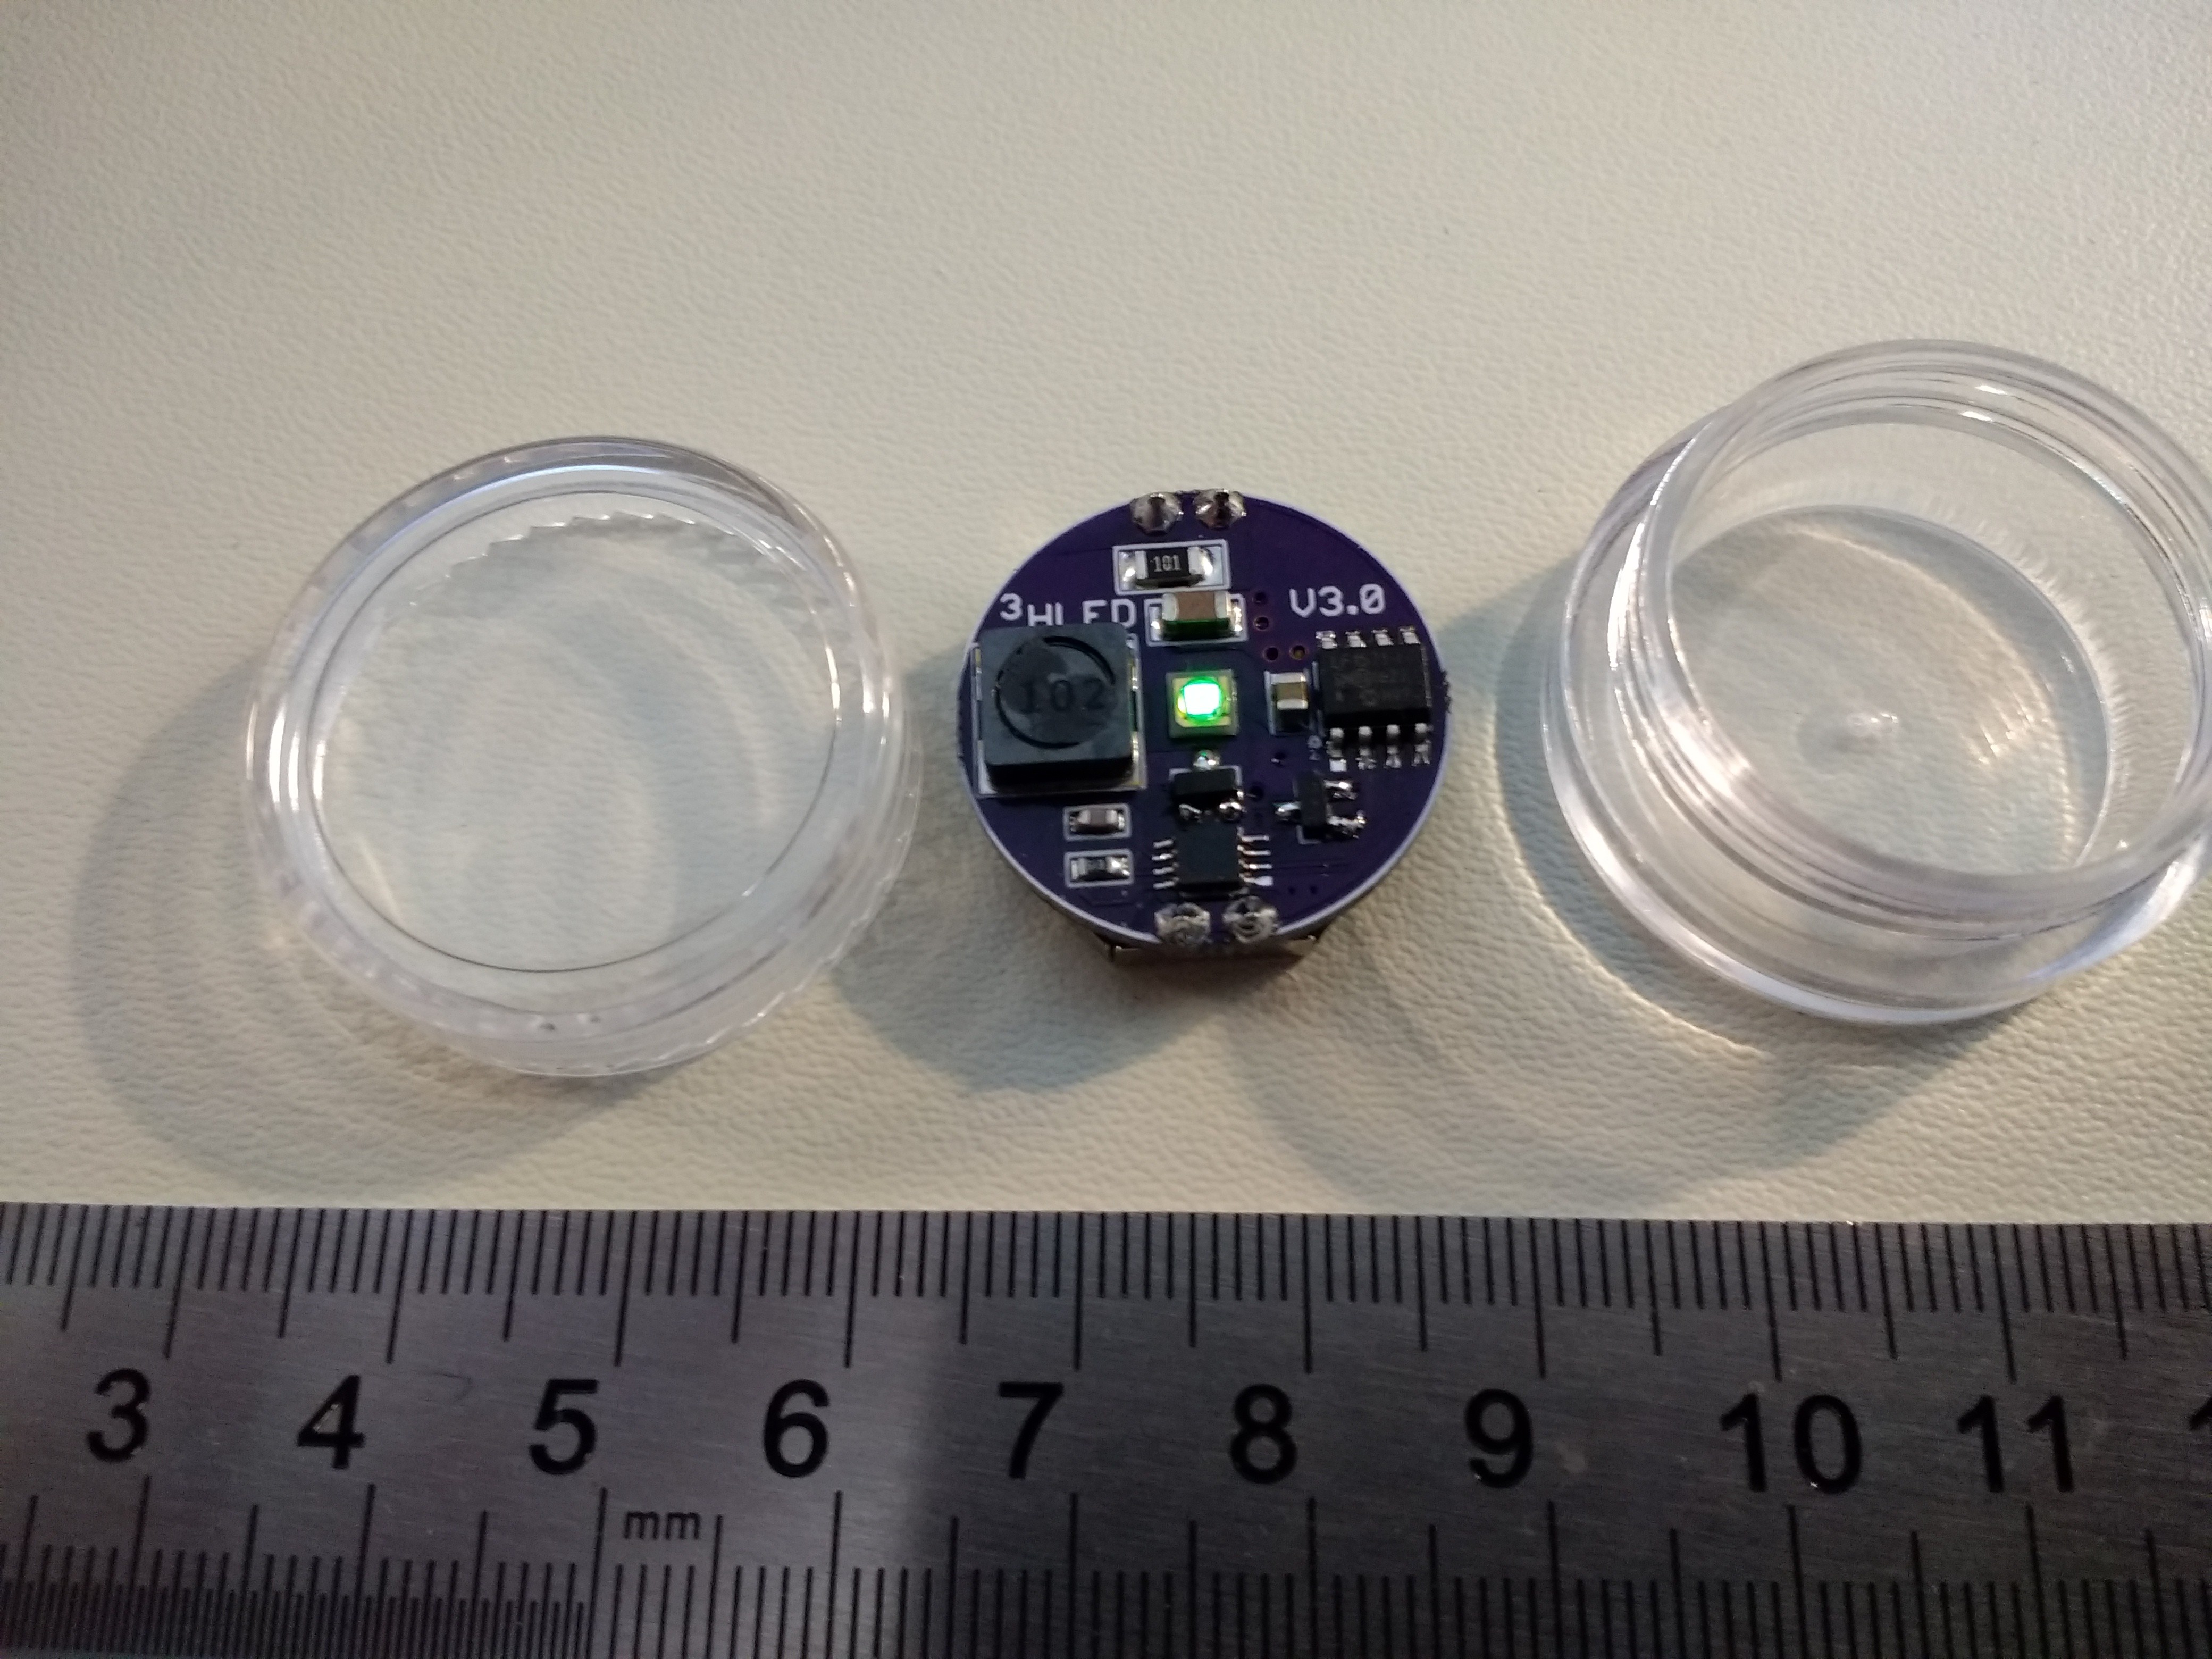
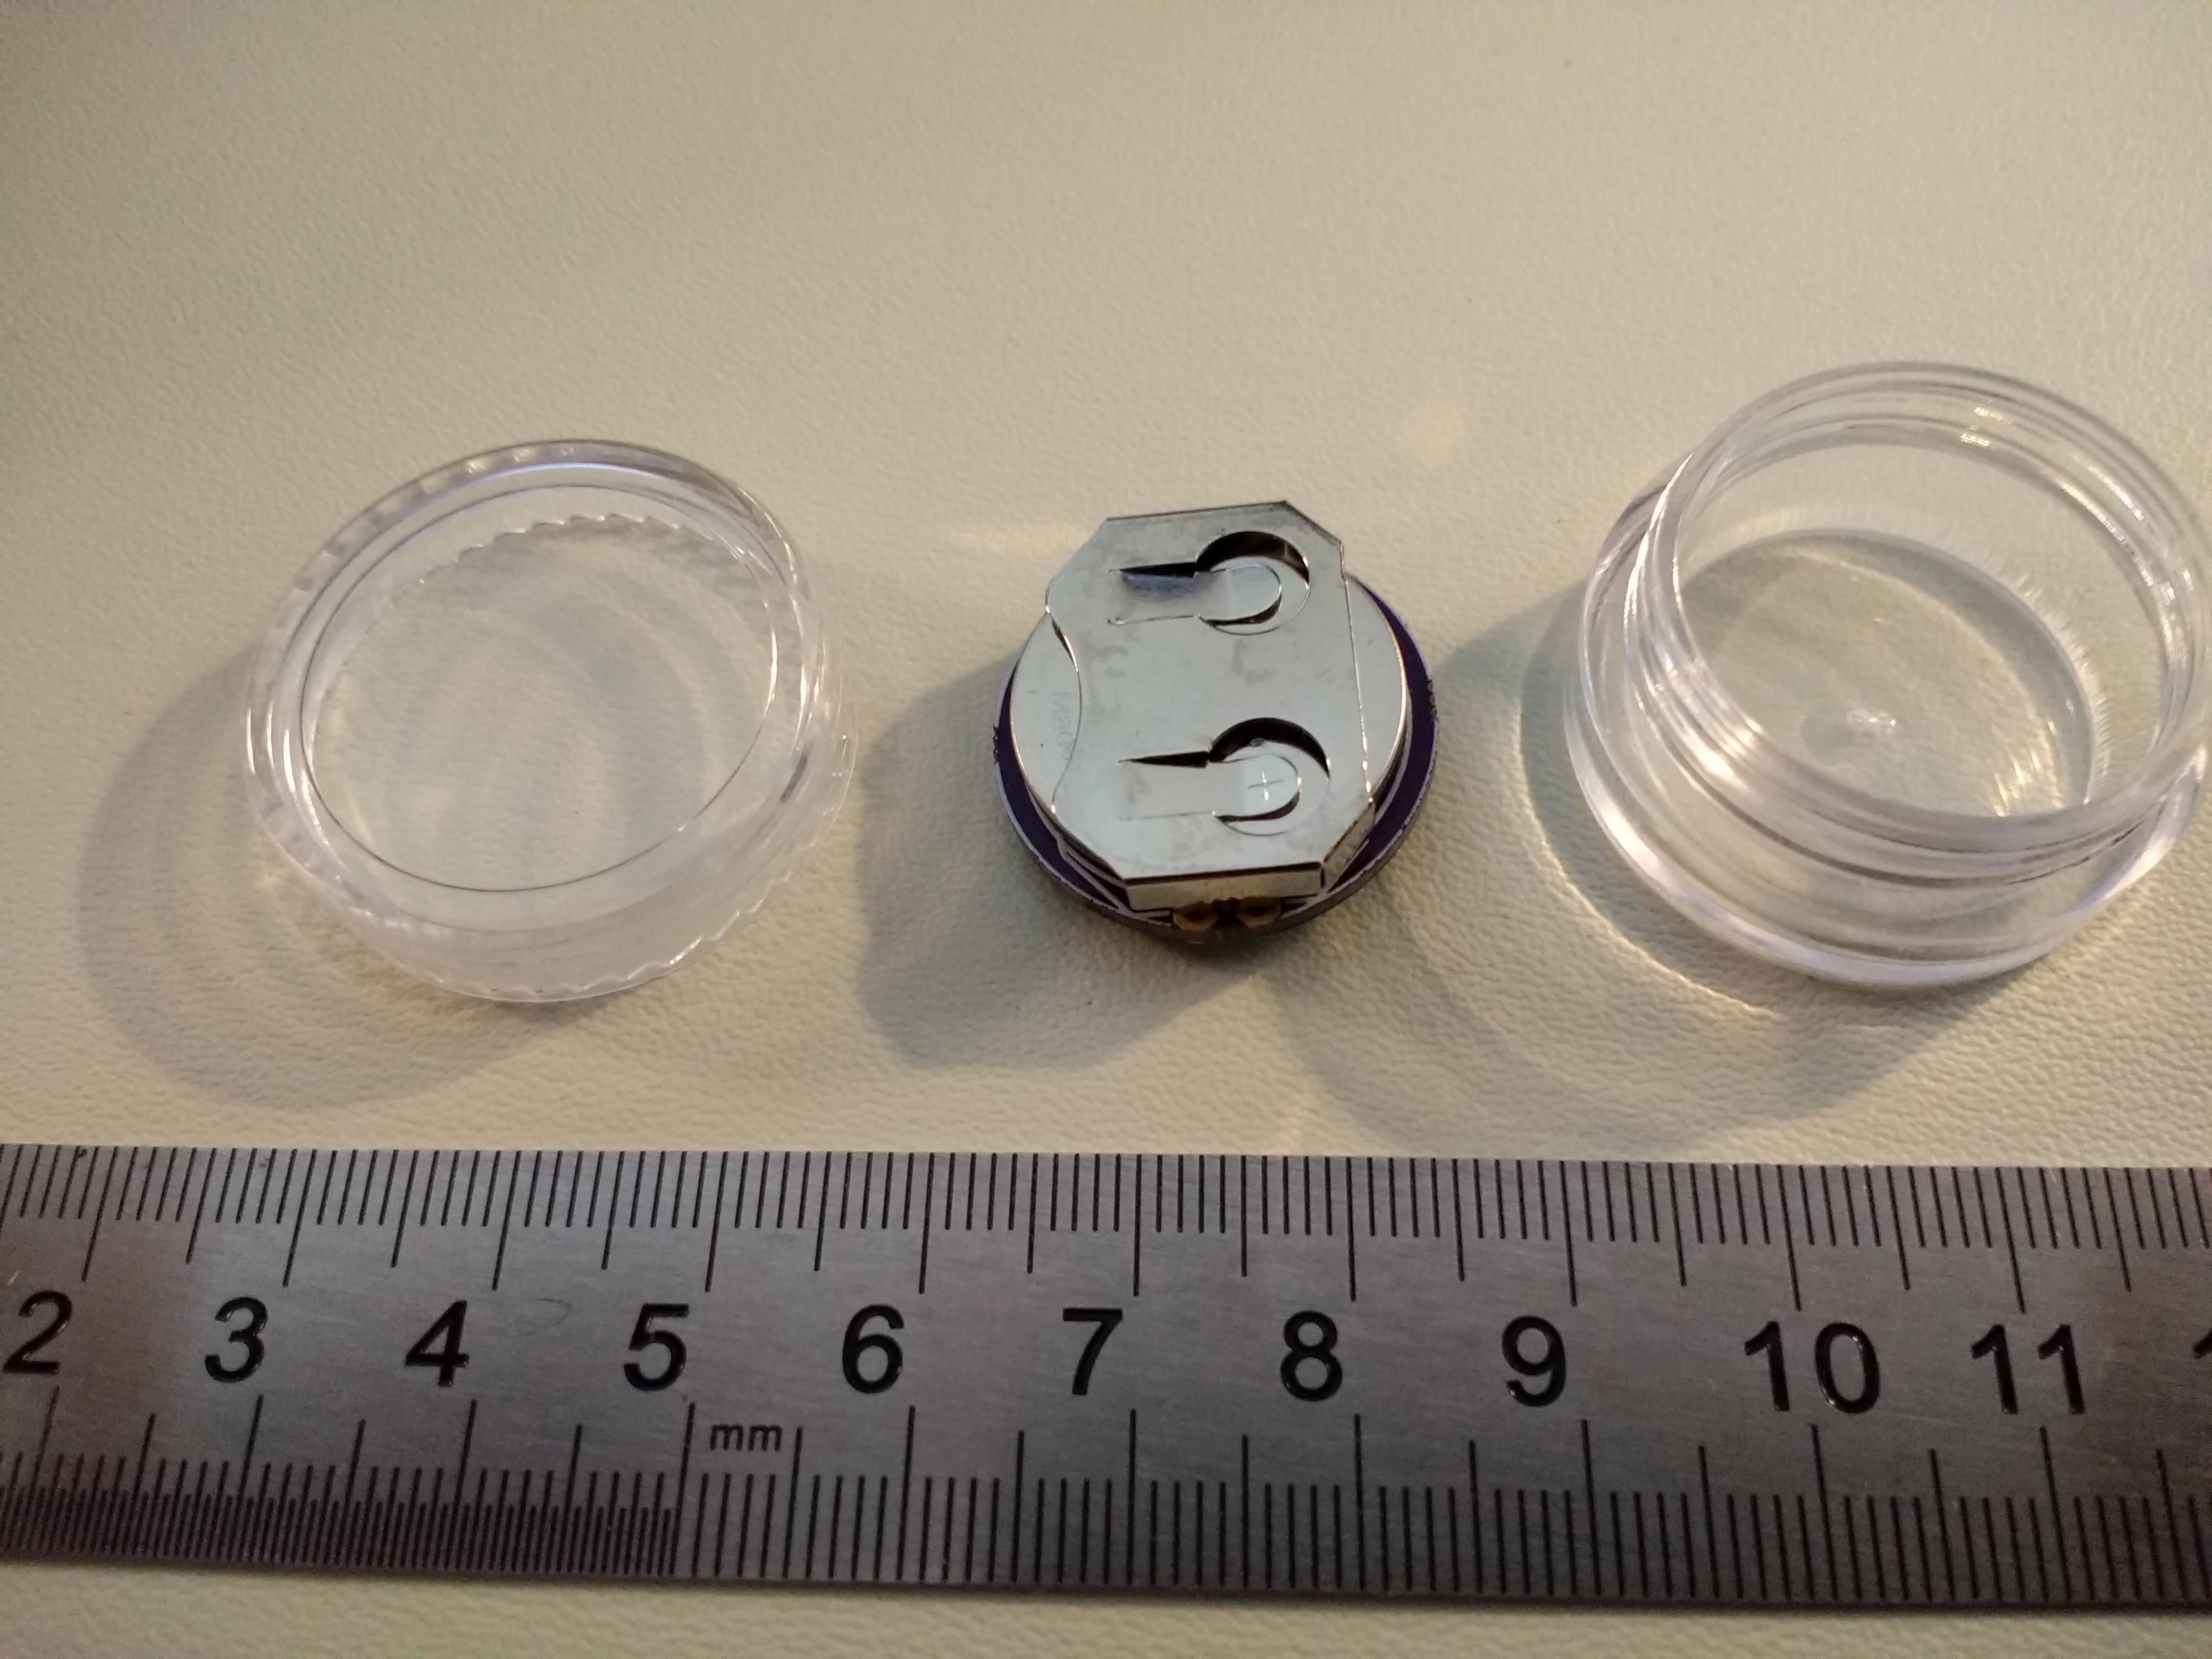
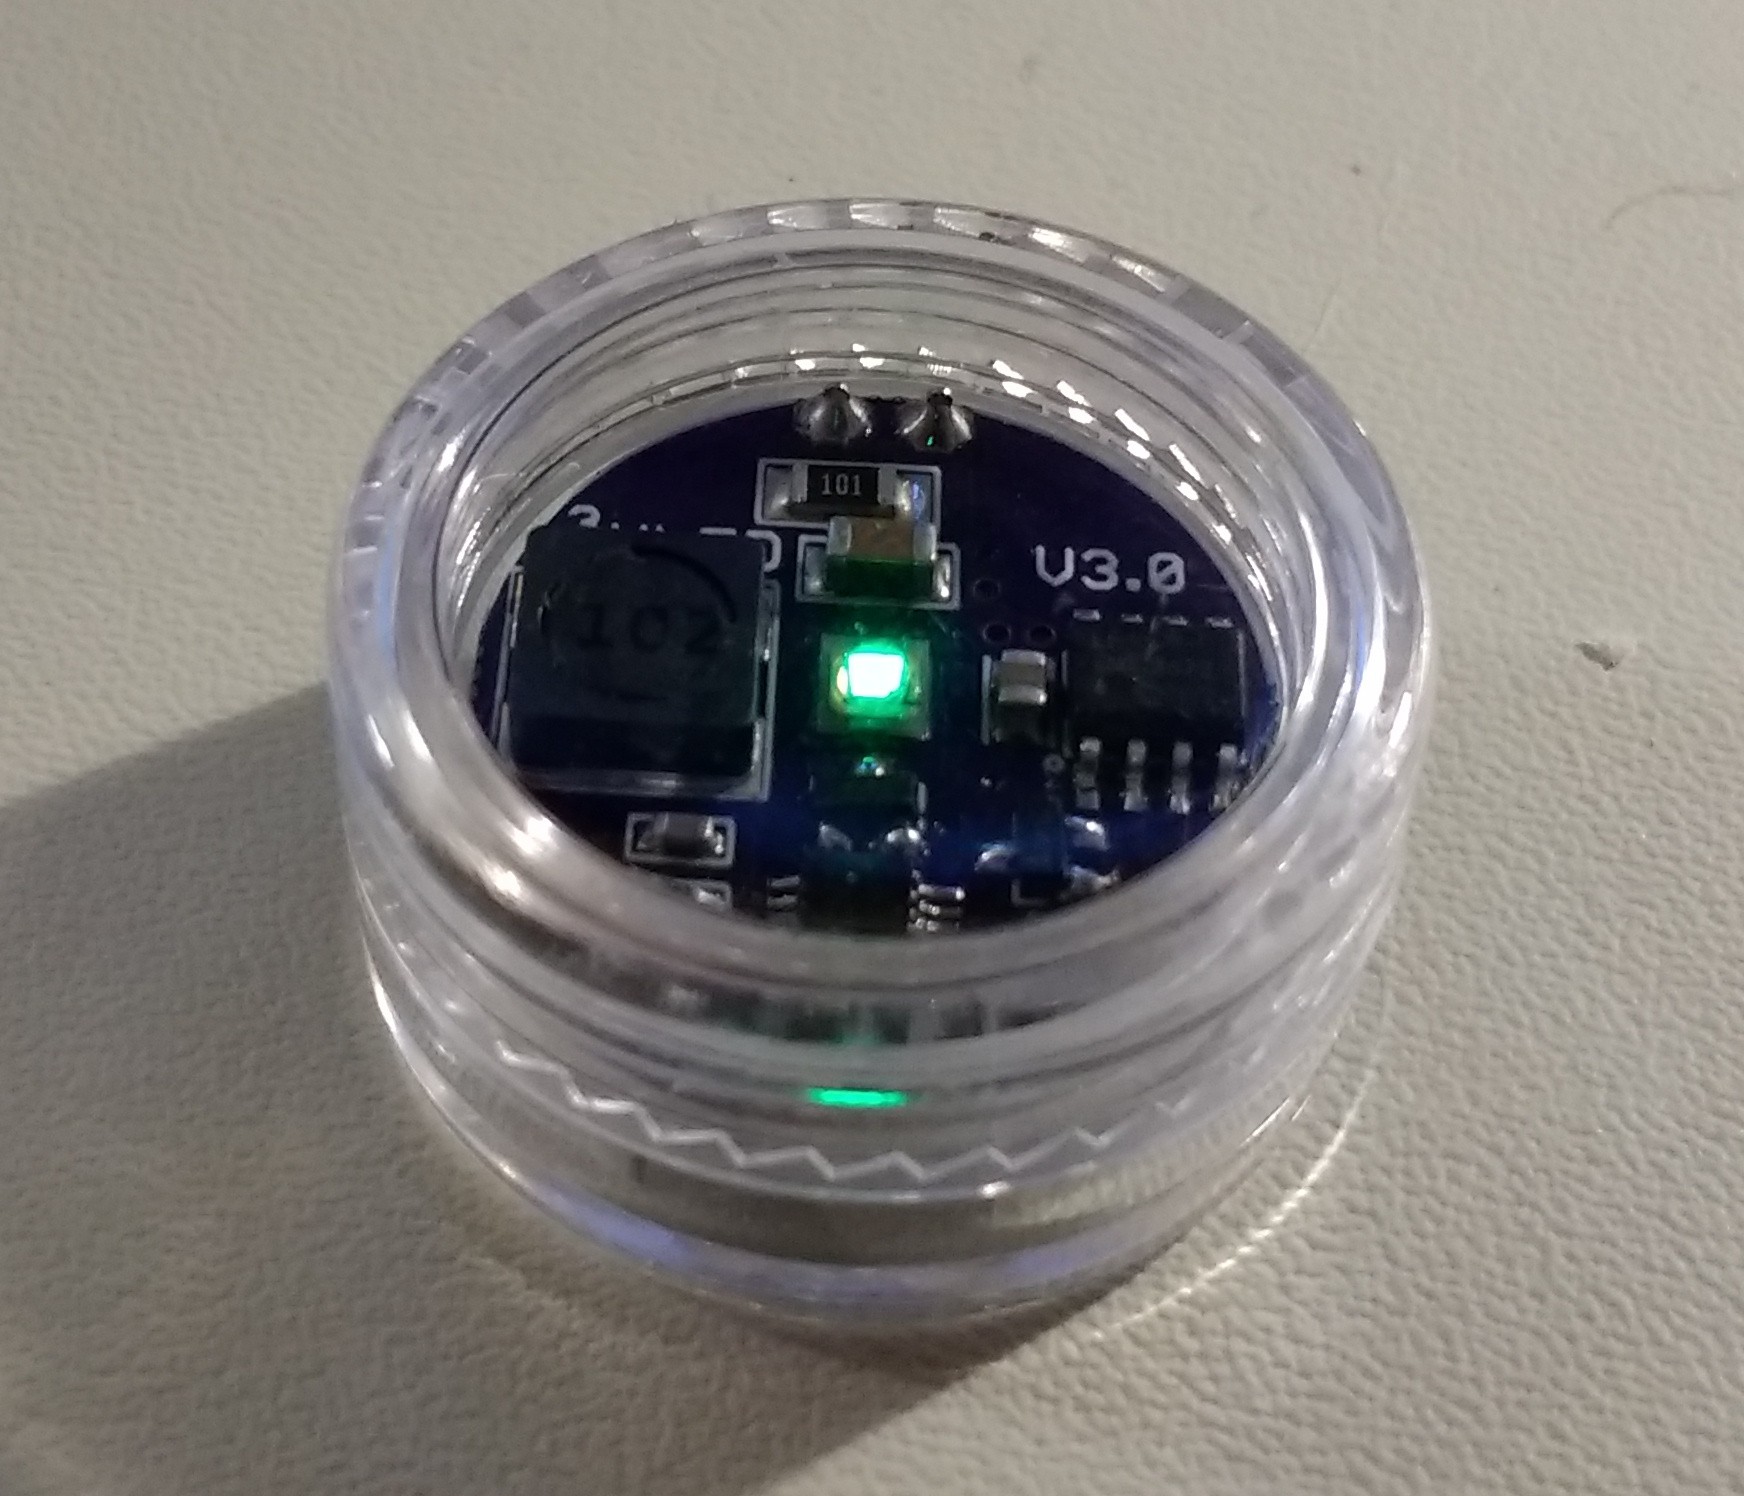
The V3.0 PCB with battery fits inside inexpensive "5g" plastic jars for weatherproofing.  The jars can be permanently sealed with silicone sealant or epoxy if you don't mind breaking a $0.16 jar when you need to replace the battery in a few years.

Details of the 3.0 version can be found in the build log.

Version 2.x

Version 2.x improves on the earlier design by driving the LED at close to maximum efficiency using a simple inductor-based boost circuit. This design also features:

  • Selectable brightness / run-time trade-off (at program time)
  • Bright blinking modes (constant / fast blink / slow blink) with constant runtime
  • Inexpensive LEDs in many colors

Due to the higher electrical and LED drive efficiency, the V2.2 circuit will run for 5 years on a CR2032 (minimum brightness). The brightness can be...

Read more »

make-logo.py

python script to make TritiLED logo (2021)

x-python - 1.70 kB - 02/20/2021 at 14:49

Download

tritiled-logo.svg

TritiLED logo (2021)

svg+xml - 1.33 kB - 02/20/2021 at 14:48

Preview

tritiled.lbr

Eagle library for components used in TritiLED designs

lbr - 26.51 kB - 04/27/2017 at 19:46

Download

20160908_141753.jpg

JPEG Image - 1.28 MB - 09/08/2016 at 18:31

Preview

Li_Battery_Model.tgz

python code for modeling LiMnO2 and LiFeS2 primary cells running low-drain devices

x-compressed-tar - 4.28 kB - 09/03/2016 at 16:32

Download

View all 11 files

  • Dude, where's my MCU?

    Ted Yapo03/11/2018 at 04:39 6 comments

    It seems like overkill to use an MCU just to light an LED, so I've wanted to get a version going just using discretes.  I'm still using a couple of logic ICs in this one, but it's closer.  I don't think it's any better, but maybe simpler and cheaper.

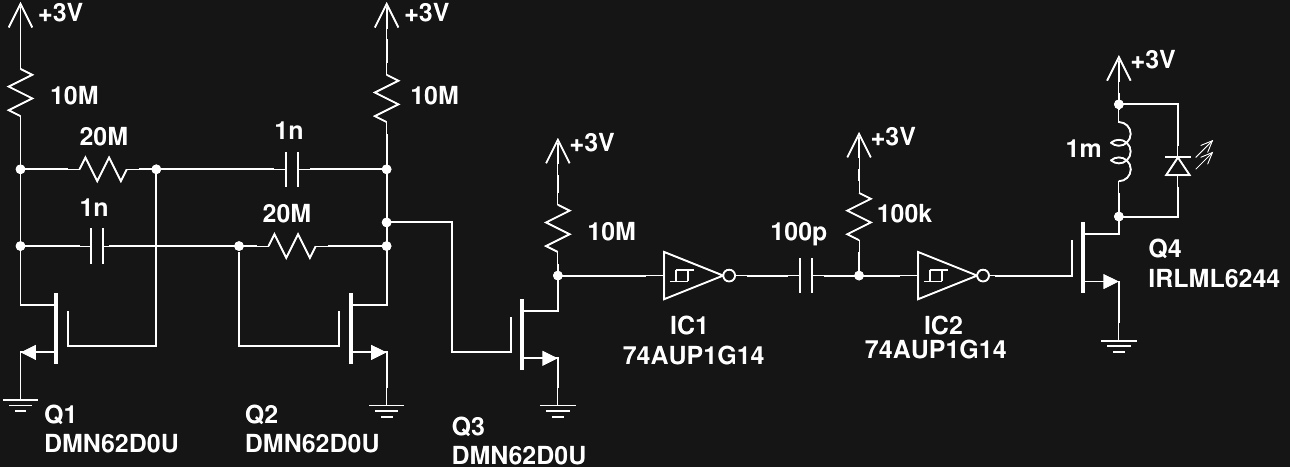
    The circuit is a revised version of an earlier attempt I made using a Schmitt-trigger relaxation oscillator.  The problem with the original version was an enormous power consumption caused by the ST inverter spending so much time in the linear region.  In the new version, I used a MOSFET astable design published by David A. Johnson to drive a one-shot pulse generator I had tried before.  The result looks like this:

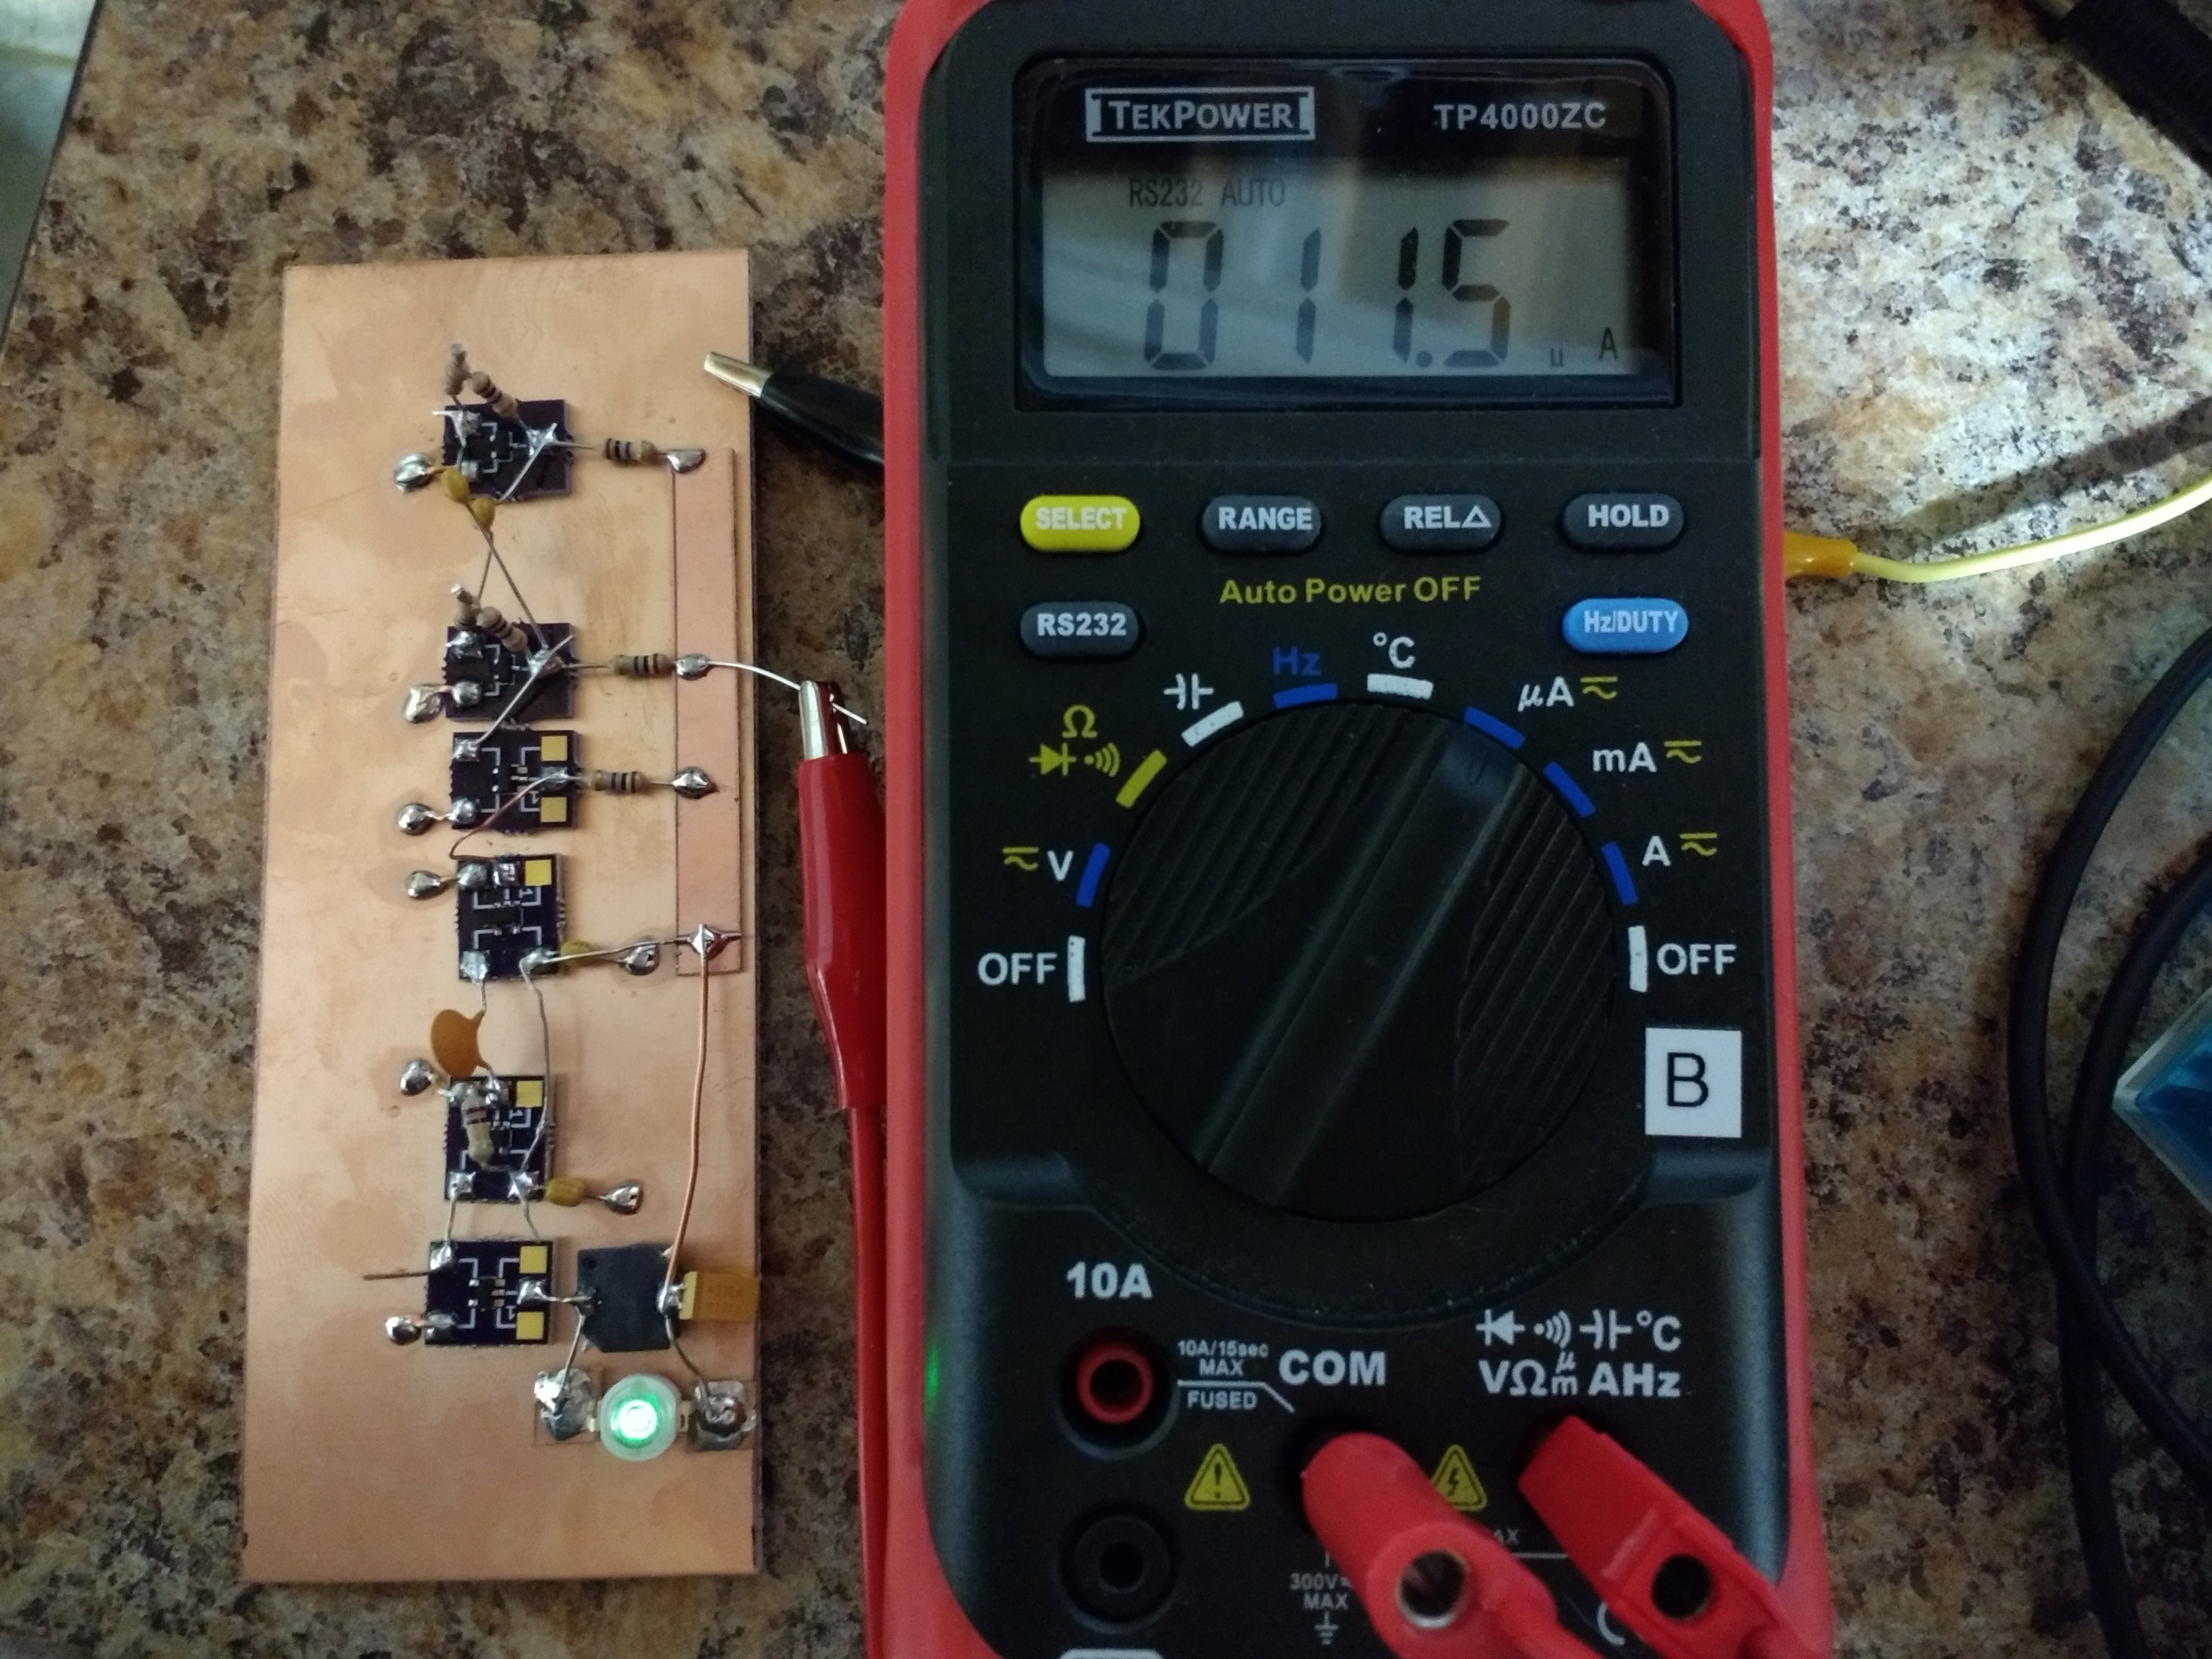
    Q1 and Q2 form an astable multivibrator oscillating at about 35 Hz.  Q3 is used to square up the output and get a rail-to-rail swing to drive IC1, which in turn creates pulses with very fast edges to drive the IC2 one-shot.  The output of IC2 is a pulse of around 12us duration.  This ramps up the current in the inductor to a maximum of around 24 mA, which is an efficient drive level for the LED.

    The whole circuit draws 11.5 uA, which will run for over 2 years on a CR2032 cell.  Without the LED, the circuit consumes around 1.8 uA, so it's at maximum 84% efficient, not counting any losses in the output MOSFET or inductor.  At 35 Hz, it's a little flickery, but increasing the frequency seems to increase the overhead current linearly.  I think most of the the consumption is actually in IC1 whose input isn't driven very quickly by Q3.  For example, I can decrease the current consumption slightly by decreasing the 10M resistor at Q3's drain.  This is counter-intuitive, since a lower valued resistor will draw more current, but what's happening is the faster switching speed with the smaller resistor dissipates less power in IC1.

    I have yet to try other logic families for the inverters.  AUP logic is supposed to be the lowest current, but others might be better with the slow input swings here.  I have some 74LVC gates to try next.  They're also available in 2-gate packages, which would save a little cost.

    There are likely to be issues with this circuit, though.  First, the high value resistors and low currents in the astable will be susceptible to leakage on the PCB.  To keep things stable, a good wash or two followed by a conformal coat is probably in order.

    Another issue is that although the RC time constant for the one-shot can be obtained with 1%-tolerance parts, the pulse length is also a function of the hysteresis in IC2.  Unfortunately, this value isn't specified very precisely in the datasheet, so the pulse width could vary considerably from unit-to-unit.  I'll have to experiment a bit to see what the variation between parts is, although batch-to-batch variation will probably be larger than that between units from the same wafer.

    Overall, I think this is probably a way to create a poorly specified cheap version.  It's perfect for the new global economy.

  • V3.1 Release

    Ted Yapo02/02/2018 at 14:35 5 comments

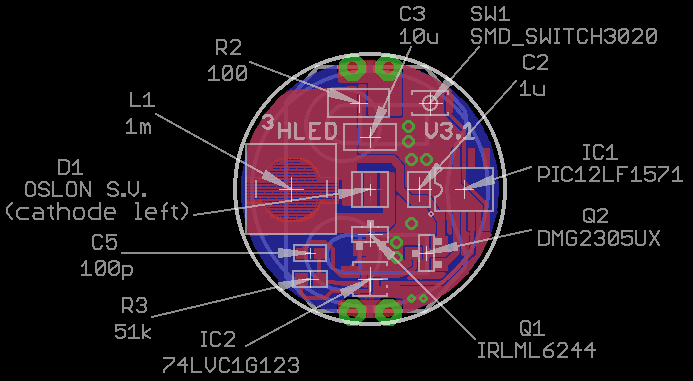
    There's not much difference between V3.0 and V3.1 (just an added switch), but I figured I'd give the latest (and final?) version its own page.  Here's where all the parts go.  Note that it shows an OSLON LED version with a 51k resistor, if you build the Cree XPE2 version, use a 59k resistor (see below).

    Cree XPE2 Green BOM

    The PCBs can be ordered from OSH park.  Cost is $4.10 for three copies.

    Here's a link to a DigiKey cart with all the parts for a single copy using a Cree XPE2 LED.  Cost is $6.40, excluding the case, which you have to buy elsewhere.  The BOM in table form:

    Index Quantity Part Number Description Customer Reference Available Quantity Backorder Quantity Unit Price USD Extended Price USD
    1 1 PIC12LF1571-I/SN-ND IC MCU 8BIT 1.75KB FLASH 8SOIC IC1 1 0 0.58 0.58
    2 1 296-18758-1-ND IC SNGL MONO MULTIVIBTOR SM8 IC2 1 0 0.7 0.7
    3 1 1276-1804-1-ND CAP CER 10UF 25V X7R 1206 C3 1 0 0.26 0.26
    4 1 1276-6469-1-ND CAP CER 1UF 25V X7R 0805 C2 1 0 0.1 0.1
    5 1 311-100FRCT-ND RES SMD 100 OHM 1% 1/4W 1206 R2 1 0 0.1 0.1
    6 1 IRLML6244TRPBFCT-ND MOSFET N-CH 20V 6.3A SOT-23 Q1 1 0 0.54 0.54
    7 1 DMG2305UX-13DICT-ND MOSFET P-CH 20V 4.2A SOT23 Q2 1 0 0.44 0.44
    8 1 BAT-HLD-001-THM-ND RETAINER BATT CR2025/2032 PC PIN B1 1 0 0.28 0.28
    9 1 P189-ND BATTERY LITHIUM 3V COIN 20MM Battery 1 0 0.29 0.29
    10 1 XPEBGR-L1-0000-00F02CT-ND LED XLAMP XPE2 GREEN 525NM 2SMD U$1 1 0 1.86 1.86
    11 1 311-3599-1-ND CAP CER 100PF 50V NPO 0603 C5 1 0 0.11 0.11
    12 1 311-59.0KHRCT-ND RES SMD 59K OHM 1% 1/10W 0603 R3 1 0 0.1 0.1
    13 1 CKN10778CT-ND SWITCH TACTILE SPST-NO 0.02A 15V U$2 1 0 0.25 0.25
    14 1 SRR6028-102YCT-ND FIXED IND 1MH 150MA 4.5 OHM SMD L1 1 0 0.790.79

    OSLON Signal Verde BOM

    The PCB can be ordered from OSH Park.  Cost is $4.10 for three copies.

    Here's a link to a DigiKey cart with all the parts for a single copy.  Cost is $8.03 (excluding case and PCB).

    Index Quantity Part Number Description Customer Reference Available Quantity Backorder Quantity Unit Price USD Extended Price USD
    1 1 PIC12LF1571-I/SN-ND IC MCU 8BIT 1.75KB FLASH 8SOIC IC1 1 0 0.58 0.58
    2 1 296-18758-1-ND IC SNGL MONO MULTIVIBTOR SM8 IC2 1 0 0.7 0.7
    3 1 1276-1804-1-ND CAP CER 10UF 25V X7R 1206 C3 1 0 0.26 0.26
    4 1 1276-6469-1-ND CAP CER 1UF 25V X7R 0805 C2 1 0 0.1 0.1
    5 1 311-100FRCT-ND RES SMD 100 OHM 1% 1/4W 1206 R2 1 0 0.1 0.1
    6 1 IRLML6244TRPBFCT-ND MOSFET N-CH 20V 6.3A SOT-23 Q1 1 0 0.54 0.54
    7 1 DMG2305UX-13DICT-ND MOSFET P-CH 20V 4.2A SOT23 Q2 1 0 0.44 0.44
    8 1 BAT-HLD-001-THM-ND RETAINER BATT CR2025/2032 PC PIN B1 1 0 0.28 0.28
    9 1 P189-ND BATTERY LITHIUM 3V COIN 20MM Battery 1 0 0.29 0.29
    10 1 311-3599-1-ND CAP CER 100PF 50V NPO 0603 C5 1 0 0.11 0.11
    11 1 CKN10778CT-ND SWITCH TACTILE SPST-NO 0.02A 15V U$2 1 0 0.25 0.25
    12 1 SRR6028-102YCT-ND FIXED IND 1MH 150MA 4.5 OHM SMD L1 1 0 0.79 0.79
    13 1 475-3450-1-ND LED OSLON SIGNAL GRN 505NM 2SMD
    1 0 3.49 3.49
    14 1 311-51.0KHRCT-ND RES SMD 51K OHM 1% 1/10W 0603
    1 0 0.1 0.1

    Design Files

    The Eagle design files and a library of all the components used are in the GitHub repo.

  • V3.x Calibration Procedure

    Ted Yapo01/23/2018 at 04:27 5 comments

    I added some code in GitHub for calibrating the V3.x boards.  Since the inductor has a +/-30% tolerance, the brightness and runtime can vary significantly from board to board.  These differences are easily calibrated out by running a little python script I wrote that calculates a calibration table.

    There are just a few steps required to calibrate a newly assembled V3.x board:

    1. Run The Calibrator Image

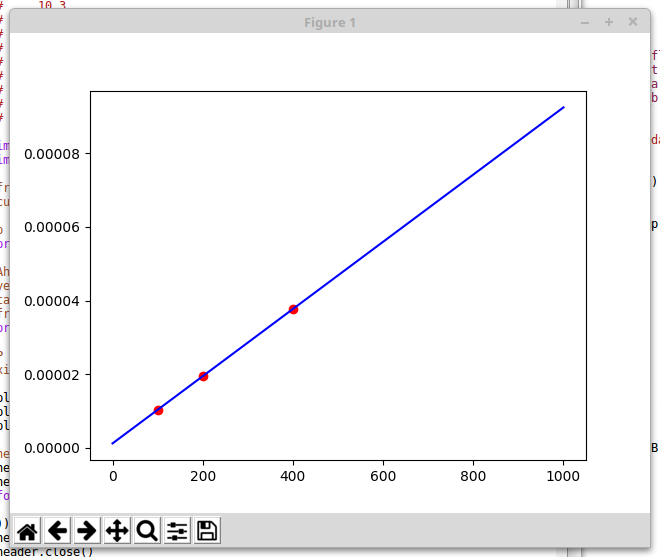
    Download the calibrator.hex image.  This image runs the LED at three different brightness levels, 16 seconds each.  When the image is running, record the currents (in uA) consumed at each brightness.  In one recent test run, I recorded the following:

    10.3
    19.4
    37.7

    These correspond to hard-coded blink frequencies of 100, 200, and 400 Hz.  Save these three current measurements in a file called currents.dat.  The C-code source for this image, calibrator.c, is in GitHub.

    2. Run the Calibration Script

    The python script, calibration.py, reads the currents.dat file you just created, fits a line to current vs frequency, and calculates the frequencies for 1-10 year run times.  The script pops up a window with the plot shown above so you can check the calibration.  All three points should be on the line.  Once you close the plot window, the script generates a header file called modes.h:

    #define N_MODES 10
    struct run_time period_table[N_MODES] = {
      {1, (int)(31000./262.124721 + 0.5)},
      {2, (int)(31000./124.768381 + 0.5)},
      {3, (int)(31000./78.982934 + 0.5)},
      {4, (int)(31000./56.090211 + 0.5)},
      {5, (int)(31000./42.354577 + 0.5)},
      {6, (int)(31000./33.197487 + 0.5)},
      {7, (int)(31000./26.656709 + 0.5)},
      {8, (int)(31000./21.751126 + 0.5)},
      {9, (int)(31000./17.935672 + 0.5)},
      {10, (int)(31000./14.883309 + 0.5)},
    };
    

    3. Compile the Calibrated Hex File

    The tritiled_v30_selectable_runtime.c code automatically includes the generated modes.h file, so you just have to recompile to create a calibrated hex file for the board.  Once you recompile, program the hex image to the board, and it's done.

    If you want, you can verify the current drain for the various modes.

    That's it.  It shouldn't take more than a few minutes to calibrate your board.

    I originally had a script that would do this all automatically, but my PICkit3 has proven to be a little unreliable.  I often have to reset it before it will program correctly.  It could be that my particular programmer is flaky, some incompatibility with linux, or something else, but it was just too frustrating.  The new calibration process is simple, quick, and gives good results, so I'm going to leave it at that.

  • V3.1: Configurable Brightness

    Ted Yapo01/18/2018 at 03:10 4 comments

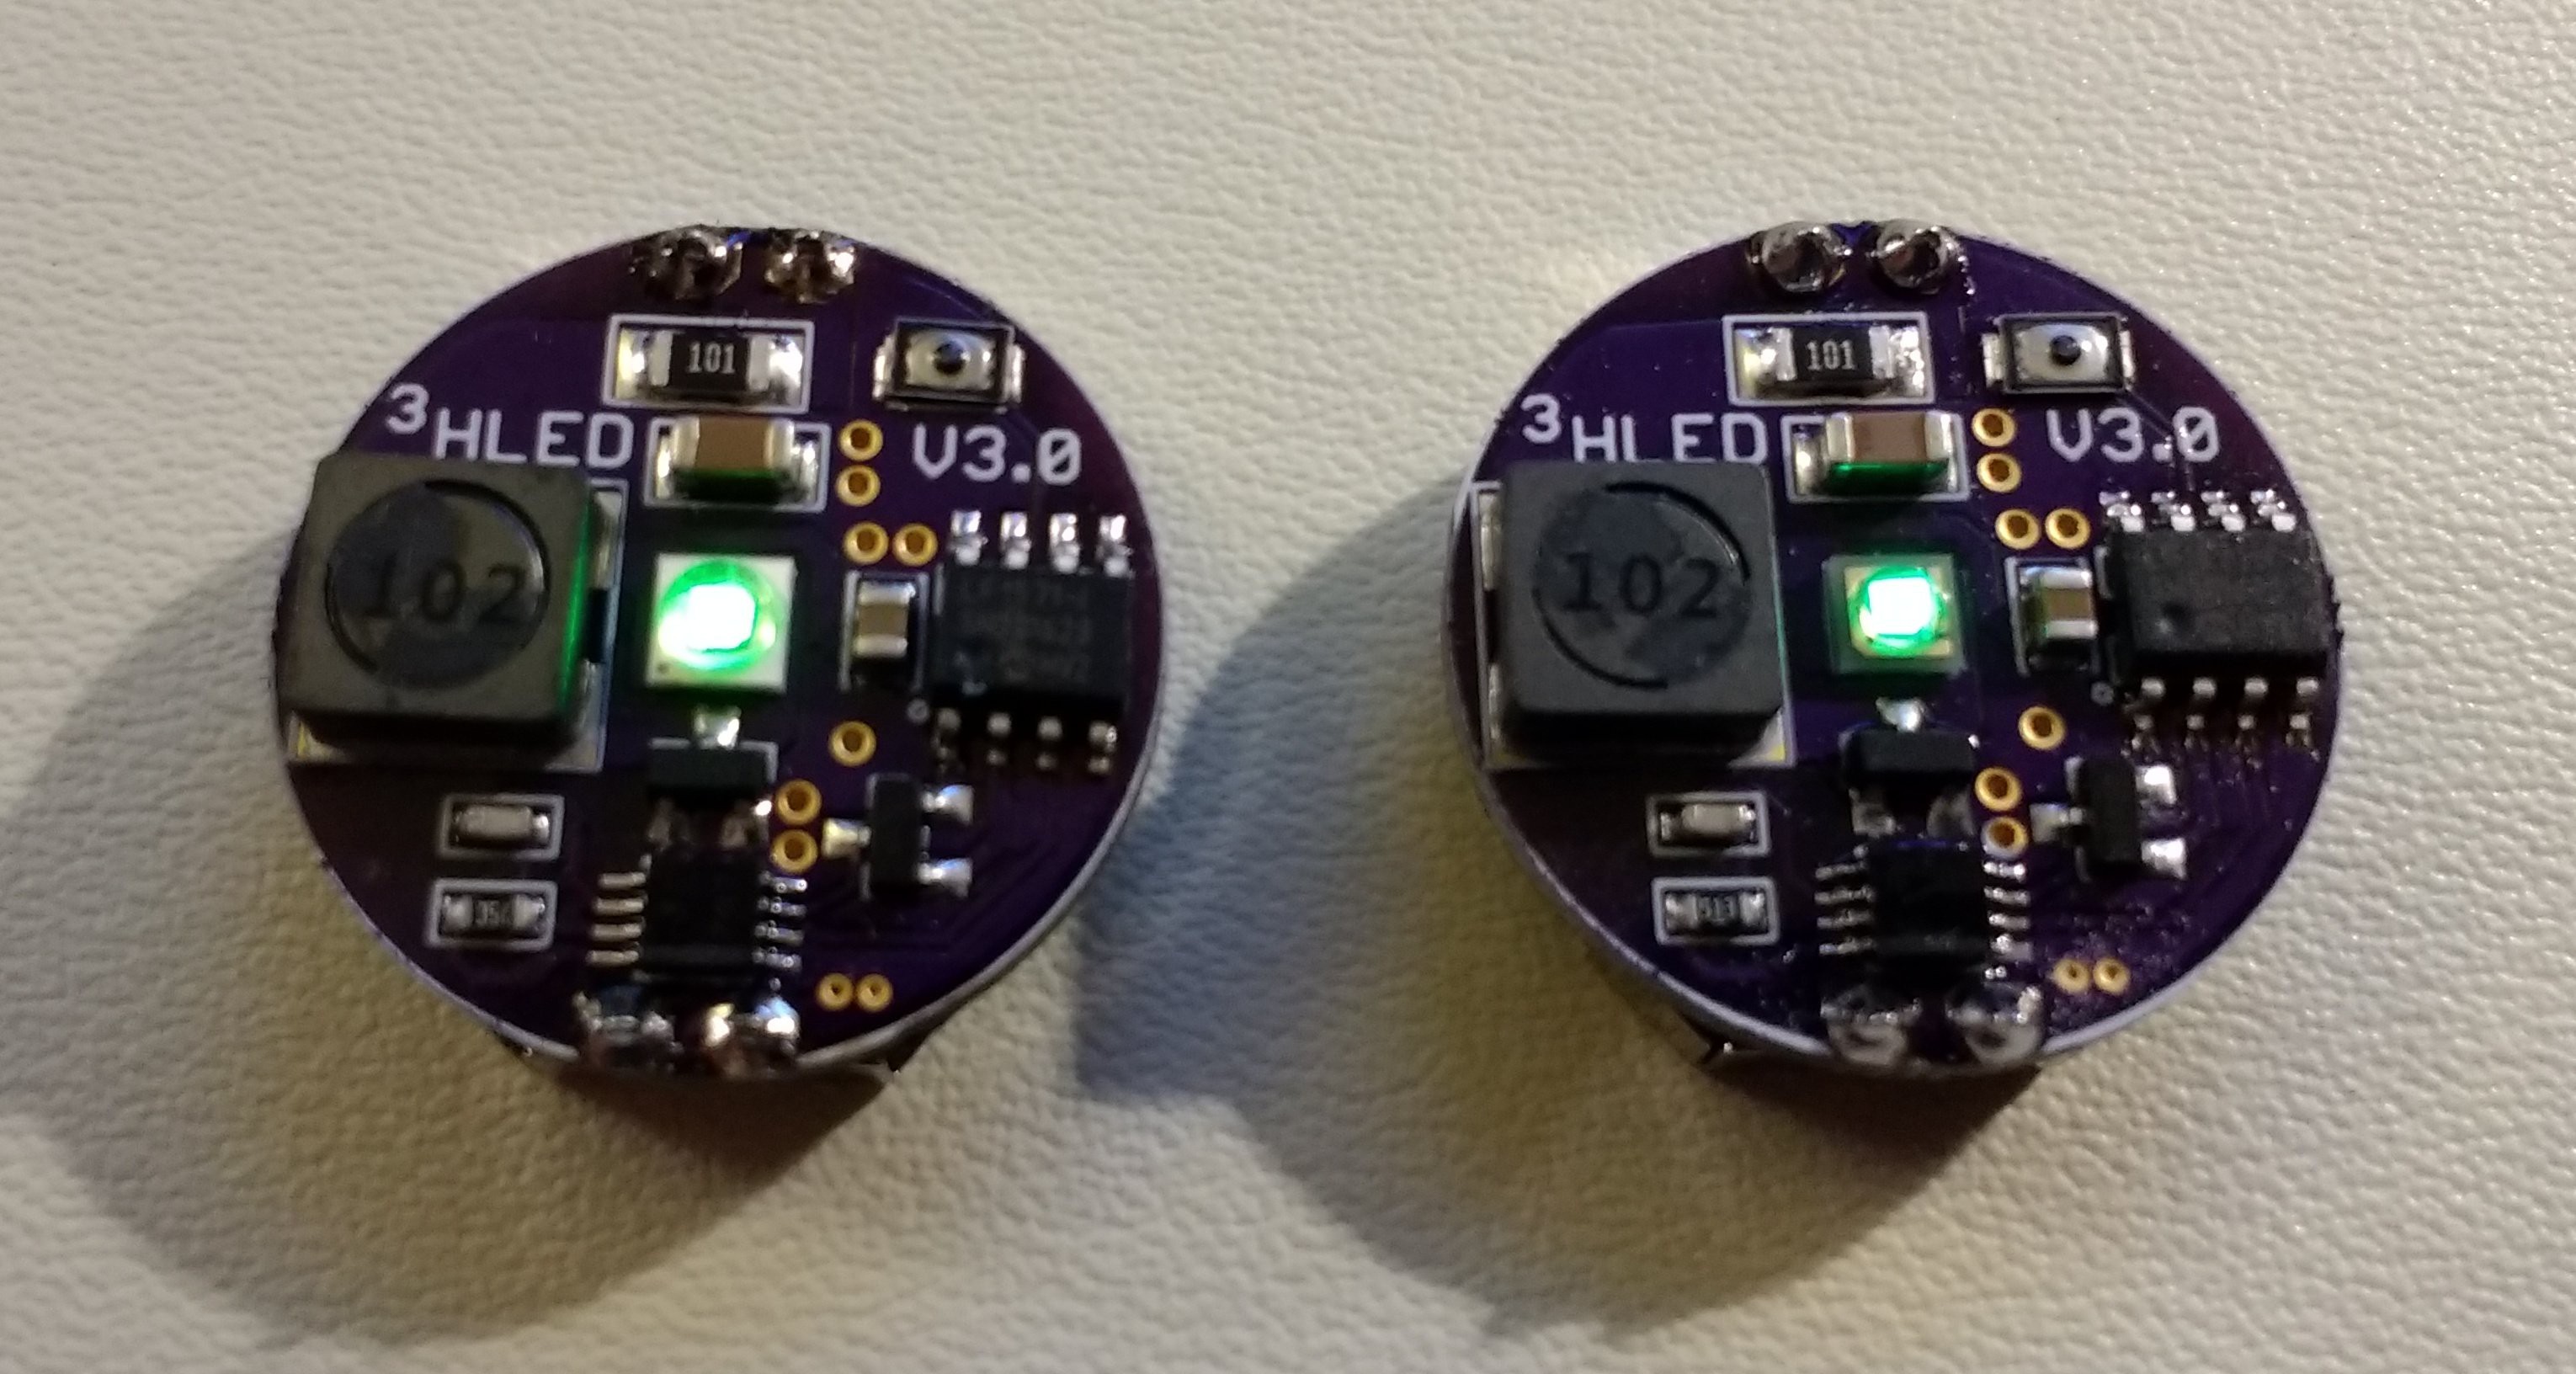
    I think this is the last version I'm going to make.  I added a tiny (3x2mm) switch to the V3 board to allow you to select the brightness/run-time at startup.  You can see the switch in the upper right, just above the incorrect "V3.0" silkscreen text (I fixed this since these boards were made).  It basically fits in a 1206 footprint! The Cree XPE2 is on the left, with the OSLON Signal Verde LED on the right. I didn't make a V3.1 PCB for the Luxeon C LED.  The Eagle files and gerbers are in GitHub.

    The switch was added to go with the new C-code.  The code allows you to tune the brightness when you first insert the battery.  Pressing the switch cycles between 1-10 year burn rates.  You get a preview of the brightness for 4 seconds, then the LED blinks out the run-time in years (e.g. four blinks = four years).  Once you let it cycle uninterrupted three times, the brightness gets locked in until the battery is removed.

    The code also has some additional enhancements (some are enforced in the makefile).  Most importantly, the code fits into the lower half of flash memory, which is write-protected in the configuration bits.  This prevents accidental over-write of the code by an errant program.  The code has to write to program flash memory to store the brightness mode, since there is no EEPROM on this part.  To make things safer, the brightness mode is stored in the upper half of flash (read/write), with the code itself safely in the lower half.  Microchip probably could have provided a finer granularity on their write-protection (all/none/half), but the part is what it is.

    BOM

    The V3.1 is identical to the V3.0 except for the switch.  This particular switch is available in three different activation forces (100g, 160g, 240g).  I have samples of the 160g and 240g, and am not sure which I like best.  They both seem to work OK:

    (160g) KXT 321 LHS switch, DigiKey part #CKN10778CT-ND, $0.25 each

    or

    (240g) KXT 331 LHS switch, DigiKey part #CKN10779CT-ND, $0.25 each

    Next Up

    I'm still tweaking the automatic brightness tuning script.  I'll be posting that soon.

    I'm also going to run a head-to-head experiment to answer the question: "why don't you just use an LED and resistor".

  • Stupid Case Tricks

    Ted Yapo01/08/2018 at 19:36 2 comments

    Here's a quick rundown on what I have learned from playing with the case:

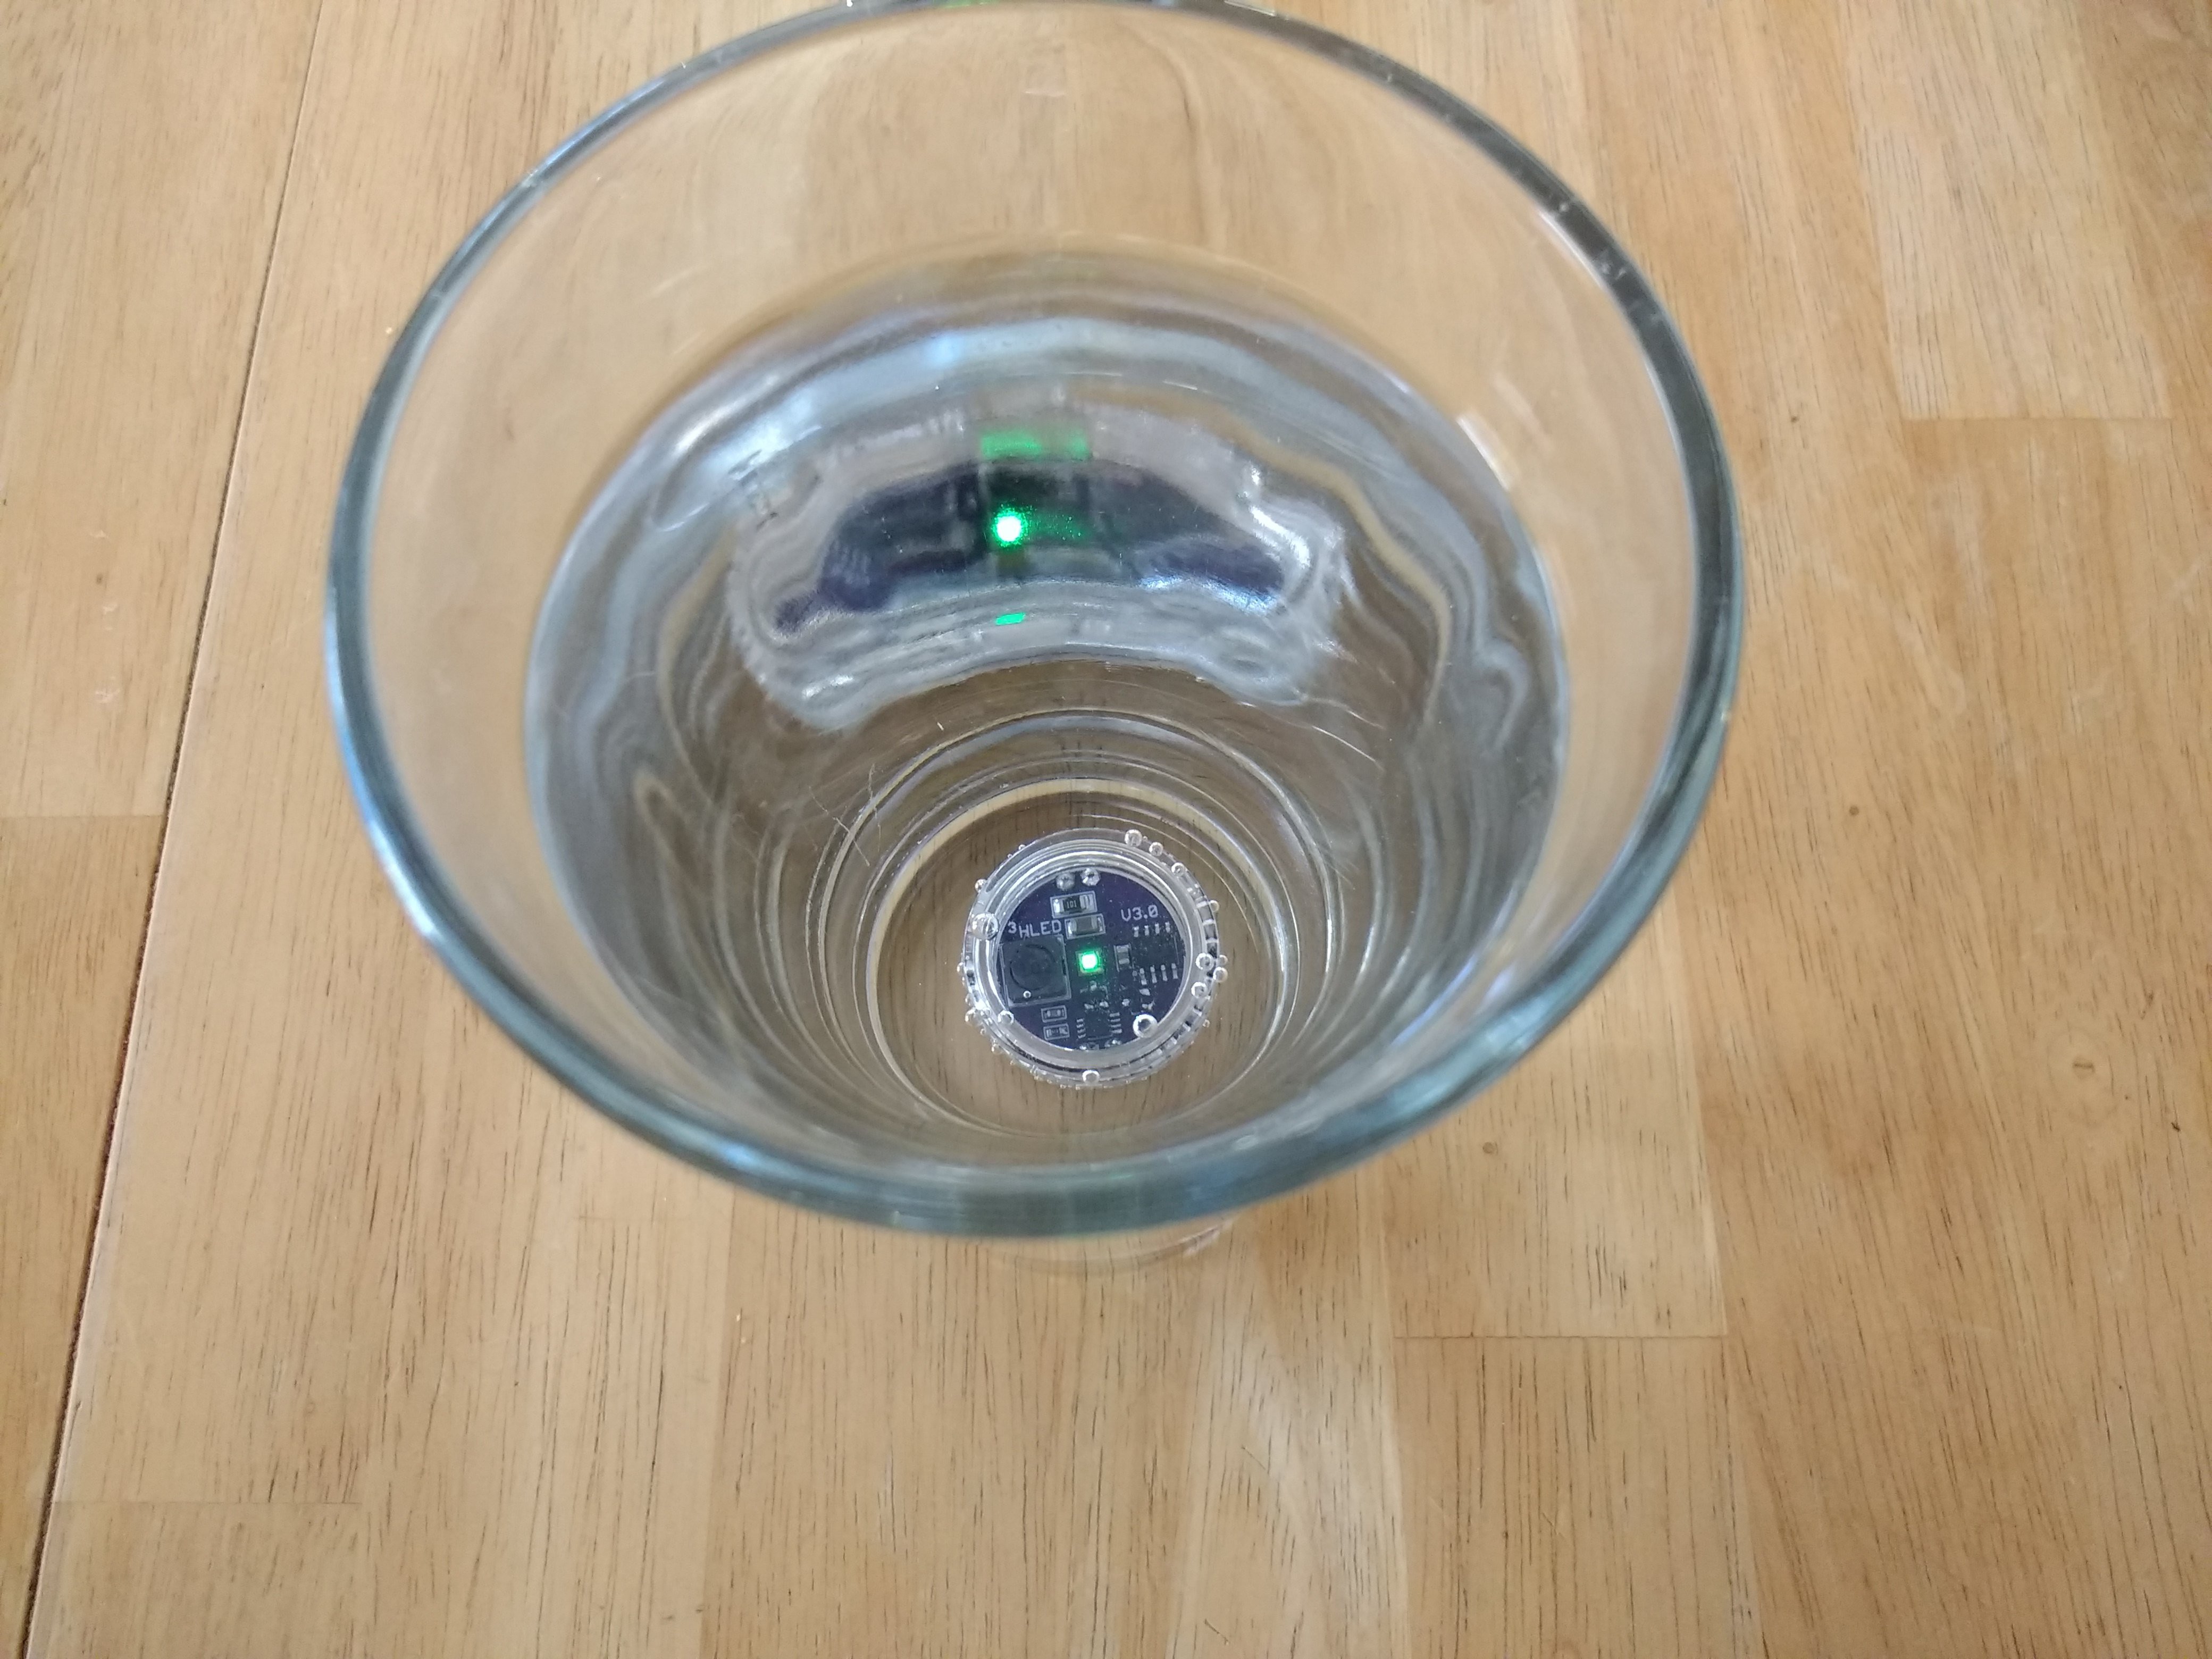
    TritiLEDs Sink

    I had hoped they would float, but I guess that would make the case larger.  This one stayed under water for a day with no leakage.  It was sealed with a 25x1mm o-ring.  The fit isn't very good, though, and I'm going to try to find some better ones.

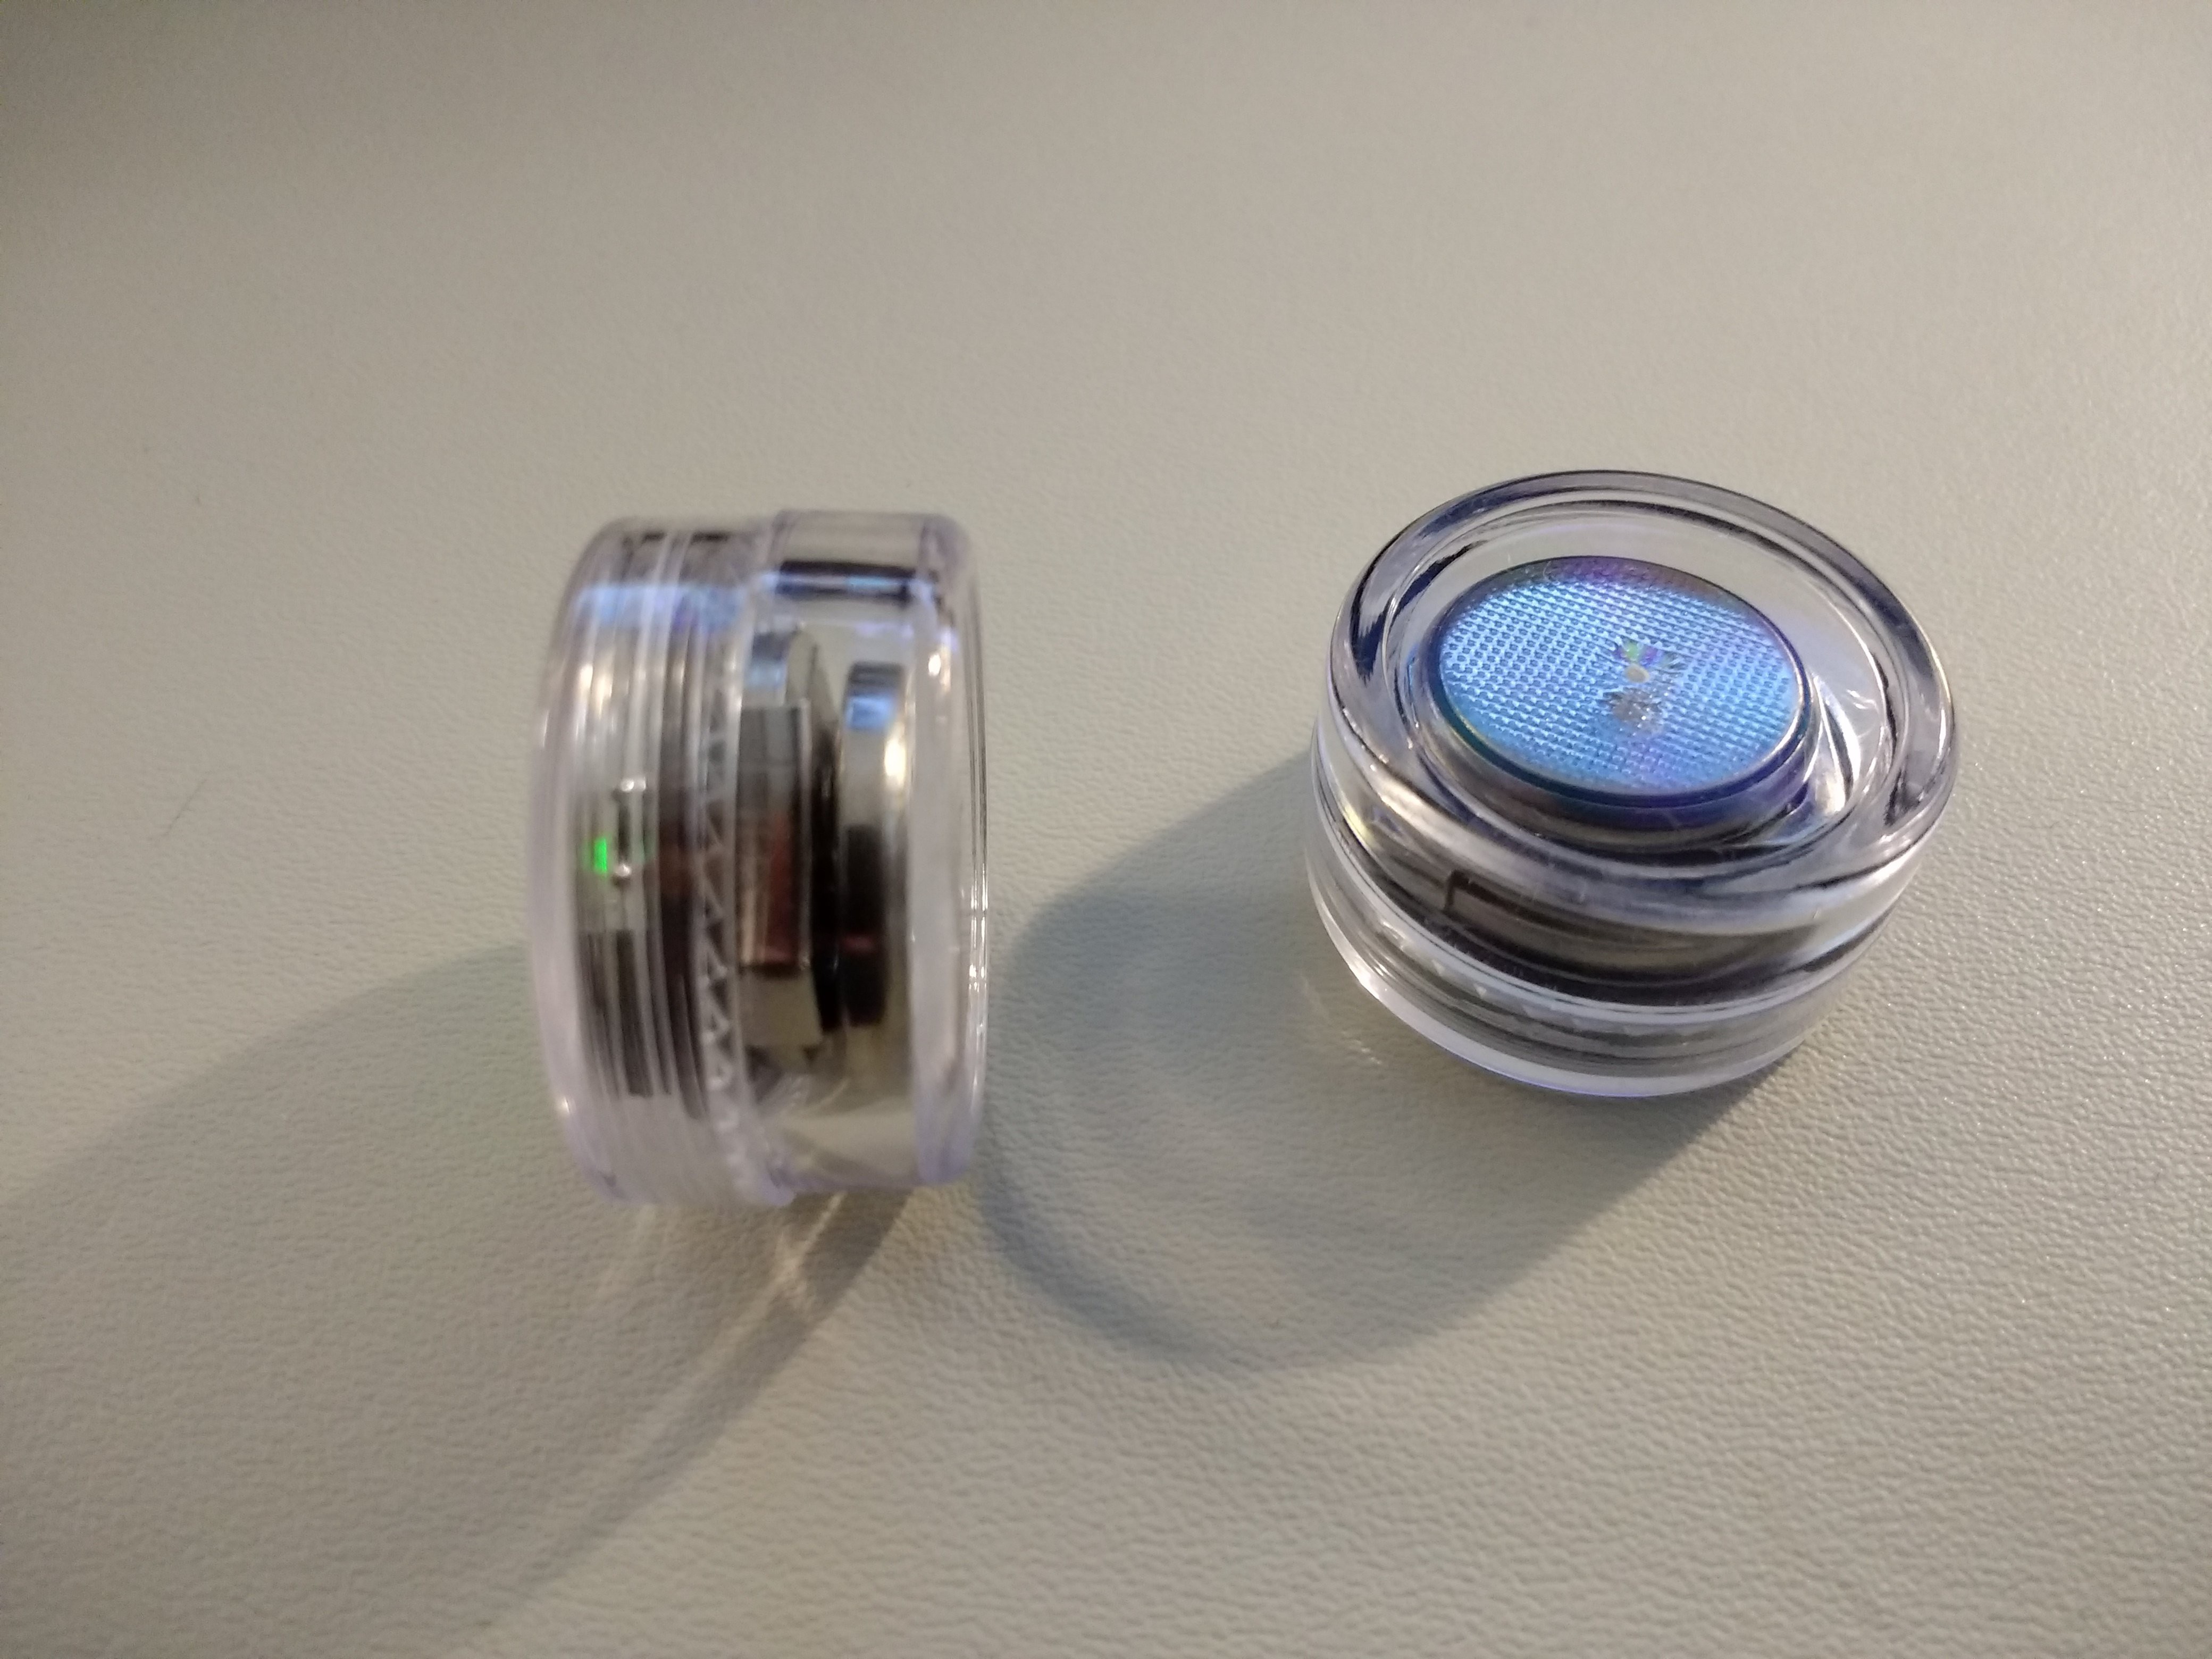
    Spare Battery

    You can fit a spare battery in the bottom of the case:

    The "5g" jars are a little too deep, and there's just enough space for a spare CR2032.  For 10-year run-times, a spare cell probably isn't too interesting, but for a bright 1- or 2-year marker, having a spare cell right in the case could be handy.

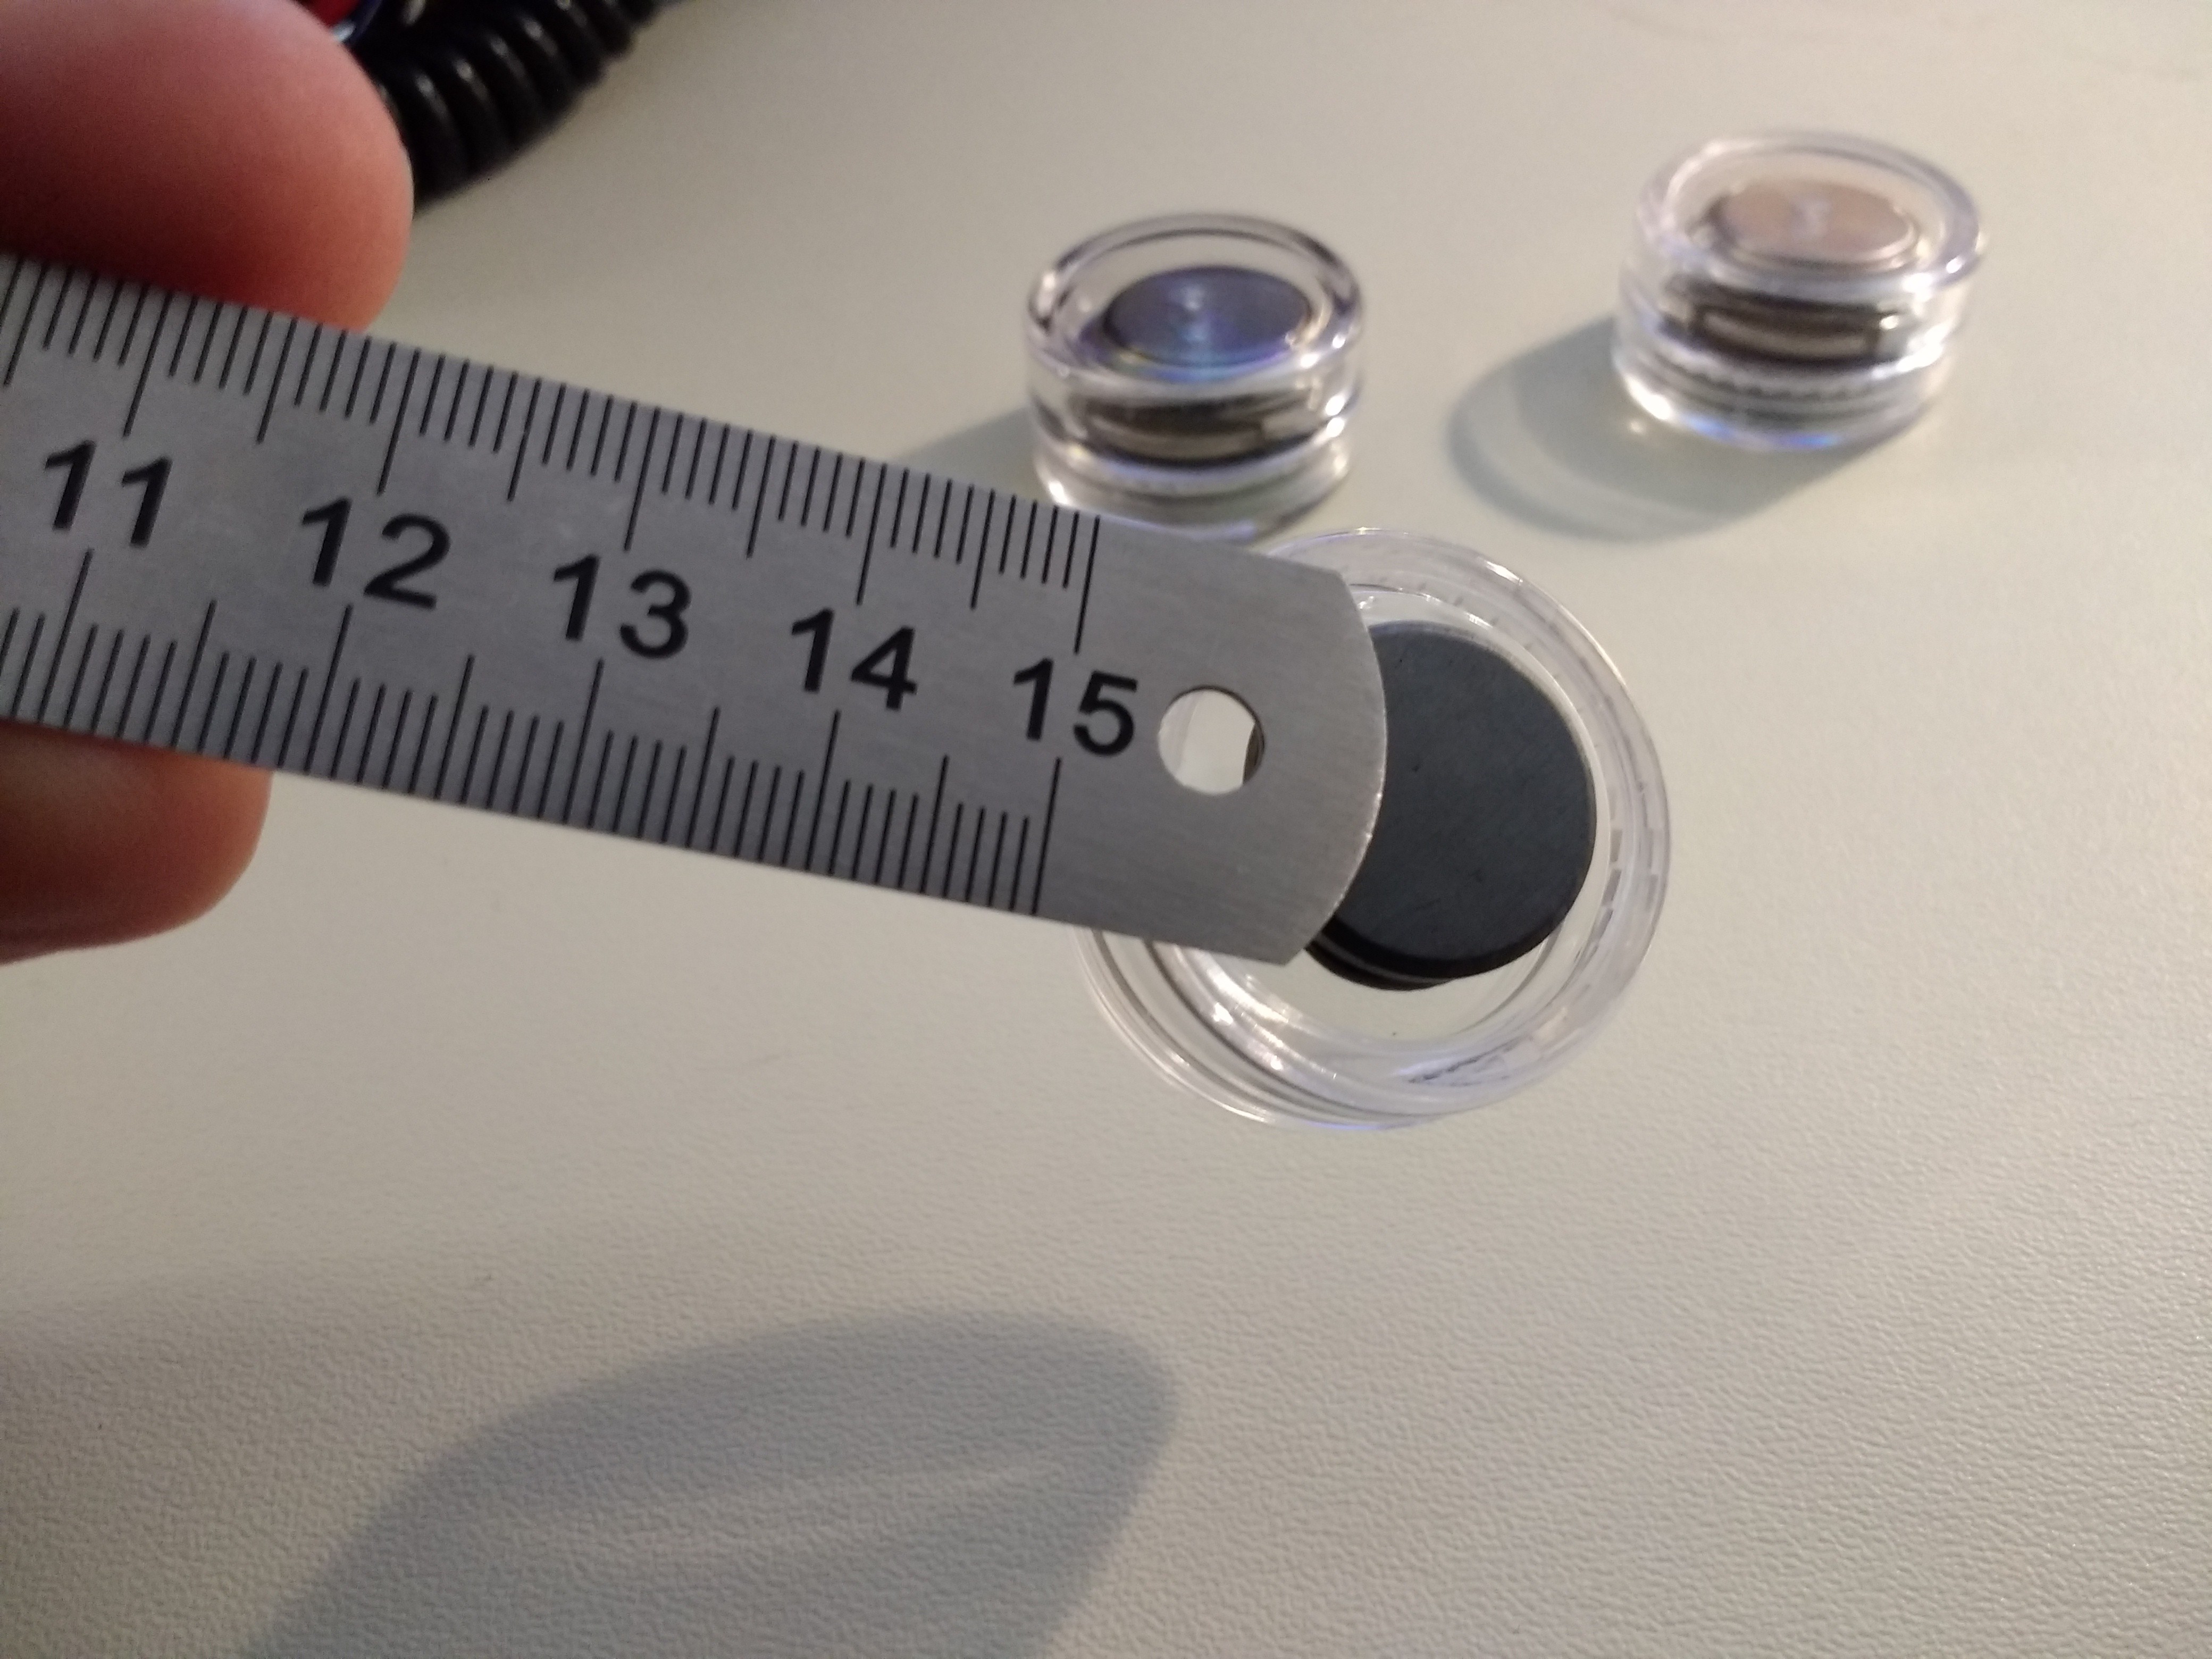
    Magnets!

    Like lasers, magnets make everything more interesting.  Here, I glued a cheap 18mm ceramic magnet to the bottom of a case with a dab of epoxy:

    The ceramic magnet isn't very strong, but holds the light OK.  A strong neodymium magnet will hold it without glue, just from being attracted to the coin cell through the case.  The best solution is probably glue+neodymium, but then you might have trouble extracting the PCB to replace the battery.

  • Determining maximum runtime: 17.6 to 20.2 years (CR2032)

    Ted Yapo01/06/2018 at 21:34 25 comments

    OK, so for the coin cell contest, we want to know the maximum runtime.  I have considered estimating this three different ways.  As an example, I'll take the minimum pulse rate of the V3.0, 0.5 Hz (the light blinks once every 2 seconds).  I measured the current drain to be around 1.15uA at this rate. 

    How long will this run on a CR2032?

    First, you need to decide on the cell's capacity.  I'll use 225mAh, which is on the Panasonic CR2032 Datasheet, since I'm using Panasonic cells.  Other manufacturers quote other numbers.

    Capacity / current

    In this method, which you see most commonly used, you divide the capacity of the cell (in Ah) by the current drain of the device (in A), to yield a lifetime in hours. To get years, we divide by 24 hours/day, and 365 days/year (if you want to get technical, you can use 365.25).  In this case, we get:

    0.225 / 1.15e-6 / 24 / 365 = 22.3 years

    Nice, but this exceeds the "shelf life" quoted as 10 years. 

    WTF is shelf life, anyway?  It certainly doesn't mean the battery is dead at that point if left on the shelf.  Instead, it's a measure of self-discharge.  Elsewhere in their Lithium Handbook, Panasonic quotes a 1% self discharge rate per year.  So, at the end of the 10 year shelf life, the cell should retain more than 90% of its initial capacity (depending on 1% of what: see below).  Considering this, the 22.3 years calculated above doesn't seem correct anymore - at that point, the battery would have lost some of its initial capacity sitting on a shelf.  It would be nice to take this into account.

    Considering Self-Discharge

    To include the effects of self-discharge, I first assume the 1% per year means 1% of the remaining capacity.  This means the capacity obeys the differential equation:

    where s is the self-discharge rate, in this case 0.01/year.  The solution of this equation is an exponential decay describing the capacity of a battery on the proverbial shelf, which is interesting, but doesn't answer the question.  To figure the runtime, we also need to include the circuit's current drain.  For the moment, assume the drain is a constant current of d amps.  The equation now looks like:

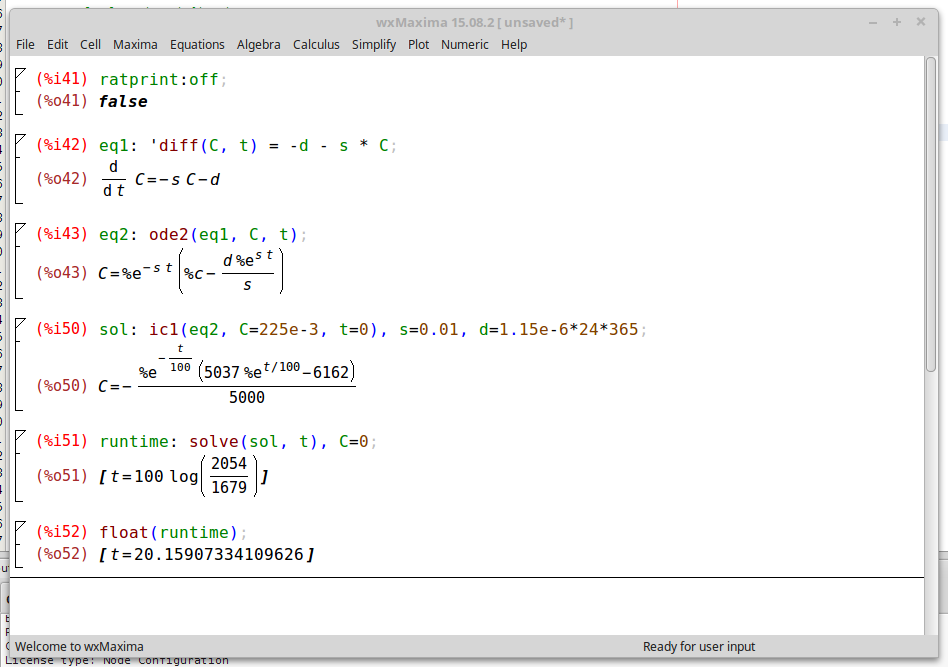
    In 2018, there's no need to be intimidated by (simple) differential equations like this: just throw them into Maxima.

    I got maxima to solve the ODE, selected a specific solution by giving the initial conditions (fresh battery at t=0), and finally solved the result for the time when C=0.  The result: 20.2 years.  Two years shorter than the earlier estimate. (Note: earlier, I posted 19.4 years here due to a typo in the maxima code).

    Linear Self-Discharge

    It's also possible that 1% discharge per year means 1% of the initial capacity per year.  This would mean a linear decay of capacity obeying:

    The solution to this one is trivial: we just add (0.225 Ah * 0.01 / 365 / 24) = 257nA to the device current.  For the lifetime, we get 0.225 / (1.2e-6 + 257e-9) / 24 / 365 = 17.6 years.  Two and a half years shorter still.

    So, there you have it: the TritiLED V3.0 can run for somewhere between 17.6 and 20.2 years on a CR2032.

    There's a subtle problem with each of these estimates.  When the cell voltage falls over time, the circuit current also falls.  This would extend the run-times, since the current is continually dropping.  Ignoring this effect would tend to under-estimate the run-time, so the above estimates may be slightly conservative....

    Read more »

  • Selecting brightness/battery life at runtime

    Ted Yapo01/06/2018 at 19:16 2 comments

    The simple assembly code I wrote to get V3.0 up and running works fine.  You can configure the brightness in code, then download a new image to the PIC to change the battery lifetime.  This is OK if you are building these devices for your own use, but inconvenient for people who just want to buy them.  So, it would be nice to have a simple user interface on the board to select the runtime.

    I was initially concerned that the runtime might get accidentally changed over the years, then @jaromir.sukuba suggested a configuration mode that was only accessible briefly after the battery was inserted.  After that period, the brightness (and battery life) are locked-in until you remove the battery.

    I wrote some C code that does this yesterday - you can see it in the GitHub repo.  Well, it's mostly C-code.  There are two helper functions I had to write in assembly to access the high-endurance flash (HEF) portion of program memory to store the current mode setting.

    The user interface is simple.  After inserting the battery, the LED blinks out the runtime in years: 5 blinks = 5 years, etc.  To increment the runtime, you short pin 4 to pin 8 (RA3 to GND).  This "switch" is properly debounced in software.  I found some 2.6x1.6 mm switches, and I think I'm going to spin a set of V3.1 boards with them.  The code blinks out the runtime 10 times, then enters the running mode, and can't be re-configured without removing the battery.

    The only downside to this approach is that you sometimes have to wait a long time for the capacitors to discharge.  At 10-year run-times (or more), the mere 11uF of capacitance on board can power the LED for many seconds!

    There are a few configurable parameters in the code controlling the interface:

    // number of cyles of blinks to show before exiting config mode
    #define N_CYCLES 10
    
    // number of pulses per "blink" in config mode, higher = brighter blinks
    #define N_PULSES 10
    
    // year run-times and corresponding PWM periods
    #define N_MODES 10
    struct run_time
    {
      uint8_t years;       // number of years of run-time or mode number
      uint16_t pwm_period; // PWM period (in units of 1/31000 s)
    };
    
    // Note: frequencies converted to pwm periods
    const struct run_time period_table[N_MODES] =
      {{1, (int)(31000./326. + 0.5)},
       {2, (int)(31000./155. + 0.5)},
       {3, (int)(31000./98. + 0.5)},
       {4, (int)(31000./69. + 0.5)},
       {5, (int)(31000./52. + 0.5)},
       {6, (int)(31000./41. + 0.5)},
       {7, (int)(31000./33. + 0.5)},
       {8, (int)(31000./27. + 0.5)},
       {9, (int)(31000./22. + 0.5)},
       {10, (int)(31000./15. + 0.5)}
      };
    
    // default mode index 
    #define DEFAULT_MODE_IDX 1
     

    The run-times and associated PWM frequencies are stored in a table in the flash.  In this case, you can select from 1 to 10 year lifetime in 1-year increments. These values can be manually determined, or you can use a script and some hardware to find them automatically (I'll be publishing this script soon, I'm just cleaning it up now).  The table shown here is not quite right: there is no need for the frequencies to be integers. Frequencies with greater precision (e.g. 21.7 vs 22), will result in more accurate PWM period counts (e.g. 1428 vs 1409).  The differences can be significant for multi-year run times.

    I guess I just promised at least two more logs: the auto-tuning script, and V3.1 PCBs with a tiny switch.  It might feel like work if I didn't love it :-)

  • V3.0 Release

    Ted Yapo01/03/2018 at 15:02 1 comment

    I've finished the design and tuning for the OSLON Signal Verde LED flavor of V3.0.  The design is documented here; as I tune the other LED flavors, I'll add to this log.  Key features of V3.0 are the ability to finely tune the brightness/lifetime trade-off, build-time configuration for different optimal LED drive currents, and using a "5g" plastic jar as a case.

    The PCB uses a through-hole CR2032 holder (smaller than the SMT version), allowing it to fit in the jar.
    Circuit

    The V3.0 circuit uses a 74LVC1G123 monostable to produce short, accurate pulses for ramping up current through the inductor.  The inductor size and monostable pulse width are selected to optimize the drive current to the LED, based on measured LED efficiency vs current.  A PIC12LF1571 uses two synchronized PWM outputs to control the pulses.  One PWM gates power to the monostable (it consumes too much quiescent power), while the second PWM triggers the pulse.  The 16-bit PWMs on the PIC allow very fine tuning of pulse frequency and hence battery lifetime vs LED brightness.  Combined with inductor and monostable resistor selection, the circuit lets you tune for very good electrical and LED efficiency while allowing accurately tunable runtime.

    Note: a different value of R3 is required for each type of LED.

    Bill of Materials

    The following components are required for any flavor of V3.0:

    Depending on the LED you choose, you will need a different PCB, resistor, and possibly inductor.  Choose from one of the LEDs in the following sections:

    OSLON Signal Verde (505nm)

    This LED has the best optical match to dark-adapted eyes.  If you are just going to build one version, use this LED, and forget about the $3.49 price tag. It requires a 1mH inductor and 51k resistor for optimum efficiency.

    Luxeon C Cyan

    This LED is my second choice for dark-adapted eyes.  It's cheaper than the OSLON at $2.74, but just a little too blue for optimum visibility.  The higher optimal current also makes it flash more visibly at extended run-times (see below).

    Read more »

  • First V3.0 PCB

    Ted Yapo01/03/2018 at 03:44 5 comments

    I populated the first V3.0 PCB today.  It's actually been through a few iterations, but I didn't even bother filling any of the earlier boards.  This one is finally worth building.  The board is smaller now (23mm diameter), so it fits inside cheap, widely available "5g" polystyrene jars, but still uses an inexpensive replaceable CR2032 for power.

    This first PCB uses an OSLON Signal Verde LED.  I tuned this particular PCB to a 2-year run-time (12.5 uA) on a CR2032, and it blinks at 157 Hz.  The breadboarded version needed to be tuned to 123Hz to achieve the same run time (probably due to the 30% inductor tolerance).  The ability to fine-tune the current draw was one of the design goals of the V3 (as was fitting inside these jars).

    I also have PCBs for Luxeon C and Cree XPE / Cree XPE2 LEDs.  They are identical to this one except for the LED pads.

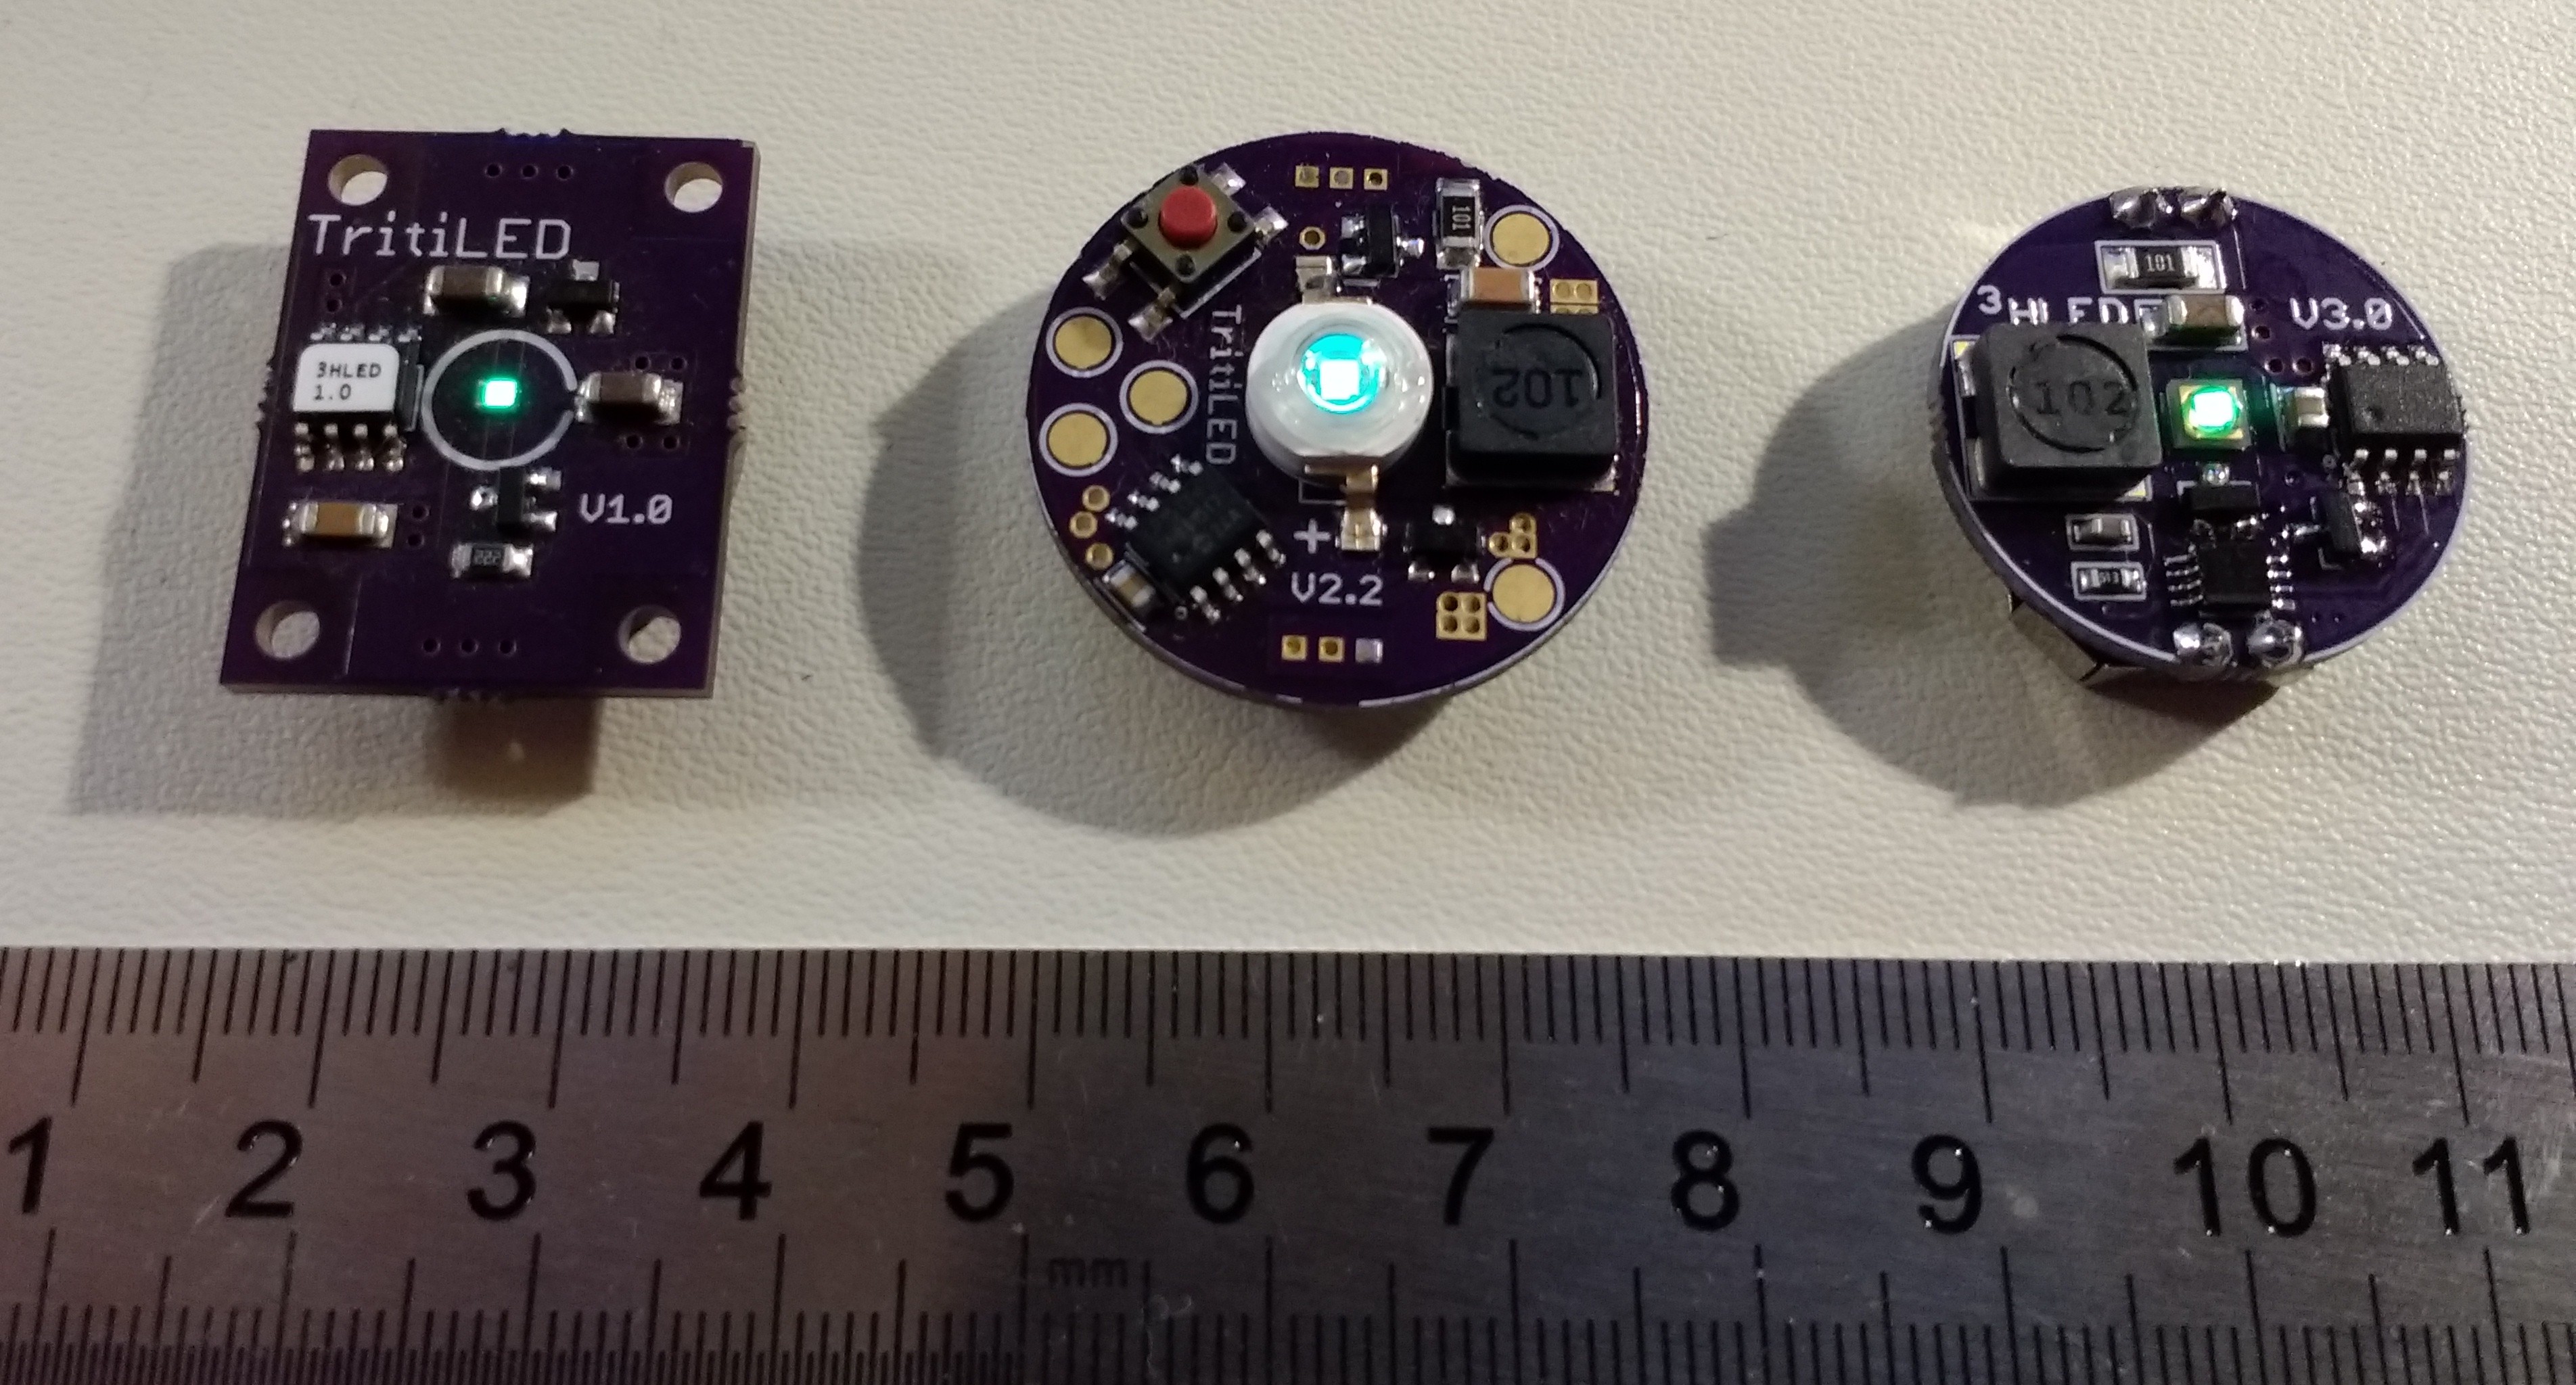
    Here's a visual comparison with the previous two generations for reference:

    One of the key differences is the use of a through-hole CR2032 holder, which is actually smaller in diameter than the surface-mount version (since the through hole doesn't need flat mounting tabs).  This was the final change required to fit the PCB inside the jar.

    Tuned to the same 2-year run time as the V2.0, the V3.0 is noticeably brighter.  It's roughly as bright as the V1.0 (which only runs 1 year).  But, you can tune the V3.0's brightness to last from less than 1 to more than 10 years on a CR2032 cell.

    I'll put together a more detailed post for those wanting to build some of this new version, including a BOM and placement diagram.  The PCB designs are already in GitHub, I just need to polish the software a little and put it up there.

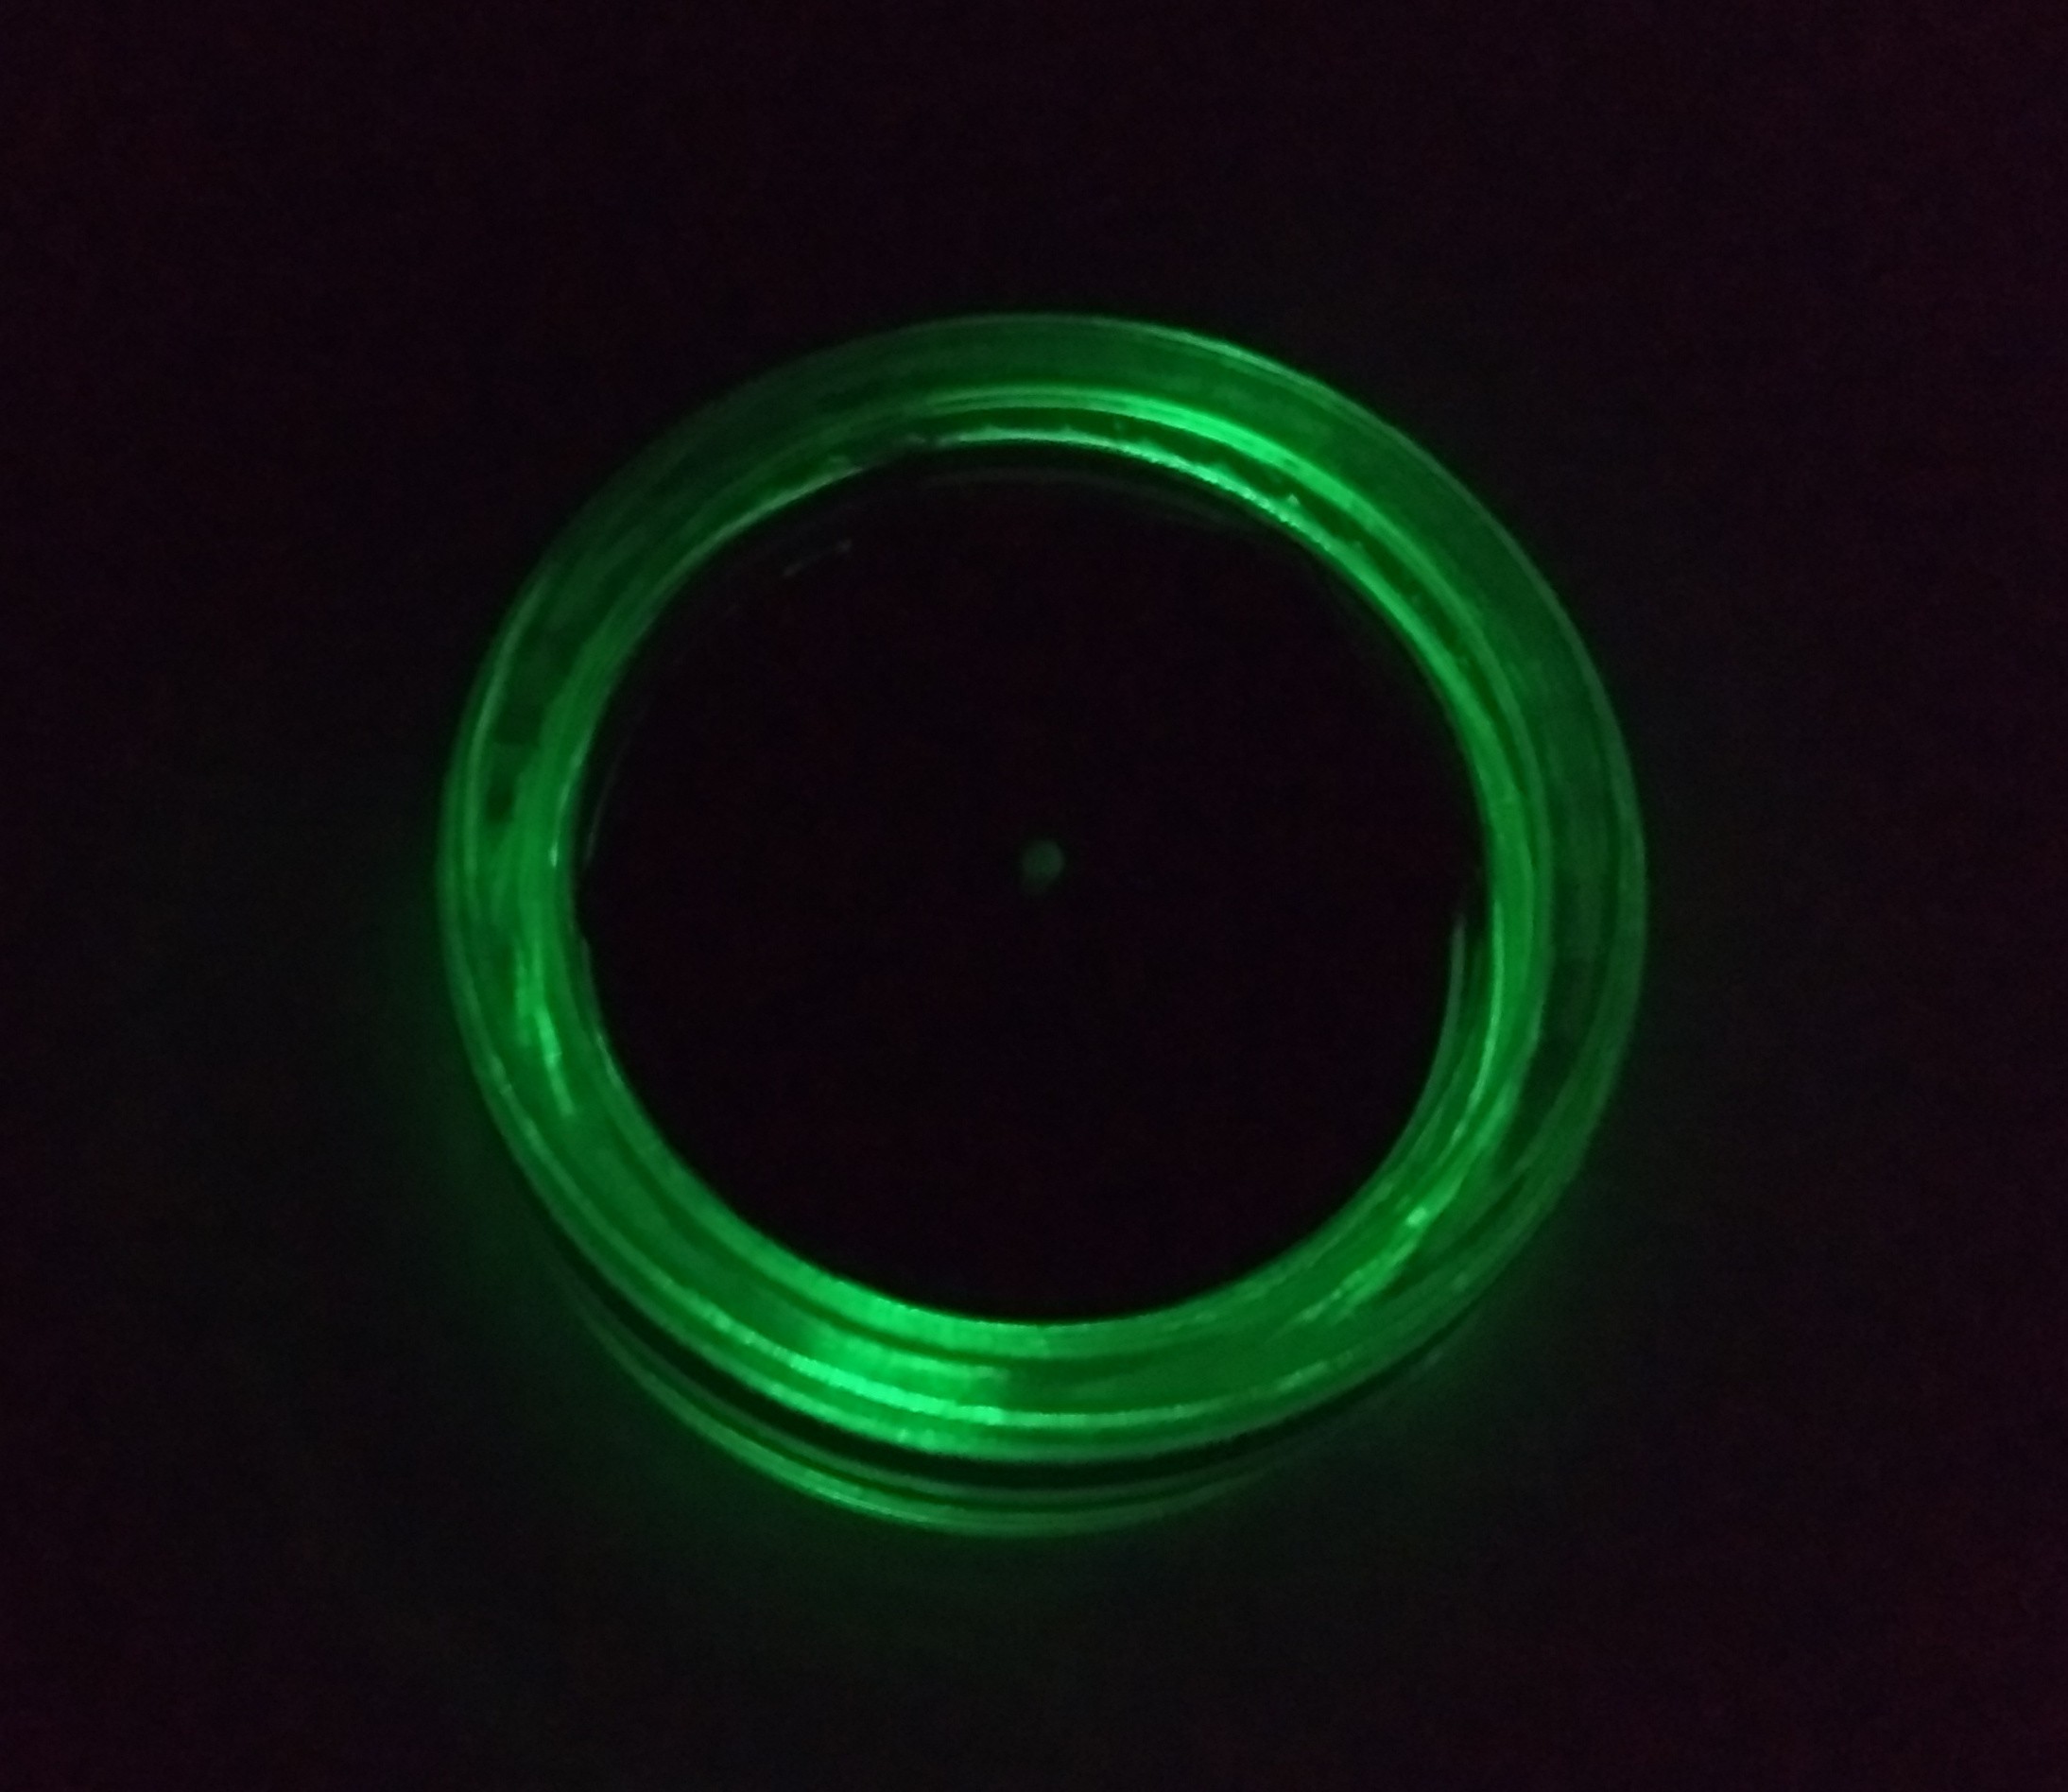
    EDIT: I discovered that the clear jar makes a nice dim ring of light when placed upside down.  I usually keep a few of these lights on my nightstand, but the light can actually be enough to bother me.  Being able to attenuate the output somewhat by turning them upside down is an added bonus, especially since it looks so cool.

  • Programming PICs with Python

    Ted Yapo12/31/2017 at 04:09 8 comments

    No, not *in* python; they're still coded in assembly.  I mean using python to drive the assembler and PICkit3 programmer.  It turns out that MPLABX tools have a decent command-line interface.  I wrote some simple python classes to take the pain out of the command-line switches and enable automatic tuning of V3.x TritiLEDs.

    One of the problems with the V2.x design was the inability to fine-tune performance for variations due to part tolerances (the inductor, for example is +/-30%).  Since the pulse frequency of the V3.x design can be very accurately tuned, I would like to be able to "tune out" the component tolerances once the devices are assembled.  This calibration process means programming the part, measuring the current drain, adjusting the pulse frequency, recompiling, and re-programming.  Then, maybe looping through the whole process a few times.  This is not something I want to do manually for each unit.

    So, that's where the python comes in.  The fundamental code is shown below.

    Scripting the MPASMX assembler is trivial.  In order to tune the frequency parameter, I simply write a one-line include file from python including an "equ" directive.  This file is included by the main assembly file.

    Scripting the PICkit3 programmer is much more interesting.  You control the programmer through a script called "ipecmd.sh" (check for the name on different OS's), and it's documented in a file called "Readme for IPECMD.htm" in the mplabx/docs directory The programmer has provisions for powering the target device directly, and allows you to adjust the Vdd voltage.  Coupling this with a serial-enabled DMM makes a very nice little test kit: you can program different code on the device, then measure the current drain over a range of supply voltages.  There are probably a lot of interesting uses.

    I still have to integrate the DMM code and write the iterative tuning algorithm, but that's probably of less general interest than programatically driving the PICkit3.

    One thing I've discovered so far is that the output voltage of the PICkit3 doesn't seem very accurate.  I may add another serial-DMM to the test setup to measure the actual voltage instead of relying on what I tell the programmer to supply.

    #!/usr/bin/env python
    
    import subprocess
    
    mplabx_path = '/opt/microchip/mplabx/'
    
    class MPASM:
      def __init__(self, path):
        self.path = path + 'mpasmx/mpasmx'
      def assemble(self, filename):
        subprocess.call([self.path,
                         filename])
    
    
    class PICKIT3:
      def __init__(self, path, part):
        self.path = path + '/mplab_ipe/ipecmd.sh'
        self.part = part
      def program(self, hexfile_name, voltage):
        subprocess.call([self. path, 
                         '-TPPK3',
                         '-M',
                         '-F' + hexfile_name,
                         '-P' + self.part,
                         '-W' + str(voltage),
                         '-OL'])
      def setVoltage(self, voltage):
        subprocess.call([self. path, 
                         '-TPPK3',
                         '-P' + self.part,
                         '-W' + str(voltage)])
    
    class Frequency:
      def __init__(self, filename):
        self.filename = filename
      def set(self, freq):
        f = open(self.filename, 'w')
        f.write('FREQ    equ    .' + str(freq))
        f.close
    
    voltage = 3.2;
    PK3 = PICKIT3(mplabx_path, '12LF1571')
    ASM = MPASM(mplabx_path)
    freq = Frequency("frequency.asm")
    
    
    freq.set(123)
    ASM.assemble('tritiled_v30.asm')
    PK3.program('tritiled_v30.HEX', voltage)
    #PK3.setVoltage(1.8)
    

View all 44 project logs

Enjoy this project?

Share

Discussions

Dylan Brophy wrote 07/05/2017 at 20:43 point

Congrats - you made it on the HaD Newsletter!

  Are you sure? yes | no

Ted Yapo wrote 07/06/2017 at 00:33 point

Thanks!  It's funny; I knew something had happened from the stream of like/follow notification emails I started getting.

  Are you sure? yes | no

Dylan Brophy wrote 07/06/2017 at 00:40 point

lol

  Are you sure? yes | no

freefuel wrote 07/05/2017 at 19:03 point
pkobla have you taken a look at the green arrays multi core chip? http://www.greenarraychips.com/home/products/

  Are you sure? yes | no

Adam wrote 06/22/2017 at 13:32 point

Please Please don't let this project be dead. It has been 7 months since the last update and the files on OSH are (I believe) 2.0 not 2.2. Simple instructions, a BOM, the gerbers (or the boards shared on OSH) and the hex are all that is needed for this project to be great and completed, don't let it just fizzle out like this. Also think about the hackaday prize for assistive tech coming up! surely these would be great as markers for those with partial sight loss.

  Are you sure? yes | no

Ted Yapo wrote 06/22/2017 at 16:11 point

To be honest, I didn't see the level of interest that would motivate "completing" this project to produce a final design.  It's more of an idea, and in that sense has been picked up, modified, and used at least three times that I know of, which I consider a success.  Maybe my perspective is different - I'm not sure I've ever built someone else's project as-is.  I look at the schematic, idea, or interesting technique, and maybe get inspired to try something on my own.  Once it gets reduced to "insert capacitor C2 into the holes marked 'C2'", I lose interest very quickly: I have a box of randomly-purchased never-opened kits as evidence.  My approach on hackaday.io has been to target like-minded people as an audience.

I did see some interest in buying completed units, but I don't want make these things for a living.  Any one of seven billion other people could do so.

Thanks for pointing out where I hadn't posted everything you might need
to re-create this project exactly.  I have it on my mental list to
re-work the board to remove the reverse-battery-protection MOSFET and
replace it with a resistor, which provides some additional protection, as discussed in #Decade Flashlight.  Meanwhile, the other MOSFET now has a 2,000 piece minimum order on Digikey, so I'll have to find a substitute.  The code also needs cleaning up.  I wouldn't release them in their current state, but I will accept your criticism and work (maybe slowly) toward posting more complete and usable info.

Oh, The Prize.  I was selected in two rounds of the 2016 prize, and paid with a few months being over-caffeinated, under-rested, and stressed out trying to make quick progress on projects I thought would compete well: I neglected my health and some other responsibilities to find time to work on them. In the end, I think I ended up spending more on parts and boards and miscellaneous stuff than I got in prize money (after taxes) - at best, it was a break-even, although I do have a few big bags of assorted parts I may never use.  This is obviously all my fault, but I learned something about myself in the process. I'm sure many others have had different/better experiences, maybe because they approach projects differently than I do.  The Prize is great, and motivates a lot of people to make awesome stuff, and I'm not trying to disparage it in any way: I've just decided that it's not for me.  This hobby is supposed to relax me - and than means working on what I want, when I want, how I want, and taking seven month (or longer) breaks when necessary :-)  So, I've decided that when a contest comes along, *if* I have a suitable project that is already in a submittable state, I might submit it.

That said, I am not alone on this project.  If one of my collaborators wanted to submit this project to a contest, I wouldn't stand in their way.

I'll just be frank about this: simple instructions aren't going to happen - if you want to build one of these you'll need to know how to assemble  an SMD board and program a PIC, which you can find many other places described better than I would.  I chose the new LEDs based on the fact that they can be hand-soldered, which should help.  You'll also need a PIC programmer and probably an SOIC-8 test clip, which seems to be the easiest/cheapest way to go.

EOR

(end-of-rant)

  Are you sure? yes | no

Jarrett wrote 06/22/2017 at 21:58 point

I feel you on a lot of this, Ted - As soon as "the hard stuff" in a project is complete, I rapidly lose interest. Packaging everything up as a kit so that someone else can blindly follow along is what I do for a dayjob, not something I want to do for fun.

I do have one issue with this, though! You say, "The code also needs cleaning up.  I wouldn't release them in their current state, but I will accept your criticism and work (maybe slowly) toward posting more complete and usable info."

There are about three projects I have on my Github in exactly that state. I promised myself that I would come back and clean up the code, but it hasn't happened yet. New, shiny projects come along, etc.

What I've found is that a working but "messy" codebase sitting on my harddrive doesn't do anyone any good. If I release something as-is, with dire warnings about the code's defficiencies, it at least gets someone a head start if they want to pick it up.

Please do reconsider!

But either way, I have enjoyed this project :)

  Are you sure? yes | no

Ted Yapo wrote 06/22/2017 at 23:18 point

@Jarrett Yes, you have a good point - if the originators of open-source (software) projects waited until it was "done" to release the source, we'd never get anywhere.  My comment was more about the hw side - I think as the 2.x design stands, there's a chance of catastrophic failure if the PIC locks up with the MOSFET conducting, or the MOSFET fails closed.  I have no idea how to assess the probability of these events, but the effect of either possibility can be mitigated with some design changes.  This means a board re-spin, buying parts, testing, then publishing.  This is exactly the kind of thing that makes me reconsider releasing "completed" designs - if someone who needs a completed kit-like design builds one, I feel I incur more liability in case there's a problem.  If I just present an idea, then someone implements their own version of the idea and happens to grow a second head as a consequence, any competent attorney would argue that the growth of the extra head was entirely due to their incompetence.

The sw is easier to just release.  It's actually mostly there in the original log from 8/30/2016:

https://hackaday.io/project/11864-tritiled/log/44864-version-2

It's just not cleaned up and githubified.  I think I hadn't used github at that point for anything - which is probably why this stuff never got in there.

Then there's the Eagle licensing stuff.  I own a 6.x license, but have been doing recent designs in a free 7.x version.  I don't know what to think about the subscription version, except that I don't feel like paying every month for something I only occasionally use, and then only so I can release stuff with a permissive/commercial-use-OK license. It's a mess, and I should really switch to KiCAD, but I might as well start writing with my left hand while I'm at it.  I guess this turned into another rant :-)

Anyway, yes, I can disclaimer all these problems away and release *something* that someone might find useful.  It's probably the right thing to do.  Thanks for the comment.

  Are you sure? yes | no

Ted Yapo wrote 06/24/2017 at 19:22 point

So, just in case anyone else is looking for all these things - github repo, all design files and code releases, easy instructions, etc, they actually exist for a version of this design in another one of my projects.  It's been there for six months , has 276 views, 1 follower, and zero likes.  I don't know why nobody notices that one.  The only significant  difference is that it doesn't have a CR2032 battery holder integrated on the board.

The main project is at: https://hackaday.io/project/19113-decade-flashlight

The circuit and PCB design and theory, along with a detailed BOM are at: https://hackaday.io/project/19113-decade-flashlight/log/50821-circuit-design-led-driver-board

The code is described in: https://hackaday.io/project/19113-decade-flashlight/log/50822-pic12lf1571-code

A 3D-printed case for that particular use (a flashlight instead of a marker) is presented: https://hackaday.io/project/19113-decade-flashlight/log/50823-printed-case

Detailed assembly instructions are given: https://hackaday.io/project/19113-decade-flashlight/log/50824-assembly-instructions

All the design files are in GitHub: https://github.com/tedyapo/ten-year-flashlight

And the boards are shared on OSH Park: https://www.oshpark.com/shared_projects/0BWPH1JP

Until I have a new version of the TritiLED project ready to release, that other one is available, if anyone wants to build one. The only thing you may want to change is the number of pulses per cycle, currently set in the code to 6, which results in a 40uA current drain - about 7 months on a CR2032 (10 years on a pair of LiFeS2 AA's).  You can modify that number to change the brightness & run-time.

  Are you sure? yes | no

pkobla wrote 05/18/2017 at 20:49 point

Hi Ted,

regarding choice of MCU. I've been programming PIC and MSP430 for low, really low power applications, but have now ended up with a Cortex M0+, the NXP (Freescale) mkl03z8vfg4.  Less $ than the msp430. Farnell (Denmark) lists them at $0.49/100s.  8kB flash, 2kB RAM, ADC etc. You  don't need to go assembler but can stay with C. 

Regarding the issues that have been discussed earlier about power use and time used during startup or wakeup. The mkl03 has a mode, VLPR, where wakeup latency from sleep, using an internal clock timer interrupt, is 7-8us and consumes about 2uA while sleeping. All inclusive. You can go lower, down in the  nA ranges,  but at a cost in latency, etc. Code may be placed and executed from RAM. When executing from RAM the "cost" per 1MHz is about 90uA. Instructions execute in 1 cycle except branches. HW multiplication in 1 cycle. The core clock can be scaled from around 25kHz up to 48MHz.  Power consumption scales accordingly. The internal clocks are pretty accurate and stable over temperature. It'll run from 3.3V down to 1.8V or is it 1.4V? All numbers are from memory, but read the datasheet. I've been around most features and the datasheet numbers are conservative compared to what you measure in real life. One drawback is the packaging. It's QFN with a 0.5mm pitch. Another of course is the learning curve which is steep coming from the msp430. Took 3-4 weeks for me to feel comfortable. IDE: I use IAR. Most people use CodeWarrior I guess. As for debugger I am using, or re-using,  the one that comes with the msp432 Launchpad which has an CMSIS-DAP mode which is supported by IAR and it works fine. IAR also supports the ST-Link-V2. A $2 Chinese ST-Link-V2 debugger has worked well too. With CodeWarrior you have to use something else than these 2. IAR does not cost anything if code is < something. I think it's 5k.  All-in-all, pretty amazing that you can get an ARM dev env up and going for a 1 digit dollar amount. Even more amazing that with ARM Cortex you can mix and match different IDEs, Cortex MCUs from different vendors, and debuggers.

As for a smaller battery holder: On aliexpress search for "CR2032 shrapnel" <sic>

Hope you and other readers may find this useful,

Peter K

  Are you sure? yes | no

Simon Merrett wrote 06/06/2017 at 19:42 point

Peter, thanks - I found that useful as an insight into what's on offer in ARM and what the cost of entry looks like.

  Are you sure? yes | no

Ted Yapo wrote 06/07/2017 at 19:43 point

Hmm ... I didn't seem to get a notification about your comment; only saw it when Simon replied.

I have been looking at the Cortex M0(+) for some time, but haven't overcome the inertia of experience and comfort with the PIC to try it out.  It's probably overkill for this particular project - even the tiniest PICs really are, but they seem to be the cheapest and easiest solution at this scale.  I think if you designed an (analog) ASIC for driving LEDs like this, you could improve the efficiency quite a bit.  There's no reason for having a whole microcontroller to blink an LED periodically (which is all this is really doing).

For some more complex projects your suggestion sounds really good.  I'm going to have to dive in and try one out - thanks for the pointers!

As for the "CR2032 shrapnel", I see the parts on aliexpress - small and cheap, very nice.  I hope the use of the word "shrapnel" in their description is a mis-translation of the Chinese "sheet metal" rather than an indication of what people are buying these things for.

  Are you sure? yes | no

Enrico wrote 01/14/2017 at 13:48 point

Hi, I am quite ignorant on spectrometer instruments: what is the one you've used to see the wavelenght? My best choice up to now was a broken CD/DVD... 

  Are you sure? yes | no

Ted Yapo wrote 01/14/2017 at 15:58 point

I don't know that much about it, either.  The spectrometer I used was one of these:

https://www.amazon.com/Science-First-Spectrometer-Project-Star/dp/B008ELSDVA

purchased a long time ago for less money.  It's more of a student demonstration than a serious instrument.  You could probably build one that gives similar results with materials you already have around - including the DVD grating.

There are some good spectrometer projects around here.  For more refined designs, see @David H Haffner Sr's projects.

  Are you sure? yes | no

[deleted]

[this comment has been deleted]

Ted Yapo wrote 11/30/2016 at 13:58 point

Yes, yes, I do need an SOIC8 test clip!

I hadn't seen them before, either.  I bought an SOIC socket when I started this project so I could program parts before soldering them, but the test clip is much better.

It would be nice to save the real estate I'm using for pads now :-)

How well does it work on less-than-perfectly-mounted chips?  When I hand-solder SOICs, sometimes it's a bit blobby.

  Are you sure? yes | no

Dan Julio wrote 11/21/2016 at 00:56 point

This is a neat project, Ted.  I thought of it this week as I walked up to my house in the early evening winter dark and surveyed all the dead solar LED lights that used to light the way...  How is the light output of V2.1/2.2 compared with a "typical" solar garden light (with, I assume, the right kind of white LED)?   It would be nice to have a set of lights that don't fail after a year...  Which would seem to be the case pairing your board with a couple of lithium primary cells.  I wonder if one could get enough light out of an energy harvesting setup using existing solar light solar cells, a super-cap and your board.  One could even add a sense input the PIC to turn the light off during the day.

  Are you sure? yes | no

Ted Yapo wrote 11/21/2016 at 01:54 point

I'm running them pretty dim compared to typical garden lights, I would assume.  I haven't compared them head-to-head, but the typical garden light is probably a hundred times brighter or more - it's the difference between a light being visible as a marker and being able to illuminate other objects (like a walkway).  I might have an old garden light in the garage I can take a look at.

But, there's no reason not to apply the same principles to a garden light.  If you take the 3W LEDs I've been using, they have an efficiency peak when run at around 10-15 mA (each color is a bit different), and they're pretty bright at that current.  If the garden lights aren't running near this current, they're wasting energy.  So, you could make a smart garden light controller to run them at peak efficiency.  Even so, I think you need the capacity of rechargeable batteries - supercaps still don't have the energy density required.

I did make a 10-year flashlight with which I am able to read and find my way around in the dark.  It's definitely not as bright as a garden light, though. You could crank up the brightness to garden-light level, but that would kill the battery lifetime.

If you are willing to go to d-size cells, the energizers claim a 10-year shelf life and 18Ah capacity.  You might get a garden-light to go for a few years on that.  They're lousy in the cold, though.

  Are you sure? yes | no

Dan Julio wrote 11/21/2016 at 02:02 point

I figured that, but since you support multiple brightness levels, thought I'd ask.  One interesting thing is that garden lights really only need to last a few hours each night (since most of us don't get home at 3:00 AM every night...).  I am looking forward to playing around with your design when you release the V2.x files.

I don't know a lot about the garden lights but I did look at one once.  The IC in there uses some sort of boost topology with an inductor to take the 1.2V out of the cell and power the 5 mm White LED.  I have no idea if it is approaching the peak efficiency of the LED.

  Are you sure? yes | no

Ted Yapo wrote 11/21/2016 at 02:35 point

If they're using 5mm LEDs they're almost certainly driving the LED above the point of maximum efficiency (probably around 1 mA).  If they're using the usual 20 mA, they might be throwing away half the energy.  The fix is buying an LED with a larger die area, which adds cost.  I think you could probably make a better light, but marketing it would be difficult (inferior but inexpensive sells).  But that's the joy of DIY - you can make one "the right way" for yourself.

I still have a few tests on the V2.2 to do, and a bunch of measurements, but so far it's looking pretty good.

I am seriously considering a version of the board for solder-on CR2450 or CR2477 batteries.  They're 620 mAh or 1000 mAh, respectively, and you could run the 2.2 circuit for 10 years or more.  But I want to get the 2.2 design out first.

  Are you sure? yes | no

Dan Saito wrote 09/07/2016 at 09:58 point

I wondered if energy harvesting could be a possibility here, so I read some app notes and did some enveloped arithmetic. Solar would work, with the limitations that entails, if that counts as energy harvesting, but RF would not. That’s not a surprising result, but it is disappointing.

Now, if they’re being embedded somewhere, the equation can shift.

One of the uses I have in mind for TritiLEDs is lighting the dials of mechanical clocks. In that application, there’s enough area to work with that harvesting RF may be feasible. Alternatively, energy could be sapped from the clock’s drivetrain. Of course, these would mainly be for the cool factor, because if you have enough space to do something like that, you could just hide batteries large enough to power the LED for decades.

If you don’t care about it working immediately if left on a shelf for a long while, sufficient energy could be gathered from motion, if left in a bag that’s carried around or a vehicle that’s driven.

  Are you sure? yes | no

Ted Yapo wrote 09/08/2016 at 19:05 point

Powering these things via energy harvesting is a neat idea.  Besides finding an energy source, storage options may also be a problem for long-term use.  I don't know that I'd trust electrolytic caps for 20 years, and ceramics are bulky and expensive for larger values.  A mechanical harvester and/or storage mechanism sounds interesting.

As far as RF powering, it depends where you are :-)  I'm 18 km from the 50,000W transmitter of WGY at 810 kHz, and I can run a version 2 from a crystal radio and voltage multiplier:

It's not fully-powered, but it lights up.  I might also be able to get it to light from microwave oven leakage or near a WiFi antenna - I used to do that with red LEDs/UHF diodes/dipole antennas before I knew they weren't very efficient at low-current DC. Probably not practical, though.

  Are you sure? yes | no

Dan Saito wrote 09/09/2016 at 04:41 point

I’m < 2 km from a 25 kW FM transmitter. I’ll have to try that out. It’s a good excuse to build an FM crystal radio.

  Are you sure? yes | no

Ripper121 wrote 08/29/2016 at 15:46 point

Do you found good alternatives for the Luxeon Z LED?

  Are you sure? yes | no

Ted Yapo wrote 08/29/2016 at 16:13 point

I have about 15 different LEDs to test, but haven't had time to run the curves yet - the analyzer over on #Automated LED/Laser Diode Analysis and Modeling is still in a very early prototype stage.  The only real problem with the Luxeon Z is that it can't be hand-soldered - this will keep some people from building them.  It would be nice to find a cheaper part, too, but I'm not sure I'd trade performance for cost here.

You can see a partial list of the candidates under the boards at the end of this log: https://hackaday.io/project/11864/log/43675-unbiased-testing

  Are you sure? yes | no

Ripper121 wrote 09/05/2016 at 12:12 point

Thank you. Yes i agree you. Performance is the Aim :)

  Are you sure? yes | no

SarahC wrote 08/28/2016 at 06:31 point

I would LOVE to buy a completed one or two of these... are you selling them anywhere? I had a look online and couldn't find anything. sarah AHT untamed dot co dot uk

  Are you sure? yes | no

Ted Yapo wrote 08/28/2016 at 06:55 point

Unfortunately, I'm not selling them; it would complicate my taxes too much.  The design is all open-source, so if some entrepreneurial spirit out there wanted to start making and selling them, they could do so (hint, hint - not necessarily directed at you).

  Are you sure? yes | no

jaromir.sukuba wrote 08/01/2016 at 07:19 point

Regarding the PIC12F508 - is there any specific reason to use this one? It is build on older manufacturing technology, causing its higher current consumption. In this case, a few microamps at 3V for the complete sleep+WDT current. 

For newer PIC12LF1552, for example, you can achieve less than half a microamp consumption for sleep+LPWDT current.

On the other hand, its current handling capabilities of IO pins are different, though better suited for 3V than 12F508, designed for 5V mainly (replacement for PIC12C508).

  Are you sure? yes | no

Ted Yapo wrote 08/01/2016 at 14:07 point

Thanks for the note!  That's a very good observation, and one I've done some thinking and experimenting on.

I originally used the 12F508 because I had some left over from another project (I actually still have 12C508/09's left from an era before that, too).  It worked well enough for a first iteration, so I stuck with it.

I have tried the newer XLP PIC parts, and have had mixed/bad results.  I haven't written it up yet because I wanted to be sure of my findings before speaking poorly about the newer PICs, but you can read essentially the same thing in Ti's white paper here:

http://www.ti.com/lit/wp/slay015/slay015.pdf

Basically, with the high-speed internal oscillator, it takes a *long* time for the PLL in the PICs to stabilize (~1ms), so very low on-time applications don't really achieve good power savings. If you want an accurate clock (which I need to generate accurate pulses), you have to wait for the PLL lock and waste power.  It's discussed in TI's document. See the image on page 8 - they're using a PIC24F, but I see the same thing with PIC12's and 16's.  The PIC12F508, in contrast, has an "instant-on" oscillator, like the MSP430.

I'm still experimenting with newer PICs, so I haven't ruled them out, but I also have a MSP430 LaunchPad board sitting on my desk (and a few sample MSP430 parts), waiting for me to test Ti's claims.

I also am going to test the new ultra-low-power timer chips in this application.  I have some TS3004's (just waiting for PCB's from the fab):

https://www.silabs.com/Support Documents/TechnicalDocs/TS3004.pdf

These are 1.9uA, pulse fast enough to get above the flicker fusion rate, have a PWM control you can use to tune the pulse width.  Achieving an average 1.9uA even with the microcontroller would be decent, because running bursts at MHz rates brings up the average.

I am also looking at the Ti TPL501x parts: 

http://www.ti.com/product/TPL5010

these run at 35nA. Unfortunately, the frequency only goes as high at 10Hz, so they aren't good for "constant" LEDs, but could probably be used for visibly blinking versions.

A lot of my focus has been on improving the efficiency, too.  39% is pretty bad. I got fooled by the relative inefficiency of the LED at very low currents before - I think I can double the runtime with a new architecture (single-shot inductor converters).

About the power handling of the PIC pins - I'm adding mosfets to reduce the voltage drop here and handle the higher current.  The I^2R losses using GPIO pins are killing efficiency.

  Are you sure? yes | no

Ted Yapo wrote 08/01/2016 at 14:25 point

This link shows the problem exactly for PIC8 XLP parts:
http://www.microcontrollertips.com/clock-startup-low-power-microcontroller-design/

  Are you sure? yes | no

jaromir.sukuba wrote 08/02/2016 at 11:19 point

Yes, there are deviations from ideal state, but I believe the overall current consumption will be lower than with the 12F508. This is interesting topic, anyway - I use PIC MCUs all the time, utilizing its power saving modes often. I still haven't met with the oscillator startup time, as the wakeup from sleep takes place only during user intervention - once you turn it off, it stays in sleep mode until you wake it up. Microseconds doesn't play any role in here. On the other hand, waking up every 18ms for a few microseconds doesn't matter much too (the total duty cycle of "high power" time fragments makes its contribution to total power budget quite low anyway), IMHO.

But as usual, devil is in details, so it is not simple to estimate everything with no actual circuit. You design is simple and will try to breadboard it and return back with results.

  Are you sure? yes | no

Ted Yapo wrote 08/02/2016 at 14:44 point

I originally tried it with a PIC16F723A, which I think has the same XLP/Nanowatt features as the newer PICs ( just because I had some of these parts around).  I have some PIC16LF723A's now (just because I have some breakout-type boards for this part).  I think the only difference is the exclusion of the 3.6V internal LDO on the LF version, but I have a test setup that I just need to mount the part for to test it out.

Anyway, I'll re-create my original measurements with the LF version and post the results.  I have some PIC12F1571 (and '72) around I can use, too.  I suspect the oscillator start-up time will also be an issue with these parts.

Taking the '1552, for instance, check out section 5.2.2.1 here on page 38:

http://ww1.microchip.com/downloads/en/DeviceDoc/40001674E.pdf#page=38

when coming out of sleep, I'd want to wait for the HFIOFR (hf osc. ready) bit and the HFIOFS (hf osc. stable) bits of the OSCSTAT register to be set before generating the LED pulses.  These bits indicate that the HS osc has started running and is within 0.5% of its nominal rate.  Before those bits are set, the oscillator speed is AFAIK undefined - not something I would want to rely on to generate a current pulse.  When I tested how long it took to set these bits on the '723A, it was at least hundreds of microseconds of just waiting for those bits to set, negating much of the savings.  I could dig through my notes, but it's probably easier to try it again and post the results.

Yes, I definitely encourage you to try it out.  I could certainly be wrong about these new parts; I didn't look too hard after my initial experiments (and was rather disappointed, because I've been using PICs since the early PIC16F84 days). I'd like to see how it turns out :-)  Very interesting.

  Are you sure? yes | no

Ted Yapo wrote 08/02/2016 at 14:48 point

But actually, now that I think of it, the tests with the newer PICs were with a slightly different driver circuit, so I don't have a good apples-to-apples comparison.  I'll have to make one.

  Are you sure? yes | no

jaromir.sukuba wrote 08/02/2016 at 20:19 point

My first PIC was PIC16F84 too ;-)

For the PIC12LF1572 (and I believe other PIC12LFxxxx are similar, but probably not older PIC12(L)Fxxx) the datasheet states 5us typical, 15us maximal start-up time for HFINTOSC, while consuming approximately 200us at 4MHz. The consumption during power-up transient may be different, but this is subject of experimentation. The good thing is that it's pin compatible to venerable 12F508, so testing it should be somehow easier than complete rework. 

Note that 12F unlike 12LF version contains internal LDO allowing VDD up to 5,5, though at the expense of higher current consumption. It is low delta current, but it gets very obvious when you need to conserve the power (sleep mode).

16F723 is generation older than PIC12LFxxxx and honestly, I never really liked the 16F72x family, it has a few quirks and gotchas I wouldn't expect in 2008 or what was its release date. The newer PIC16(L)Fxxxx (and 8-pin versions 12(L)Fxxxx) do have much better peripherals, better specs, I think even lower price and more consistent scale-up/down migration path, while being reasonable compatible with older models.

No matter what, your tritiLED project piqued my interest and will test it minimally at breadboard and we will see.

  Are you sure? yes | no

Daniel wrote 07/12/2016 at 03:50 point

I think that you may be able to take advantage of some of the properties of the eye to make your project more efficient. Supposedly, the short-pulse integration time of the eye is around 20ms. Anything below that is not registered as a 'sharper pulse' but simply as less bright. This would mean that you could actually run the LED for 20ms at a MUCH lower current, which saves on I^2R losses. I read about this effect somewhere in the past, but have not gotten around to doing the experiments to verify that 20ms is accurate. It may serve you to try it out though!

  Are you sure? yes | no

Ted Yapo wrote 07/12/2016 at 18:29 point

Thanks for the comment!

I'll have to think about it a bit.  I think the properties of the LED are working against you here.  LEDs become terribly inefficient at very low currents, which is why the pulsed version wins over the DC version (you can see my confusion in build log 2).  So, at 20ms long pulses, the overall efficiency is likely to be pretty low, because you're still in uA range of currents.

In contrast, V1.0 runs at a 0.017% duty cycle, so is able to use 100mA pulses, where the LED is very efficient.

I'm definitely going to look more into the human visual system (HVS) side of things, it seems like there's "free" efficiency to be gained there. Here's a reference that shows a 2x perceived brightness increase with pulsed LEDs:

http://techon.nikkeibp.co.jp/english/NEWS_EN/20080407/150114/

They use 60Hz with 5% duty cycle, which works out to 833us pulses.  It certainly seems like there's some interesting experiments that could be done - you've got the battery, the electrical efficiency of the circuit, the LED color and efficiency, and the HVS to consider.

  Are you sure? yes | no

Daniel wrote 07/12/2016 at 21:24 point

Ted, Blane, maybe this indicates that a smaller LED could/should be used instead?

  Are you sure? yes | no

Ted Yapo wrote 07/12/2016 at 22:05 point

I missed Blane's comment.  EDIT - found it!

Anyway, I am looking for different LEDs.  This one is too expensive and can't be hand-soldered.  I chose it because it has a color very close to the sensitivity peak for dark-adapted (scotopic) vision (and is very efficient).  It's surprisingly difficult to find LEDs like this.

  Are you sure? yes | no

Daniel wrote 07/12/2016 at 22:07 point

What are your requirements?

  Are you sure? yes | no

Ted Yapo wrote 07/12/2016 at 22:22 point

I'm looking for two different LEDs - one for really dark adapted eyes (scotopic vision), with a peak near 505nm, and one for mesopic (in-between) vision, with a peak in between 505 and 555 (the photopic peak).  Best efficiency possible, hand-solderable packages, widest viewing angle (120 degrees or so), cheaper than the $2.76 (qty. 1) Luxeon Z.

Last time I ordered parts, I picked up a few of these:

https://www.digikey.com/product-detail/en/kingbright/AA3021ZGS/754-1529-1-ND/2438951

and these:

https://www.digikey.com/product-detail/en/wurth-electronics-inc/150141GS73100/732-4997-1-ND/4489955

which I'd consider for mesopic lights, but I haven't had a chance to play with them yet.

  Are you sure? yes | no

Ted Yapo wrote 06/13/2016 at 18:44 point

I have a couple of log updates planned discussing the full details, but this week is very busy, so it may be a little while. I will post more stuff as soon as I have it in usable form :-)  In the interim, I uploaded an LTspice model for the circuit you can use to explore.  I don't have a SPICE model for the Luxeon Z LED, so I used a different model from the LTspice library - the concept is the same.  If you haven't used LTspice, you can download it here (it's free):

http://www.linear.com/designtools/software/#LTspice

Yes, the voltage is doubled to 6V.  What doesn't appear in the schematic is the drop across Q1 and the internal resistances of the PIC output pins - that's what ultimately limits the current.  I roughly modeled the PIC pins in the simulation, but you can get the idea.

The capacitor voltage only drops a few tens of millivolts during the discharge - fully discharging it each time would mean additional losses of 50% during charging (due to the "capacitor paradox").  At least, unless you charged through an inductor.   I'll explain this more in a log, too.

There is still a bit of mystery for me, too. The rough SPICE simulation would lead you to believe the circuit is about 50% efficient, but I think it must be higher.  When I compare the board running at 26uA to an LED lit by 26uA DC through a resistor, the board is *much* brighter, and I have to turn the DC current up to 75-80 uA to get approximately the same visual brightness (pictures coming). I'll soon have actual numbers to calculate efficiency from a modified board I'll be able to measure on the 'scope. 

There is also research which suggests that pulsed LEDs appear brighter than those lit with DC.  For green LEDs, this effect is supposed to increase the brightness by a factor of two. This may be contributing to the unusual perceived brightness from this circuit:

http://techon.nikkeibp.co.jp/english/NEWS_EN/20080407/150114/

I think the limiting factor in this design is the low-side driver made from paralleled PIC pins and their relatively high output resistances.  You can replace this with an NPN or N-channel MOSFET to avoid those resistances (and boost efficiency), but then the current varies widely over battery voltage and temperature. 

The 2.0 version uses an inductor in addition the the capacitor to make a single-pulse hybrid buck converter, which will more easily control the LED current, and allow greater electrical efficiency while eliminating the battery voltage and temperature dependencies.  I'm still working on the prototype, and will be posting progress about it.

EDIT: I re-uploaded the LTspice file.  The first one I put up had a different resistor value.

  Are you sure? yes | no

mr.jb wrote 06/12/2016 at 10:53 point

My understanding is that you turn on the led for 3us  55 times per second, the drop out voltage is like 0.3V thus resulting in like 150mA for cyan LXZ1-PE01 ( on average equal to 26μA during a second )

http://www.lumileds.com/uploads/415/DS105-pdf

What's your opinion on charging the capacitor with QX7135 ? ( fast enough ? )

http://intl-outdoor.com/qx7135-advanced-current-regulator-380ma-5-pcs-p-666.html

I'm interested in being able to switch between extreme low power and a more normal flashlight

http://flashlightwiki.com/AVR_Drivers

/JB

  Are you sure? yes | no

Ted Yapo wrote 06/12/2016 at 12:30 point

Assuming 100% efficiency, you should see 150mA pulses.  I (very roughly) measured around 100mA - I'm instrumenting a board now to get a comprehensive view of voltage and current waveforms and estimate efficiency.  I suspect a lot of the loss is in the low-side PIC output drivers - even four of them paralleled is probably not enough.  The other big issue is microcontroller sleep current.  The WDT on the PIC consumes 2.5-5 uA itself, according to the datasheet. I'll work up a full accounting to see where all my power goes.

I hadn't seen the QX7135 before.  I think this is the same part:

http://lib.chipdip.ru/709/DOC000709557.pdf

It looks like flashlights are driving it with PWM, so it's good for more than DC, but who knows what it does with really fast pulses - you might have to test it out.  The datasheet graphs show "quiescent current" at around 150uA - I don't know if this means that VDD is connected, and the LED not connected, or vice-versa.  One way doesn't matter, the other may blow up your power budget.

The ATtiny13 in those flashlights has a sleep/WDT current similar to the PIC, and a 4.8 or 9.6 MHz oscillator, so you should be able to generate very short pulses, if your LED driver can handle them.  You could also choose a faster WDT timeout to avoid flicker.

  Are you sure? yes | no

mr.jb wrote 06/13/2016 at 14:53 point

I think a just partly understand what is going on.


Is it correct that the led is powered by 6v in discharge mode !?
Looking at the diode curve http://www.lumileds.com/uploads/415/DS105-pdf
that should mean a peak current of several amperes ( outside the chart ).
I'm very interested about more details on what is going on..... ( I first
thought the voltage over  the led was something like 2.7V which should
result in like 100-150mA bursts and in the end an average current of  26μA )

What is the remaining voltage in the capacitor after discharge ? 0V ?

The discharged energy  10E-6 * ( 3^2-0 )/2 =0,000045Ws   

or is this more correct

10E-6 * ( 6^2-3^2 )/2 =0,000135 Ws


Please explain more about the design, and the efficiency you gain with this capacitor "trick"


/JB

  Are you sure? yes | no

Similar Projects

Does this project spark your interest?

Become a member to follow this project and never miss any updates