Peter McCloud
-
Hover Testing...Broken Vehicle
08/29/2014 at 17:24 • 2 commentsUPDATE - Great news, got the engine started! Bad news, I broke lots of stuff! See bottom for details
I'm taking advantage of a four day weekend by doing a series of tests, eventually building up to a hover test. I'll be updating this post over the weekend as I make progress towards the hover test. I plan on sharing whatever happens good or bad, and since these things seem to never go according to plan, please be patient if it seems like it's taking too long or nothing happens at all.
As I laid out in the last post, Today (Friday) the plan is:
- Friday - Attach the rotors and test everything out using only the starter
- Saturday - Run the engine on gas for the first time, but only at low speed
- Sunday - Run the engine at higher speeds, building up to a hover test
- Monday - Not cleaning up debris from a failed test
FRIDAY AM
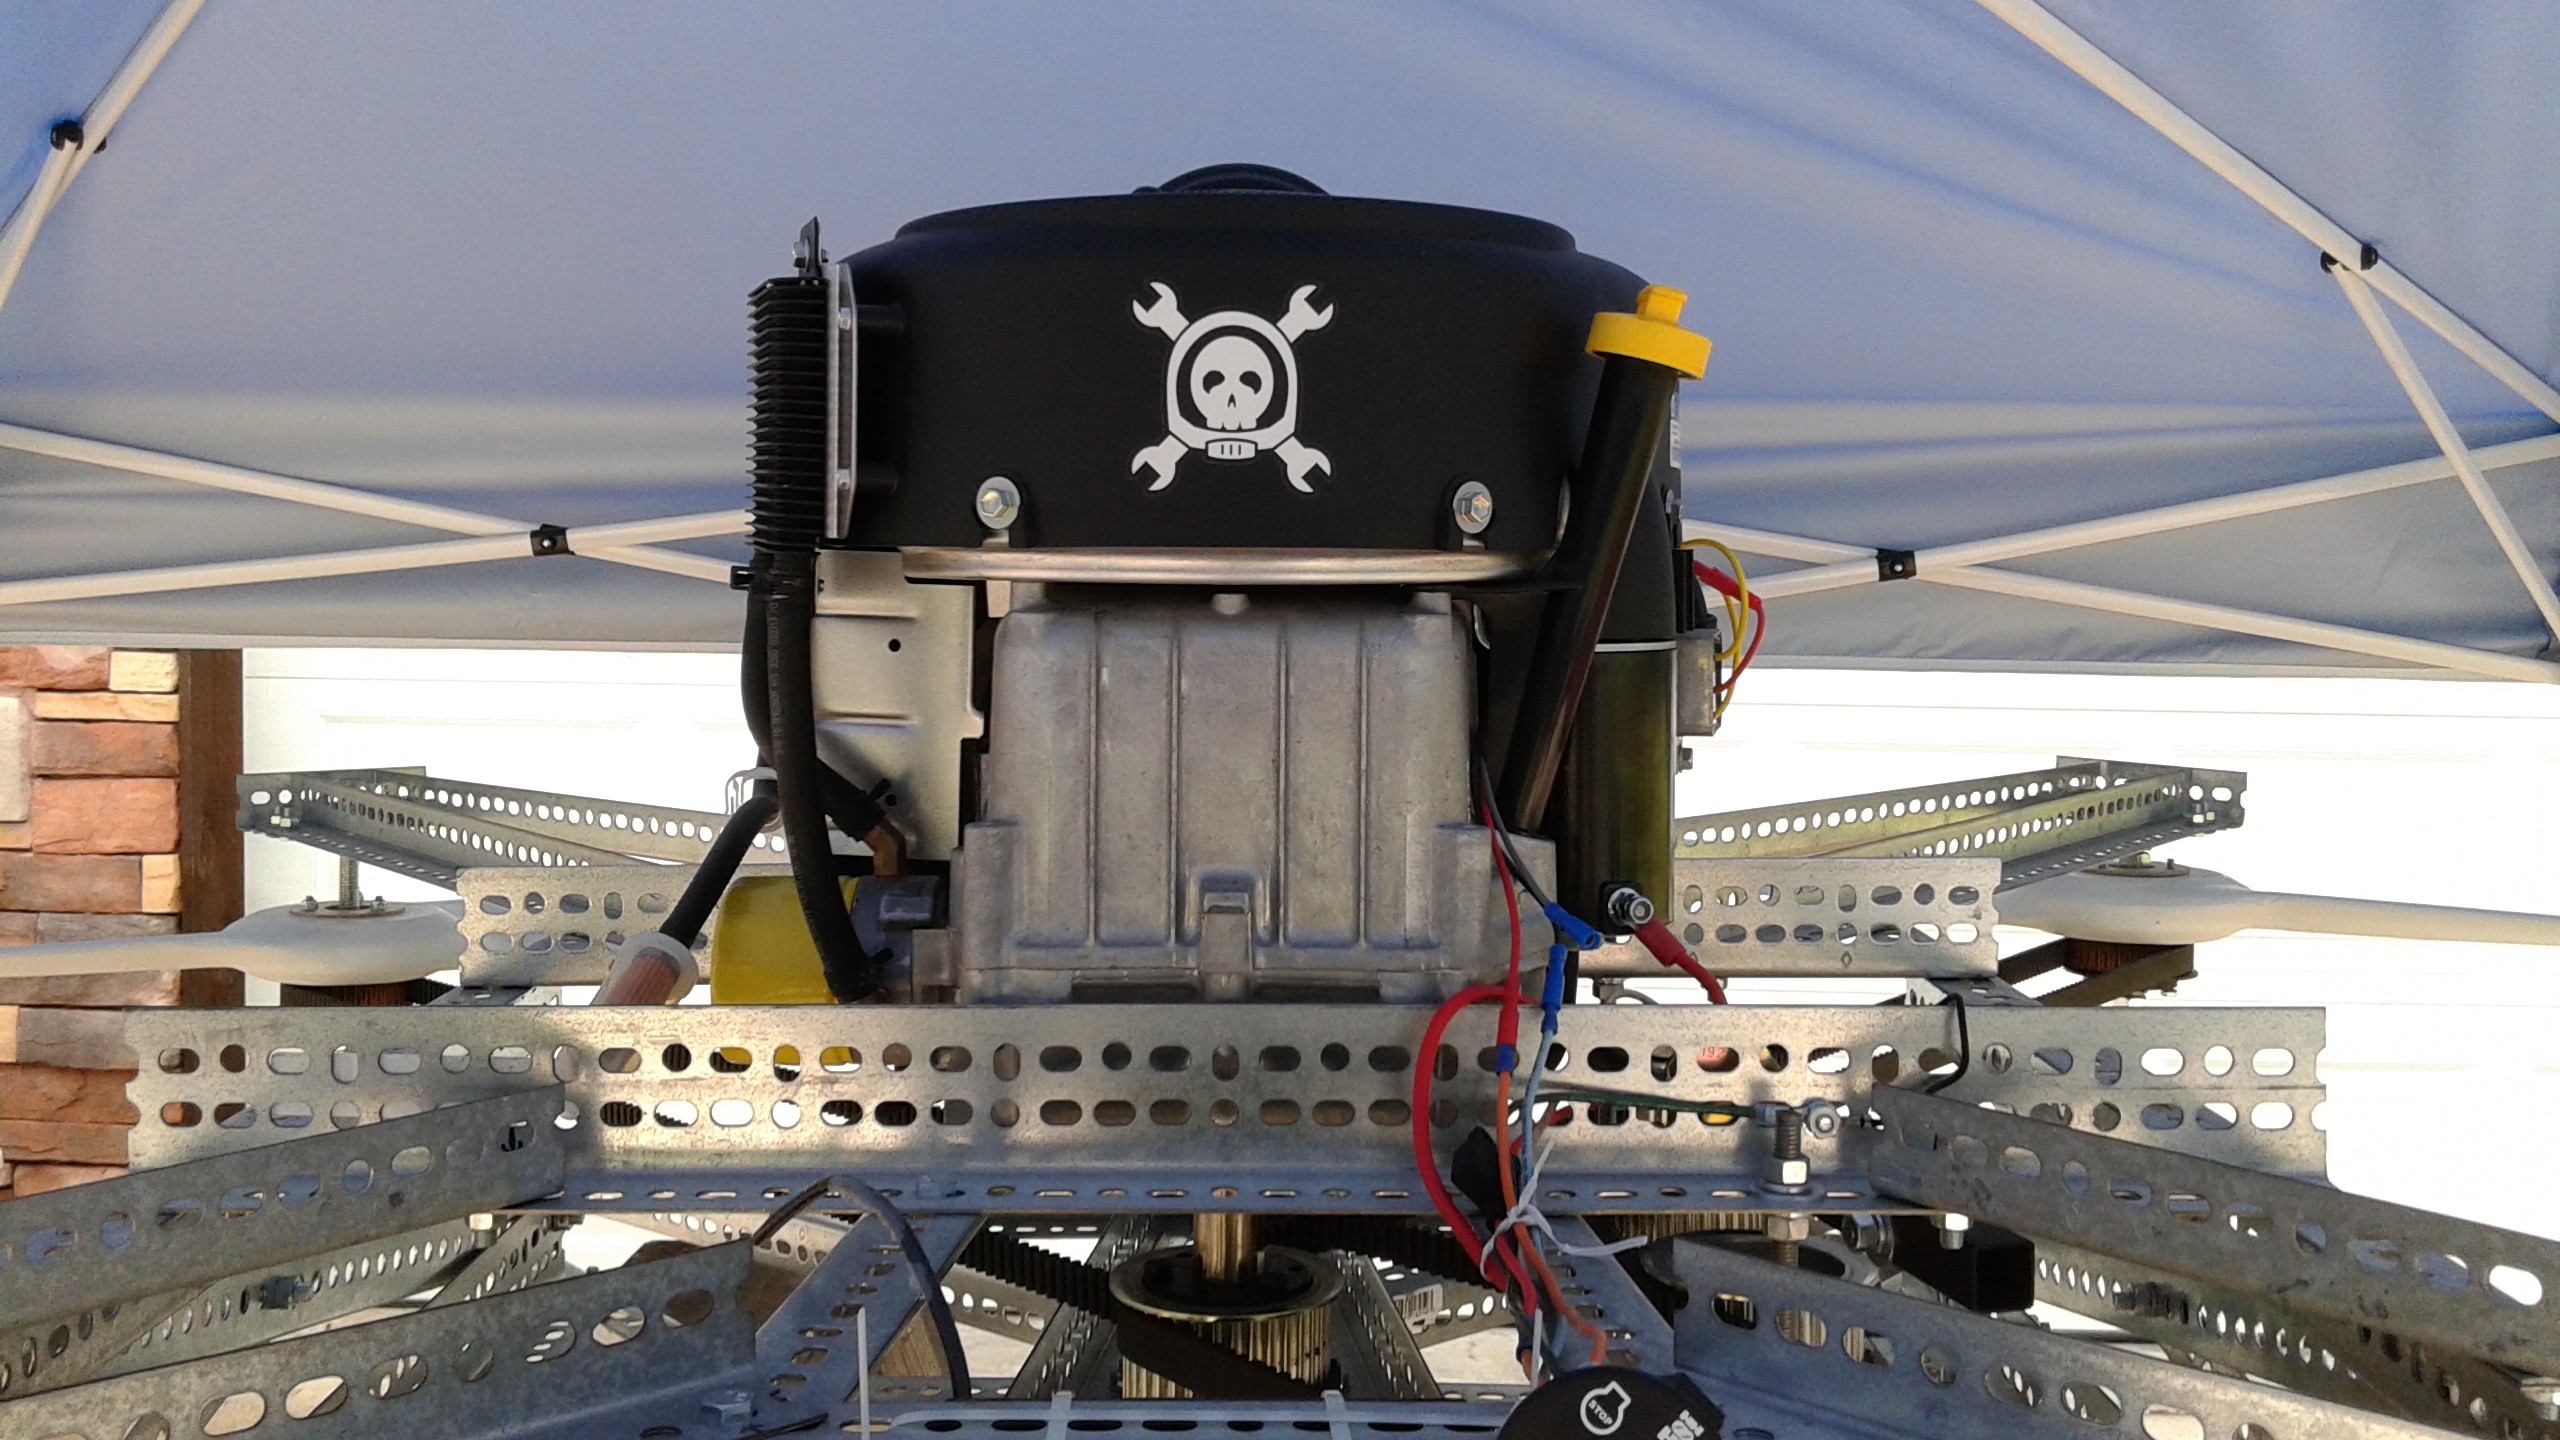
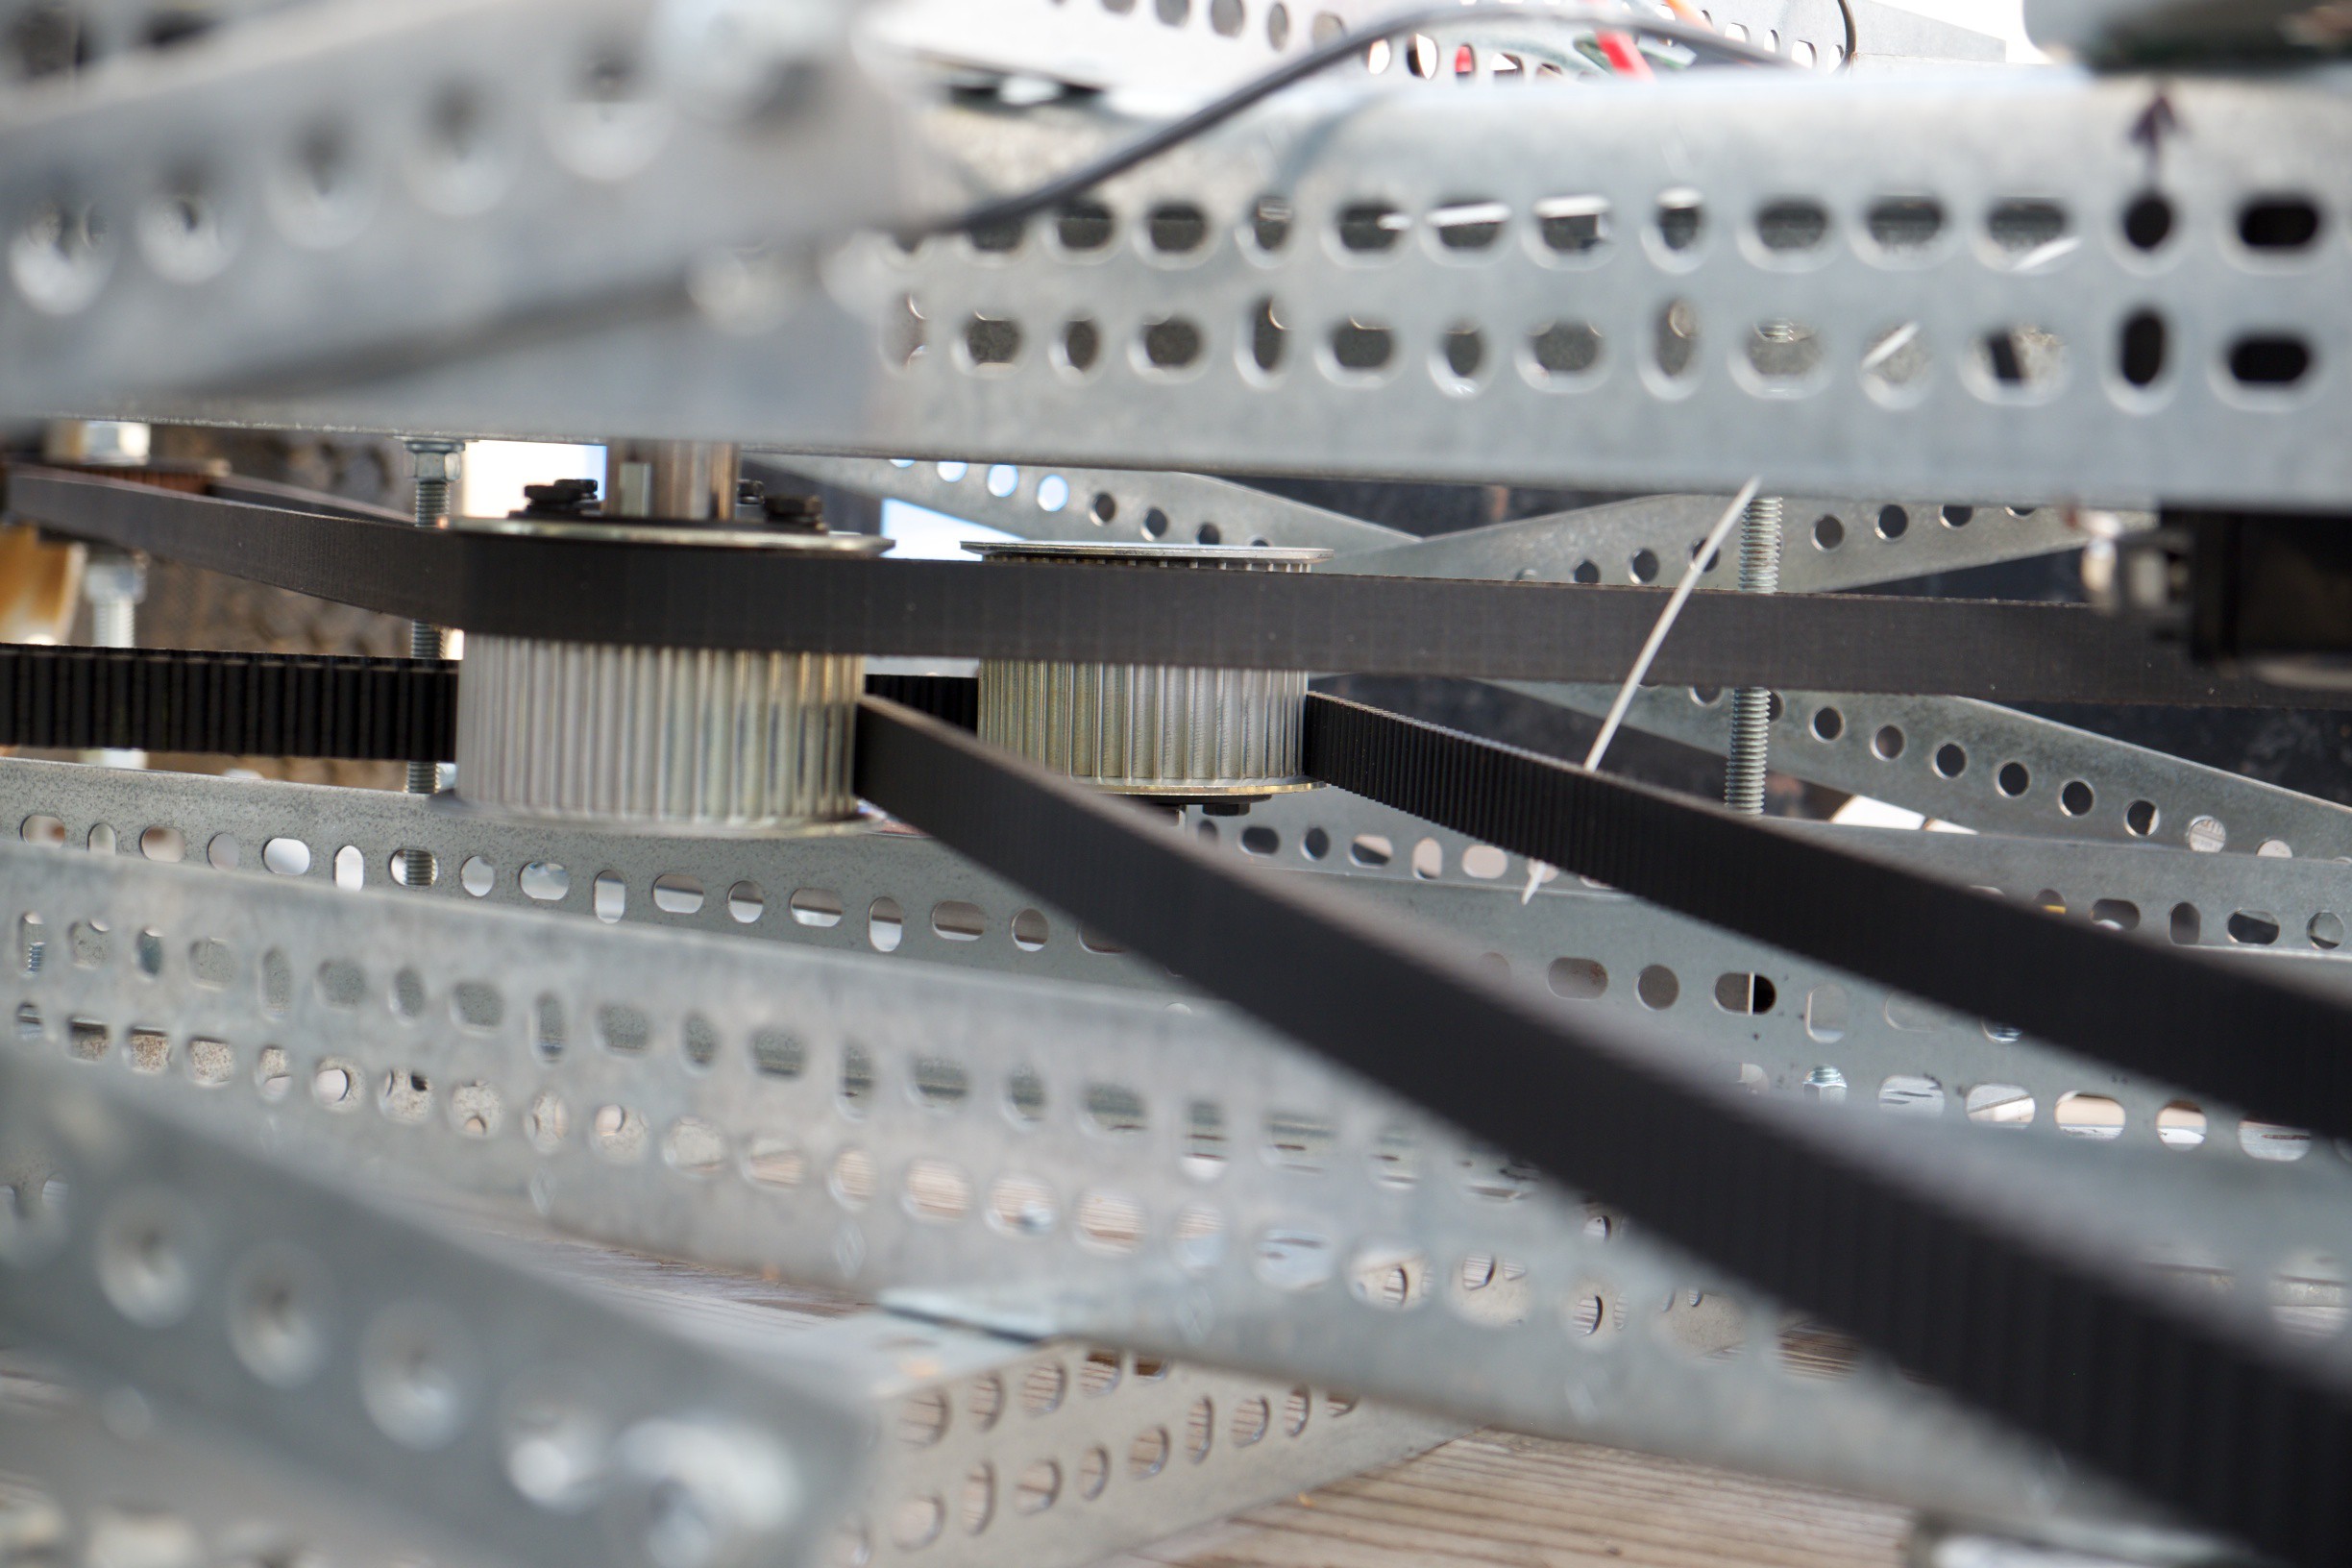
So the weather this weekend does not look good. Today (Friday) is an 80% chance of rain, Saturday 90 %, Sunday 80% and Monday is 40%. Things might slip a bit. I was running out of room in the workshop to actually work on the vehicle with the rotors attached so I moved it outside under a pop-up canopy to get the last two rotors attached. I have them attached, but I'm still adjusting all of the pulleys to make sure they are all aligned. It started raining so I lowered the shade to cover Goliath better and waiting for a break in the rain. I did get one other important item installed (below).
![]()
I got my T-Shirt this week from the "Astronaut Or Not" Challenge, specifically the "Most Outrageous Component" round. They also sent included a few stickers, one of which is now placed on the engine.
FRIDAY AFTERNOON
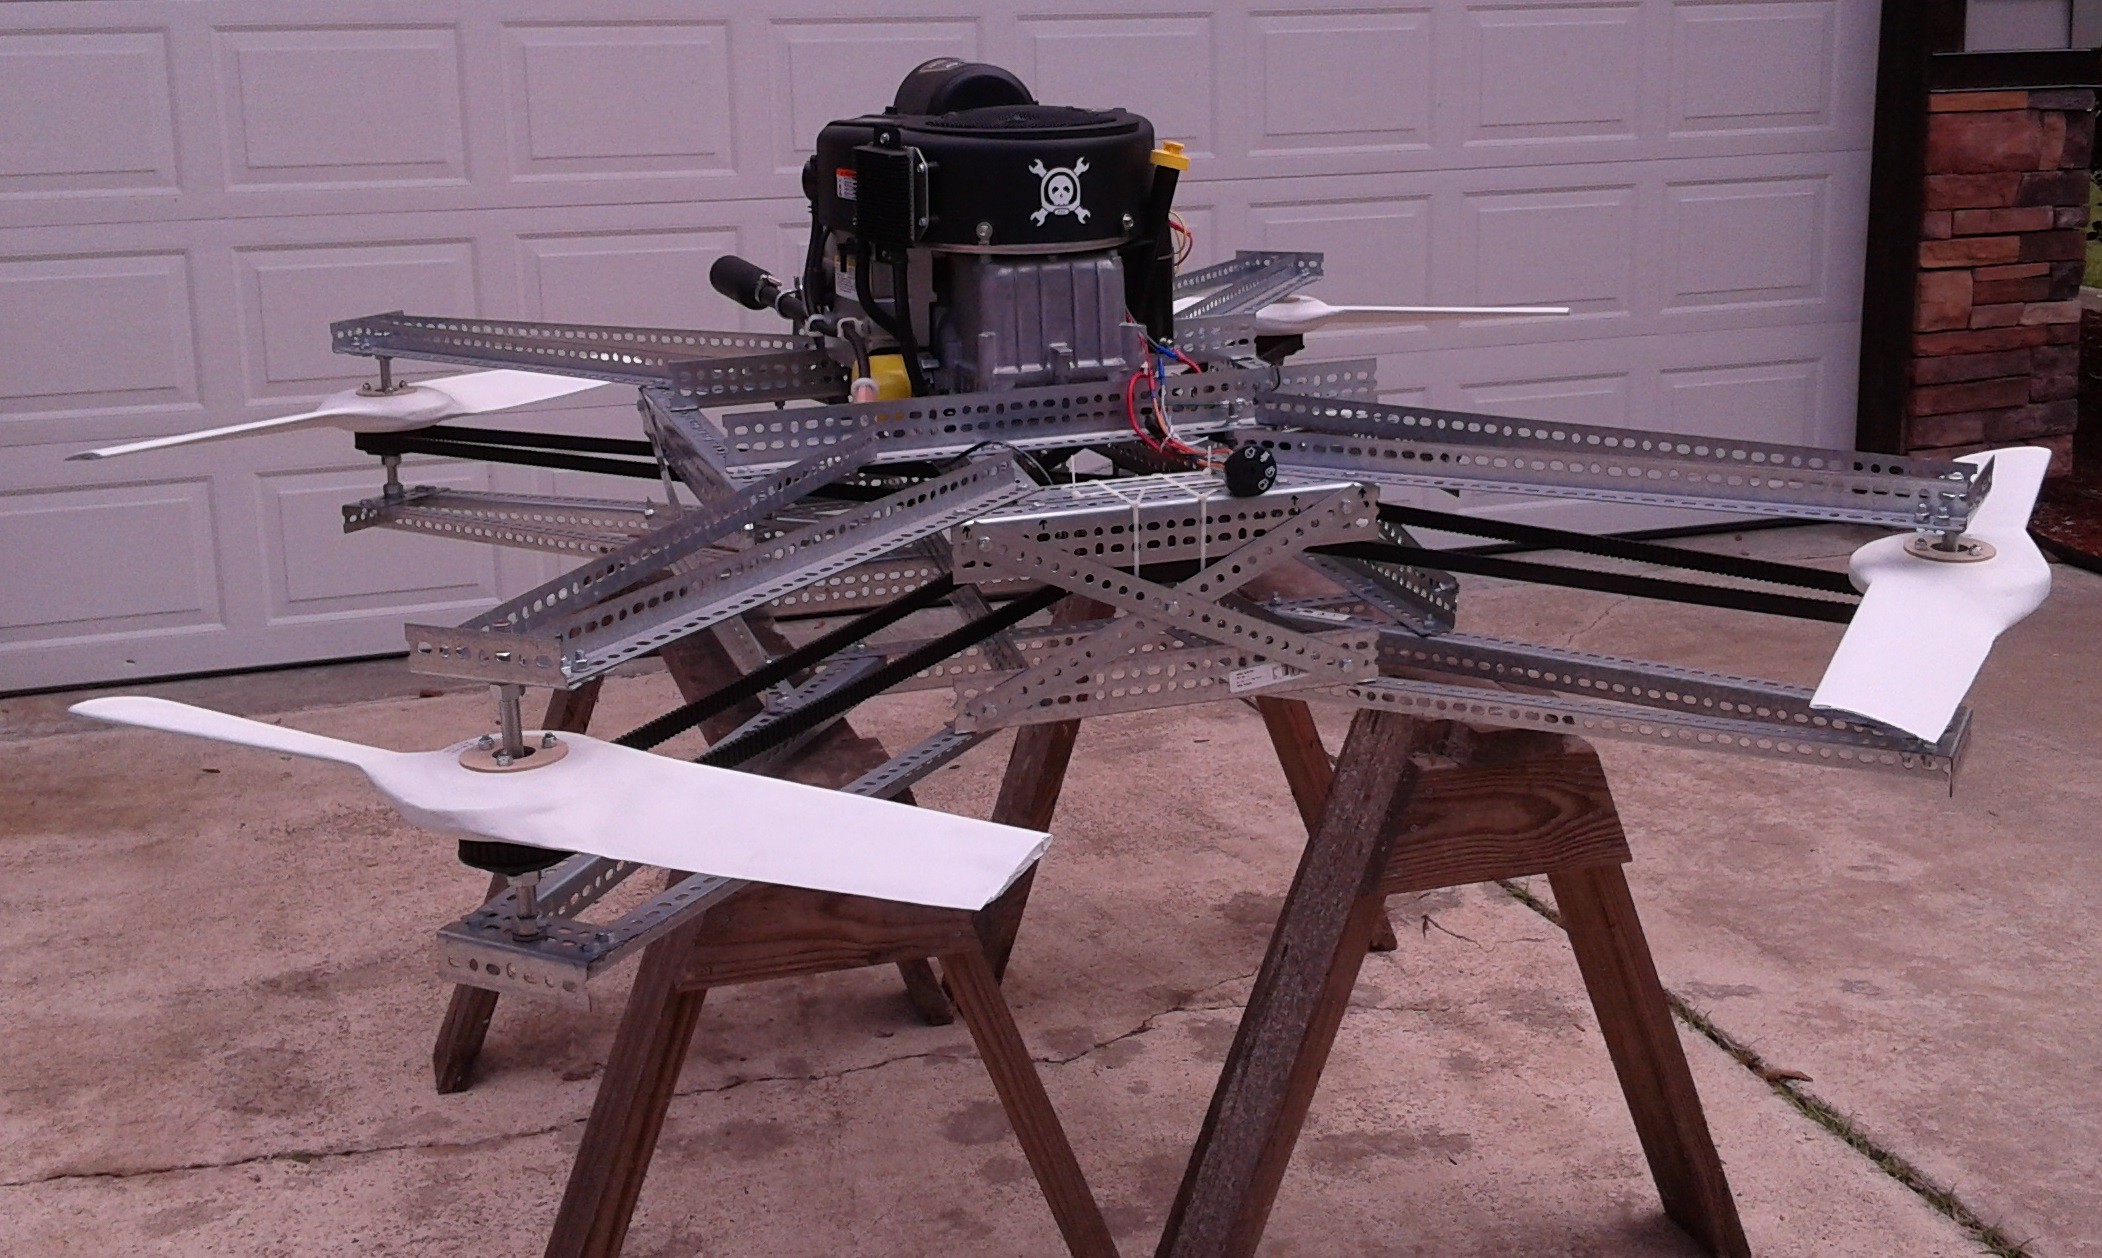
So the rain let up for a while and I was able to finish adjusting the pulleys and belts. Goliath is finally starting to look like a quadcopter.
![]()
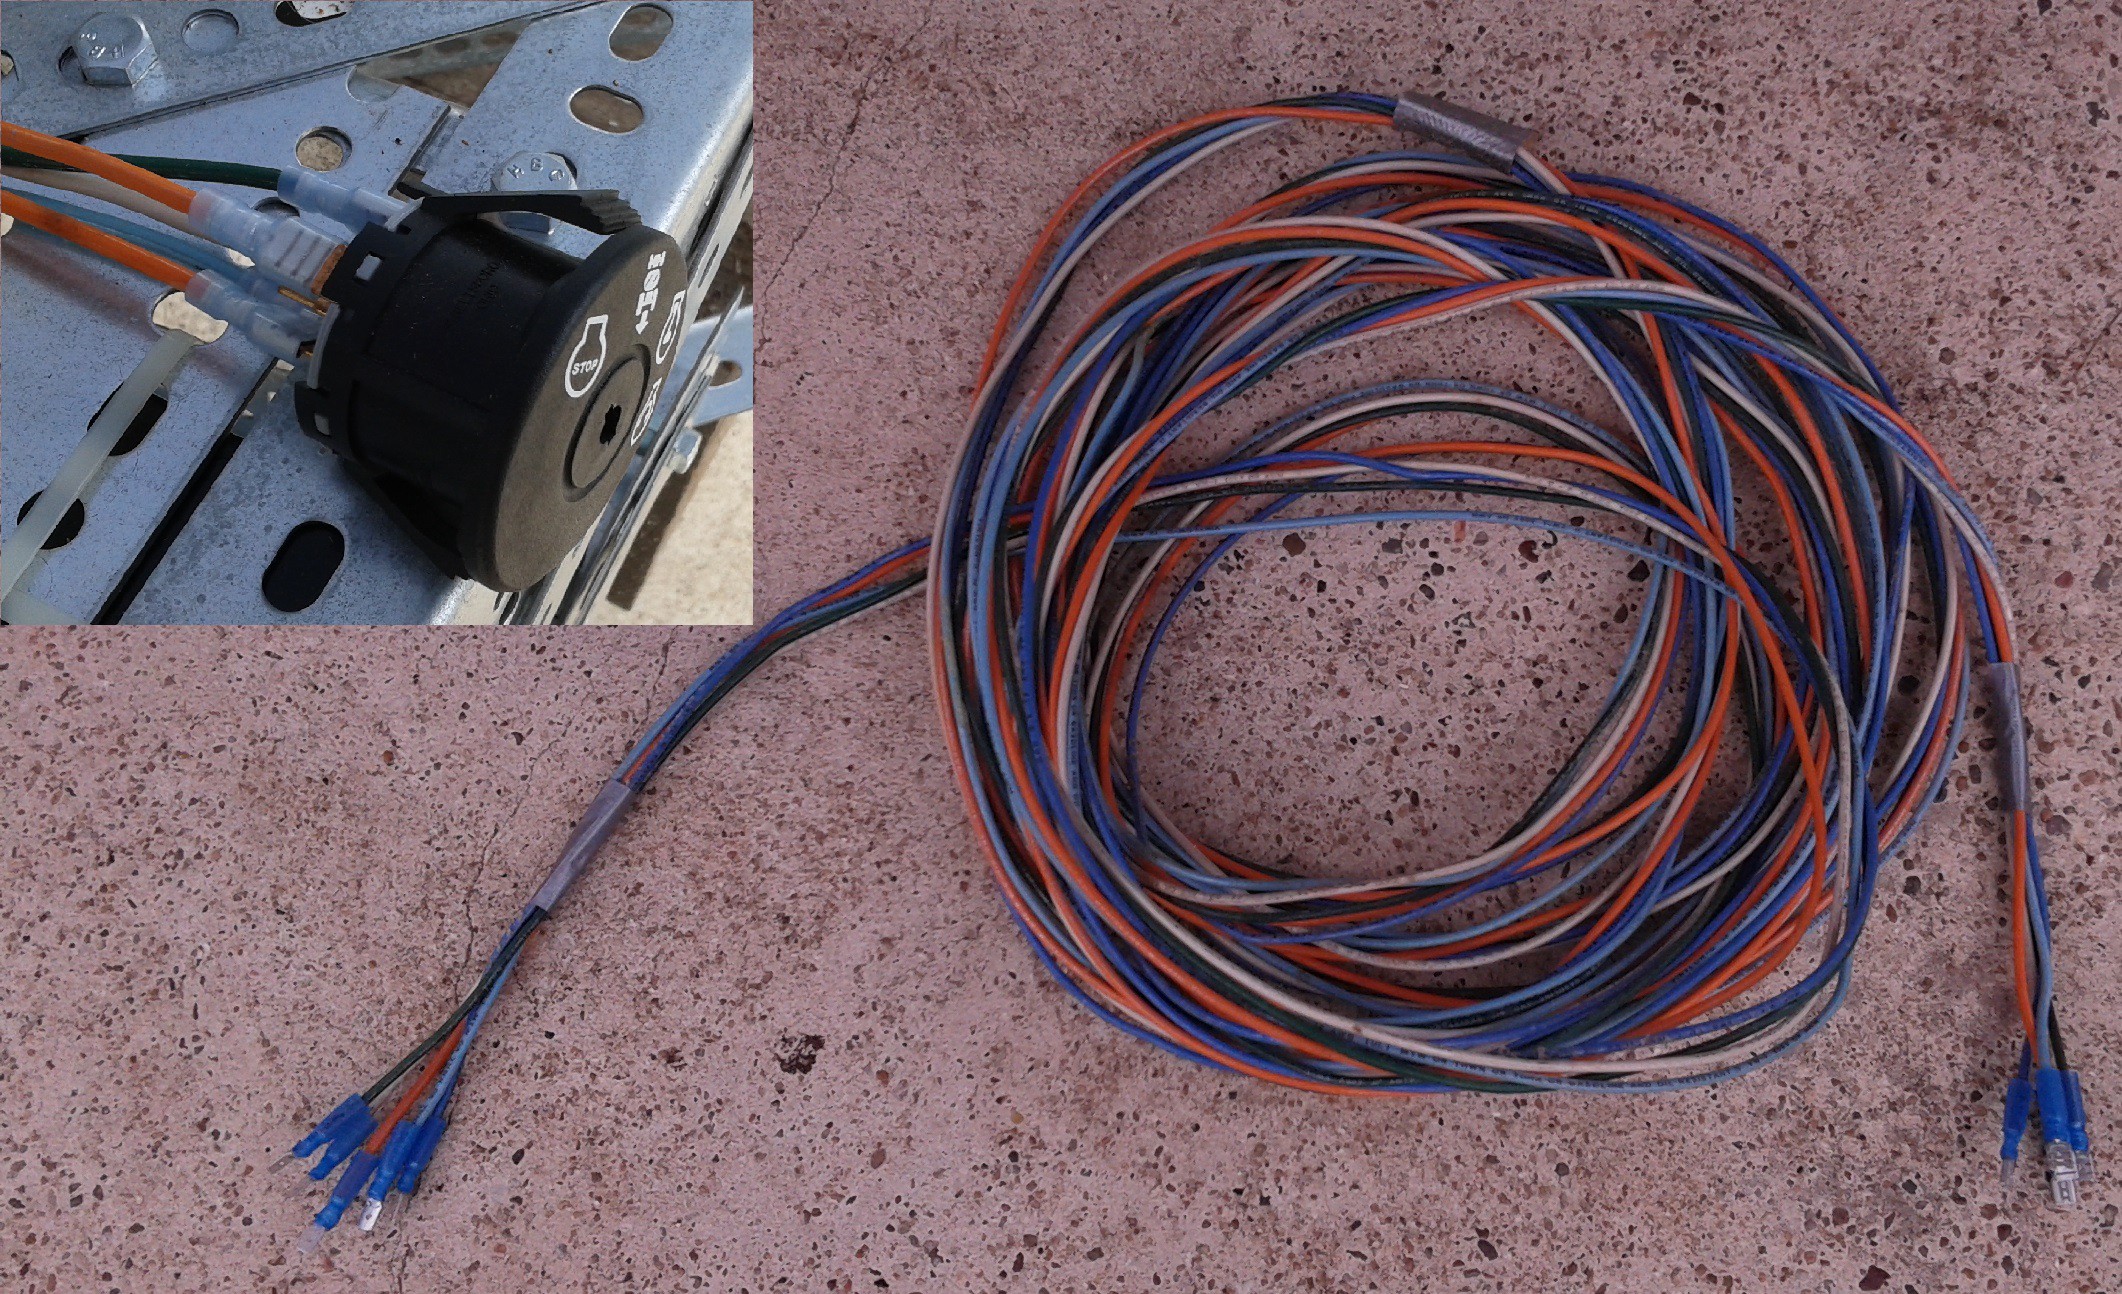
Next step is getting ready to remotely start the engine. Previously I had connected an riding lawn mower ignition switch to Goliath for testing out the starter and other hardware. Later the ignition will be controlled with the Pixhawk controller, but for doing some preliminary testing. I need to start the vehicle remotely for safety reasons, so I rigged up an extension for the ignition.
![]()
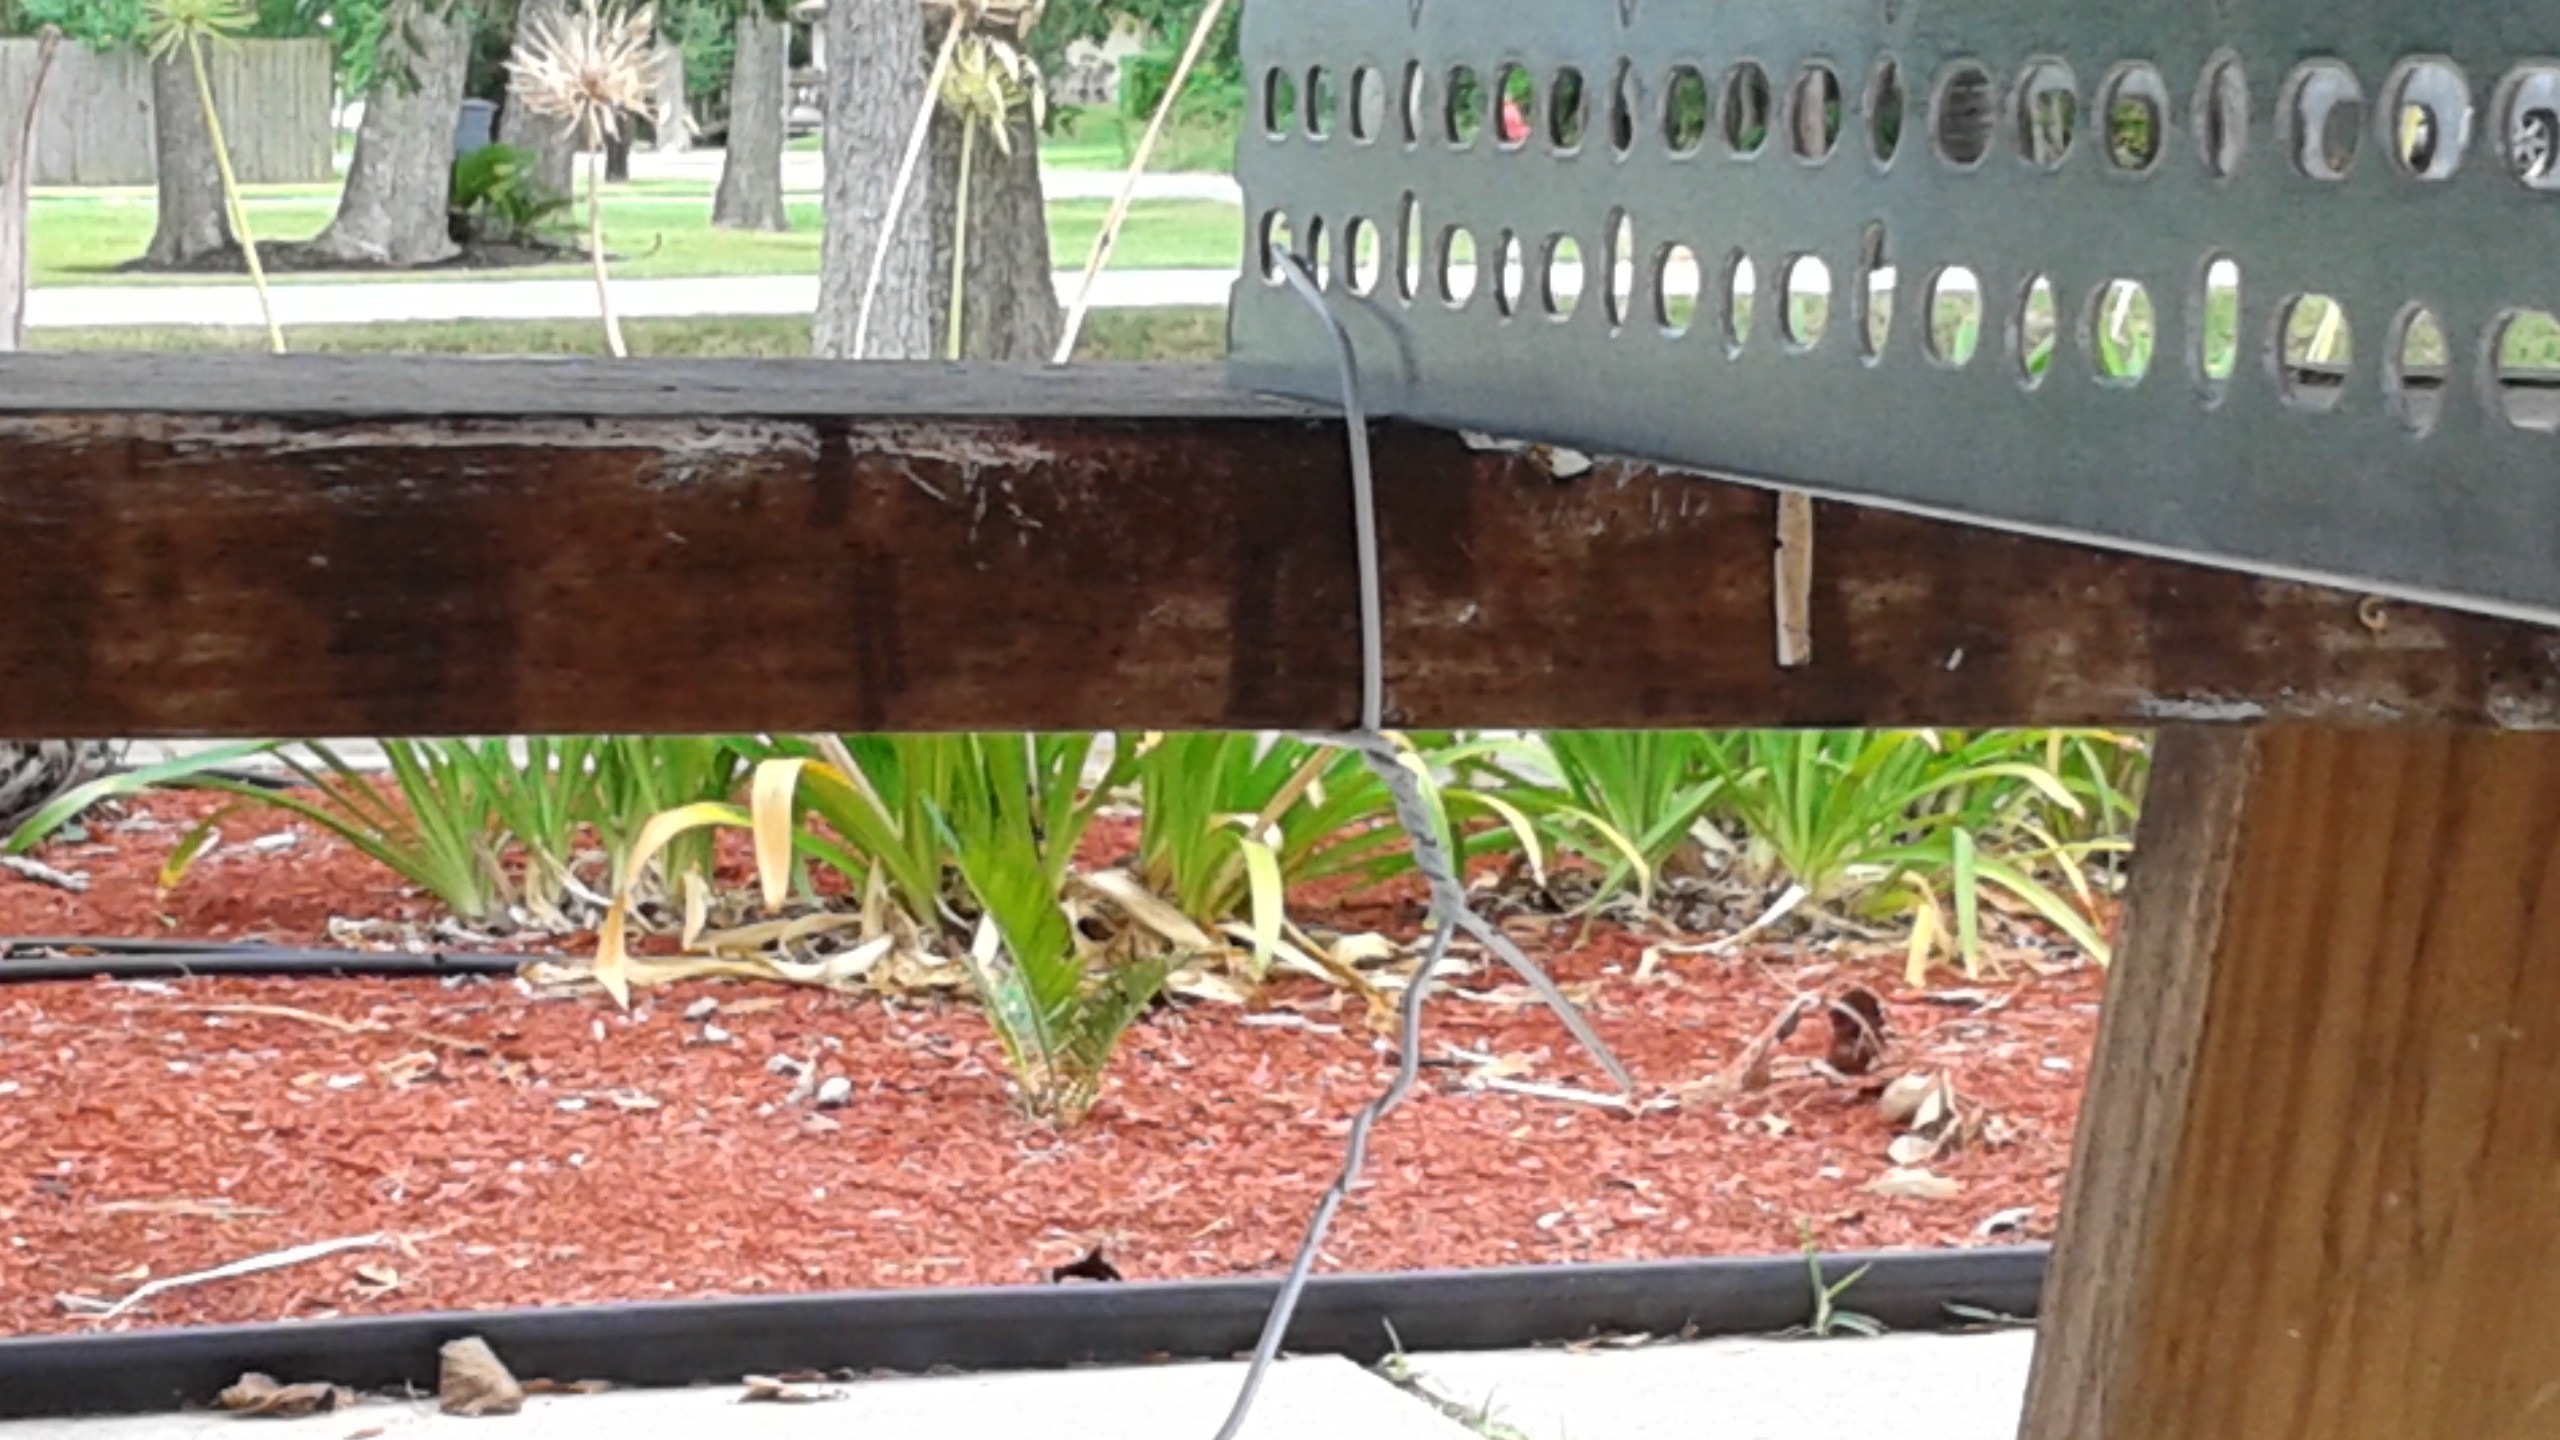
Last step is making sure Goliath isn't going to go anywhere while just running the starter. I'll get more serious with ties down for the hover test.
![]()
With all those things done, it was time to try it out.
Everything seemed to work as expected, so everything looks good for running the engine on gas next.
SATURDAY PM
So after meeting all the goals on Friday, Saturday did not go as well. The first part of the day was doing a bit more research into the Pixhawk controller. I'd like to have the Pixhawk included as part of the hover test and I'm working on making sure I have everything I need. Turns out I misunderstood some of the documentation on the Pixhawk. While the Pixhawk has 8 main and 6 aux PWM outputs, the Pixhawk does NOT provide power for servos.
To power servos off the Pixhawk, a BEC needs to be connected to one of the servo inputs to provide power to the rest. So this morning I called around and got a Castle 10AMP BEC that will convert the voltage from the 12 V Battery currently on Goliath to what the servos need. This will be in addition to the Voltage Converter that powers the rest of the Pixhawk.
After making a trip to the Hobby Shop, I got ready for today's testing. First thing was getting the fuel solenoid tied in to the ignition switch. After that I connected a temporary gas setup consisting of nothing more than a 1 gallon gas can with 1/4" tubing shoved in it and taped off.
![]()
I had wanted to keep the gas separate from the rest of the vehicle, and it was setup underneath at first, knowing that the change in height might be too much for the fuel pump. However after turning the engine over several times it was obvious the fuel wasn't reaching the engine. The engine comes equipped with a clear fuel filter case and the gas got to the fuel filter and stopped. Once the gas can was place on top of the vehicle, the fuel flowed freely though the filter.
Several attempts were made to start the engine, but the engine never fired. The connections were checked, but nothing seemed to work. Eventually the battery got low, so the battery charger was connected to recharge it. It could be that the long wires for the ignition extension are the problem. Sunday I'll have to get the voltage meter out and do some testing.
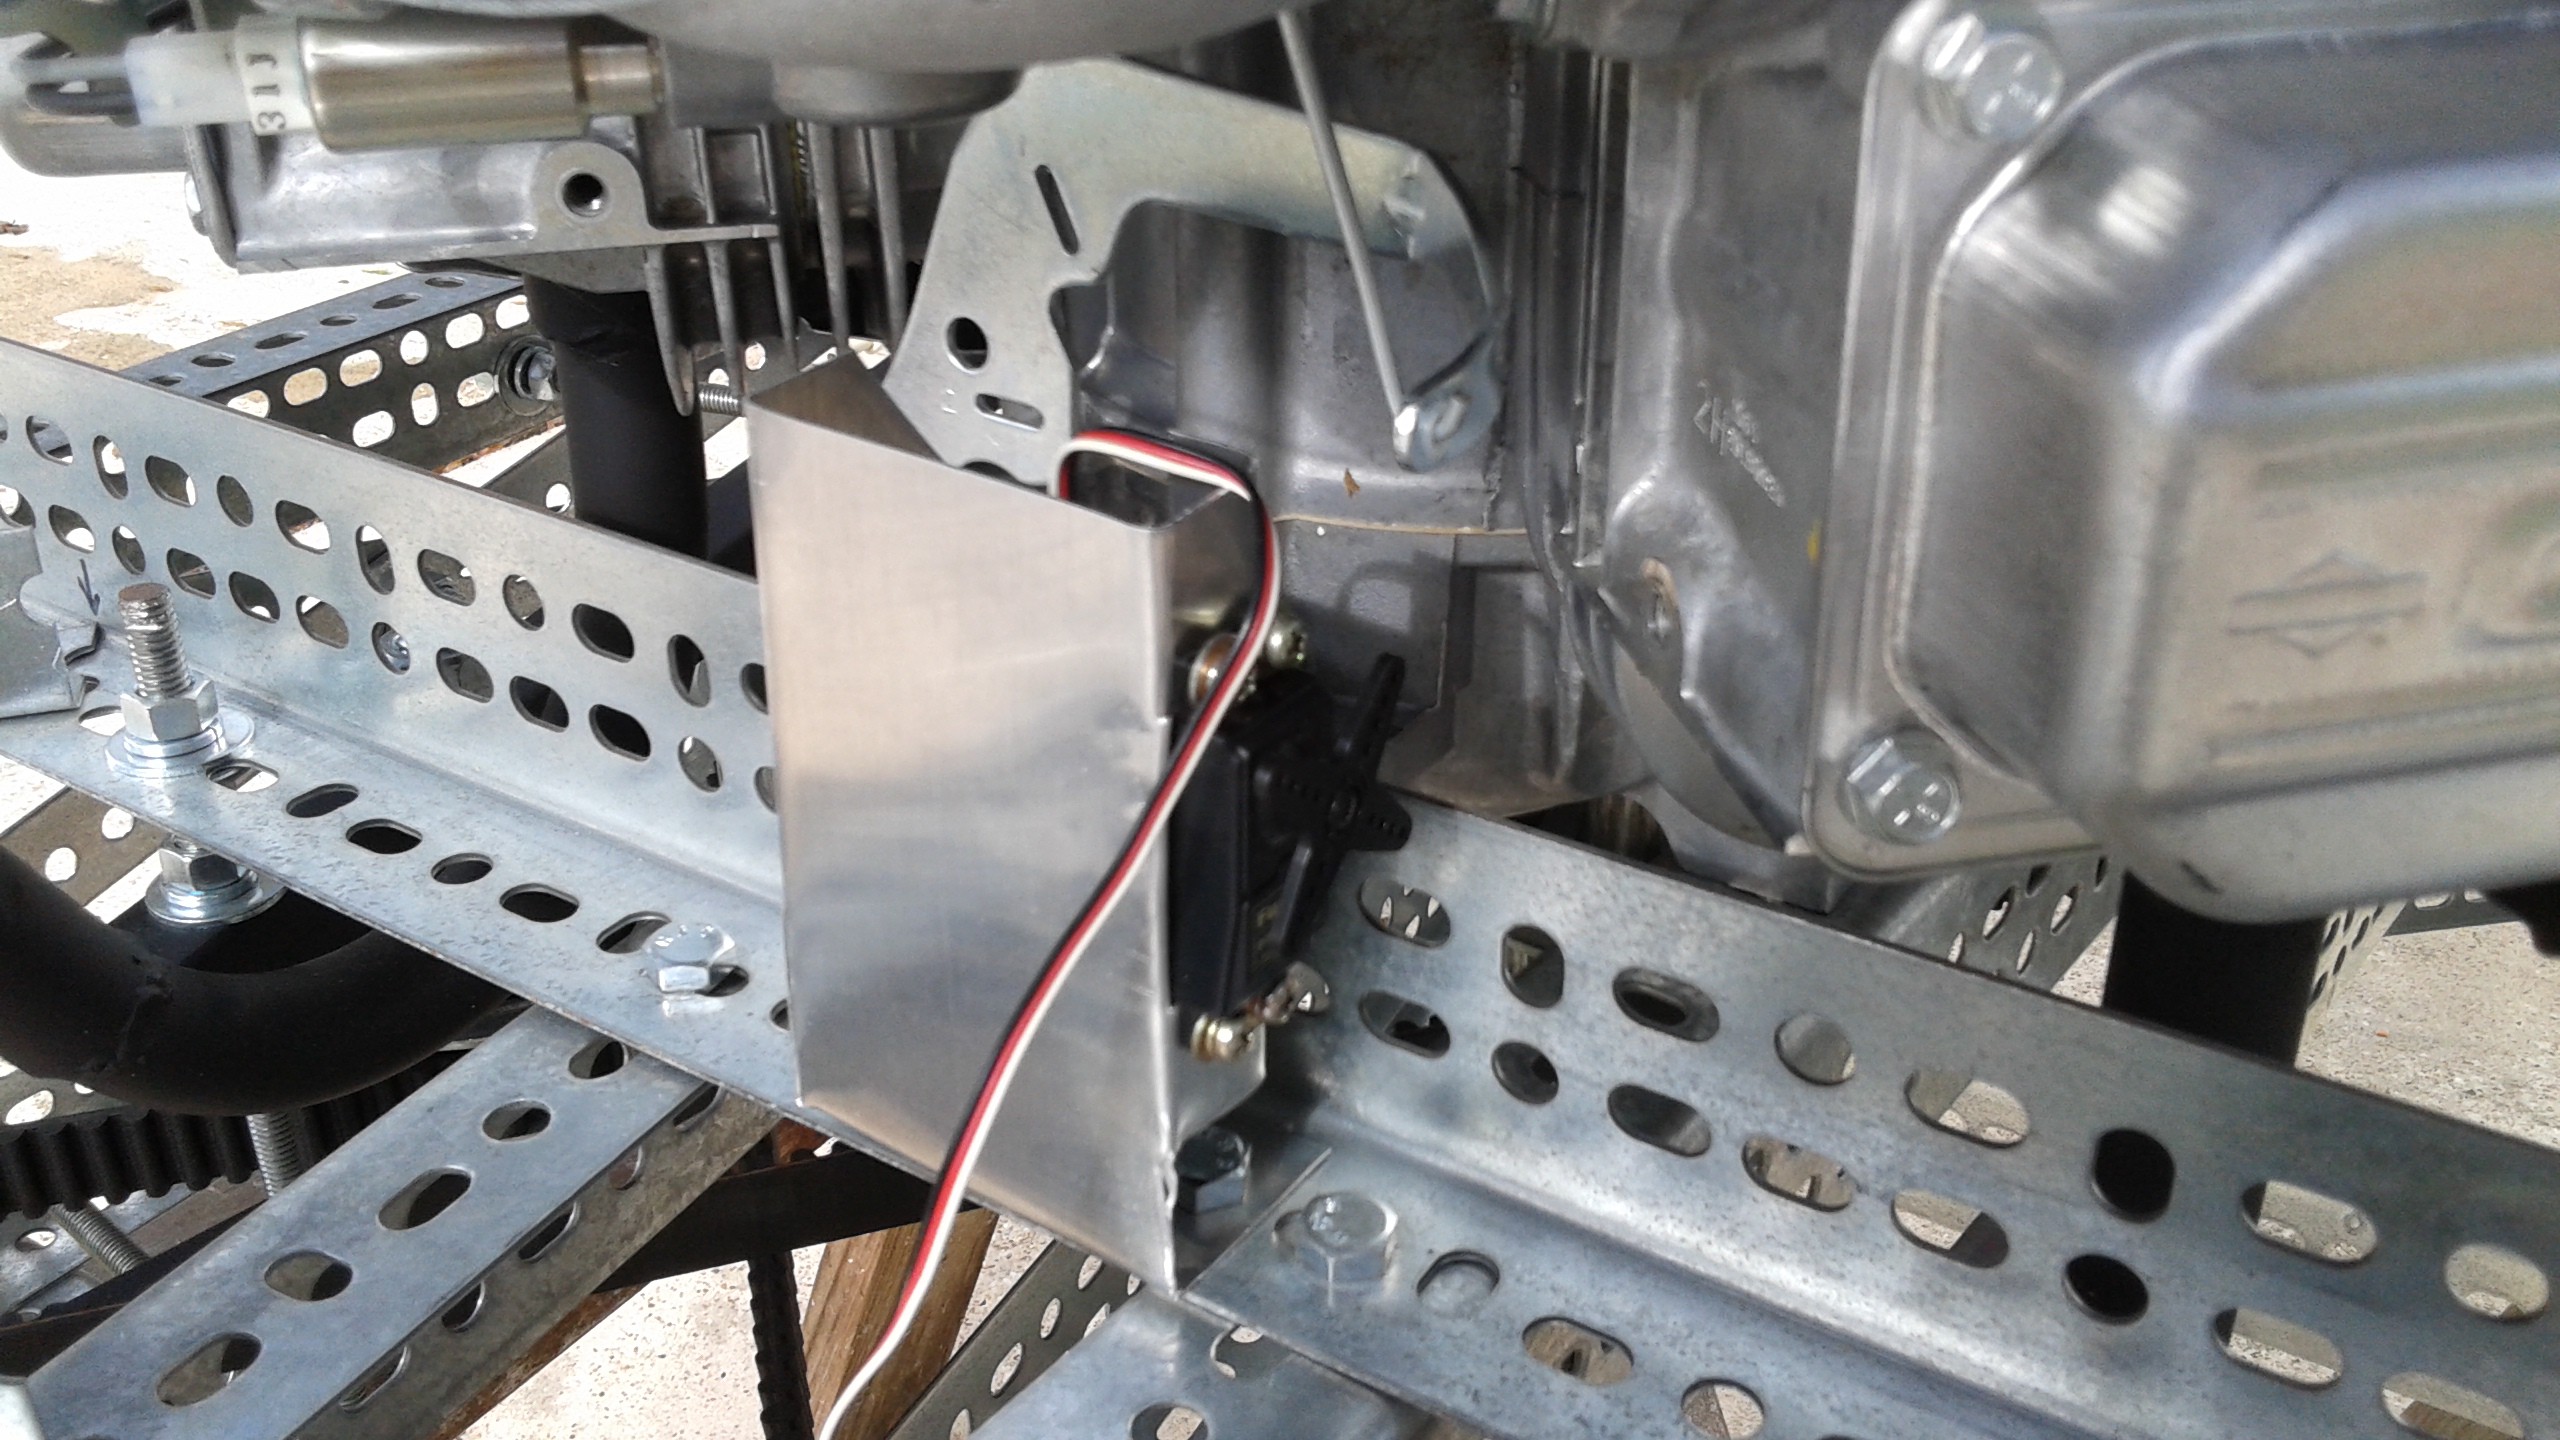
While waiting for Goliath to recharge I did get some time to start prototyping the throttle servo bracket out of some scrap aluminum sheet. It's an OK start but I need to find a spot on the frame or engine to connect to the top of the bracket to make it more secure.
![]()
Hopefully it won't take too much more work on Sunday to get the engine figured out and still get the hover test completed this weekend.
SUNDAY AM
I had to do some office work this morning, so I got a late start today. It's raining so I'm working adding some of the electrical needed for the final design, starting with having a master switch and fuse, along with a mini fuse box for the different systems.
SUNDAY EVENING
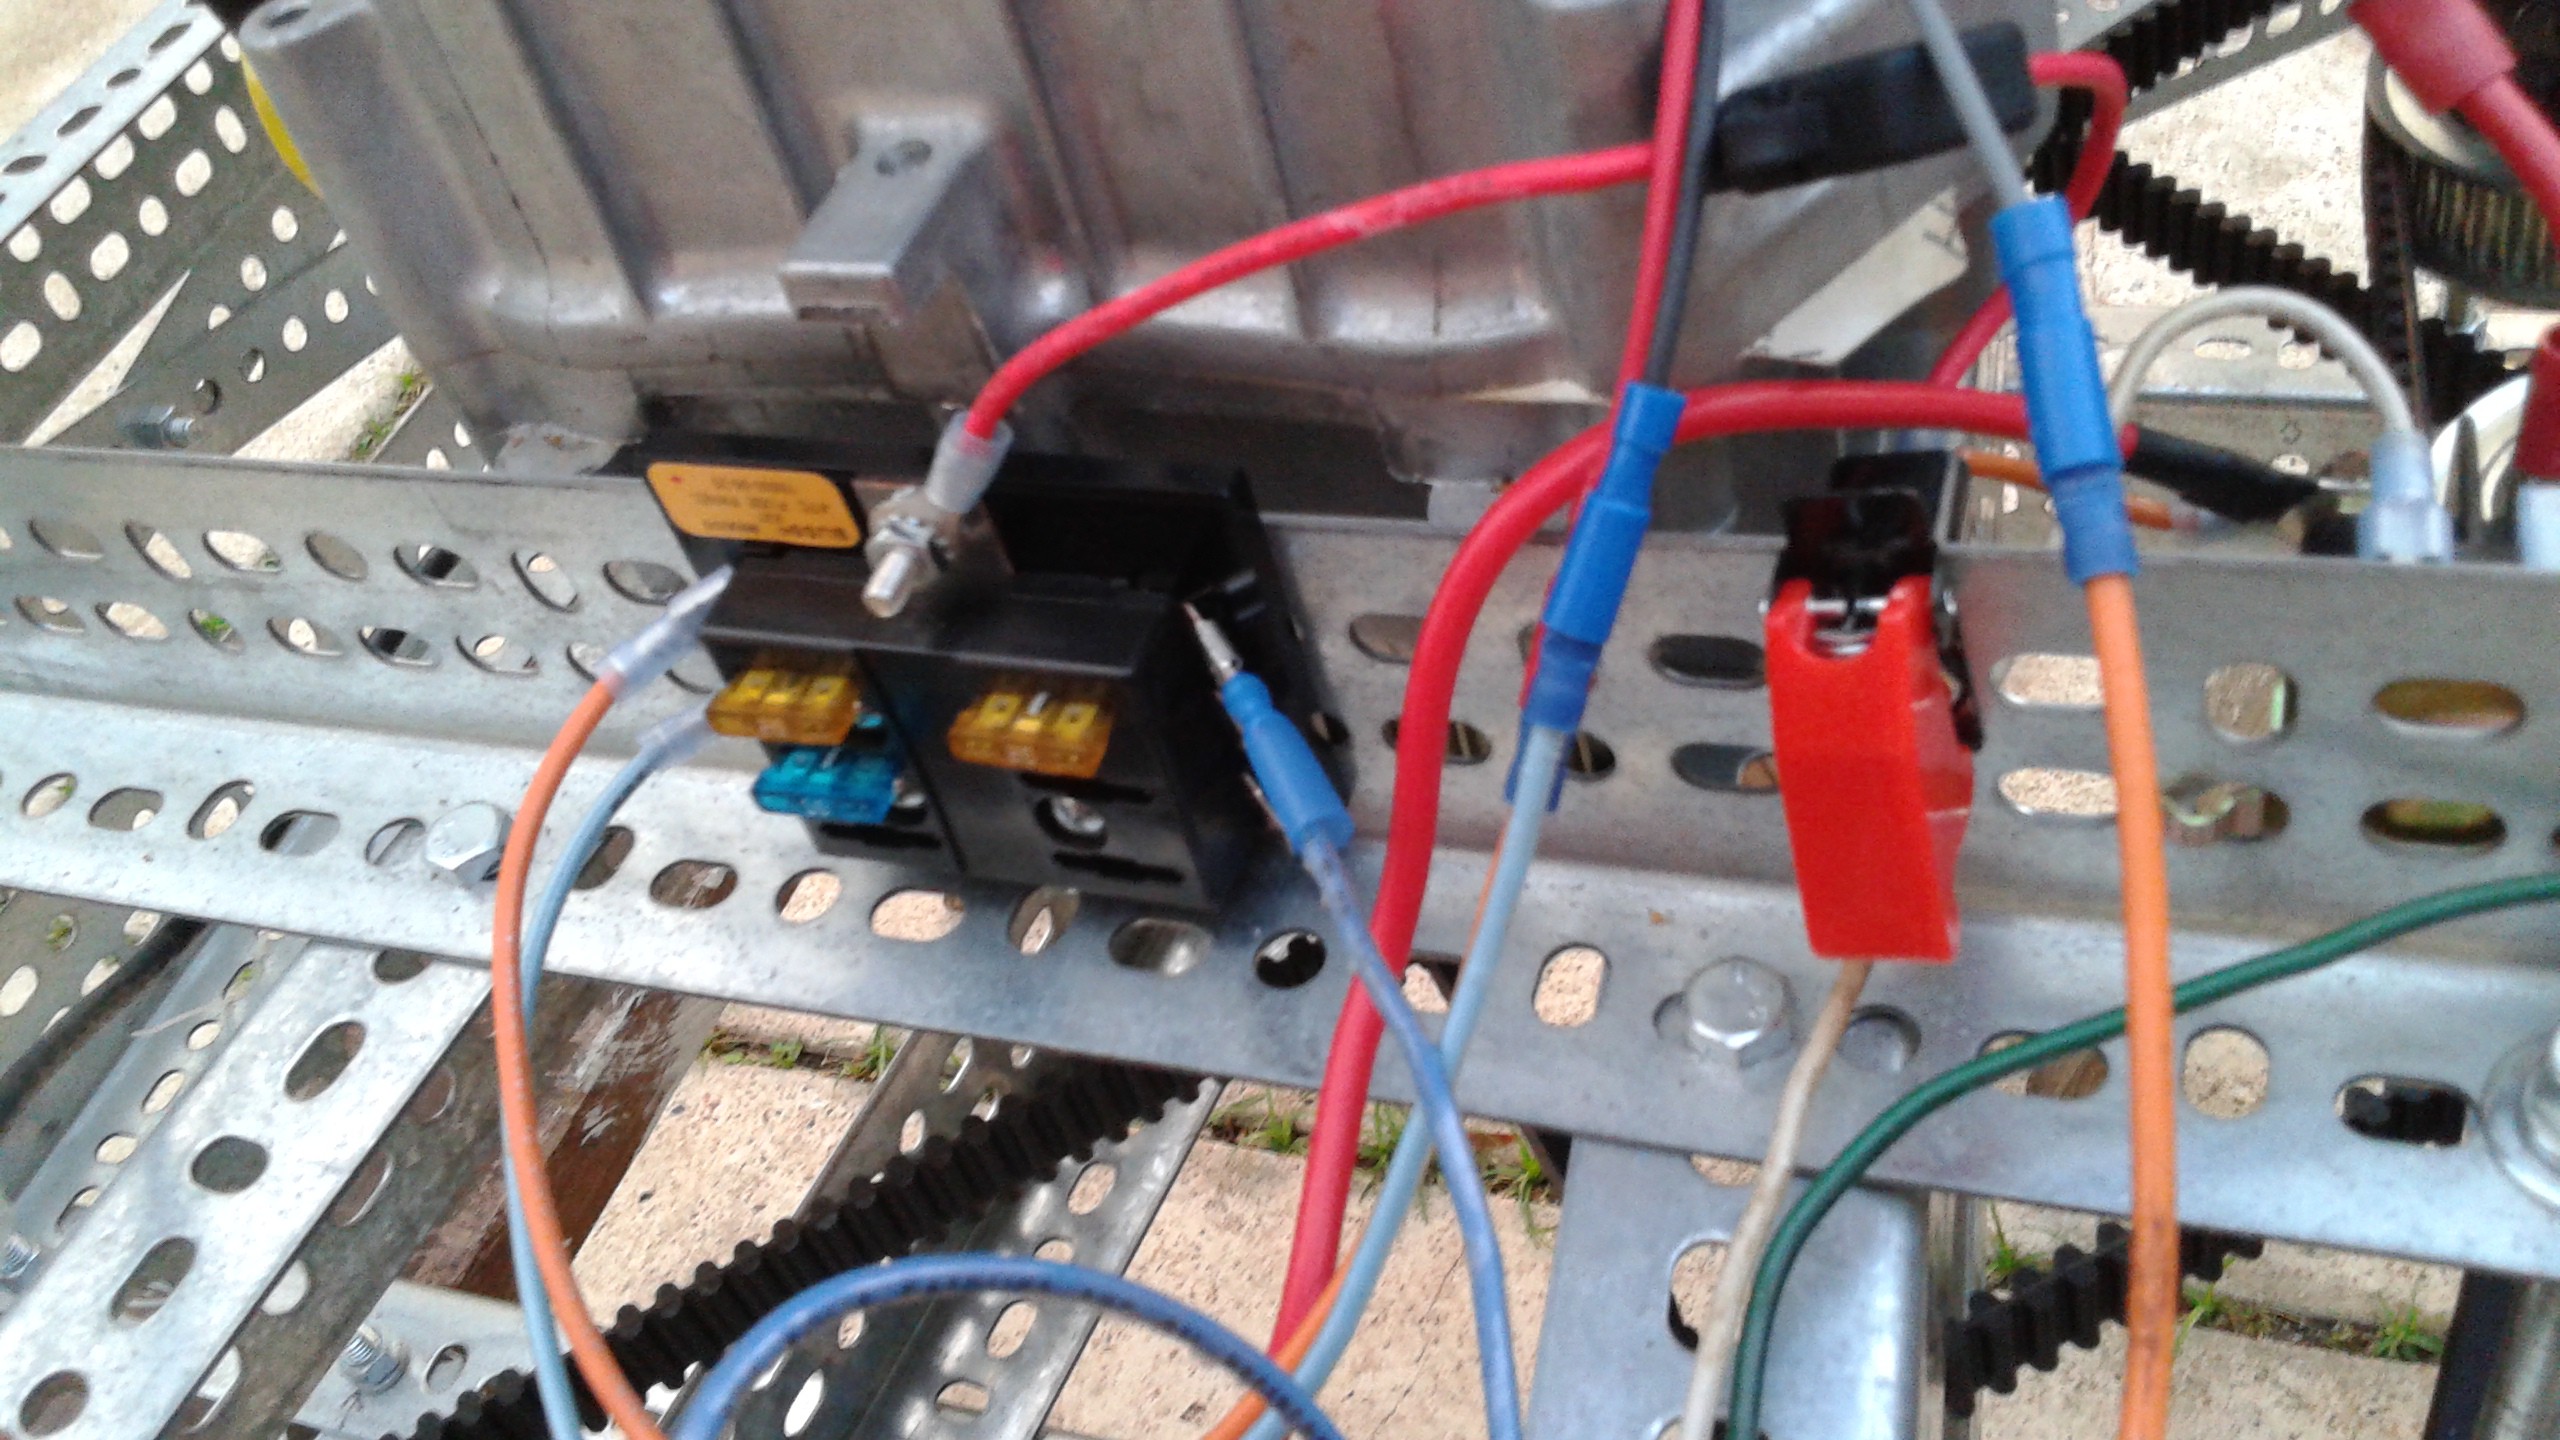
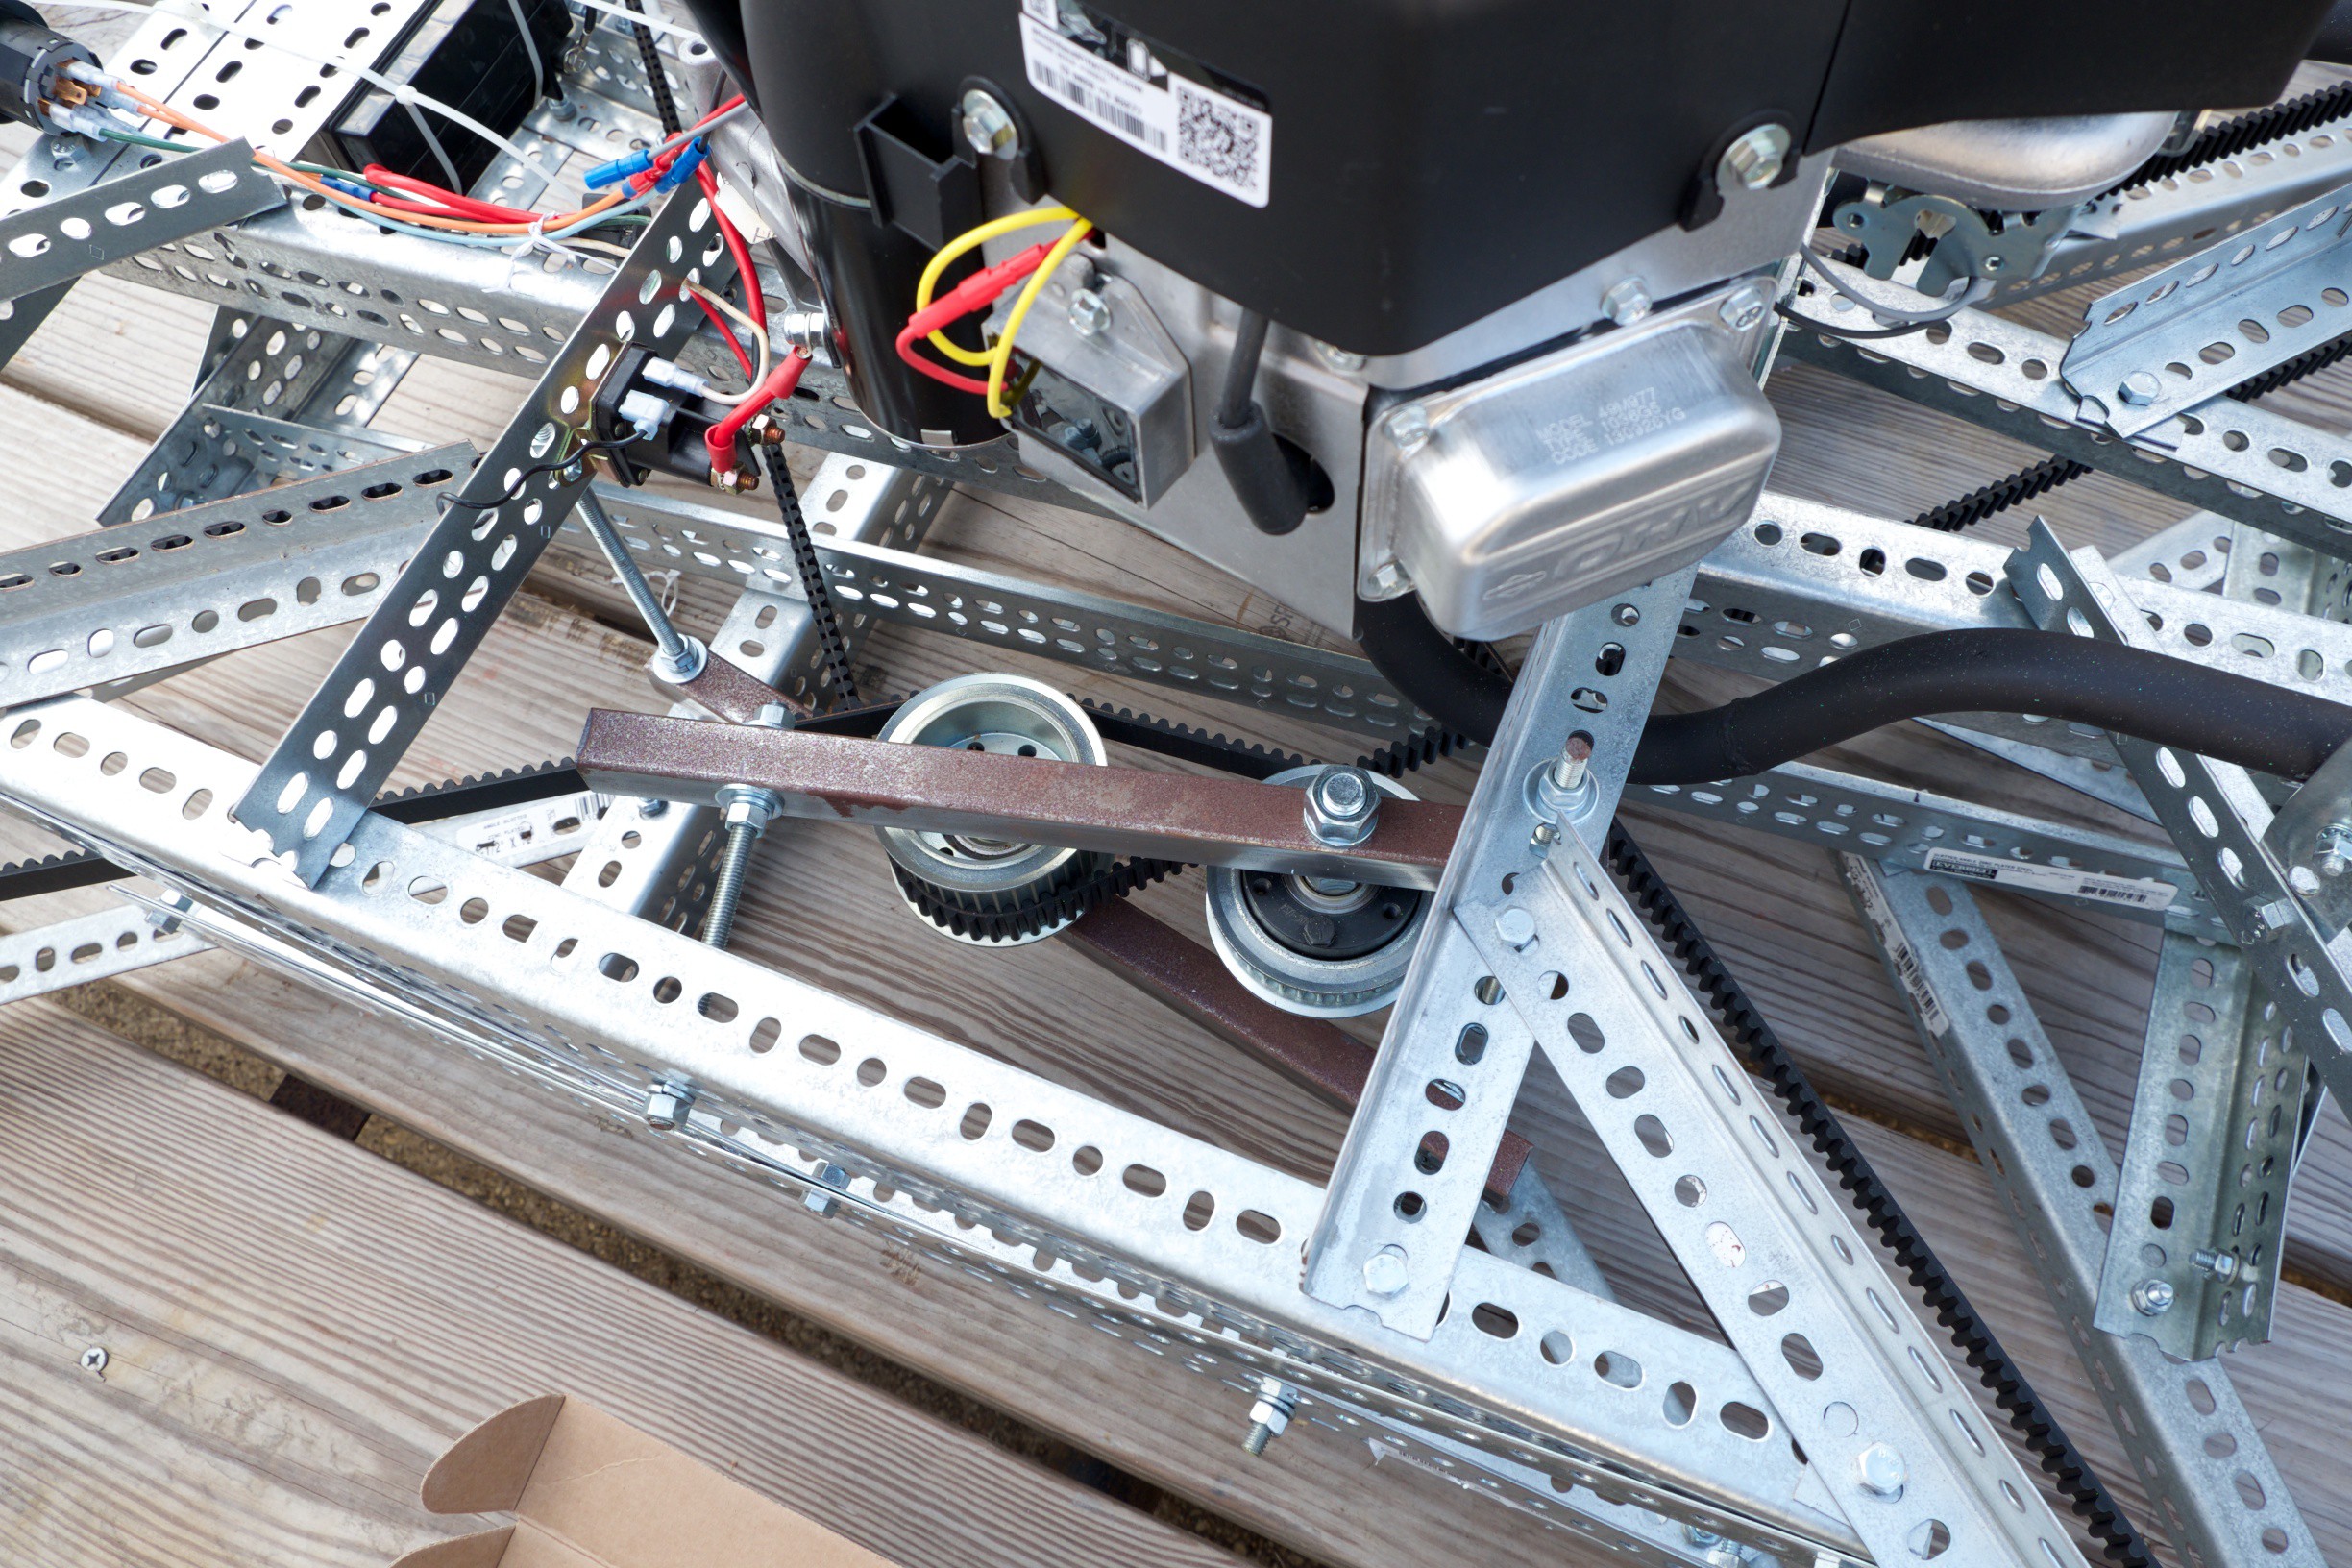
The good news is that we haven't had to use the fire extinguisher so far, but the engine still isn't starting. I took advantage of the rain to do some rewiring. After yesterday's testing, I suspected that the long wires used for the ignition extension was the culprit so I worked on rewiring so that some of the components weren't wired through the ignition extension.
The first thing I did was add a master electrical switch and a power box. This lets me know that I can turn everything off in the system and easily isolate different components. Currently the alternator and ignition are wired trough the box and they are connected when the master switch is enabled.
![]()
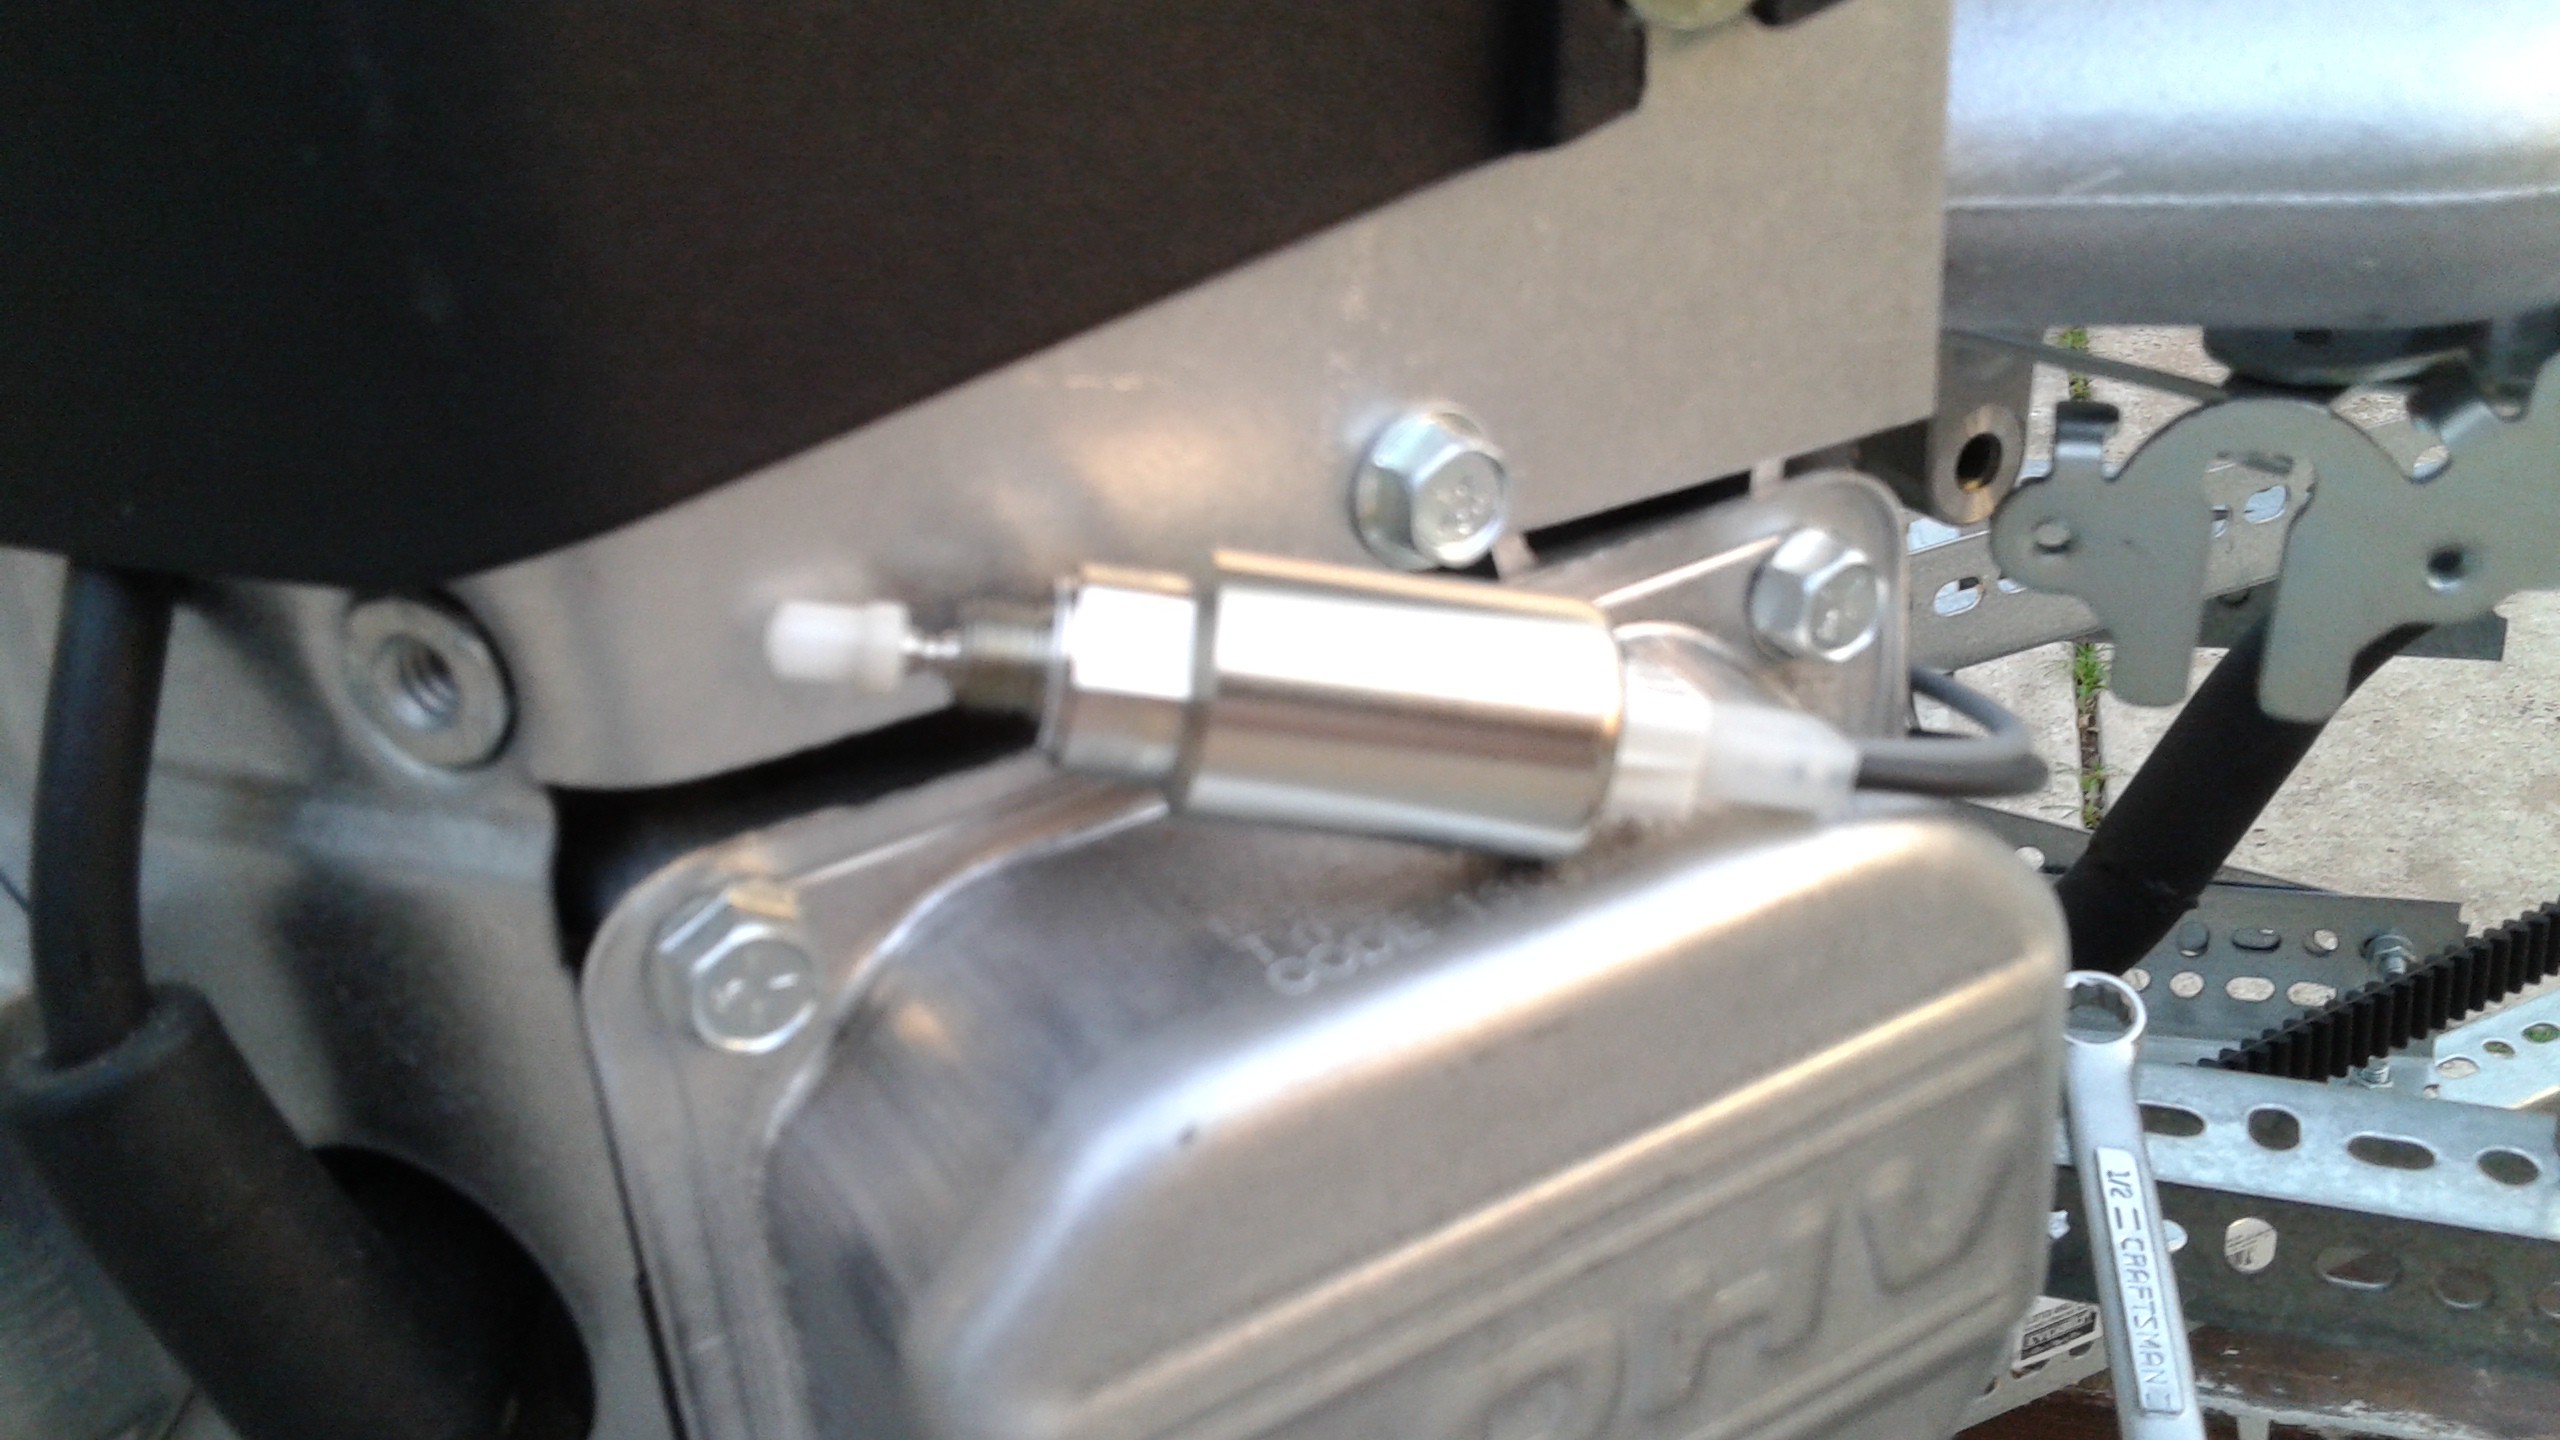
The fuel solenoid and starter are still wired through the remote ignition, which can only be used if the master switch is on. To make sure the fuel solenoid was working I removed the solenoid and visually checked to see if it actuated when the switch was enabled. It did activate and when I removed it, gas poured out of the carburetor, so I'm confident fuel is getting to the engine.
![]()
The rain cleared out for a little bit to try starting it up a few times again, but it didn't start. There isn't any sputtering, it just turns over without making any other sounds.
Right now I suspect that the ignition is not working correctly. There seems to be a slight acrid smell after the electronics have been powered on for a minute or two. It could be the ignition coils, but I'm not sure. If anyone has any experience with starting a brand new engine like this or if you have any ideas, I'd love to hear from you.
MONDAY AM
Rain again...
![]()
MONDAY AFTERNOON
So the afternoon was rather eventful. The problem with the engine appears to have been fouled spark plugs (though I don't have an idea how new plugs could be fouled). The engine started up strong and came up to speed quickly. After a few seconds I shut it off, but one of the belts appeared to lose tension and the blades got caught and two of the propellers broke. Attached is some video. Note, the startup seems to have been cut off, and while in the video the propellers seem to spin backwards, it's likely an artifact of the video capture speed. I'll post more details later when I get things sorted out.
-
Upcoming Testing this Weekend
08/28/2014 at 02:41 • 0 commentsSo things are close to being ready to do a tethered hover test this weekend! As things progress over the weekend I'll add a Hover Testing post and update it as things progress.
The tentative plan ( trying to allow for extra time for the inevitable issues that allows seem to pop up) for the weekend is:
Friday - Mount the remaining propeller and test the propellers and belt system using only the starter
Saturday - Run the engine on gas at low RPM.
Sunday - HOVER!
-
Throttle and Choke Servos
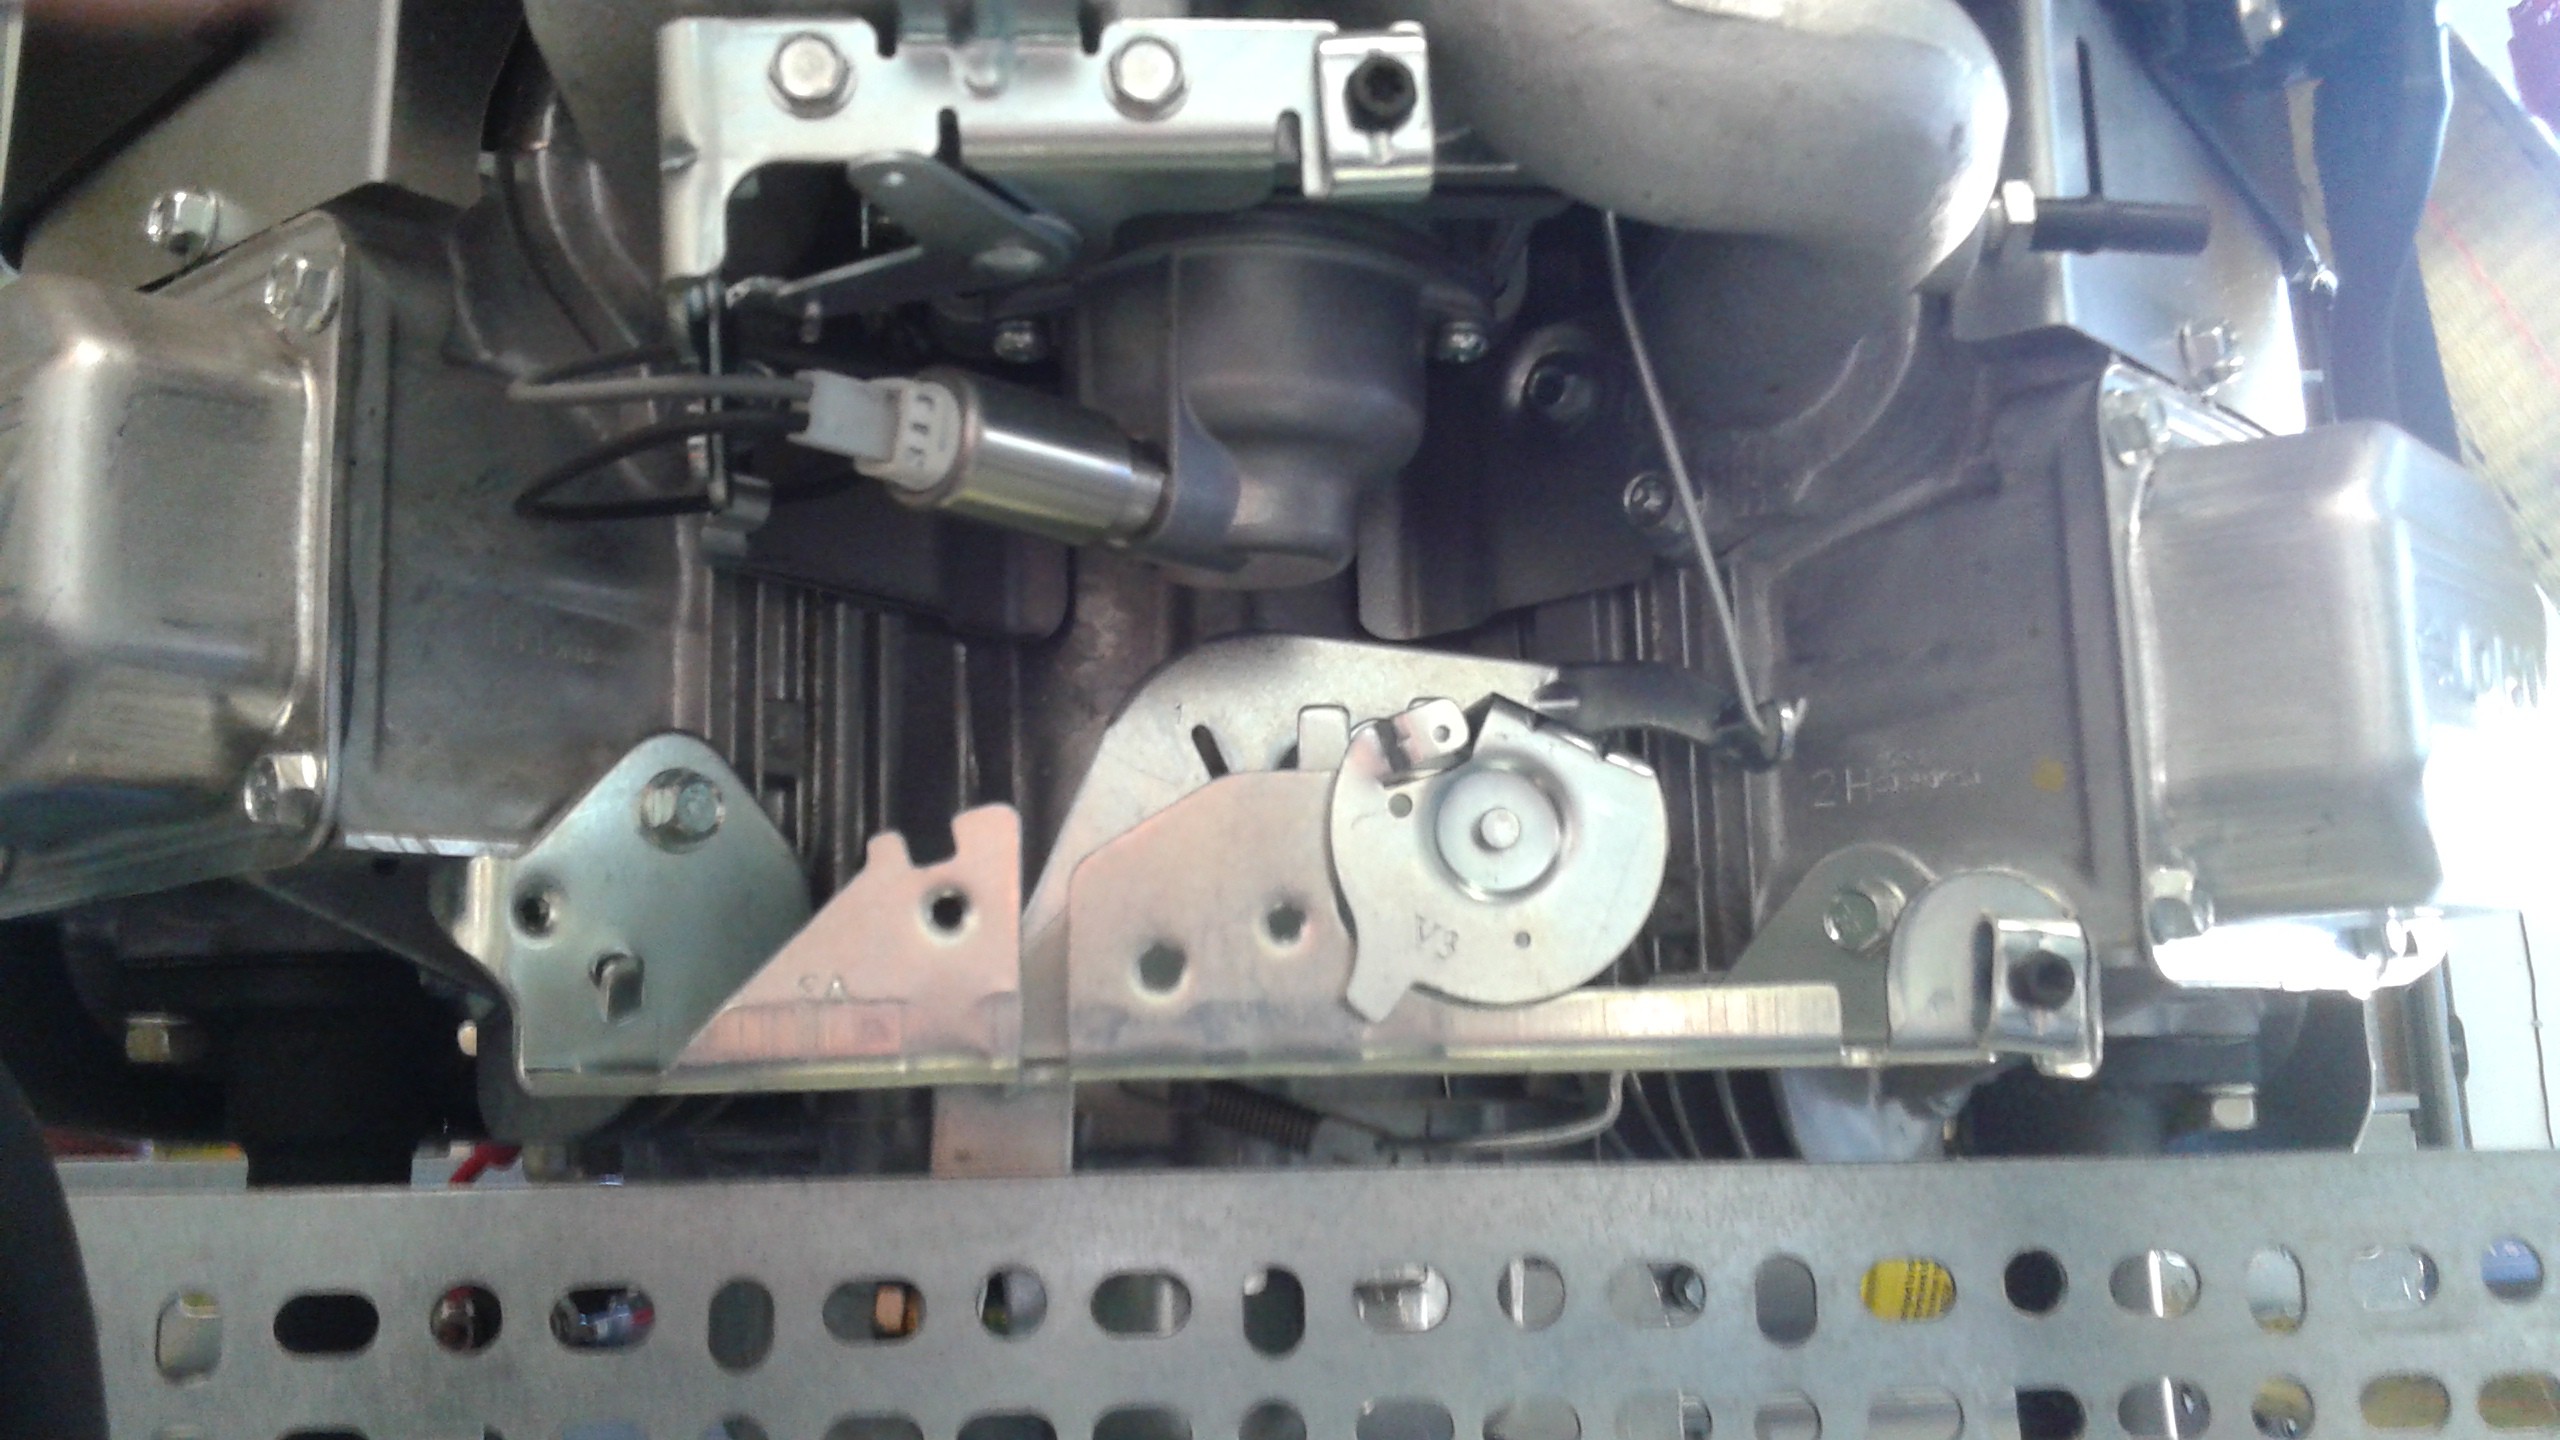
08/24/2014 at 14:59 • 1 commentConnecting a servo to throttle and choke is one of the last things to be done before the hover test. I've been taking a look at the hardware on the engine to see what's required.
![]()
The engine user manual doesn't cover anything regarding the mechanical connections. A bit of research on the internet hasn't shed any light on the details on the throttle plate either. I know that the fuel solenoid is what has the electrical connection. The lever arm attached to the fuel solenoid is likely the throttle. That means the lower hardware where is likely the choke. There's a few springs and connections, which don't seem straight forward. The one thing that's clear is the the vertical push rod is the only part that interacts with the rest of the engine. If I'm going to just connect a servo, this seems like the best place and the rest of the hardware could just be removed.
If any one has better knowledge or access to a schematic on this, any inputs would be helpful.
-
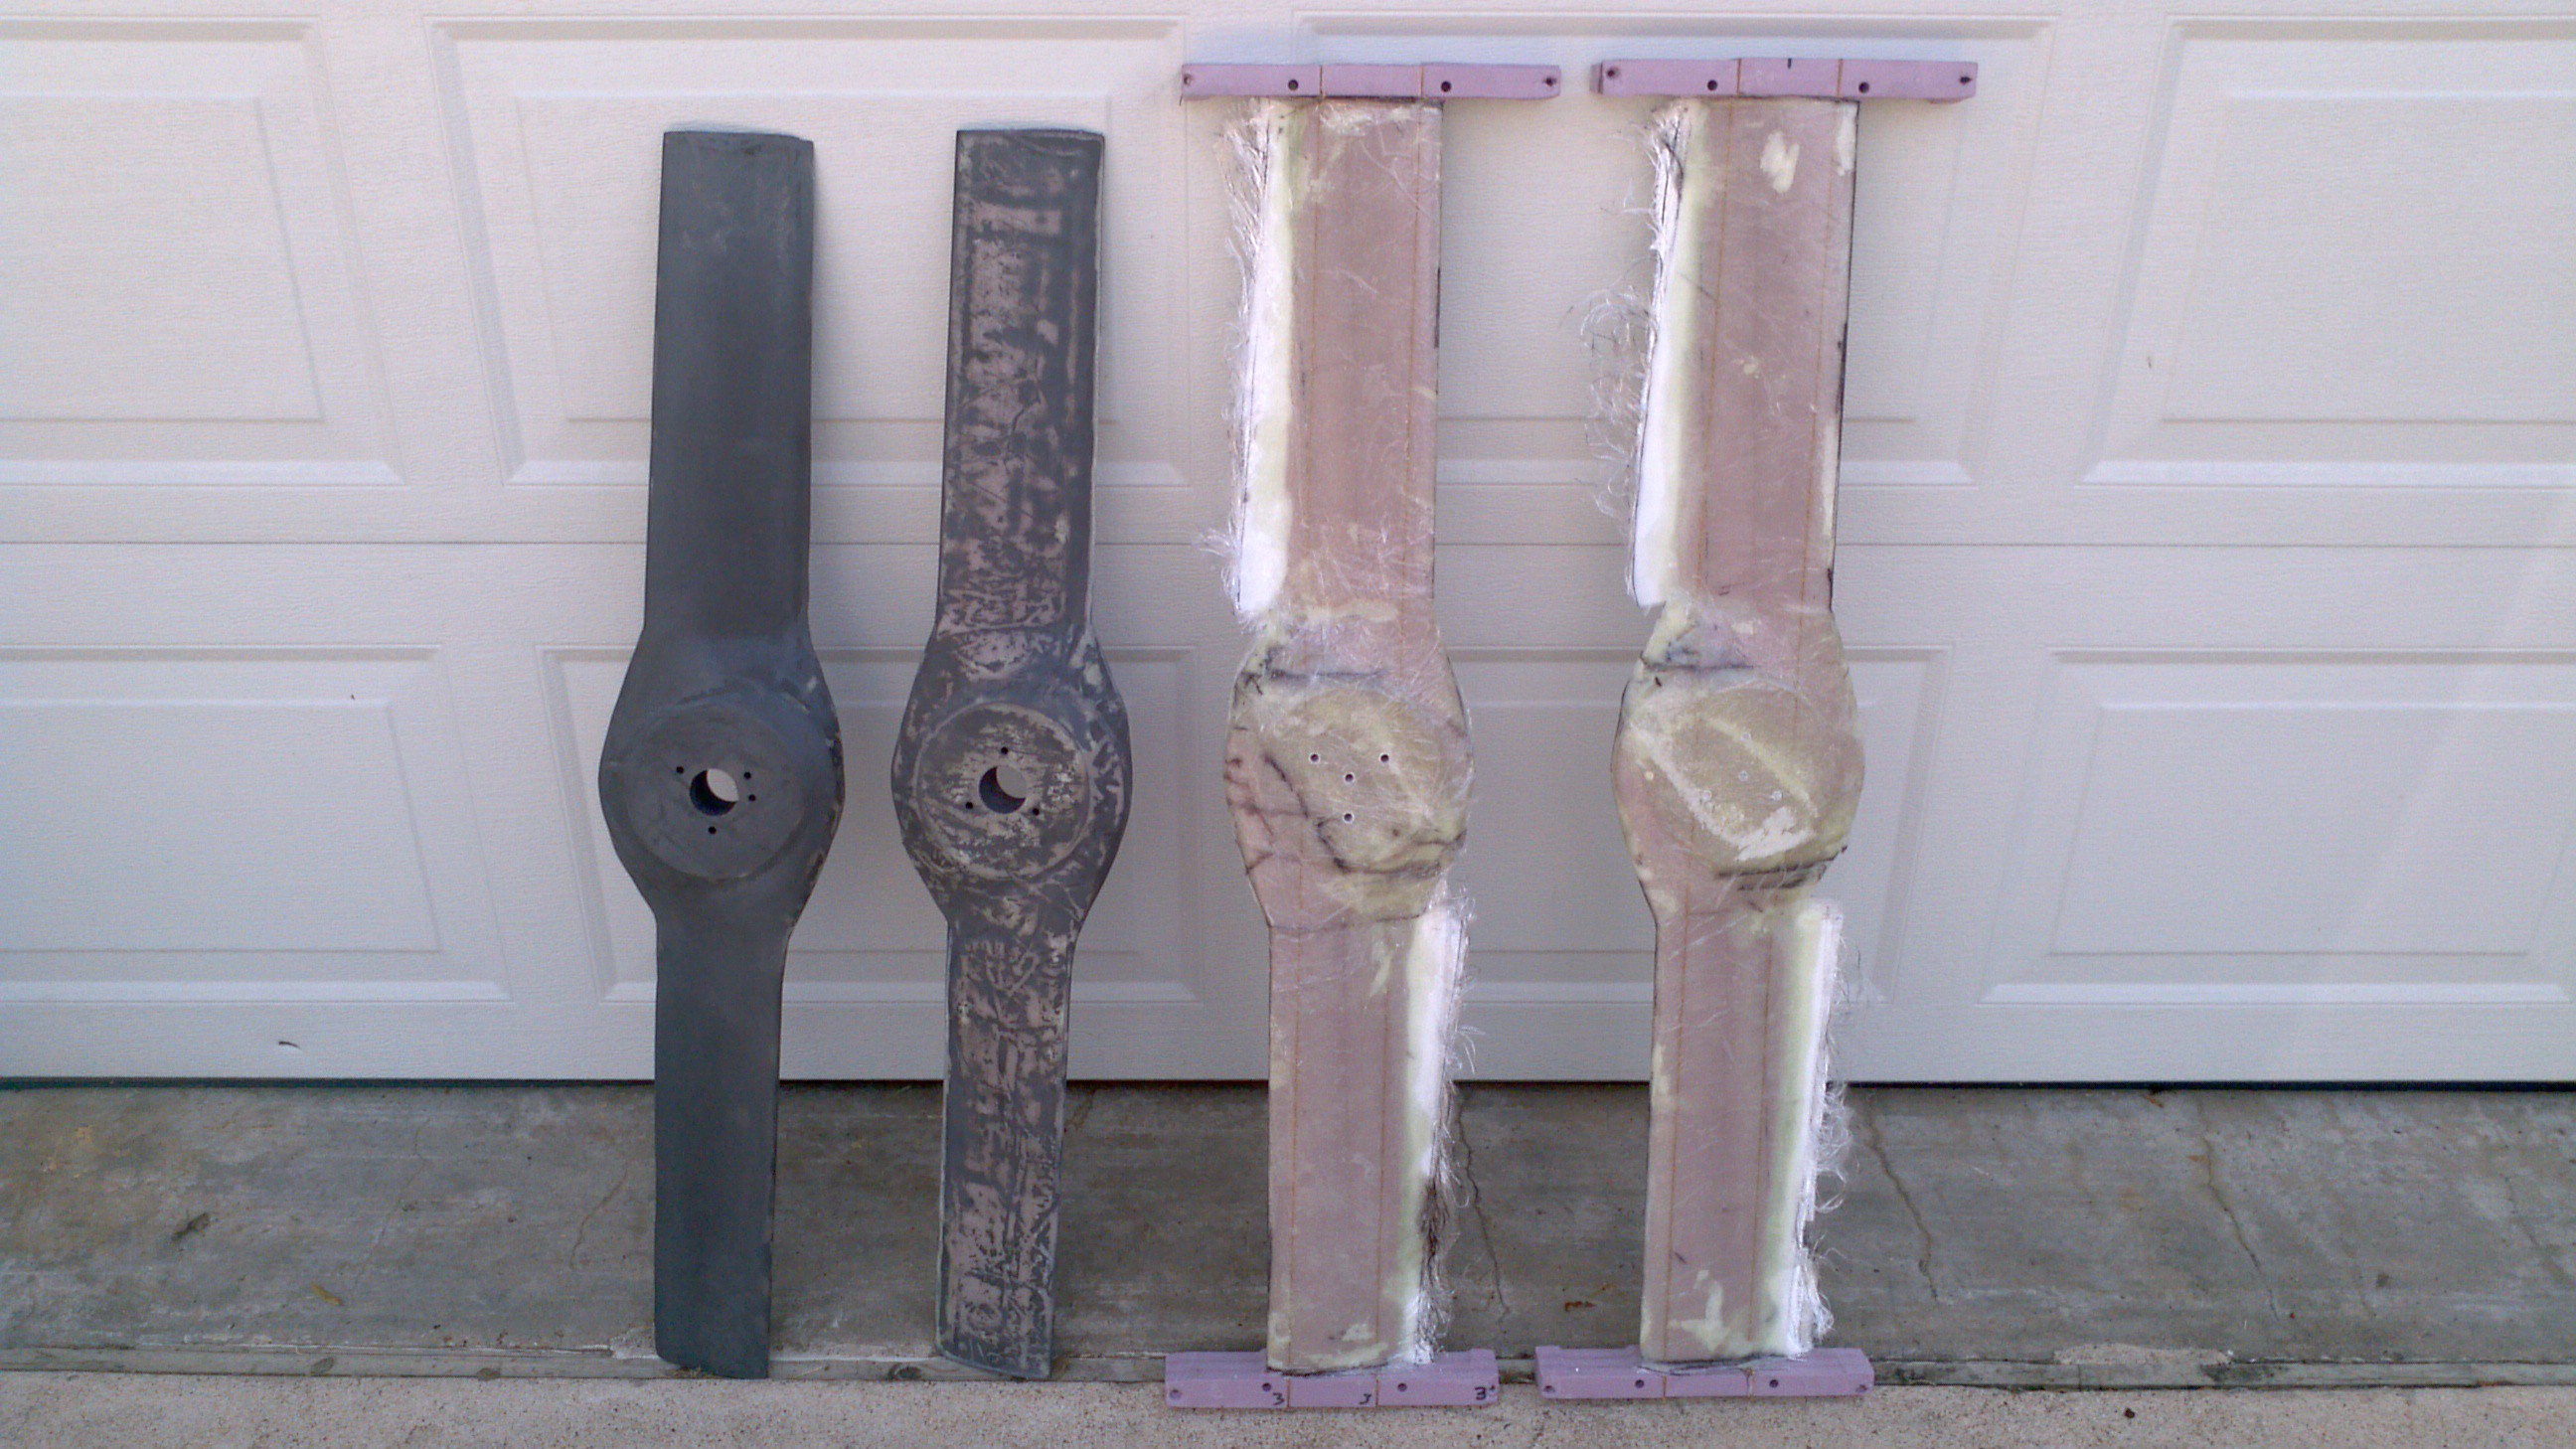
Finishing the Propellers
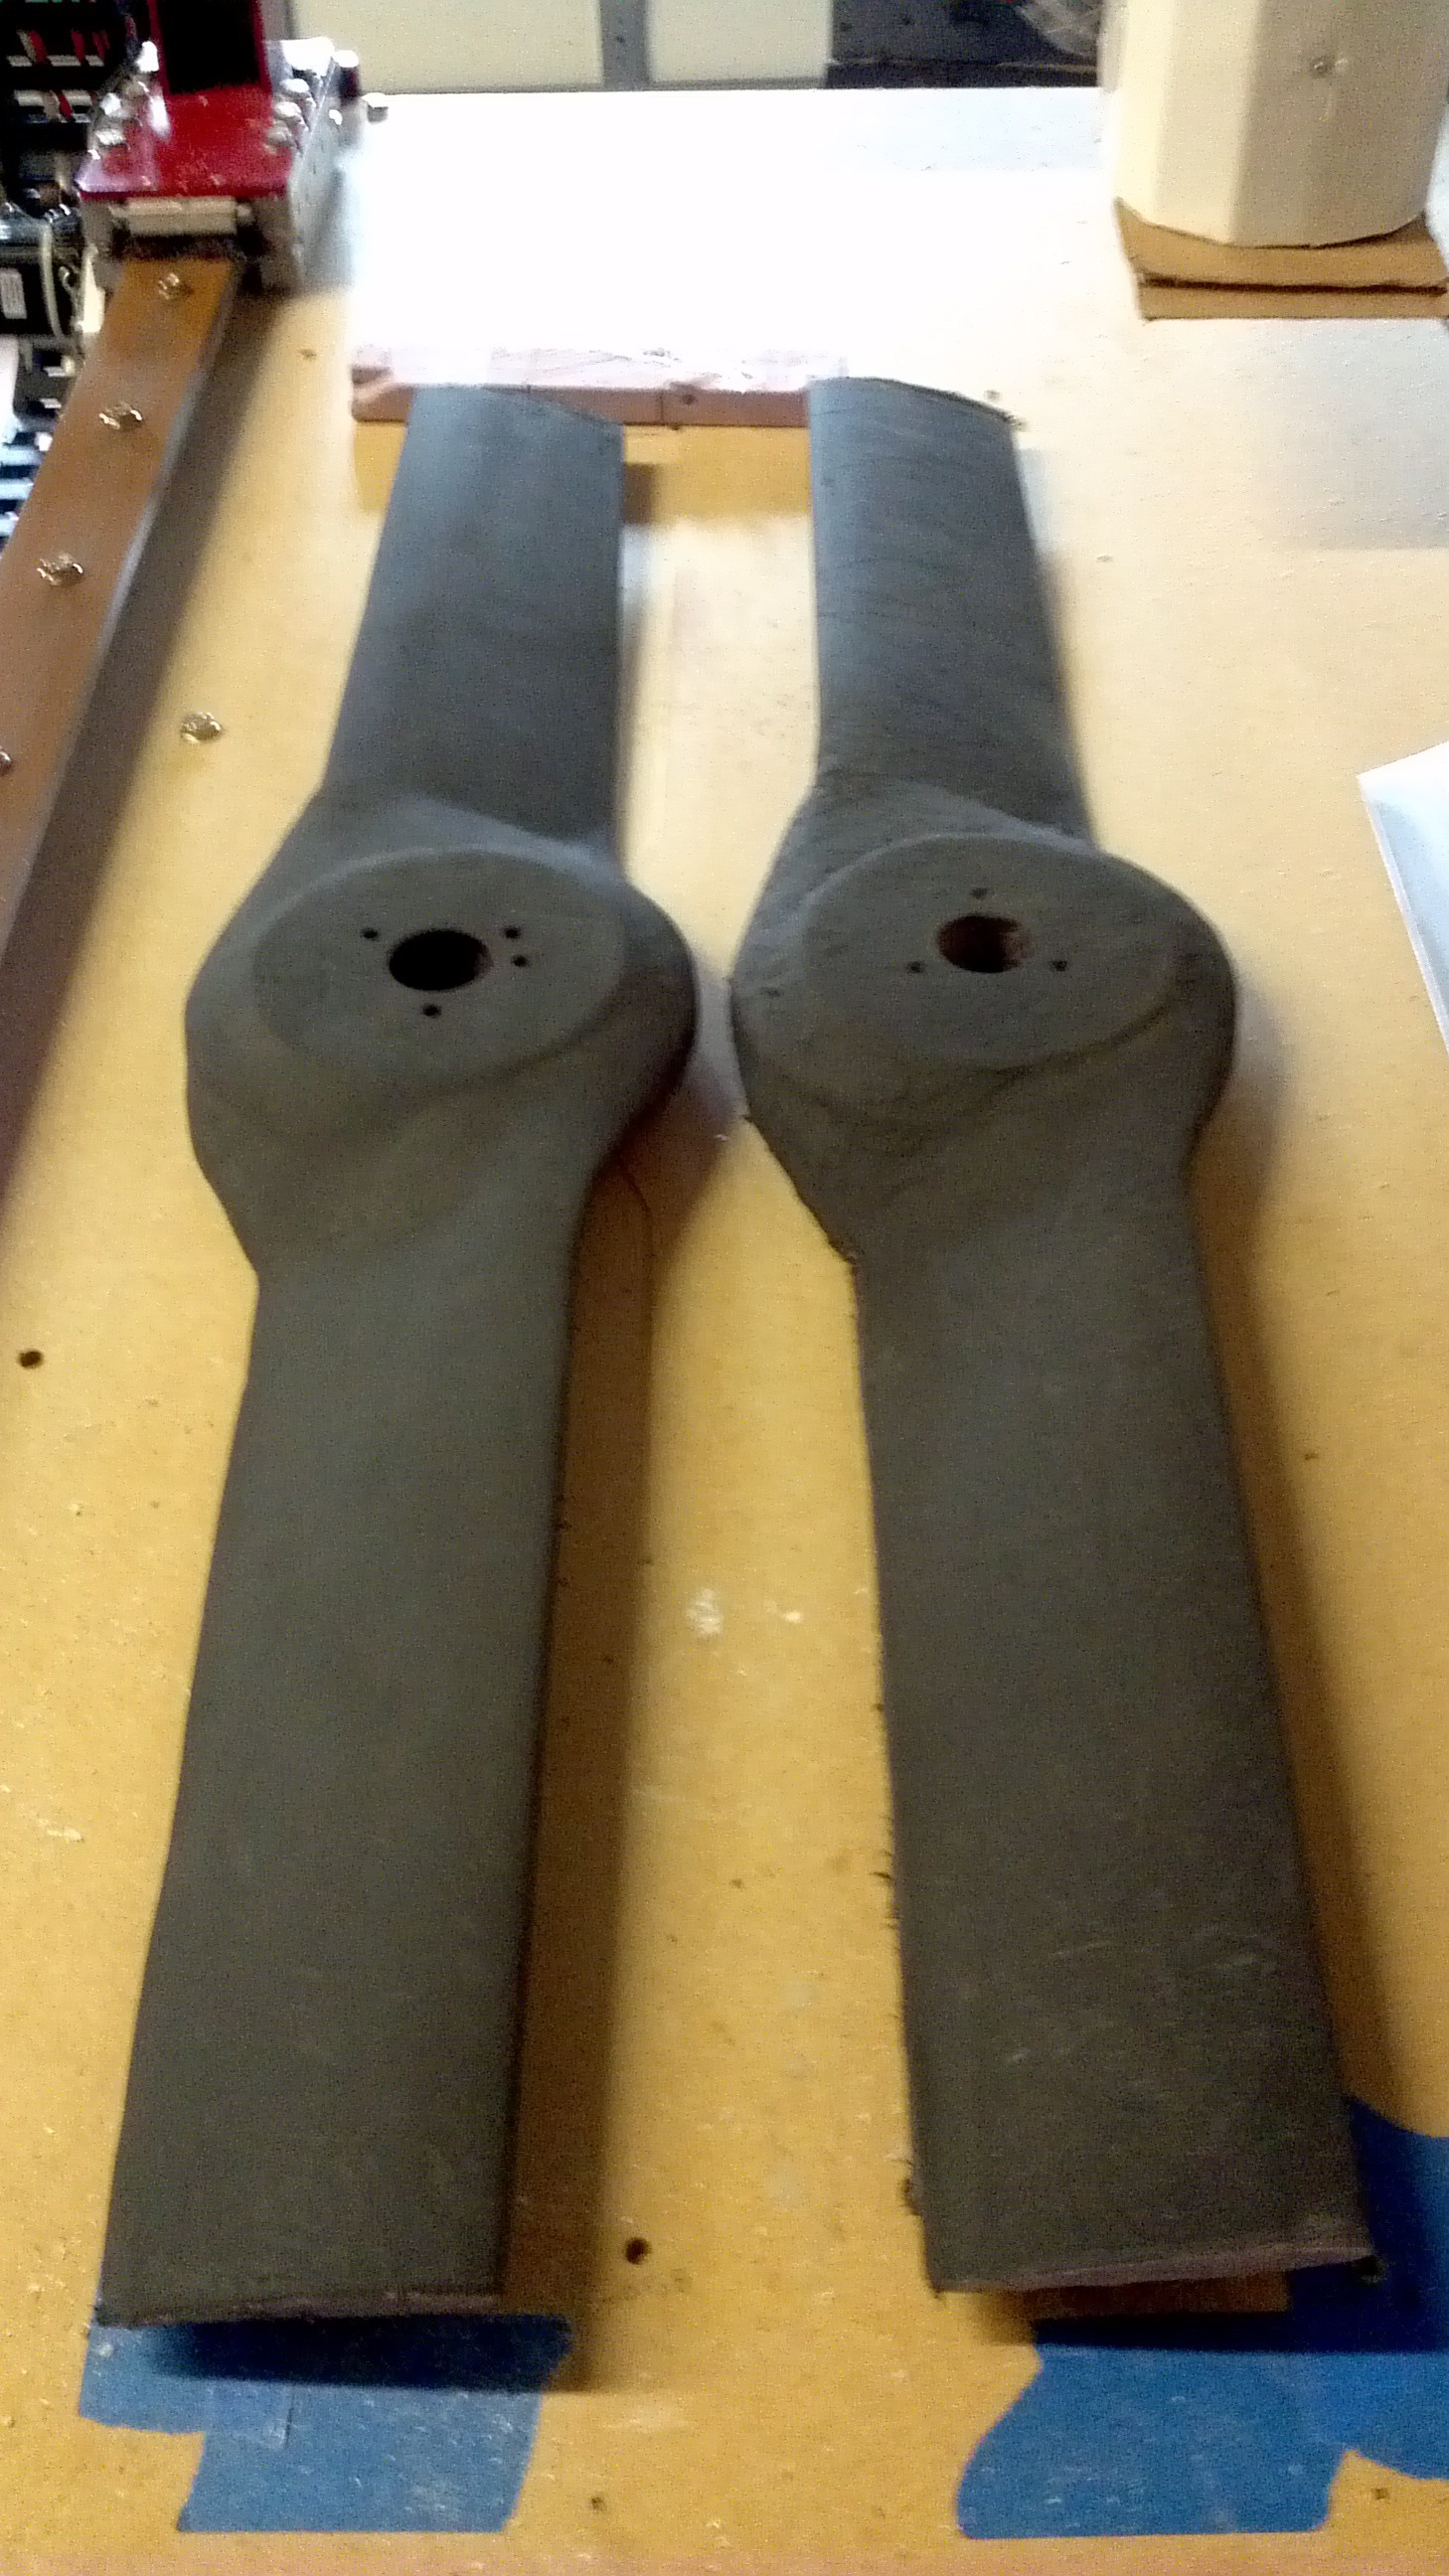
08/16/2014 at 20:05 • 0 commentsOver the last week I completed doing the fiberglass layup for the 3rd and 4th propeller. Cutting the cores and doing the fiberglass layup for the propellers was one of the biggest parts of the project and it's good to have it out of the way. The propellers all just need some sanding primer and paint and they'll be ready to start hover testing. From left to right are propellers 1-4.
![]()
The last part needed for mounting the propellers are the crush plates. These will distribute the force from the bolts around the propeller hub. I created the CAD, machine code and cut four copies out of 1/8" thick birch plywood.
![]()
All the files for the crush plates have been uploaded to the github repository. I'll be uploading my entry video for The Hackaday Prize in the next day or two and getting everything else ready for the first hover test.
-
Not So Rapid Prototyping
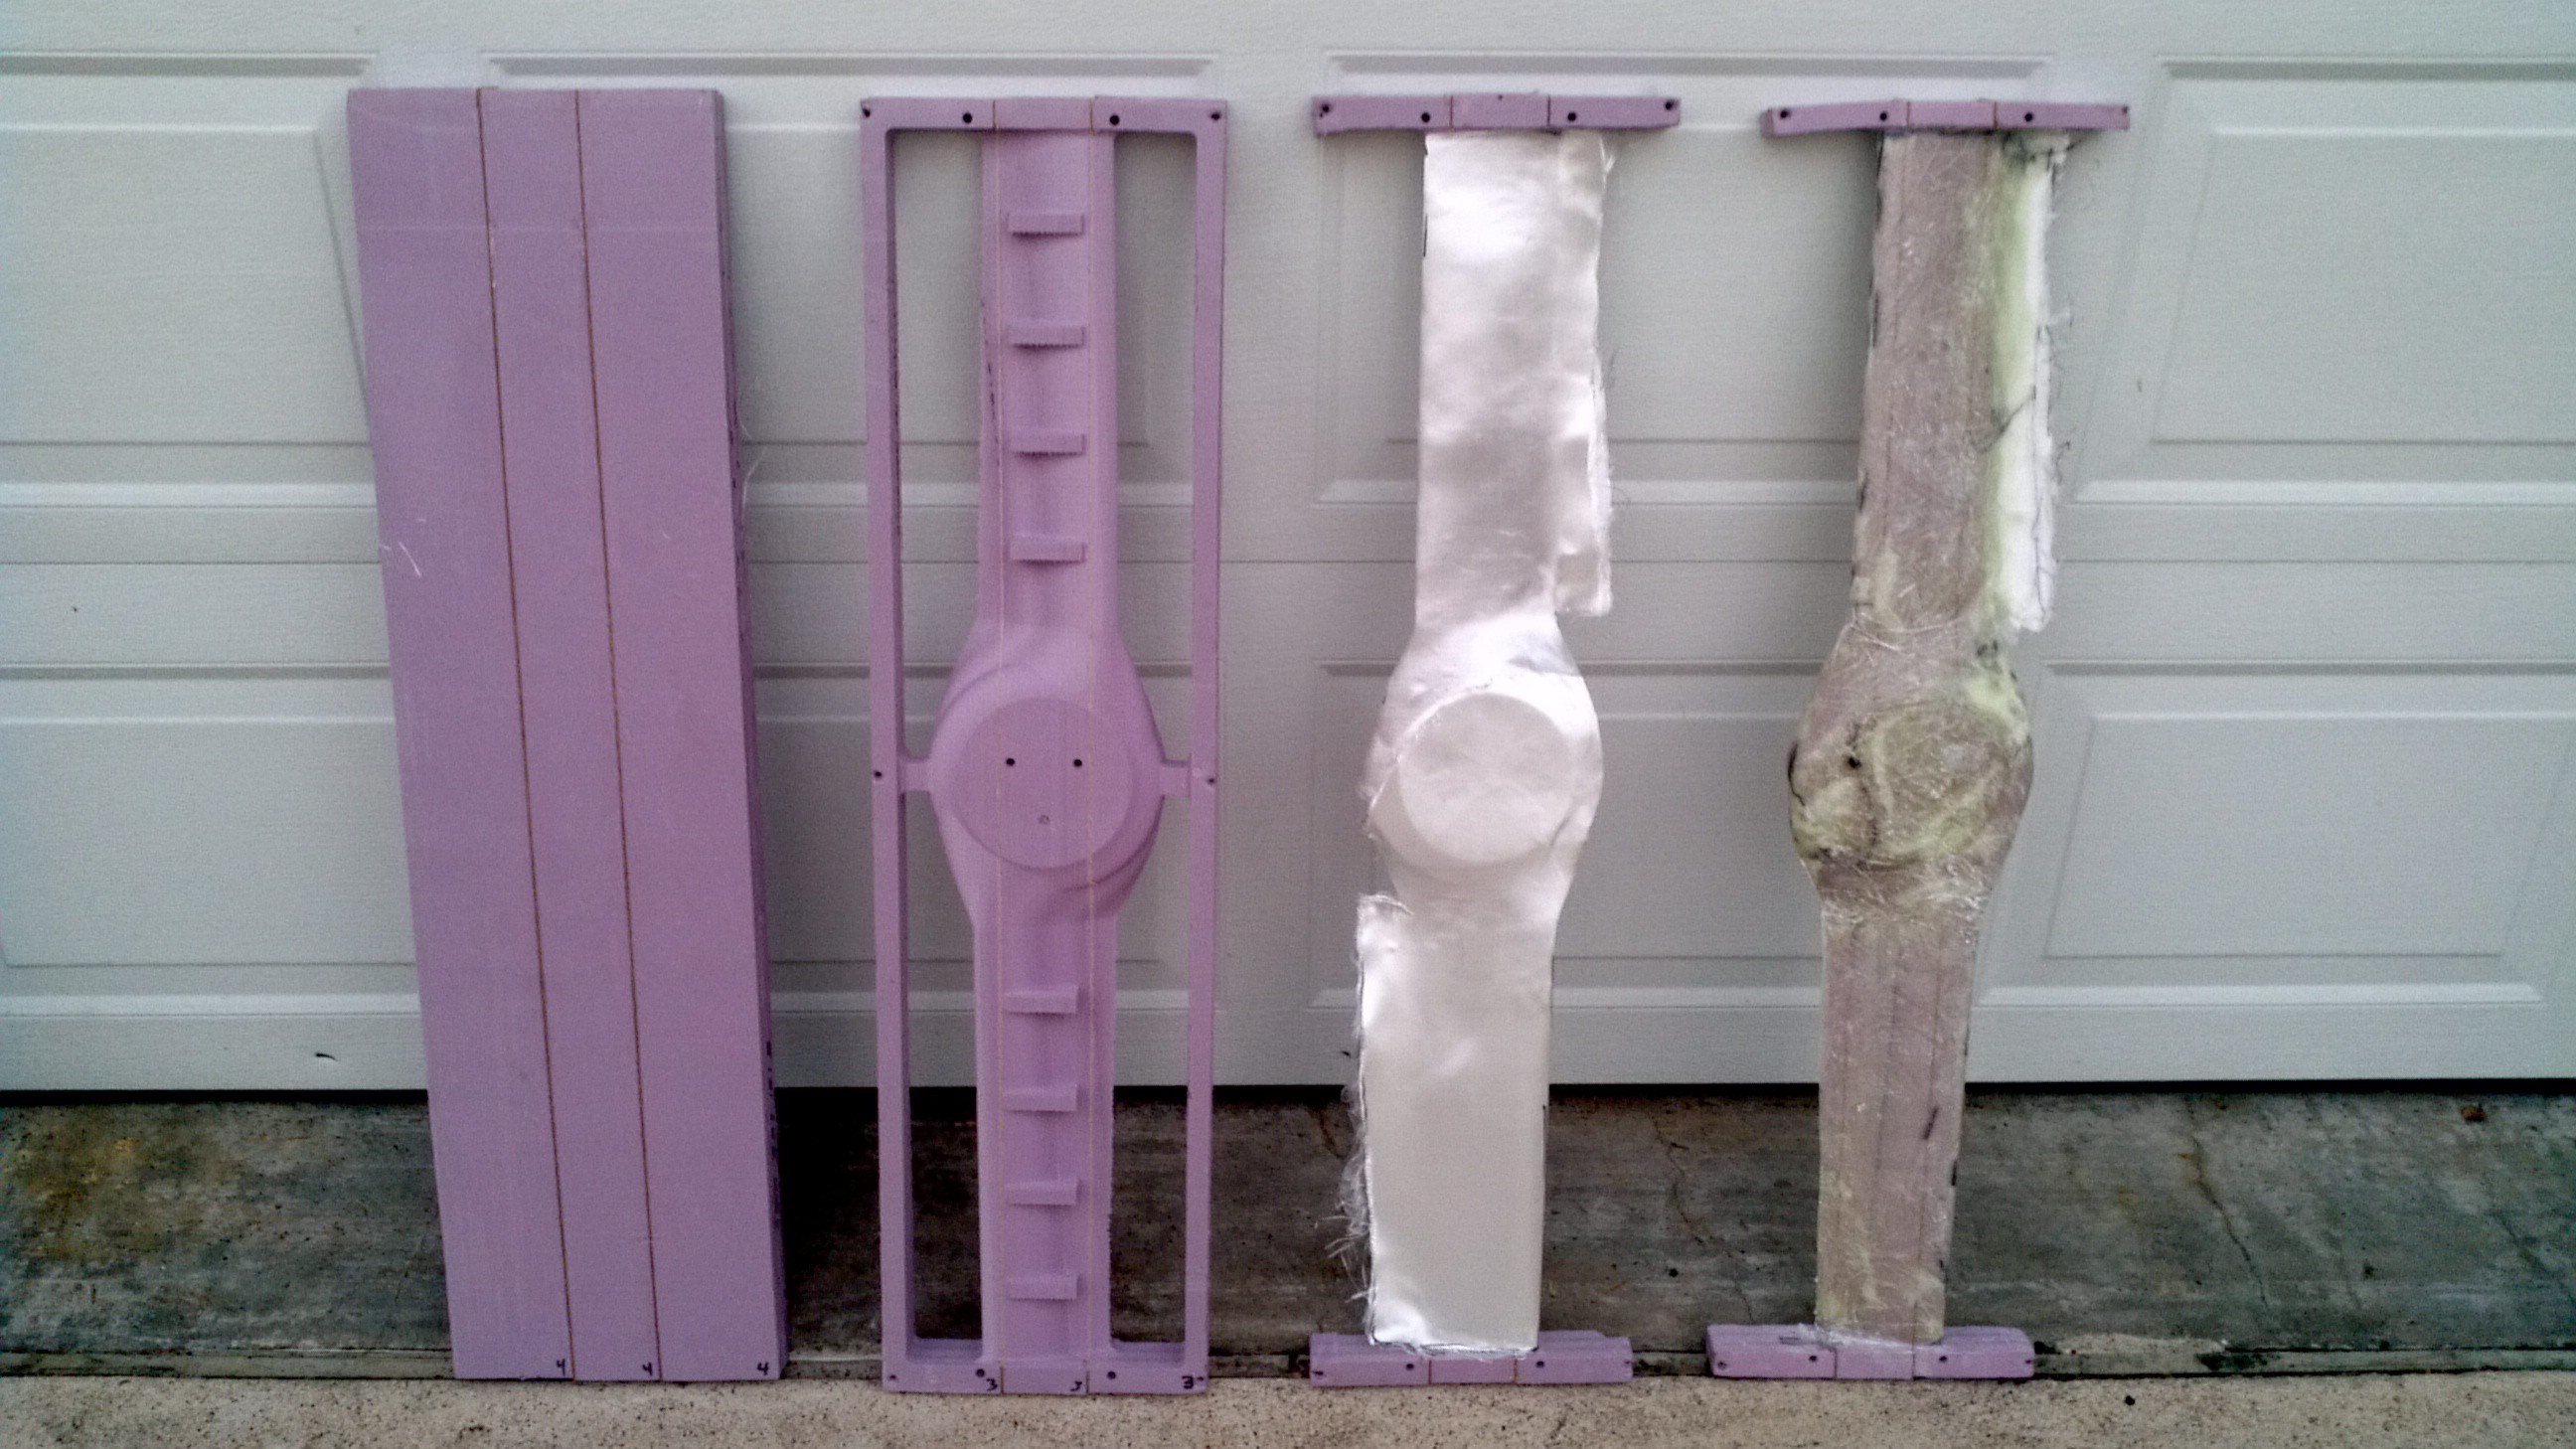
08/08/2014 at 15:45 • 2 commentsI haven't been posting build updates as frequently because the build activities have mostly consisted of sanding....lots and lots of sanding. The good news is that I'm nearly complete with the first flight quality propeller! I've talked previously about everything up to adding resin to the propeller so now I'll talk about the finishing process.
My early attempts at vacuum bagging used saran wrap over the fiberglass/resin and breather cloth over that before everything is placed inside the bag. That was the propeller where the blade ended up twisting. The other thing that went wrong with that earlier propeller was that the breather cloth left an uneven imprint on the surface. For the first flight quality propeller, I omitted the breather cloth since there wasn't too much excess resin.
![]()
The results were significantly better, but I should have worked the wrinkles out of the bag better. The wrinkles fill with excess resin that eventually needed to be sanded off. After curing the next step was to start finishing the propeller. I placed it back onto the CNC router using the alignment holes and re-drilled the mounting holes, as well as an alignment hole in the center. The center alignment hole was used to drill out the center with an hole saw. The center hole allows the shaft and nut to pass through. I didn't cut the center hole with the router because it had a hard time cutting through fiberglass. I probably could have just cut it a lot slower, but it's easier to just use the hole saw.
![]()
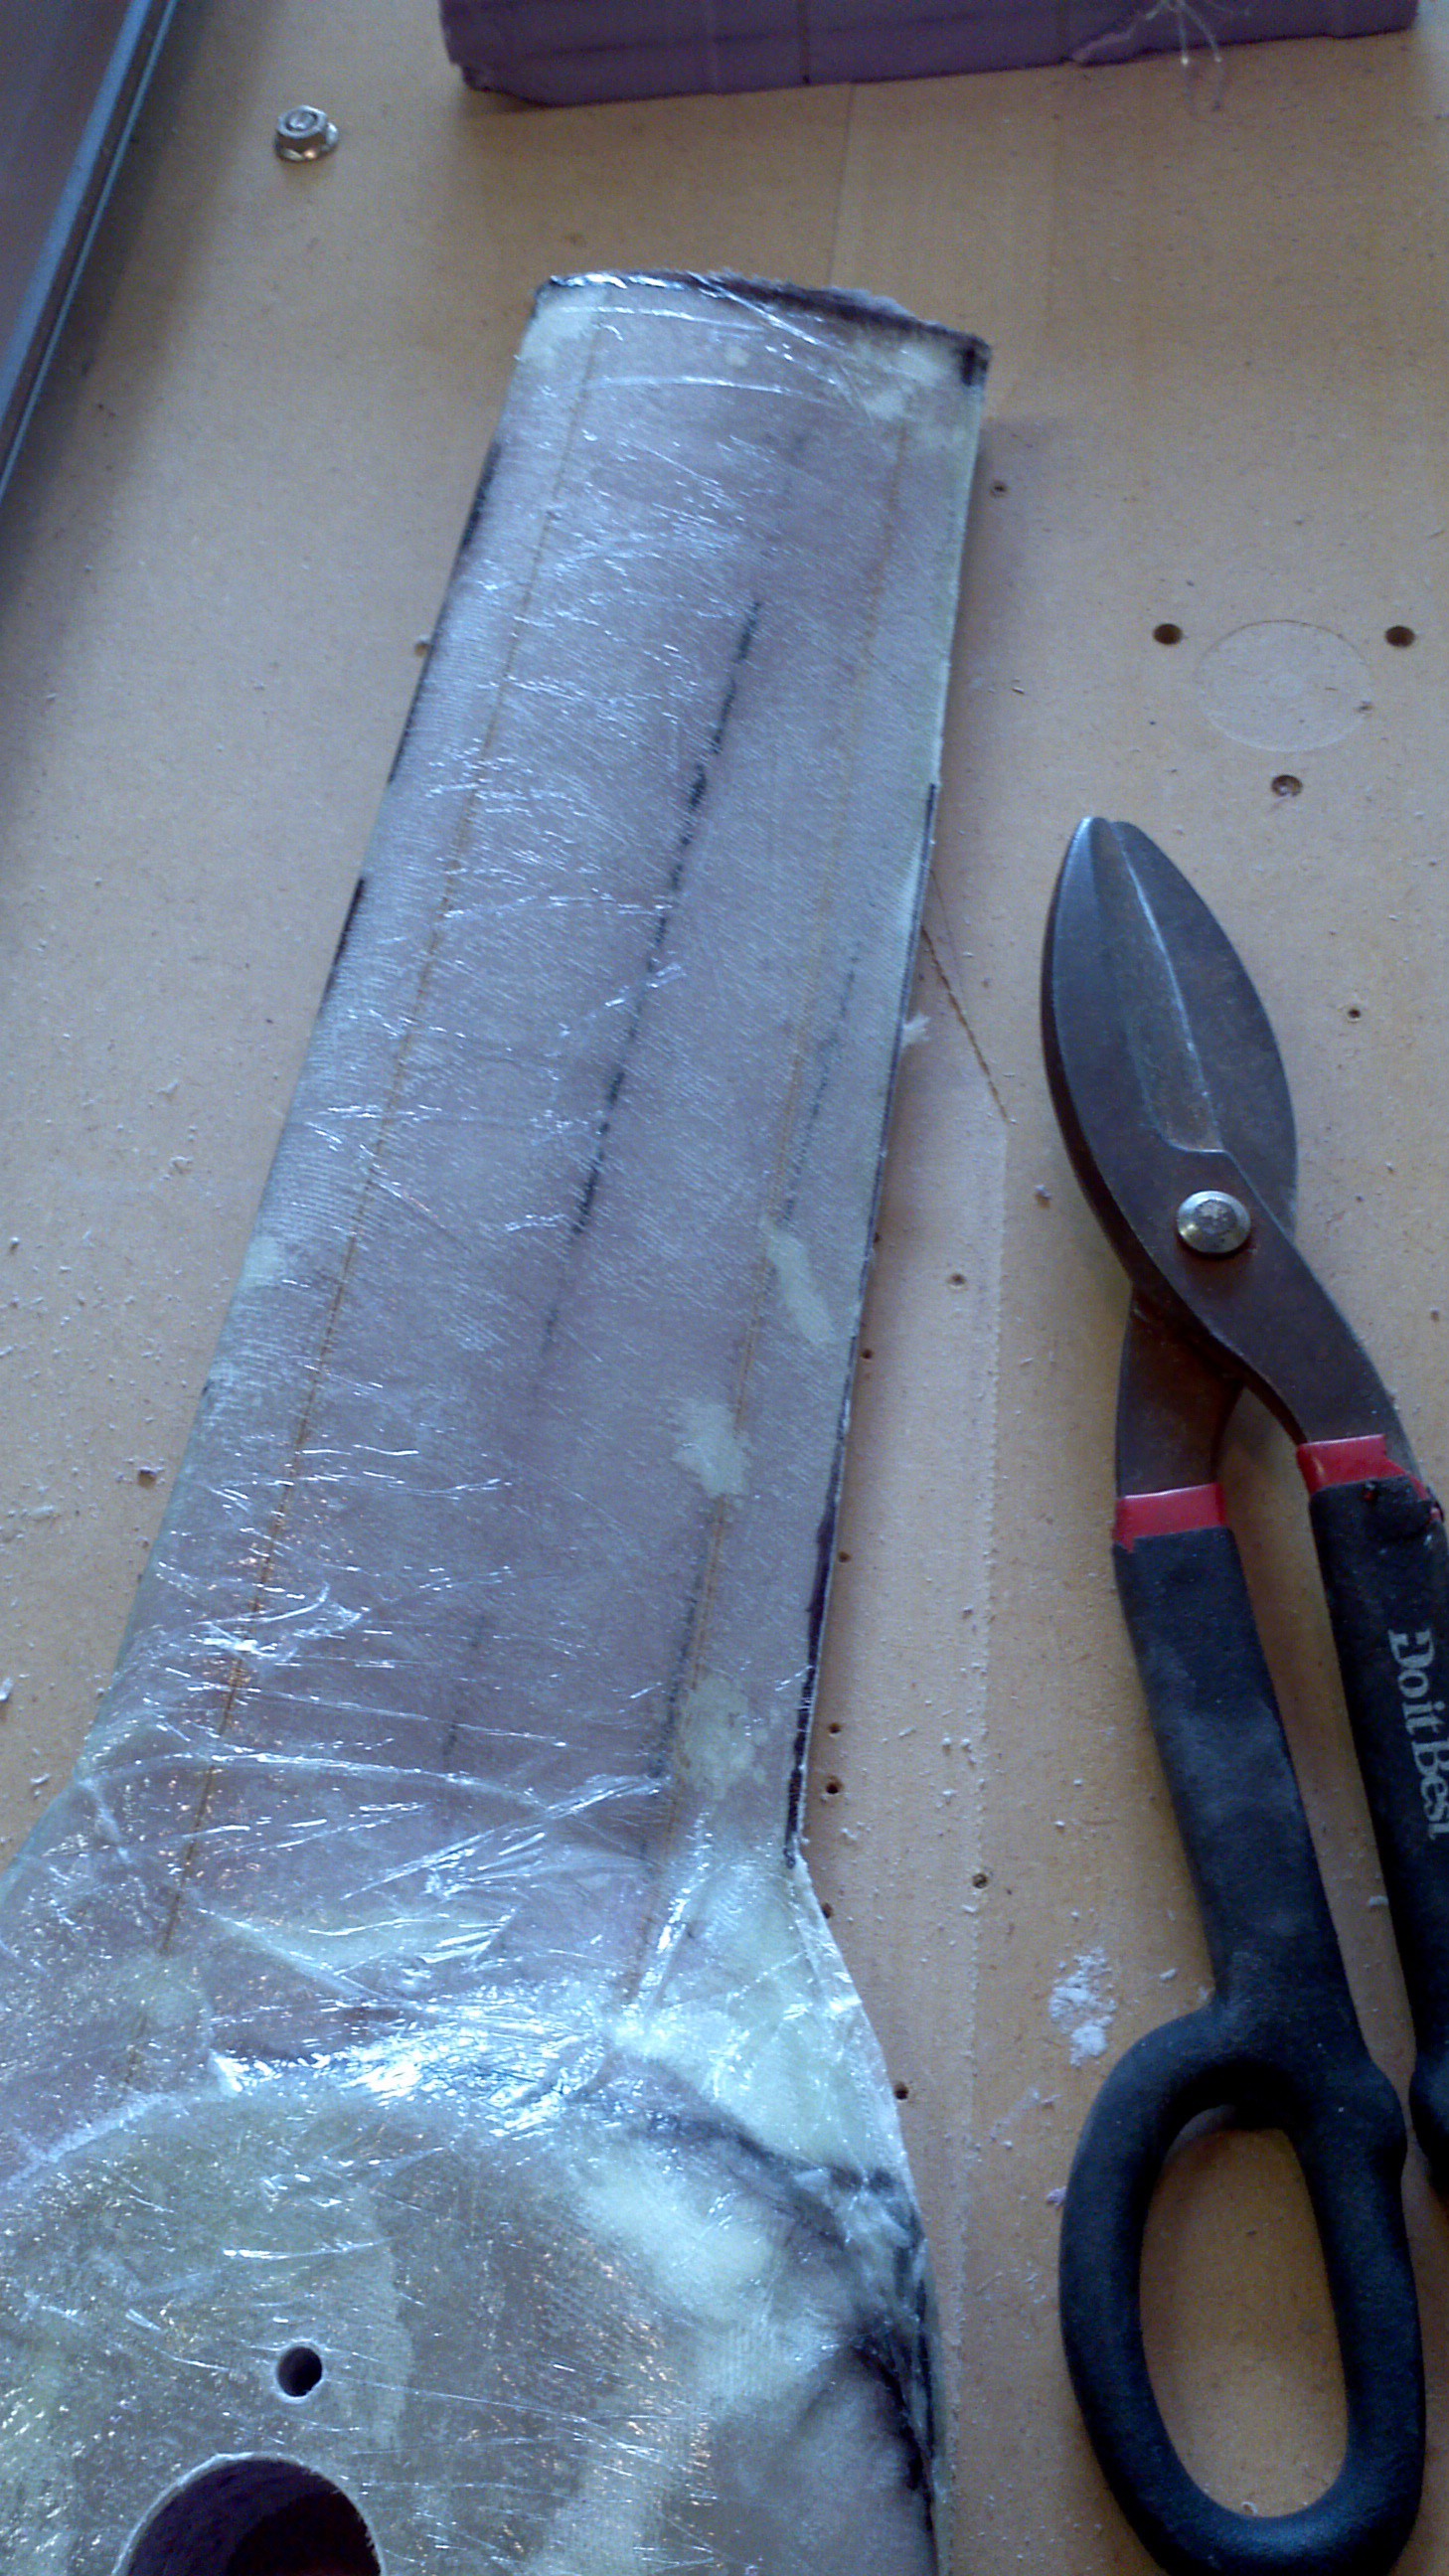
After that the the excess at the tips was trimmed off and the trailing edge was marked off and cut off with some shears. You can see the excess resin in both these pictures. A Dremel was used to start the smoothing process by remove the bigger pieces. Then it was time to sand (being sure not to sand into the fiberglass) and then add primer.
![]()
The sand/primer process was repeated several times. The second propeller didn't need as much since I did a better job of removing the wrinkles. Here are the first two props in various stages of sanding...
![]()
While the first one needs just a little more sanding and a final coat of paint, I wanted to see how much it weighed thus far:
![]()
I was quite surprised that the propeller only weighs 1 lb, 3 oz. I had assumed a much more conservative weight for the propellers, so that'll help get the vehicle weight down. If I make another set I'll probably add more reinforcement.
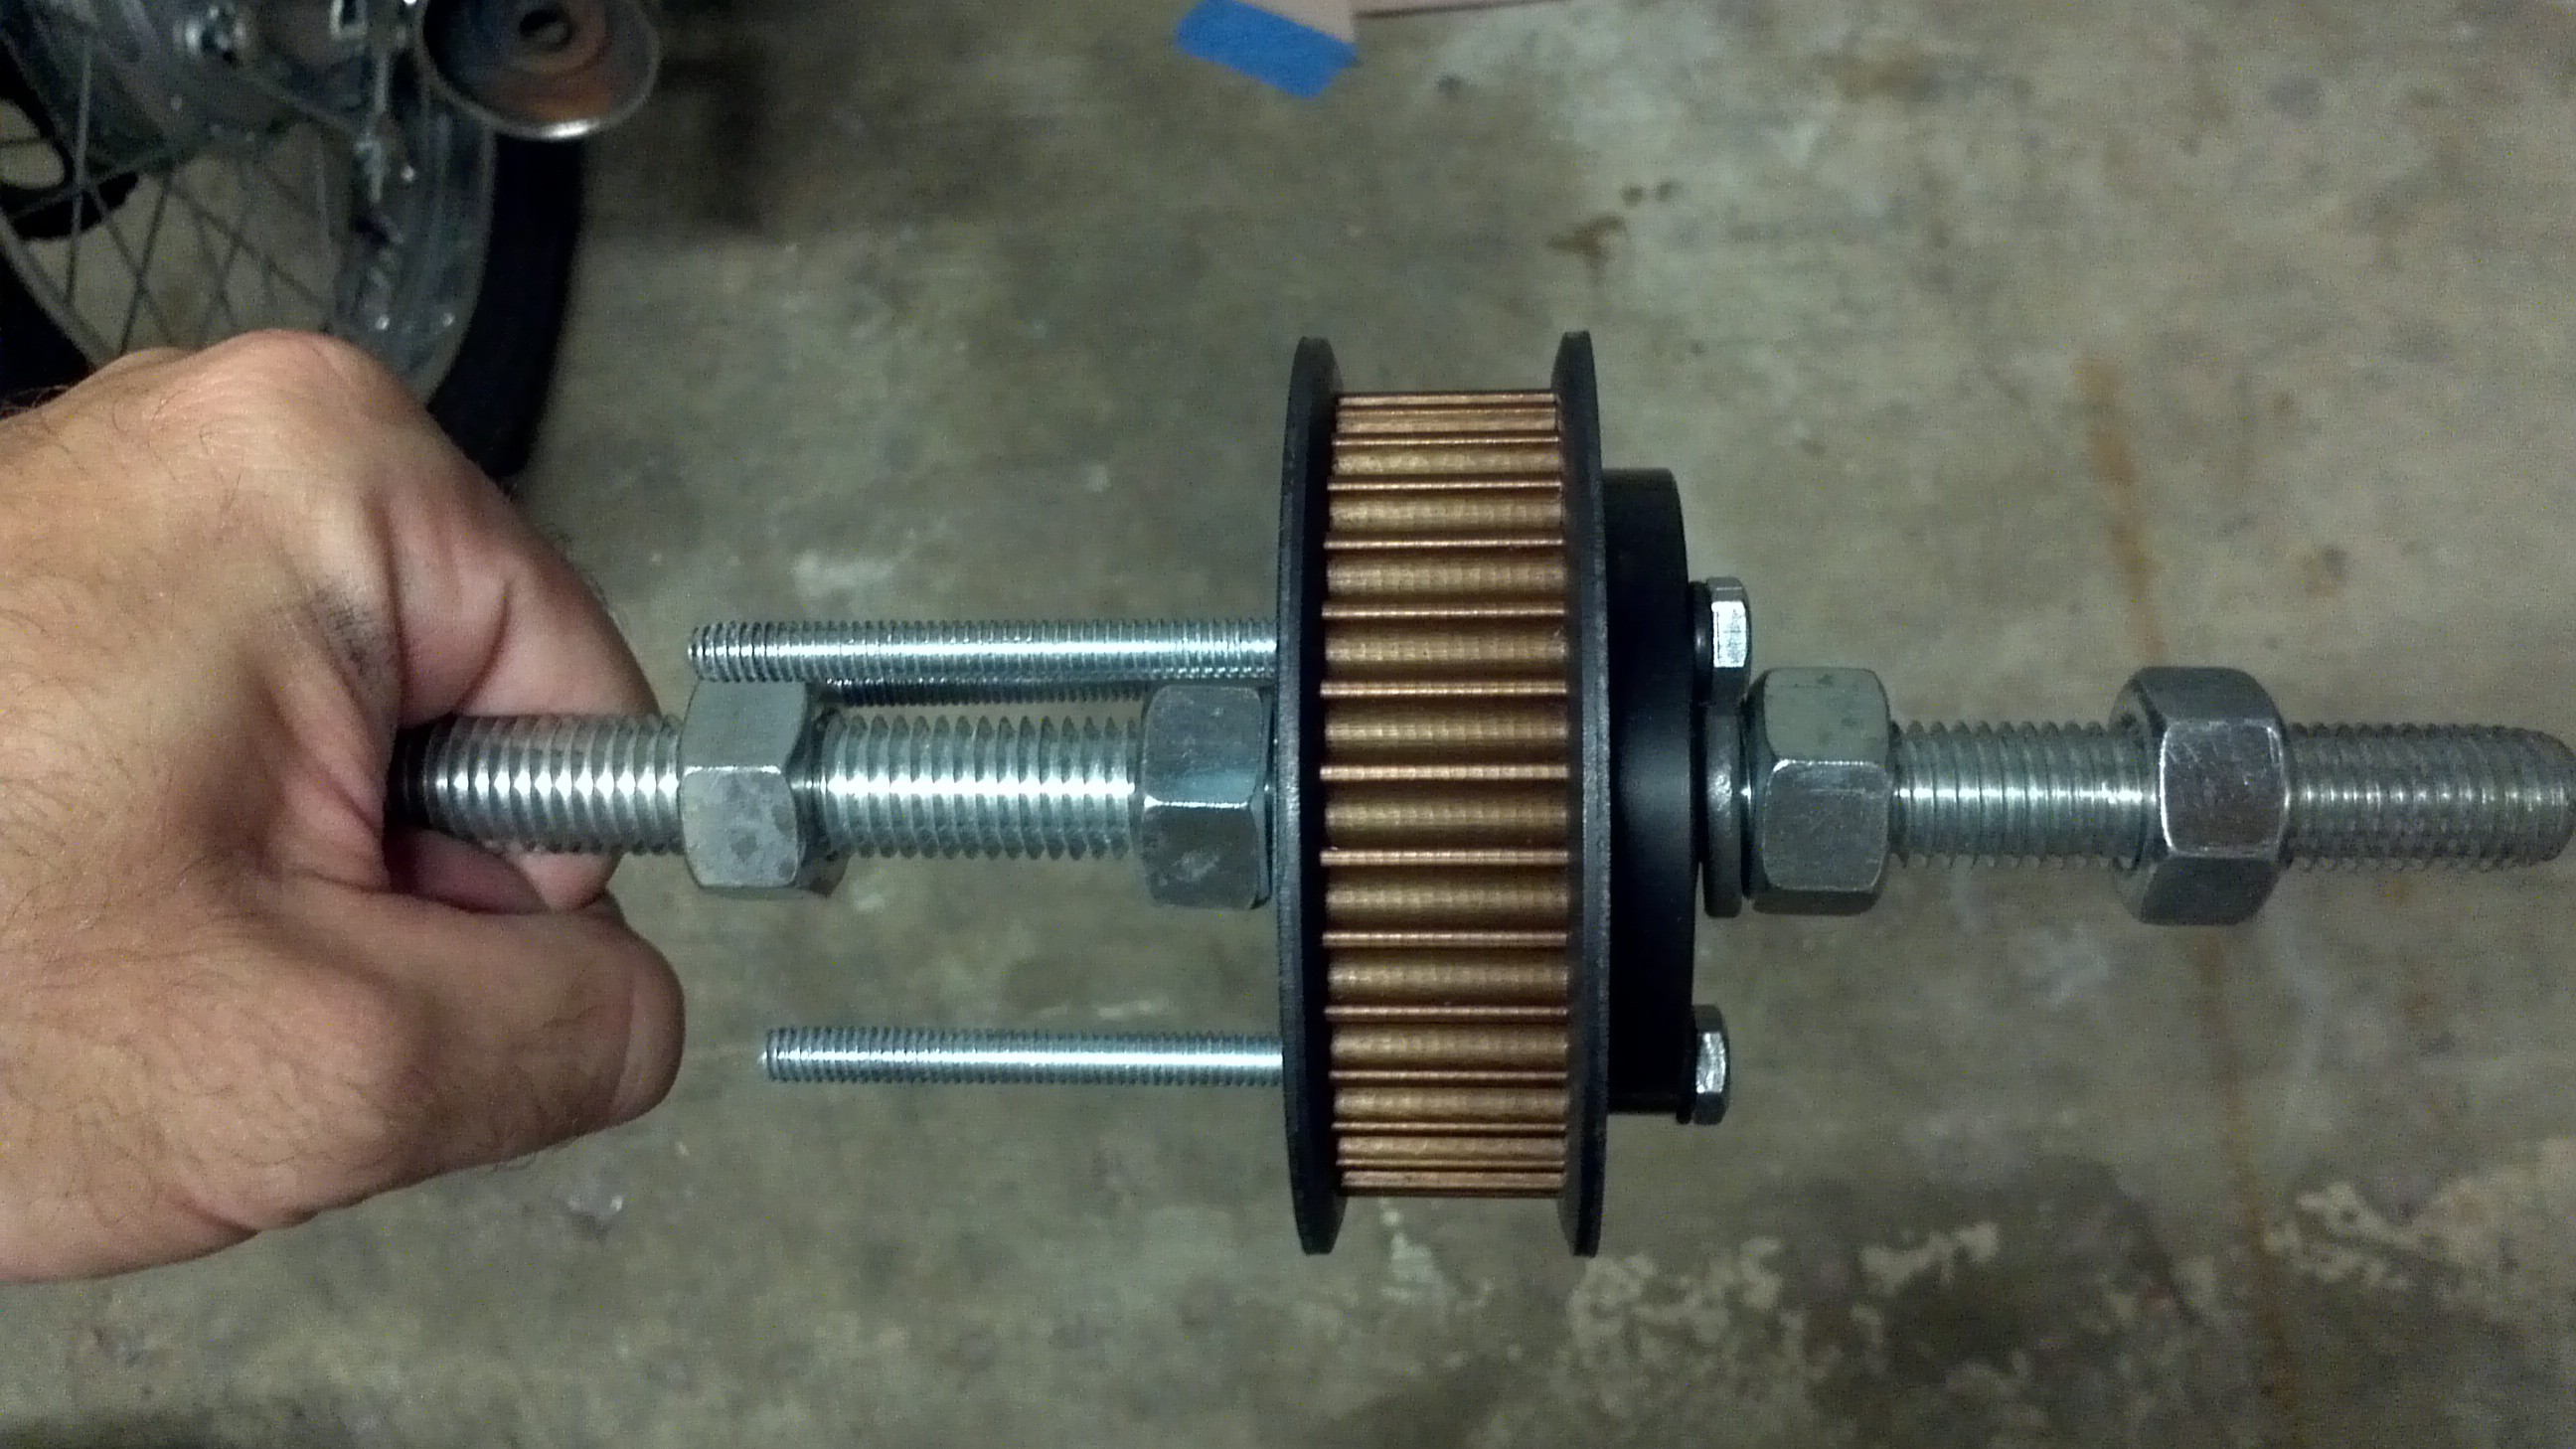
I've also started on getting the props ready to mount. I removed one of the shafts from the vehicle and replaced the bushing bolts with longer 4" bolts that the props will mount to.
![]()
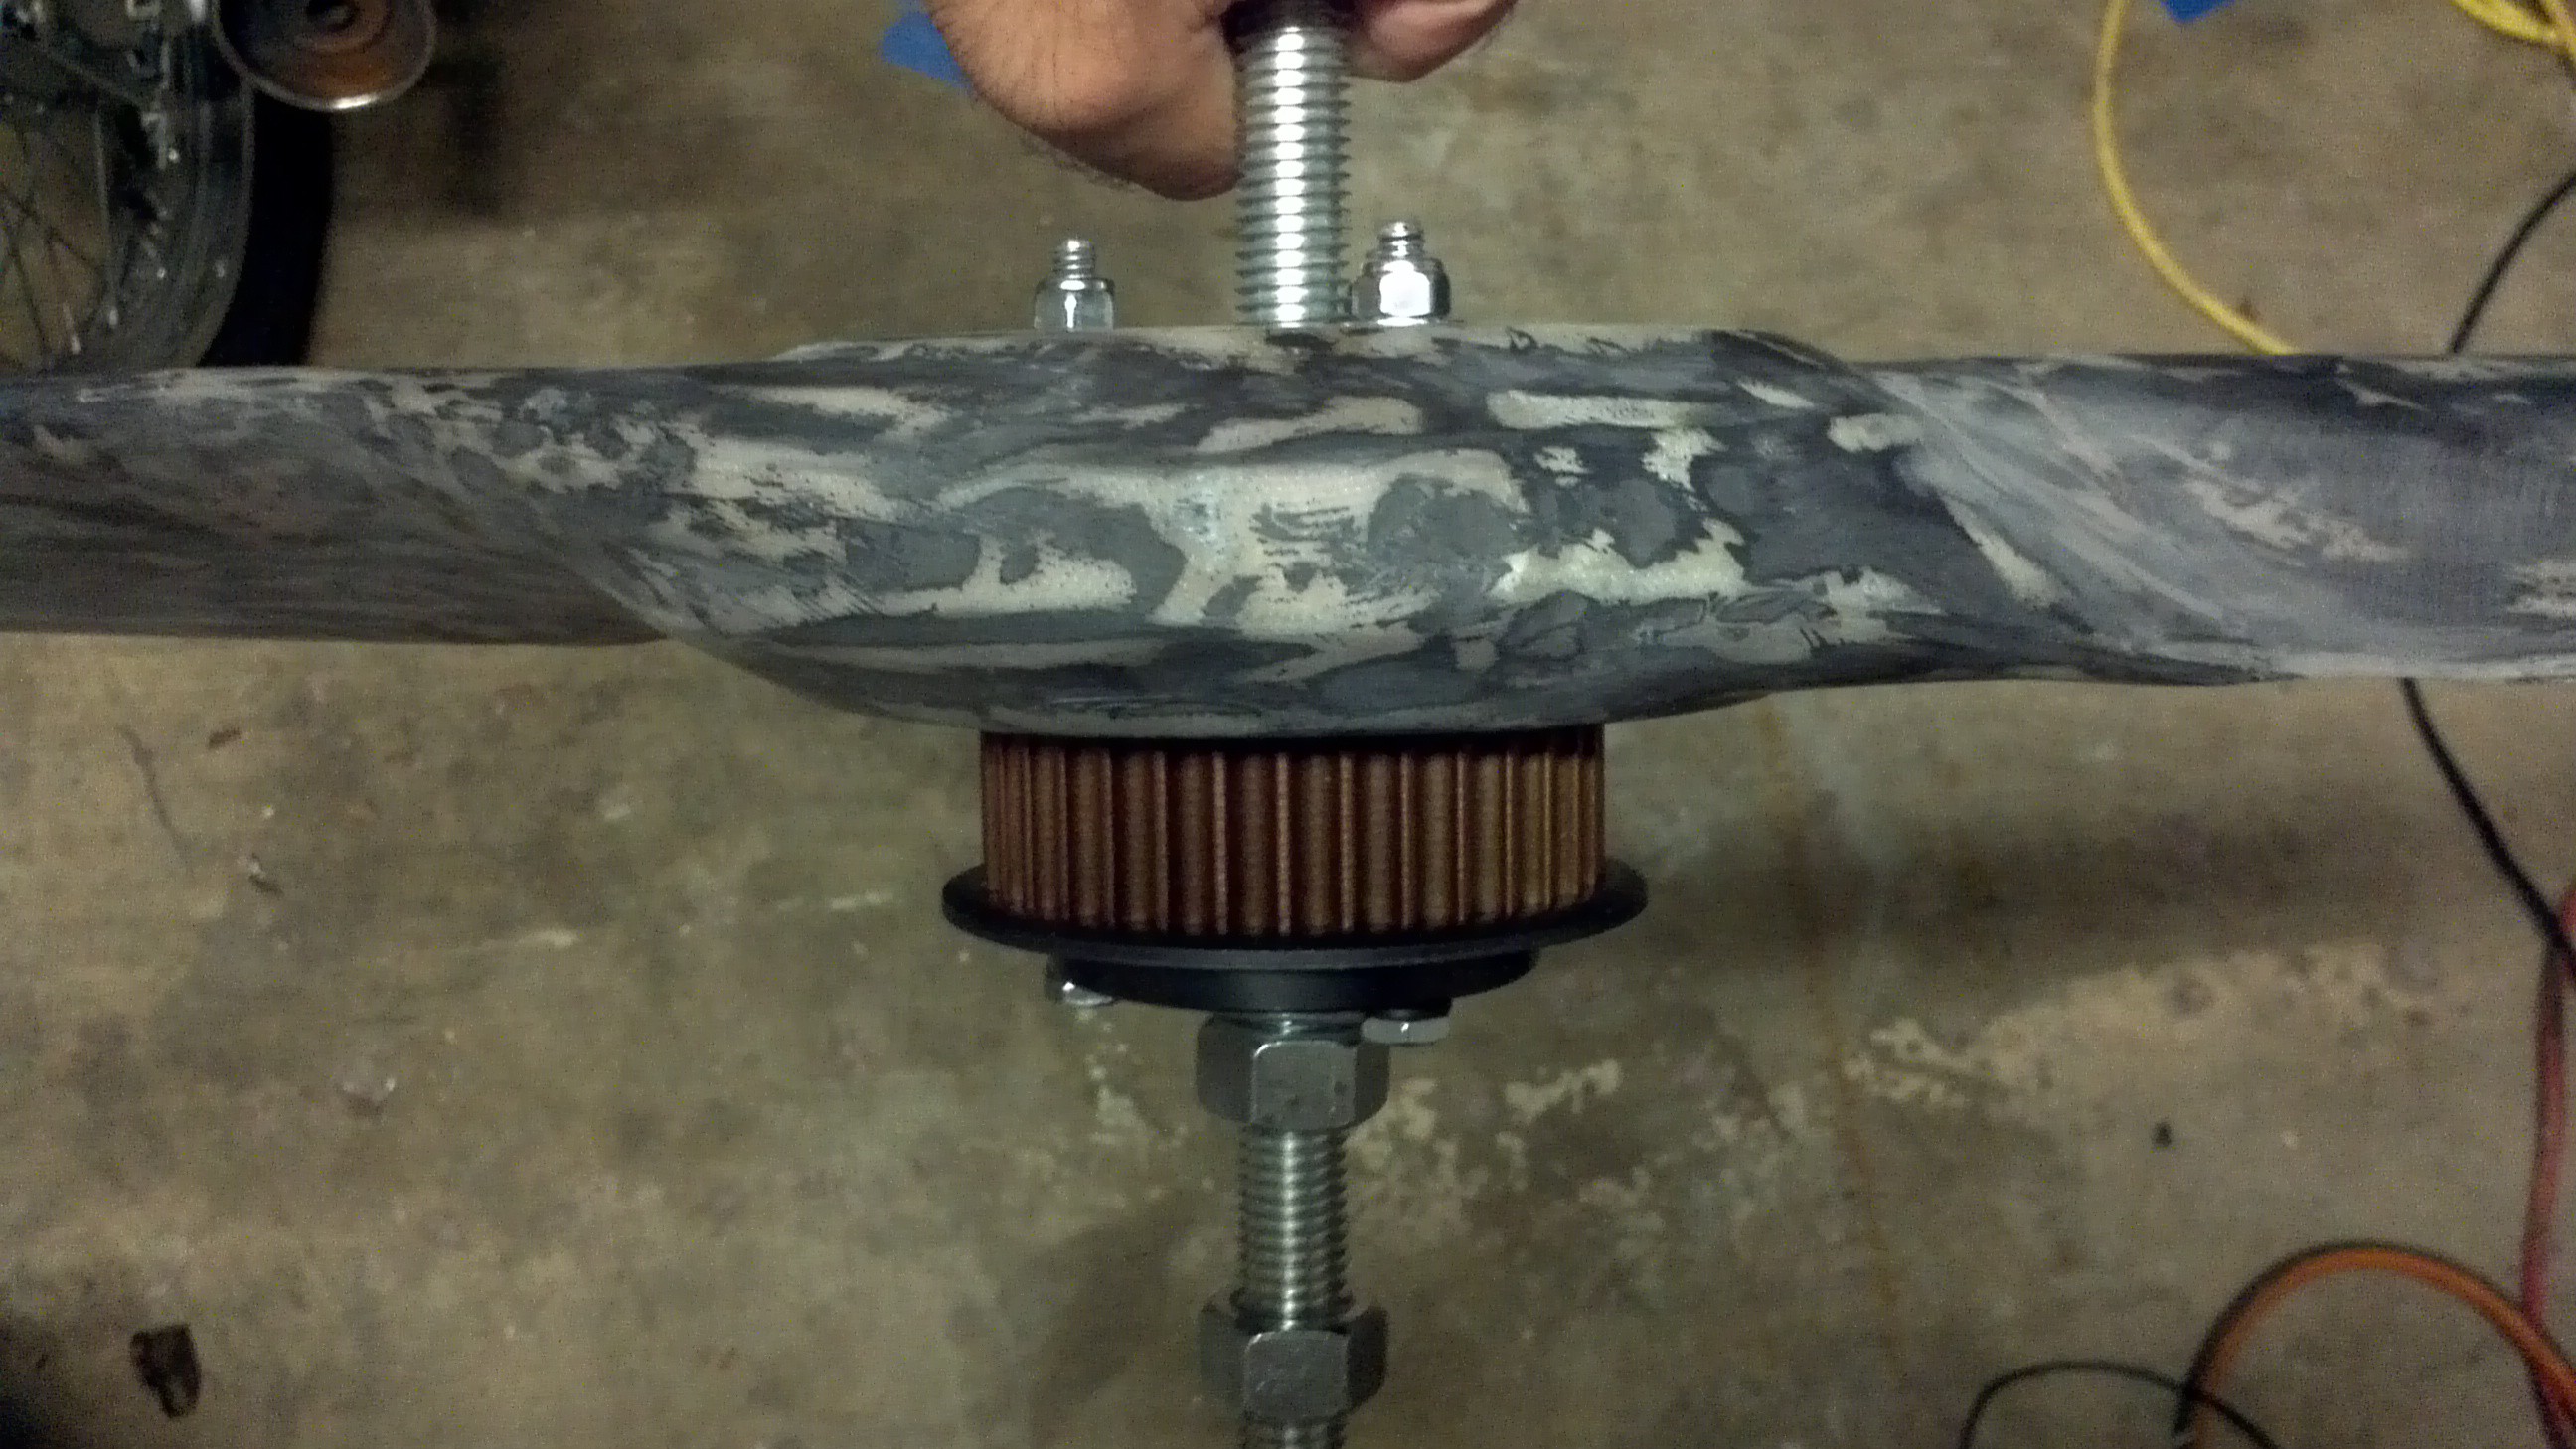
Then I testing out the hole alignment and bolted the prop to the bushing. The only thing left it to make a crush plate to help distribute the load over the prop.
![]()
I'll be posting more often over the coming weeks as I get closer to finishing the props, getting ready for a hover test and completing the entry requirements for The Hackaday Prize deadline!
-
Creatorspace and Turning Over the Engine
07/31/2014 at 22:13 • 0 commentsIt's been two weeks since I presented at Creatorspace and I'm just now getting the pictures together. Thanks to Patrick for taking the great pictures and videos (see below). I have to admit that I really hadn't processed how big Goliath really is until I was faced with the prospect of actually having to move it somewhere. I used an engine hoist to move it on my neighbors flat bed trailer.
![]()
![]()
![]()
![]()
Thanks to everyone who showed up to check out the hardware and provided great inputs for finishing Goliath. Even the trailer ride over was a learning experience, because the zip ties holding the battery in place broke due to the vibrations. Definitely need to upgrade the battery mounting hardware. While Goliath isn't ready to fly, I did turn the engine over using the starter to show the how the belt system works. Below is the video of turning the engine over.
Meanwhile I'm still working on the propellers, the second one is now cured after having epoxy applied and the first one is currently is the process of being sanded smooth. I've also been researching how to build the Ardupilot code and started a fork for Goliath
-
Propeller Progress
07/22/2014 at 12:29 • 2 comments![]()
Lately I've been spending most of my time outside of my day job working on the propellers. The picture above shows the current progress of the 4 propellers for Goliath. From left to right, there is the foam core with the birch plywood stiffeners inserted. Next is the first clockwise (CW) propeller done being milled. Second from the right is the second counter clockwise (CCW) propeller with a few layers of fiberglass tack in placed and almost ready to have resin applied. On the far right, is the first CCW propeller with the resin cured and currently being sanded and trimmed. It'll get a few coats of primer and a finish coat before it's done.
The birch stiffeners seem to work well, and the propeller core is stiff enough now to handle the weight of the fiberglass and resin during the layup process. Another improvement to the layup process was tacking the fiberglass layers in place with spray adhesive, just the minimum amount to hold them in place. This made dealing with the multiple layers and overlaps a lot easier.
Previously I had done a propeller layup that ended up twisting on side of the propeller, but the other side was still good. This was used to do some rudimentary load testing.
![]()
I incrementally placed weights at the 75% span location to test out the loading. While this doesn't match exactly what the blade will see in flight, it's close. Shown above is 30 lbs loaded on the single blade which translates to 240 lbs for the entire vehicle and the currently the target hover thrust. There was about an 1.25" deflection at the tip. I did test the blade to 35 lbs, still without any failure, but I couldn't keep the weights from tipping over and take a picture at the same time.
Hopefully in a few more weeks the the set of propellers will be complete and some initial hover testing can take place.
-
Creatorspace Presentation on July 15th, 6PM
07/12/2014 at 02:50 • 0 commentsFor those of you in the Houston area, next Tuesday July 15th at 6PM, I'll be presenting at the local maker group, Creatorspace. I'll be talking about Goliath as well as showing the hardware I've built thus far. Creatorspace is a Houston Hacker space near NASA Johnson Space Center. Tuesday's meeting will be at Odyssey Hobbies, (100 E Nasa Road One #45 Webster, TX 77598 ) Hope to see you there!
-
Connectivity and Router Hacks
07/11/2014 at 14:50 • 0 commentsOne thing I hadn't addressed yet in the project logs is the connectivity requirement of The Hackaday Prize. I've had some concepts that I want to incorporate into Goliath, and over the past few weeks I've had a chance to refine some of those ideas.
There are a lot of discussions about the pros and cons of drones. The safety of others, is one of the concerns that people have, either due to a drone hitting a person or colliding with an aircraft. How do we address this valid concern? While Goliath is bigger and the consequences of a collision could be more serious, it does have the advantage that it has the ability to carry more hardware than a typical drone.
The FAA has addressed the potential for mid-air collisions with ADS-B. Using this system, individual aircraft transmits a standard signal to nearby aircraft with location and airspeed data. While the system is intended to be 2-way (I don't think the FAA wants Goliath broadcasting the signal), the system can be used in a 1-way mode to locate other aircraft. John Wiseman (@lemonoder) has a great page on his blog on adding Cheap ADS-B on amateur drones. He got the information on Hacking a $20 USB TV Tuner to receive the ADS-B data from Clayton Smith. This could be integrated into the PixHawk to notify the Pilot of nearby aircraft and help prevent collisions. Not all aircraft are equipped yet, but having this capability on Goliath would help. All aircraft are supposed to be equipped with ADS-B by 2020.
So what if we could have something similar to ADS-B for people and drones? Almost everyone has a smart phone these days. What if Goliath was equipped so that people could interface with it and provide their location data? What if they wanted to know more about Goliath? What if they really don't want it around?
To address this Goliath is going to be equipped with a Raspberry Pi setup up as a Wireless access point. An observer notices Goliath and sees that there is a new network available (say DRONE-FEEDBACK or something like that). The connect to it and it brings up a webpage that provides information about Goliath. The page would allow the user to share their location with Goliath (if they desire) to help maintain safe distances, submit feedback data to the operator and maybe even access some of the data from Goliath. The Raspberry Pi would be connected to the PixHawk to receive some of it's data, but hopefully in a manner that prevents someone from maliciously accessing the PixHawk directly. See diagram below:
![]()
For The Hackaday Prize, the emphasis would be on the Wi-Fi / Web Interface and if time allows the ADS-B would be incorporated. This is because it's unlikely Goliath will be operating near other aircraft anytime soon.
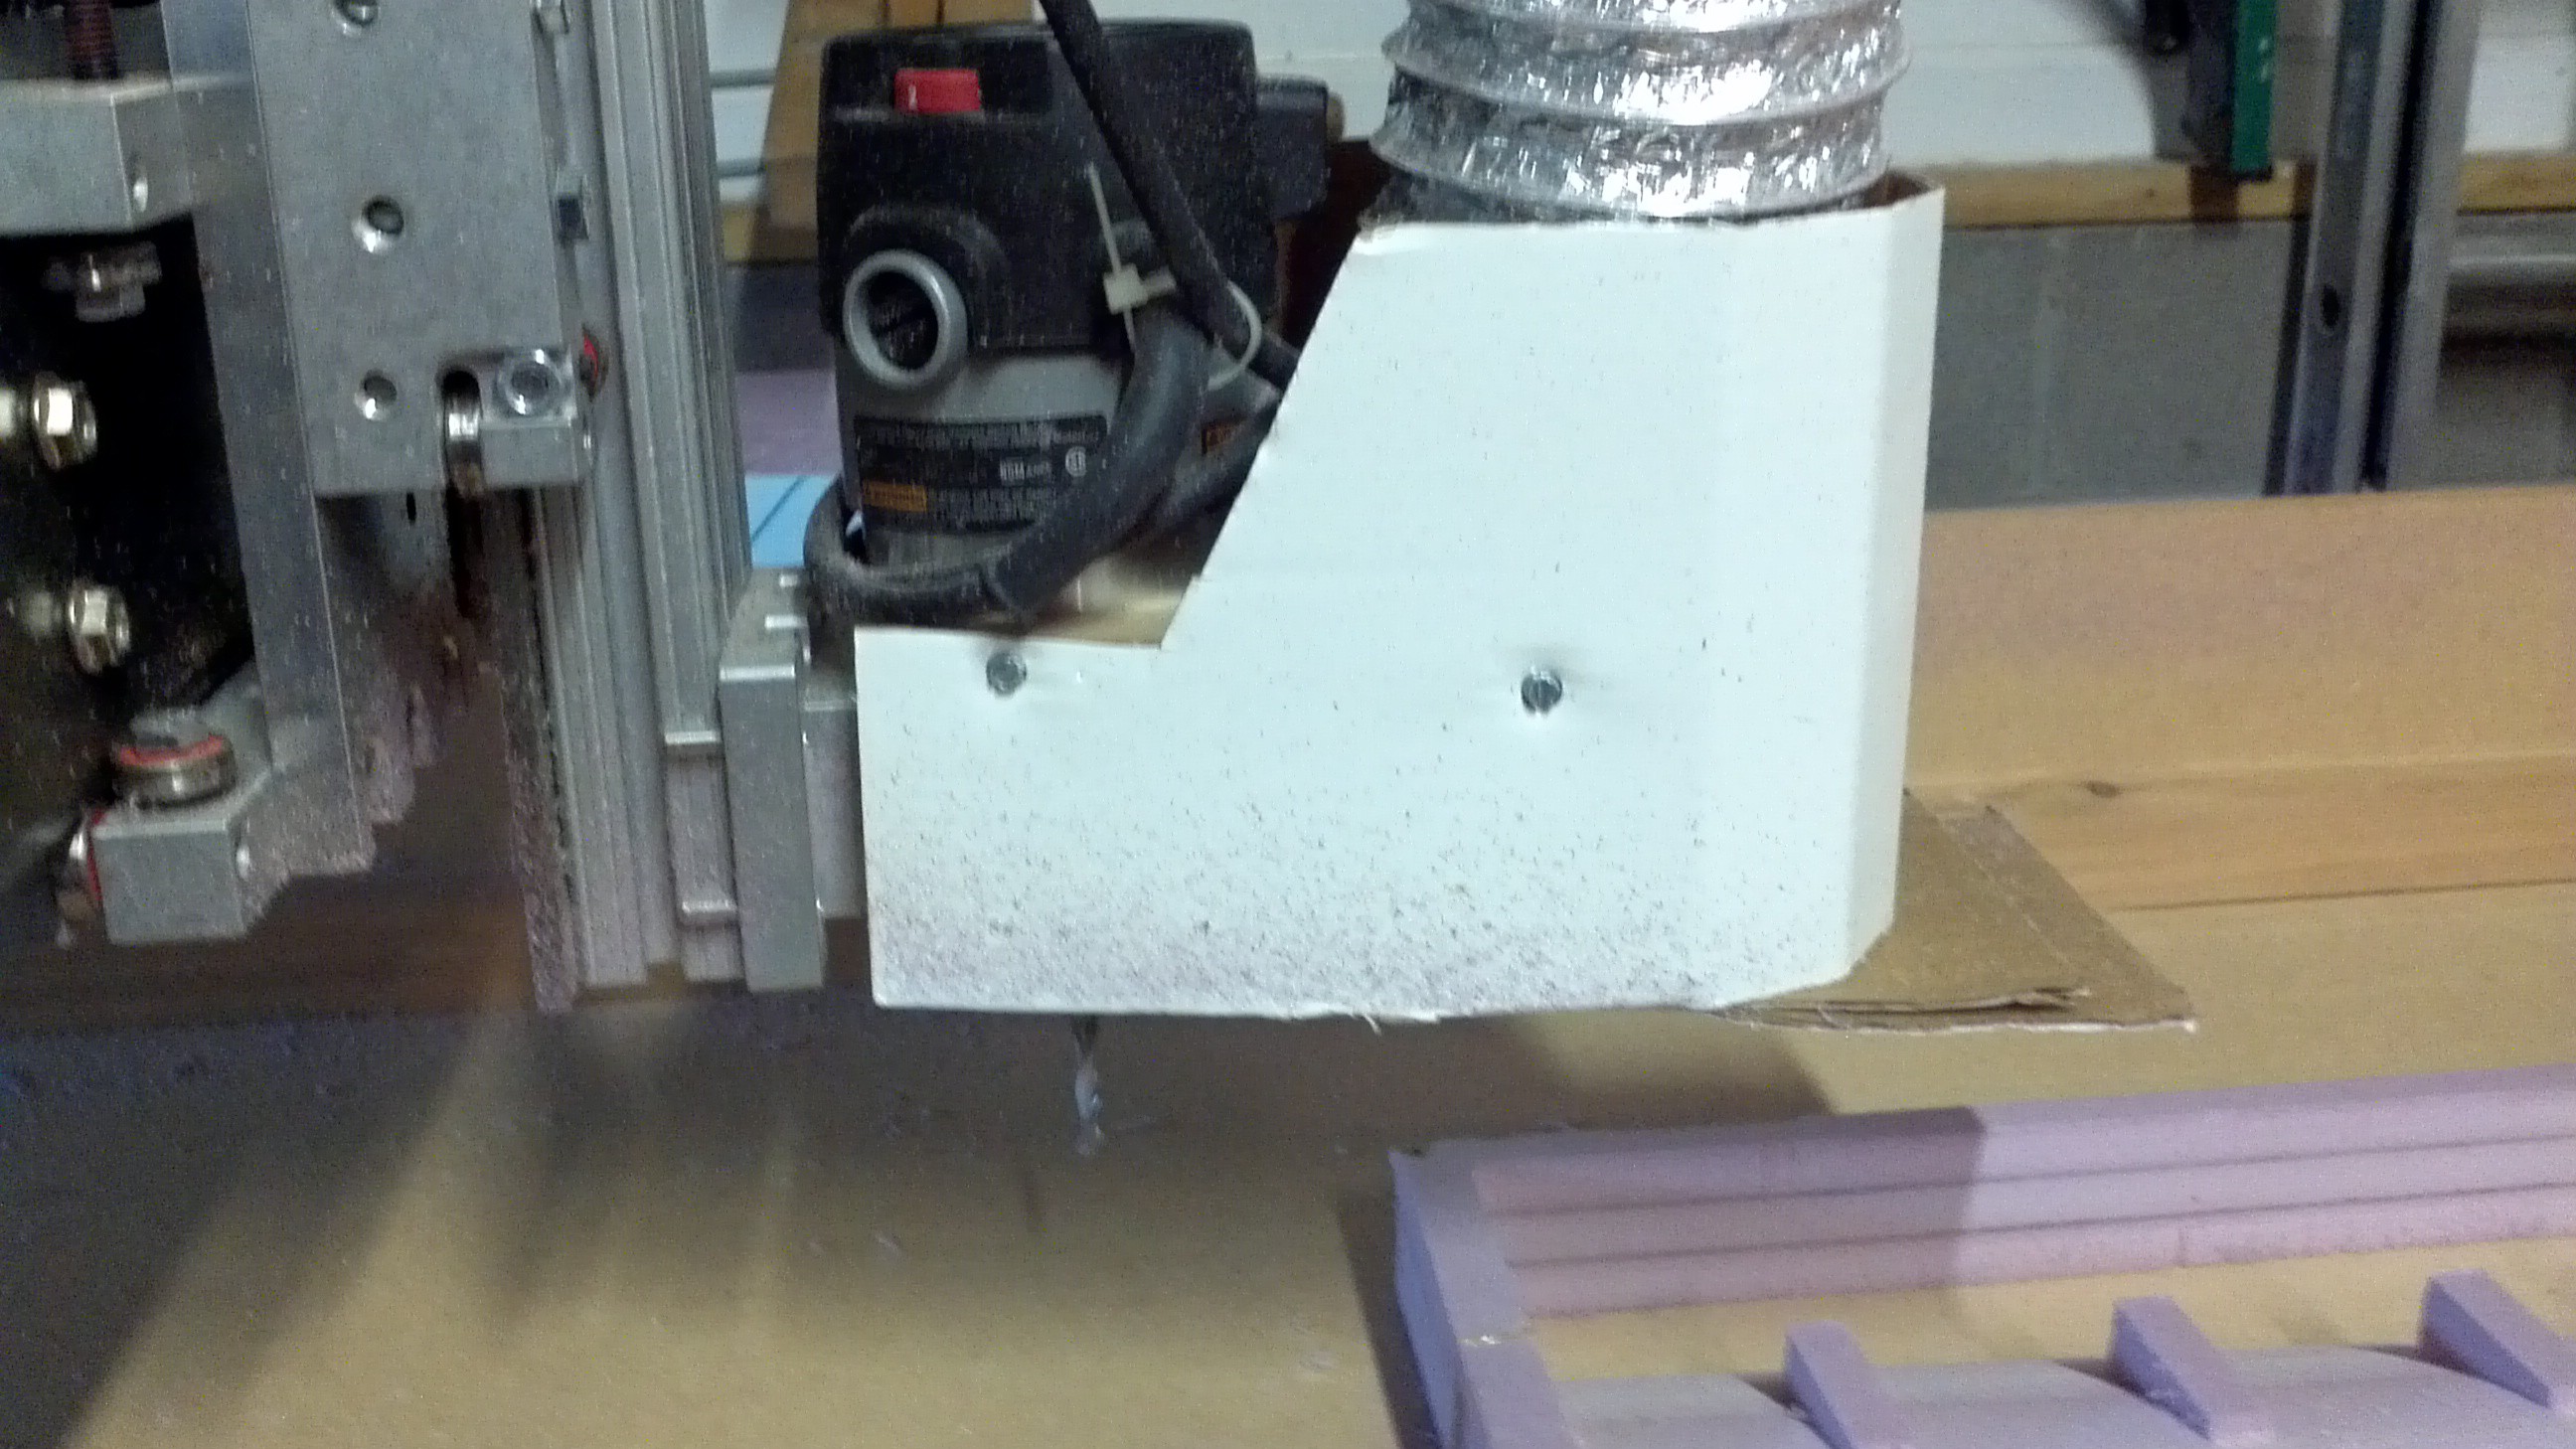
Meanwhile I've been working with the CNC router and had two hacks I wanted to post. The first was to address the amount of foam shavings that get everywhere. The CNC router has had a dust collection system for sometime, and the end of the 4" ducting was brought up to the router, but nothing was done to route the vacuum closer to the spindle. This week I made a shroud out of cardboard that seems to be working well.
![]()
![]()
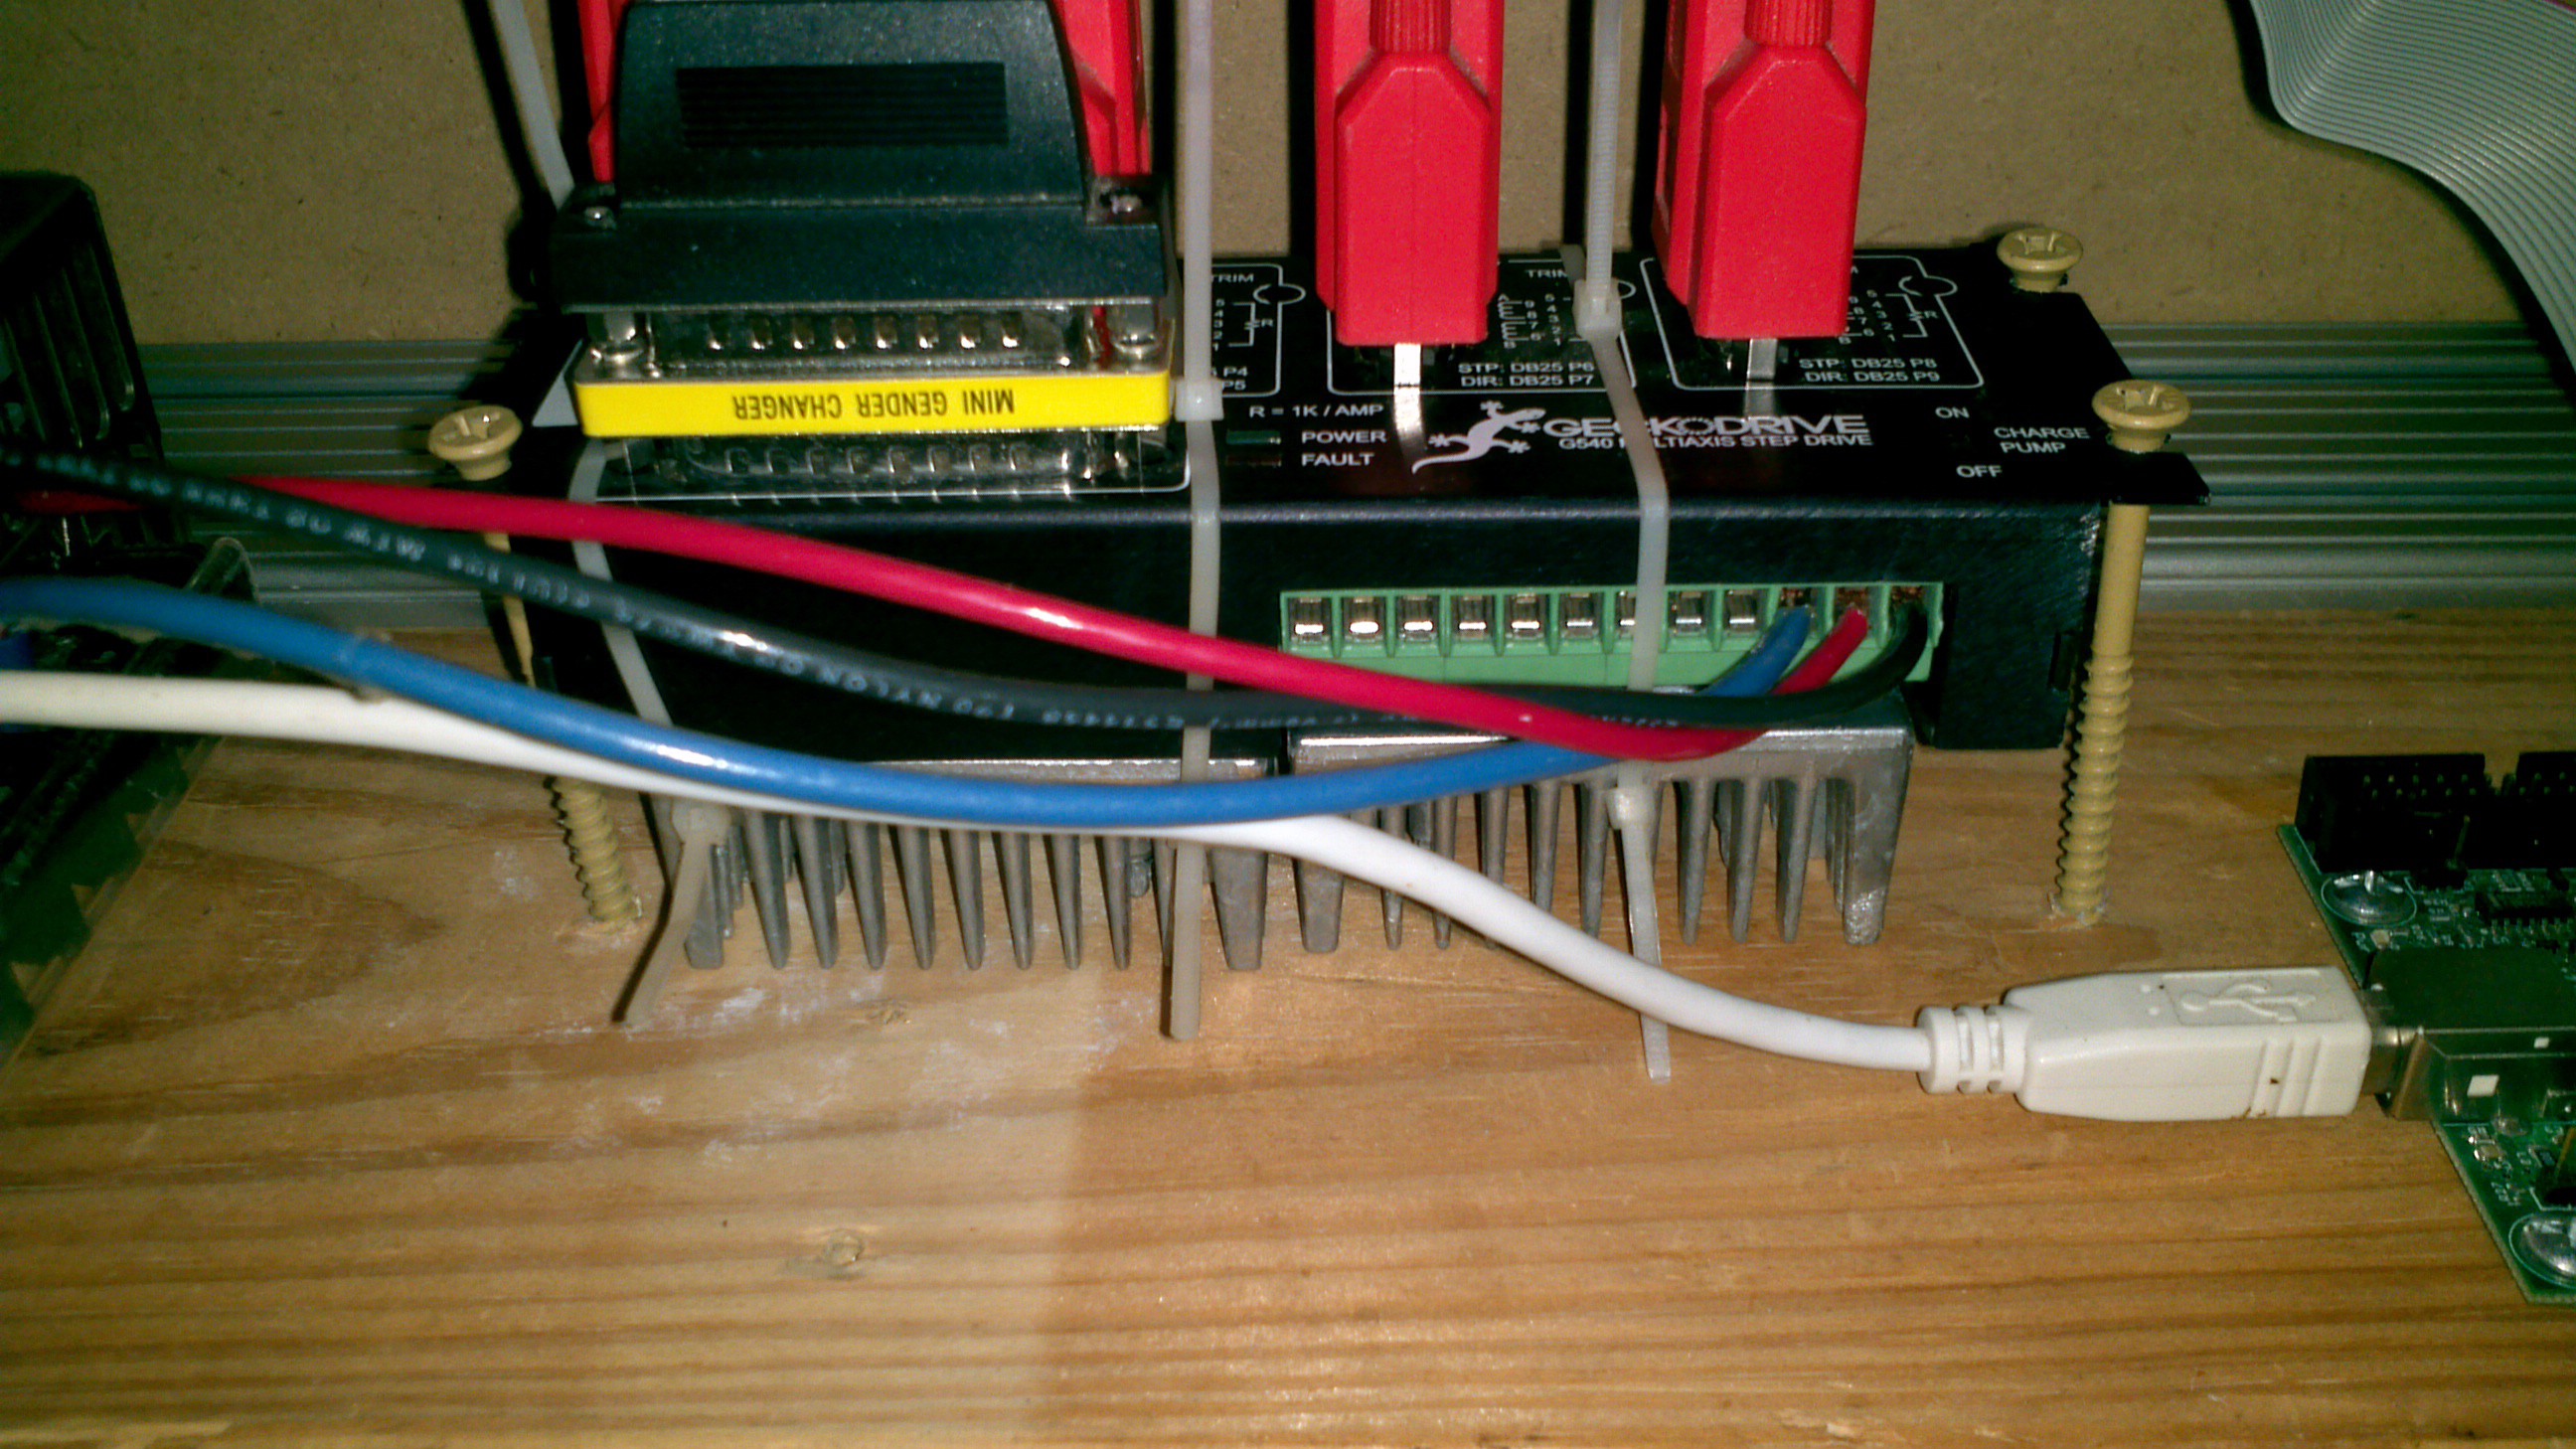
The other hack I did this week was to address the CNC hardware resetting in the the middle of cutting. After doing some research, the culprit was likely the Gecko G540 overheating. There is some good documentation on adding heat sinks and/or fans to improve the heat rejection. I stopped by the local electronics store and got some heat sinks. However no one seems to carry the thermal adhesive locally. So in the mean time I used some zip ties to attach the heat sinks. It seems to be working because I haven't had an issues since.
![]()
-
Propeller Files up on Github
07/05/2014 at 05:16 • 0 commentsI'm starting to get the Goliath design files place on Github . This evening the files necessary for creating the propellers that rotate CCW were committed. Please check them out and let me know if there's anything else that should be there. The instructions need additional detail, but I've tried to label everything to be straight forward. The G-code files are included, but aren't optimized. The roughing pass is fairly efficient, but the finish passes waste some time going over areas that are already cut. If anyone has the inclination and expertise to improve on them, please feel free.
I'll be adding information to the repository as the project continues so be sure to periodically check it out!