-
Test data on the cloud
08/03/2016 at 10:06 • 0 commentsAfter fiddling with Adafruit IO, Aerotron can now publish to feeds via http (though ultimately we plan to make it use MQTT). You can see example results at my temporary dashboard here. In case nothing pops up, just click the feed title and it will redirect you to a plot of whatever data is stored. There is also a download button in case you find some of it useful. Another way to get it is to change the url to jadefox/feeds/<feed you need>. The feeds are as follows:
- aerotron-co for carbon monoxide [mg/m^3]
- aerotron-pm for particulate matter over 2.5um [ug/m^3]
- aerotron-t for temperature [deg. C]
- aerotron-h for relative humidity [%]
- aerotron-V for sensor voltage control [V]
The data you can find will consist mostly of our test runs which follow a set pattern of heat-up transient -> normal measuring conditions -> battery death. Unfortunately at present we have no means of adding annotations to the cloud, but worry not, in case we measure something interesting, we will bring it up here.
-
Power supply considerations
07/16/2016 at 16:00 • 0 commentsThere's no way for LiIon battery to provide enough juice with our current setup.
Although our step-up converter declares up to 3A, and device consumes below 2A, we get unstable voltage when all sensors are plugged in. Working assumption is, battery's protection kicks in - device's inner resistance is just a few ohms.
And, so far device isn't exactly portable.
Anyway, we'll try with some good old dumb batteries. Although twice cheaper, they are much heavier, so we're not happy about it. Then again, step-up might not be required then.
But, we'll take a vacation first, and be silent for next two weeks or so;)
-
Going Live!
07/13/2016 at 11:32 • 0 commentsWe managed to send real-time data to Adafruit IO!
So far, we're sending only carbon monoxide readings from our office, via HTTP.
Check it out here:
-
Source published
07/11/2016 at 11:01 • 0 commentsBehold mighty aerotron source!
-
Going to github...
07/09/2016 at 14:57 • 0 commentsJust created the repo:
https://github.com/mikrotron-zg/aerotronIt's still empty, for the code is still a mess... but stay tuned, coming soon;)
We still need to decide which MQTT lib we'll use. Adafruit's lib seems to have one mad pointer, or maybe we're just running out of memory. So we'll investigate PubSubClient too.After checking a couple of ESP8266 libs, seems we'll have to make our own. That's a mess too - various firmware versions on various modules, supporting various AT commands. So we have to make sure that ESP firmware matches the Arduino lib. Bottom line - we'll have to include instructions to upload one specific ESP firmware to the module.
-
Cloudy data
07/04/2016 at 14:46 • 0 commentsSo where will pollution data go?
We decided to send them to Adafruit IO.Here's why:
- our favourite fruit is Adafruit ;)
- all IoT things should talk IoT protocols; Adafruit IO talks MQTT
- available open source libs and learning resources
- cool web widgets to display the data
That said, please note that Adafruit IO is still in beta.
So, here are the feeds:
https://io.adafruit.com/jalmasi/feeds/co
https://io.adafruit.com/jalmasi/feeds/co2
https://io.adafruit.com/jalmasi/feeds/h2s
https://io.adafruit.com/jalmasi/feeds/o3
https://io.adafruit.com/jalmasi/feeds/c6h6
https://io.adafruit.com/jalmasi/feeds/pm
https://io.adafruit.com/jalmasi/feeds/tempThey are all public, or are supposed to be.
Our initial attempt to send the data failed, due to chicken-egg problem:
we use SoftwareSerial to drive ESP8266. ESP8266 works on 115200 bps by default, and highest accurate boud rate available with SoftwareSerial is about 38400.
Our attempt to change baud rate to 19200 resulted in two fatalities, now we have to upload firmware to two ESP8266 modules.So, no data yet :(
Probably tomorrow;)But FTR, here's the code for MQTT over SoftwareSerial ESP8266.
// https://github.com/Diaoul/arduino-ESP8266 #include <ESP8266Client.h> #include <SoftwareSerial.h> #include "Adafruit_MQTT.h" #include "Adafruit_MQTT_Client.h" // wifi setup #define WIFI_SSID "krbljovrtislav" #define WIFI_PASSWORD "Kobasica" //SoftwareSerial softSerial(3, 2); /* RX:D3, TX:D2 */ SoftwareSerial softSerial(2, 3); /* RX:D3, TX:D2 */ ESP8266 wifi(softSerial); /************************* Adafruit.io Setup *********************************/ #define AIO_SERVER "io.adafruit.com" #define AIO_SERVERPORT 1883 // use 8883 for SSL #define AIO_USERNAME "supersecret" #define AIO_KEY "SuperSecretAndLongKeyImpossibleToGuess" // Create an ESP8266 WiFiClient class to connect to the MQTT server. //WiFiClient client; // or... use WiFiFlientSecure for SSL //WiFiClientSecure client; // Store the MQTT server, username, and password in flash memory. // This is required for using the Adafruit MQTT library. const char MQTT_SERVER[] PROGMEM = AIO_SERVER; const char MQTT_USERNAME[] PROGMEM = AIO_USERNAME; const char MQTT_PASSWORD[] PROGMEM = AIO_KEY; ESP8266Client client(wifi); // Setup the MQTT client class by passing in the WiFi client and MQTT server and login details. Adafruit_MQTT_Client mqtt(&client, MQTT_SERVER, AIO_SERVERPORT, MQTT_USERNAME, MQTT_PASSWORD); /****************************** Feeds ***************************************/ // Notice MQTT paths for AIO follow the form: <username>/feeds/<feedname> const char CO_FEED[] PROGMEM = AIO_USERNAME "/feeds/co"; Adafruit_MQTT_Publish co_feed = Adafruit_MQTT_Publish(&mqtt, CO_FEED); const char CO2_FEED[] PROGMEM = AIO_USERNAME "/feeds/co2"; Adafruit_MQTT_Publish co2_feed = Adafruit_MQTT_Publish(&mqtt, CO2_FEED); const char H2S_FEED[] PROGMEM = AIO_USERNAME "/feeds/h2s"; Adafruit_MQTT_Publish h2s_feed = Adafruit_MQTT_Publish(&mqtt, H2S_FEED); const char O3_FEED[] PROGMEM = AIO_USERNAME "/feeds/o3"; Adafruit_MQTT_Publish o3_feed = Adafruit_MQTT_Publish(&mqtt, O3_FEED); const char C6H6_FEED[] PROGMEM = AIO_USERNAME "/feeds/c6h6"; Adafruit_MQTT_Publish c6h6_feed = Adafruit_MQTT_Publish(&mqtt, C6H6_FEED); const char PM_FEED[] PROGMEM = AIO_USERNAME "/feeds/pm"; Adafruit_MQTT_Publish pm_feed = Adafruit_MQTT_Publish(&mqtt, PM_FEED); const char TEMP_FEED[] PROGMEM = AIO_USERNAME "/feeds/temp"; Adafruit_MQTT_Publish temp_feed = Adafruit_MQTT_Publish(&mqtt, TEMP_FEED); void setup() { Serial.begin(9600); softSerial.begin(115200); wifi.begin(); // setWifiMode Serial.print("setWifiMode: "); Serial.println(getStatus(wifi.setMode(ESP8266_WIFI_STATION))); Serial.print("joinAP: "); Serial.println(getStatus(wifi.joinAP(WIFI_SSID, WIFI_PASSWORD))); // getMAC byte mac[6]; Serial.print("getMAC STA: "); Serial.print(getStatus(wifi.getMAC(ESP8266_WIFI_STATION, mac))); Serial.print(" : "); for (uint8_t i = 0; i < 6; i++) { Serial.print(mac[i], HEX); if (i < 5) Serial.print(":"); } Serial.println(); // getIP IPAddress ip; Serial.print("getIP STA: "); Serial.print(getStatus(wifi.getIP(ESP8266_WIFI_STATION, ip))); Serial.print(" : "); Serial.println(ip); } int32_t coVal, co2Val, h2sVal, o3Val, c6h6Val, tempVal = 0; void loop() { // Ensure the connection to the MQTT server is alive (this will make the first // connection and automatically reconnect when disconnected). See the MQTT_connect // function definition further below. MQTT_connect(); // Now we can publish stuff! publish( co_feed, coVal++ ); publish( co2_feed, co2Val++ ); publish( h2s_feed, h2sVal++ ); publish( o3_feed, o3Val++ ); publish( c6h6_feed, c6h6Val++ ); publish( temp_feed, tempVal++ ); // sleep a bit delay(2000); } void publish(Adafruit_MQTT_Publish feed, int32_t val) { if (! feed.publish(val)) { Serial.println("Failed"); } else { Serial.println("OK!"); } } // Function to connect and reconnect as necessary to the MQTT server. // Should be called in the loop function and it will take care if connecting. void MQTT_connect() { int8_t ret; // Stop if already connected. if (mqtt.connected()) { return; } Serial.print("Connecting to MQTT... "); uint8_t retries = 3; while ((ret = mqtt.connect()) != 0) { // connect will return 0 for connected Serial.println(mqtt.connectErrorString(ret)); Serial.println("Retrying MQTT connection in 5 seconds..."); mqtt.disconnect(); delay(5000); // wait 5 seconds retries--; if (retries == 0) { // basically die and wait for WDT to reset me while (1); } } Serial.println("MQTT Connected!"); } // ESP8266Client utilities String getStatus(bool status) { if (status) return "OK"; return "KO"; } String getStatus(ESP8266CommandStatus status) { switch (status) { case ESP8266_COMMAND_INVALID: return "INVALID"; break; case ESP8266_COMMAND_TIMEOUT: return "TIMEOUT"; break; case ESP8266_COMMAND_OK: return "OK"; break; case ESP8266_COMMAND_NO_CHANGE: return "NO CHANGE"; break; case ESP8266_COMMAND_ERROR: return "ERROR"; break; case ESP8266_COMMAND_NO_LINK: return "NO LINK"; break; case ESP8266_COMMAND_TOO_LONG: return "TOO LONG"; break; case ESP8266_COMMAND_FAIL: return "FAIL"; break; default: return "UNKNOWN COMMAND STATUS"; break; } } String getRole(ESP8266Role role) { switch (role) { case ESP8266_ROLE_CLIENT: return "CLIENT"; break; case ESP8266_ROLE_SERVER: return "SERVER"; break; default: return "UNKNOWN ROLE"; break; } } String getProtocol(ESP8266Protocol protocol) { switch (protocol) { case ESP8266_PROTOCOL_TCP: return "TCP"; break; case ESP8266_PROTOCOL_UDP: return "UDP"; break; default: return "UNKNOWN PROTOCOL"; break; } } -
First measurement results
06/30/2016 at 09:16 • 0 comments![]()
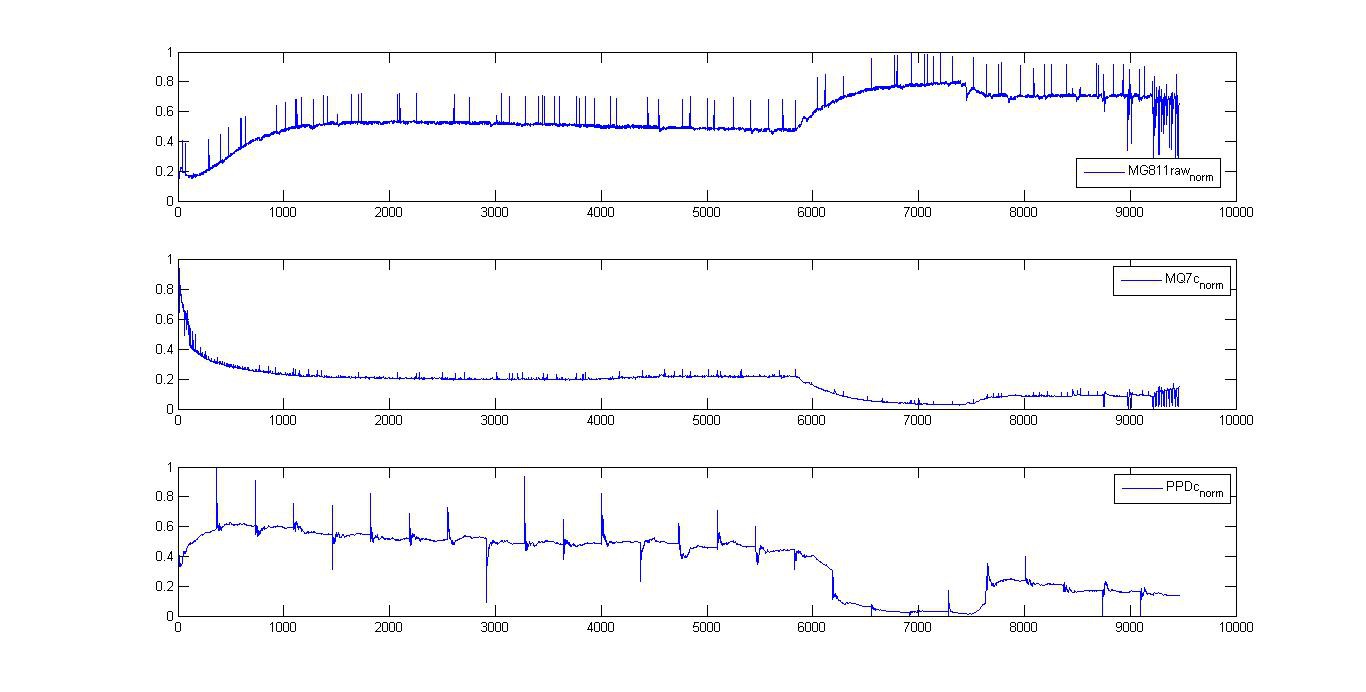
CO2, CO and PM measured every 2 seconds, indoors. These are raw sensor data, and we need to remove the noise, and calculate concentration.
Readings need about 2000 seconds to stabilize... so our device will be portable, but will not be exactly mobile:(
After nearly 6000 readings, window was opened. Breeze of fresh air is clearly visible - readings display less monoxide, dioxide and dust:)
Battery dies after about 19000 seconds, and readings are inaccurate soon before. -
Sensor barbecue
06/24/2016 at 13:26 • 0 commentsGas sensor require preheat (burn-in) of 12-24 h. Usually, just connect one to your Arduino or any other 5V power supply and leave it be till tomorrow.
But we actually made a custom device to preheat all sensors at once.
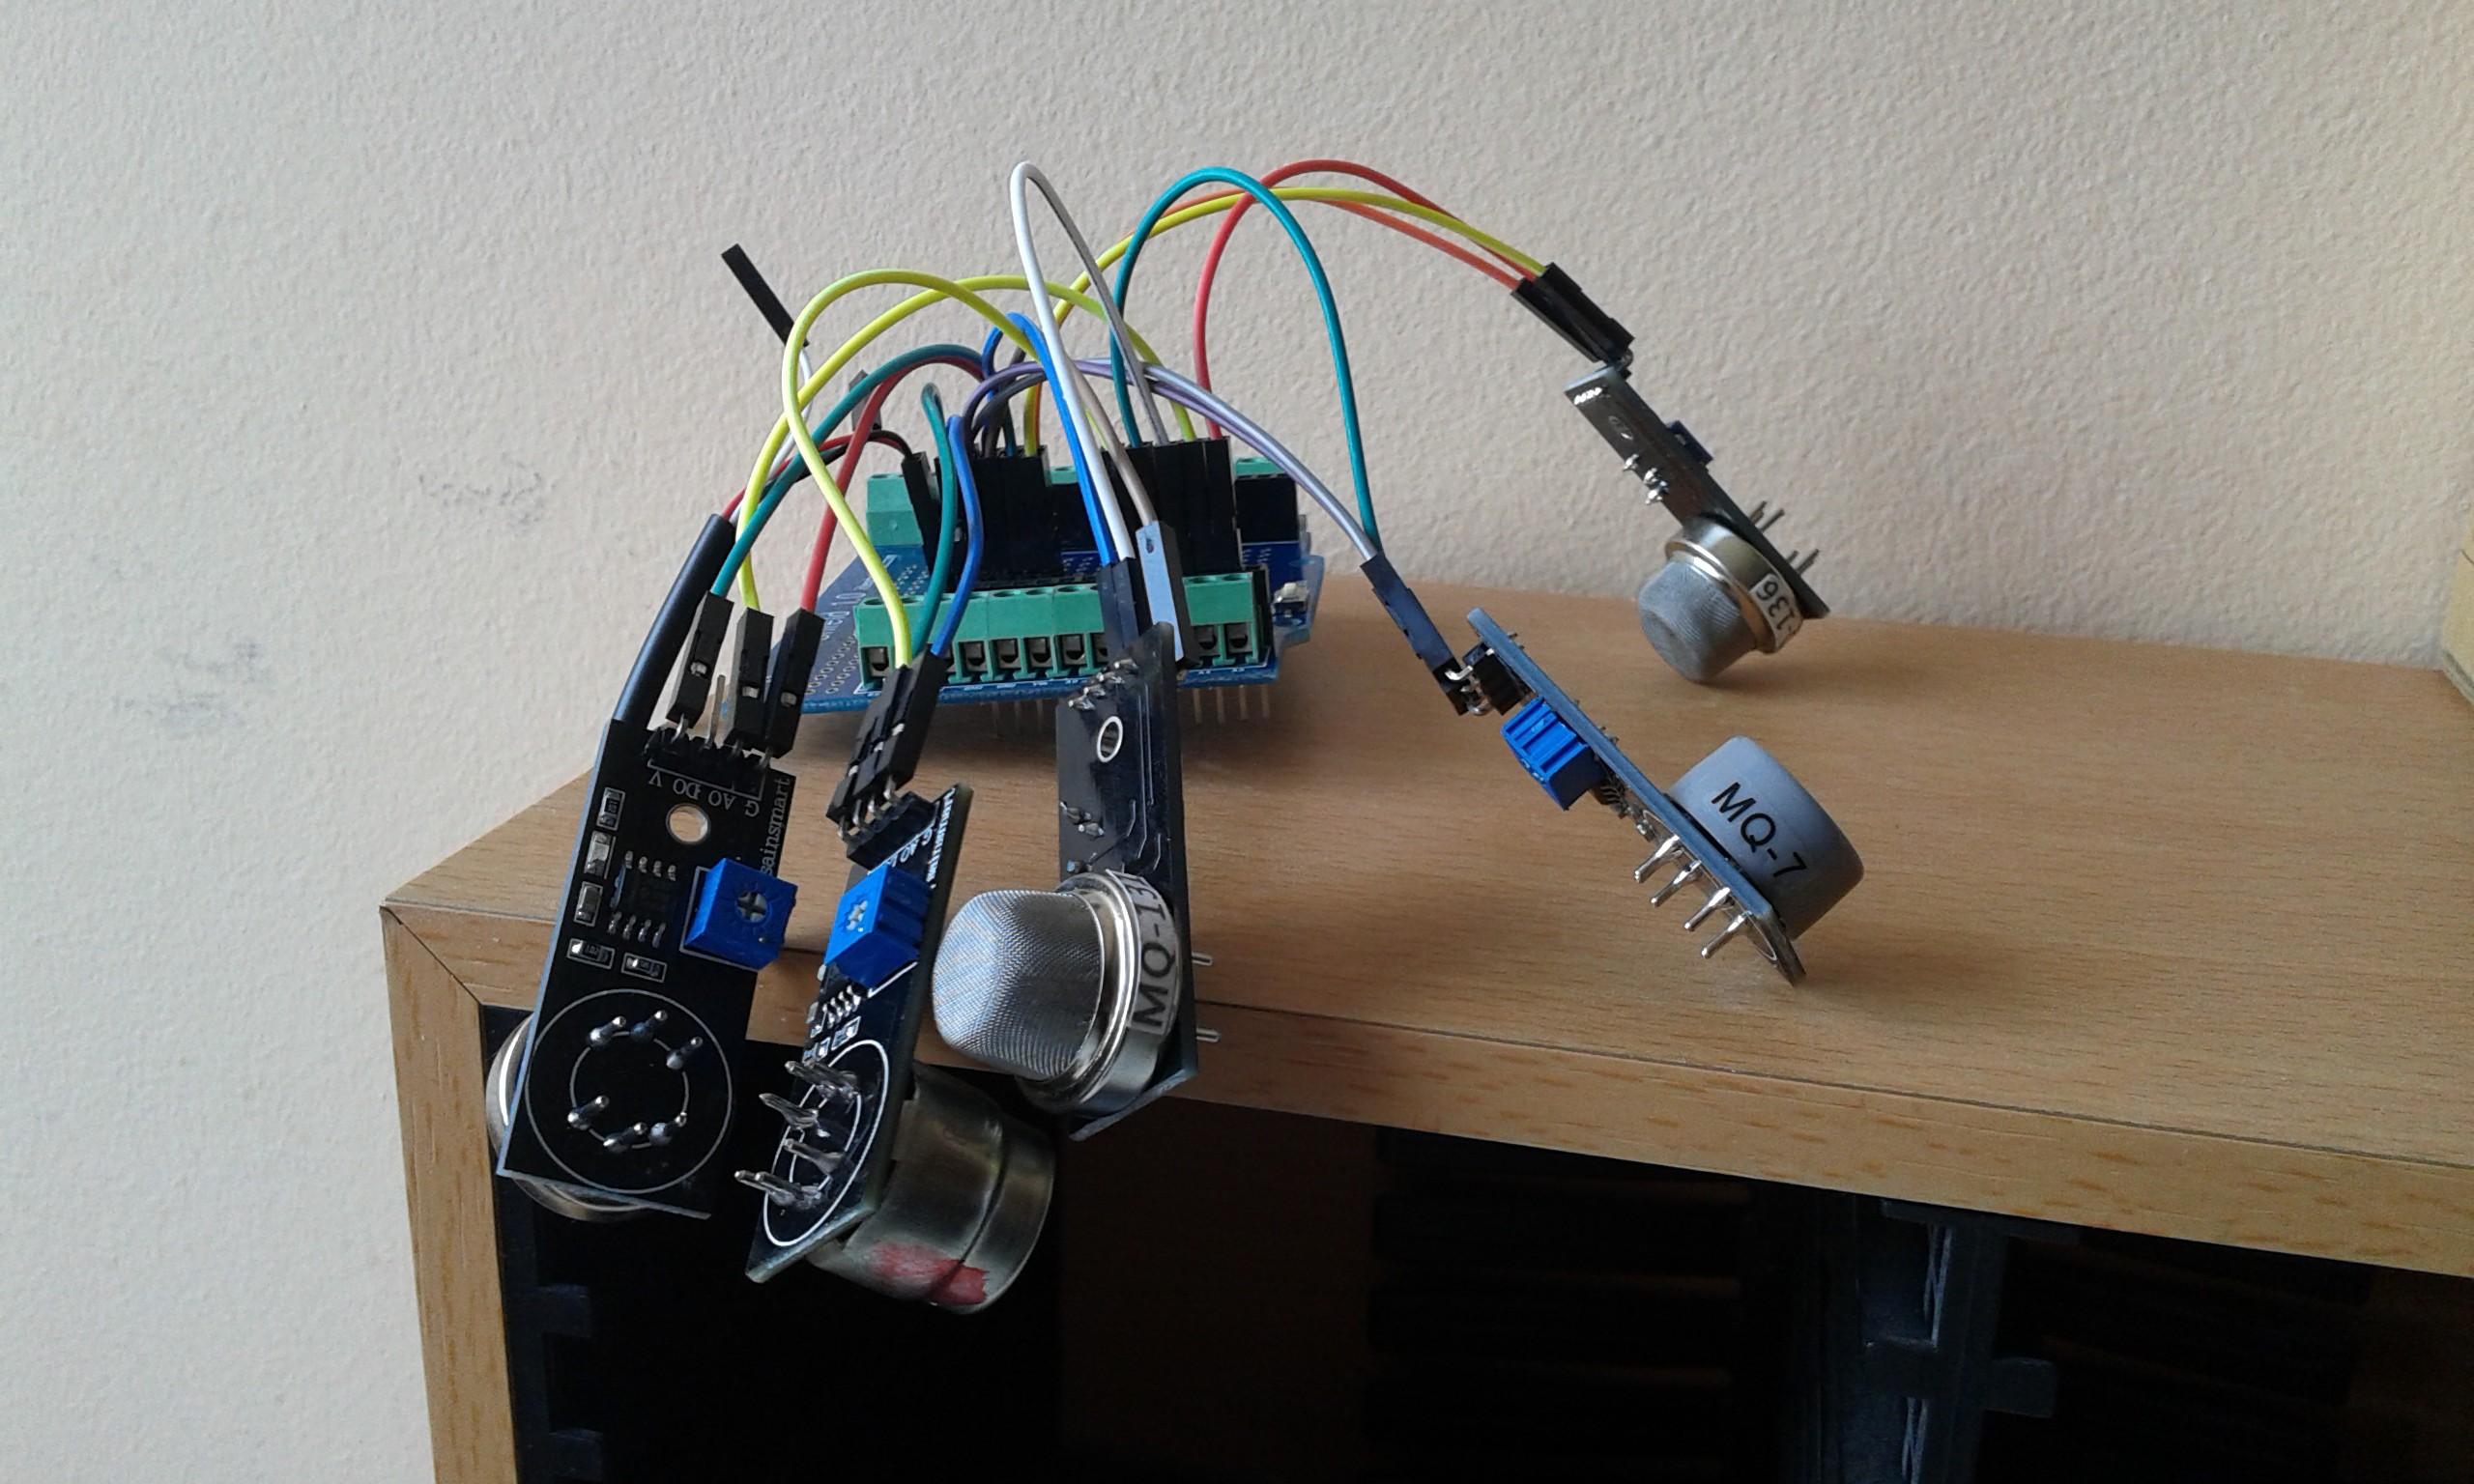
Behold the mighty sensor barbecue!![]()
-
Notes on choice of sensors
06/24/2016 at 13:15 • 0 commentsAt this point we are working on project for about three months., and will be posting past reports. And first one starts like this:
Do not buy MG811 module from Sainsmart! We recommend one from DFRobot.
The catch is, MG811 needs 6V. No it's not a typo, it's six (6) volts. Sainsmart didn't get it, DFRobot did, and included a step-up on their module.Also, we gave up DSM501A dust sensor by ITead. We don't know whats wrong, but didn't get any meaningful readings. (pointers appreciated). Instead we bought Grove dust sensor from Seeed, seems fine.
We acquired other gas sensors from Sainsmart, and they seem fine.
Aerotron
Portable device to measure most commmon air pollutants: CO, CO2, O3, H2S, C6H6 and PM
 mikrotron
