 agp.cooper
Weird CPU
It is a big project so I will not try to write it up in one go.

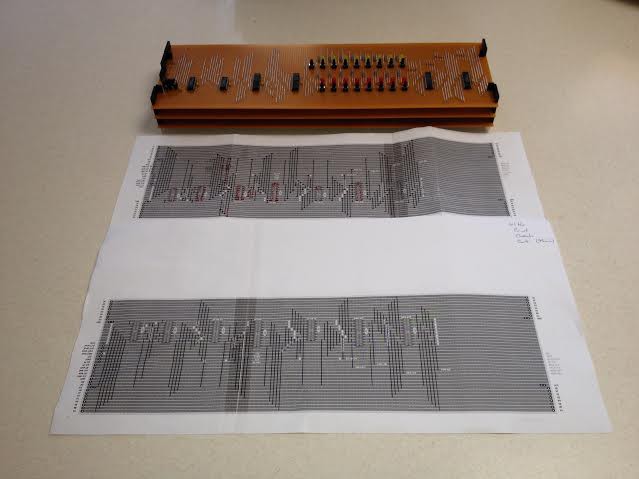
Front Panel Interface
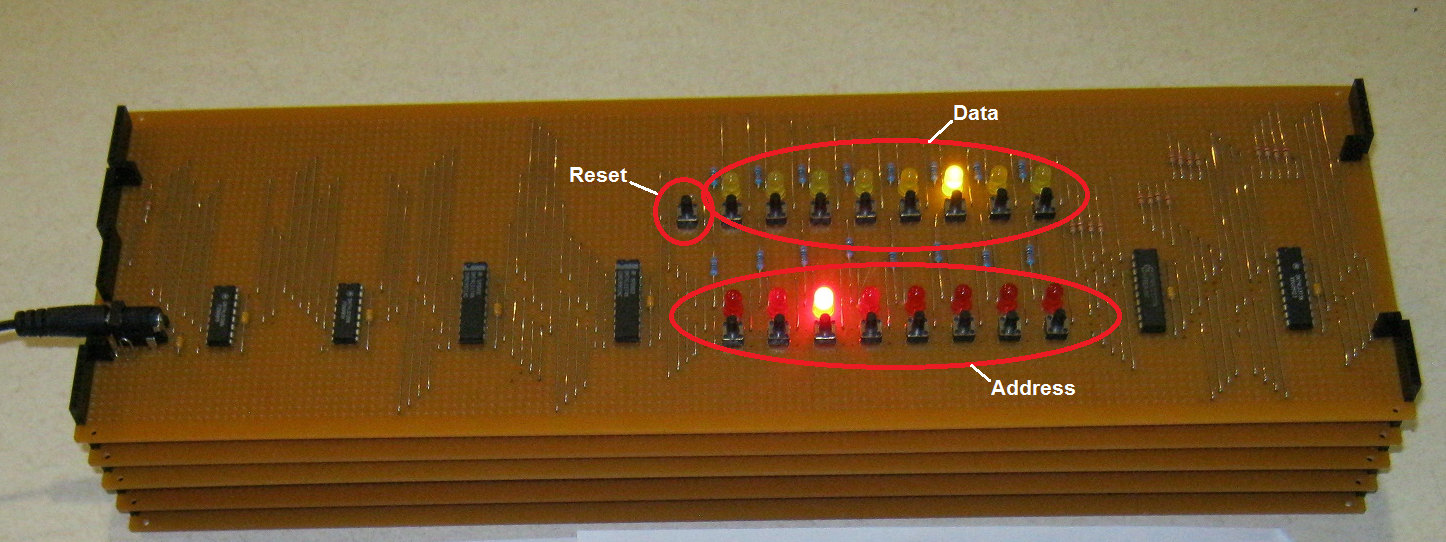
The front panel consists of:
- A reset switch (left top IO row).
- An 8 bit Data Input/Output (top row of 8 LEDs and 8 momentary contract switches)
- An 8 bit Address Input/Output (bottom row of 8 LEDs and 8 momentary contract switches)
The front panel:
Using the Front Panel
- Obviously the front panel works in binary!
- The Data IO (i.e. top row of switches and LEDs) will display the contents of the address location from memory (RAM, ROM or hardware).
- The switches toggle the state of the matching LED. Changing the Data will change the memory location (if it can be changed).
- When powered up or reset the monitor program will set the Address IO (i.e. bottom row of swtiches and LEDs) to 0x80 (i.e. b10000000), the start of the programmable RAM (of 120 bytes).
- To execute the program, set the Address IO to 0xFF (i.e. b11111111) and then change any bit of the Data IO to run.
Memory usage:
| Address | Name | Comment |
| 0x00-0x5F | Monitor subroutine | Called on reset |
| 0x60-0x71 | Delay subroutine | Called with 0xF0 equal to the delay (ms) and 0xF1 equal to the return address |
| 0x72-0x7F | Constants | Constants used by the Monitor and Delay subroutines |
| 0x80-0xEF | Programmable RAM | |
| 0xF0 | TMP/DELAY | Subroutine parameter Delay subroutine (address 0x60) delay (ms) User temporary variable (V0) |
| 0xF1 | RETURN | Return address from subroutine User temporary variable (V1) |
| OxF2 | ADDR | User temporary variable (V2) |
| 0xF3 | DATA | User temporary variable (V3) |
| 0xF4 | FETCH | User temporary variable (V4) |
| 0xF5 | DEPOSIT | User temporary variable (V5) |
| 0xF6 | RPTR | User temporary variable (V6) |
| 0xF7 | JUMP | User temporary variable (V7) |
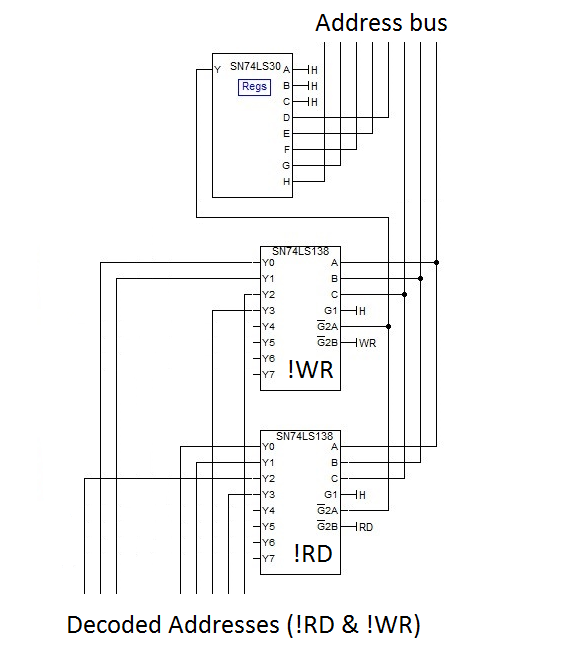
| 0xF8-0xFF | Hardware instructions | See hardware instructions below |
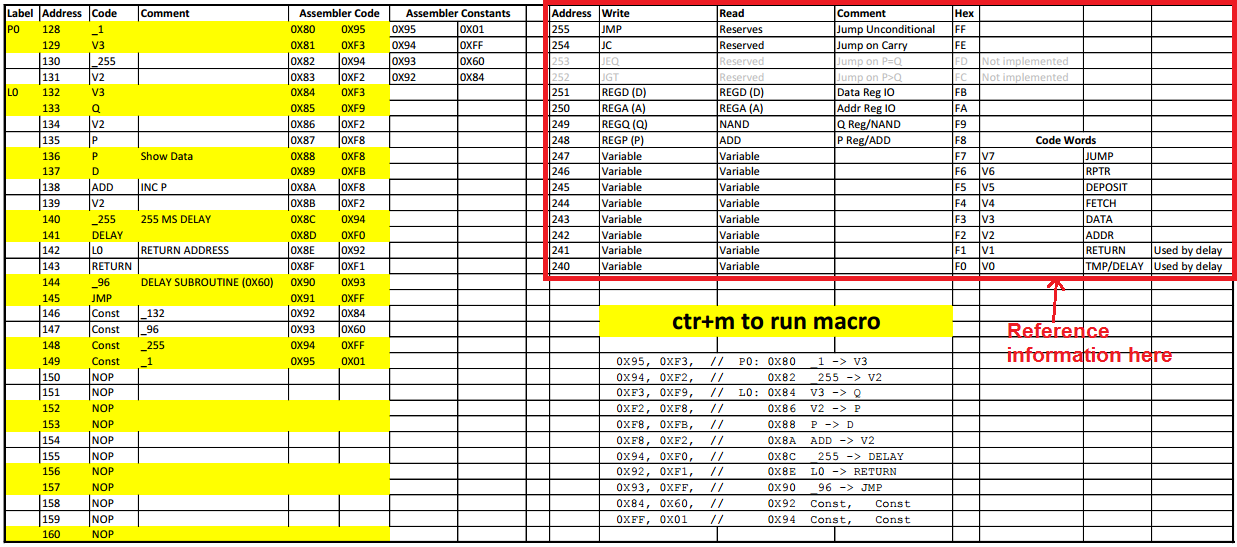
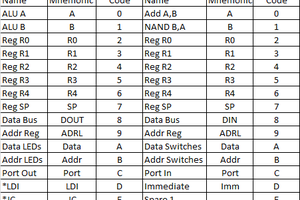
CPU hardware instructions:
| Address | Write | Read | Comment |
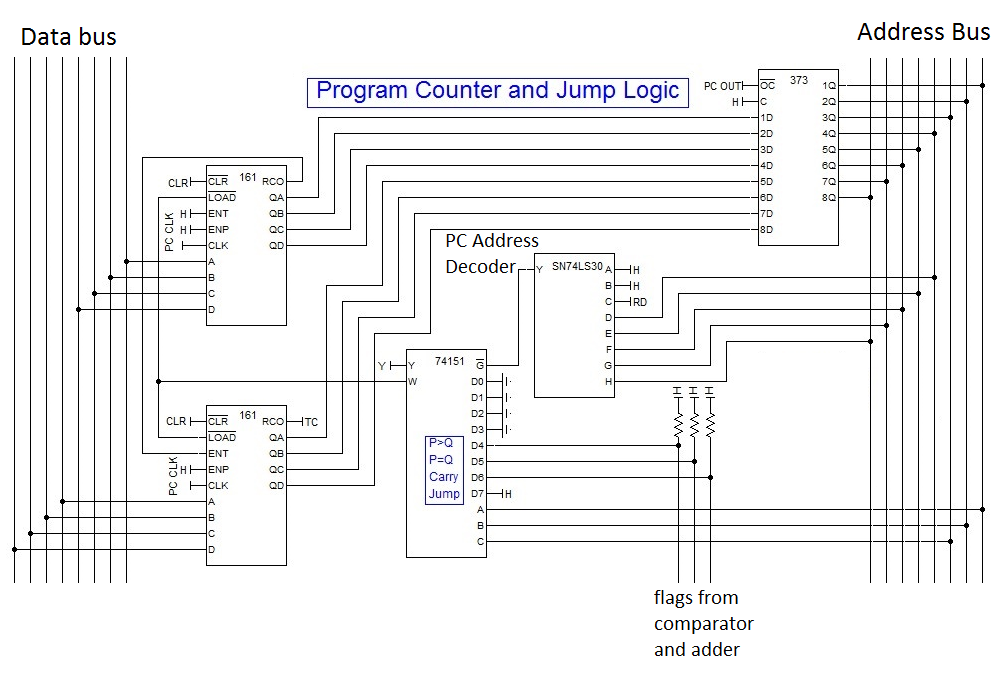
| 0xFF | JMP | Reserved | Jump unconditional |
| 0xFE | JC | Reserved | Jump on carry |
| 0xFD | JEQ | Reserved | Jump on P=Q (not implemented) |
| 0xFC | JGT | Reserved | Jump on P>Q (not implemented) |
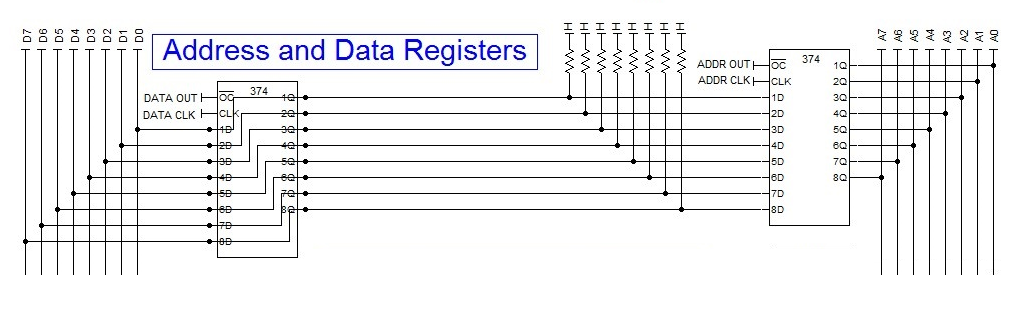
| 0xFB | RegD | RegD | Data IO |
| 0xFA | RegA | RegA | Address IO |
| 0xF9 | RegQ | NAND | ALU: Write P Register / Read "P NAND Q" |
| 0xF8 | RegP | ADD | ALU: Write Q Register / Read "P ADD Q" |
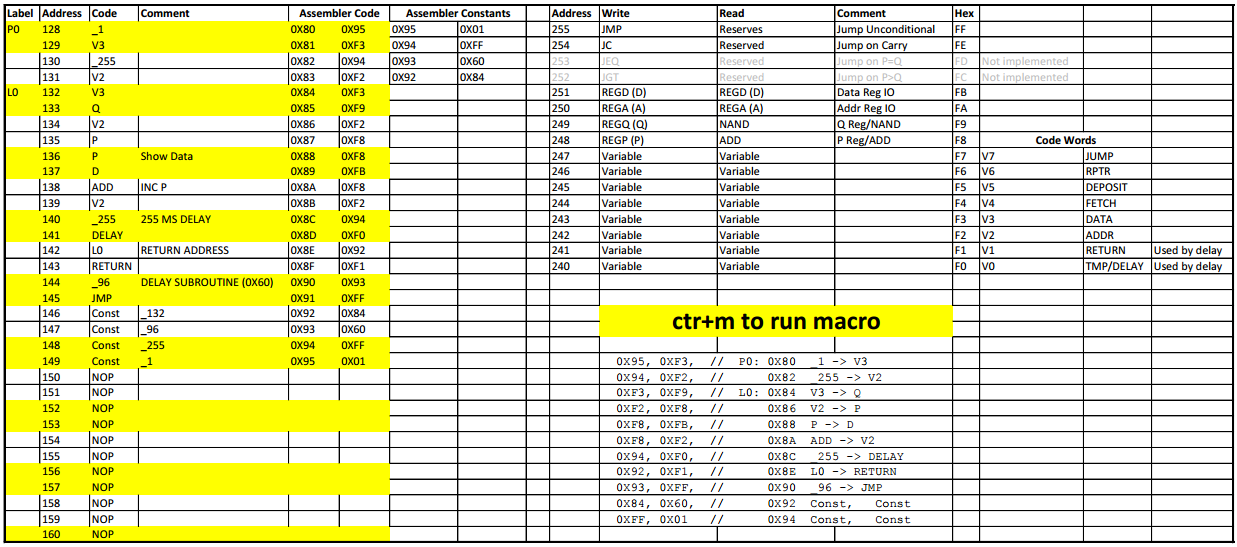
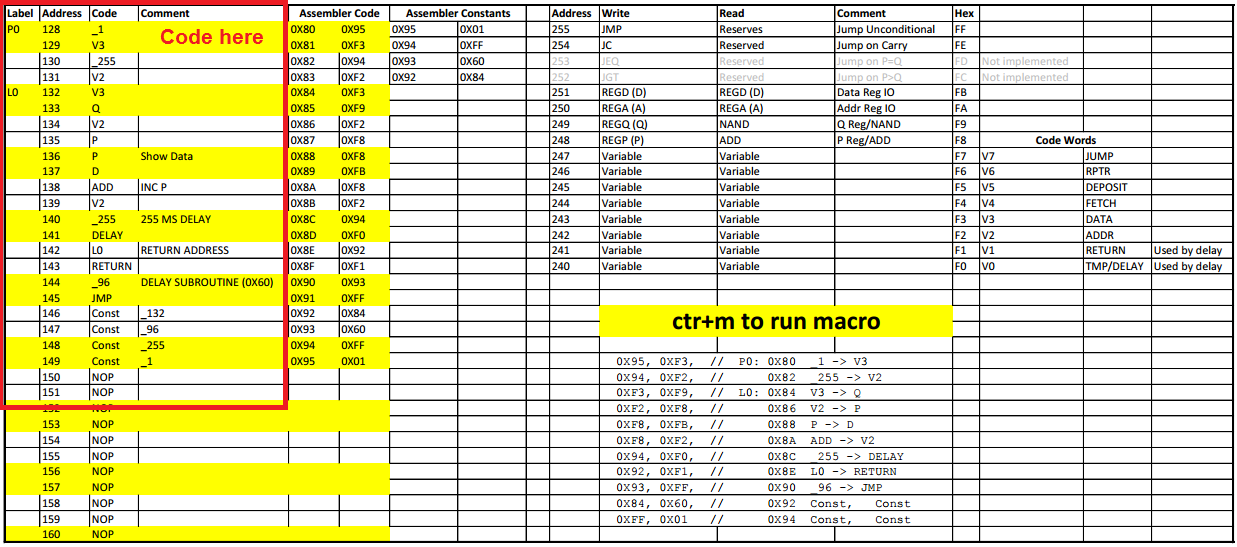
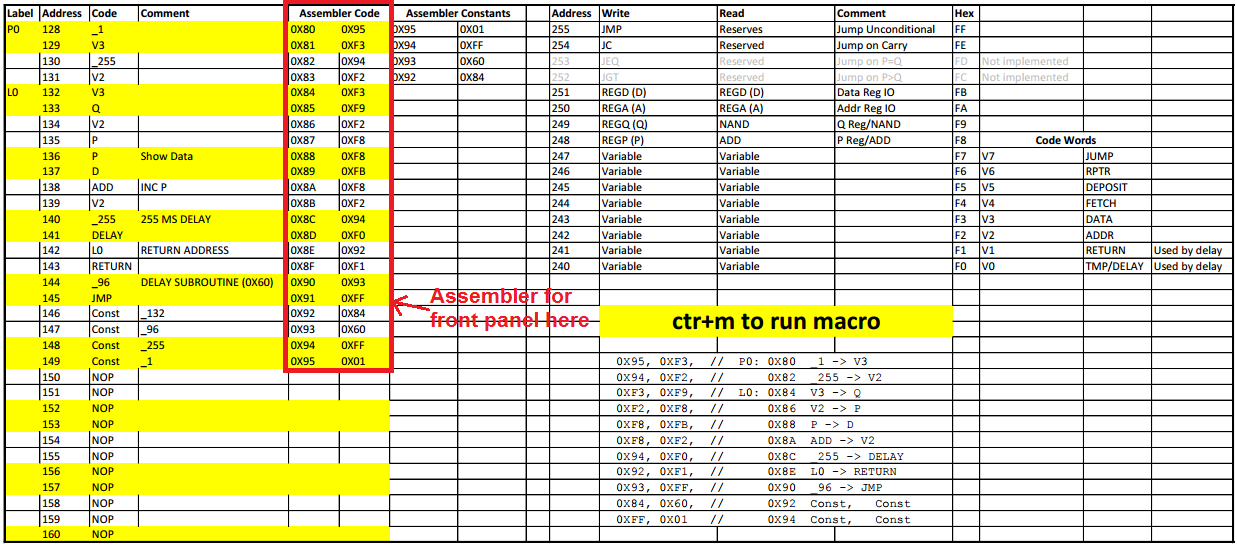
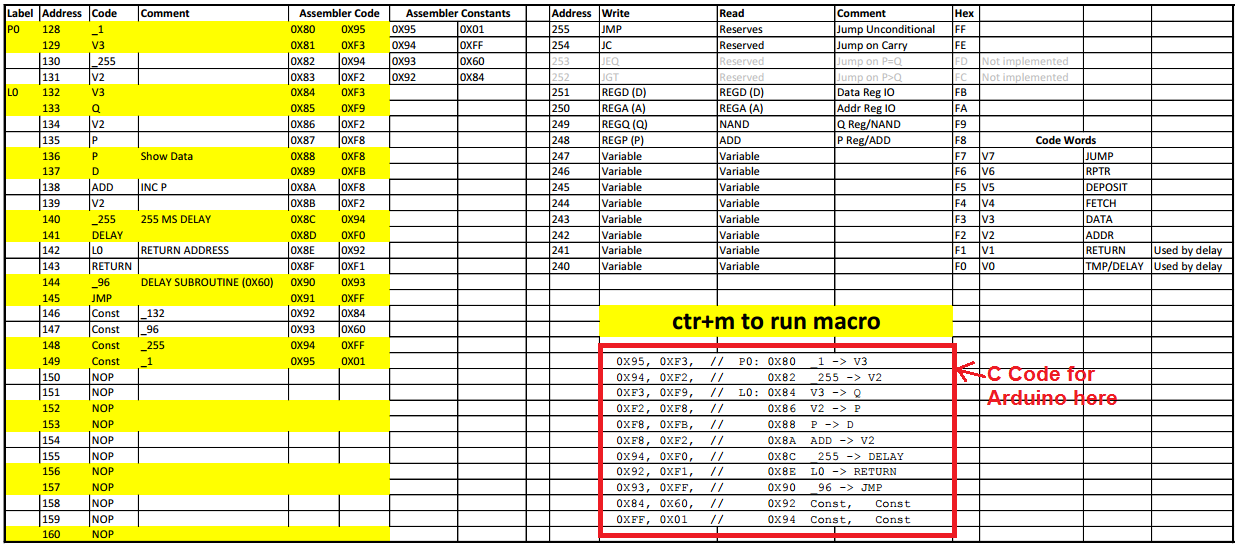
Programming Example
A binary counter:
  0X95, 0XF3,  //  P0: 0X80  _1 -> V3
  0X94, 0XF2,  //      0X82  _255 -> V2
  0XF3, 0XF9,  //  L0: 0X84  V3 -> Q
  0XF2, 0XF8,  //      0X86  V2 -> P
  0XF8, 0XFB,  //      0X88  ADD -> D
  0XF8, 0XF2,  //      0X8A  ADD -> V2
  0X94, 0XF0,  //      0X8C  _255 -> DELAY
  0X92, 0XF1,  //      0X8E  L0 -> RETURN
  0X93, 0XFF,  //      0X90  _96 -> JMP
  0X84, 0X60,  //      0X92  Const,   Const
  0XFF, 0X01   //      0X94  Const,   Const
In the above code you will note that the simple assembler (an Excel macro) written for the Weird CPU can handle labels (e.g. "P0:"), constants (e.g. "_1") and has a number of built in aliases (e.g. "P" for Register P etc).As there is only one instruction "move from fetch address to deposit address", constants (e.i. "Const") need to be stored somewhere. In this case the assembler adds the constants to the end of the program.
Interpreting the code:
| Code | Label | Comment |
| P0: 0X80 _1 -> V3 | P0: | Move Constant 1 to Variable 3 |
| 0X82 _255 -> V2 | Move Constant -1 to Variable 2 | |
| L0: 0X84 V3 -> Q | L0: | Move Variable 3 to Register Q |
| 0X86 V2 -> P | Move Variable 2 to Register P | |
| 0X88 ADD -> D | Move ADD to Data IO (P ADD Q) | |
| 0X8A ADD -> V2 | Move ADD to Variable 2 | |
| 0X8C _255 -> DELAY | Move Constant 255 to DELAY (V0) | |
| 0X8E L0 -> RETURN | Move Address L0: to RETURN (V1) | |
| 0X90 _96 -> JMP | Move 0x60 to JMP (Jump to subroutine) | |
| 0X92 Const, Const | Constant L0:, Constant P0: | |
| 0X94 Const, Const | Constant -1 or 255, Constant 1 |
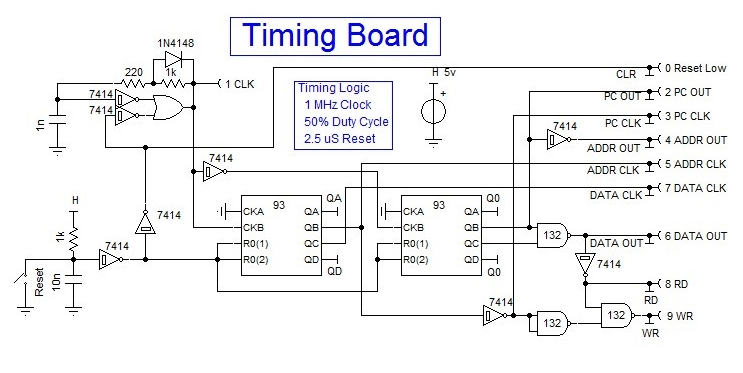
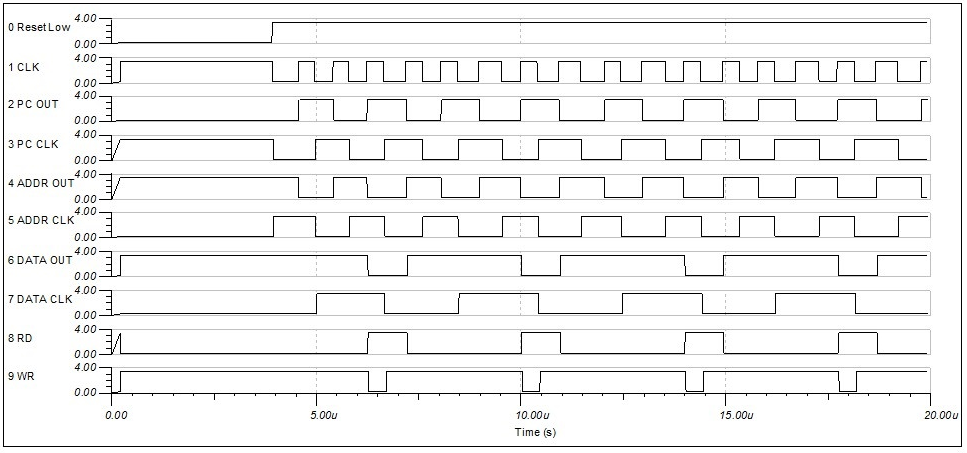
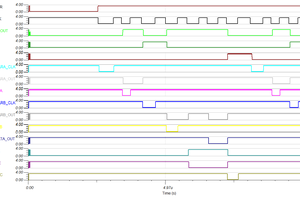
Clock Speed
The clock frequency is 1 MHz (should be good to 24 MHz if the RAM could keep up). This equates to 8 us per instruction.
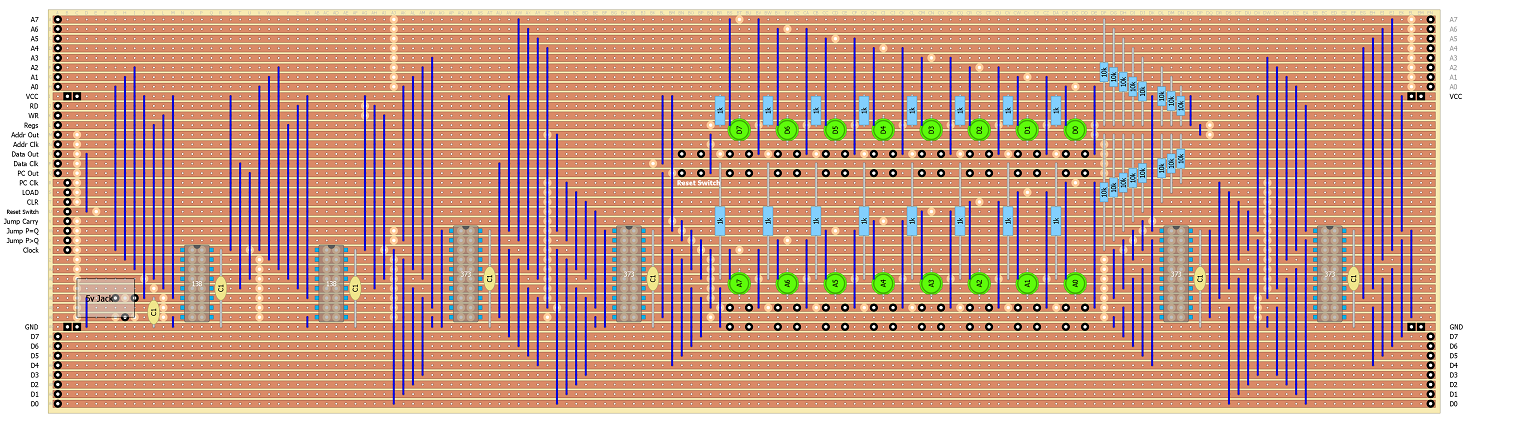
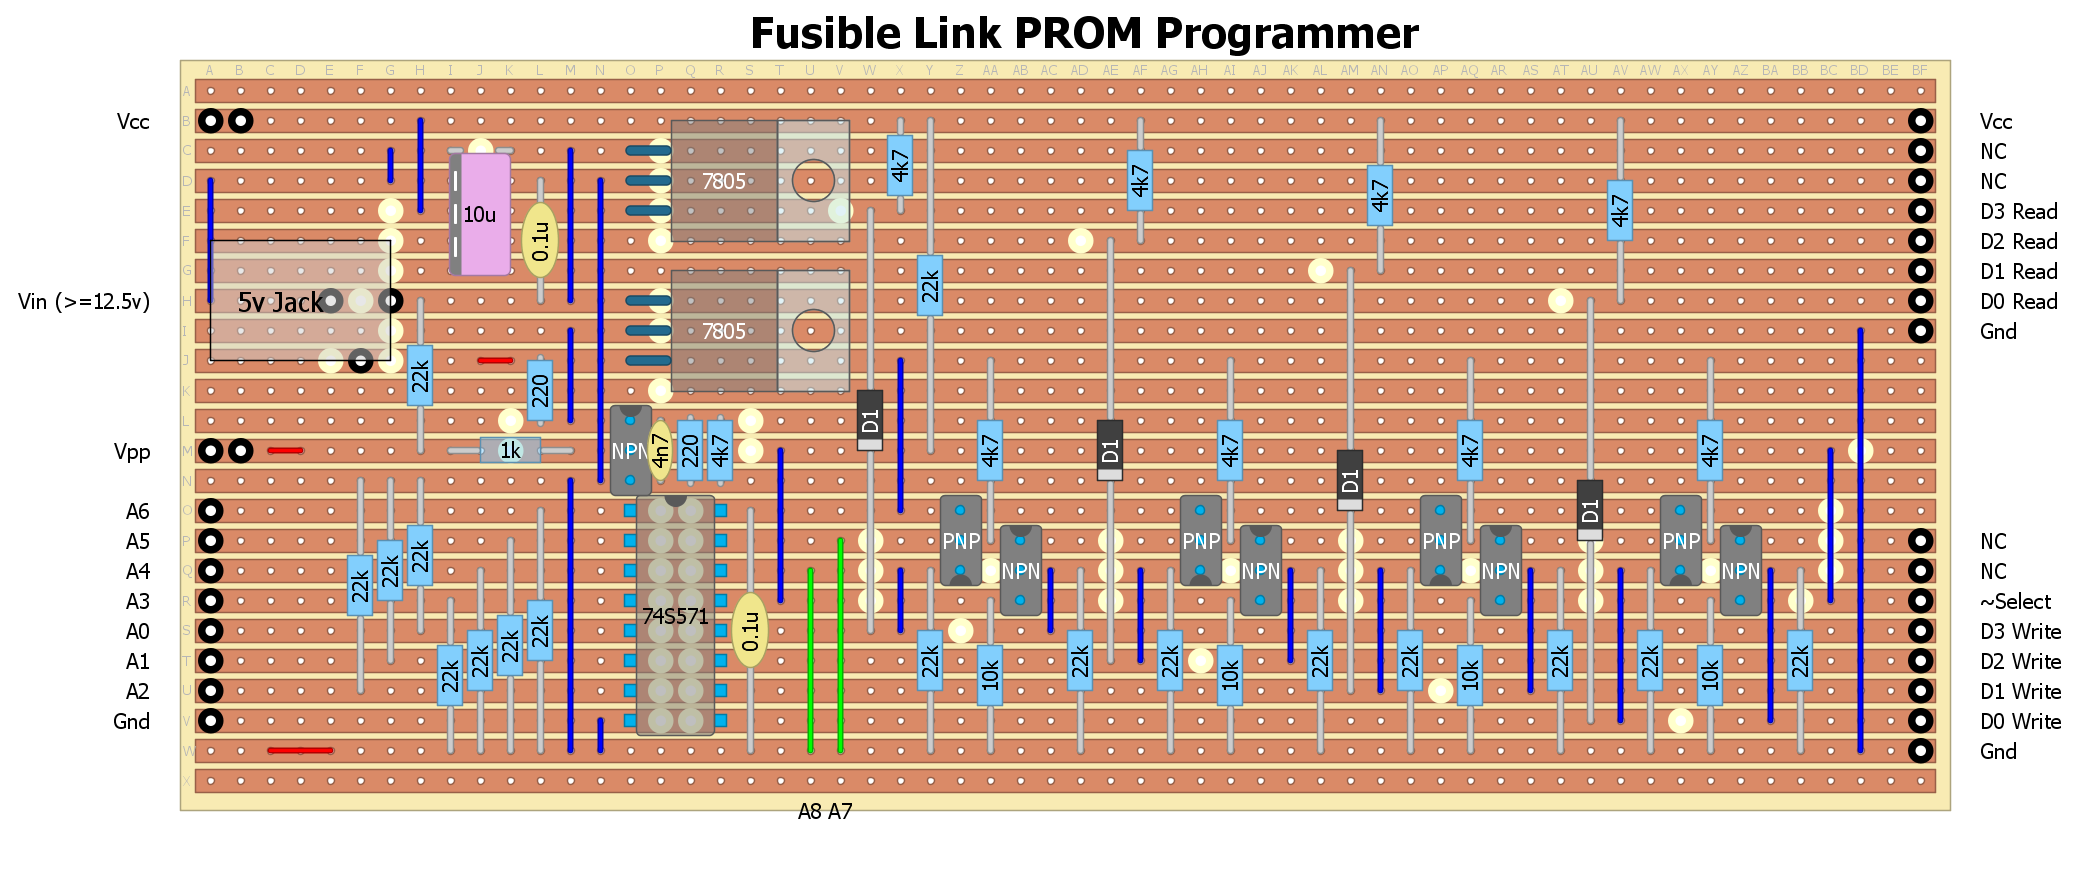
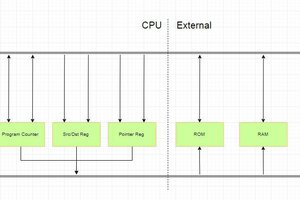
Designs
The designs have been uploaded in DIYLC format. DIYLC is an excellent free software for manual PCB design and is excellent for strip-board design.
Update
Added the monitor and two demo programs to the file list.
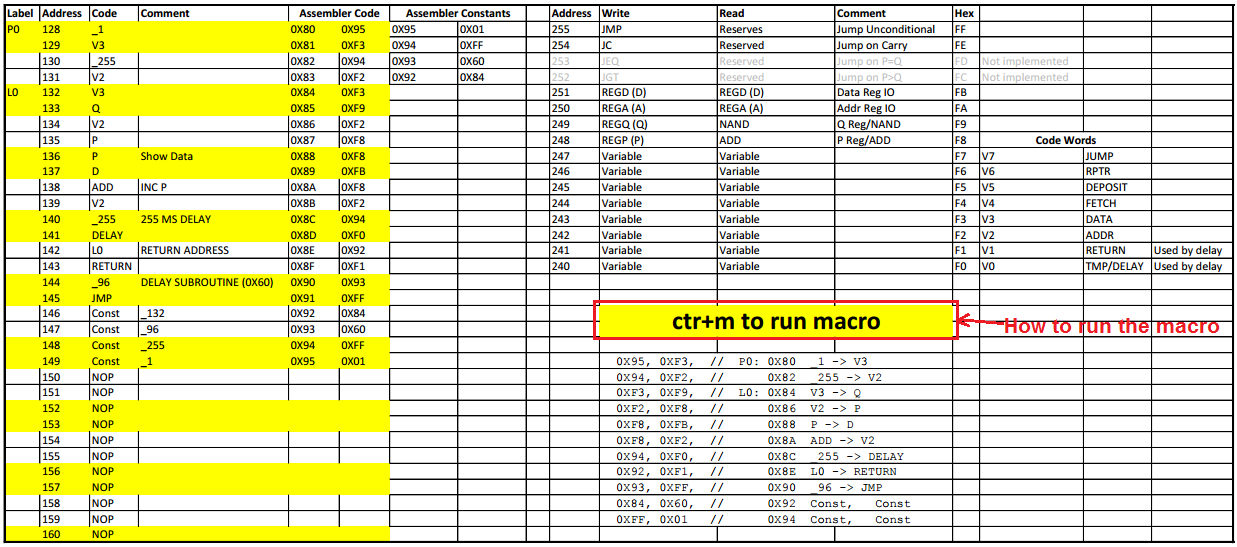
The programs use an Excel macro (Ctrl-M) to assemble the code (in hex).
Regards AlanX

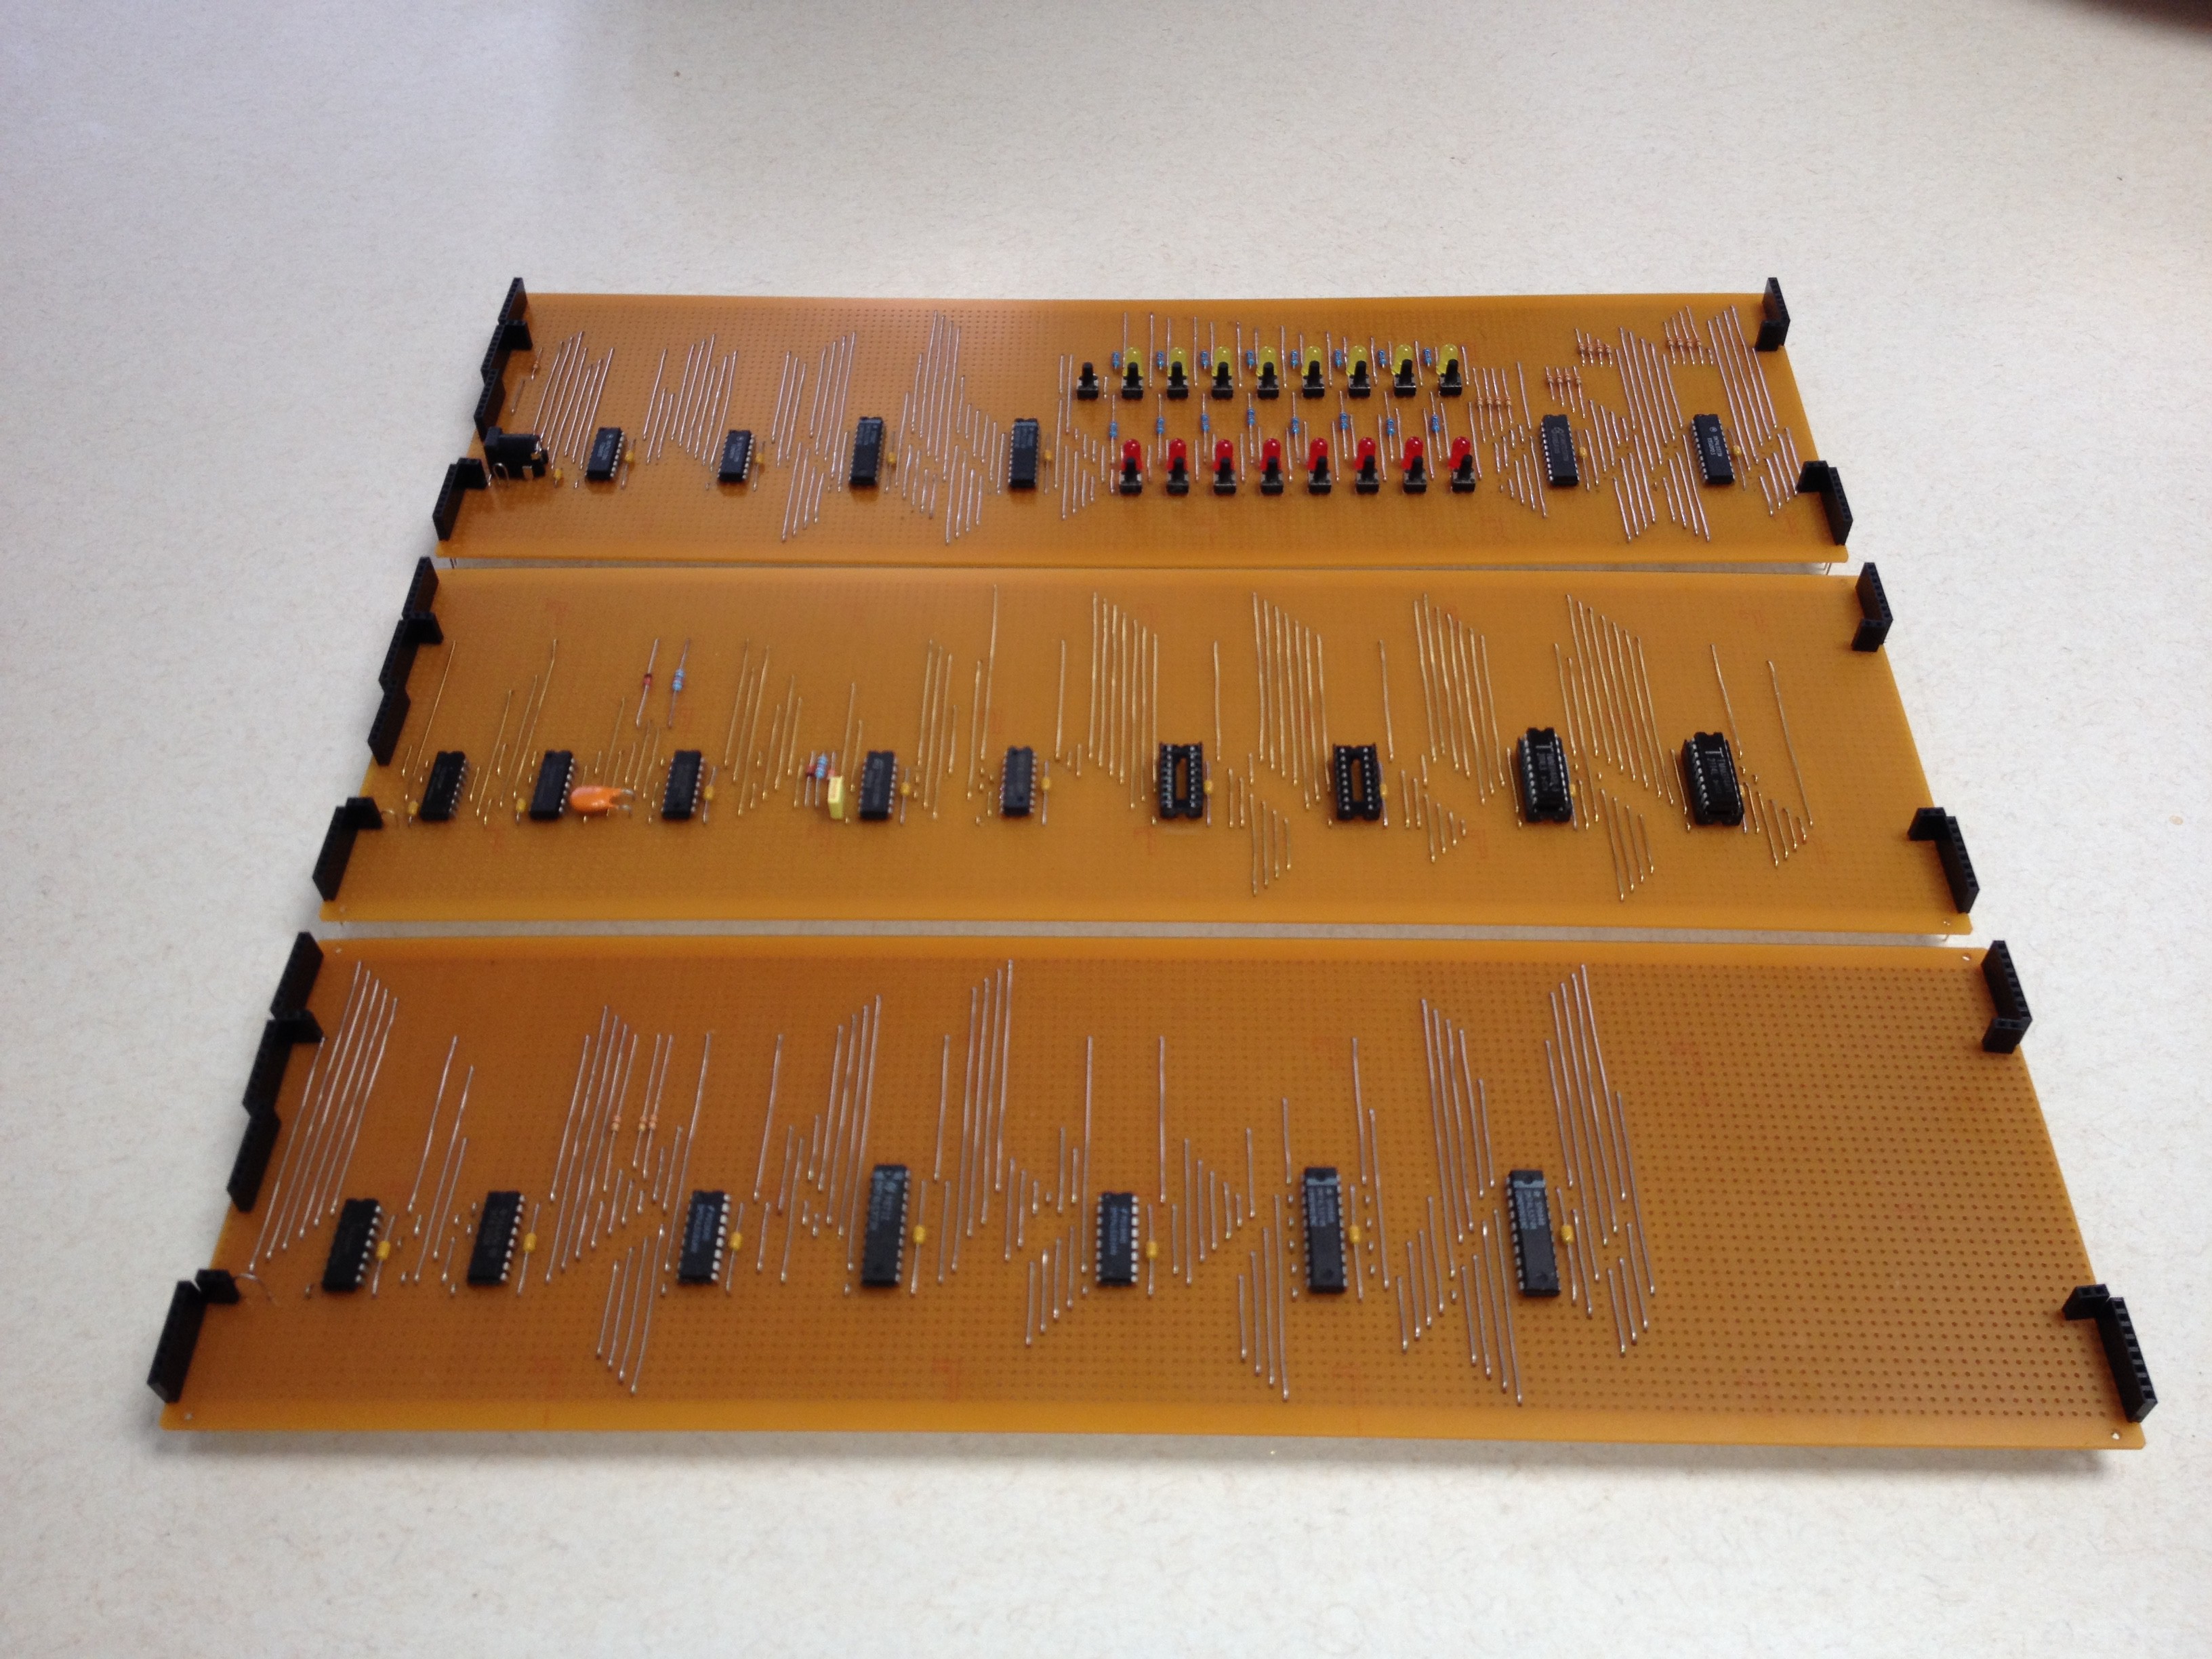


I'm a big fan of Veroboard / Stripboard and this project is "taking it too far"... Excellent!