Close
0%
0%

Circuit Playground Dice Bag

Dice Bag uses Adafruit's Circuit Playground to roll dice of several type, d100, d20, d12 or d6.

Similar projects worth following
The Circuit Playground Dice Bag
CC Attribution-ShareAlike 4.0 International Tom Higgins & Sons

Dice Bag uses Adafruit's Circuit Playground (https://www.adafruit.com/products/3000) to
roll dice of several type, d100, d20, d12 or d6.
An optional custom 3in button was created to mount the CP on. The test unit uses a 150mah lipo
(https://www.adafruit.com/products/1317) mounted on the back side of the button.

Features
Can roll d100, d20, d12,or d6
Hold button down and hear the bones rolling
NeoPixels will brighten or dim based on surrounding light level
Will not roll off table
Does not cheat

The Circuit Playground Dice Bag CC Attribution-ShareAlike 4.0 International Tom Higgins & Sons

Dice Bag uses Adafruit's Circuit Playground (https://www.adafruit.com/products/3000) to roll dice of several type, d100, d20, d12 or d6. An optional custom 3in button was created to mount the CP on. The test unit uses a 150mah lipo (https://www.adafruit.com/products/1317) mounted on the back side of the button.

Features

  • Can roll d100, d20, d12,or d6
  • Hold button down and hear the bones rolling
  • NeoPixels will brighten or dim based on surrounding light level
  • Will not roll off table
  • Does not cheat

    User Manual

    Select the type of die you would like to throw by putting the Select Switch in the proper position

    and then pressing the proper Button

    Select Switch + Left Button d100 (0-99) Right Button d20 (1-20)
    Select Switch - Left Button d12 (1-12) Right Button d06 (1-6)

    • Dicebag Make Code For Circuit Playground Express

      tomwsmf05/15/2017 at 07:47 0 comments

      In preparing for Adafruit's new version of the Circuit Playground I started using the web browser based dev environment over at http://makecode.adafruit.com

      You can find this up there at https://makecode.com/_MJjJrg9eRTmi

      /*
      The Circuit Playground Dice Bag  - CC Attribution-ShareAlike - Tom Higgins and Sons


      User Manual
      Select the type of die you would like to throw by setting the Select Switch
      and pressing one of the Buttons


      Select Switch Left and Button A = d100
      Select Switch Left and Button B = d20
      Select Switch Right and Button A = d12
      Select Switch Right and Button B = d6


      You can hold down the Button and it will flash through many tosses.
      Release the Button and your results will show on the Circuit Playground as
      two (or one) lit NeoPixel


      Red=Tens Place (0-9)
      Blue=Ones Place (0-9)
      Green=Tens and Ones are the same (00,11,22,33,44,55,66,77,88,99)


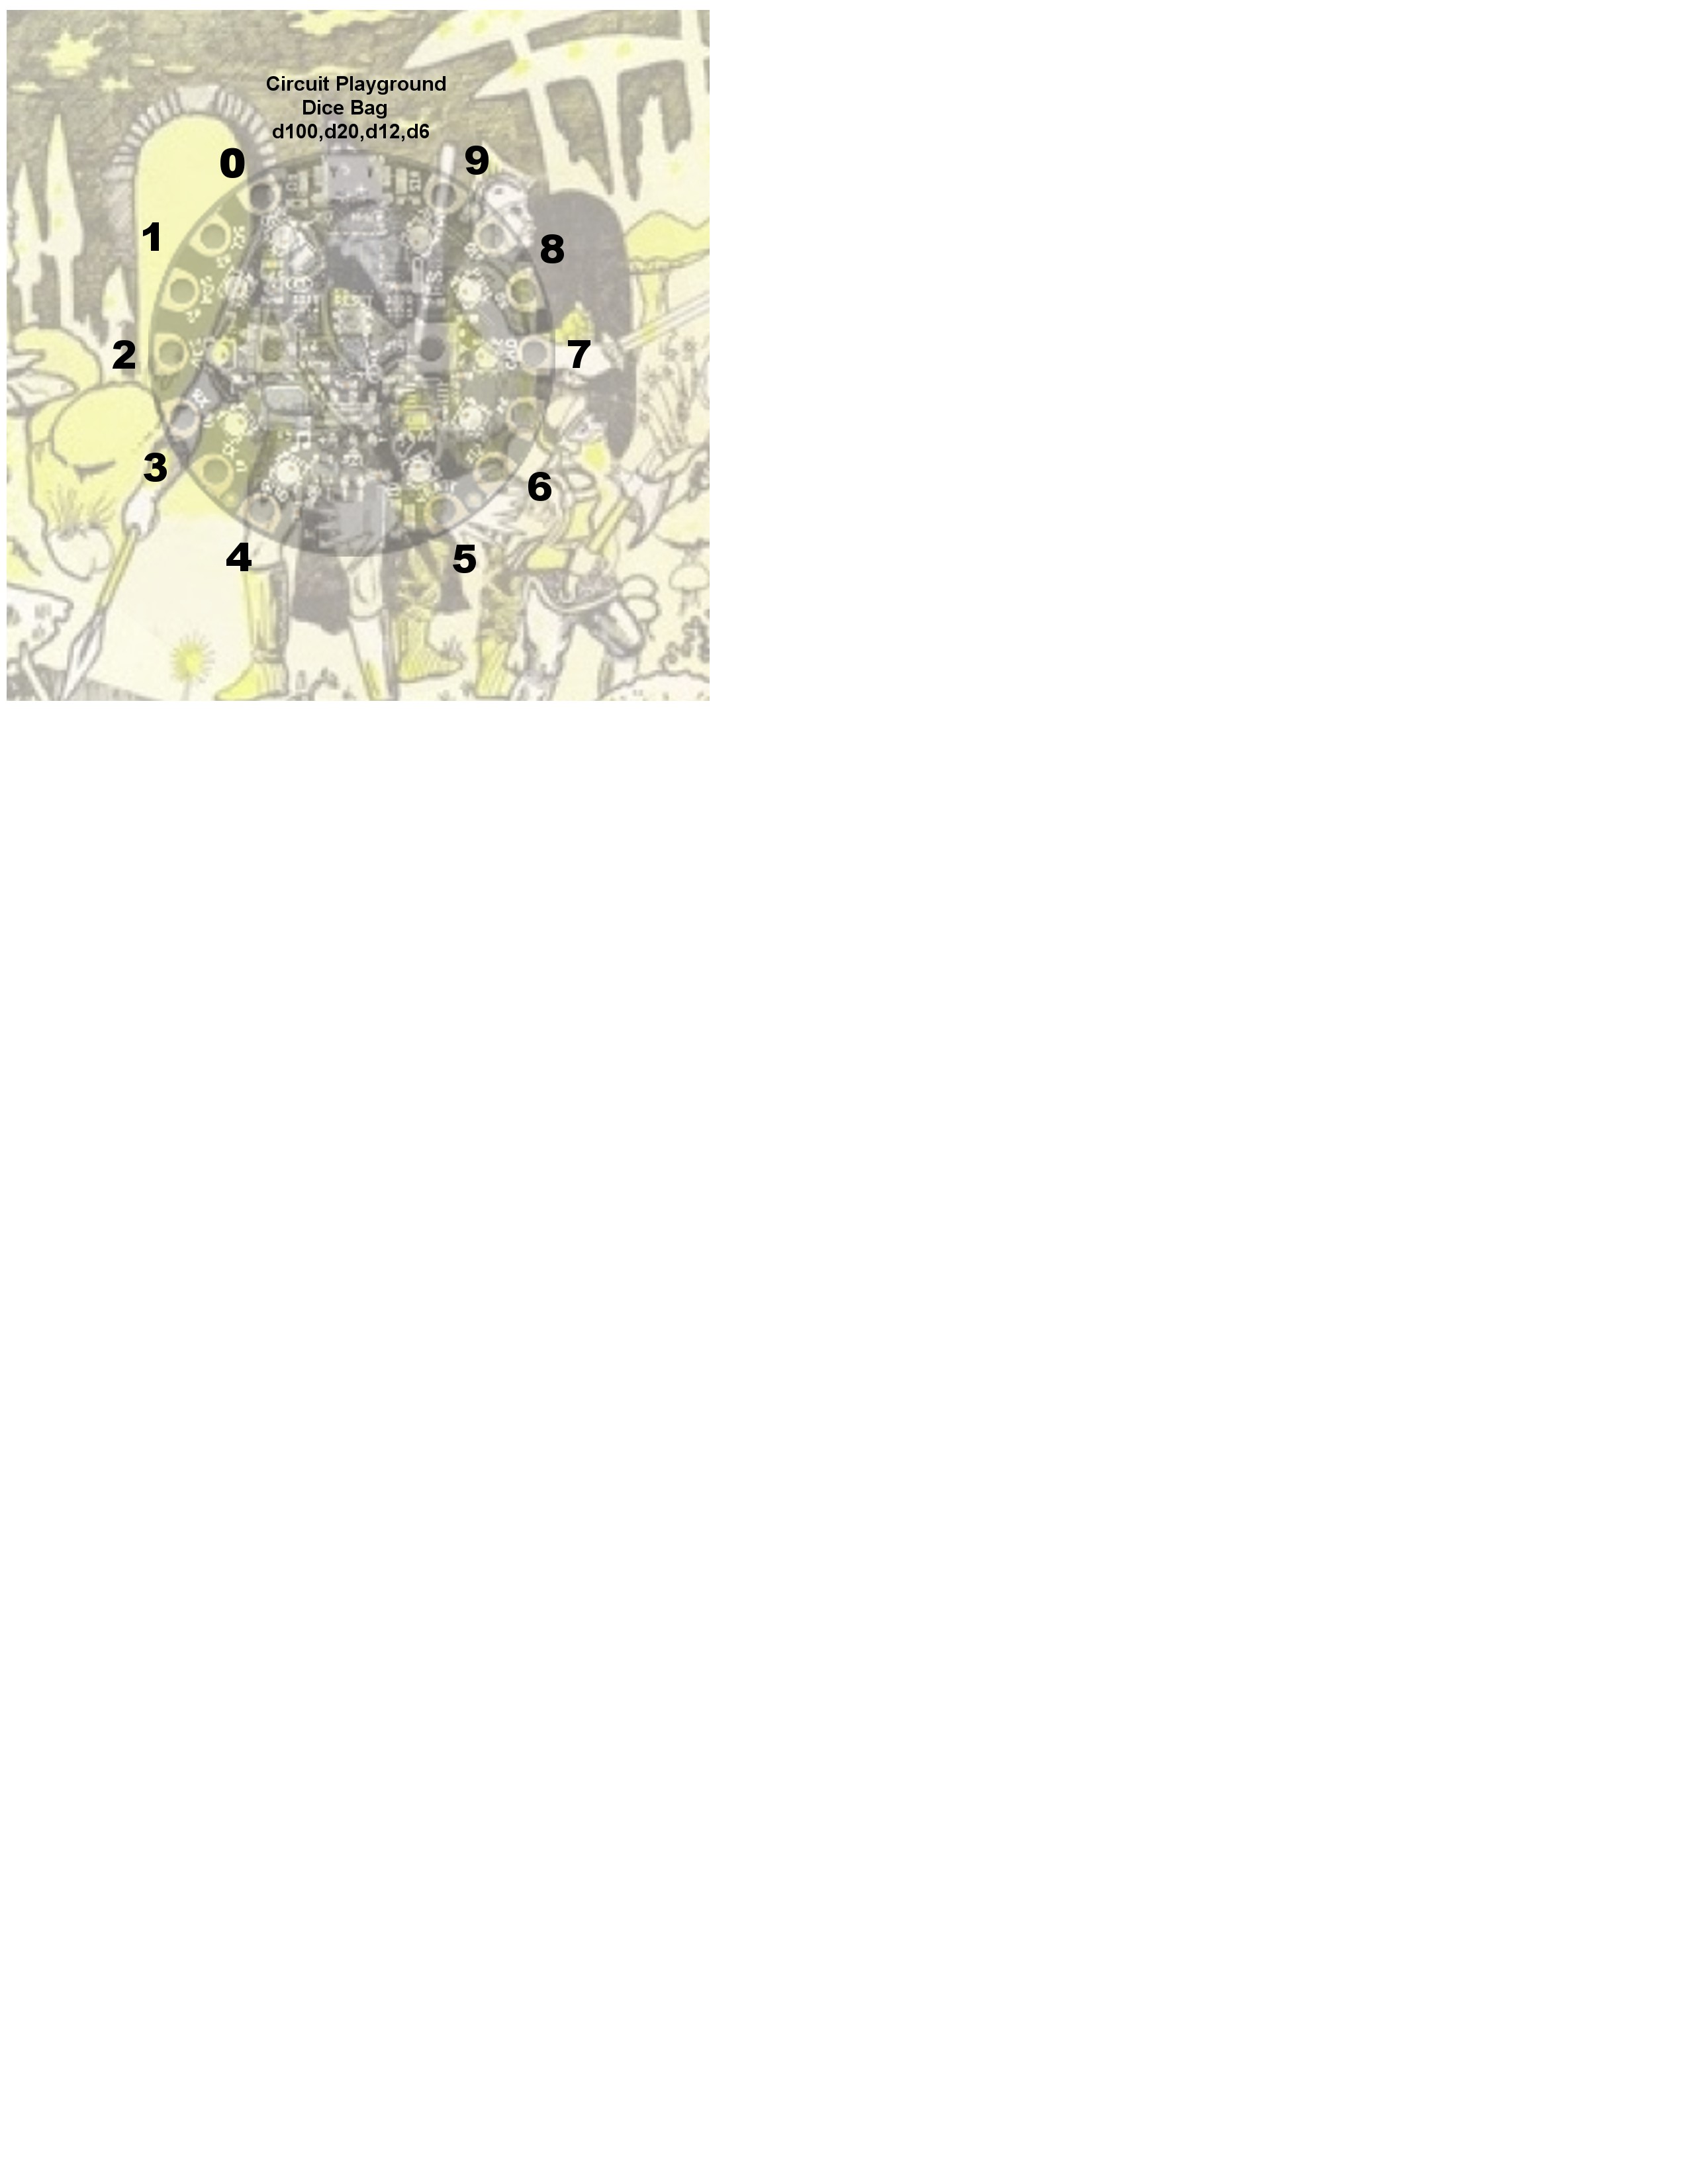
      The NeoPixels are arranged from 0 - 9 . If you are holding your Circuit Playground with the USB port facing Up
      0 is the top left NeoPixel closest to the USB port


      1 is to the left of that
      ..
      4 is the bottom let NeoPixel closest to the Battery Jack
      5 is the bottom right NeoPixel closest to the Battery Jack
      ..
      9 is the top tight NeoPixel closest to the USB port
      */
      
      let troll = 0
      let tens = 0
      let ones = 0
      let switcher = 0
      loops.forever(() => {
          music.stopAllSounds()
          if (input.buttonA.isPressed()) {
              if (switcher) {
                  tossd12()
              } else {
                  tossd100()
              }
          } else {
              if (input.buttonB.isPressed()) {
                  if (switcher) {
                      tossd6()
                  } else {
                      tossd20()
                  }
              }
          }
      })
      input.onSwitchMoved(SwitchDirection.Left, () => {
          switcher = 0
      })
      input.onSwitchMoved(SwitchDirection.Right, () => {
          switcher = 1
      })
      function tossd100() {
          troll = Math.random(99)
          prepthrow(troll)
          return
      }
      function tossd20() {
          troll = (Math.random(20)) + 1
          prepthrow(troll)
          return
      }
      function tossd12() {
          troll = Math.random(11) + 1
          prepthrow(troll)
          return
      }
      function tossd6() {
          troll = Math.random(6) + 1
          prepthrow(troll)
          return
      }
      function showtoss(ones: number, tens: number) {
          light.pixels.clear()
          music.playTone((ones * 100) + 1, 50)
          music.stopAllSounds()
          if (ones == tens) {
              light.pixels.setPixelColor(tens, Colors.Green)
          }
          else {
              light.pixels.setPixelColor(ones, Colors.Blue)
              light.pixels.setPixelColor(tens, Colors.Red)
          }
          light.pixels.show()
          music.stopAllSounds()
          return
      }
      
      function prepthrow(troll: number) {
          ones = troll % 10
          tens = troll / 10
          showtoss(ones, tens)
          return
      }

    • CP Dice Bag For The Visually Impaired

      tomwsmf08/16/2016 at 23:03 0 comments

      My kids play games with a friend who is visually impaired. The thought went up, can the CP speak? According to Adadfuit's example code the answer is yes...but it is a finicky beast to hear. I put the code in from their example code and worked it into the flow of the Dice Bag code. When you release the button it will not only show you the results on the Neopixels but also speak it from that teeeeny tiny speaker on the CP.

      This is the first stab at a solution. I am going to try some of the other speech code to see if those are more understandable on this speaker.

      Another idea was to uses beeps to give the results of the dice throw. If the speech does not pan out in testing we might go that route.

      #include <SPI.h>
      #include <Wire.h>
      #include <Adafruit_CircuitPlayground.h> 
      
      
      /*
      The Circuit Playground Dice Bag  - CC Attribution-ShareAlike 4.0 International Tom Higgins & Sons 
      
      
      TO select the type of die you would like to throw 
        First put the Select Switch in the proper position
        Then press the proper Button
      
      
      Select Switch     Left Button  Right Button
      ----------------+------------+-------------+
      +               | d100 (0-99)| d20 (1-20)  | 
      ----------------|------------|-------------|
      -               |  d12 (1-12)| d06 (1-6)   |
      --------------------------------------------
      
      
      You can hold down the Button and it will flash through many tosses.
      Release the Button and your results will show on the Circuit Playground as 
      two (or one) lit NeoPixel
      
      
      Red=Tens Place (0-9)
      Blue=Ones Place (0-9)
      Green=Tens and Ones are the same (00,11,22,33,44,55,66,77,88,99)
      
      
      The NeoPixels are arranged from 0 - 9 . If you are holding your Circuit Playground with the USB port facing Up
      
      
      0 is the top left NeoPixel closest to the USB port
      1 is to the left of that
      ..
      4 is the bottom let NeoPixel closest to the Battery Jack
      5 is the bottom right NeoPixel closest to the Battery Jack
      ..
      9 is the top tight NeoPixel closest to the USB port


      */
      
      
      const uint8_t spZERO[]          PROGMEM = {0x69,0xFB,0x59,0xDD,0x51,0xD5,0xD7,0xB5,0x6F,0x0A,0x78,0xC0,0x52,0x01,0x0F,0x50,0xAC,0xF6,0xA8,0x16,0x15,0xF2,0x7B,0xEA,0x19,0x47,0xD0,0x64,0xEB,0xAD,0x76,0xB5,0xEB,0xD1,0x96,0x24,0x6E,0x62,0x6D,0x5B,0x1F,0x0A,0xA7,0xB9,0xC5,0xAB,0xFD,0x1A,0x62,0xF0,0xF0,0xE2,0x6C,0x73,0x1C,0x73,0x52,0x1D,0x19,0x94,0x6F,0xCE,0x7D,0xED,0x6B,0xD9,0x82,0xDC,0x48,0xC7,0x2E,0x71,0x8B,0xBB,0xDF,0xFF,0x1F};
      //const uint8_t spONE[]           PROGMEM = {0x66,0x4E,0xA8,0x7A,0x8D,0xED,0xC4,0xB5,0xCD,0x89,0xD4,0xBC,0xA2,0xDB,0xD1,0x27,0xBE,0x33,0x4C,0xD9,0x4F,0x9B,0x4D,0x57,0x8A,0x76,0xBE,0xF5,0xA9,0xAA,0x2E,0x4F,0xD5,0xCD,0xB7,0xD9,0x43,0x5B,0x87,0x13,0x4C,0x0D,0xA7,0x75,0xAB,0x7B,0x3E,0xE3,0x19,0x6F,0x7F,0xA7,0xA7,0xF9,0xD0,0x30,0x5B,0x1D,0x9E,0x9A,0x34,0x44,0xBC,0xB6,0x7D,0xFE,0x1F};
      //const uint8_t spTWO[]           PROGMEM = {0x06,0xB8,0x59,0x34,0x00,0x27,0xD6,0x38,0x60,0x58,0xD3,0x91,0x55,0x2D,0xAA,0x65,0x9D,0x4F,0xD1,0xB8,0x39,0x17,0x67,0xBF,0xC5,0xAE,0x5A,0x1D,0xB5,0x7A,0x06,0xF6,0xA9,0x7D,0x9D,0xD2,0x6C,0x55,0xA5,0x26,0x75,0xC9,0x9B,0xDF,0xFC,0x6E,0x0E,0x63,0x3A,0x34,0x70,0xAF,0x3E,0xFF,0x1F};
      //const uint8_t spTHREE[]         PROGMEM = {0x0C,0xE8,0x2E,0x94,0x01,0x4D,0xBA,0x4A,0x40,0x03,0x16,0x68,0x69,0x36,0x1C,0xE9,0xBA,0xB8,0xE5,0x39,0x70,0x72,0x84,0xDB,0x51,0xA4,0xA8,0x4E,0xA3,0xC9,0x77,0xB1,0xCA,0xD6,0x52,0xA8,0x71,0xED,0x2A,0x7B,0x4B,0xA6,0xE0,0x37,0xB7,0x5A,0xDD,0x48,0x8E,0x94,0xF1,0x64,0xCE,0x6D,0x19,0x55,0x91,0xBC,0x6E,0xD7,0xAD,0x1E,0xF5,0xAA,0x77,0x7A,0xC6,0x70,0x22,0xCD,0xC7,0xF9,0x89,0xCF,0xFF,0x03};
      //const uint8_t spFOUR[]          PROGMEM = {0x08,0x68,0x21,0x0D,0x03,0x04,0x28,0xCE,0x92,0x03,0x23,0x4A,0xCA,0xA6,0x1C,0xDA,0xAD,0xB4,0x70,0xED,0x19,0x64,0xB7,0xD3,0x91,0x45,0x51,0x35,0x89,0xEA,0x66,0xDE,0xEA,0xE0,0xAB,0xD3,0x29,0x4F,0x1F,0xFA,0x52,0xF6,0x90,0x52,0x3B,0x25,0x7F,0xDD,0xCB,0x9D,0x72,0x72,0x8C,0x79,0xCB,0x6F,0xFA,0xD2,0x10,0x9E,0xB4,0x2C,0xE1,0x4F,0x25,0x70,0x3A,0xDC,0xBA,0x2F,0x6F,0xC1,0x75,0xCB,0xF2,0xFF};
      //const uint8_t spFIVE[] PROGMEM = {0x08,0x68,0x4E,0x9D,0x02,0x1C,0x60,0xC0,0x8C,0x69,0x12,0xB0,0xC0,0x28,0xAB,0x8C,0x9C,0xC0,0x2D,0xBB,0x38,0x79,0x31,0x15,0xA3,0xB6,0xE4,0x16,0xB7,0xDC,0xF5,0x6E,0x57,0xDF,0x54,0x5B,0x85,0xBE,0xD9,0xE3,0x5C,0xC6,0xD6,0x6D,0xB1,0xA5,0xBF,0x99,0x5B,0x3B,0x5A,0x30,0x09,0xAF,0x2F,0xED,0xEC,0x31,0xC4,0x5C,0xBE,0xD6,0x33,0xDD,0xAD,0x88,0x87,0xE2,0xD2,0xF2,0xF4,0xE0,0x16,0x2A,0xB2,0xE3,0x63,0x1F,0xF9,0xF0,0xE7,0xFF,0x01};...
      Read more »

    • The User Manual

      tomwsmf08/15/2016 at 04:25 0 comments

      User Manual
      Select the type of die you would like to throw by putting the Select Switch in the proper position and then pressing the proper Button

      Select Switch + Left Button d100 (0-99) Right Button d20 (1-20)

      Select Switch - Left Button d12 (1-12) Right Button d06 (1-6)

      You can hold down the Button for as long as you want. Dance to the sound of the bones rolling.

      Release the Button and your results will show on the Circuit Playground as two (or one) lit NeoPixels

      Red=Tens Place (0-9)
      Blue=Ones Place (0-9)
      Green=Tens and Ones are the same (00,11,22,33,44,55,66,77,88,99)

      The NeoPixels are arranged from 0 - 9 . If you are holding your Circuit Playground with the USB port facing Up
      0 is the top left NeoPixel closest to the USB port
      1 is to the left of that
      ..
      4 is the bottom let NeoPixel closest to the Battery Jack
      5 is the bottom right NeoPixel closest to the Battery Jack
      ..
      9 is the top tight NeoPixel closest to the USB port

    • 3 inch Button Template

      tomwsmf08/15/2016 at 04:15 0 comments

    • One Day - One Project - More Coffee

      tomwsmf08/15/2016 at 04:13 0 comments

      Last night the idea was floated to make a Dice Roller on the Circuit Playground. This morning we took it up...

      1. What started as a d6 tosser grew to multiple dice type thanks to the switch and two buttons on the CP.
        1. Random gen needs some work, had to add to the range.
        2. Use Select switch and Buttons to select the dice type
          1. Switch + and Left Button is a d100
          2. Switch + and Right Button is a d20
          3. Switch - and Left Button is a d12
          4. Switch - and Right Button is a d6
      2. Working out the display took some iterating.
        1. 2 digits, 2 neopixels
          1. Red for 10's
          2. Blue for 1's
          3. Green if it is the same for both
      3. Needed sound. Tried to get it to sound like dice being shaken...which yeah...it is what it is.
      4. Hey look, a light sensors. Lets make the Neopixels dim or brighten based on the surrounding light levels.
      5. Lets mount it to a 3inch custom button. We have a button maker so why not.
        1. Created a 3inch button template with numbers in the right place
          1. added an old school rpg pic in the background
          2. Put a scaled img of the CP on the button face so placement is easier
        2. Little lipo fits on the back
        3. Using double sided tape to hold all parts down for now.

    View all 5 project logs

    Enjoy this project?

    Share

    Discussions

    Similar Projects

    Does this project spark your interest?

    Become a member to follow this project and never miss any updates