Close
0%
0%

WiSci: Wireless Spectrometer

Portable Wireless Spectrometer that lets you explore the world around you.

Similar projects worth following
The aim of this project is to make spectroscopy a tool accessible to everyone, and not be limited to research and industrial applications. Spectroscopy is a powerful tool extensively used for diagnosing physical properties, assessing food quality, environmental sensing and various other applications.

We have built a portable, wireless spectrometer that talks to its companion Android application via Bluetooth to store and visualise the spectrum. We have used it for non-destructive testing of fruit ripeness (more on this below). Now we want everyone to build this device and start exploring the world around them. We are open sourcing all the build instructions, codes and design files required to build the device so that anyone and everyone can build one!

A spectrometer is an instrument used for studying the interaction between matter and electromagnetic radiation. Spectrometers operate over both optical and non-optical wavelengths like gamma rays and X-rays. In general, any particular spectrometer will operate over a small portion of electromagnetic spectrum because of the different techniques used to measure different portions of the spectrum. Mostly these instruments measure wavelengths and their respective intensities, which upon detailed study reveal various information of the material under study. The intensity measured from these instruments can either be in absolute units or in relative units. Instruments measuring intensities in absolute units are usually called Spectrophotometers.

A spectrometer is a very powerful tool. By analysing intensity/wavelength pairs of the interacted EM radiation with the material under study, detailed information like its chemical composition, crystal structure and other elemental information can be extracted. It can also be used for food analysis. For example, it can reveal adulteration in milk or oil and analyse toxins to understand causes of food poisoning to name a few uses. We have used it to non-destructively measure fruit ripeness. Also, did we mention, the Curiosity Mars Rover also houses a suite of Spectrometers for analysing various rock and soil samples(more information can be found here). Spectrometers are awesome!!

In our build we have used the C12666MA mini-spectrometer from Hamamatsu. As discussed earlier, every spectrometer is sensitive over a small portion of the electromagnetic spectrum, so is this. Its spectral response is from 340 to 780 nm, detailed specifications can be found here. Check out our paper in Scientific Reports here.

  • 1 × C12666MA Spectrometer Hamamatsu Mini Spectrometer
  • 1 × Arduino Pro Mini 328 - 5V/16MHz
  • 1 × FTDI USB to Serial Board (5V) For burning code to Pro mini
  • 1 × HC-05 Bluetooth Module
  • 1 × Buck Boost Converter ( 3v to 5V) - TPS63060 based module

View all 13 components

  • App Update: Added option to select which Bluetooth device to connect to

    Ishan Kothari10/10/2016 at 09:42 0 comments

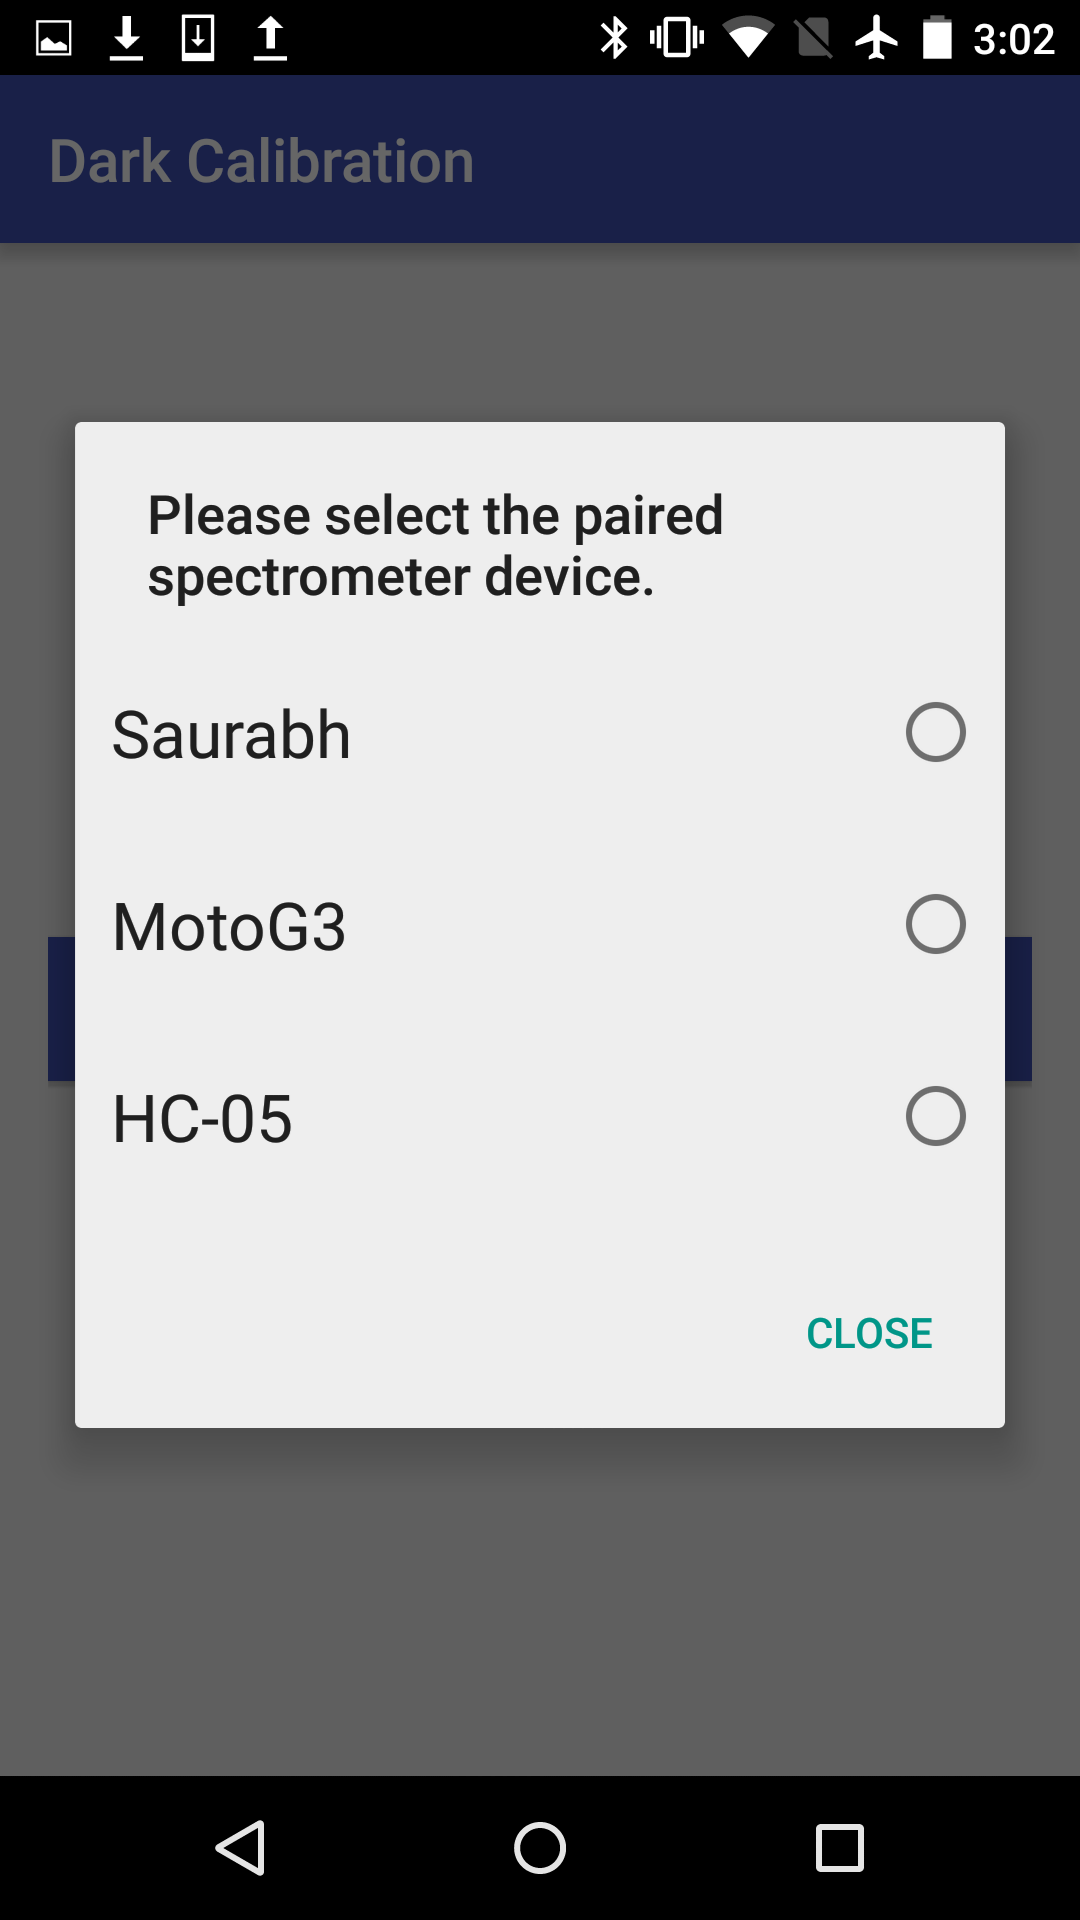
    In this app update, we have added the option for users to select which device they want to connect to, so that the app can connect to any device, irrespective of the name of the Bluetooth module used with the spectrometer.

    A standard dialog with a simple list was used to achieve this trivial but much needed feature as users could previously only connect to devices named "HC-05". The update increases compatibility to any Bluetooth module irrespective of its model, make or name. The code changes can be found here on the commit log on GitHub.

  • Measuring fruit ripeness

    Akshat Wahi10/02/2016 at 09:33 0 comments

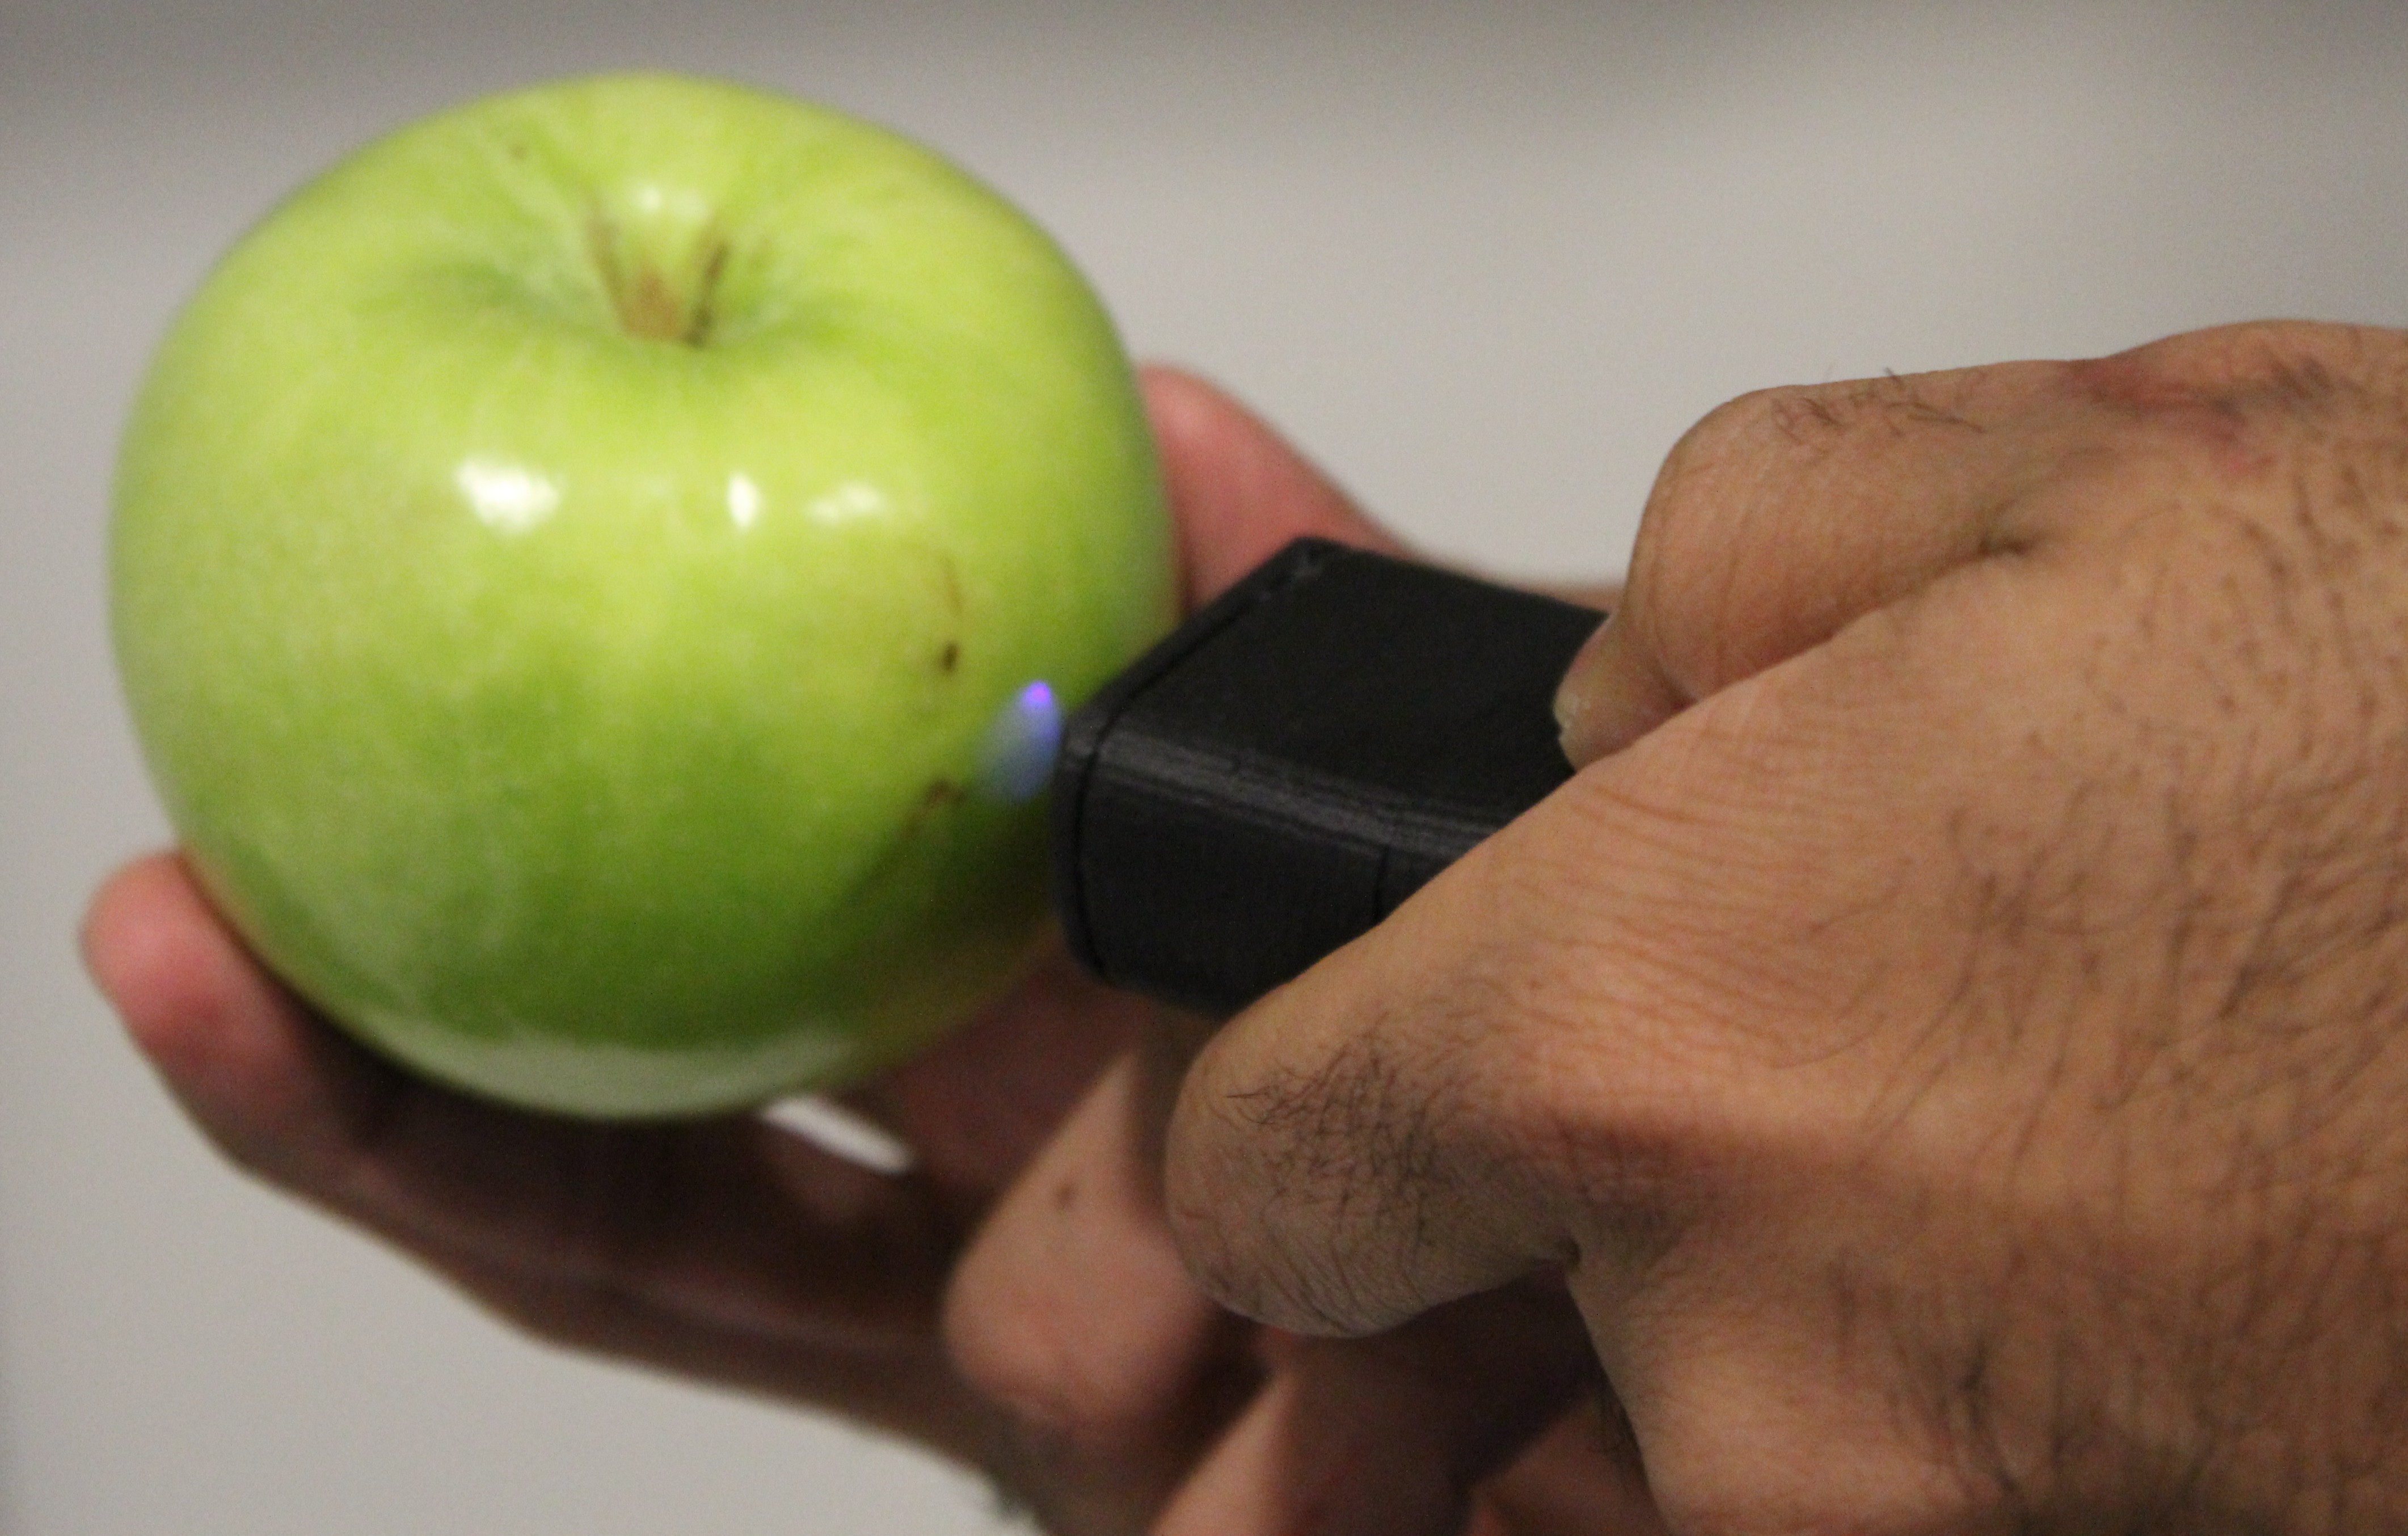
    We have successfully used the device for non-destructive testing of fruit ripeness. Ultra-Violet (UV) fluorescence from Chlorophyll present in the skin of three different kinds of apples - Red Delicious, McIntosh and Empire was measured over the period of 11 days. The data collected showed strong correlation with the ripeness measured by a penetrometer.

    There are lot of interesting applications for such a portable device. Imagine carrying such a portable device when you next visit a supermarket, that helps you buy perfectly ripped fruits. Our work is published in Scientific Reports and you can read it in detail here.

    Illustration of the device checking for fruit ripeness.

  • Building the Android Application

    Akshat Wahi10/01/2016 at 18:02 0 comments

    We wanted the Android application to be compatible with as many Android devices as possible, so we ensured we only used features that were compatible with all devices running Android 2.3.3 or higher. This corresponds to 98.5% of Android devices. We also used Bluetooth 2.0 over BLE to ensure that maximum number of devices are supported. Using BLE would have reduced the percentage of supported devices (Based on statistics at the time of writing. Latest statistics can be found here).

    Android Studio IDE was used to develop the application using the target SDK as Android 5.0 (SDK 21) but using only APIs that are supported down till Android 2.3.3 (SDK 10). The app was build incrementally by adding modules, starting from a basic skeleton for the overall app and then developing individual modules. The modules were refined as the app was built.

    The overall architecture of the app consists of following modules with some overlap between modules:

    1. The driver routine: This consists driver routines for the app so that app can initialize and move ahead to appropriate parts of the app based on user inputs.
    2. The camera activities: To capture images of the objects being examined using the phone’s camera and save them onto local storage.
    3. Bluetooth activities: To pair with the spectrometer over Bluetooth and to trigger the reading of data from the sensor. Once the data is received, it is cleaned, visualized and stored.
    4. Visualization: To visualize the data received from Bluetooth and present it appropriately in the form of a plot so the spectrum can be observed.
    5. Database and data export: To store the spectrometer readings, images and to allow the user to exported the stored data to an excel file for further analysis.

  • Designing the housing

    Akshat Wahi09/28/2016 at 18:58 1 comment

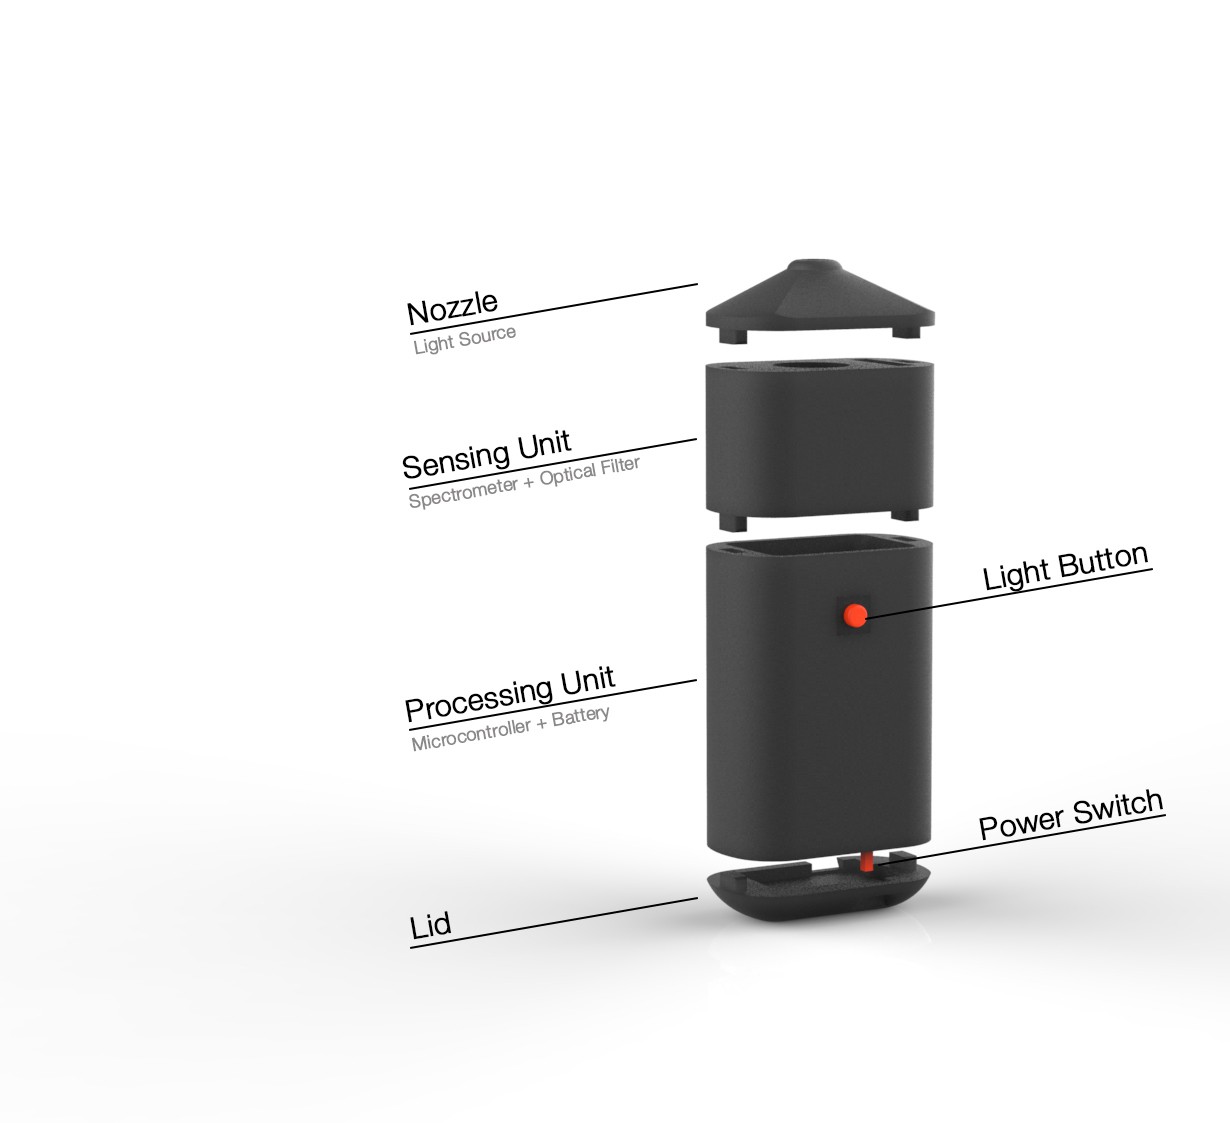
    Considering the DIY nature of the build and need for constant modifications, we came up with a modular design for the housing. It’s small, everything fits neatly and at the same time gives easy access to different sections of the device for modifications. The device is split into four different sections -


    1. Nozzle - This section houses the excitation source, LED.

    2. Sensing Unit - The spectrometer and the optical filter sits in this section.

    3. Processing Unit - It houses other main electronics which includes the microcontroller, bluetooth module, battery, and the buck booster.

    4. Lid - There are no components in this section, once removed it provides access to battery connector for charging.

    All the sections easily press fit into a neat little device that looks good and can easily be carried in a pocket. :)


    All the design files can be downloaded from the ‘files’ section of this document. The files are available in ready to 3D print .stl file format and also in neutral file format for easy modifications! The parts designed are optimised for 3D printing and there is a file named ‘preferred_print_orientation’ that shows orientation of the parts on print bed while printing.

  • Building the Electronics

    Akshat Wahi09/28/2016 at 09:47 0 comments

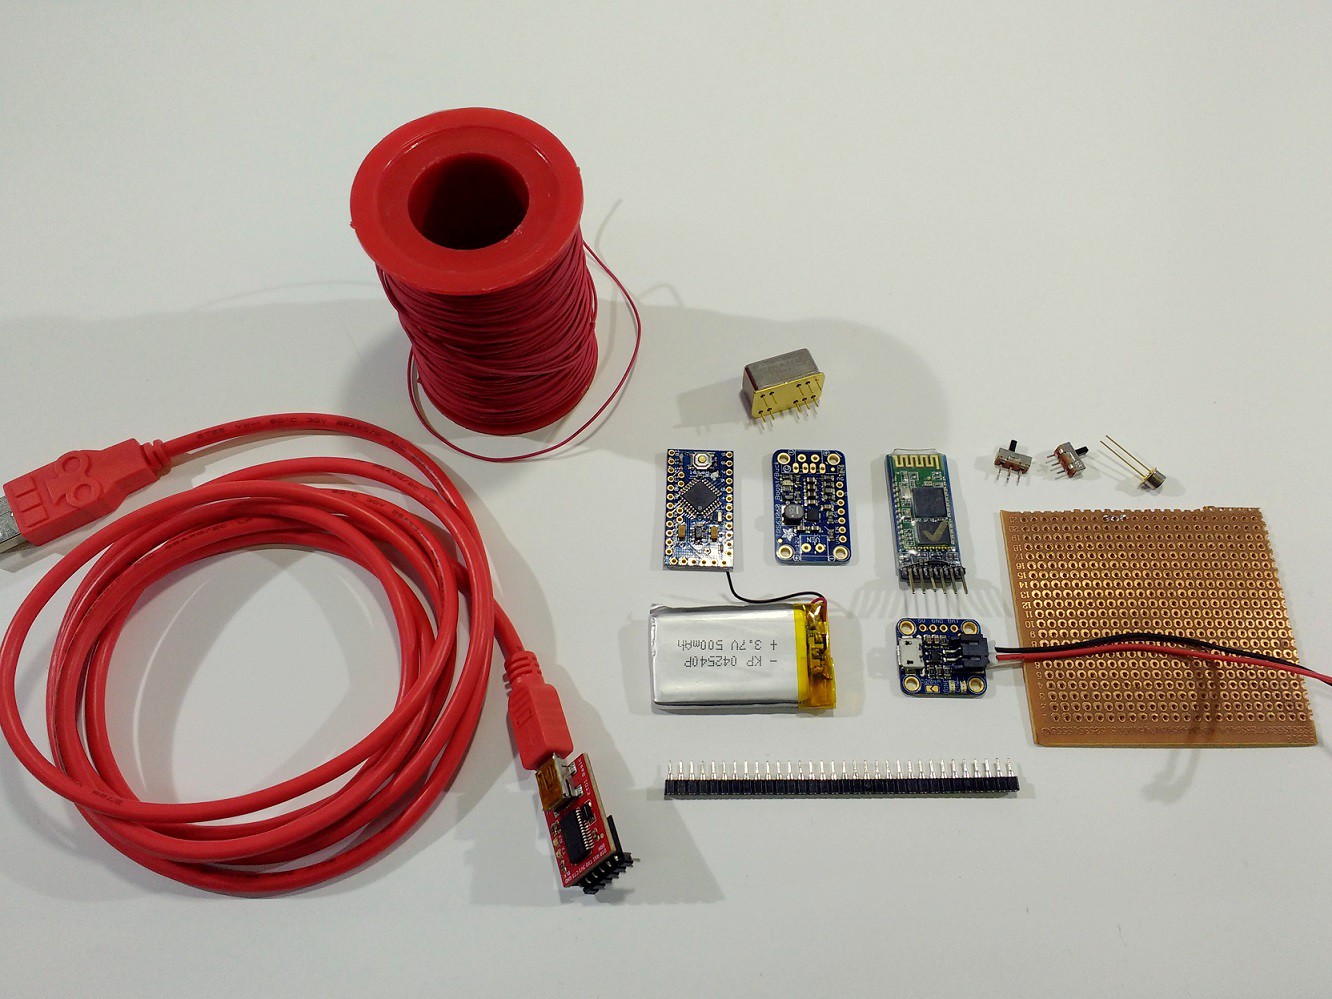
    We wanted the device to be easily replicated by people and extend its capabilities and so in that effort we have build it using easily available modules. The list of materials is available in the components section.

    All required components

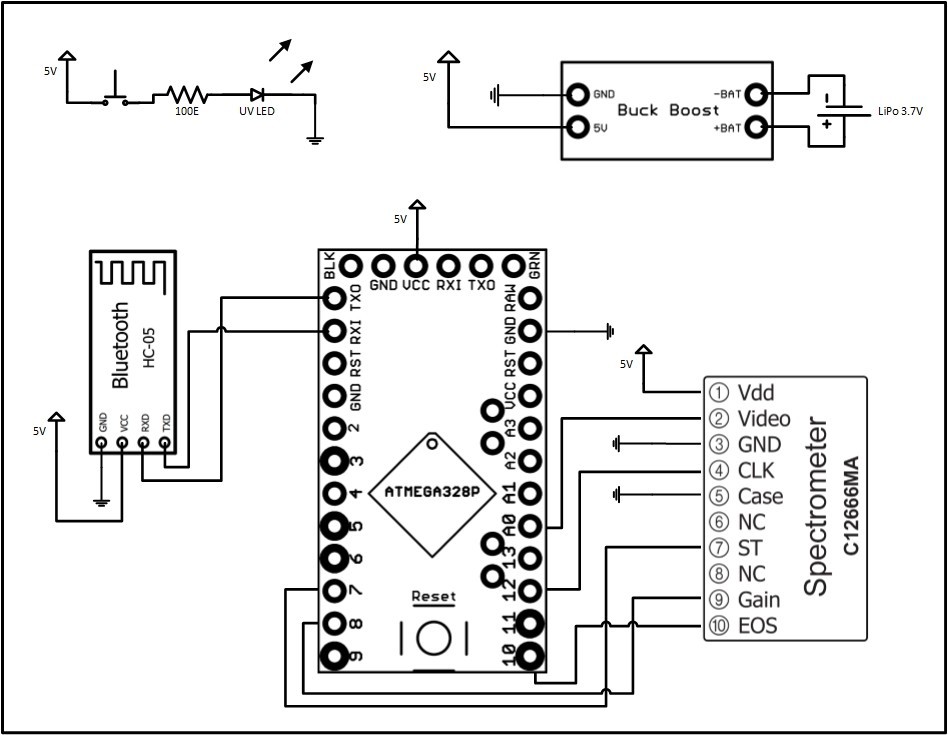
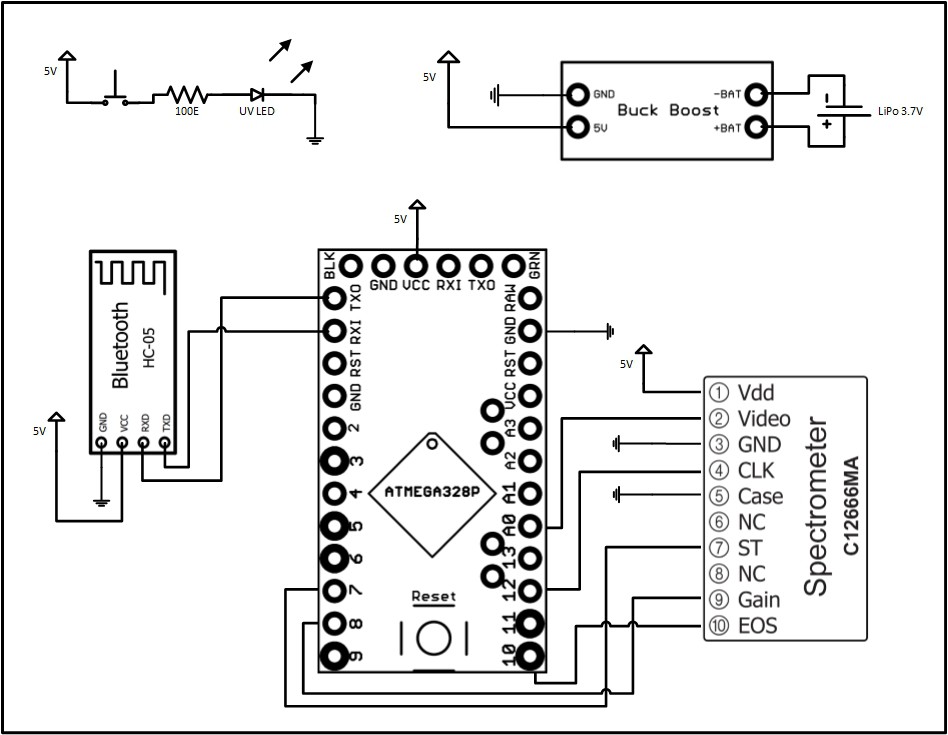
    Connections of all these modules can be found in the circuit diagram attached below.

    The modules used have all their PCB design files easily available for someone who wants to build a single PCB board that houses all the components used in the device. This can easily be done by someone with skills of PCB designing and fabrication. It is totally optional and not at all required for building and testing the device. Complete build instructions will be updated soon.

  • Developing the socket for C12666MA spectrometer

    Akshat Wahi09/27/2016 at 18:44 0 comments

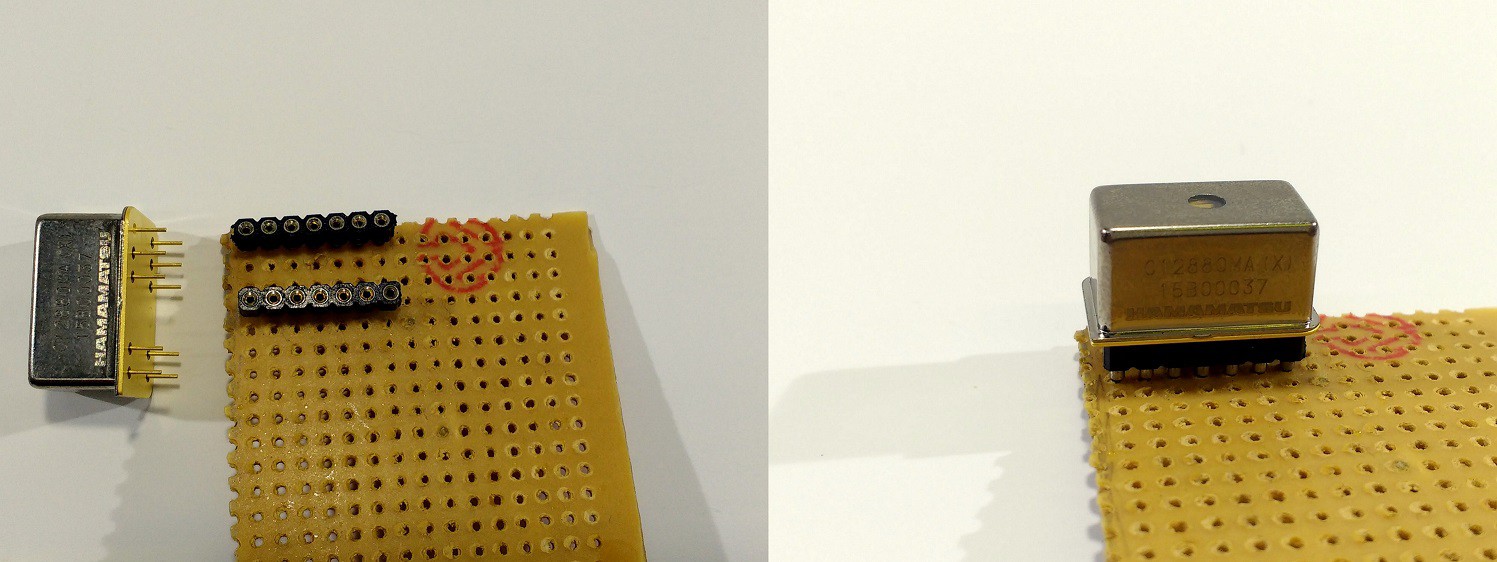
    C12666MA is a sensitive module and it will be good to avoid direct soldering to the pins. Making a socket is easy and prevents chances of any damage to relatively costly spectrometer module.

    As the pins on C12666MA module are round, so for good electrical connection round female headers should be used (Link for reference - https://www.sparkfun.com/products/743). And you will also need a small piece of Perfboard (ref ) and after soldering the headers it should look something similar to the image below.

    Socket


    Extra perfboard should be removed for proper assembly in the housing.

View all 6 project logs

  • 1
    Step 1

    The idea was to make a device that can easily be replicated by everyone, and so we have tried to use as much possible easily available modules. The device can be easily replicated and extended as per use case. In a nutshell the steps to be followed are mentioned below-

    1. Source all the components/modules required.
    2. Connect them together as per the circuit diagram.
    3. Burn the code in the microcontroller.
    4. Print the housing and assemble all the components inside
    5. Download the android app
    6. Start exploring!
    7. Extract raw data and perform detailed analysis.
  • 2
    Step 2

    The required components/modules are mentioned in the components section of the document.

    The circuit diagram for connecting all the modules is given below.


  • 3
    Step 3

    Burn the code available here to the microcontroller (Pro mini). Pro mini is a neat little board with just the essential stuff for making small packaging. So you would need external USB to UART board that will help you burn the code to the Atmega328p chip that sits on the board. USB to UART hookup guide can be found here.

    Important Note:- Make sure the bluetooth module is not connected to the RX,TX lines while burning the code. It will be helpful to create a removable connector for bluetooth connections to the microcontroller using male female headers.

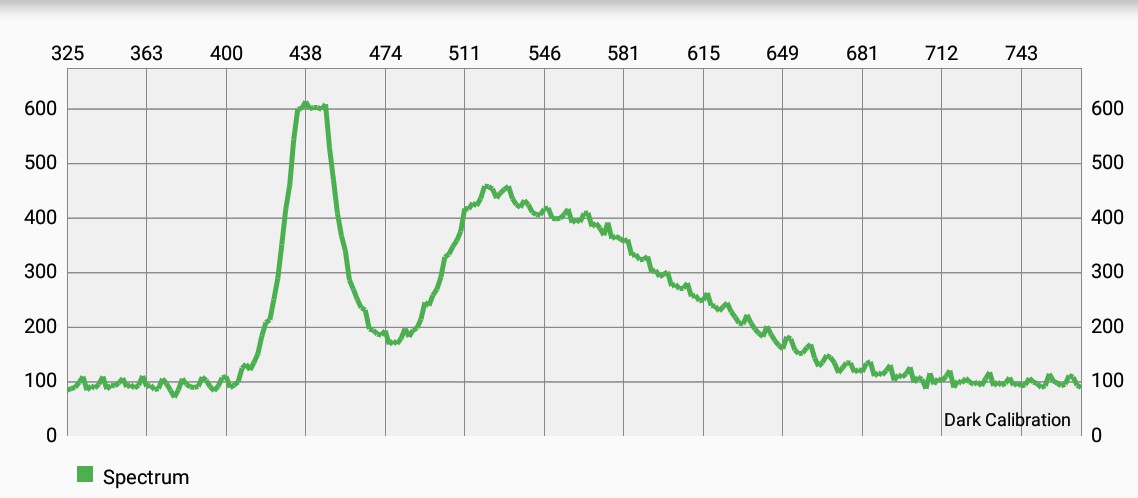
    Now let’s check all our connections to know if everything is working as desired. Open your preferred serial monitor and send ‘s’ character. After few seconds you should see a stream of numbers. These are ADC readout values from the spectrometer. You can perform a quick check to know what the spectrum looks like by plotting those values. If the spectrums looks similar to one attached below, then you can tell that the light fixtures has white light LEDs in them. This is the characteristic spectrum from the white LED light source(more on this here). Exciting right!

    White LED Spectrum

    Chlorophyll fluorescence from apples


View all 3 instructions

Enjoy this project?

Share

Discussions

ViesLink wrote 11/17/2022 at 02:46 point

 All files are missing.

  Are you sure? yes | no

michael.mcgrath wrote 11/06/2020 at 05:29 point

Hi great project.  However the source code links don't work.  Could someone please upload a copy of the source or a link to a working repository please?  Thanks Michael

  Are you sure? yes | no

michael.mcgrath wrote 09/24/2020 at 02:20 point

Great work Team WiSci!   However the Github repository link is not working, and the 3D printer files are missing.  Can you please post or send me a link to those?  Thanks Michael

  Are you sure? yes | no

sarvjitpatil009 wrote 02/15/2019 at 05:11 point

Hi, I want to make spectrometer to measure percentage of micronutrients in the soil using this method . Can u please guide me

  Are you sure? yes | no

goskkar wrote 11/13/2018 at 18:04 point

Hello, it is a very interesting project to build a spectrometer at low cost. But step 3, the link to download code to burn in arduino does not work: "https://github.com/AkshatWahi/WiSci_Arduino_code".

Can you pass an updated link to download the code for arduino ?.
I would like to make a spectrometer to analyze water quality.

Thanks.

  Are you sure? yes | no

sesheridan wrote 10/23/2018 at 02:02 point

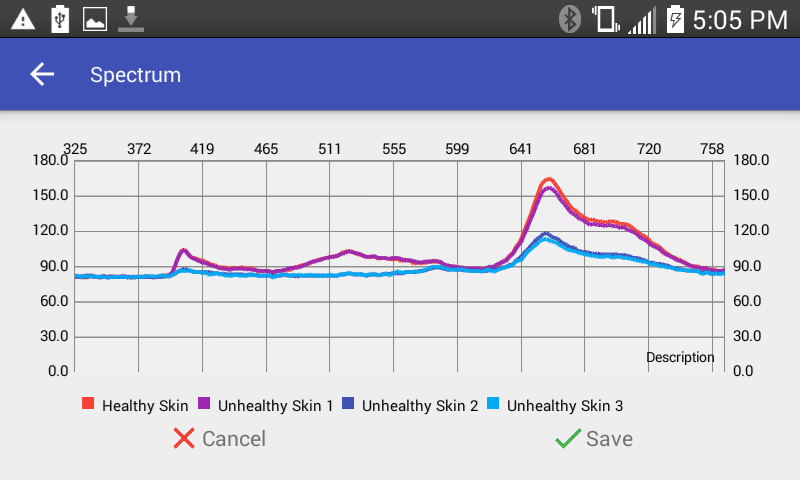
I’m totally new to the spectrometer world.   My goal is to measure skin color, separating melanin and blood components.    This can check for tissue swelling etc.      But I’m wondering if the  WiSci spectrometer would do this for me.      I’ve linked the article:   https://onlinelibrary.wiley.com/doi/full/10.1002/jbio.201400103

And this is a summary: 

Quick analysis method. The melanin slope between λ1 = 700 nm and λ2 = 800 nm is determined, yielding a melanin score (MS [OD/nm]). Extrapolation to 585 nm yields a baseline value and the difference between the measured OD585 nm and this baseline value yields a blood score (BS [OD]).

Thanks!

  Are you sure? yes | no

Chris Macquet wrote 05/15/2018 at 19:04 point

We have a market for the use of spectrometers to measure and record BRIX readings (such as the SCiO), but our market(s) are not IT teco's. Nor am I, so if anyone can supply a finished working product, I am keen to buy!

  Are you sure? yes | no

godie.jdhl wrote 04/10/2018 at 21:04 point

I can not find the code for Arduino, how could it be obtained? I'm developing an equal one.
thank you very much

  Are you sure? yes | no

wiseguybec wrote 03/26/2018 at 21:36 point

Hi there - where can I find case 3d print blueprints?

  Are you sure? yes | no

Reghu Anguswamy wrote 07/18/2017 at 10:53 point

Hi, can we build this same project with any Hamamatsu mini spectrometer, say C10083CA or C10082CA?

  Are you sure? yes | no

Anshuman Das wrote 08/06/2017 at 16:49 point

We are afraid that is not possible. Those units come fully assembled.

  Are you sure? yes | no

Reghu Anguswamy wrote 07/18/2017 at 10:52 point

Hi, can we build this same project with any Hamamatsu mini spectrometer, say C10083CA or C10082CA?

  Are you sure? yes | no

Andrej Mosat wrote 07/12/2017 at 10:40 point

Congratulations to your entire team. Do you have estimations on how many people contacted you, apart from this discussion board, about possible meaningful applications? According to your citations, grapes and apples are the only fruits with measurable quantities in UV/VIS range via antho/fyto cyanins. Have you read some articles with other important fluorescence markers in plants? Thx.

  Are you sure? yes | no

jagadish kumar wrote 05/29/2017 at 12:03 point

Hi @Anshuman Das is this project only find Apple fruit ripeness??? 

If i wan try some other fruits, what will i do ?

please tell me.

Thanq

  Are you sure? yes | no

Cory Vickruck wrote 01/21/2017 at 21:12 point

will you be updating your code for the new C12880MA? 

  Are you sure? yes | no

Robert wrote 09/21/2016 at 12:31 point

Is there any way how to estimate light source (LED) power? What LED did you use? I'm thinking about using the C11351 with wider spectrum range (up to IR) and I don't know what LED I should use.

Also what is the purpose of the filter in front of spectrometer?

  Are you sure? yes | no

paola_draicchio wrote 09/16/2016 at 08:21 point

When is it possible to buy it?

  Are you sure? yes | no

Anshuman Das wrote 09/20/2016 at 17:47 point

Hi Paola, 

We have made everything open source and you can build it from scratch. Currently, we dont have any plans to sell it. If we do, we will get in touch. 

  Are you sure? yes | no

Dipaligavkar wrote 10/26/2017 at 15:05 point

sir,

I am interested in this application. but I want to do it with python. is it possible?

How did you extract values from hardware? and how did you filter that data?

  Are you sure? yes | no

ccasillas wrote 09/09/2016 at 22:12 point

If only I remebered more about Electronics I would do one for my self! I am will ing to try this product in an intensive and industrial enviroment. Please contact me if you what to try it with  Grape tomatoes And Cherry tomatoes in a real chalenging enviroment.

The goal would be to determine BRIX content in the fruit in a non destructive way.

  Are you sure? yes | no

Anshuman Das wrote 09/20/2016 at 17:46 point

Hi CCasillas, That sounds like an interesting application. We are in the process of improving the prototype and the app. We will get in touch once it is ready for more testing. 

  Are you sure? yes | no

Jong KIM wrote 09/09/2016 at 03:03 point

Wow, it's quite handy and cute!

  Are you sure? yes | no

Anshuman Das wrote 09/20/2016 at 17:44 point

Thanks Jong!

  Are you sure? yes | no

Similar Projects

Does this project spark your interest?

Become a member to follow this project and never miss any updates