Close
0%
0%

Cap-sense name card

Combine PCB art and cap-sense activated LEDs to create a worthy maker name card

Similar projects worth following
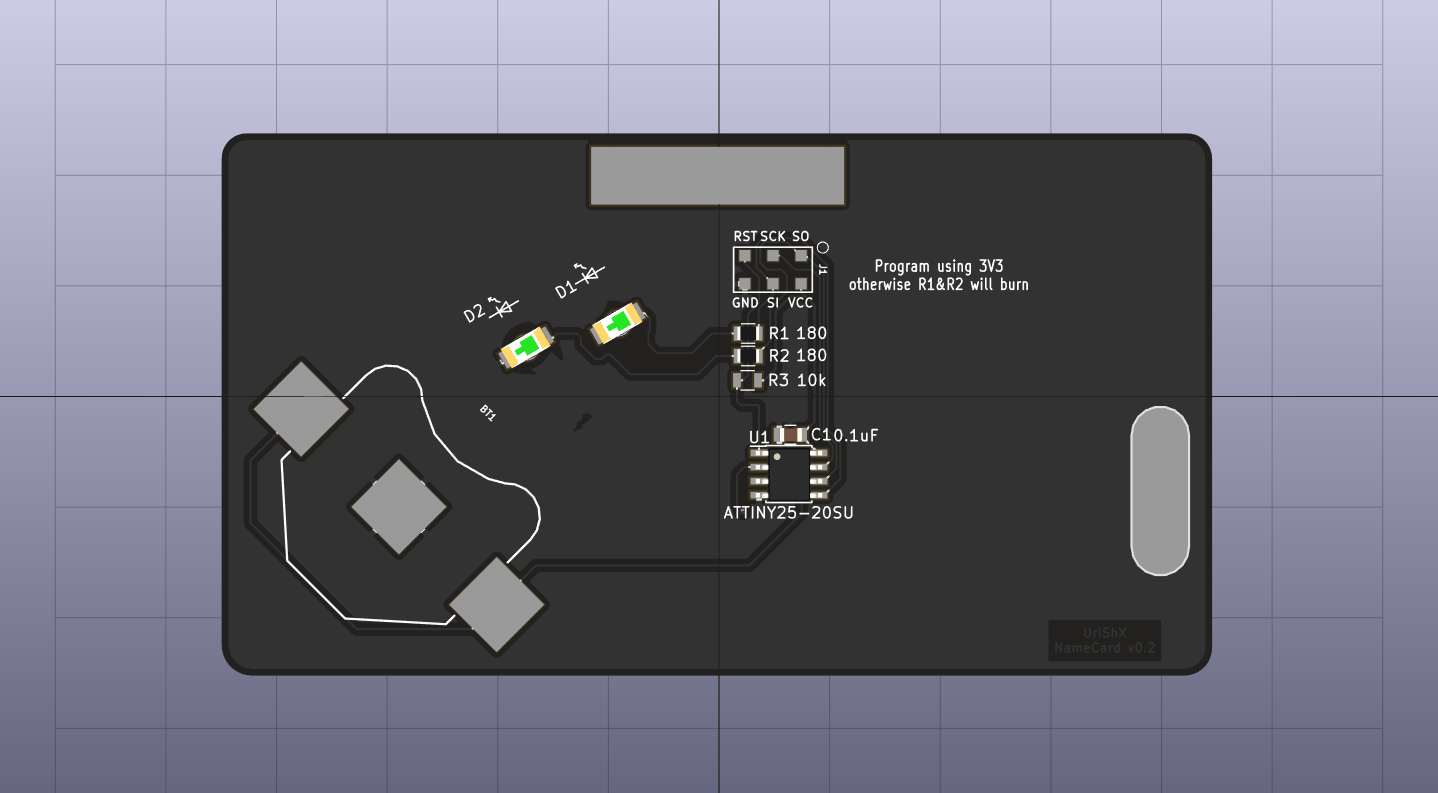
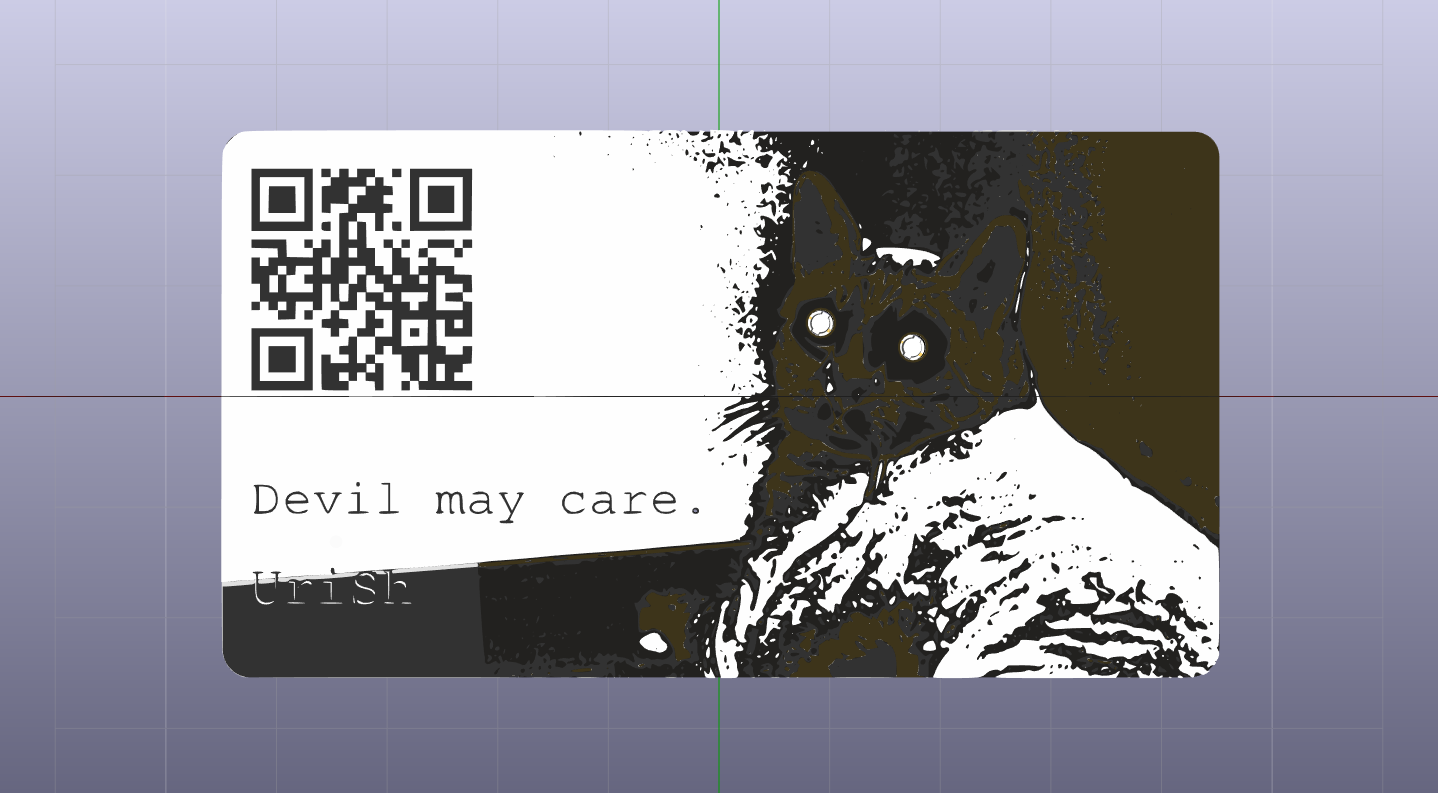
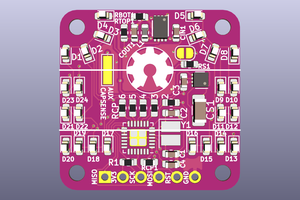
A while ago I saw Andrew Sowa & Alex Glow's about creating PCB art in KiCad, and thought it's an awesome medium. As I think of going to this year's Jerusalem mini Maker Faire, I decided to create a name card with my profile picture and a link to my Hackaday.io profile. While doing some basic graphic design for that, I started thinking maybe I should also add some LEDs for my cat's unnaturally glowing eyes. Trying to keep the cost as low as possible while getting some intercativity into the design, I decided to design my circuit around an ATtiny13a which will handle a capacitive sensor and a couple of cheap 1206 reverse mount LEDs, and be powered by a button cell battery. With all parts being SMT, I can keep the front layout design clean, while still getting a fully functional uC circuit on the back side.

I started doodling with my profile picture in the week after I saw the PCB art video I mentioned. I worked in inkscape, and exported PNG files of the color scheme I decided on: bare FR4, glossy black mask over copper, glossy black mask over bare FR4 on the front side, glossy black mask over bare FR4 on both sides of the board, HASL coated copper for the front side, and white silkscreen. later I found svg2shenzhen, a plugin for inkscape making export to KiCad simpler, which I used for exporting the outline. I wish I found this plugin earlier, as it made exporting to KiCad much simpler - though I found it a bit annoying it only supports square layouts and not rectangular ones or any other geometric shape. 

When I decided I want to incorporate a simple circuit on the back, I edited the back copper layer exported from inkscape to a zone by changing it's net_name to GND, which made sure I had a ground plane covering most of the back side of the board to begin with. I looked for LEDs that will shine through the FR4 when mounted on the back facing down, but found their prices to be prohibitive for a throwaway board. I decided on cheap(ish) 1206 reverse mounted LEDs with round flat lenses, which cost less than half(!) the price, and created a footprint in KiCad that incorporated a NPTH in the middle to test those with the board design. I found they're almost exactly the right size for my cat's eyes in the picture when scaled for the card size (which is not exactly the 50x90mm I originally intended - but by the time I found that out I was already too invested in the graphical layout to not go back and change this). Then I looked for a simple, dirt cheap, microcontroller, that I has a working core for Arduino. I wanted the board to be easily programmed via an ICSP header, and be beginner friendly. At first I thought of an ATtiny25 with the ATtinyCore, but then I found microCore, which is built for the ATtiny13, and at about half the cost (again) it made perfect sense.

I then designed the bare minimum circuit I could fit - an ATtiny13a, 2 LEDs w/current limiting resistors, a decoupling cap, a reset pullup resistor, a CR2032 button cell battery (which I found to be the most fitting in terms of both size and discharge current), and a ICSP header. First iteration of the schematic also included another cap and 1M resistor for touch sensing, but I later found there's a library called ADCTouch for the Arduino which does without external hardware.

Next, I set out to test the feasibility of the circuit and code. I stated off with an Arduino Uno, two 5mm LEDs w/current limiting R's connected to pins 5 & 6, and a dangling wire from A0 as a touch sensor. First test was simply to light the LEDs when the cap-sense wire was touched. Next, I decided to add some animation to the LEDs - making them pulse, somewhat like the iphone button. I thought that that is a fitting (and surprising, hopefully) animation in a setting such as handing the card to someone. I found a function that does just that here, than some further digging got me to a non-blocking implementation, so I could check for for touch sensing between changing of the LEDs intensity. While that worked, and is quite elegant, for this particular use there's no reason for using the function and the included sub-functions, as well as using floats. So instead, I used a spreadsheet to get the desired values, and truncated the values to 8 bit values so I could than store those as progmem bytes and save some space. I then exported that to CSV, and edited the text file a bit, saving it as a .h file, and including that in my Arduino sketch.

Once I got the code down to a manageable size I chose my components for size, weight, and price. I chose a SOIC8 package for the ATtiny13, 1206 LEDs, 0805 180R's and 0.1uF C, and a bent metal battery clip. The ICSP header was laid out finished the design of the PCB using the footprints of the components I chose. Layout was done in such a way...

Read more »

PWM table.zip

Zip Archive - 34.28 kB - 09/07/2018 at 10:03

Download

UriShX_flicker_LED_nameCard_v1.0.ino

Arduino sketch for ATtiny13 using microCore Pre-determined delay / PWM values. Performed best in testing

x-arduino - 3.34 kB - 09/07/2018 at 09:59

Download

UriShX_random_flicker_LED_nameCard_v1.0.ino

Arduino sketch for ATtiny13 using microCore Use (millis()/1024 - 50) as pseudo-random delay generator

x-arduino - 3.10 kB - 09/07/2018 at 09:56

Download

UriShX_breathing_LED_nameCard_V1.0.zip

Arduino sketch for ATtiny13 using microCore Fade in/out using pre-tabulated table

Zip Archive - 4.96 kB - 09/07/2018 at 09:52

Download

NameCard_v0.1.zip

KiCad schematic & board design, varified

Zip Archive - 783.92 kB - 09/07/2018 at 09:44

Download

View all 8 files

  • 1 × ATtiny13a-SSUR Microprocessors, Microcontrollers, DSPs / ARM, RISC-Based Microcontrollers, Mouser #556-ATTINY13A-SSUR
  • 1 × 0.1uF ceramic cap Multilayer Ceramic Capacitors MLCC - SMD/SMT 25volts 0.1uF Y5V -20+80%, Mouser #80-C0805C104Z3V
  • 2 × 180 Ohm thick film resistor Thick Film Resistors - SMD 180ohm 1%, 0805, Mouser #652-CR0805FX-1800ELF
  • 1 × 10k thick film resistor Thick Film Resistors - SMD 10k 1%, 0805, Mouser #652-CR0805FX-1002ELF
  • 1 × Green LED, 1206, 2V, reverse mount Standard LEDs - SMD WL-SMRW SMD RvMt Mon Watrclr Rnd 1206BtGn, Mouser #710-156120VS75300

View all 7 components

  • Just a quick update

    uri.shani11/18/2018 at 15:19 0 comments

    A quick thing or two:

    • When I first selected the components for the card, I selected the LEDs for lowest price @ Q=10, not giving much thought to current consumption. I found there are much lower forward current (an order of magnitude lower!) on offer, such as Kingbright's APTD3216LSYCK and APTD3216LCGCK (Mouser #'s 604-APTD3216LSYCK & 604-APTD3216LCGCK), which seem to fit the bill, and are priced similarly at higher quantities. I'll give those a go on the next iteration.
    • In trying to lower power consumption of the circuit, I set up a sleep function with a watchdog timer interrupt based wake up routine. I'm currently running the circuit at 2.3 mA when running, 3.4 - 12.8 mA when the LEDs are lit, but only managed to get the power consumption to 0.76 mA when sleep is enabled. That is probably because I'm using inverted PWM, and can't turn pins 0 & 1 to inputs and LOW - if I do the LEDs are just left half lit. I've posted a thread on the Arduino forum, but I have a sneaking suspicion that I'll have to do some changes in the circuit beside the code.
    • When editing the code to add the sleep function, I had a Eureka moment: the pulsing type code, which I hard coded as a progmem lookup table, was basically a sine wave. That means, it's symmetric, and I can do away with half the table. So instead of going through the whole table, value by value, The function will look at the current numerator, than if that'll be lower than the array length the value returned will be the array cell value corresponding to the cell in the numerator location. On the other hand, if the value will be higher than the array length, the returned value will be array[(array.length - numerator)].
      val = (timingVar < 100)?((byte)pgm_read_byte(pwmVal + timingVar)):((byte)pgm_read_byte(pwmVal + (200 - timingVar)));

  • PWM, the right (wrong) way

    uri.shani09/09/2018 at 10:38 0 comments

    While migrating the code from my initial trials with the Uno, it was obvious the LEDs do not get the correct values - even though I started out with the exact same sketch that worked on the Uno. As it was my first time working with a ATtiny85 / ATtiny13, I did some digging to find the root of the problem. I didn't actually nail the reason down yet, but I found a solution for the time being: following the advice given here, I set up the PWM registers to work in an inverted state.

    // Configure counter/timer0 for fast PWM w/inverted input on PB0 and PB1
    TCCR0A = _BV(COM0A0) | _BV(COM0A1) | _BV(COM0B0) | _BV(COM0B1) | _BV(WGM00) | _BV(WGM01);

    At first I thought it had something to do with the implementation of analogWrite() in the cores I used, but a quick look at wiring_analog.h proved me wrong. My next guess will be the setup of timer 0, which is used both in ATtinyCore and microCore for millis() and delay() - though I did not check that out yet.

    Anyway - inverting the registers works, and the only thing needed to work with the connected pins is the simple conversion (output value) = 255 - (intended value). I went ahead and pre-programmed the values for the breathing LED animation, but you can still see this conversion in the flickering scripts. Also, turning the LEDs off after calibration of the ADCTouch is done by turning the pins "high", because of this inversion:

    if (ref0 > 0) PORTB |= (1 << PINB0) | (1 << PINB1); //Confirm ref0 initialization
    

  • Testing v0.1 boards

    uri.shani09/07/2018 at 12:13 0 comments

    I first got the boards two weeks ago, and took my time testing. I originally thought I'd use ATtiny85 to get the code on the board for testing, then figure ways to slim down the code. When I got to soldering the boards (by hand, I don't have any reflow setup), I found out the '85's I ordered are 200 mil wide, while the footprint of the uC I chose was 150 mil wide. I squeezed the legs together, and finally got it working. I also used 220 Ohm resistors, so I could easily connect the ICSP header to my 5V programmer (Arduino Uno w/ Adruino as ISP sketch). I did not get the pogo pins I was planning on using on time, so I soldered a 2x3 header, and managed to burn the board using the Arduino IDE.

    I found out the ADCTouch library was configured for ATtinyx5's, so I added the ATtiny13 definition to the .h and .cpp, since the ADC pinout is the same (merged into library 04.09.18).

    I thought of getting some random flickering when the sensor was activated, but found out the random() function was filling up my available program space. I then thought of two solutions - first one was hard coding different length arrays for the PWM values and delay values, and the second was using millis() for pseudo-randomizing the delay values.

    The first solution works better in my opinion, as the different sized arrays (8 and 5) only meet every 20 cycles, which is not very noticeable. The second solution does provide some randomness, using millis()/1024 as the source, but results in too long delays.

    The "breathing" sketch works very nicely, but it seems to me the flickering effect is more fitting for using as either a card or a name tag, since it remains lit for some time after the light show sequence.

    I found out the battery was draining much faster than I thought it should, and the card becomes less sensitive to touch sensing. I will probably add some deep sleep / wake on an overflow timer in the next iteration.

    Two other additions were added to v0.2 of the board - a solder pad for a pin, so I will be able to solder a safety- style lapel pin directly to the board and not use hot glue, and an exposed ground patch opposite from where touch sensing should occur. I found out while testing that touch sensing was much more efficient and accurate when touching both the sensor pad and the ground plane.

View all 3 project logs

  • 1
    Design PCB name card (optional)

    I thought of getting into the details about how I designed this card / tag PCB, but quite frankly I'm really new to this, and I still have a lot to learn. Therefore, here are my resources:

    1. My PCB art youtube video playlist.
    2. A medium article on the subject.
    3. svg2shenzhen Inkscape plugin.
    4. @Andrew Sowa's blog.

    There were tons more places I dug, mostly KiCad forums discussions. Some google-fu was important for me.

  • 2
    Part selection and electrical design

    As I've written in the project description, I tried to keep both the cost and the complexity of the circuit as basic as I could. The ATtiny13 has 2 PWM pins, I could easily program it using the Arduino IDE, and I caould use the ADCTouch library with it. If you wish to design your own circuit, keep in mind the current draw for driving the LEDs when choosing your power source. Besides that, you can copy the schematic drawing for the bare- minimum circuit shown in the microCore readme. Or use the schematic I used, found in the files section. Note - when ordering the uC, check to see it is 150 mil wide and not 200 mil which will not fit the footprint.

  • 3
    Solder parts

    I tried to keep placement of the parts easy to understand, and in v0.2 I kept the values for the parts visible on the back silkscreen for easy reference. Hand soldering is best done with 0.4 mm no-clean solder wire (except for battery holder and pin). I did not try reflow yet, so I have no comment on that.

View all 7 instructions

Enjoy this project?

Share

Discussions

Horace wrote 02/23/2024 at 07:21 point

you did a great job making this VN Video Editor Mod APK unlock every program object I want to embed with my webpage you can see it here,https://vnvideoeditorapk.com/

  Are you sure? yes | no

ziz wrote 07/06/2021 at 12:45 point

Looks cool. Can I test this device for my name convertor tool? You can see my tool detail here https://namemixers.com/combine-mother-and-father-names/

  Are you sure? yes | no

Similar Projects

Does this project spark your interest?

Become a member to follow this project and never miss any updates