uri.shani
-
Just a quick update
11/18/2018 at 15:19 • 0 commentsA quick thing or two:
- When I first selected the components for the card, I selected the LEDs for lowest price @ Q=10, not giving much thought to current consumption. I found there are much lower forward current (an order of magnitude lower!) on offer, such as Kingbright's APTD3216LSYCK and APTD3216LCGCK (Mouser #'s 604-APTD3216LSYCK & 604-APTD3216LCGCK), which seem to fit the bill, and are priced similarly at higher quantities. I'll give those a go on the next iteration.
- In trying to lower power consumption of the circuit, I set up a sleep function with a watchdog timer interrupt based wake up routine. I'm currently running the circuit at 2.3 mA when running, 3.4 - 12.8 mA when the LEDs are lit, but only managed to get the power consumption to 0.76 mA when sleep is enabled. That is probably because I'm using inverted PWM, and can't turn pins 0 & 1 to inputs and LOW - if I do the LEDs are just left half lit. I've posted a thread on the Arduino forum, but I have a sneaking suspicion that I'll have to do some changes in the circuit beside the code.
- When editing the code to add the sleep function, I had a Eureka moment: the pulsing type code, which I hard coded as a progmem lookup table, was basically a sine wave. That means, it's symmetric, and I can do away with half the table. So instead of going through the whole table, value by value, The function will look at the current numerator, than if that'll be lower than the array length the value returned will be the array cell value corresponding to the cell in the numerator location. On the other hand, if the value will be higher than the array length, the returned value will be array[(array.length - numerator)].
val = (timingVar < 100)?((byte)pgm_read_byte(pwmVal + timingVar)):((byte)pgm_read_byte(pwmVal + (200 - timingVar)));
-
PWM, the right (wrong) way
09/09/2018 at 10:38 • 0 commentsWhile migrating the code from my initial trials with the Uno, it was obvious the LEDs do not get the correct values - even though I started out with the exact same sketch that worked on the Uno. As it was my first time working with a ATtiny85 / ATtiny13, I did some digging to find the root of the problem. I didn't actually nail the reason down yet, but I found a solution for the time being: following the advice given here, I set up the PWM registers to work in an inverted state.
// Configure counter/timer0 for fast PWM w/inverted input on PB0 and PB1
TCCR0A = _BV(COM0A0) | _BV(COM0A1) | _BV(COM0B0) | _BV(COM0B1) | _BV(WGM00) | _BV(WGM01);
At first I thought it had something to do with the implementation of analogWrite() in the cores I used, but a quick look at wiring_analog.h proved me wrong. My next guess will be the setup of timer 0, which is used both in ATtinyCore and microCore for millis() and delay() - though I did not check that out yet.
Anyway - inverting the registers works, and the only thing needed to work with the connected pins is the simple conversion (output value) = 255 - (intended value). I went ahead and pre-programmed the values for the breathing LED animation, but you can still see this conversion in the flickering scripts. Also, turning the LEDs off after calibration of the ADCTouch is done by turning the pins "high", because of this inversion:
if (ref0 > 0) PORTB |= (1 << PINB0) | (1 << PINB1); //Confirm ref0 initialization -
Testing v0.1 boards
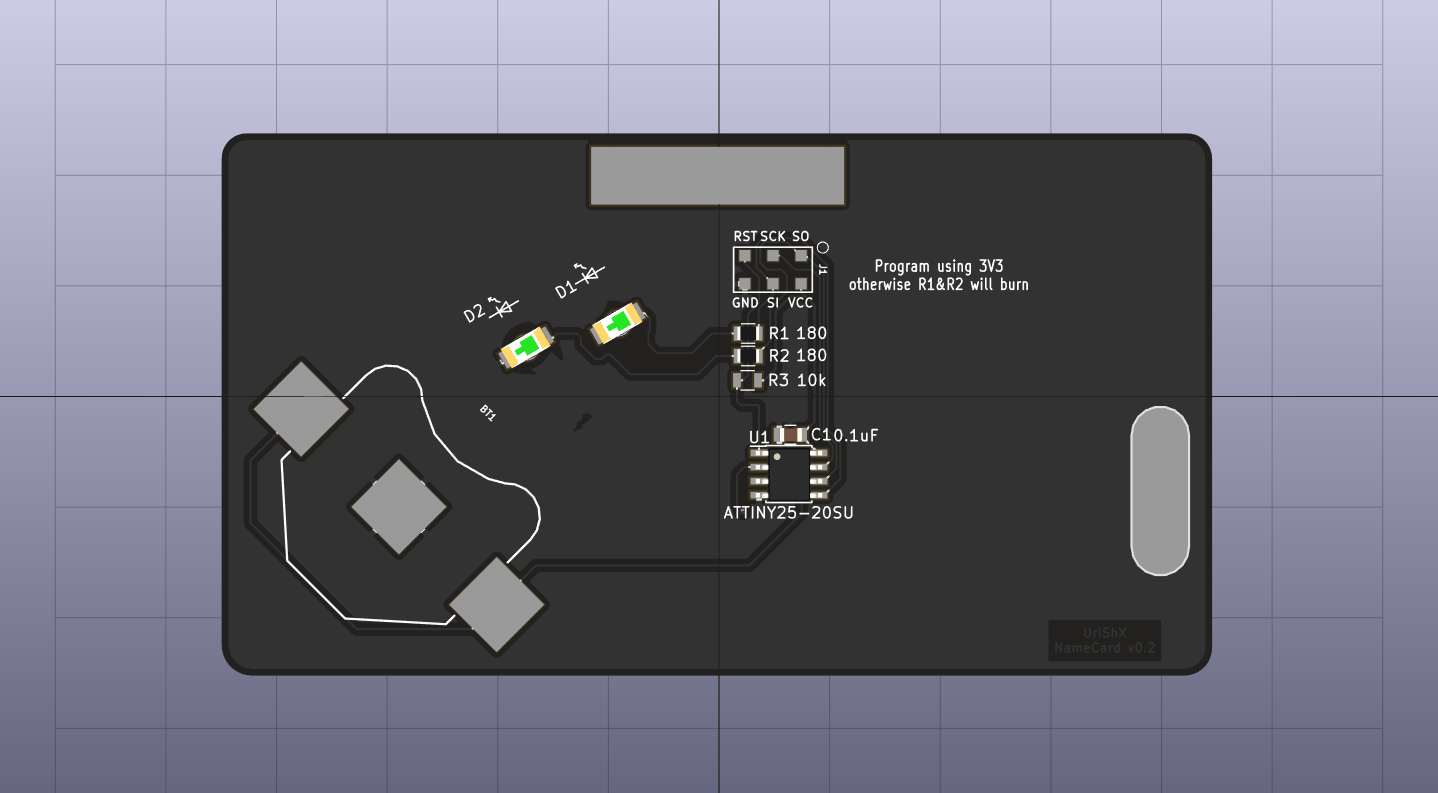
09/07/2018 at 12:13 • 0 commentsI first got the boards two weeks ago, and took my time testing. I originally thought I'd use ATtiny85 to get the code on the board for testing, then figure ways to slim down the code. When I got to soldering the boards (by hand, I don't have any reflow setup), I found out the '85's I ordered are 200 mil wide, while the footprint of the uC I chose was 150 mil wide. I squeezed the legs together, and finally got it working. I also used 220 Ohm resistors, so I could easily connect the ICSP header to my 5V programmer (Arduino Uno w/ Adruino as ISP sketch). I did not get the pogo pins I was planning on using on time, so I soldered a 2x3 header, and managed to burn the board using the Arduino IDE.
I found out the ADCTouch library was configured for ATtinyx5's, so I added the ATtiny13 definition to the .h and .cpp, since the ADC pinout is the same (merged into library 04.09.18).
I thought of getting some random flickering when the sensor was activated, but found out the random() function was filling up my available program space. I then thought of two solutions - first one was hard coding different length arrays for the PWM values and delay values, and the second was using millis() for pseudo-randomizing the delay values.
The first solution works better in my opinion, as the different sized arrays (8 and 5) only meet every 20 cycles, which is not very noticeable. The second solution does provide some randomness, using millis()/1024 as the source, but results in too long delays.
The "breathing" sketch works very nicely, but it seems to me the flickering effect is more fitting for using as either a card or a name tag, since it remains lit for some time after the light show sequence.
I found out the battery was draining much faster than I thought it should, and the card becomes less sensitive to touch sensing. I will probably add some deep sleep / wake on an overflow timer in the next iteration.
Two other additions were added to v0.2 of the board - a solder pad for a pin, so I will be able to solder a safety- style lapel pin directly to the board and not use hot glue, and an exposed ground patch opposite from where touch sensing should occur. I found out while testing that touch sensing was much more efficient and accurate when touching both the sensor pad and the ground plane.
![]()
![]()
Cap-sense name card
Combine PCB art and cap-sense activated LEDs to create a worthy maker name card