Capt. Flatus O'Flaherty ☠
-
Operation 'Origami' Completed!
01/17/2019 at 17:48 • 2 comments![]()
A bit of whacking with a large hammer and some small spanners and the gimbal starts to take shape. The laser device has been tested and successfully burnt a hole in my carpet at distance = 1 metre.
-
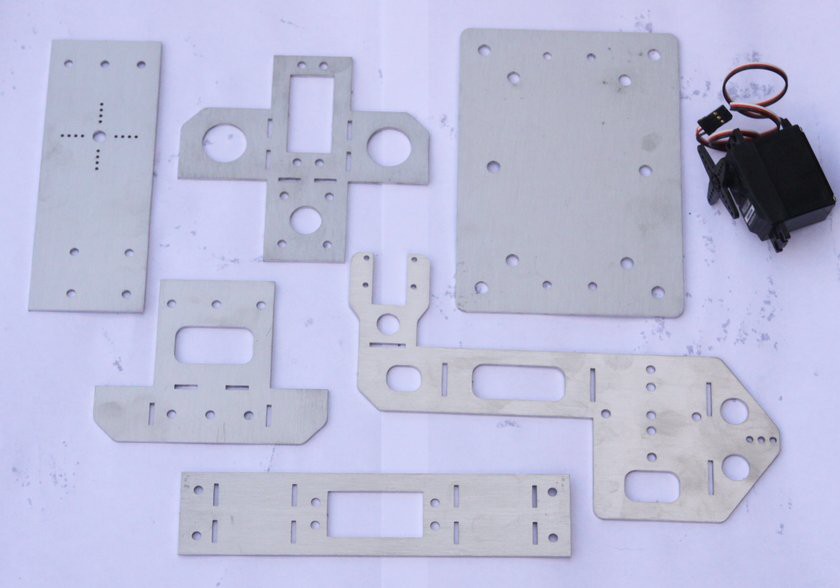
Gimbal Components Arrived!
01/14/2019 at 14:05 • 0 comments![]()
-
Build and Deploy a Custom Mobile SSD Model for Raspberry Pi
01/13/2019 at 14:22 • 0 commentsThis was a long and tedious 3 stage process involving building up a specialised Mobile SSD version of caffe, converting the resulting trained model to Intel OpenVino format and then deploying it on the Raspberry Pi. Fortunately, the results were 'not too bad', although far to slow to guide anything other than a laser on a gimbal whilst hoping that the wasp remains stationary long enough to zap it. Certianly not fast enough to zap them 'in flight'.
https://github.com/chuanqi305/MobileNet-SSD
Step 1 is to clone the particular flavour of caffe to train Mobilenet SSD:
$ sudo apt-get update && sudo apt-get upgrade
$ sudo apt install git
$ git clone https://github.com/weiliu89/caffe.git
$ cd caffe
$ git checkout ssd
Next, is to configure the makeconfig file:
Since I was using the Jetson TX2 for training:
Makefile.config:

INCLUDE_DIRS += /usr/include/hdf5/serial/
LIBRARY_DIRS += /usr/lib/aarch64-linux-gnu/hdf5/serial
CUDA_ARCH := -gencode arch=compute_30,code=sm_30 \
             -gencode arch=compute_35,code=sm_35 \
             -gencode arch=compute_50,code=sm_50 \
             -gencode arch=compute_52,code=sm_52 \
             -gencode arch=compute_61,code=sm_61 \
         -gencode arch=compute_62,code=sm_62 \
         -gencode arch=compute_62,code=compute_62

BLAS := atlas
# BLAS := open
After renaming the config example to makeconfig, I installed a whole load of dependencies:
$ sudo apt-get install libboost-system-dev libboost-thread-dev libgflags-dev libgoogle-glog-dev libhdf5-serial-dev libleveldb-dev liblmdb-dev libopencv-dev libsnappy-dev python-all-dev python-dev python-h5py python-matplotlib python-numpy python-opencv python-pil python-pip python-pydot python-scipy python-skimage python-sklearn

$ sudo apt-get install python-setuptools
$ sudo apt-get install autoconf automake libtool curl make g++ unzip
$ sudo apt-get install protobuf-compiler

$ export PROTOBUF_ROOT=~/protobuf
$ git clone https://github.com/google/protobuf.git $PROTOBUF_ROOT -b '3.2.x'
$ cd $PROTOBUF_ROOT
$ ./autogen.sh
$ ./configure
$ make "-j$(nproc)"
$ sudo make install
$ sudo ldconfig
$ cd $PROTOBUF_ROOT/python
$ sudo python setup.py install --cpp_implementation

$ sudo apt-get install --no-install-recommends build-essential cmake git gfortran libatlas-base-dev libboost-filesystem-dev libboost-python-dev

$ sudo apt-get install libprotobuf-dev libleveldb-dev libsnappy-dev libopencv-dev libboost-all-dev libhdf5-serial-dev \
libgflags-dev libgoogle-glog-dev liblmdb-dev protobuf-compiler


$ sudo ln -s /usr/lib/x86_64-linux-gnu/libhdf5_serial.so.10.1.0 /usr/lib/x86_64-linux-gnu/libhdf5.so
$ sudo ln -s /usr/lib/x86_64-linux-gnu/libhdf5_serial_hl.so.10.0.2 /usr/lib/x86_64-linux-gnu/libhdf5_hl.so
Then I set some pathways:
$ export CAFFE_ROOT=/home/tegwyn/caffe
$ export PYTHONPATH=/home/tegwyn/caffe/python:$PYTHONPATH
… Which I had to perform every bash session as I was too lazy to write it into bash,rc.
Jetson TX2 ARM only:
sudo ~/jetson_clocks.sh && sudo nvpmodel -m0
$ sudo ln -s /usr/lib/aarch64-linux-gnu/libhdf5_serial.so.10.1.0 /usr/lib/aarch64-linux-gnu/libhdf5.so
$ sudo ln -s /usr/lib/aarch64-linux-gnu/libhdf5_serial_hl.so.10.0.2 /usr/lib/aarch64-linux-gnu/libhdf5_hl.so
Next actually install and test this flavour of caffe:
$ cd && cd caffe && make -j8
# Make sure to include $CAFFE_ROOT/python to your PYTHONPATH.
$ make py
$ make test -j8
# (Optional)
$ make runtest -j8
Testing may go on for up to an hour and my test eventually failed when it tried to process 50 boxes simultaneously, which overloaded the system! Otherwise it was all ok.
Now we can install some image data to test the ability to train the Mobile SSD network:
$ cd /home/tegwyn/data
$ wget http://host.robots.ox.ac.uk/pascal/VOC/voc2012/VOCtrainval_11-May-2012.tar
$ wget http://host.robots.ox.ac.uk/pascal/VOC/voc2007/VOCtrainval_06-Nov-2007.tar
$ wget http://host.robots.ox.ac.uk/pascal/VOC/voc2007/VOCtest_06-Nov-2007.tar
# Extract the data.
$ cd /home/tegwyn/data && tar -xvf VOCtrainval_11-May-2012.tar
$ tar -xvf VOCtrainval_06-Nov-2007.tar
$ tar -xvf VOCtest_06-Nov-2007.tar
Lastly create a database and then start to train:
Create database:
$ cd $CAFFE_ROOT
$ ./data/VOC0712/create_list.sh
$ ./data/VOC0712/create_data.sh

Train and evaluate:
$ cd $CAFFE_ROOT
$ python examples/ssd/ssd_pascal.py
$ cd $CAFFE_ROOT && python examples/ssd/ssd_pascal.py
Next, swap out the images from above with the wasp images and labels and train. This was not as easy as it might seem as there are 21 different categories and I only wanted one. Eventually, after a lot of hacking about, I got it to work, but cant remember the exact procedure :(. Also, the Python script, (examples/ssd/ssd_pascal.py) had to be edited to avoid any attempt by the script to calculated mAP to test the accuracy. Batch and accumulation sizes were both set to 16 which allowed maximum benefit of the Jetson's memory.
Step 2: https://software.intel.com/en-us/articles/OpenVINO-Using-Caffe Use the model optimiser script in OpenVino to convert from caffe format to a .bin and .xml pair.
cd /opt/intel/computer_vision_sdk_2018.5.445/deployment_tools/model_optimizer/

python3 mo_caffe.py --data_type=FP16 --input_model /home/tegwyn/Desktop/SSD_300_WASP01/VGG_VOC0712_SSD_300x300_iter_20211.caffemodel

[ SUCCESS ] XML file: /opt/intel/computer_vision_sdk_2018.5.445/deployment_tools/model_optimizer/./VGG_VOC0712_SSD_300x300_iter_20211.xml
[ SUCCESS ] BIN file: /opt/intel/computer_vision_sdk_2018.5.445/deployment_tools/model_optimizer/./VGG_VOC0712_SSD_300x300_iter_20211.bin
Step 3: https://software.intel.com/en-us/articles/OpenVINO-Install-RaspberryPI Deploy on the raspberry Pi:
This step was actually relatively easy and the software installed nice and slick.
sed -i "s|/home/pi/inference_engine_vpu_arm/|$(pwd)/inference_engine_vpu_arm|" inference_engine_vpu_arm/bin/setupvars.sh

source <OVINO_INSTALLDIR>/bin/setupvars.sh'
Edit the bash.rc file to run setup vars every bash session using VIM editor:
$ sudo vi /etc/bash.bashrcAdd: source /home/pi/inference_engine_vpu_arm/bin/setupvars.sh to the bottom.
I then downloaded intel models to: /home/pi/intel_models/ (350mb)
To run the 3 tier face detection interactive demo, using Neural Compute stick 2:
cd /home/pi/inference_engine_vpu_arm/deployment_tools/inference_engine/samples/build/armv7l/Release
./interactive_face_detection_demo -d MYRIAD -m /home/pi/intel_models/face-detection-retail-0004/FP16/face-detection-retail-0004.xml -d_ag MYRIAD -m_ag /home/pi/intel_models/age-gender-recognition-retail-0013/FP16/age-gender-recognition-retail-0013.xml -d_em MYRIAD -m_em /home/pi/intel_models/emotions-recognition-retail-0003/FP16/emotions-recognition-retail-0003.xml -d_hp MYRIAD -m_hp /home/pi/intel_models/head-pose-estimation-adas-0001/FP16/head-pose-estimation-adas-0001.xml
............ WORKS !!!!
I then built the object_detection_sample_ssd model and ran the following python script on one .bmp image of a wasp:
cd /home/pi/inference_engine_vpu_arm/deployment_tools/inference_engine/samples/build/armv7l/Release
./object_detection_sample_ssd -d MYRIAD -i /home/pi/Desktop/SSD_300_WASP01/test_images/wasp02.bmp -m /home/pi/Desktop/SSD_300_WASP01/./VGG_VOC0712_SSD_300x300_iter_20211.xml
The result was a new 'inferred' .bmp image and the following text output:
[0,1] element, prob = 1    (8.82812,228.438)-(205.312,409.375) batch id : 0 WILL BE PRINTED!
[1,1] element, prob = 1    (163.75,202.812)-(362.812,420.312) batch id : 0 WILL BE PRINTED!
[2,1] element, prob = 1    (390.938,292.031)-(626.562,505.625) batch id : 0 WILL BE PRINTED!
[3,1] element, prob = 1    (160.625,386.25)-(382.188,623.125) batch id : 0 WILL BE PRINTED!
[4,1] element, prob = 0.999023    (7.8125,372.188)-(173.75,577.188) batch id : 0 WILL BE PRINTED!
[5,1] element, prob = 0.99707    (282.188,120.078)-(492.188,343.438) batch id : 0 WILL BE PRINTED!
[6,1] element, prob = 0.161255    (210.312,148.359)-(433.438,392.812) batch id : 0
[7,1] element, prob = 0.152832    (165,251.562)-(284.688,350.938) batch id : 0
[8,1] element, prob = 0.0758667    (230.781,305.625)-(328.75,431.25) batch id : 0
[9,1] element, prob = 0.0470276    (251.25,177.5)-(699.375,473.125) batch id : 0
[10,1] element, prob = 0.0458679    (2.1875,287.5)-(180.625,483.75) batch id : 0
[11,1] element, prob = 0.0388184    (219.062,294.375)-(510.938,445.625) batch id : 0
[12,1] element, prob = 0.0379333    (1.09375,404.062)-(52.1094,500.938) batch id : 0
[13,1] element, prob = 0.0323792    (89.0625,223.75)-(275.312,406.875) batch id : 0
[14,1] element, prob = 0.0202637    (295,202.969)-(451.25,503.75) batch id : 0
[15,1] element, prob = 0.0196075    (71.4844,375.938)-(289.062,617.812) batch id : 0
[16,1] element, prob = 0.0182953    (232.344,380)-(701.25,651.875) batch id : 0
[17,1] element, prob = 0.0160522    (393.75,131.875)-(618.125,342.5) batch id : 0
[18,1] element, prob = 0.0159302    (142.969,233.75)-(244.531,336.25) batch id : 0
[19,1] element, prob = 0.0155487    (288.125,263.438)-(371.875,375.938) batch id : 0
[20,1] element, prob = 0.0140076    (-69.6875,386.562)-(381.25,660.625) batch id : 0
[21,1] element, prob = 0.0131454    (154.375,432.5)-(478.75,731.875) batch id : 0
[ INFO ] Image out_0.bmp created!
Success! (After several days work)
-
What's the next step?
12/01/2018 at 10:46 • 0 commentsI tried adding another 500 carefully crafted images to the database and ran the training session once more, but got no improvement in mAP and no noticeable improvement in a real life deployment on the Jetson TX2. According to the forums etc. its normally all about getting a larger dataset, but in my case this has made no difference at all!
Maybe it's time to start hacking into the standard bvlc_googlenet.caffemodel pre-trained model?
Does anybody have any suggestions?
-
'Ideal' Training Graph
11/28/2018 at 16:51 • 0 commentsIn an ideal situation, the training graph 'might' look something like below:
![]()
-
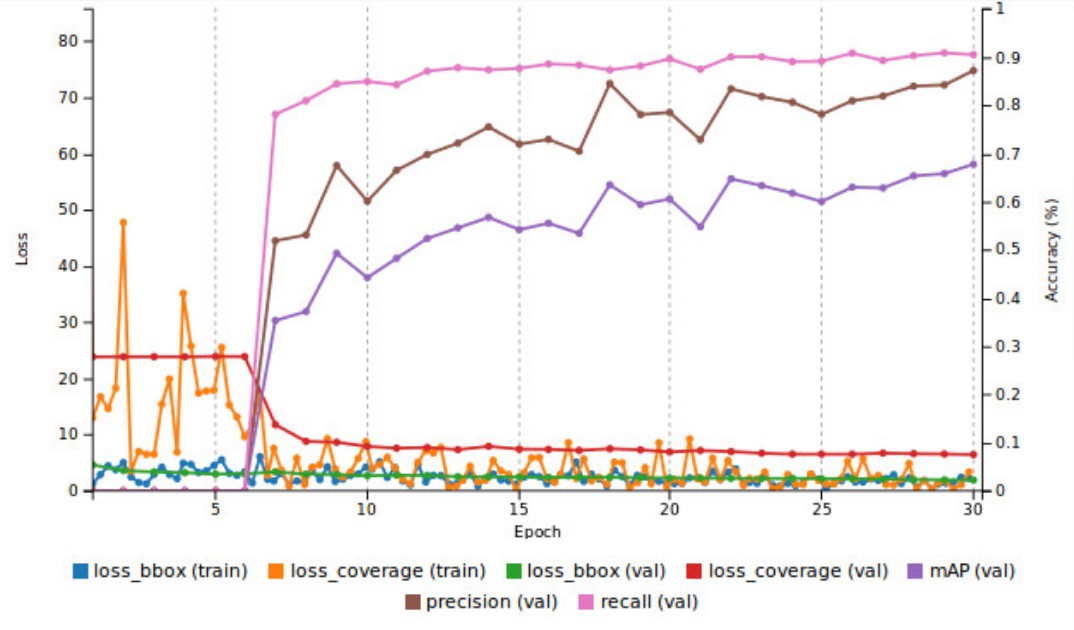
Training Results have some Meaning
11/27/2018 at 21:00 • 0 commentsAt last, some coherent results using Nvidia docker container nvcr.io/nvidia/digits:18.11-caffe :
![]()
The main thing to look at is the mAP (val) and this peaked at about 21%. Now I can try adding a few more images and see how they affect the accuracy :)
-
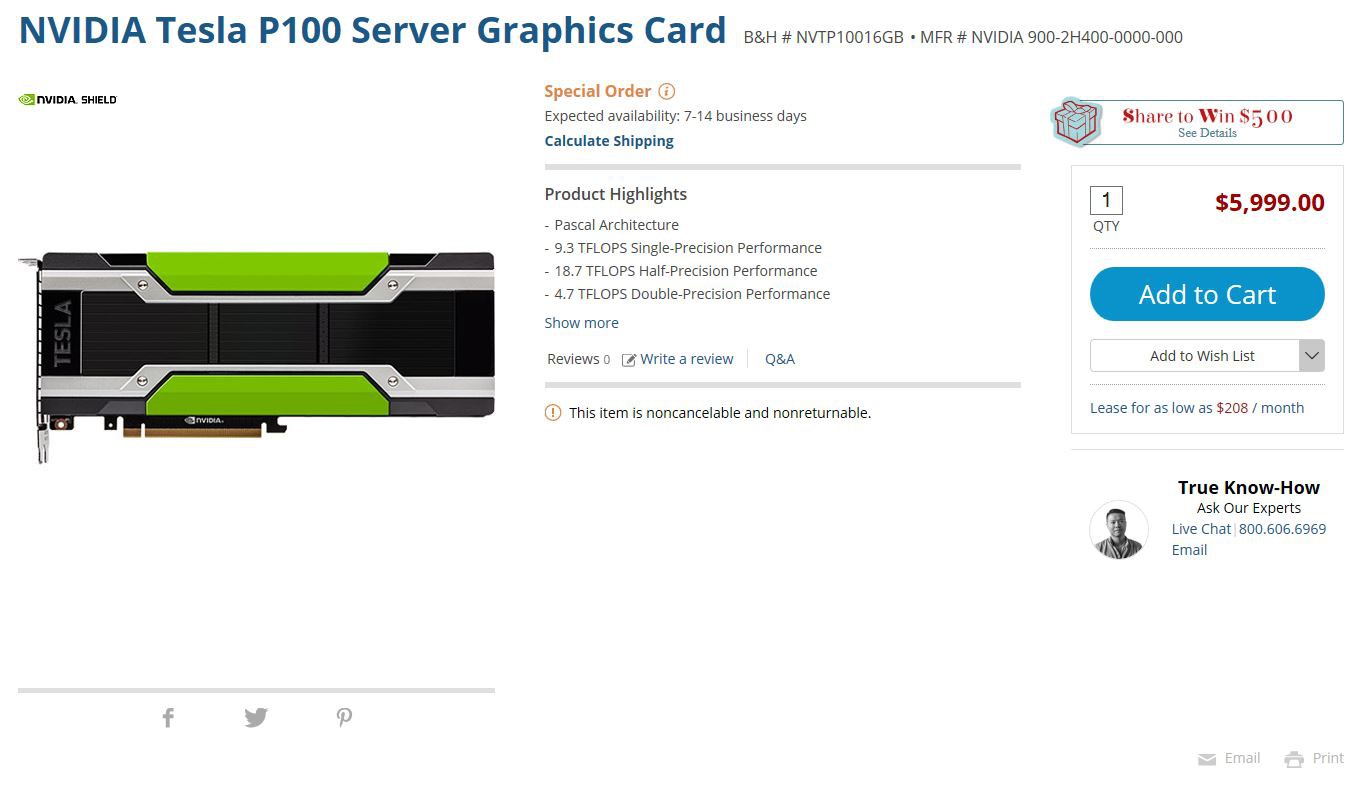
Training Networks on the Amazon Cloud GPUs
11/26/2018 at 09:50 • 0 comments![]()
If you've looked at the price of high end graphics cards recently (2018) you'll quickly realise that it will be much more cost effective to rent one in a cloud for $3 an hour. I rented a Tesla 16Gb P100 which has a list price of about $6,000 dollars!
The Amazon Web Service (AWS) provides online compute power in the form of 'instances' and there's a choice of all kinds of configurations depending on what the specific task is. The following is a step by step that will get Nvidia DIGITS up and running for processing images/photos to create a model for deployment on the Jetson TX2. It is, of course, possible to do this on the Jetson, but it will take about 48 hours and the device will run out of memory if pushed too far. See previous logsfor this.
Step 1: Sign up with AWS with your credit card and then visit the support section and ask them to enable a 'p3.2xlarge' instance - this is your Nvidia Tesla with a few CPUs and some storage space. Also, sign up with Nvidia NGU cloud and make a note of the API key they give you.
Step 2: Use the 'Create instance wizard' in the US west 'Oregon' region regardless of where you actually live! (This is where the GPU lives). The wizard will guide you through everything required, including creating security keys.
Step 3: Follow the wizard and select the 'Nvidia Volta' AMI in the Amazon marketplace. Don't worry, Nvidia has supplied it for free.
Step 4: DO NOT assign an elastic IP as it's not necessary and Amazon will charge you for it on a per hour basis whether you're using the GPU or not. The only expense should be the GPU when you're actually using it.
Step 5: Install a SHH client on computer such as PUTTY. I use PUTTY and WinSCP on a windows 10 machine. Both are very useful.
Step 6: Launch your AWS instance and hit the 'start' button. Remember to this this off again as soon as finished as we're now being charged per minute. An IPv4 address should become displayed very quickly - if not, refresh the browser.
Step 7: Launch WinSCP, use 'ubuntu' as your username and the IPv4 address from the above. Go to advanced settings and install your AWS key having previously set permissions on the key to read only or CHMOD 400.
Step 8: Save the WinSCP session and press login. Sometimes the authentication key can cause a problem and on one occasion it locked me out of my instance permanently and I had to delete the current instance and create a new one. I now key my key on a USB stick rather than on windows machine. Also, if the AWS is stopped and started again, it assigns a new IPv4 address, so this needs to be updated in WinSCP accordingly.
Step 9: Once logged in, create a directory structure in WinSCP for the images or photos to be processed. I created:
/home/ubuntu/waspLarge for my project as I'm using photos of wasps in my experiments. The 'waspLarge' folder itself has the following directory structure:
/waspLarge/train/images
/waspLarge/train/labels
/waspLarge/val/images
/waspLarge/val/labelsIt is possible to copy and paste the whole directory structure and all the images and text files located inside in one go. Check out the dusty-nv inference tutorial for more info on how to use DIGITS.
Also, copy and paste in the pre-trained model as below:
/digitsJobs/bvlc_googlenet.caffemodel
Step 10: Once set up with WinSCP, find the PUTTY icon and launch that. It should produce a terminal for entering commands.
Step 11: First command is to pull an Nvidia container. I used:
$ docker pull nvcr.io/nvidia/digits:18.11-caffe
….. But check here for the most up to date one: https://ngc.nvidia.com/catalog/containers?query=&quickFilter=&filters=&orderBy=
Step 12: Run:
$ nvidia-docker run -d --name digits-18.11-caffe -p 8888:5000 --shm-size=1g --ulimit memlock=-1 --ulimit stack=67108864 nvcr.io/nvidia/digits:18.11-caffe…. to allocate memory effectively. This will create a new container called 'digits', as described by the --name command and print out the very long container name eg. e8956e9586bb1a5e842a3ab0c6fc79f29f8c1f735d1945347c92a918913d7fc7
Step 13: Now, as a bit of an exercise, we're going to kill this container:
$ docker kill e8956e9586bb1a5e842a3ab0c6fc79f29f8c1f735d1945347c92a918913d7fc7
……. Trust me, we're going to need to know these Docker commands!
Step 14: Now to make sure all previous containers are removed:
$ docker rm $(docker ps -a -q)
Step 15: Check that the inode limits have not been exceeded in the system:
$ df -i
…….. It should look something like the below:
Filesystem Inodes IUsed IFree IUse% Mounted on
udev 7858000 327 7857673 1% /dev
tmpfs 7859998 469 7859529 1% /run
/dev/xvda1 8192000 208669 7983331 3% /
tmpfs 7859998 1 7859997 1% /dev/shm
tmpfs 7859998 3 7859995 1% /run/lock
tmpfs 7859998 16 7859982 1% /sys/fs/cgroup
/dev/loop0 12808 12808 0 100% /snap/core/5897
/dev/loop1 13 13 0 100% /snap/amazon-ssm-agent/295
/dev/loop2 12847 12847 0 100% /snap/core/5145
/dev/loop3 15 15 0 100% /snap/amazon-ssm-agent/930
tmpfs 7859998 4 7859994 1% /run/user/1000….. More Docker commands can be found here: https://docs.docker.com/engine/reference/commandline/system/. $ df -h is also useful.
Step 16: Now we're going to link all the stuff we did in step 9 to stuff going on inside the container. The way I came to understand the file system is using an analogy of the human brain where on one side we have 'conscious thought' and the other 'unconscious thought', which in this case is mostly hidden inside the container. Conscious thought is the directory structure we created using WinSCP. To link the two together we use a Docker 'mount' command -v, otherwise called volume, which is very confusing. Launching DIGITS is also explained here: https://docs.nvidia.com/deeplearning/digits/digits-container-getting-started/index.html, but I found it difficult to understand and it misses out some key steps.
Step 17: If the directory structure is set up EXACTLY as in step 9 and it contains our photos and label files and pre-trained model in the correct place, we can run DIGITS and open it in a browser:
$ nvidia-docker run --rm --name digits -d -p 8888:5000 -v /home/ubuntu/waspLarge:/waspLarge -v /home/ubuntu/digitsJobs:/workspace/jobs nvcr.io/nvidia/digits:18.11-caffe
…. This should now run a new container and print out another long container name.
-it ……. means run in interactive mode. --rm …….. means remove container when finished.
Step 18: DIGITS should now be running. Type your IPv4 address into the browser http input field (no 'http://' or 'www' required) then type ':8888' eg. 12.34.73.89:8888 . Hit return and you should see the DIGITS workspace.
Step 19: Refer to my previous log for how to set up DIGITS and use the following in the labels and image boxes:
/waspLarge/train/images
/waspLarge/train/labels
/waspLarge/val/images
/waspLarge/val/labelsCopy and paste in the deploy.network text as in my previous log and use the following as the path to pre-trained network:
/workspace/jobs/bvlc_googlenet.caffemodel
If you look at these paths and what we did in step 9, you should see the correlation!
That's it - happy training …. and remember to turn off the AWS instance when finished or else AWS fees will continue to accrue.
PS. I am not affiliated in any way to AWS.
-
Wasp Detector with Increased Accuracy
11/23/2018 at 11:14 • 0 commentsThe video above shows a common European wasp being 'inferred', which means it's being recognised and it's position and size represented by a blue box. Here, the coordinates of the boxes are exported via I2C to an Arduino where they are processed to produced beeps of various frequencies depending on the confidence, or accuracy, statistic. The higher the beep frequency, the better the accuracy.
The model was trained on my Nvidia Jetson TX2 using caffe with a pre-trained model based on googlenet, the 'bvlc_googlenet.caffemodel'. The 'wrapper' software used is DIGITS 6.1 from Nvidia, which enables an easy to use GUI on a standard internet browser, which is really useful as this system can also be used on a cloud based GPU in the same way.
The TX2 is not the ideal training machine as I could only run 100 epochs with about 2600 images of 640 x 640 pixels and the DIGITS software, for some reason, cant display updated accuracy statistics, which makes it difficult to tell if the training has reached any degree of 'convergence' or not.
The next step is to do more training on the Amazon AWS cloud service which allows us to create an ad-hoc computer in the cloud with very powerful GPU cards for a small per hour fee rather than having to fork out thousands of pounds / dollars for our own system. The AWS system can run Nvidia Docker containers that are already pre-configured with caffe and DIGITS etc so, thankfully, there's no protracted software installation with the usually gauntlet of missing dependencies. Setting up the AWS machine is not, however, trivial and there's still a lot of head scratching involved in getting it to work! More on this in the next update.
-
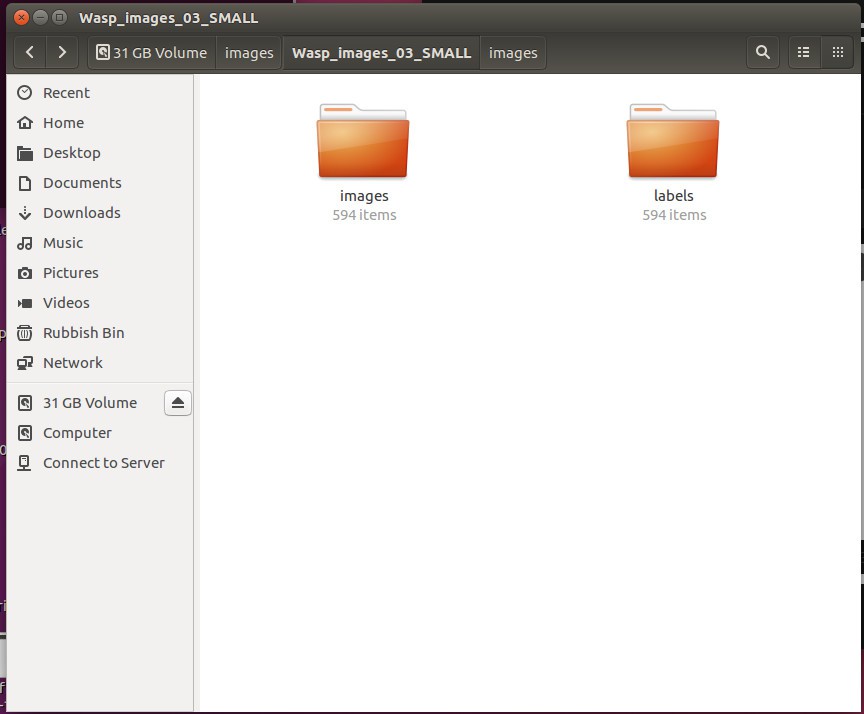
Processing the Images
11/04/2018 at 12:24 • 1 commentFirstly, using Ubuntu, imagemagick software was installed and, using the command line, we go to the relevant folder eg:
$ cd /media/tegwyn/C999-F05F/images/Wasp_images_03.... Then we use an imagemagick command to resixe all the images in one hit to 640 by 640:
$ mogrify -resize 640x640! *.jpg
.... Next, remane the image set sequentially to something more useful eg:
$ rename 's/.+/our $i; sprintf("B%05d.jpg", 1+$i++)/e' *![]()
Now to draw the bounding boxes and export the coordinates in kitti format:
...... Install Pillow using:$ pip install Pillow
Download euclidaug python script from: https://github.com/prabindh/euclid
Using command line, cd to the euclidaug folder eg:$ cd /home/tegwyn/euclidaug/euclid-master/
...... Then run the script:
$ python euclid.py
![]()
.... Set the class number eg 2 for all the wasp photos and draw the bounding boxes such that the body of the insect is in the centre. Taking the photos is fun and this is the only boring part of the process. It takes about 5 seconds per image, 720 images per hour. It's a good idea to split the images up into batches of 500 or so and use a different capital letter prefix for each batch of images and labels to ensure successful sanity check later on.
IMPORTANT: Check that there's the same number of images and text files in each batch !!!!!!
![]()
-
Getting Images for Training Models
11/04/2018 at 11:58 • 0 commentsThere's a few hundred images of our species of wasps on the interweb which can be downloaded easy enough, but there's nothing like having one's own photos. Photographing wasps is hazardous as the stings are painful and can cause a lot of swelling and even death for some people. It's important not to kill the subject as it just curls up and is no longer useful. I caught the subjects in a clean jar and deprived it of oxygen long enough to sedate it somewhat. A lot of shots were taken through the jar, but also by releasing the insect and letting it roam around a bit before recovering too much from being locked in the jar. A proper macro lens on a DSLR camera gave best results. Now to process the 500 or so images!
![]()
![]()
Ai Equiped Wasp (and Asian Hornet) Sentry Gun
A powerful laser guided by cameras will vaporize these pests in flight. Hopefully.