Timescale
-
Setting up scenes
05/05/2019 at 12:01 • 0 commentsThis weekend I got around to doing some work on the plumbing of the engine. A lot of the scene data was still hardcoded in the init function, but now nearly all data is loaded from the XML file. Asset information, object information and the scene data now make up the structure with which I want to drive the narrative.
I realized that an engine is not so much a necessity as it is a luxury and therefor it should provide me with a level of comfort. It should make the minimum of demands on the data I feed into it and make the maximum amount of assumptions on data when I do not feed the data. Also, I want to be able to add/modify attributes at every point without having to dive into the code.
So the minimum data required to get an item in a scene should be something like this.
<scenes>
    <scene>
        <name>Intro</name>
        <character>PittRivers</character>
        <stage>scene</stage>
        <actors>
            <actor>
                <objectName>PittRivers</objectName>
                <x>35</x>
                <y>165</y>
            </actor>
        </actors>
    </scene>
</scenes>
This simply puts the character in the scene at those coordinates and defines it as the playable actor. All other attributes have either been set in the object definition of in code as defaults. At any stage can I add an attribute or overwrite one in the actor section. In fact, the object definition works just like this, only 1 step higher in the data structure hierarchy. This means that data like frame animations, anchor points or zoom types won't have to be set in every scene every time.
There now is one layer that is missing and that is the global game state. This is where the game logic will exist in part. It is the bit that makes sure that when you picked up the stick and you re-enter this scene, the stick will remain hidden.
Here is a demo video of the current state of the engine.
Right now I'm selecting the options with the keyboard so L is "look at" and P is "pick up". This will later be selectable by clicking the main character.
The text responses for the character are defined on the object level and the responses and action for items are right now defined on the stage level. There are also set distances at which certain actions can be done. These are also scene attributes.
Another thing is audio. The asset loader now also loads and indexes ogg files that can be used for actions like picking up or using objects. This was a real simple addition. I'm still thinking on how to do background music. I love the idea of using MIDI for this and I am currently looking at existing in browser MIDI player options. If this does not work out, a simple looped ogg file will do just as well.
-
Frame animations and more
04/30/2019 at 21:49 • 0 commentsLast entry, I was working on the frame animation system. By combing the re-sampler function with the frame selector, it made live a whole lot easier. Basically any object which can be tiled up in frames has this information in the XML file and that is handled by the loader. The asset data for the Pitt Rivers character looks like this.
<asset>
    <name>PittRivers</name>
    <mediaType>image</mediaType>
    <assetType>sprite</assetType>
    <file>./assets/characters/pitt/pitt-standing.png</file>
    <frameCount>5</frameCount>
    <frames>
	<frame id="0" x="1" y="0" w="28" h="47">Standing1</frame>
	<frame id="1" x="29" y="0" w="28" h="47">Standing2</frame>
	<frame id="2" x="57" y="0" w="28" h="47">Walk1</frame>
	<frame id="3" x="85" y="0" w="28" h="47">Talk1</frame>
	<frame id="4" x="113" y="0" w="28" h="47">talk2</frame>
	<frame id="5" x="141" y="0" w="28" h="47">talk3</frame>
    </frames>
</asset>
The image is stored just like before, but assets that can be tiled have an extra array bolted onto their data structure that holds the frame data. I realize that this approach is not the most elegant as I could simply do without the frameCount tag and simply check for and count if any frames are defined. Also as of now, there is no support for sub-frames, where various smaller frames can be spliced on other frames. For talking normally you only need a couple of heads.
On the other hand, this does mean that elaborate animations can be made like the ones in Flight of the Amazon Queen, where the characters are fully animated even while talking and doing small stuff.
![]()
This is the current character file that I'm loading. I took the Indy sprite I "borrowed" and photoshopped a couple of stances. The first 2 are the breathing stances while 3 is a "walk" and the last 3 are talky head movements. To accommodate for the frame animation, the object data structure array did indeed receive more features.
objectData[]['name'] = "PittRivers"
objectData[]['asset'] = "pittStanding"
objectData[]['type'] = "character"
objectData[]['frame'] = 0;
objectData[]['text'] = false
// .... all the other attribs

objectData[]['animationSequence'] = 'standing'; // current animation
objectData[]['animationLoop'] = true;
objectData[]['animationTick'] = 0;
objectData[]['animationStep'] = 0;
objectData[]['animations']['standing'] = "10,0,0,0,1,1"; // animation sequence time,frame,frame,frame...
objectData[]['animations']['walking'] = "3,1,2,1,2,0";
objectData[]['animations']['talking'] = "3,3,0,4,5,4,3,0,5,3,0,4";
This is the set of attributes per object for frame animating. This object current has 3 animation sequences, standing, walking and talking. The starting sequence is the standing sequence which has a value of "10,0,0,0,1,1". The first number is the number of ticks (half Jiffies?) for the next frame to be set in ['frame']. Whatever frame number resides in that field, that is the frame the render engine will draw.
The rest of the numbers are the frames themselves. When the animation is a loop, this animation runs until another sequence is selected. Here is the re-sample frame function.
function resample(tileID,zoom,frame){
    // resample frame with simple nearest neighbour style resampling
    var frameCount = assetIndex[tileID]['frameCount']
    if(frameCount == 0){
        var frameX = 0,
            frameY = 0,
            width = sceneGraphics[tileID].width,
            height = sceneGraphics[tileID].height;
    } else {
        var curFrame = assetIndex[tileID]['frames'][frame],
	    frameX = curFrame['x'],
	    frameY = curFrame['y'],
	    width = curFrame['w'],
	    height = curFrame['h'];
    }
    var newWidth = Math.floor(width * zoom),
        newHeight = Math.floor(height * zoom),
        resImage = context.createImageData(newWidth, newHeight);

    for(tileX = 0; tileX < newWidth; tileX++){
        for(tileY = 0; tileY < newHeight; tileY++){
	    var curTileX = frameX + Math.floor(tileX / zoom),
	        curTileY = frameY + Math.floor(tileY / zoom),
		curSrcPixel = (curTileY *  sceneGraphics[tileID].width + curTileX) * 4,
		curDestPixel = (tileY *  newWidth + tileX) * 4;

		resImage.data[curDestPixel + 0]  = sceneGraphics[tileID].data[curSrcPixel + 0]
		resImage.data[curDestPixel + 1]  = sceneGraphics[tileID].data[curSrcPixel + 1]
		resImage.data[curDestPixel + 2]  = sceneGraphics[tileID].data[curSrcPixel + 2]
		resImage.data[curDestPixel + 3]  = sceneGraphics[tileID].data[curSrcPixel + 3]
        }
    }
    return resImage;
}
So this function neatly puts part of the image into a buffer and sends it off to the main draw function. If I decide to include say splicing of frames, procedural transformations in the bitmaps or other FX that could come in handy in this type of game, this function would be a likely place to implement such features.Fonts
![]()
This image is the font file I used in Shovelization. I believe it came from a game-boy game, so again, "borrowed"! The original implementation I made was to hack this up into an array of image data objects and call them by their decimal number.
For this project, I could simply use the asset loader almost as is and use the infrastructure in place to display the font. The only thing I needed to add was a function to generate a lookup array.
Whenever the state engine determines that there is text to be displayed, the text and it's coordinates are put into a text buffer that is handled almost last. In order not to over-complicate things, I did write/copy past a draw function specific for text because using the main draw function would have meant a similar function only to output an object buffer to the main drawing function. Now it draws directly to the screen buffer which means less overhead (Not that I'm running out of cycles!). So now for a short demo !
Here you see me demonstrating the frame animations. The character has an animation standing still, walking and talking. While talking you can see the text floating above the object from which the text is coming.
In the last part of this particular demo, I tried to ad a filter to demonstrate why having continues refresh is a great thing to have, even for such simple graphic games. I implemented an "old movie mode" where the image gets grainy with projector glitches and stripes and I control the tone to make it look more sepia. This feature could be used for various things. It could generate a CCTV type of effect or reuse scenes with different lighting. A daytime scene could easily be reused as a scene at dawn. Bonus, it takes almost no extra cycles at all!
Right now I am at the point where I feel the data structure for the object should be generated by the asset loaded entirely. This means a lot of under the bonnet work, making sure that the XML file structure makes sense, the right fields are being made for each object and so on. After that, it is time to start thinking about game logic and the scripting engine.
(This is the last "log" I wrote before posting all of it to Hackaday.IO So from now on, logs will happen as fast as I finish a feature and the subsequent write up).
-
It's starting to feel like a game.
04/30/2019 at 19:03 • 0 commentsThe little online adventure game engine that could has had some major improvements the last session I spend on her. I could list them all, but as I promised video (or it did not happen) last time, here is the current state of the project.
In this short video, you can see me demo'ing the masking feature first. With the crude cursor input I can move around Pitt Rivers in front or behind features in the scene. I an happily navigate around the stone pillar and you can see the (oddly transparent) rock being masked as well.
After that I use the cursor to demonstrate that this type of input does indeed move the object towards it target. This function checks the meta data file and if the red channel has a pixel at that point, it tries to navigate the object there. This function has room for improvement as the object can get kind of stuck at some angles and it now tries to go in a straight line, so when it encounters a zero in it's way, it stops. There is no a* path finding routine implemented (yet).
The final demonstration is picking up the bag and clicking the strange rock which then disappears. These are the first bits of game logic that are surfacing. At this point these are not really important and the implementation is nothing like the final product should work, but at one point it is nice to actually see something happening.
A major upgrade to the render engine also has been made. The obvious one is the ability to vertically mirror the graphic. So when I steer left, the figure looks left. A bit less noticeable is the re-sampling of the image. As this is 8-bit style, it is a simple near-neighbour algorithm. It isn't the prettiest, but it is period specific. Especially Sierra scaled their onscreen assets similarly like this for ages.
I would like to share this function now, but unfortunately it is a bit of a mess at the moment, but that is not a bad thing! Before doing the re-sampling, I was trying to implement basic frame animations. I decided that I do not want separate files for frames, so frames for an object exist in the same PNG, delimiting the boundaries either in the data structure or later via abusing the alpha channel.
The problem was that with opacity, masking, mirroring and scene offset build into the main pixel-wrangler, this function was becoming.. crowded? It started to look like the onset of spaghetti and I was trying to avoid that.
What I needed was a nice in-between function that would handle the frames and neatly deliver it to the drawing function. It struck me that I could roll the frame select function and the re-sample function into one, creating a single image for the main function to draw. So I started with the re-sample function that can be seen in the video and am now in the process of implementing the frame select code.
As you can imagine, the object data structure has grown a bit since its initial inception
objectData[objectData.length - 1]['name'] = "PittRivers"
objectData[objectData.length - 1]['asset'] = "PittRivers1"
objectData[objectData.length - 1]['type'] = "character"
objectData[objectData.length - 1]['frame'] = 0; // which animation frame to draw
objectData[objectData.length - 1]['hidden'] = false;
objectData[objectData.length - 1]['alphaMask'] = true; // use scene mask
objectData[objectData.length - 1]['opacity'] = 1;
objectData[objectData.length - 1]['drawClean'] = false; // subject to filters or not
objectData[objectData.length - 1]['x'] = 35;
objectData[objectData.length - 1]['y'] = 165;
objectData[objectData.length - 1]['Direction'] = -1;
objectData[objectData.length - 1]['zoom'] = 'map'; // map = use Y position
objectData[objectData.length - 1]['curZoom'];
objectData[objectData.length - 1]['action'] = 'none'; // For example "move"
objectData[objectData.length - 1]['targetX'] = 0;    // Move target
objectData[objectData.length - 1]['targetY'] = 0;
objectData[objectData.length - 1]['anchorX'] = 15;
objectData[objectData.length - 1]['anchorY'] = 45;
objectData[objectData.length - 1]['fixed'] = false;
And it will get longer! But eventually this structure will be generated in the asset loader. The movement of the object is very simple. When a targetX and targetY is set and the action attribute is set to move, every tick, the X and Y attributes are pushed a bit closer to the target by a set speed amount. This is handled in what are the beginnings of the state machine where the real action happens!
Plans for the next step will be the frame animation implementation.
-
Mouse and Mask
04/30/2019 at 18:17 • 0 commentsAfter a relatively easy code clean up, it was time for some user input. This is relatively strain forward event based Javascript, so going into detail isn't necessary. For testing purposes, I use the arrow keys to move around the main character all over the screen. This is quite simple to do as the position of the character in the scene is an attribute of said object. As the render engine chooches along, the screen get updated instantaneously.
This of course has little to do with animating the objects, but that is a subject for another blog. Point is that I can now kick around my main antagonist on screen to test the alpha masking. I'm not sure if the way I implemented the meta image file is the most elegant and perhaps I'll change this in the future as I suspect it is not necessary and a bit convoluted.
<asset>
    <name>scene</name>
    <mediaType>image</mediaType>
    <assetType>scene</assetType>
    <file>./assets/scenes/cave1.png</file>
    <metaFile>./assets/scenes/cave1alpha.png</metaFile>
</asset>
Essentially, the meta-data file is just another graphic, so perhaps loading it as a separate asset would have been cleaner and easier as it would not have needed the loader to handle this. On the scene data side it really does not matter much as all that is needed for the render engine to use this data is to have the pointer to the graphic.
Each object now has a mask attribute that, when set true, checks every pixel position of the object against the mask data and the Y position of the object in the scene. This works a bit like this.
![]() The object neatly disappears behind the rocky ledge. It can now also walk in "circles" around the pillar. At this point objects are drawn in the order in which they are loaded, so between objects there is no adapting draw depth, but this isn't the hardest thing to implement later on.
The object neatly disappears behind the rocky ledge. It can now also walk in "circles" around the pillar. At this point objects are drawn in the order in which they are loaded, so between objects there is no adapting draw depth, but this isn't the hardest thing to implement later on.
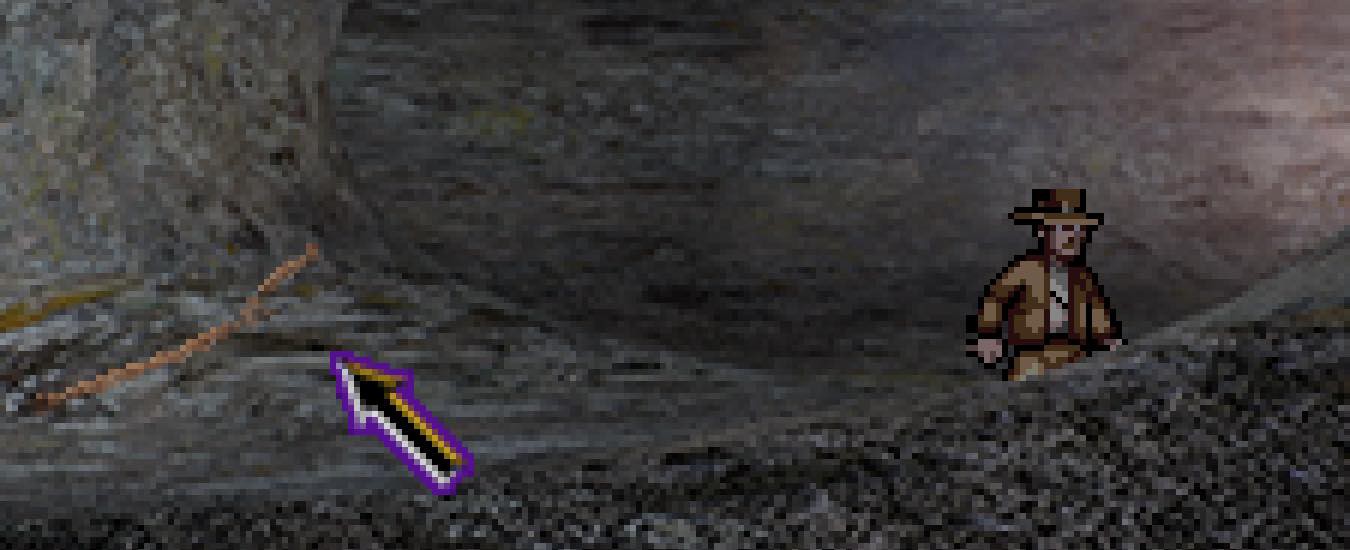
I also implemented mouse events for extra clicky-ness which helps with the whole effort! The mouse cursor is just another object just like the sticks and figure with some extra attributes and options. One option is that the graphic for the cursor can be changes at any time.![]() For example, here the cursor uses the bag icon. This means that I can use the actual graphics in the game when the player wants to use it. If you pick up the stick, you carry it and click the bolder. This is a simple visual dynamic that feels quite natural.
For example, here the cursor uses the bag icon. This means that I can use the actual graphics in the game when the player wants to use it. If you pick up the stick, you carry it and click the bolder. This is a simple visual dynamic that feels quite natural.
Some smaller features I make this session were the scrolling scene which just proportionately sets an offset based off of the characters position on screen. This was trivial to implement and because I redraw everything 30 times a second, this scrolling is very smooth. I have yet to see any flickering or shearing as I will demonstrate in a demo video as soon as the next set of functions have been build.
These functions will be the pointy clicky interface to move the character, the path system and a way to animate the movement. -
Basic render engine
04/30/2019 at 17:13 • 0 commentsLast time, I finished the asset loader and the main loop. Now I want to take the stuff I loaded and so something with it, preferably displaying it inside the canvas element. So I'll be starting the game state data structure and a render engine that will take this state and display it graphically.
The game state basically is a scene and a bunch of objects. For the scene we hardcode the following. Eventually the final data structure will be loaded from the XML file.
sceneData['stage'] = 'scene'; // the graphic asset
sceneData['character'] = 'PittRivers'; // controllable character
sceneData['offsetX'] = 0; // scroll X
sceneData['offsetY'] = 0; // scroll Y
This array will probably not be so small in the future. meta files, layers and all sorts of mischief could go into here.
objectData.push(new Array());
objectData[objectData.length - 1]['name'] = "PittRivers" // in game name
objectData[objectData.length - 1]['asset'] = "pittStanding" // graphic asset
objectData[objectData.length - 1]['type'] = "character"
objectData[objectData.length - 1]['hidden'] = false;
objectData[objectData.length - 1]['x'] = 35;
objectData[objectData.length - 1]['y'] = 165;
objectData[objectData.length - 1]['anchorX'] = 15; // Where is his middle
objectData[objectData.length - 1]['anchorY'] = 45; // Where are his feet!
objectData[objectData.length - 1]['fixed'] = false;
This is the basic object. it also has a lookup table for, but this is basically all that is needed to render a scene with the objects in it. That looks something like this!
![]()
Here you can see the scene with 3 elements, Pitt Rivers, The stick in the middle and the bag which is a fixed object. You might think that I left out a few steps, but in reality I did manage to re-purpose some code from the earlier attempt as well as my online image editor to quickly implement the drawing function which looks a bit like this.
function draw(x,y,tileName){
    var tileID = assetPointer[tileName];
    // Draw graphic at position in the scene
    for(tileX = 0; tileX < sceneGraphics[tileID].width; tileX++){
        if (tileX + x < 320 && tileX + x >= 0){
            for(tileY = 0; tileY < sceneGraphics[tileID].height; tileY++){
	        var curPixel = (tileY *  sceneGraphics[tileID].width + tileX) * 4,
		    curScreenPixel = ((tileY + y) * 320 + (tileX + x)) * 4;
		if (sceneGraphics[tileID].data[curPixel + 3] > 16){
		    imgdata.data[curScreenPixel + 0] = sceneGraphics[tileID].data[curPixel + 0];
		    imgdata.data[curScreenPixel + 1] = sceneGraphics[tileID].data[curPixel + 1];
		    imgdata.data[curScreenPixel + 2] = sceneGraphics[tileID].data[curPixel + 2];
                }
	    }
        }
    }
}
This is the basic function I use to write the graphics onto the scene. Of course this will not stay this short (and readable), but really this is all that is needed to draw the scene, characters and objects. It uses the alpha channel to "cut out" the objects. I could use the alpha channel more granularly, giving the object opacity, but I think opacity should be an attribute in the data structure. Of course for things like car windows, selective alpha would be nice and that will probably be included in this function at one point with the general (controllable) opacity attribute.
Note in the screenshot the numbers in the upper left corner. The last number is the total of the 33th of a second. The first number however is the time that the render engine takes to draw a frame in that 33th of a second. This means that we have cycles to burn for more rendering and of course the state engine which actually is the game! I still find it amazing that in browser Javascript performs this well.
In the next log, I hope to have added some user input and I'll be implementing the masking functions. At this point, I have not coded myself into some corner.
-
The main loop and the render engine
04/30/2019 at 15:55 • 0 commentsRight, I make some executive decisions on this pet project of mine concerning timing and the render engine. From my failed Shovelization project I learned that modern day browsers on modest hardware are able to push an amazing amount of data with blooming Javascript! Writing image data to a buffer and plonking it on a canvas takes fractions of a second, it really is amazing how optimized it is compared to the mid naughties.
In my previous attempt to build a game, I wrote it such that only when absolutely needed, a screen redraw was requested. This makes for all sorts of problems that are a pain to force code away, requiring some elements to buffer the background.... but not after a redraw and all other sorts of shenanigans. Secondly, this approach took away some options that I would have liked like filter effects and it made animating "sprites" a royal pain. Who would have guessed! I'm not a game coder...
But I do learn and I have come to the following conclusions. My render engine will simply (try to) render 33 frames per second regardless of state. Sure, a bit overkill in most scenes I think, but it's 2019, I'm not racing the beam on an Atari 2600! In a 240 by 300 pixel canvas, this is peanuts on a moderate desktop. This will also be my "tick". I know the clock for SCUMM games were measured in Jiffies, being a 60th of a second, but I do not think I need that resolution. Every frame being 1 tick means roughly 30 frames is a second which is easy to work with and will support everything from animation to timers.
Two of the more controversial choices I have make are that A. I'm not going to use requestAnimationFrame() but rather use a timeout and B. As a product of the 80's and 90's, I'm not going to use classes at all. My data struct is going to be the maximum of OOP in my game and that is that!
The reason my I'm not going to use requestAnimationFrame() is because I believe it fixes nothing for me but would cause useless overhead. Sure, flickering and shearing are awful, but I do not think my brute force approach will have any issues with this. I will be controlling every sub-pixel and only after the buffer is completed, it will be dumped to the canvas so shearing is impossible. As for flicker, we'll just have to see. It can always be implemented if needs be. (famous last words). As for the main loop :
	function main(){
	    var sTime = performance.now();
	    ++counter;

	    // main code starts here.
            gameStateTic(); // do game'y stuff
	    renderer(); // render the gamestate
	    // main code ends here.

            // timing to match a precise FPS number.
	    var xTime = Math.round(performance.now() - sTime),
	        waitTime = setRate - xTime,
	        processTime = waitTime;

		if (waitTime < 0){
		    // process took longer than the fixed rate.
		    waitTime = 0;
		}

		if (fps){
		    rateMonitor(xTime, waitTime);
		}

		if (loop){
		    setTimeout(function(){ main(); }, waitTime);
		} else {
		    alert("end program")
		}
	}
That is the main loop and seeing as user input will be handled via events which will be set up before the main loop starts, I do not think the function will be much different in the future. As you can imagine, this loop is chooching along nicely with nothing to do, so I'll have to give it something to chew on!
Next time I'll be setting up a basic hard coded data structure and building the rudimentary render engine and then we'll see how much cycles we are left with to actually build this thing! -
Asset loader
04/30/2019 at 15:06 • 0 commentsI got some graphics and I have some outline of what I want to do with it. The very first thing that I need is a way to get the graphics into memory in a way where I can use them in the render engine.
I'm using the HTML5 canvas element to display the game, but I'm also going to use it to load the graphics and because I want the main canvas to display a splash screen and loading status while loading the assets, I'll use a hidden canvas element to do this.
The first thing that happens after the page is loaded, is a call to the function that loads the XML file that essentially holds all the games data or at least the scene data. This means the assets, how they are to be stored, what they represent and how they relate to each other and ultimately the game logic, but we are a long way of from that. A basic asset looks something like this.
    <asset>
	<name>PittRivers</name>
	<mediaType>image</mediaType>
	<assetType>sprite</assetType>
	<file>./assets/characters/pitt/PittRivers1.png</file>
    </asset>
This is basic enough. From this data, the loader function can now build some indexes and arrays that hold the graphics and the data needed to handle them. This structure will most likely be added to later as it will contain various types of media and asset types.
After this data is properly stored, one by one the images will be loaded into the hidden canvas element and then copied to their location in a big chunky array where we can address every sub-pixel individually. This is important because I'm going to use this for storing various types of meta data with this.
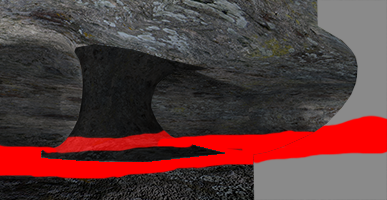
An Image object contains a vast amount of data that, when not strictly being used as image data, can be used for a lot of things. When I made the cave graphic, I also made this image.
![]()
This is not the exact image because the grey and black parts are eventually going to be the alpha layer, but this does illustrate what this meta-data file is going to do. Imagine this file projected on the cave scene. Or lets not imagine it, lets take a look.![]() The red channel represents the places a character can walk and the grey/black areas are indicative of where this part of the image is in relation to the background. This concept isn't new and has been used in many (adventure) game engines. This exercise is about how I want to use these 4 channels to work with the game dynamics.
The red channel represents the places a character can walk and the grey/black areas are indicative of where this part of the image is in relation to the background. This concept isn't new and has been used in many (adventure) game engines. This exercise is about how I want to use these 4 channels to work with the game dynamics.
So with four channels to work with, R,G,B and A, each having 256 levels to assign meaning to, we have some options to consider. Of course the path channel and the mask channel are a given.
The mask channel will use 0 for always visible and 255 for always hidden with all the numbers in between being either depending on the players Y-coordinate in the scene.
For the path channel, we get 1 to 255 where 0 is not accessible but 1 to 255 are. Now what possible meaning could we assign to that channel apart from accessibility? At this point in time, I'm considering speed! (Change my mind!). Basically it will dictate how fast the character will be able to move through a specific area like flat road versus water. Now it is apparent that this does not work with slopes, so I'm not 100% committed in giving up this data channel for that specific reason.
But regardless, we have 2 channels left. Green and blue also have 255 values each in the same file that we can attribute a meaning to. So what is spatially dictated that I could want to control in this fashion?
Size perhaps? naturally the easiest way to control size is to control it by the Y position of the character just like the mask, but perhaps there are scenarios where the size on different locations of the scene have to be forced.
Y offset. In conjunction with mask, using a Y offset would make it possible to create effects like in Kings Quest (5 or 6), where the character walks off in the distance over dunes, bobbing up and down, disappearing behind the hills as he gets smaller and smaller.
As it stands I have nearly 3 channels of unused bandwidth in this scene and I would like to make use of it! Any recommendations are welcome!
With the basic loader nearly finished, there comes a crucial part of the games design. The main loop! In that main loop, the game state engine and the render engine will live. For now, the game state will be hard coded so the next log will be all about the main loop and the render engine. -
Graphics and story
04/30/2019 at 14:10 • 0 commentsFor me to build this project, I have to build towards something, in this case a graphical adventure in the early to mid 90's style. For that I need a couple of things, primarily a story to tell and the assets/graphics to tell them with.
As for the story, I have decided to use an old writing project from way back. I was developing the story of Pitt Rivers: Archaeologist in the future (You see a pattern here?). I wanted to write a cheesy short novel about this guy named after a pioneer in archaeology set in the far future. I never got around to actually properly write the thing, but much of the structure and characters are there. Seeing as graphic adventure engine are obviously perfectly suited to tell stories about protagonists who are also archaeologists, this seemed like the right story to use.
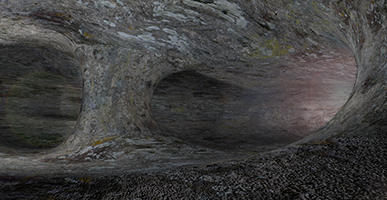
For the graphics, I fired up Cinema 4D and quickly build a cave scene for testing. This is what I came up with :
![]()
This cave scene has a few of the properties that the render engine will have to deal with. First of all, it has to be a scrolling scene as the image is wider than 300 pixels. Then it has depth and obstructions. Characters walking in the distance should be smaller than characters walking in the foreground. Also there are obstructions and hidden areas. A player should not be able to walk through the pillar and a player should not be seen behind the pillar. Also nothing should be able to get in front of the cave opening on the right.
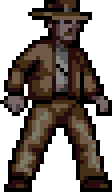
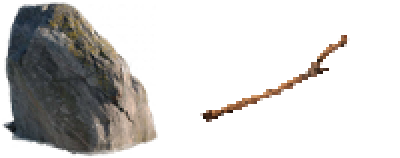
As for the first "mission" Pitt Rivers should go on, it should be a simple game mechanic that makes use of the majority of features we need to build a fully fledged adventure game. So the goal is to get the engine up to a point where Pitt Rivers in this cave needs to pick up a stick and use it to dislodge a bolder in order to get to the next scene. Here are the assets I will start with.![]()
Alright, alright! The character I'm going to use is blatantly ripped off from some Indiana Jones game. This will be replaced with original graphics when everything is working like it should of course. It just felt better having a period piece styled graphic in the scene.
![]()
Here we have the bolder and the stick that are part of the plot. I'm using PNG exclusively for various reasons, the main one being that it does not have artifacting and the alpha channel is going to be extremely important in all sorts of interesting ways.
![]()
This is the icon I'll be using for both the inventory and the game options and controls. While I want that LucasArts feel, I want to use the entire screen as the stage, so I won't be having the Look, Pick Up, Push and Talk icons on screen all the time. Clicking the active character will bring up the interaction options. So the story board for this scenario would be something like this :
- Click Pitt Rivers
- Choose Look at
- Look at Stick
- Click Pitt Rivers
- Choose Pick up
- Pick up Stick
- Walk to Bolder
- Click Bag
- Choose Stick
- Use Stick on Bolder
- Walk to exit
Of course the game will provide the character will all sorts of accompanying animations and test responses while tackling this "puzzle". All those components and how I implement them will have their own project logs and I come across them.
Now, I think it is time to start putting some code to file. The first thing we need to a way to load the assets. Basically this is the beginning of the data-structure, so I better not make a mess of this. Next log, I'll do the asset loader and the first pieces of game data structure.
-
Getting started...
04/30/2019 at 12:46 • 0 commentsInstead of starting haphazardly in some random direction and seeing what comes out I think, I'll treat this more like a work project and actually try and plan and design before committing to code. So the question is : "What do I want to build".
Right, so I have decided on a retro faux 8-bit scriptable adventure game engine and I want it to have a similar feel to SCUMM games. I always like those a tad better than the Sierra look. It needs to be feature rich to tell engaging stories and build enjoyable puzzles. So lets make a shoppinglist of sorts.
- Point and click style control
- Scriptable stories
- Scrolling graphics
- Character and object animations
Well, that does not seem to overly ambitious. So lets figure out what we actually need to build to make that happen.
- Some graphics to test with
- A render engine that takes the game state and puts it on screen
- A state machine that takes user input and controls the game logic
- User input methods
- Some basic plumbing for loading files and setting up shop
- A story to tell!
So there we are! Roughly, those are the components I think I need. Hopefully this time I can keep them separate and not end up entangled in poorly documented code by yours truly. Each element will have separate components which I will describe as I go along.
Before I start putting code to screen, I think I'll have to let this peculate a bit in my mind while I create (or borrow) some test graphics and think about what story I might want to tell in the actual game.
HTML5 Retro Game Engine(s)
A Side project where I try and build various scriptable retro game engines in the browser.

 The object neatly disappears behind the rocky ledge. It can now also walk in "circles" around the pillar. At this point objects are drawn in the order in which they are loaded, so between objects there is no adapting draw depth, but this isn't the hardest thing to implement later on.
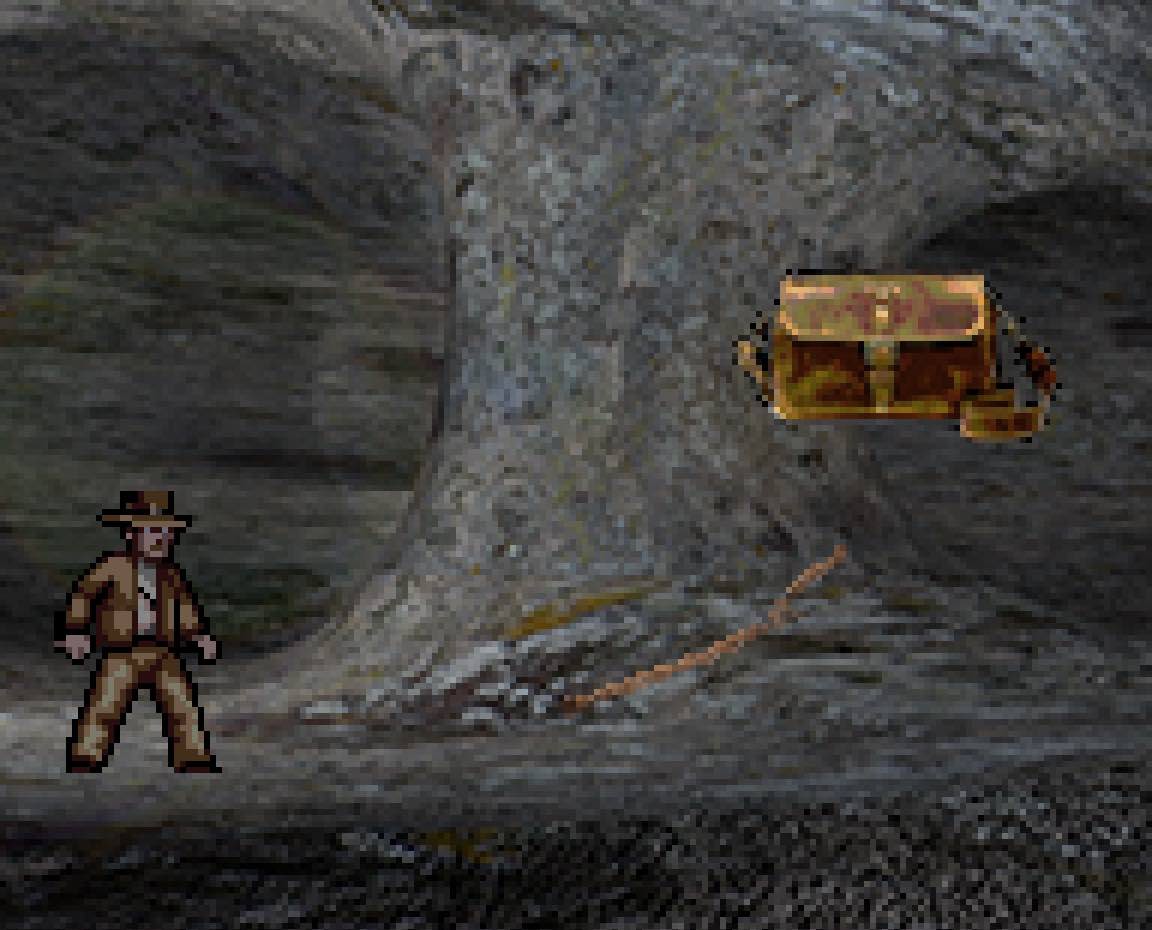 For example, here the cursor uses the bag icon. This means that I can use the actual graphics in the game when the player wants to use it. If you pick up the stick, you carry it and click the bolder. This is a simple visual dynamic that feels quite natural.
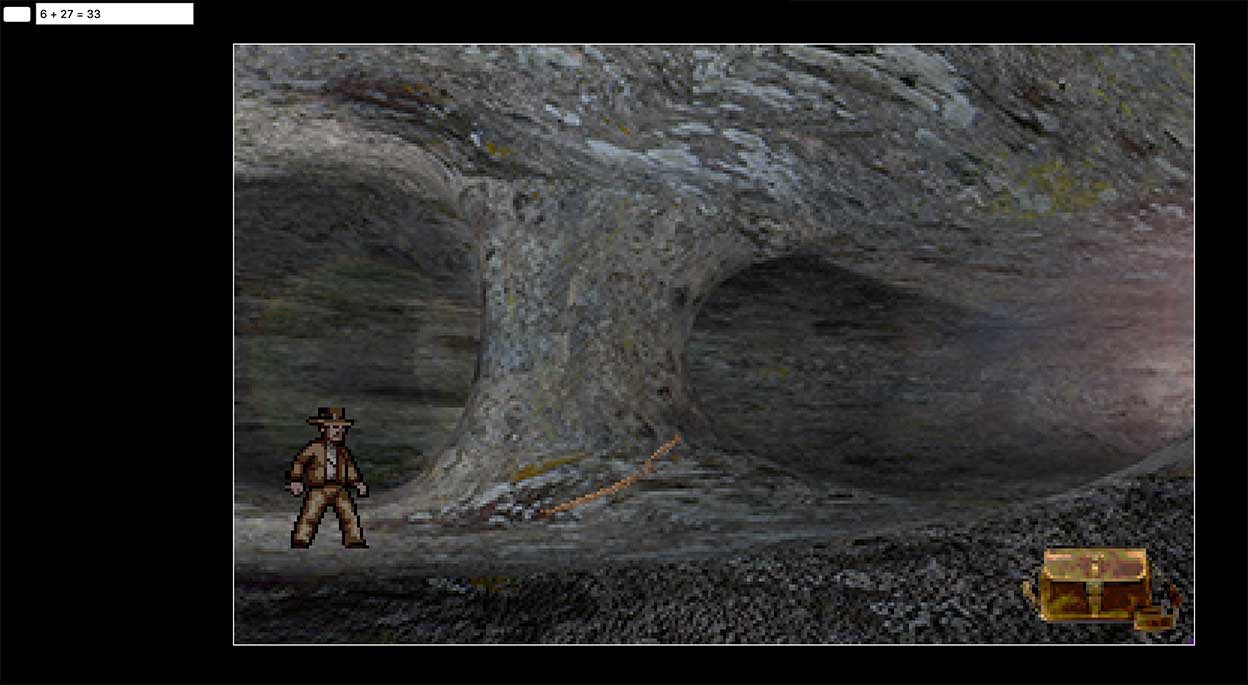

 The red channel represents the places a character can walk and the grey/black areas are indicative of where this part of the image is in relation to the background. This concept isn't new and has been used in many (adventure) game engines. This exercise is about how I want to use these 4 channels to work with the game dynamics.