Close
0%
0%

Cable Robot

Using low cost parts to construct a cable robot with incredible capabilities.

tomTom
Public Chat
Similar projects worth following
Cable robots offer some pretty awesome capabilities and haven't been widely explored by hobbyist. The cool thing is that you can have a very large work envelope with very little inertia. I initially put this concept together as I was trying to figure out a way to monitor, feed, spray, and water large areas of plants.

Life got busy and the cable robot project got neglected for a while. When I saw the hackaday 2019 contest, I thought that this is the perfect opportunity to share what I have learned, and see if I can generate some excitement about the project. I learned ALOT and there are some very key things that are worth reading through in this project if you are interested and exploring it on your own.

I am looking for folks that are interested in work on the next step and would like to collaborate on the project.

Here is a video of the cable robot stacking some cans in my basement.

The cable robot is running G-code that tells it the location of the pickup, and then it goes and builds that stack of cans that was pre-programmed into the robot. The cool thing here is that you can get an idea of the repeat-ability of the robot and control. There are three cable hoists actuators that are controlled using EMC2 software. 

Here is an early video showing the actuators up close. 

A couple of key take away's from the initial development.

* Stepper motors are awesome, I love stepper motors. The one thing to remember is that the torque drops off as a function of speed and does so pretty quickly. I geared the hoists for more torque, to be able to lift heavier objects. By gearing down that requires that motors to run faster, and running faster means they have less torque. So did I really gain anything with my gearing selection, I don't know.

* Run high voltages on the steppers, I started off with 12VDC then swapped to 36VDC. Higher voltages allows for higher speeds.

* I used my own drivers, based on the SLA7078 chipset. These are cheap ways to drive stepper motors but if I were to continue to use stepper motors I would choose a driver than can change micro stepping on the fly. Faster moves would be nice to do half step or full stepping.  

* I think this a good application for servos, my goal is to use servos on the next generation. The problem is interfacing the servos to EMC2 software is more difficult than using steppers.

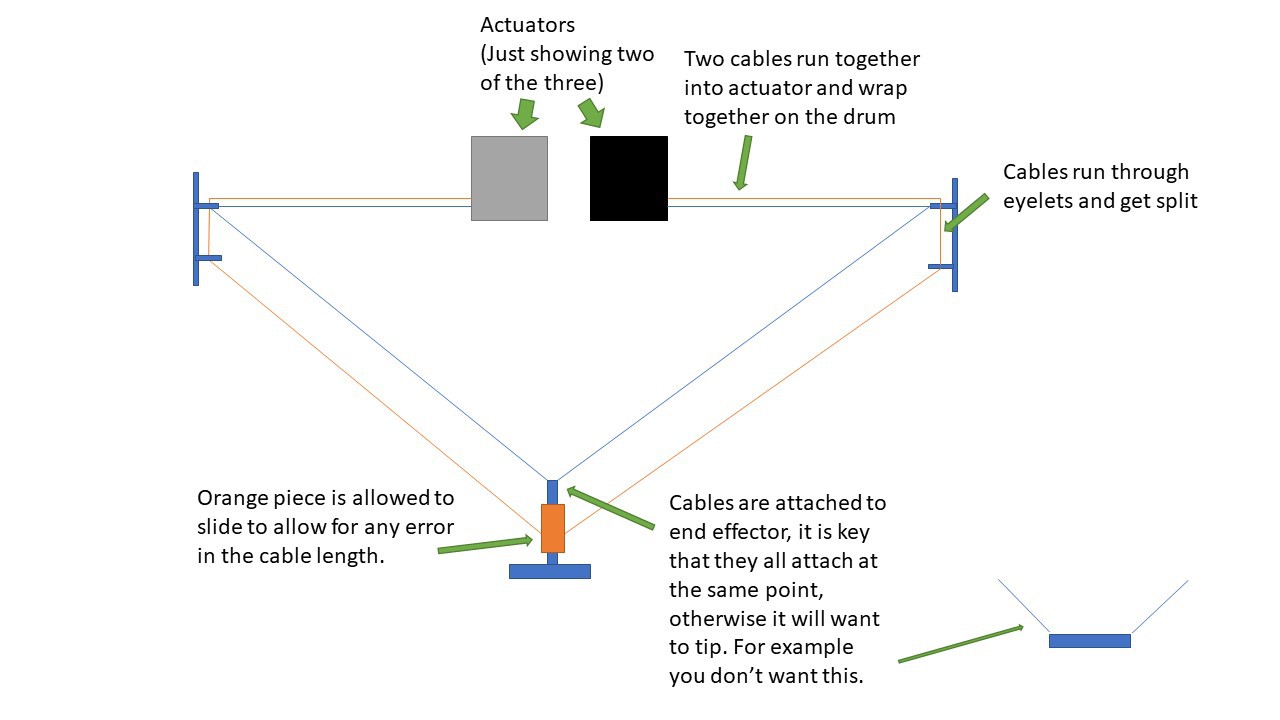
* The point where the three cables come together is very important. You can put a big triangular rigid structure in there because then it will want to rotate. The points all have to come together as one for the solution to work out. I used a neat technique to provide stability that I will share in another post. 

* The top of the envelope has alot of unusable space. It is all about the angles of the cables, they have to have sufficient angle to be able to work decent. Also the edges of the envelope don't work well either. 

* The actuator design is key to only allow one wrap on the drum to be able to keep track of the distance. 

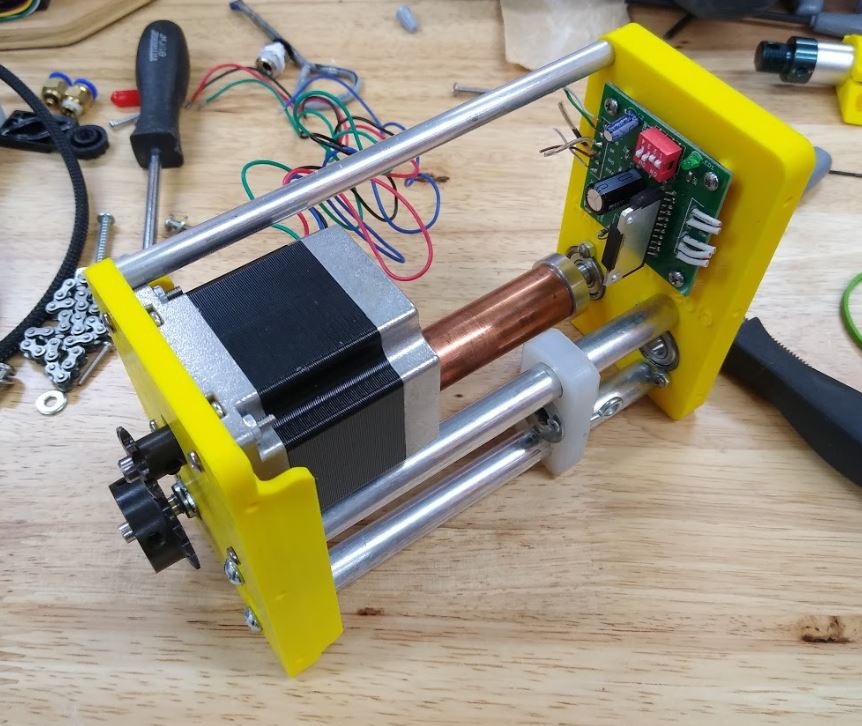
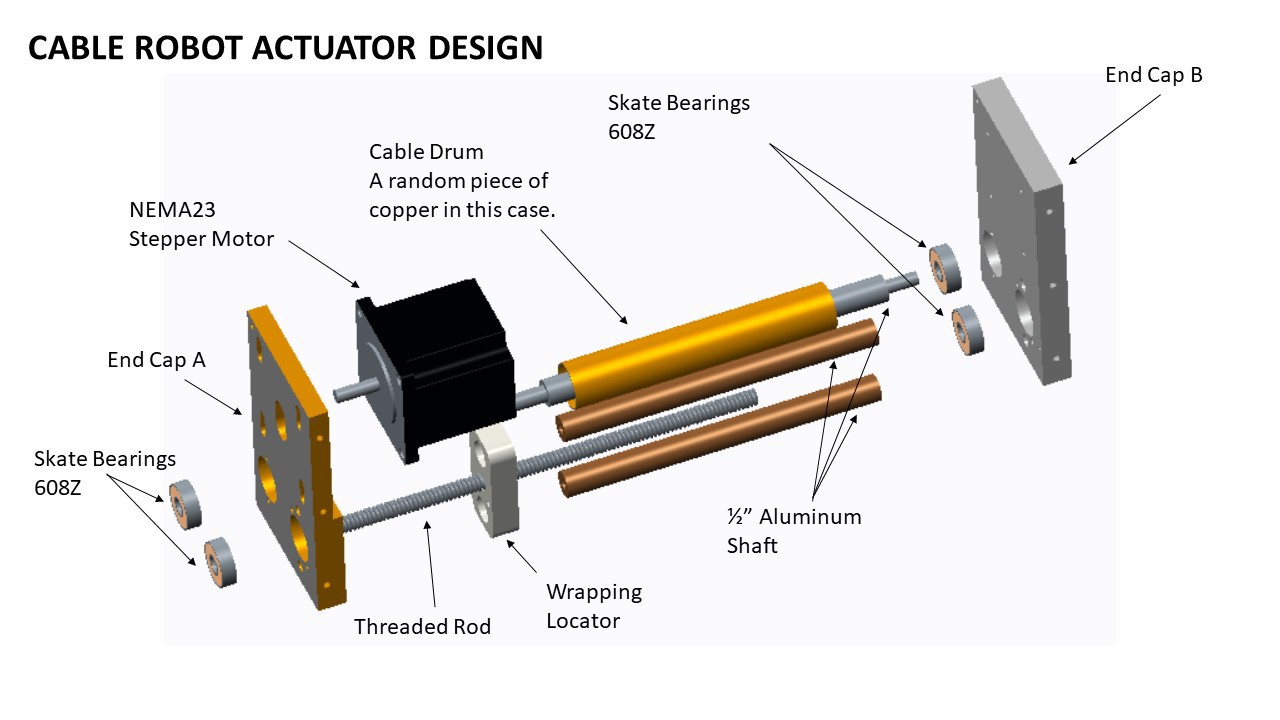
The actuator design is essential for good control of the robot. You need to ensure that you get only one wrap of cable on the drum to maintain accuracy. Here are some details regarding the actuators.
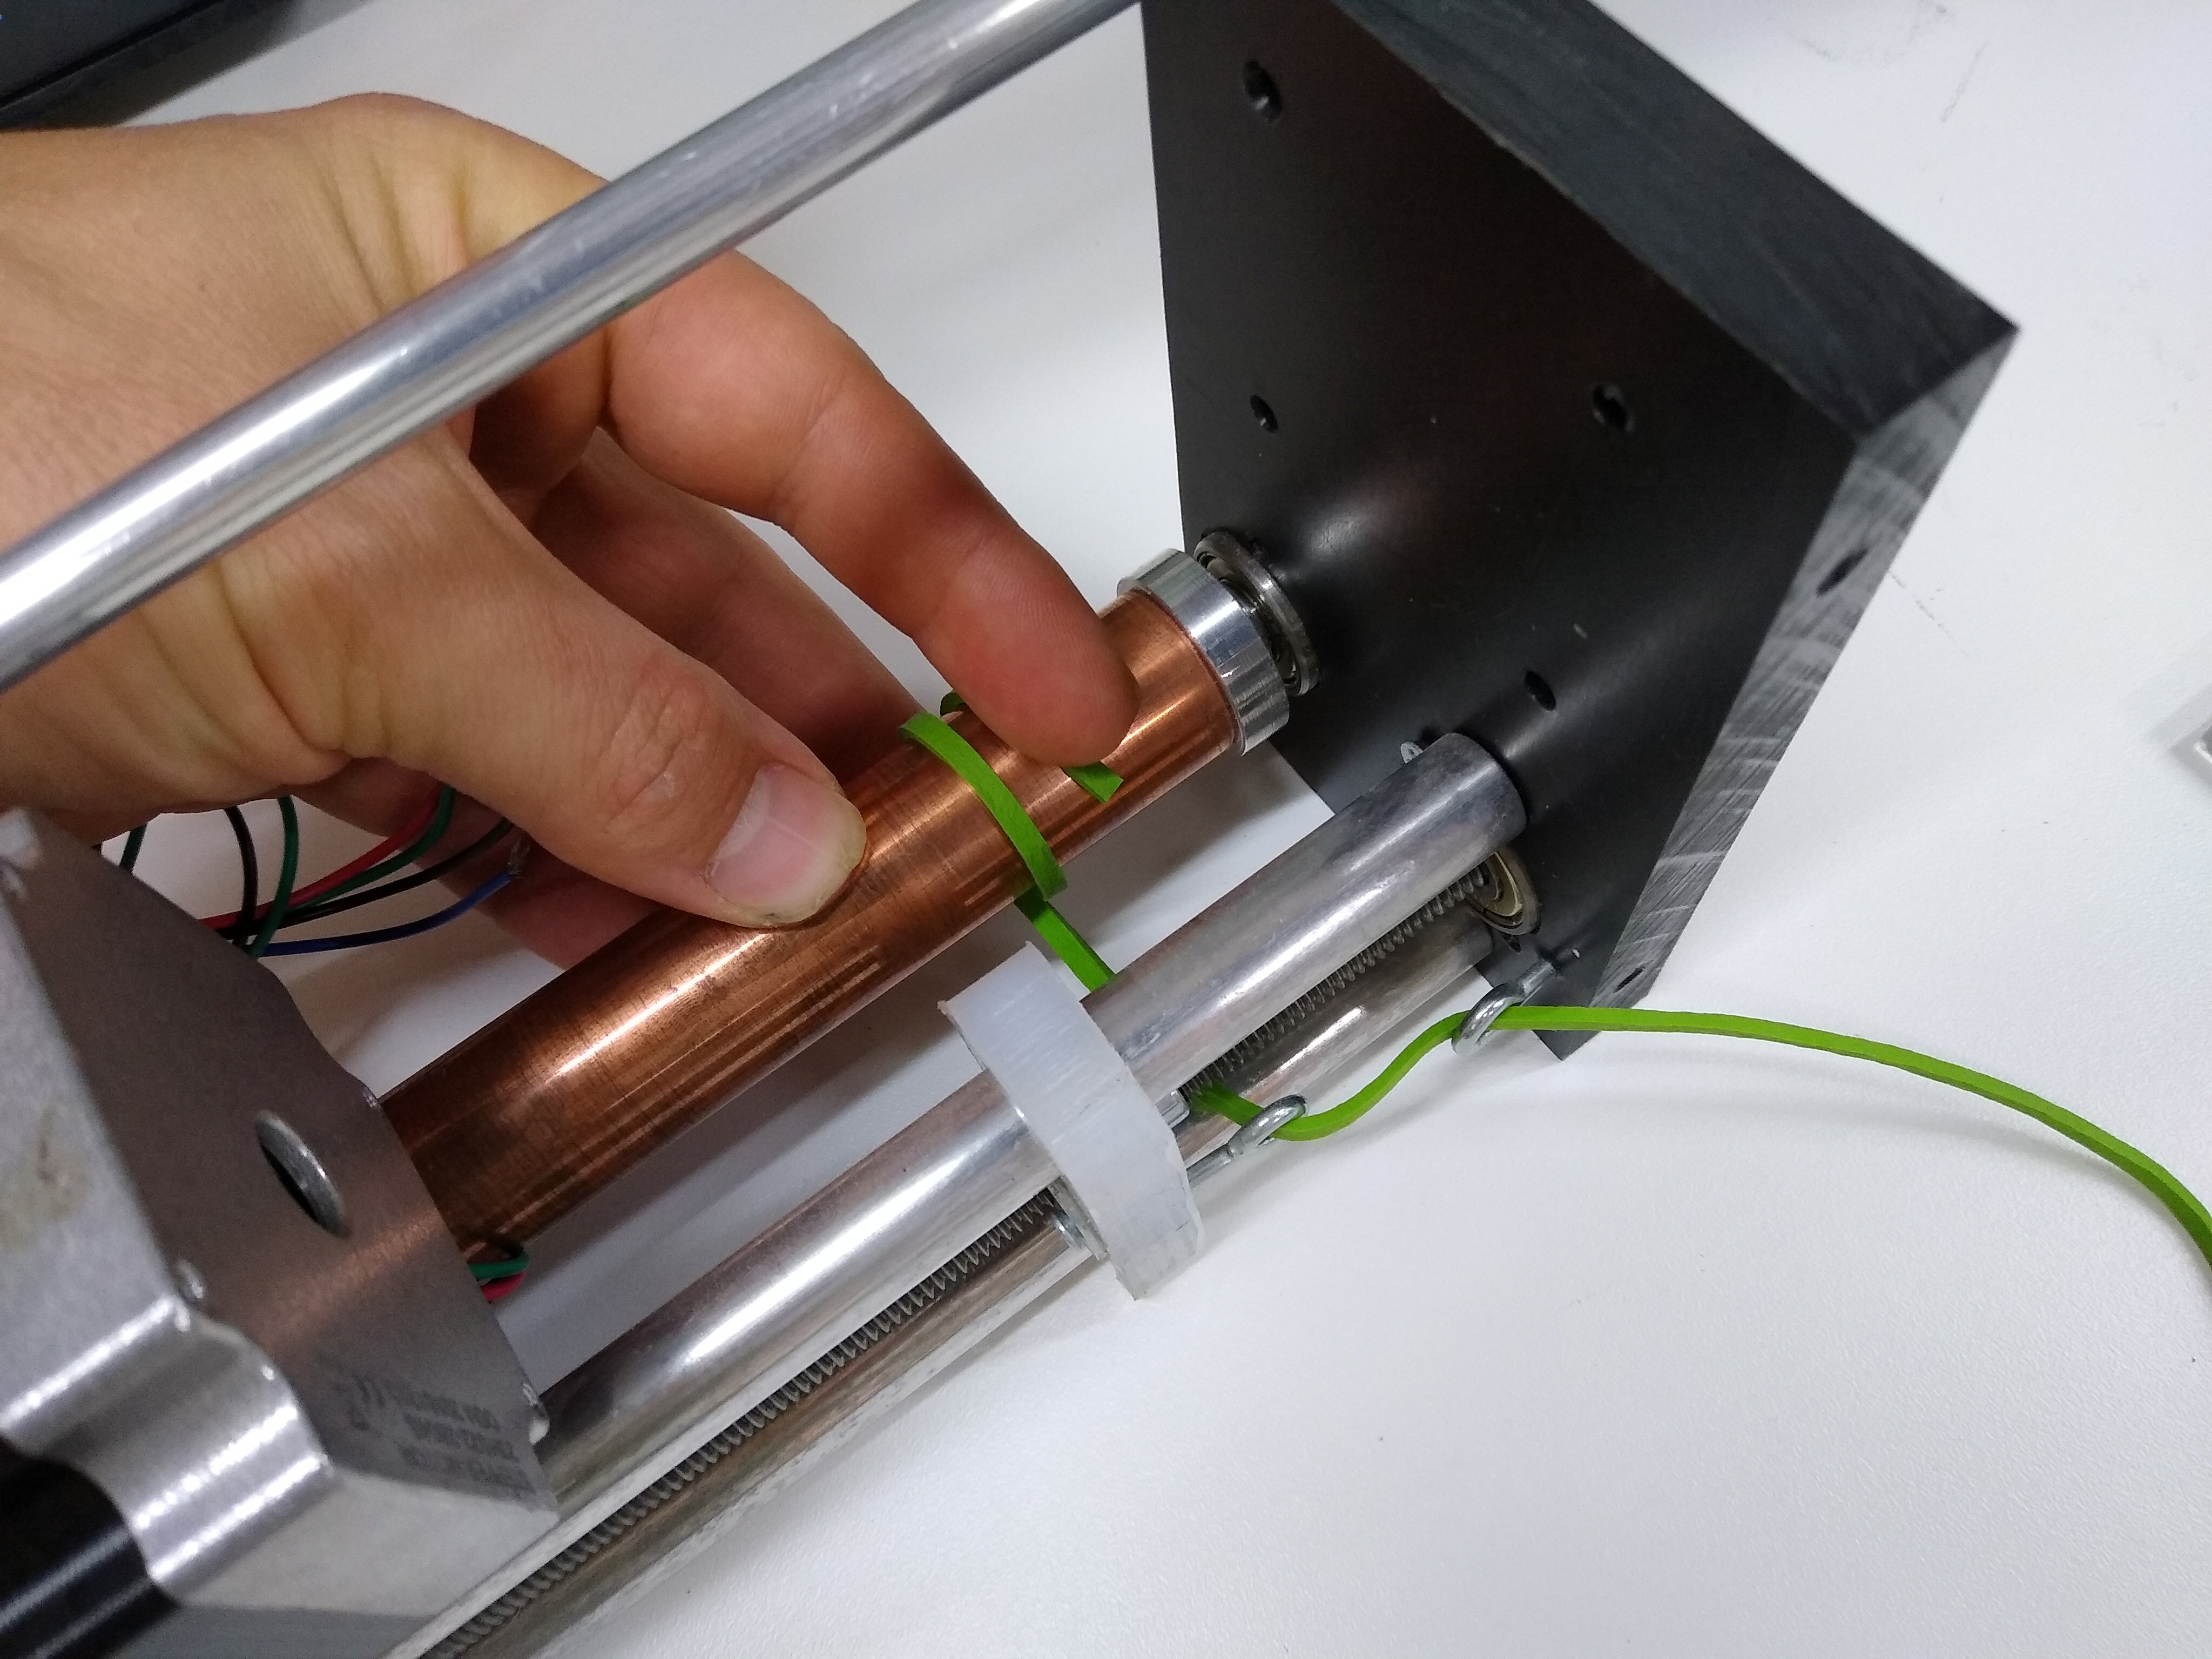
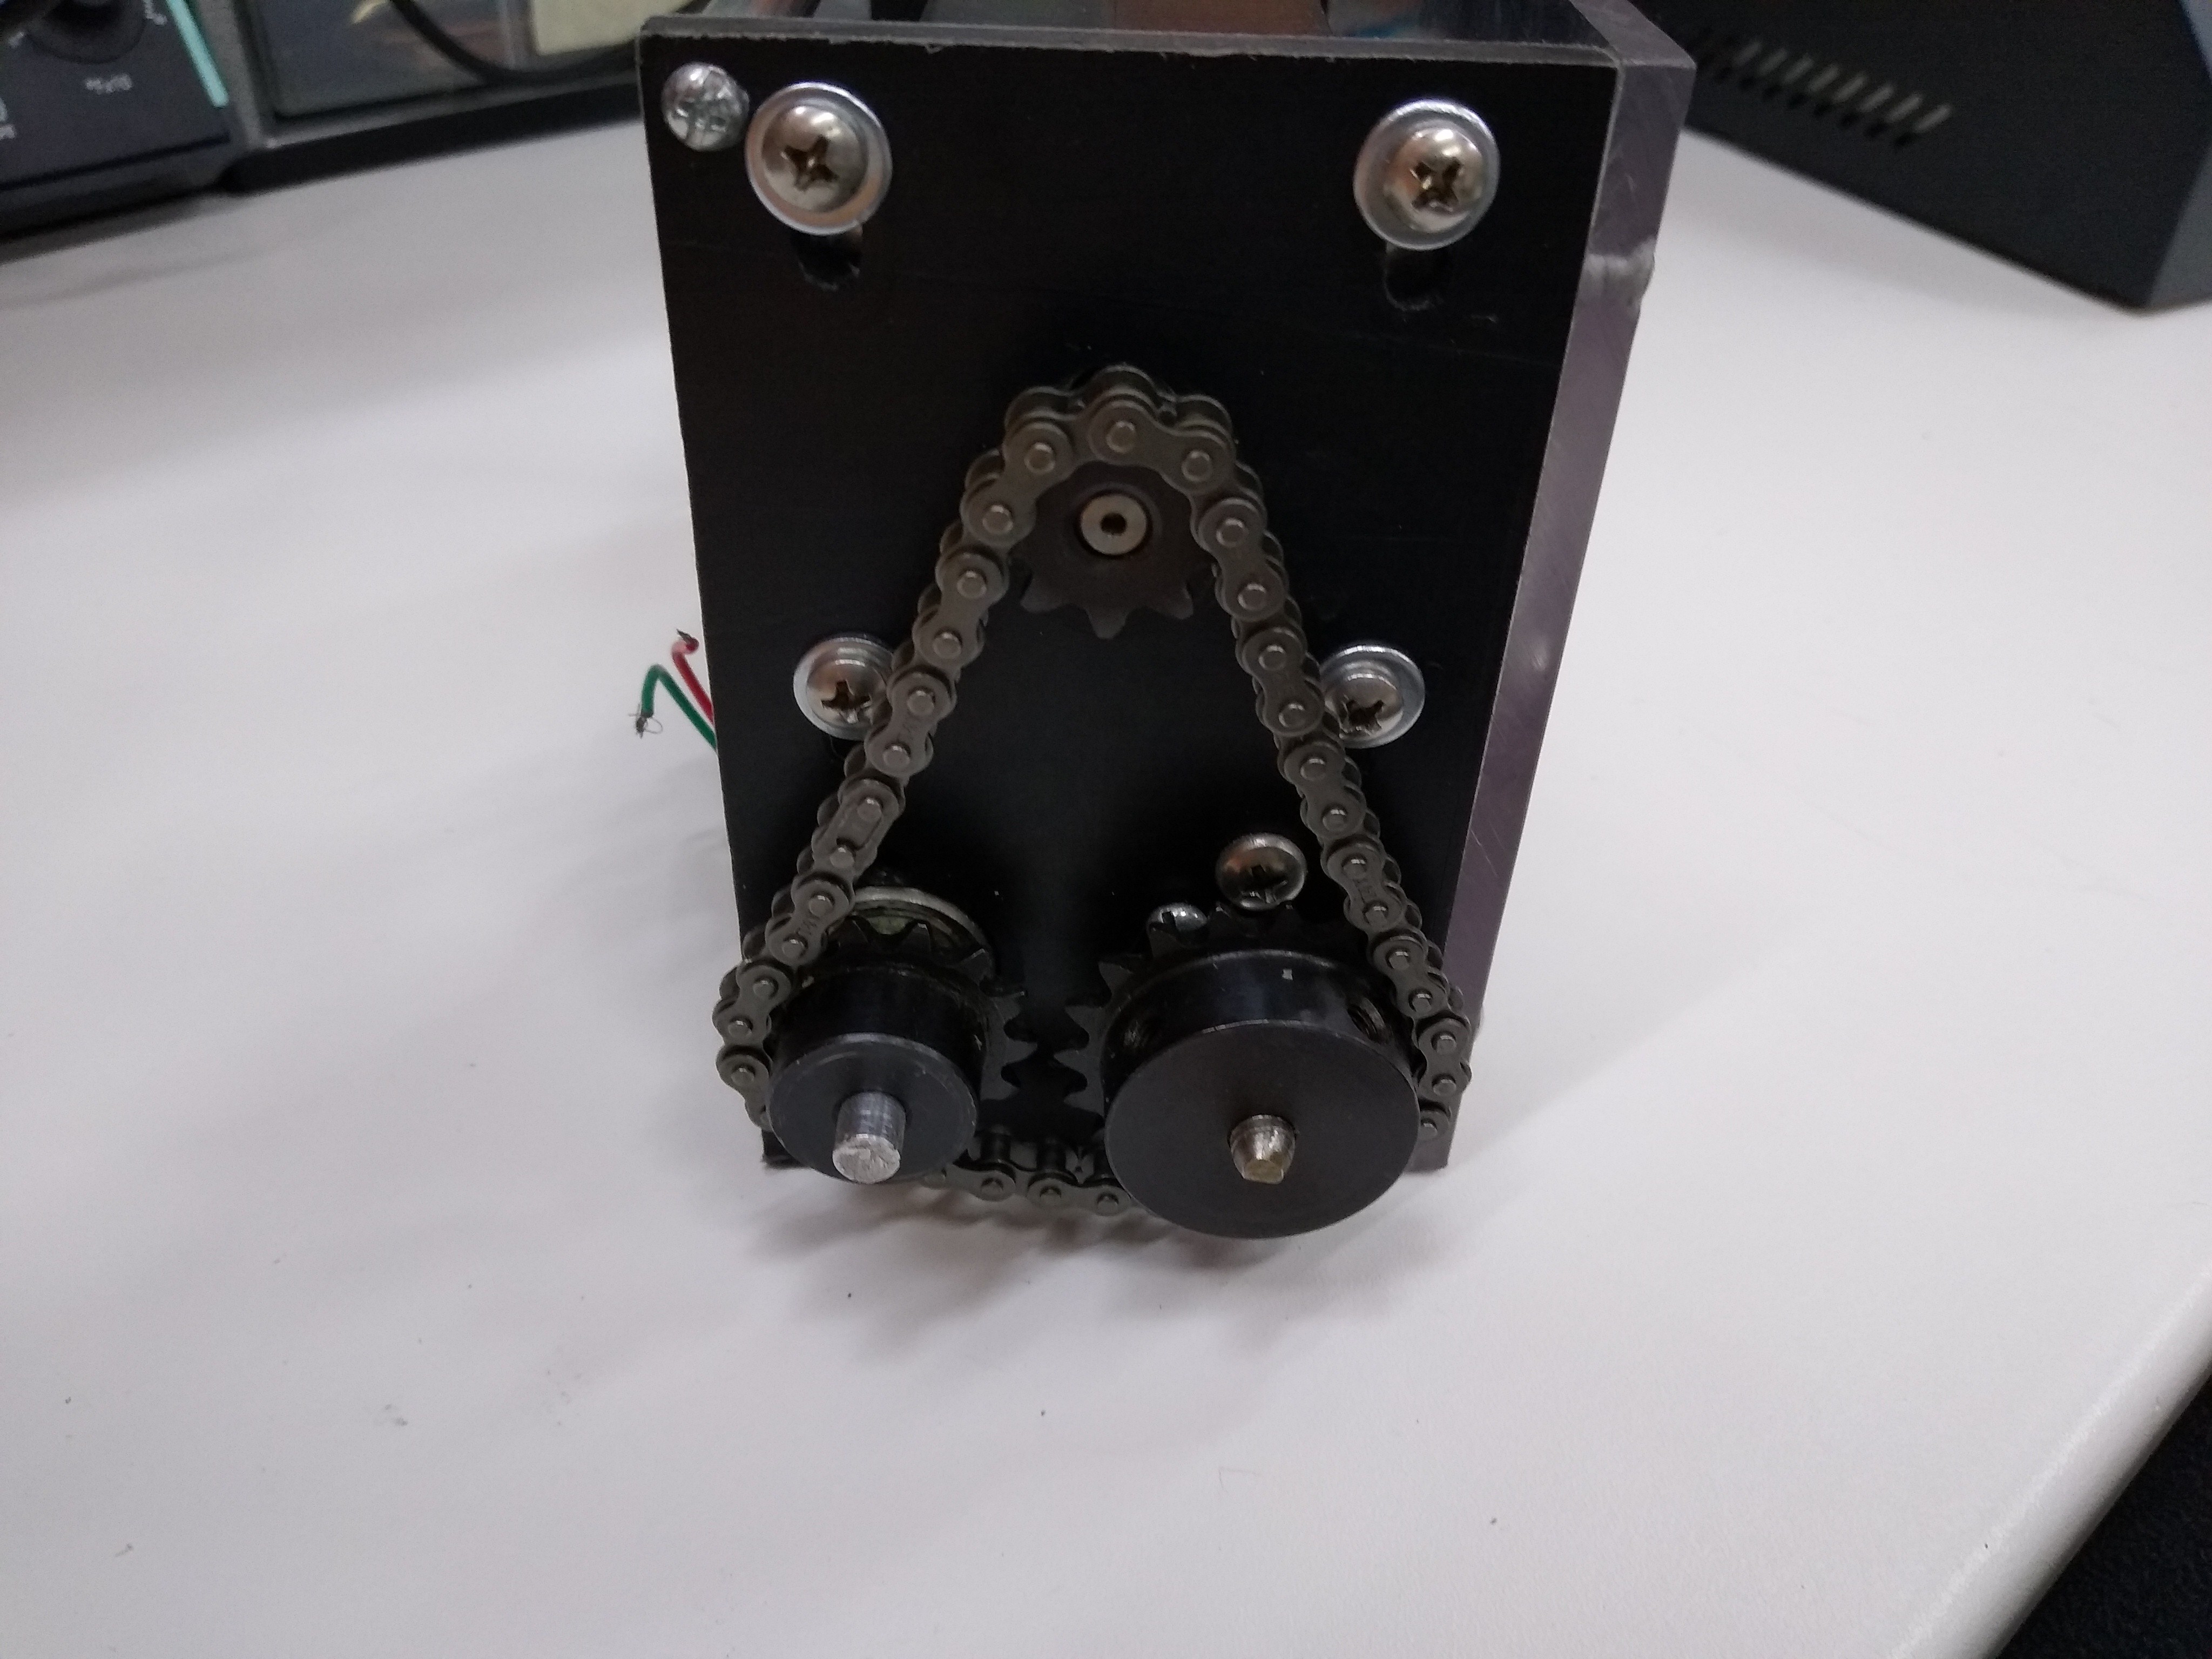
I used a green rubber band so that it is more visable. The white piece slides along the two aluminum shafts and wraps the cable evenly on the copper drum. I plan on doing a design with some 3D printed parts to simply the design. The distance per revolution becomes a thinker, it is one revolution of the drum + the distance traveled by the wrapping mechanism. All of the shafts are sequenced using a chain drive. I would recommend using GT2 timing belt since it is so readily available and GT2 timing pulleys. 
Lastly one of the key things that I have not seen done elsewhere is wrapping two cables on the drum at the the same time. What this allows is to have 6 cables go down to the actuator to allow for stability.  Otherwise I found that any payload swings like crazy. 
View all 12 components

  • 3D Printed Parts

    Tom09/01/2019 at 15:41 0 comments

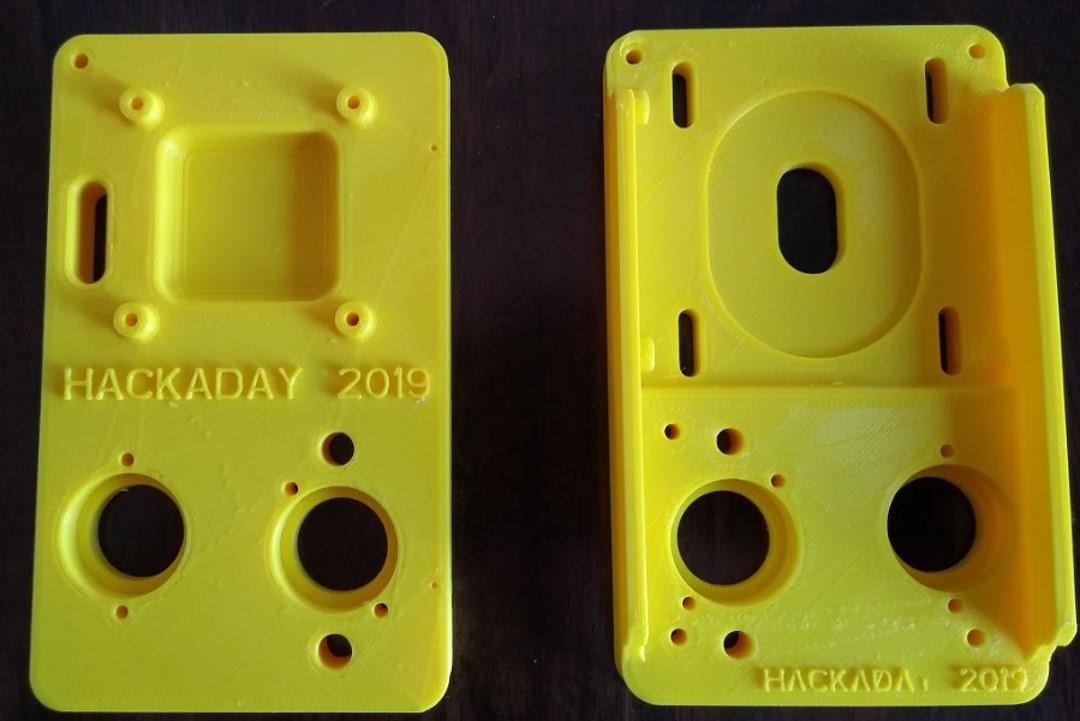
    Got the parts off the printer the other night and they turned out well. These pieces are the end caps of the cable actuator.

    Here is a shot of the first fit up of the parts and the assembly.

    There was a comment about the heat generated by the steppers, so this is something that I will keep an eye on. The plastic is just PLA so not very heat tolerant.

  • Applications of Cable Robots

    Tom08/22/2019 at 20:37 1 comment

    Cable robots have some pretty neat abilities, but we don't see them everywhere in our daily lives. Some of pitfalls are that large work areas require high angles in order to keep the cable tensions low enough. For example if you wanted to cover the size of a football field, then you need a pretty tall tower on each corner to allow for high enough cable angles. 

    That brings me to the concept of using them underwater.....

    There are numerous articles out there about coral reefs that are dying or already dead, we have invasive species of weeds that infiltrate our fresh water lakes (for example Eurasian mil foil) , and we have large dead zones in our oceans (Gulf of Mexico, Mississippi delta). Underwater applications can use buoyancy to offset payload weight, thus don't require such high angles. The advantage of the cable robot is then you have solid idea of where it is at, (underwater positioning is not trivial, we are spoiled by GPS on land), and the actuators can remain above the water line for service. 

    Maybe we see cable robots in the future farming and creating coral reefs. Maybe they identify and chemically treat invasive specifies in our lakes. Maybe they create life in dead zones by seeding tolerant lifeforms in lifeless areas.

    They allow the ability to observe and to perform action.

     I just wanted to throw this out there to see if it spurs any additional outside of the box ideas. Looking for comments.....

  • 3D Printed Parts

    Tom08/22/2019 at 20:21 2 comments

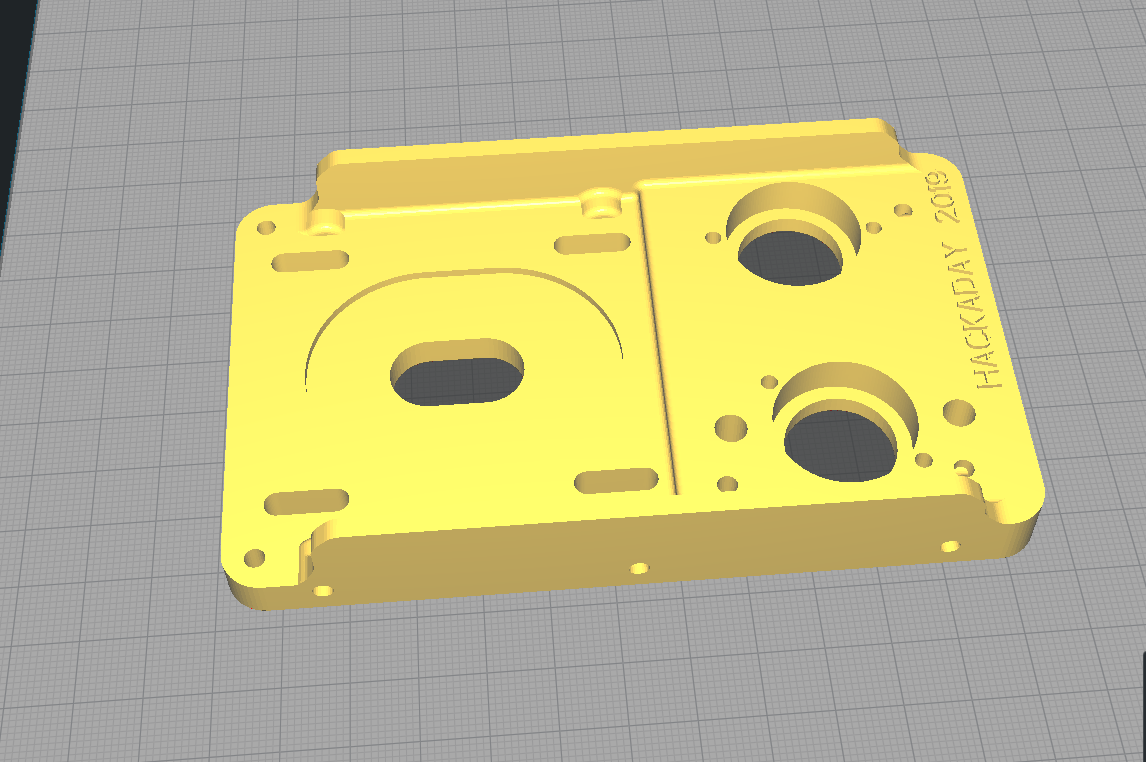
    I finally had some time to modify the design to be 3D printed. Here is the first part that is being printed right now. This piece holds the stepper motors and bearings. More to come....

  • Electronics

    Tom08/21/2019 at 03:54 0 comments

    I posted some pictures of the assembly of the cable actuator. Hopefully this week I will have a chance to do a little design work and create some 3D printed parts to replace the parts that I machined to make it more user friendly for  people to make. 

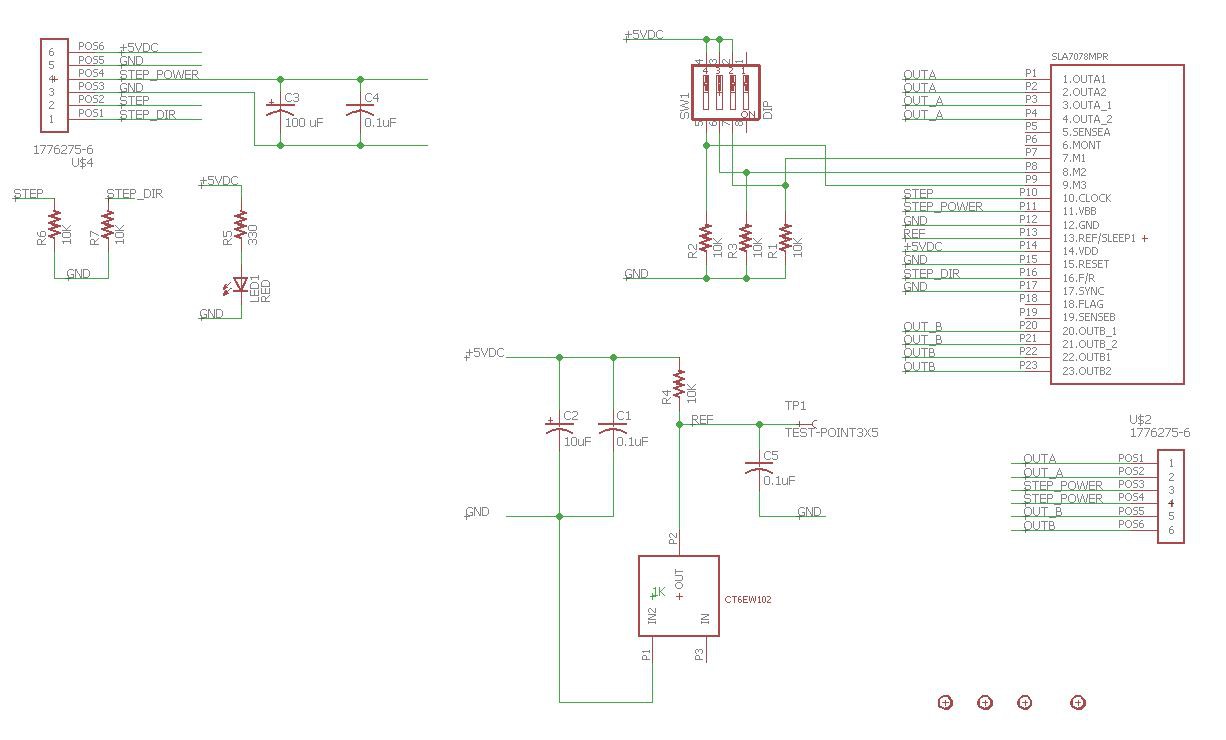
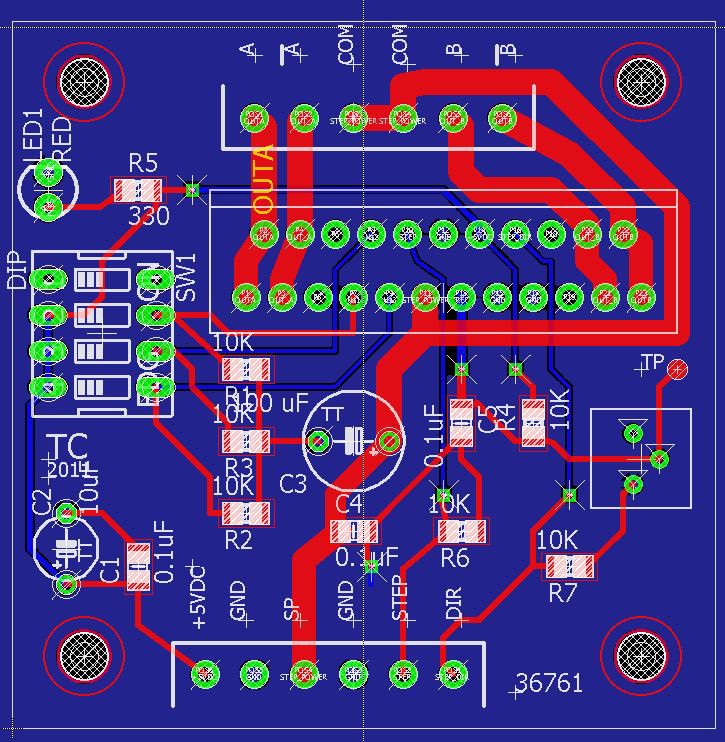
    Here is the schematic for creating the 7078 stepper driver board.

    And here is the PCB layout.

  • What Next?

    Tom08/05/2019 at 03:23 1 comment

    The project has generated some excitement and there have been people asking about helping. It provokes the questions as to what are the next big steps in turning a cable robot into something more useful than a very cool way to pick up beer cans. So here are my thoughts on the next steps.

    1. Going embedded: Right now I run the LinuxCNC software on a old desktop computer that I have from college. The reason why? Parallel port. I started looking at the marlin firmware for 3D printers sometime back, and would like to use to control the cable robot such that the computation could take place on the head. The goal would be a microcontroller dedicated to motion control, and then something like a Nvida Jetson or Raspberry pi for any AI or Camera work. 

    2. Everything is on head, meaning move all the motors, the controls, etc... to the head (head meaning the point where all the cables come together, the end effector). I think this makes things more practical. Basically the only other hardware is just hooks on a wall.

    3. Servos: I want to play with servos. The thing that is cool about the cable robot is that you can scale the payload size. Meaning if you want to do some camera work you can use some pretty basic servo motors. Also as one comment noted, the encoder doesn't have to be on the motor. For example here is a cheap DC geared motor and a encoder that could be used to create a servo drive system. This requires just a basic brushed DC motor control.

  • Kinematics

    Tom07/18/2019 at 02:22 2 comments

    One of the key components of the cable robot is understanding the forward and inverse kinematics. Lucky for us there a great resource out there that already exists. For this robot I used emc2 which I use to control my CNC Mill and CNC router.  That can be found at the following location -> EMC2 (now linuxcnc). Typically that software is used to control mills and lathes that are orthogonal in nature, XYZ style setups. However if you dig into it you find out that it supports different kinematics such as a cable robot. The real beauty resides in this file called tripodkins.c. If you want to make your head hurt a little you can try to derive it out, kind of fun.

View all 6 project logs

  • 1
    Cable Robot Parts
    Here is the guts of the actuator and how they get assembled. The drive sprockets and chain are not in this drawing, those simply mount on the shafts that stick out of End Cap A.

    Here is what the assembled product minus the gear train looks lke. 

View all instructions

Enjoy this project?

Share

Discussions

hondo wrote 08/09/2019 at 23:43 point

Cool project! 

To overcome the drudgery of making a pour over coffee every morning -- I made a cable robot to do the job.  

https://drive.google.com/open?id=16OG39bJUZj3CQKuV_7KI9TRT9vnNs2vX 

The x and y movement of the coffee mug is not very extensive in the video because not much movement  is needed to brew a good cup of Joe. It's the slow pour and the waiting for the coffee to "bloom"  that makes the coffee tastie.  (But the x y  movement is robust and accurate -- friction of  the actuator's sliding can cause difficulty. )

The machine's movement is achieved with a Raspberry Pi Zero controlling three 28BYJ-48 steppers / ULN2003A Darlington driver chips,  3-D printed pulley gears, a sewing machine bobbin as an actuator and common button thread as the "cable."

Instead of G-code, a bash script calls a series of Python scripts that coordinate the steppers' movements. This allows all of the software to be run on a Pi Zero. This approach might help your endeavors to "embed" the code -- no LinuxCNC, Universal G-code Sender, etc.

The Python scripts requires that each movement be entered line by line, not unlike writing your own G-code. But for simple repetitive movements, this is not a particularly difficult task. This of course is only 2-D movement.

I'm of the opinion that the z travel should be handled independently of the x and y movement's mechanism in cable robots. Imagine a Hang Printer with a print bed that lowers, or one in which pulley mechanisms may be raised (and lowered) as a unit? This removes the z limit and keeps the machine operating in the x an y's optimum range. 

  Are you sure? yes | no

Brandon wrote 08/06/2019 at 01:55 point

Just discovered this.  So cool!!!  Would you want a #Luxonis DepthAI for the AI and camera work?  Would be happy to send one when we’re done with it as the integration seems like it would be epic!

  Are you sure? yes | no

James Newton wrote 08/03/2019 at 04:26 point

TOTALLY love this project BTW! The two cables for stability thing is genius! Not sure how much of a help I can be, but I'd love to be involved. 

  Are you sure? yes | no

Tom wrote 08/05/2019 at 03:29 point

Thanks for the comment, it seems you have quite a bit of experience with stepper drives and motor drives in general. Do you have any general input for low cost servo drives or what do choose? I added the "What Next" section in the project log that talks a little about this. 

  Are you sure? yes | no

James Newton wrote 08/11/2019 at 20:41 point

Interesting... I wasn't notified by email of this reply. Sorry for the late response. Yeah, I like old, brushed, cheap, DC motors. You replace the brushes, they run for ever. VERY strong. The trick is finding DC motor controllers that are capable of higher voltages (same as steppers) so you want lower voltage motors at higher currents (harder to find). I recommend my BOB PID servo /controller/ (controller is not driver, despite what some people say) which is mentioned in my comment below. Why? Because it's stupid simple, cheap, and works "good enough" while still allowing modification. You can build it on a breadboard, or perf board. PIC's are cheap and tough and the programmers aren't expensive. And I /love/ the AMS non-contact magnetic rotary encoders. It's soooo nice not to have to engineer a mechanical connection to an optical unit. But the really good 4K CPR chip (AS5047P) is hard to find in reasonable cost. And probably not needed for something like this anyway. The AS5134 is, again, "good enough". I'd love to help / join the project or just work with you in any way I can. 

  Are you sure? yes | no

James Newton wrote 08/03/2019 at 04:20 point

Higher voltage does give steppers higher speeds, and works up to the point where the cost of the driver chips starts to skyrocket. Higher current (more torque) at lower speeds becomes more cost effective with gearing to make up the difference. 

In the end, the only thing that matters is power. As in Watts = Volts * Amps. So for example the SLA7078 is 46 volts at 3 amps max or 138 watts. Another example: The THB6064AH will do 4 amps at 59 volts or 200 watts. (Note: Those are continuous ratings... there are all sorts of BS on ebay that claims huge currents and then it turns out they are only peak, or just made up) 

So you can get 44% more power out of that second chip, which means the same torque and 44% more speed (at just about the same voltage) by changing the gearing. 

But servos... especially with cheap DC or BLDC drivers... are even more cost effective. 

  Are you sure? yes | no

James Newton wrote 08/03/2019 at 04:06 point

This Servo Controller takes step and direction inputs just like a stepper driver, so interfacing it is easy. Use whatever motor driver you want as long as it can accept a PWM drive strength and direction... or change the code to produce some other output; it's not that complex. 
https://hackaday.io/project/13043-bob-pid-servo-controller

  Are you sure? yes | no

RigTig wrote 07/30/2019 at 12:10 point

Some really great ideas here. Much better than my efforts (see https://hackaday.io/project/13420-rigtigs-big-3d-printer). There are also good ideas, tested too, in the HangPrinter (https://www.youtube.com/watch?v=Jk4fhQvNoaM) and others (see comments under my project above).  I noticed that Marlin firmware now supports the HangPrinter too. I am getting well enough again to get back to my own project, so look out for some activity there and some cross-fertilisation of ideas back to here.

  Are you sure? yes | no

Tom wrote 08/05/2019 at 03:03 point

One of my goals was to see if I could run the system by modifying the Marlin firmware, if they already support a Hangprinter, it seems possible.

  Are you sure? yes | no

matop wrote 07/23/2019 at 17:36 point

The sound it makes is just awesome

Nice project

  Are you sure? yes | no

MasterOfNull wrote 07/19/2019 at 05:09 point

Put it all on the head instead, and that vertical cable routing is what I designed for as well.  I have since had some second thoughts on this, so I've been sitting on it..  #Arcus-3D-E1 - Elephant Printer 

Also, take a look at Machinekit.  It's a fork of LinuxCNC, but adds Arm processor support, better buffering, more modern real-time kernels, lower CPU usage, and support for PRU and FPGA based step generation at extremely high rates.

  Are you sure? yes | no

Tom wrote 08/05/2019 at 03:32 point

I agree with everything on the head. I would like to go embedded as well, but will look at the Machinekit you mention. 

  Are you sure? yes | no

Carl Mueller wrote 07/18/2019 at 23:37 point

If you go to a servo, you should consider servoing based on the amount of line that moves rather than on the motor rotation.  That way, it does not matter as much how the line builds up on the spool.  There is a servo-stepper controller known as mechaduino (as well as a clone by Bigtreetech) that may be easy to use in this way.  The feedback is based on a Hall sensor.  If you put the sensor & magnet on a line idler pulley, you get the feedback I'm talking about.

  Are you sure? yes | no

Jerry Biehler wrote 07/18/2019 at 20:10 point

This guy has a PCI card that works with LinuxCNC that will run Mitsubishi SSCNET servo drives: http://yurtaev.com/

  Are you sure? yes | no

Andy Pugh wrote 07/18/2019 at 19:17 point

LinuxCNC was recently used to control the cable robot that flew the fireball at the 2019 Universiade. https://youtu.be/aTaBl4HJT2M?t=29

Servo motors are not _that_ much harder to drive with LinuxCNC than steppers. There are several step/dir controlled servo drivers out there (Gecko have one) or there is the STMBL if you can face self-assembly.

  Are you sure? yes | no

Tom wrote 07/18/2019 at 22:25 point

That fire ball was pretty awesome. I researched and saw those Gecko drives after you mentioned it, that is a neat option, and allows me to maintain the same interface. It would be interesting to see what kind of travel speeds I could get out of it. Thanks for the link to the video!

  Are you sure? yes | no

jerigonzacl wrote 07/18/2019 at 00:01 point

Hi Tom, ver nice Project, I'm looking forward for your next step end willing to build one myself.

  Are you sure? yes | no

Similar Projects

Does this project spark your interest?

Become a member to follow this project and never miss any updates