Close
0%
0%

Blinkencard - Pocket Altair 8800

'70s microcomputer meets '80s handheld game

Similar projects worth following
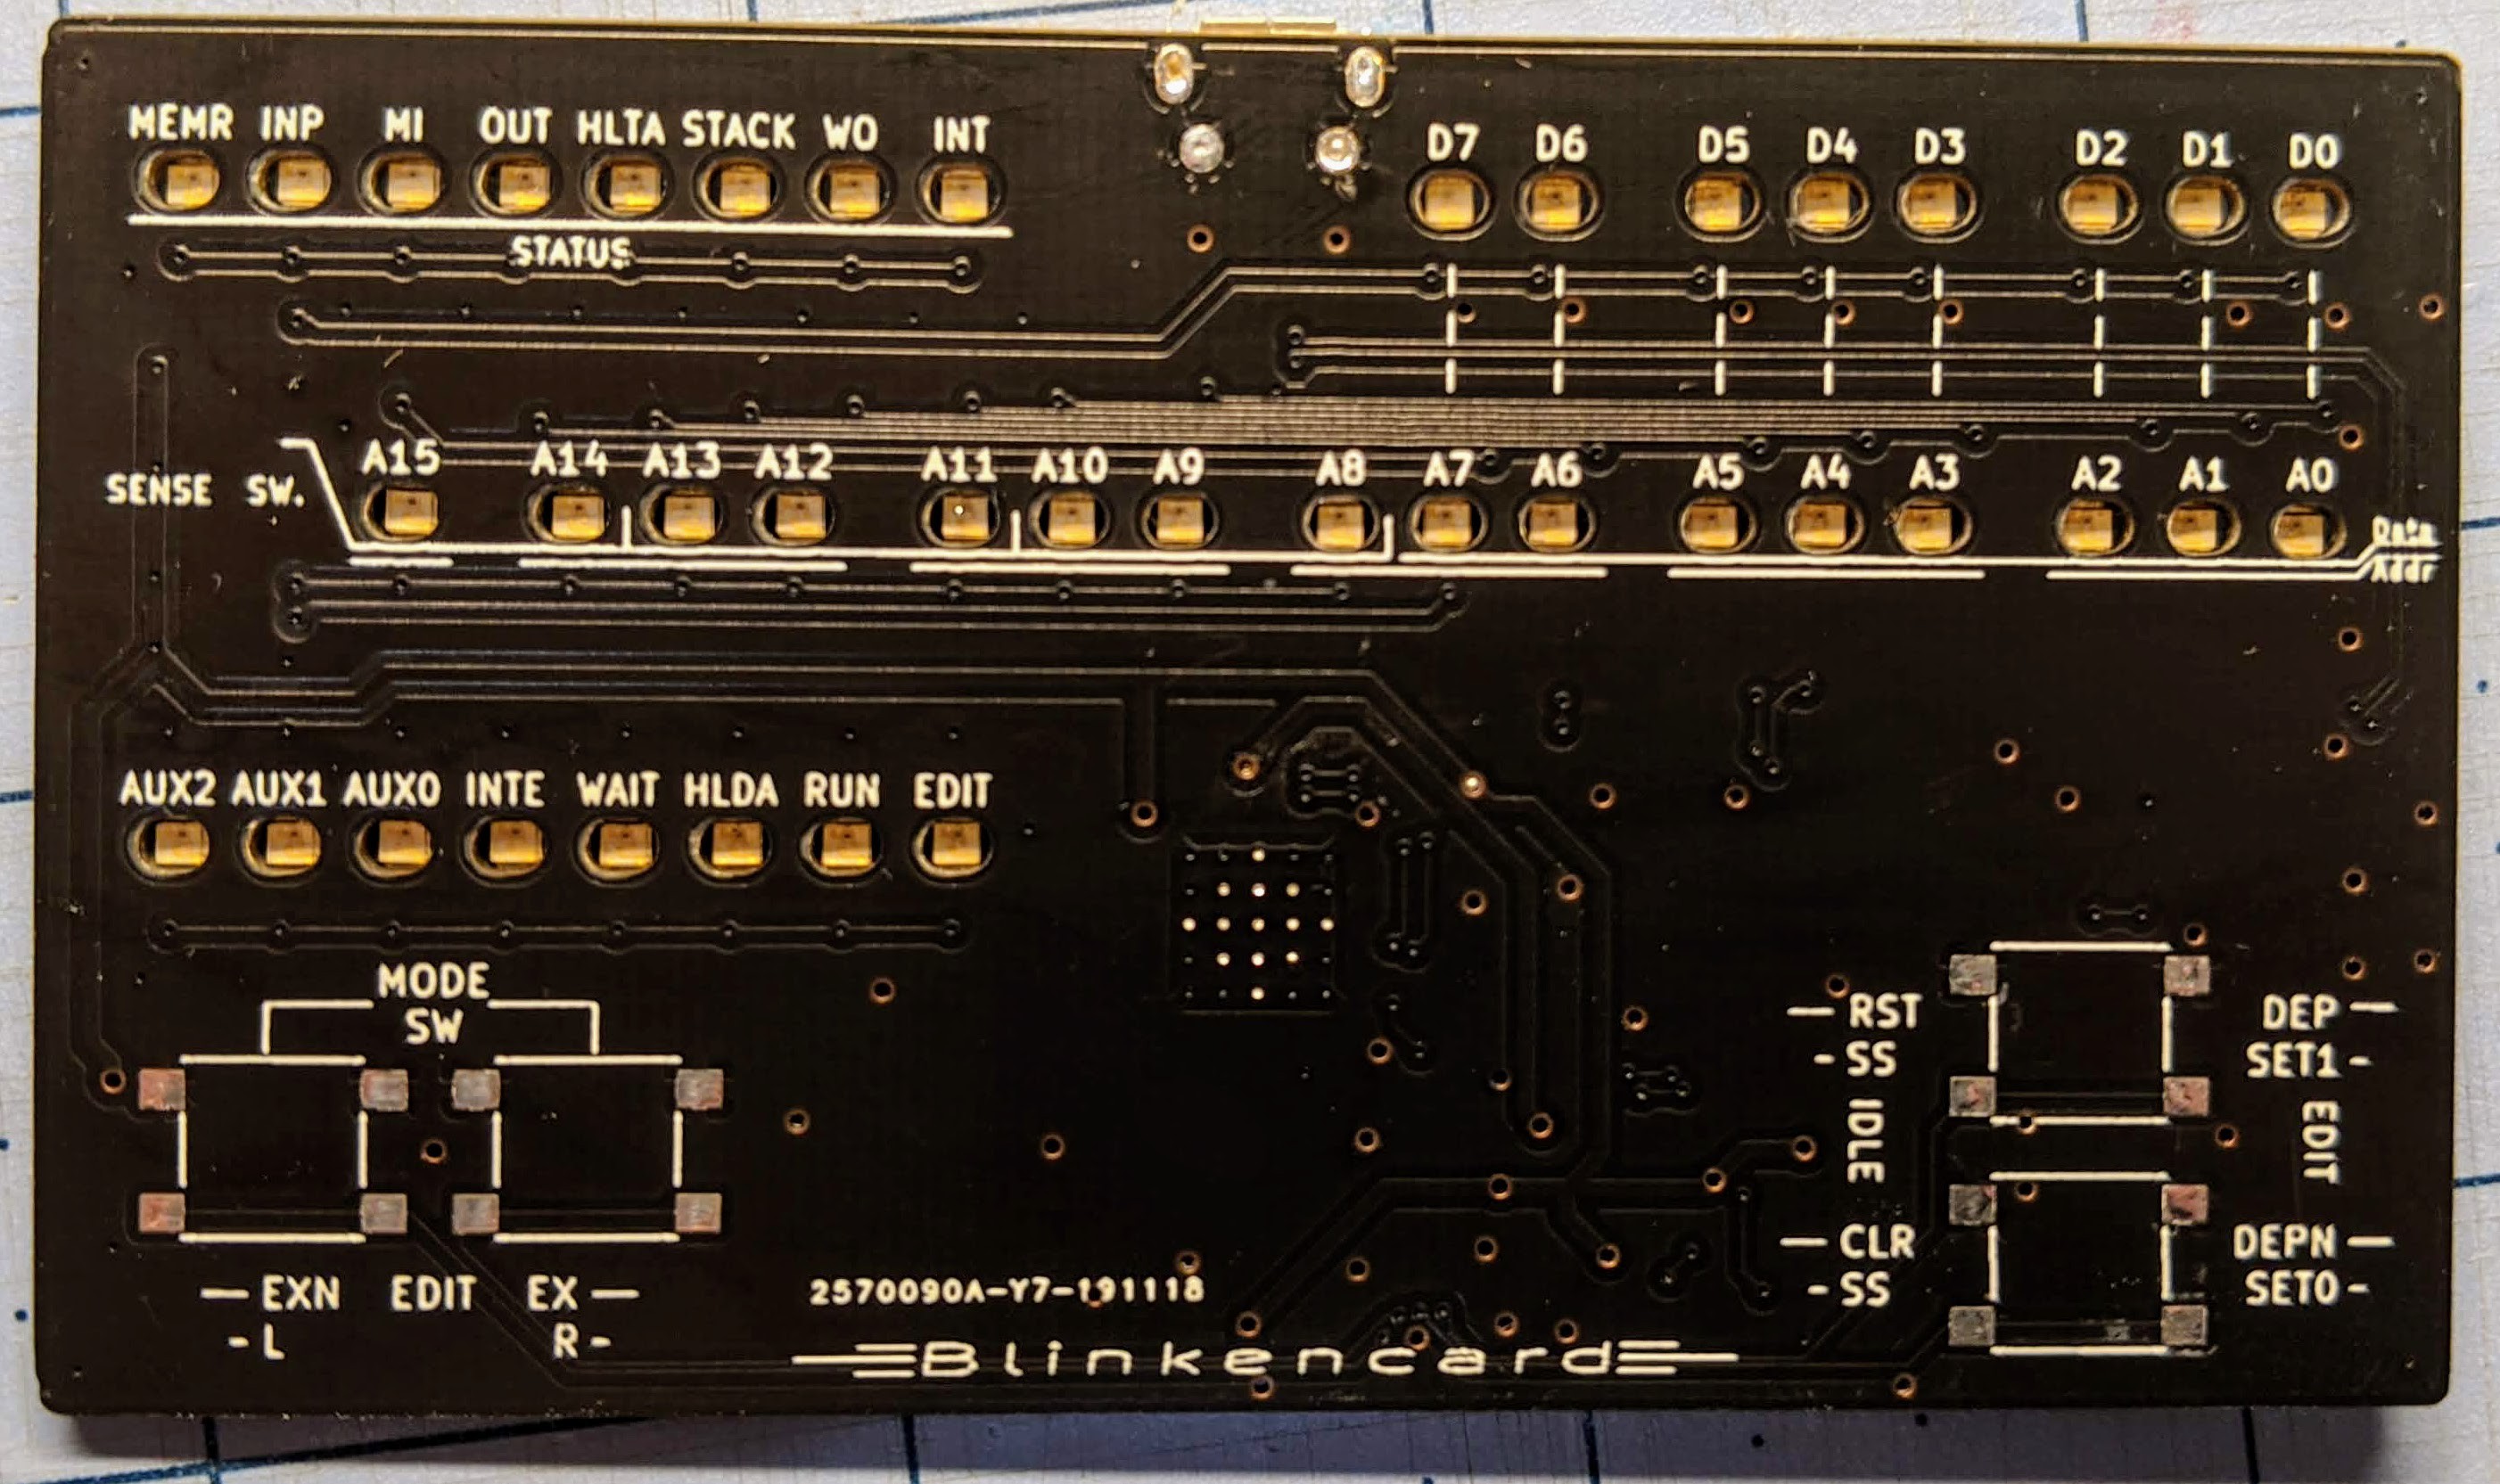
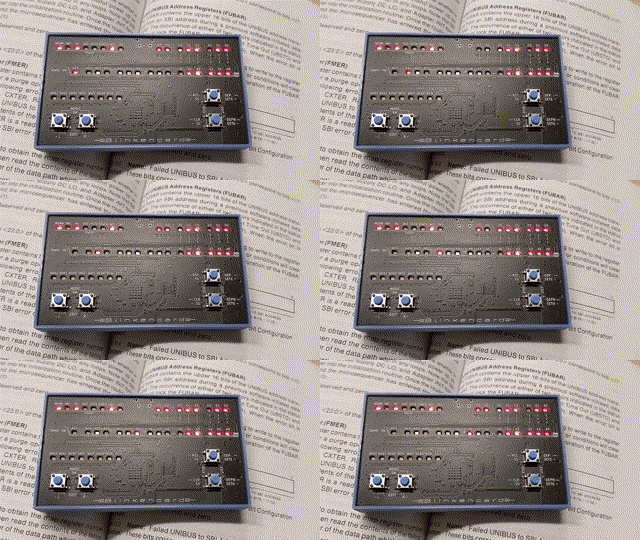
Here's my take on a hardware emulation of an Altair 8800 and other 8080 / Z80 hobby microcomputers. Rather than take up a shelf, it fits in your pocket and can use a smartphone as a terminal. It uses a PCB with reverse mount LEDs for that classic Altair front panel look, a Lattice FPGA running an 8080 emulation, an ESP32 running Micropython for IO and storage, and a LiPo to make it fully portable.

A bank of tiny switches would be irritating to flip with normal human fingers and not as clacky and satisfying as the real deal. Instead there are 4 buttons used to peek and poke memory and control the processor.

Features

  • Lattice ICE40UP5K FPGA to run the emulation and LEDs
  • Icestorm / Yosys / NextPNR toolchain
  • Based on the s100fpga project emulating Altair hardware
  • ESP32 module with 4MB flash running Micropython for I/O and storage
  • LED matrix homage to the Altair 8800 front panel with  O  C  T  A  L     G  R  O  U  P  I  N  G
  • 4 buttons instead of the front panel toggle switches with modal UI
  • LiPo battery and built-in charger

Status

Software / firmware still in progress... is the tiny lie I tell myself every time I see the Blinkencard on the shelf, covered in a thin layer of dust. "It'll be fun! Learning how to make a Verilog test bench is good for you," is what goes through my head briefly before being distracted by some other shiny thing. Lather, rinse, repeat once a month or so for life.

Done:

  • v2.0 hardware - four instances built
  • s100fpga project ported with front panel LED support
  • Micropython modules for bootstrapping the bitstream, telnet serial console, boot script
  • Altair / MS 8k BASIC and Altair Turnkey monitor runs from ROM

Todo:

  • SPI bus interface logic so the ESP32 can control the emulation
  • Replace the 8k of BRAM with the 128k of SPRAM to free up LUT resources
  • Disk emulation via SPI
  • CP/M port
  • Front panel button UI logic
  • Full virtual front panel web interface

  • 1 × Lattice ICE40UP5k FPGA
  • 1 × ESP32-WROOM module with 4MB flash
  • 1 × 200mAh LiPo cell with JST connector
  • 1 × PCB (see Github link) Electronic Components / Misc. Electronic Components
  • 1 × 40 red SMT reverse mount LEDs

View all 8 components

  • Series Recap

    ajlitt06/03/2021 at 16:42 3 comments

    It's been over a year that I've been procrastinating working on this project. Rather than make any real progress I thought I'd show off some dead-end hardware.

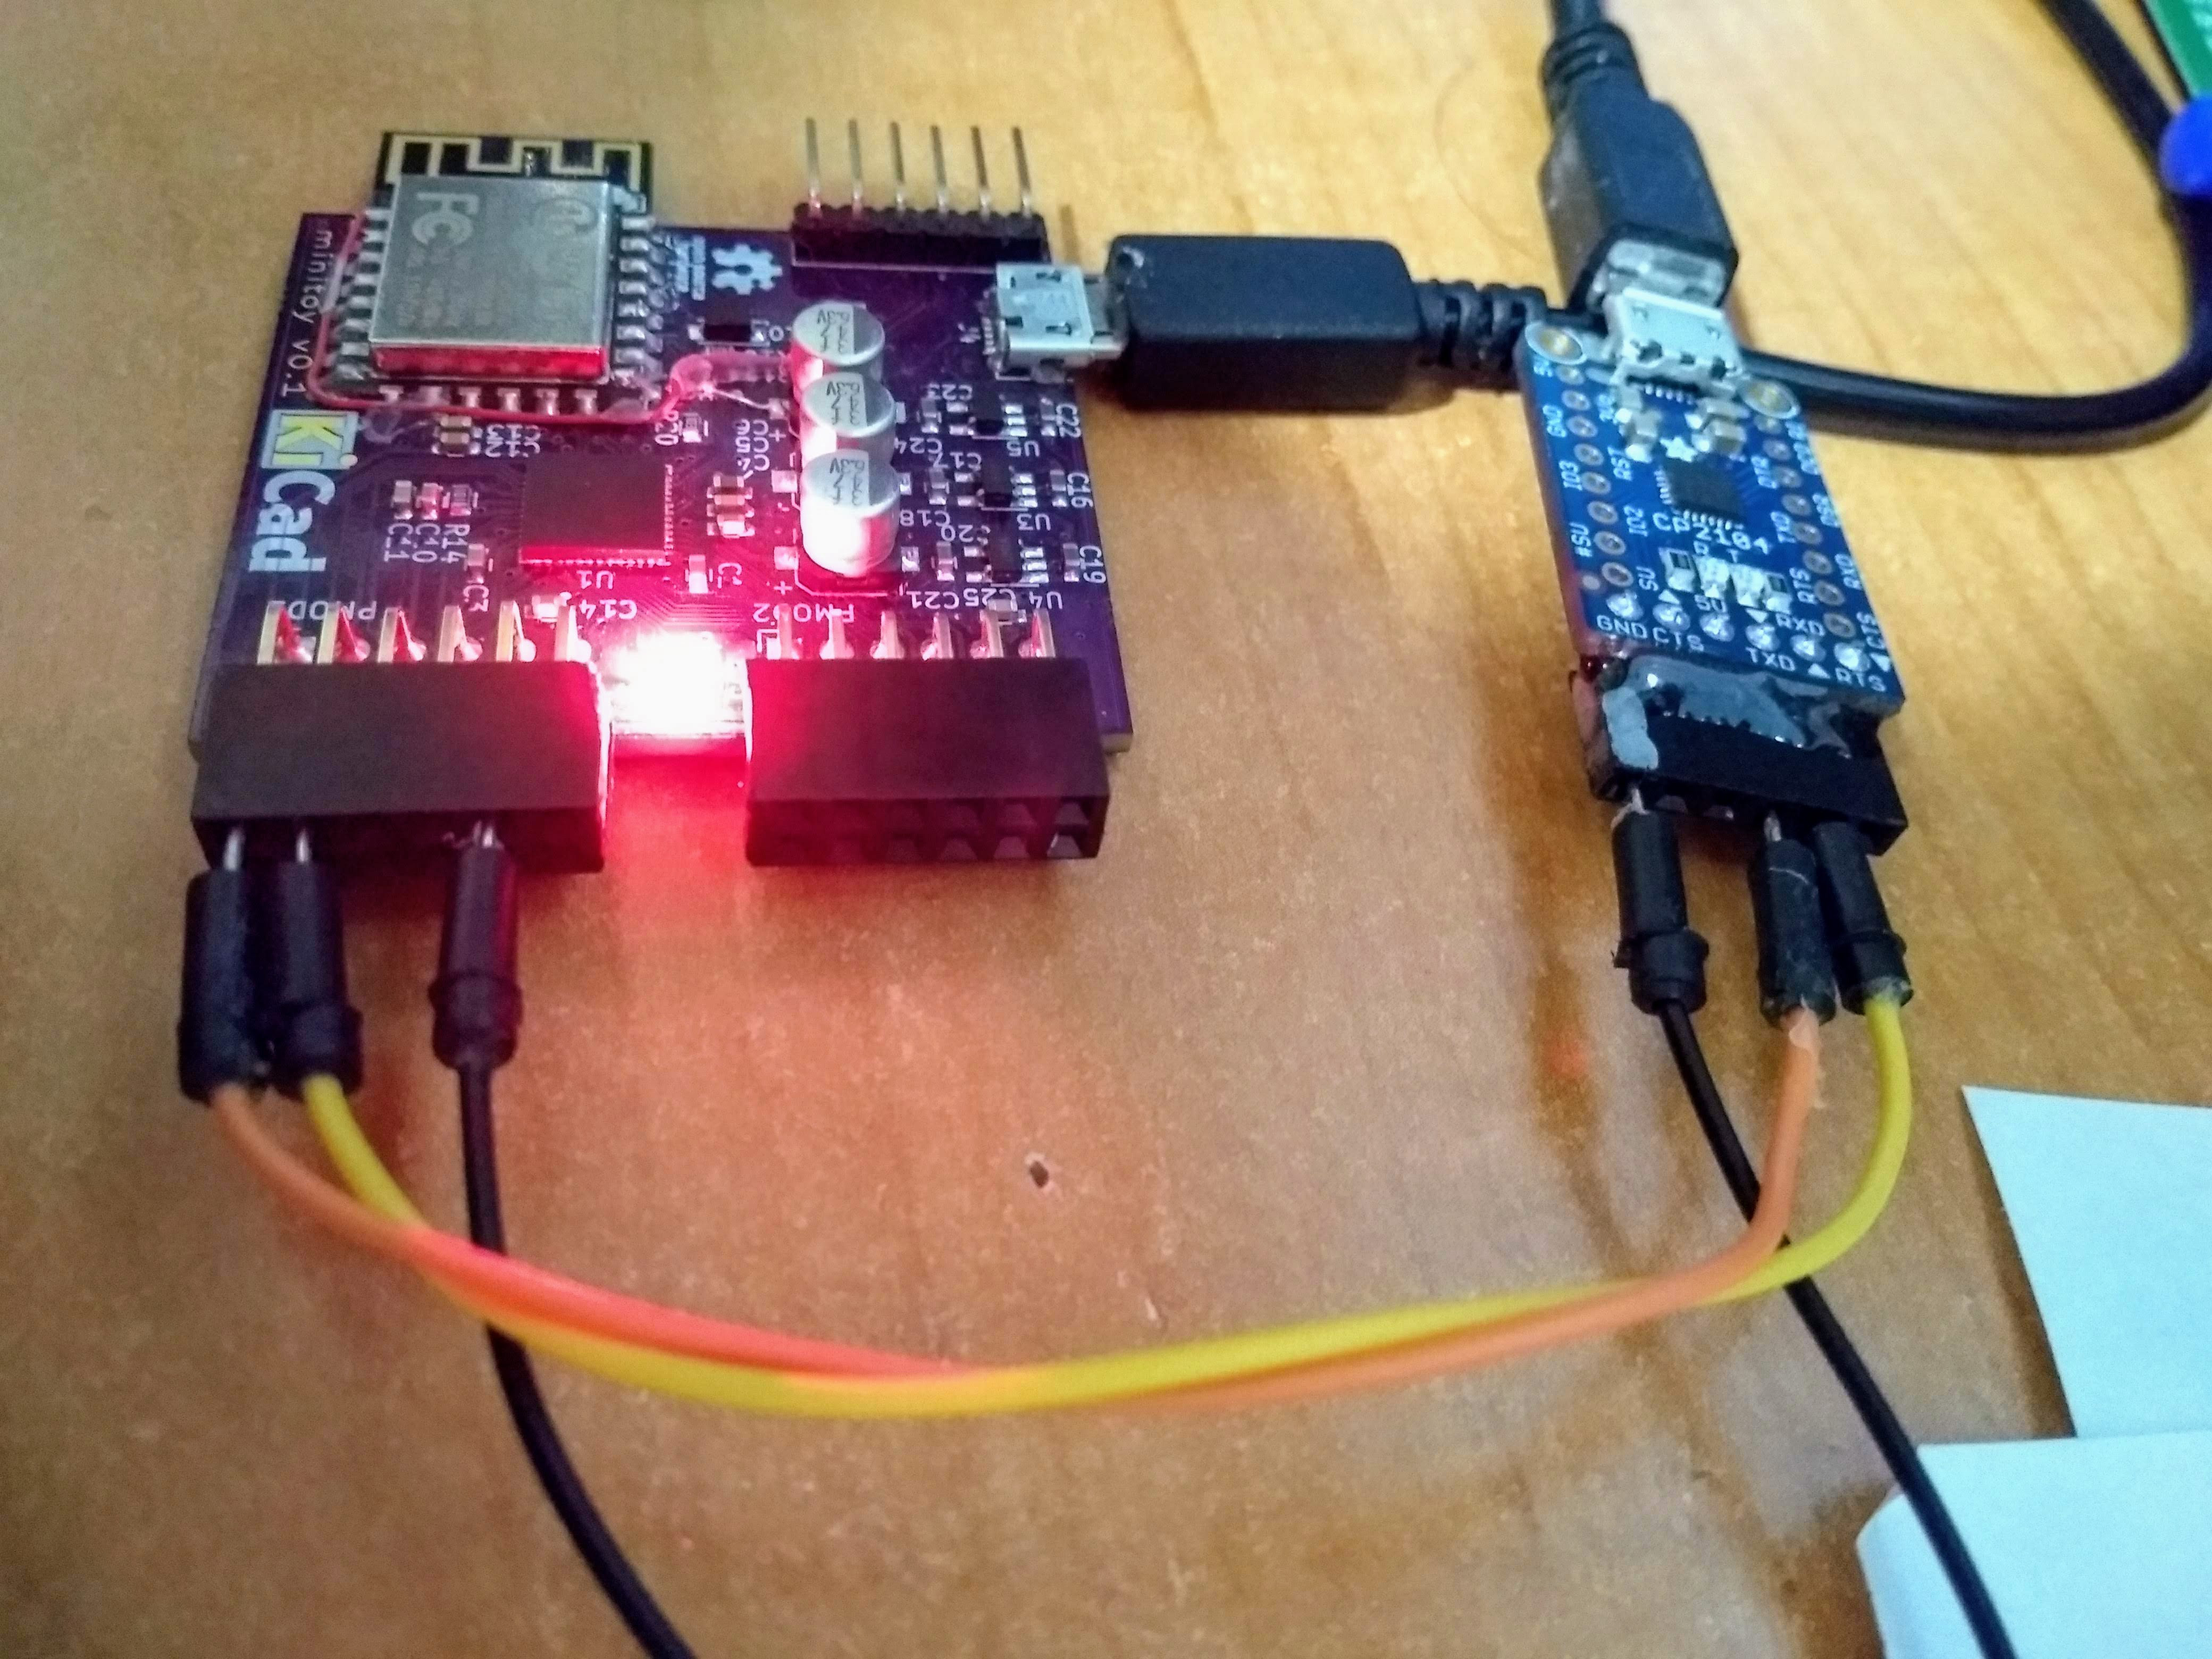
    Minitoy

    I created Minitoy during the great flood of Icestorm compatible boards of '18. All of the ICE40 FPGA boards were either disproportionately expensive, lacking in features I wanted, or vaporware, so I made my own. Minitoy has an ICE40UP5K bootstrapped by an ESP8266 running Micropython, which ended up being a testbed for the UP5K + ESP32 in Blinkencard. One feature I wanted was PMOD compatibility so I could use off-the-shelf FPGA I/O modules, so 16 FPGA I/Os are brought out to 2 PMOD headers.

    Prior to building this board, I did a proof-of-concept of the bootloader scheme with an off-the-shelf ESP8266 board and an Upduino 1.0. The Upduino 1.0 is a basic ICE40UP5K board that has little more than the FPGA and flash, so it was easy to disable the flash and use SPI from the ESP board to load the FPGA directly.

    However I got a few things wrong, hence the bodge wires and external USB-to-serial. I messed up the ESP8266 bootmode straps and reset circuit, necessitating the bodge wires. I also used the wrong footprint for the RGB LED and had to settle for individual red and green LEDs tacked on the board. Additionally the power supply section is needlessly complex and large, and ended up taking up half the board area.

    Still, I was able to assemble one prototype and get it working well enough to use. I played around with the icicle RISC-V port, and got a port of the Apple I emulator working (and contributed an ICE40UP5K target). Shortly after I started a new and demanding job and shelved all my projects.

    Blinkencard V1.0

    About a year later, I got the itch again to do a personal project. A coworker had purchased a blue powder coated sheet metal enclosure for a project that never happened, and a water cooler conversation about what to do with it inevitably turned to making an Altair clone. We never did anything with that case, and it's still sitting on top of a storage cabinet.

    But it did get me thinking about what made the Altair 8800 and the S100 hobbyist scene so appealing at the time. Certainly there's historical significance, and the visual and tactile experience of the LED and toggle switch front panel. Back in the day though, the idea of owning a computer that you made and can modify and extend to meet your own needs made them the popular precursor to the home computers of the late '70s and '80s. A bunch of projects over the last few years, namely RC2014, have tried to capture that sentiment using components that are still available and roughly period-correct. And while it would be easy and fun to throw money at a kit, I wanted to get deeper experience with FPGAs and use Verilog instead of chips and solder for that same sort of expandability.

    So I made Blinkencard 1.0.

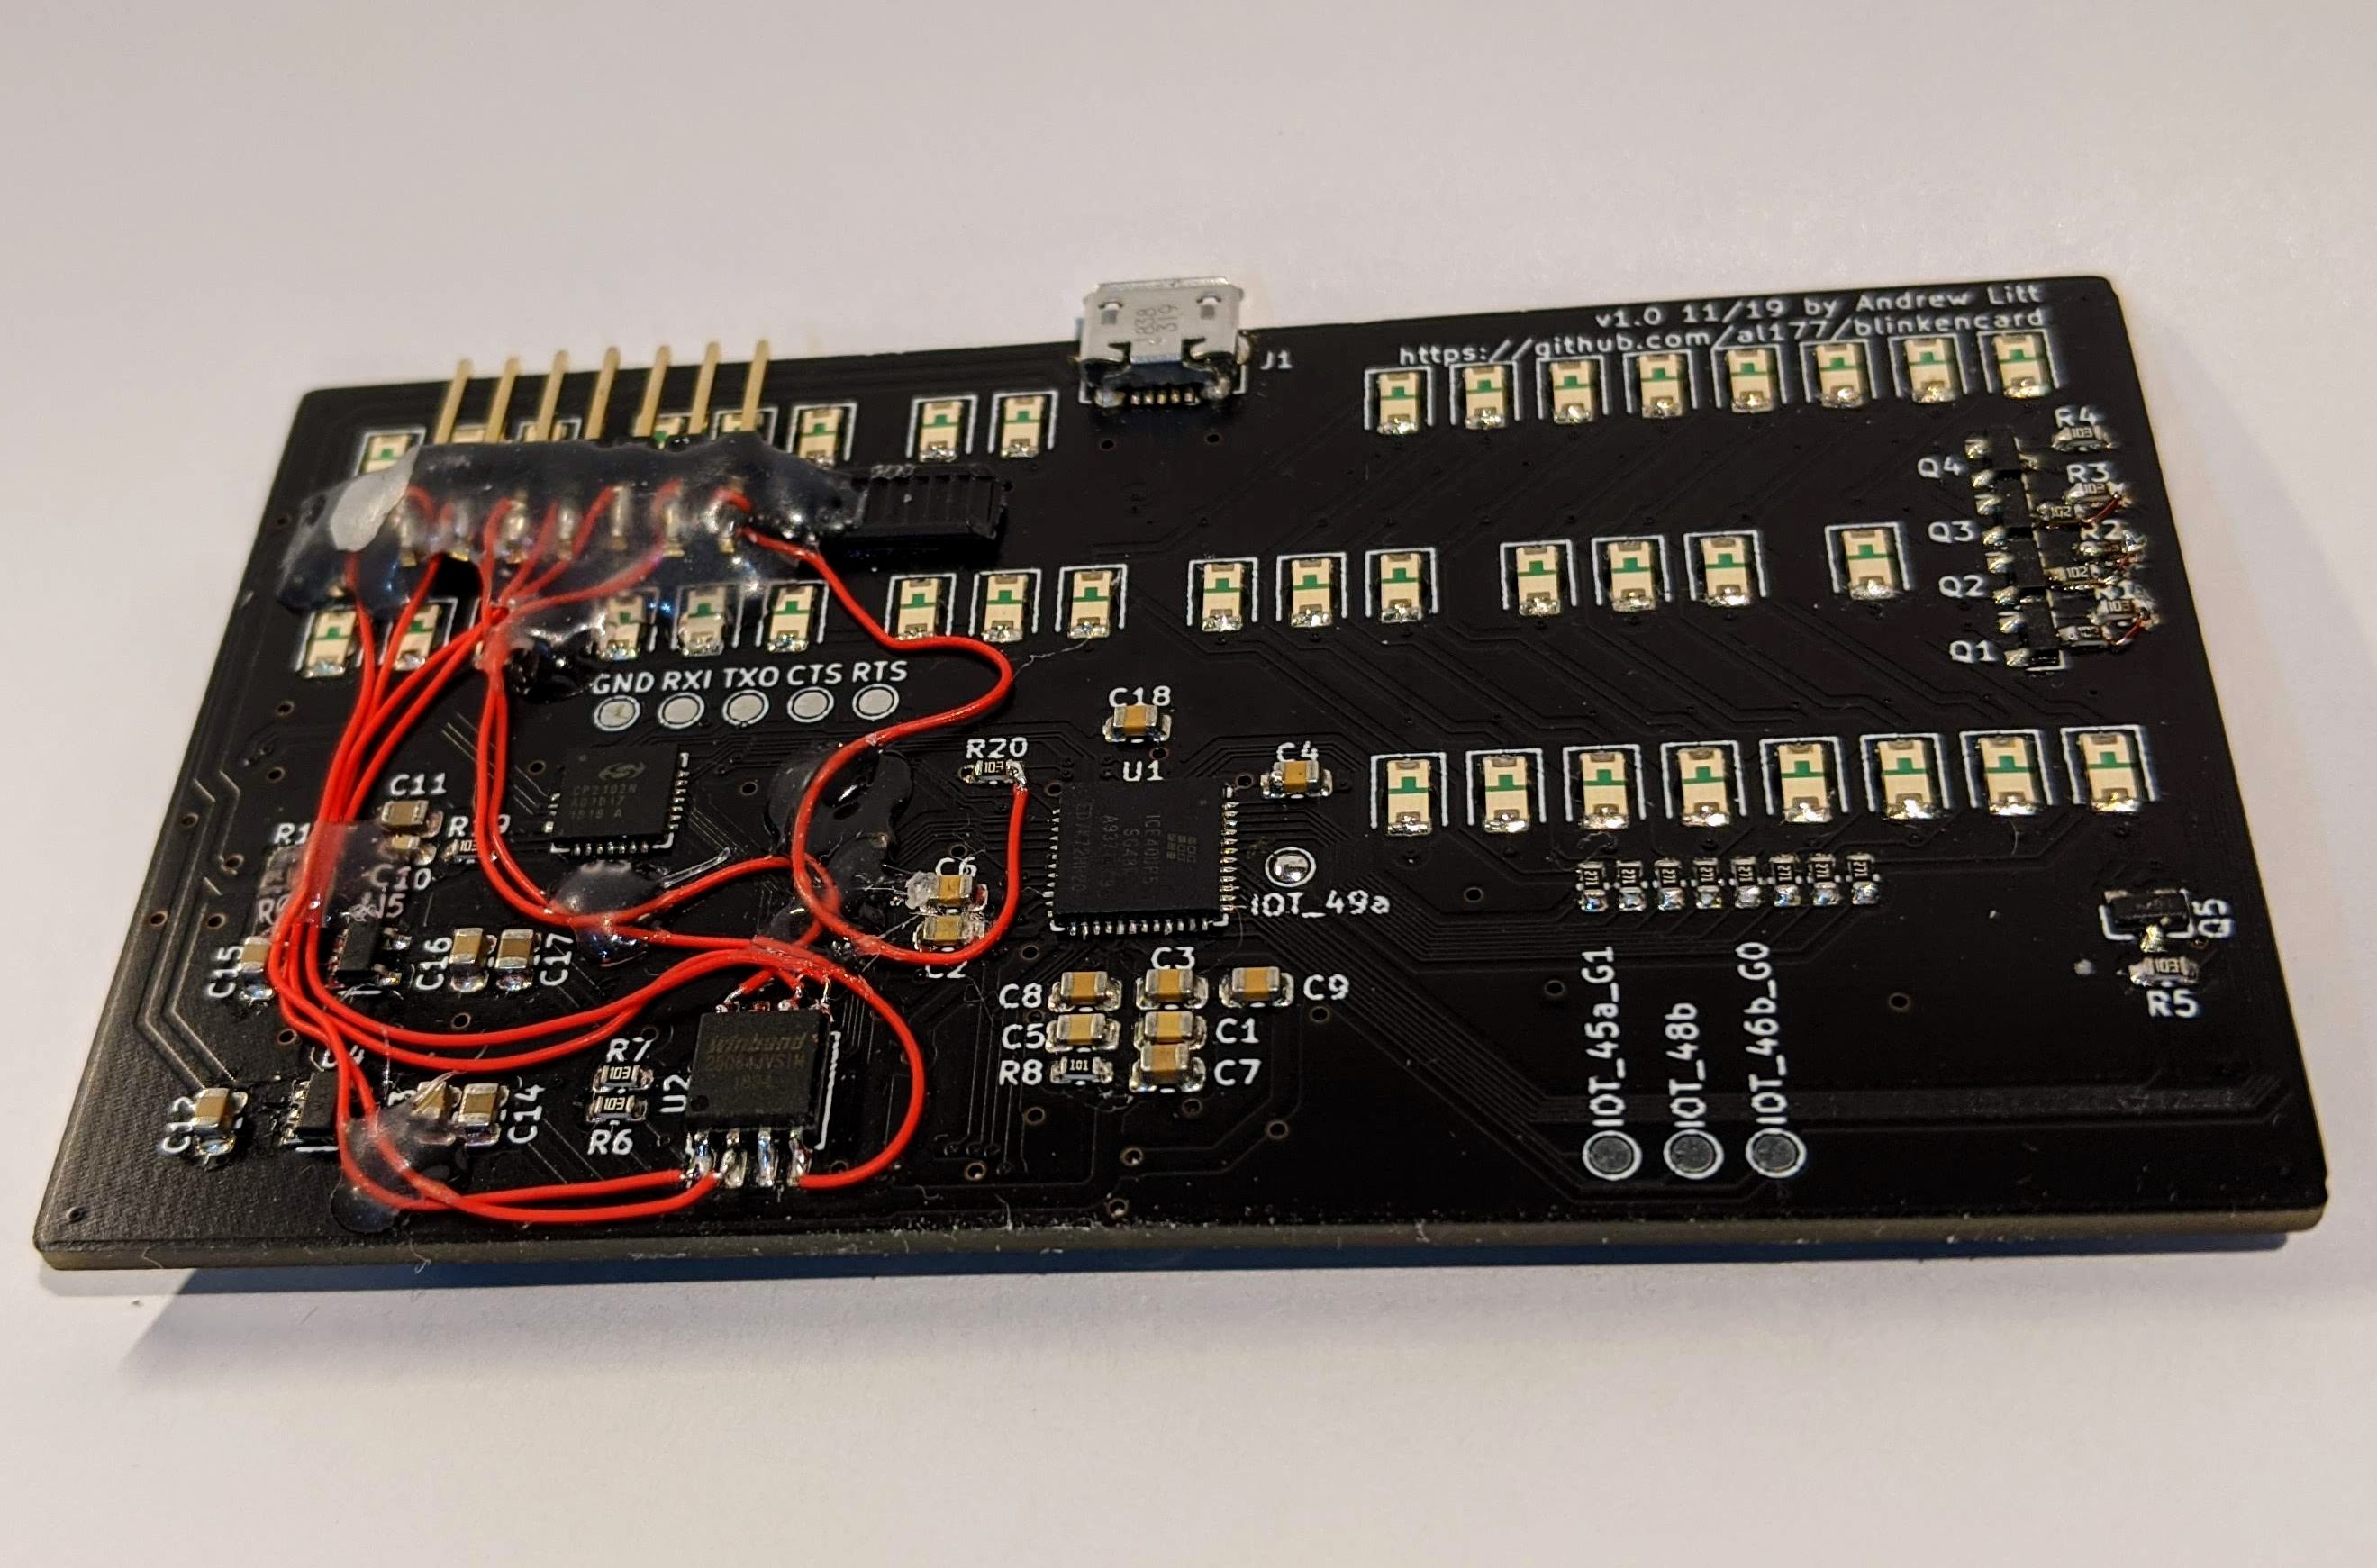
    Originally I wanted to make it a business card to hand-out because it seemed like a thing that one does. I planned to use JLCPCB's assembly service since all those LEDs and discretes are a pain to solder. Everything in the design except the FPGA was in JLCPCB's library, leaving the FPGA which I could solder easily with hot air and paste. The front panel looks almost identical to the 2.0 design, and the primary mode of use would be through the front panel buttons and LEDs. My thought was that it could be like an early handheld video game, but instead of controlling an LED football you would control bits on the address and data buses.

    The nest of bodge wires and the hot glued header are for programming the flash. I though I could use the SiLabs CP2102 USB-to-serial I added for communication with a PC to program the SPI flash, but the bitbang mode I thought it was capable of doesn't exist. The USB port is useful only for serial console, while the header and an FTDI module are used for programming the bitstream to SPI.

    I was able to get the s100fpga project's Altair emulation...

    Read more »

  • BASIC casual

    ajlitt05/25/2021 at 17:08 0 comments

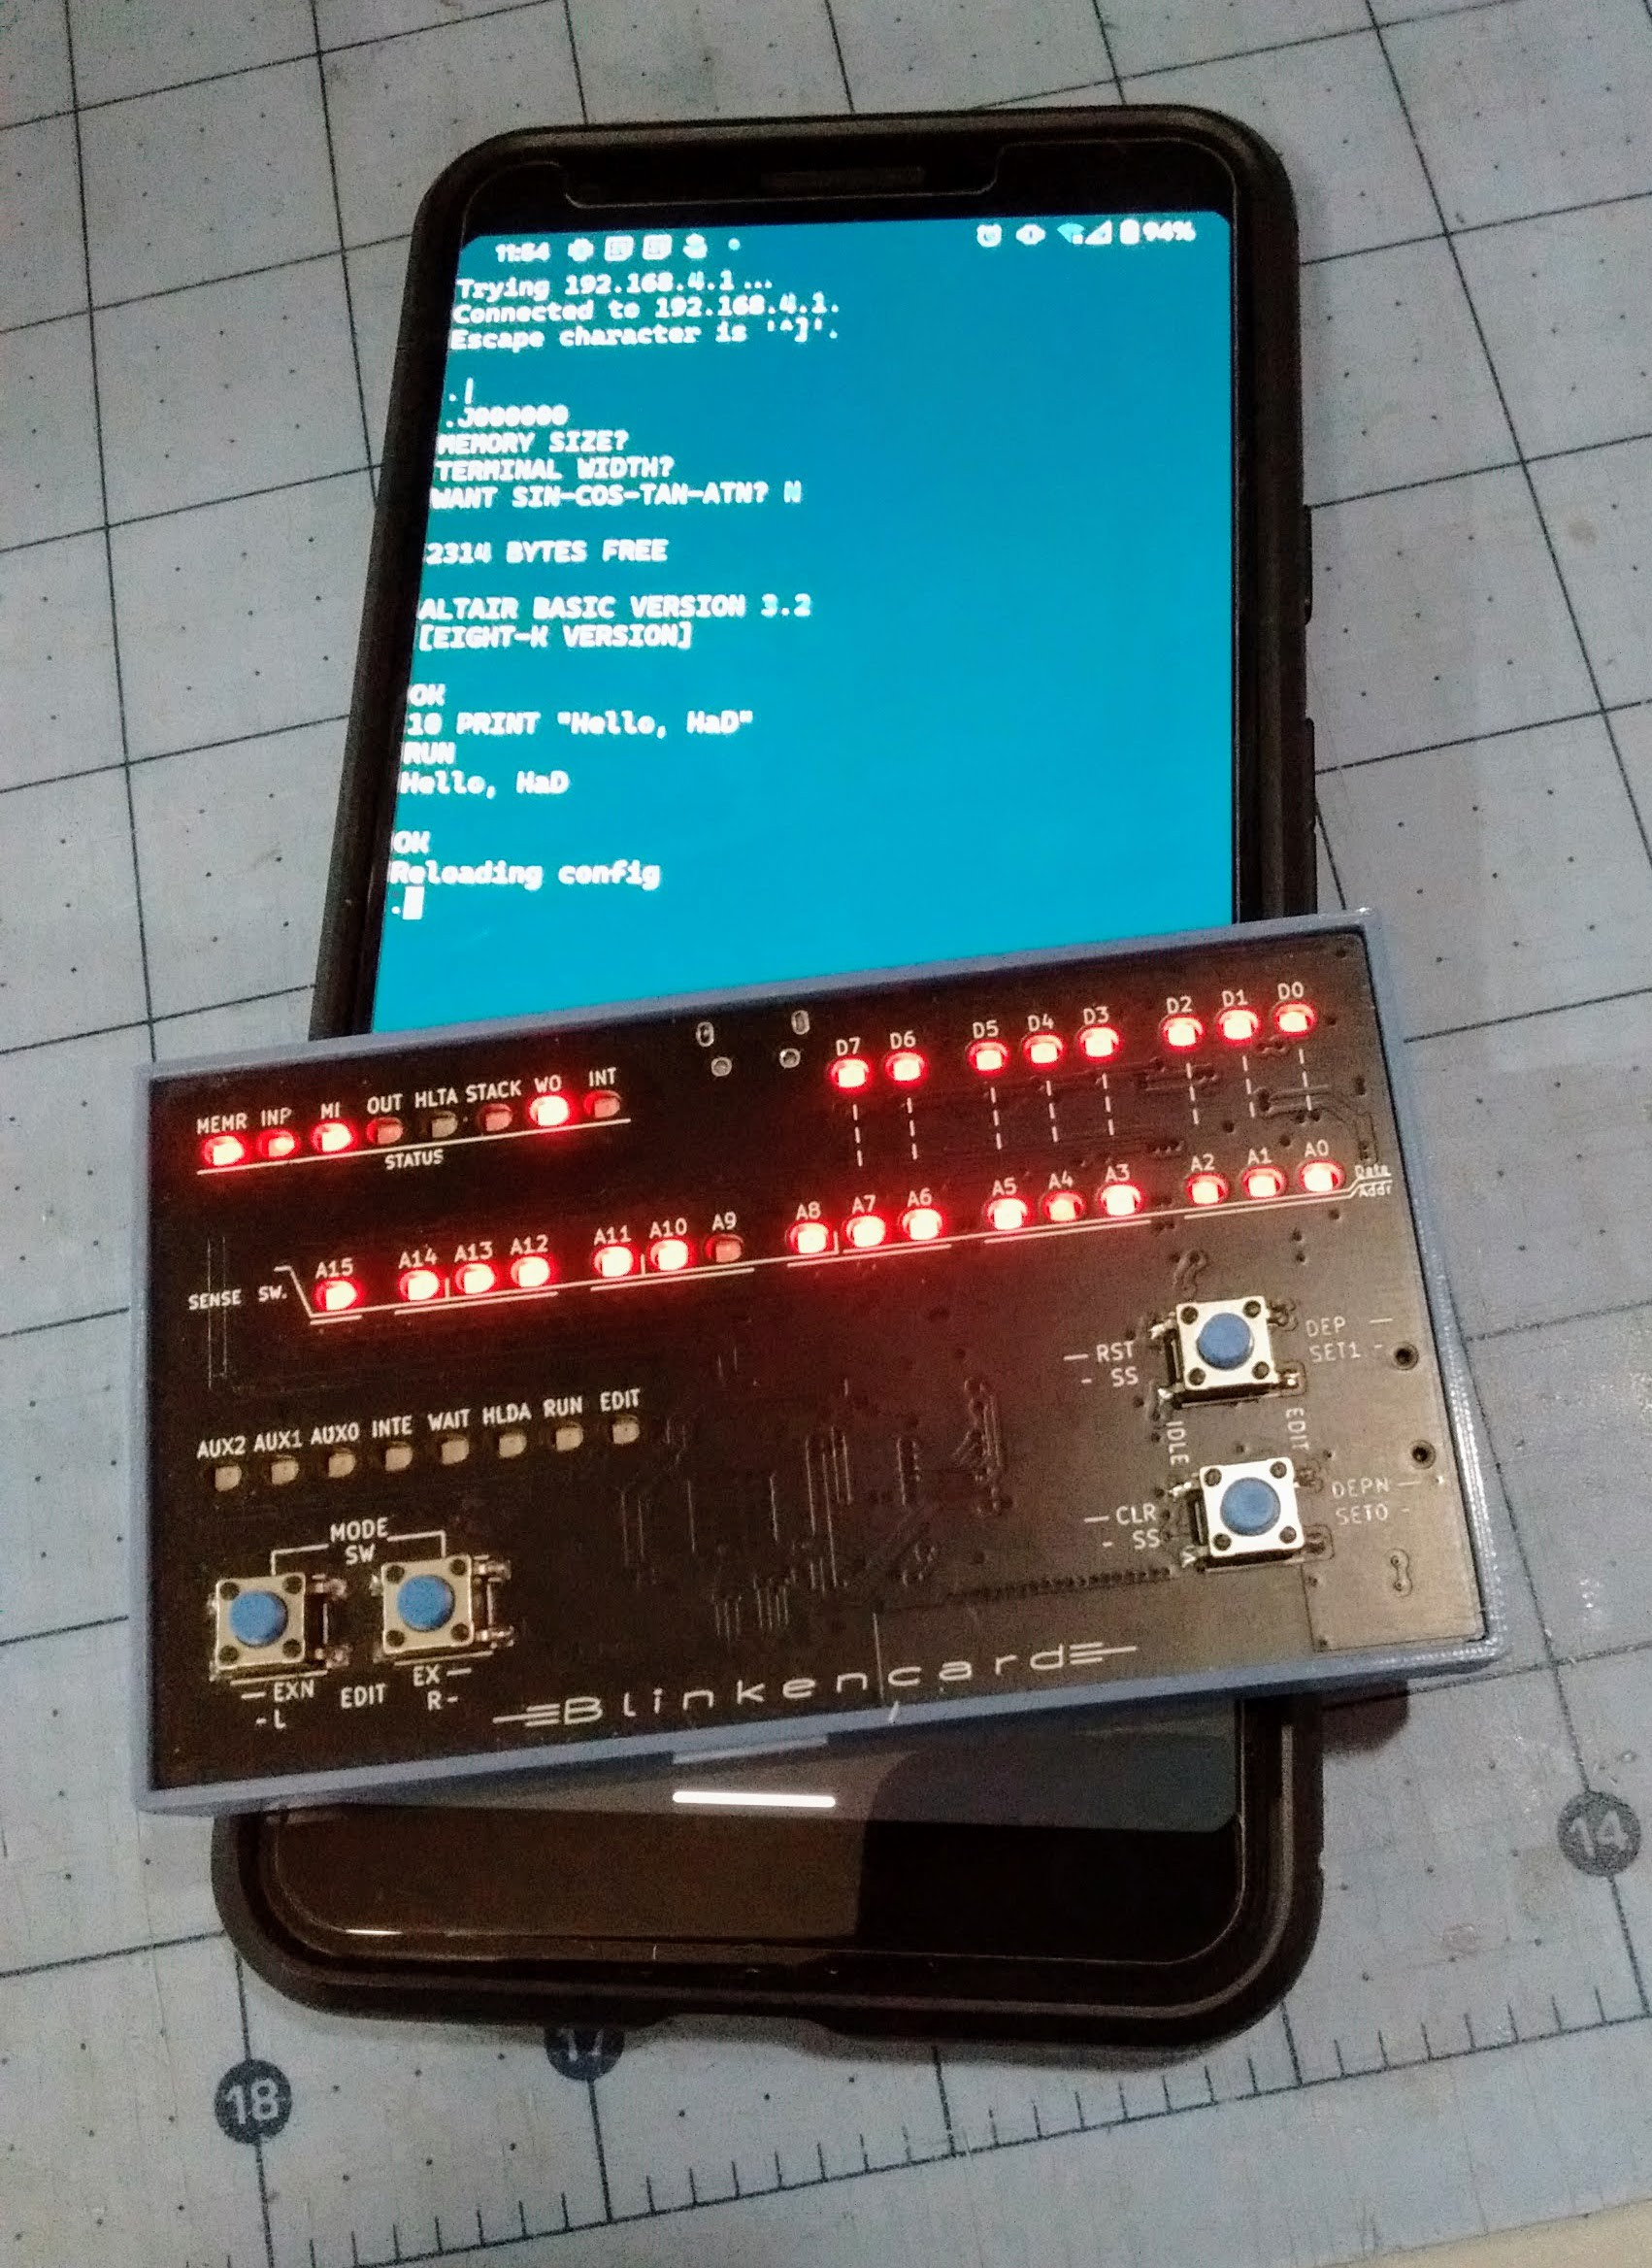
    I haven't shown the Blinkencard doing its thing, so here's a console session over WiFi:

    The initial '.' prompt is the Turnkey monitor - a CLI for peeking and poking at memory on Altair systems that don't have blinkenlights and switches. Here I'm running the BASIC ROM at address 0 (J000000) and entering a simple BASIC program.

    The 'Reloading config' line comes from my telnet server which catches [CTRL-A] + R causing the ESP32 to reload the FPGA image and reset the emulation.

  • Blinkin' LEDs and killin' bits

    ajlitt02/16/2020 at 22:55 0 comments

    I've been working on this project off and on for about four months now. Someday I'll get to posting stuff about the architecture, project direction, blah blah. But for now, here's the Blinkencard running the once-popular killbits program, but without switches with which to kill the bits:

View all 3 project logs

  • 1
    Install the IceStorm toolchain including nextpnr
  • 2
    Go to the Github link in the sidebar and download the 'blinkencard' project
  • 3
    Order PCBs, stencil, and components from the BOM from the 'kicad' directory

View all 11 instructions

Enjoy this project?

Share

Discussions

ap0l0 wrote 08/06/2024 at 19:22 point

how do you share contact information from the business card?

  Are you sure? yes | no

ajlitt wrote 08/06/2024 at 20:09 point

You know, I haven't thought about that yet. Perhaps I need to write a bare metal program to blink my contact info on the data bus LEDs in ASCII.

  Are you sure? yes | no

teraz wrote 05/09/2022 at 22:58 point

meybe add 18650 and fuzix system os ?

fuzix is more usable than altair system

  Are you sure? yes | no

James Newton wrote 10/29/2021 at 22:21 point

SHUT UP AND TAKE MY MONEY!

  Are you sure? yes | no

teraz wrote 10/08/2021 at 16:56 point

What You thing replace fpga to OrangeCrab

altair have key (like in auto) to start hardware and meybe add a knob for setup?

  Are you sure? yes | no

ajlitt wrote 10/12/2021 at 23:21 point

OrangeCrab is pretty cool, though I think it would make this significantly more expensive and would need through-hole connections which would ruin the single board front panel aesthetic. But it's a good idea, and once the chip market settles down it might make sense to use an ECP5 and SPI flash standalone instead of ICE40 + ESP32 and use existing USB code to provide a link between a PC and the emulation. Still, I think the ESP as a service processor is working out well, and has the advantage of wireless connectivity.

I thought a lot about adding switches, and I decided against them. I'd have to scale up the project from pocket-size to actual Altair size, or settle for teeny switches that aren't clacky and fiddly to set. The first compromises the project budget, and frankly I don't have the space for a large project like that, and the second doesn't sound like fun at all.

Assuming I had switches, how often do they really get used? I watched a bunch of videos from deramp5113 (https://www.youtube.com/user/deramp5113/videos) and read up on the progression of the Altair and other S100 machines from front panel boot to turnkey monitor. It seems that using the front panel switches wasn't something users enjoyed, and preferred to use a monitor.

We can all agree though that the blinkenlights are the important front panel components!

  Are you sure? yes | no

teraz wrote 10/13/2021 at 15:21 point

blinked lights ;-)

ok, So I suggest you make the front panel out of transparent plastic, it will look more nice. ;P

You're showing hardware that works with a cell phone, and you didn't think to add a power supply. To make it truly mobile equipment? Let's say running for a week on a single charge?

  Are you sure? yes | no

ajlitt wrote 10/17/2021 at 15:49 point

(to your latest msg)

This thing is tiny, and lasered acrylic won't have the same precision in lettering and holes as the PCB fab. What I think was the "clever bit" in this project is using back-firing LEDs and single sided board load (except buttons) to make a passable pocket sized Altair 8080 replica. Also I don't have a laser cutter.

As for power, it does have a battery and built-in charger!!! Look at the next-to-latest post and you can see it completely untethered and working with my phone. I haven't run the cell I have down til it dies, but I think I can get 5-6 hours on it. It could run longer if I made a bigger backshell and used a bigger pack, but that would reduce the cuteness factor and portability. However I don't think a week is possible since the ESP needs to always be active and waiting for connections, hence no low power modes.

  Are you sure? yes | no

ATmel91 wrote 02/17/2020 at 21:42 point

Can you provide more information? Like project code, PCB/Schematics, for the FPGA and the ESP32? Thank you :) I absolutely LOVE this project!

  Are you sure? yes | no

ajlitt wrote 02/18/2020 at 02:17 point

Thank you! Check the GitHub links in the sidebar. PCB is finished and working, while ESP32 and FPGA code is a work in progress.

  Are you sure? yes | no

ATmel91 wrote 07/05/2020 at 22:49 point

Thank you so much!

  Are you sure? yes | no

Similar Projects

Does this project spark your interest?

Become a member to follow this project and never miss any updates