-
13D Printed Parts
Depending on the glove required to be made, the 3D print and the STL files can be downloaded from the respective GITHUB repositories:
- Body-powered Exoskeleton Glove - https://github.com/newdexterity/Body-Powered-Exoskeleton-Glove
- Motorized Exoskeleton Glove - https://github.com/newdexterity/Hybrid-Exoskeleton-Glove
For the fabrication of the Body-powered Exoskeleton Glove follow step 2 to step 5. Otherwise, skip to step 6 for the Hybrid Motorized Exoskeleton Glove Instructions.
![]()
-
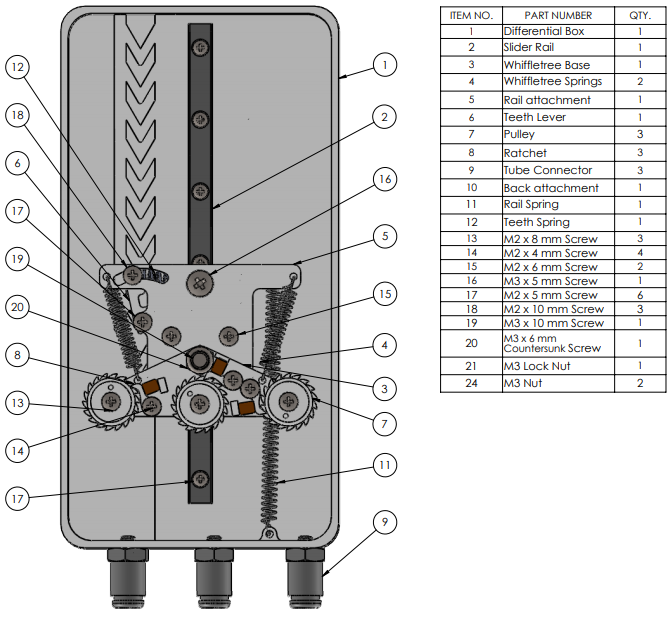
2Differential Module Preparation
In order to prepare the differential module you will require the following parts. The 3D printed parts are represented by the white parts. The video shows the assembly procedure of the differential module.
-
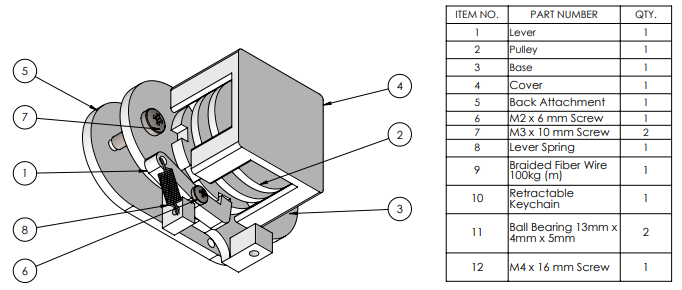
3Tendon Tensioning and Adjustment Mechanism Preparation
In order to prepare the tendon tensioning and adjustment mechanism you will require the following parts. The 3D printed parts are represented by the white parts. The video shows the assembly procedure of the tendon tensioning and adjustment mechanism
-
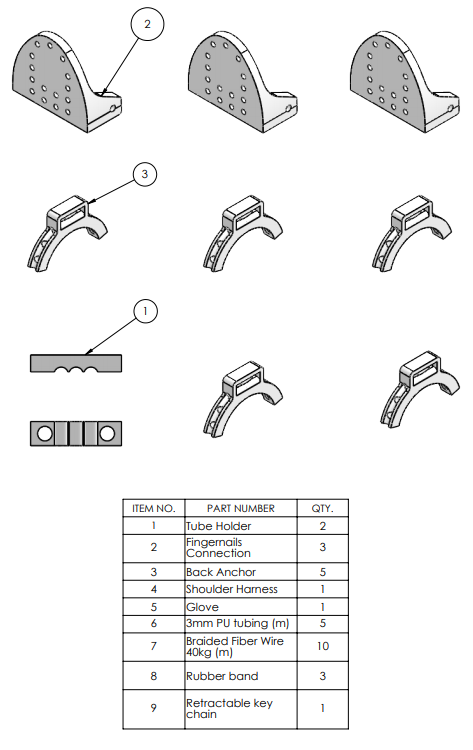
4Soft Glove Preparation
In order to prepare the soft glove you will require the following parts. The 3D printed parts are represented by the white parts. The video shows the assembly procedure of the soft glove.
-
5Assembly of the Body-powered Exoskeleton Glove
The video below shows the assembly and testing procedure of the body-powered exoskeleton glove. This is the final step in completing the body-powered exoskeleton glove
-
6Exoskeleton Controller Circuit
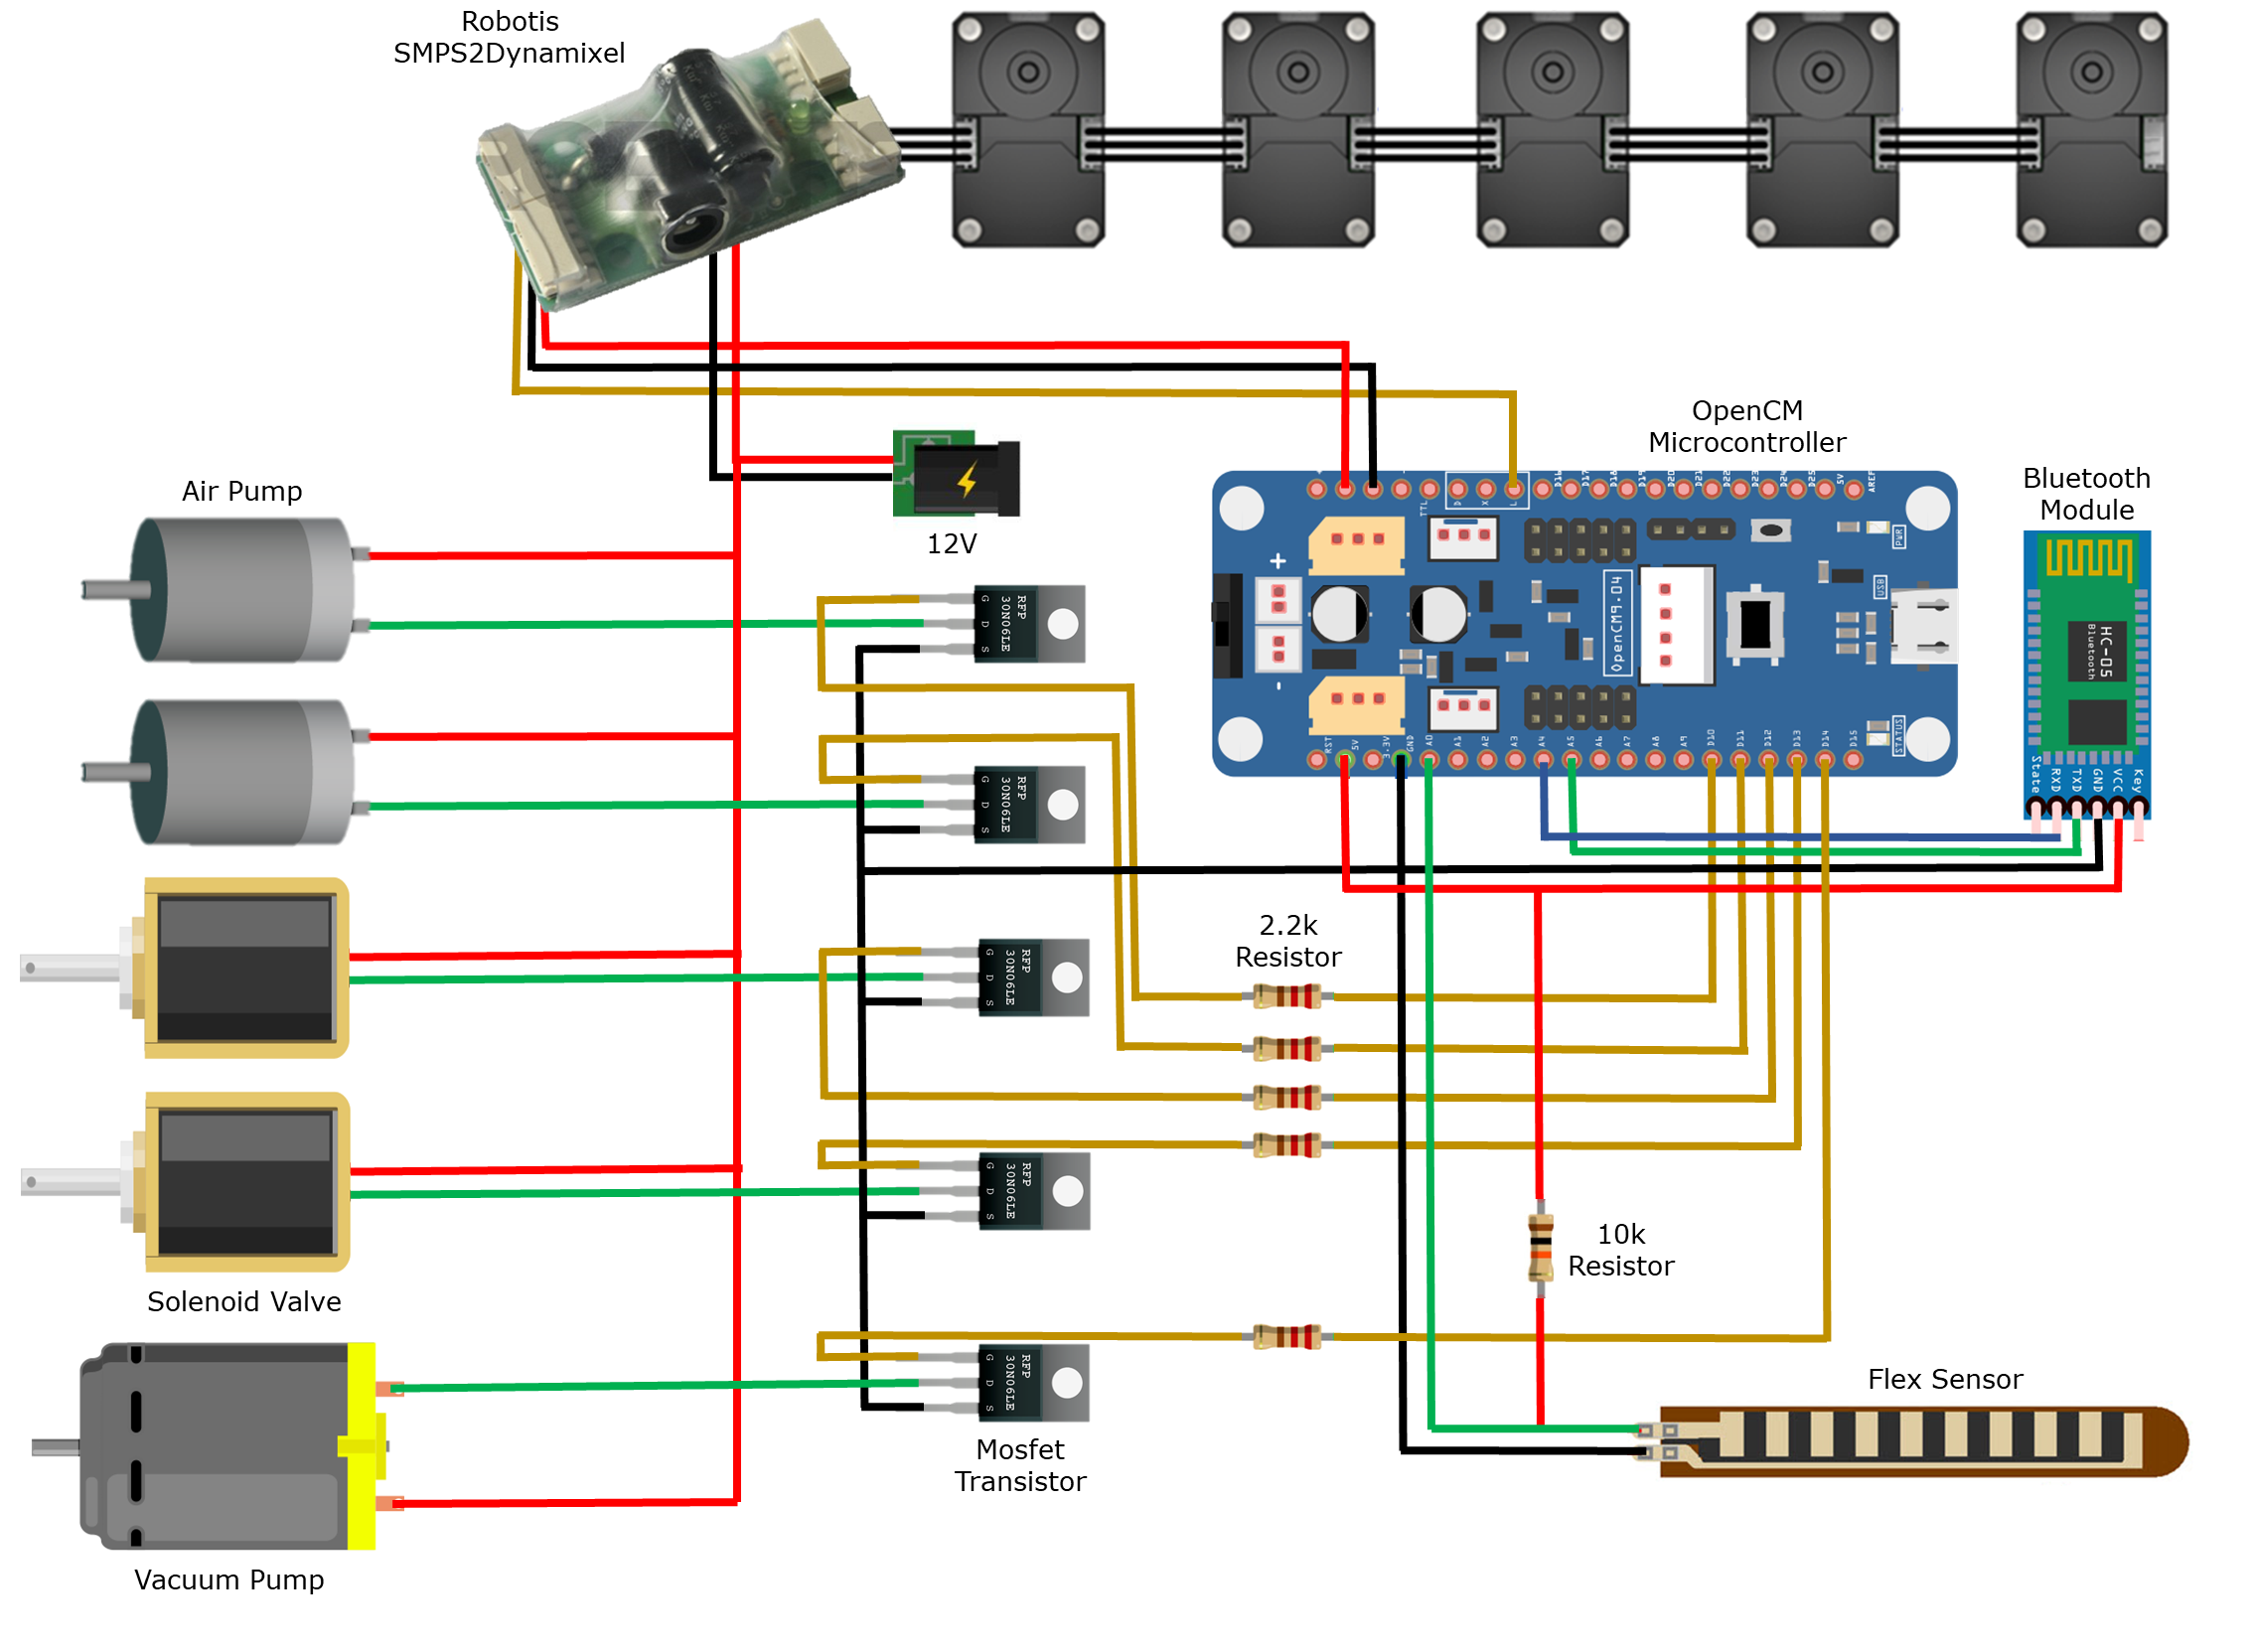
Connect the cables according to the schematic below. The components required are the following:
- 2 Mini Air Pumps
- 2 Solenoid Valves
- 1 Vacuum Pump
- 5 Mosfet transistors
- 5 Resistors (2.2k Ohms)
- 1 Resistor (10k Ohms)
- 1 Flex Sensor
- 1 OpenCM 9.04 Microcontroller
- 1 Arduino Bluetooth Module (HC-05)
- 5 Dynamixel XM430-W350-T motors
- 1 Power distribution board (Robotis SMPS2Dynamixel)
![]()
-
7Pneumatic Extra-thumb
The soft telescopic, extra thumb actuator is based on a urethane rubber (Smooth-On Vytaflex 40) structure designed for grasping assistance during the execution of ADLs. The foldable structure was designed in such a way that it does not influence grasps that do not require an extra thumb due to its small thickness and telescopic behaviour. The rounded shape of the actuator was chosen so as to maximize the size of the objects that could be grasped by employing the actuator. The actuator operates at a pressure of 20 kPa, weighs 18 g, is 10 mm thick, and 80 mm long.
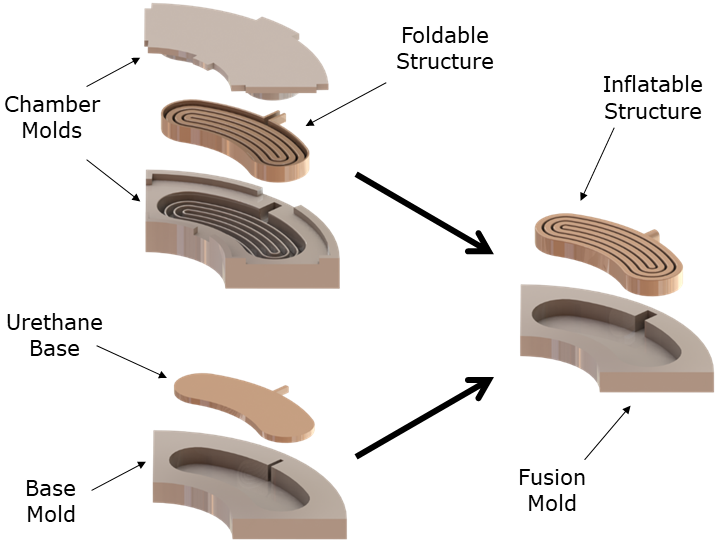
The manufacturing process of the inflatable thumb involves the following three molding steps:
- The foldable part of the actuator is fabricated using two molds.
- The base layer is fabricated using a third mold, with the base layer being 1.5mm thick and 2 mm smaller than the foldable part in all directions so that they can be molded together.
- After both parts are cured, a fourth mold is used to combine the upper part and the base layer part, filling the remaining gaps between the two parts and bonding them together. This technique avoids leakages and deformations in the actuator. Although having a thick elastomer base, a fabric layer can be added to the base to restrict the extension of the actuator along the base axis.
![]()
-
8Abduction Chambers
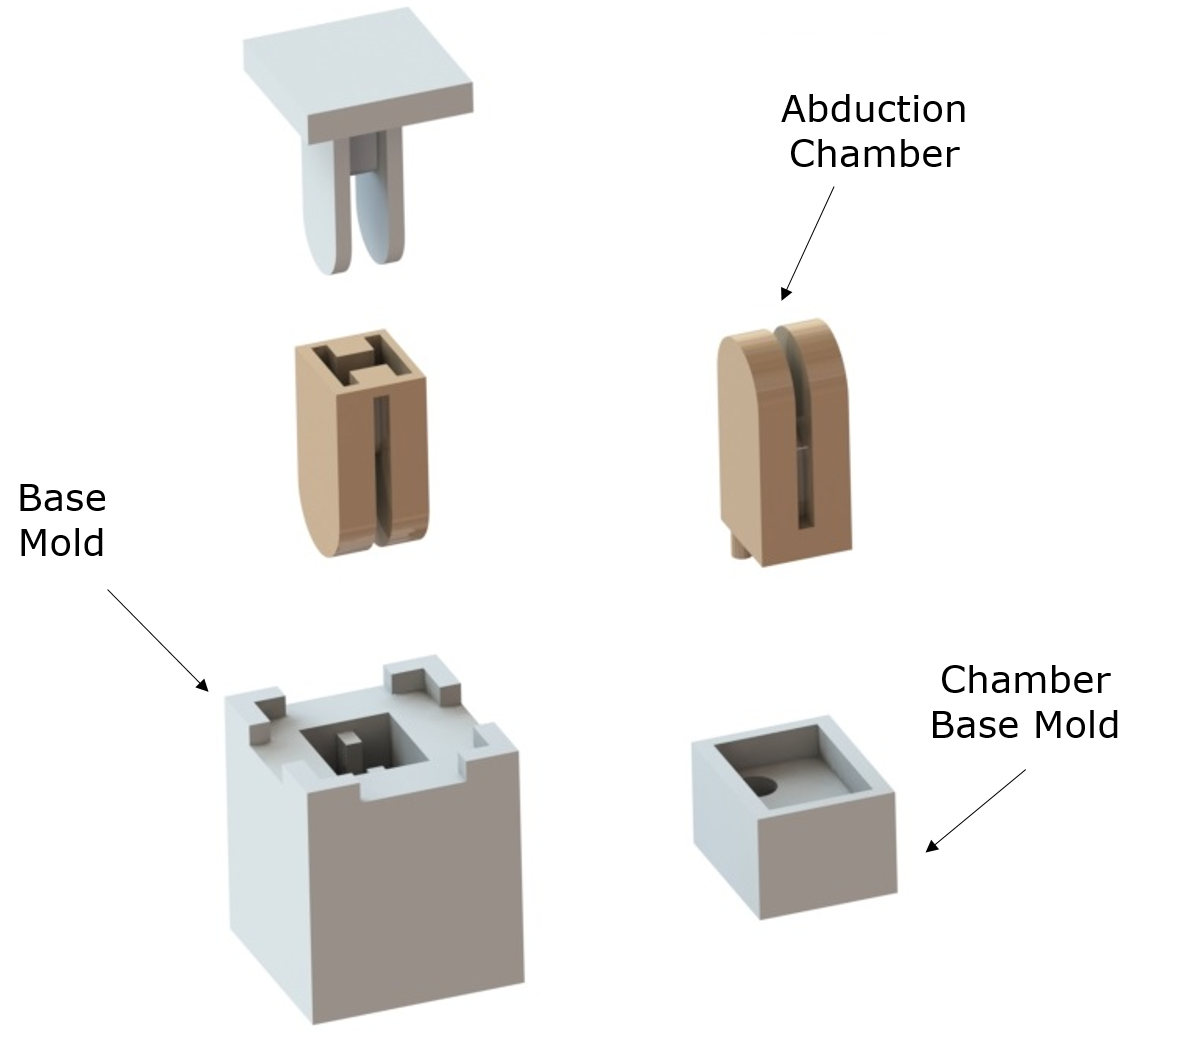
The proposed robotic exoskeleton glove contains three soft pneumatic actuators that execute the abduction and adduction motions of the fingers. These actuators are made out of urethane rubber (Smooth-On Vytaflex 40). The manufacturing process of the abduction chamber involves the following two molding steps:
- The top part of the actuator is fabricated using two molds.
- After the top part is cured, another mold is used to generate the base layer of the actuator and the air tube connection.
![]()
-
9Jamming Structures
The soft, laminar jamming structure proposed was designed to achieve multiple stiffnesses by applying a pressure gradient into the system. The structure is composed of a soft pouch with several thin layers inside it. When the vacuum is applied inside the pouch, the high friction between layers stiffens the entire structure. The pouches are made out of silicone rubber (Smooth-On Dragon Skin 30), and their walls are 1 mm thick. The jamming structures used pouches 160 mm long, 11 mm high, and 22 mm wide. Each jamming structure contains seven thin layers encased in the silicone vacuum pouch.
The layers can be made out of urethane rubber (Smooth-On Vytaflex 30), sandpaper, regular paper, or a combination of multiple materials. The layer material will change according to the desired stiffness of the structure. In the picture below, each layer is made out of a urethane rubber matrix (Smooth-On Vytaflex 30) and carbon fiber sheets. The composite layers retain the high flexibility of the rubber (promoting passive extension of the fingers) and low deformation in the axial direction of the carbon fiber (increasing the bending resistance when the structure is under vacuum). The elastic properties of the jamming layers and the soft pouch promote the passive extension of the fingers, keeping the human hand in a natural, zero-effort pose.
![]()
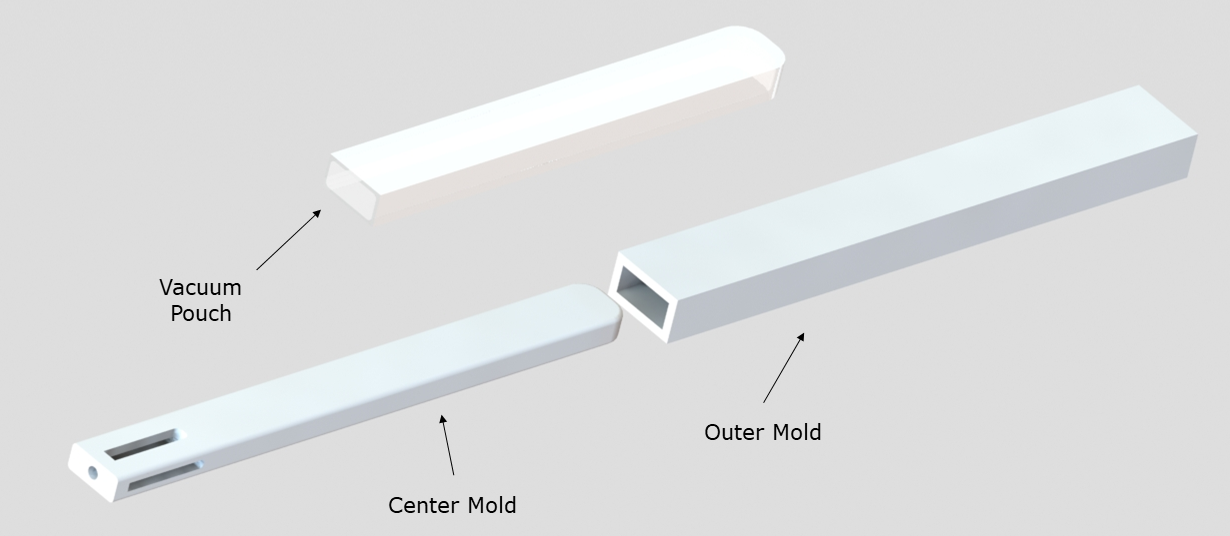
The vacuum pouch can be manufactures using the molds presented below in a single molding step using silicone rubber (Smooth-On Dragon Skin 30).
![]()
-
10Assembly Instructions for Hybrid, Motorized Exoskeleton Glove
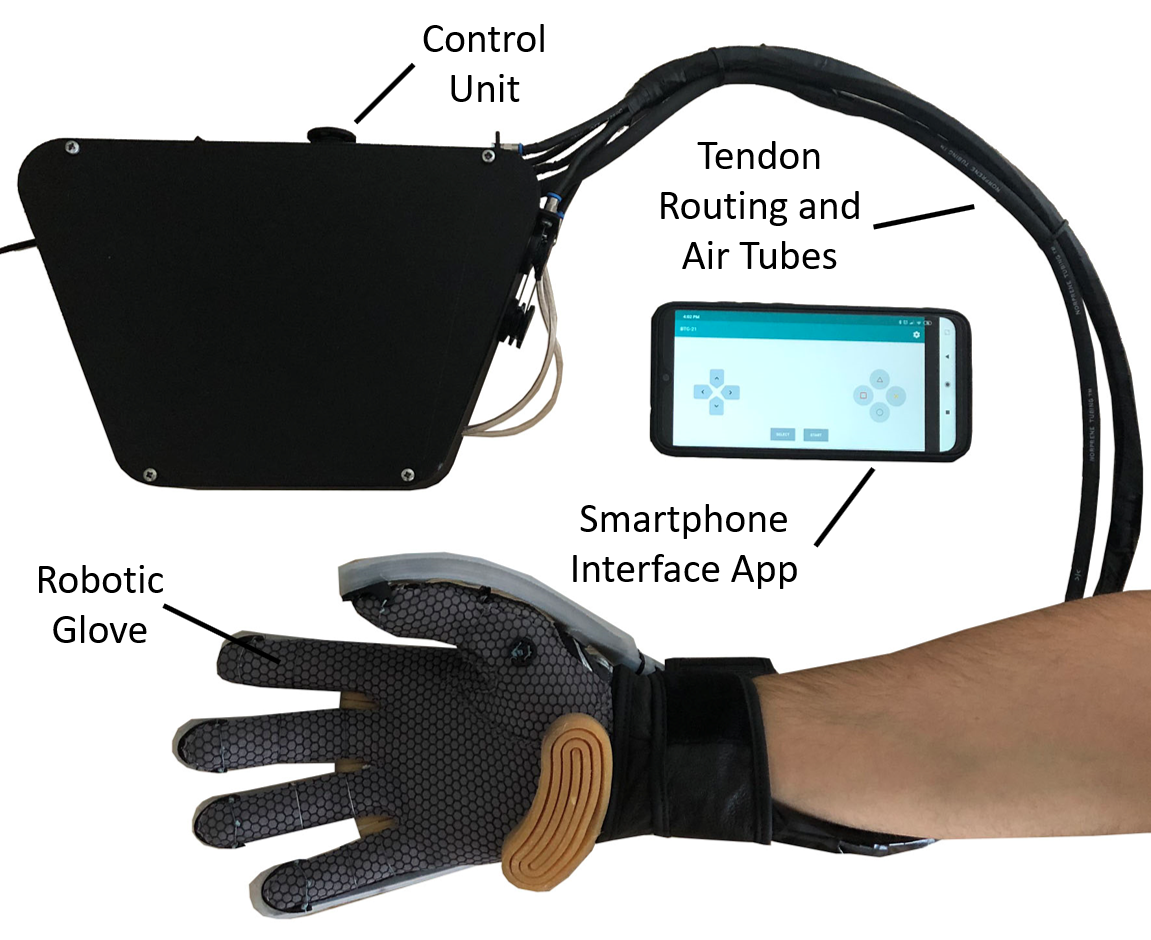
The motorized exoskeleton glove consists of three different main parts:
- Control Unit
- Robotic Glove
- Smartphone Interface App
![]()
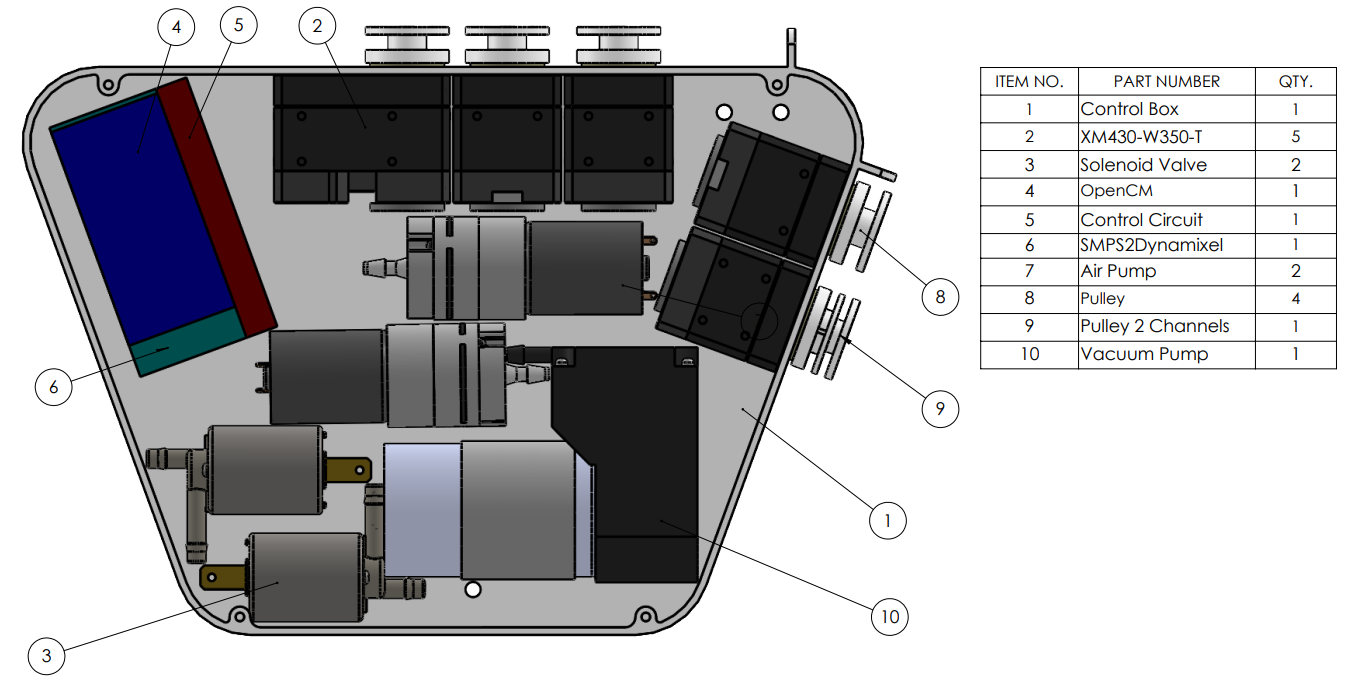
Control Unit Preparation
In order to prepare the control unit you will require the following parts. The 3D printed parts are represented by the white parts. The wiring diagram for the electronics are described in the Build Instructions section of this project.
Robotic Glove Preparation
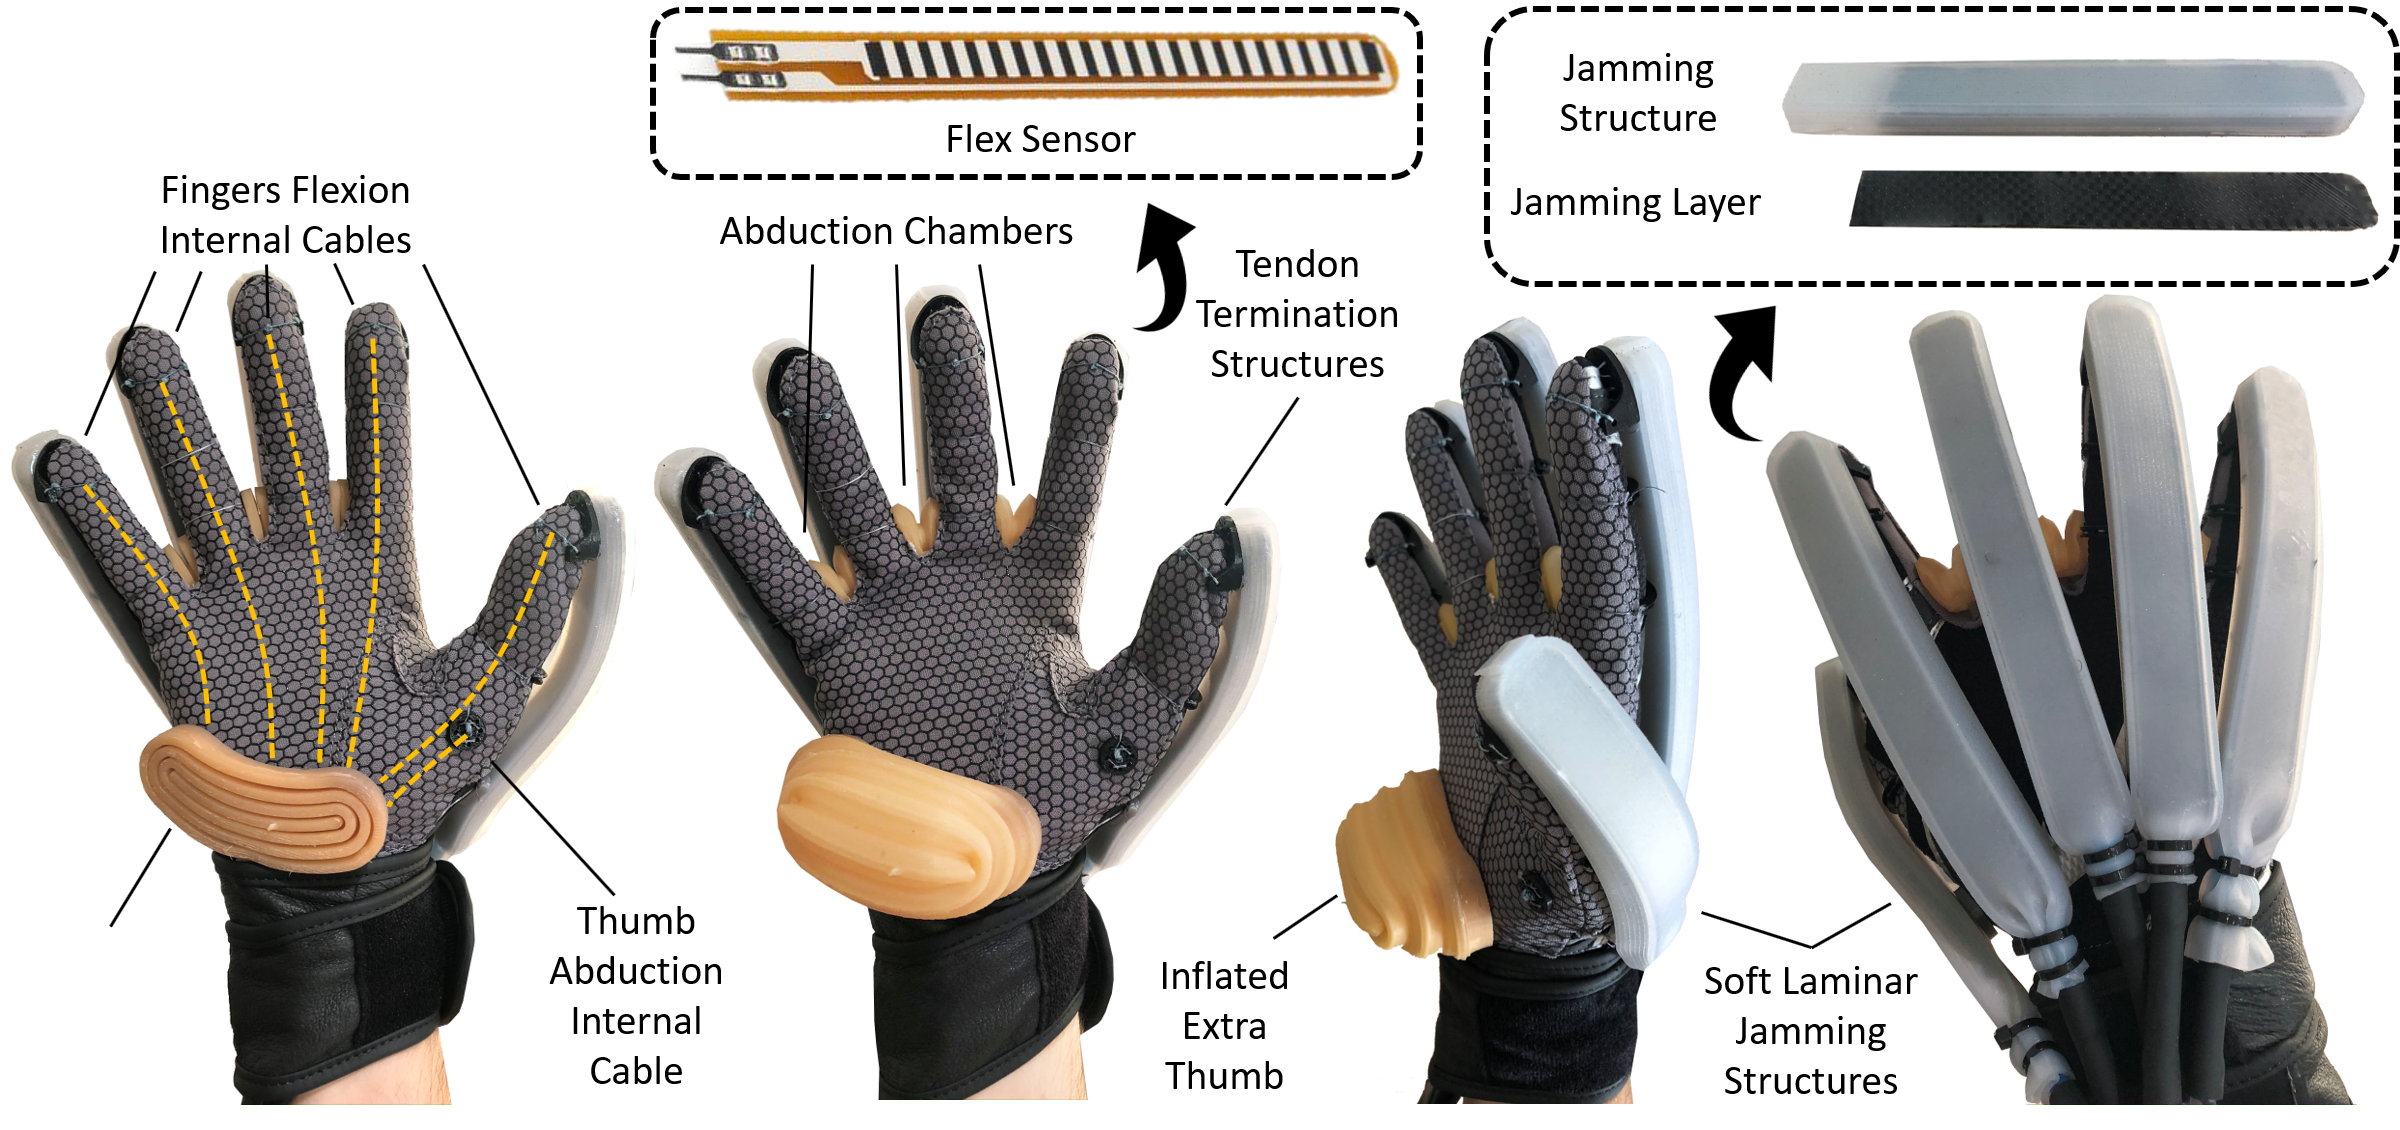
The preparation procedure of the robotic glove is similar to the soft glove of the body-powered exoskeleton glove (video below). The fabrication processes of the abduction chambers and the inflatable extra thumb are described in the Build Instructions section of this project. Once the 3D printed parts are stitched on the glove, the soft parts (abduction chambers, jamming structures and the inflatable extra thumb) can be glued (with superglue) on the glove in the positions showed in the picture below.
![]()
Smartphone Interface App Preparation
In order to control the motorized exoskeleton glove you need to follow the steps below:
Wearable, Soft Robotic Exoskeleton Gloves
The New Dexterity / Open Bionics wearable, affordable, soft exogloves are bionic devices for rehabilitation and human augmentation.
 New Dexterity


Discussions
Become a Hackaday.io Member
Create an account to leave a comment. Already have an account? Log In.