Yohan Hadji
-
Success!
07/08/2022 at 07:06 • 0 commentsWe just had the first successful high altitude R2Home demonstration!
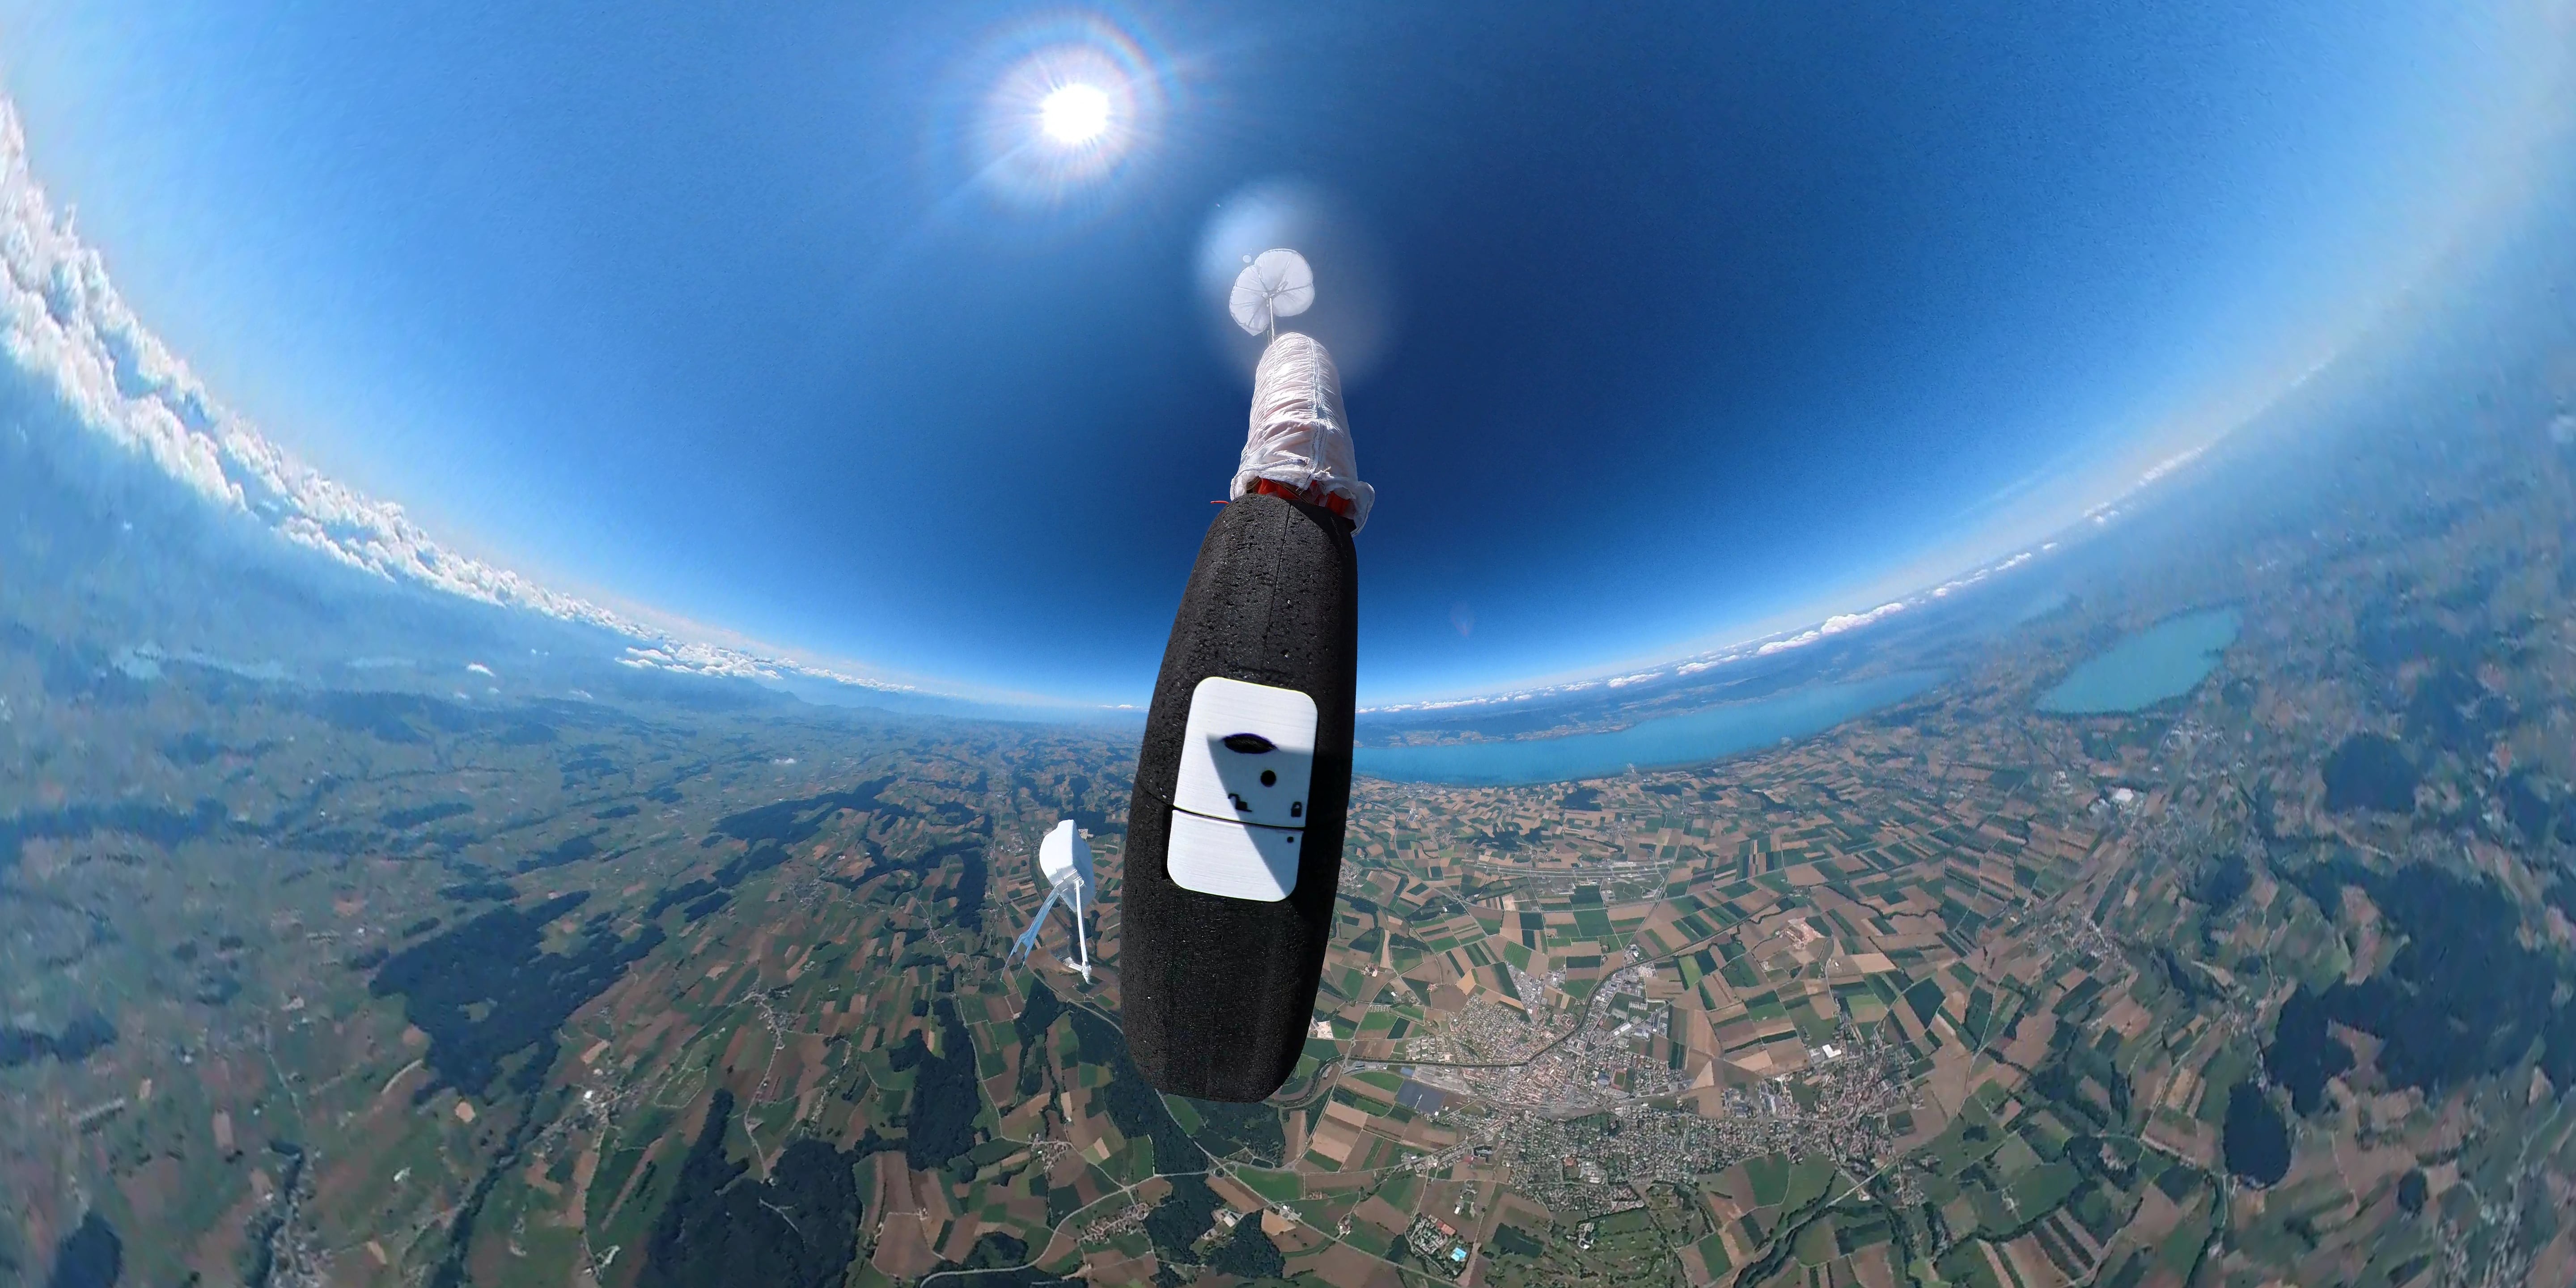
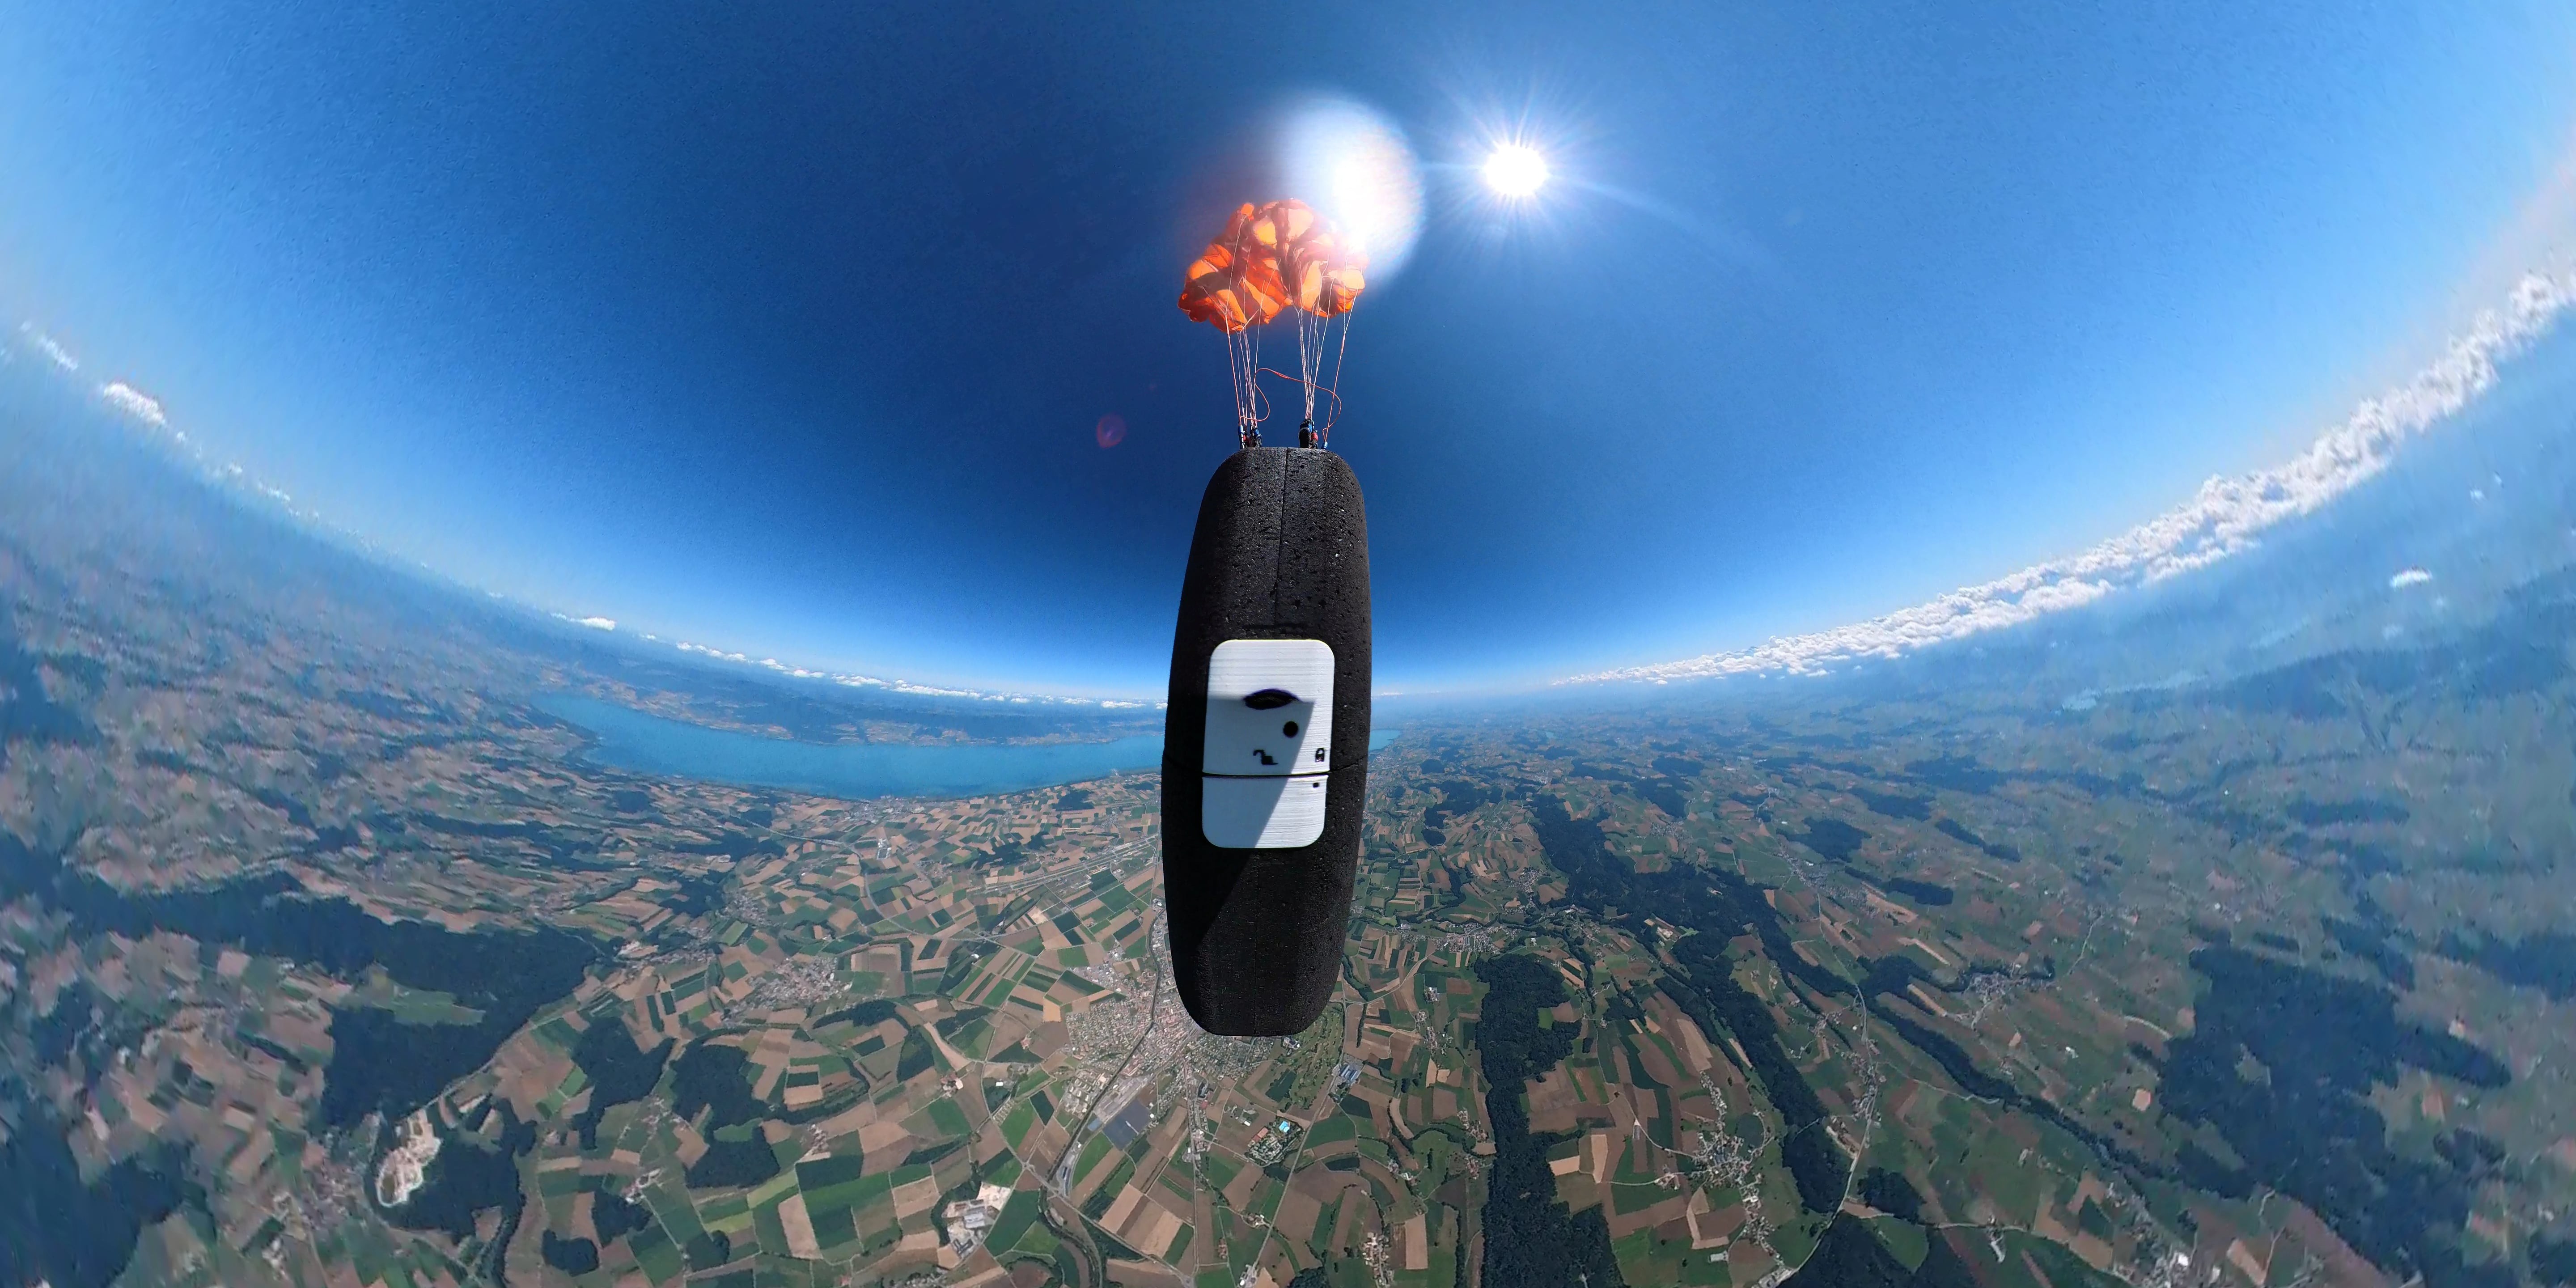
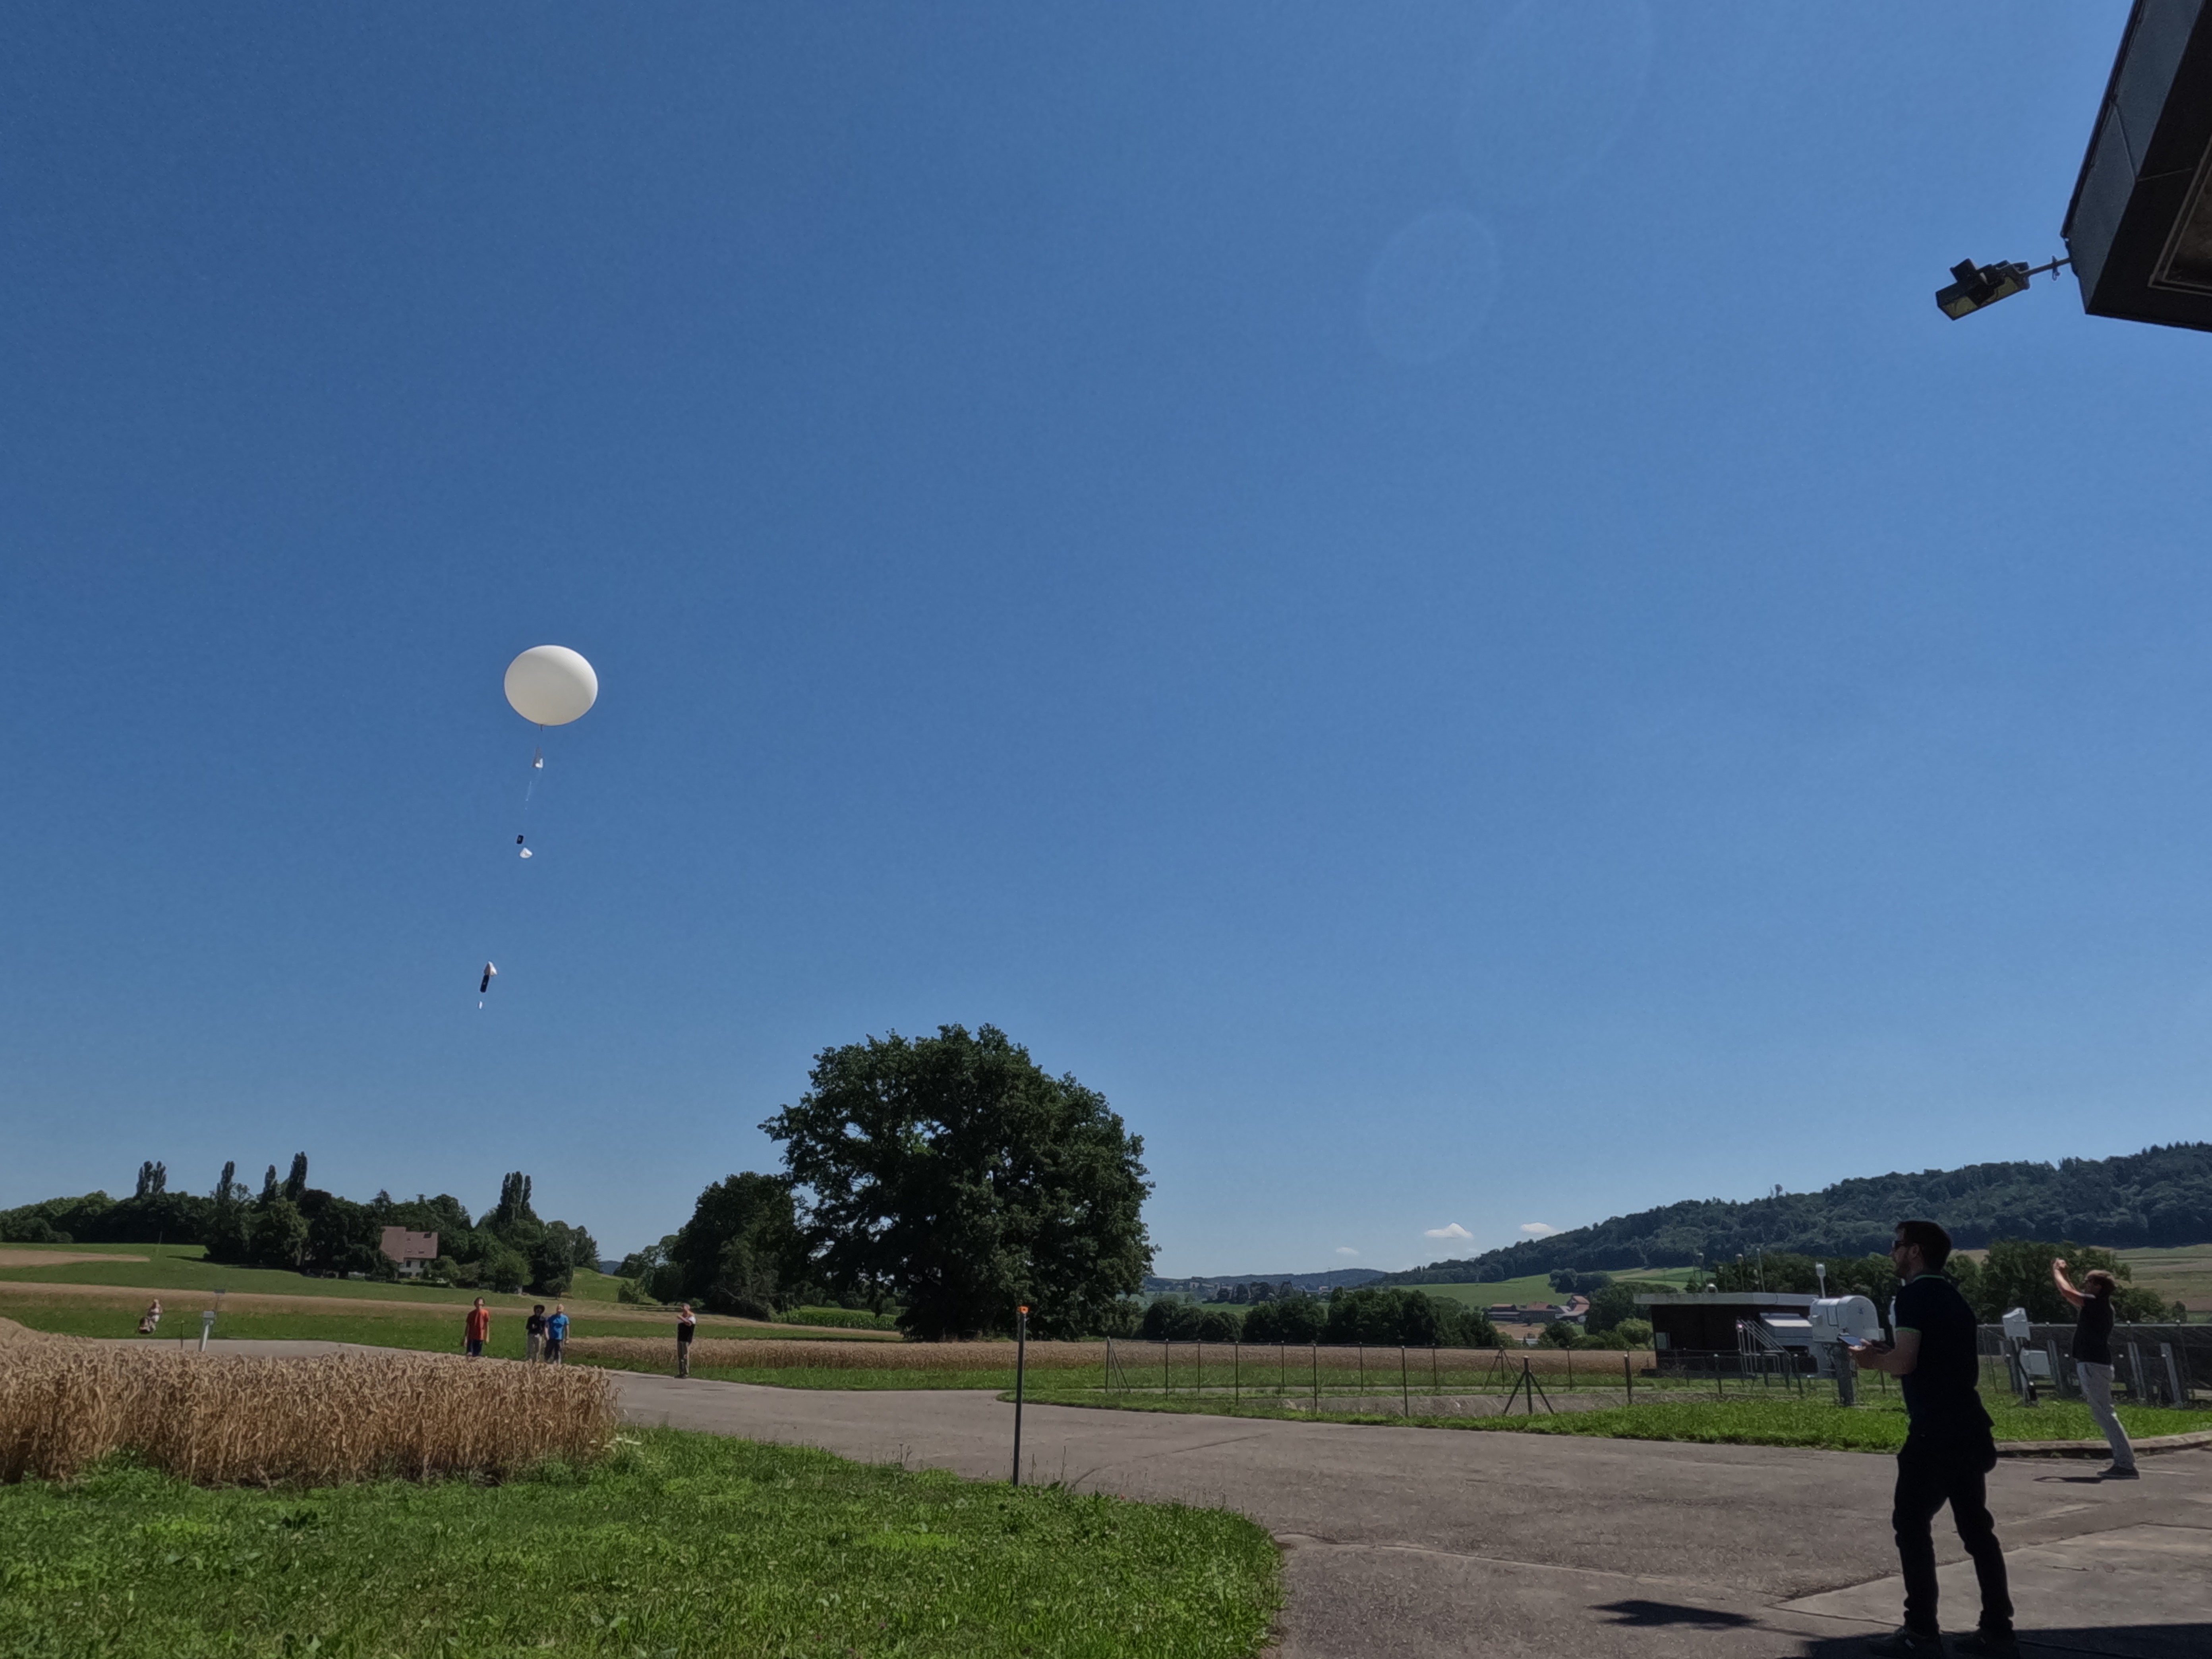
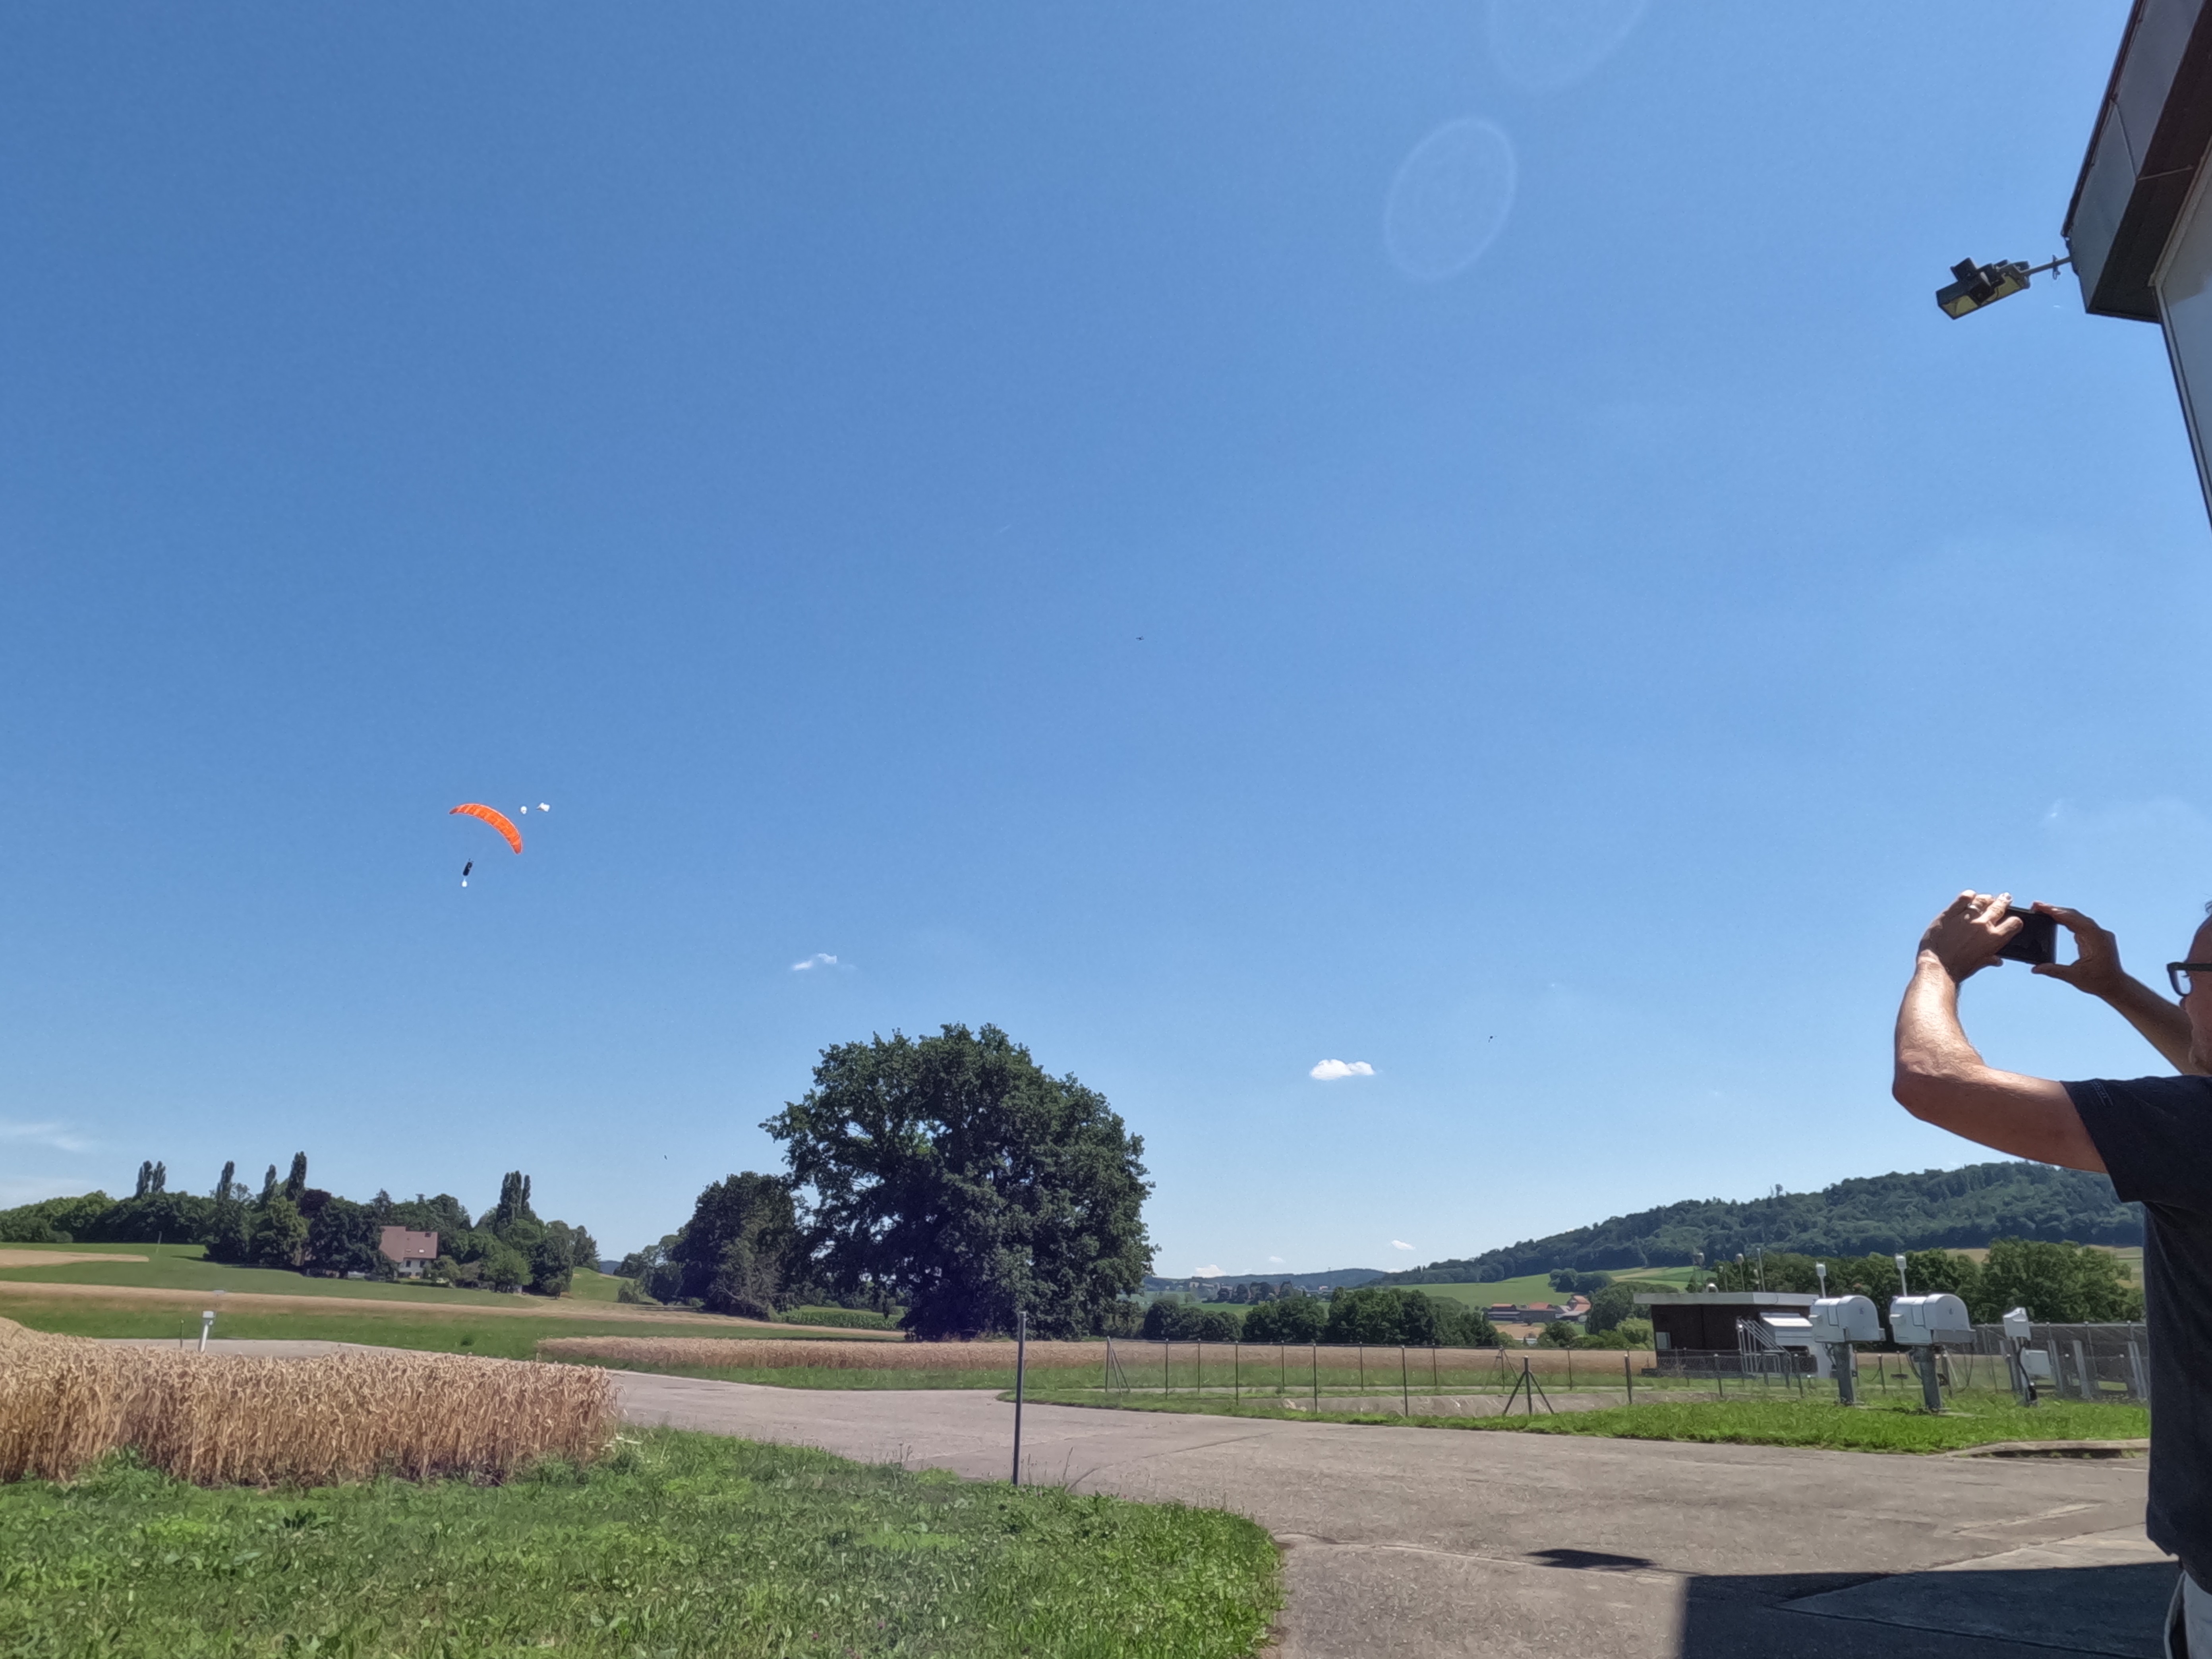
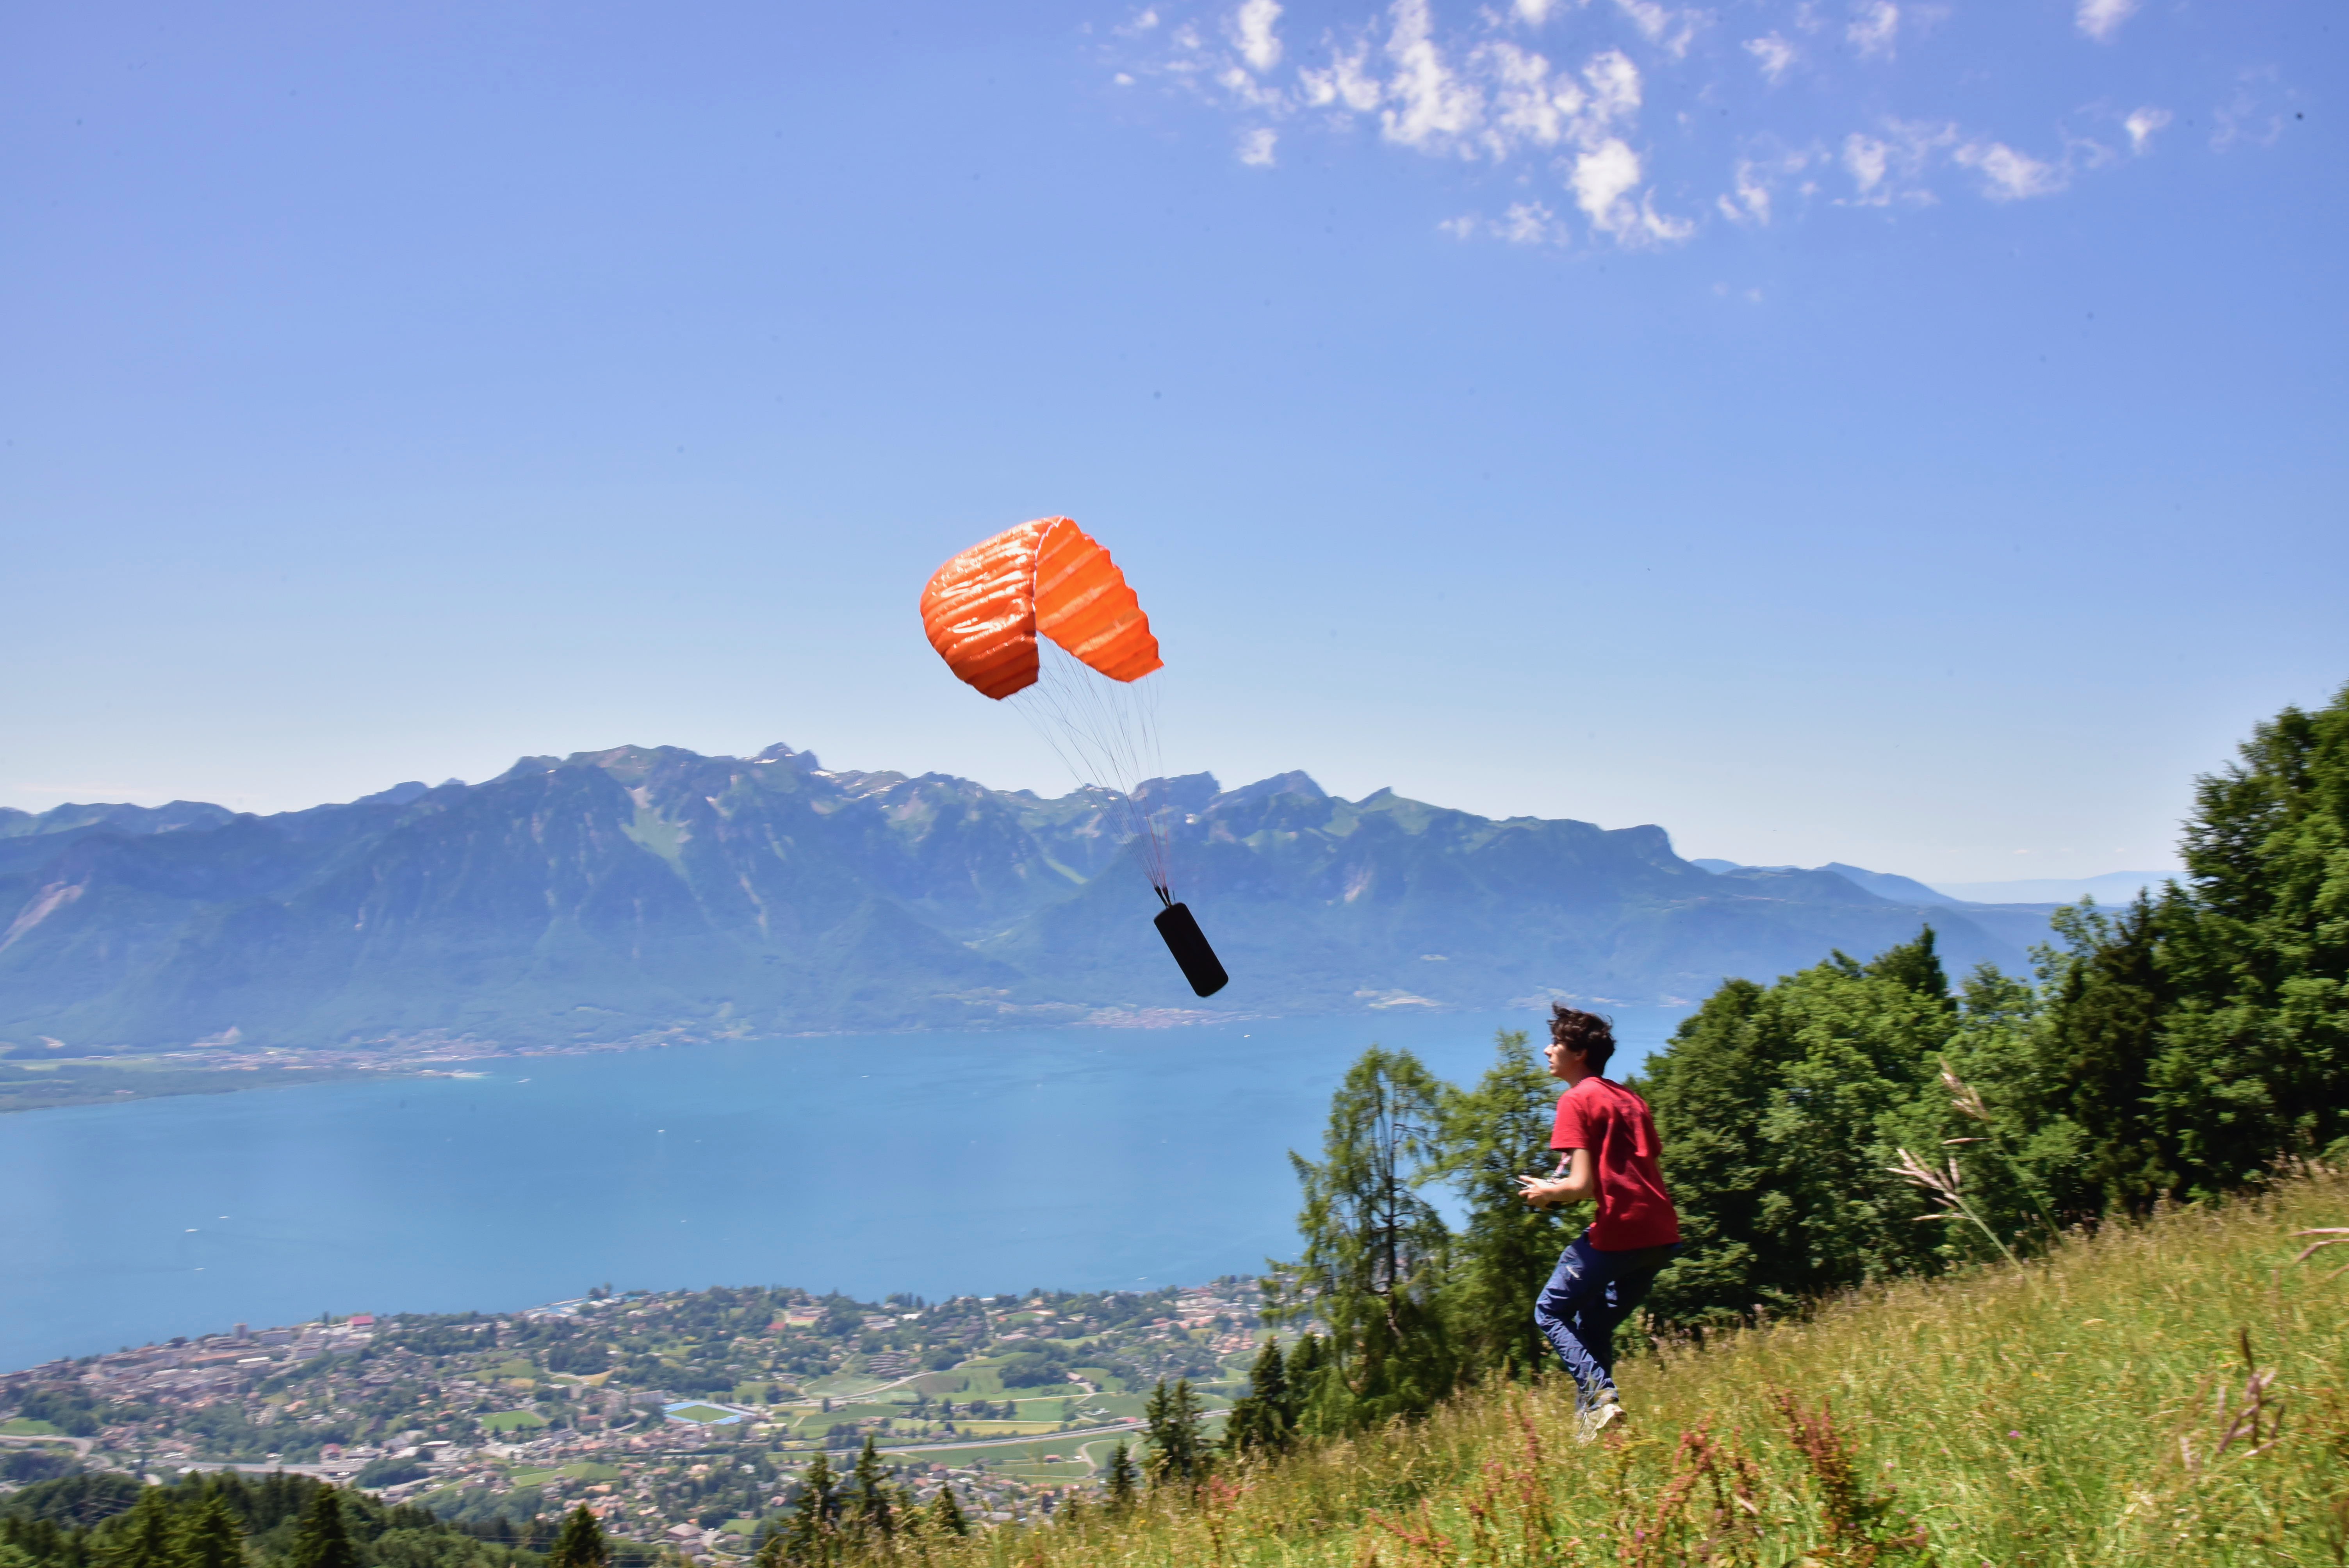
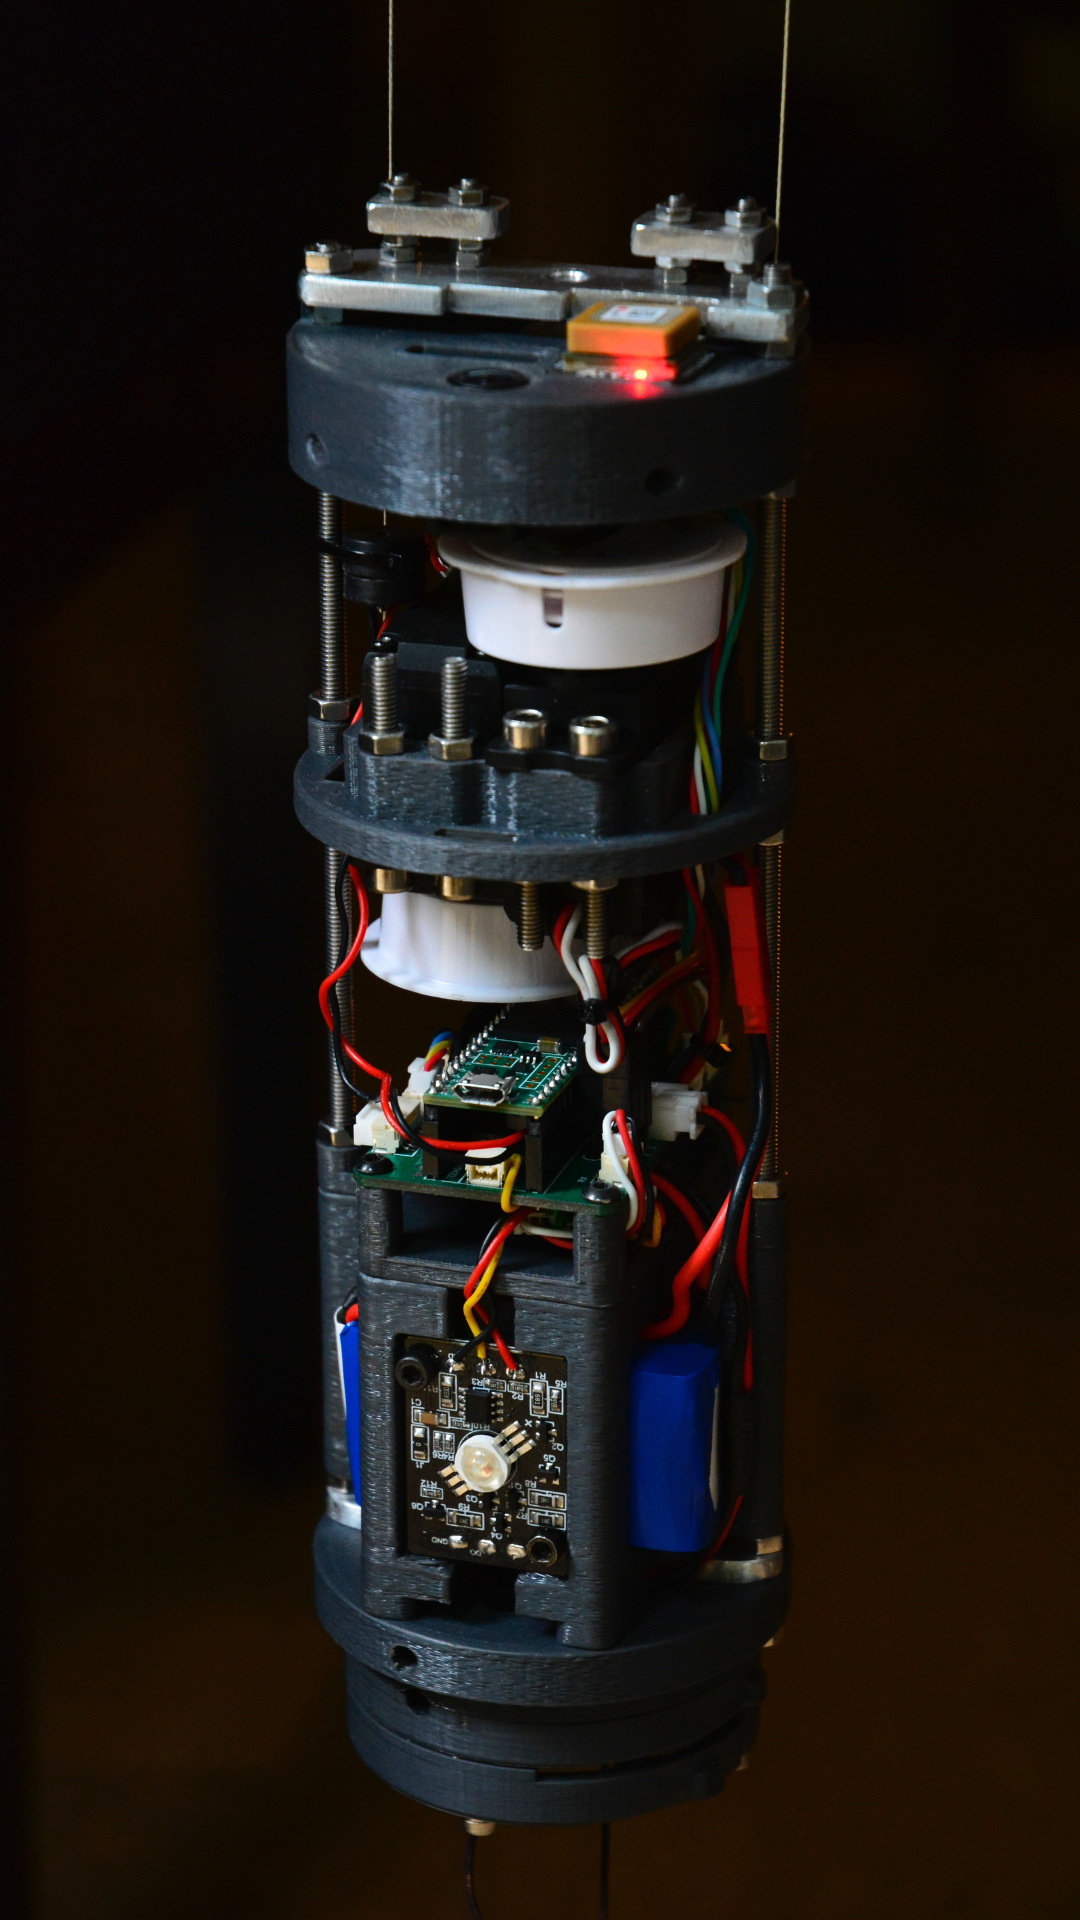
After getting the « go for flight » from Skyguide (Air traffic regulation authorities in Switzerland) R2Home rose up to 3500m (11400ft) under a weather balloon launched by MeteoSwiss. At this altitude it autonomously detached itself from the balloon before opening its paraglider wing and flying back to the launch site to land within five meters of the launch point!
![]()
![]()
![]()
![]()
Here is the video of the flight:
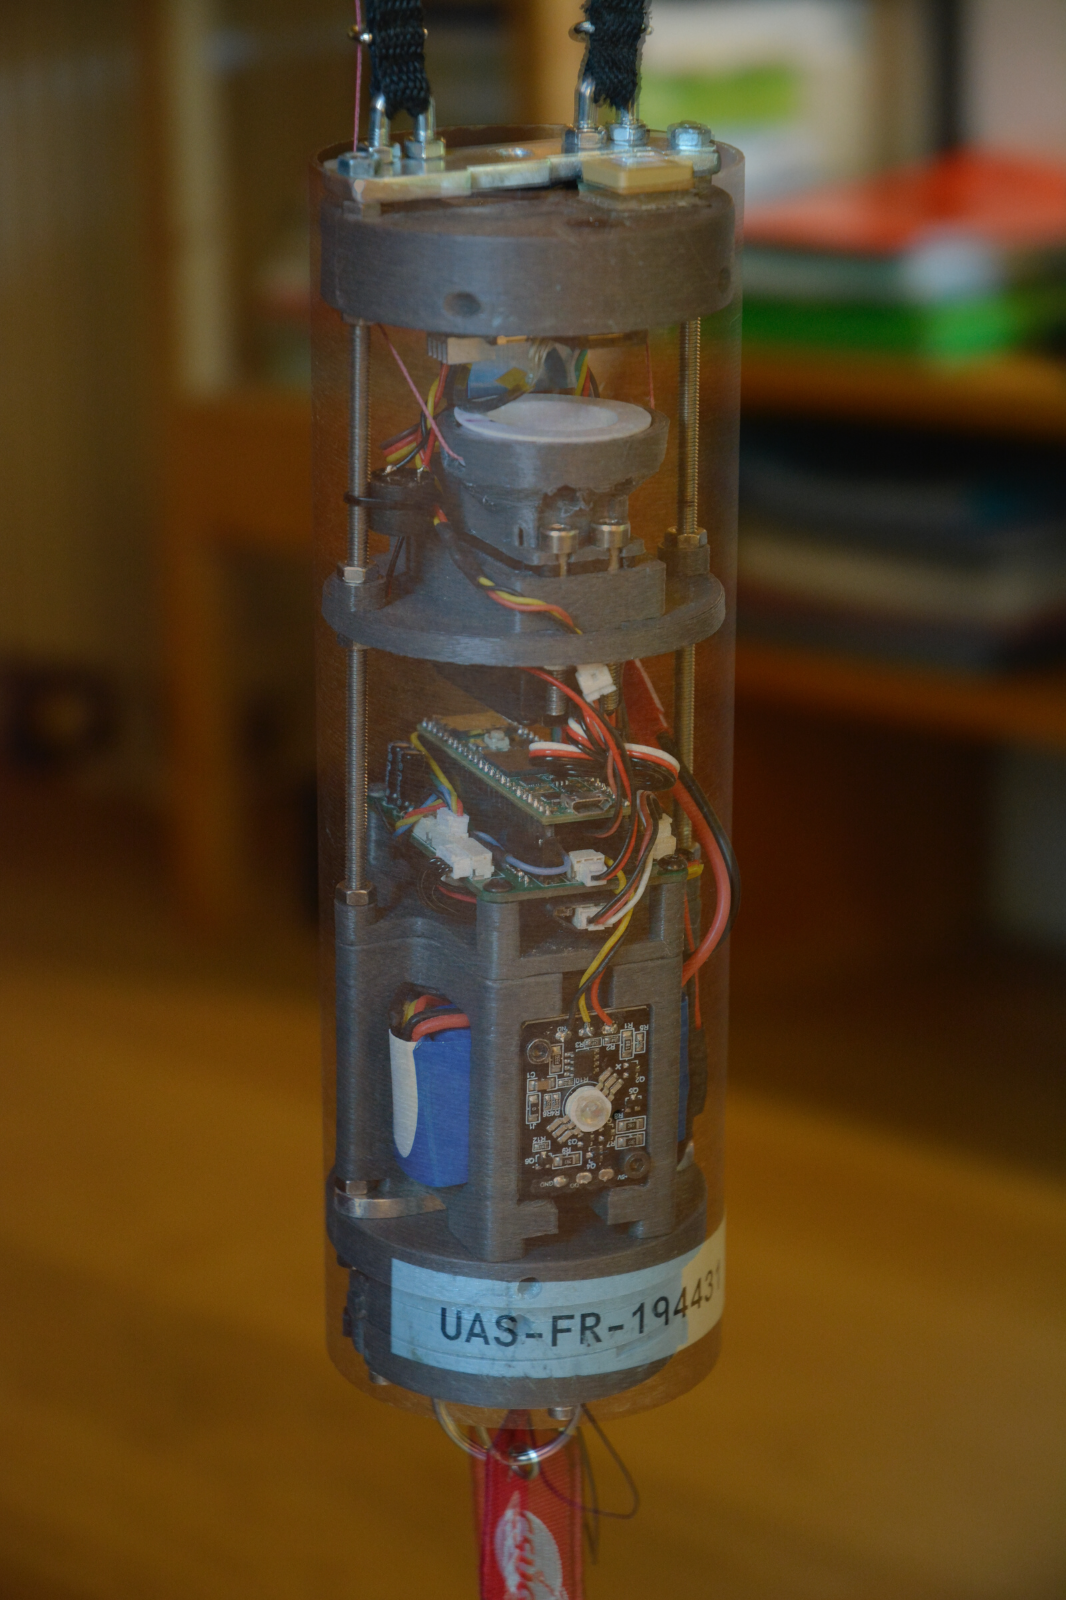
It came back with a RS41 radiosonde attached as a payload. This is the first small step toward making them reusable.
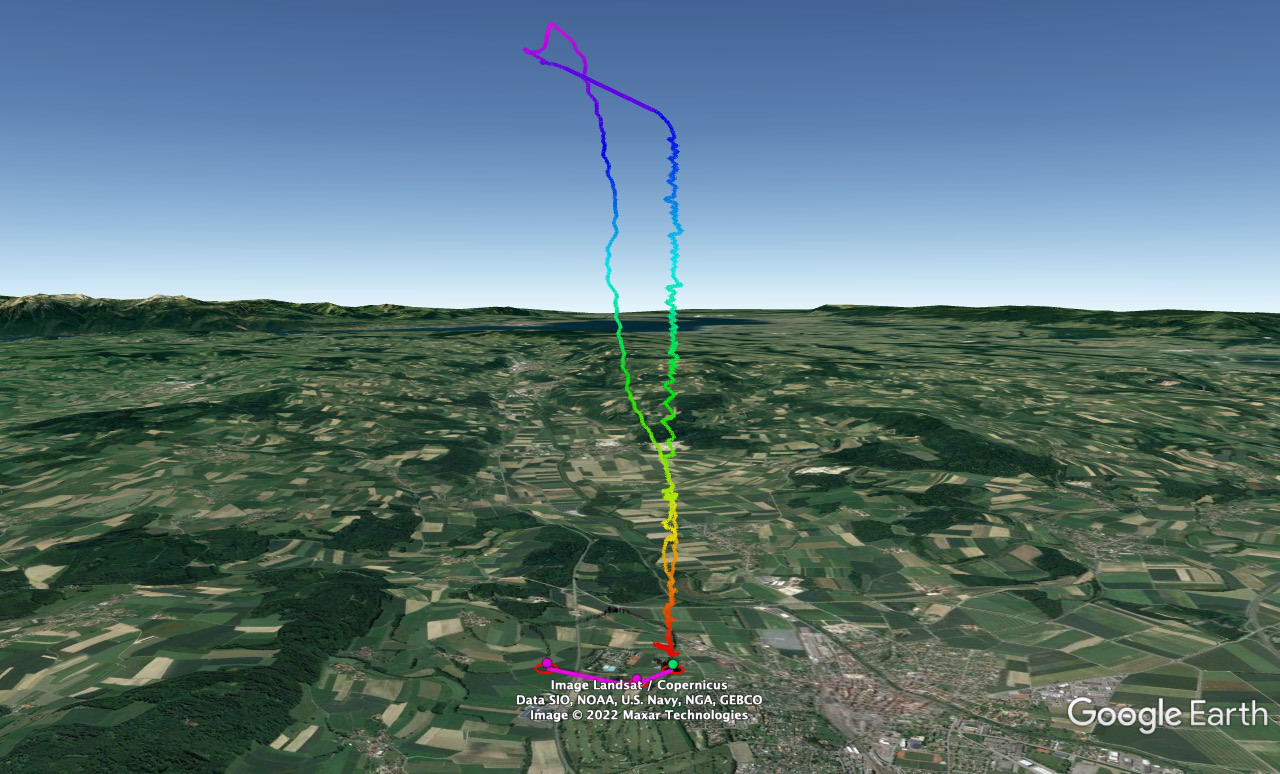
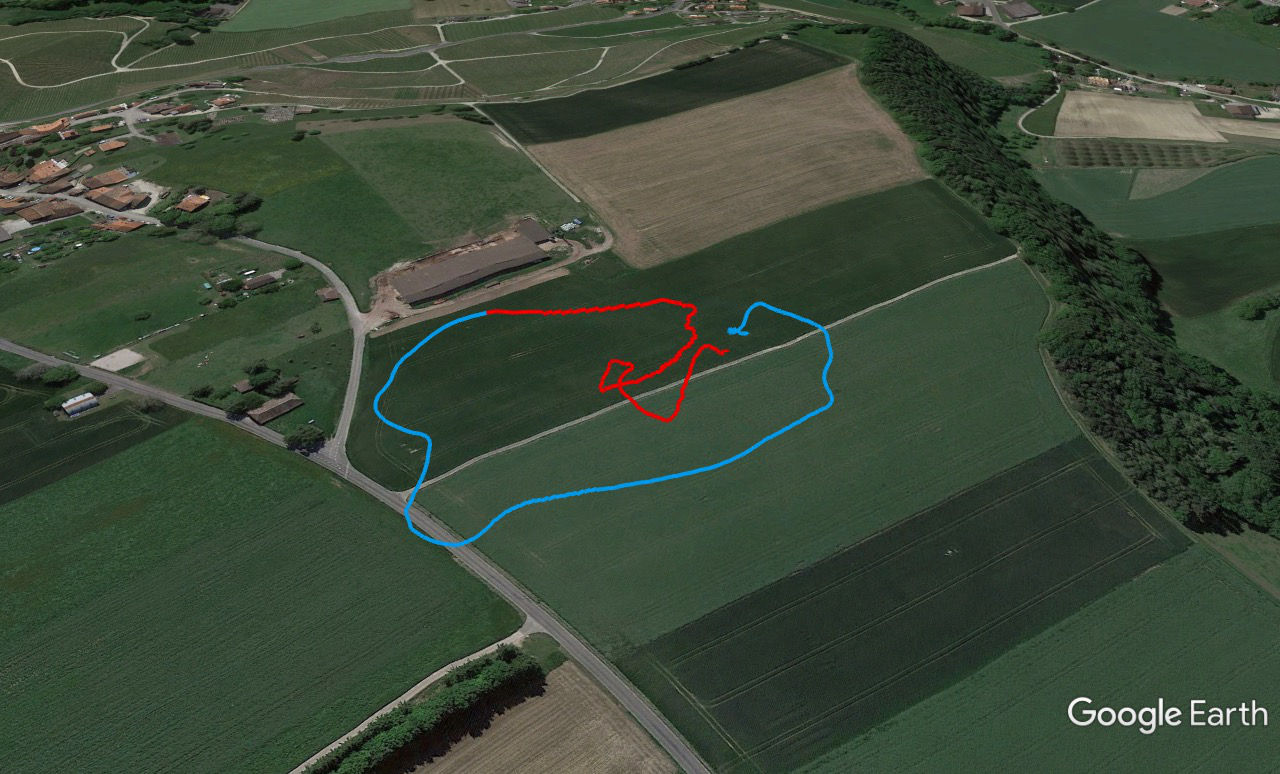
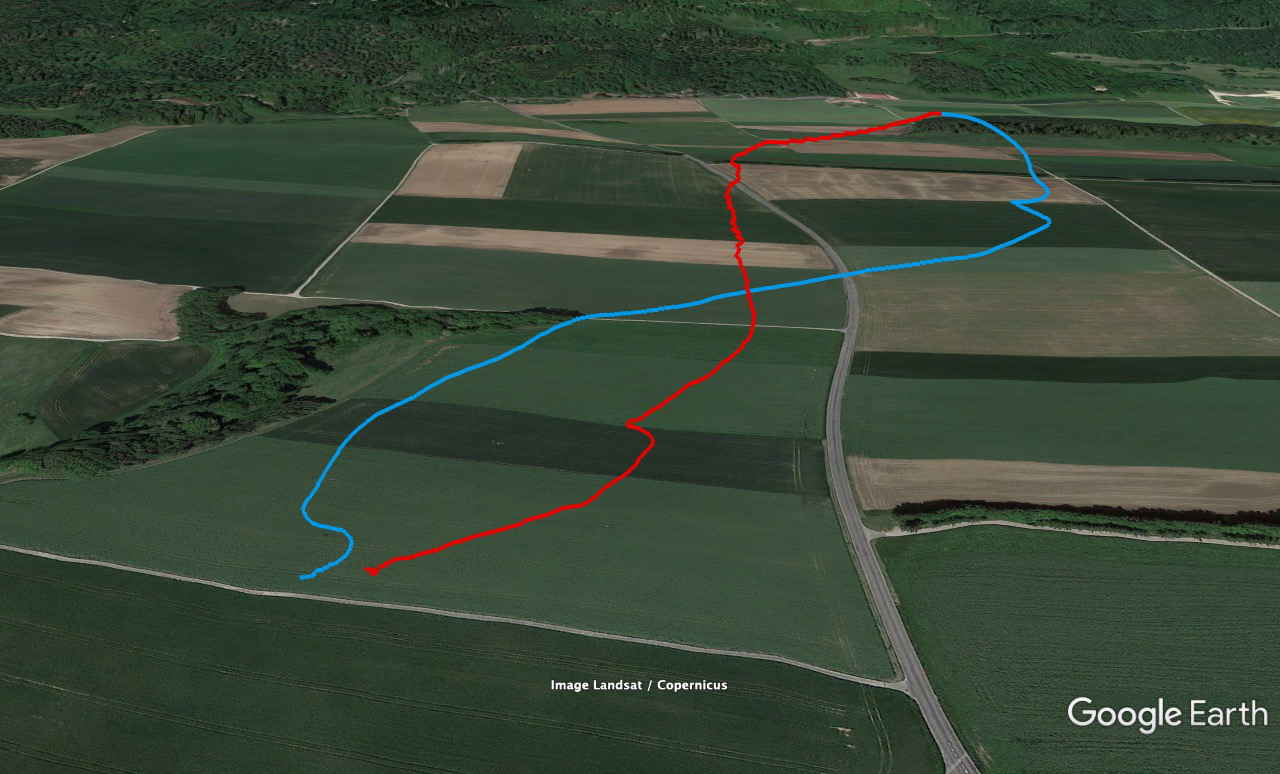
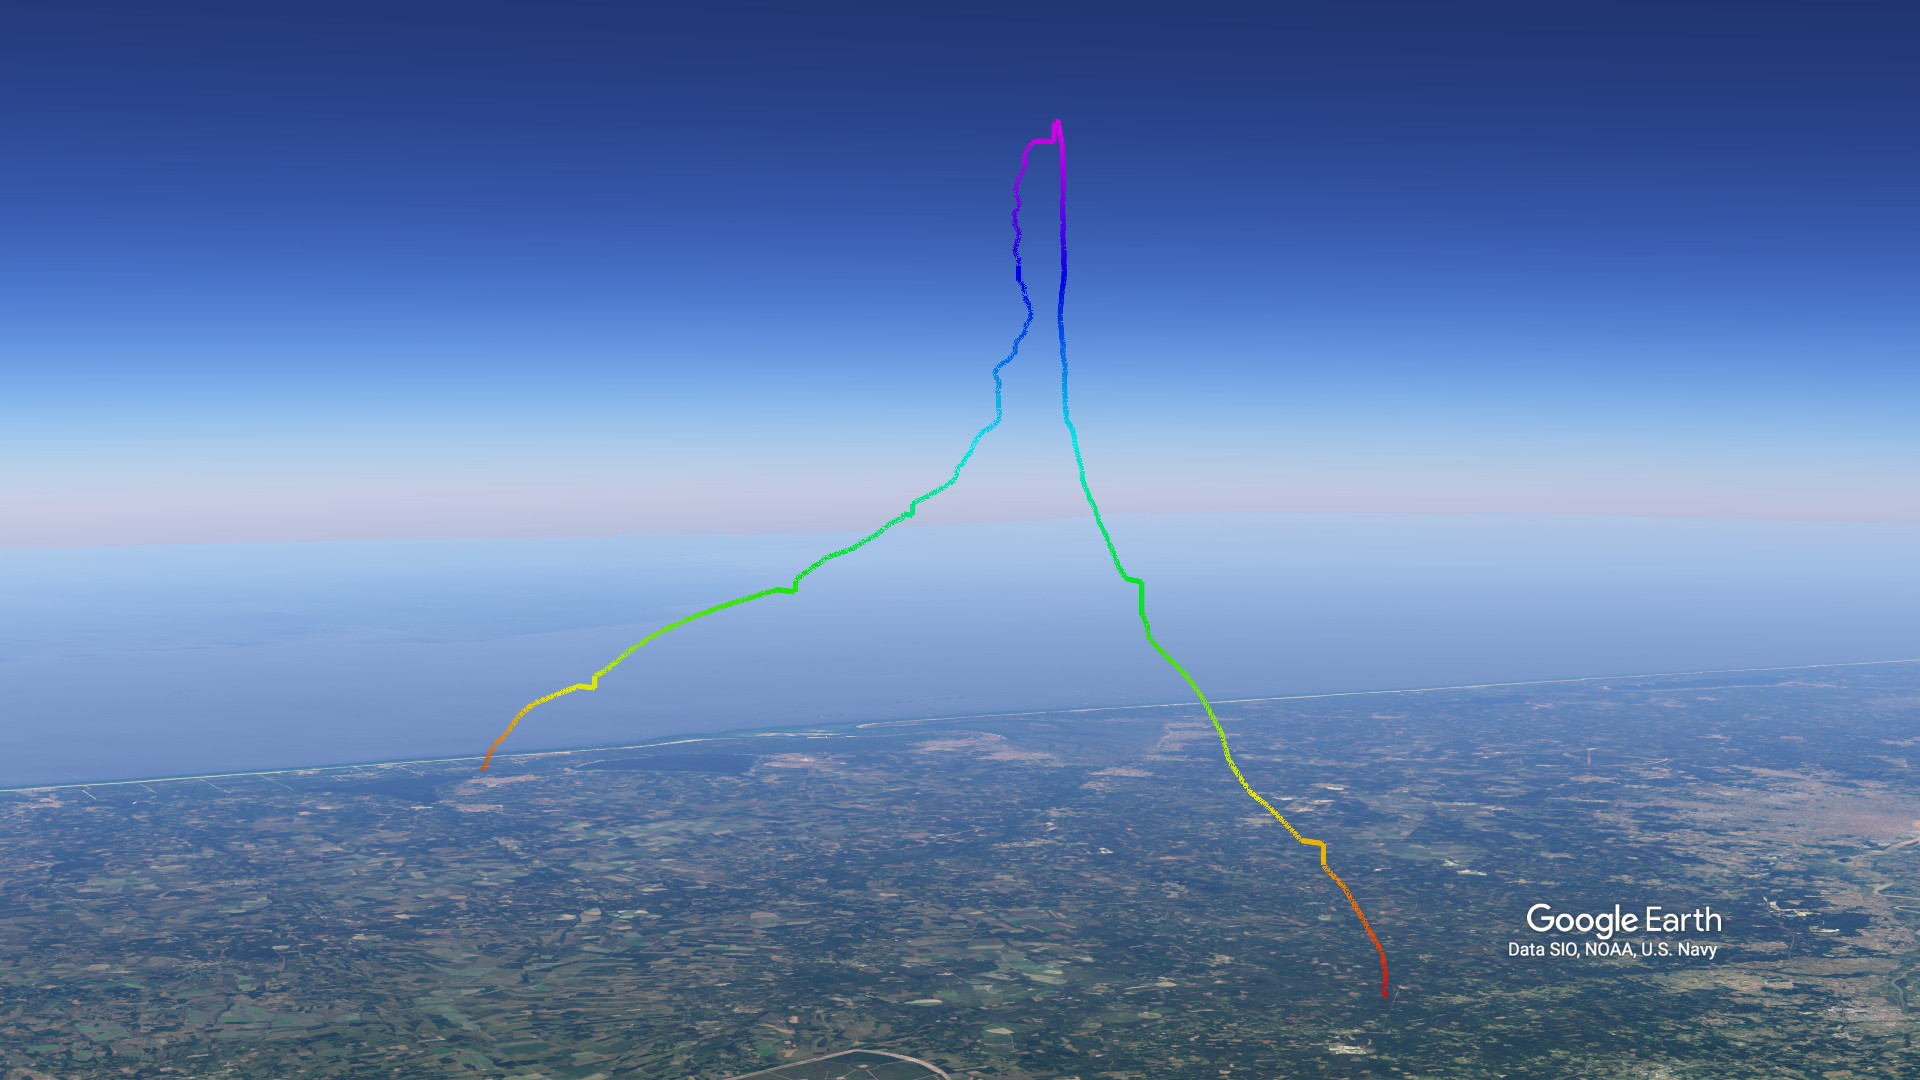
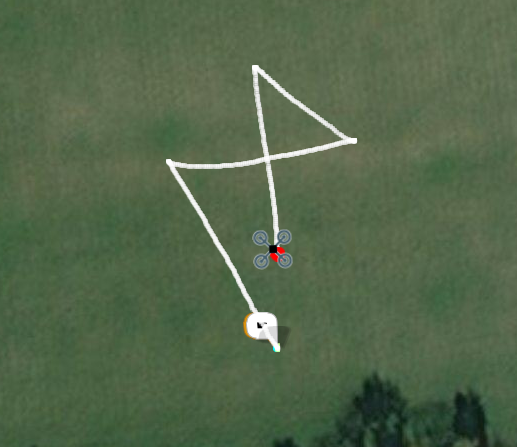
Here is the trajectory of the flight :
![]()
![]()
![]()
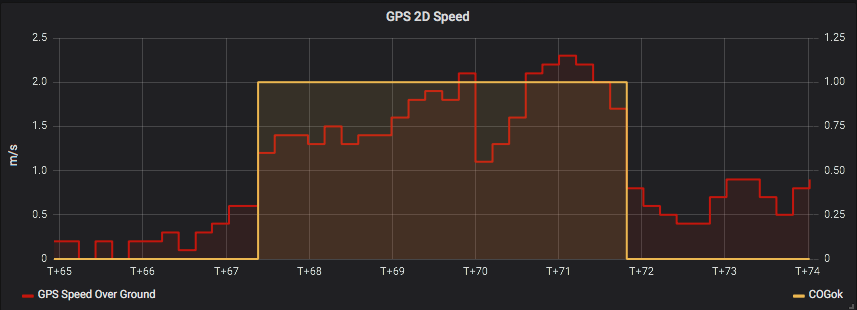
You will notice that we had a ton of altitude margin, for 15 minutes R2Home was just doing circles above the landing point meaning we can easily go higher next time or with more wind :)
The wing was trimmed on the slowest position for a flight speed between 5 and 7 m/s. With trim speed on fast we should be able to reach 8-9 m/s and above.
You can also see three waypoints on the trajectory. These were placed such that R2Home would avoid flying directly above any populated area (public pool and big parking place).
![]()
![]()
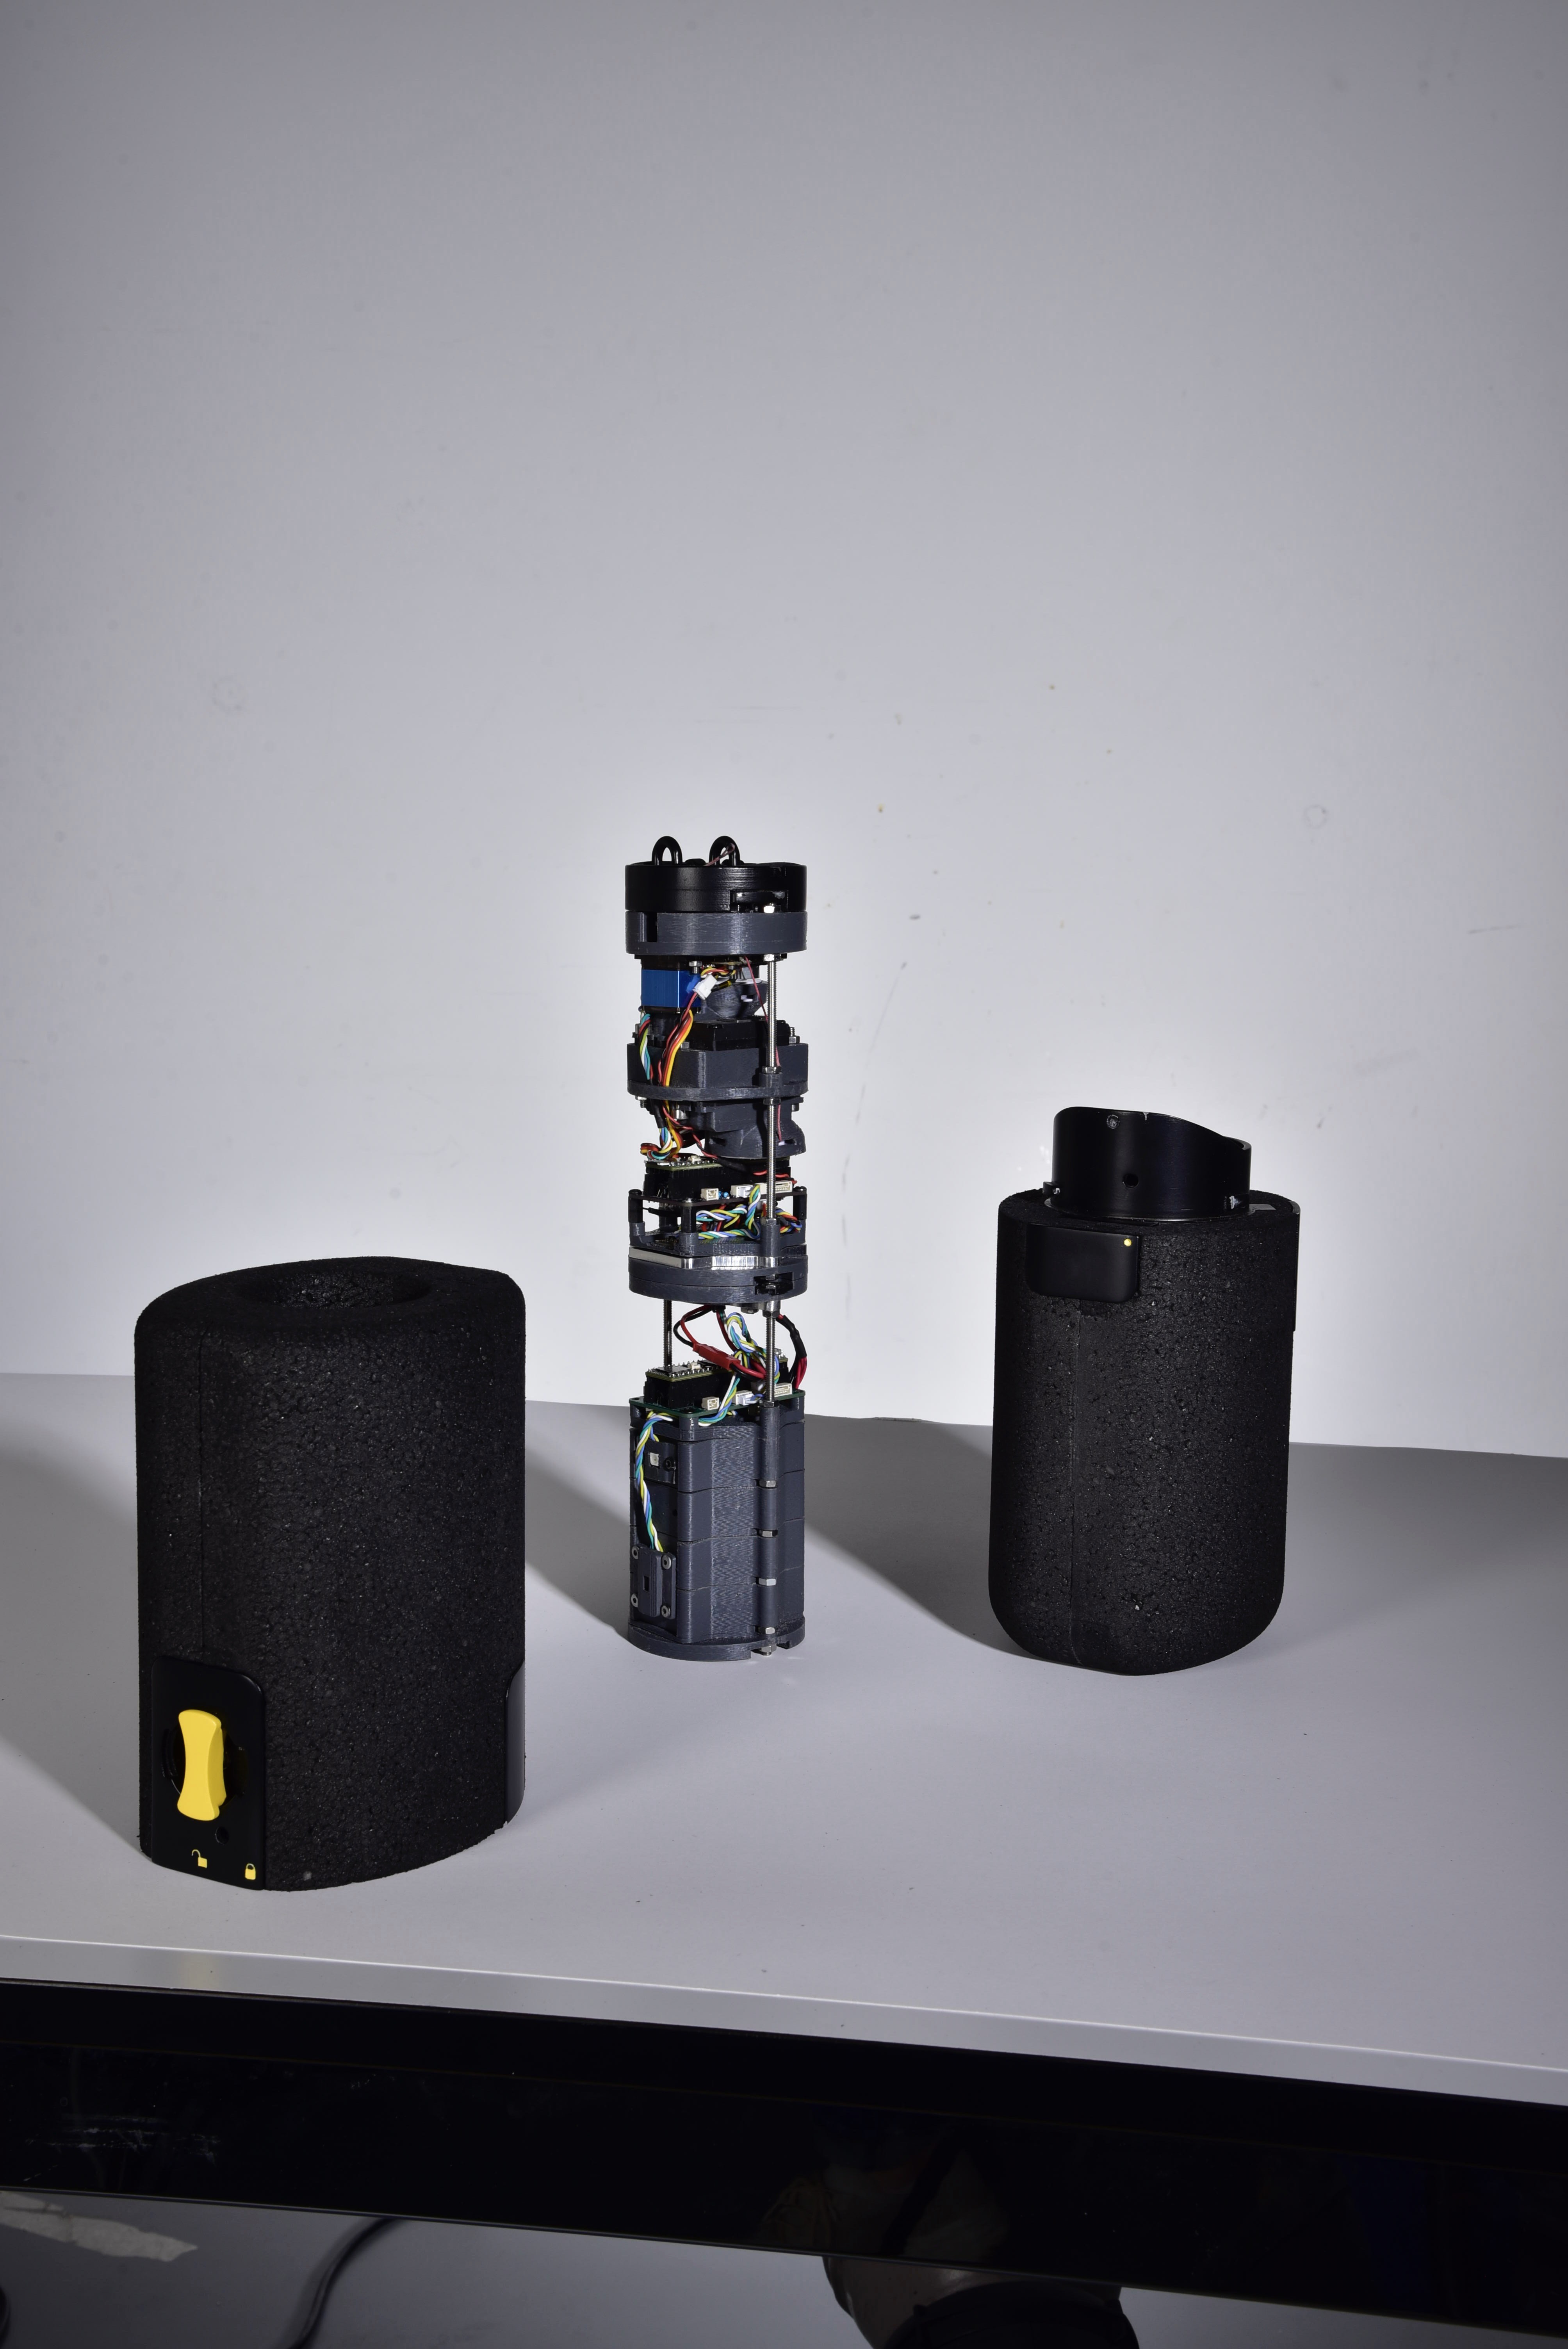
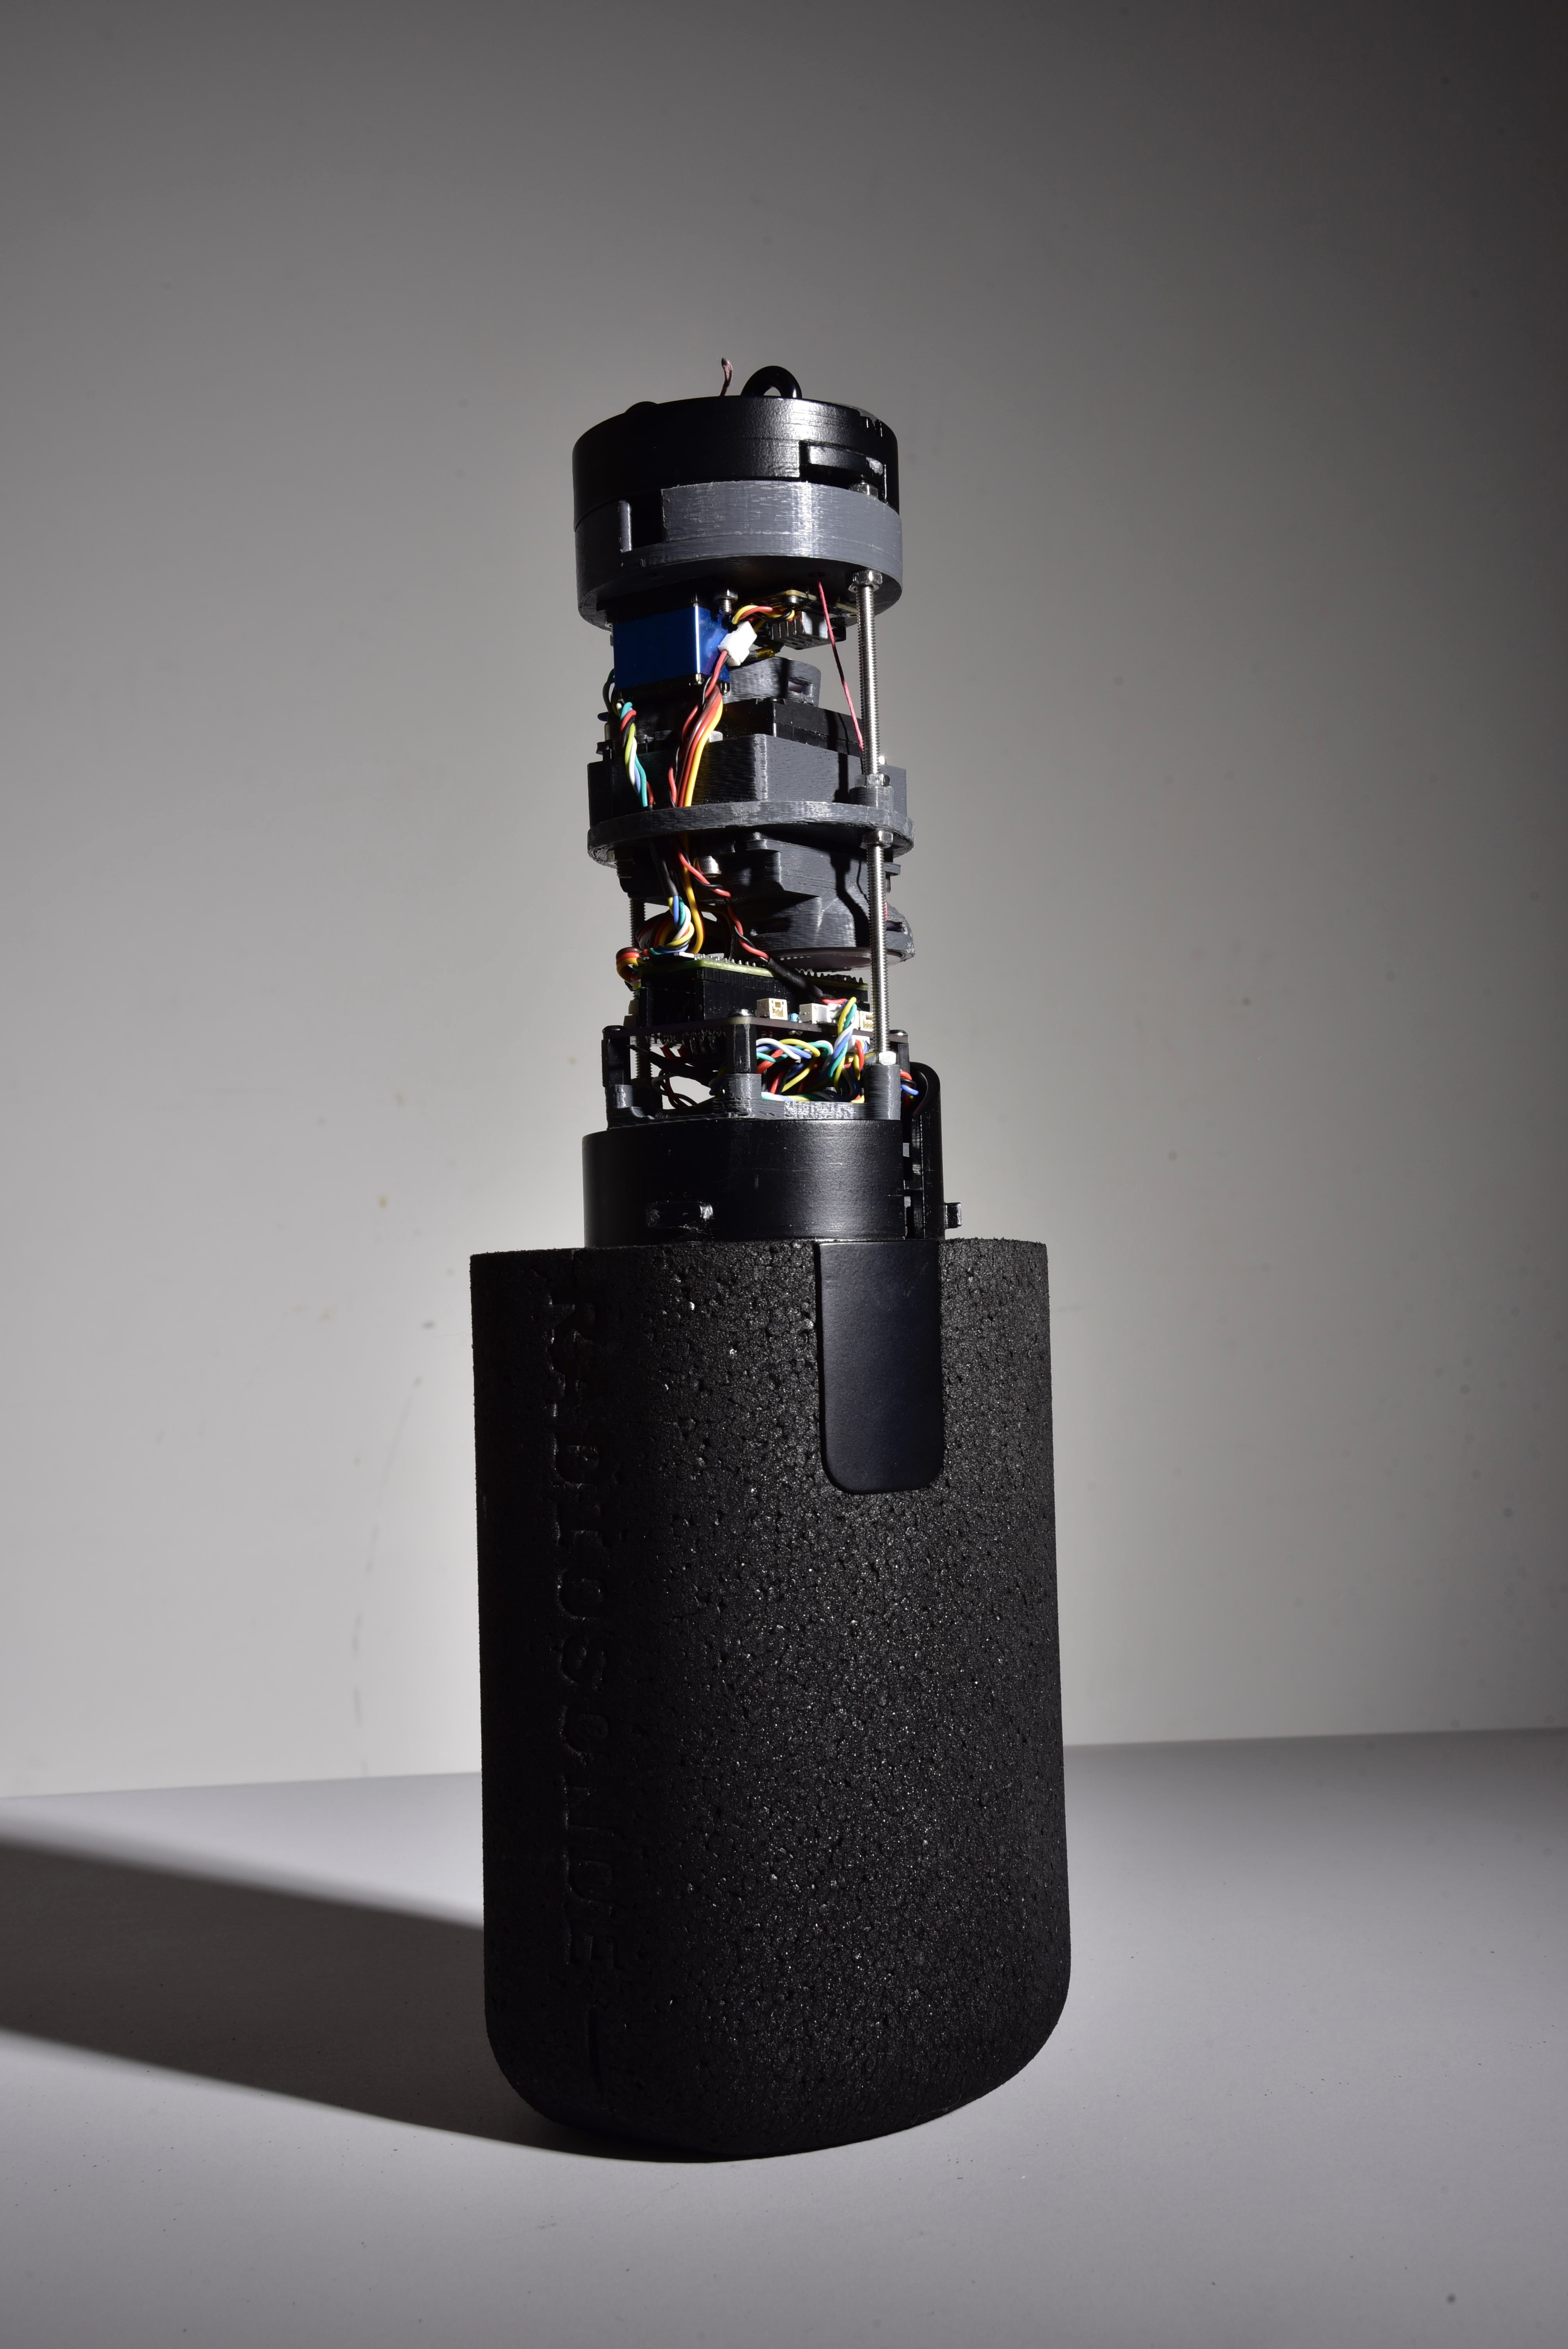
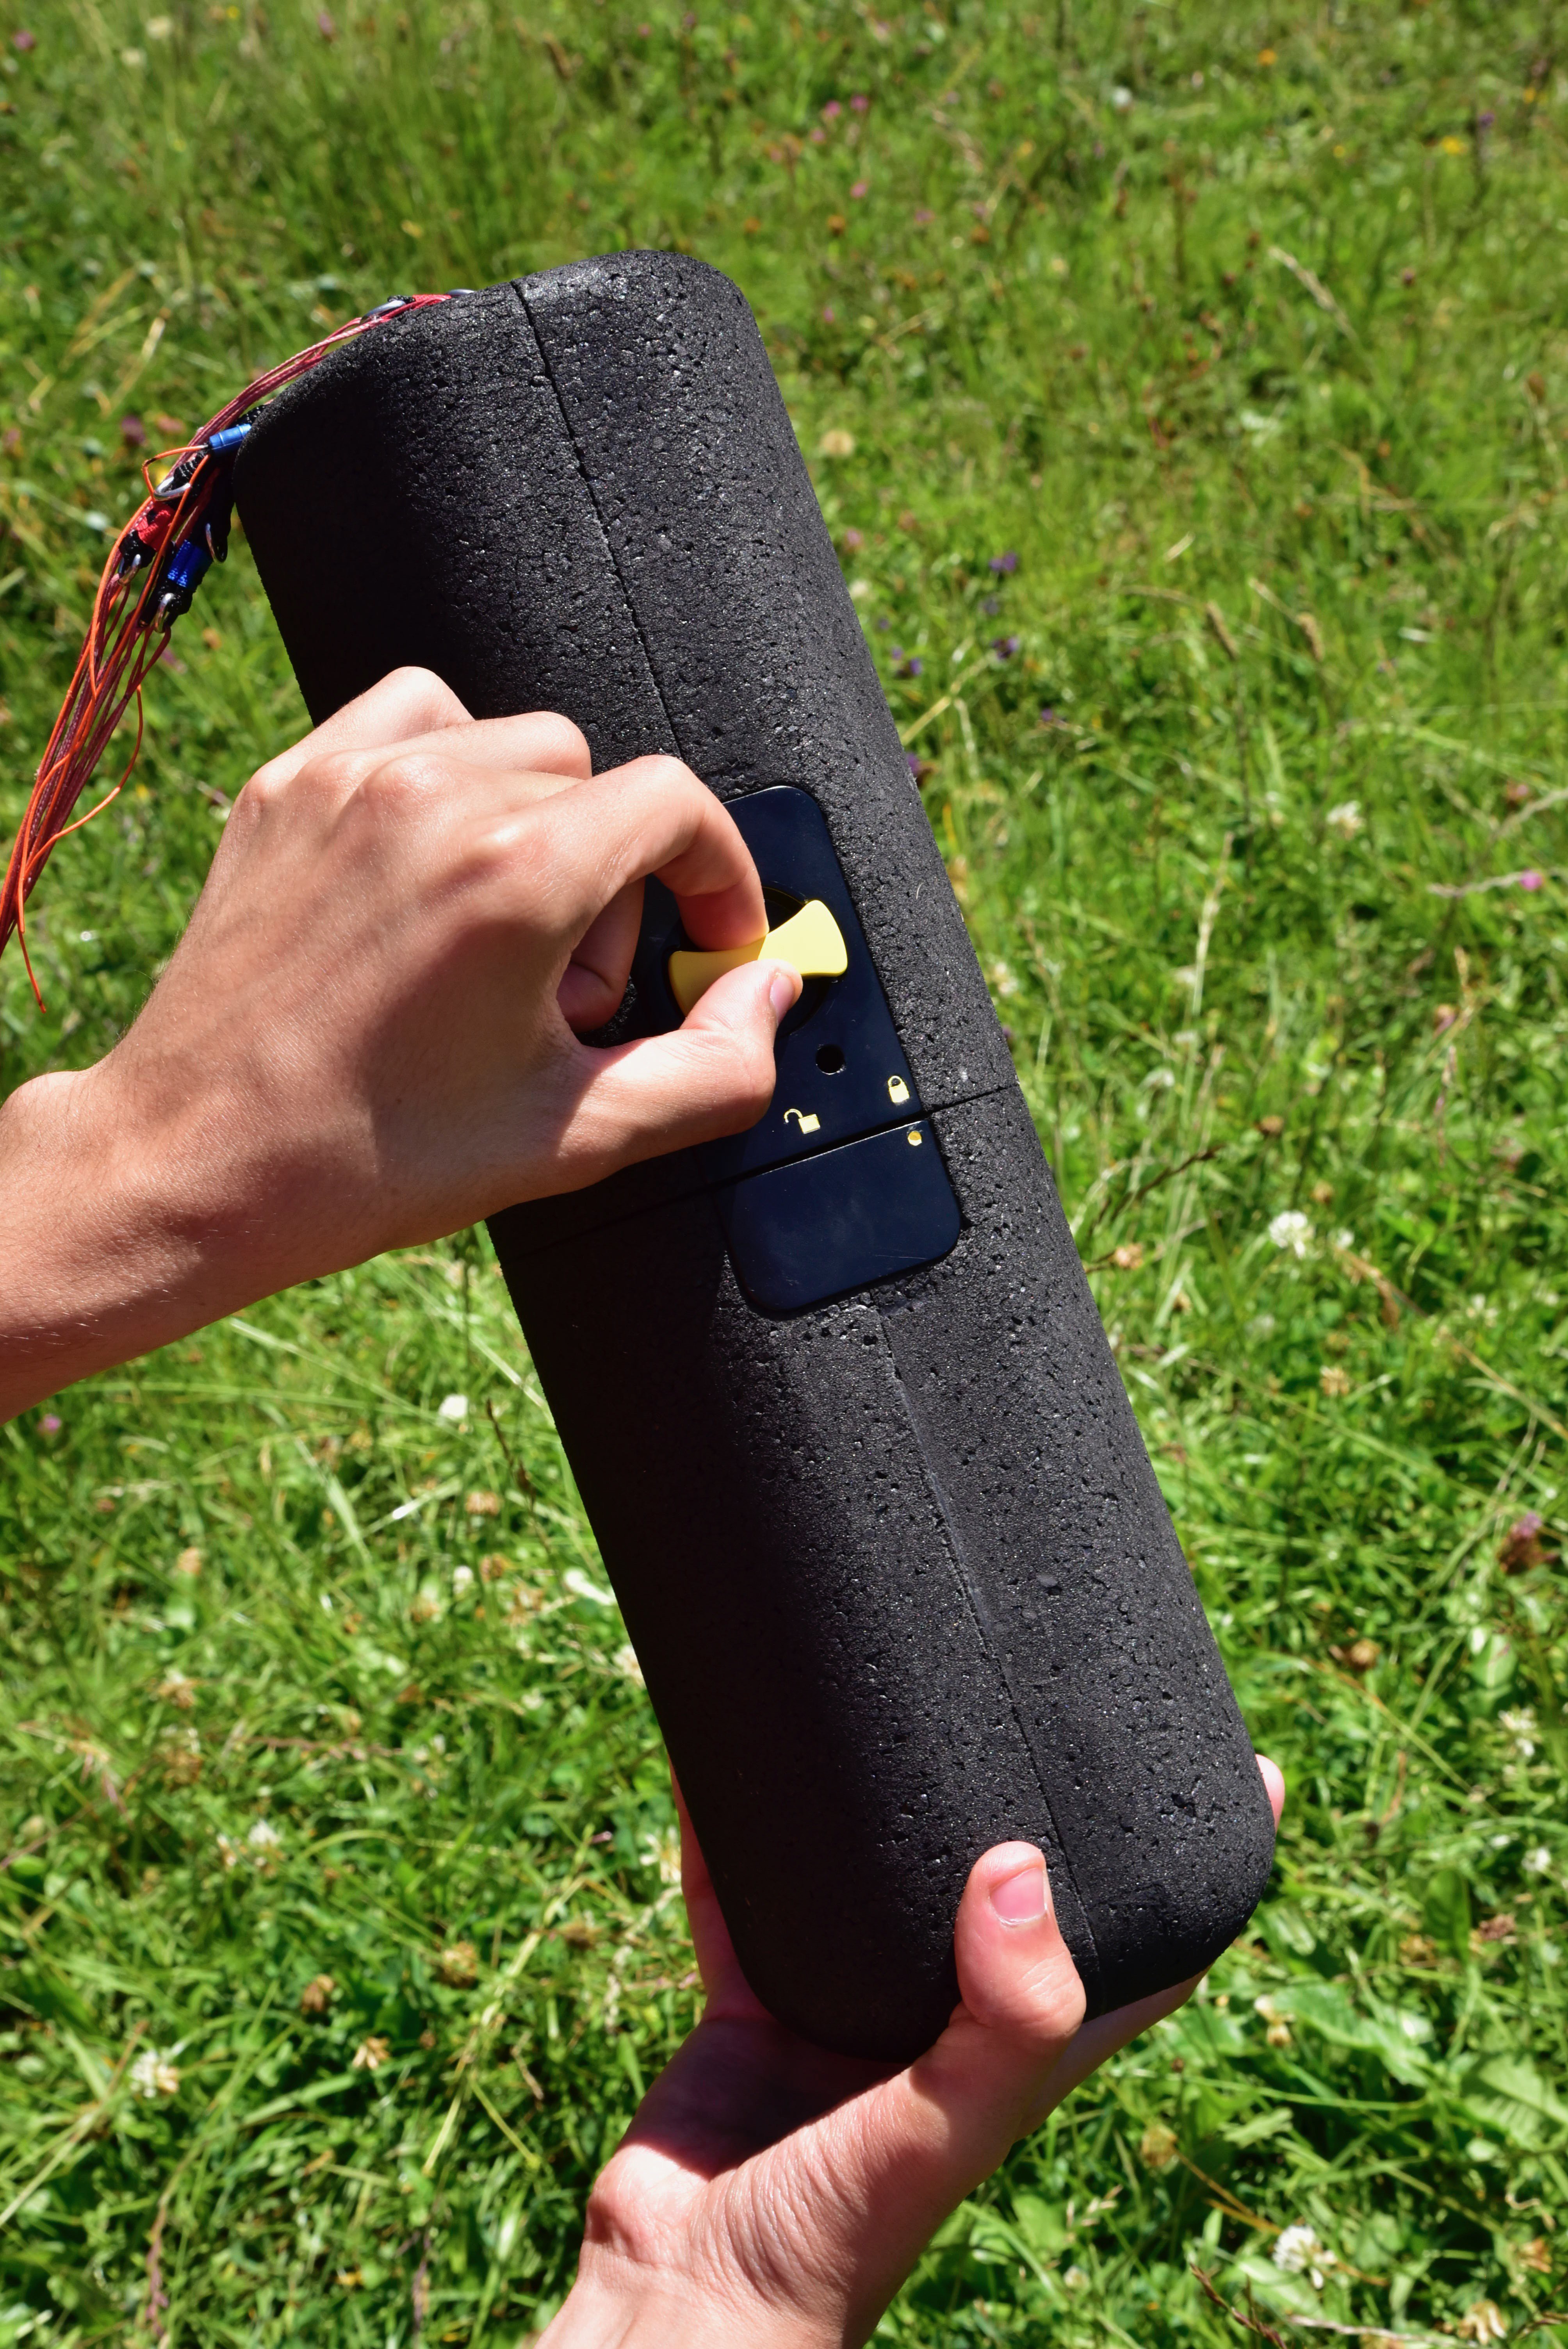
On the flight video you can also notice the new "tube" containing R2Home. It's a foam shell designed in collaboration with ECAL design student Lucie Herter (Credits for all the following pictures).
The plan was to create a shell that would correspond to the idea of modularity. A shell in two parts with one of the two parts that is specific to a given application and the second part that is related to the minimum system and the same for all applications.
![]()
![]()
![]()
![]()
After this demonstration the future looks pretty bright. We have new interesting challenges to solve. What is the best navigation strategy? Taking into account the wind forecast, having a very long list of possible landing points?
We'll learn this by the end of the summer :)
Yohan
-
Well, we're there
06/19/2022 at 09:06 • 0 commentsHi there, June 2022.. time flies!
In September 2021 we demonstrated that R2HOME was possible, with a commercial RC paraglider wing, a P only controller quickly tuned, a wobbly drogchute, cheap servos and a not very reliable software.
It took about 1 year to transform this prototype into the real system, with a faster wing designed specially for R2HOME, a clean and reliable software. Precision servos and a nicely tuned PID controller. We're also on the third iteration of the onboard computer.
The result of this work is this video:
The next step (and I know I've been saying this multiples times already) is obviously higher altitude flights. But this time we're really ready. Like really.
I've also been working with Lucie Herter, a design student at ECAL in Switzerland on a super nice foam shell designed exactly for higher altitude flights where we have to fight low temperatures. Here is a sneak peek of one of the early test we did with it :)
![]()
(Picture by Lucie Herter)
I'll keep you updated as soon as I have more to share!
-Yohan
-
Testing again and again and again!
03/26/2022 at 19:16 • 0 commentsHey there!
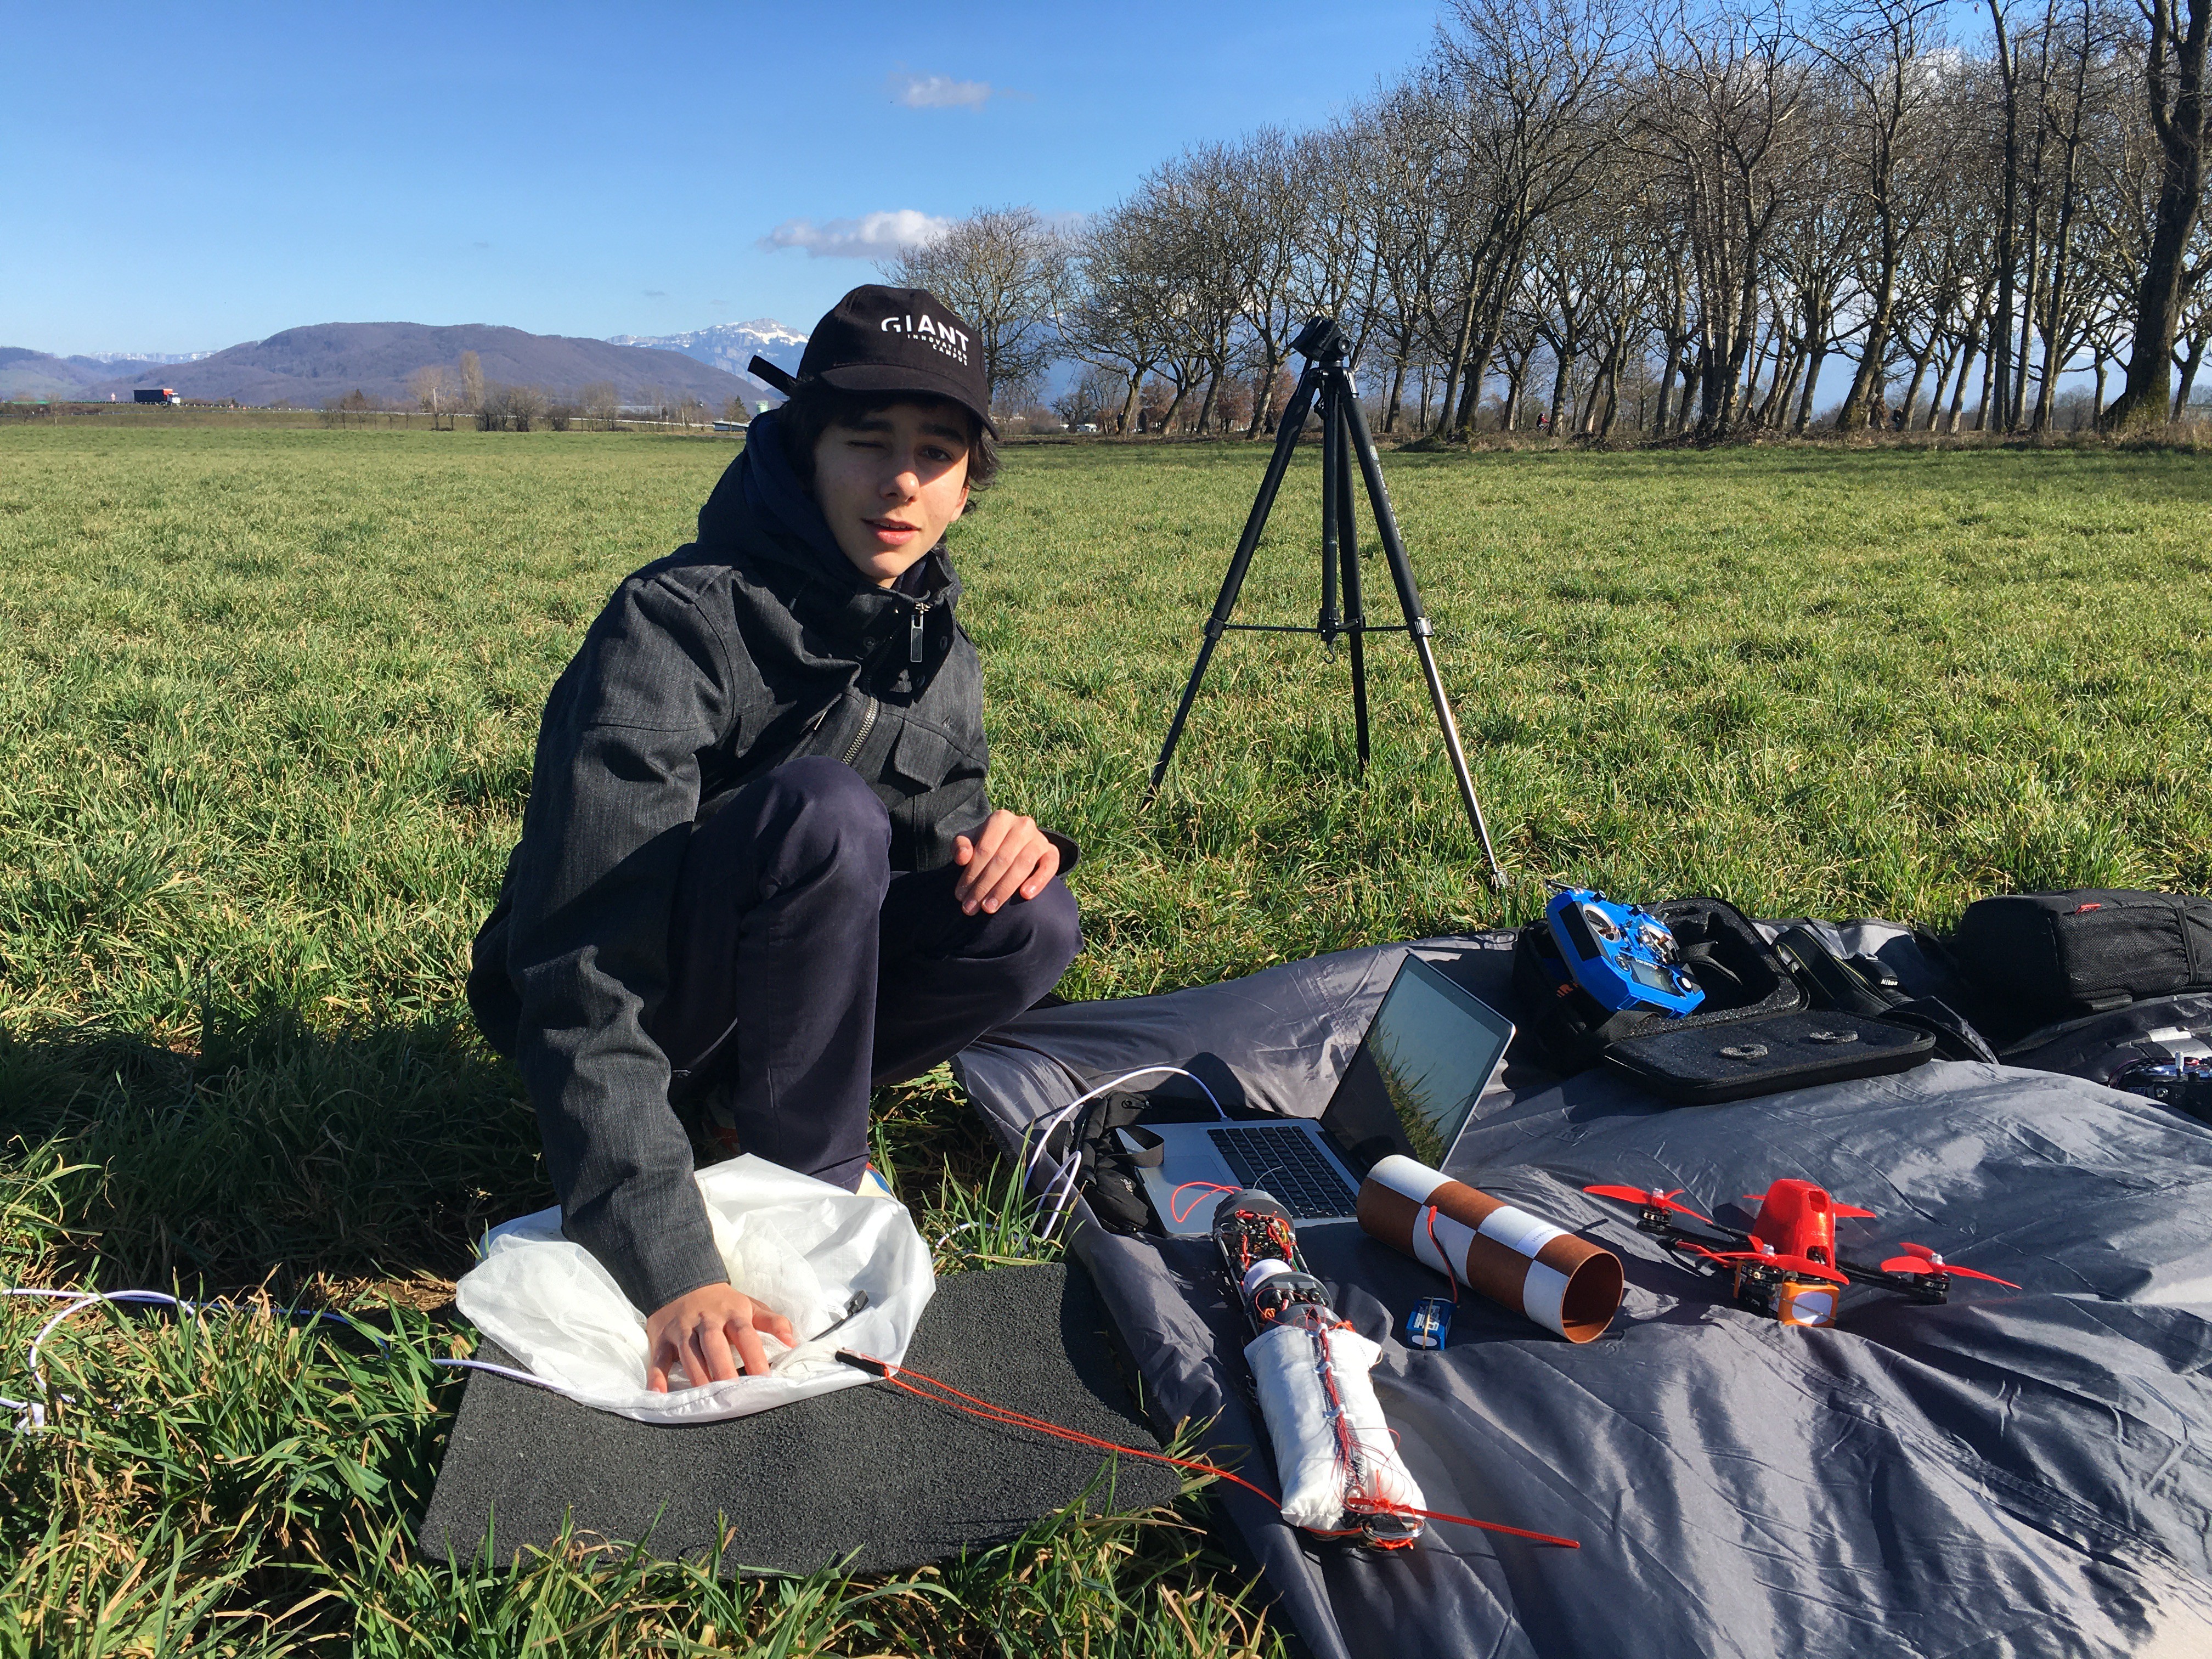
While we're still getting ready for higher altitude test flights (in Switzerland and in the US!), I continue to test the system with a little bit more extreme conditions.
Today I wanted to do a test flight with a heavier payload: 1kg, meaning a greater flight speed, (and also we don't want the landing point to be near the drone pilote - me - anymore, because R2Home is so precise it's a little bit dangerous!)
There was also more wind than during the latests test flights in September.
Here is the video of the test flight :
And here two pictures of the GPS trace of the flight: red is ascent under the drone, and blue is descent under the guided parachute.
![]()
![]()
I've also spent the last few days re-writing the code with modules instead of a single.. too long.. code file. This will make updates easier as we're going to do more risky flights in the coming weeks!
![]()
This new, flight proven today, version is available on GitHub here: https://github.com/YohanHadji/R2Home/tree/main/RLS_V1.0/R2Home_SOFTWARE_V1.01/R2Home_OBC_V1.04/main
-
Getting Ready
01/26/2022 at 18:19 • 0 commentsIt's been a little quiet here the last few months!
In September I started university at the EPFL in Switzerland, and my time is now obviously much more limited than when I was in high school last year.
But a lot happened in the background, and we are now aiming fo high altitude test flights between the beginning of the spring and the summer.
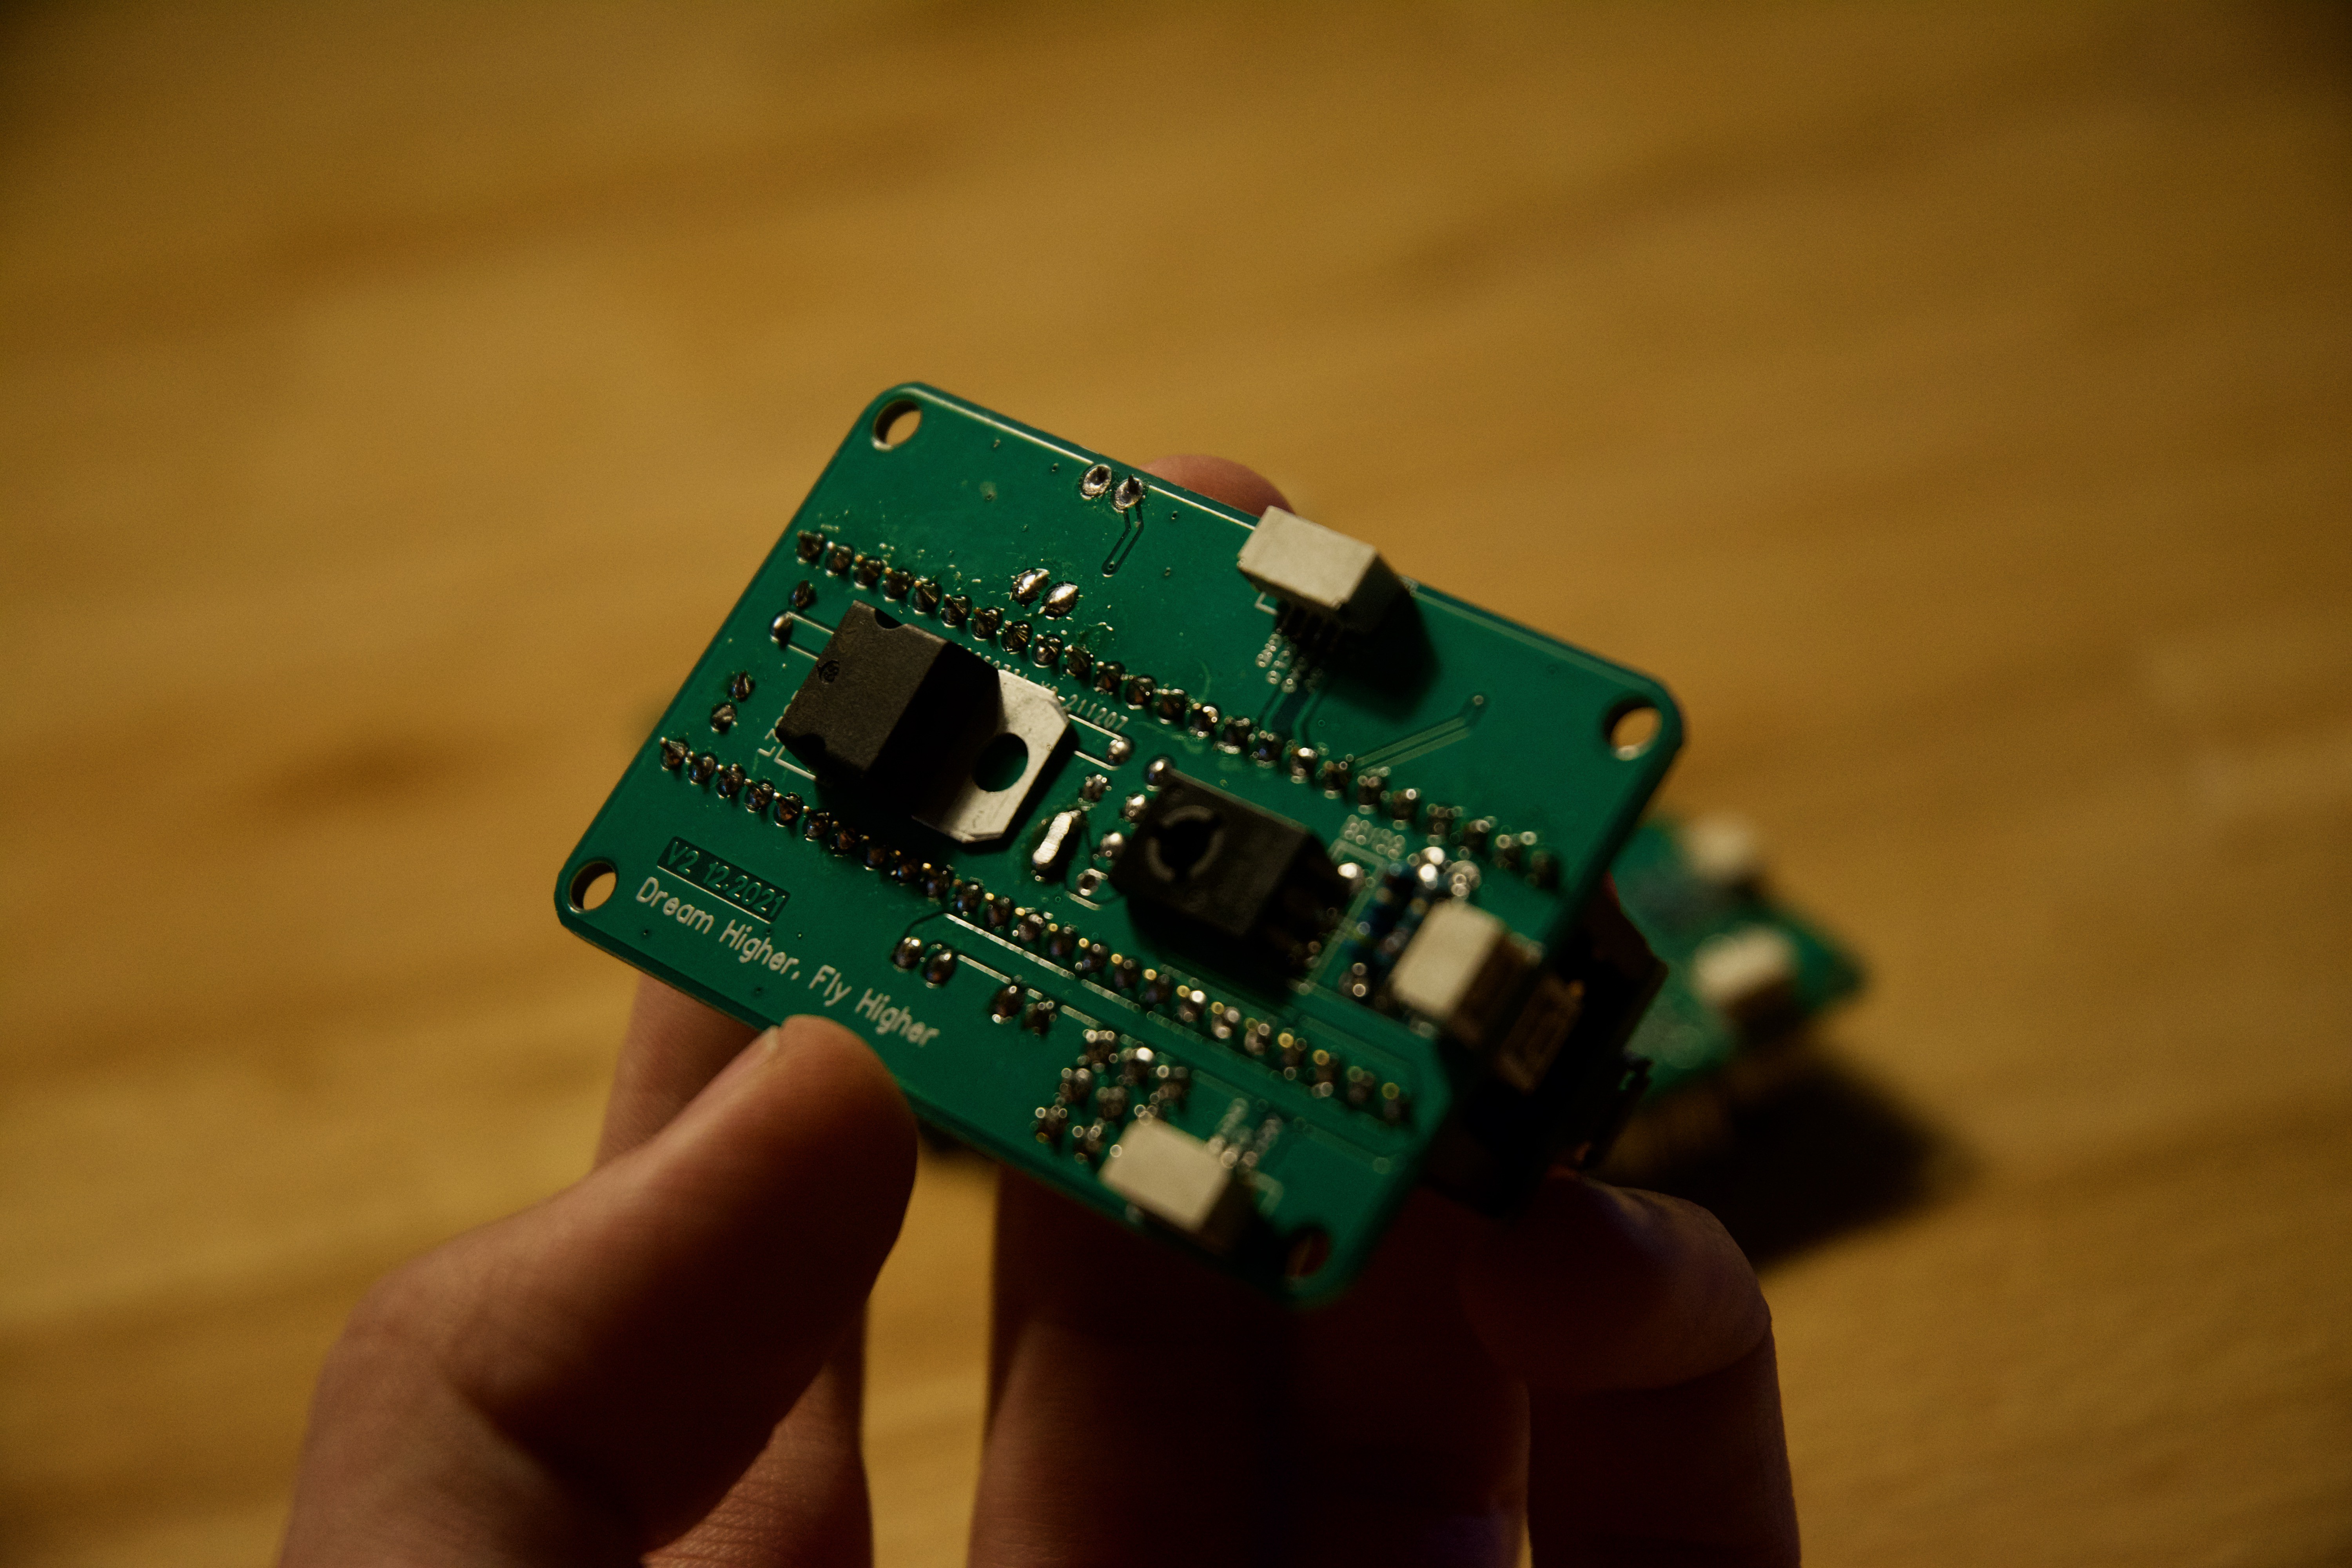
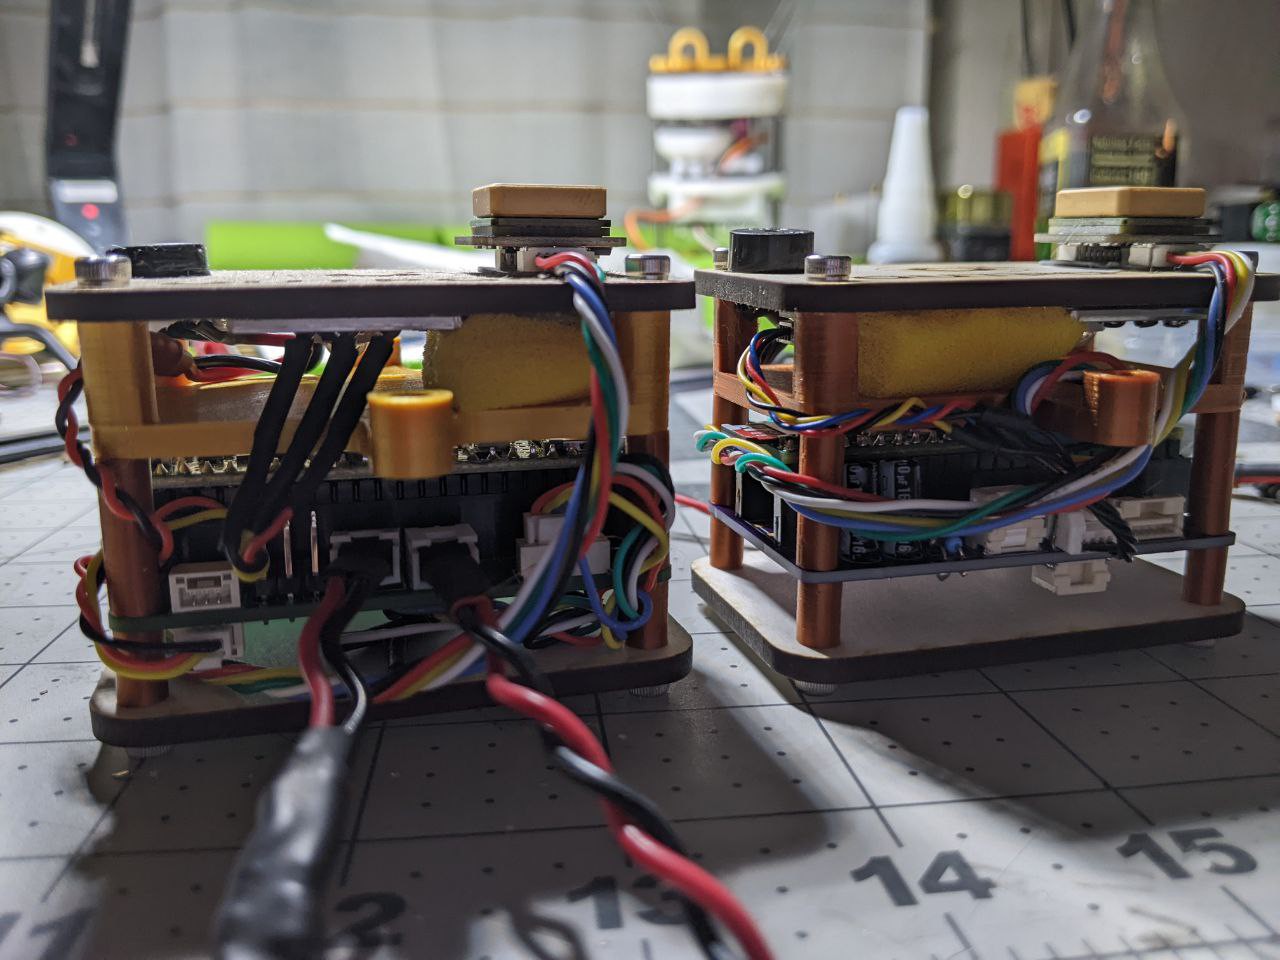
The onboard computer PCB got an update to fix a bunch of design mistakes, and the flight code is getting tested again and again flying on a full scale paraglider with Mike from Free Flight Lab as the simulated autopilot.
![]()
![]()
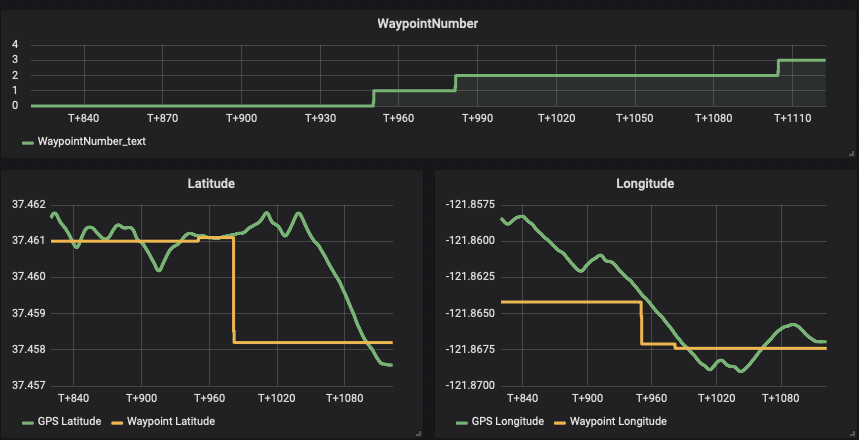
He has the standalone computer on his harness setup flying with him, and the game is always to try to reach as many waypoints as possible - yes, we now also have a waypoint functionality!
![]()
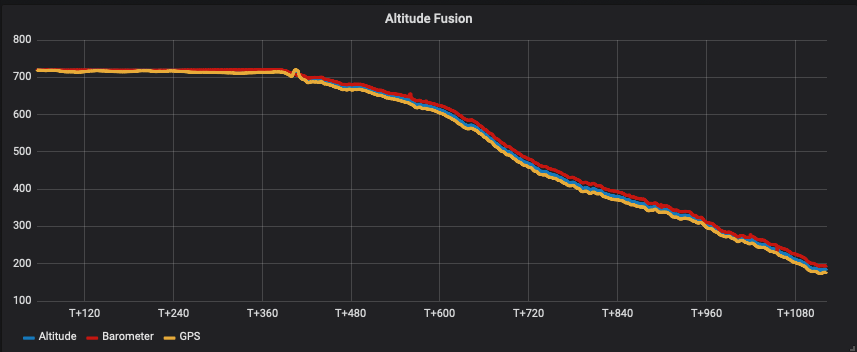
This is the kind of data we get after a good flight :
![]()
![]()
On my side, I continued to test the onboard computer on high altitude ballon flights, in November it flew for the third time as a secondary payload on a HAB. I should be able to go for a new flight in the next few weeks if the winter weather is not too hard.The plan is to test it again and again and again to make sure that as soon as we can get the green light for high altitude flights of the full system with paraglider wing everything else is ready for it.
Speaking of the paraglider wing - Cefics Punkair, the company behind the Swift RC paraglider wing that I've been using for flight test so far, is now working for the project on a specialized wing for R2Home. The main request is "the fastest wing we can get".
Why? Because flying high = flying with high speed winds, and if we want to be always able to fly in any direction whatever the wind speed and direction is, we want to be able to fly fast.
That's all I have for you at the moment, but I'll have a bunch of other exiting news in the coming weeks :))
-
this.. is R2Home!
09/06/2021 at 11:20 • 0 commentsHi there!
In the last project LOG, it told you we were close from reaching our objective: dropping the system high and far in the sky from the drone, open the wing autonomously at the right altitude, and flying autonomously back to home.
Today, I am incredibly happy to be able to tell you that this goal has been reached!
Here is the video:
On that flight if you look at the GPS trace, you can see that the wind was coming from the bottom left of the square. You can also see that the wing was able to fly upwind.
The trace isn't a straight line, because the controller isn't optimal, but I will now be able to optimize it. If the controller is perfect, and the wind speed >! wing forward speed, to trajectory should theoretically be a straight line.
However I think I can safely say the landing precision is already great enough:
![]()
That day, I also did a second test that isn't on the video above, the test was also successful, and just for you, here is the video:
The name of this video is "fly me to the ground" in reference to the song "fly my to the moon" by Frank Sinatra. Now that the system is working great on a short flight, we can dream bigger: "Fly me to the ground" will be the official name of R2Home's first high altitude mission.
You will find on github the latest kad and kod for this operational version. I'm still working on more documentation.
And finally here is a composite picture of R2Home:
![]()
R2Home will fly higher, on a model rocket or on a stratospheric balloon I don't know yet, but that's also what's cool!
Everything is possible!
Thanks for everything, for your support and your interest!
![]()
- Yohan
-
Let's.. Assemble!
08/26/2021 at 14:14 • 0 commentsHi there!
Last time I wrote a project LOG, I told you that R2Home was now technically capable of reaching the final objective. The only missing part was really the software and the autopilot.
The first good news is that there has been a lot of progress on these two things!
But what’s the objective already? The objective is to drop the system at ~100m of altitude and ~100m of distance, to get it to autonomously deploy its wing at a given altitude, and then fly autonomously to to the home location.
The first part - the autonomous deployment of the wing at the right altitude, is now really proven to work on many flights.
![]()
The autopilot thought, wasn’t really working until yesterday. As you might have seen on one of the latest videos :
On this flight, we had multiple problems with the autopilot. What we can see is that the wing is flying a bit in the right direction, but then it quickly overshoots and enters a dead spiral. The only way to get out of the dead spiral was to bring back control to neutral, and let the wing fly again.
The first reason for this problem was the reliability of the data used by the autopilot. At the moment, the only data - less is more - used is the course over ground given by the GNSS receiver (fancy name for GPS) .
This first part of this first problem was in the way the GPS is communicating with the onboard controller. The GPS is sending a position estimation message every 200ms, this message is put in a buffer by the onboard controller before, or while parsing it to update the controller. But the buffer was too small to fit one full message, which meant that if the computer was not exactly emptying it as soon as the message was entering the buffer, then information was lost.
The result was that every ~5s, the GPS position wasn't updated for ~1 or ~2s.
The second problem is that the GPS course over ground is only calculated and updated by the GPS if the speed > ~1m/s. And if the speed is lower than ~1m/s, then the data output is frozen.
So what I needed, in addition to a bigger buffer size, was a function, to detect, using speed and course over ground variation, whether the course over ground is valid or not.
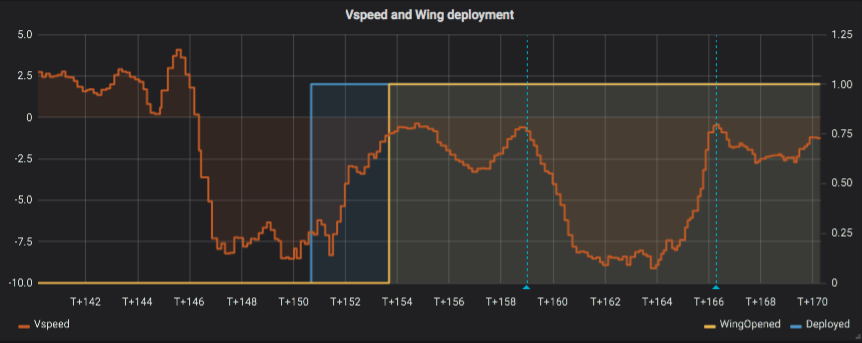
![]()
![]()
If valid, then command is calculated and applied to the servos, otherwise, the command is brought back to neutral. So we are sure that, if the data is wrong, then we are just flying in a straight line.
I also had to set the gain a bit lower than on this first test, to make sure, there isn’t enough command applied to enter the dead spiral, but in any case, there is also another function that monitors the vertical speed, and if it’s way too low (<-5m/s) then the command is brought back to neutral to get out of the spiral.
![]()
See the spiral on this graph?
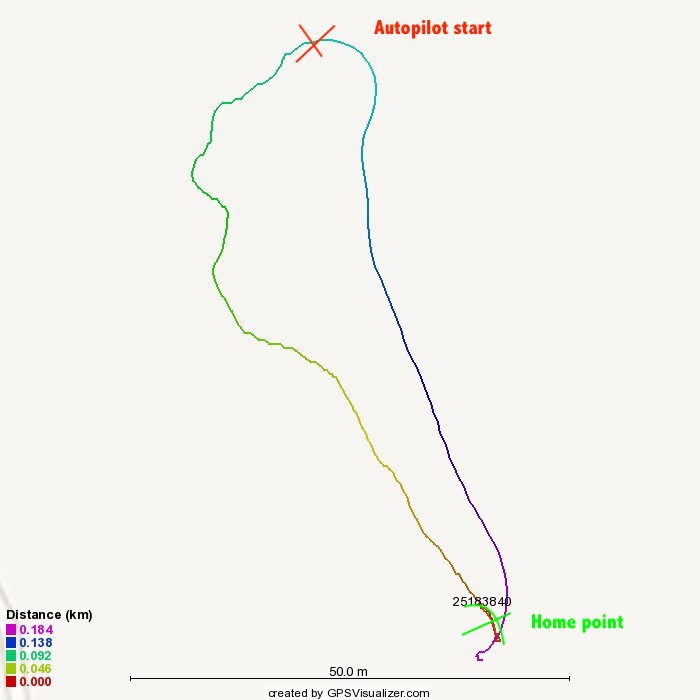
And so here is the result :
![]()
What you are looking at is the GPS trace of R2Home’s motorized version, it’s using the same servos, the same onboard controller, there is just a thruster, to be able to lift off from the ground, instead of using a drone drop to conduct a flight test.
![]()
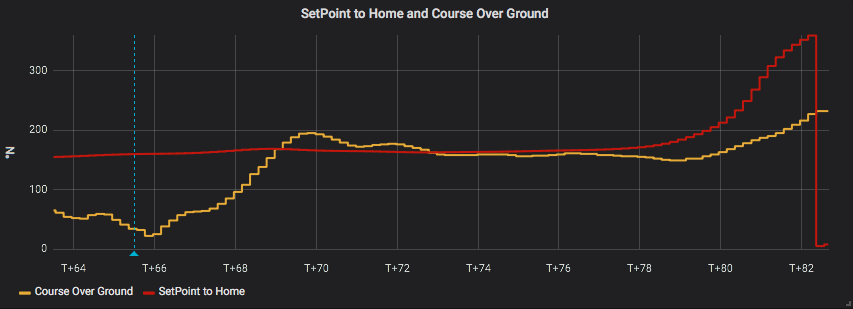
Here is also the direction sepoint and the measured direction (GPS course over ground), the big deviation that you can see at the end is when the wing is flying just above the home location and so it has to turn 180° really fast.
The controller is actually a PD controller with very little D, and a bit too much P at the moment, I still have to set it a bit better, and see how wing loading is interacting with it.
![]()
The dashed blue line on that graph is the beginning of the autopilot mode. The very big deviation you can see at then end is when the wing is flying just above the home location and it has to turn 180° really fast.
And.. I guess you’re now all waiting for! Here is the video:
So as you can see it’s working quite well in multiple different flights / wind conditions. I would be working better if the wing loading was higher, but then it is really hard for me to launch the wing with the thruster.
And so the next step is to.. assemble! Assemble both operational “sub-projects”, the deployment, and the autopilot, to reach our objective. And make them both work together.
Stay tuned, it’s gonna be.. epic!
- Yohan -
R2Home - From the idea to the system
07/19/2021 at 19:12 • 0 commentsHi there!
You may have already seen the last video, but last week I had the opportunity to conduct two new test flights with R2home
![]()
The idea was to test the latest version of the system with an improved way to deploy the wing, as well as the automatic deployment of the wing at the desired altitude.
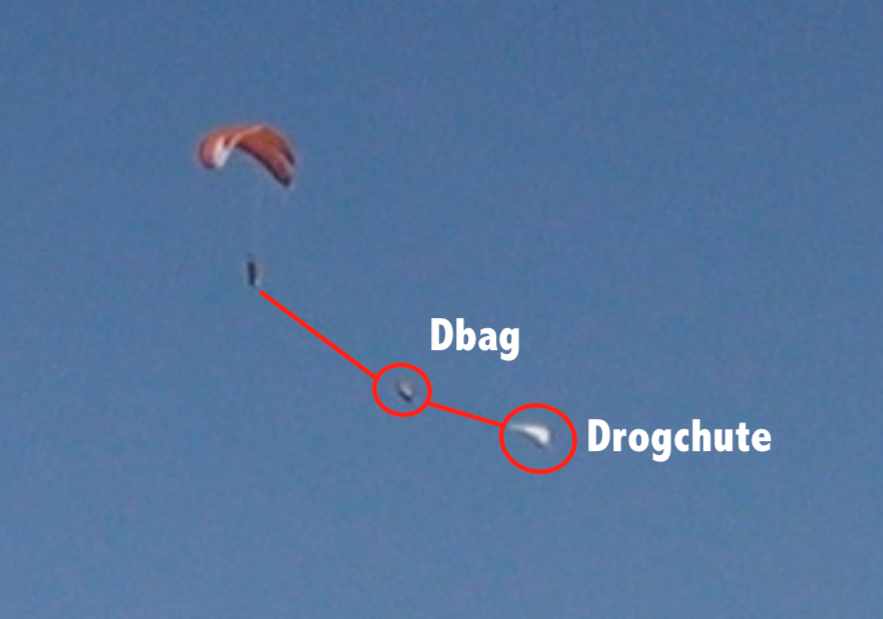
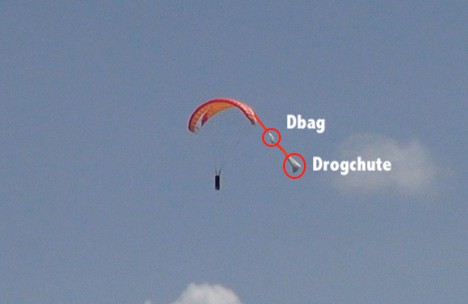
Here is the modification about the new improved way to attach the drogchute and dbag.
Before :
![]()
After :
![]()
And here is the video :
I also just published another longer video talking (in english!) in details about the project and the system :
I spent a fair amount of time on it so I hope you like it :)
See you soon (after few weeks of holidays for me!) for the next part of the adventure!
- Yohan
(For more technical details you might want to go check to github :https://github.com/YohanHadji/R2Home/releases/tag/V0.9)
-
What's coming soon ?
06/22/2021 at 19:19 • 0 commentsHi there!
The purpose of this project LOG is to give you some news about the project, and explain what's next!
1. Technical development
As stated in the last project LOG, the system is now mechanically functional. It only remains to design, test and validate its automation. In other words, the system need to do the exact same things but alone.
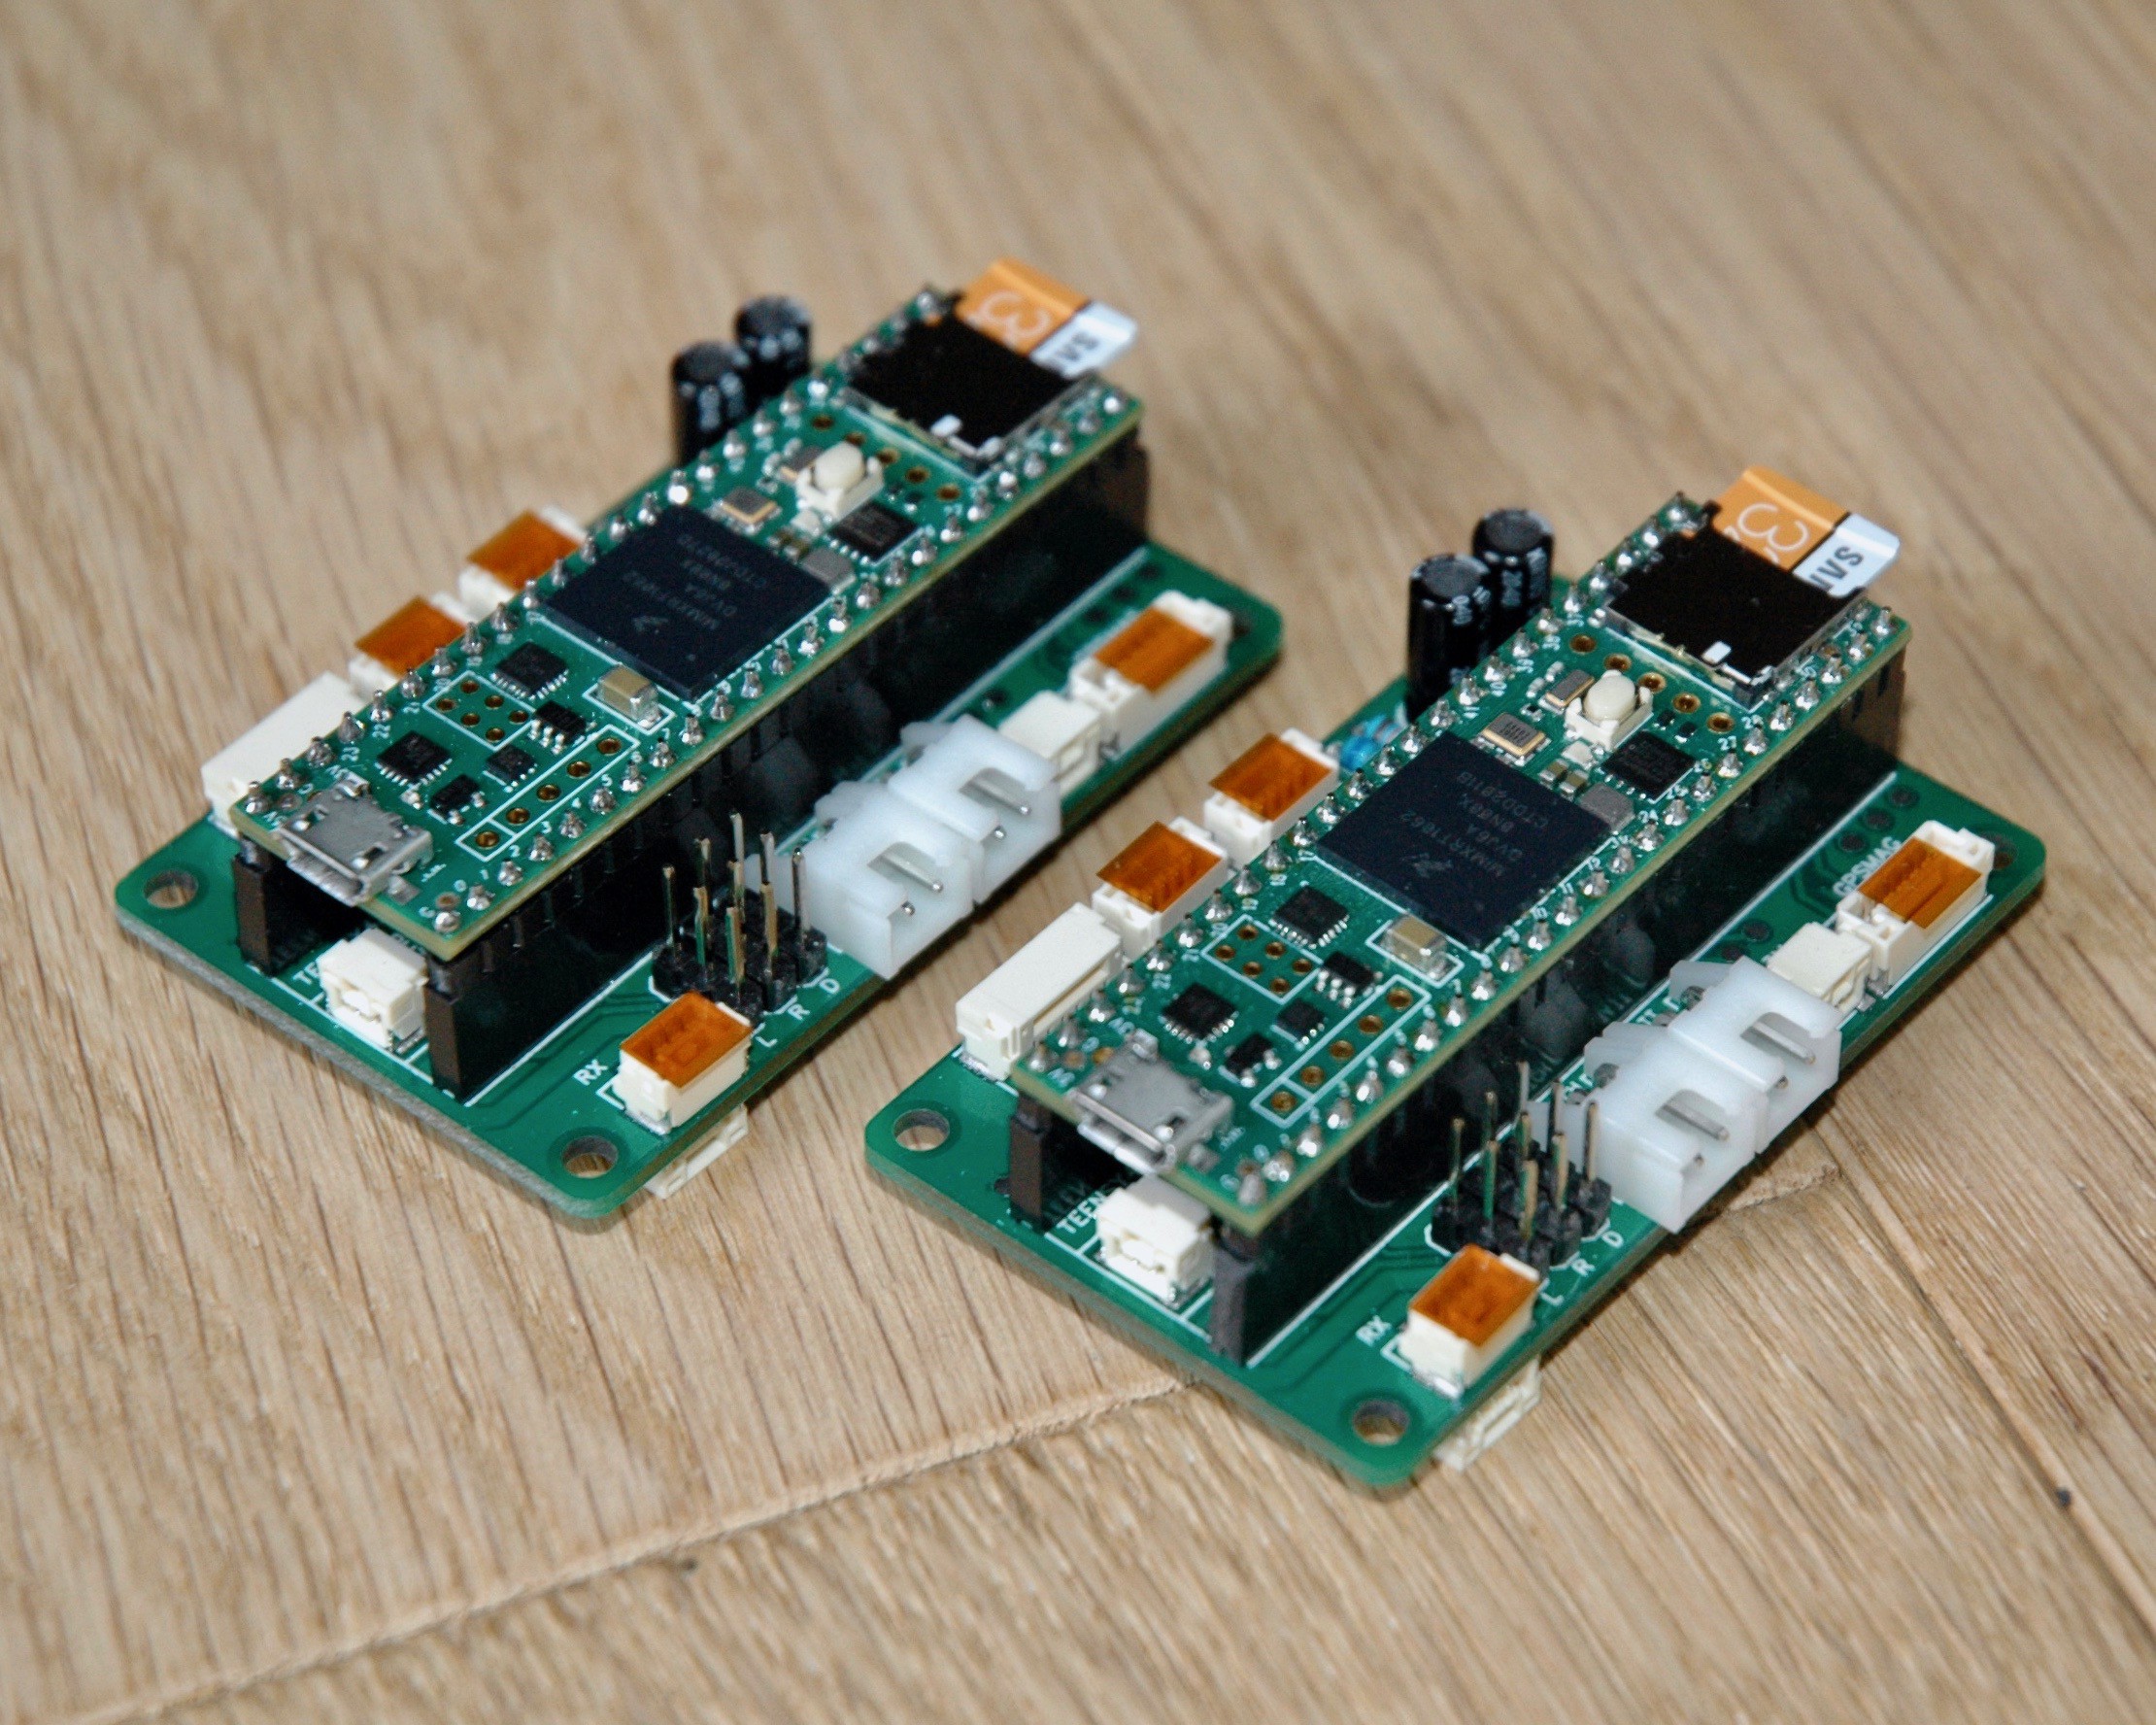
A PCB for the on-board computer has been designed, produced, assembled and tested :
![]()
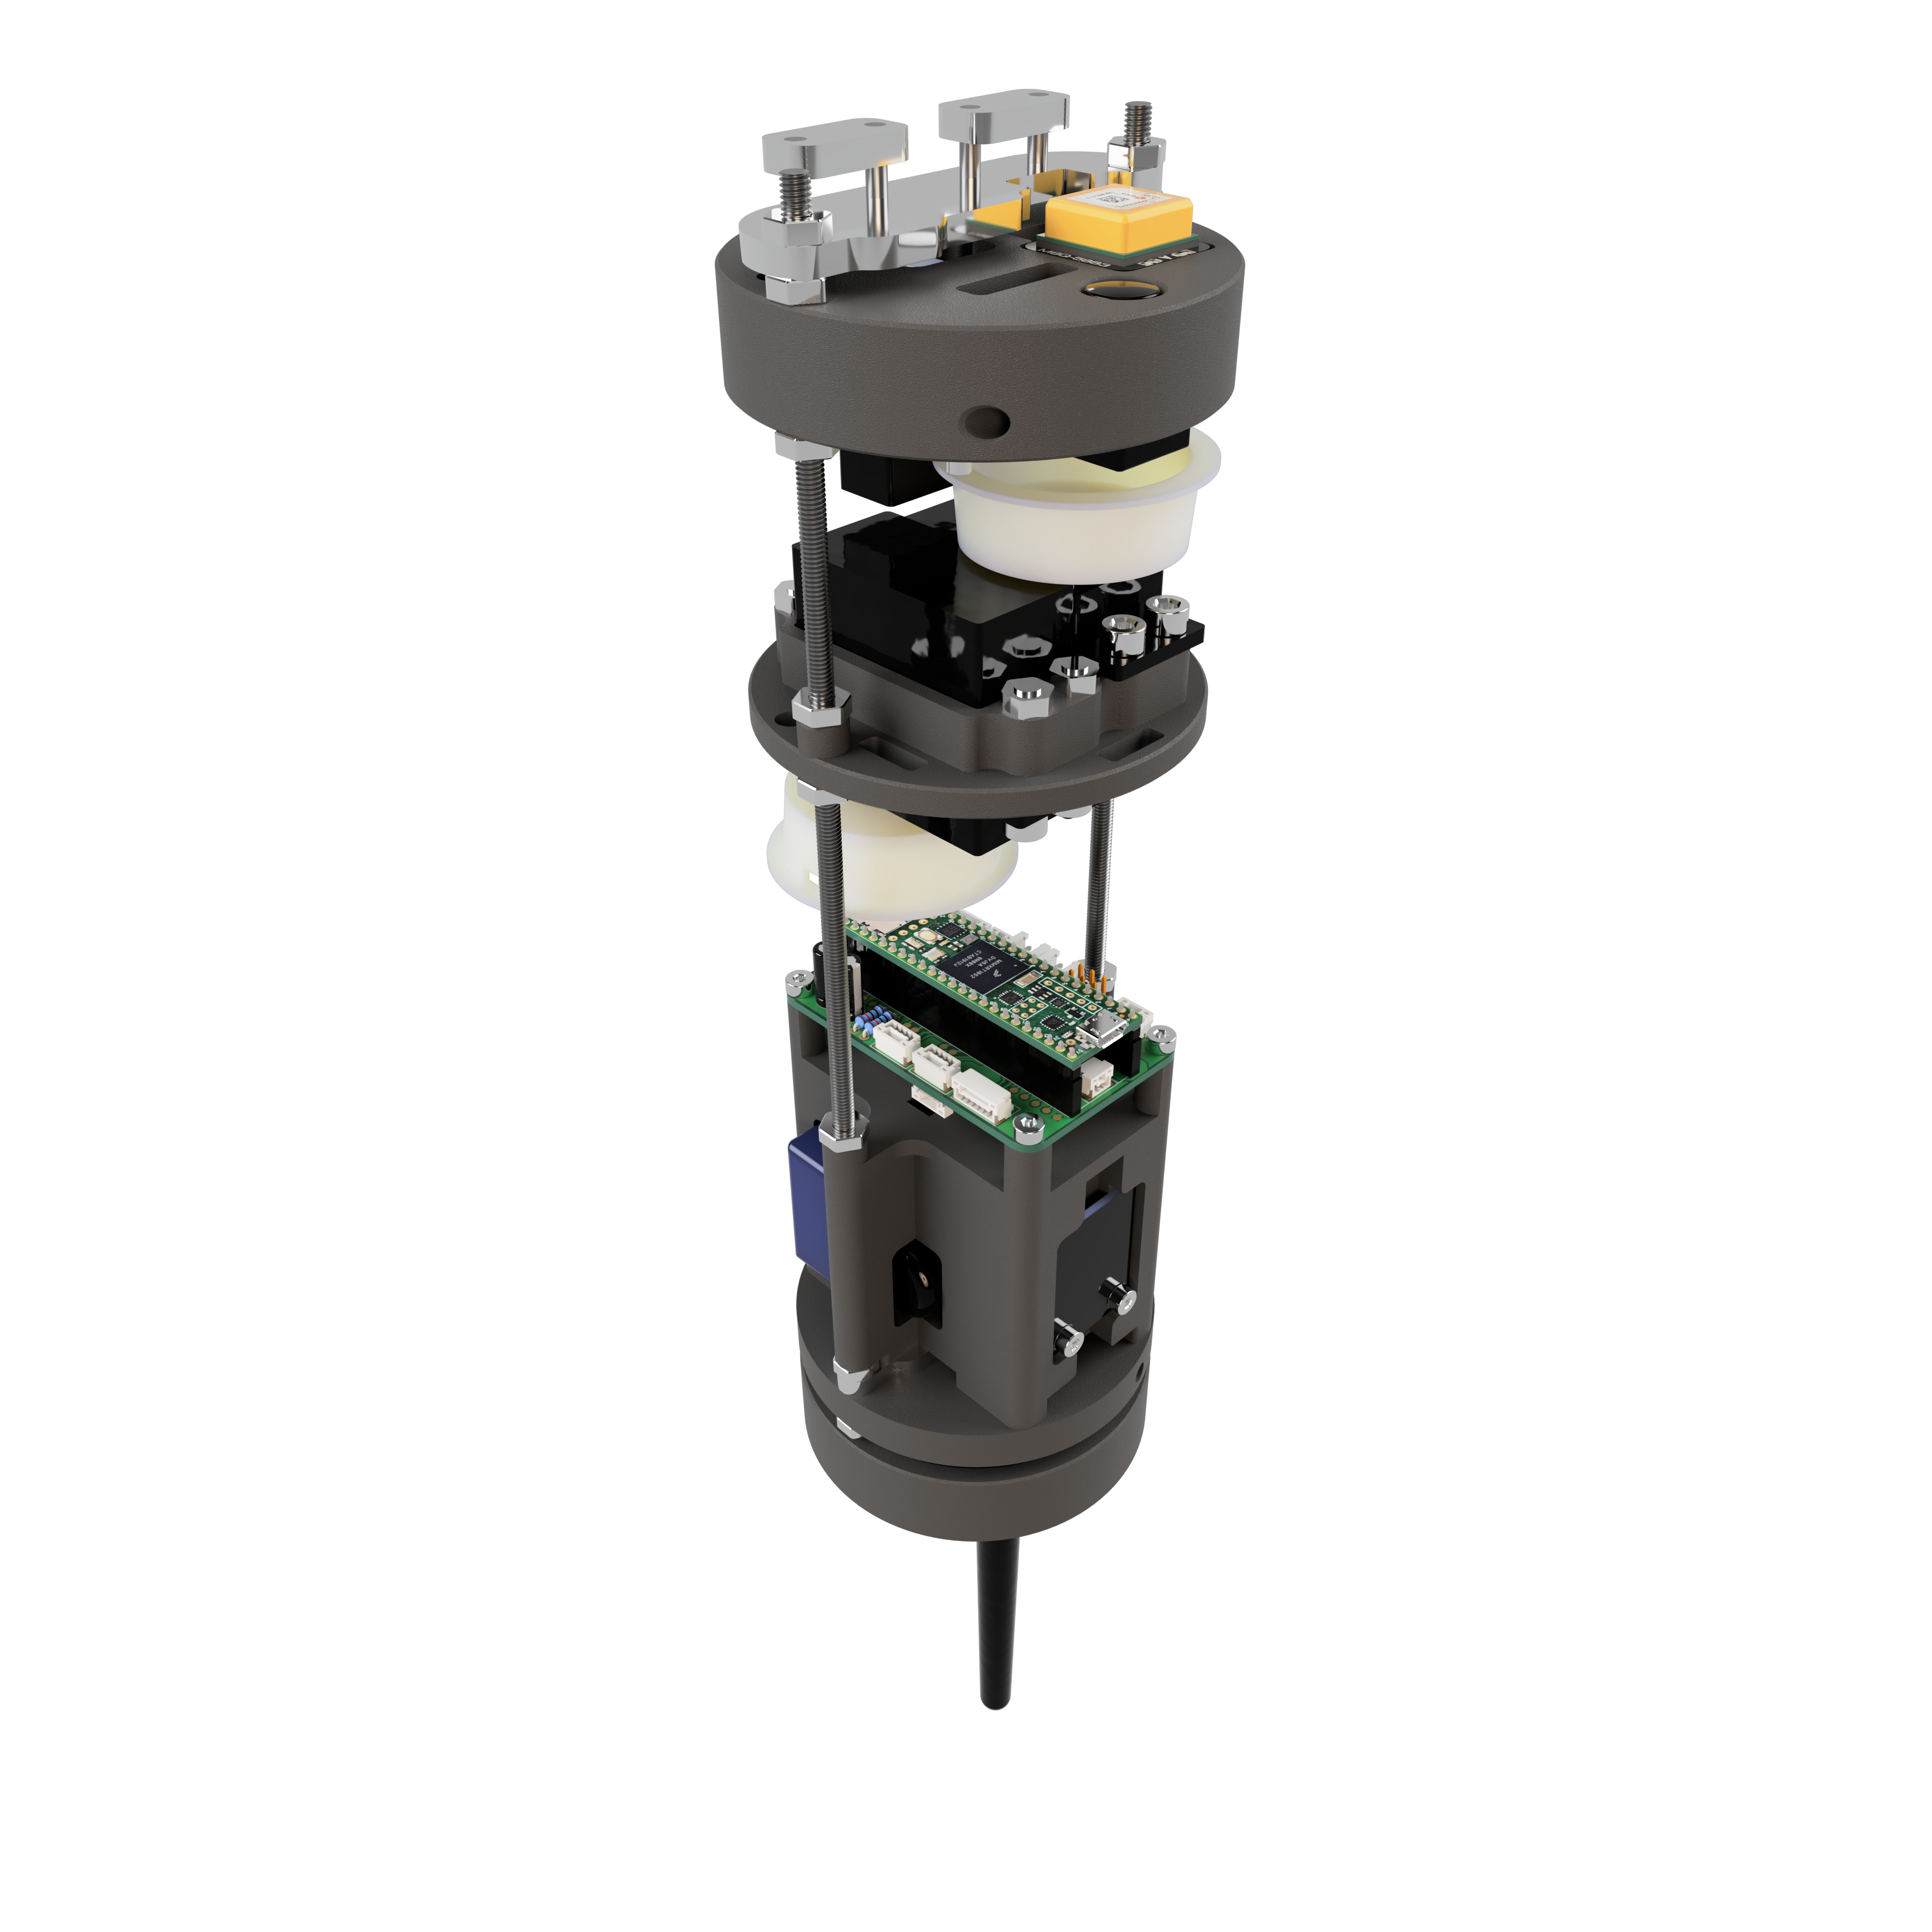
The brain of the computer is still a Teensy4.1, but the PCB enable the use of very convenient connectors to connect all external components as well as an integrated power supply circuit for the servo motors, and another one for the computer itself.
With it, a very new version of the system has also been designed and is now waiting to be built.
![]()
A prototype of the actual on-board computer has been successfully tested as a secondary payload on a weather balloon flight on May 26th. The objective was to validate the general operation of the computer in real flight conditions as well as the operation of the GPS device on high altitude ( > 30km).
More than 17000+ lines of data were recorded and all subsystems were successfully tested and validated.Here is as an example of the data recorded, the 3D trajectory :
![]()
2. The project and it's supports
At the beginning of May the project was selected as one of the 3 winners of the earth day challenge organized by hackaday among 70 projects. Thanks once again to hackaday! This helped the project to gain (again) a little more visibility.
https://hackaday.io/contest/176995-earth-day-challenge
https://hackaday.com/tag/earth-day-challenge/
This also helped to trigger some serious discussions with several institutions to support the project.
In particular with the CNES (the "French NASA"). However, it is impossible for them to directly support an individual, and I'm also still a minor. So I decided to join an association known as the Open Space Maker Federation, to find a more official framework to the project.
https://www.federation-openspacemakers.com
I am still the initiator of the project, but other people will also be able to work on the project within the federation. The federation also guarantees open source development.
3. What's next ?
I have about 3 and a half weeks ahead of me and few goals:
The first one is to document much more the system, with the complete publication of the current version (3D model, code, technical drawings, assembly instructions, explanatory videos)
The second one is to document much more the project. I'm a bit afraid to lose with the time all the reflexions that I had which pushed me to make some choices. I am thinking about a series of videos to explain everything, but I'm very bad at making videos of me talking in english.
The third one is to proceed to the assembly of the next version of the system and to test it in flight. The next milestone is to be able to open the wing automatically at a given altitude, and then to flight in a straight line at a given heading automatically too.
The last objective is to start working on the flight strategy, that is to say, concretely which trajectory is the smartest to reach the landing point.
- Are there some altitudes where the flight is more interesting than others?
- Is it necessary to take into account the weather forecast of the day?
- Is it better to try to fight the wind or is it better to fly into the wind?
These are all questions for which we will have to perform many tests before being able to find an answer.
Here are also the "bigger test" opportunities that will be available then :
- Test of the complete system dropped from a drone at 300-500m of altitude (with the competent authorities)
- Test of the flight computer only again on a weather balloon as secondary payload
- Test of the complete system as main payload on a weather balloon flight up to 30km of altitude, with the main objective to validate the deployment at 30km of altitude. The piloting of the wing will be optional.
If all these tests are conclusive, a general test, with deployment and piloting of the wing from 30km of altitude could be envisaged in a little longer time.
I will *try* to post an update here every of these three weeks to keep you updated, if you are using twitter you can also follow me to get more frequent and less formal updates : https://twitter.com/YohanHadji/status/1394587769758965761
As always, thanks to everyone supporting the project, see you soon for the nexts steps of the adventure!
- Yohan
-
Milestone
04/20/2021 at 17:29 • 0 commentsHi All!
In the last project log it was about failures and problems to solve, in this one I'm happy to tell you that it is about success and a big milestone reached!
R2Home is now perfectly functional on the mechanical part, that is to say that now all that remains to be done concerns only wiring, programming, things a little easier to test! And less risky!
Here is a small picture of the latest version of the system, including a camera, data-logging, telemetry, manual RC control.
On the background the new "drop drone" (DJI S800 Evo). This drone is now only used to lift the system and not anymore as a static line deployer for the system.
Now the system is fully autonomous in terms of deployment forces.
![]()
- So you'r talking a lot about the deployment but can we see how is it working now ?
Sure sure! Here it is :
![]()
Step 1 : be in free-fall
Step 2 : release deployment bag
Step 3 : the wing is pulled out of the dbag, the drogchute is "disabled" (see last log for more informations about the magic drogchute)
Step 4 : the wing inflate, and fly !
(for a slightly higher quality video of this same deployment, follow this link : https://youtu.be/pFeydoTiUqQ)
Here is now the complete video of the latest test :
And here is a special video to celebrate this milestone :
Thank you to all those who have supported the project since the beginning, nothing would have been possible without them!
If you want to take part in the adventure too, follow this link : https://gofund.me/060d2215
Can't wait to work on the next part of this project!
- Yohan
-
Test, fail, learn, RETRY!
02/19/2021 at 09:16 • 0 commentsHi there!
In France, every 2 months or so there are school holidays,And for me holidays = parachute test.
![]()
But when you do a test, it's because you have something to test, so this time what did we test ?
The weather balloon that we want to recover usually explode at an altitude of 30km, at this altitude there is almost no air. And what we want is to open a parachute that is kind of hard to open, so we are not really in the best conditions to open a parachute at 30km of altitude directly when the balloon explode.
Also, to open the ram-air canopy parachute, we need what we will call an extractor parachute, which is a small round parachute already deployed in the air during the ascent, that will give us during descent, at the chosen moment, the force needed to extract the ram-air canopy from it's deployment bag in which it is folded during ascent.
The last point you need to get, is that it is dangerous and therefore illegal to drop an object in absolute free-fall from any altitude (at least where I am) this is why at any moment of the flight we don't want fall with a velocity >5 m/s
To sum up, we need to open the raim-air parachute canopy at a lower altitude than the ballon burst altitude (30km), we need a small round parachute to open the ram-air canopy, and we don't want at any moment of the flight to fall at a velocity > 5 m/s
And this, is the solution :
I call it the collapsable-dragchute
The idea is that, we need a big enough dragchute to fall with a velocity < 5 m/s before the opening of the ram-air canopy, but we also need it to be as small as possible once the ram-air canopy is opened, because otherwise it will make impossible the flight of the wing.
So to sum up :
After the burst of the balloon, everything come down under this drag-chute, at a velocity < 5 m/s, at the desired altitude (where there is enough air of canopy inflation) the dragchute is used to get the canopy out of it's deployment bag, at the same time, the "collapsing line" of the dragchute il released by a small mechanism, the wing is opened, and the dragchute is collapsed. And everything is perfect !
Well at least in theory, because reality is really hard with concepts that seems so easy :)
So this objectif of this test was :
1. Like each time, get more data on the performance and the flight of the raim-air parachute canopy, see how it react to commands, how it fly with a bit of wind etc etc
2. To test this new concept of collapsable-drogchute
(3. And also last point, get better at organisation of the test flight, with a more "streamlined process", for example with automatic flight mission for the drop drone etc etc..)
And if the first and the third mission have been perfectly accomplished
An example of the data we got from one of the flights :
An example of automatic mission with INAV running on the drop drone
![]()
On the second mission, it is unfortunately not a total success, and at this point, the story continue with this video :
As explained in the video, what happened is that we got a tangled dragchute, but what is exactly a tangled dragchute ?
If you take a look closely at the "The solution" video, you will see that to get this collapsable dragchute we need to use two different line, so the dragchute before collapse is connected with two line to the system, and what happened there is that during preparation or during ascent, a part of the parachute got stuck between these 2 different lines, which once the system was released got even more stuck between the lines, because they were under tension due to the low but high enough drag of the tangled dragchute.
So I've tested, I've failed, but now I've learned, we need to find a way to have one and only one line on this collapsable parachute. But we need two of them to make it collapsable, so how is that possible ?
One idea is to get one line into another, like a wire in a tube, but this will be the subject of the next update !
Thanks again for your interest, your support, your ideas, and the motivation you give me by following my (very small) adventure !
Yoyo
R2Home
GPS Guided Parachute Recovery System - Making Radiosondes Reusable