Matthew Pearce
-
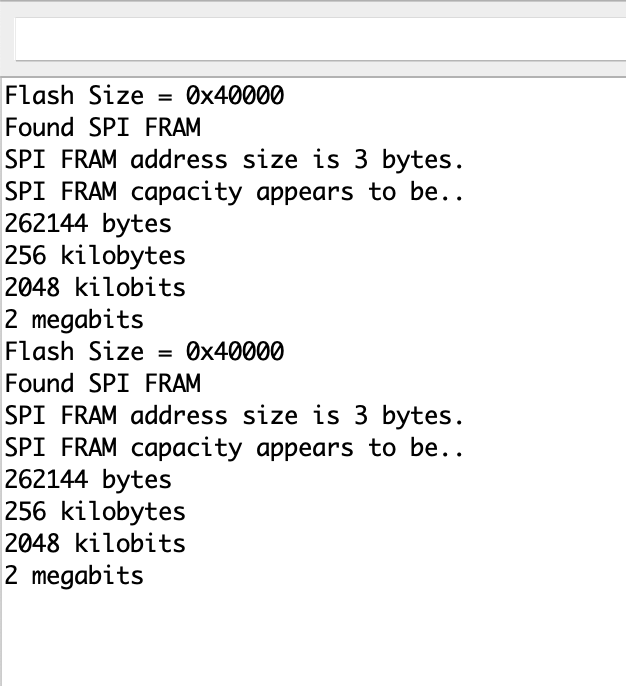
512k of Non-volatile Ram
12/11/2021 at 08:14 • 0 commentsMy 2x SPI FRAM prototype is now up and running and memory mapped in. It now works as normal ram but retains data after power off. This will be used for firmware storage. 1 chip stores upper 8bits the second stores lower 8bits. Because I'm using an FPGA I just add as many SPI interfaces as I need so both chips run in parallel.
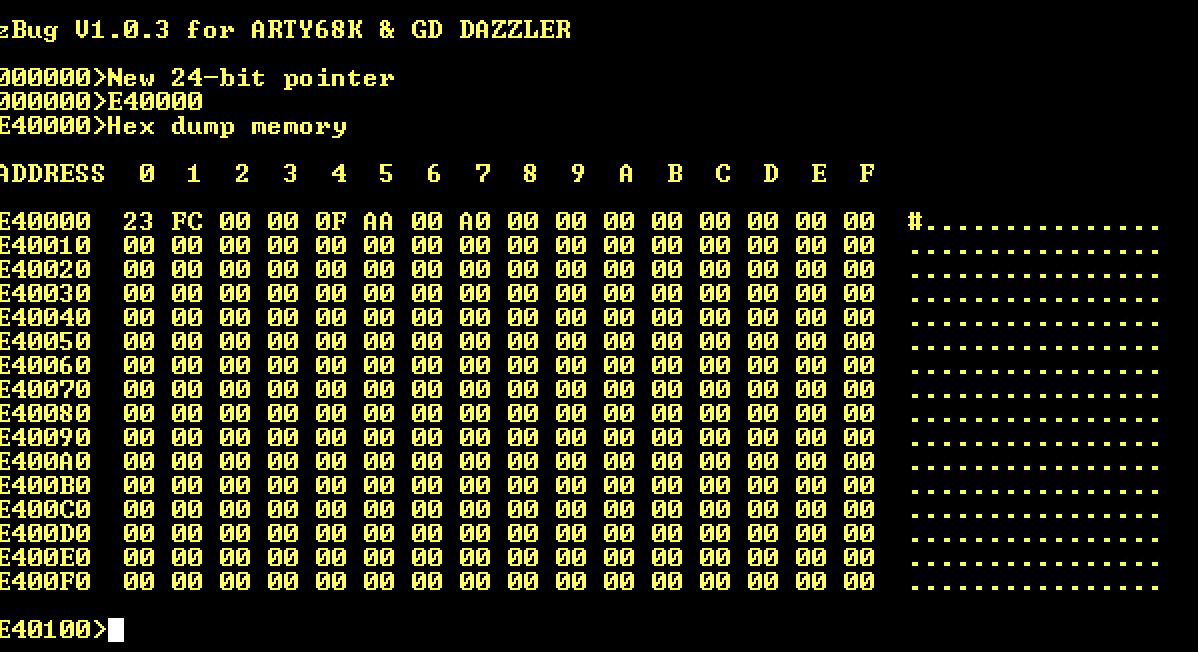
Hex dump of my test s-rec program after being loaded into FRAM.
![]()
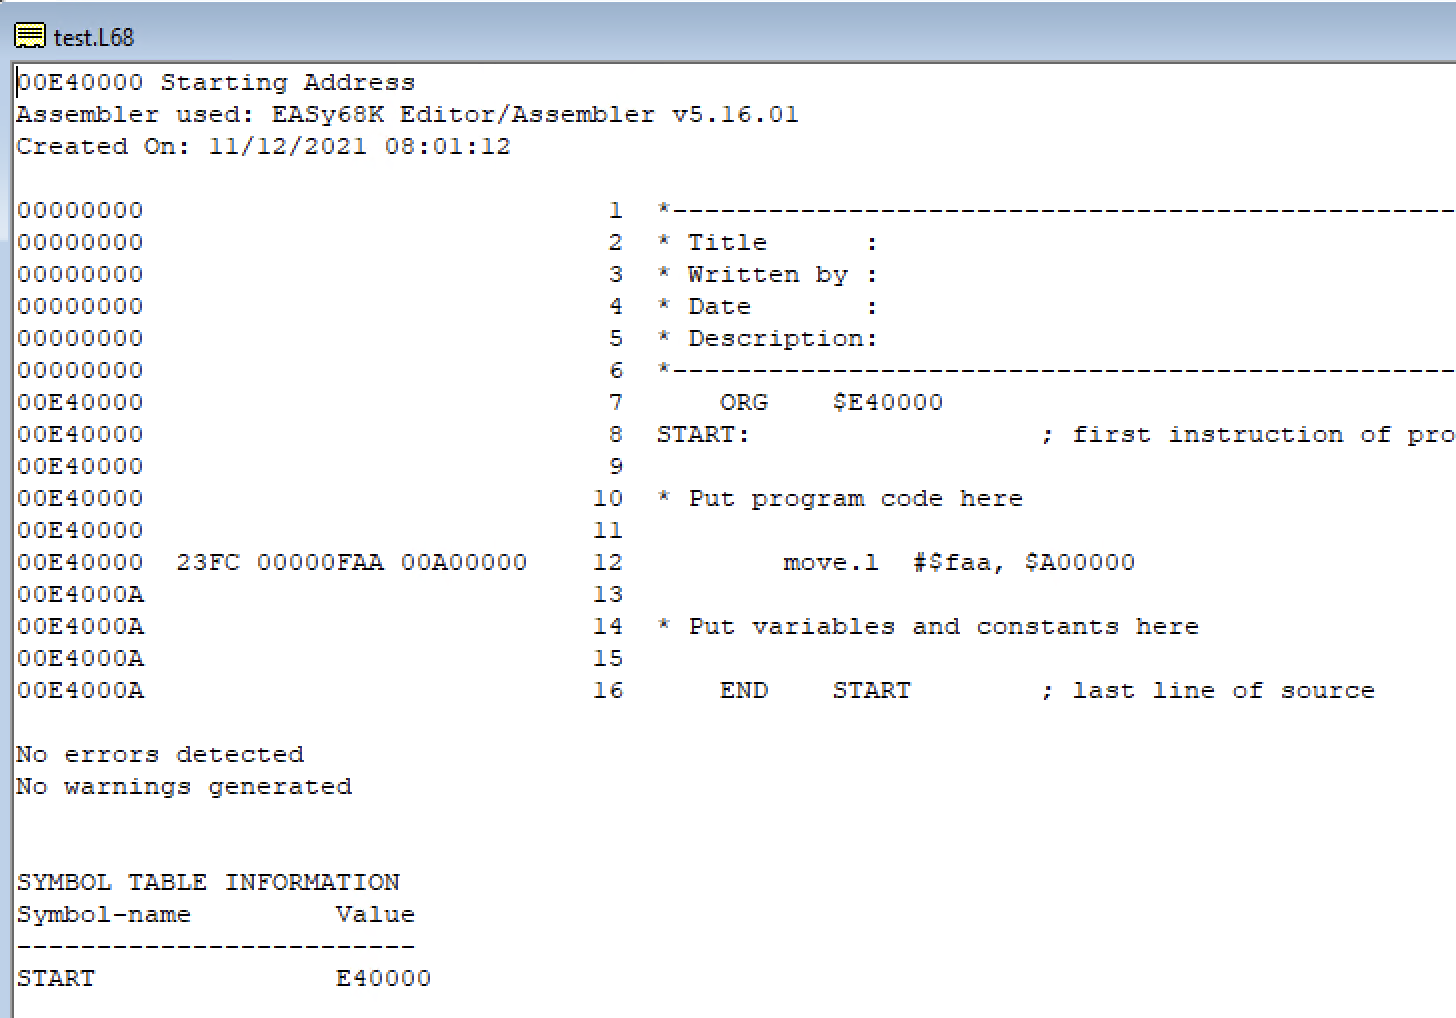
The actual code - FRAM is mapped to E40000-E80000:
![]()
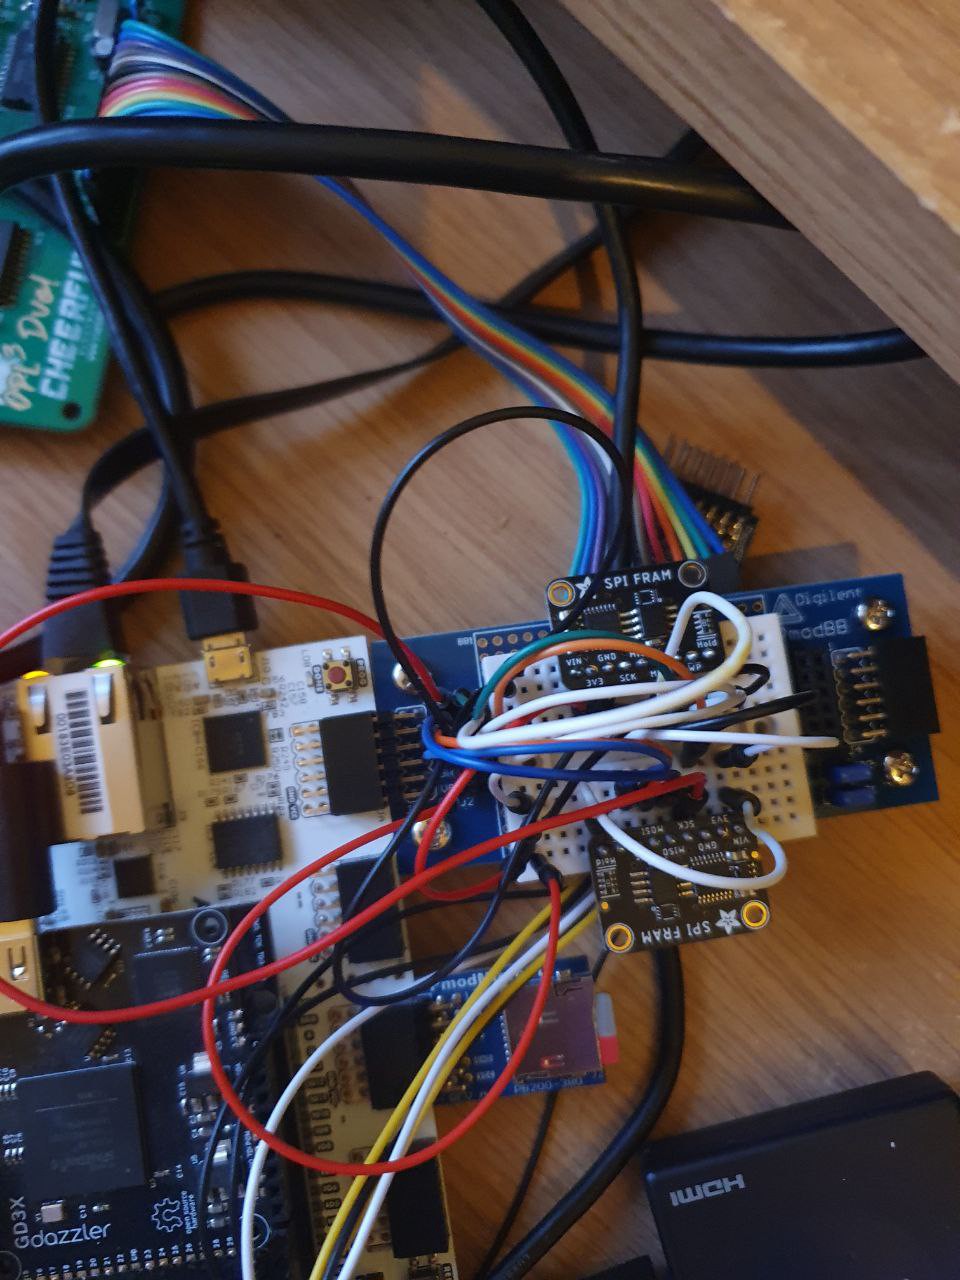
The dual FRAM pmod board prototype.
![]()
-
FRAM first c code works
12/05/2021 at 16:10 • 0 commentsI have created a simple c-library to read and write to the fram. So I know my PMOD interface to the arty is working correctly. Next step is to write a more complicated hdl to allow the fram to be accessed directly via a memory location rather than with c code. With that in place I will be able to run the rom directly from the FRAM
![]()
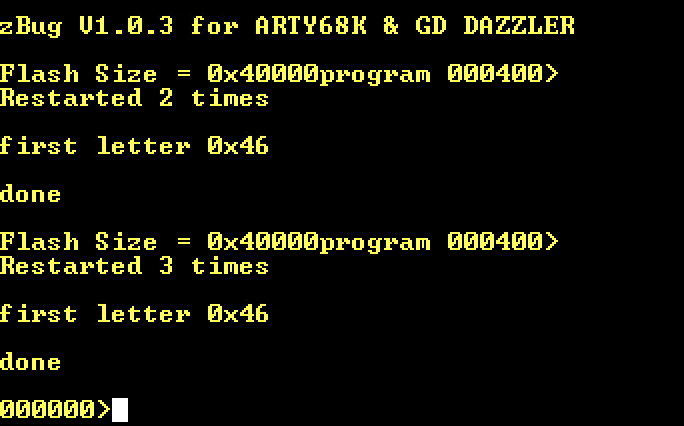
fram_spi->begin(); uint8_t test = fram_spi->read8(0x0); printf("\r\nRestarted %d times\r\n",test); uint8_t test2 = fram_spi->read8(0x1); printf("\r\nfirst letter 0x%x\r\n",test2); // Test write ++ fram_spi->writeEnable(true); fram_spi->write8(0x0, test+1); fram_spi->writeEnable(false); fram_spi->writeEnable(true); fram_spi->write(0x1, (uint8_t *)"FTW!", 5); fram_spi->writeEnable(false); printf("\r\ndone\r\n"); -
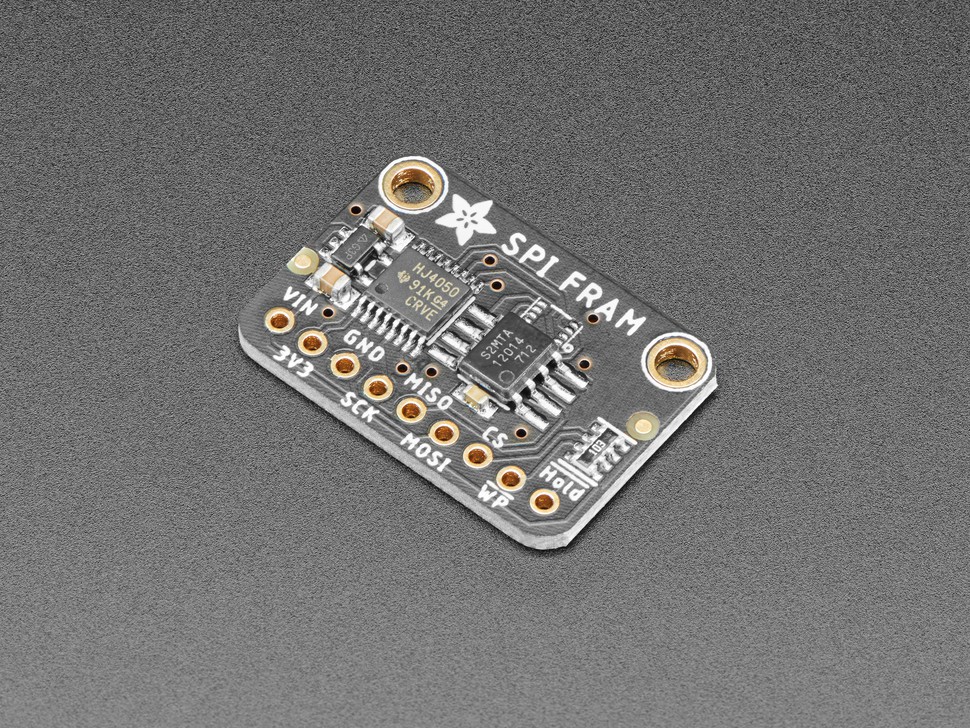
FRAM breakouts arrive
12/02/2021 at 11:23 • 0 commentsMy boot rom will be placed onto 2 Adafruit FRAM SPI breakouts. That will give me 2x 256k external non-volatile memory. This will also allow the system to run on FPGAs with limited block ram.
FRAM works at 40mhz SPI speed, works in the same way as normal ram, but is non-volatile like eeprom or flash but without the delays and paging. So I will be able to update the rom code directly and also execute in place.
Adafruit 2mb FRAM breakoutBoth breakouts soldered and working with my Metro M4. Just need to write the hdl now.
![]()
![]()
-
WIP
11/18/2021 at 13:04 • 0 commentsA few things now in progress.
A more stable vhdl code for the memory map. It still retains it's multicomp roots, but is now more suited to 24bit addresses and 16-bit data used by the 68000. This will allow me to create a better design for the bios and bootstrap.n_basRom1CS <= '0' when cpu_uds = '0' and cpuAddress(23 downto 20) = "1110" else '1'; --E00000-E0FFFF n_basRom2CS <= '0' when cpu_lds = '0' and cpuAddress(23 downto 20) = "1110" else '1'; hiMem <= '1' when cpuAddress(23 downto 20) = "1111" else '0'; hiMemRegAddr <= cpuAddress(7 downto 0); spiMem <= '1' when hiMem = '1' and cpuAddress(19 downto 16) = x"4" and hiMemRegAddr(7 downto 4) /= x"4" else '0'; --f4 ethMem <= '1' when hiMem = '1' and cpuAddress(19 downto 16) = x"4" and hiMemRegAddr(7 downto 4) = x"4" else '0'; --f4 timerCS <= '1' when hiMem = '1' and cpuAddress(19 downto 16) = x"3" and hiMemRegAddr(7 downto 4) = x"3" else '0'; -- timer f3003 rtcCS <= '1' when hiMem = '1' and cpuAddress(19 downto 16) = x"3" and hiMemRegAddr(7 downto 4) = x"4" else '0'; -- f3004 fpuMem <= '1' when hiMem = '1' and cpuAddress(19 downto 16) = x"5" else '0'; --f5 ioMem <= '1' when hiMem = '1' and cpuAddress(19 downto 16) = x"2" else '0'; --f2 uartMem <= '1' when hiMem = '1' and cpuAddress(19 downto 16) = "0000" else '0'; --f0 -- ____________________________________________________________________________________ -- RAM ram_cen <= '0' when cpuAddress(23 downto 20) < X"E" and n_reset = '1' else '1';I've also now started working on a physical adapter for the Arty pmod boards which will convert from 3.3v to an 8-bit 5v bus. I will use the RC2014 bus design as it seems to have a lot of pre-built modules. At the moment I am thinking that the vhdl code will translate the 68000 bus signals to the RC2014 Z80 style so the add-on boards can be used without modification. Level shifting bus transceivers will manage the i/o and I will probably add 2mb of fast sram for the main system to use as well.
-
Assemble
11/07/2021 at 08:44 • 0 commentsI have ported the Motorola assembler and monitor. The manual is in the files, it is the software from the
Motorola MC68000 Educational Computer Board (MEX68KECB). There is a site with more info here: http://www.easy68k.com/paulrsm/mecb/mecb.htm
It is the most capable monitor available for the 68k. It offers an in line assembler, trace and breakpoint routines. I have tested them and they are now all working on the Merlin. Here's a quick demo showing the assembler and a trap function.
-
100!
11/06/2021 at 06:59 • 0 commentsStill can't quite believe this! Hello everyone! My quick lockdown project has turned into a labour of love.
I'm currently working on a proper bios, bootstrap, monitor and native assembler using the tutor monitor as a starting point. Then I think the following in no particular order:
- 8 or 16 bit external data bus level shifted to 5v through the two remaining pmod ports- keyboard and screen modes via gameduino. I've already got the amiga font working on it.
- audio output on a pwm pin
- case
- in-line assembler modification for eh-basic a la bbc basic.
- custom pcb design (once I've taught myself layout)
Anyway, thanks for following :)
![]()
-
Vivado goes on the naughty step
11/03/2021 at 09:54 • 0 commentsEverything fine, then the SD Card stops working. For no apparent reason. Luckily because I have a 100% fpga system I can track everything that goes on using the Vivado debugger.
Here's a guide to debugging:
https://www.xilinx.com/support/documentation/sw_manuals/xilinx2019_2/ug936-vivado-tutorial-programming-debugging.pdf
Anyway - turns out the vivado tools had optimised my SD card interfaces away.... In this case you put Vivado on the naughty step and tell it to leave your code alone.attribute dont_touch : string; attribute dont_touch of sdCardDataOut : signal is "true"; attribute dont_touch of sdCardDataIn : signal is "true"; attribute dont_touch of sdAddress : signal is "true";and we are back in business!
![]()
Sometimes you need to remember it's not the code but the tool!
-
New Release
11/01/2021 at 12:31 • 0 commentsNew bitstream release:
- Double precision FPU
- Interrupts
- Timers
- Keyboard
- Switch to 100T
- UART link to ESP32 on Pmod B (+ Terminal code)
- Add in sqrt into FPU
- Add L2 cache in front of DDR
- General tidy up of some old files and directories
- Update project .tcl file
https://github.com/mattuna15/zed-68k/releases/tag/ARTY-100T-v1.0
-
Hello World
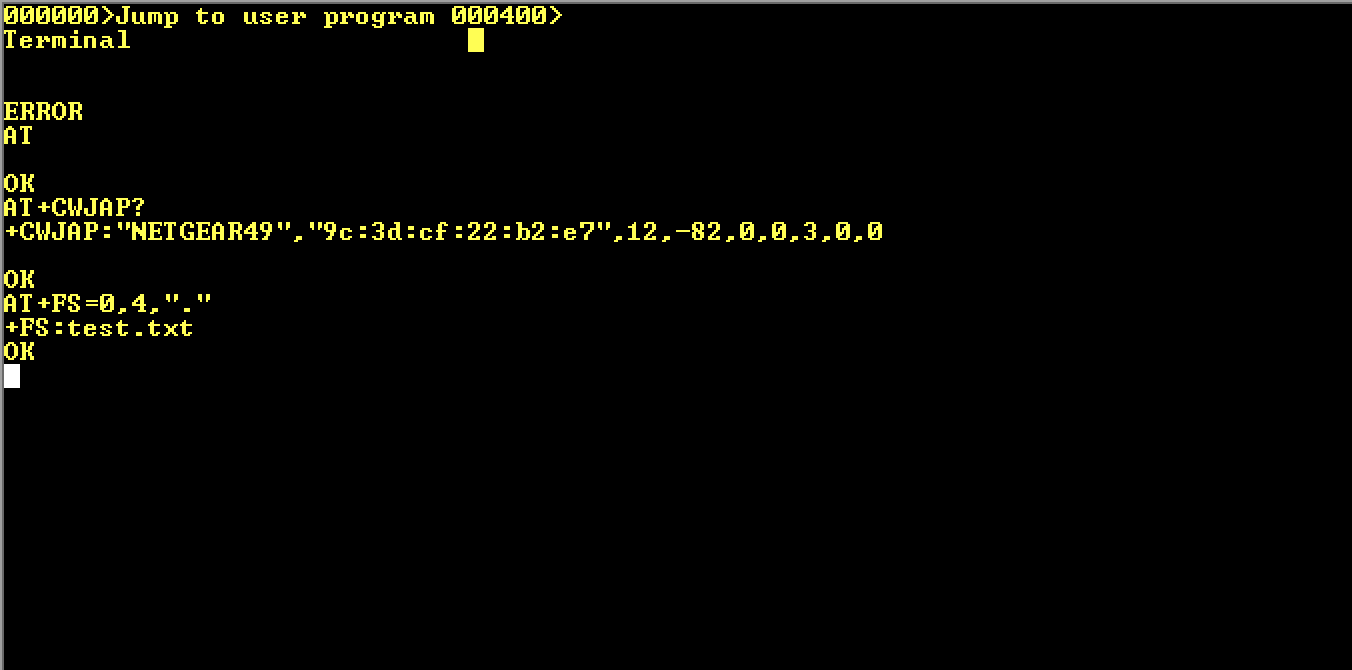
11/01/2021 at 09:53 • 0 commentsBeside putting in the cache, I've been looking at a simple way of bootstrapping Merlin without the monitor, but also in a way that doesn't need a big SD card routine. I had a PMOD ESP32 from an earlier project, so I've added a UART to my design and can now send "AT" commands to access the internet and also use the flash filesystem on the ESP32.
The ESP32 is already setup to connect to my wifi and has a custom os with the filesystem enabled. As you can see WIFI is connected and there is already a test file on it.![]()
I think next I'll write a program to transfer a BIOS binary to the flash and then also boot from it at start up.
-
Cache!
10/31/2021 at 07:25 • 0 commentsDespite me saying that was it for hardware, noticed I was getting instability sometimes just because the DDR was just soooo slowwwww. So started investigating caching. Luckily because I use the AXI protocol for my DDR accesses, xilinx already provides an IP block for caching. So it was a fairly simple change to modify my retro axi code to include a call to a cache block as an intermediate.
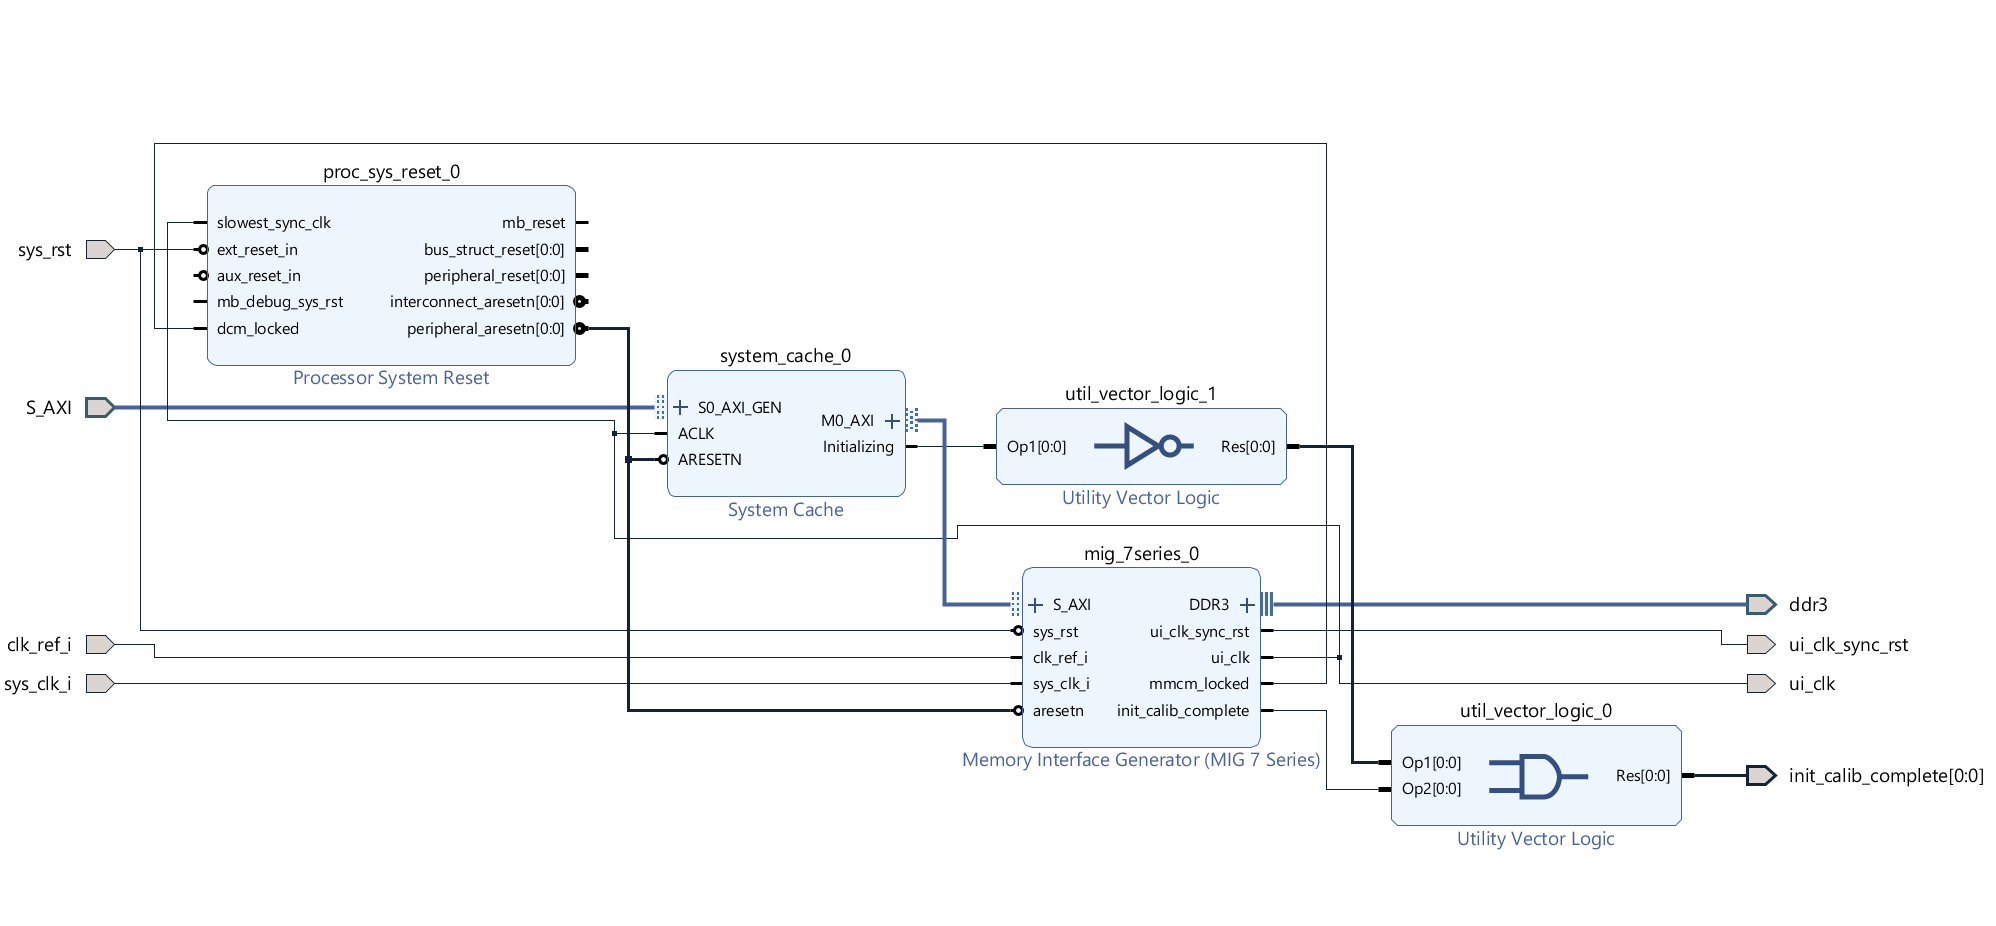
In the project the code looks like this - so as you can see it has a traditional look to the memory interface (aside from the external DDR links). The DDR3 requires a 166 & 200 mhz clock to work correctly. This gives a speed of 83mhz (166/2), which isn't too far off the main system speed and isn't a problem with the cache in-between. In the block diagram below, the S_AXI input comes from my retro-axi master code, into the cache which then handles the traffic to/from the MIG and DDR.
memory: main_memory_control port map( sys_clock => cpu_clock, sys_resetn => resetn and clk_locked, clock166 => clk166, clock200 => clk200, -- cpu interface (Fast memory) address(27) => '0', -- // Address bus (Upper part not used) address(26 downto 4) => cpuAddress(23 downto 1), --ignore last digit. always 0 address(3 downto 0) => "0000", i_cen => cpuCS or boot_rom, -- chip select i_valid_p => mem_i_valid_p, -- valid input active high wr_byte_mask(1) => not cpuUpper, -- upper byte from cpu wr_byte_mask(0) => not cpuLower, -- lower byte from cpu i_wren => cpuWriteEn, -- Write enable wr_data => cpuDataOut, -- Data to write rd_data => memDataOut, -- Data to read o_valid_p => mem_ack ,-- read ready (link to dtack) wr_ack_p => mem_wr_ack, -- write complete (link to dtack) o_ready_p => open, -- idle (not used) -- DDR3 Inouts ddr3_sdram_addr => ddr3_addr, ddr3_sdram_ba => ddr3_ba, ddr3_sdram_ras_n => ddr3_ras_n, ddr3_sdram_cas_n => ddr3_cas_n, ddr3_sdram_we_n => ddr3_we_n, ddr3_sdram_ck_p => ddr3_ck_p, ddr3_sdram_ck_n => ddr3_ck_n, ddr3_sdram_cke => ddr_cke, ddr3_sdram_dm => ddr3_dm, ddr3_sdram_odt => ddr3_odt, ddr3_sdram_dq => ddr3_dq, ddr3_sdram_dqs_p => ddr3_dqs_p, ddr3_sdram_dqs_n => ddr3_dqs_n , ddr3_sdram_cs_n => ddr3_cs_n, ddr3_sdram_reset_n => ddr_rstn, init_calib_complete => mem_ready -- memory and cache initialised and ready );![]()
The code I wrote for my retro-axi and axi-stream components is here https://github.com/mattuna15/RetroAxi
These convert traditional signals to the more complex axi. This has the advantage of opening up the range of IPs provided by Xilinx (and others). For example I use some of the xilinx axi-stream floating point IPs in the Merlin FPU design.
The caching IP has improved the performance and the stability of the design overall. The documentation of the system cache is here https://www.xilinx.com/products/intellectual-property/axi_systemcache.html