lion mclionhead
-
-40C dew point with desiccant
11/08/2022 at 21:42 • 0 comments![]()
![]()
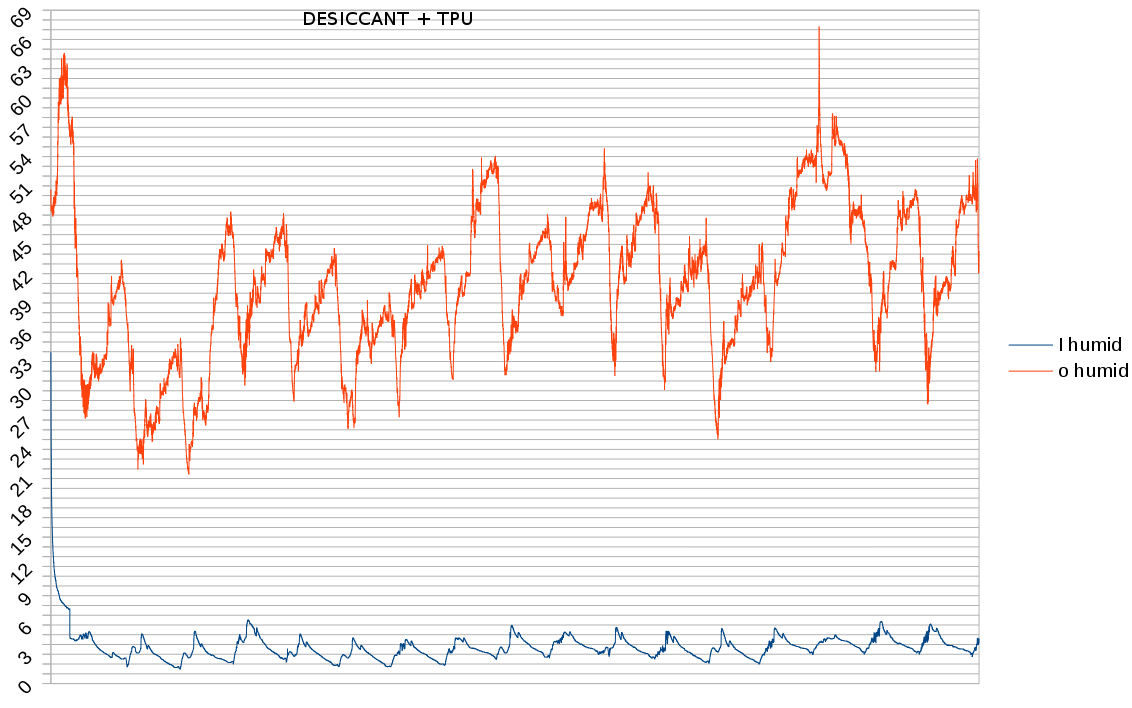
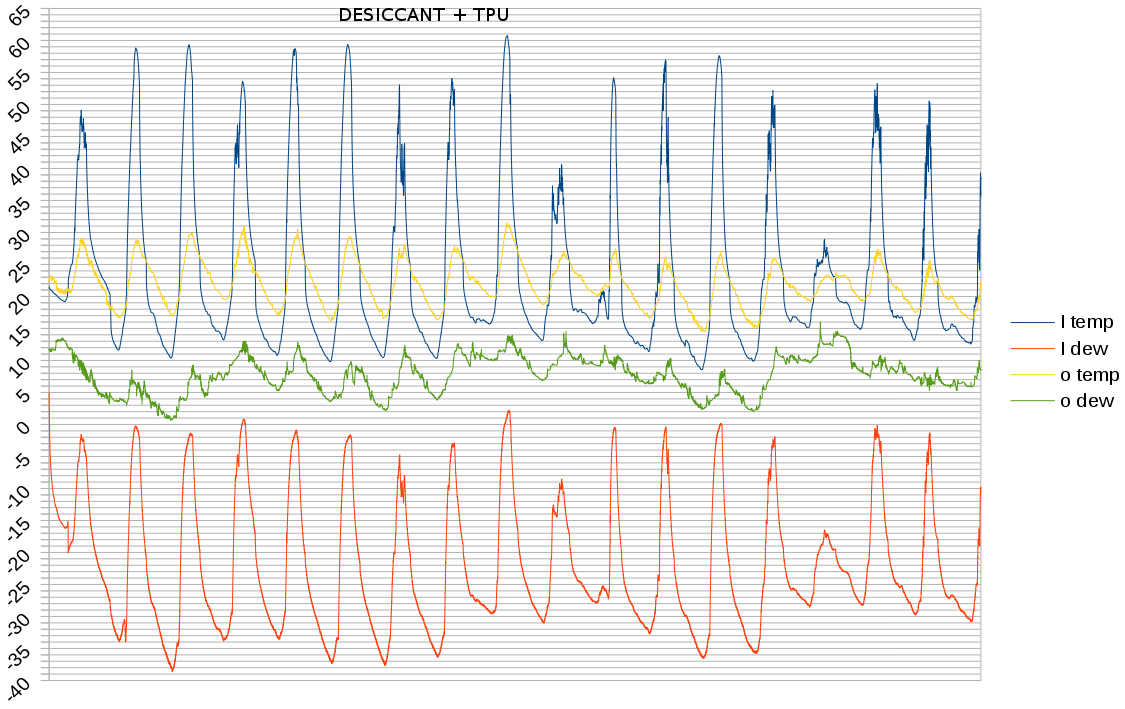
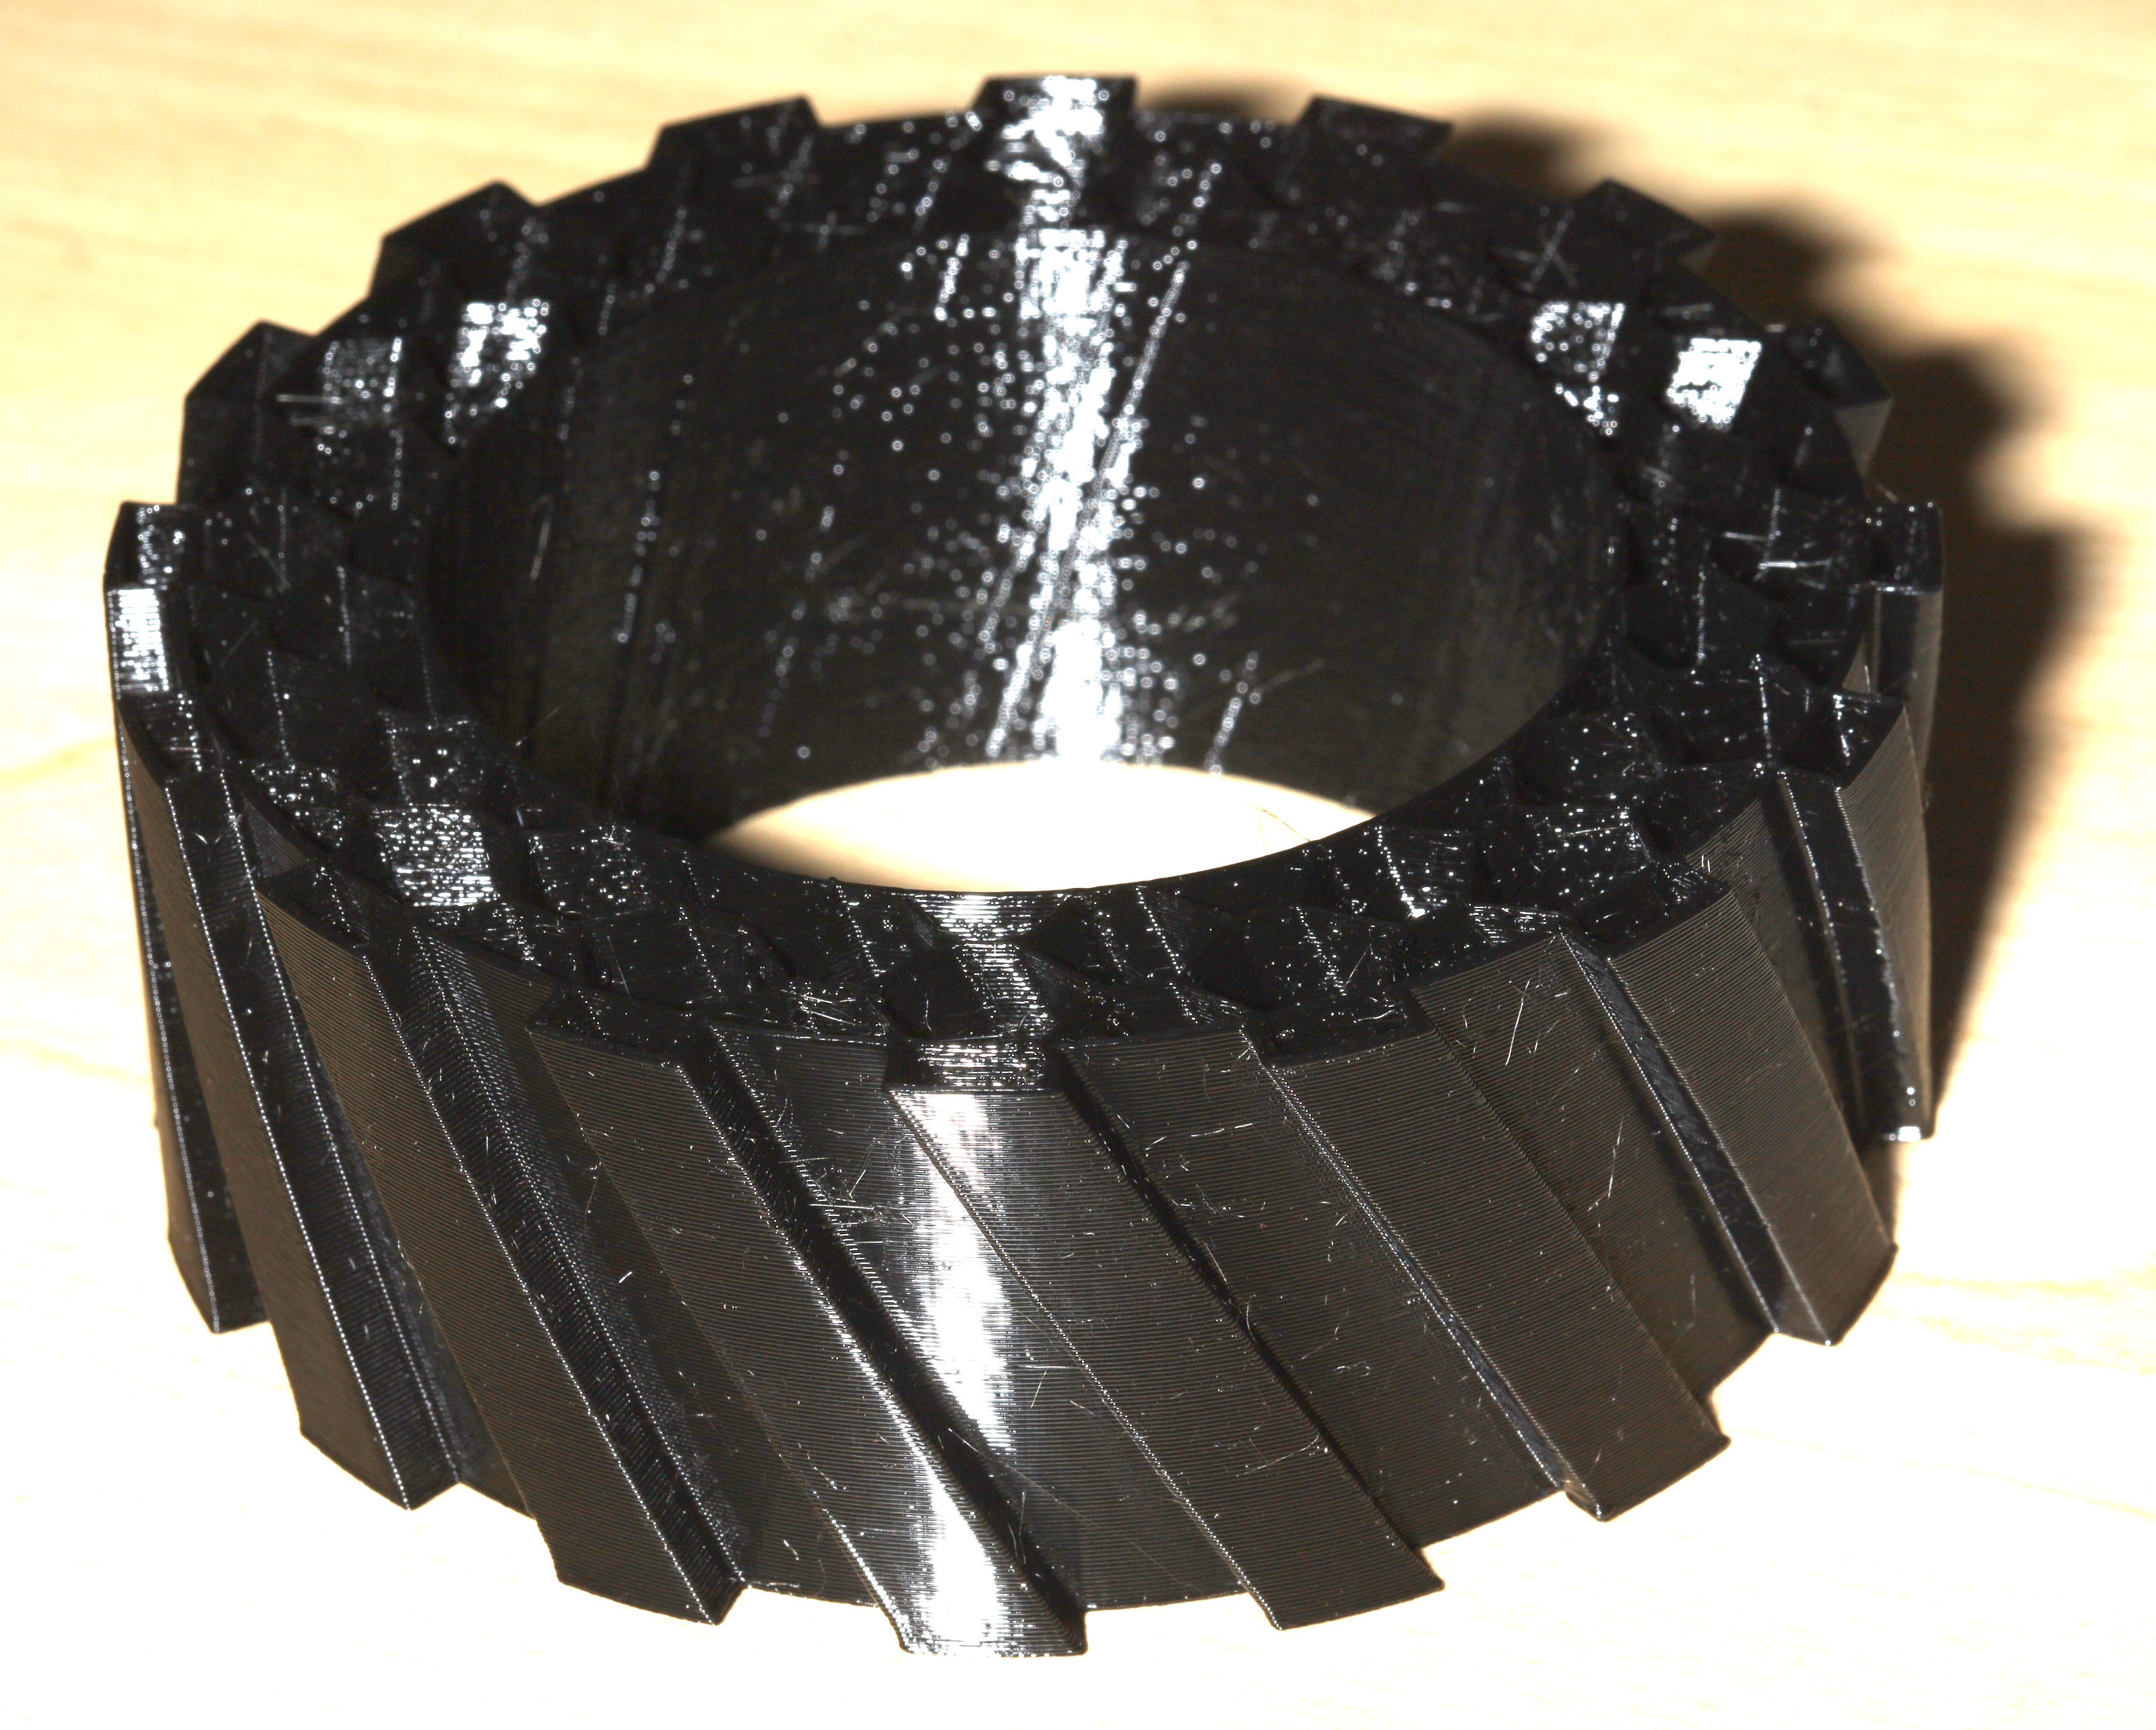
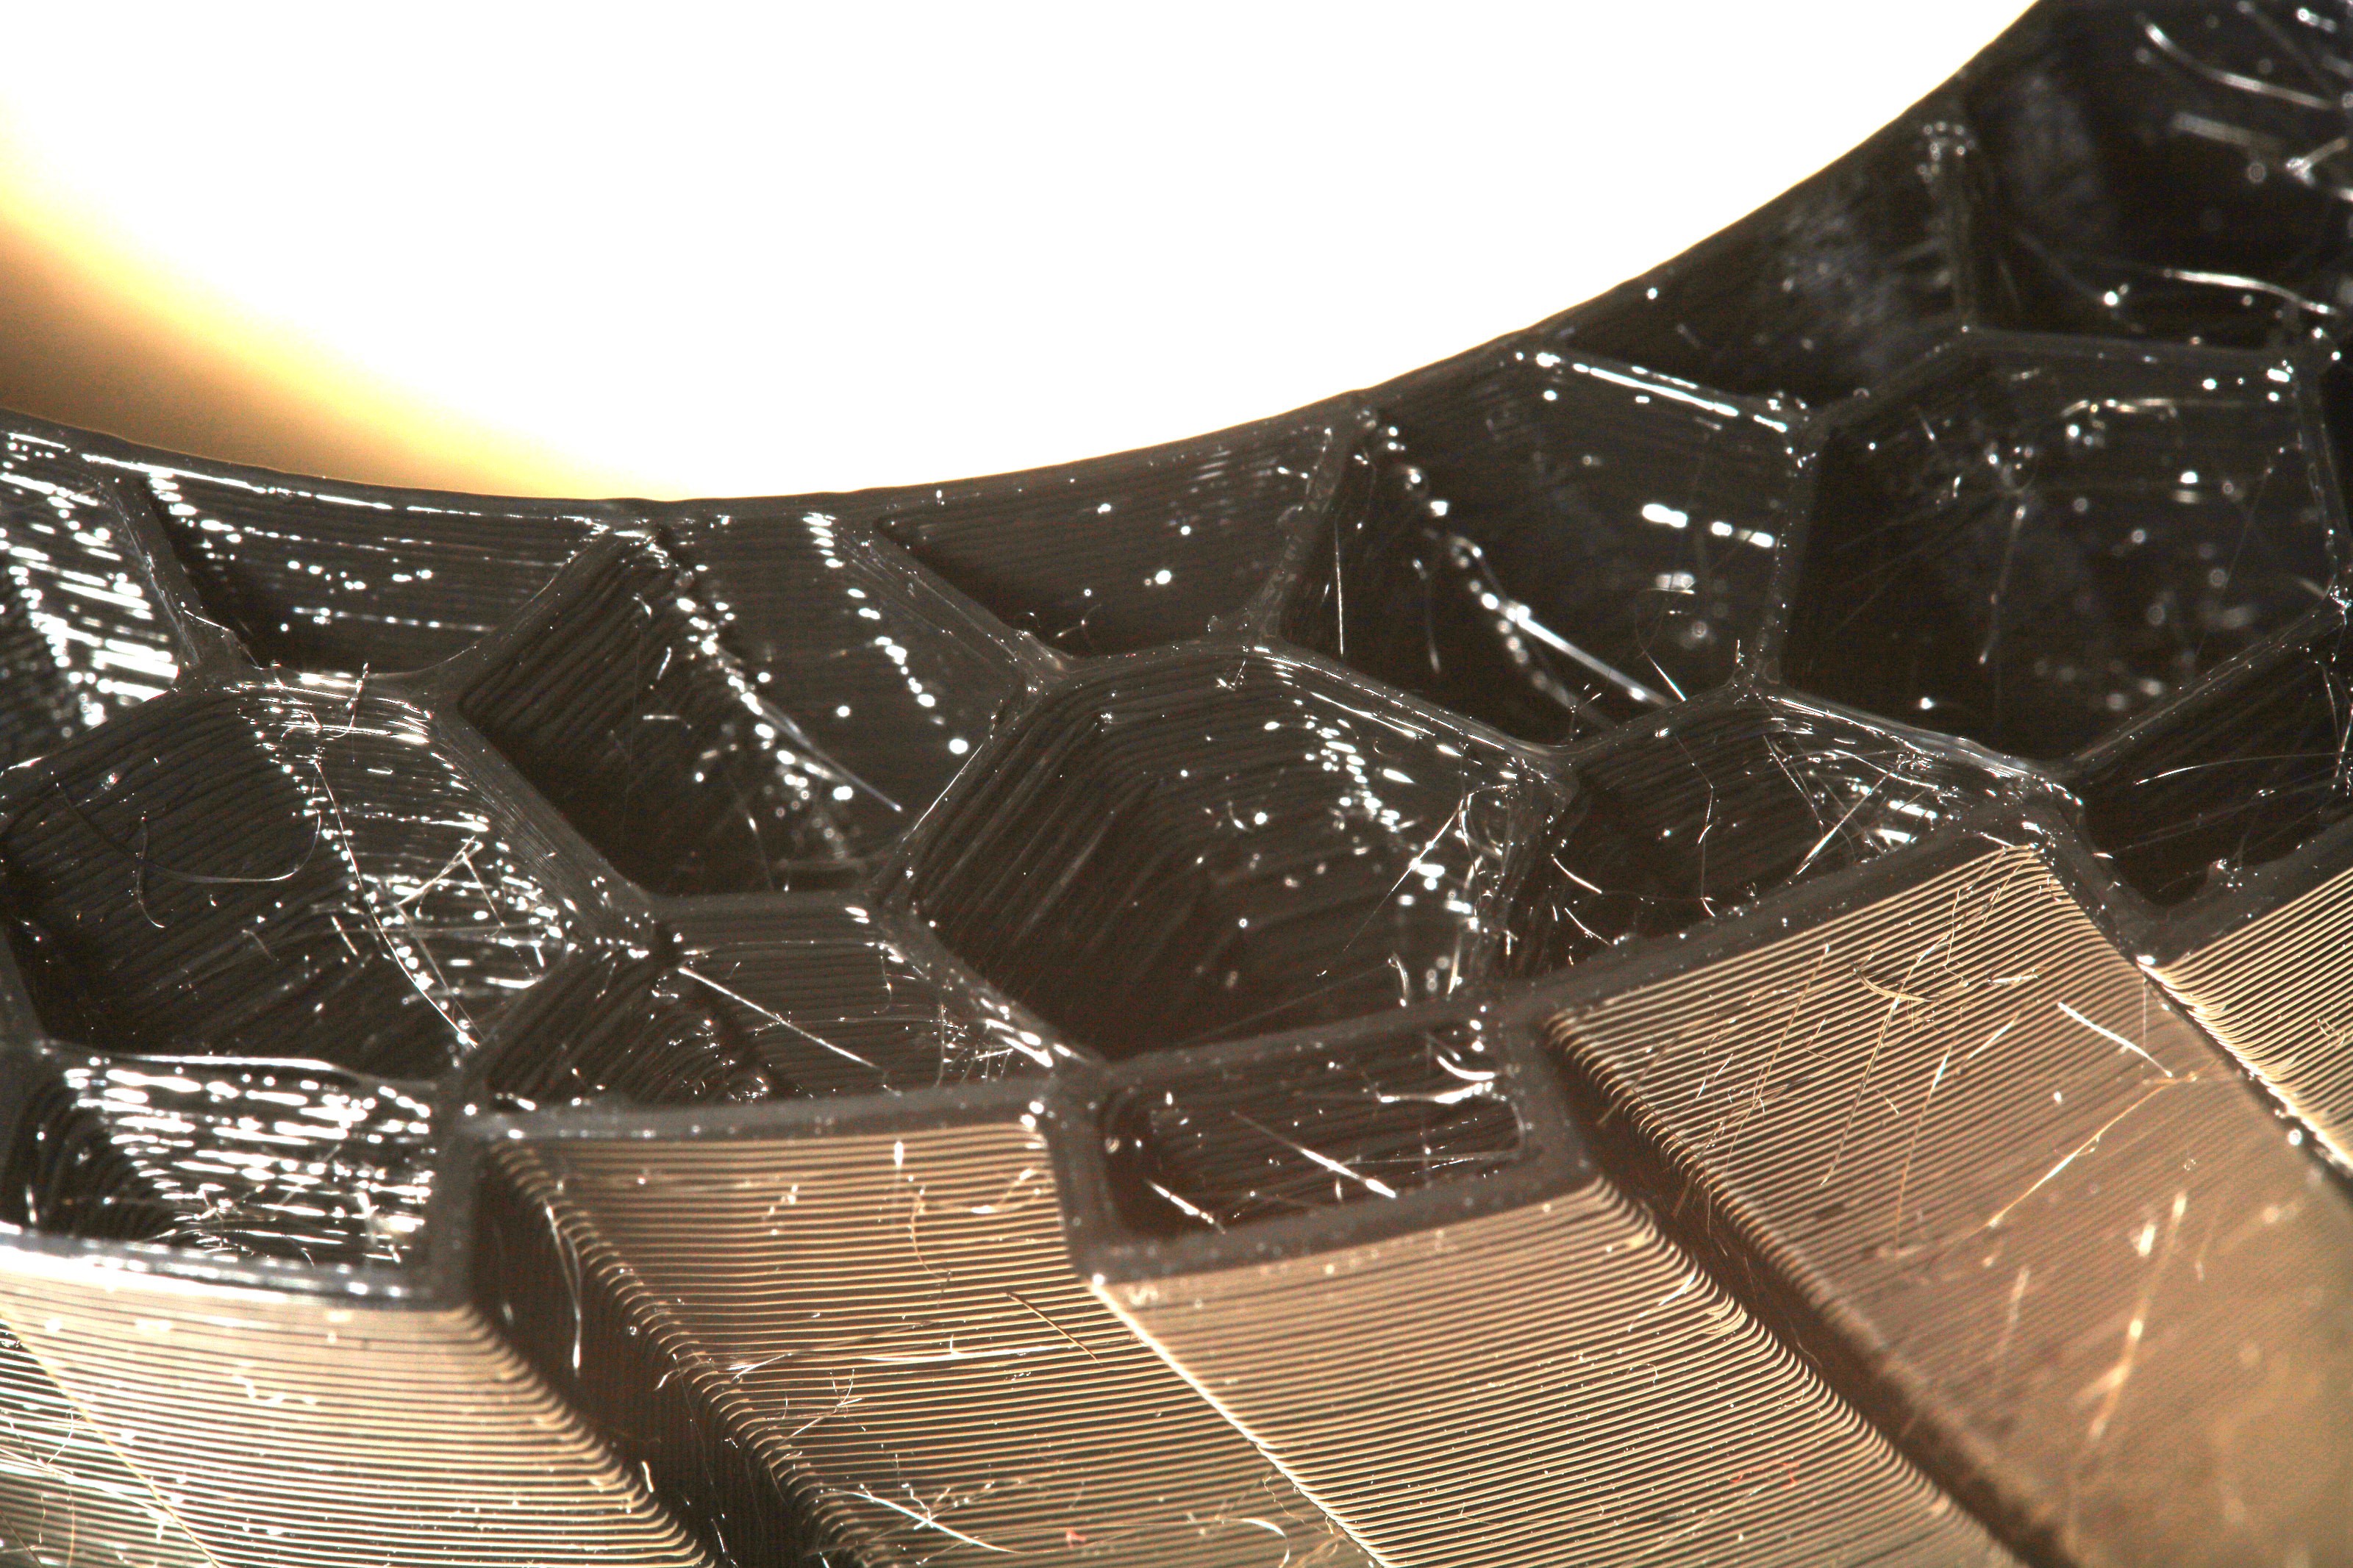
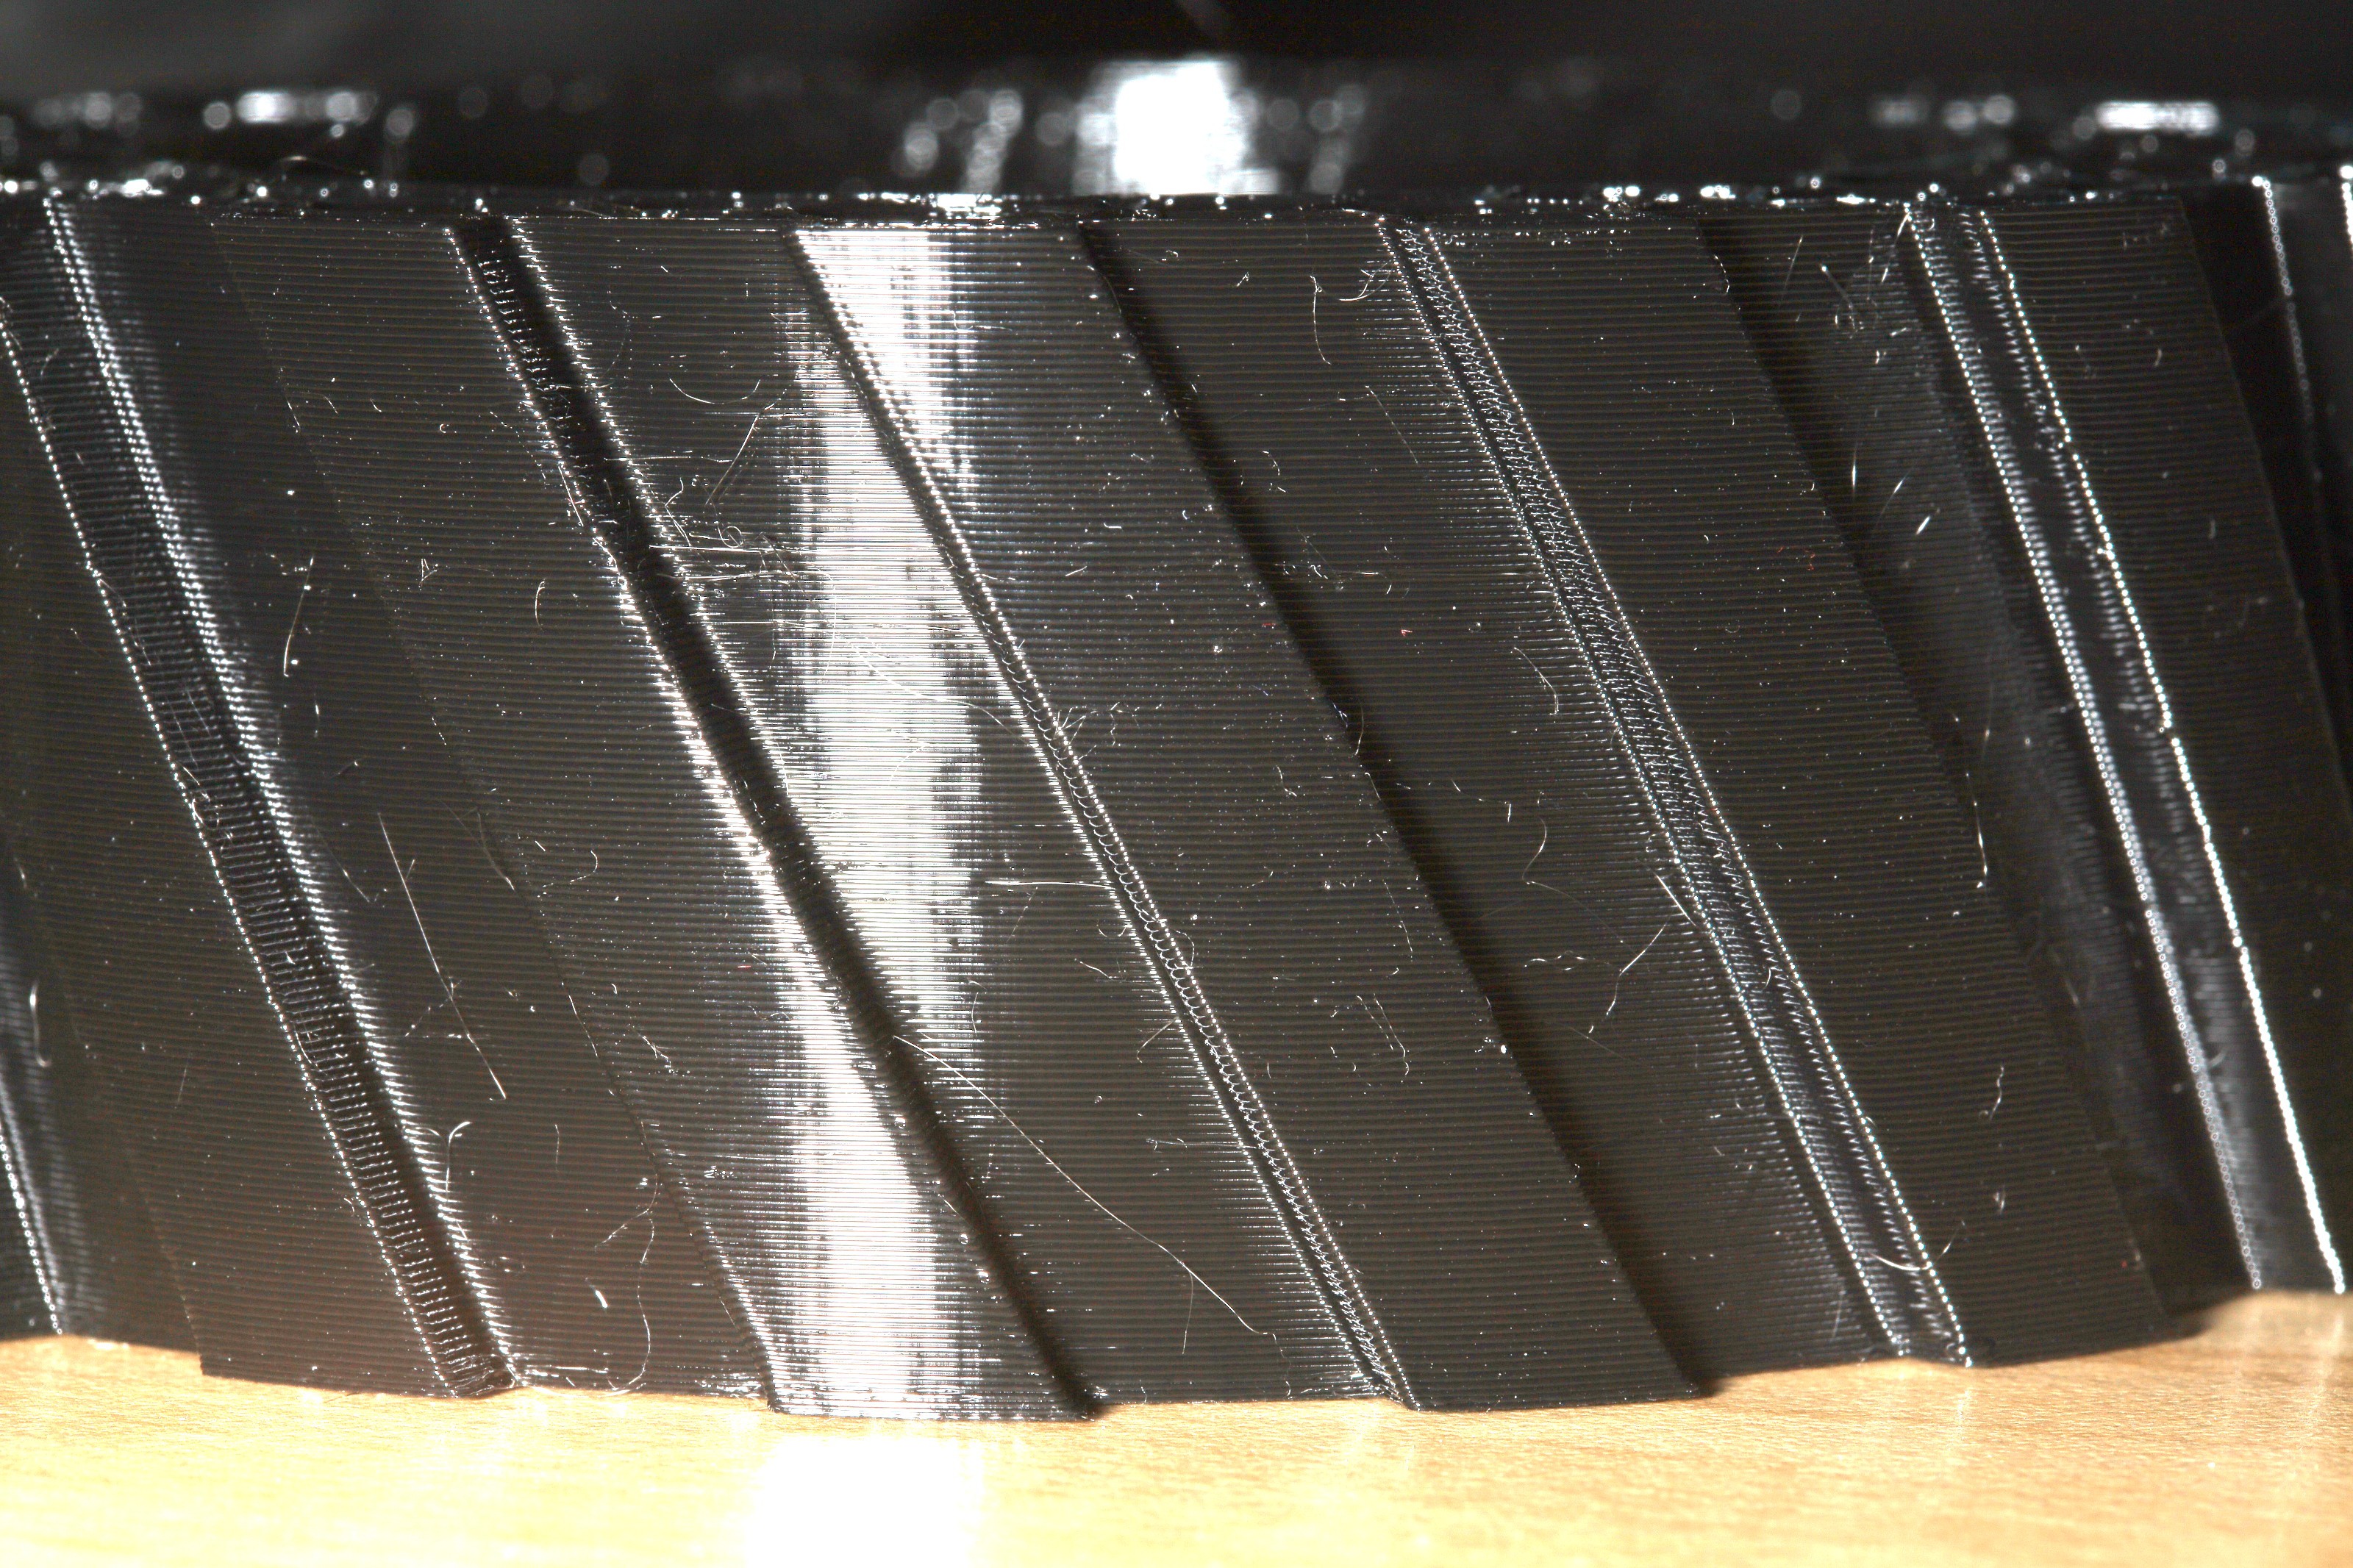
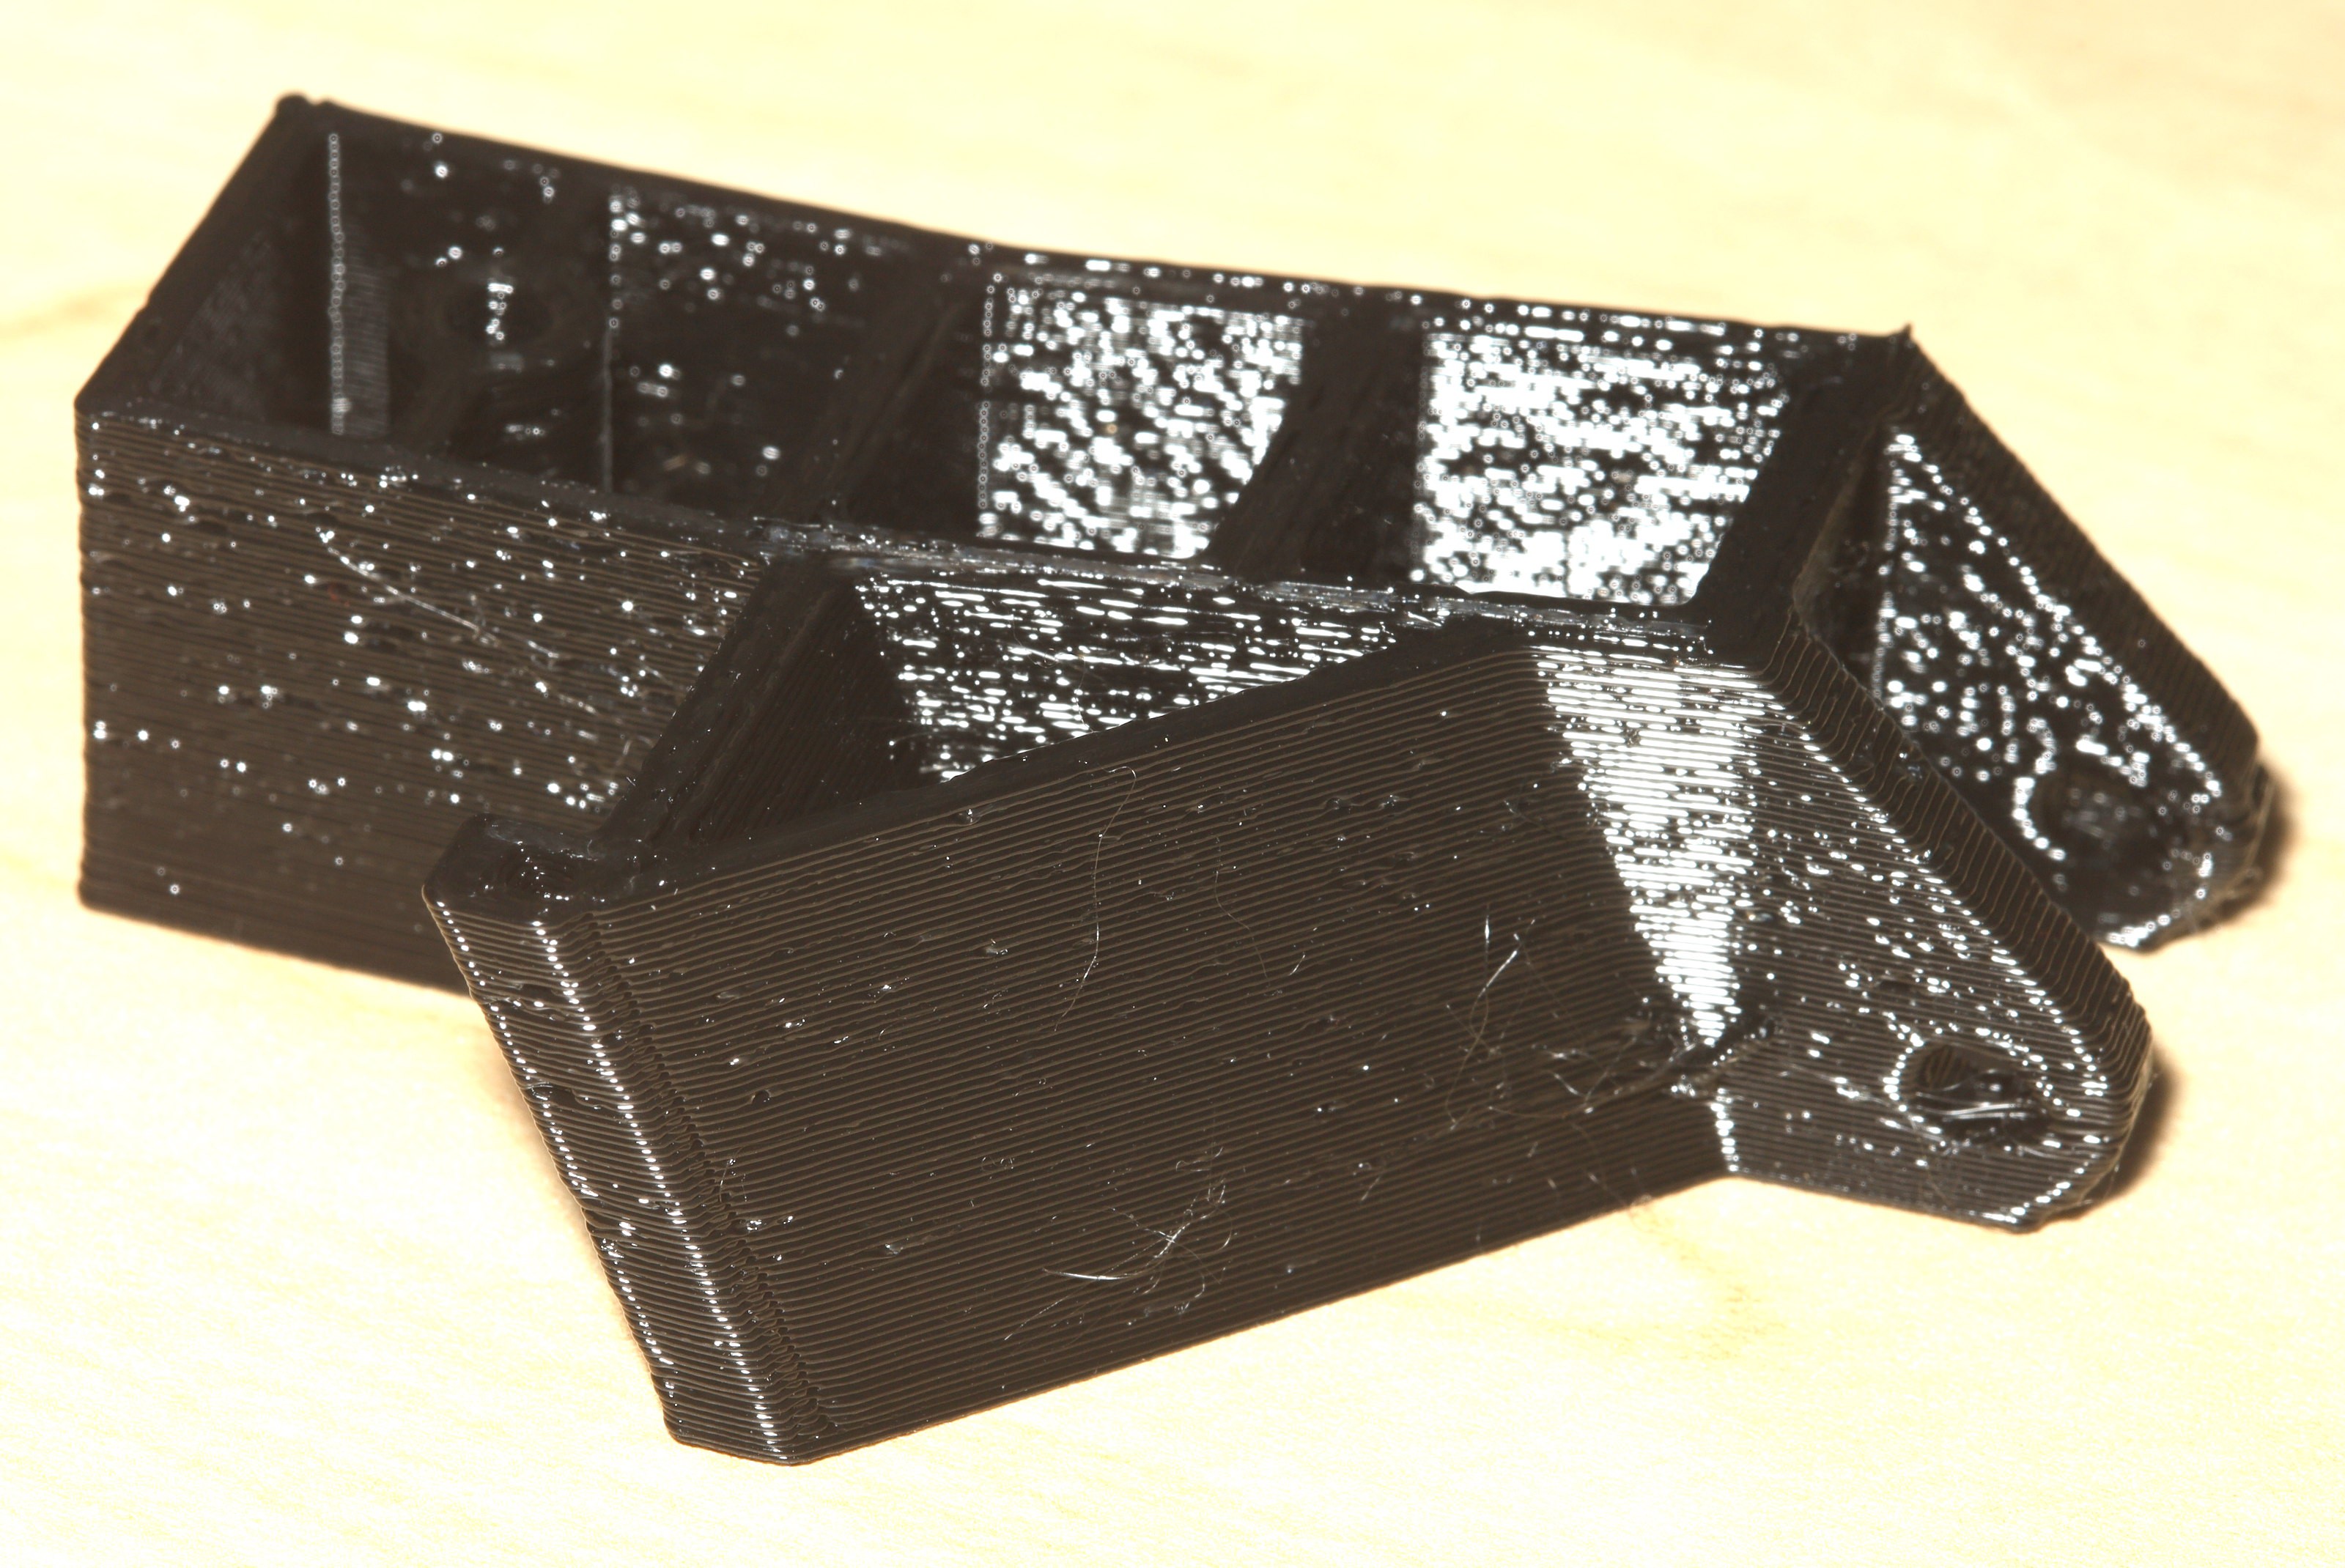
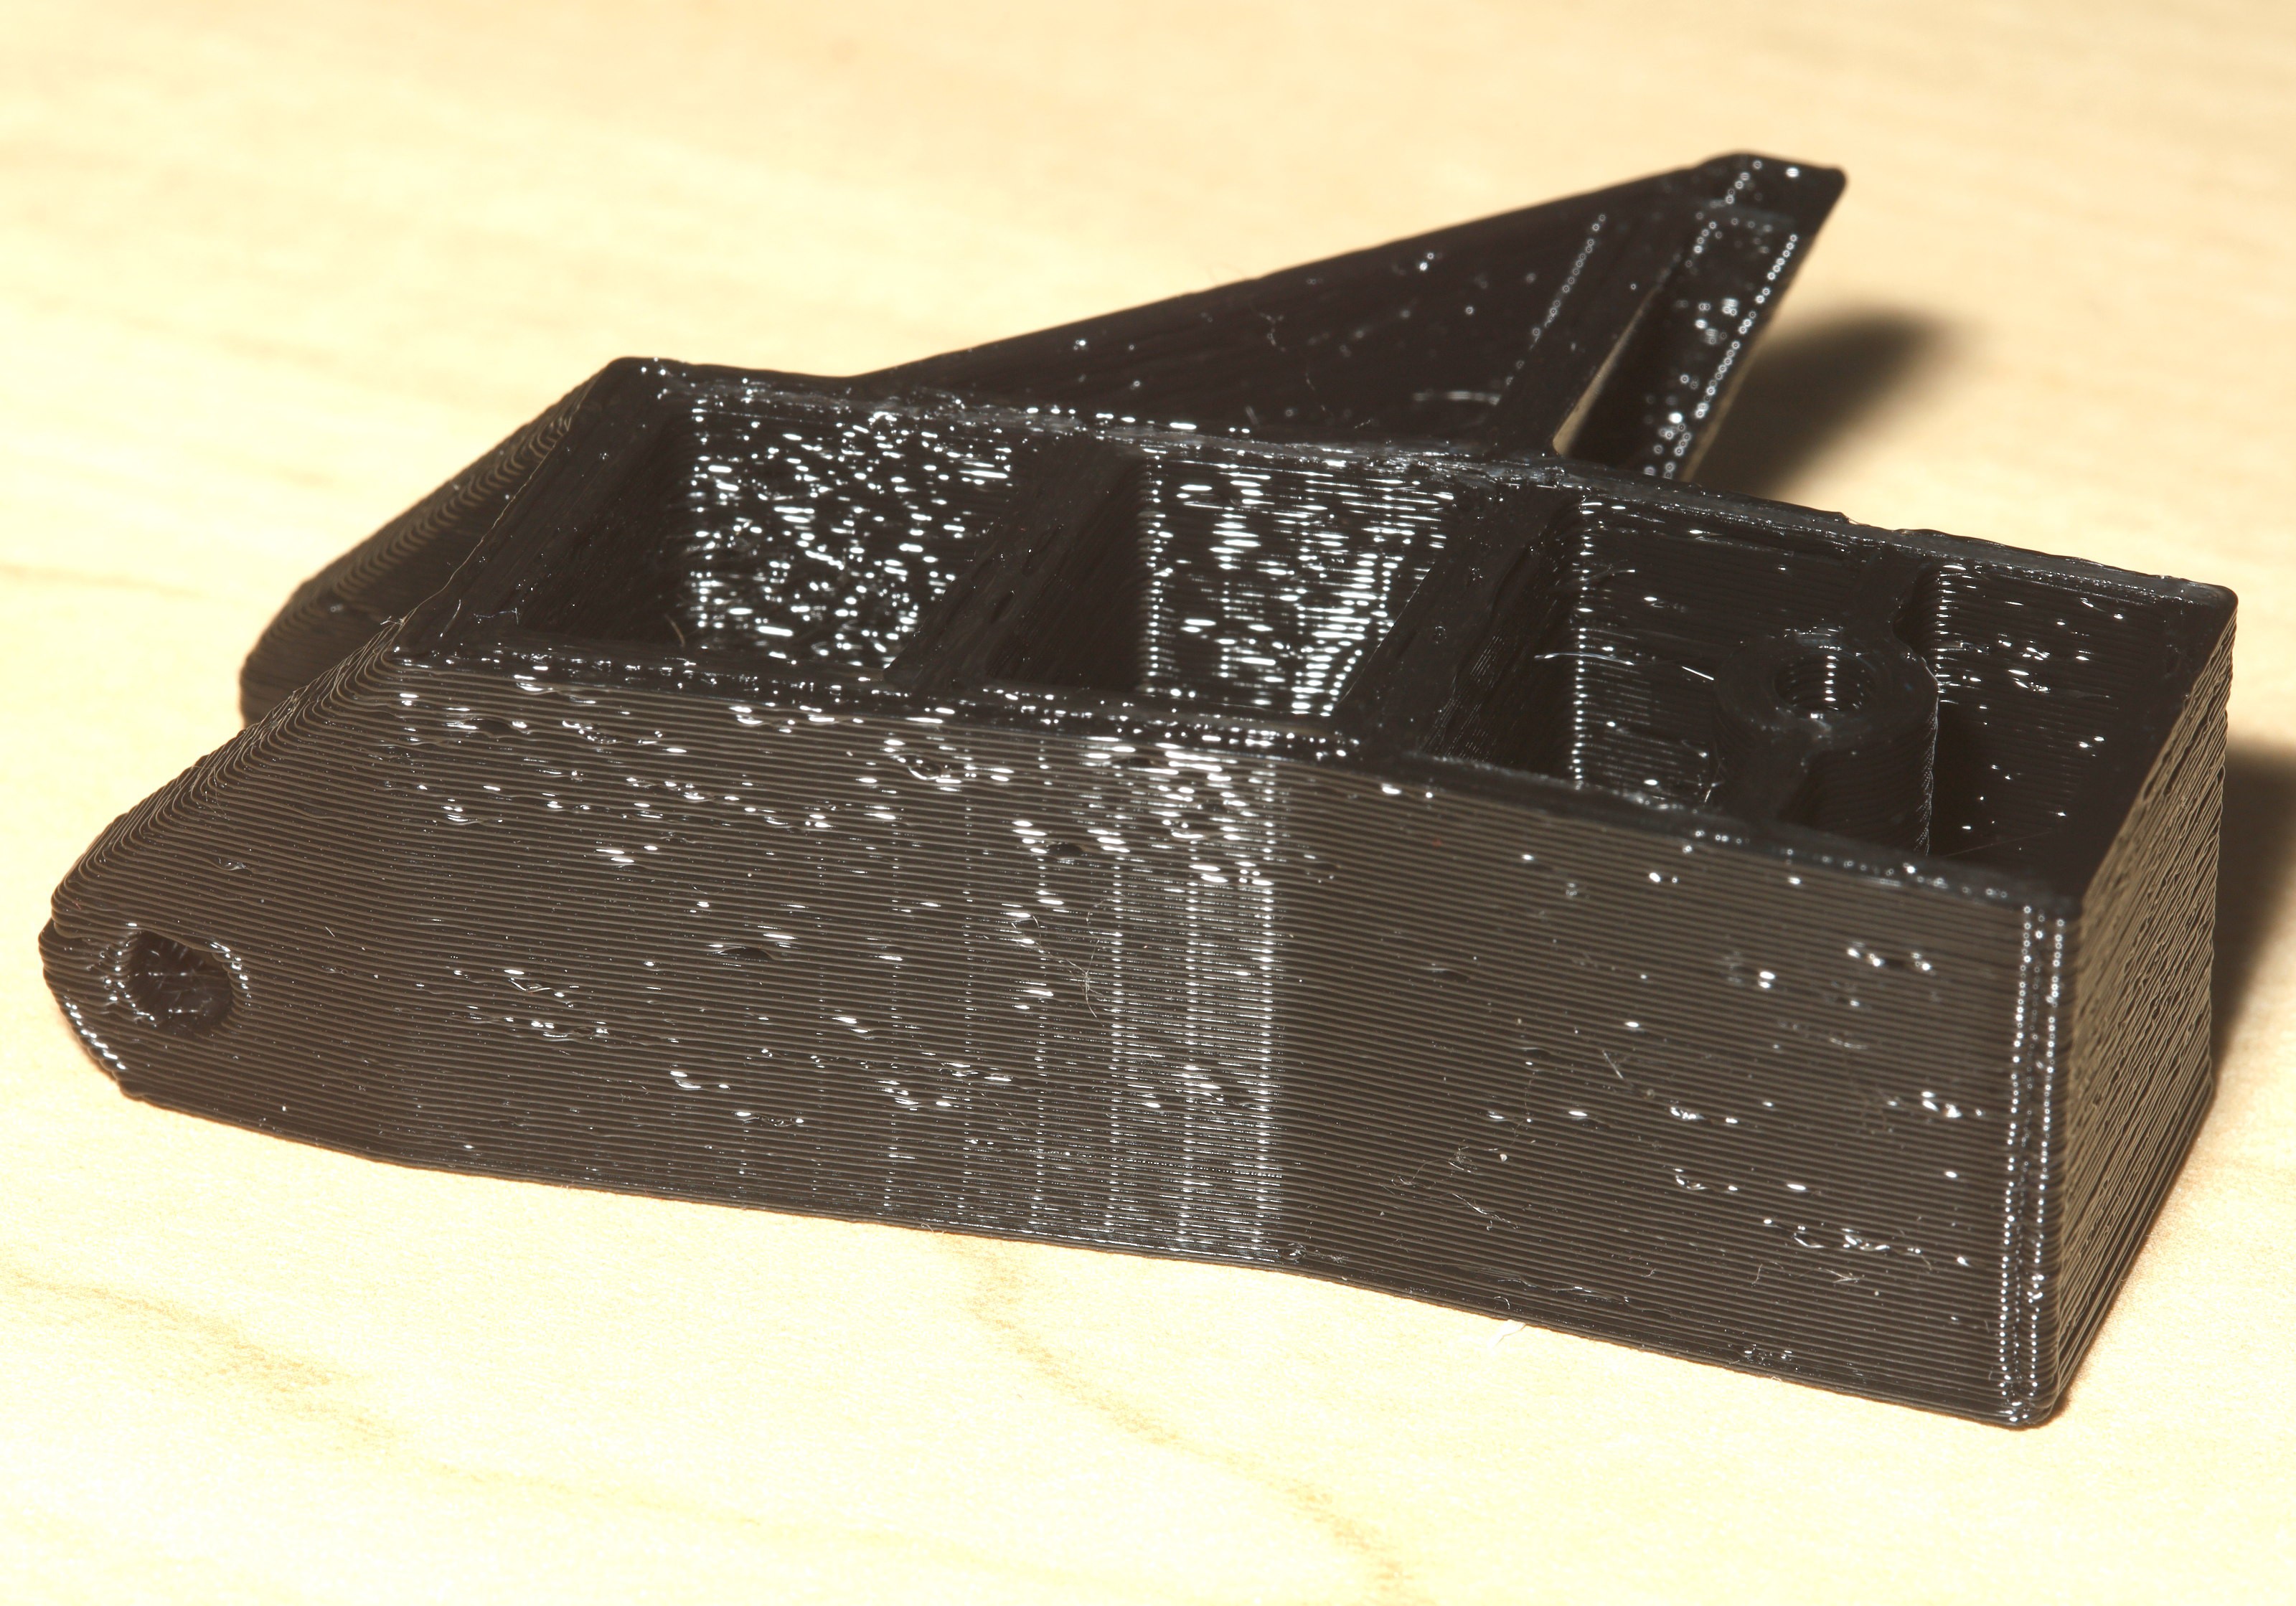
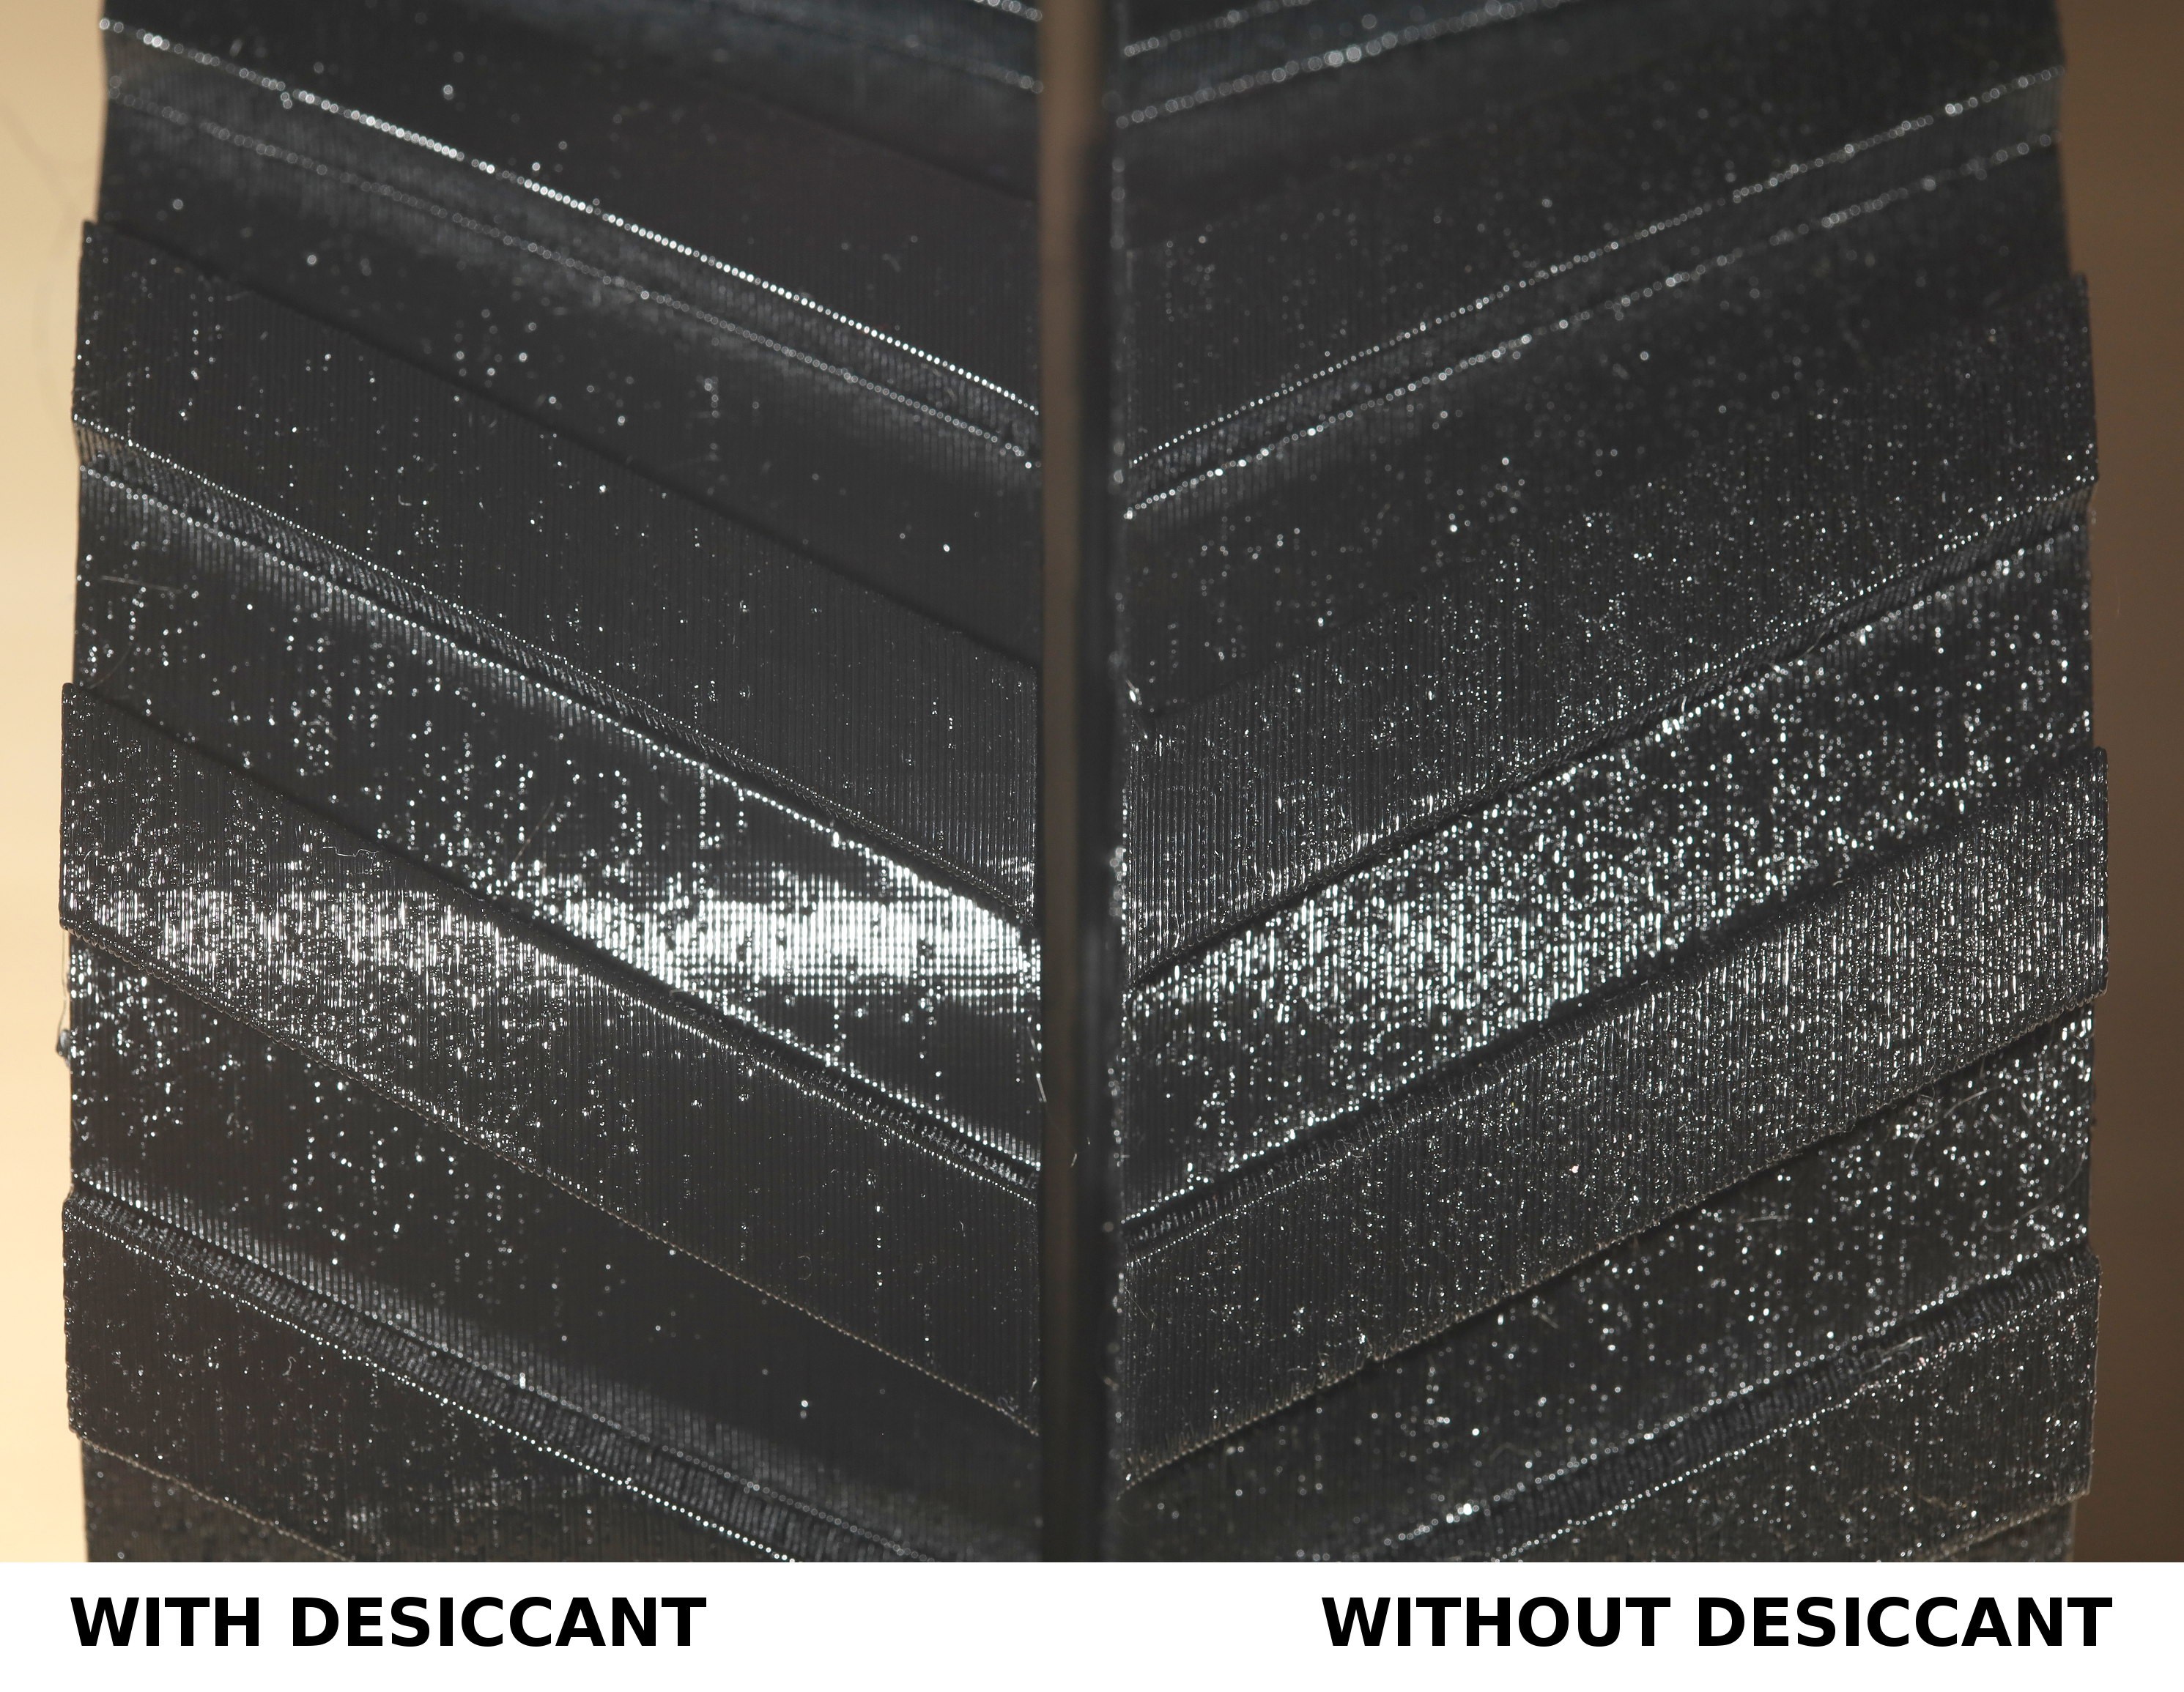
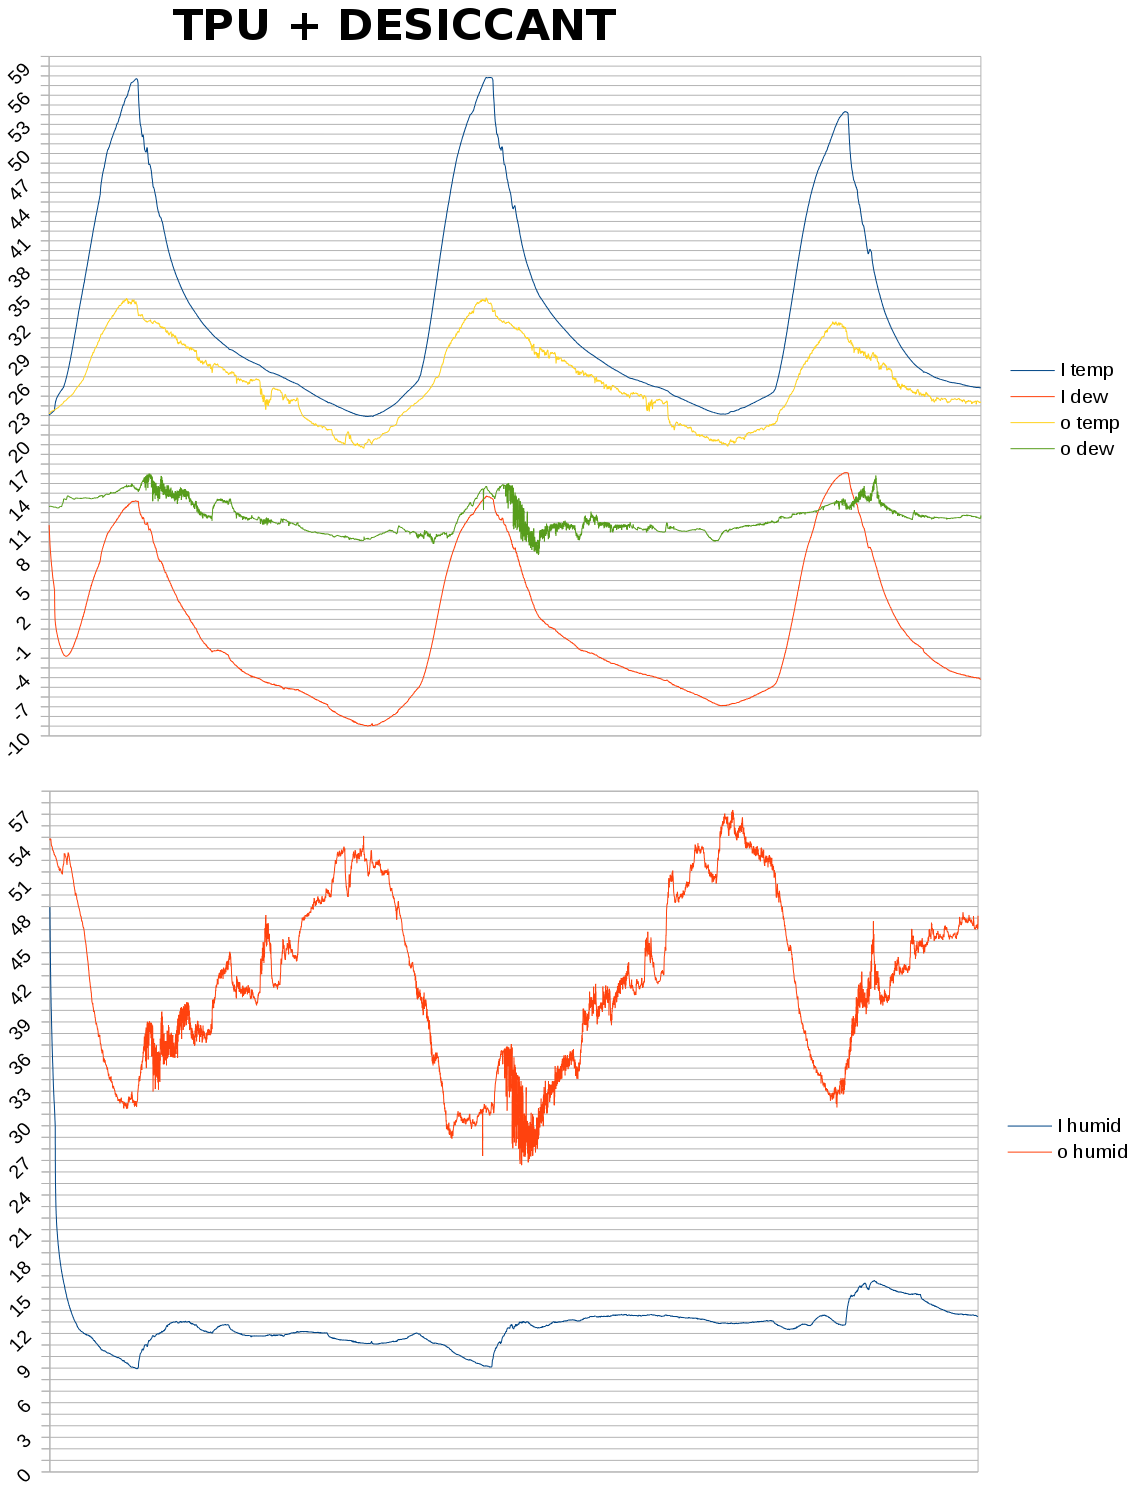
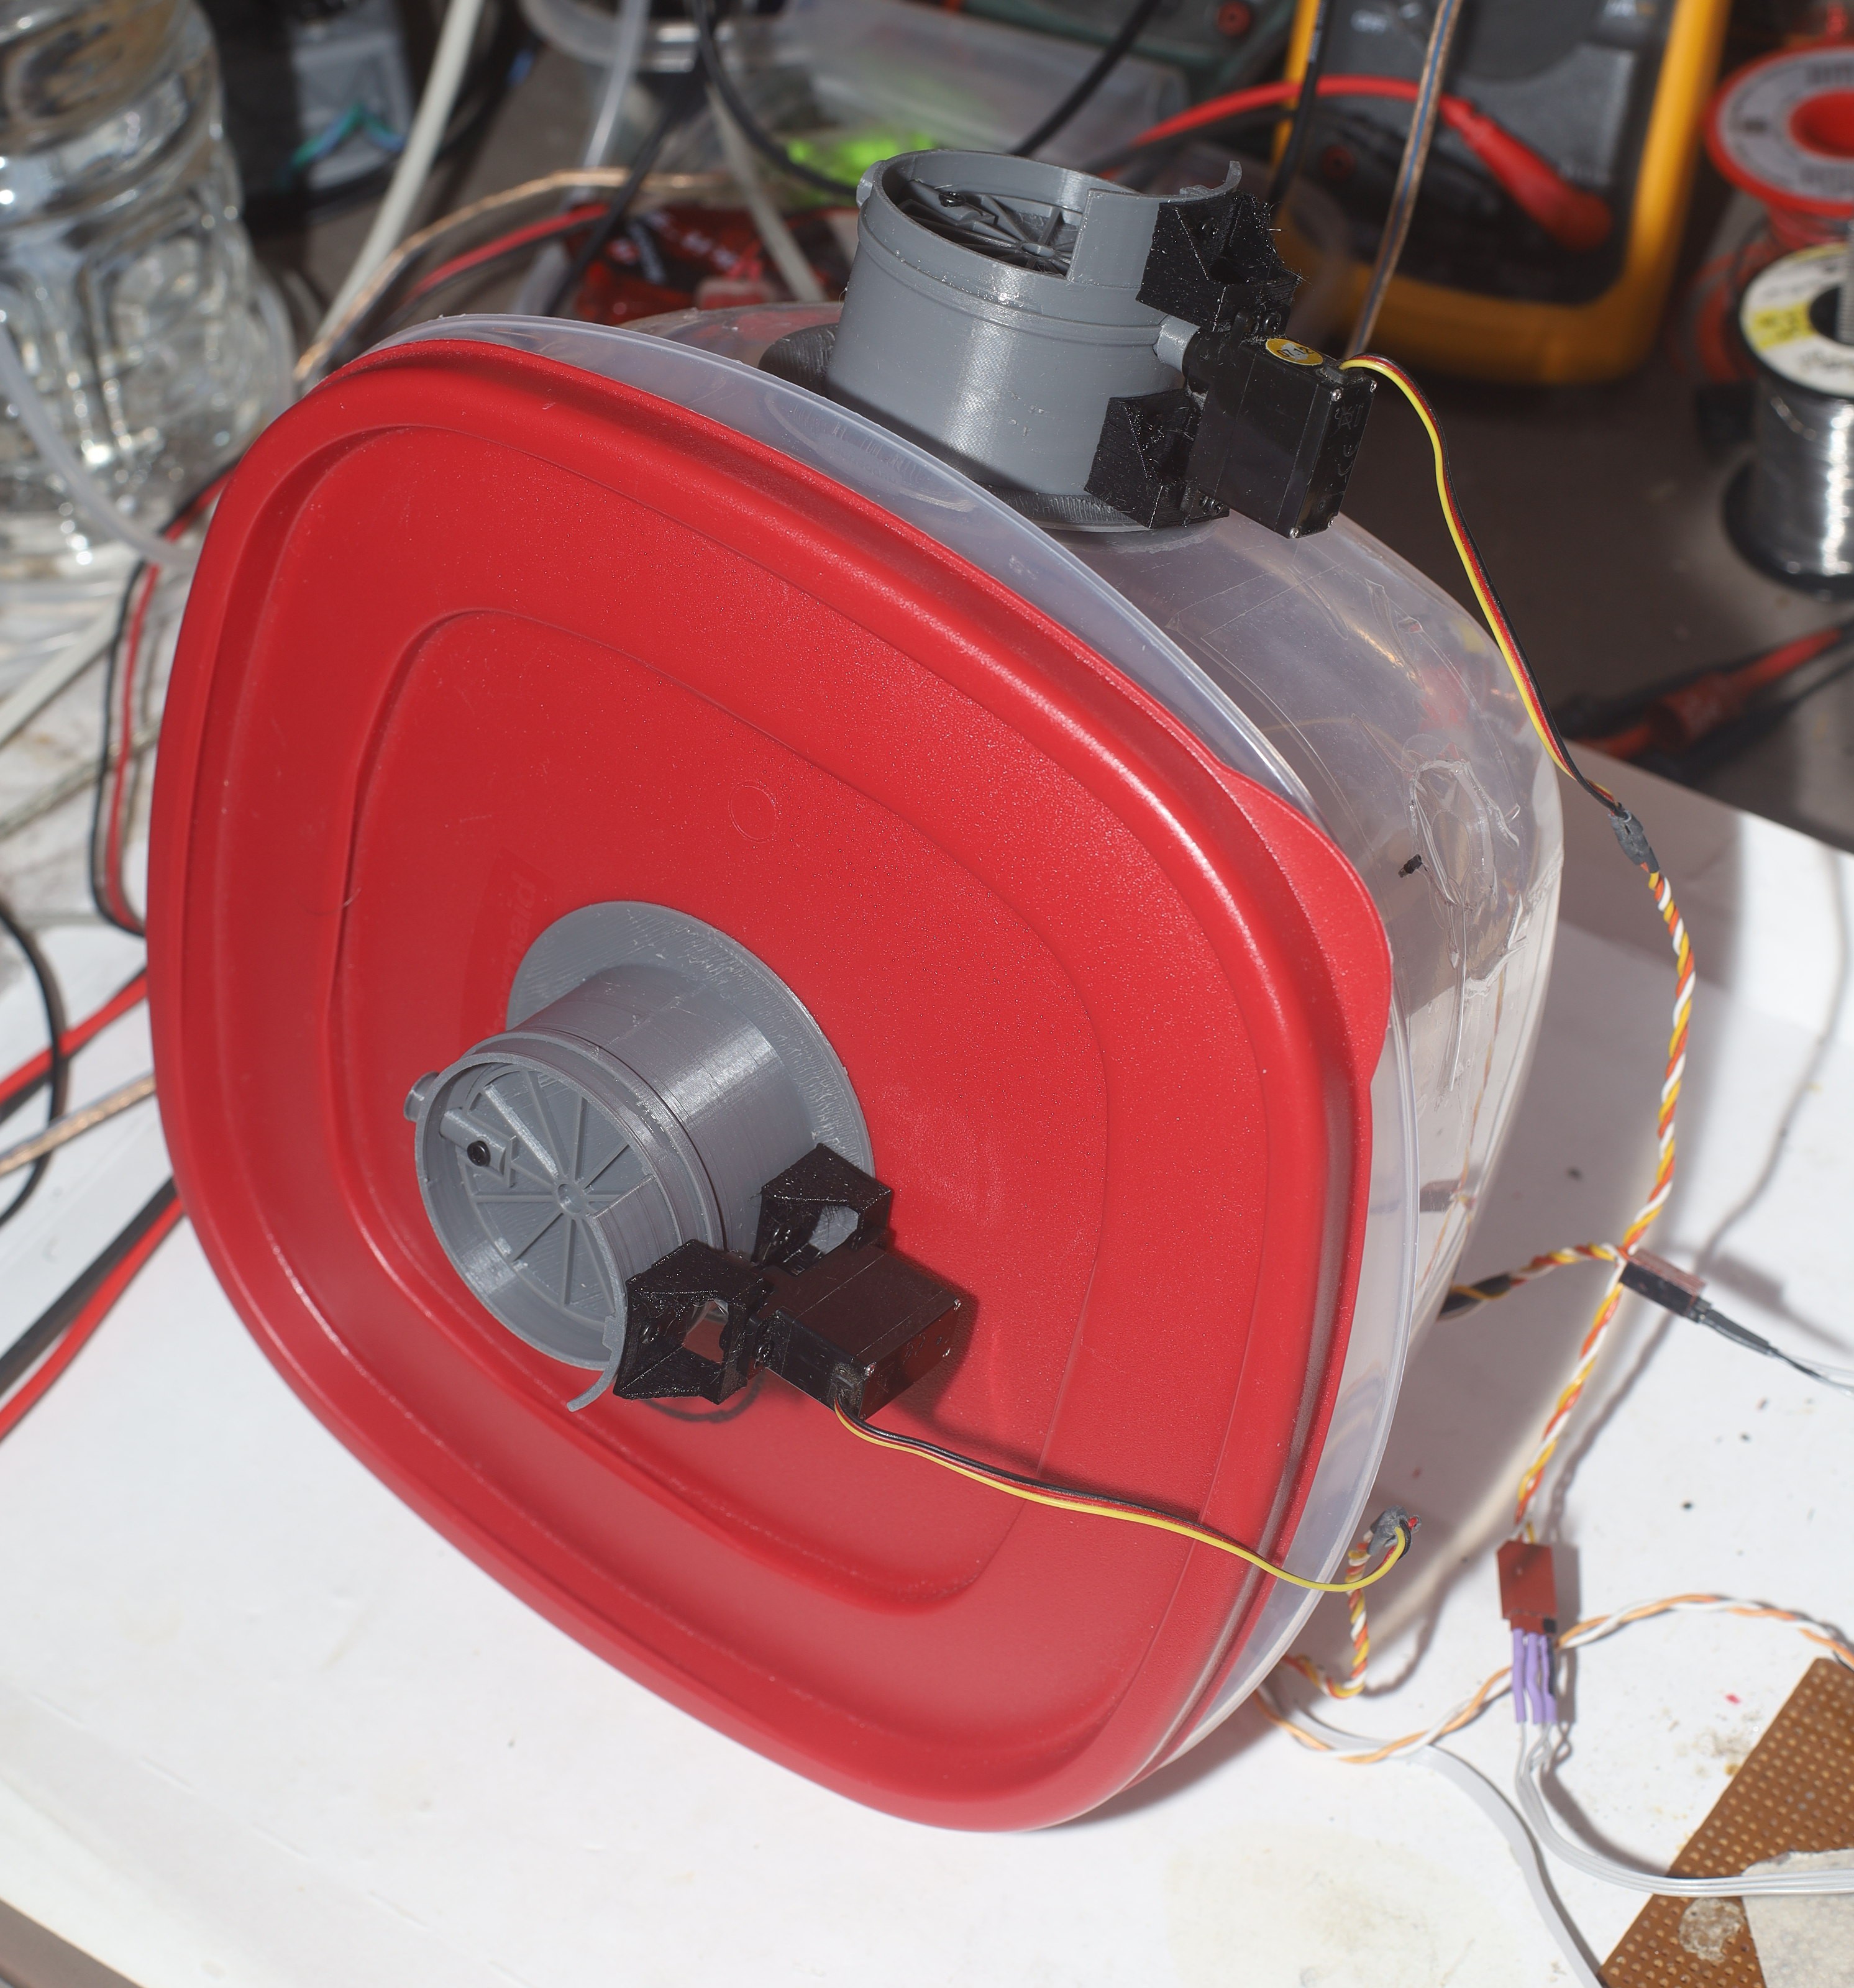
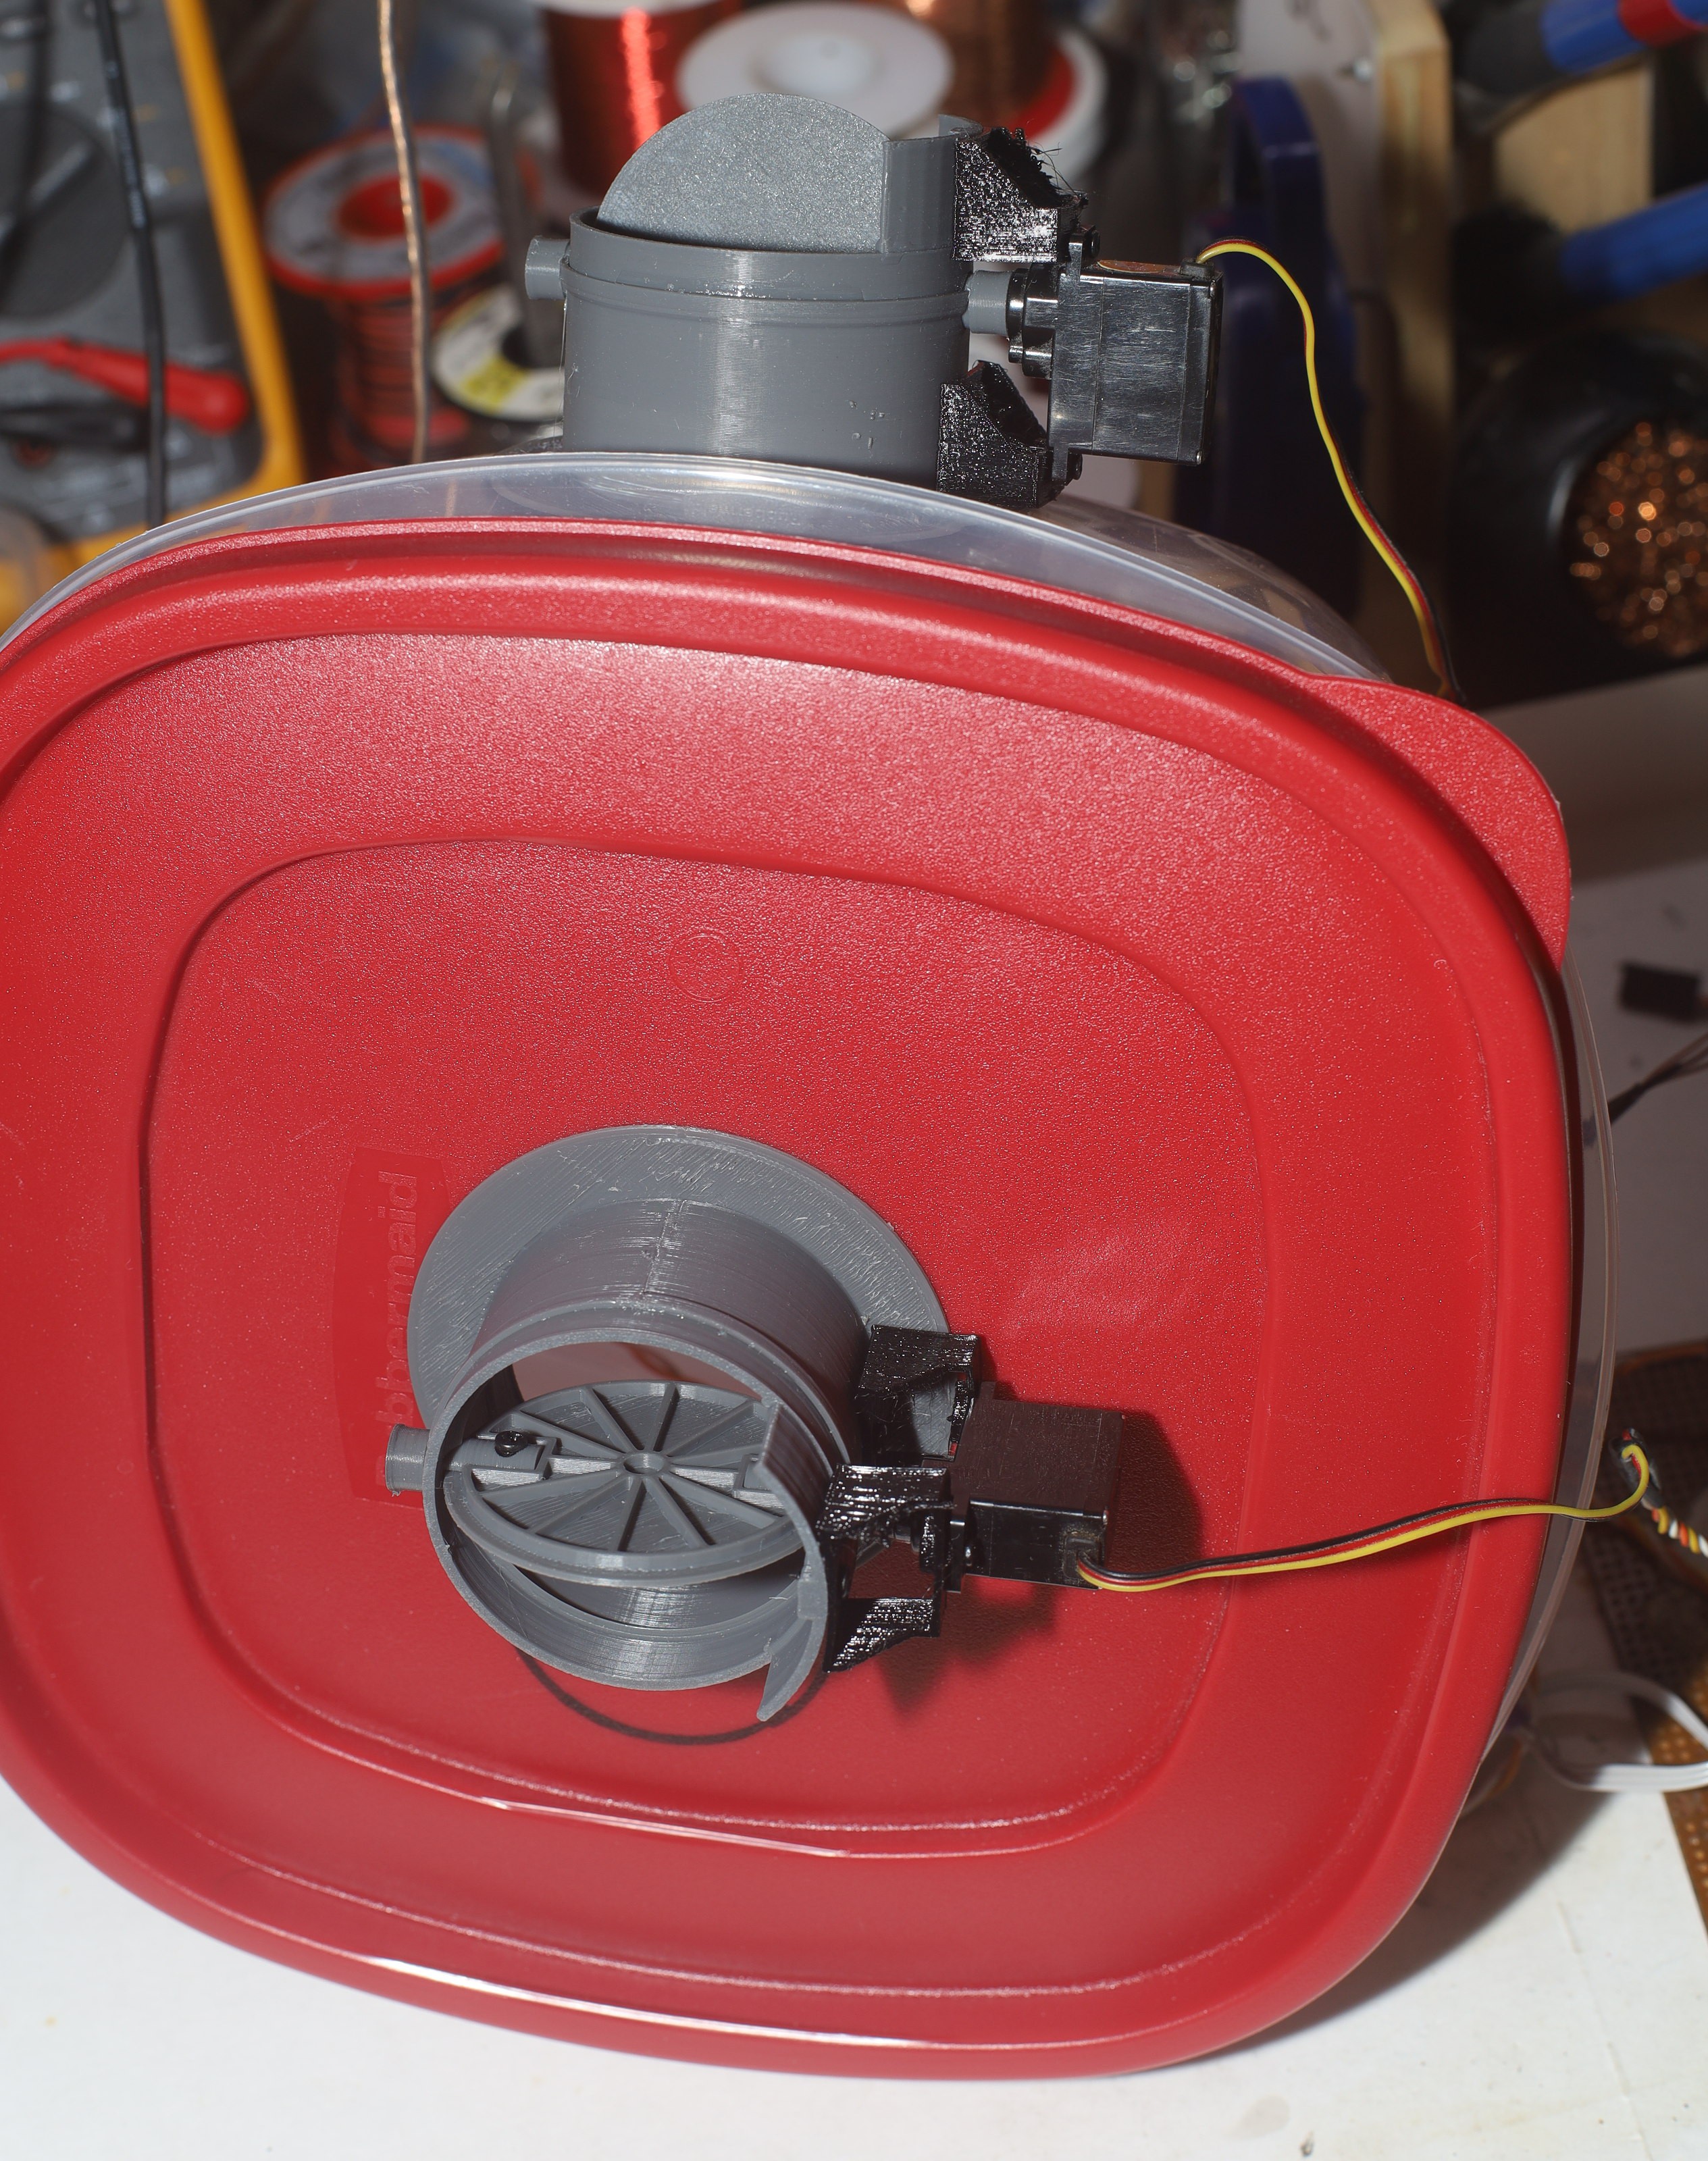
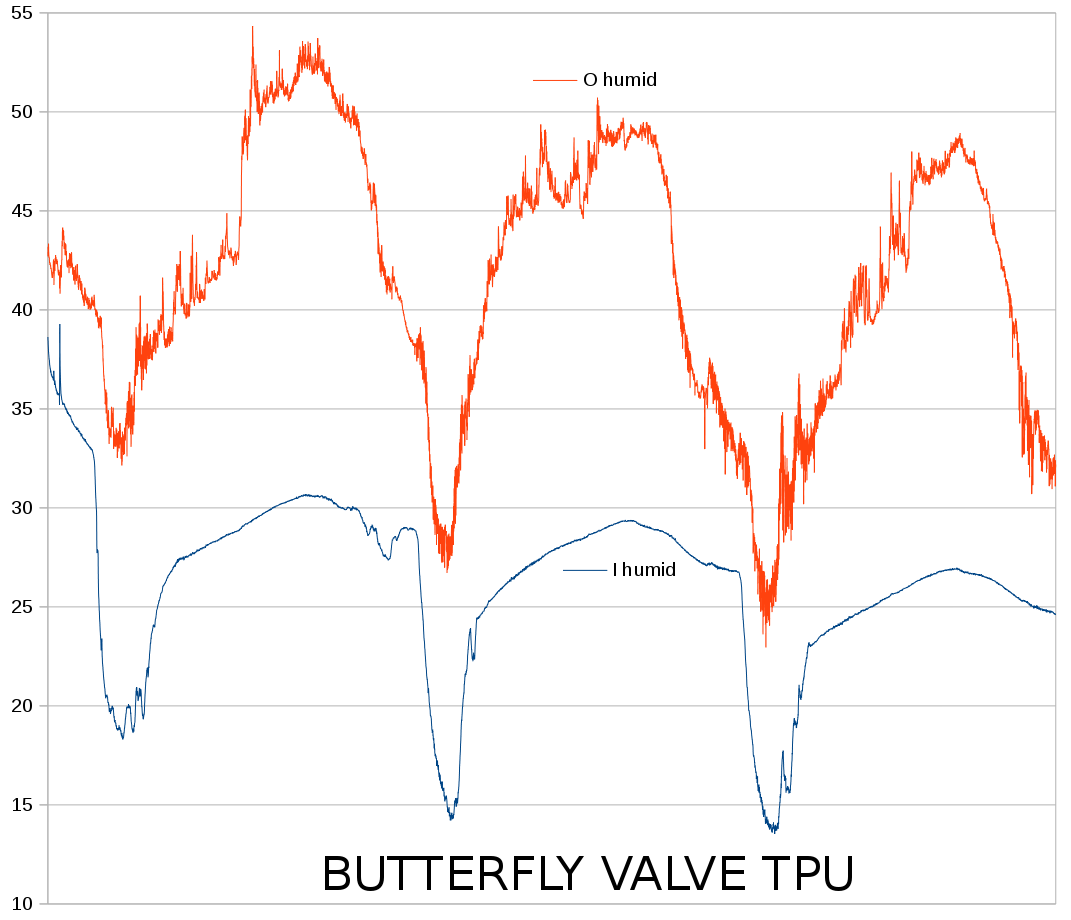
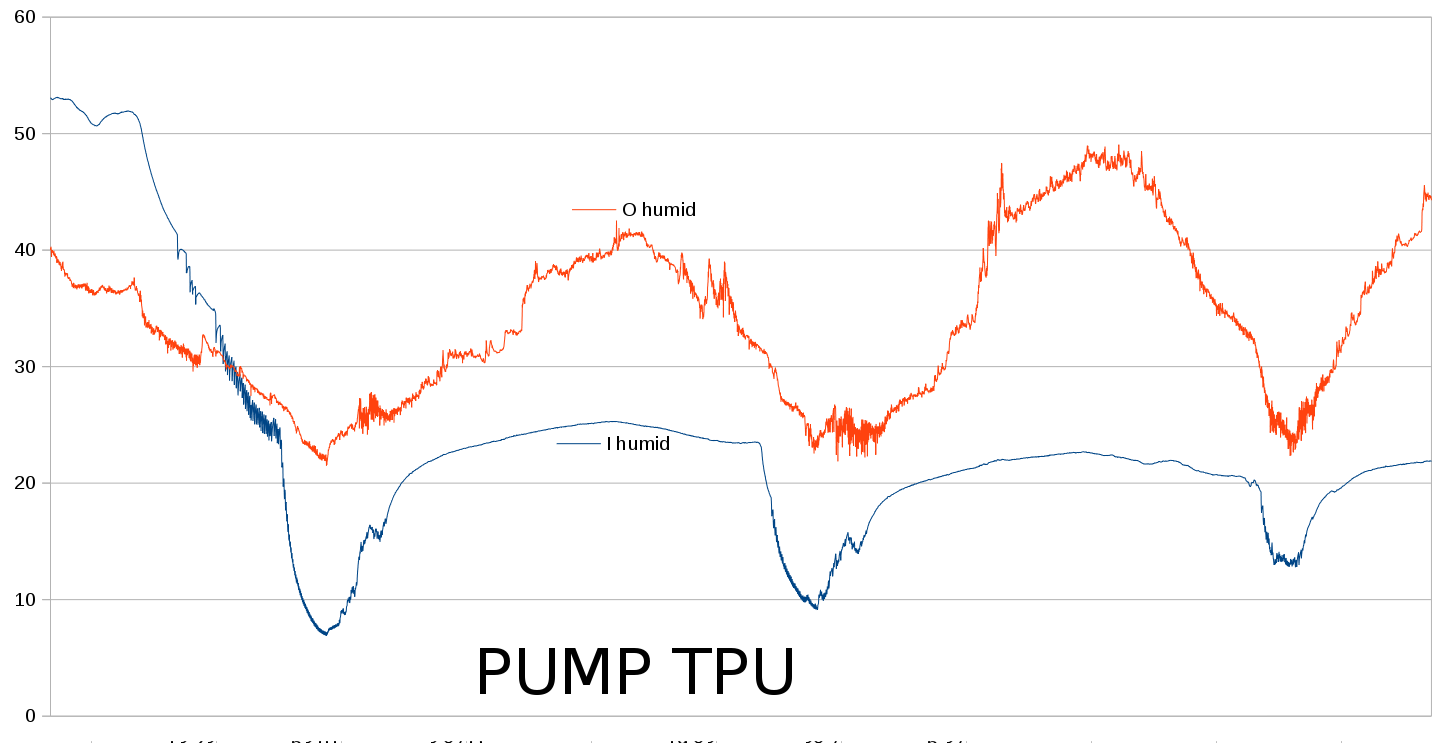
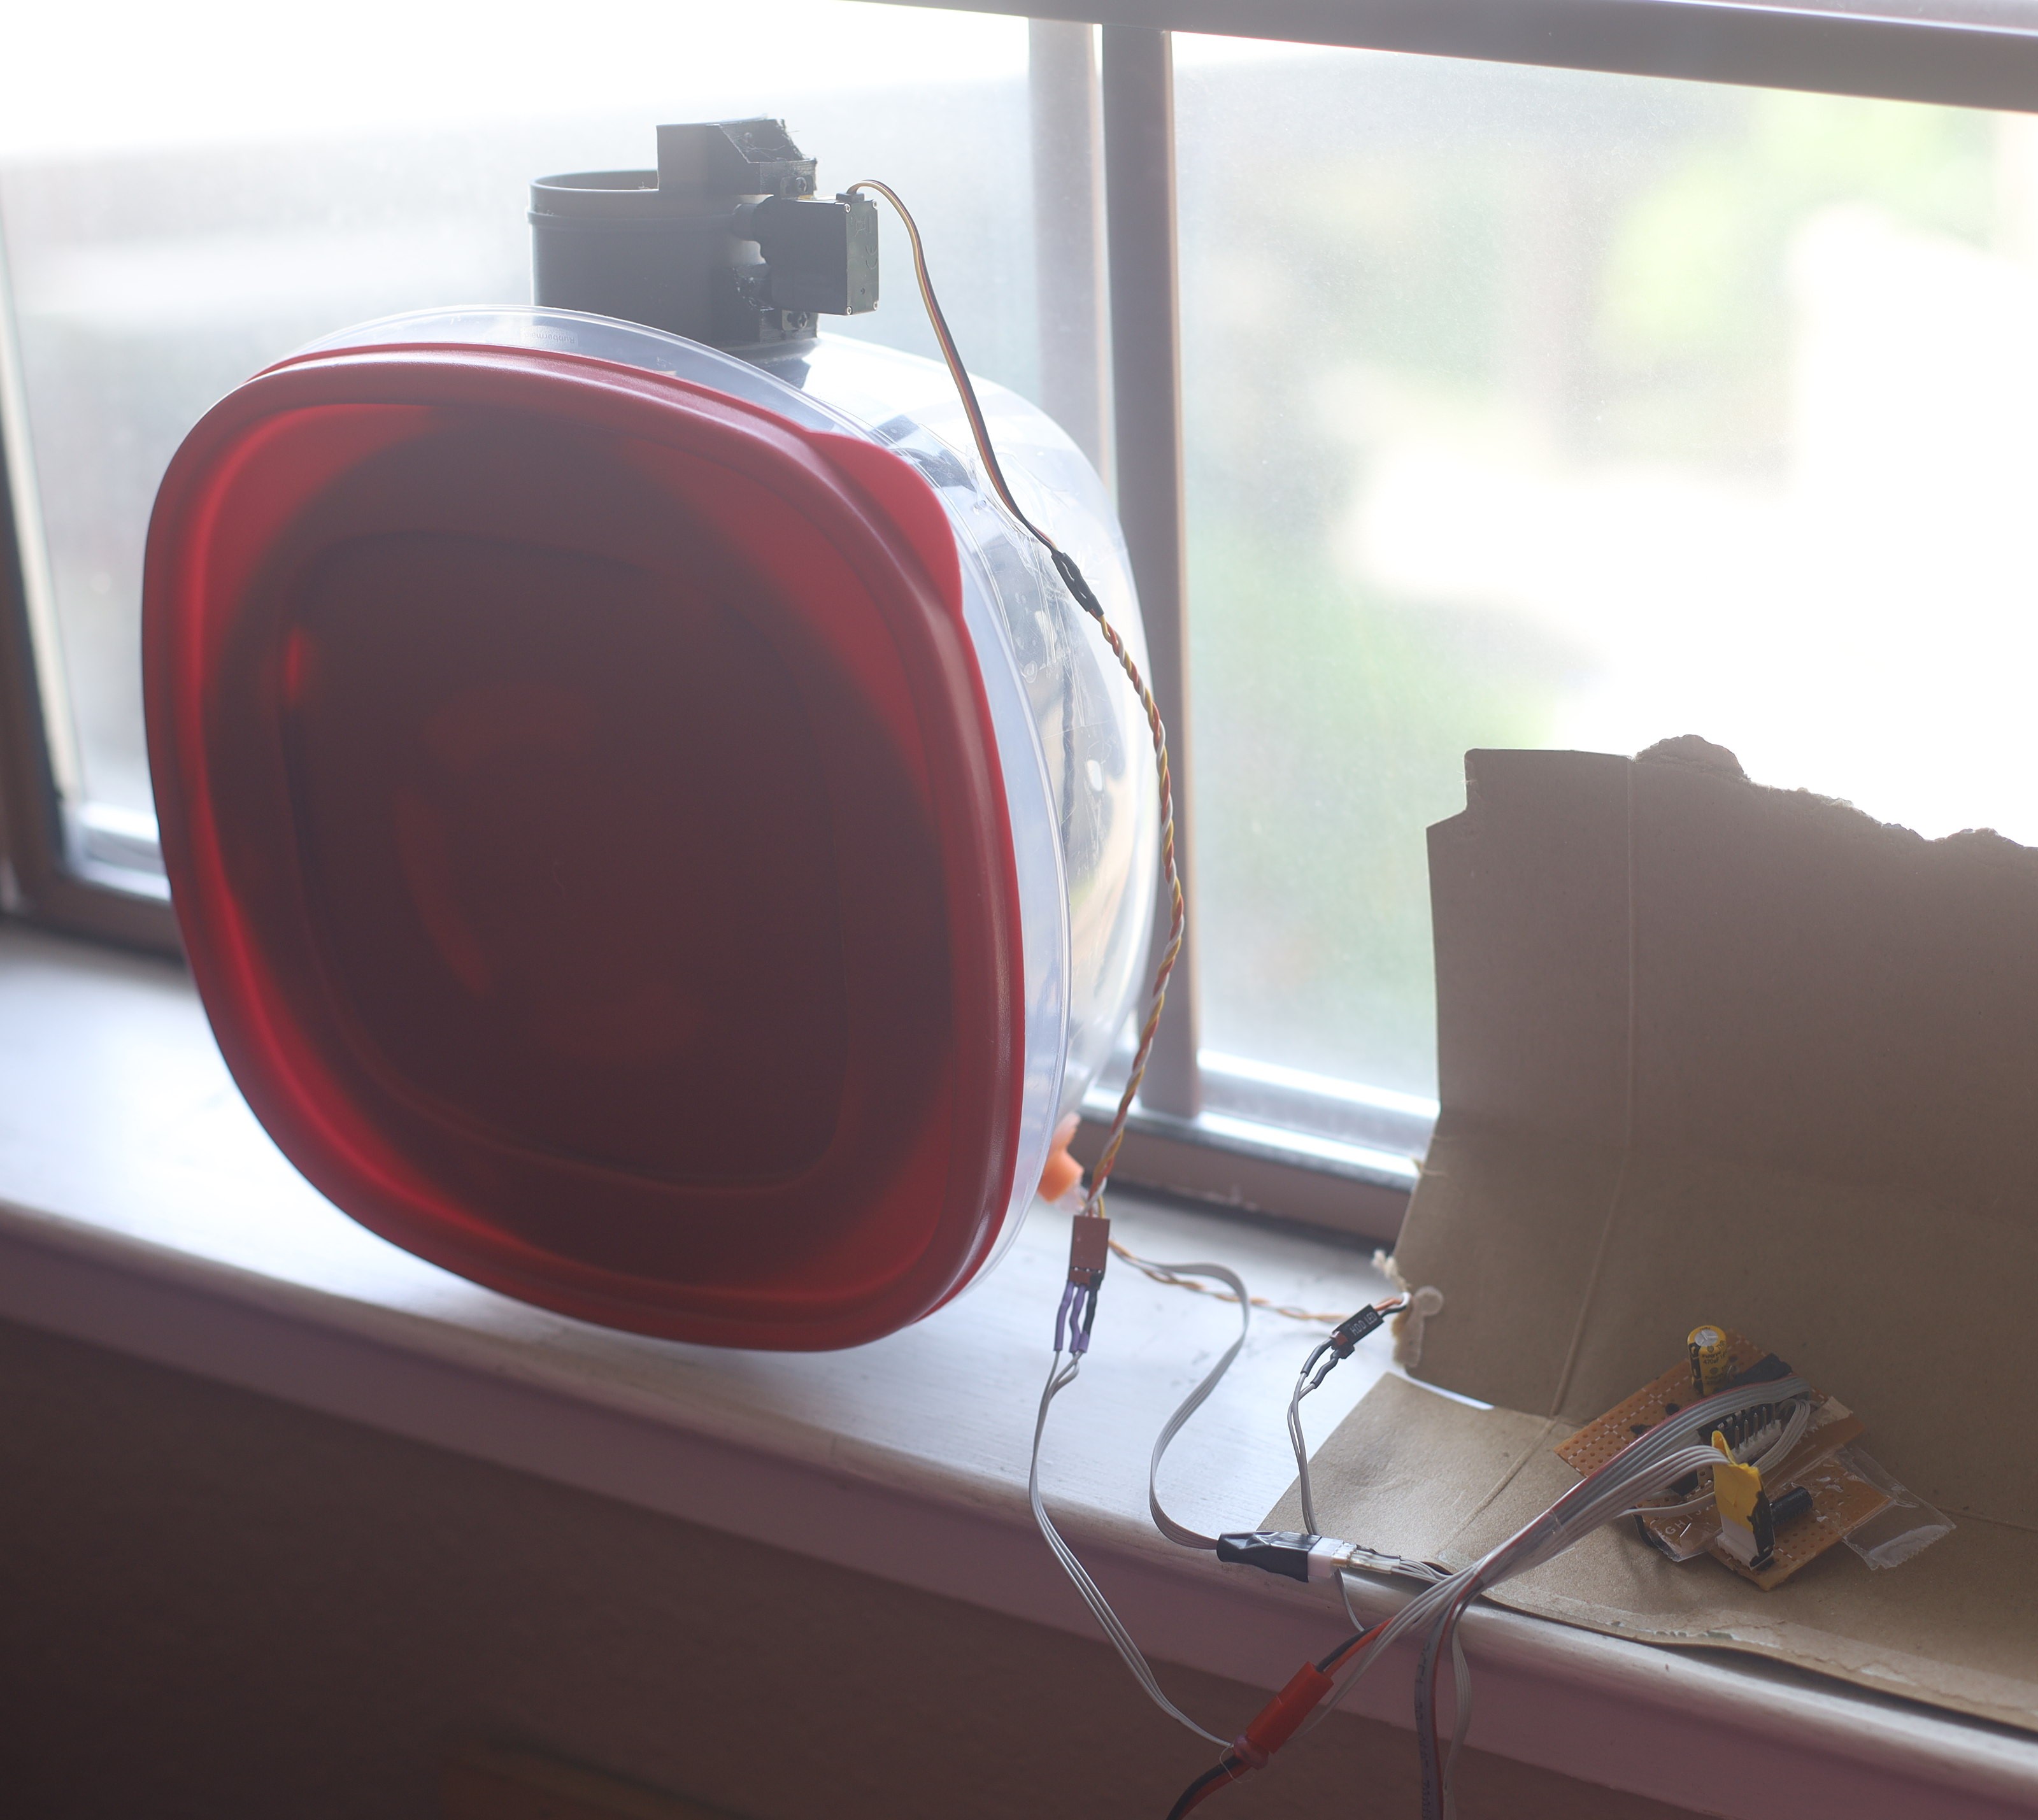
3 weeks with desiccant, TPU, air circulator & no pump gave as good a print as it ever got, from a roll which was wet from the factory.
![]()
![]()
![]()
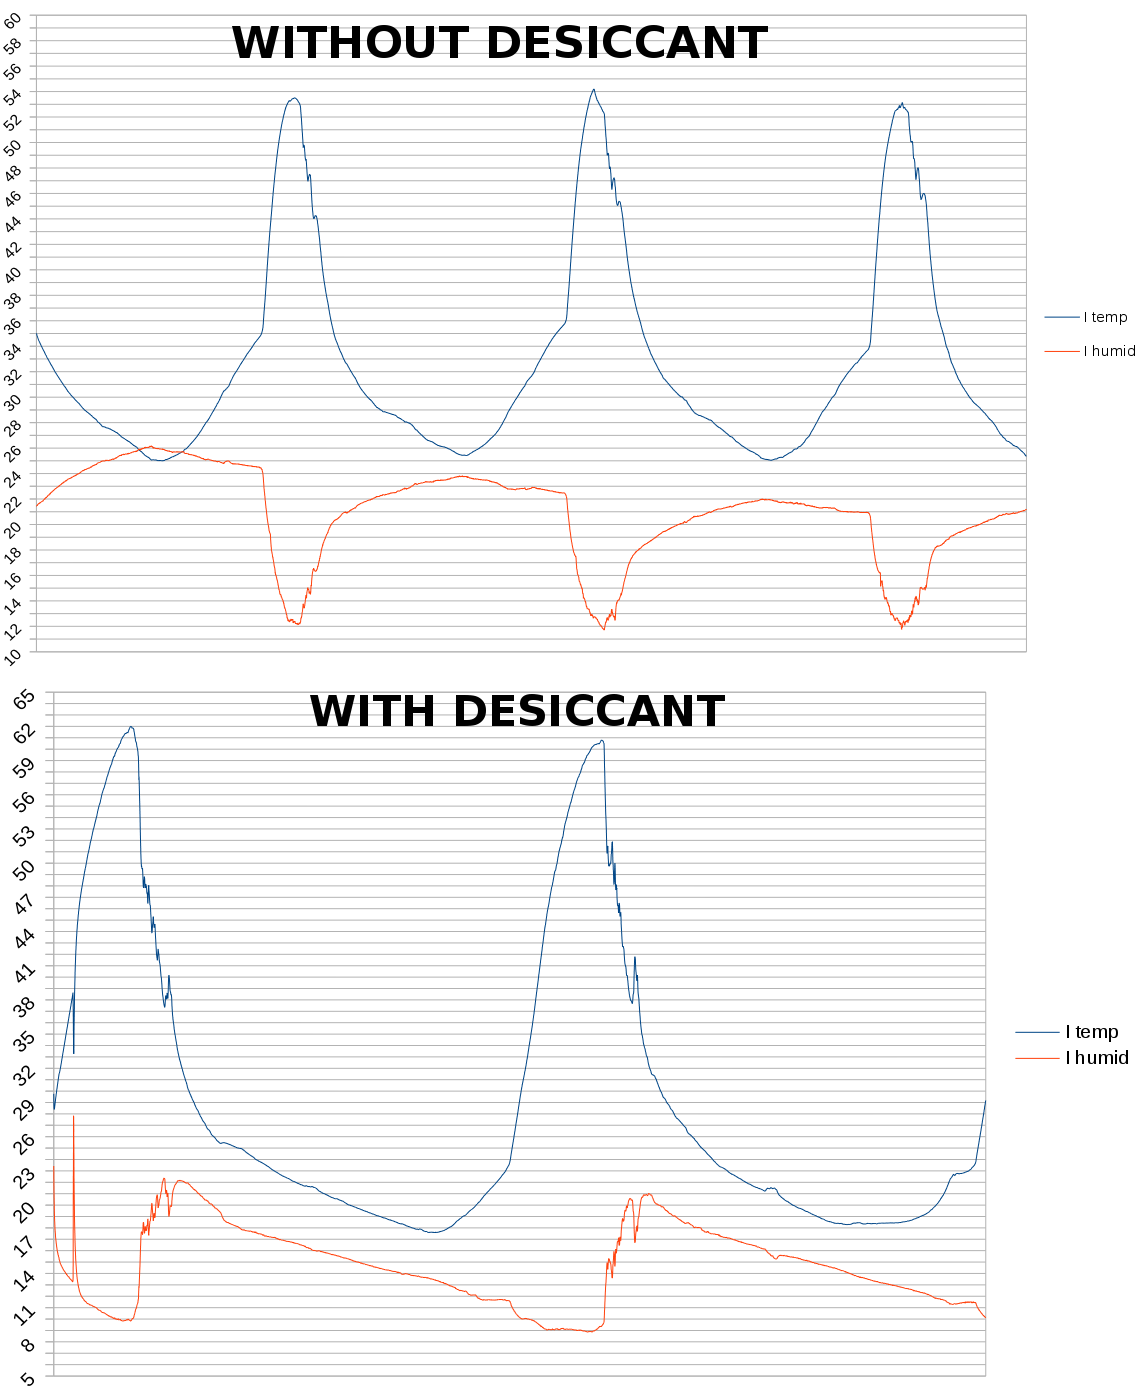
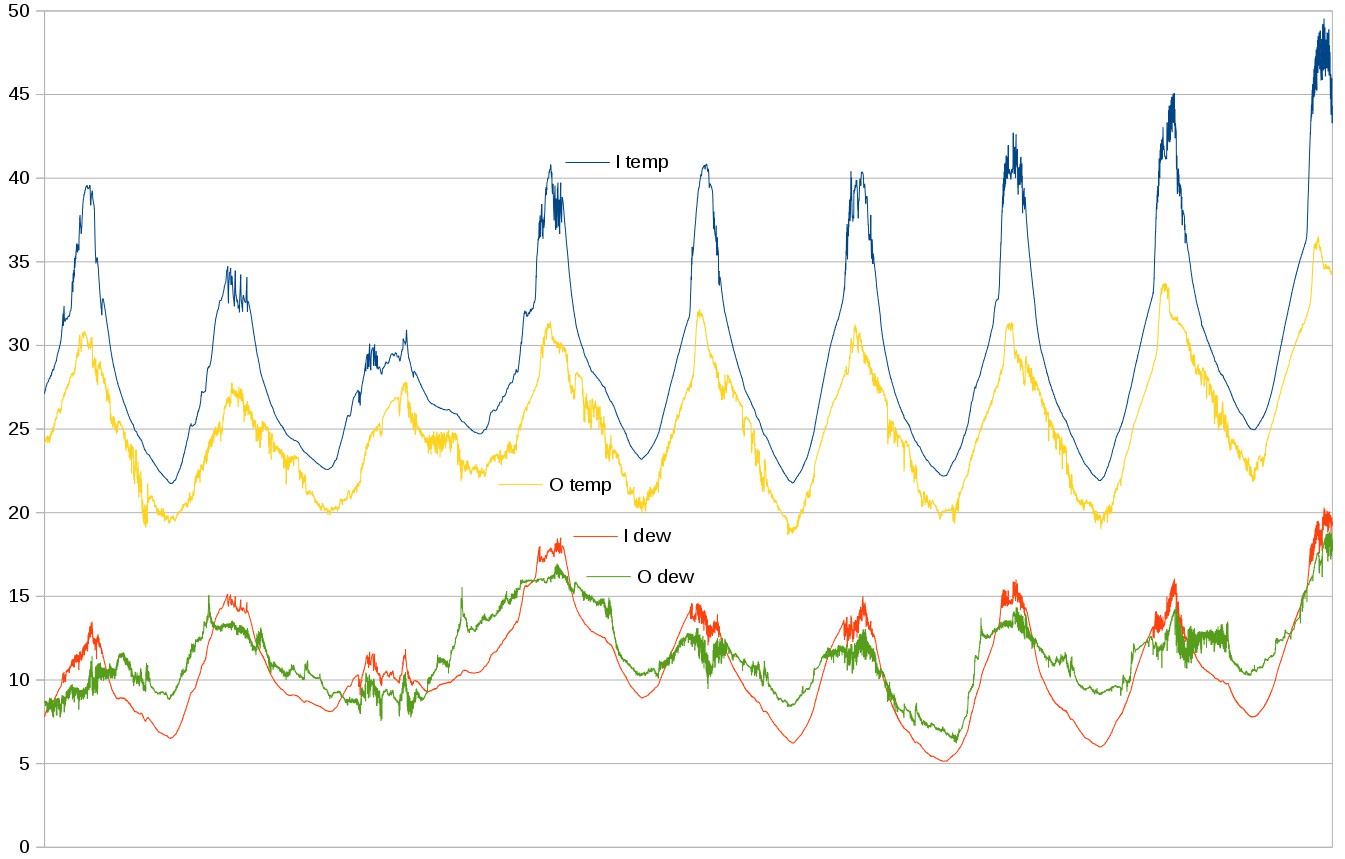
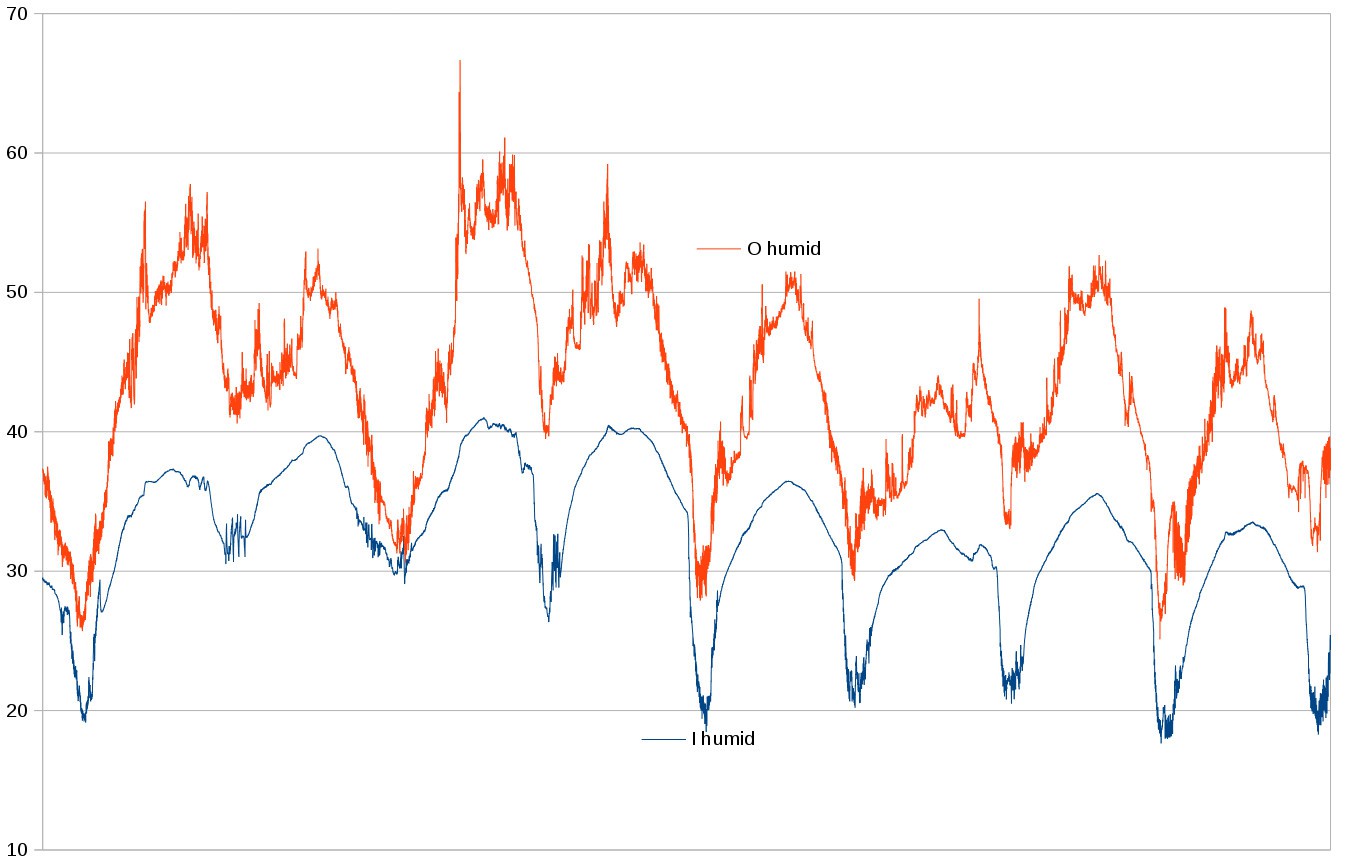
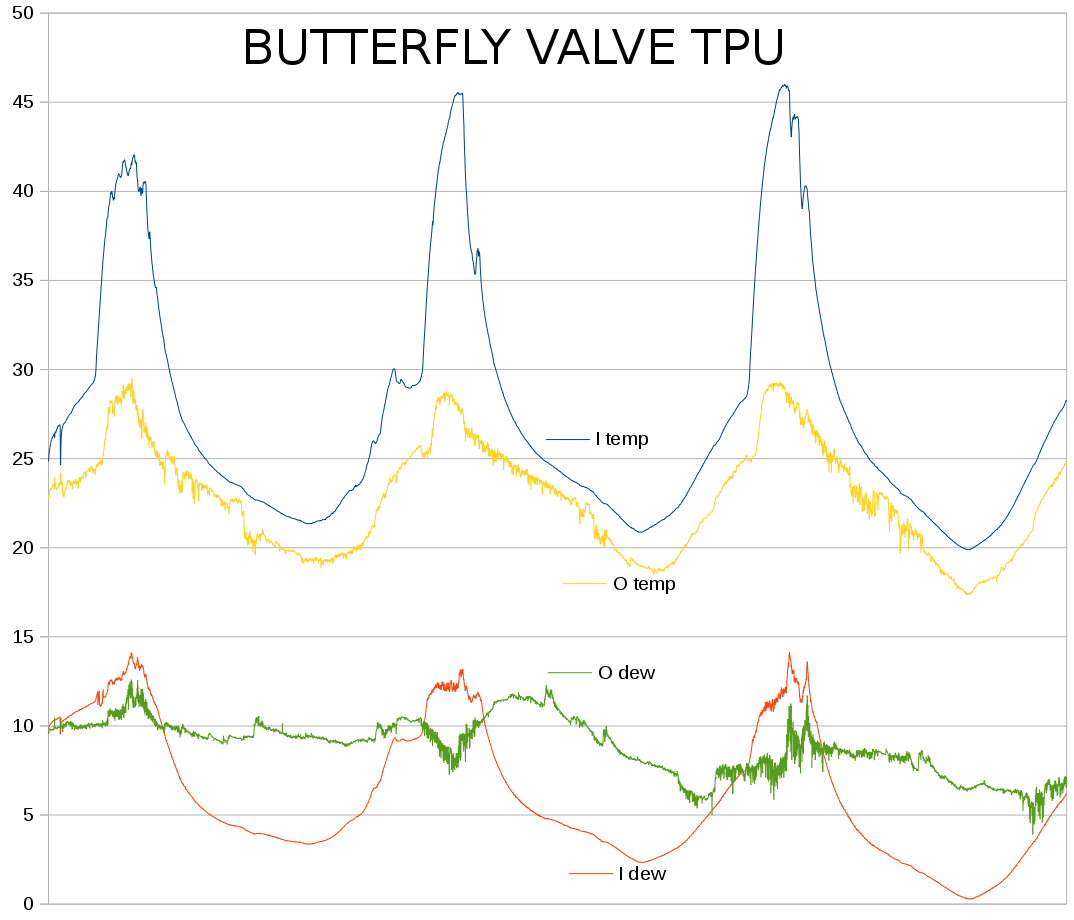
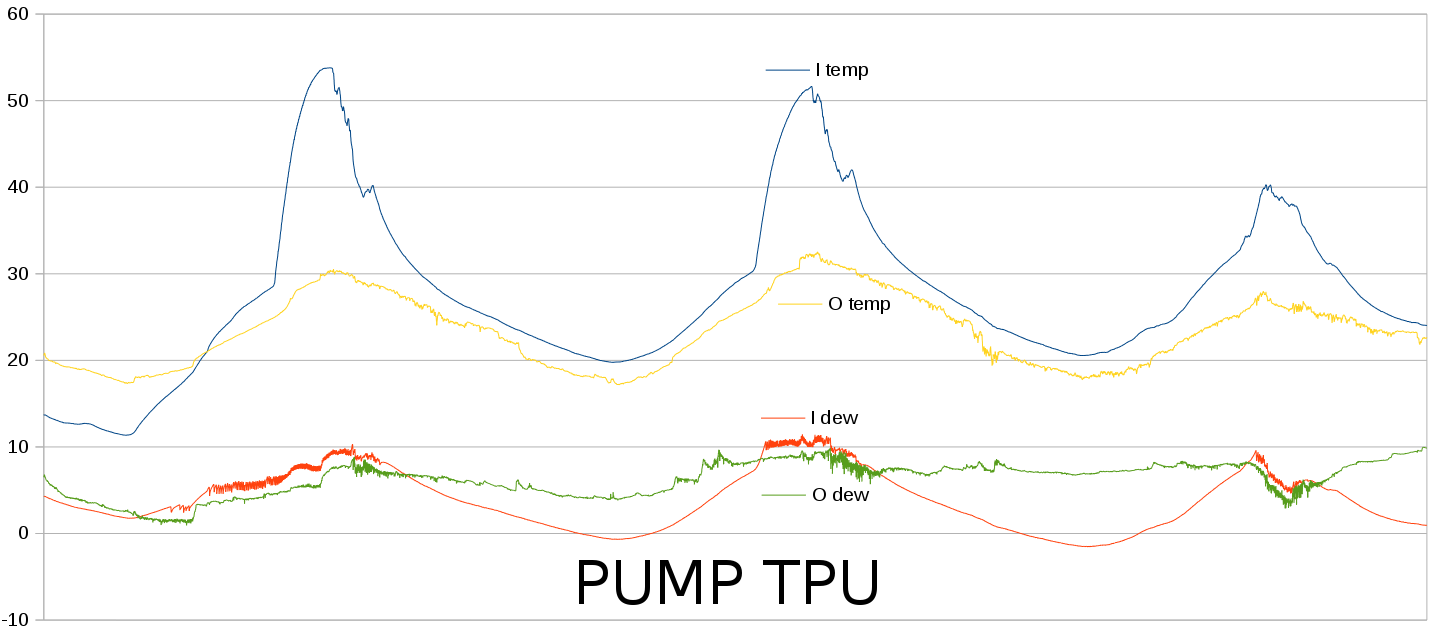
These were entirely different results than the last time the same test was done. Dew point never reached ambient but went way below what it did before. -40C is the standard marketing for desiccants. The calcium chloride didn't saturate. There were a few rainy days.
The most likely reason for the same test giving improved results is a different bag of desiccant being used or the air being completely sealed when it wasn't before.
The winner so far is an air tight container with circulation fan & desiccant. Maybe sunlight accelerates the drying. There's no way to dry the filament through heat alone & replacing air at opportune times. Maybe a solar powered peltier cooler could be a perpetual desiccant if only lions had the money. There's no need for any sensors except for logging data.
![]()
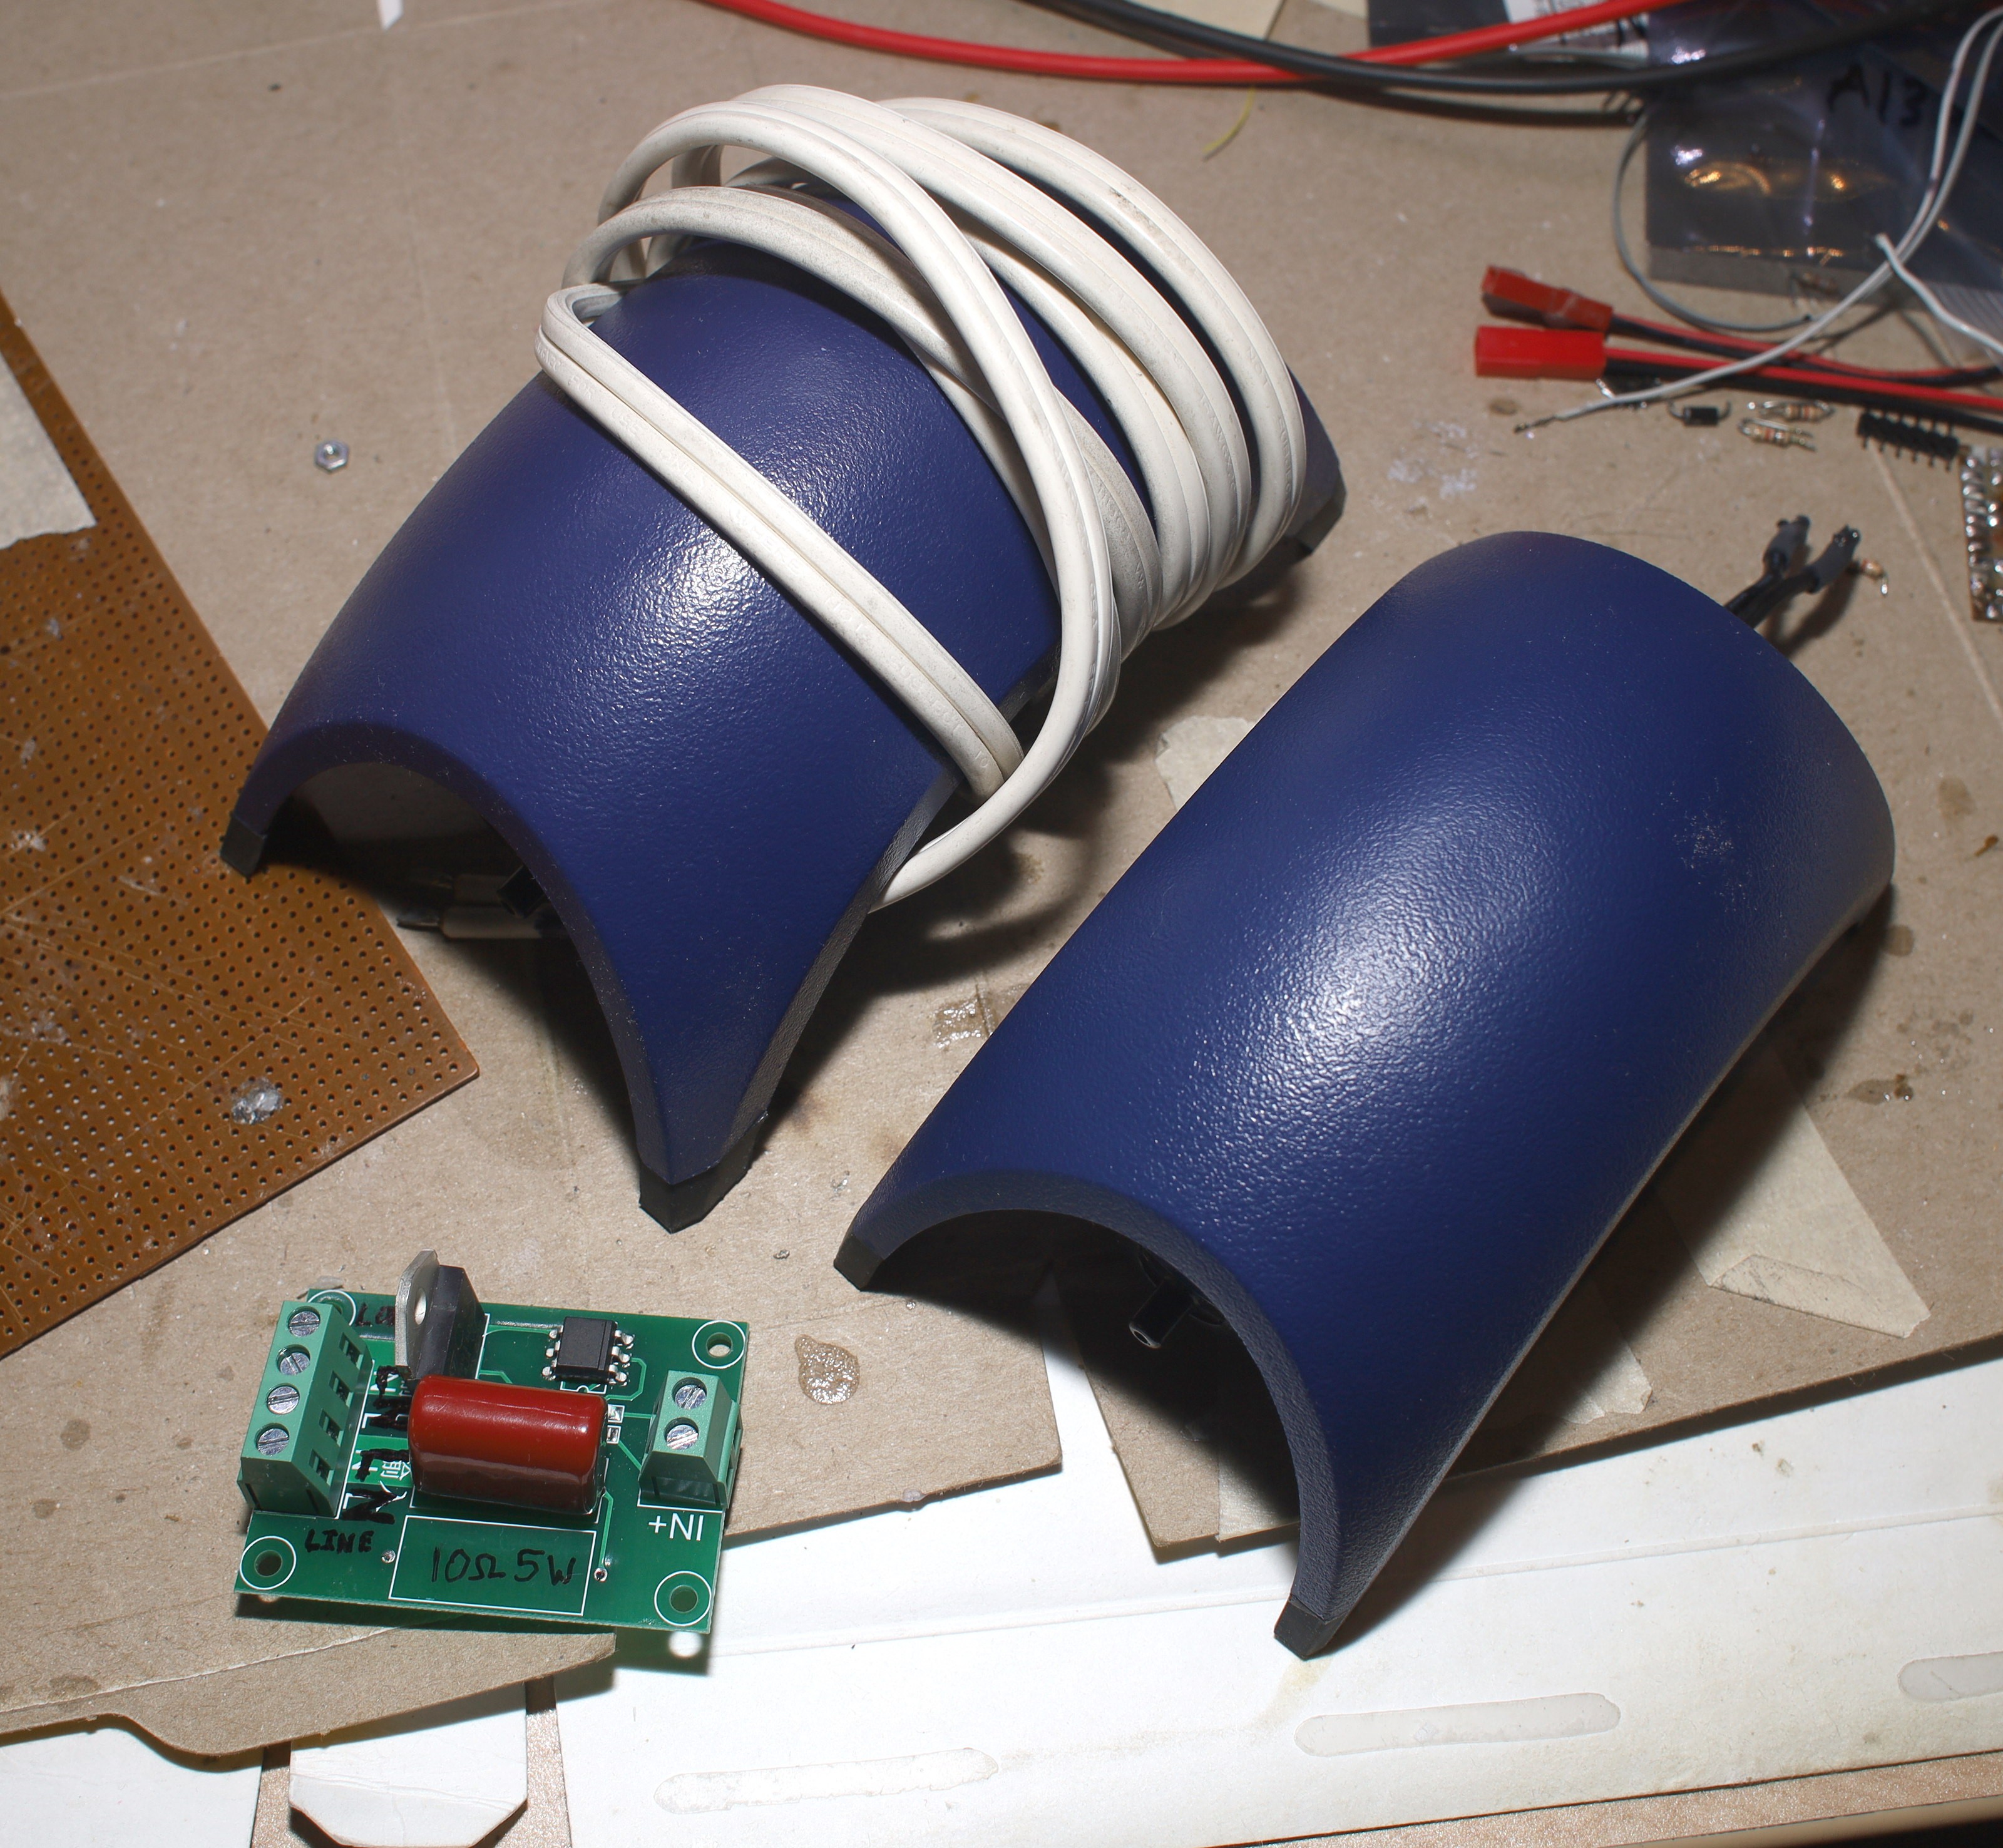
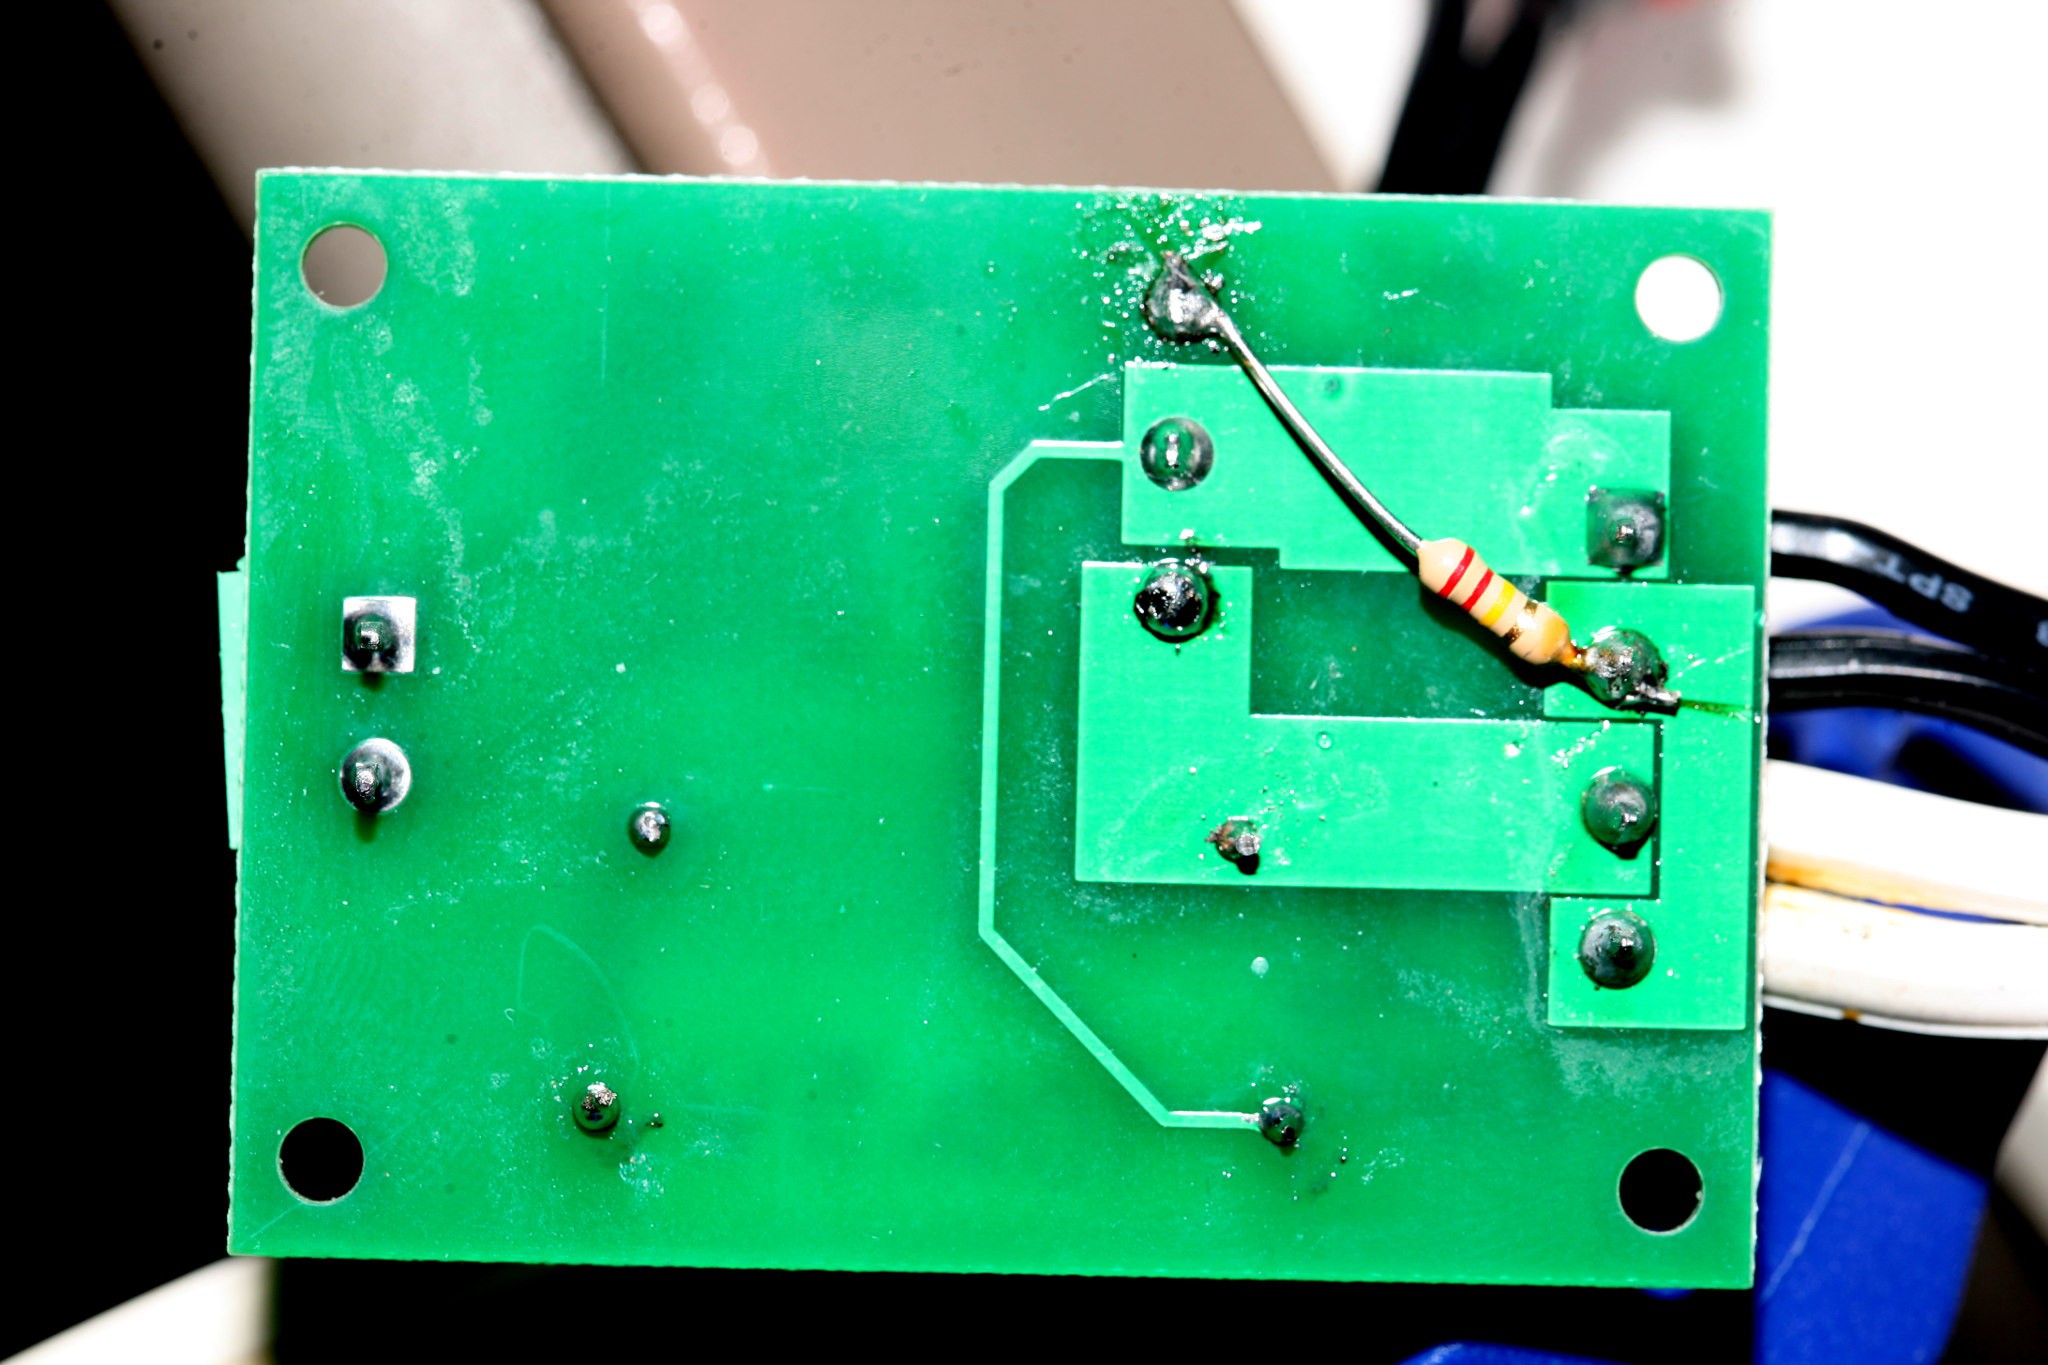
Thus 2 aquarium pumps & a triac join the scrap heap. That triac board never failed after it was hacked.
-
Desiccant + air pump + TPU
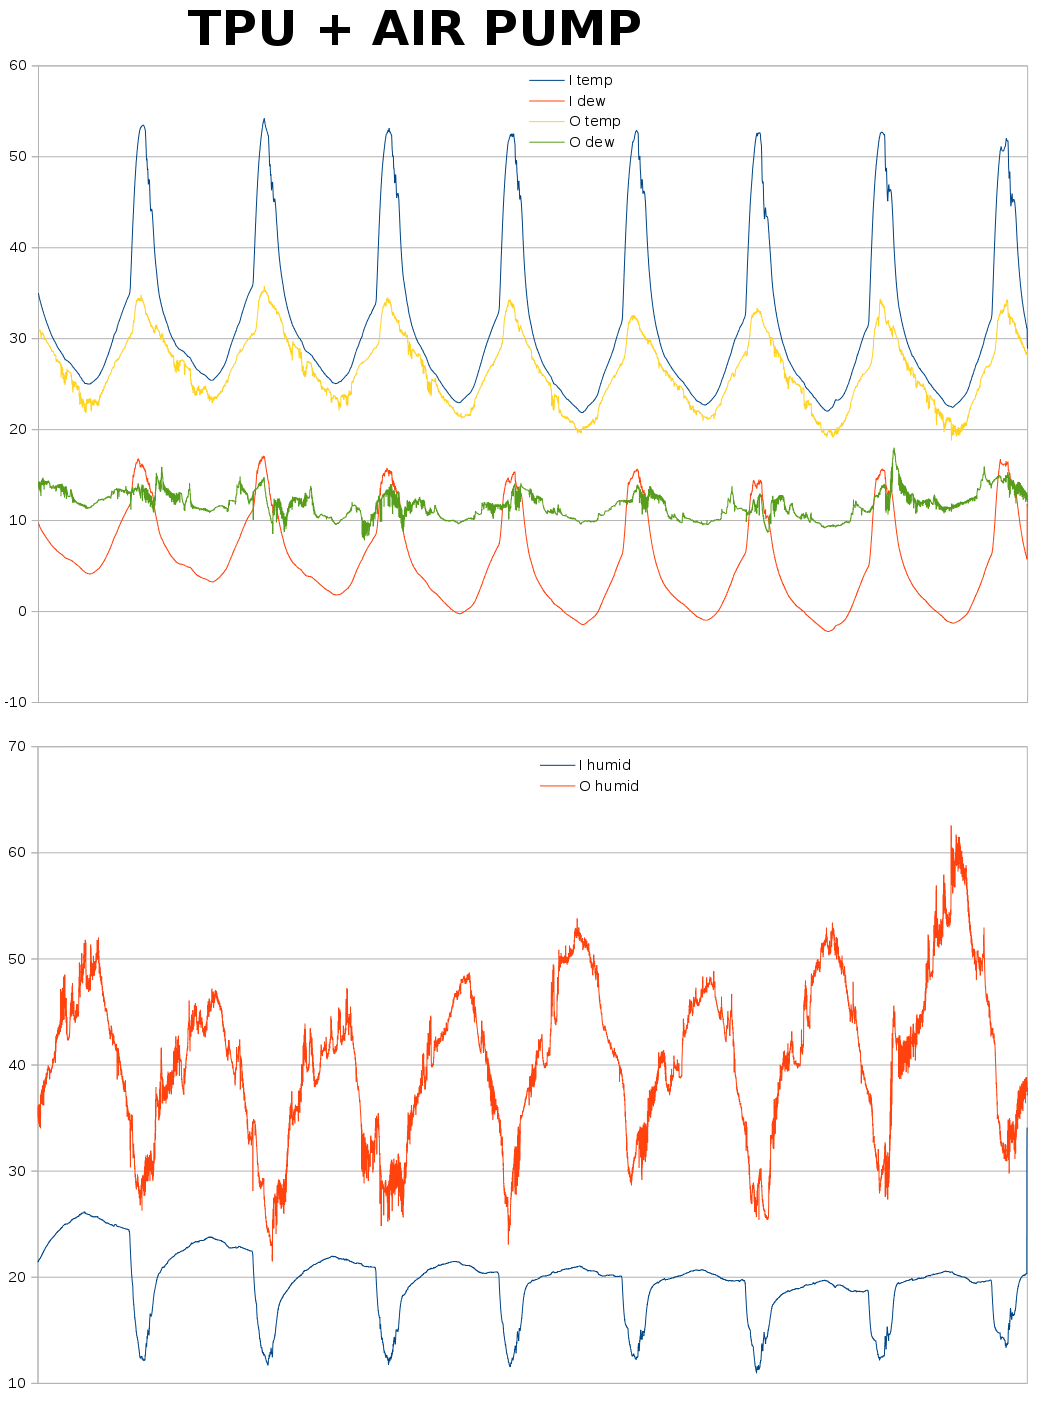
10/04/2022 at 19:30 • 0 commentsNoted humidity with desiccant falling at night & rising by day. Without desiccant, humidity fell by day & rose at night. Also, the desiccant wasn't getting saturated.
![]()
What's probably happening is the desiccant absorbing water at night & releasing it by day. There's a net transfer of water out of the filament into a baseline desiccant saturation, but it might be more efficient to run the air pump during the day to reduce the dew point to ambient levels & have the circulator fan run constantly. It might be more efficient to use silica gel instead of calcium chloride.
The desiccant does solve a key flaw in that the filament previously absorbed water at night. It's believed the water has more affinity for desiccant at night than filament, hence why humidity is falling at night.
Recharging the desiccant in cold air & discharging the desiccant in hot air is how commercial dehumidifiers work. We're just doing it over time, with sunlight as the source of heat.
![]()
![]()
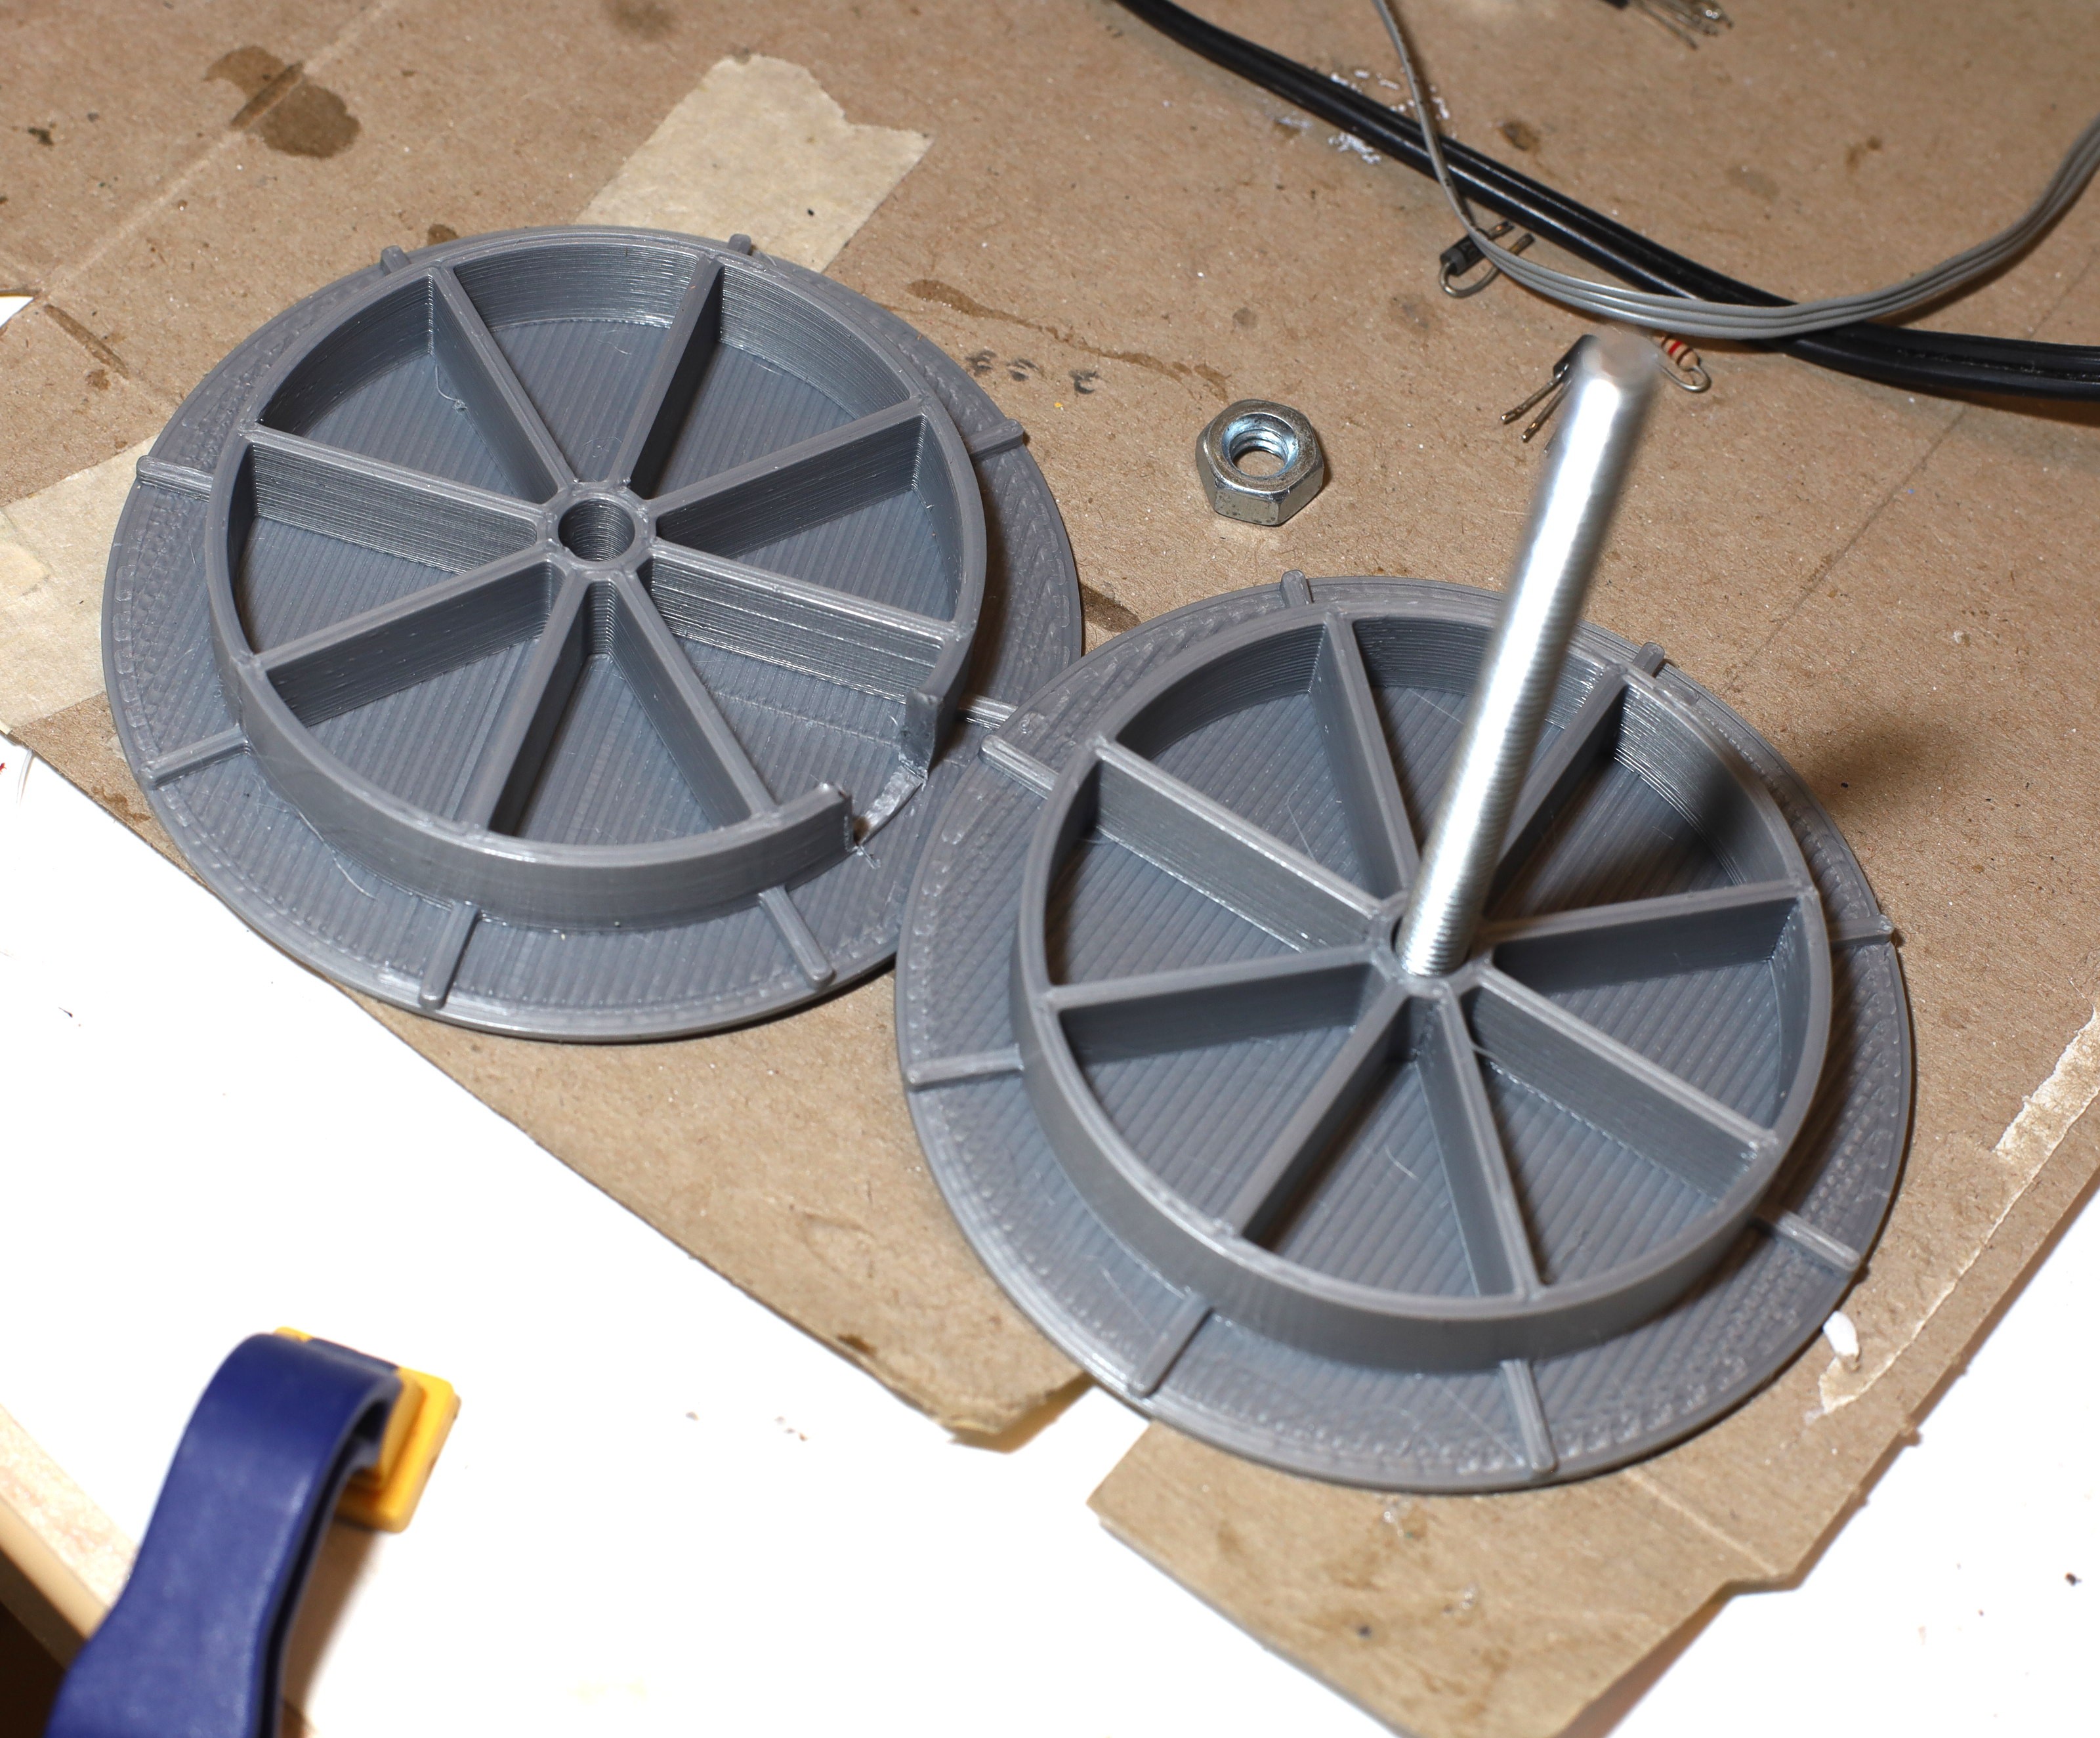
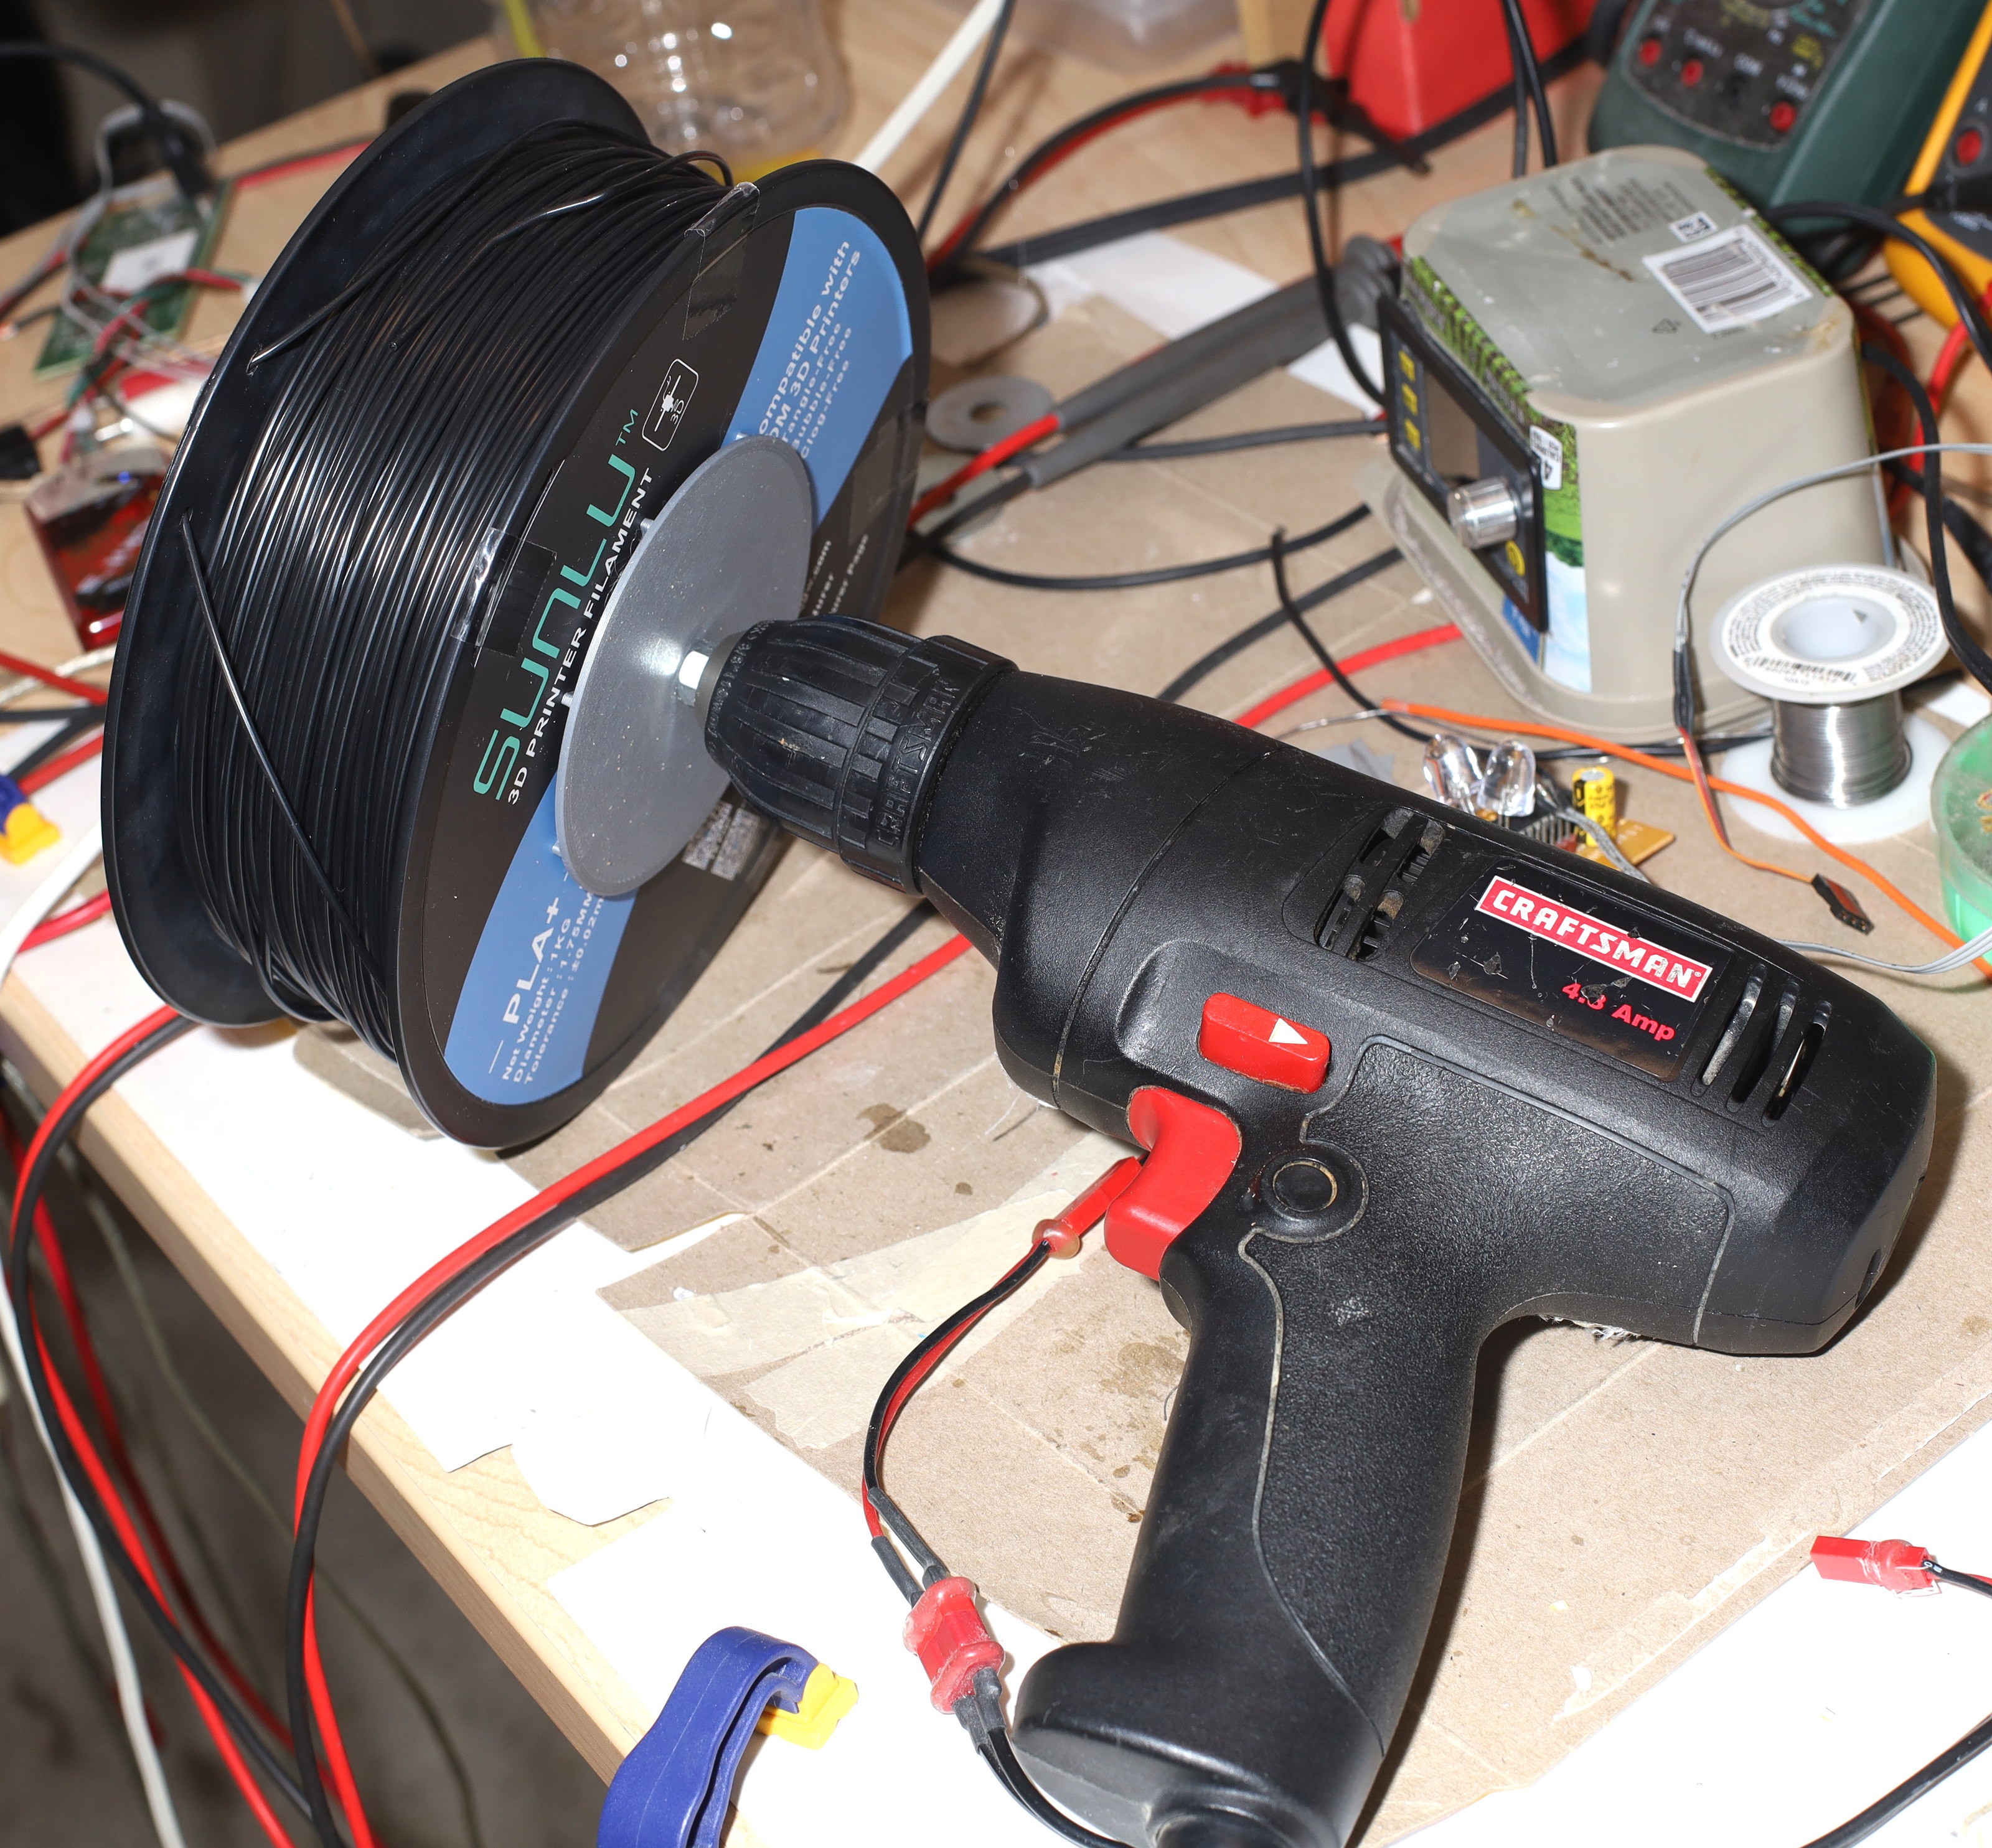
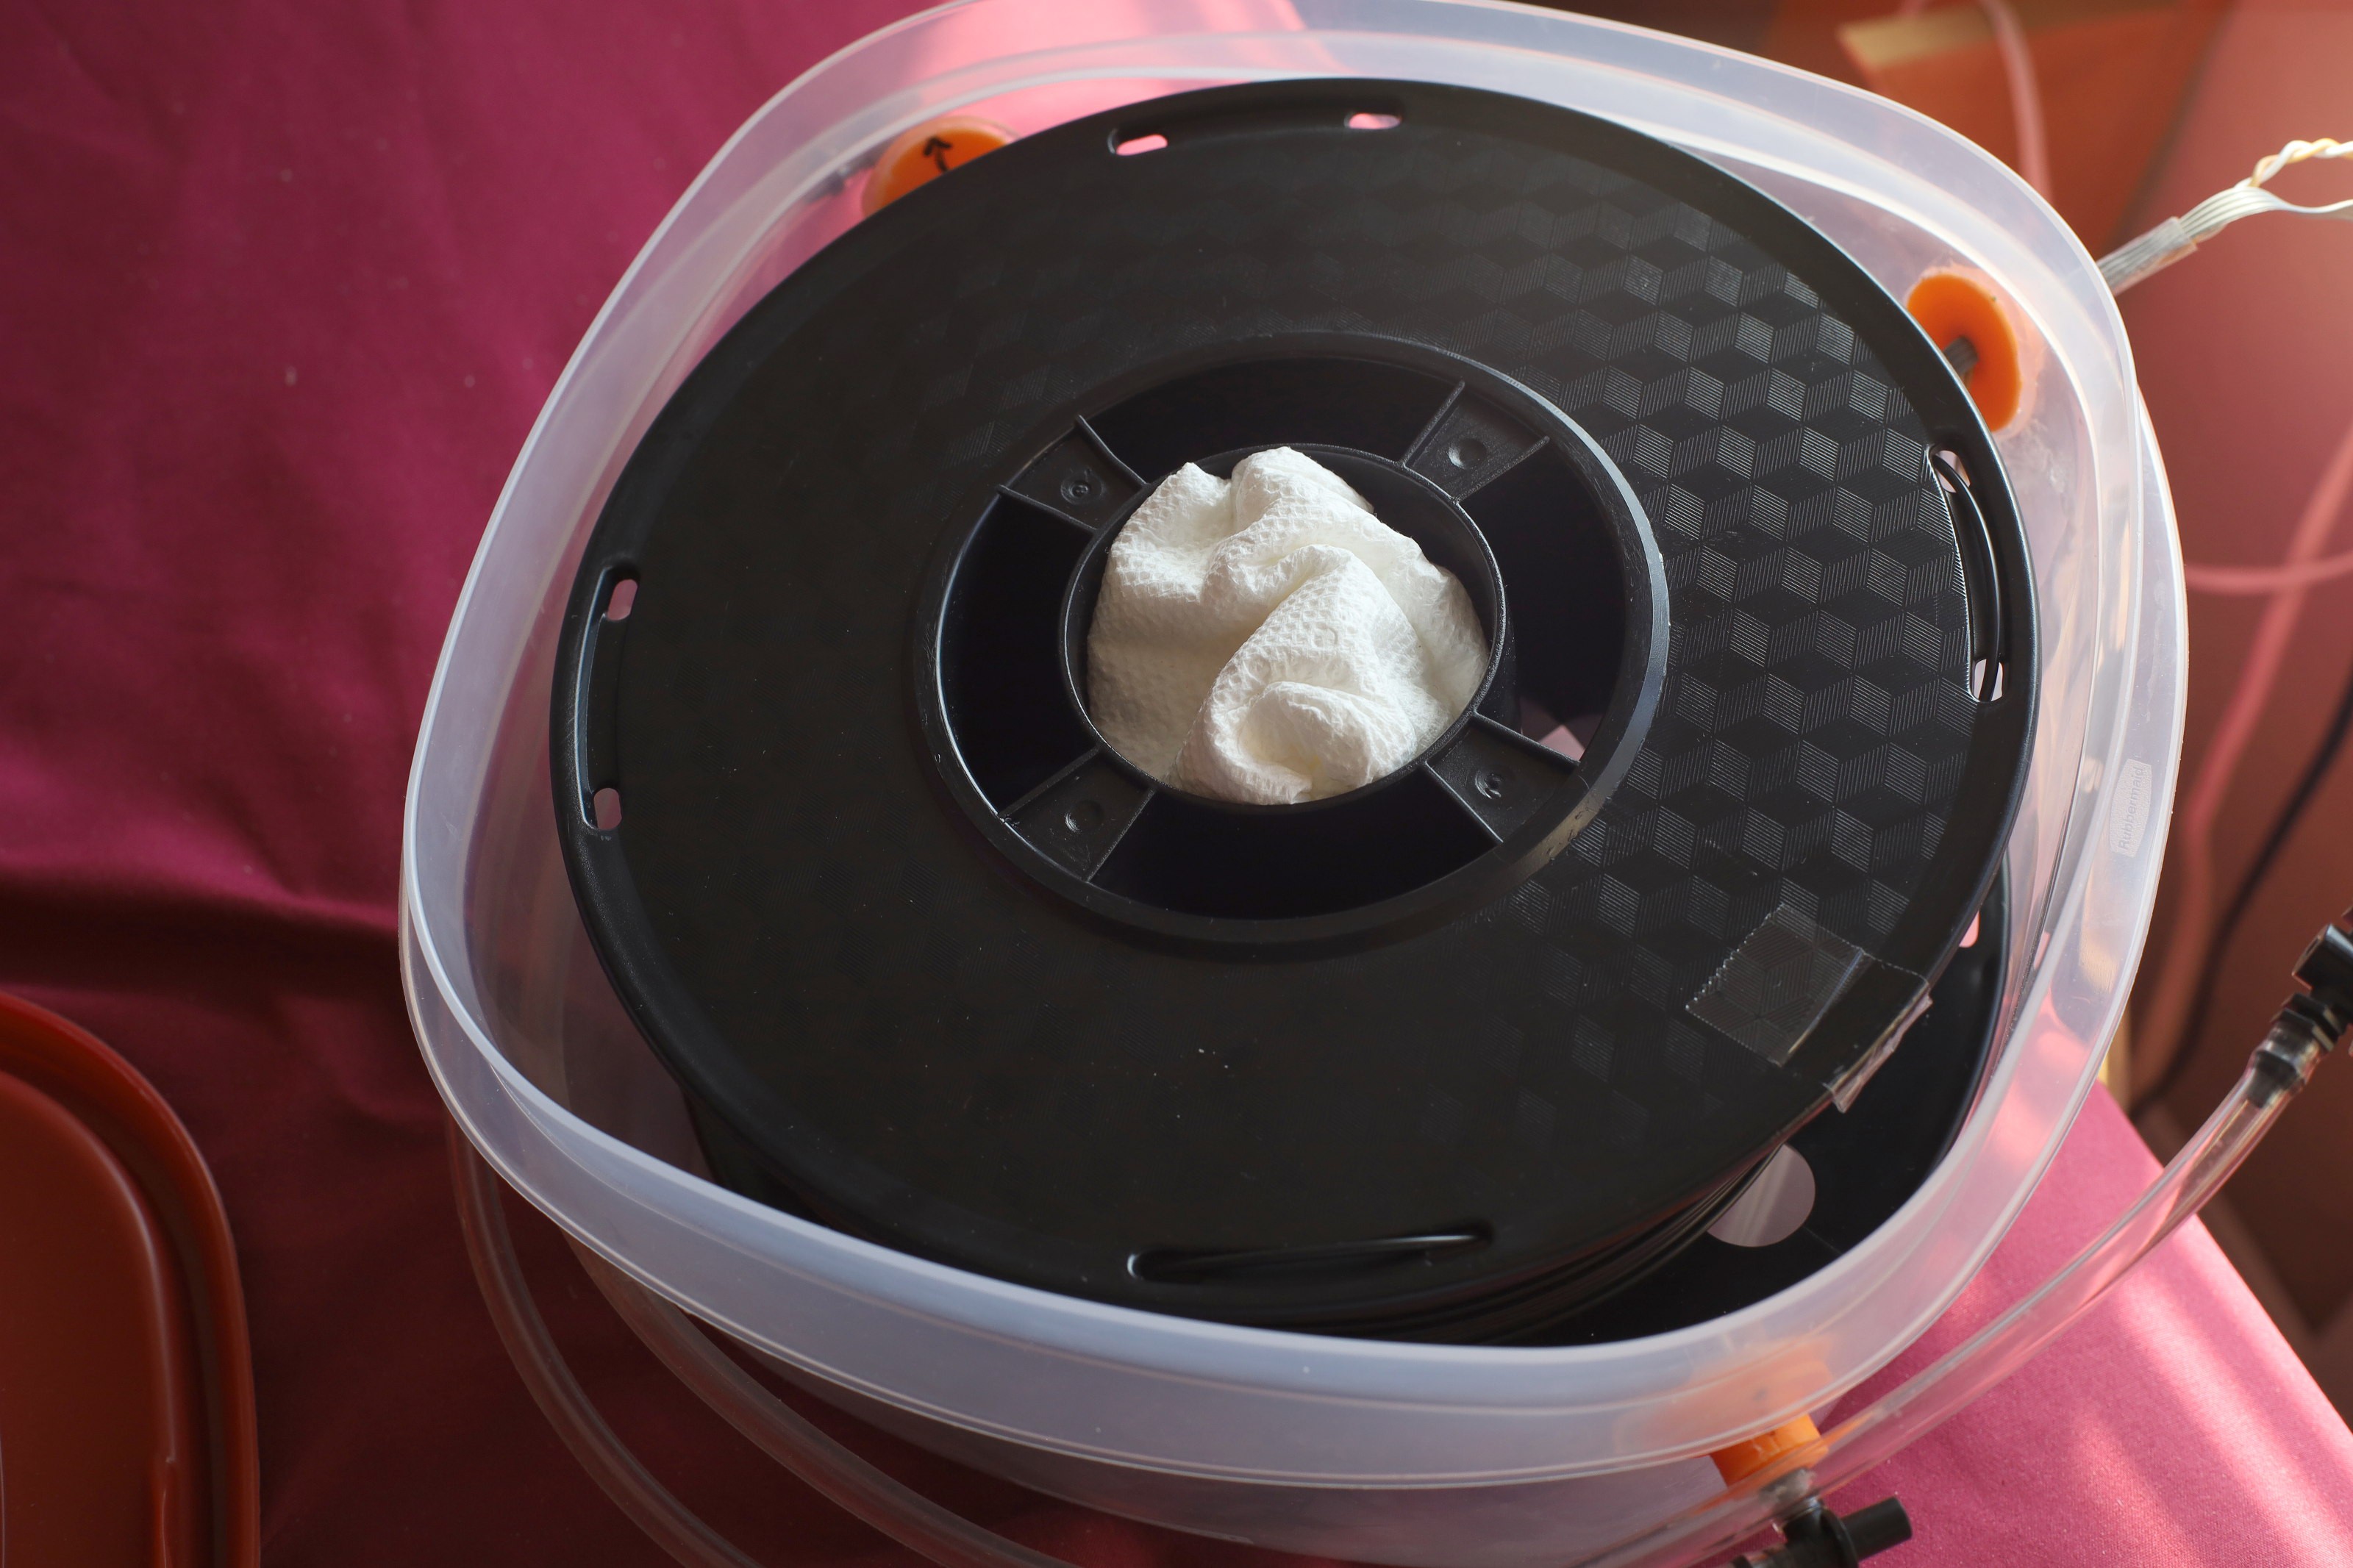
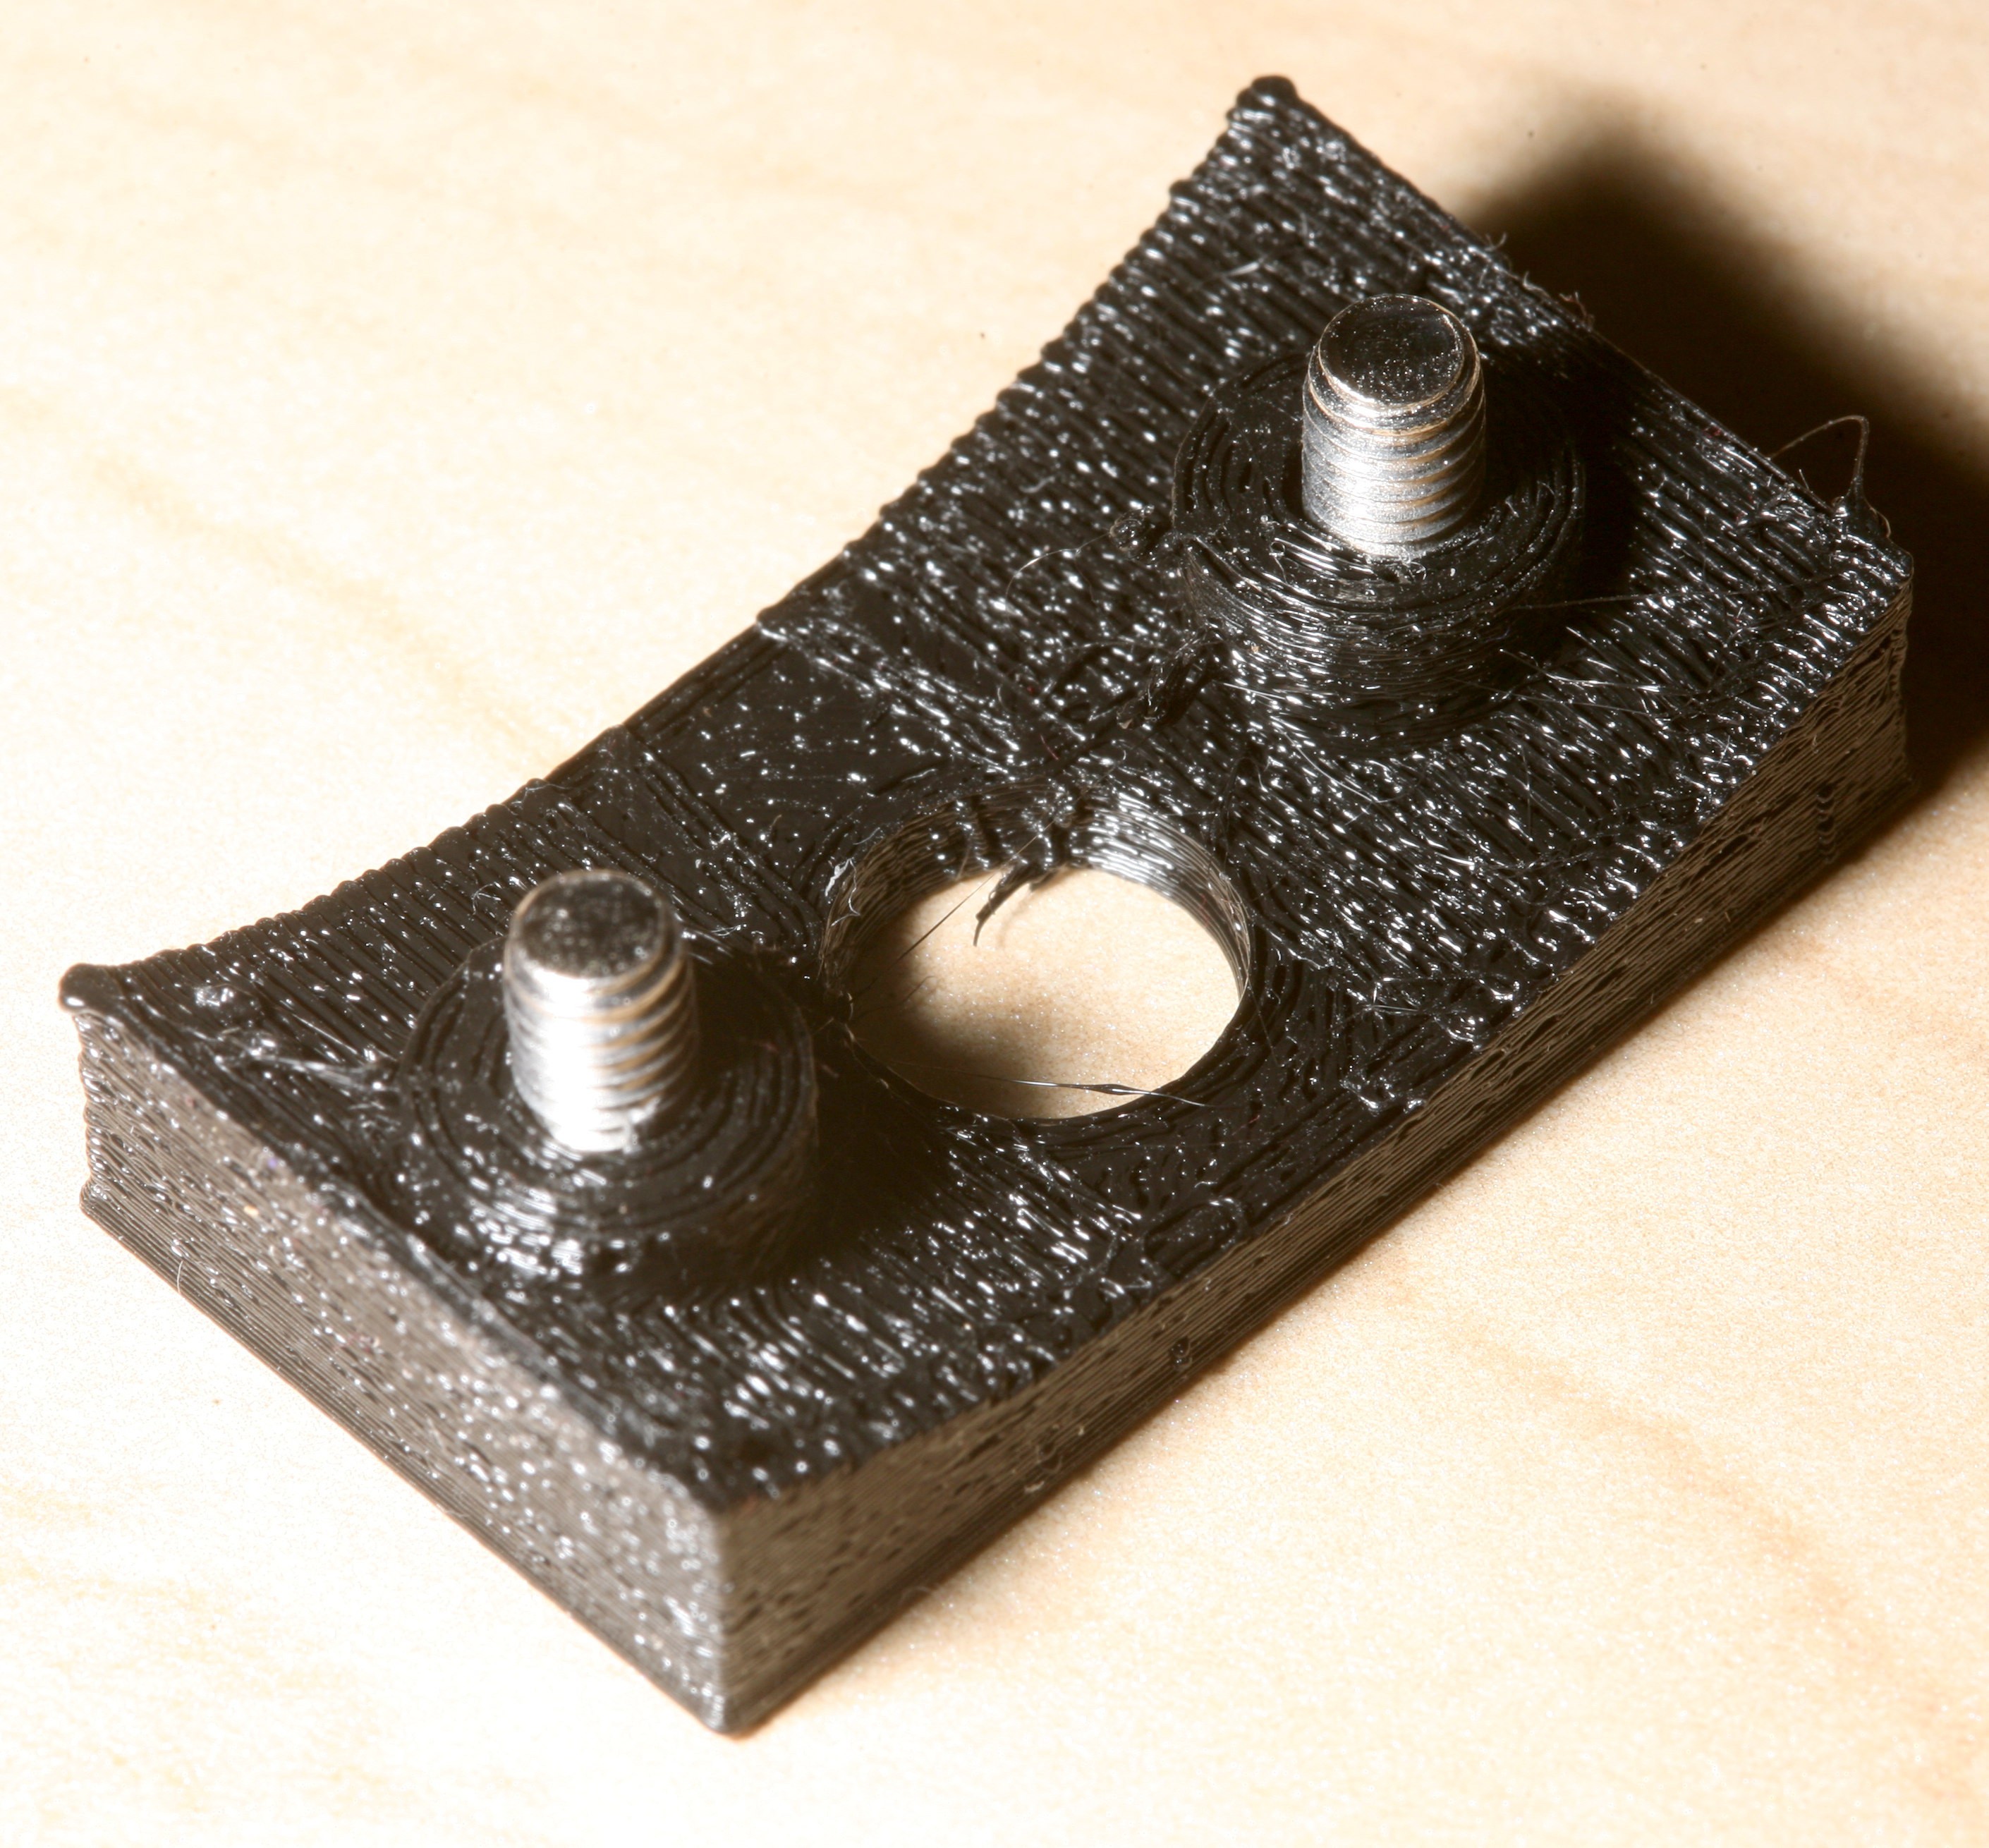
It was finally decided to transfer rolls, believing unwinding it would unstick the inner filament which wasn't drying out. The internet doesn't have any good ideas for a filament winding tool, so the lion kingdom devised this.
The problem has always been each roll having a different hole size. It was decided a new tool should be printed for every hole size & you just need to keep around empty rolls of similar hole size for winding. Some rolls are too wide for the bolt to go through, so these would require a tool with a stair step.
Only 1 roll has ever had hydration problems in the unexposed filament, so only 1 tool has been needed. Normally the exposed part gets wet while the factory part is dry. Fortunately, the hole in the sunlu roll is big enough for desiccant.
![]()
After a few more weeks with desiccant drying TPU & the pump limiting the dewpoint to ambient, the CaCl turned into a goo. It must be absorbing more water from outside at night than the pump is taking out during the day & not releasing water during the day. The only way to know is if running the pump during the day lowered the dewpoint at night, but the serial port broke & there was no data.
![]()
![]()
A pretty spongy test piece resulted from this experiment.
There are some valves which could isolate it at night, but the container isn't airtight overall.
The container would have to be completely air tight to just take water from the filament. Complete air tightness with enough power to circulate air & measure the environment would be difficult. An inductive power supply might do it, but it would take space.
The easiest step might be to just disable the pump again, seal off the hoses, & let the dew point rise above ambient during the day in exchange for less water being taken in at night. Silica gel might be the only solution.
-
Desiccant dehydrator
09/06/2022 at 19:18 • 0 comments![]()
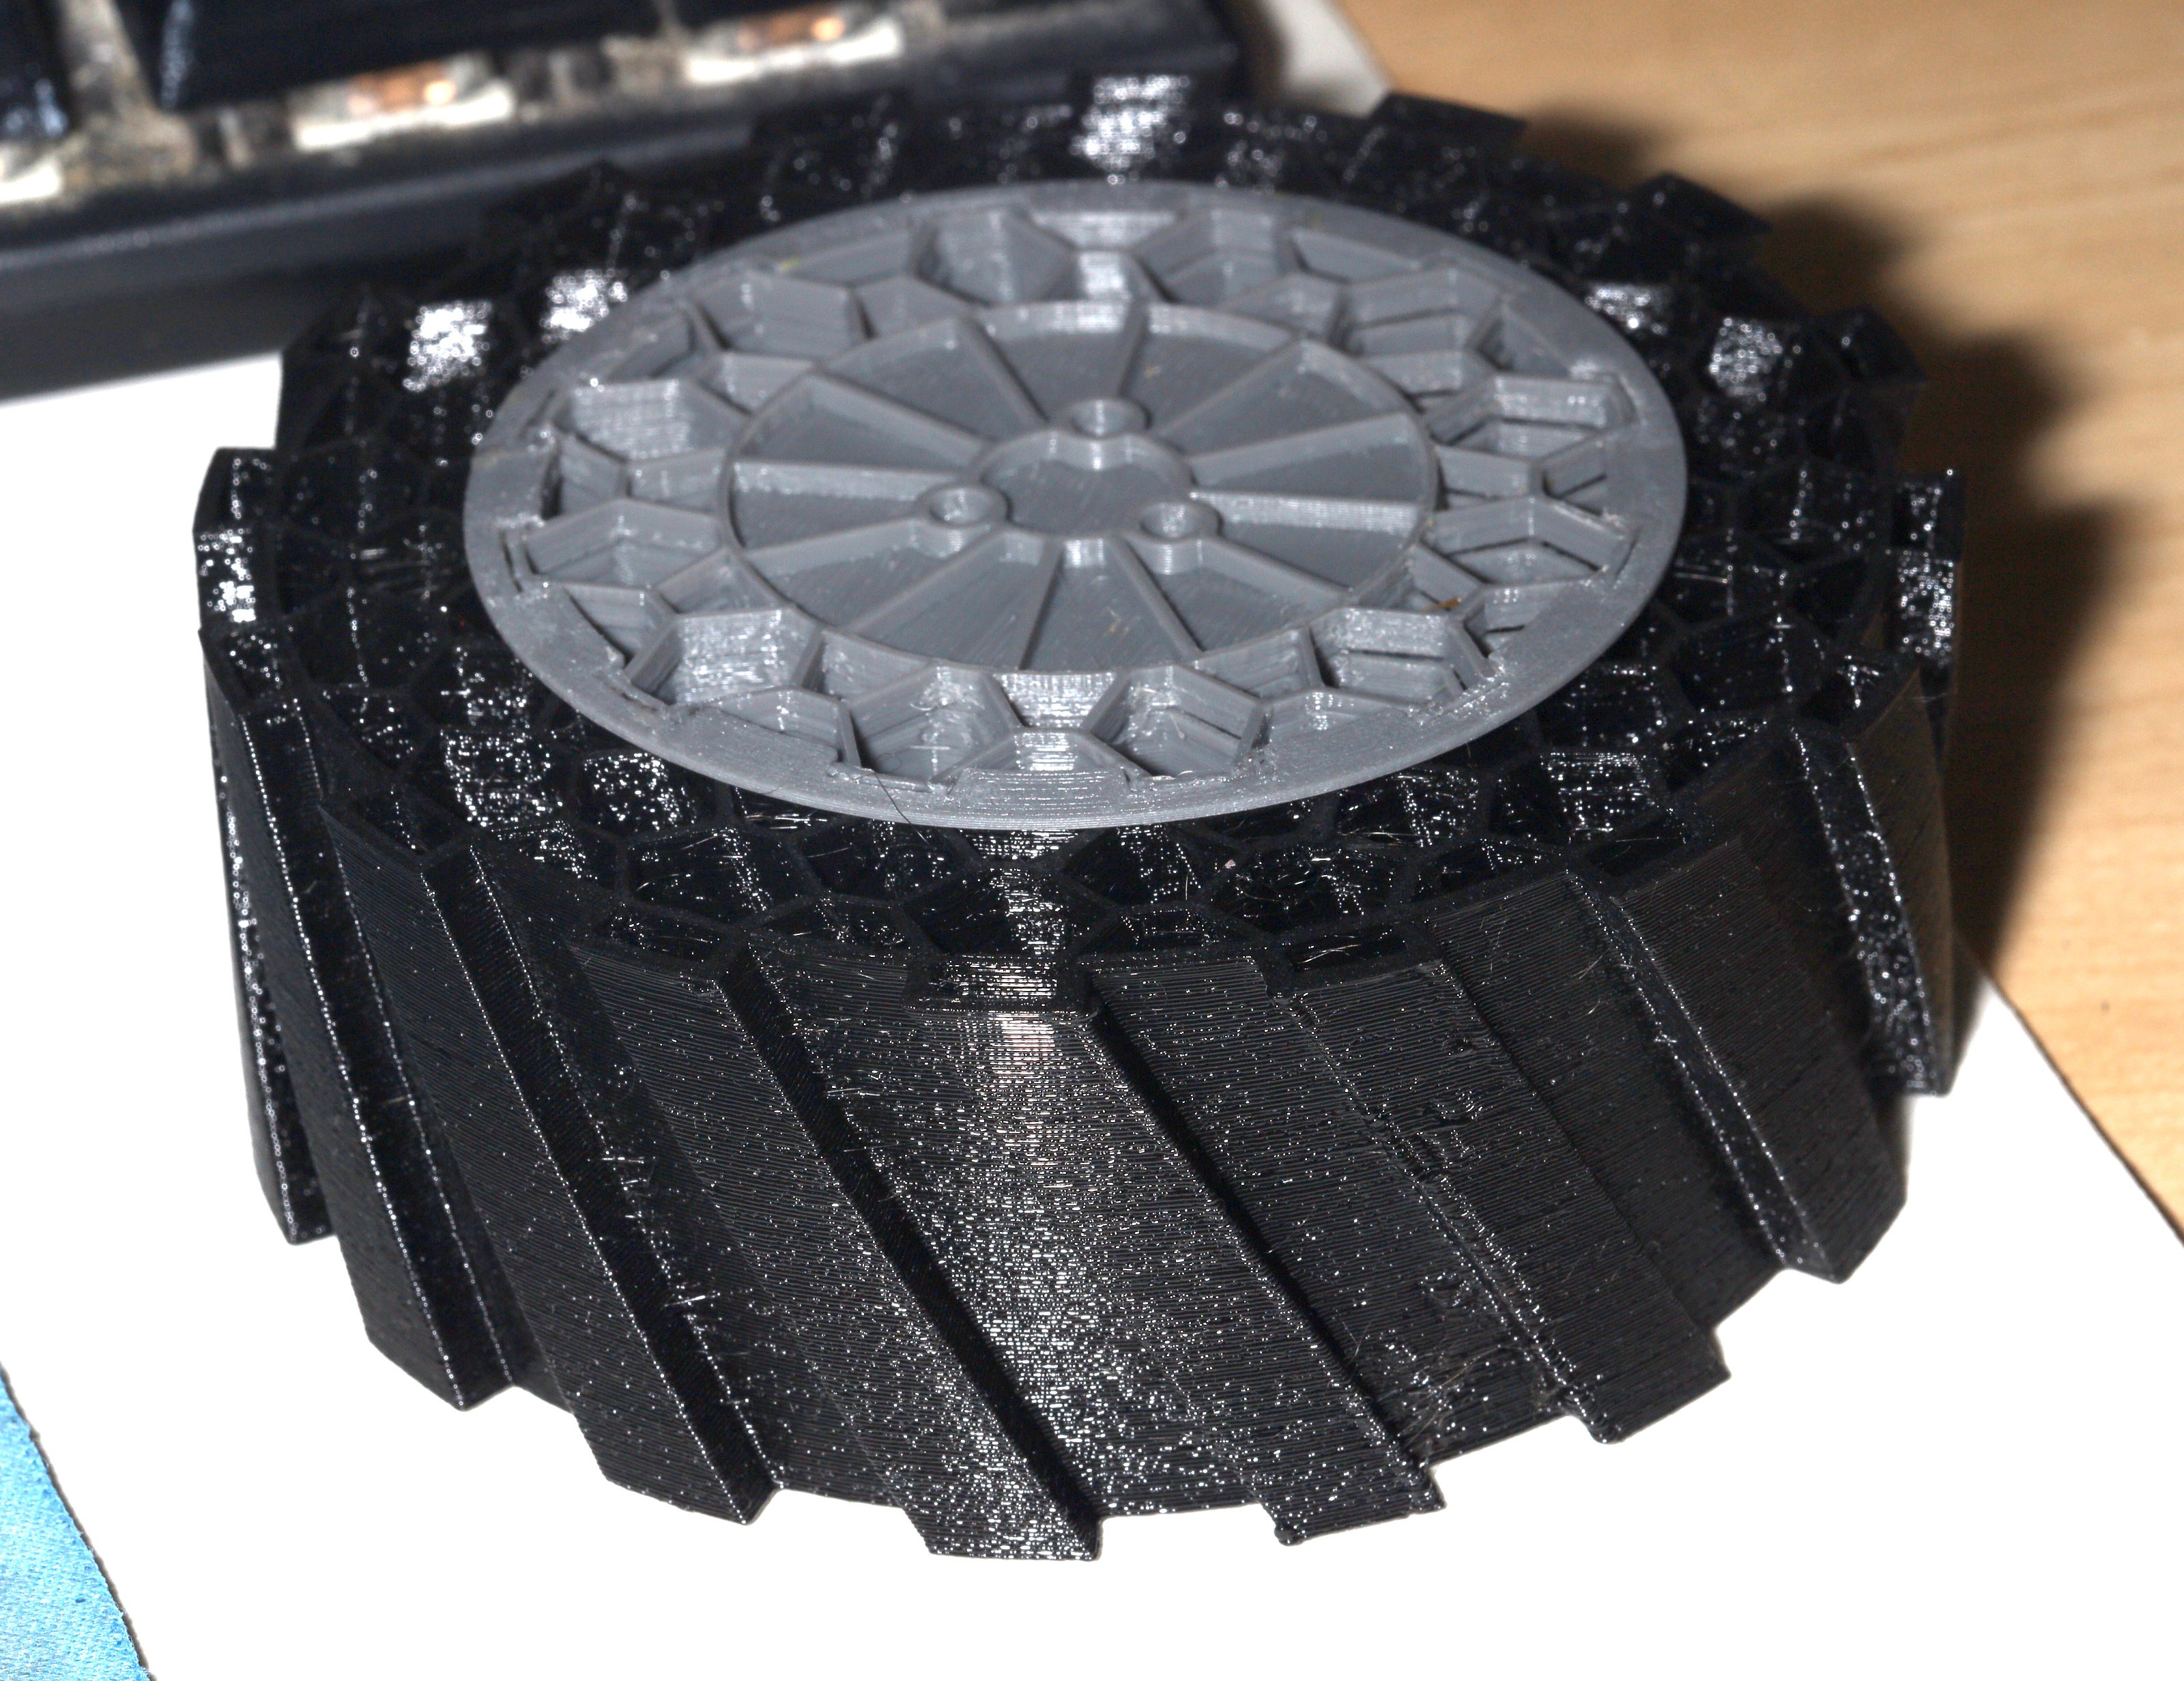
Sponge tire, despite months of drying out the filament in the solar drier & then a few weeks with a dry tote.
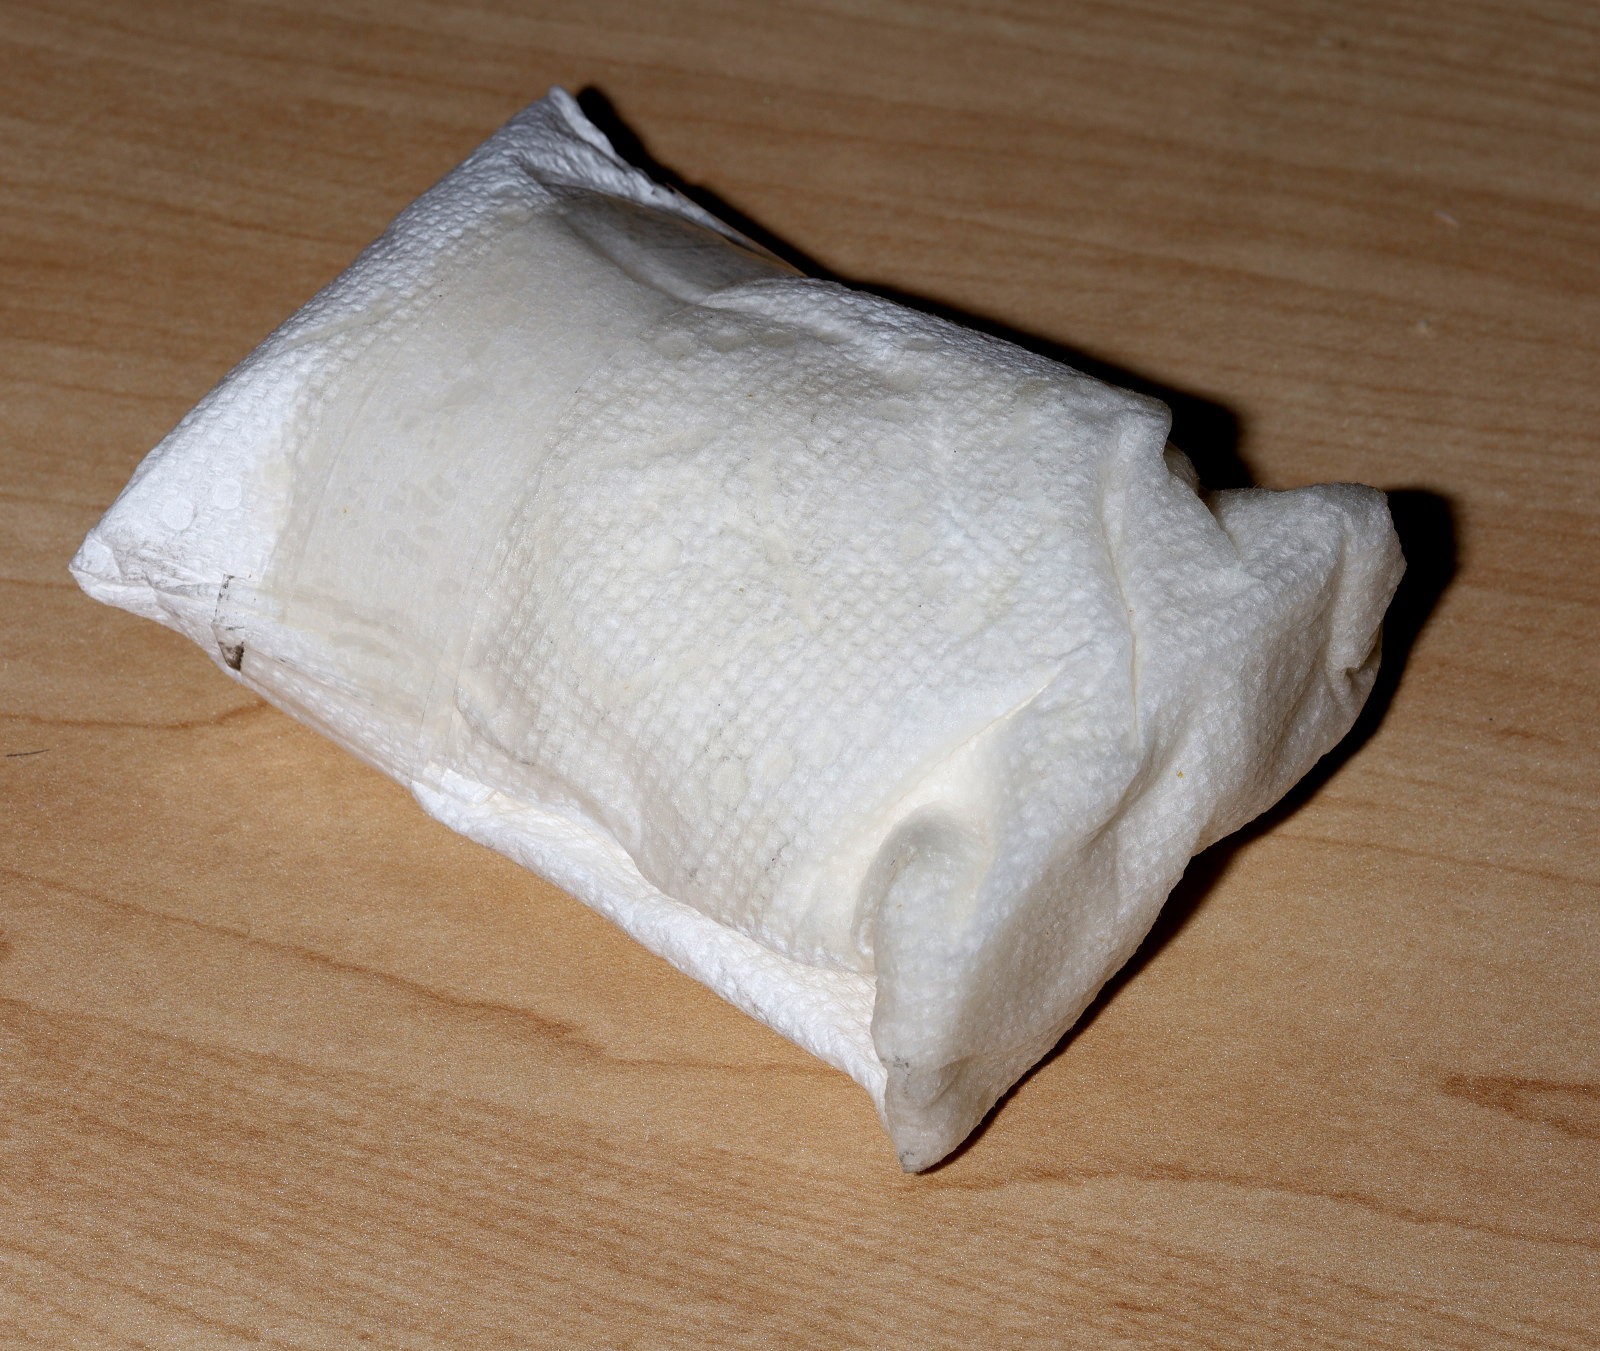
Eventually a calcium chloride pack with filament that was previously in the solar drier became rock solid. The way to know if calcium chloride is hydrated is if it's hard. It showed the desiccant was pulling more water out than the solar drier. So the solar drier might be good enough to get minimal printing in a few days, but the best results are going to come from a desiccant.Lions succumbed to making desiccant packs out of paper towels & ordinary calcium chloride, then storing filament with those. The trick is the amerikan people only allow 6"x11" paper towels to be sold, which limits the desiccant pack to a long narrow tube. Calcium chloride in the long term may cost more than new filament.
Dry tote was a fail. A roll of TPU with that produced the shown tire. Calcium chloride has proven to be filament crack. It's most affordable for renters as DampRid in 2 pound bags.
![]()
![]()
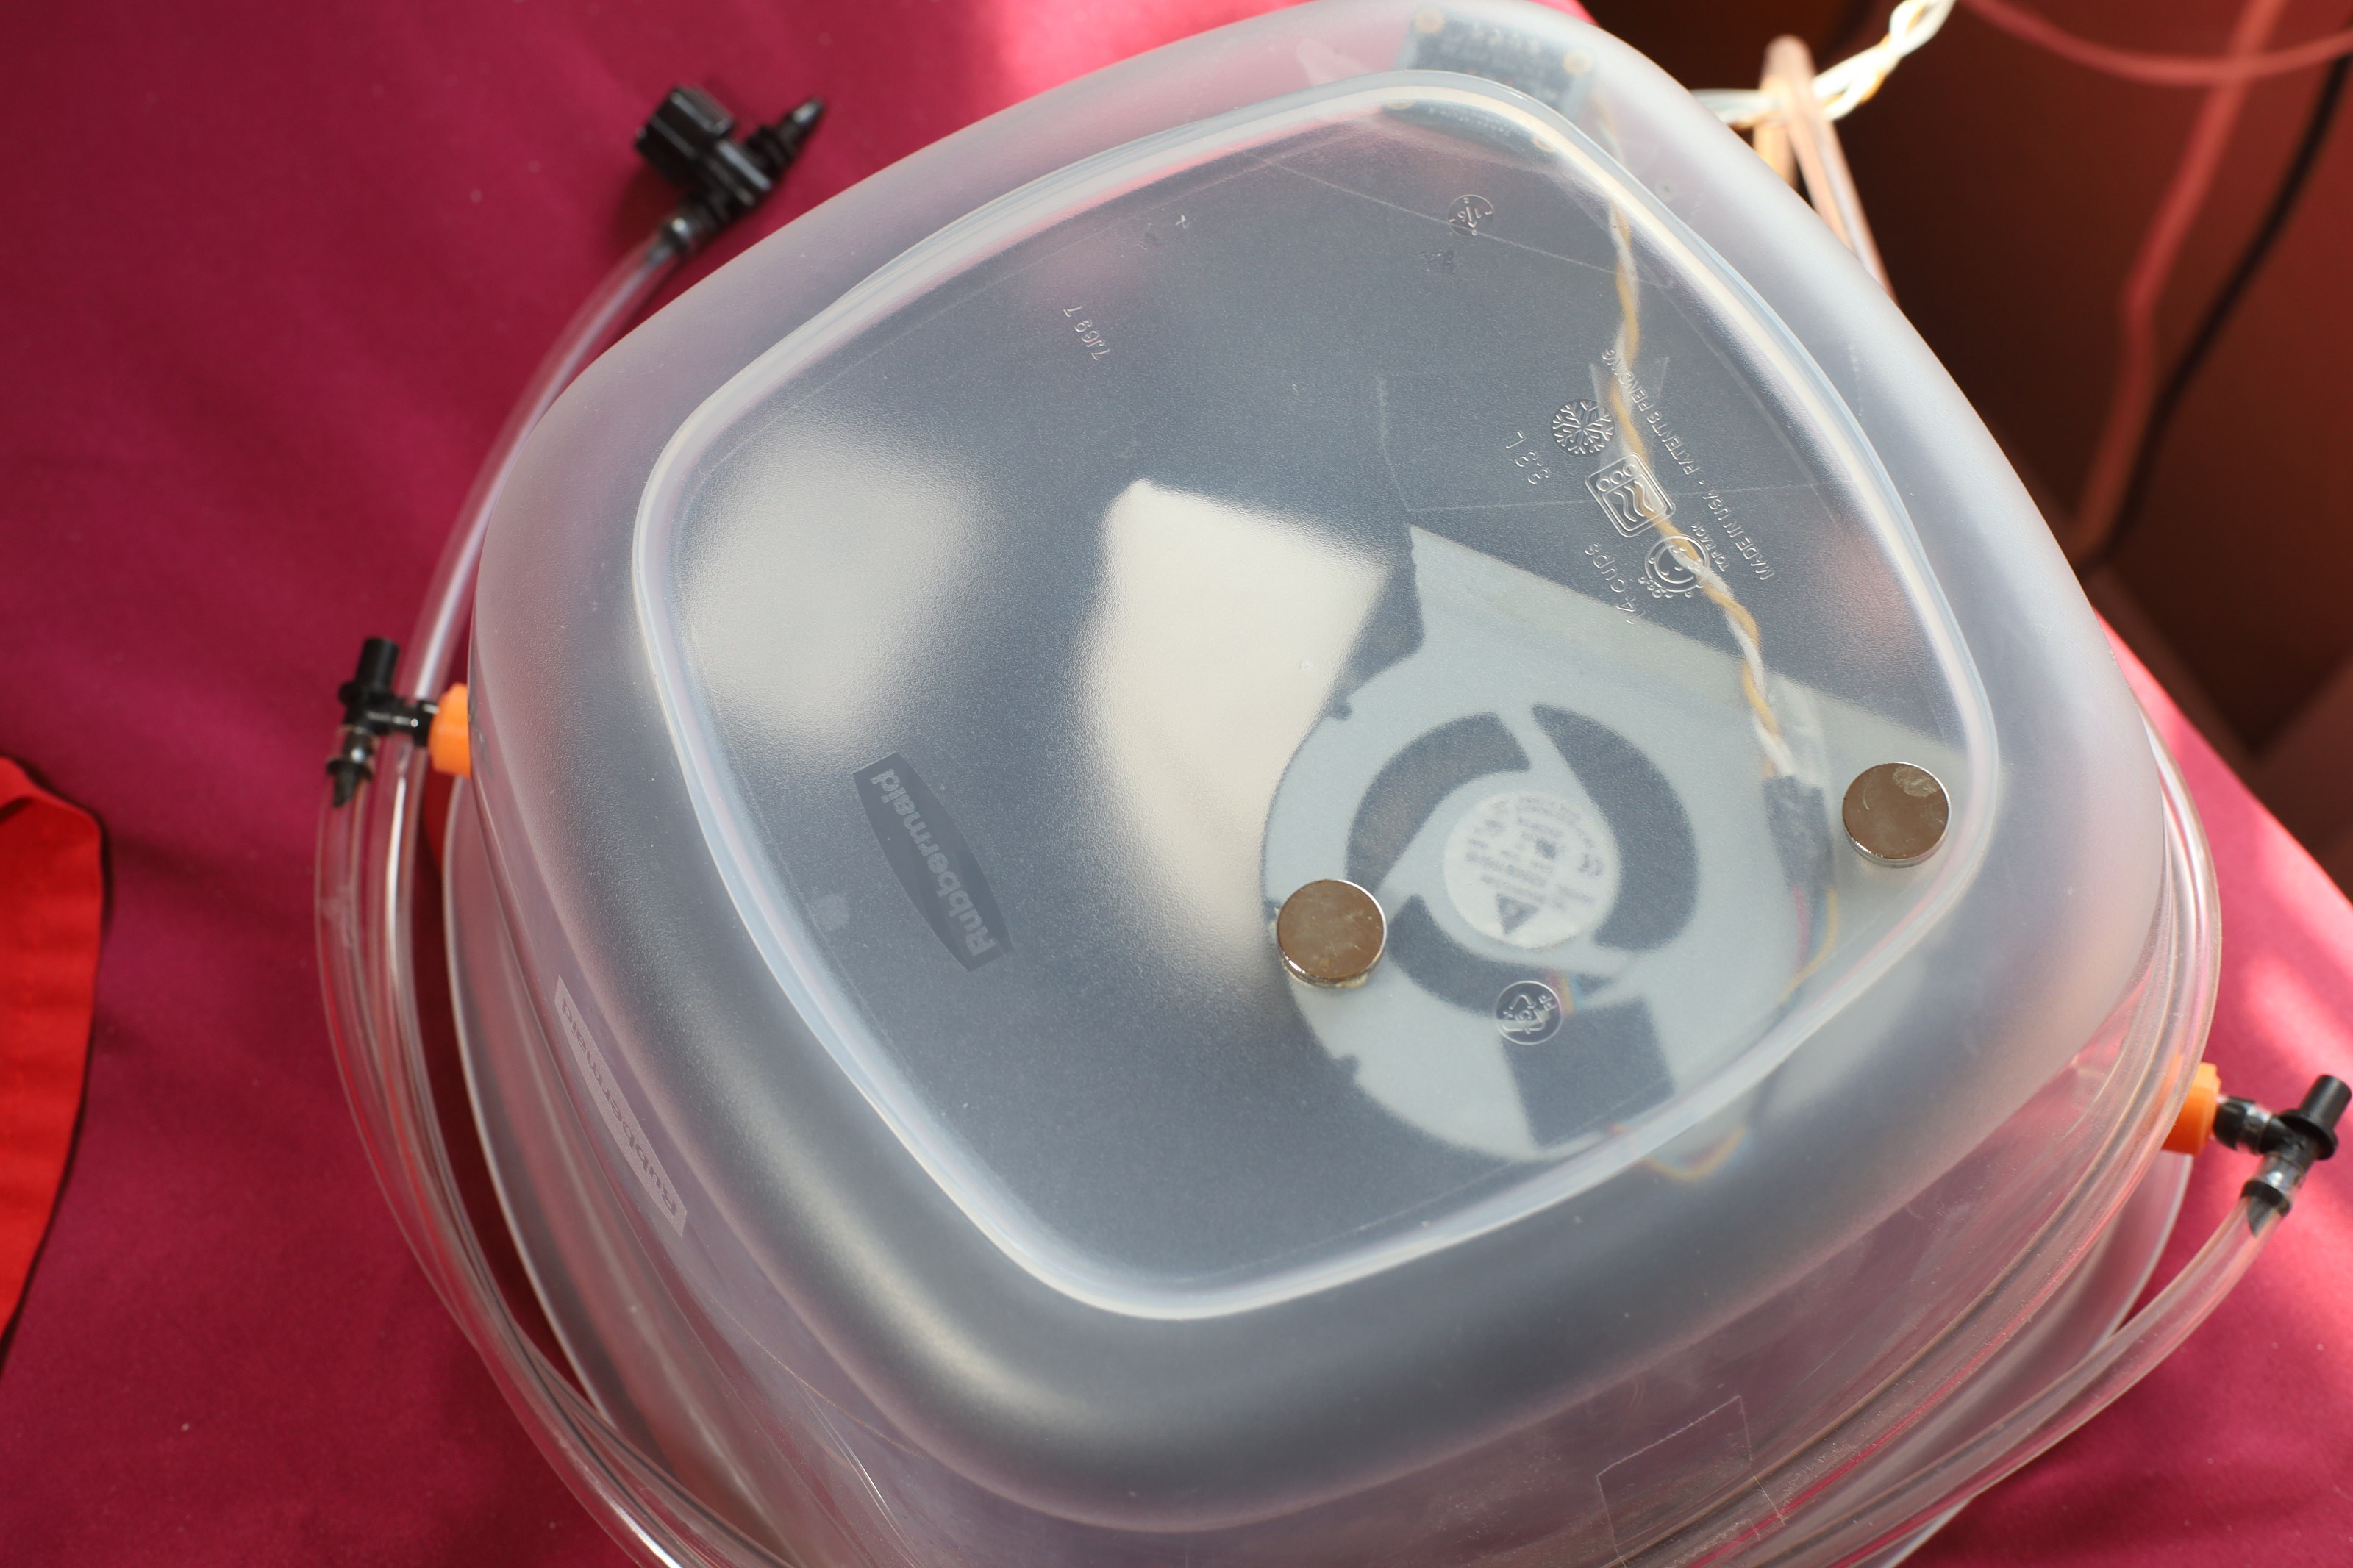
After many months of various filament drying techniques, the best solar drier has proven to be a sack of calcium chloride in a container with a fan, heated in sunlight. Maybe it can have a solar panel to know when to turn the fan on & a sensor to detect when the calcium chloride is expired. Powering it with solar would require too much space. All the air pumps, the triac, the tubing would go to landfill.
As always, it's not so simple. Making the container air tight requires some kind of expansion area. There is a long tube, but osmotic pressure will force water in. A ziploc bag wouldn't have enough air to circulate.
From an electronical standpoint, there is a desire to have it automatically detect from dewpoints when the desiccant has expired. It could be an online graph that an animal interprets, but an LED for expired desiccant would be better.
![]()
Definite improvement, though this filament continues to be wet on the inside from the factory. Completely unrolling it may be the next step.
![]()
![]()
The data showed it hitting lower humidity in the dark but equivalent humidity in the sun. Since most of the time is spent in the dark, it overall takes more water out. The circulator fan should run all night. The desiccant seems to saturate by day 3.
Burning money to remove water should always be more effective than pumping air. The mane problem is how much water the desiccant releases back into the filament when it gets hot, how much it's going to cost to manetain an advantage over pumping air. Given the challenge of drying filament, it might be justified to finally use a peltier condenser or mechanically unwind the filament in the drier.
-
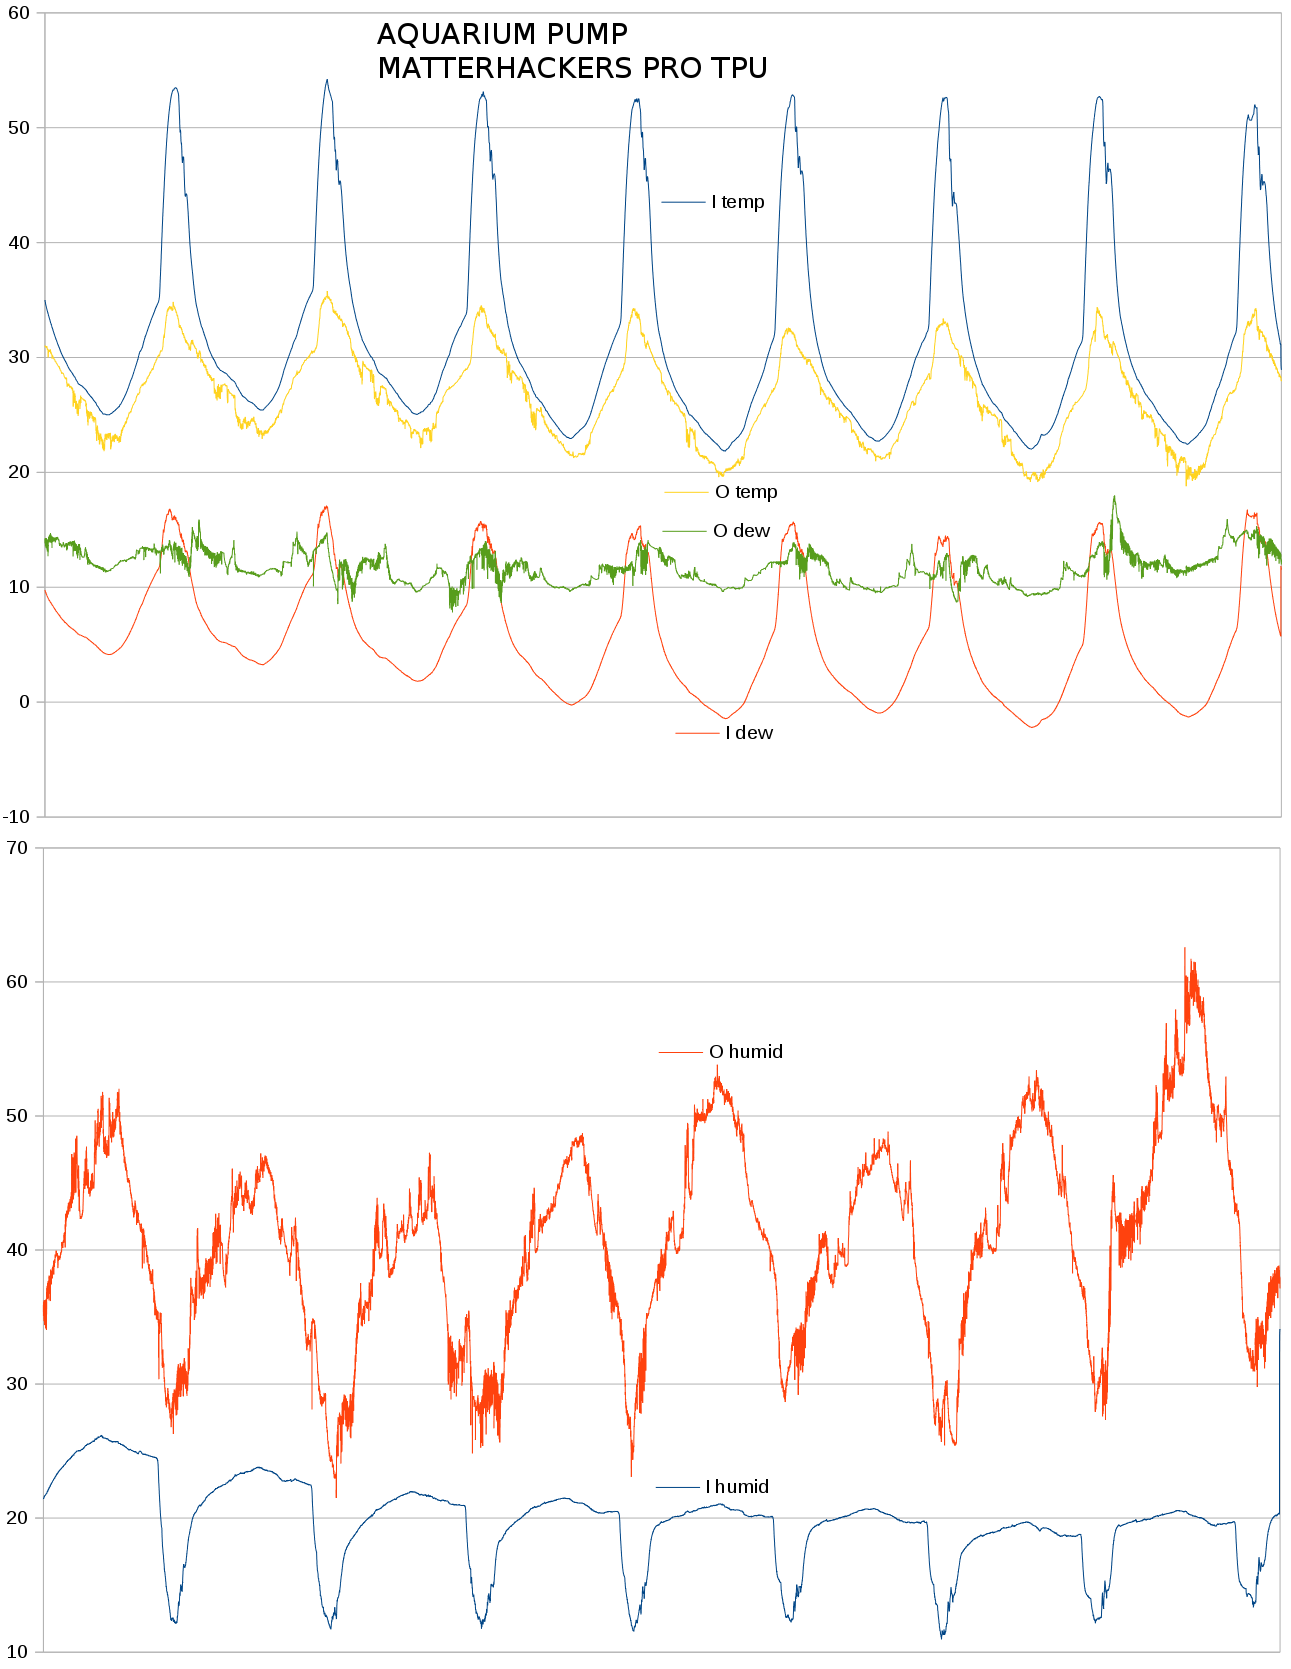
Matterhackers PRO TPU
07/25/2022 at 06:28 • 0 comments![]()
Threw the roll in for 8 days & it printed about as well as the others.
![]()
![]()
All TPU filament is coming out with voids, but less voids than no drying. Doing any better might just require a heater on the printer itself.
-
Triac round 3
07/05/2022 at 07:41 • 0 comments![]()
After continuing to intermittently fail on, a 220k was put between gate & neutral to pull it to neutral. The lion kingdom observed that probing gate's voltage turned it off. The 1 meg resistance in the Fluke might have been enough to pull it to neutral. Now the meter said there's 2k between the gate & neutral by default. Not sure why that would be if the optocoupler was off & the gate is high impedance. The optocoupler may well be defective.
This got it turning off again, but reinstalling the snubber circuit made it fail again. The snubber never did work.
The next step would be a bag of triacs & optocouplers. A triac is much cheaper than a relay so lions would rather keep bodging a triac than solve the problem with a relay.
Another thing lions learned is resistances need to be a lot bigger at high voltage. The word pullup conjures up visions of 10k resistors, but at 120V that burns 1.4W & starts a fire. 220k is a more useful pullup resistor at 120V.
![]()
A few weeks with the pulldown resistor yielded stable dewpoints & low humidities. The summer has much higher humidity than the winter & much less sunlight hitting the container. Being much quieter, the aquarium pump runs all afternoon without a timeout.
It could almost run based on solar panel output instead of hydrometers, but lions fear the slight loss of efficiency would cost it like the passive valve idea. The filament gets hot enough that the air circulator never turns off. Inside air temperature never drops below outside air temperature in the summer.
The next frontier is disabling the air circulator. It should only run when turning it on would cause the filament to release water instead of absorb it. The only way to know the filament can release water is when the inside dewpoint is rising or above ambient. Activation of the pump creates an unknown where the inside dewpoint is falling while the filament is still releasing water, so we have to wait until it's below ambient & falling to be sure.
The derivative of the dewpoint might be the key. It just requires the filament to already be releasing water to know if the filament can release water.
-
Aquarium pump upgrade
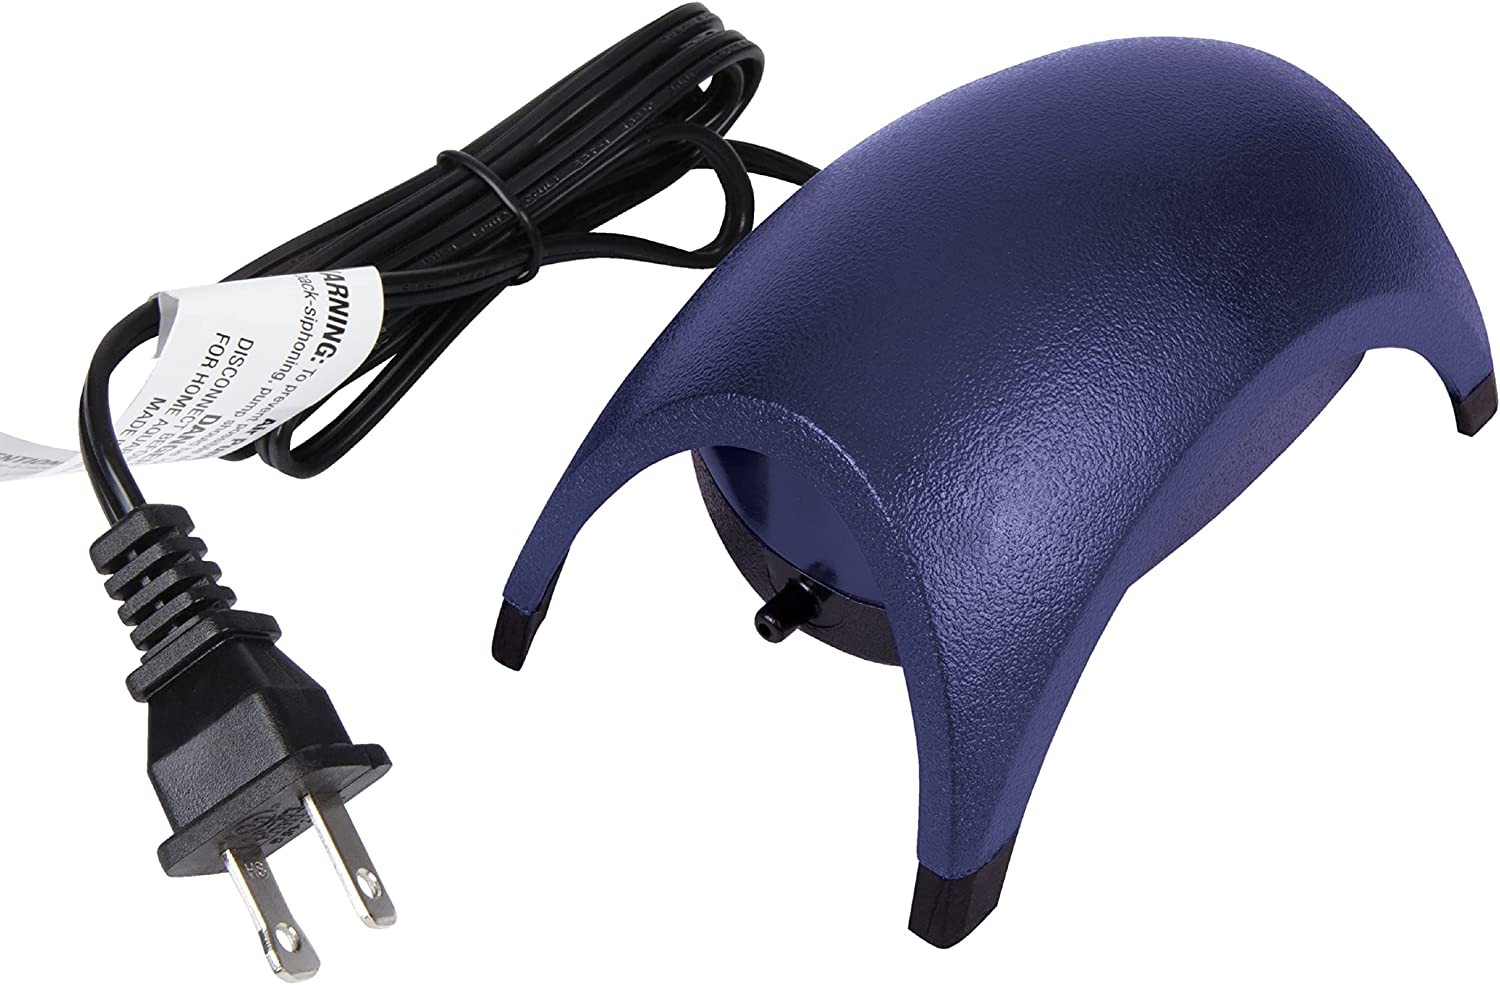
06/19/2022 at 21:30 • 0 commentsSo then there was this 10-20 gallon aquarium pump.
https://www.amazon.com/gp/product/B0009YJ4N6
![]()
![]()
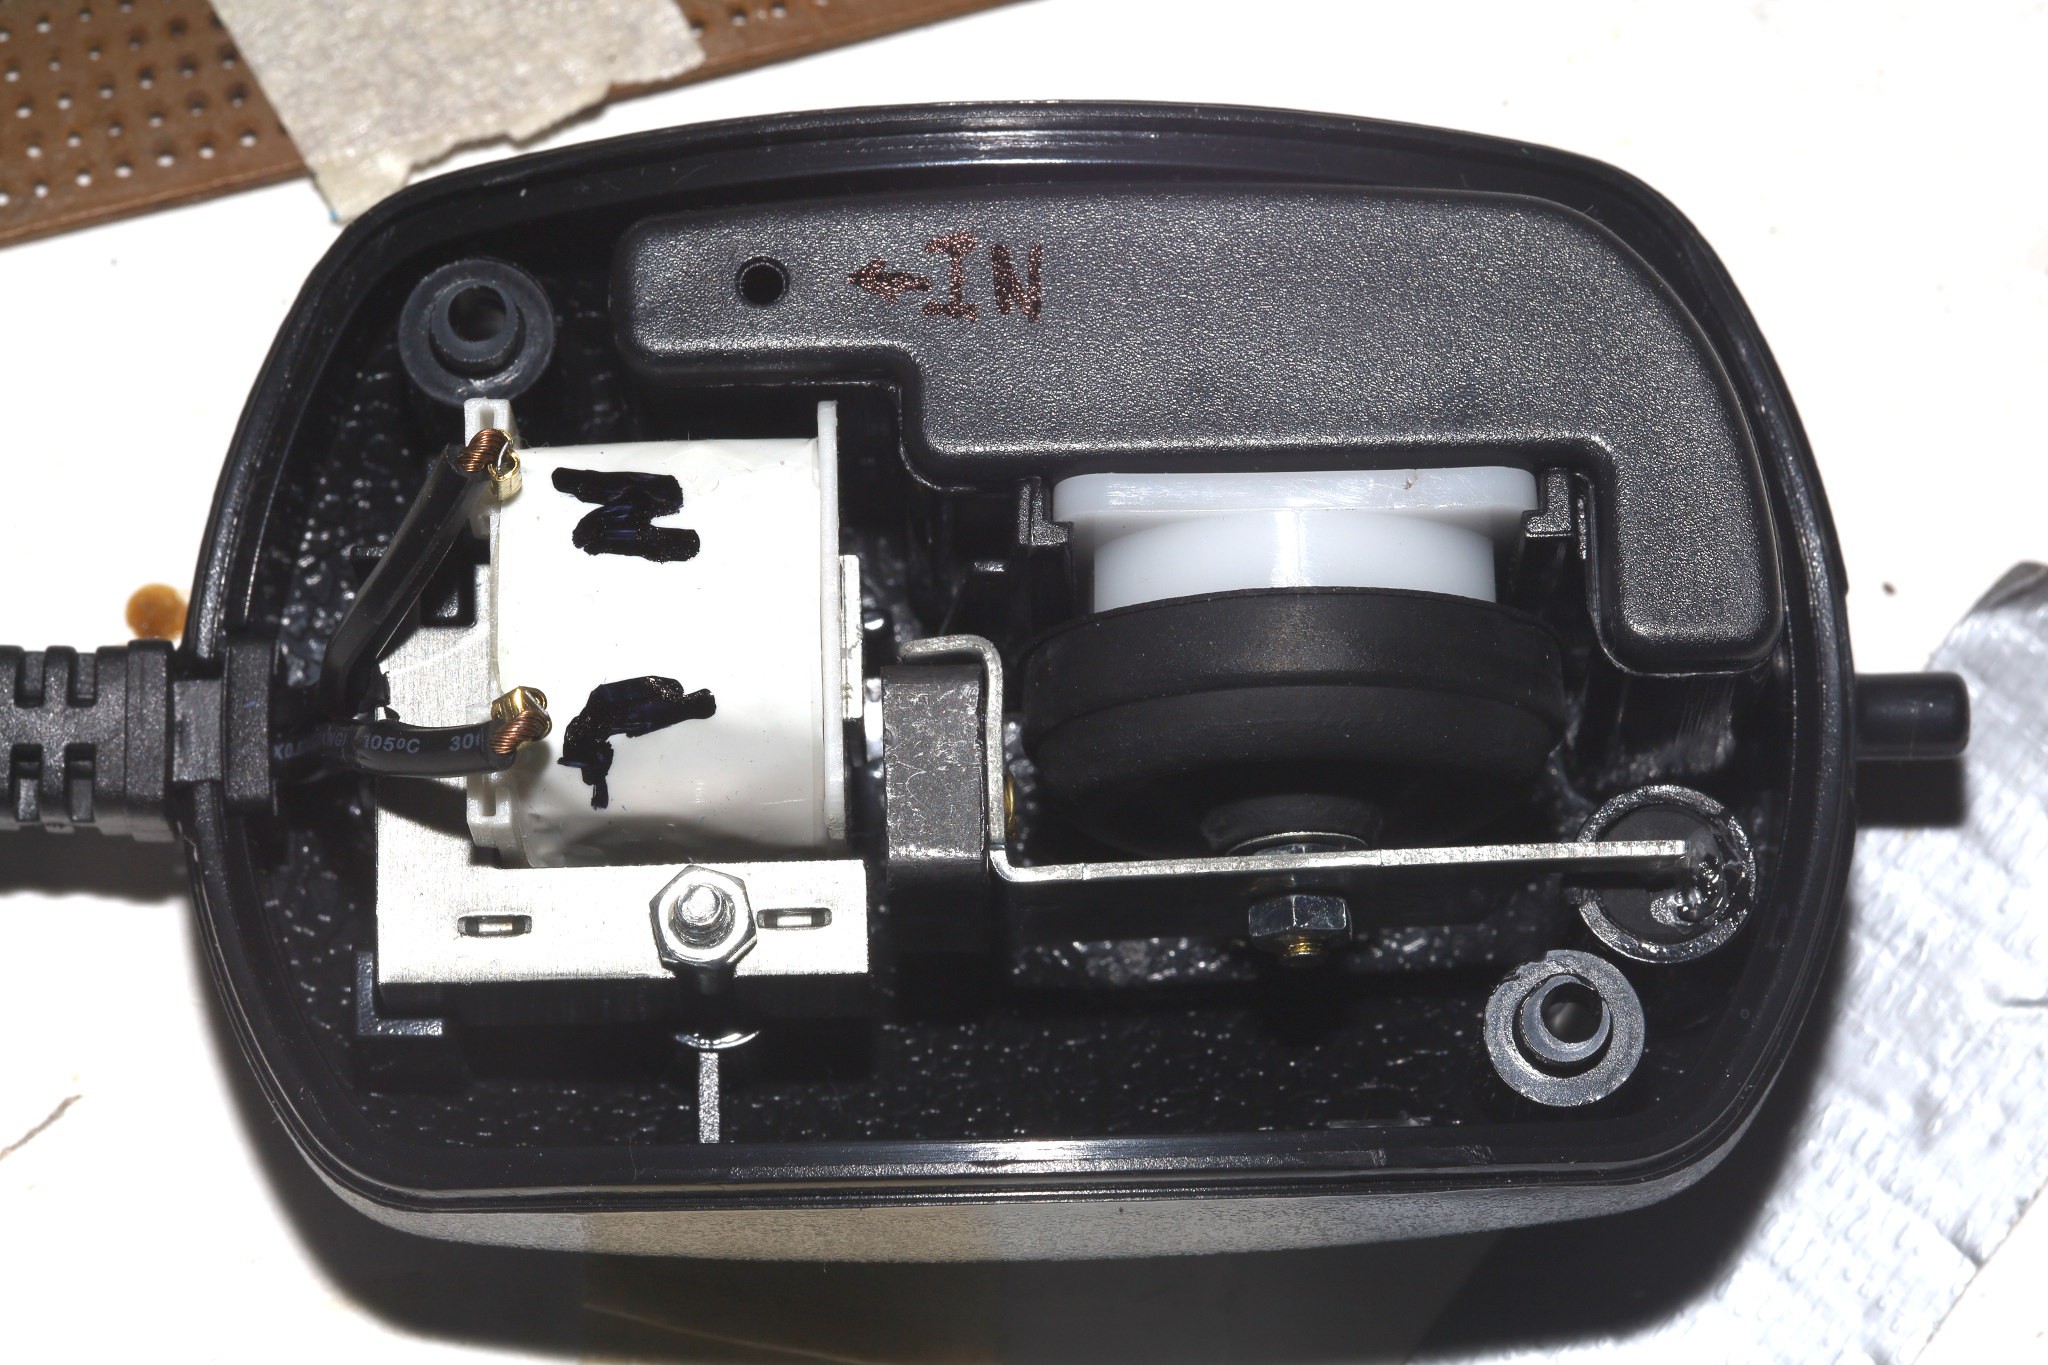
It does have an inlet which generates a vacuum, but the difficulty of connecting to that inlet led to another use as a compressor & hope the container didn't explode. It doesn't need a 1 way valve to manetain a seal. It's just a simple 4k ohm solenoid which oscillates a ferrite magnet. It burns 2.5W at a .95 power factor.
The great challenge was turning it on.
https://www.amazon.com/dp/B07P6HX85G
![]()
This thing is based on the BTA41-600B Triac & MOC3021 optocoupler. The 1st problem was it not turning off. Removing the 10 ohm snubber resistor was the only way it would turn off. It could be the 2.5W load wasn't enough to turn it off.
The other problem was a lack of desire to have a live load when it's off. As originally labeled, the load was always live & the neutral was switched off. It actually works if live & neutral are reversed. To make this arrangement work, the line has to plug in to the triac side. The line provides the voltage to turn on the gate. This might not work for inductive loads which require the snubber circuit.
![]()
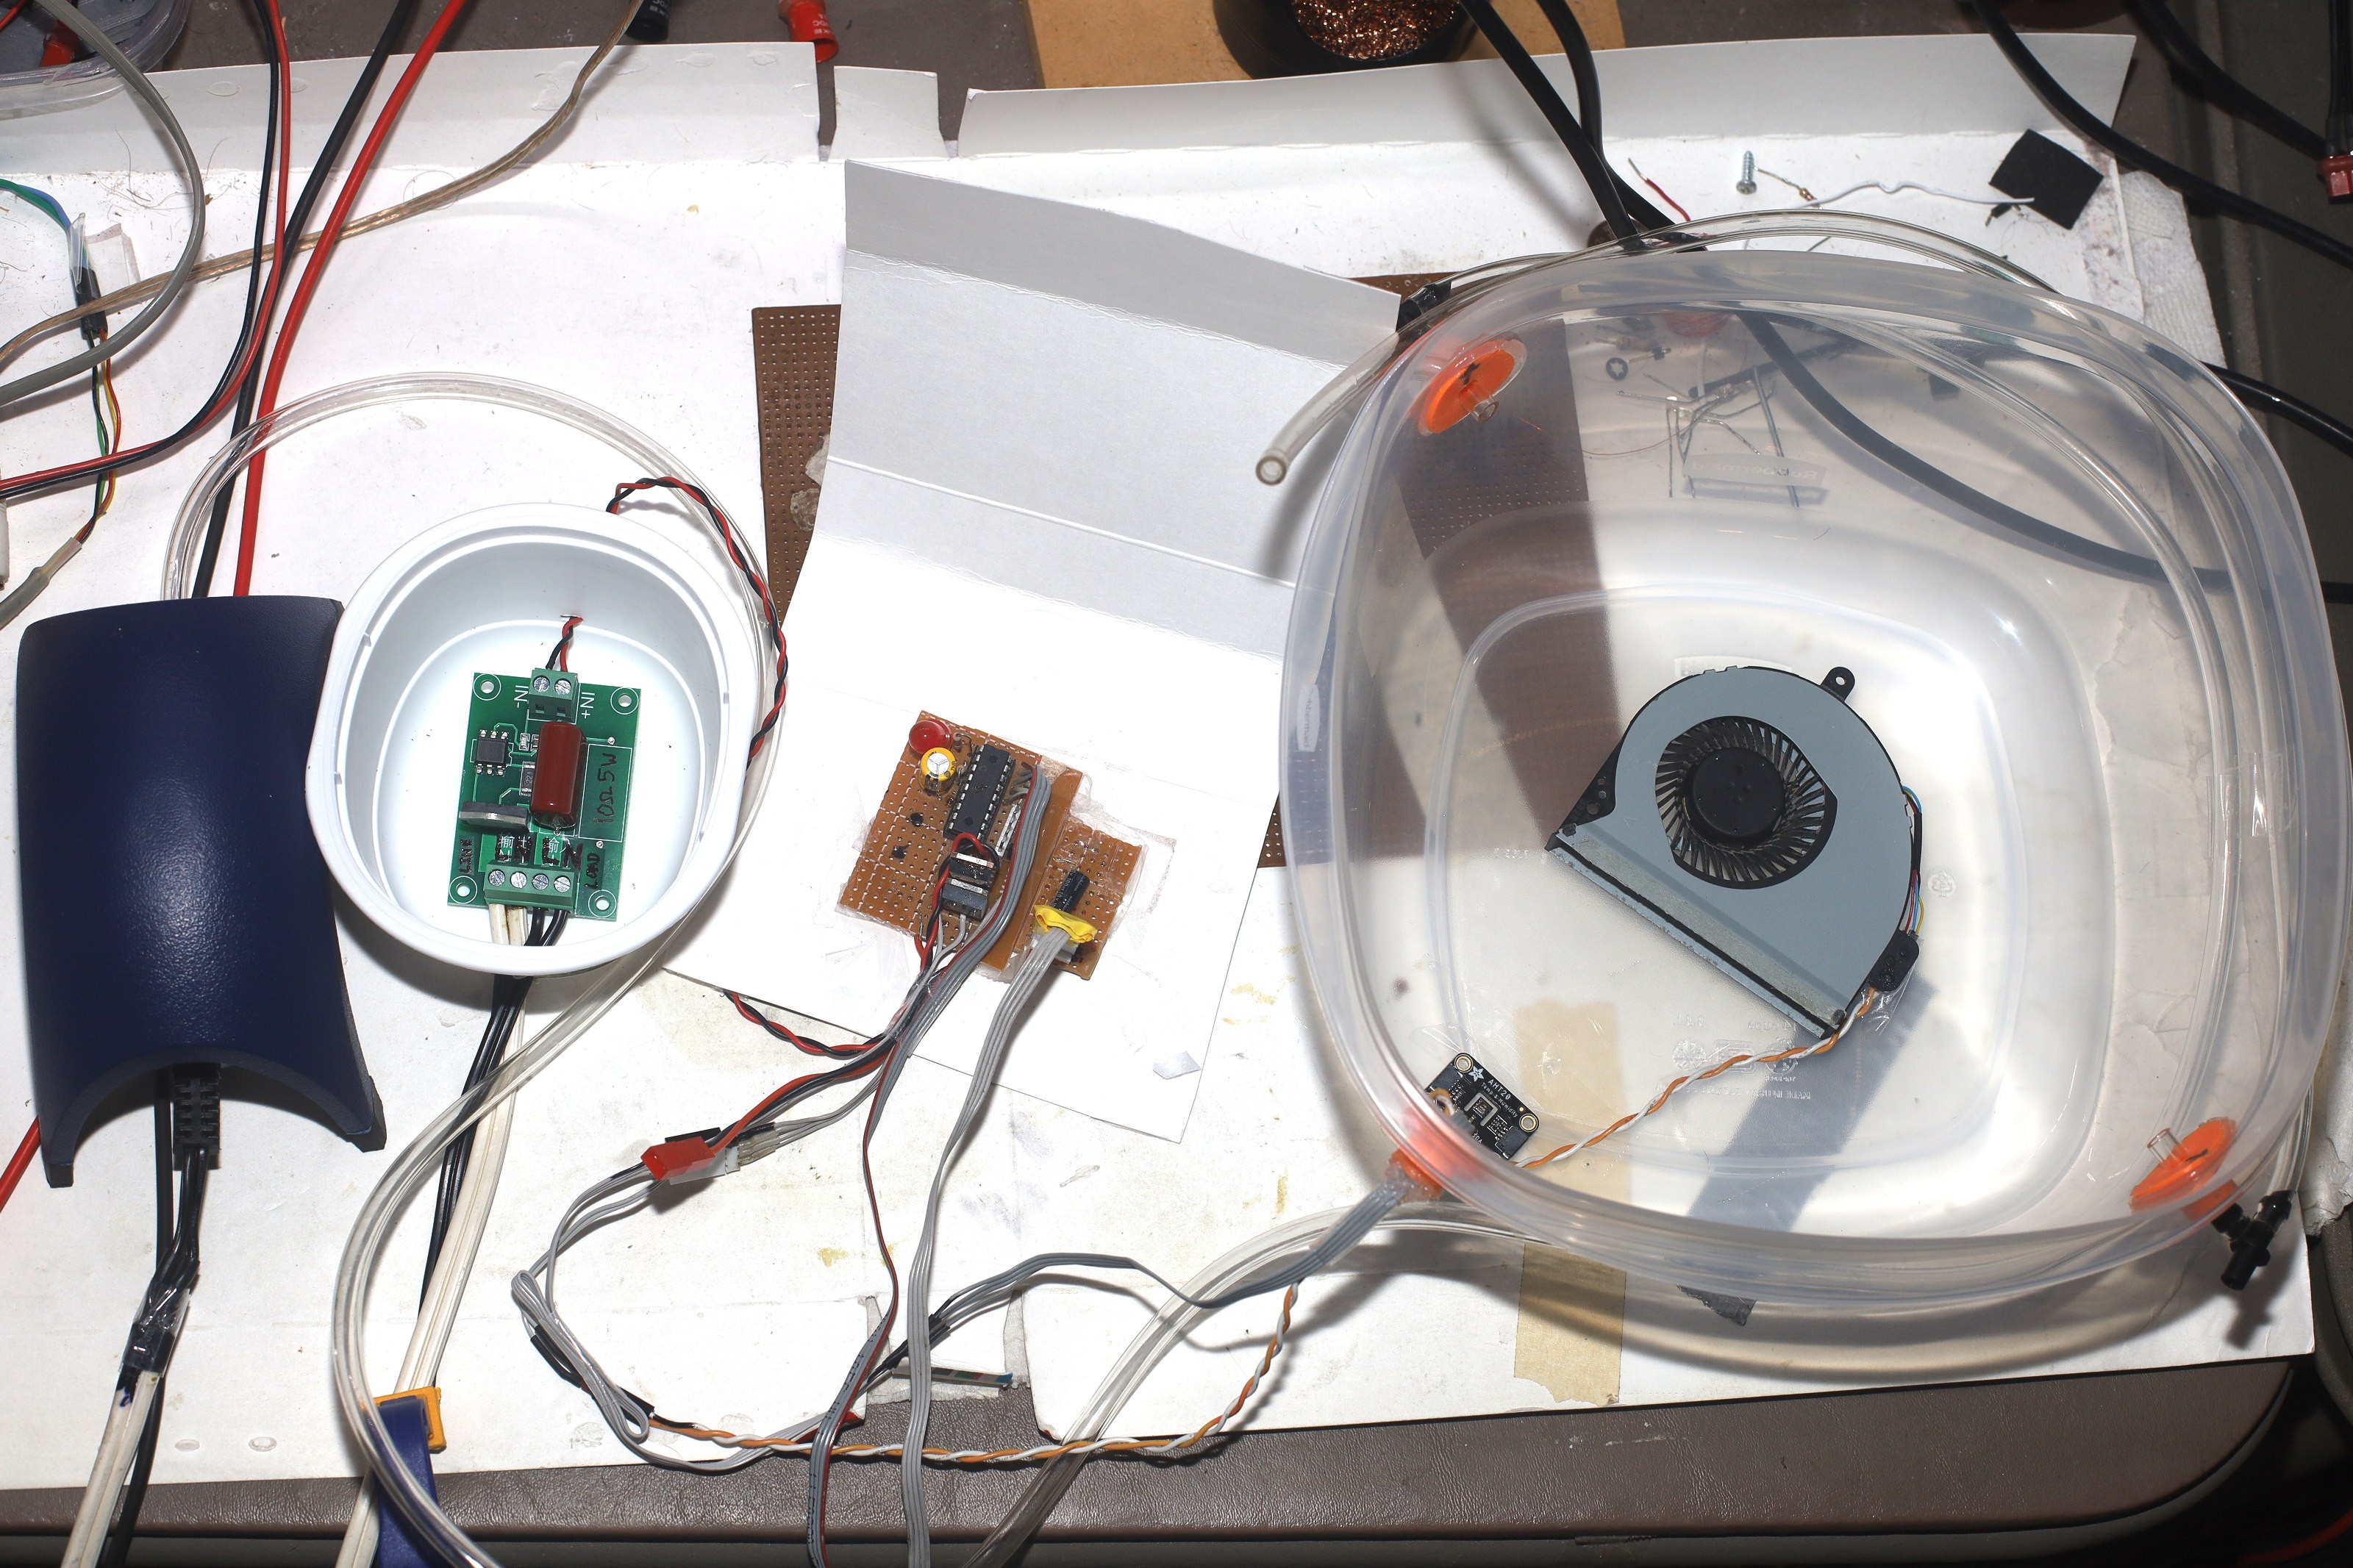
Enclosing the new mess of pumps & electronicals will require a 3D printed enclosure. As hoped, the pump is totally silent. Unfortunately, the 10 gallon aquarium pump was nowhere close to as powerful as the inkjet pump so daytime dewpoints ran away. The most efficient drying happens when the inside dewpoint is as low as possible during the highest temperatures. There shouldn't be any water hanging around above the ambient dewpoint.There are delusions of rewinding the solenoid to run on lower voltage & higher current & higher frequency. The only real capacity change would come from a bigger pump. The volume of air is limited by the mechanics. Bigger aquarium pumps take more space, cost more & are louder.
![]()
![]()
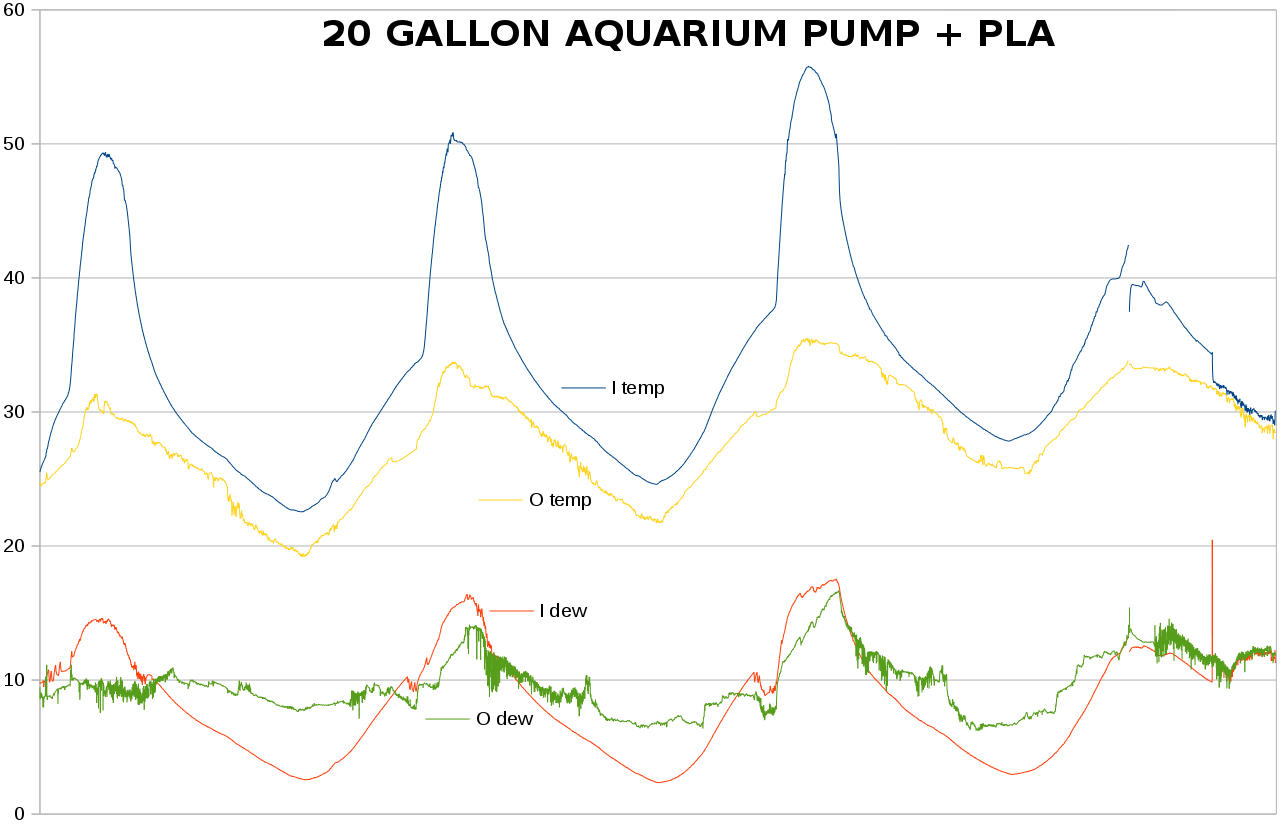
2 days showed it pulling more water out than the passive valves but not as much as the adafruit pump. At least it was silent.
![]()
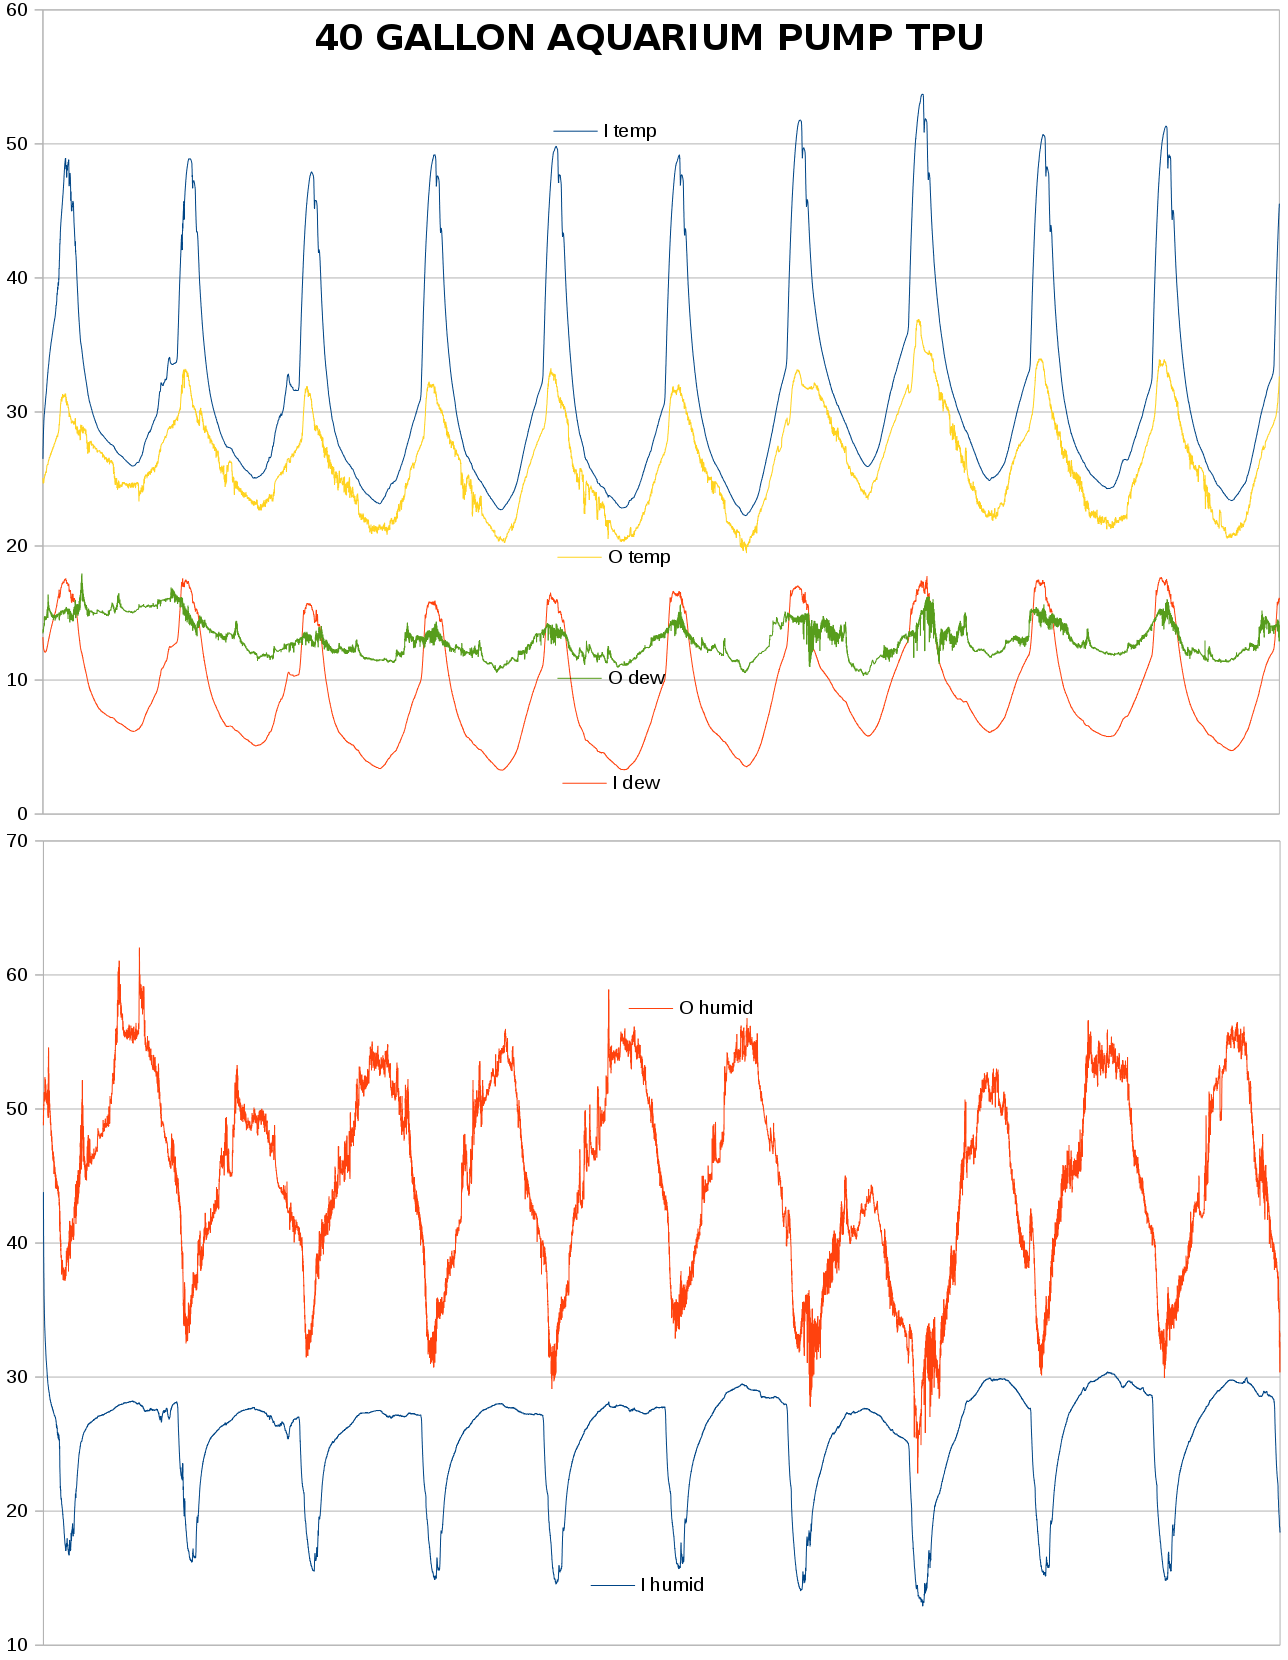
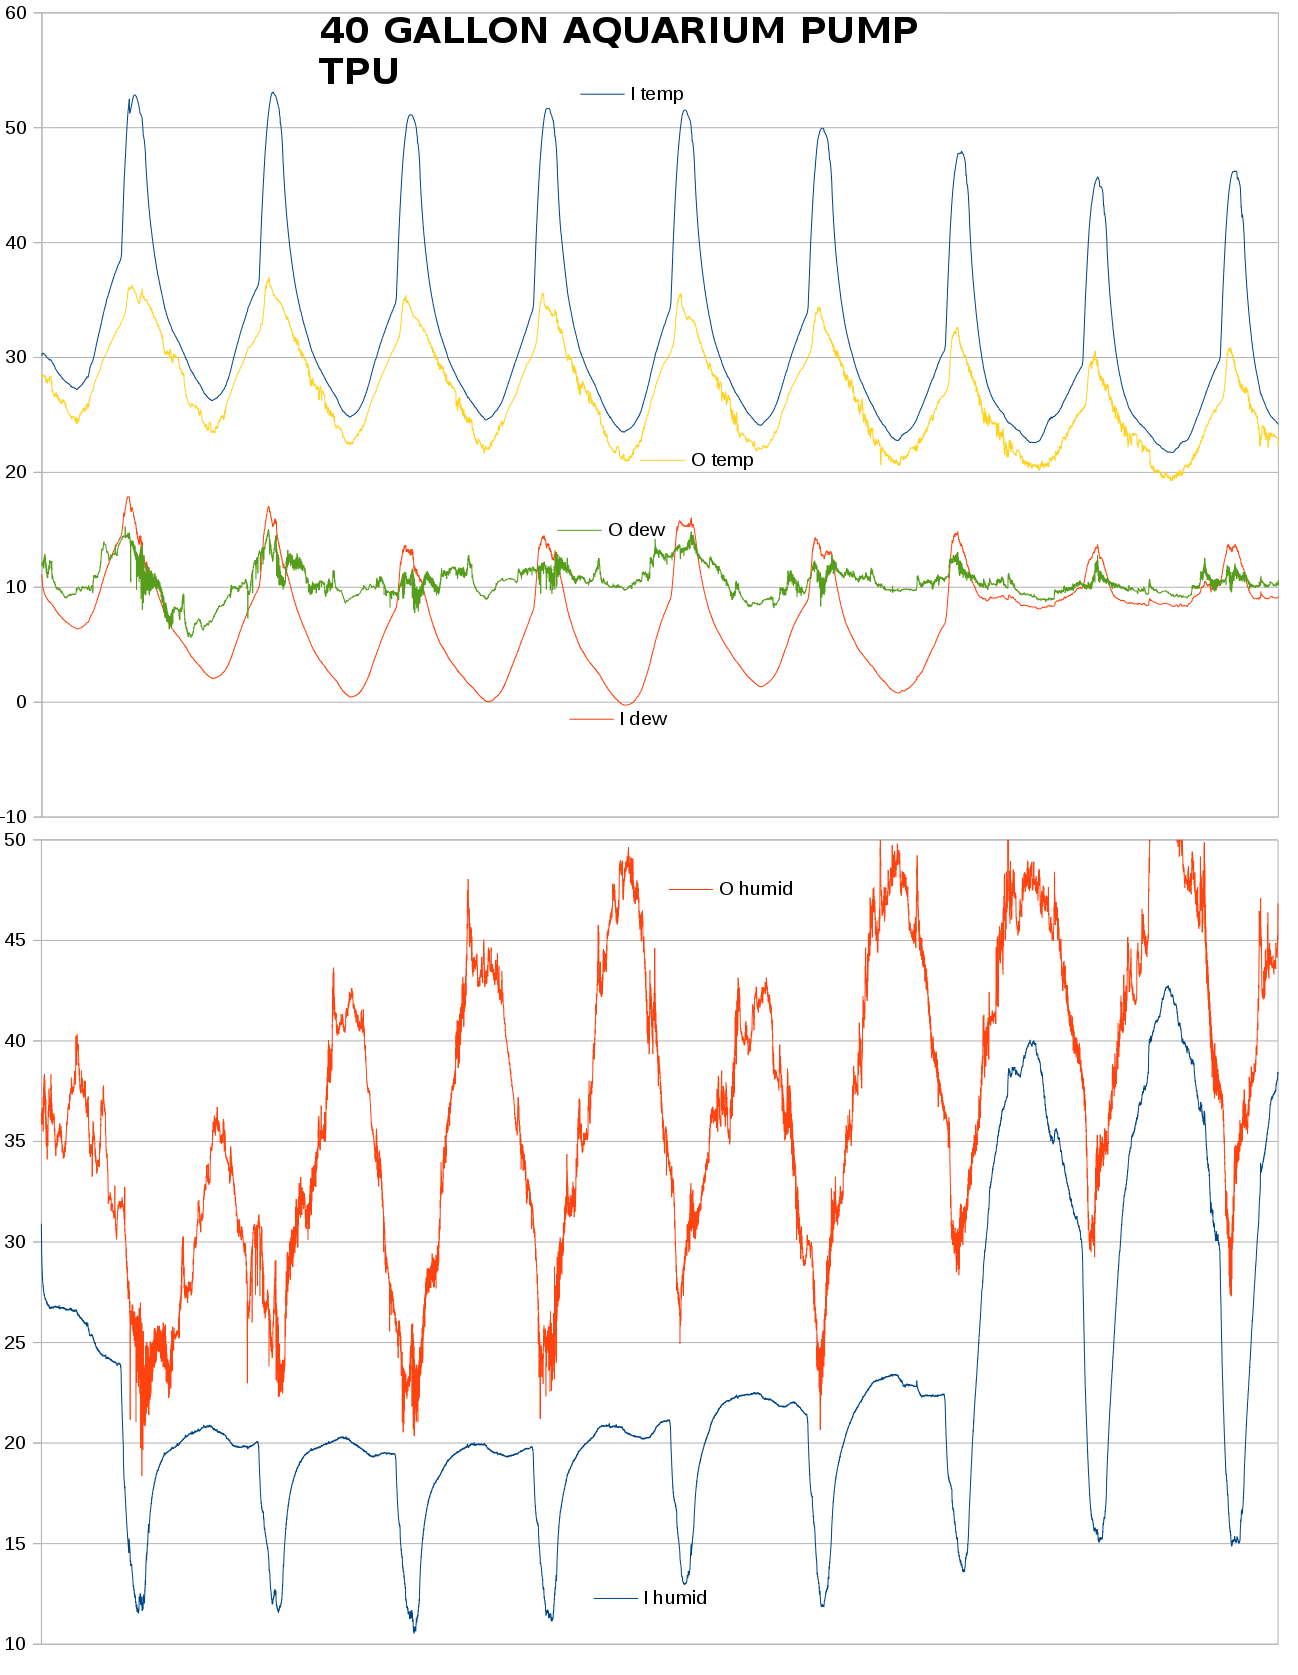
A 40 gallon pump quickly replaced the 10-20 gallon one. It was just as silent but had comparable thrust to the inkjet pump. It burned 3.5W.
![]()
Interior dew points were pulled right down to exterior dew points. Unfortunately, it still requires 120V. After 9 days, the triac failed on again & it started pumping in water instead of pumping it out. By this time, the lion kingdom was leaning on a defective triac. There could be 1 more attempt at a pulldown resistor between the gate & neutral but the mane idea was to buy a bag of triacs & a relay.
The next problem is the CPU fan as a circulation fan is dying. There's no way to lubricate it & it's not up to the conditions in the dehydrator. CPU fans are intended to blow cold air at a hot CPU, not circulate hot air. A more serviceable blower is needed.
-
Vacuum pump 2
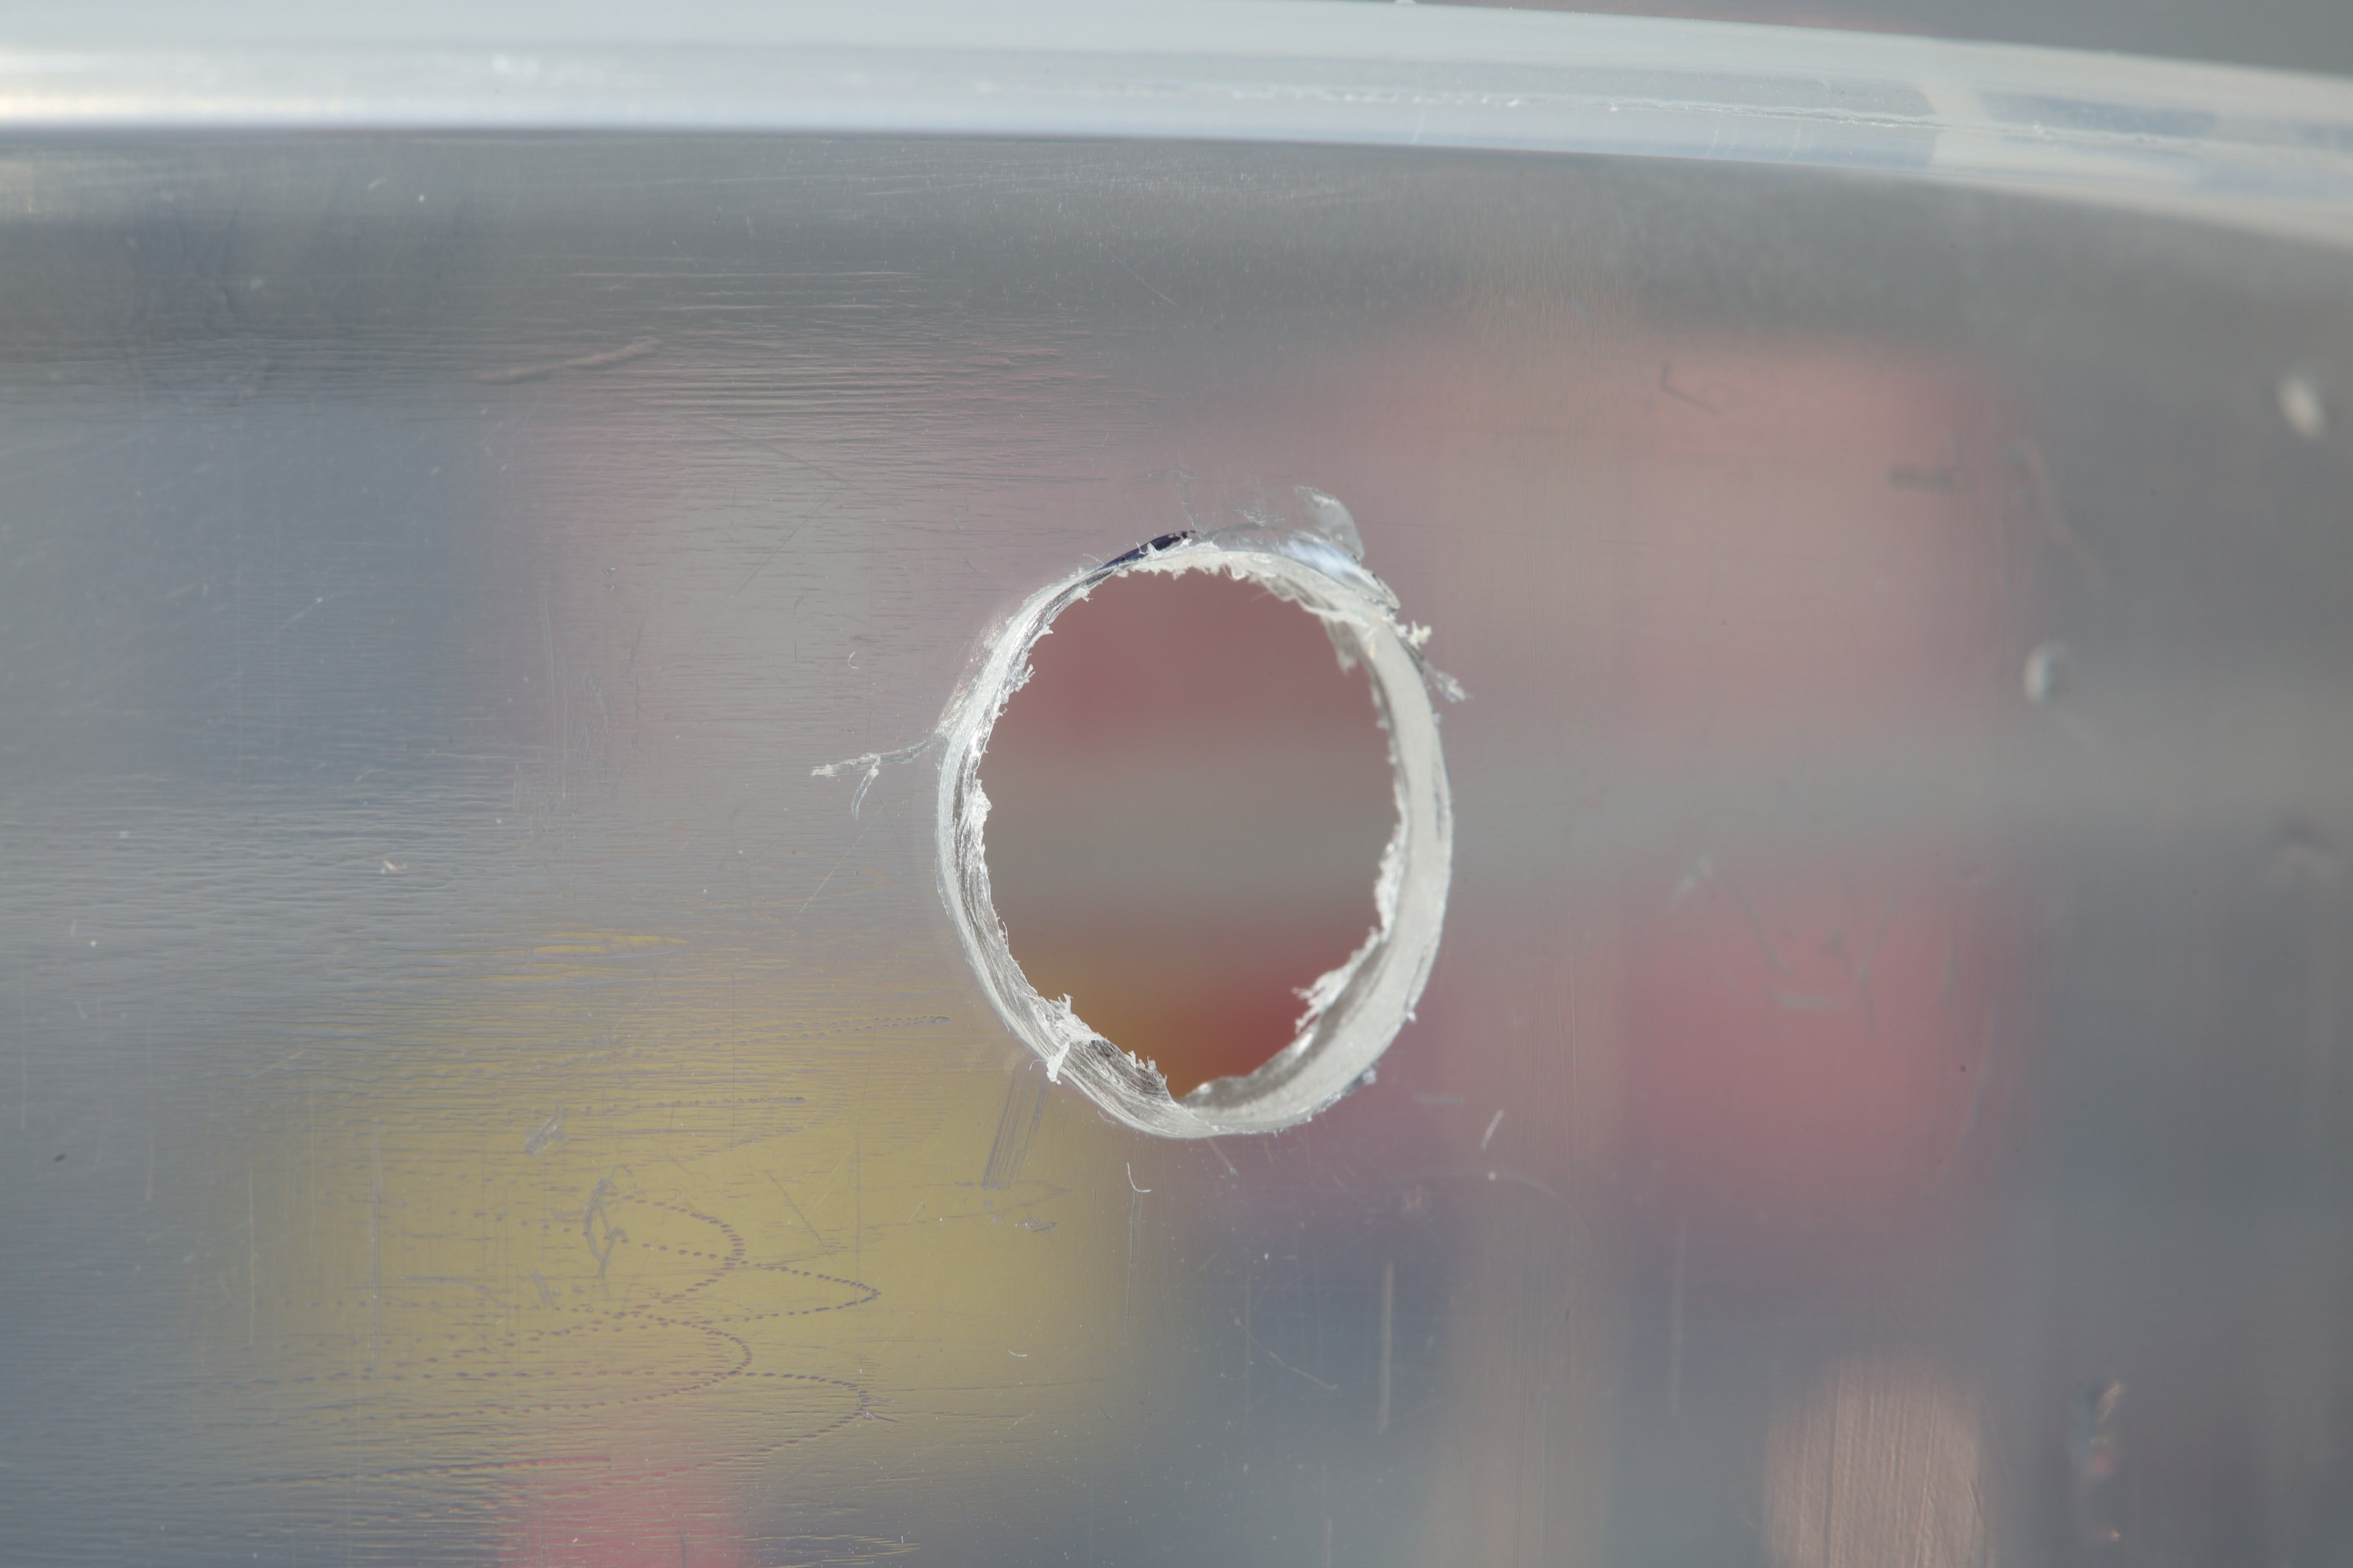
06/11/2022 at 07:16 • 0 commentsInstalling the tubes for the 2nd time in a new container, the lion kingdom noted some essential techniques to get an airtight seal. Melt the plastic & sand the edges to make holes. Cutting with an xacto or drilling cracks the plastic.
![]()
![]()
The new holes went right against the lid.
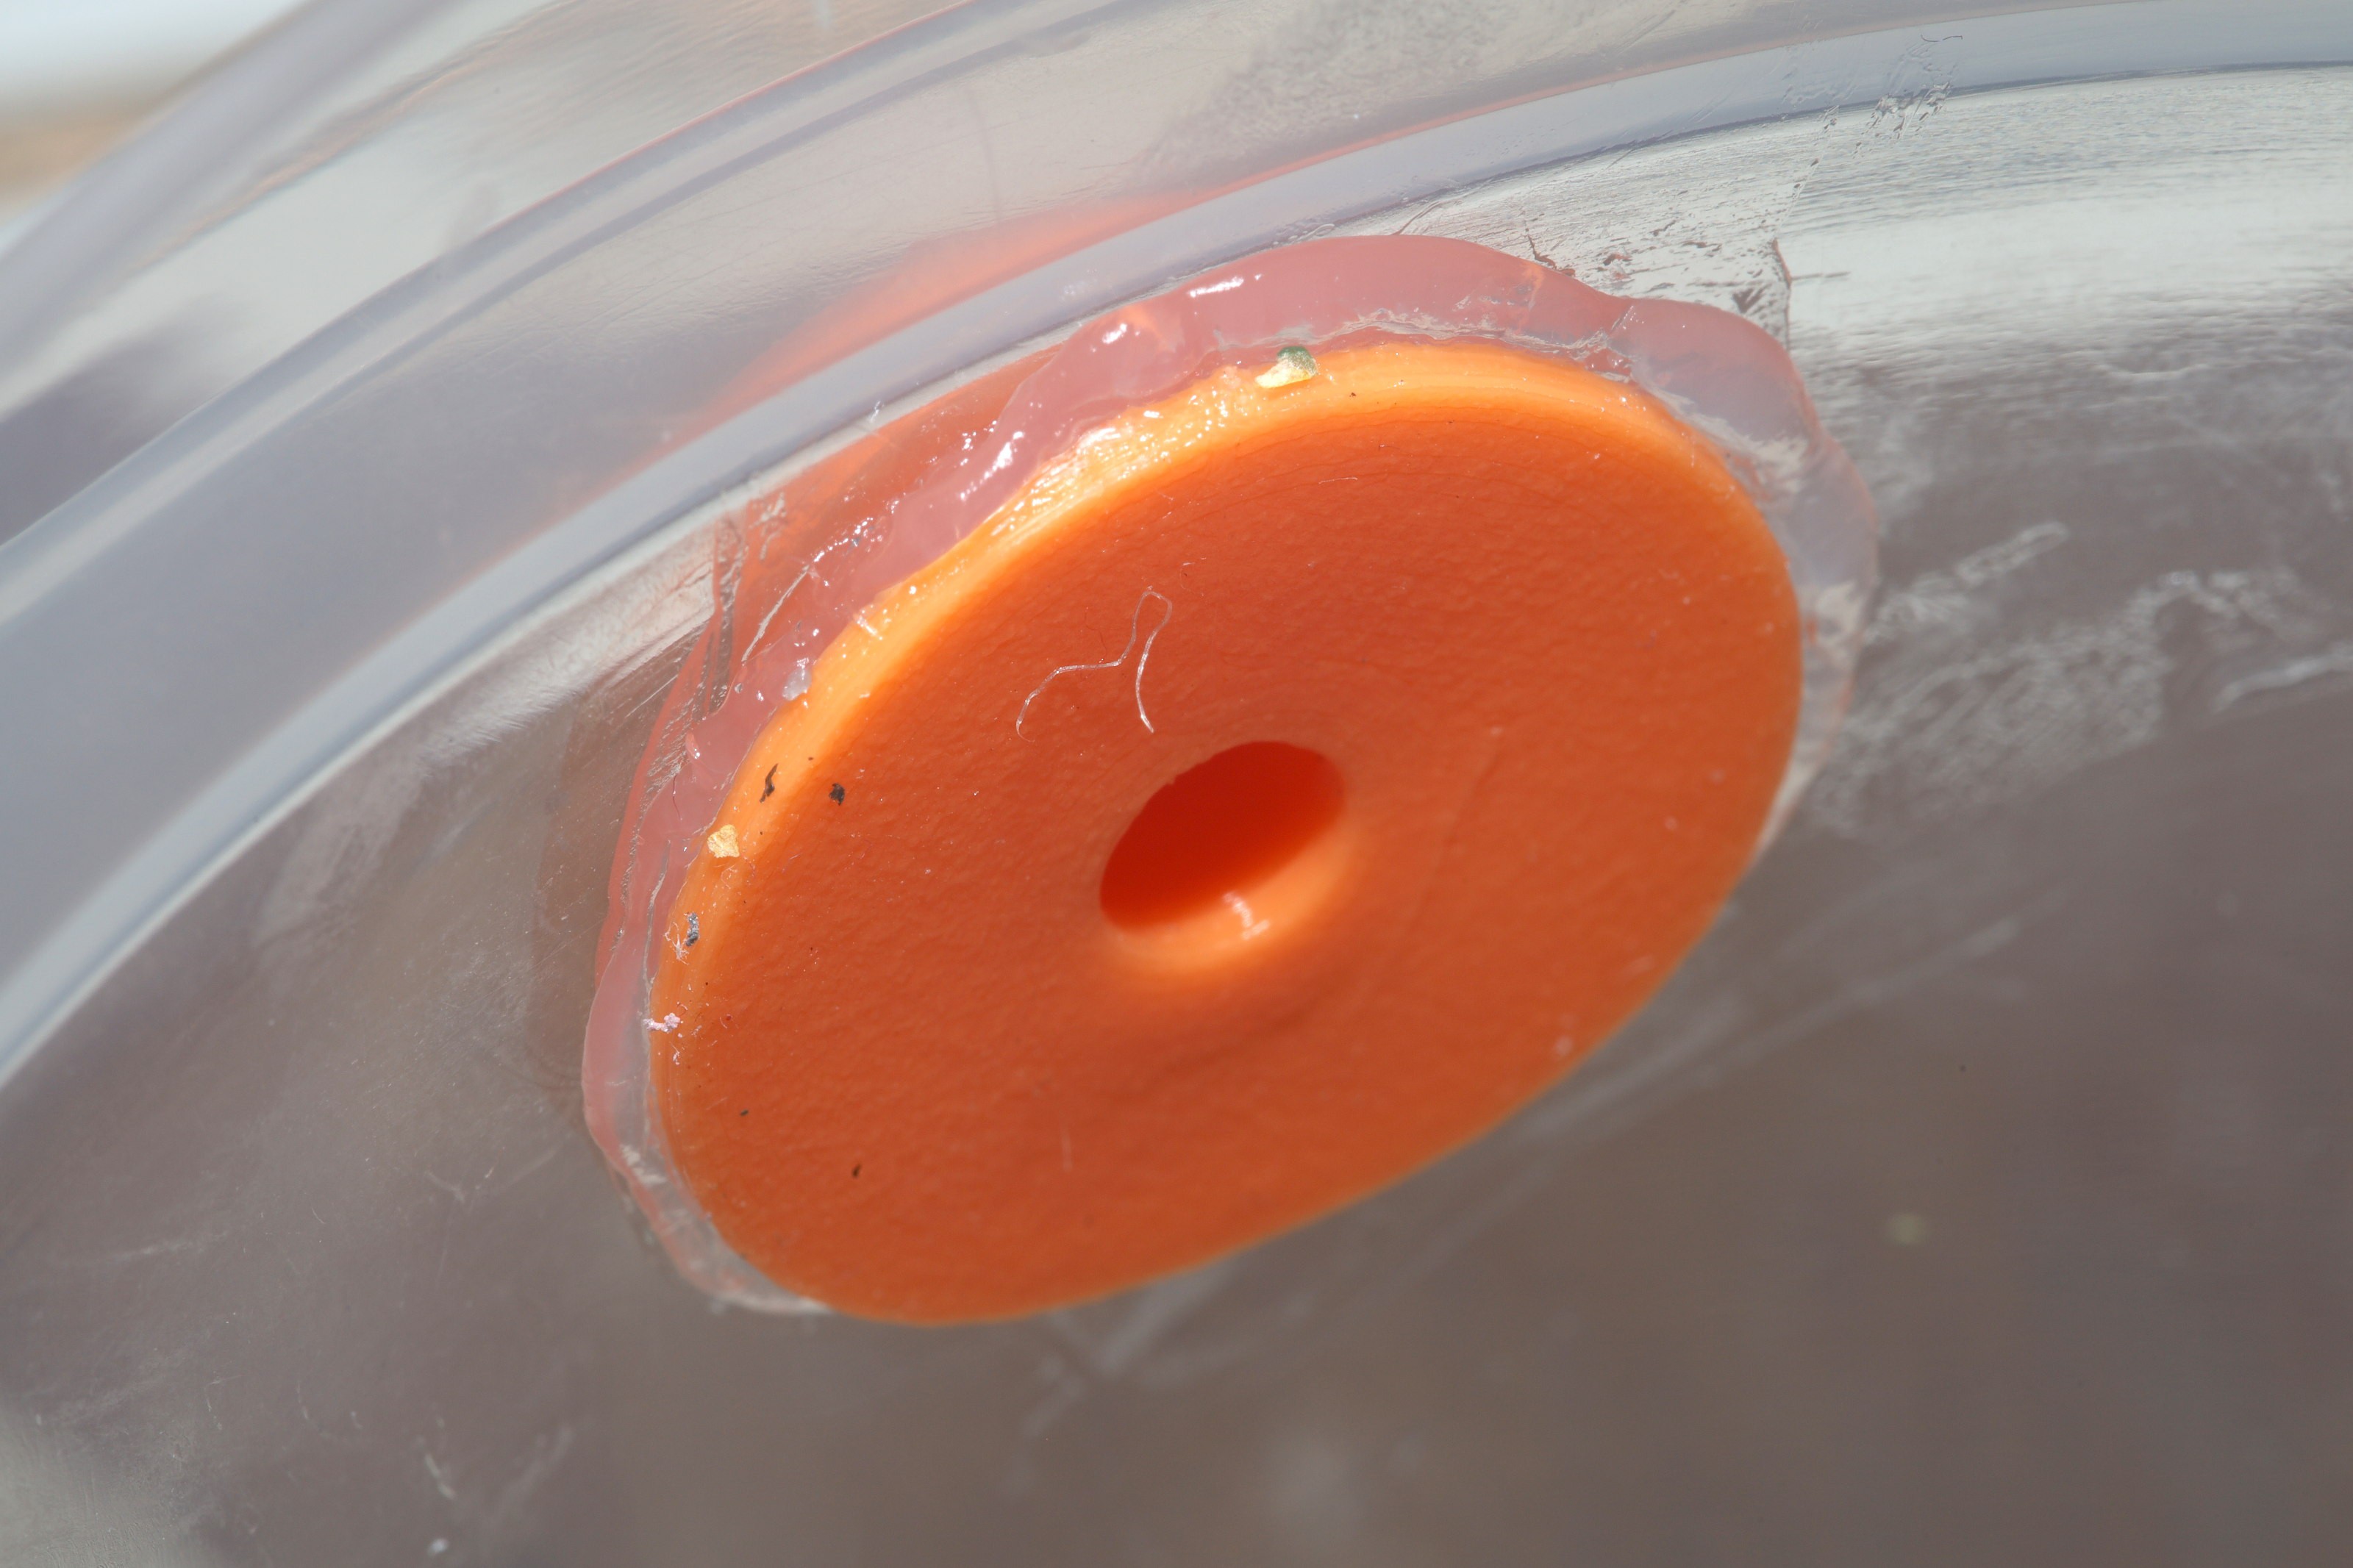
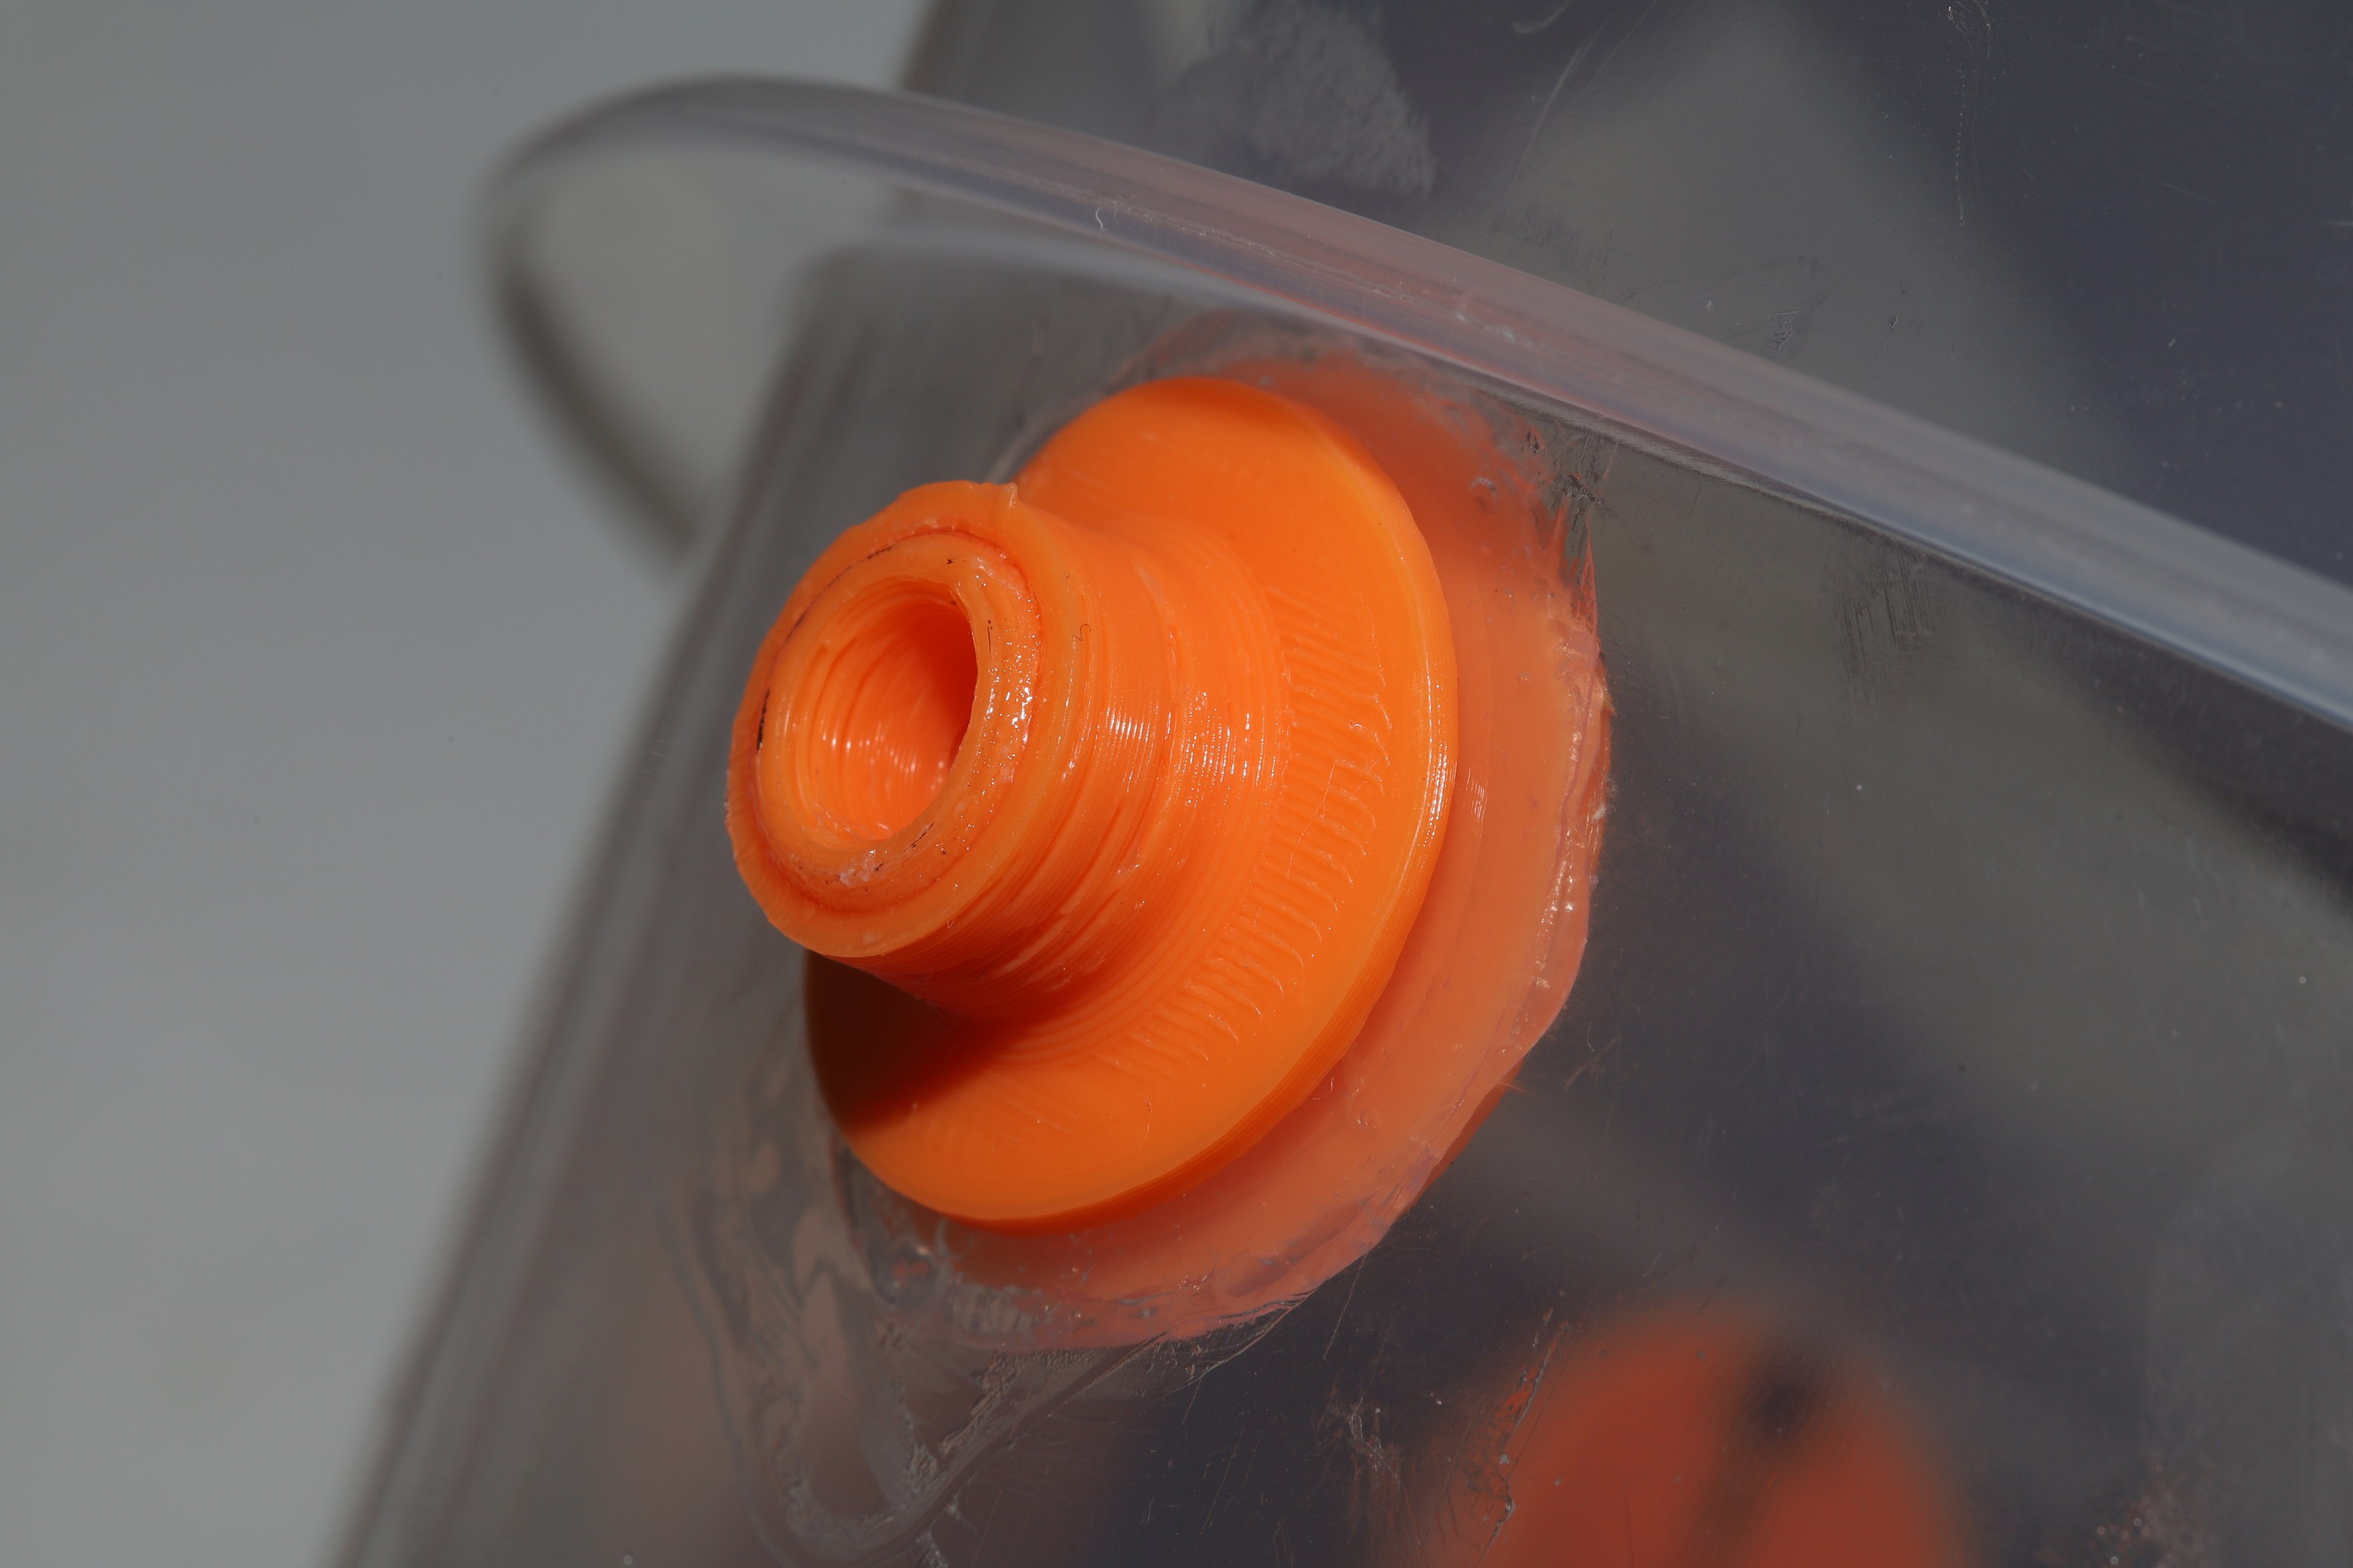
Install the inner components 1st. Mark which way is up. Melt them all to conform them to the inside shape. Then apply Loctite clear silicone to all the inner components & press them in place. Only after all the inner components are loosely adhered in place, slide the outer components on. Melt them to conform them to the outside shape. Apply CA glue to bond the 2 pieces after everything is in place.
To get the best silicone seal, the outer pieces have to slide on loosely. Melting the outer pieces stops them from sliding loosely.
![]()
![]()
The lion kingdom has a PLA hydration problem.
![]()
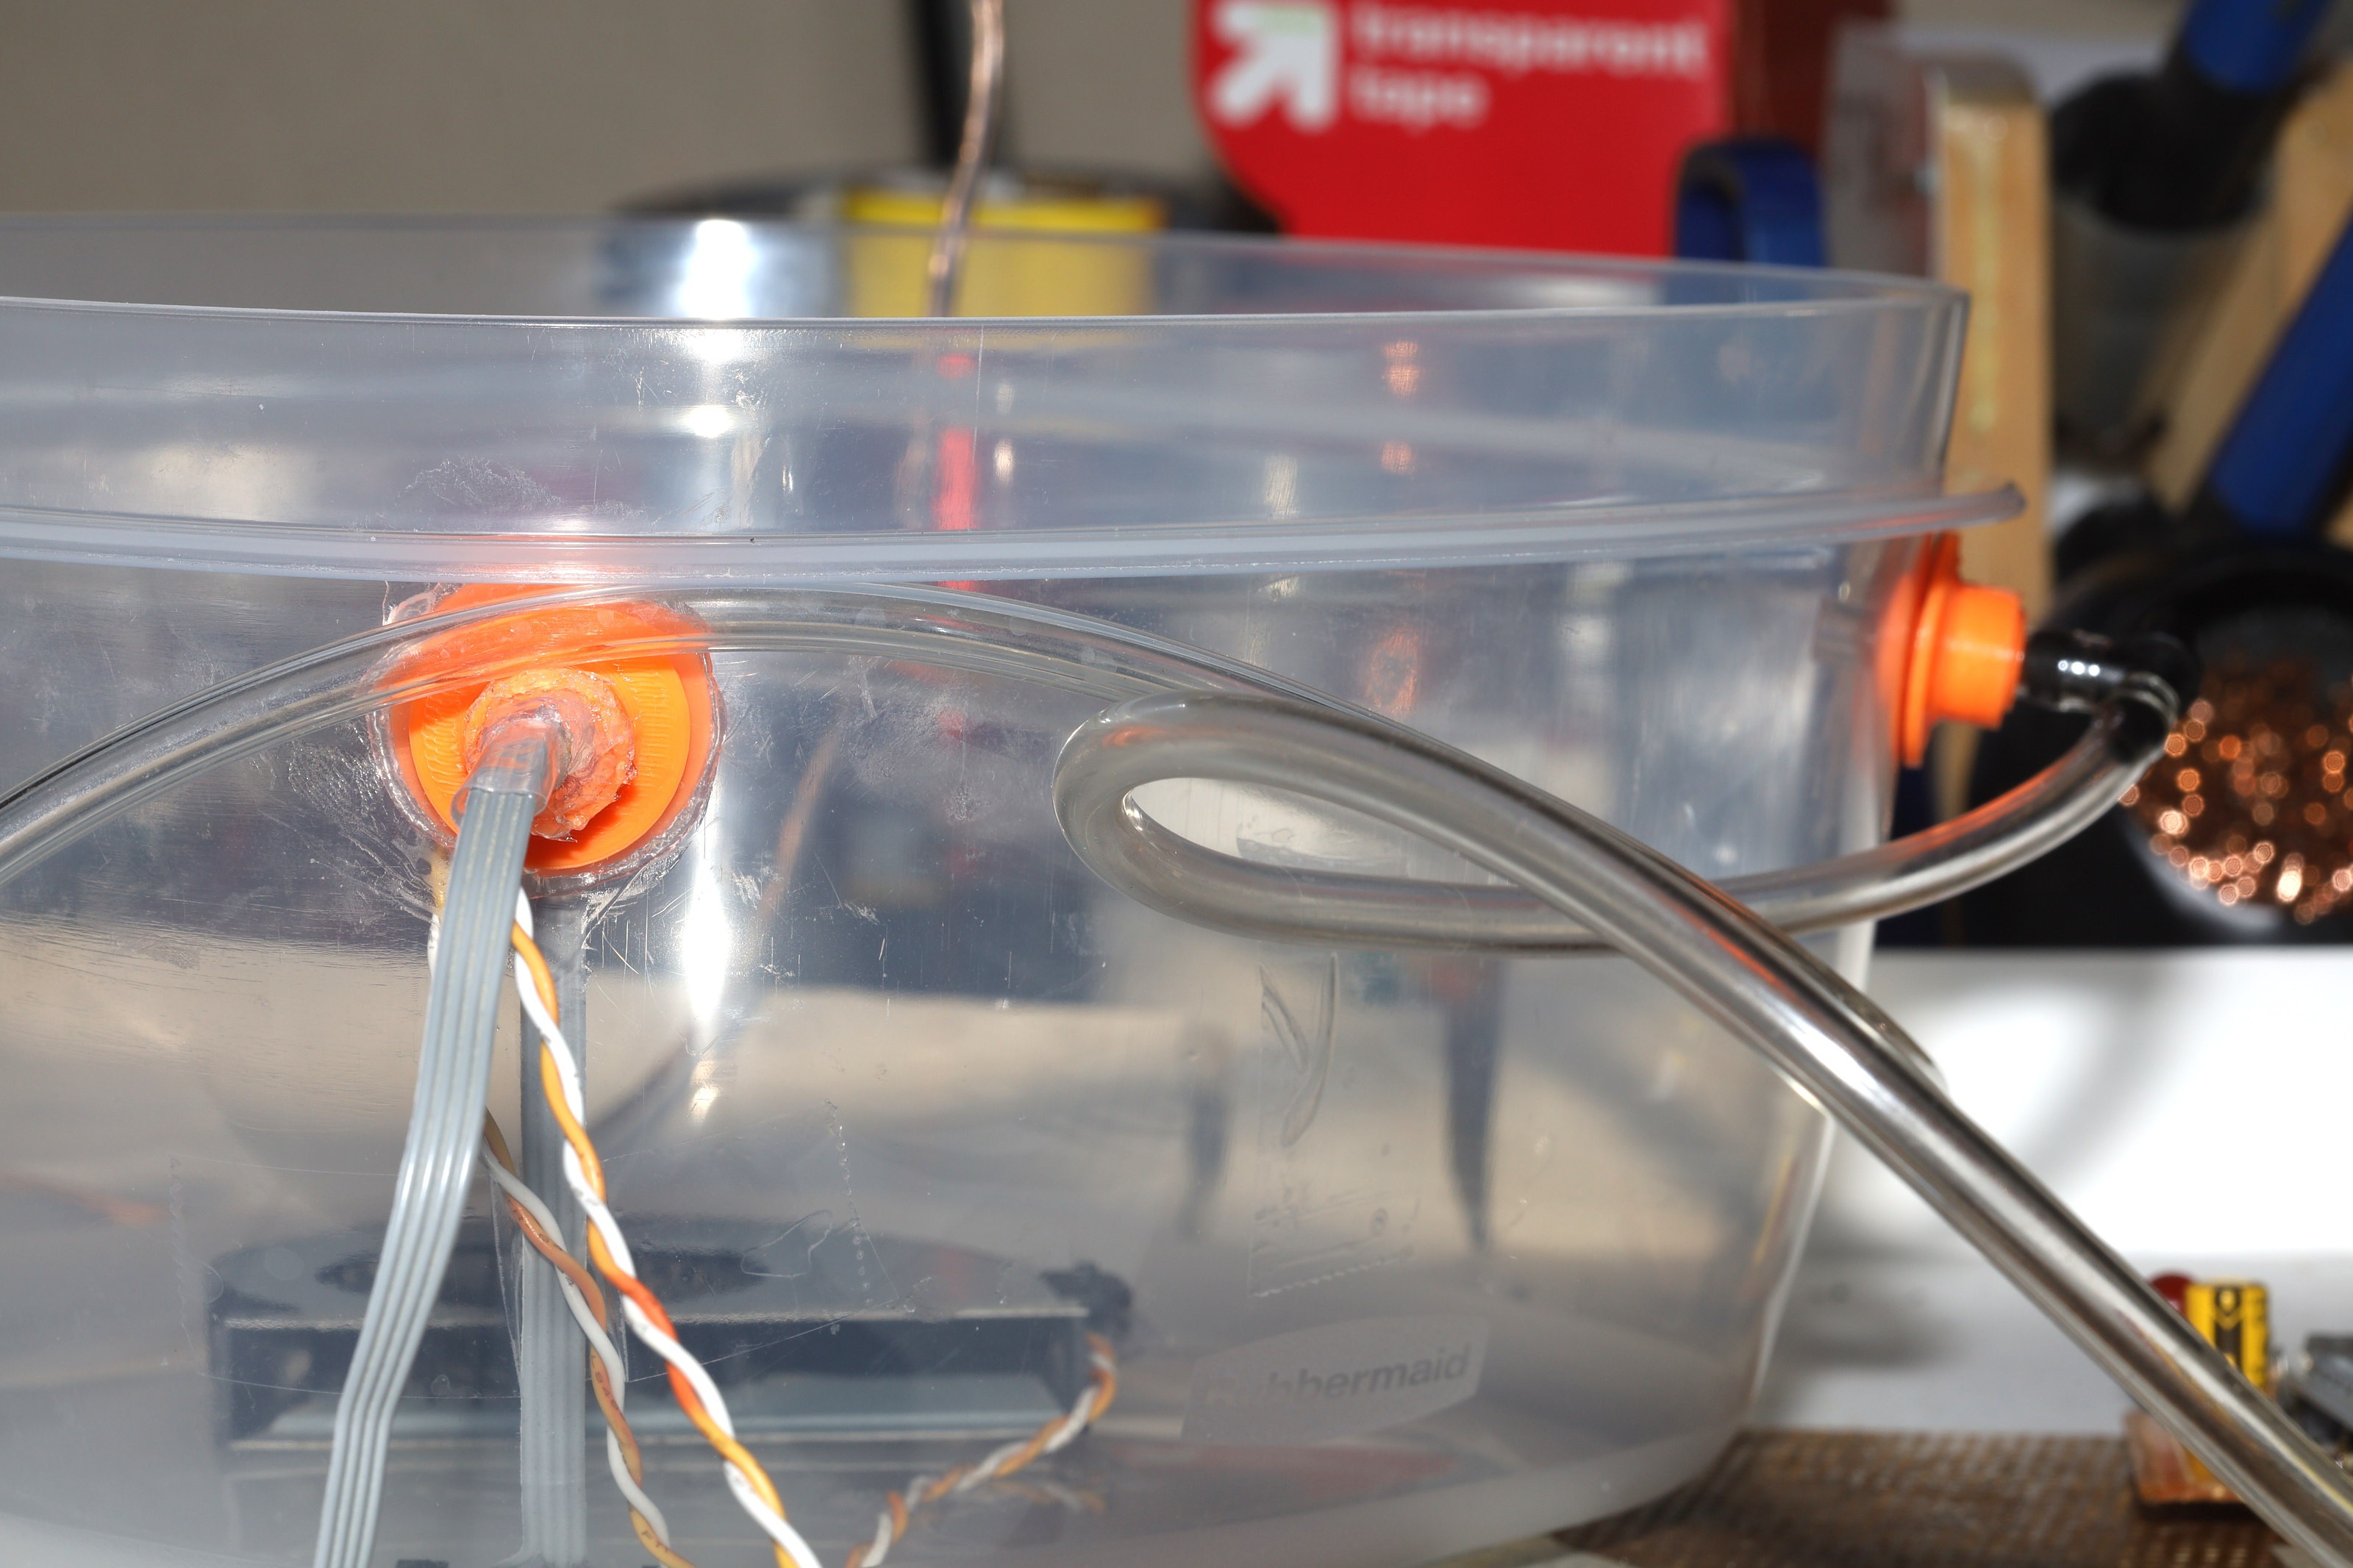
Silicone was stuffed in the wiring hole.
![]()
The pump was stuffed between some stuff in a box to try to quiet it. This was not really any quieter.
![]()
Hoses used normal 1/4" drip tubing, which allowed many right angle connectors.
![]()
The rebuilt pump MOSFET got no flyback diode or pulldown resistor. The fuse resistor might reduce the flyback current.
![]()
Humidity was pumped back down to 30% below ambient. Dew point was pumped back down to below 0.
![]()
![]()
After a few days of pain from that pump running continuously all afternoon, attention turned to a silent aquarium pump. Silent vacuums don't exist. It has to be a pump. They all use 1/4" tubes & manes voltage.
https://www.amazon.com/gp/product/B0009YJ4N6
A thyristor is required.
https://www.amazon.com/Module-Thyristor-Control-Trigger-High-Power/dp/B07P6HX85G/
The pump has to go in the inlet on the bottom. The outlet tube now has to wrap over the top. There have to be 2 manes plugs.
-
Dual valve upgrade
06/02/2022 at 07:09 • 0 comments![]()
![]()
Driving them off the same PWM does work. Get the confuser to close the valves before installing the servo. Then install the servo in the closed position with slight tension on the TPU. The valve closes by turning counter clockwise, so the TPU has to be twisted slightly in the clockwise direction.
There was no way to put the 2nd valve any lower than half way, so it went as close as possible to the circulation fan. The mane problem with valves is the inlet air is much warmer than the outside sensor. The sensor can't go near the heated container.
![]()
![]()
A week of drying showed a 10-15% difference in humidity being manetained & no difference in night time dew point being manetained.
The last set of data with the pump showed a 20-30% difference in humidity during the day & nighttime dew point pulling 10 deg below ambient.
https://hackaday.io/project/183147/log/206421-changing-pumps
This proved the air seal with the pump made a difference. The valves are no match against the volume changes of the air.
The next task is reconstituting the pump system & making it quiet. Despite its tendency to stay on all day like it wasn't working, it actually was working better than than the passive valves & it's already paid for. The times when it came on at night were only when a cold front moved through.
-
3 days of butterfly valve drying
05/30/2022 at 21:30 • 0 comments![]()
![]()
3 days of data showed the passive valve achieving humidity 5% higher than the active pump.
![]()
![]()
Both devices kept the inside temperature above the outside temperature. The mane problem is the passive valve doesn't replace the inside air as much as the pump. Inside dewpoint is allowed to rise higher with the valve, but it still has limited ability to clamp the dewpoint. Inside temperatures didn't get as high, probably because the valve isn't air tight. A small fan blowing air down half of the valve would replace more of the air.
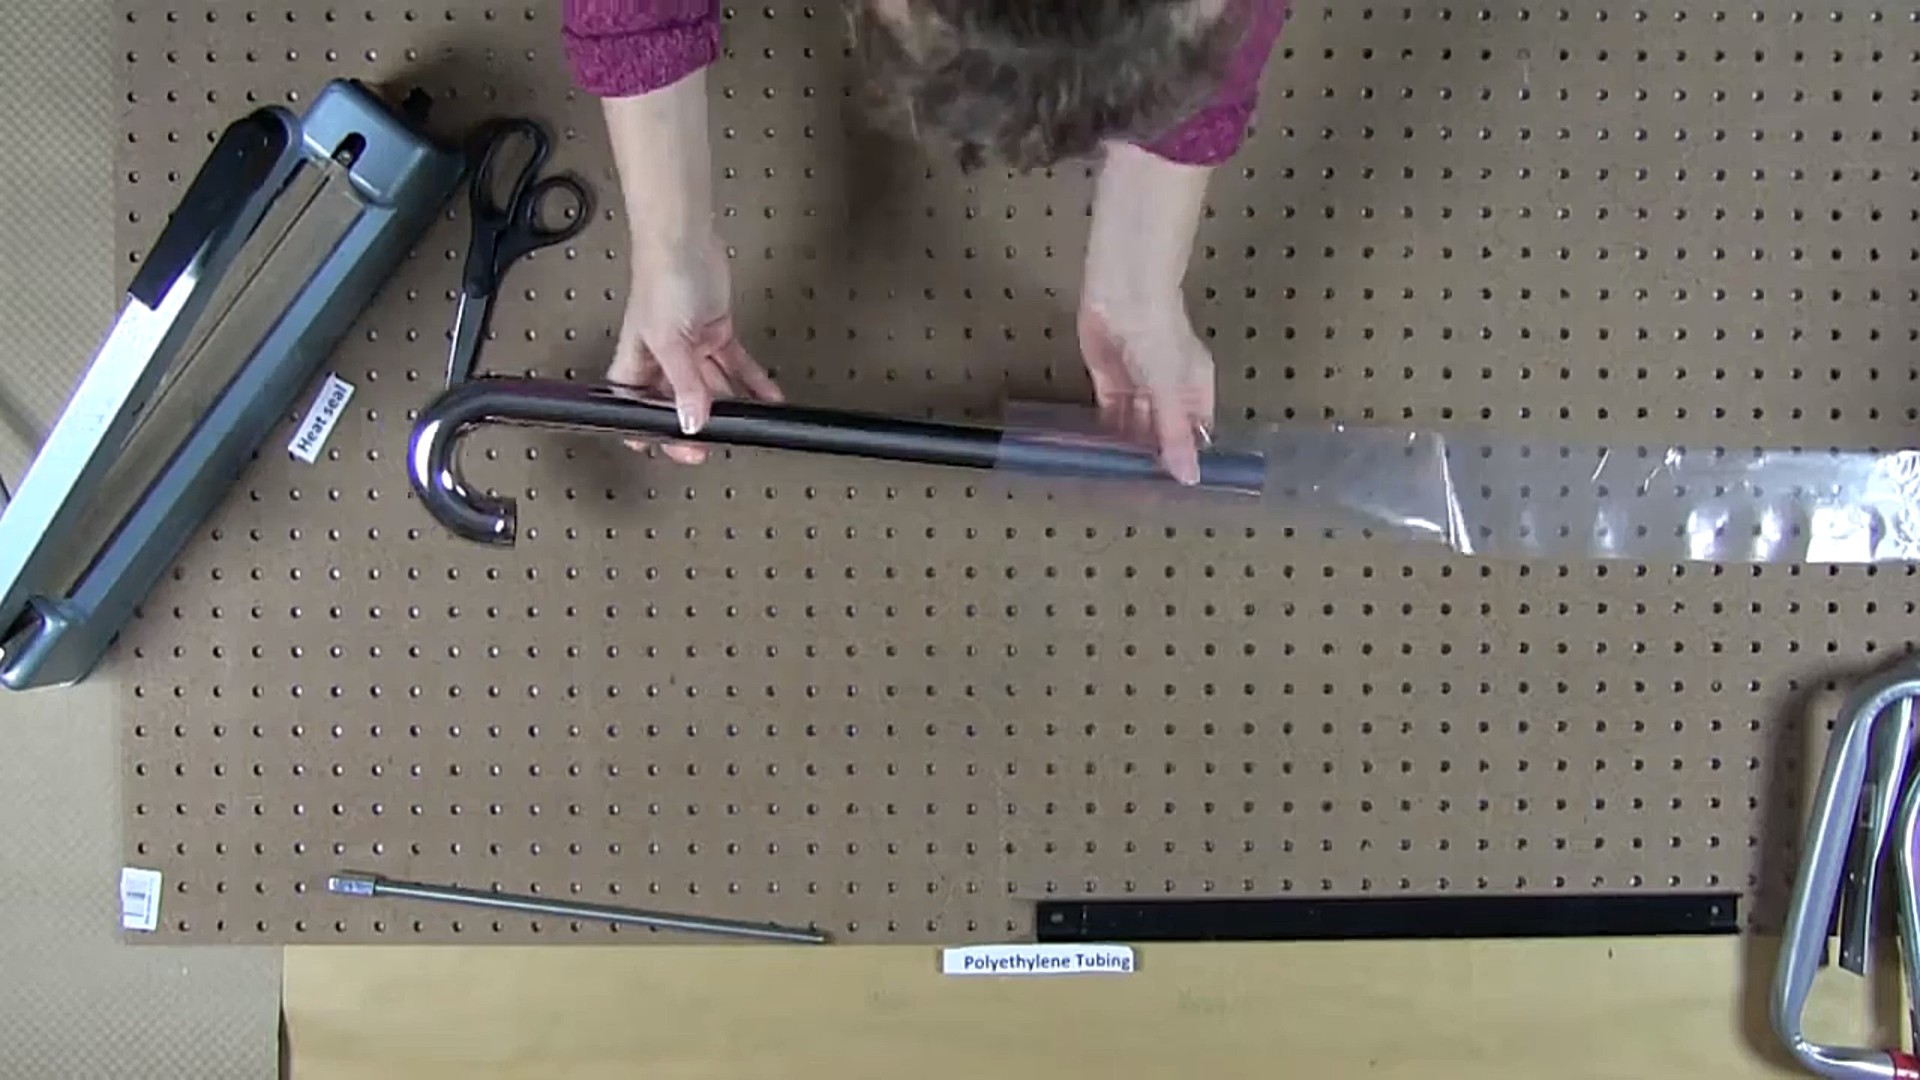
The results were a bit too degraded to live with so forced air started gaining favor again. There was the idea of a non self supporting air duct made of 3" poly tubing but poly tubing in small quantities is extremely expensive.
![]()
![]()
The alternative is taping bits of polyethylene together to make a tube. It's not air tight & it doesn't create a seal against the blower. The types of blowers which are silent don't generate enough static pressure to inflate the tube. Between the lack of air pressure & the leaks, the tube has to be self supporting to move any air.
It might be good enough just to have a 2nd butterfly valve on the bottom of the lid to let cold air in.
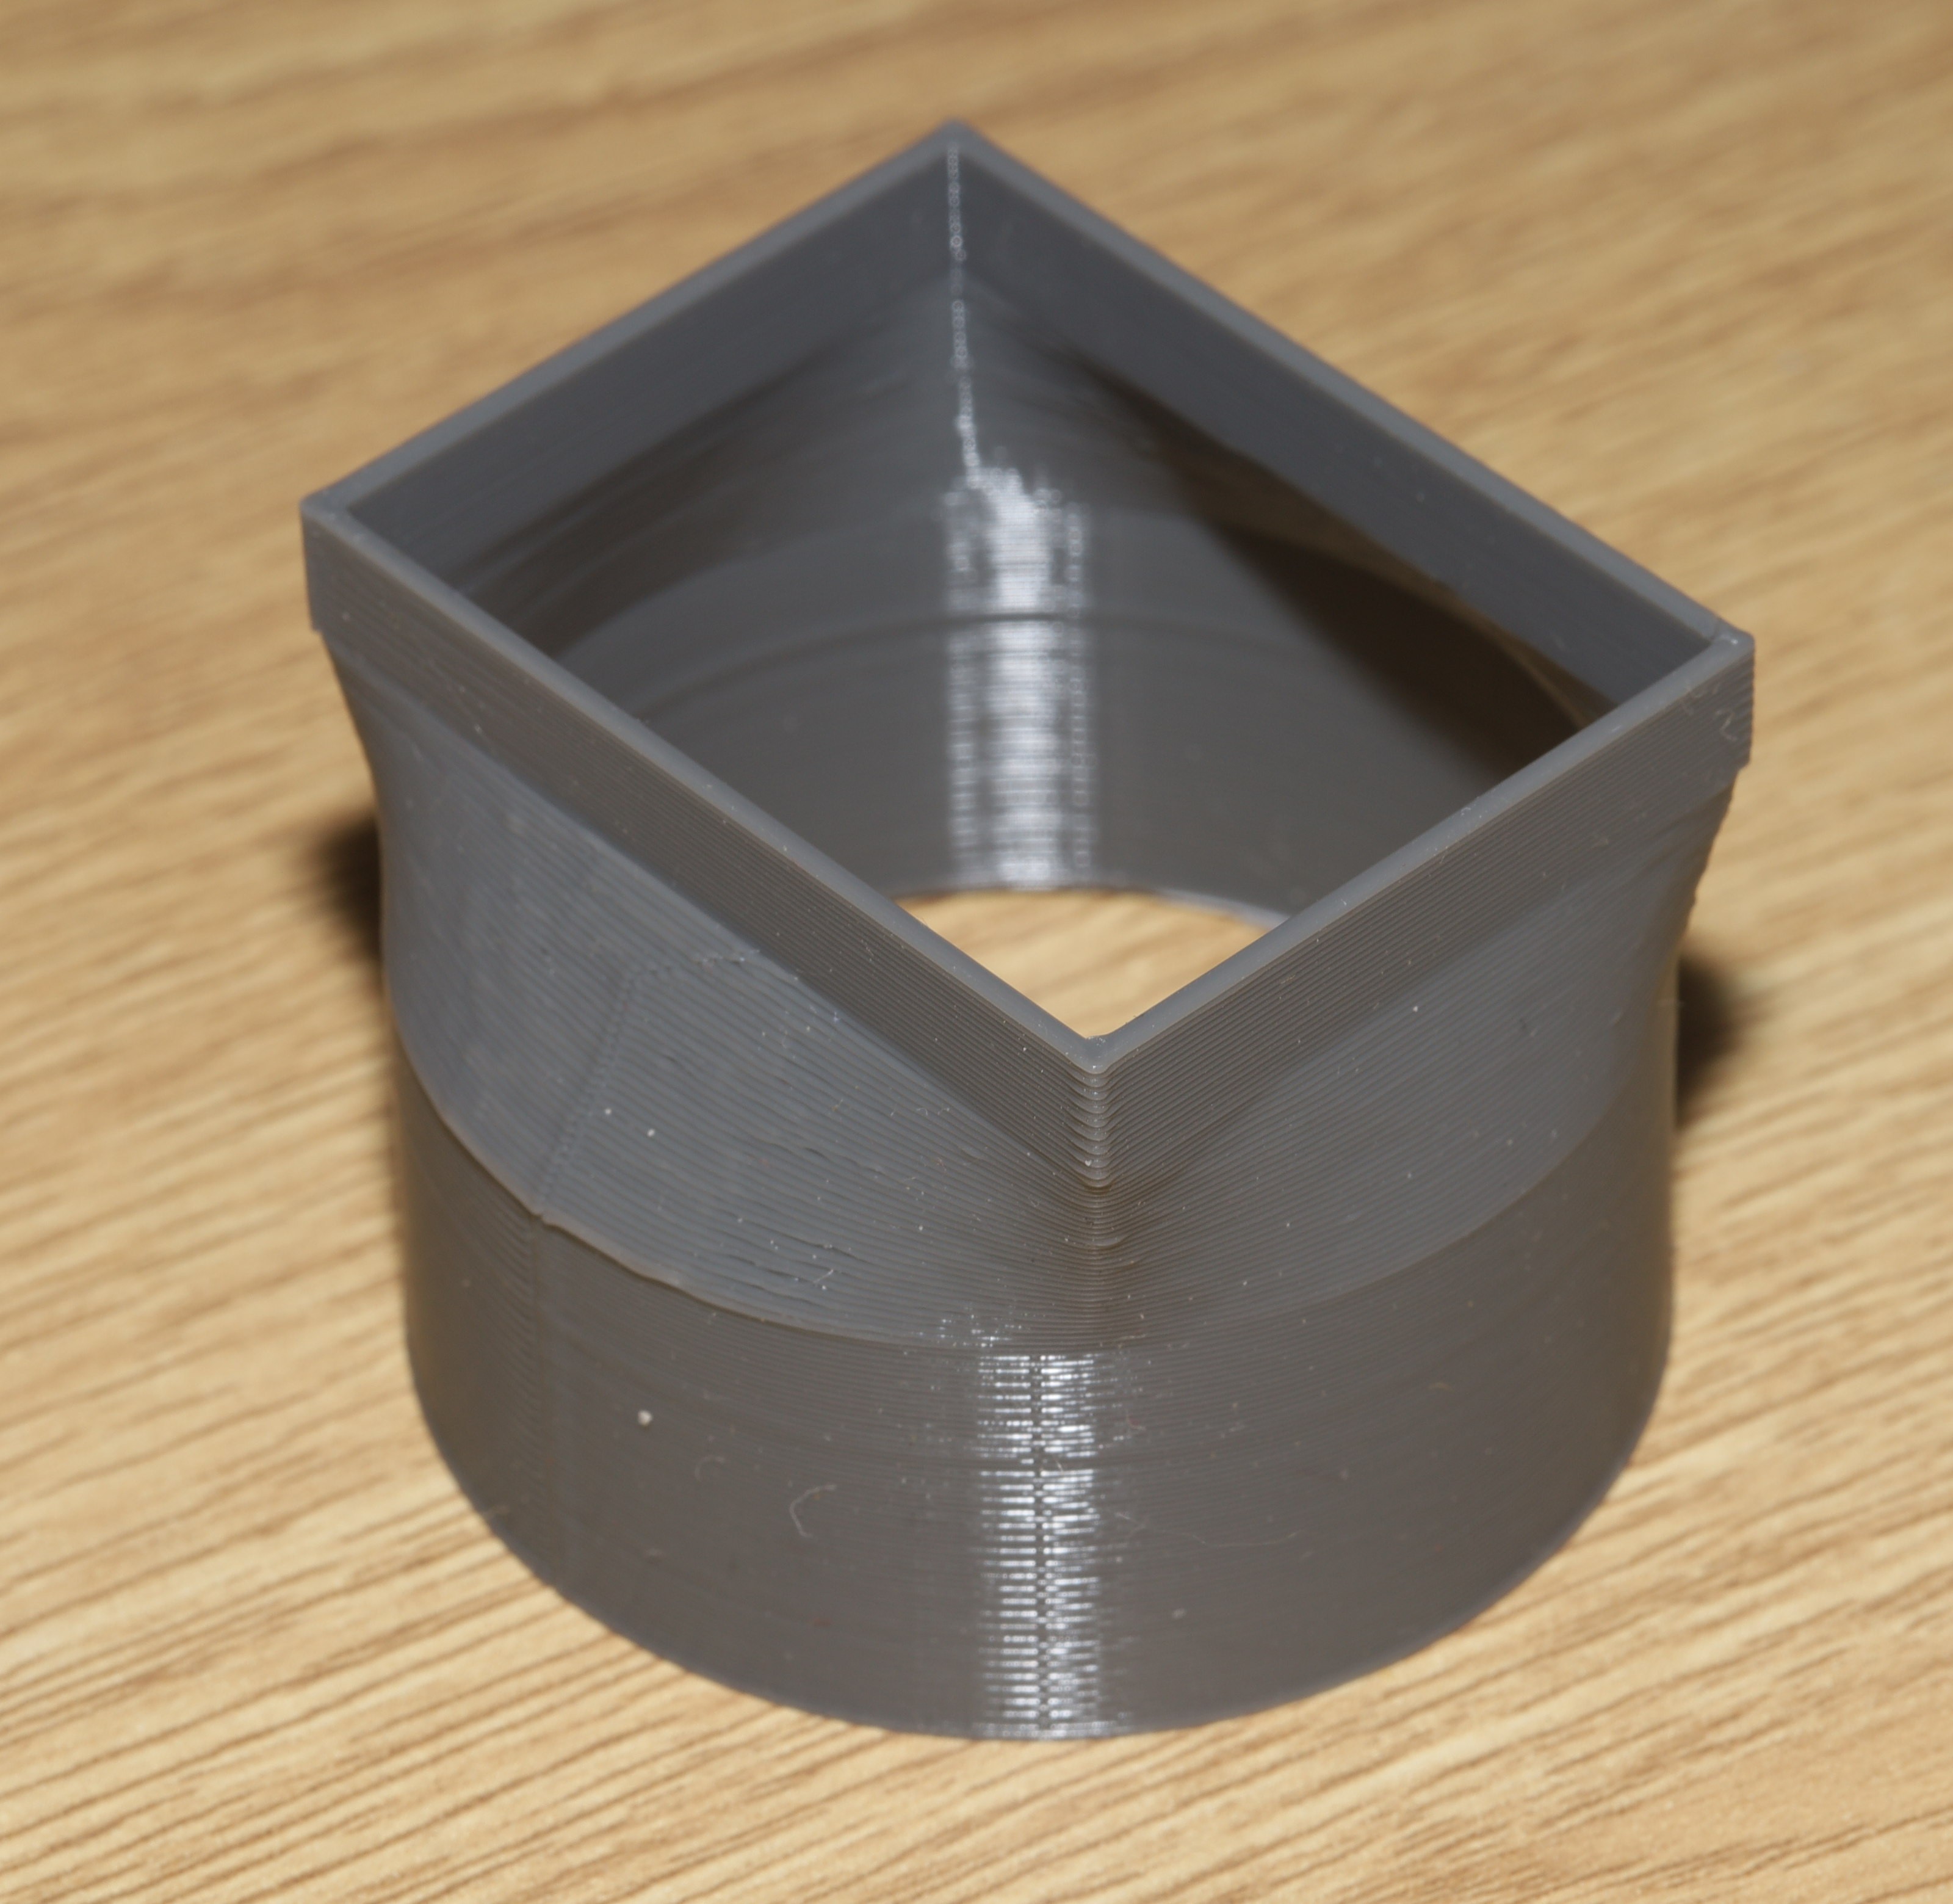
![]()
At least it yielded a nice adapter. 3 years ago, an adapter like that would have entailed many trips to the homeless despot, bodging together random vacuum cleaner parts.
-
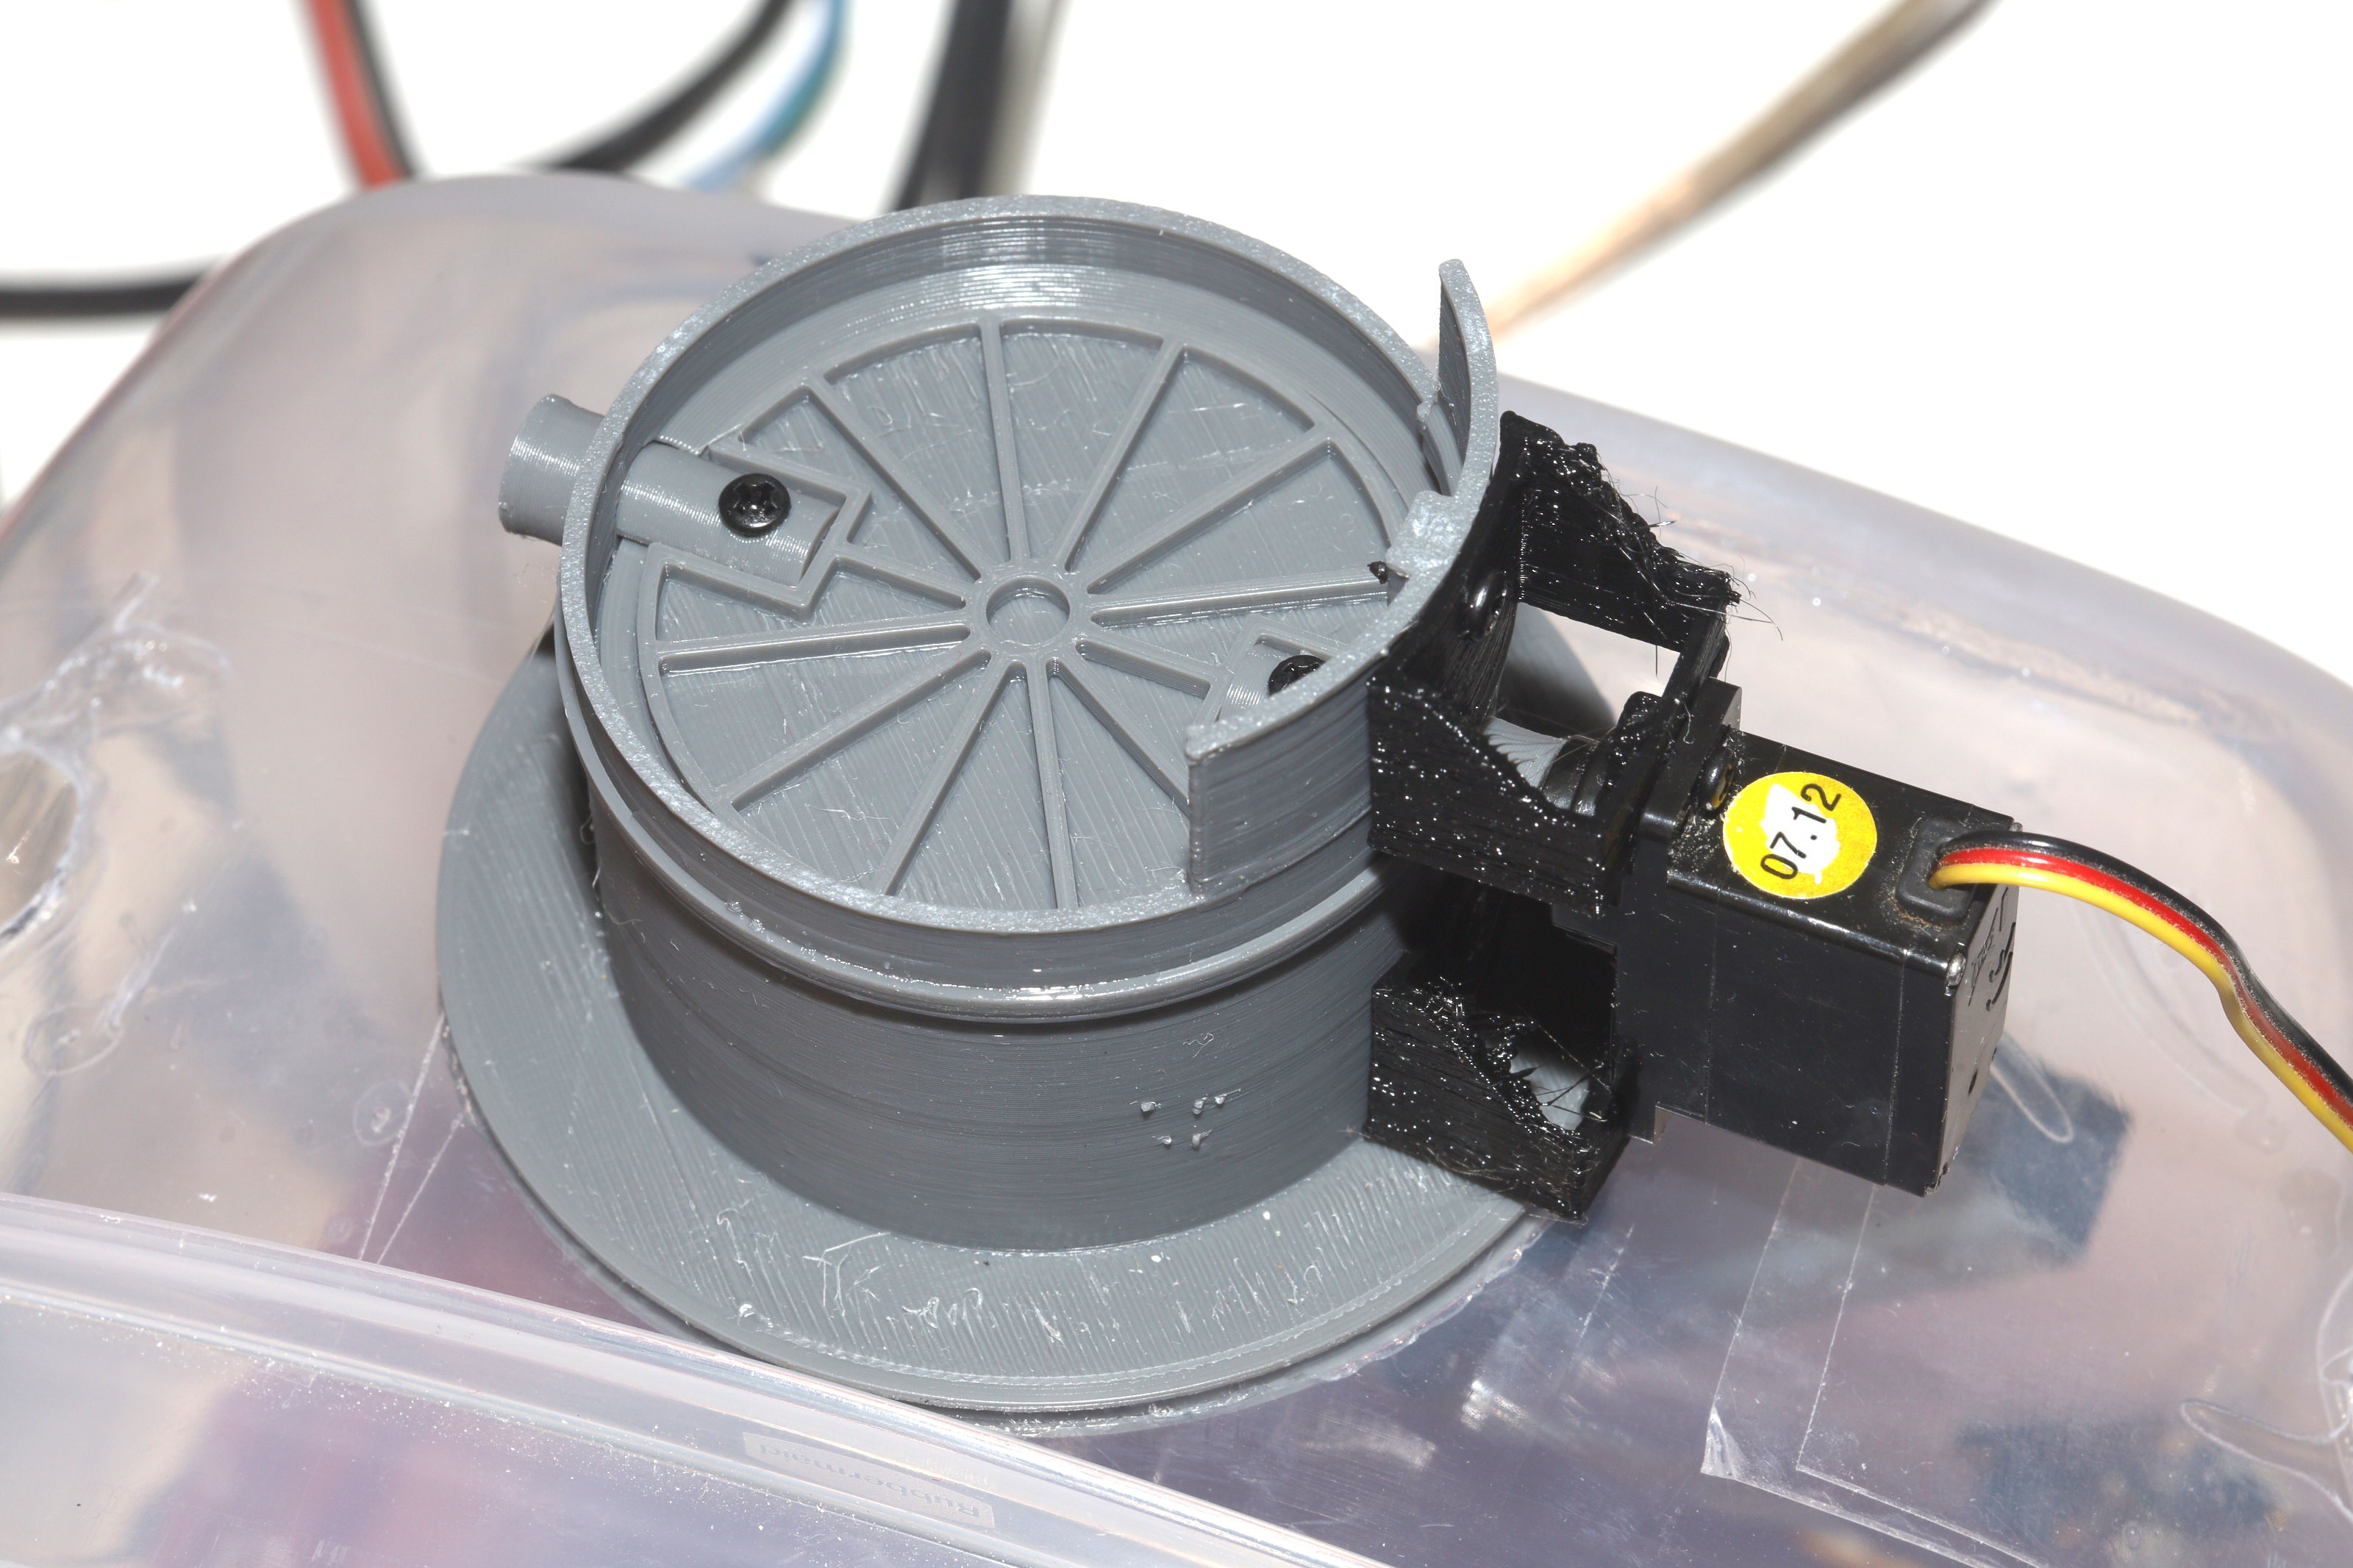
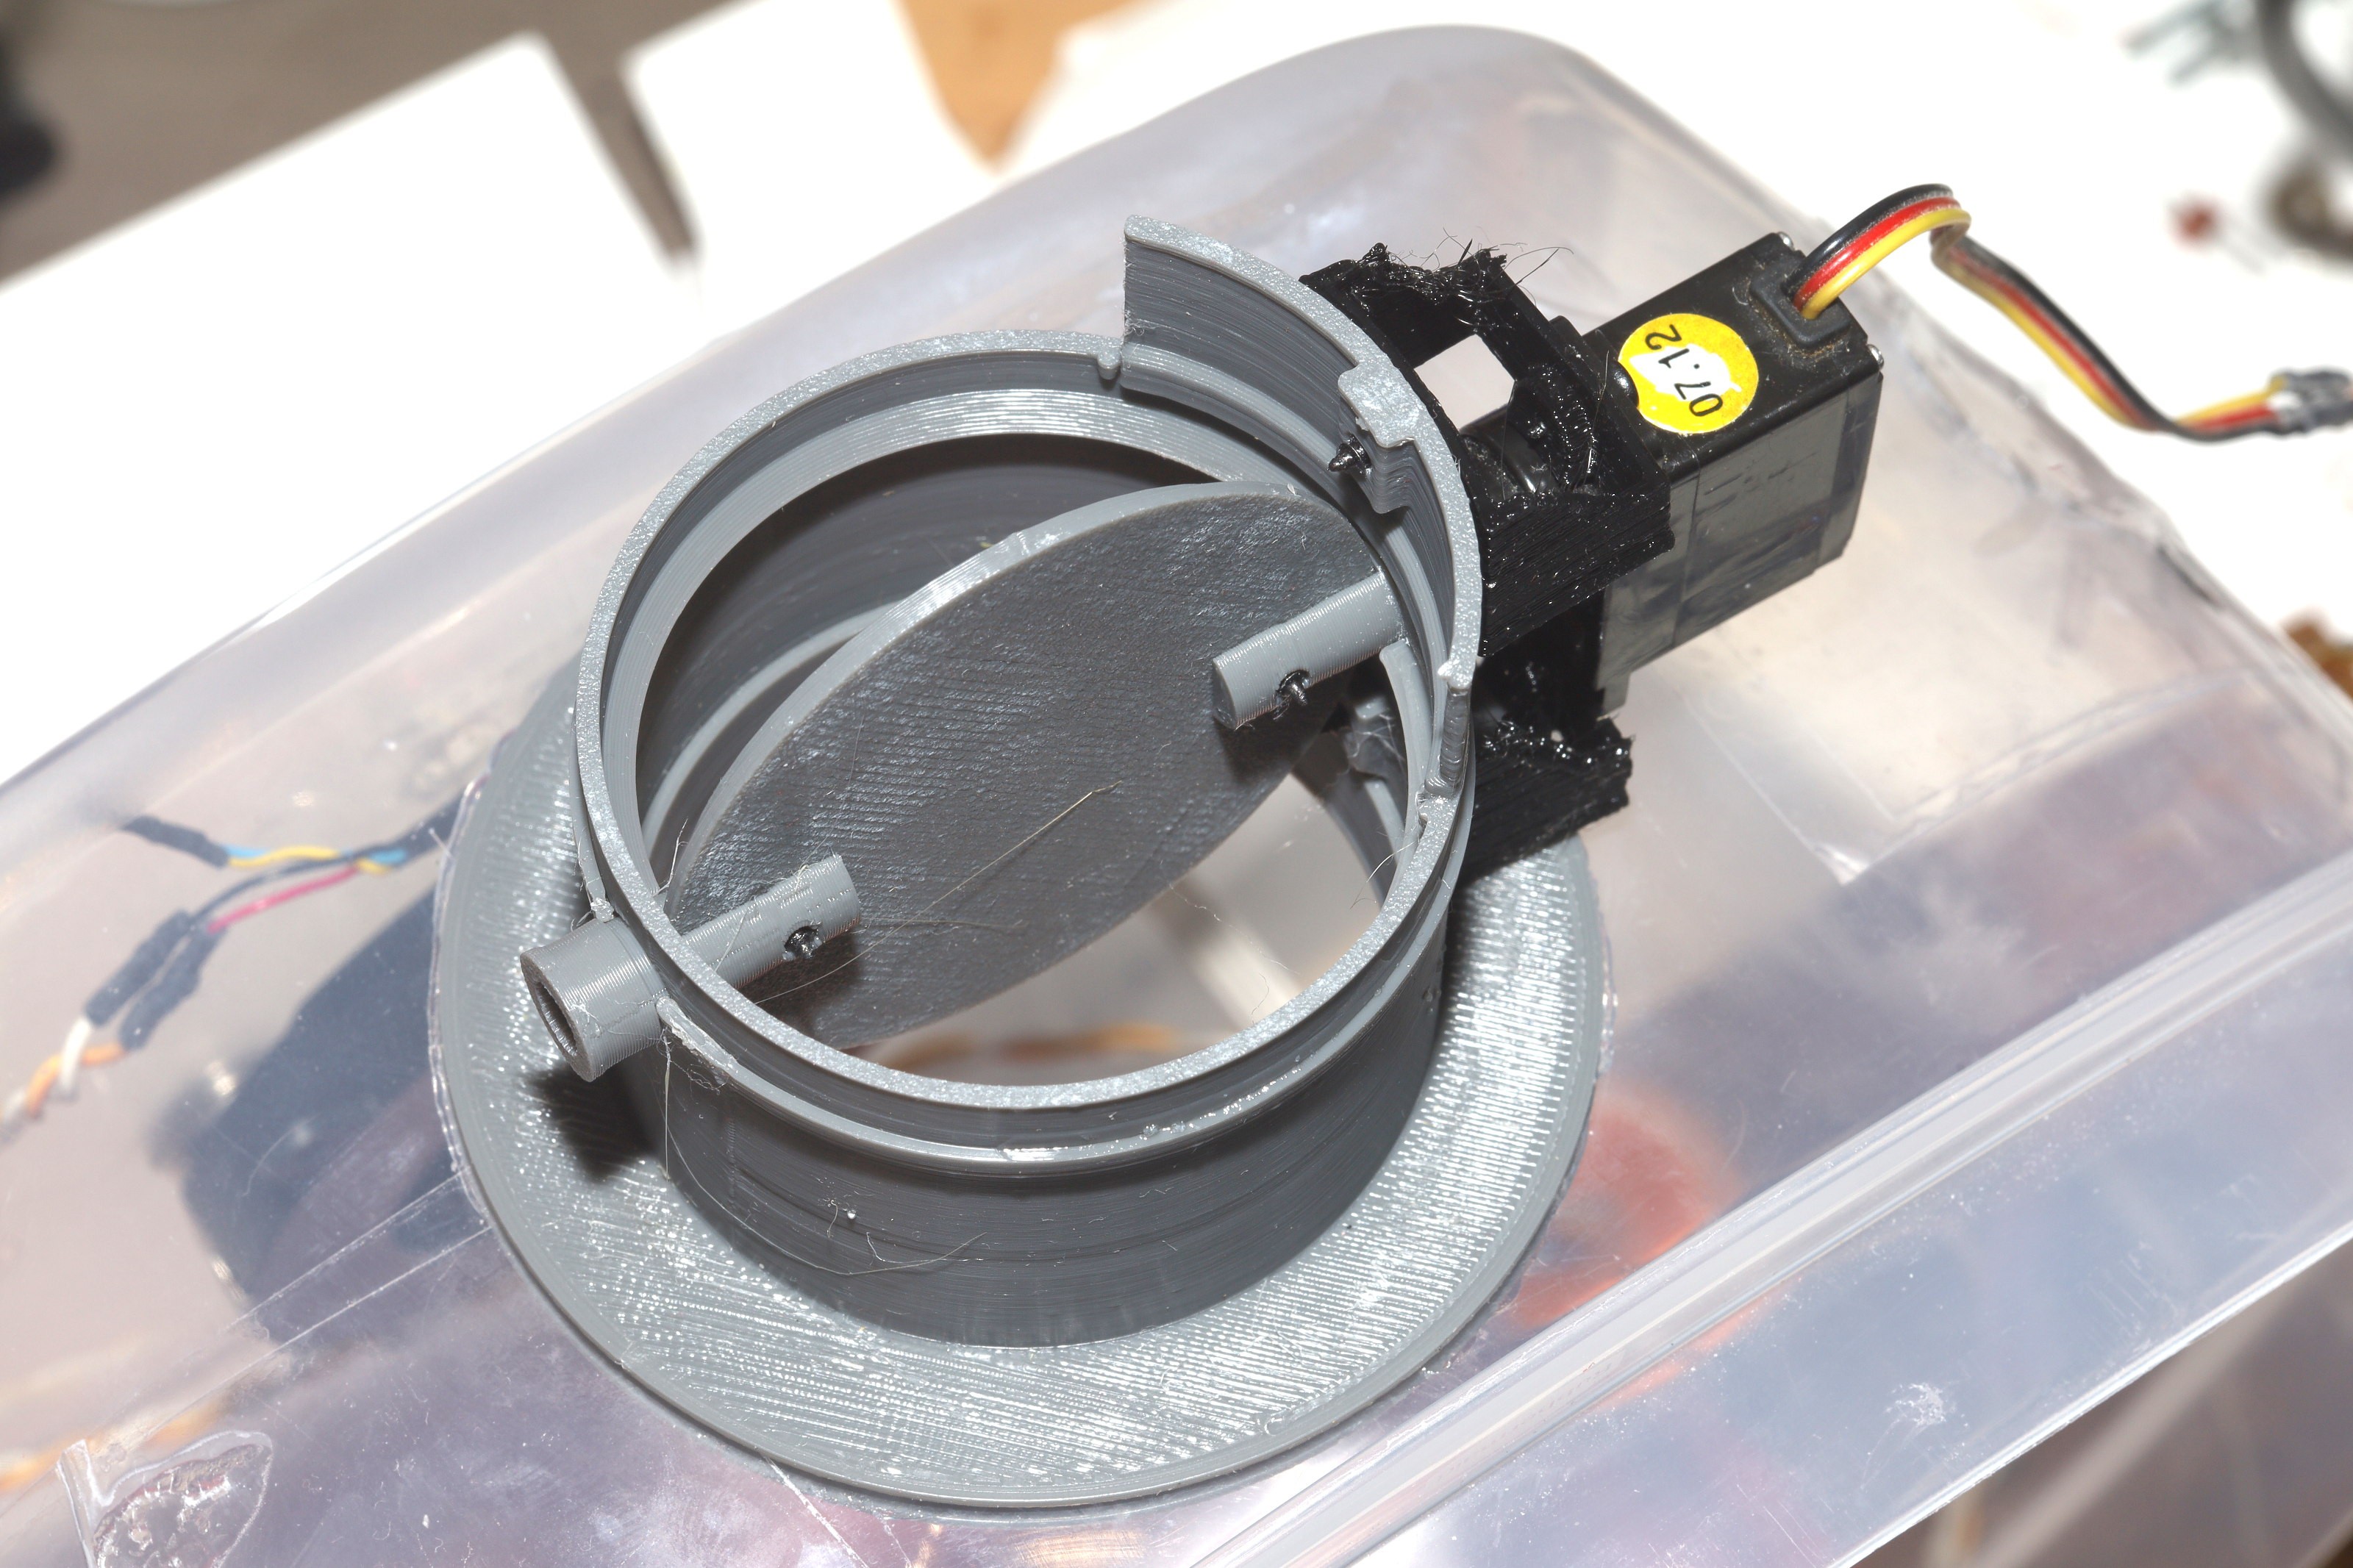
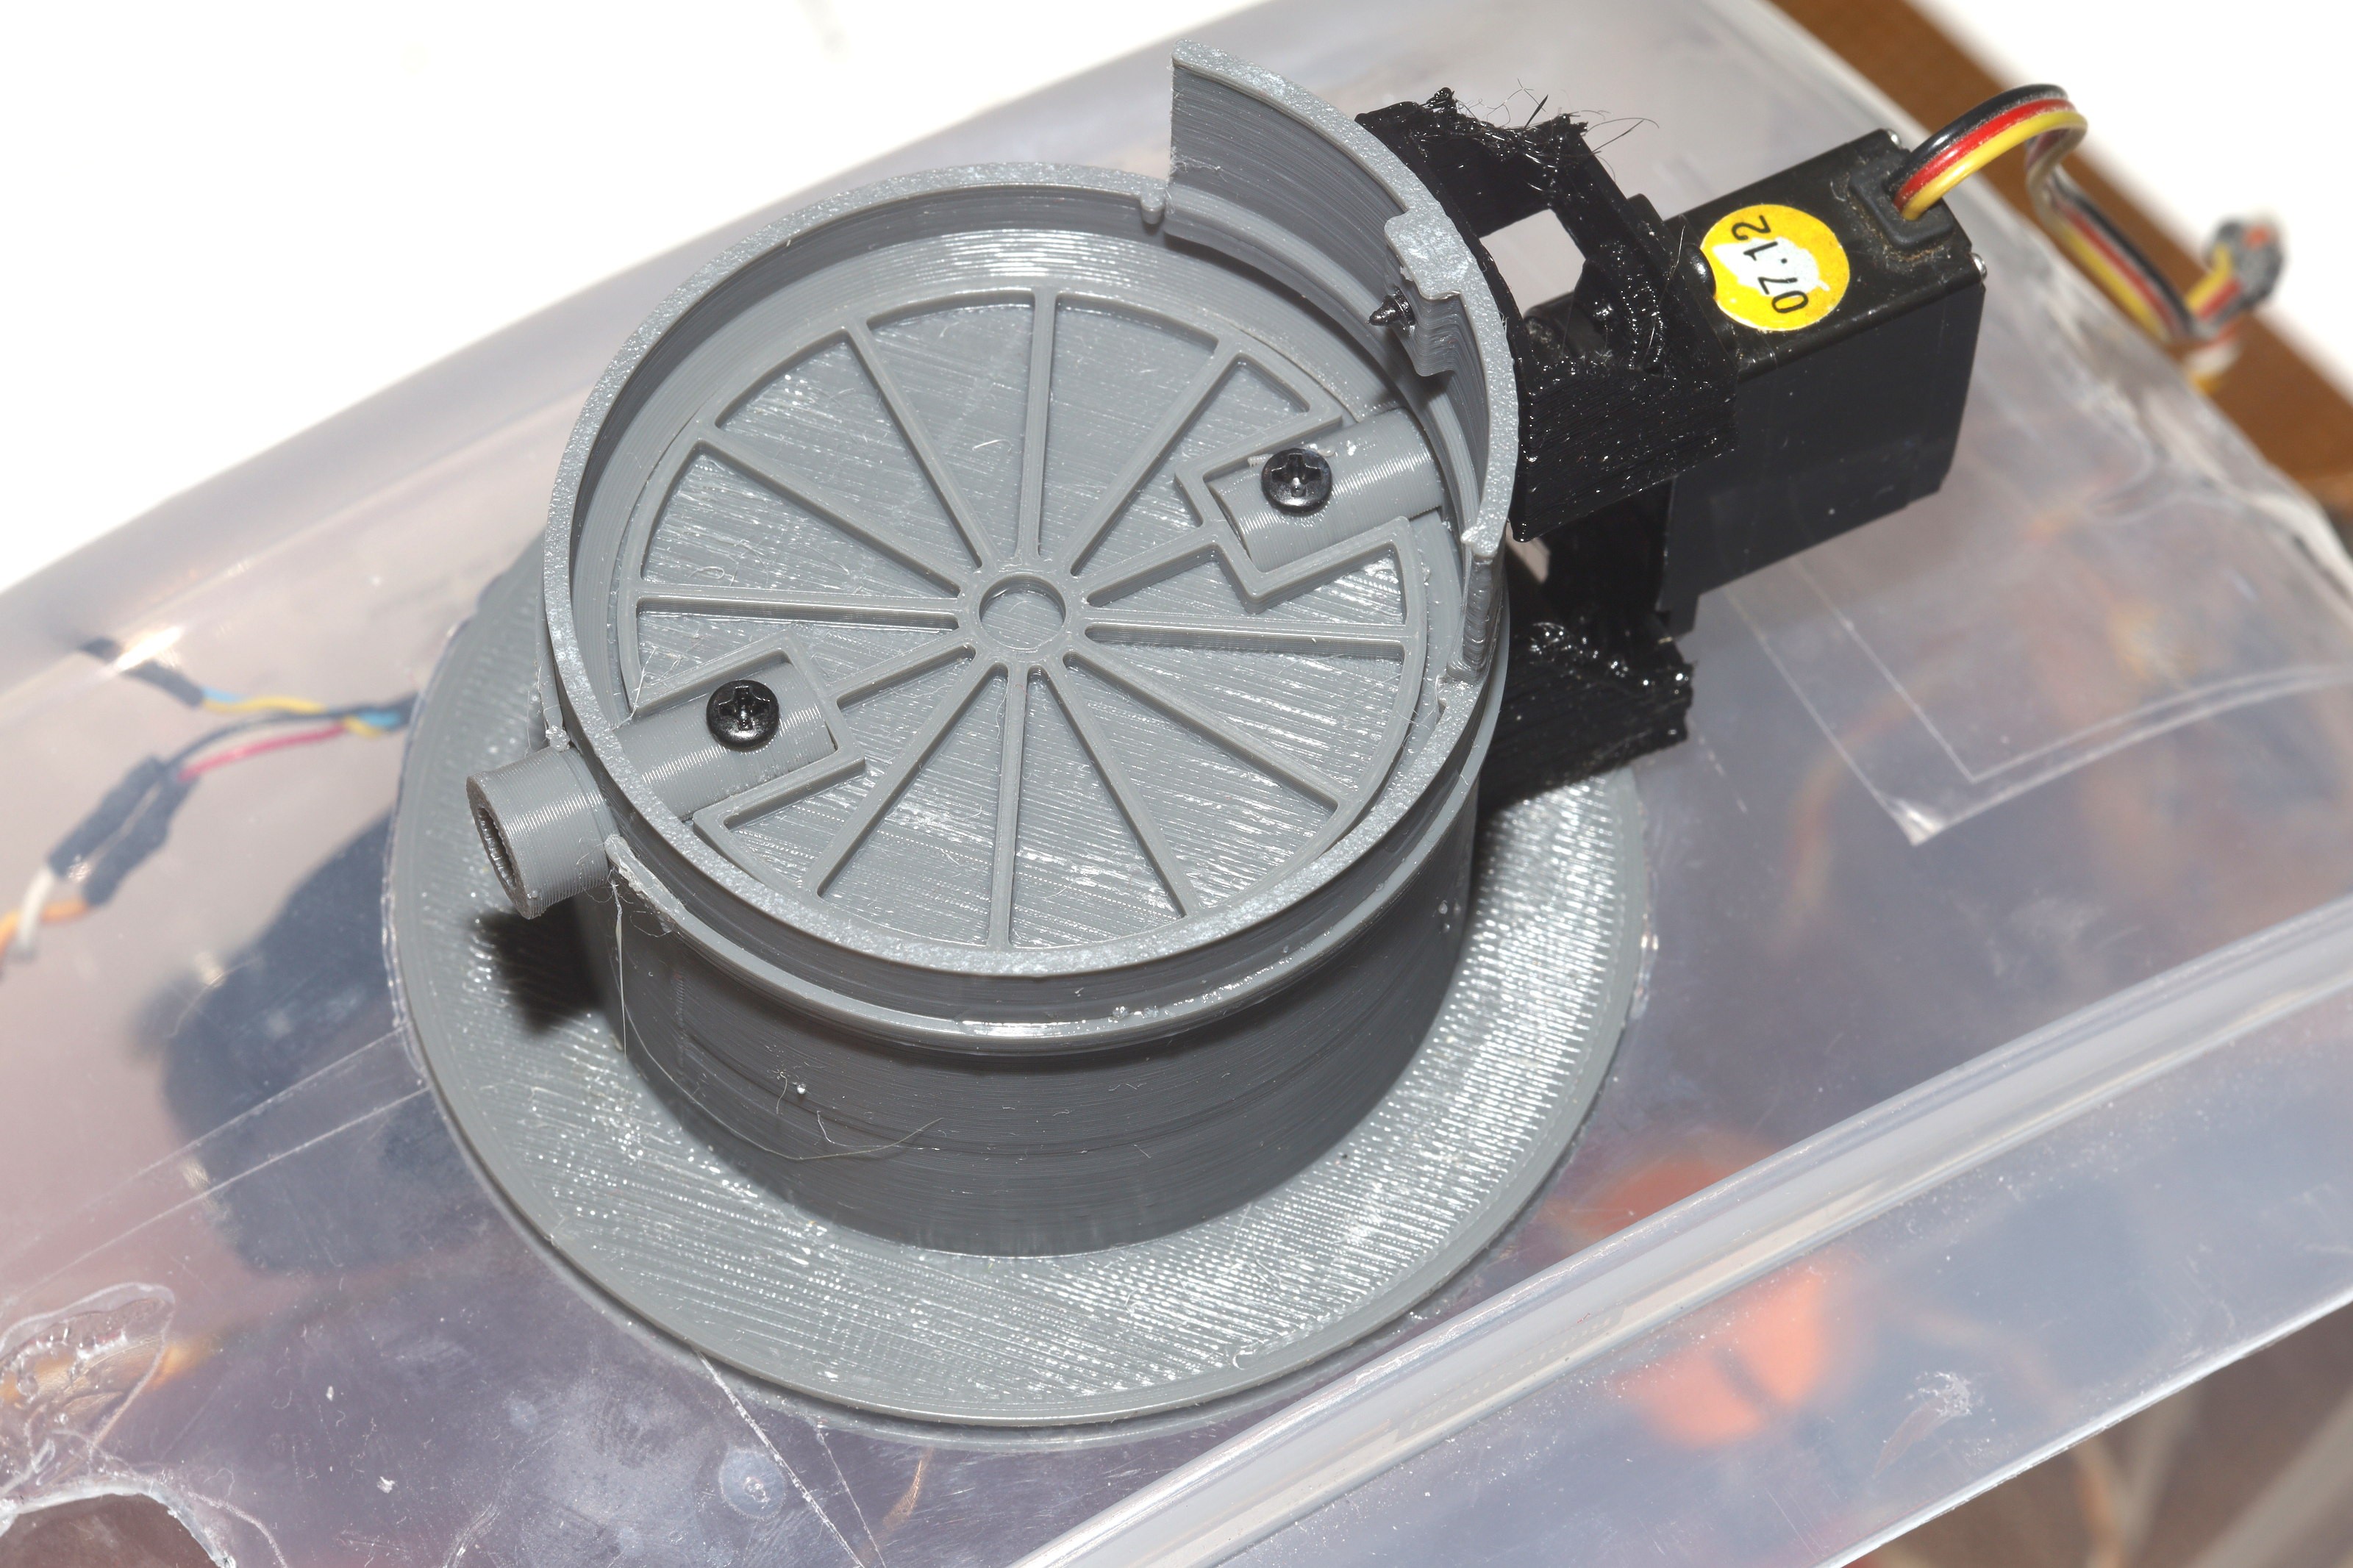
3D printed butterfly valve
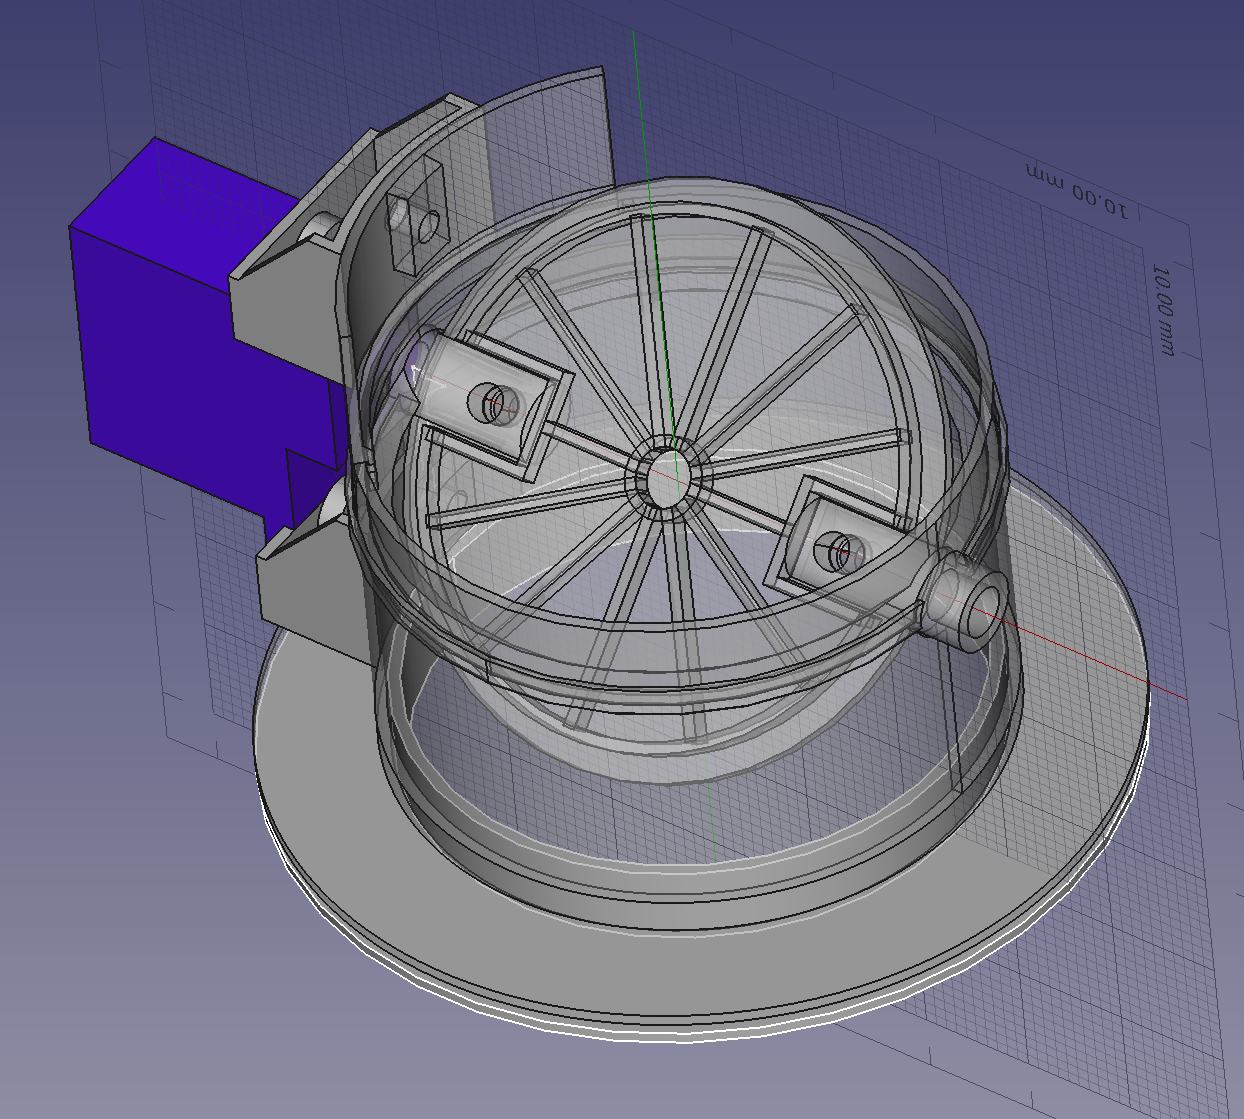
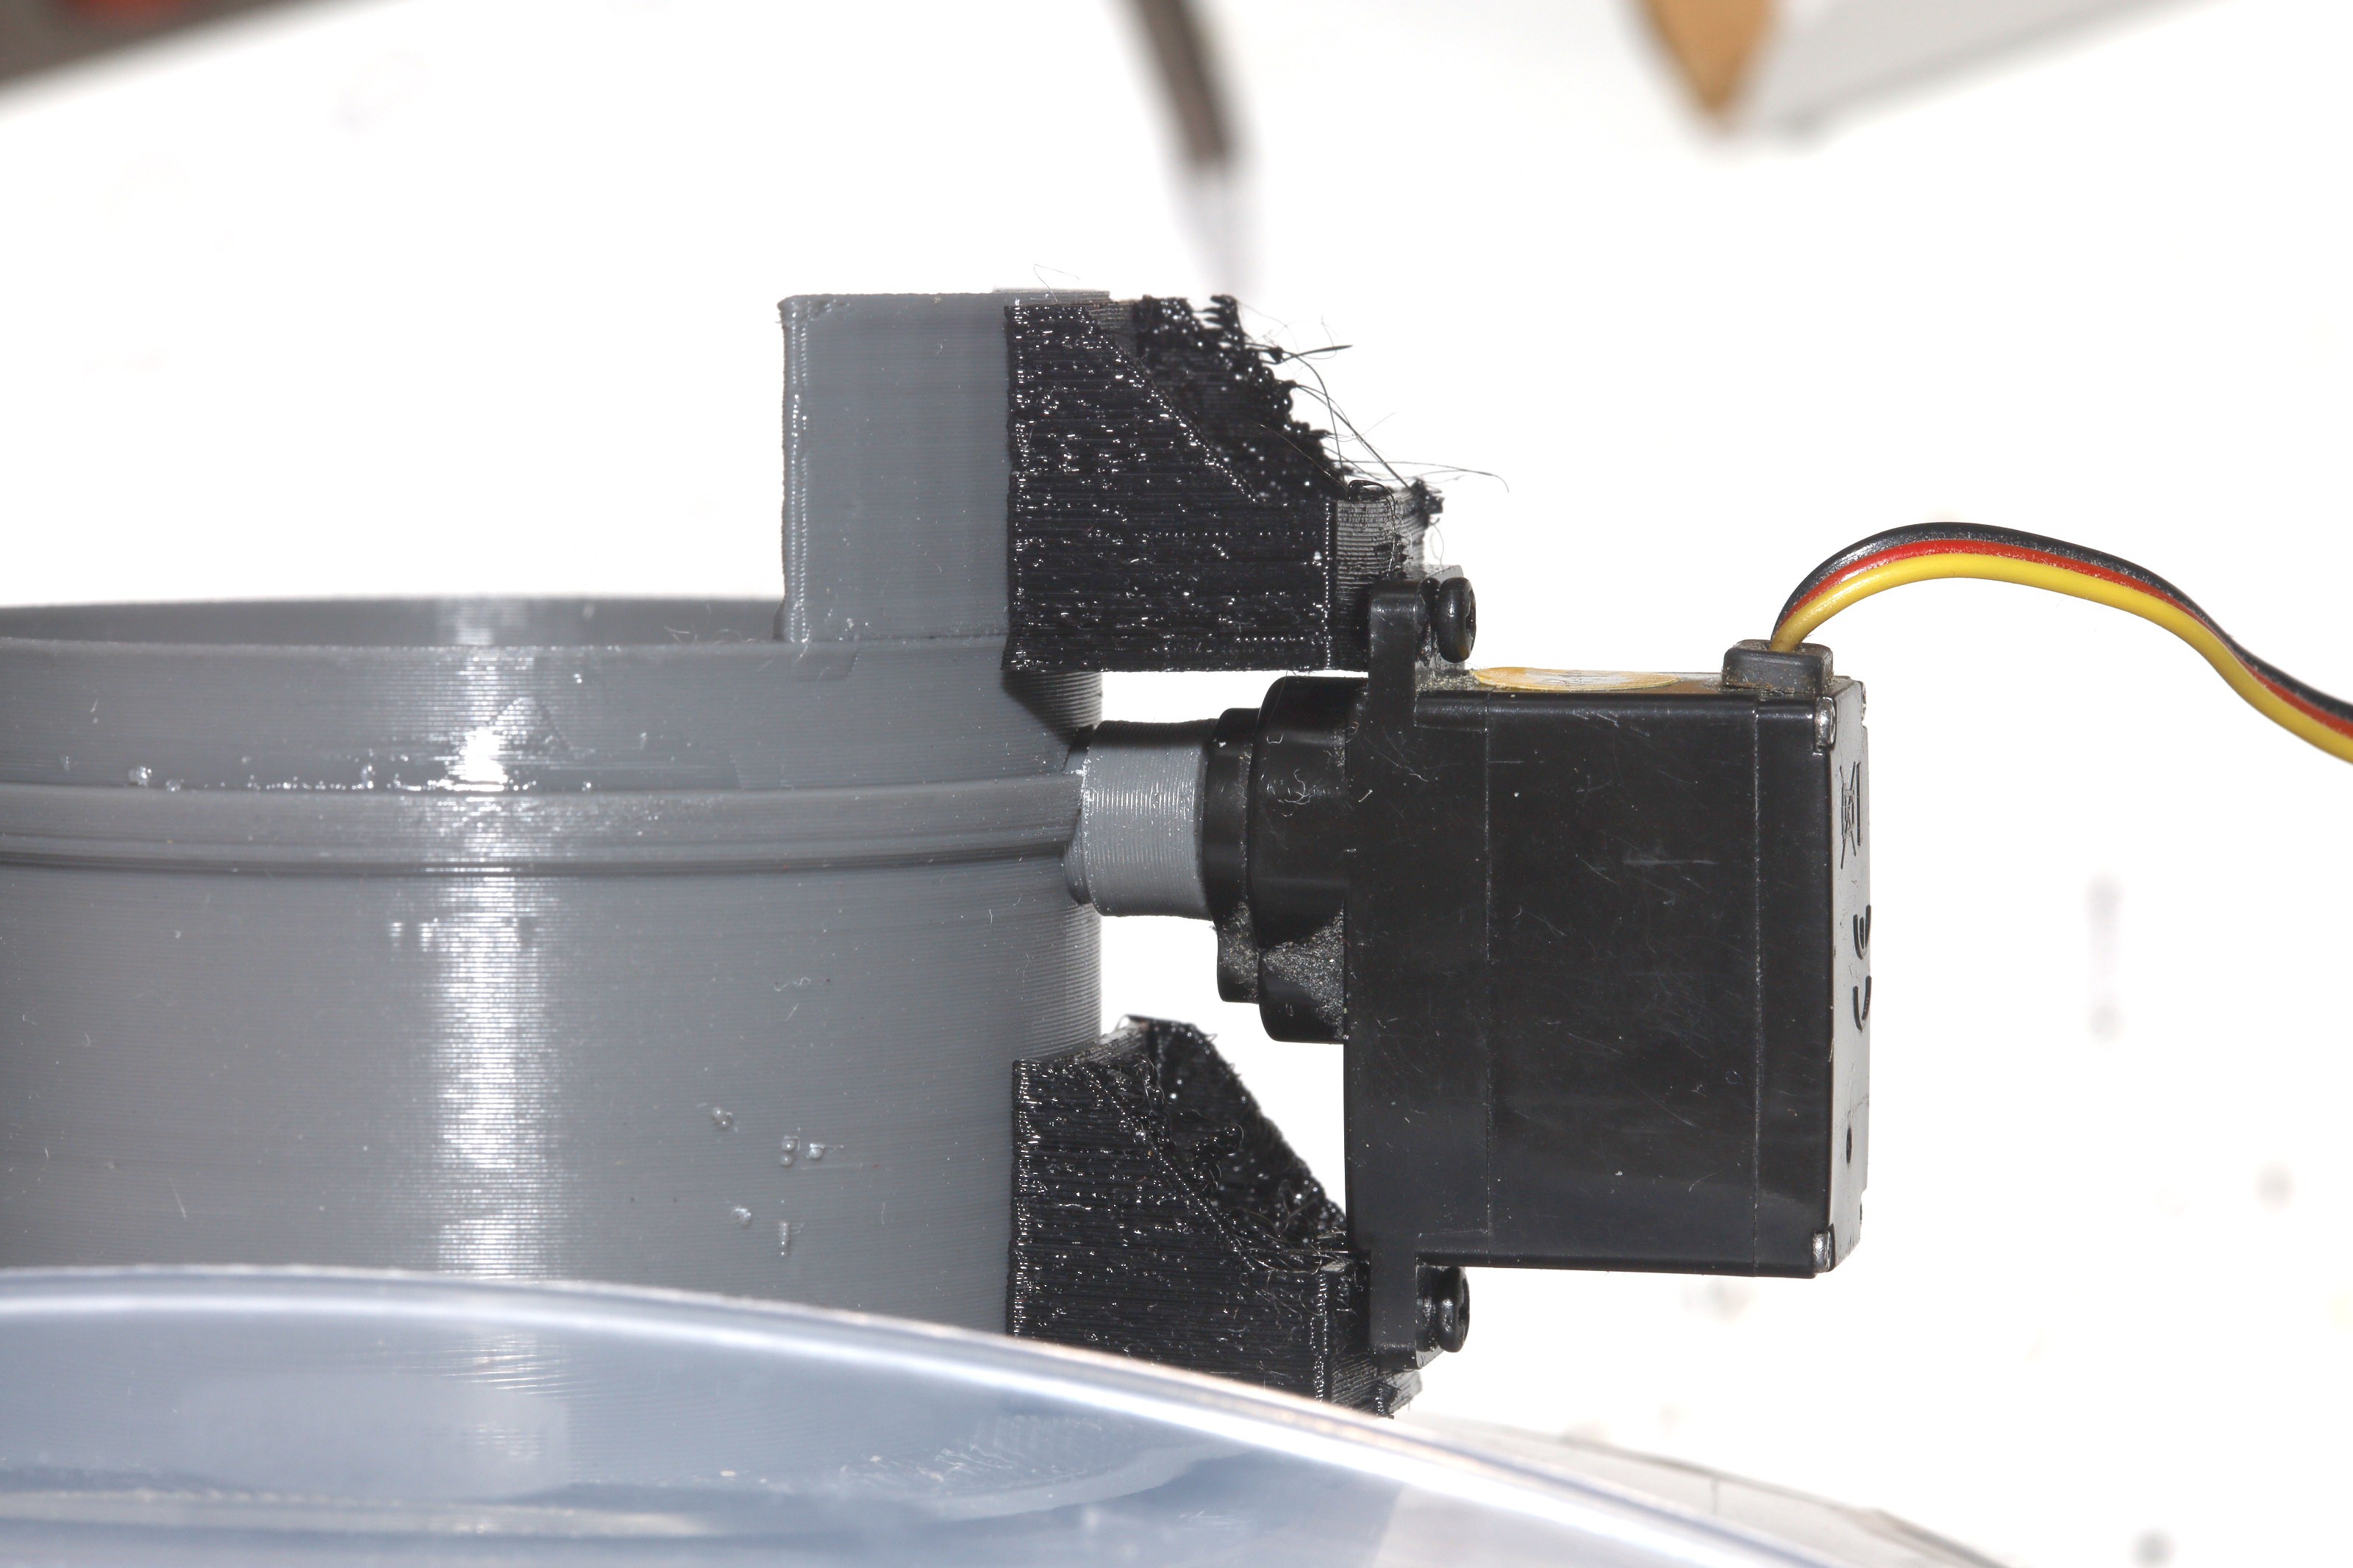
05/25/2022 at 00:29 • 0 commentsA solid week of banging on CAD models yielded a butterfly valve.
![]()
![]()
![]()
![]()
![]()
This was the 1st to directly couple a PLA shaft to a servo shaft. To start with, it uses friction. It could resort to CA glue. To achieve a static pressure on the valve, it relies on the servo supports applying a static spring pressure on the torque tube. The servo powers off after 5 seconds to avoid wearing out the motor. There's no sensor for valve position, so it could get stuck in 1 position.
![]()
![]()
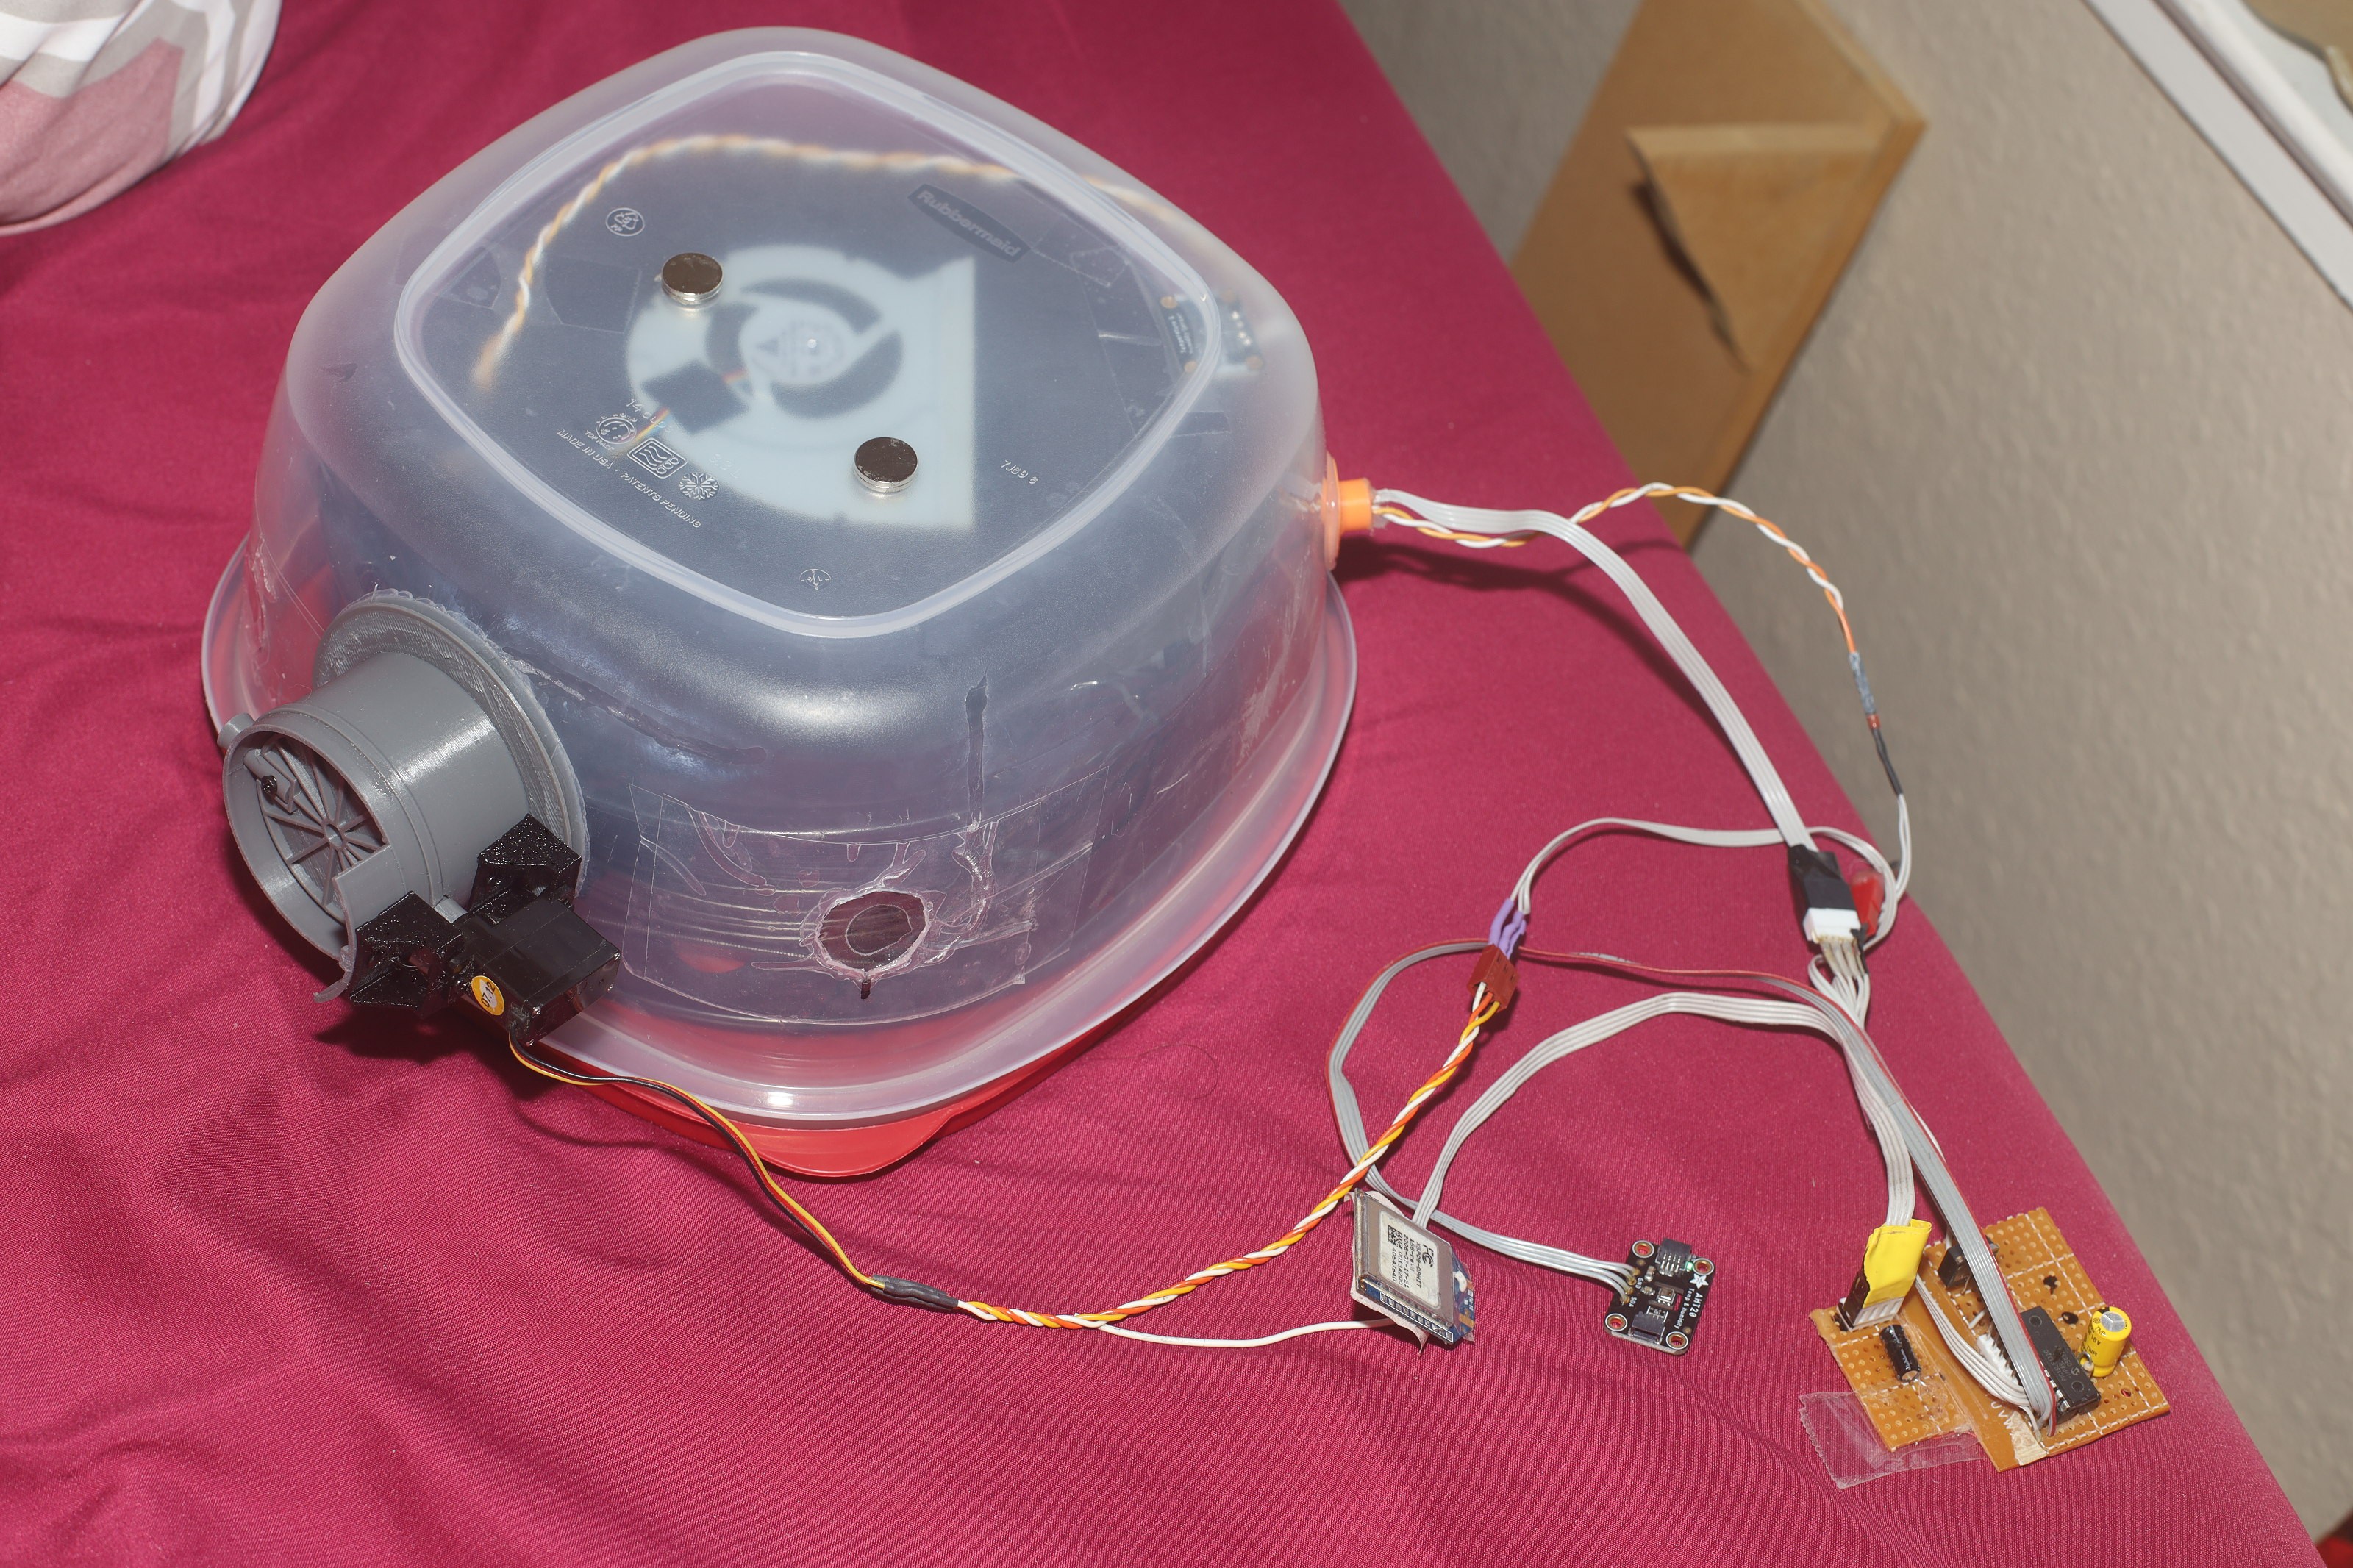
The latest idea was a container with just 1 big valve. The inside air should get hot during the day. When the valve opens, the hot air leaves & the cold air enters. At night when the container is colder than ambient, no air is replaced. The valve is not as air tight as the former tubes.
The board got converted back to 5V, a MOSFET got taken out, a PWM driver got put in.
Solar filament drier
How to keep filament dry while being too poor to afford electricity.