Close
0%
0%

Variometer Audio-Only for Hang Gliding

A simple audio only variometer (rate of climb indicator) for hang glider or paraglider use

Similar projects worth following
A variometer is a device used to indicate whether you are ascending or descending when other cues are inadequate. It works by detecting the difference in air pressure at different altitudes, and in this instance sounds beeps of varying tones and intervals depending on rate of climb. It also sounds a warning tone if you are descending fast.

Using very few parts, the original design was by Rolf R Bakke (2012) for use in radio control gliders. It is based on a MS5611 pressure/temperature sensor and an Arduino Nano microcontroller. Additional parts are the battery, a switch, a piezo speaker,
couple of resistors, Veroboard, battery snap, hookup wire and a 3D printed box.

The code is simple, and has been extended to include a configuration capability to adjust the response parameters when the unit is plugged into a computer via a USB port using a terminal emulator such as TERATERM. There's a battery health monitor on startup too.

The original design of this Variometer was intended to be carried on a radio controlled sailplane and the resulting sound transmitted to the controller via a low power 433mhz device. Initially I simply replaced the transmitter with a speaker, put it in a standard jiffy box and that generally worked fine.  As always, if you have spare time on your hands, any project is prone to suffer from creeping elegance, hence the design you are now browsing.

Changes and features:

Uses a third party ToneAC library to give a louder tone 

A custom designed 3d box with lanyard or screw mount options 

Customisable sensitivity and "excitability" and sink alarm via a PC connected to the USB port 

Battery health check on startup and every 2 minutes of use with tones signalling the percentage of power remaining. If the battery is desperately low the unit will cut off so as not to confuse with random beeping. If the unit is left on on the ground, it will make a sound occasionally to attract your attention.
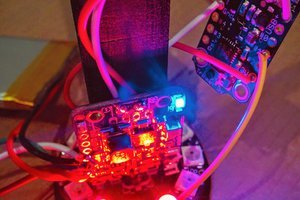
vario_components.jpg

Component side of the strip board

JPEG Image - 253.15 kB - 01/12/2022 at 22:49

Preview

veroboard_back.jpg

Veroboard, showing tracks to be removed and holes to be drilled

JPEG Image - 186.61 kB - 12/31/2021 at 00:57

Preview

Vario_Customisation.pdf

Instructions for installing a PC terminal program, connecting the Vario and modifying the stock configuration sensitivity and excitability level.

Adobe Portable Document Format - 469.53 kB - 12/30/2021 at 22:26

Preview

VARIO_BOX.stl

3D print STL file for enclosure parts as single file (you may need to separate the parts to print individually.

Standard Tesselated Geometry - 584.26 kB - 12/30/2021 at 22:16

Download

Vario_Circuit.jpg

Schematic for the variometer

JPEG Image - 102.12 kB - 12/30/2021 at 22:04

Preview

View all 6 files

  • 1 × Arduino Nano ATmega328P or ATmega168 both OK (low memory use). Put header pins only on used pins
  • 1 × MS5611 Temperature/pressure sensor
  • 1 × Slide switch PCB mount
  • 1 × 9V battery
  • 1 × Snap connector suit battery

View all 10 components

  • 1
    Circuit board

    The circuit can be constructed on good quality strip board (.1" pitch) and requires only a few tracks to be cut and some larger holes drilled depending on the slide switch available.  Track cutting is easy using a sharp 5mm twist drill in your fingers and twisting it in the through hole until the track is clearly separated. (Clean away the swarf)

  • 2
    Adding components

    BOth the Nano and the Ms5611 are usually supplied with header pins.  The PCB has been designed so that the only header pins installed are on active points. This allows the simplest layout, lets signals cross under the boards and the least soldering. The easiest way to do this is to place the required header pins in a section of prototyping breadboard and solder them to the nano and ms5611 prior to insertion into the circuit board.  The resistors and wire links should be soldered in first, however. The last step is to solder on the slide switch, battery snap and piezo speaker.

  • 3
    Configure via Serial Port

    Assure you have a terminal emulator such as TERATERM installed or use the Serial Monitor in the Arduino IDE and attach the vario via a USB cable to your PC.  Attach at 9600 bps, N, 2.

    Type "?" and press Enter.  The current settings should be displayed.

    To modify settings, type as follows:

    "S nnn"  where nnn= sink alarm value in fpm  (Minimum is 200fpm)

    "D nnn" where nnn= threshold to detect lift in fpm (default is 30fpm)

    "B nnnn" where nnnn= lowest audio frequency to start at in Hz (400-600 range)

    "R n" where n=1-8 sets the rate at which the beep rate increases with lift

View all 3 instructions

Enjoy this project?

Share

Discussions

bogdan wrote 09/20/2023 at 13:59 point

Hello. I managed to build this vario and to give you a good idea: the rx/tx from the arduino nano can be connected to the HC05 bluetooth module and on the android phone you can install "serial bluetooth terminal" so that you can do the settings without a cable connected to the PC . You only need a separate on/off button for the HC05 because it consumes the battery unnecessarily. The code works very well, but can someone help me to write from FPM to m/s?

  Are you sure? yes | no

J Reynoldson wrote 12/07/2023 at 06:44 point

Sorry about the slow response, but do you mean changing the configuration process so it reads in M/S?

  Are you sure? yes | no

J Reynoldson wrote 12/31/2021 at 23:20 point

The pressure sensor is light sensitive and the vario will go wild if the sensor is exposed to a light source, so it needs to be protected from light while testing the circuit..

  Are you sure? yes | no

J Reynoldson wrote 12/31/2021 at 01:48 point

The code uses the 3rd party ToneAC library instead of the built in Tone function of the Arduino native support to increase the available speaker volume slightly without extra components. This will need to be added to your IDE using the Arduino Library Manager.

  Are you sure? yes | no

J Reynoldson wrote 12/31/2021 at 01:09 point

The vario operation is simple.  It measures the pressure on a 20ms loop and keeps two running averages of the pressure, one over a longer interval than the other. The varying difference between these two averages gives the rate of climb.

  Are you sure? yes | no

Similar Projects

Does this project spark your interest?

Become a member to follow this project and never miss any updates