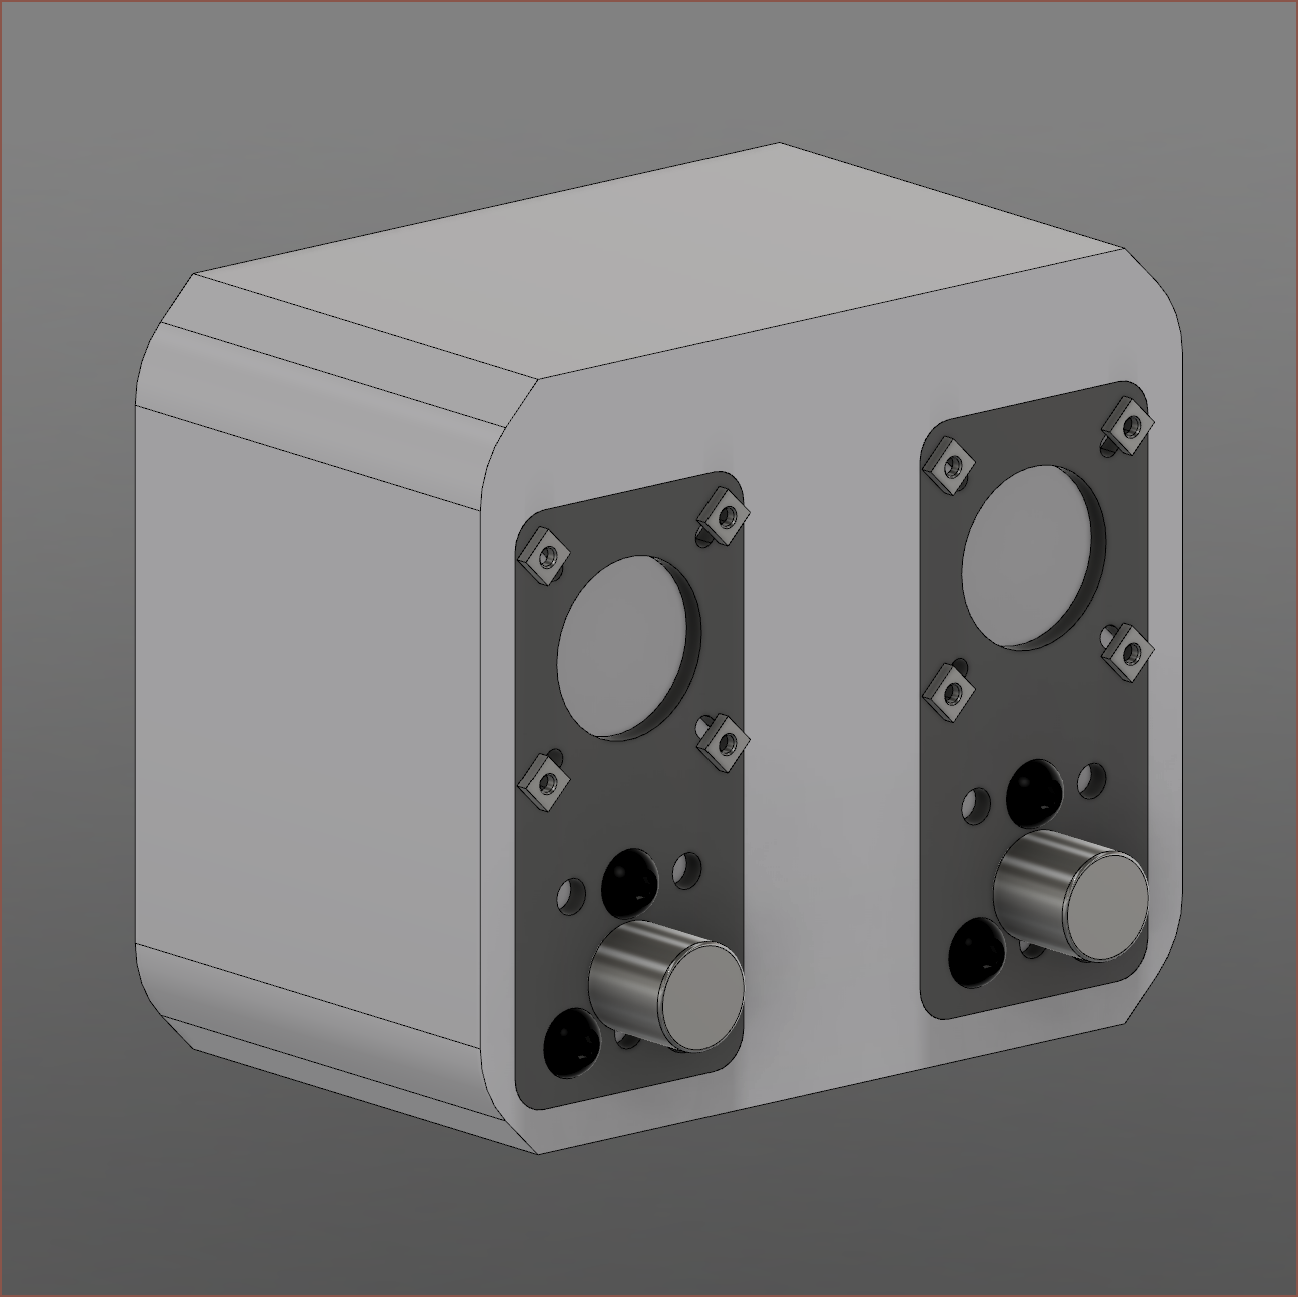
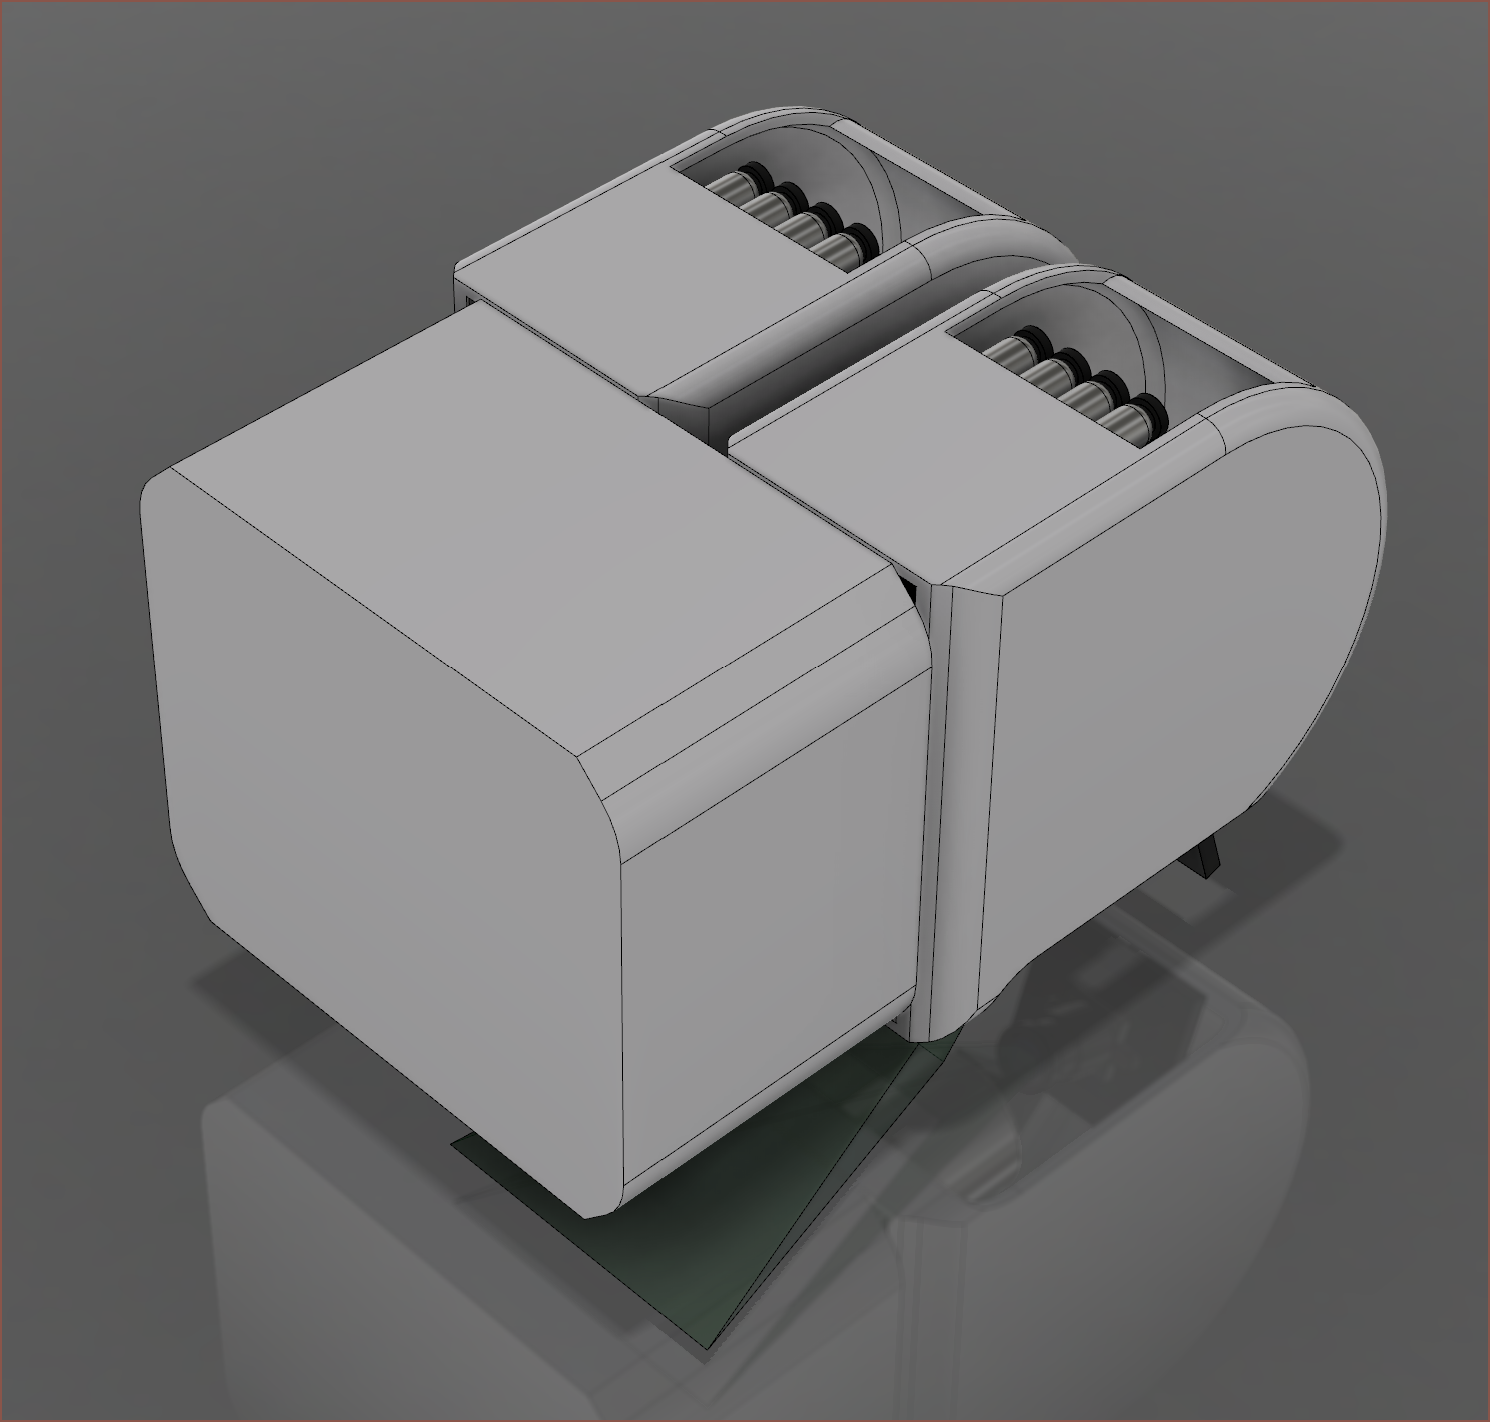
I was going to have a different head instead of the Slime for heavy duty use like milling, but while looking around AliExpress for a spindle motor, I had this idea instead where two SecSavr Slimes come together like some micro version of a giant fighting robot.
Hopefully, the dual magnetic holding power and double sets of motors working together will allow me to skip having to model and test a heavy duty head for the SecSavr and having to install it every time I want to use it. I might be able to do 5 axis milling and since the Slimes would be together, the power limit of the spindle can be doubled to 240W.
There might also be enough space in this dual sized tool to be able to raise and lower a selection of bits; 2 would already be an improvement but 4 would be even better as it could allow up to 16 different bits to be installed or switching to another bit if one breaks at the press of a button.
I expected the milling tool and chocolate tool to be larger than the SecSavr Slight, so I can use this concept to know how much depth space would be needed on the Tool Bar. The concept above is 70mm long.
Along with the milling and chocolate tool, this dual tool idea is probably also going to be used for the robotic pancake maker I still want to try. Oh and I just realised that, with 2 Slimes, I could have a 2 in 1 out hotend. I'd really like to get the magic sauce powering the Cetus2, who recently made their nozzle removable:
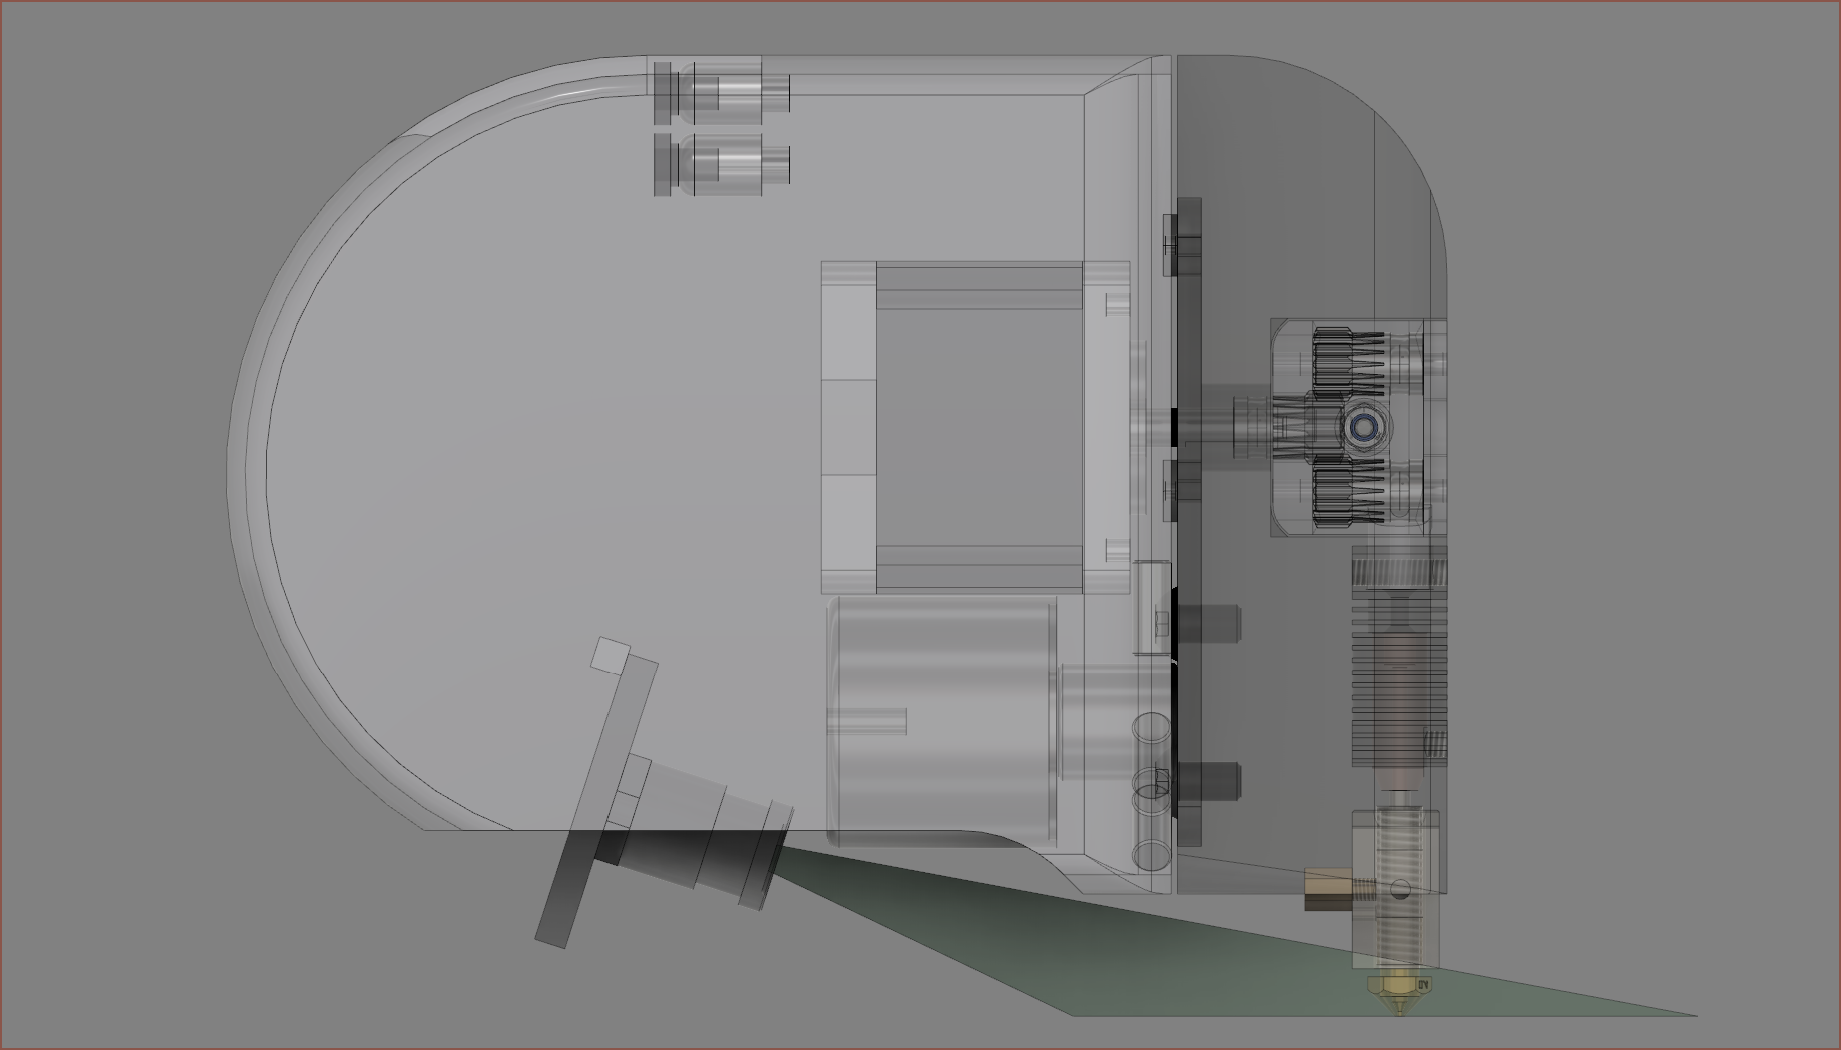
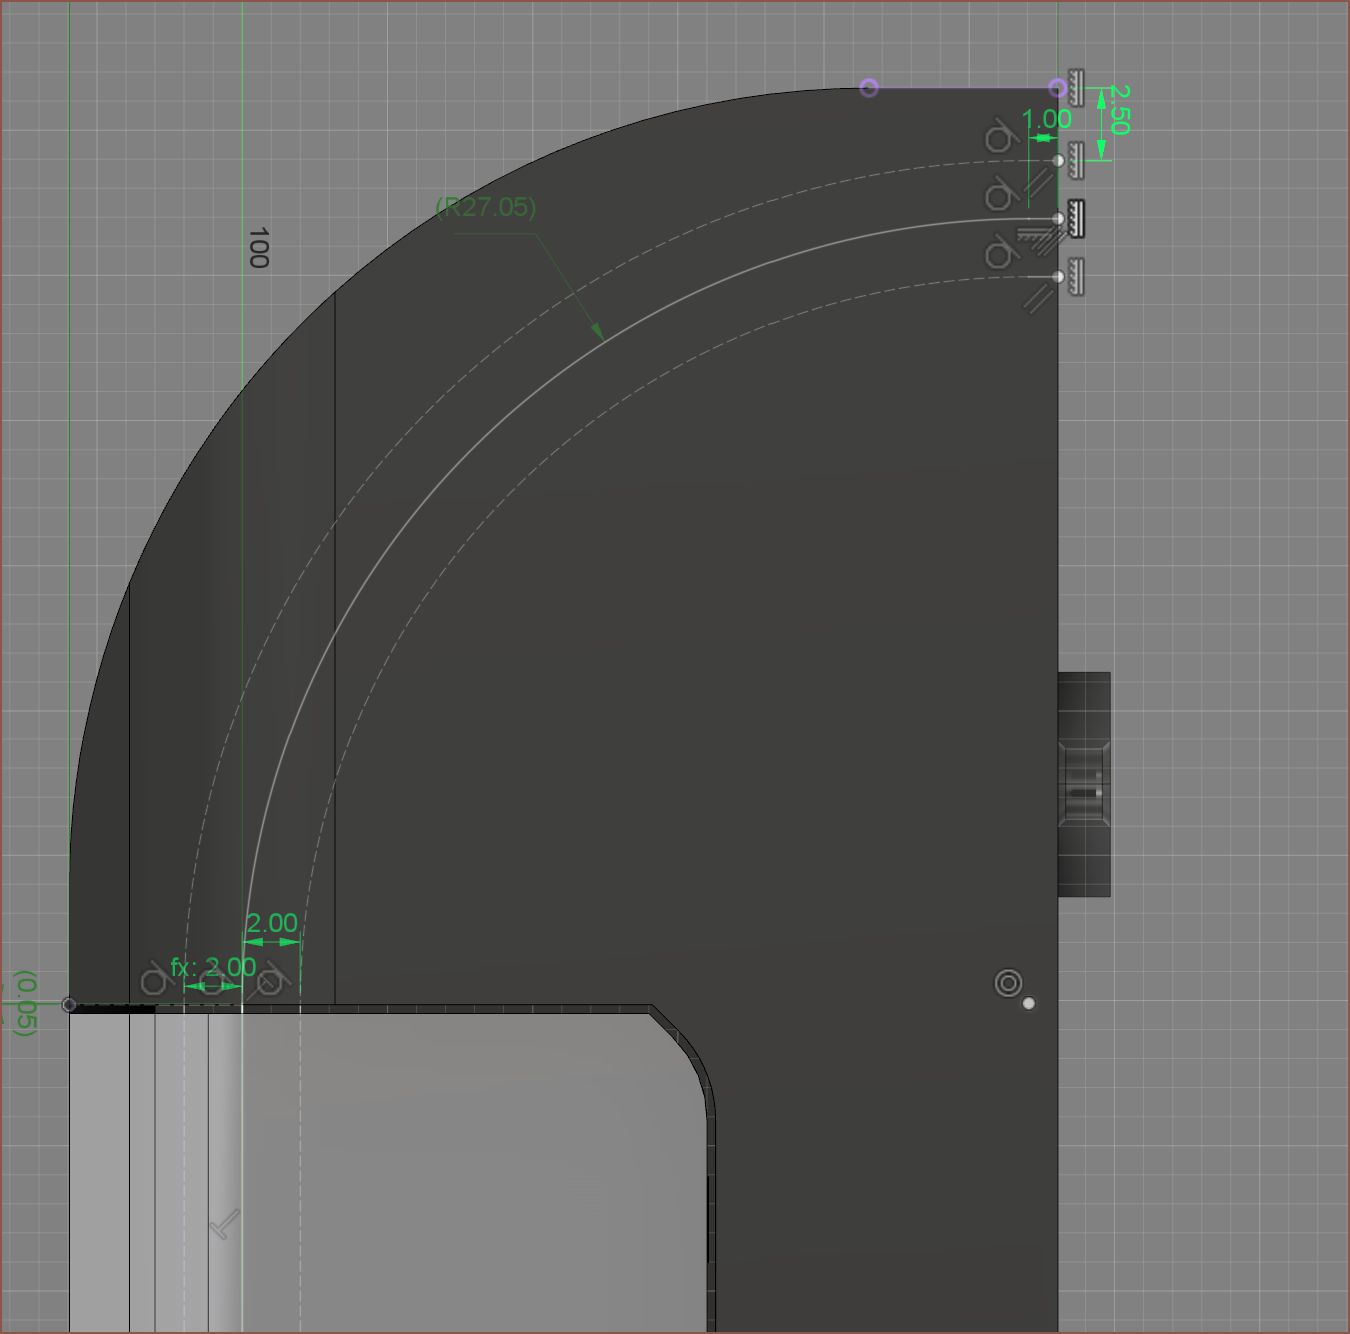
So I woke up today and thought "Do you think there's enough space to rotate the tool plate 180 degrees?". The reason I've been considering it is because:
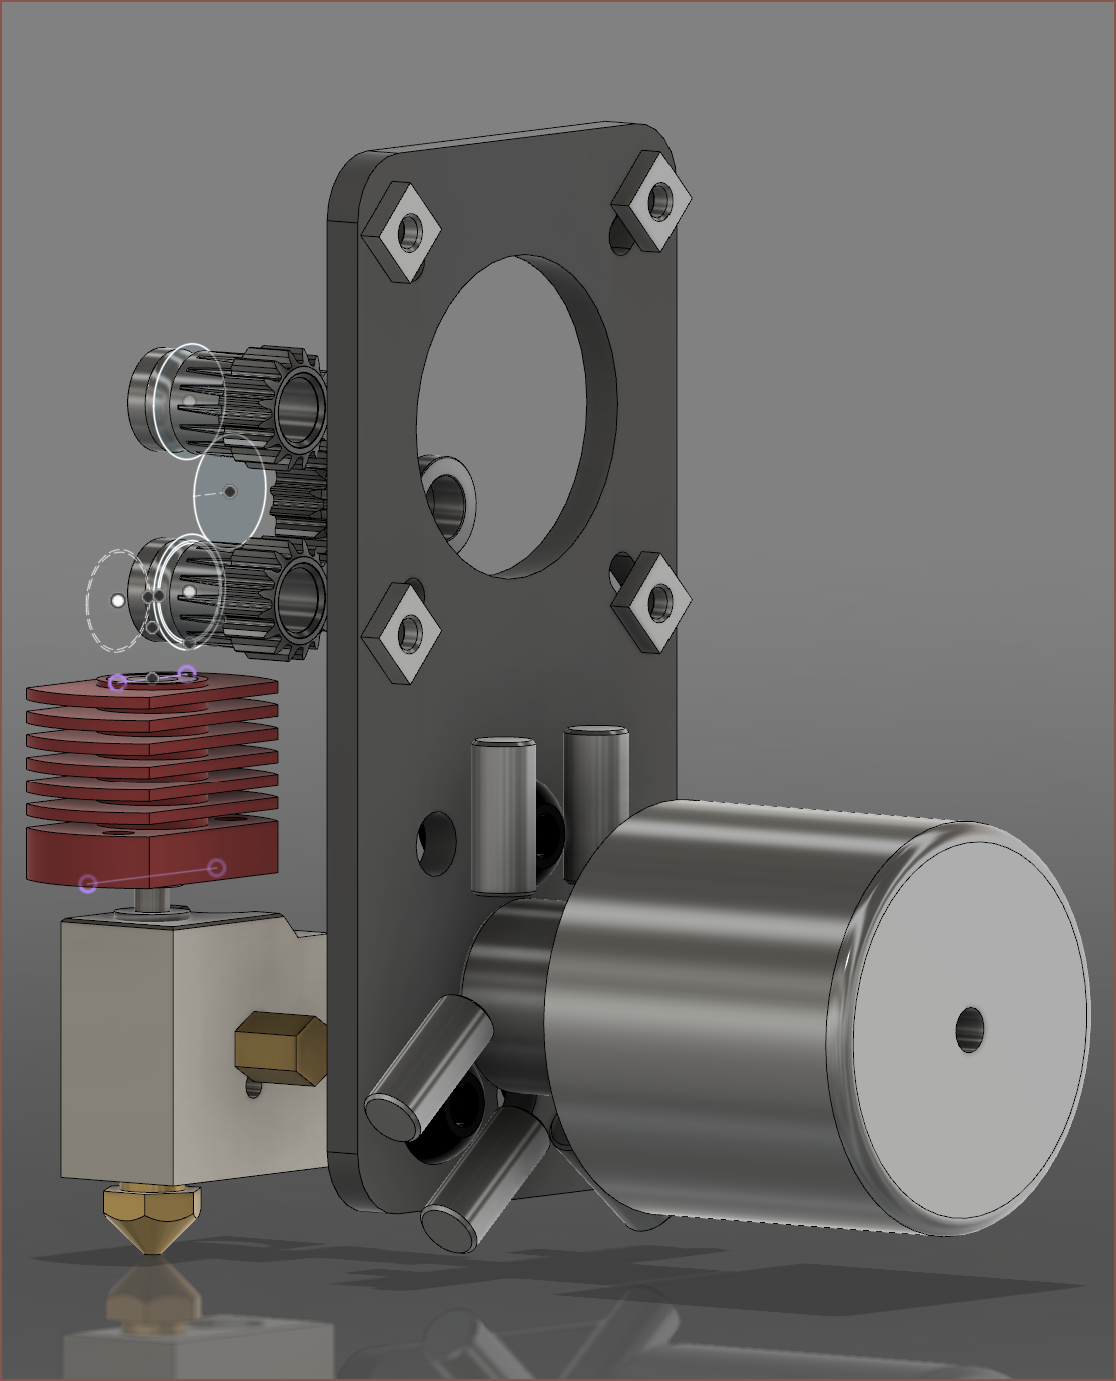
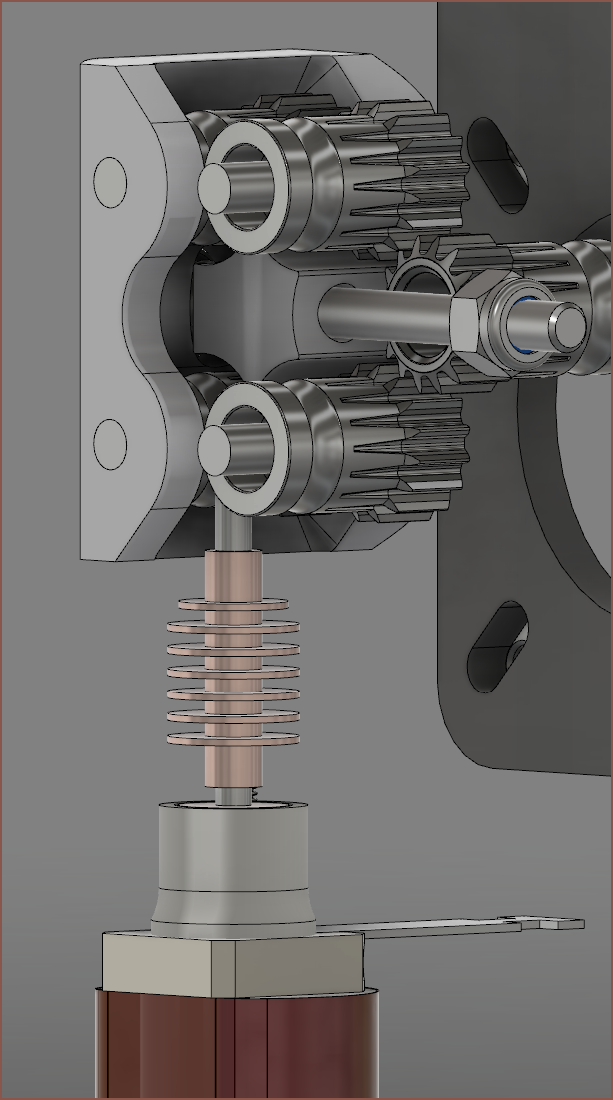
The fixing location is closer to the end position of the tool, wether that be the nozzle of the extruder tool or the drill bit of the milling tool.
The gear of the extruder is likely to be used for things in other tools like lifting or lowering tools in the milling tool or connected to a plunger for the chocolate tool, and the mechanical force is expected to be on the top section of the tool.
The extruder is probably heavier than the degaussing electromagnet, so having that higher up means that the centre of mass is closer to the axis rail.
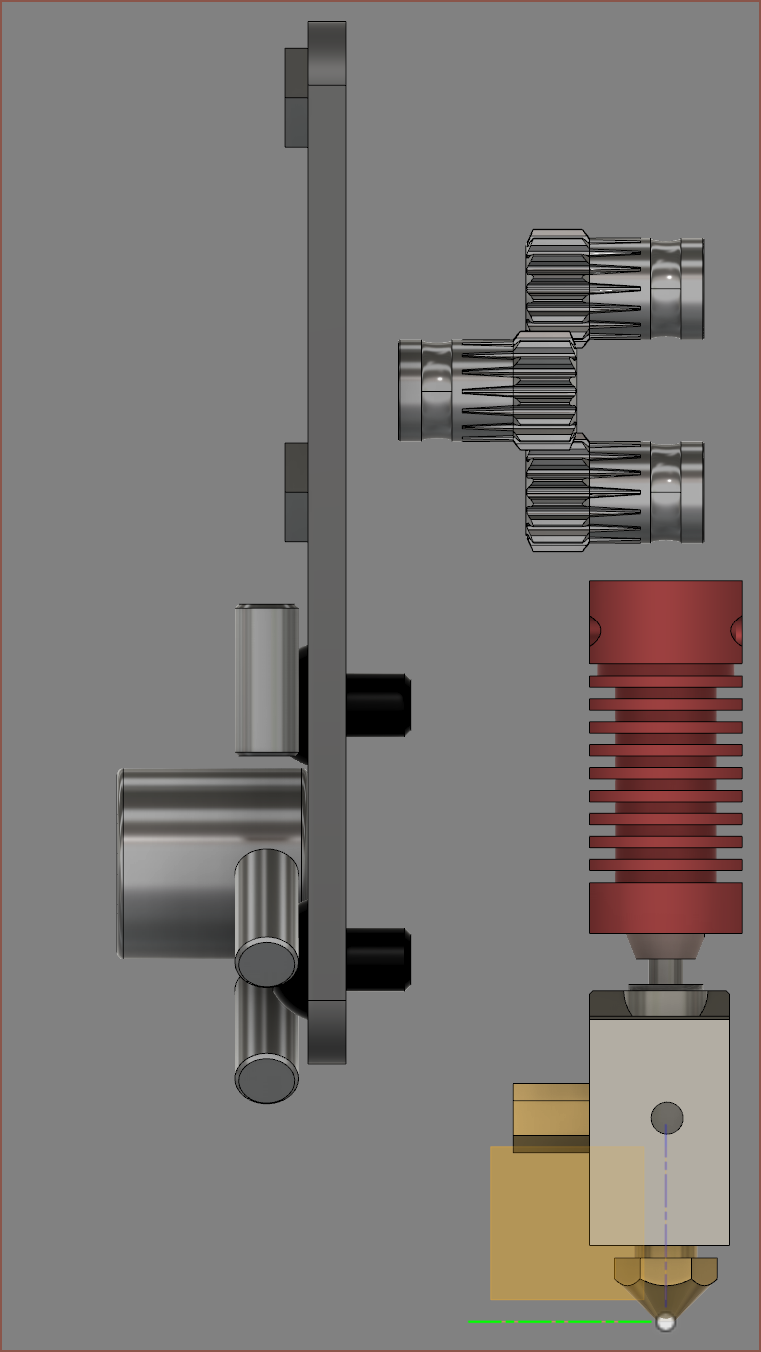
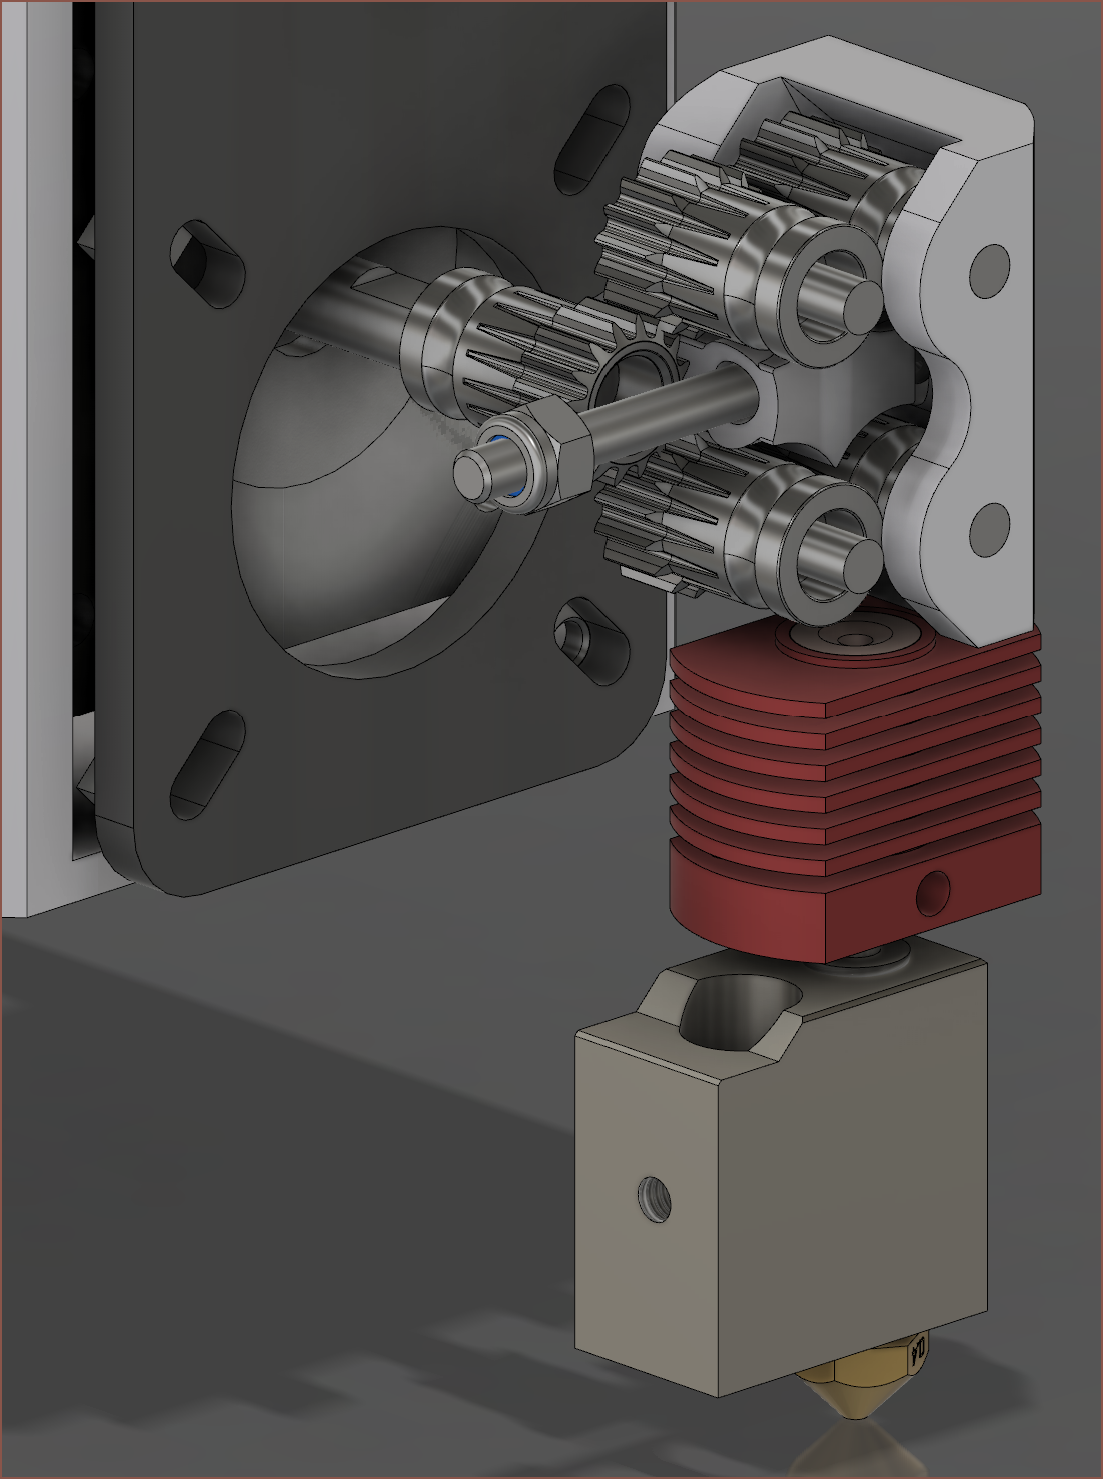
Modelling a concept
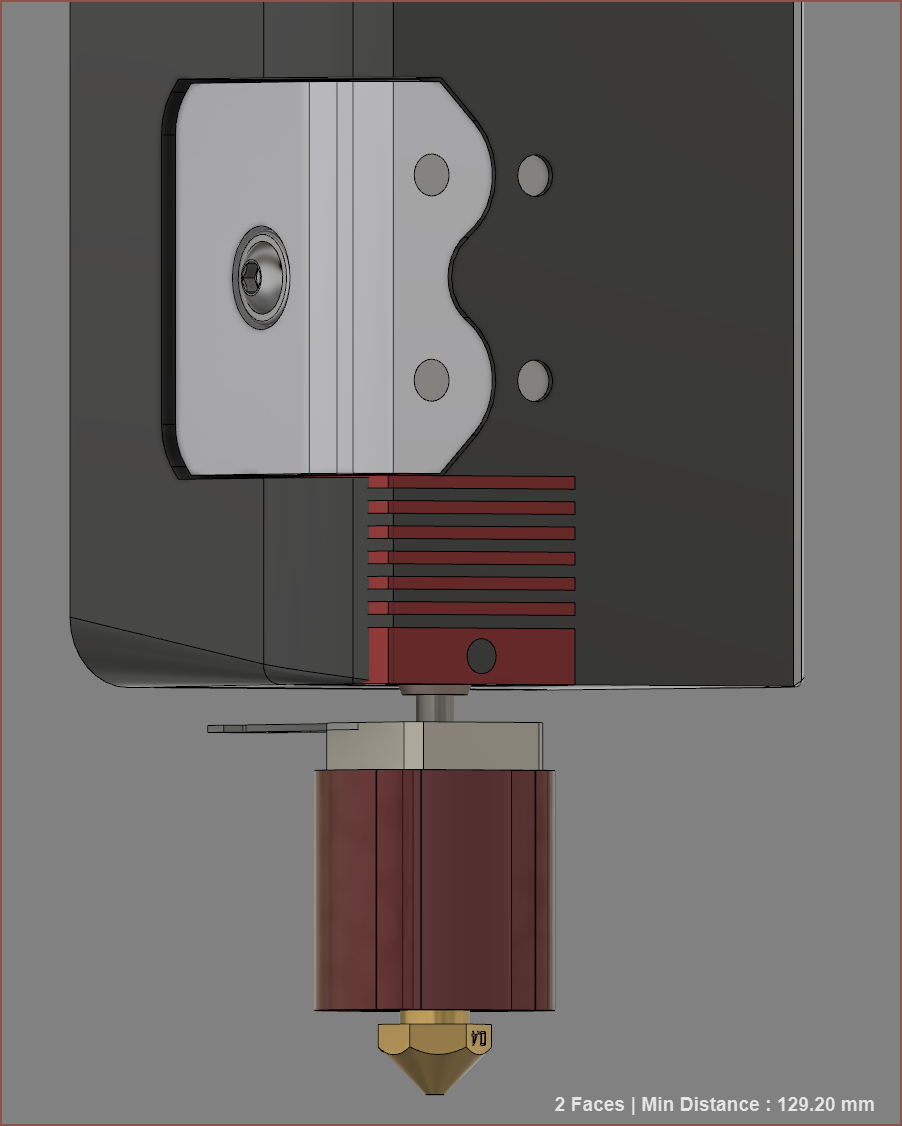
Yeah it's going to be close alright. It looked promising though so I kept going.What else can I say expcept "Barely (TM)"? There is just about enough space for the filament to curve around the 90 degree bend.
Increasing length for the camera
I then updated the Slime file and the bottom of the hotend was too close to the bottom of the Slime. I guess that's a nice problem to have, because I increased the length of the hotend assembly so much that I don't even have to cut the CR10 heatsink anymore.
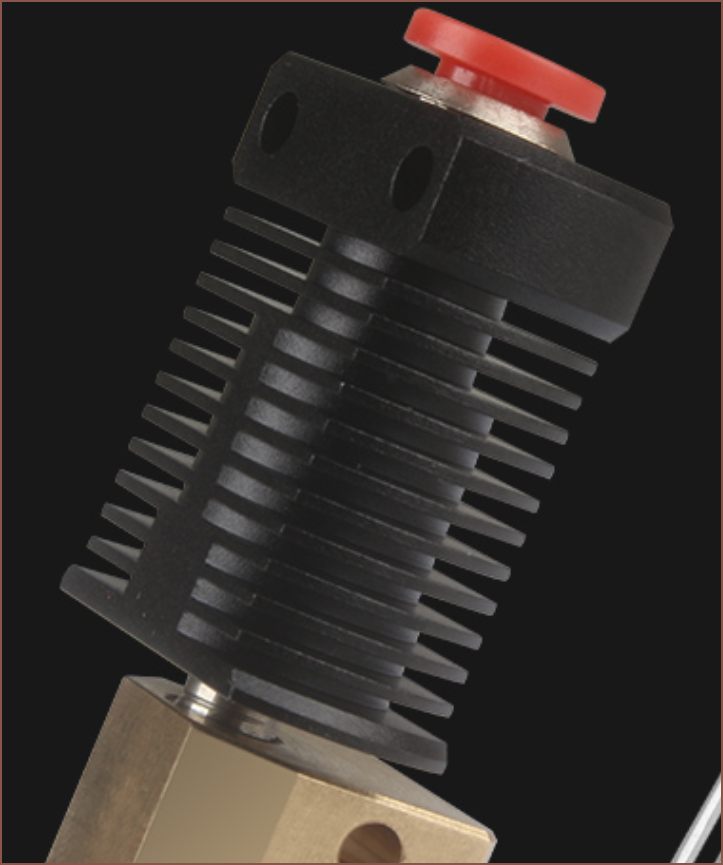
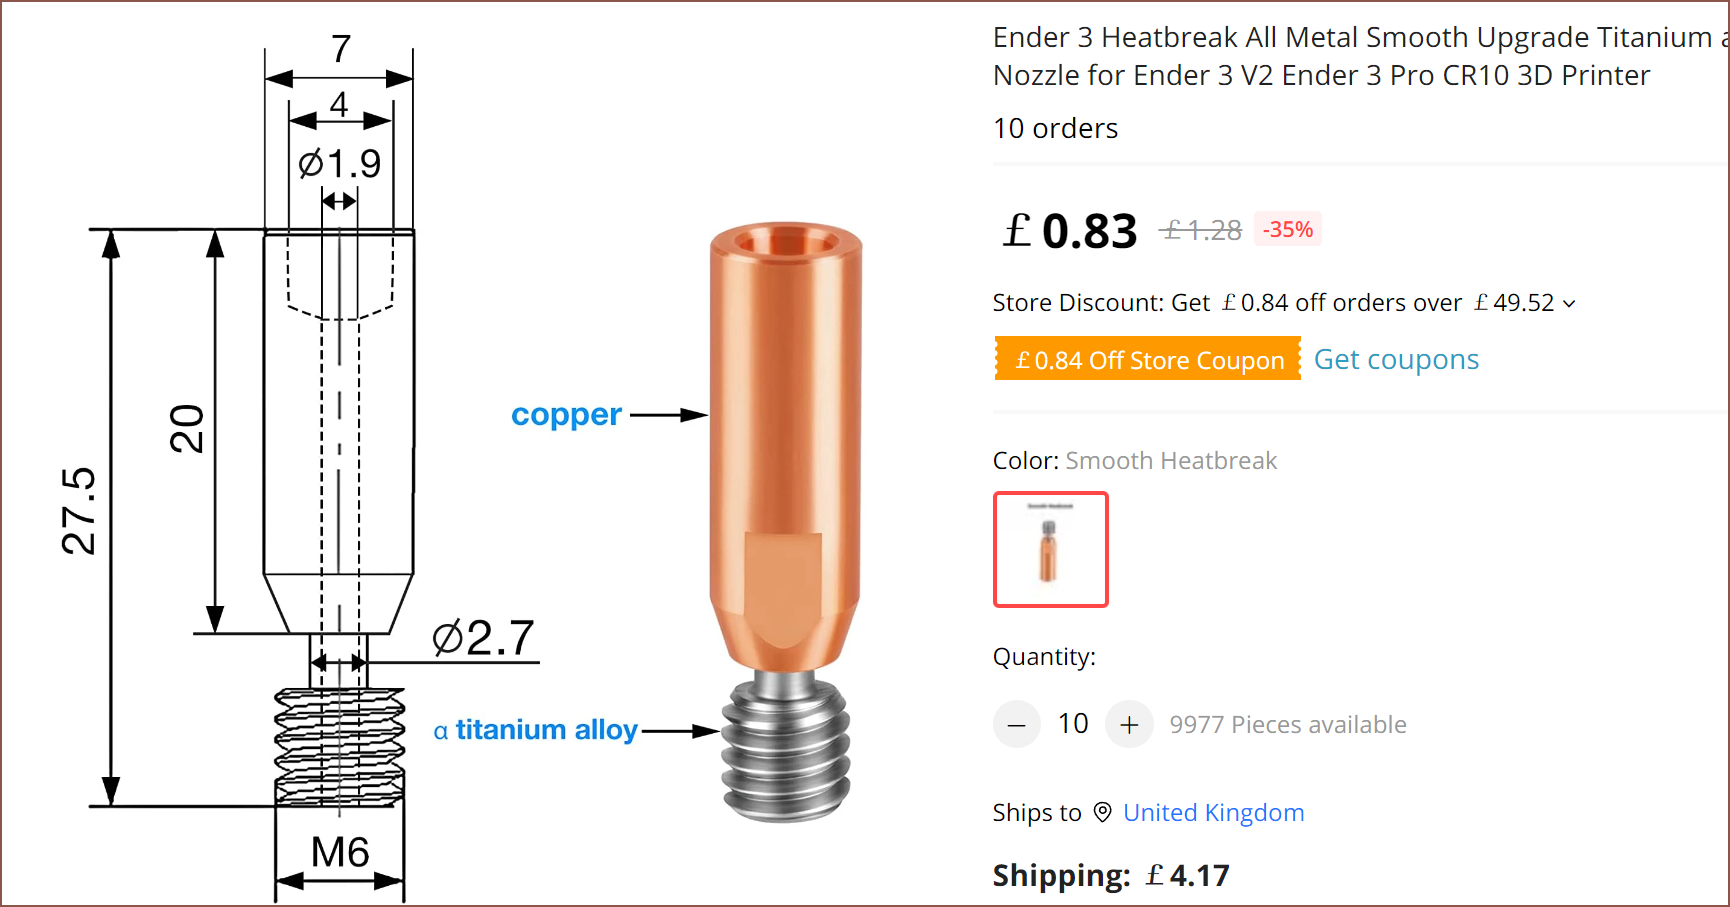
I went on AliExpress to do some searching on my hotend options again, and found this hotend from LERDGE.It's a tad more expensive than the CR10, but it comes with advantages:
Easier to add a filament guide as it uses a grub screw instead of an M10 thread for the bowden coupler
Uses an M4 grub screw instead of M3 for the heatbreak, meaning that there's a lower chance of stripping the screw.
More material around the mounting holes, which I intend to tap in some M4 threads.
It's black, increasing both aesthetics and matte black objects emit radiation the best.
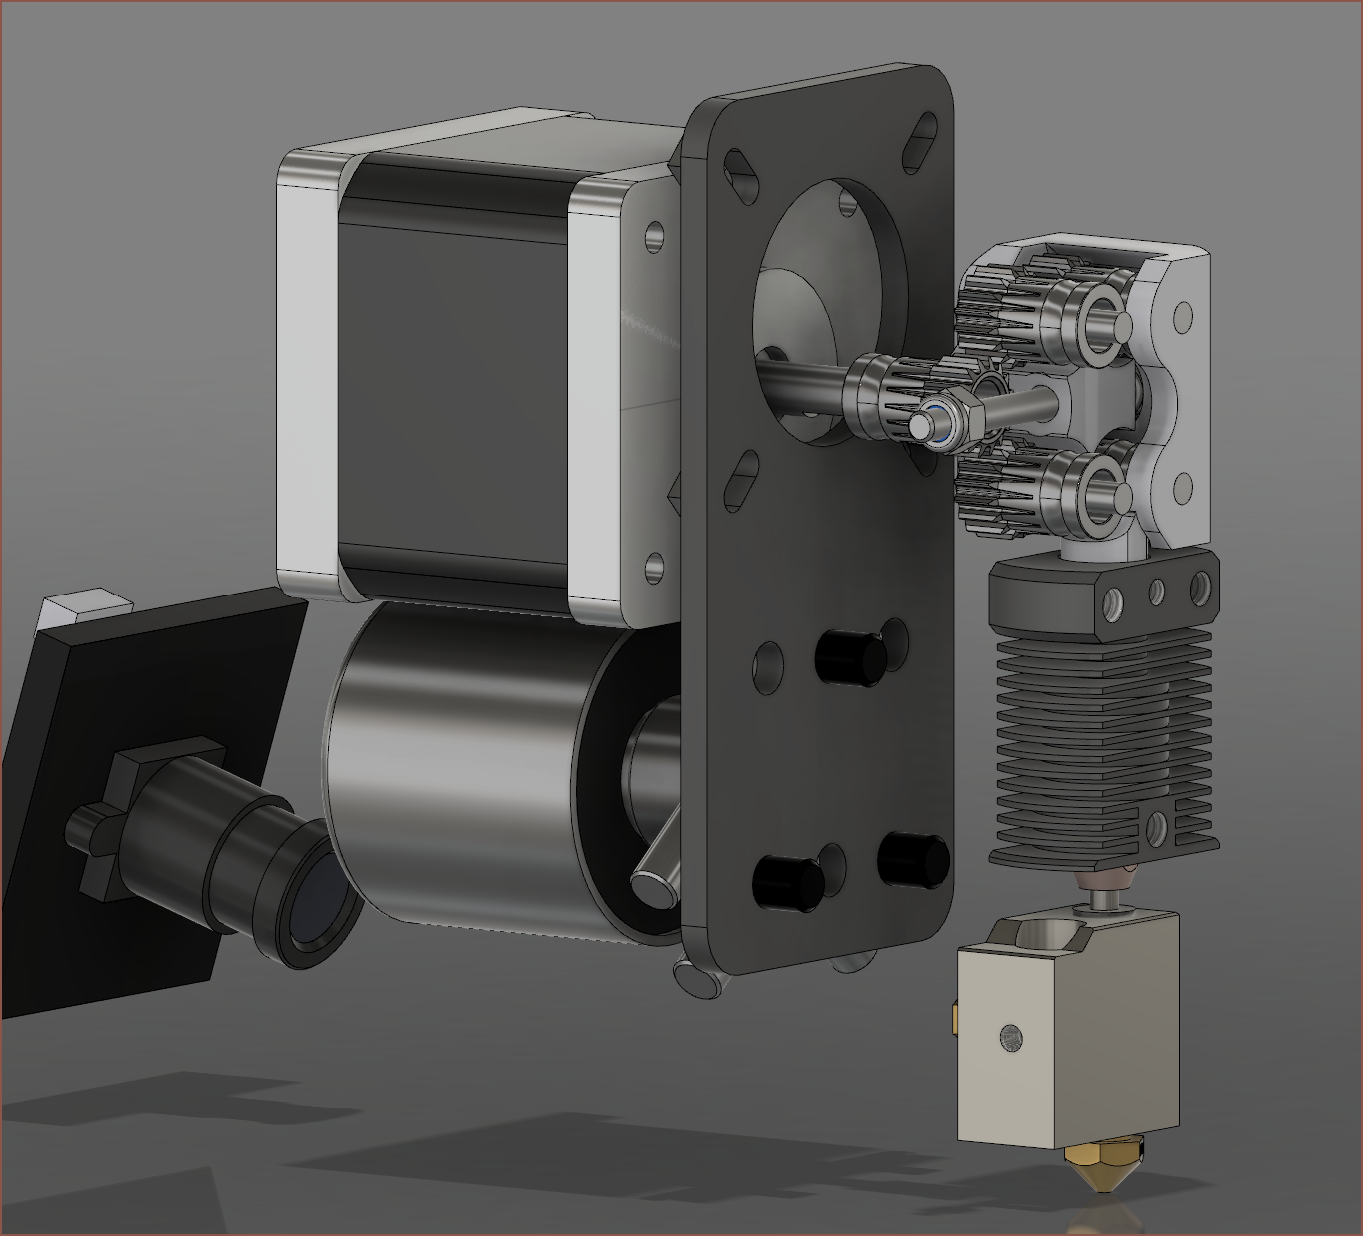
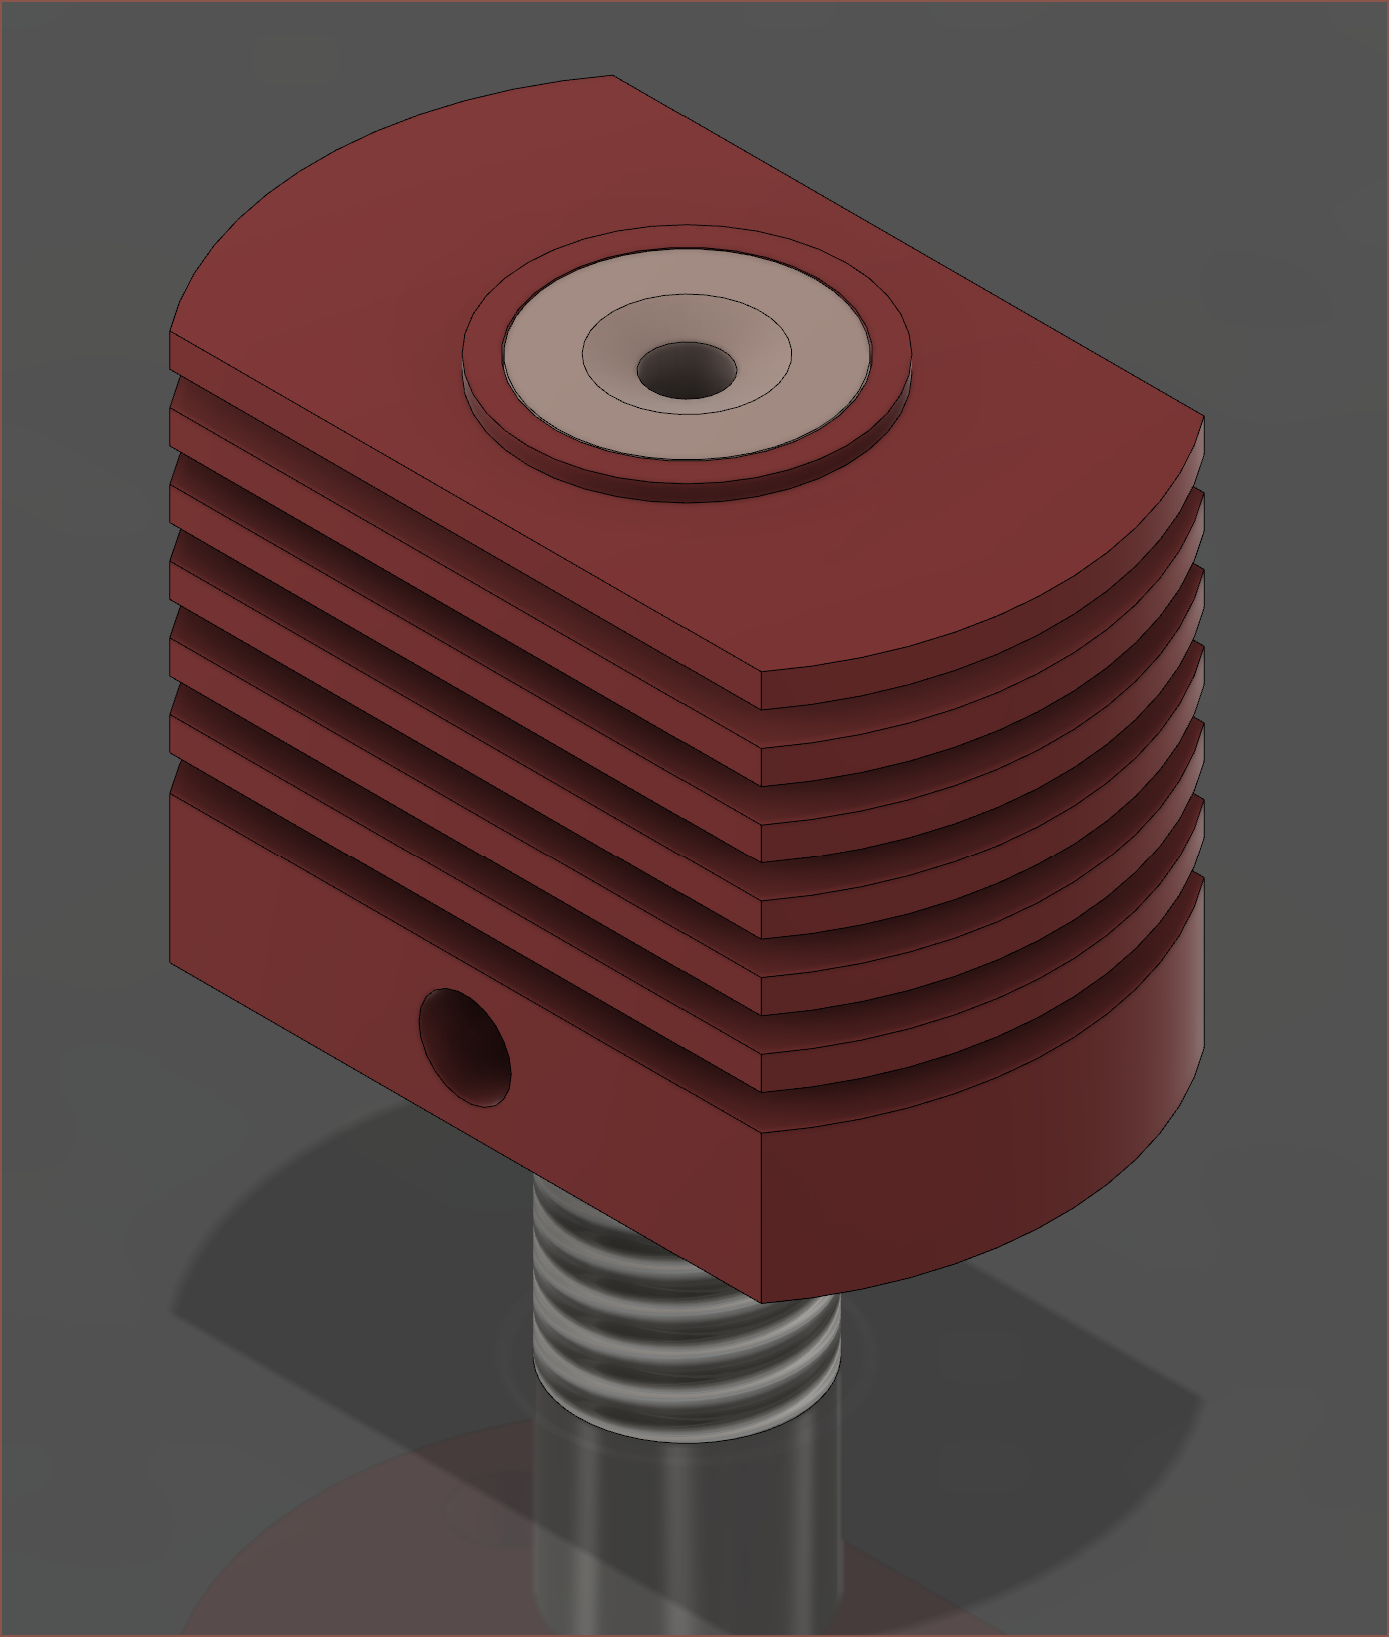
I got to modelling and uploaded it on GrabCAD. Lastly, I modelled the filament guide and fixed the SecSavr Slime model.
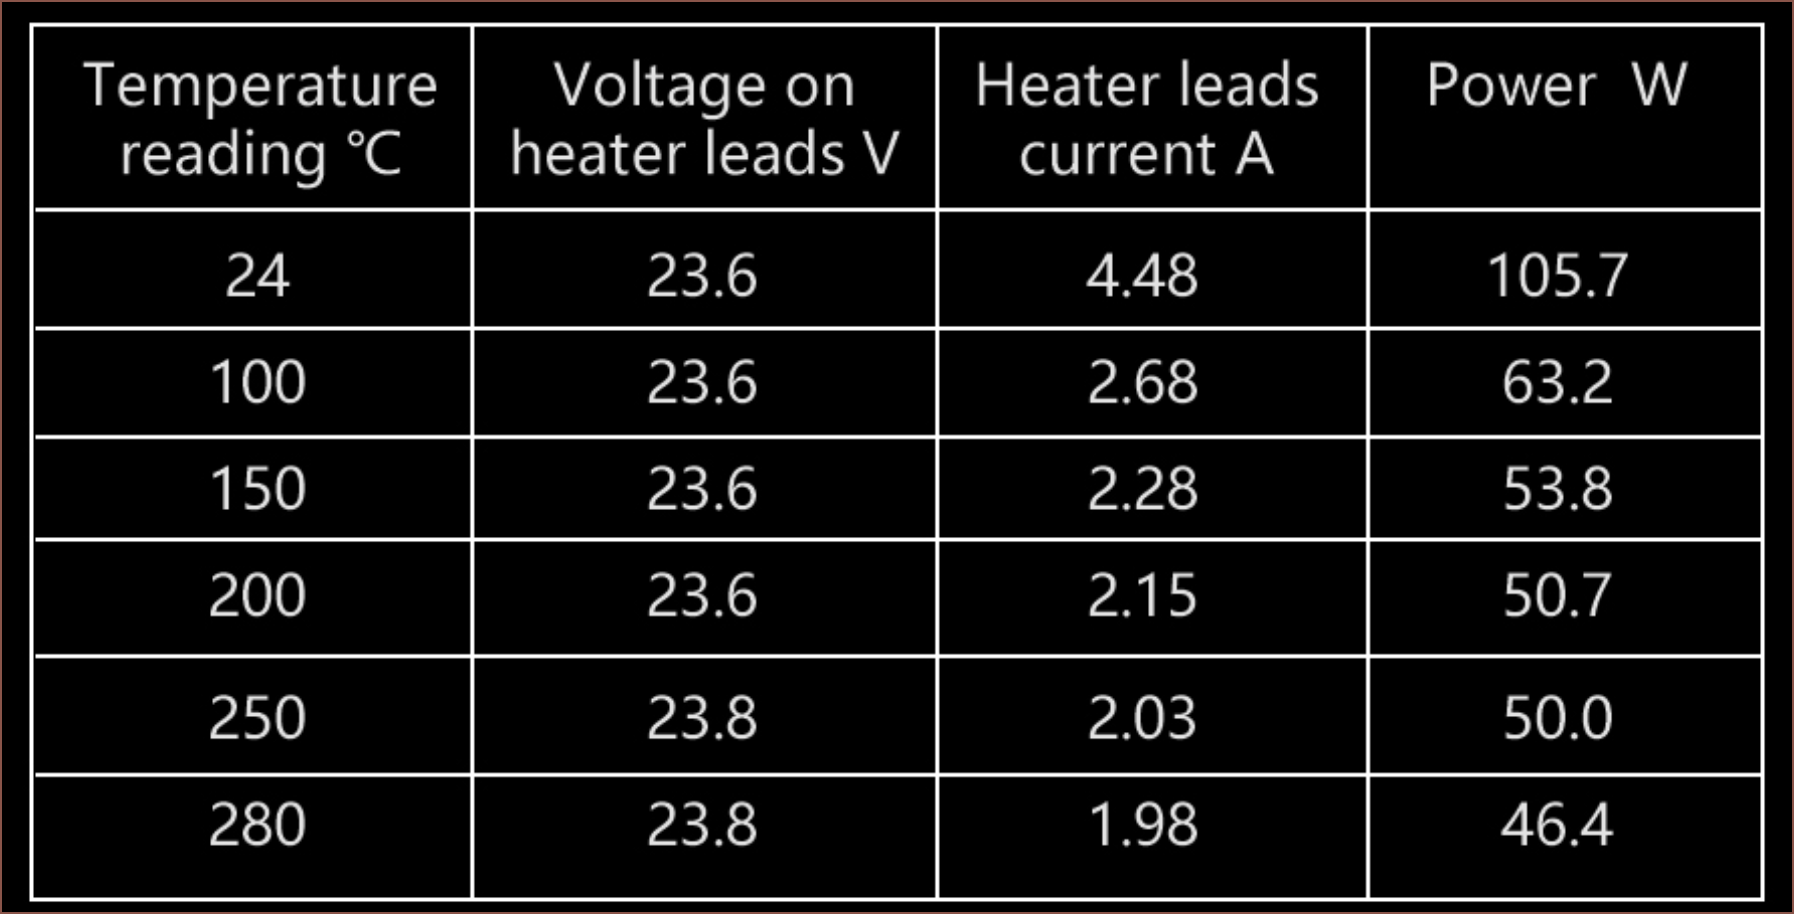
Earlier today, I was looking at spindle motors to see what was available on AliExpress, and I found a 200W 24V motor for about £16. "It's cheaper than a CHC Pro so, worst case scenario, I have 1 motor per bit. Wait..."
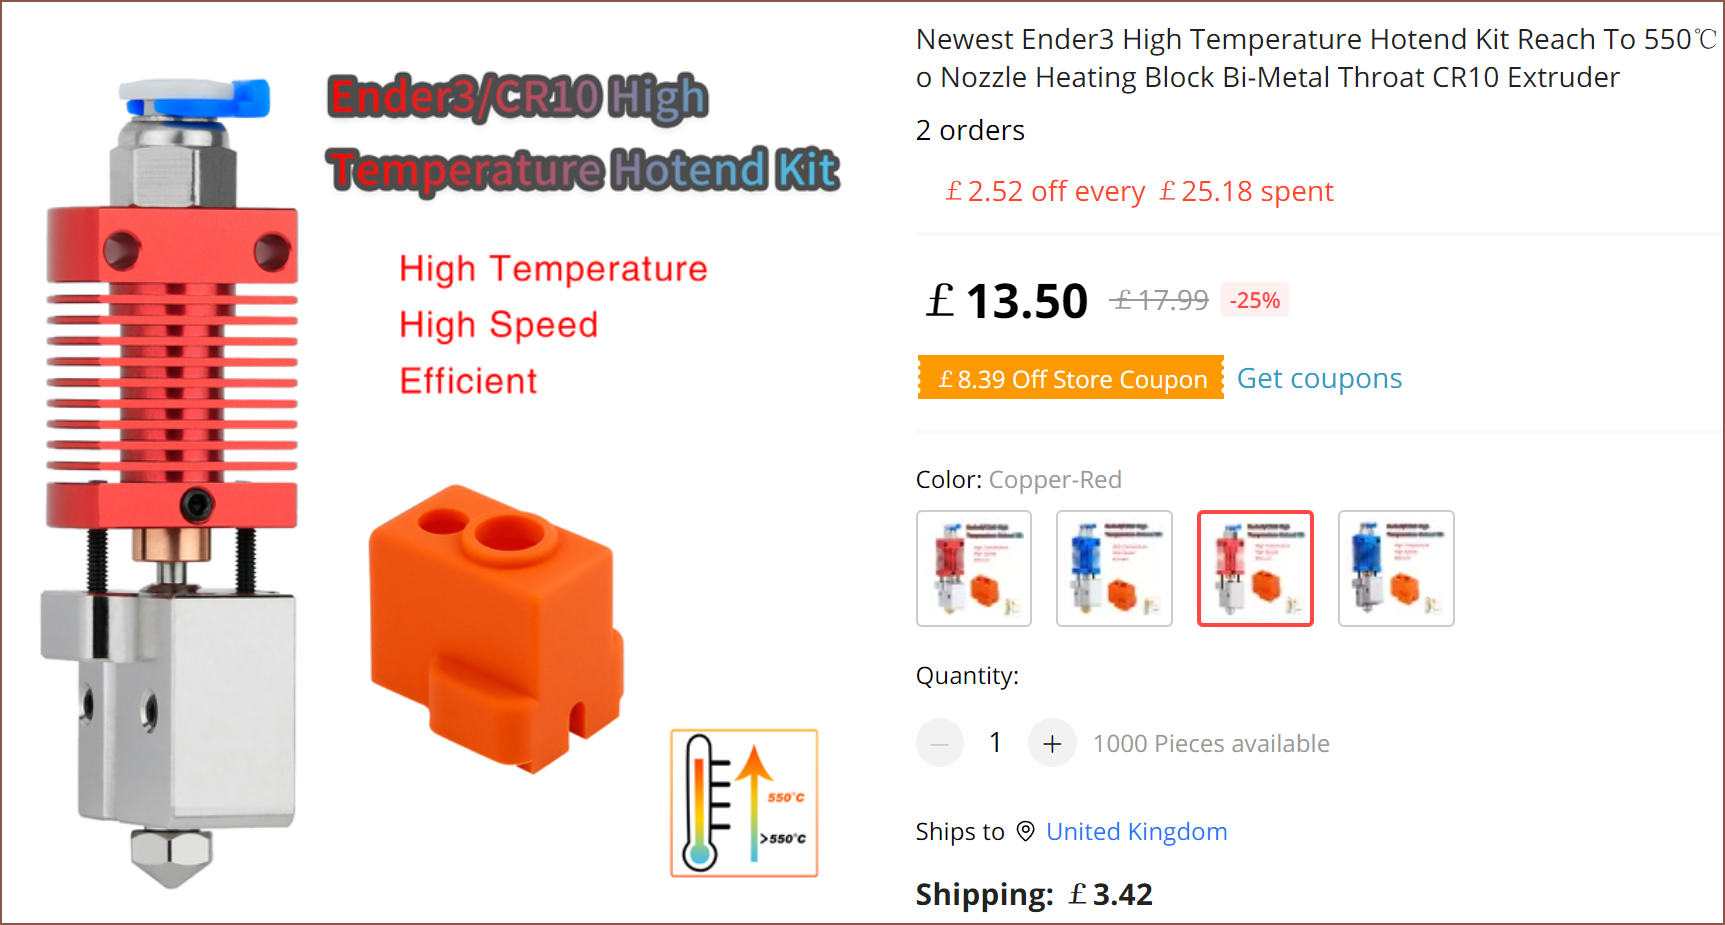
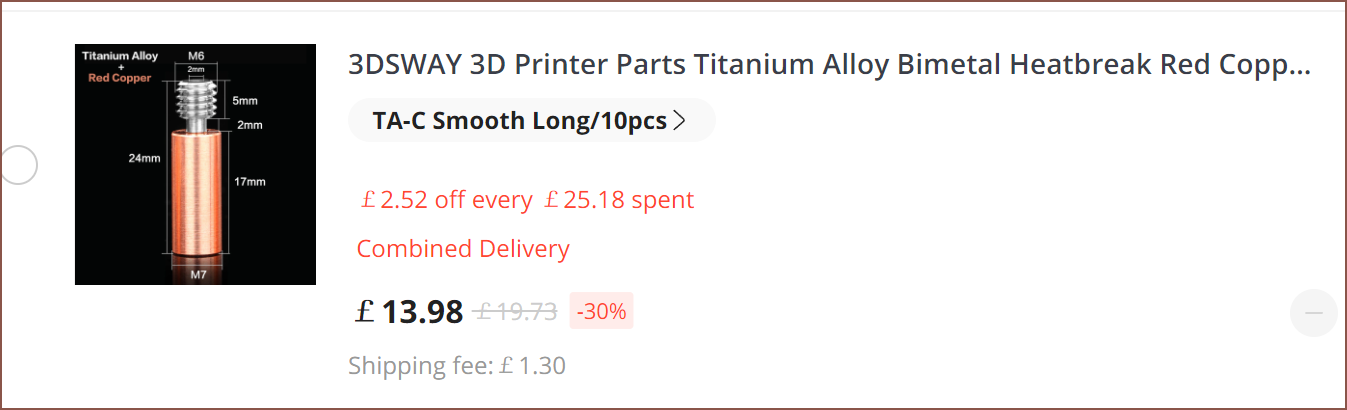
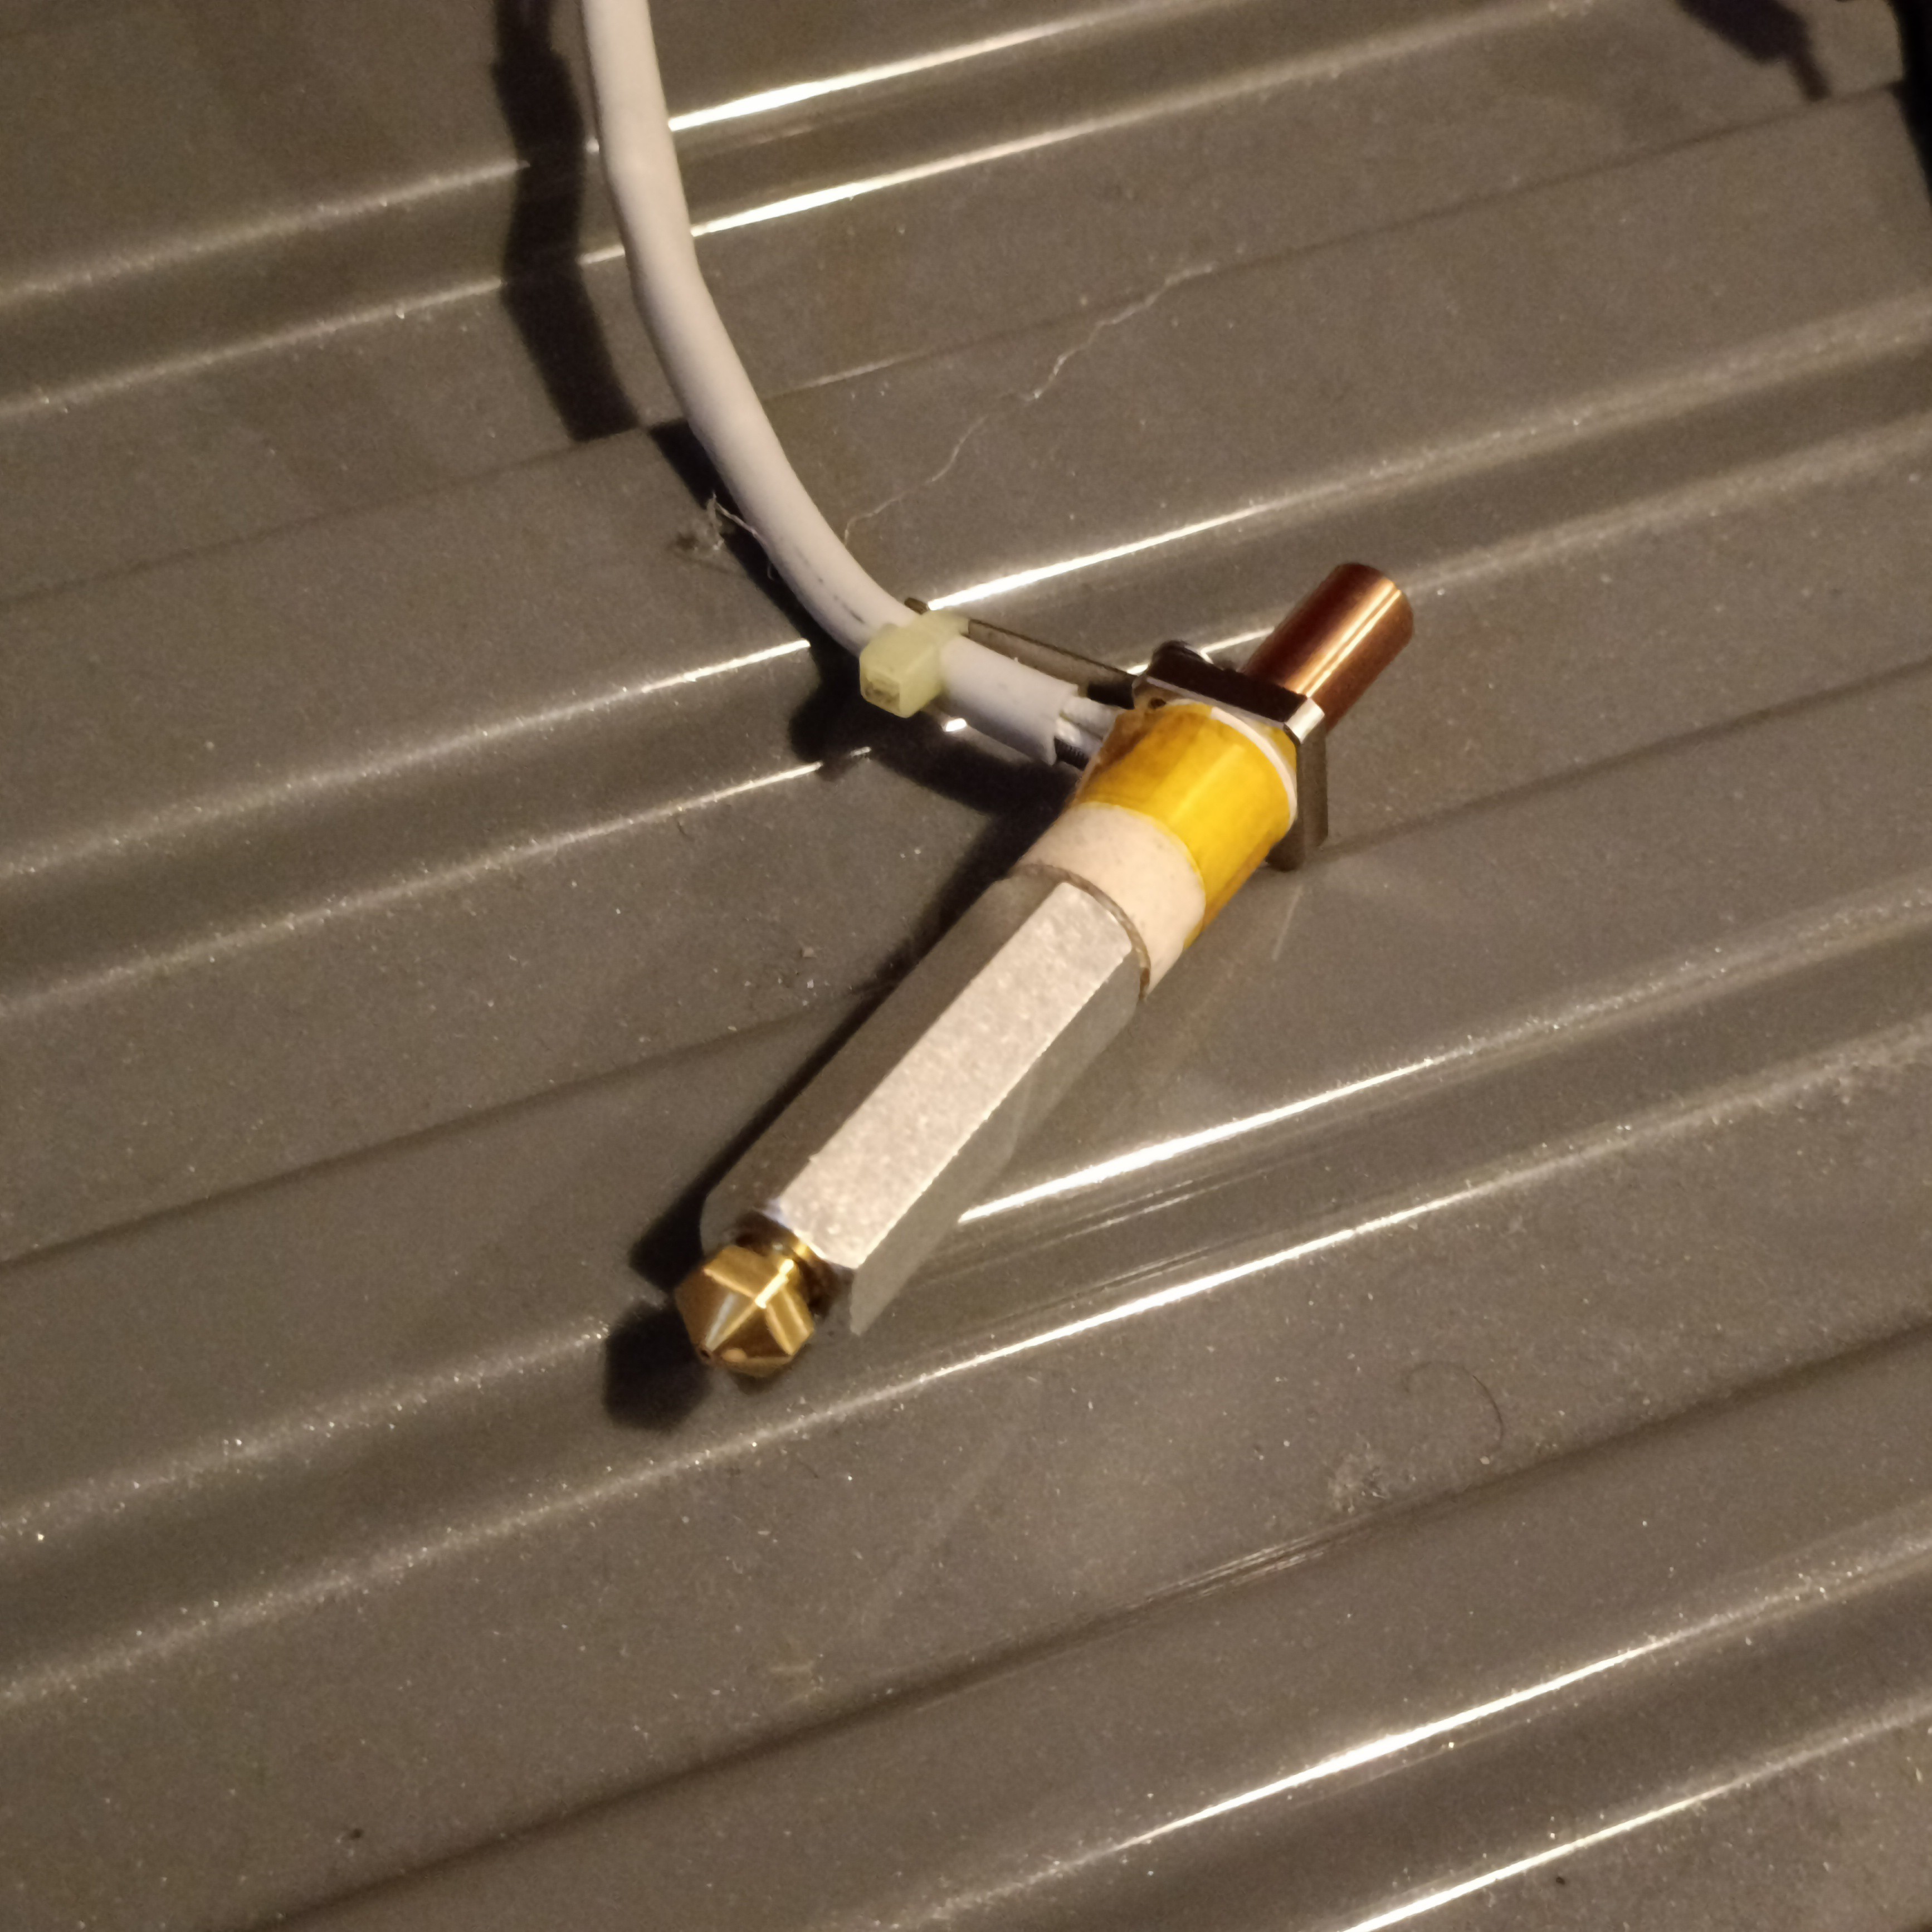
Thus I went around to see what my options were. My first find was the copper Volcano V2 block (modelled above) where I could get 10 for £15, followed a little later by an Ender 3 high temperature kit that comes with a copper plated nozzle as well as the heatsink and bimetal heatbreak.
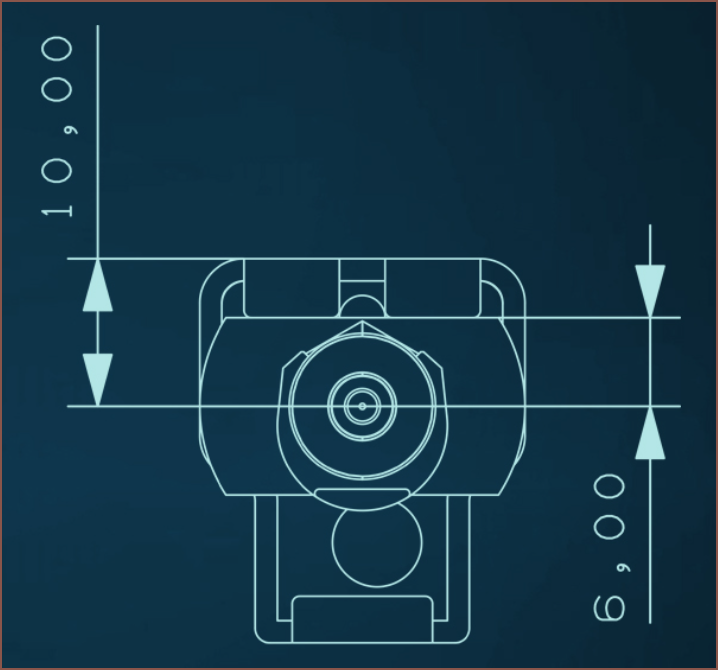
While the second find looked cooler, my first concern was the centre to edge distance. The longer this is, the higher a print feature would need to be before the Slime could reach it at a 90 degree angle without hitting the bed.
On this block, it's 10mm (including sock) wheras the CHC is 6mm. Speaking of silicone socks, I just found out that the max temperature of them is around 300C these days; I thought that it was 260C.
While it's probably a less needed feature for SecSavr (because of toolchanging), the HT block allows for single handed nozzle changes.
What I like about the "Volcano V2" (VV2) was that it finally eliminated those annoying 2 screws that clamp the heater cartridge. I've never been able to get them off, but more importantly, they increase the distance between the orifice and the edge. My main concern was that 300C thermistors don't usually come in beads, but conviniently, there are M3 versions.
I also did some research into thermocouples, PT100/1000 and the D500 thermistor, but apparently polycarbonate doesn't usually need over 300C to print so I cancelled that research tangent.
The highest wattage cartridge I could find was 24V 70W. I was hoping for 80W but it's still more than the CHC Pro most of the time:
Lastly, one other benefit over the CHC is that there should be more cross sectional area between the block and the melt zone extenders.
Then came the prices. Below is for a set of 10, excluding VAT.
CHC Pro + Heatsink + Bimetal: £209.43
HT Kit + Cartridge Heater + Cartridge Thermistor - Copper Nozzle (estimated value of £5.50): £127.91
The CHC is nearly £129 more expensive than the VV2, and I'd need around 18 (8 and a spare for each of the two SecSavr's), so an extrapolated difference would be £232. That saving could go towards the Milling Tool, BTT's fancy new Mantra M8P I'm probably going to use if the price is right or another project, and I'm fine with using a melt zone extender if I really need to get a higher angle for non-planar printing. Thus I quickly got to work modelling the changes needed and it took probably an hour.
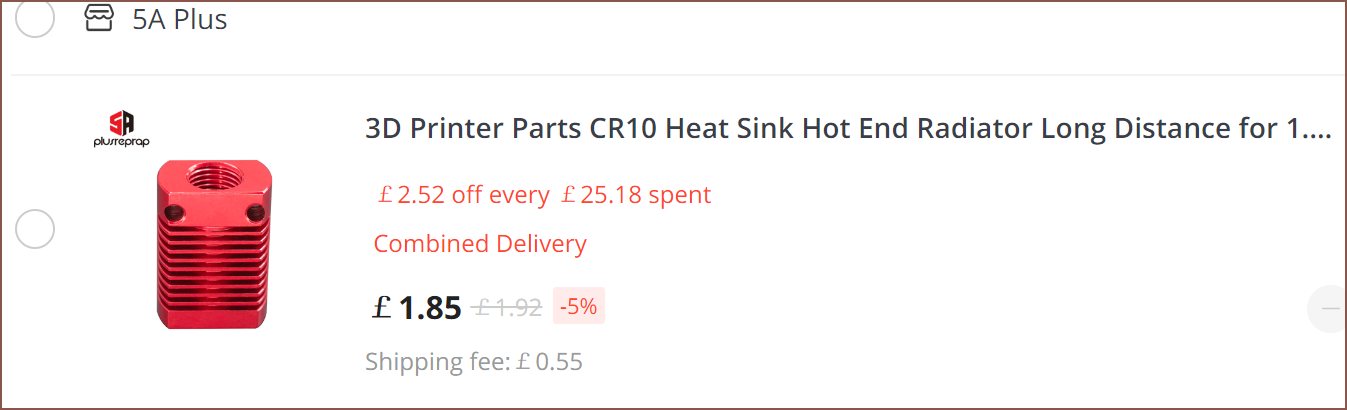
Due to the pros I mentioned in the last log and that the CR10 heatsink + bimetal throat is £2.30/each (for 10, including shipping and tax) while the MQ Mozzle heatbreak is £3.50/each, I'm switching to it.
I plan to cut the bimetal throat while inside the CR10 heatsink.
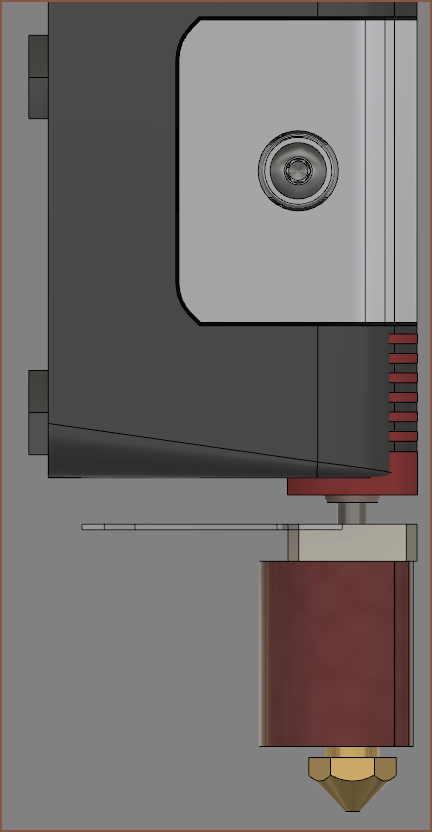
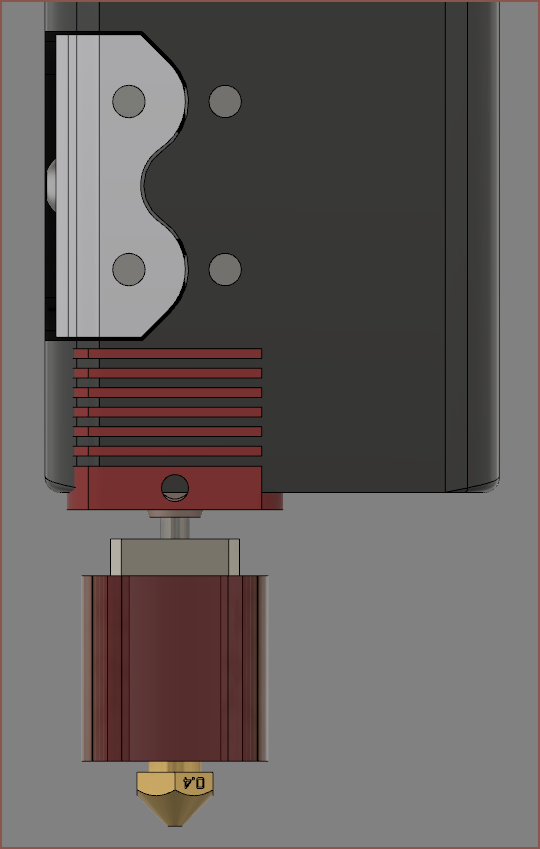
Here is the assembly inside the SecSavr Slime:
While it would most likely reduce the flow rate a tad, it makes the Slight almost 4mm shorter and I could probably make it 5 while keeping compatibility with the CHC Pro.
[E1] Just went to see what I could do, and I was able to get a 5.9mm reduction.
It's going to be another one of those "I don't really have much to say but I should probably write a log about it. Oh wait, there actually is a lot to say." logs. I've been thinking over the past 2 days and somewhat worried about this configuration. The delicate nature of this MQ Mozzle throat means that shaving 1mm from its base would probably be difficult. I also still somewhat doubt this tiny heatsink's cooling ability and would like to test this soon.
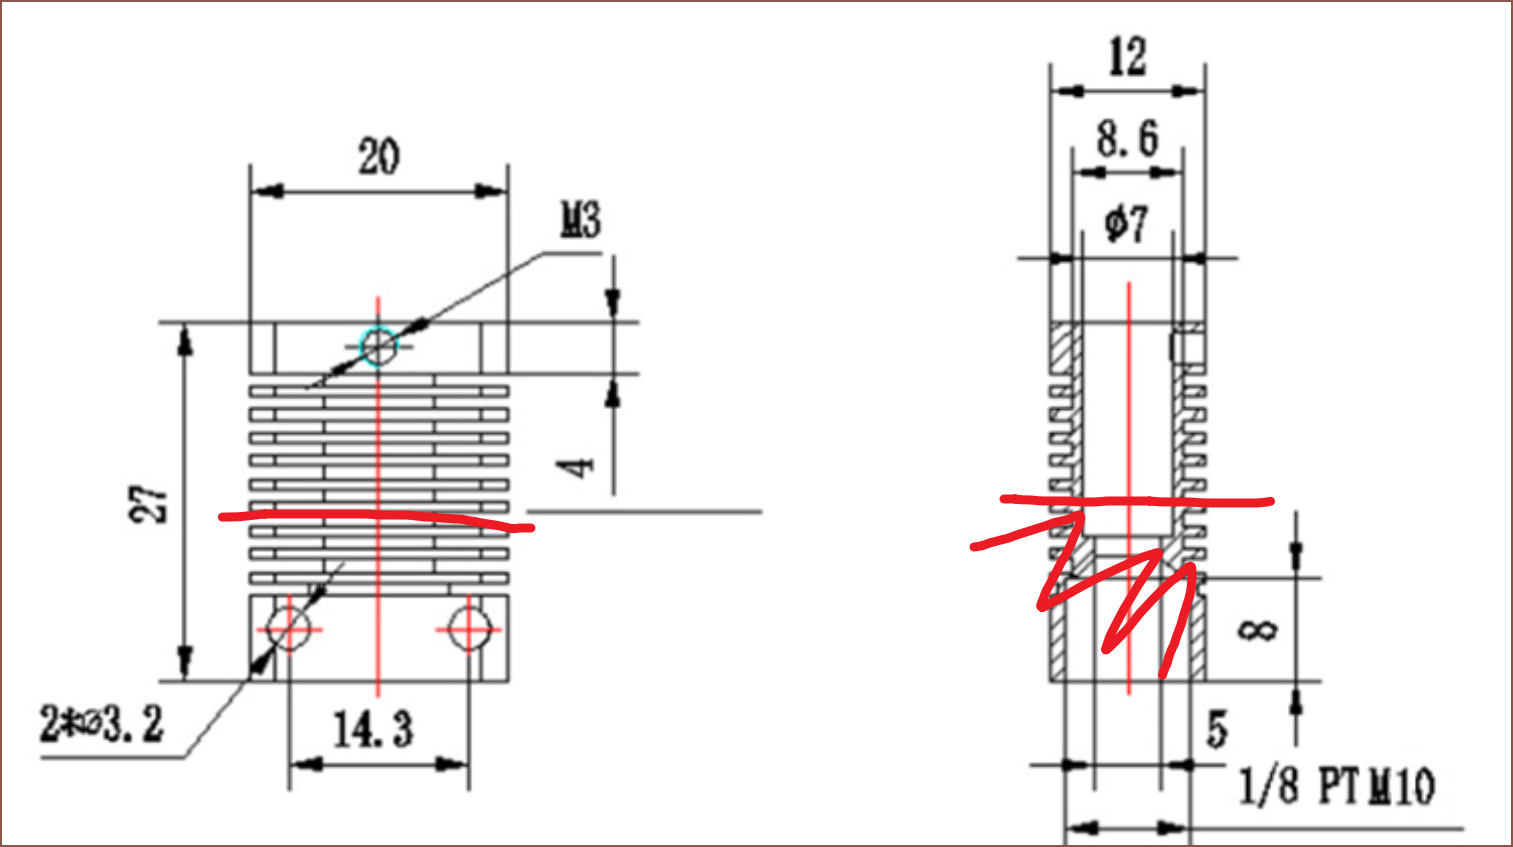
After some AliExpress searching, I'm thinking that an alternative could be a CR10 heatsink cut so that it's 15mm in height along with a bimetal heatbreak.
This combination would be a comparable to the price of a single MQ Mozzle heatbreak.
Cons
The filament would be less constrained.
It could make manufacture more tedious. It looks like there wouldn't be that much material to cut through and the fins should act as a guide for the sawblade, so I have hope that it should be very straightforward to do.
It's technically would be heavier too, but I'm not one to be chasing grams.
I've never tried the titanium alloy bimetal heatbreak and only have experience with the copper threads version, and I suspect that clogs could be more likely and lower flow rates.
Pros
It works and I can have the option for using normal length or volcano nozzles as intended.
The parts would likely be easier to source, especially considering if the cheap Mozzle heatbreak would still be around in a few years.
May be easier to securely fix into the Slight due to the larger surface area on the sides.
Other considerations
Use a more expensive version of the MQ Mozzle throat?
It doesn't seem like any of the £3 - 10 options would have the 5mm long threads, and I'm still trying to go for a cheaper (and lighter) option to the metal BMG hotend.
Use an aluminium hex spacer for M7 and stick heatsinks on the flat surfaces.
Oh sweet, a cheaper version
I just found this as I was writing this log. It's even got a flat section for better contact with the grub screw. Copper should be easy to cut like aluminium, right? Perhaps an idea is to cut the throat while inside the heatsink to get rid of that 4mm hole at the top.Wait a second. This heatsink is drastically cheaper from this seller and a bunch of others on AliExpress. Nice to know.
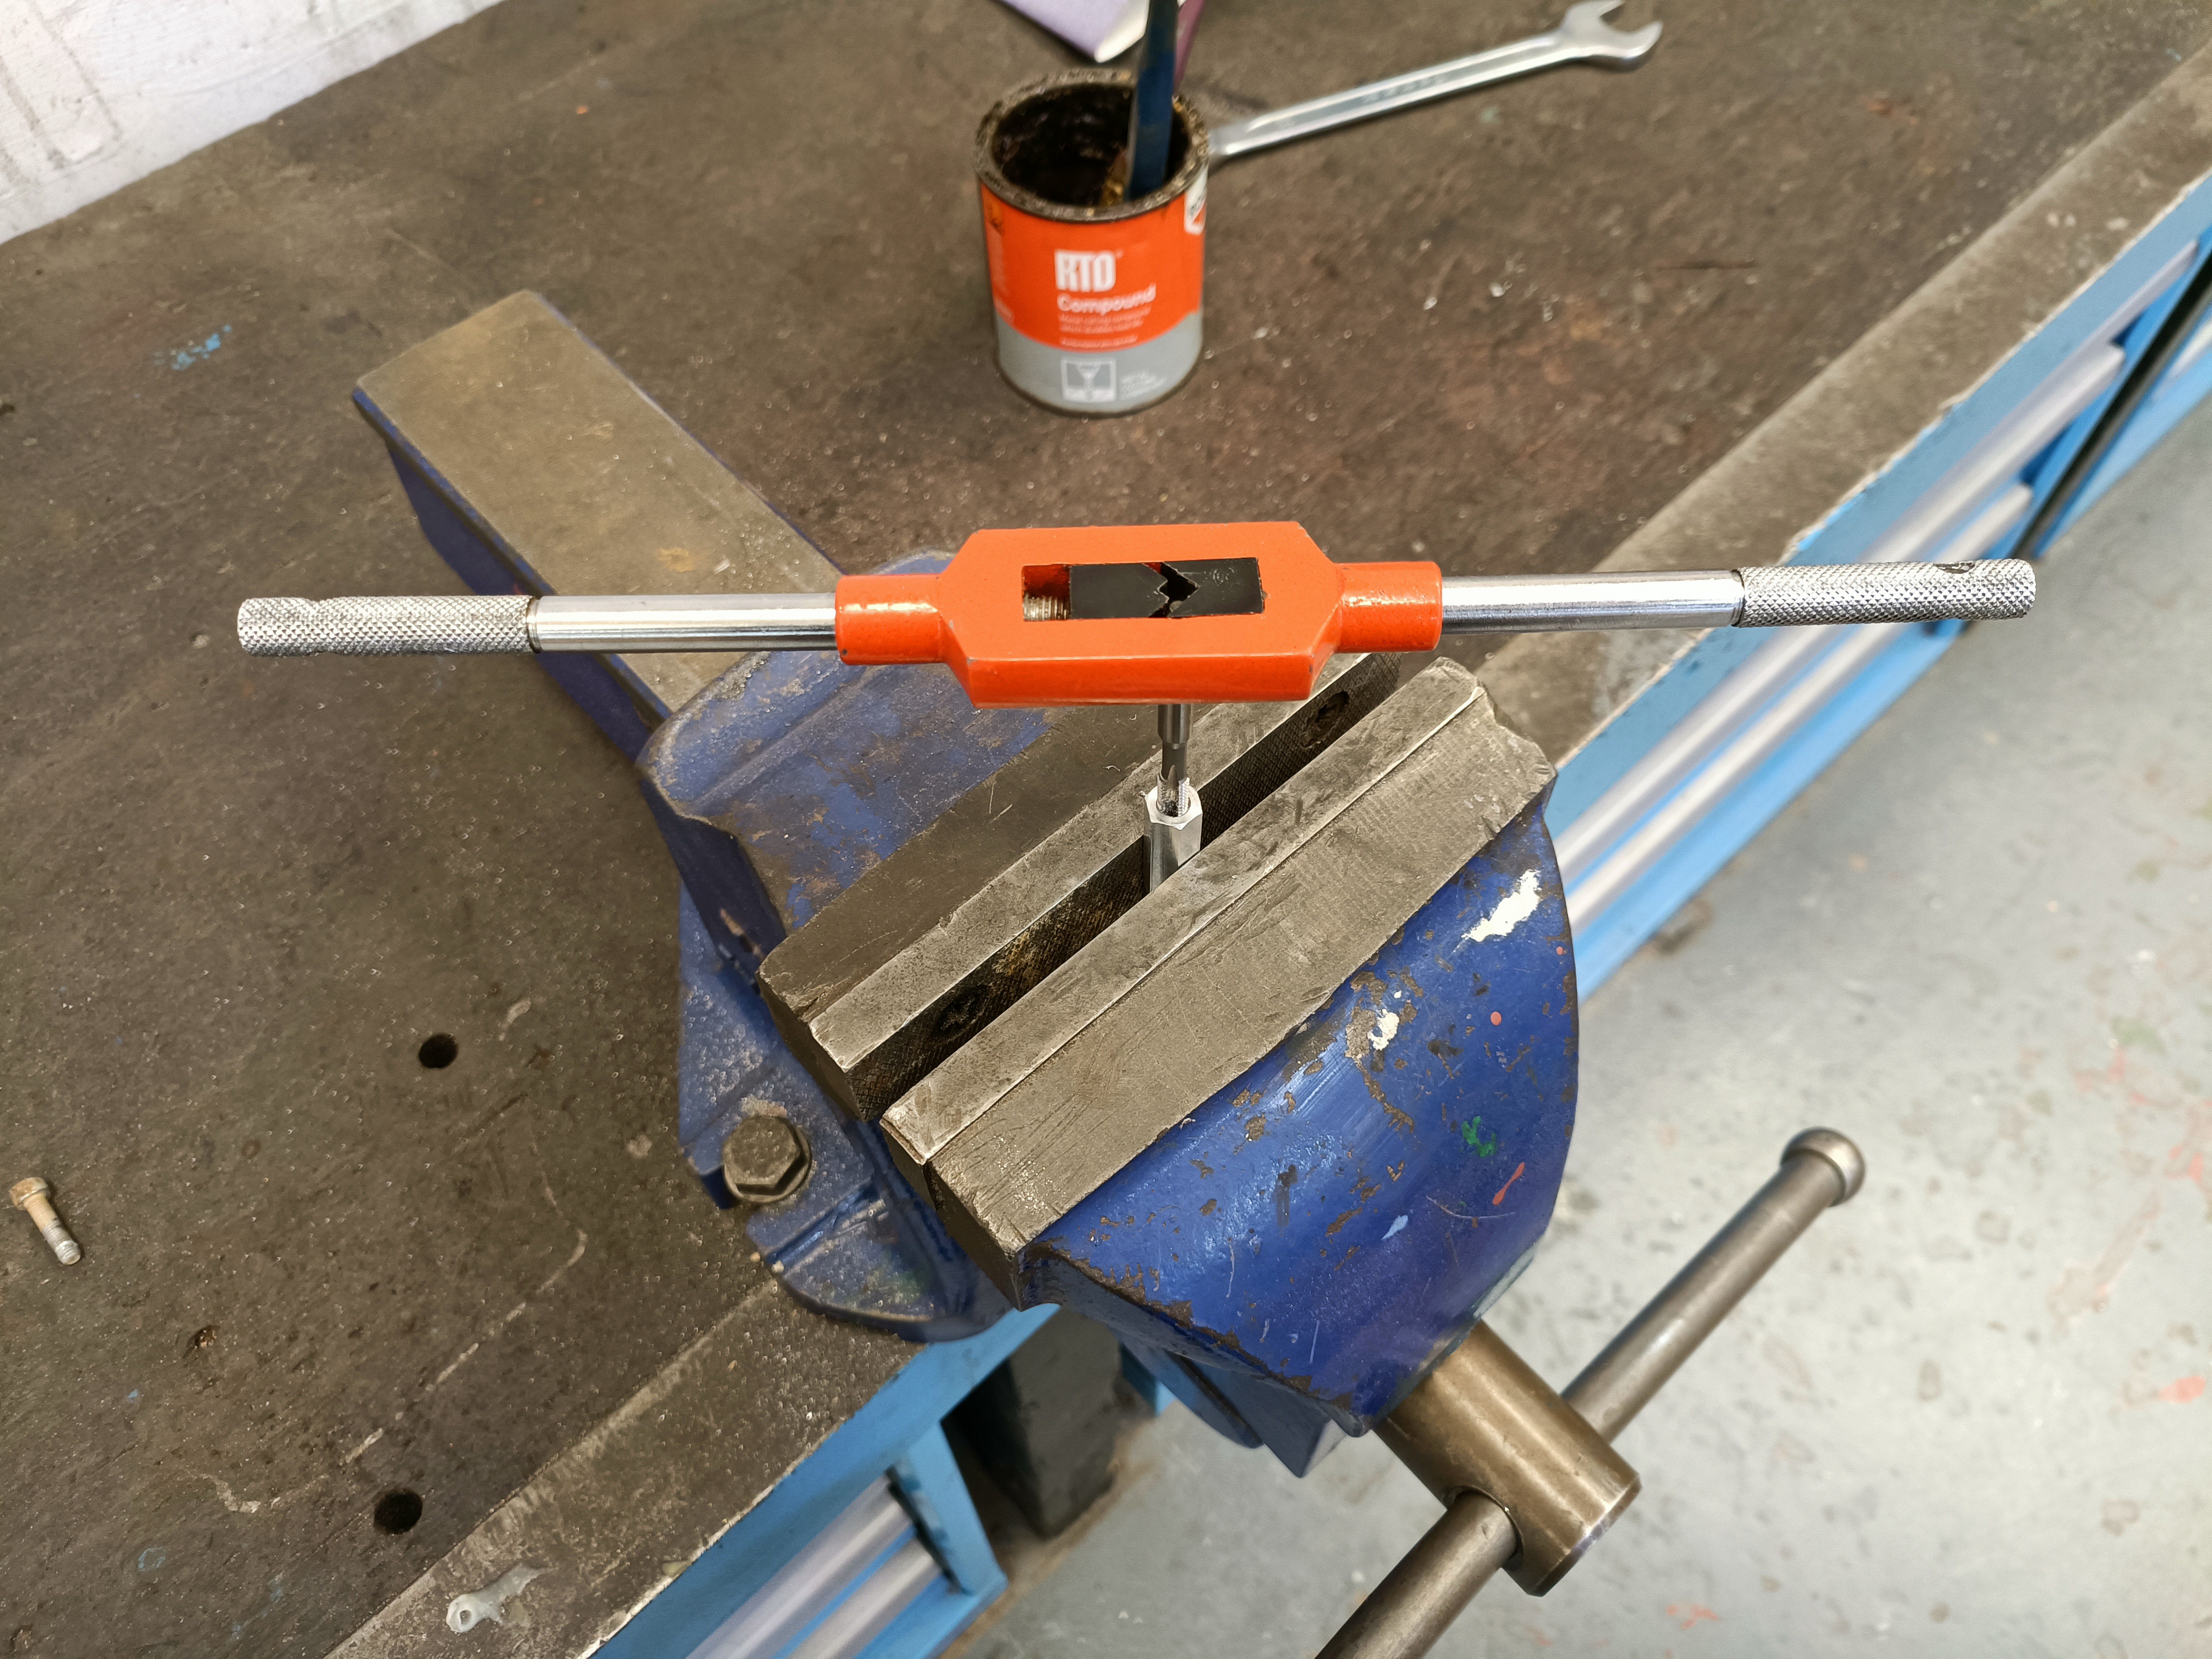
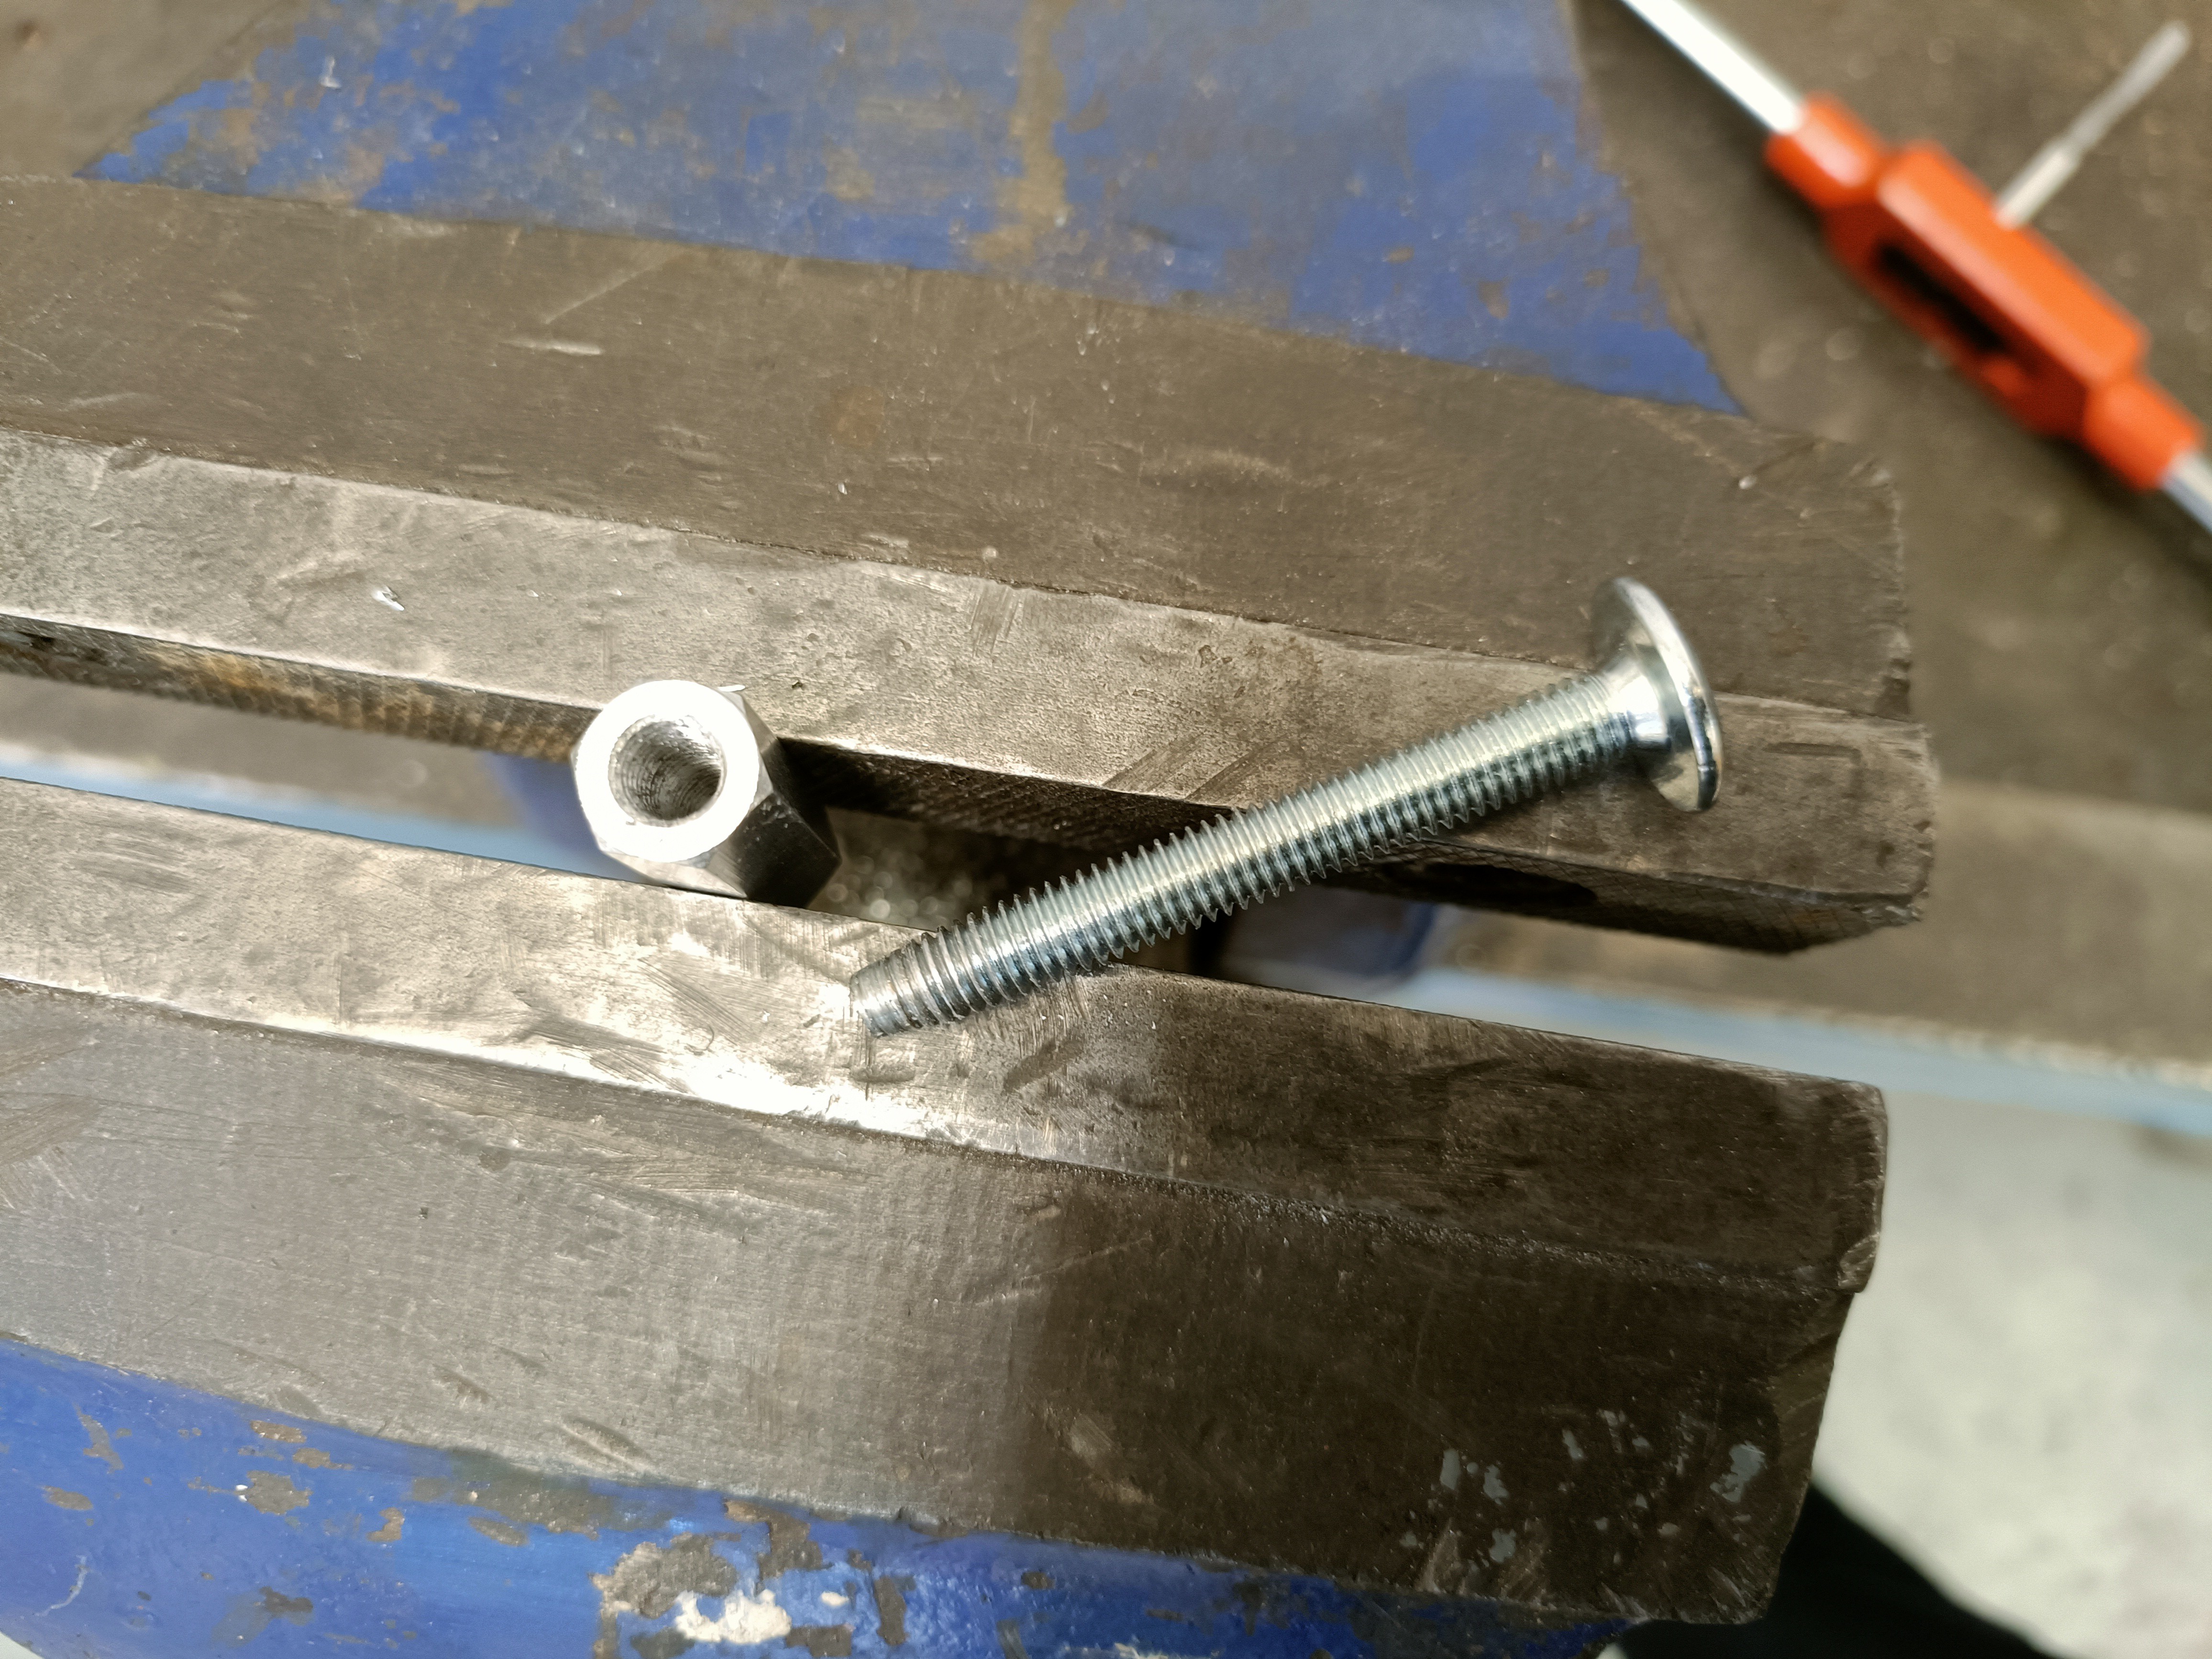
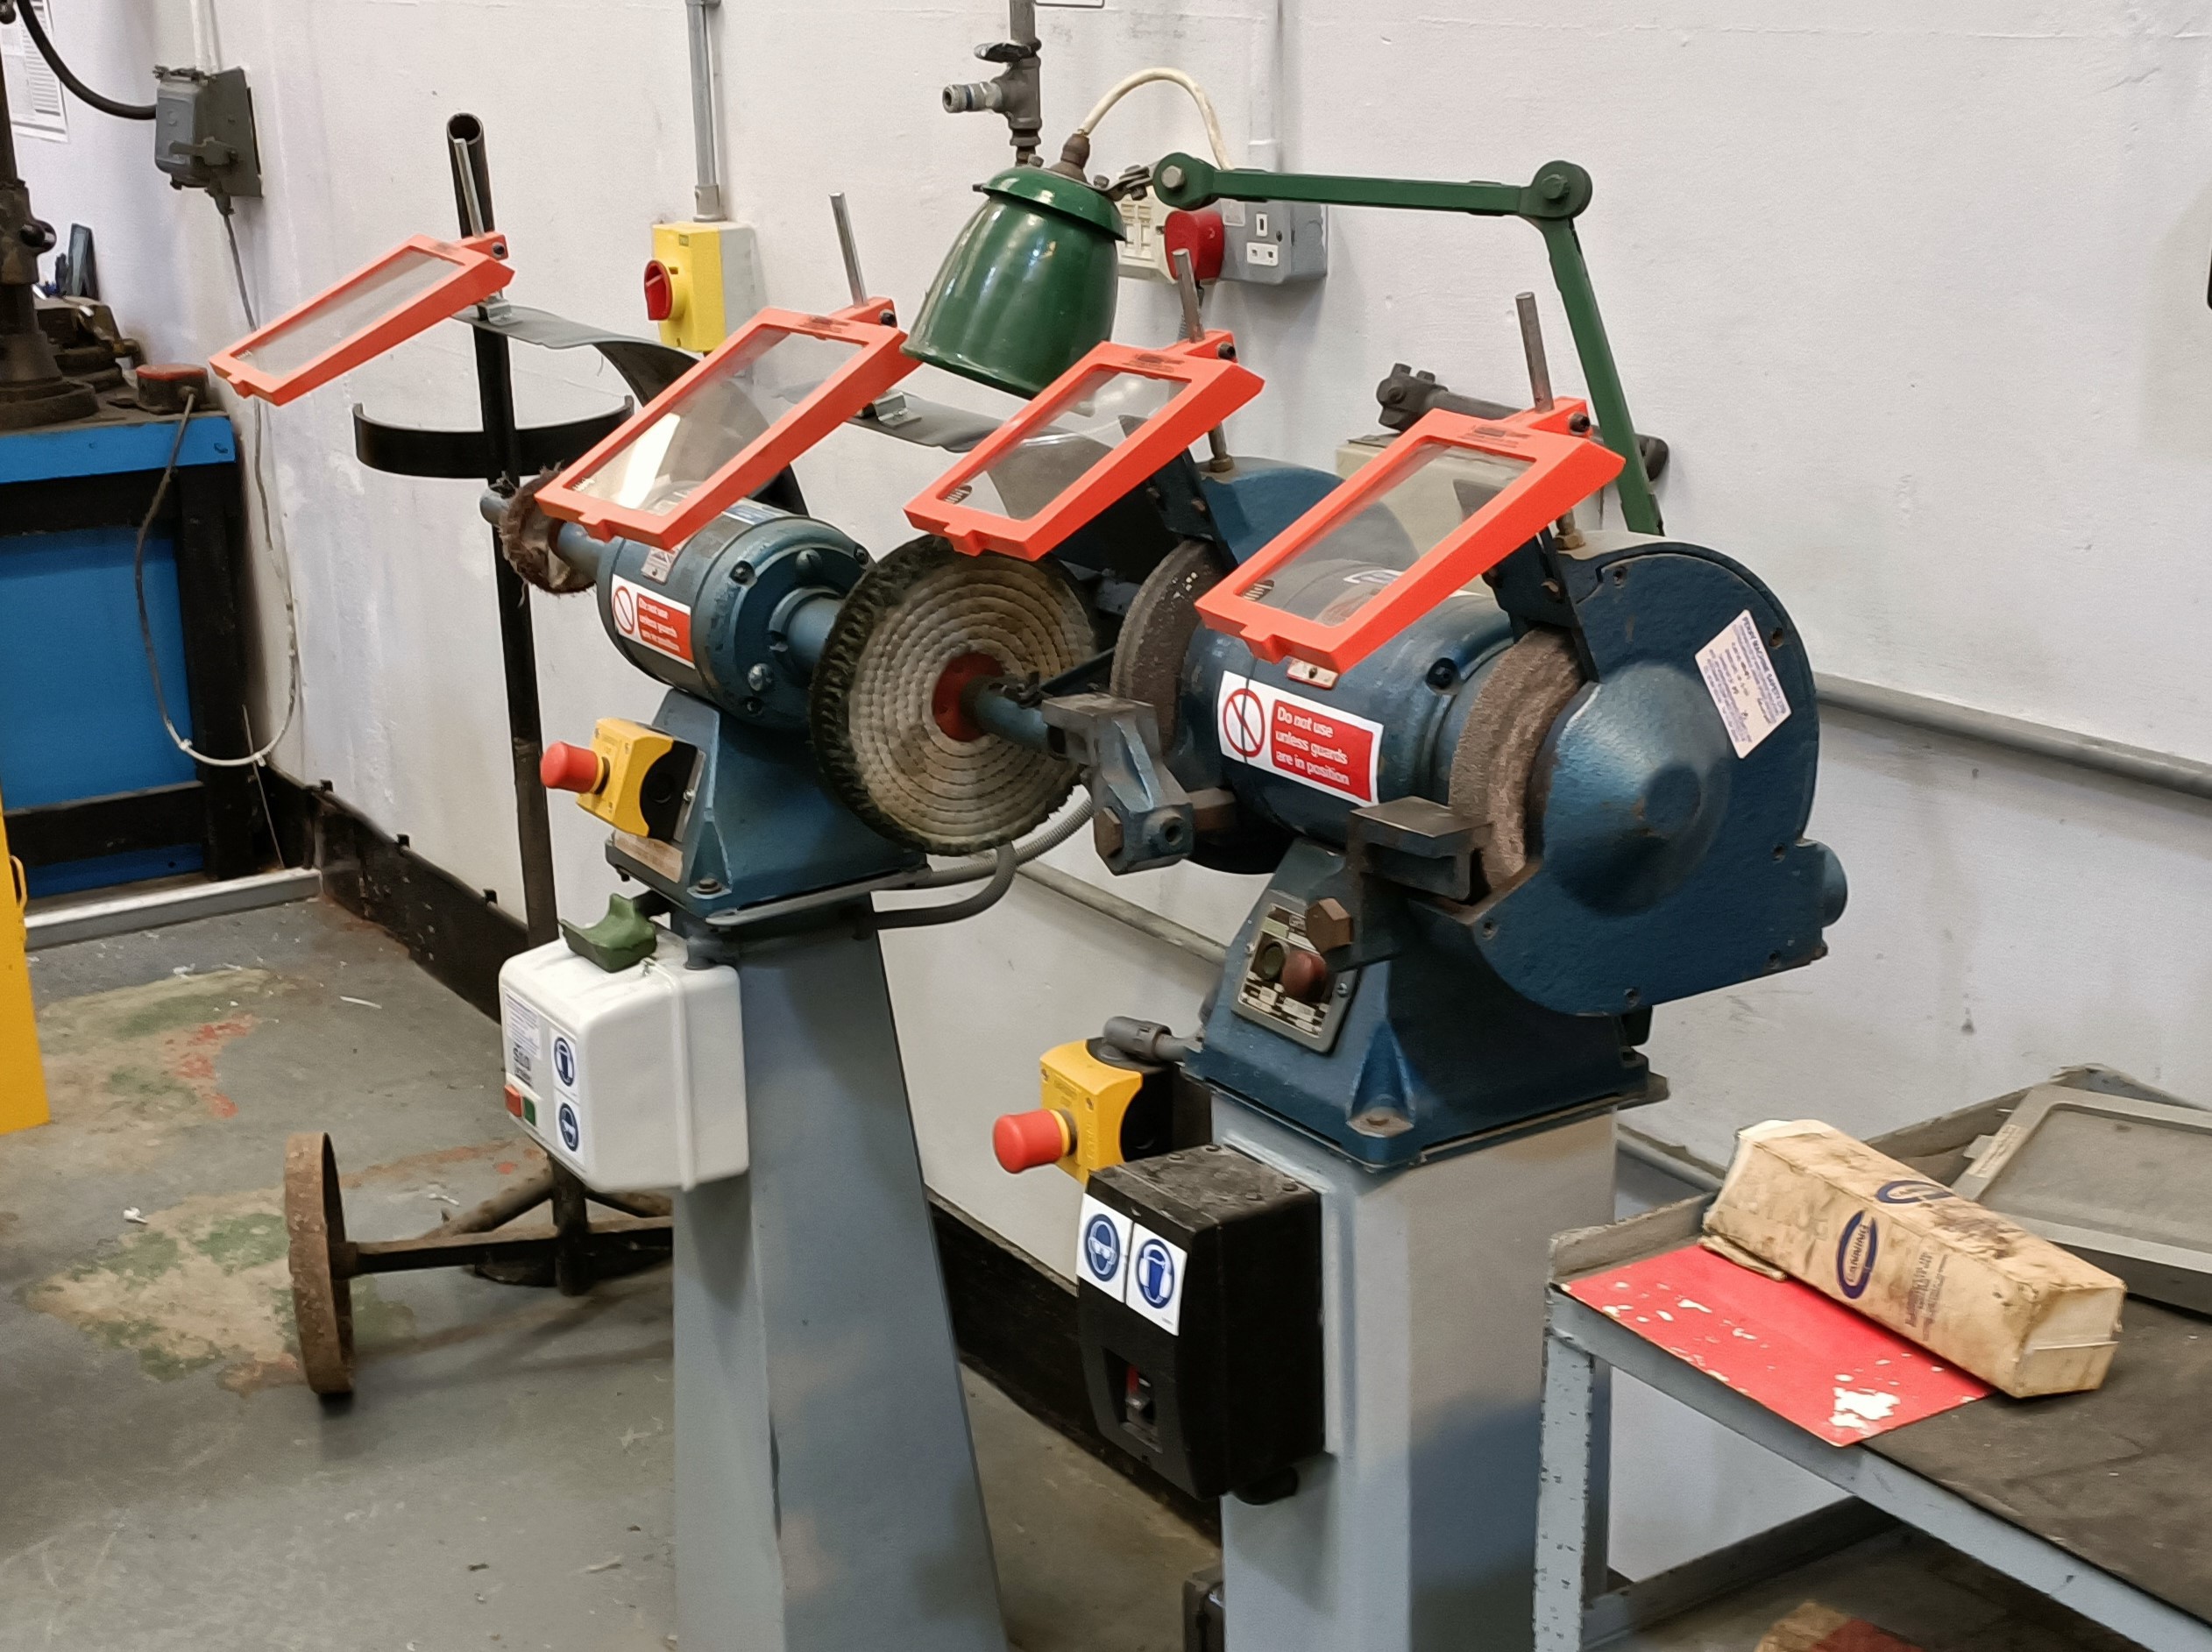
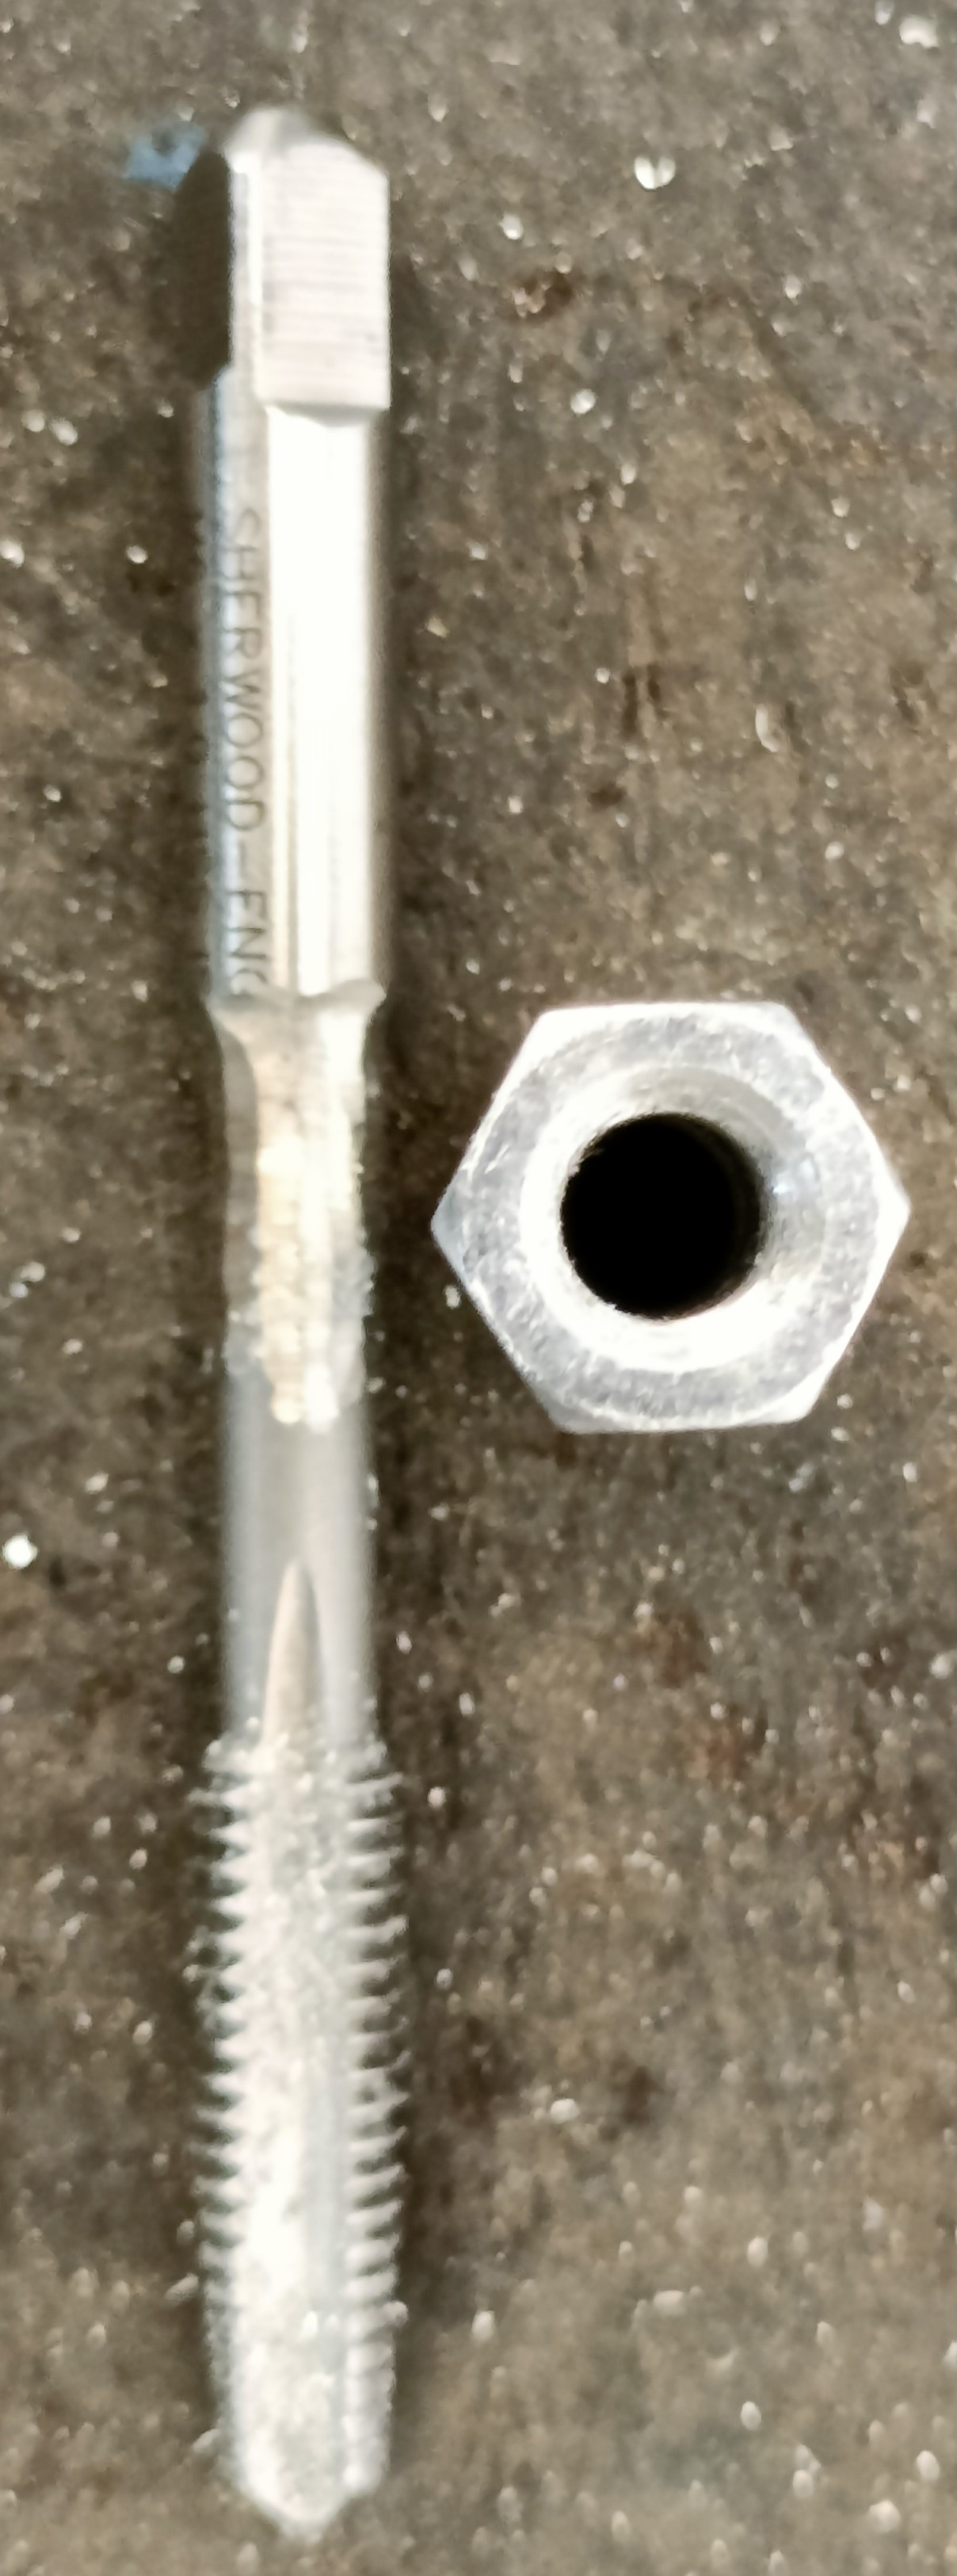
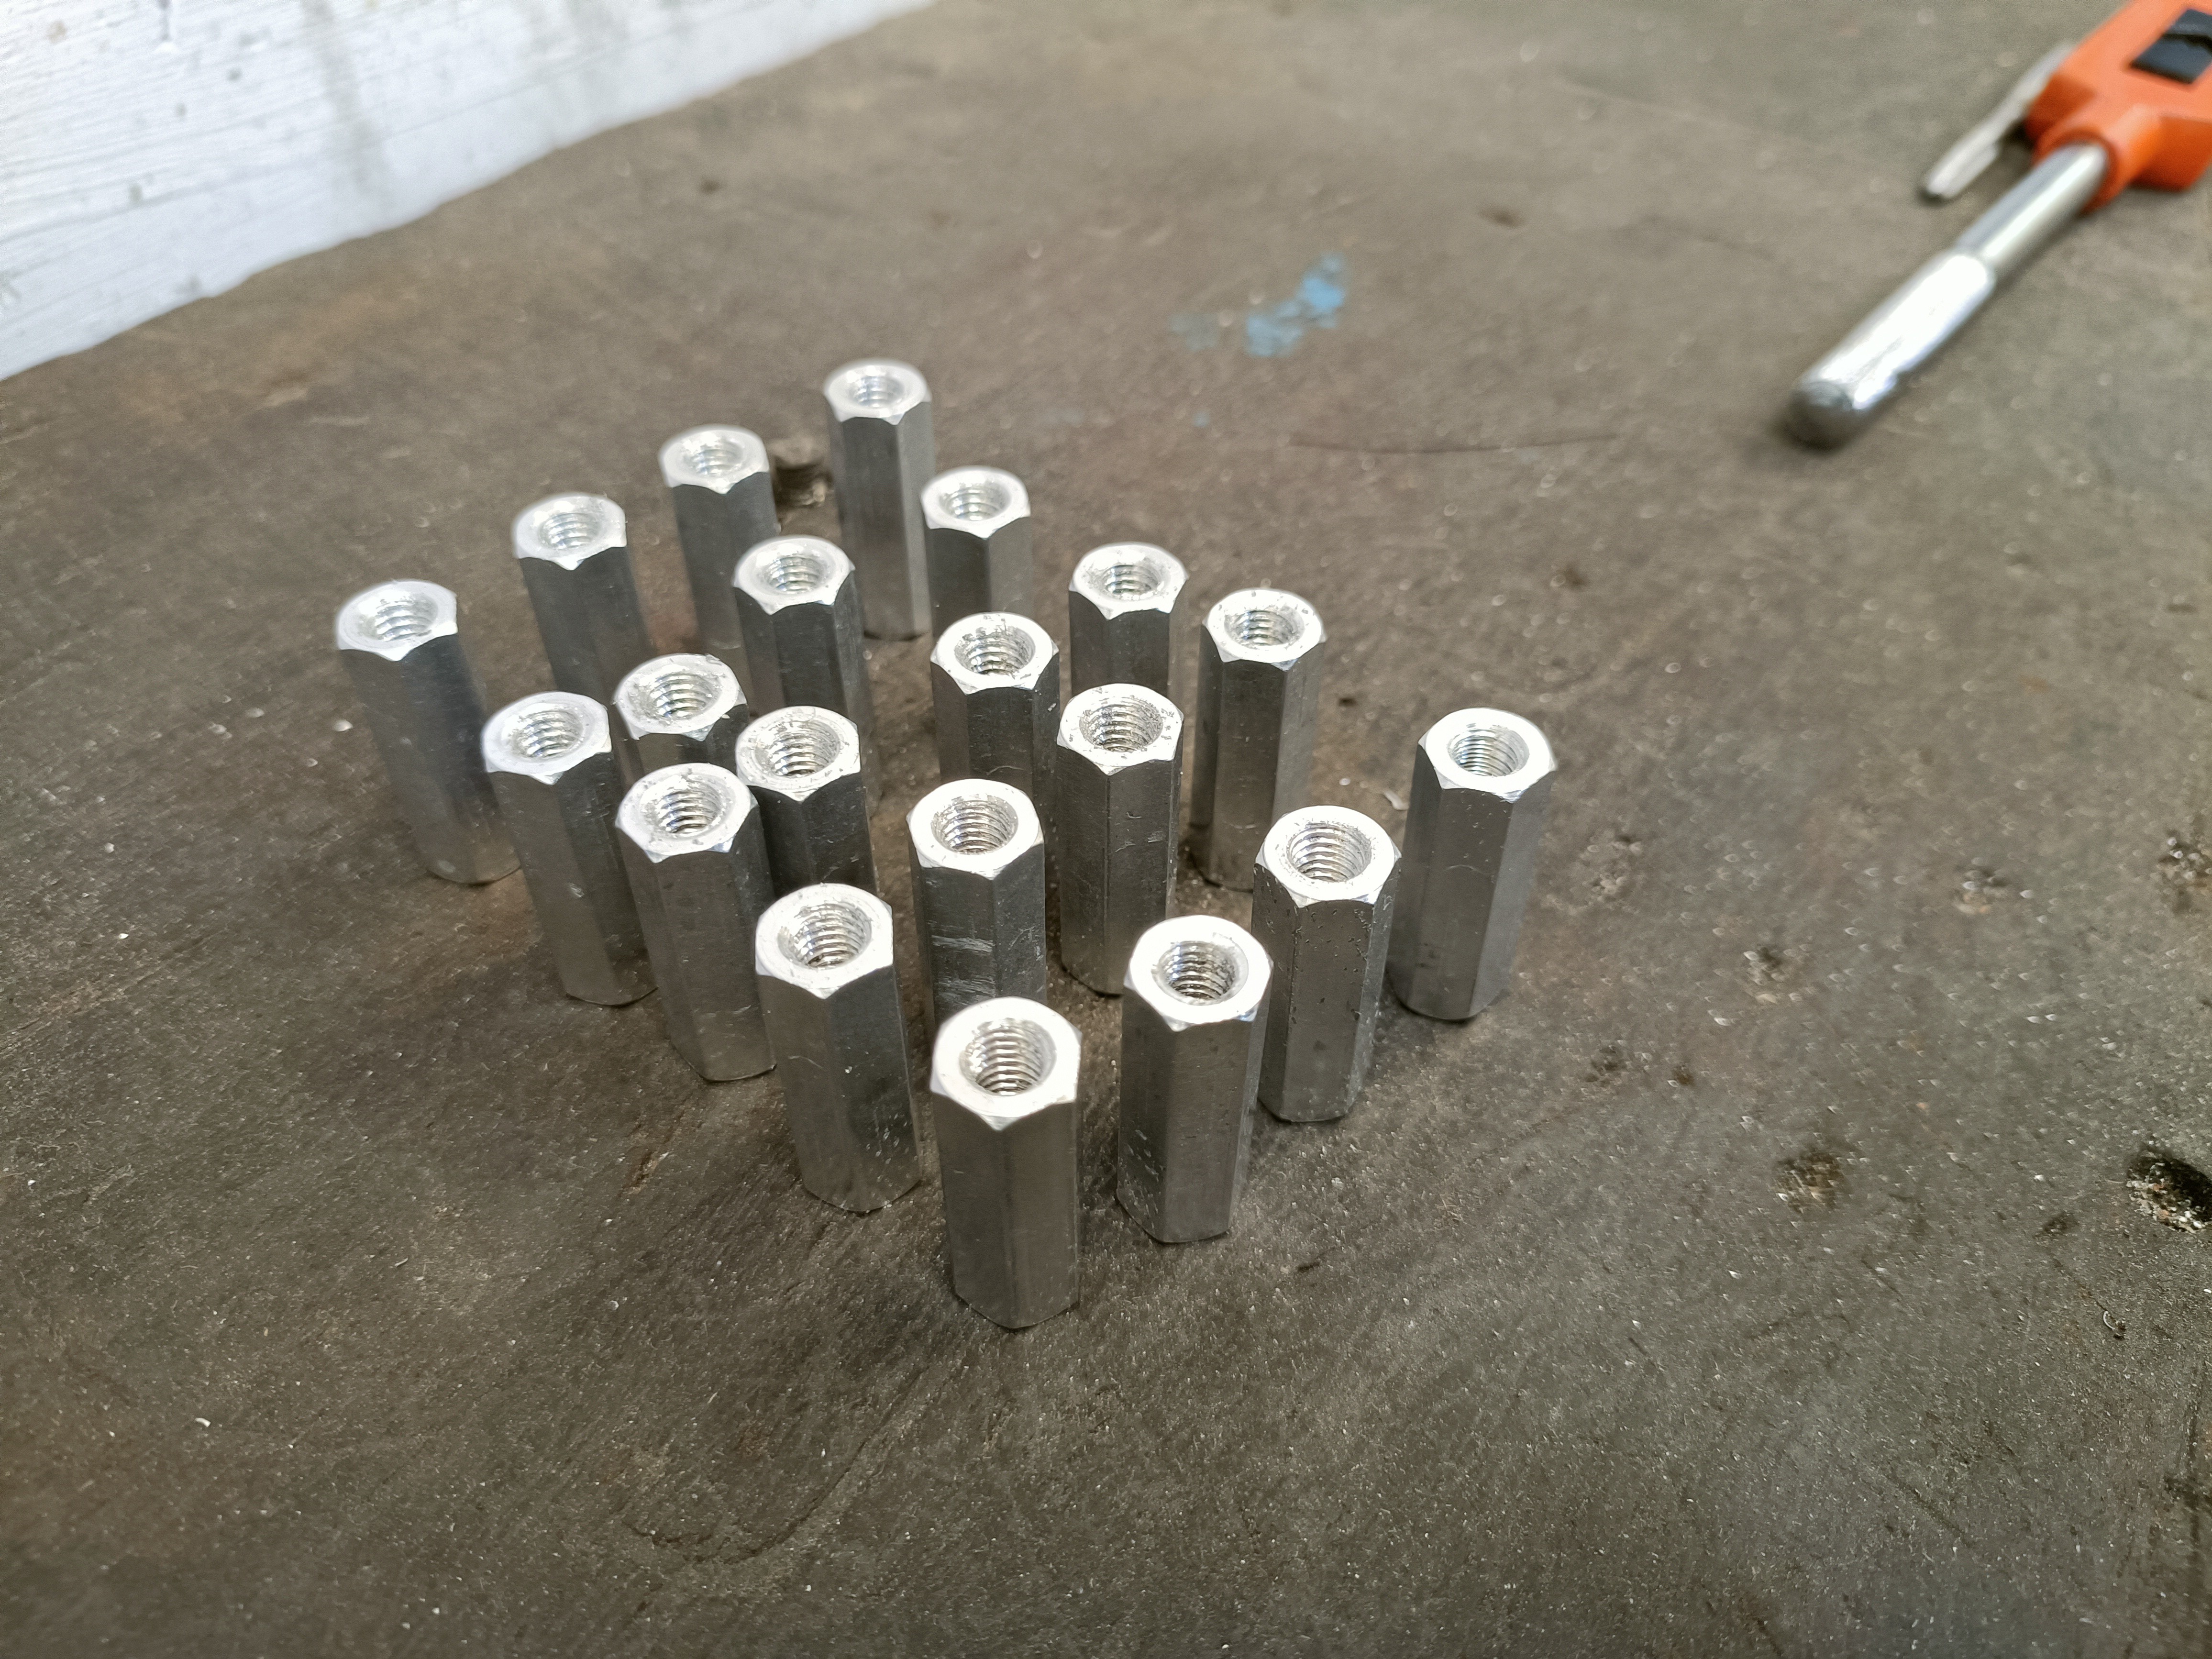
I've been meaning to get an M6 tap for a while to fix the threads in the 30mm aluminium spacers I bought months ago, but today I thought that I might as well ask my uni's workshop if they have one.
The spacer will be covered with ceramic wool anyway, so I'm not worried about marks from the vice.
So with the M6 tap the uni's workshop just happened to have, I got to work. I bottommed out, flipped the spacer and threaded from that side too for good measure.
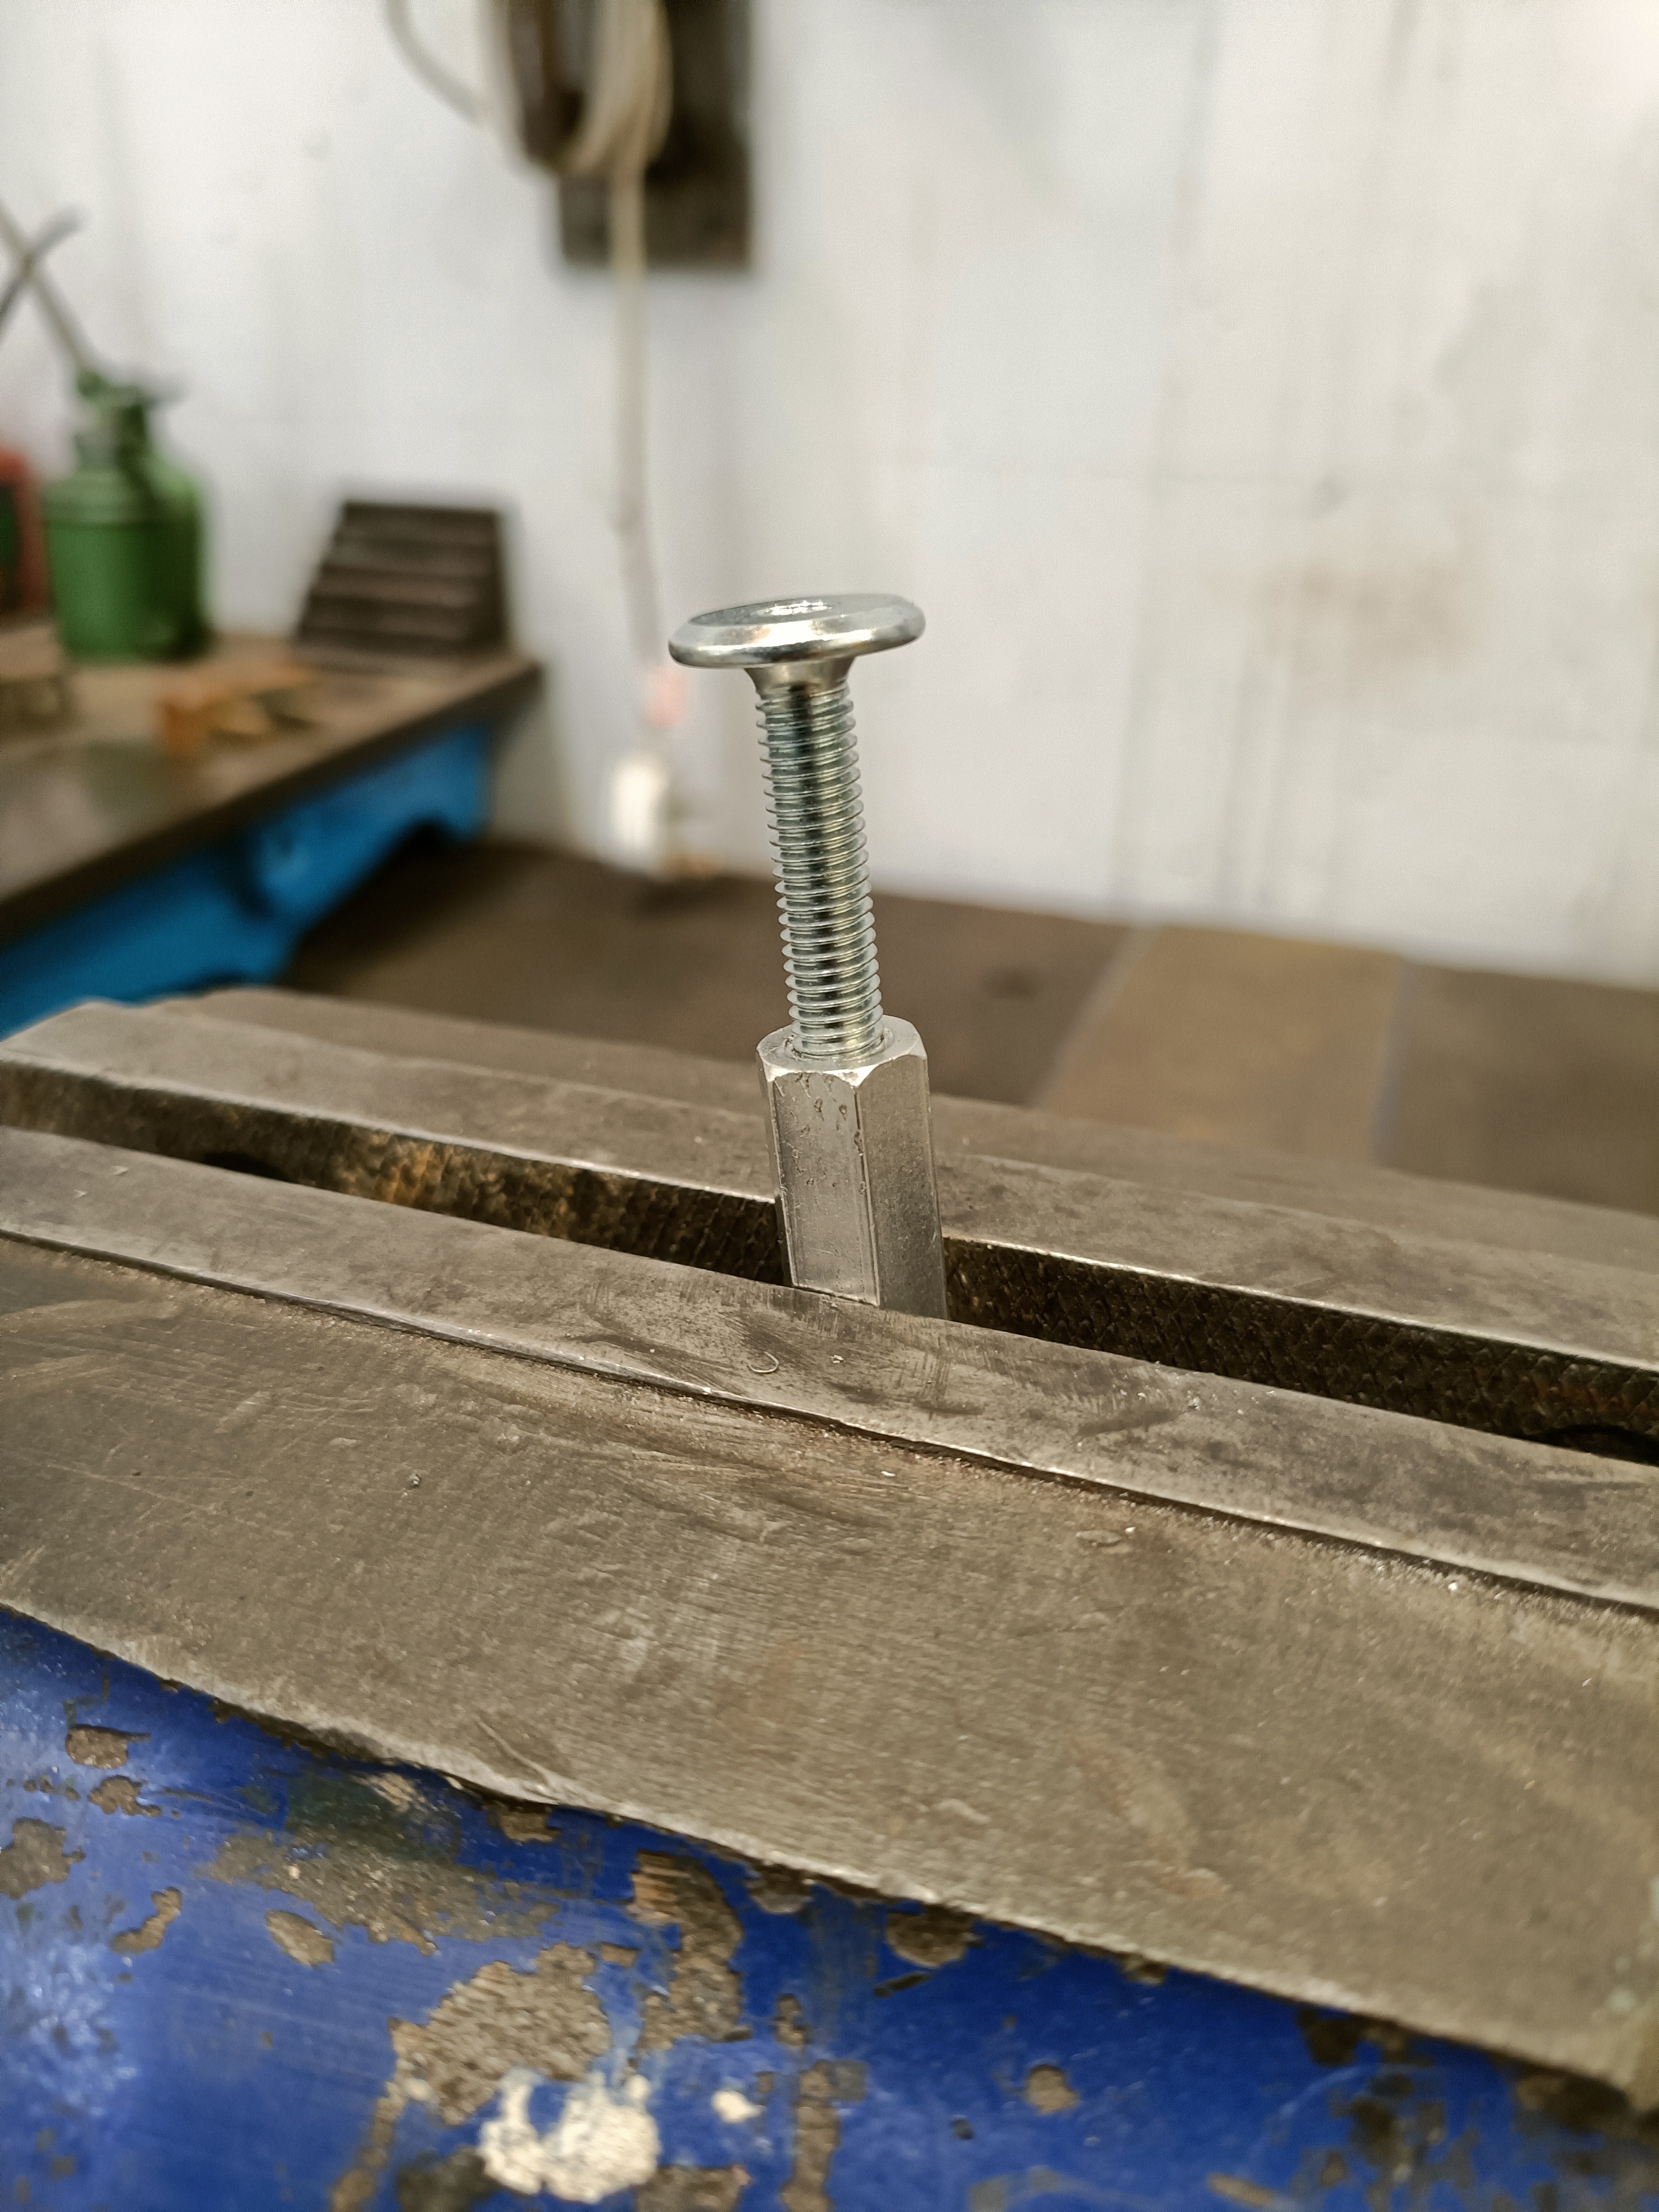
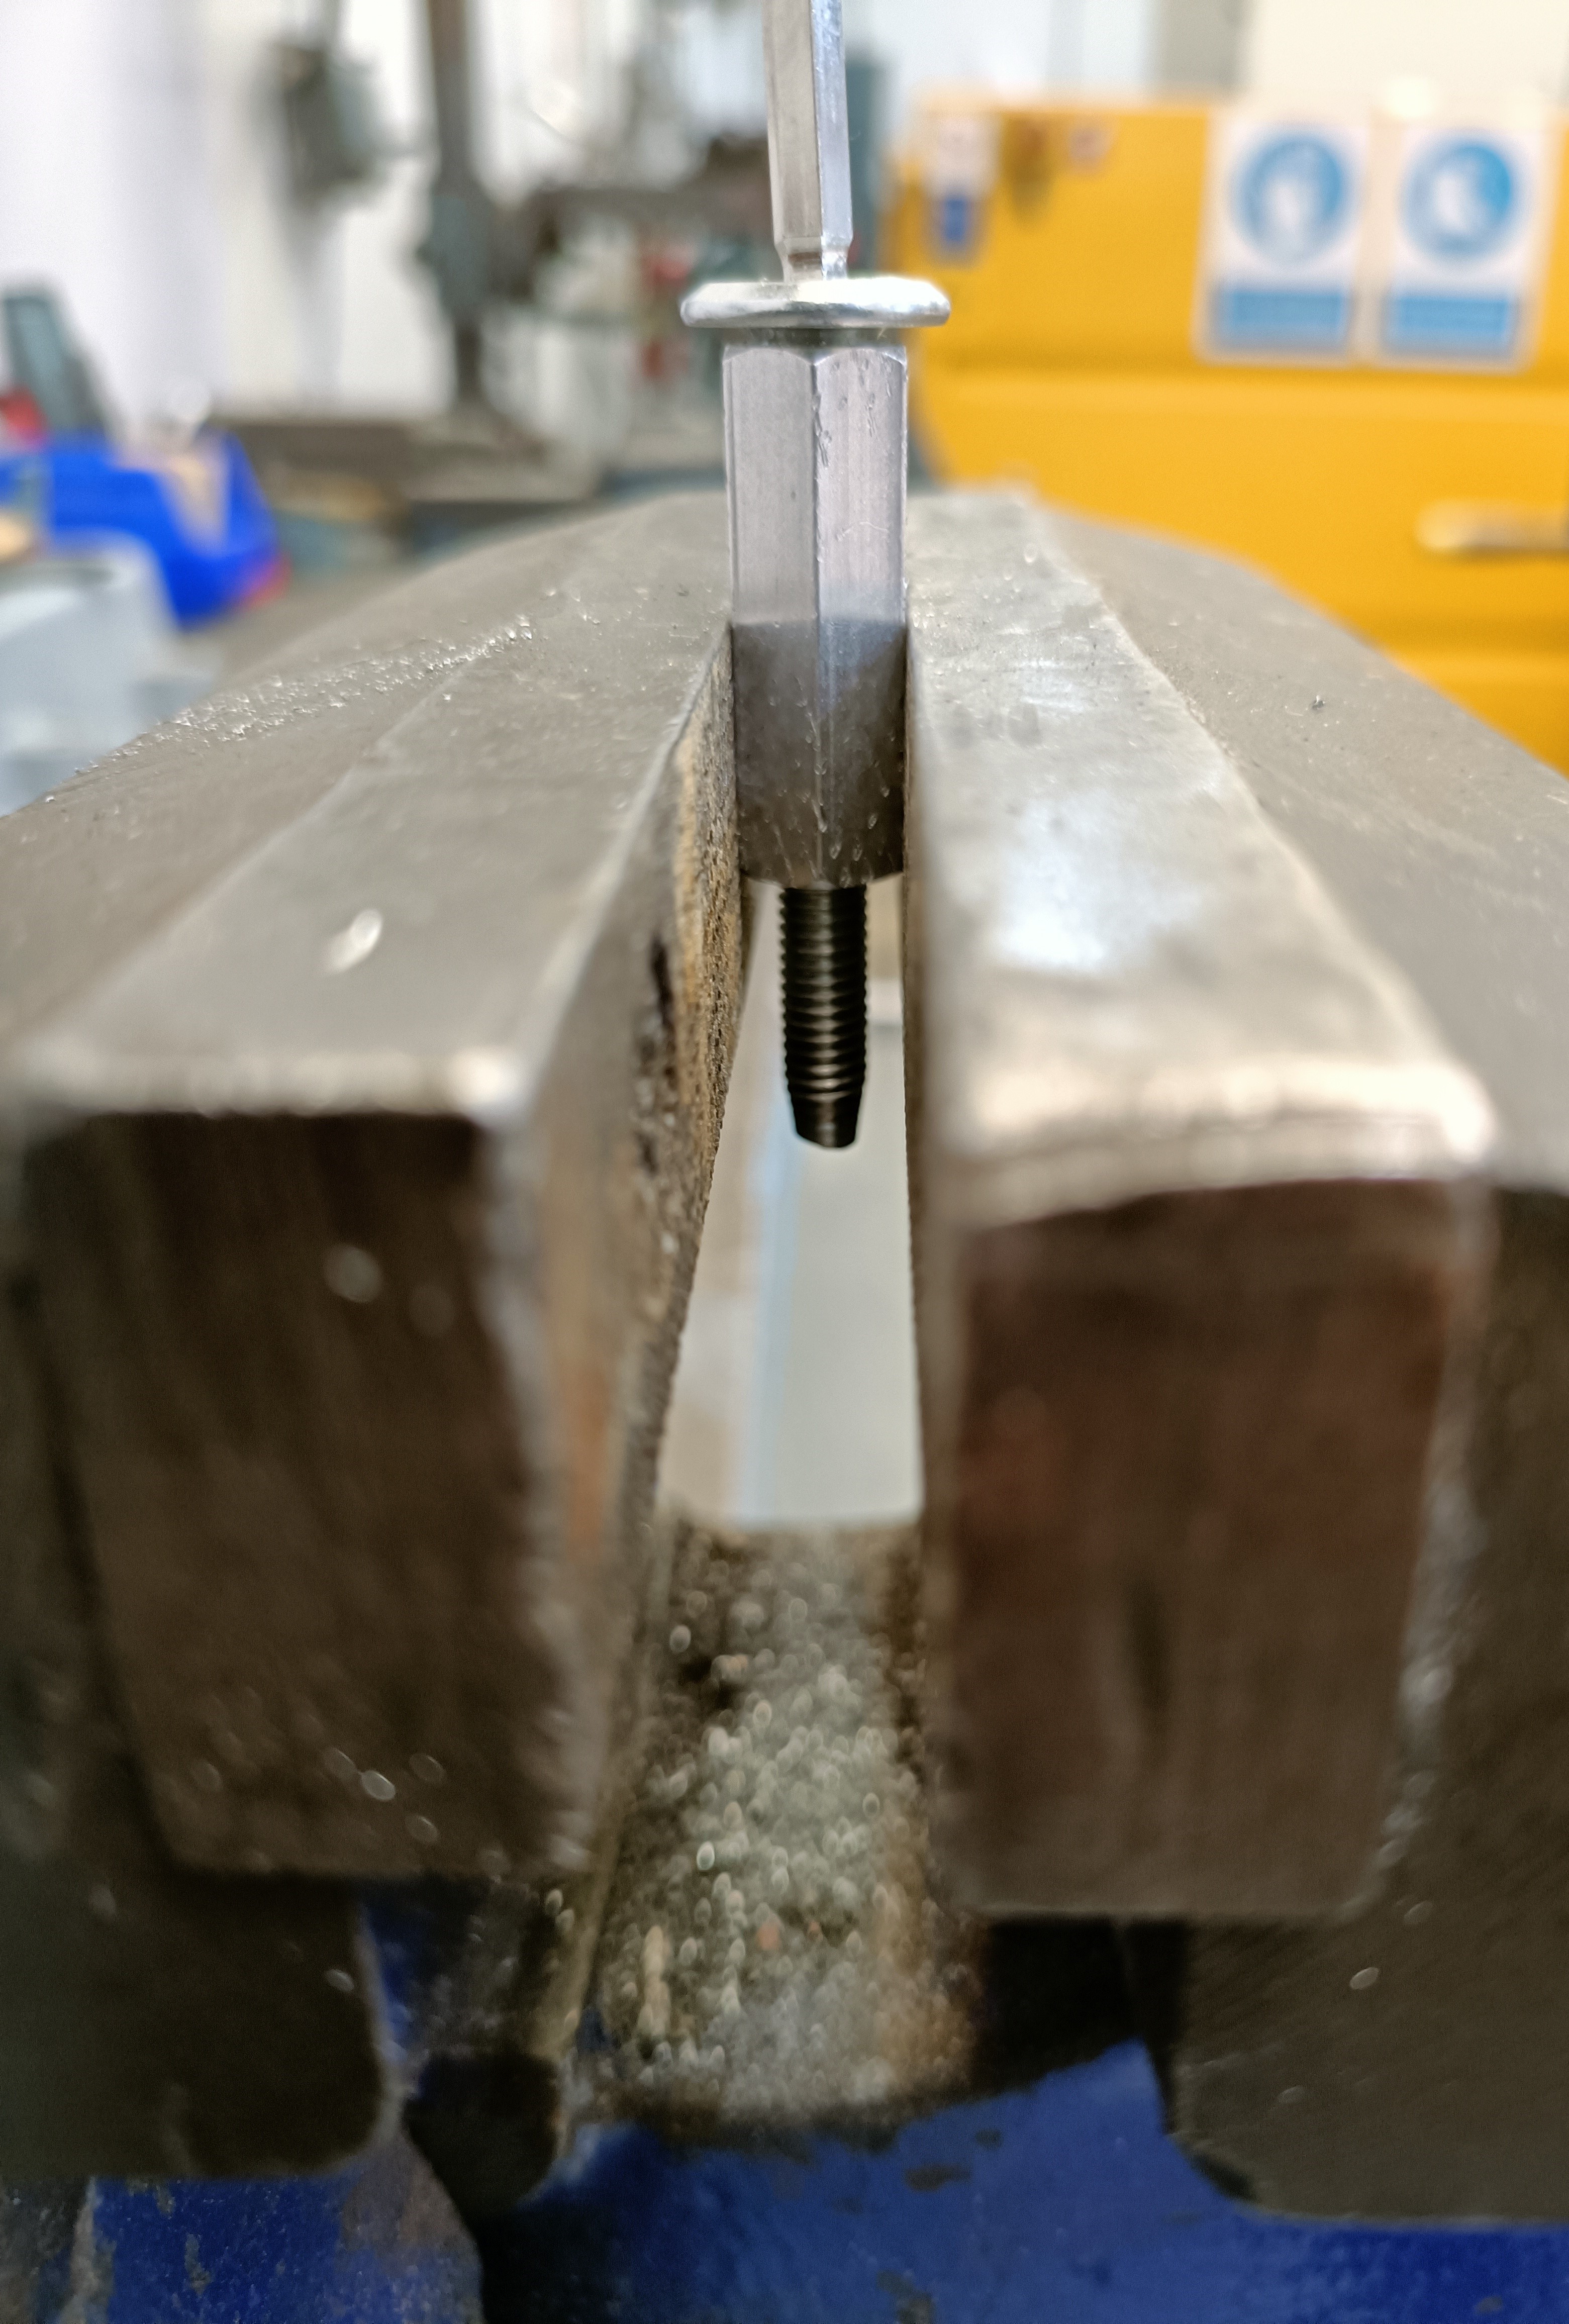
Then I got the long M6 bolt to try the threads.
Failure. Shame. It still didn't want to thread all the way. It really seems that I'd need to thread all the way from one side. Oh but it's so close:So I go to the technician and ask if they have a tap that's ever so slightly longer.
"How much more do you need?"
"About 5 milimetres."
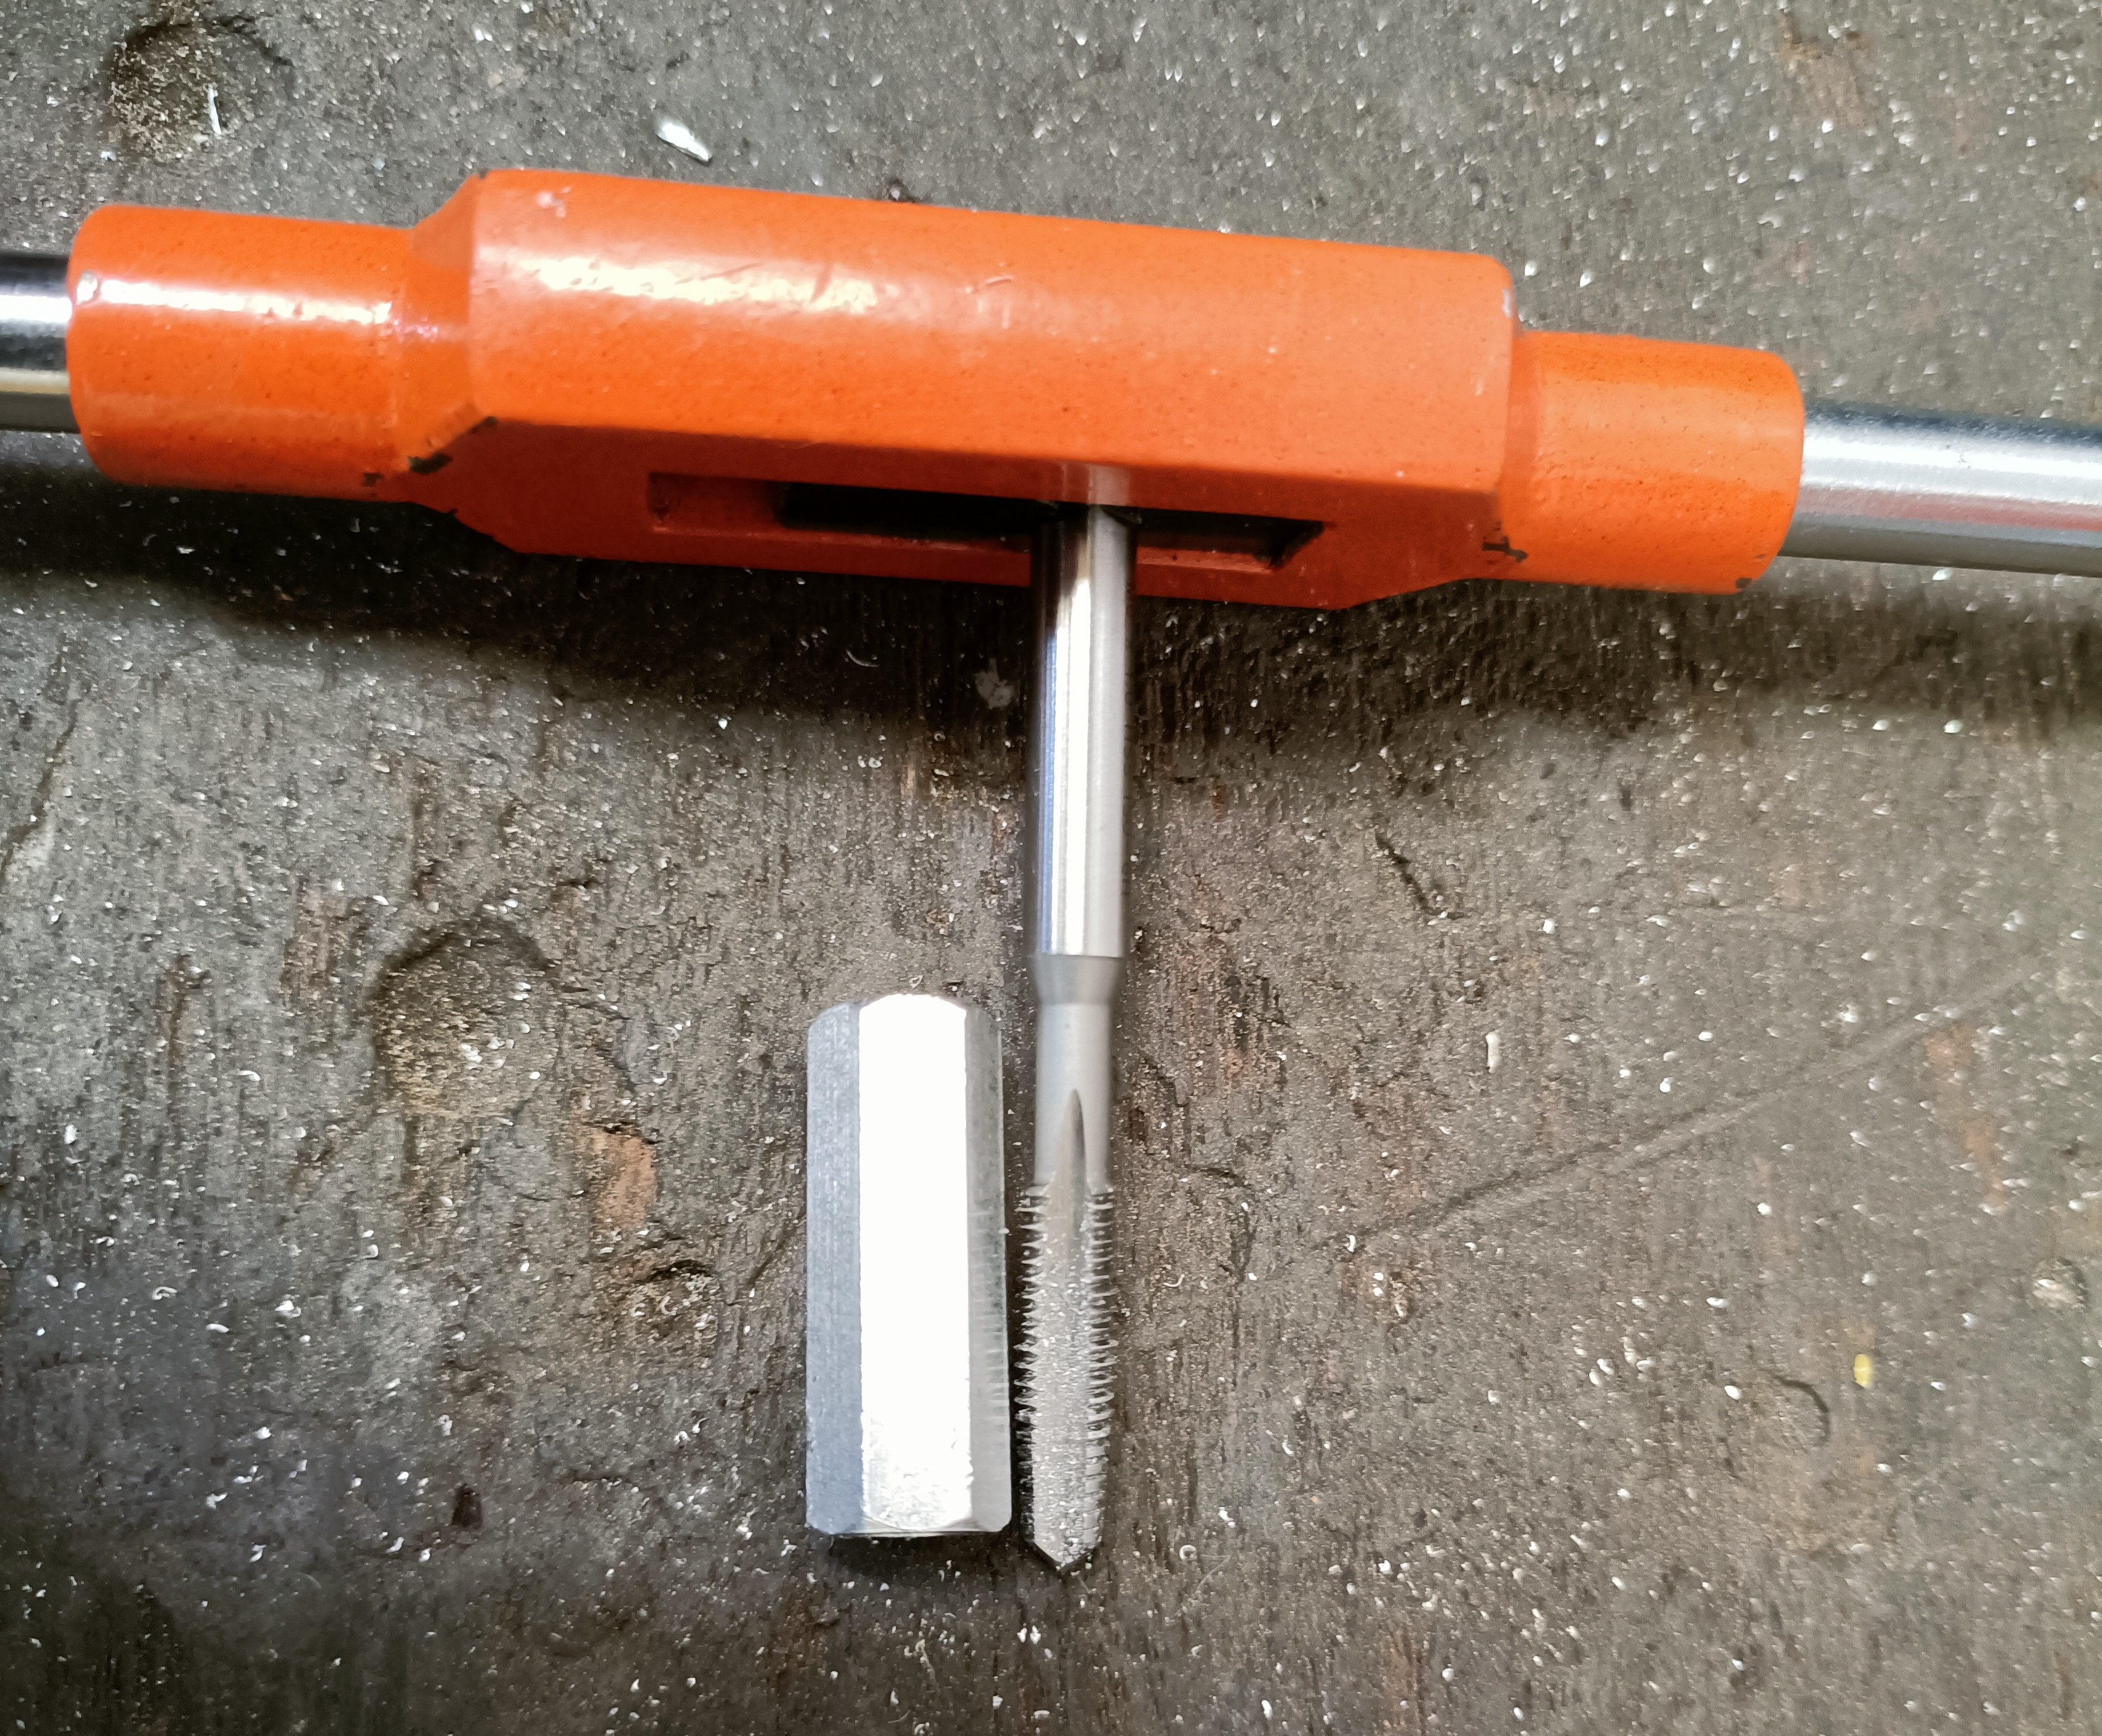
Then he goes to a machine [below] that I assume is some kind of sander and grinds away at the tap for 1 - 2 minutes.
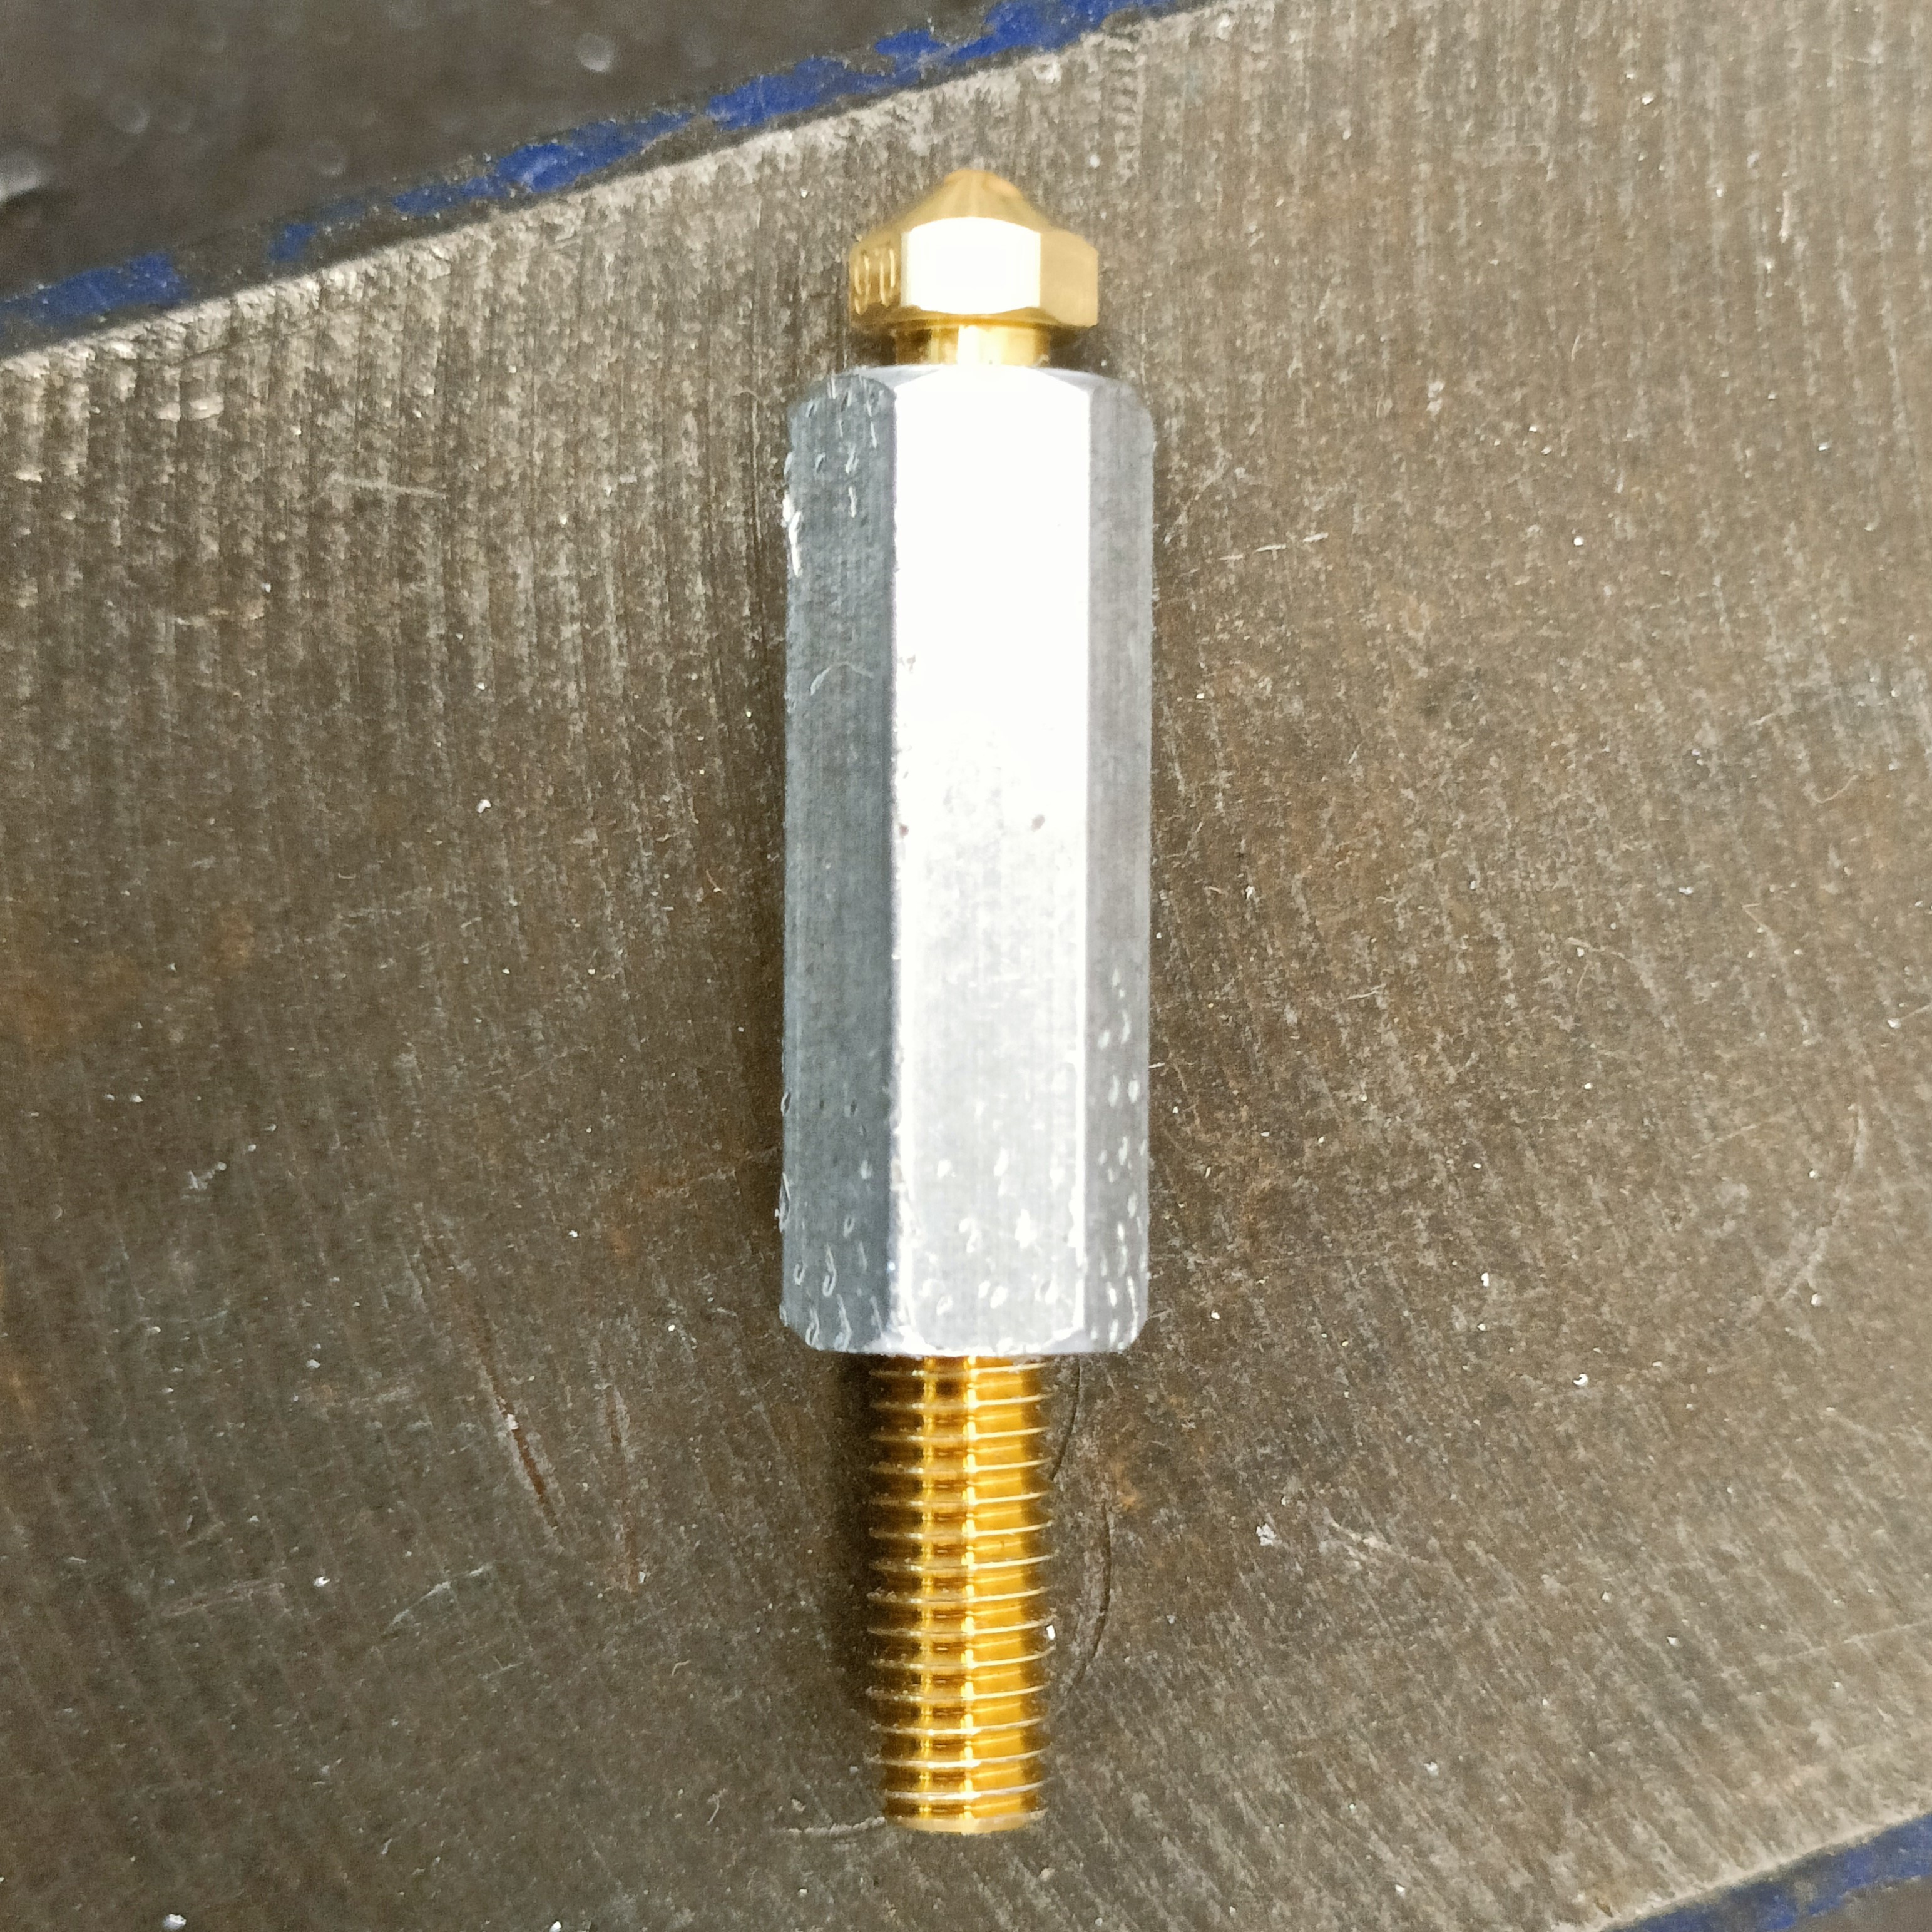
So now the wider part of the tap has been ground back approximately 12mm:10mm (flat to flat) hex spacer for scale.
Wow. I was not expecting that. I try it and it goes through pretty nicely. Moment of truth; does the bolt thread through?
Success.
Now I didn't want to find myself wishing I tapped more, and I had the other 19 spacers in my pocket, so I tapped them all.
My method was this:
Insert spacer into vice.
Put tap in thread and turn it once by hand.
Put on the tap handles and spin the tap with just my left hand until noticable resistance.
Turn with both hands. The left hand is always in contact with the handle and the right hand lets go to grab it again.
On the 4th time the right hand grabs the handle, turn the tap back 270 degrees.
Continue 4 and 5 until I've gotten through the spacer (and bottomed out)
Unscrew the tap by turning it 32 times, then take off the handle and manually unscrew until it comes off.
Insert the 50mm M6 bolt and then the allen key.
Screw the bolt in until very low resistance (the bolt freely rotates with almost no friction)
Unscrew the bolt. Take out the spacer and tap it to remove shavings.
Do steps 1 - 10 for the remaining bolts.
Now I've got to put the test hotend back together again to see what the temperature difference is between 3 9mm spacers and 1 30mm spacer.
[E1: 23 June, 20:31] The melt zone extender looks suprisingly professional.
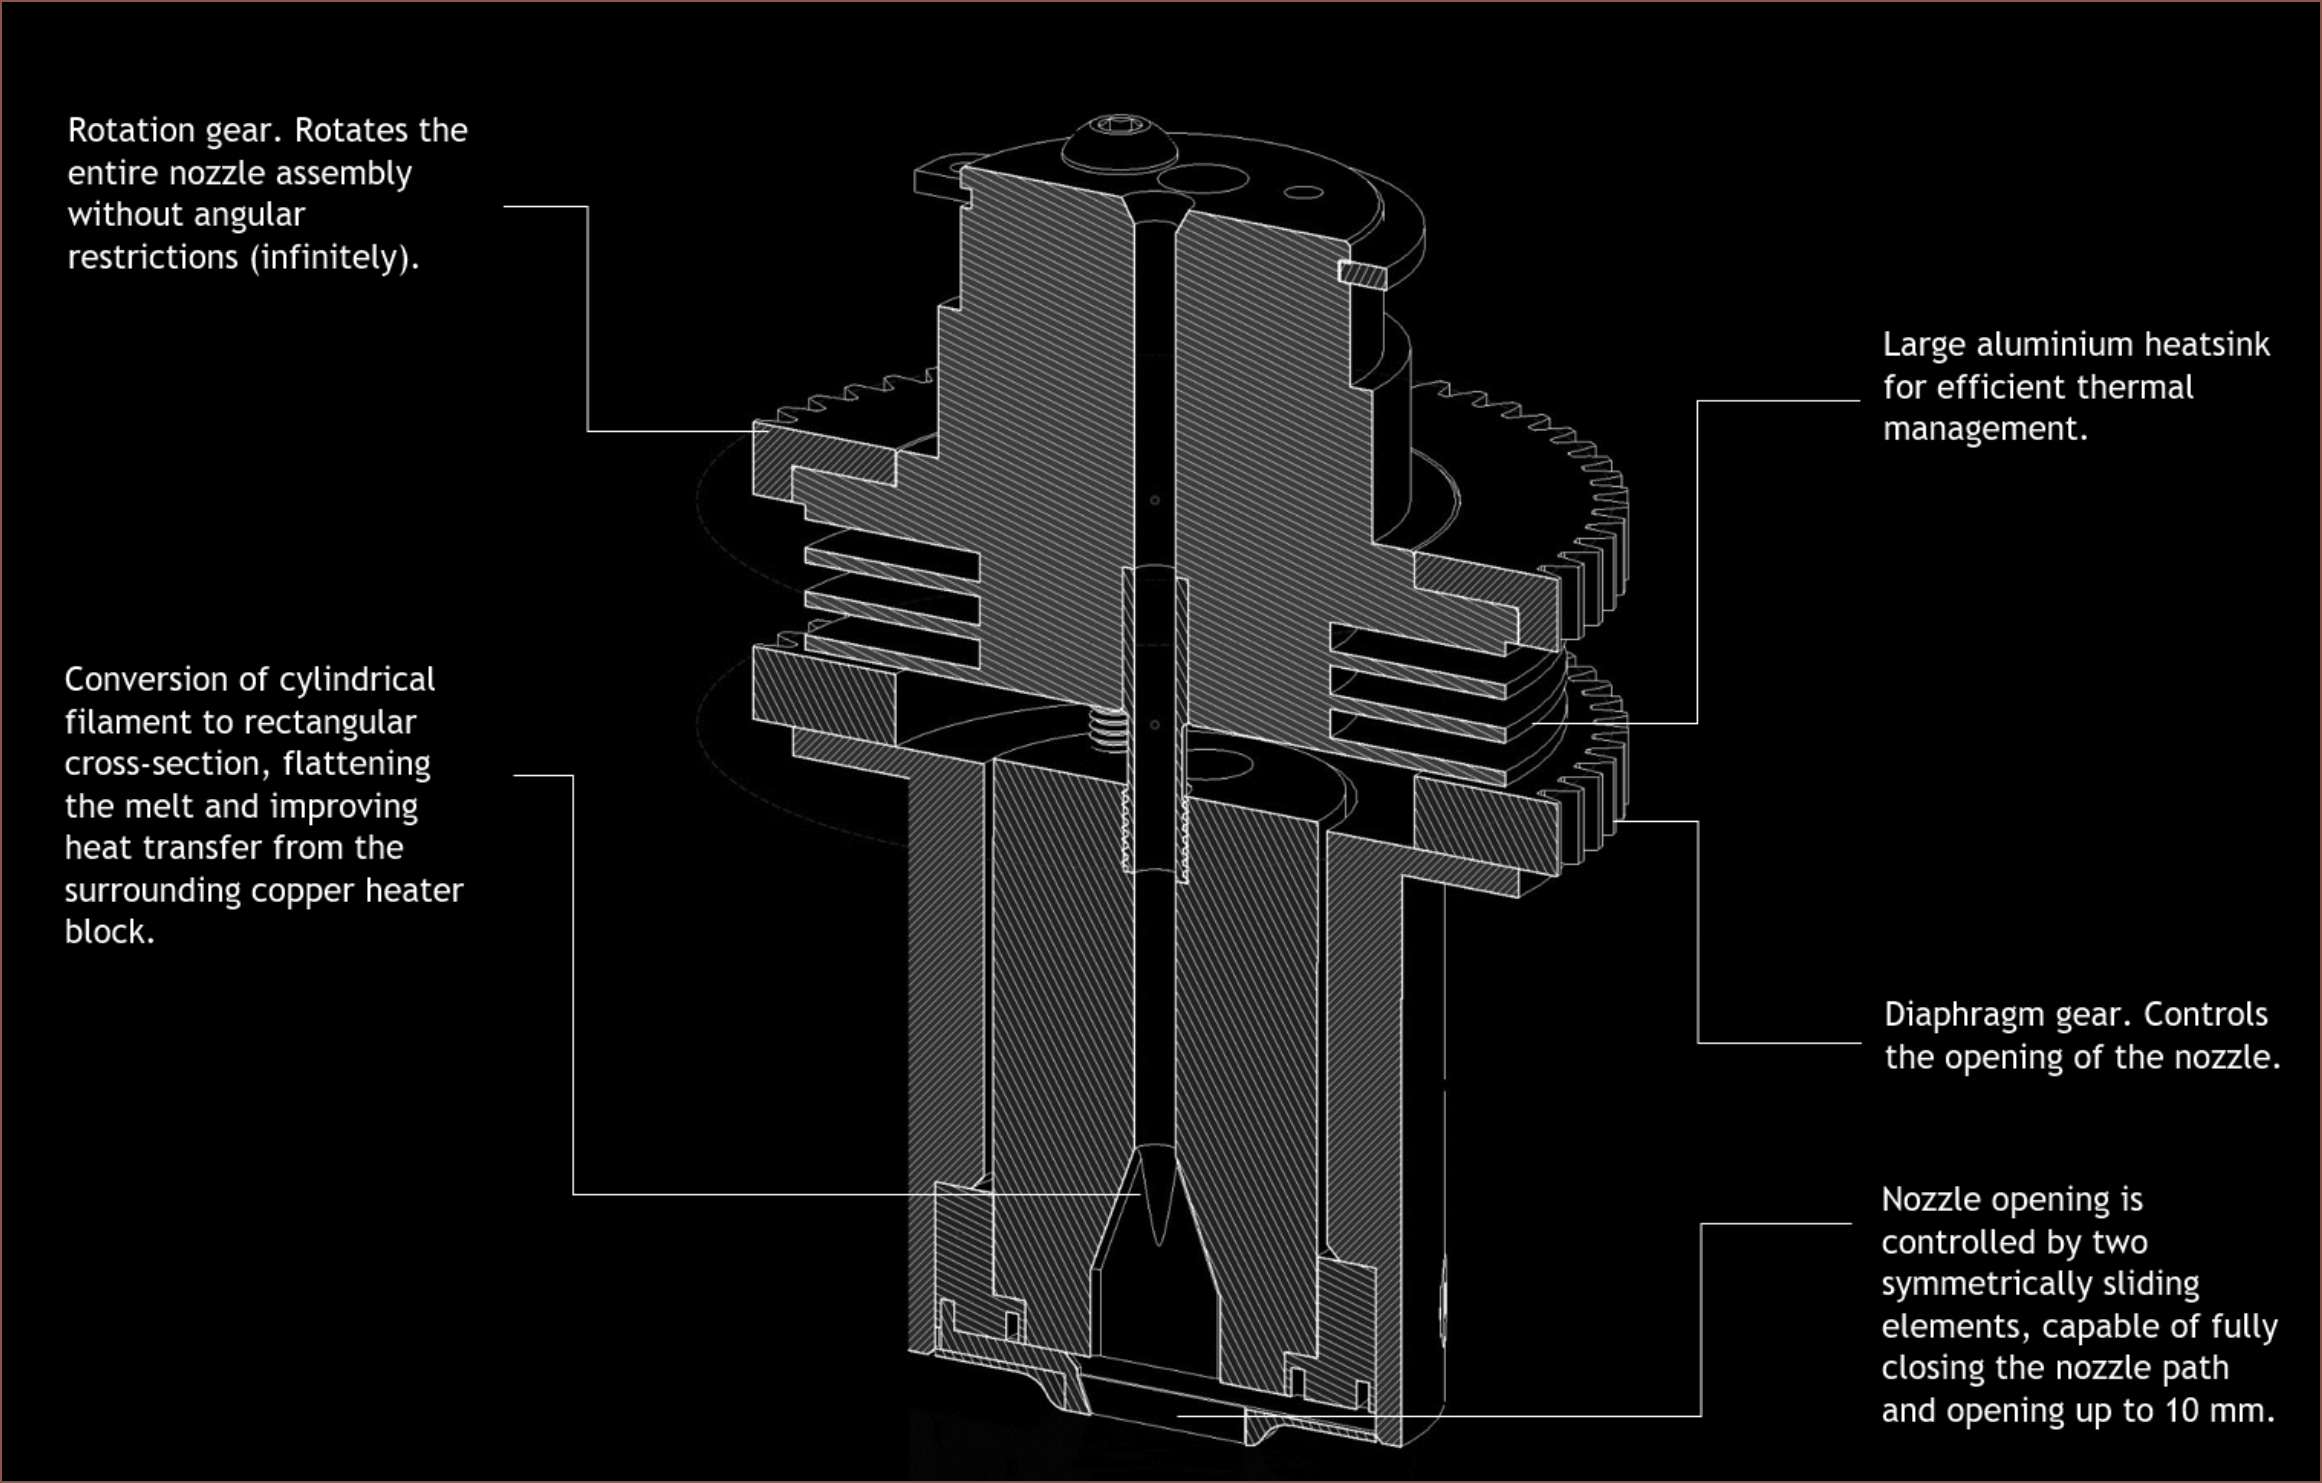
This company makes a nozzle that converts 2.85mm filament into a ribbon which can adjust from 0 - 10mm. The bad news is that they only want to work with companies, as told in their Contact page.
The SecSavr and the #Polar Cartesian Hybrid with "rotating nozzle" (where I found out about this nozzle) wouldn't need the rotating axis on the hotend, but the creation of the nozzle is out of my element. My uni made a hotend that prints tubes that they just showed off at TCT 360 (though I'm sure more people saw the hangprinter drone) so the probabilityof obtaining a solution for a ribbon nozzle is low but not 0.
I'm still scanning the old posts on Hackaday and this is an intreguing find.
It's unlikely that I'd be using this method for a custom length alternative to using belts for the main Z axis, but this method could be useful for the mini Z axis. However, such a method might not be usable due to the milling tool exerting strong forces and/or vibrations... ok nvm I just saw 1:08 and it looks pretty locked on there.
I've got all the hardware I need right here so I want to try a 3 bearing and 6 bearing solution.
 kelvinA
 I was going to have a different head instead of the Slime for heavy duty use like milling, but while looking around AliExpress for a spindle motor, I had this idea instead where two SecSavr Slimes come together like some micro version of a giant fighting robot.