-
1Homemade dosimeter assembling process
Required steps:
- Solder the elements to the breadboard in the desired position.
- Connect all the elements according to the proposed scheme.
- Check the connection first visually, then by connecting the ESP to USB.
- Connect the RadSens library and the ESP32 board to the Arduino IDE.
- Add code to IDE and upload it.
-
2Step 1. Connection
We need to solder all the elements and connect them. The SDA and SCL pins on the RadSens and the OLED screen must be connected to the D22 (SCL) and D21 (SDA) ports, which communicate via the I2C interface. Connect the rest according to the diagram below.
![esp32 pinout]()
![Connection scheme]()
![Example of the dosimeter layout.]()
-
3Step 2. RadSens, ESP32, GyverOLED libraries connection
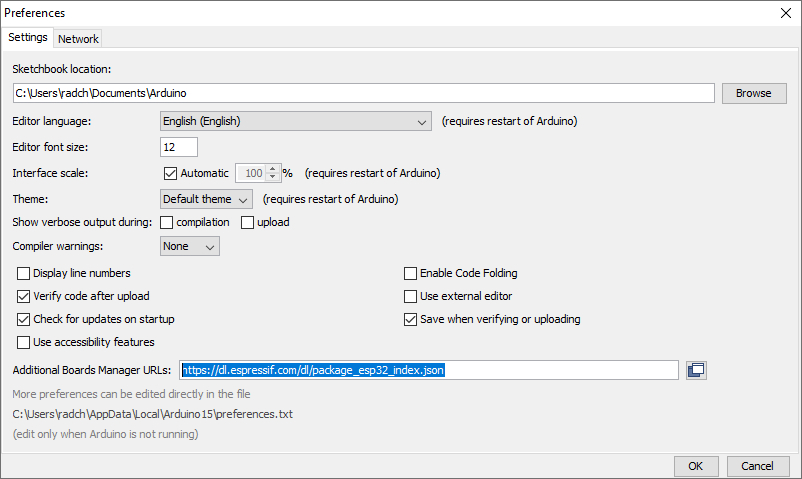
Before installing ESP32 tool you need to open preferences and type “https://dl.espressif.com/dl/package_esp32_index.json" in the Additional Boards Manager URL’s line
Extensions connection in the Arduino IDE for the ESP32 board is as follows:
Arduino -> Tools -> Board -> Board Manager -> type “ESP32” in the search bar.
![]()
After the installation, you need to specify “ESP32 Dev module” in the “Board” section.
![]()
Next, we need to select the specific board. To do this, go to the “Tools” tab, select the “Board” section, then select “ESP32 Dev Module” in the “ESP32 Arduino” subsection.
![]()
Almost done! Let's move on to the library installation.
To install the RadSens library, you need to follow almost the same steps:
Arduino -> Sketch -> Add Library -> Manage Libraries -> Type “RadSens” in the search bar.
![]()
![]()
Next, you need to install the GyverOLED library in the library manager.
![]()
Now we are ready to move on to development.
-
4Step 3. Code
The code was written using the OLED library by Alex Gyver that I think is one of the easiest to use. But it is acceptable to use U8G2, Adafruit or any library convenient for you.
// Connecting the libraries
#include <radSens1v2.h>  // RadSens library
#include <Wire.h>        // I2C library
#include <GyverOLED.h>   // One of the easiest-to-learn OLED libraries by Alex Gyver
#define buz 18   // Initializing the buzzer pin. You may change it if you connected buzzer to another pin

GyverOLED<SSD1306_128x64, OLED_NO_BUFFER> oled;   // Initializing OLED screen
ClimateGuard_RadSens1v2 radSens(RS_DEFAULT_I2C_ADDRESS);   // Initializing RadSens


uint32_t timer_cnt; // Timer for updating count of pulses and intensity
uint32_t timer_imp; // Timer for updating pulses for buzzer
uint32_t timer_oled; // Timer for updating OLED data

float dynval;  // Variable for dynamic intensity value
float statval; // Variable for static intensity value
uint32_t impval;  // Variable for count of impulses
uint32_t pulsesPrev;  // Variable for count of impulses at previous cycle

void setup() {
 pinMode(buz, OUTPUT);  // Initializing buzzer as an output
  ledcSetup(1, 500, 8); // Initializing PWM for buzzer (ONLY FOR ESP DELETE THIS STOKE FOR ARDUINO)
  ledcAttachPin(buz, 1); // Initializing buzzer pin for PWM (ONLY FOR ESP DELETE THIS STOKE FOR ARDUINO)
  oled.init();           // Initializing OLED in code
  oled.flipV(1);         //I has flipped the screen for comfortable use
  oled.flipH(1);         // For normal appearance of text we need horizontal inverting
  oled.clear();
  oled.setScale(2);      // Setting scale of text
  radSens.radSens_init();
  oled.clear();
  radSens.setSensitivity(105);     // Setting sensitivity of Heiger’s tube (in case of not default tube, check technical specifications of your tube to find sensitivity)
  int16_t sensval = radSens.getSensitivity();
  oled.setCursor(10, 2);
  oled.print("Sens:");
  oled.setCursor(42, 4);
  oled.print(sensval);
 delay(4000);
  oled.clear();
  pulsesPrev = radSens.getNumberOfPulses(); //Setting number of pulses to zero
}

void beep(int deltime) {     // Setting time and frequency of buzzer beeps
  ledcWriteTone(1, 500);  // Switching on (freq = 500Hz)
 delay(3);
  ledcWriteTone(1, 0);   // Switching off
 delay(deltime);
}
/*
  void beep(int deltime){
    tone(buz, 500, deltime)
  }                                            same function but for Arduino */

void loop() {

 if (millis() - timer_imp > 250) {  // This function creates crack of buzzer
    timer_imp = millis();
 int pulses = radSens.getNumberOfPulses();
 if (pulses > pulsesPrev) {
 for (int i = 0; i < (pulses - pulsesPrev); i++) {
 beep(30);  // You may change this parameter if you need longer cracks
      }
      pulsesPrev = pulses;
    }
  }

 if (millis() - timer_cnt > 1000) {      // Writing values to global variables
    timer_cnt = millis();
    dynval = radSens.getRadIntensyDyanmic();
    statval = radSens.getRadIntensyStatic();
    impval = radSens.getNumberOfPulses();
  }

 if (millis() - timer_oled > 1000) {  //Writing variables to a strings and display them on the screen
    timer_oled = millis();
 String dynint = "Dyn: ";
    dynint += dynval;
 String statint = "Stat:  ";
    statint += statval;
 String nimp = "Imp: ";
    nimp += impval;
    oled.setCursor(0, 1);
    oled.print(dynint);
    oled.setCursor(0, 3);
    oled.print(statint);
    oled.setCursor(0, 5);
    oled.print(nimp);
  }
}// Connecting the libraries


Discussions
Become a Hackaday.io Member
Create an account to leave a comment. Already have an account? Log In.