Close
0%
0%

LoRa darkStar

Low Quiescent Current, Solar Powered +30dB LoRa

Similar projects worth following
What is the minimum possible current consumption when a IOT type device is not doing anything? Nano amps? Micro amps? This project attempts to reach the ultimate sleep state wherein the energy guzzling modules go completely dead.

Main functional blocks:
1. ESP32 D4 MCU
2. Ebyte +30dB LoRa module
3. AEM LION solar harvester
4. TPS 61023 buck booster
5. 1000 mAh 3.7V lithium battery / coin cell
6. DIY transistor + logic gate + timer switching circuit.

Features:
1. Protection against discharging the battery below 3.6V.
2. High powered +30 dB LoRa module.
3. DIY 'Sleep' mode using low power programmable timer and CMOS logic gates.
4. Complete disconnection of all energy guzzling modules when in Sleep.
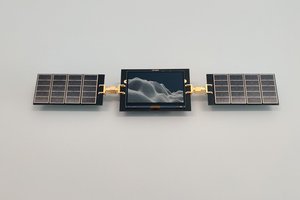
5. Onboard SMT solar panels.

Lastly .... how to test how dead the device can go.

This device has the requirement to go into Ultra Deep Sleep (UDS) and wake up every hour or once a day, transmit some data via LoRa and go back to sleep again. UDS is not like the deep sleep function in an ESP 32 chip as it can shuts down multiple modules, including the MCU and completely isolates them from the power supply. It's very easy to get current leakage into modules that are supposed to be disabled and UDS cures this problem very nicely. The modules that currently require isolation from the power are the 5.5V buck booster, the ESP32 MCU and the EBYTE LoRa and any sensors wired into the device are automatically put into UDS by default. There's even a sleep sate beyond UDS which even seems to shut down the logic gates called Beyond Ultra Deep Sleep (BUDS). This state is controlled by the AEMLION energy harvester and reduces the quiescent current down to an obscene 60 nA! UDS has been measured at 240 nA, which aint to scruffy either.
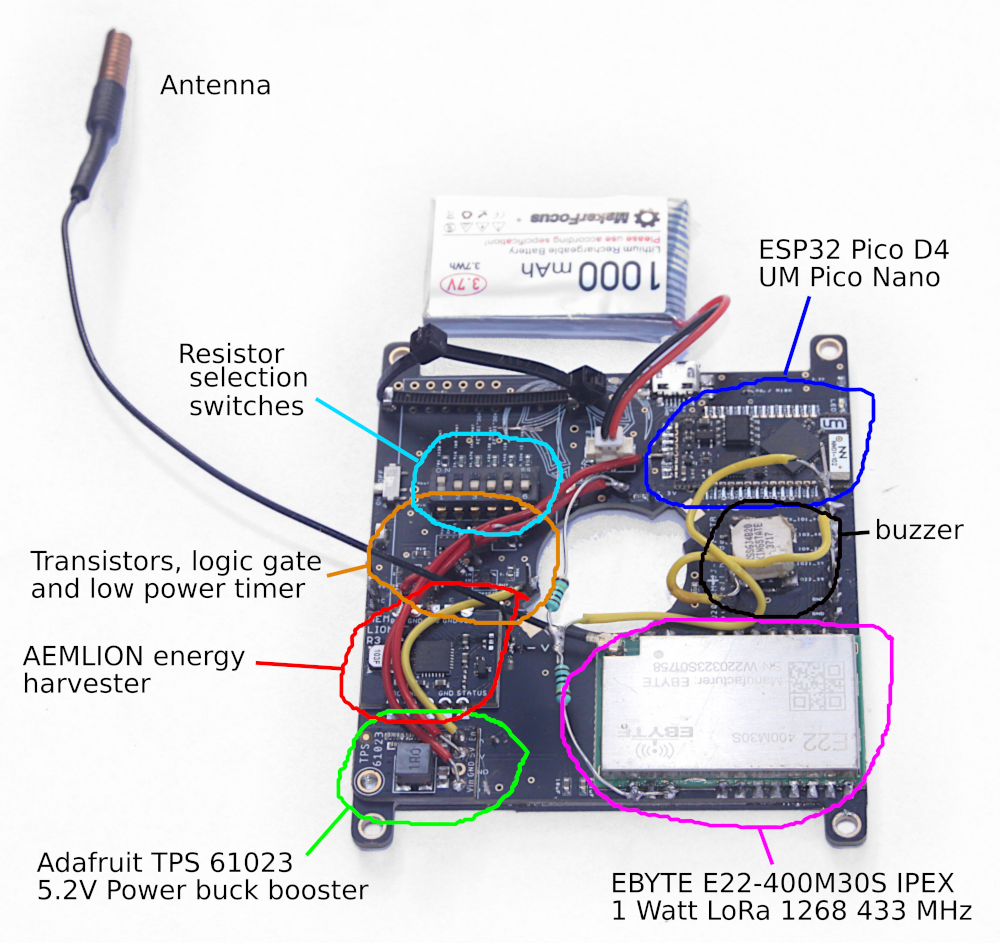
The UDS time is set by a resistor switch bank by simply flicking various switches in the correct order and the longest time interval is 2 hours which means the ESP32 needs to momentarily wake up, count how many times it has previously booted up and go back into UDS if the count is not high enough. Fortunately, the number of electrons needed to do this is fairly minimal.

In theory, this project should have been fairly simple but, unfortunately, the timer chip did not behave as described by the data sheet and currently the longest time interval is a pathetic 10 minutes. Rather than settle for mediocrity, it seems to be worth wrangling with some logic gates to make use of the short pulse that can be reliably detected from this chip and turn it into something more useful.

Once finished, the device should be fairly useful and various sensors could be wired into it or just used 'asis' to hack into the neighbour's WIFI (with permission, of course!). Having onboard 1 watts of LoRa means it's much more likely that the radio waves transmitted can reach a local node and communicate with the Interwebs. If it only transmits once a day it should be able to retain a good amount of charge in the battery, even in the depths of Winter. A winter on the North or South pole might be challenging though!, but with BUDS it might well just wake up in the Spring and start transmitting again. Hopefully there would be a LoRa gateway in range.


Project partially sponsored by Seeed Studio: https://www.seeedstudio.com/pcb-assembly.html

Support any of my projects, check out my Amazon Wishlist here: https://www.amazon.co.uk/hz/wishlist/ls/3AW6R7V5BVU3R?ref_=wl_share

Patreon donations can be made here: https://www.patreon.com/Goat_I

Solar_Harvester_v17.pcb

Opens with Design Spark PCB software

pcb - 513.50 kB - 04/10/2023 at 10:32

Download

Solar_Harvester_v17_GERBERS.zip

Zip Archive - 169.97 kB - 04/10/2023 at 08:01

Download

Solar_powered_gadget_09.ino

x-arduino - 17.34 kB - 04/10/2023 at 08:00

Download

BOM_Solar_gadget (copy).ods

spreadsheet - 19.49 kB - 02/01/2023 at 15:26

Download

  • All systems are nominal

    Capt. Flatus O'Flaherty ☠04/09/2023 at 15:55 0 comments

    Finally, the timer chip and associated logic gates are working at all time intervals right across the full range.

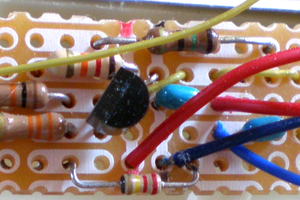
    The timer and logic circuit is shown in the photo above and occupies a footprint of 20 x 15 mm. There's plenty of opportunity for a bit more hacking, with pads for extra resistors and tracks for slight changes in the circuit, but for now it seems to work fine.

  • Fixing problems with the TPL5110 timer

    Capt. Flatus O'Flaherty ☠03/22/2023 at 16:08 0 comments

    Using one of my universal prototyping boards, I rigged up some gates along with the timer chip in the hope of being able to get the full range of time intervals that should be available from the timer. So far the max has been 30 minutes before the circuit started to fail. 2 hours is the ultimate goal.
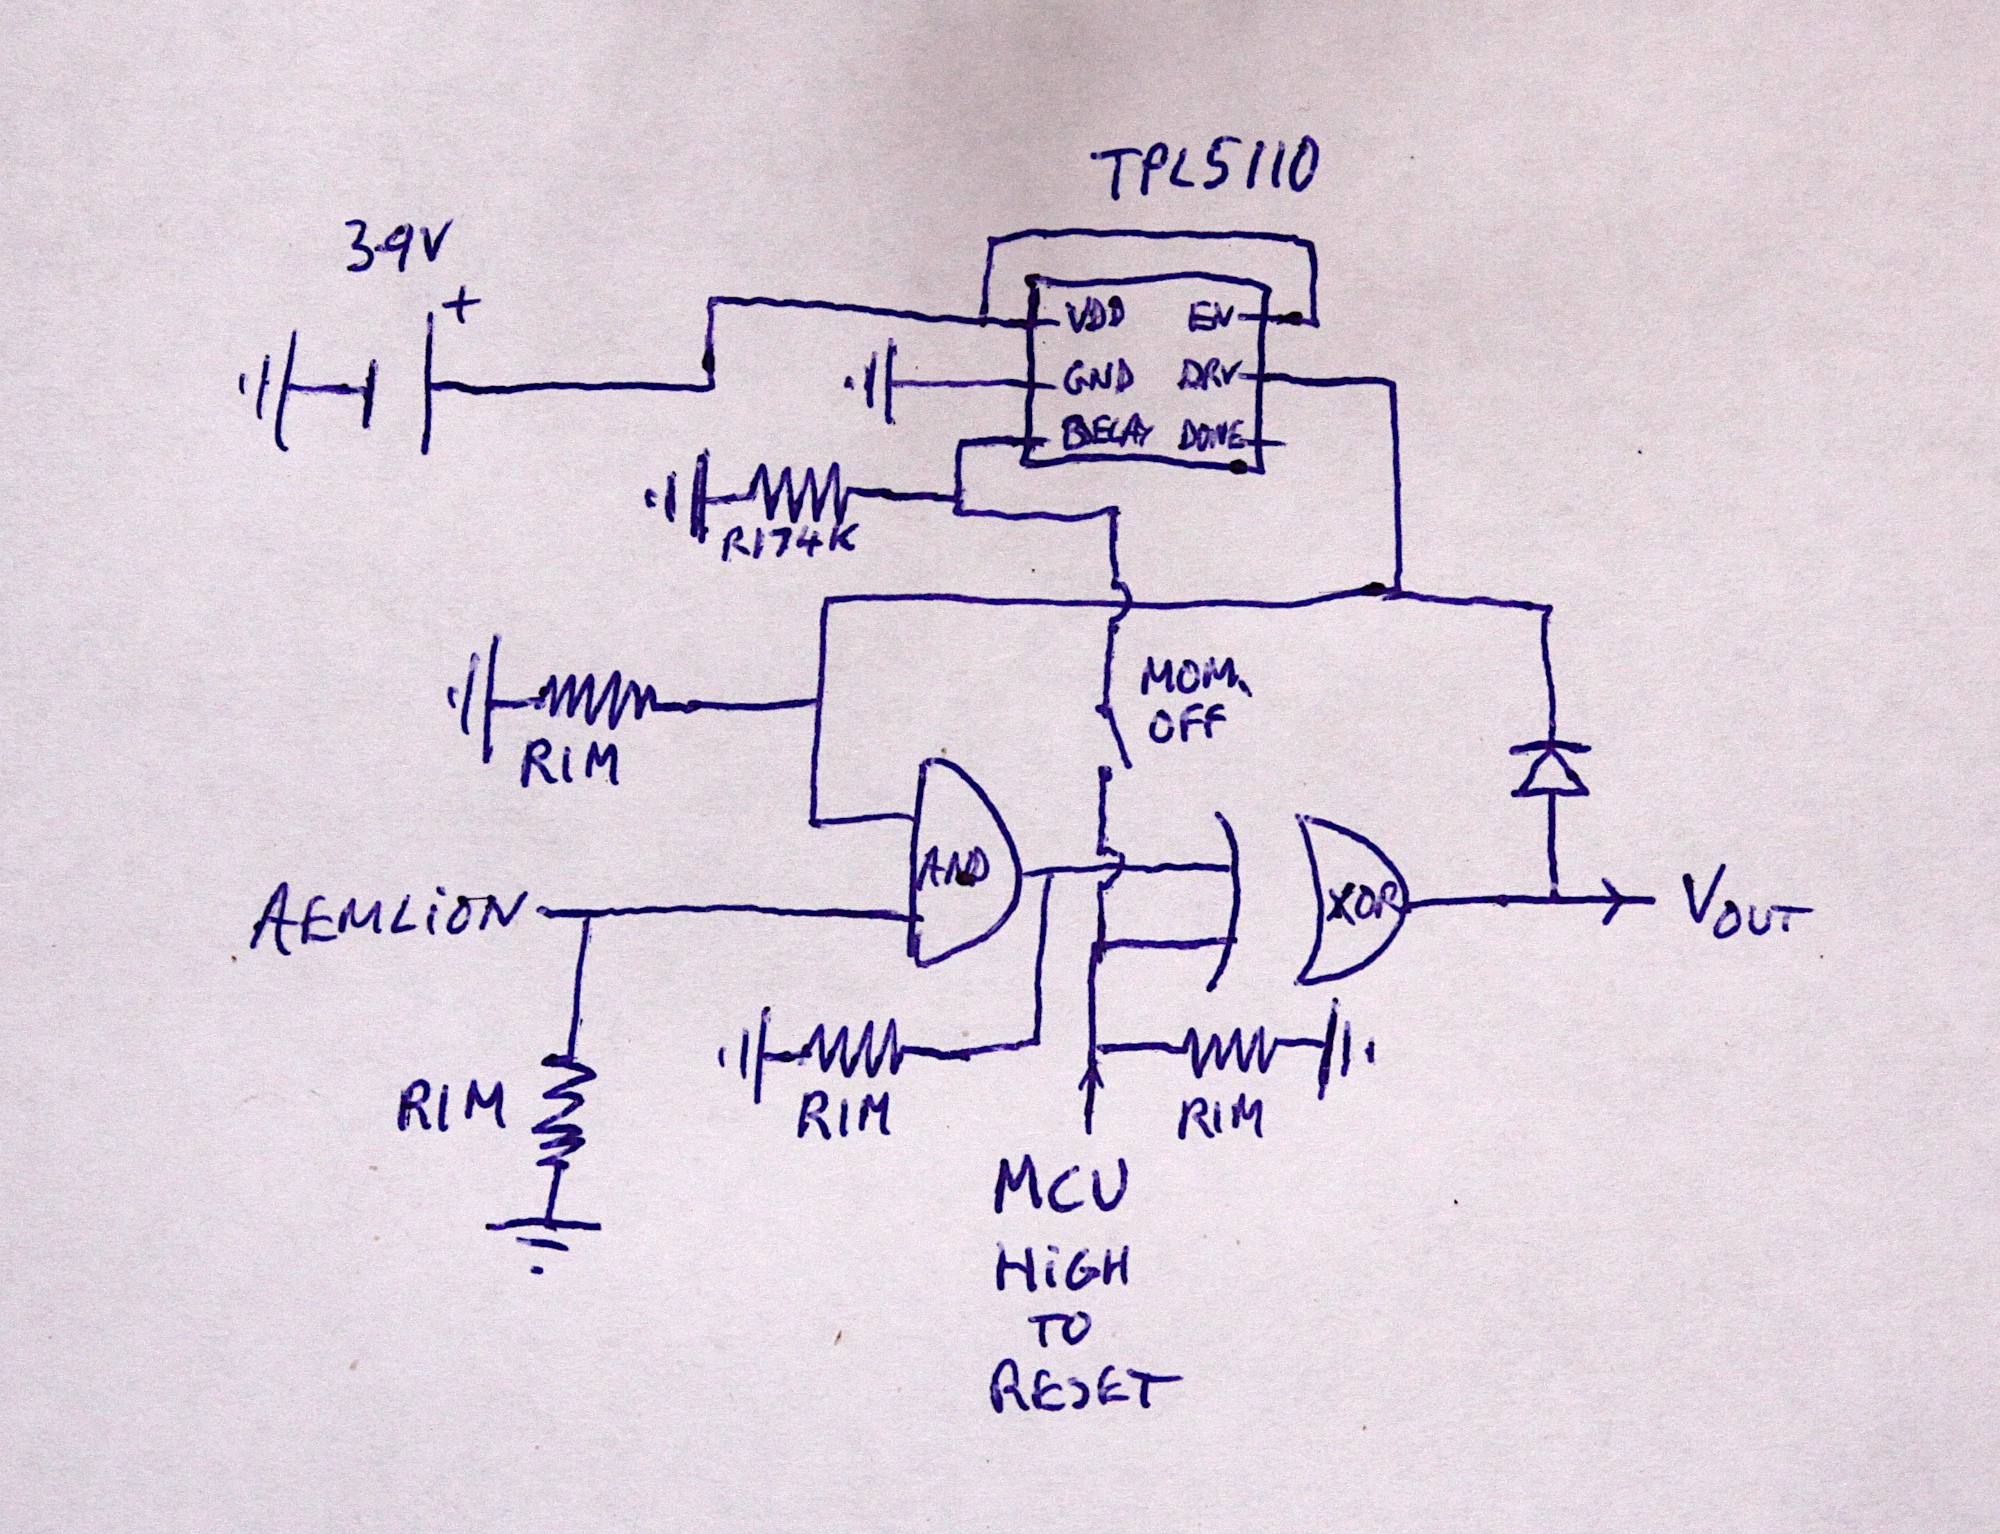
    The plan is to use the basic pulse output that the timer chip seems to be able to output without too much trouble, rather than try and get the chip to 'hold' in the HIGH state before a 'release' signal is sent from the MCU. After a bit of head scratching I worked out that I could use CMOS gates to create my own hold function. I imagine that this is technically some kind of latch, I dont really know!

    I firstly envisaged using an AND and an OR gate together with a feedback loop from the OR back to one of the AND inputs to create a HOLD. After looking more closely at the logic tables I realised that I needed to extend this to an XOR gate which ensures that if there are no signals whatsoever on both the inputs then the output is LOW. The theory looked good and I added a load of pull down resistors to all the inputs to stop random static from inadvertently triggering the gates.

    Keen observers will note the use of a diode in the feed back loop and a momentary OFF switch to isolate the DELAY pin in the timer. when doing the initial programming. Without the diode, the circuit behaved with slightly wrong logic and I have almost no idea why! Without the momentary switch, the DELAY pin in the timer sensed resistance through the MCU and the time interval became badly affected.

    So far, as tests continue, the circuit seems to be working even with all the wild array of wires flying about all over the place creating gallons of associated parasitic capacitance. Maybe this circuit is now immune to parasitics?

  • Testing the low power characteristics of the device

    Capt. Flatus O'Flaherty ☠03/14/2023 at 17:46 0 comments

    At last, the long awaited low power performance of the device has been tested!

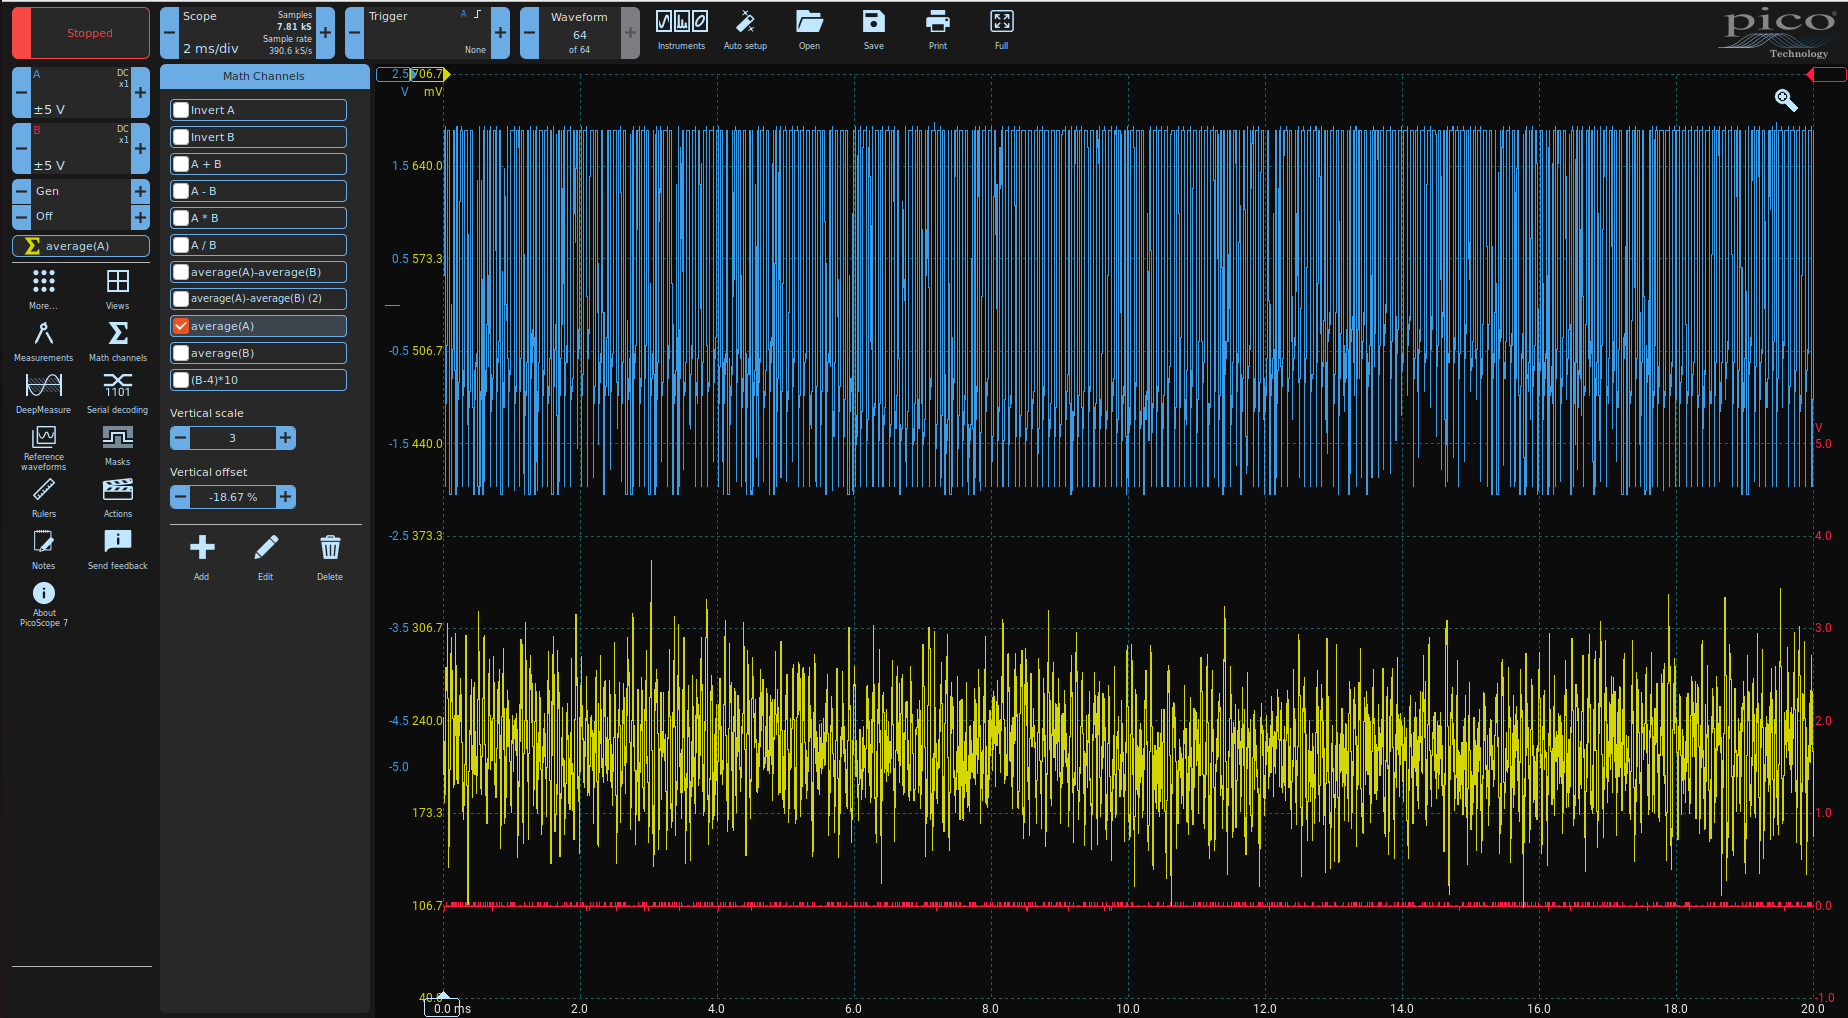
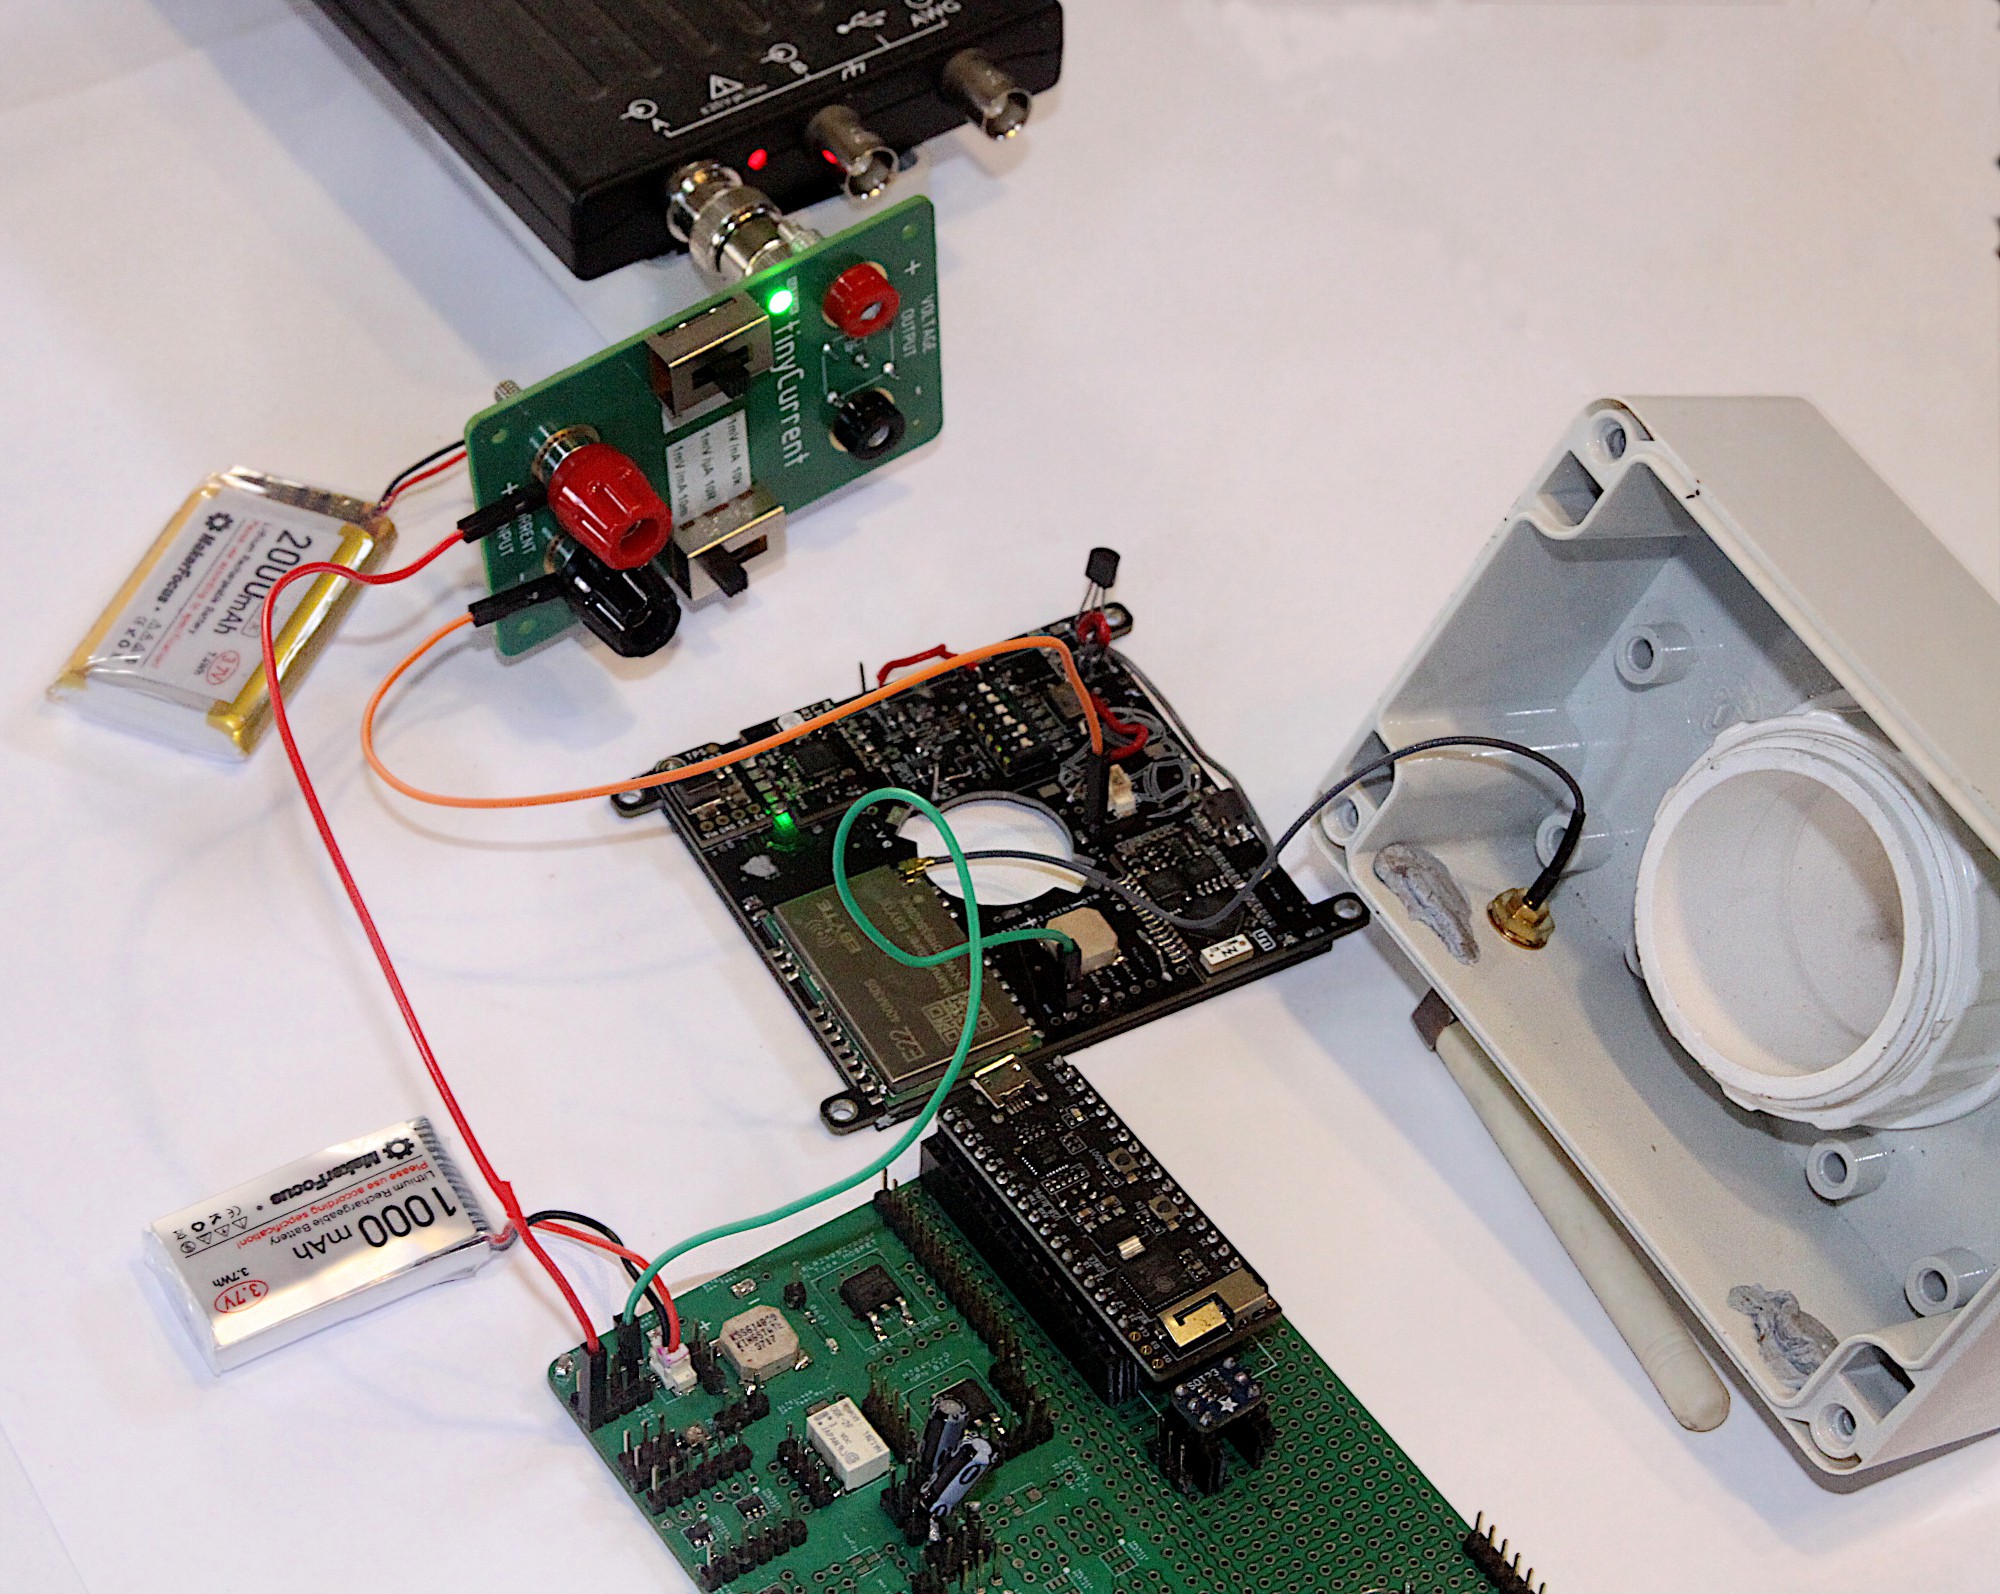
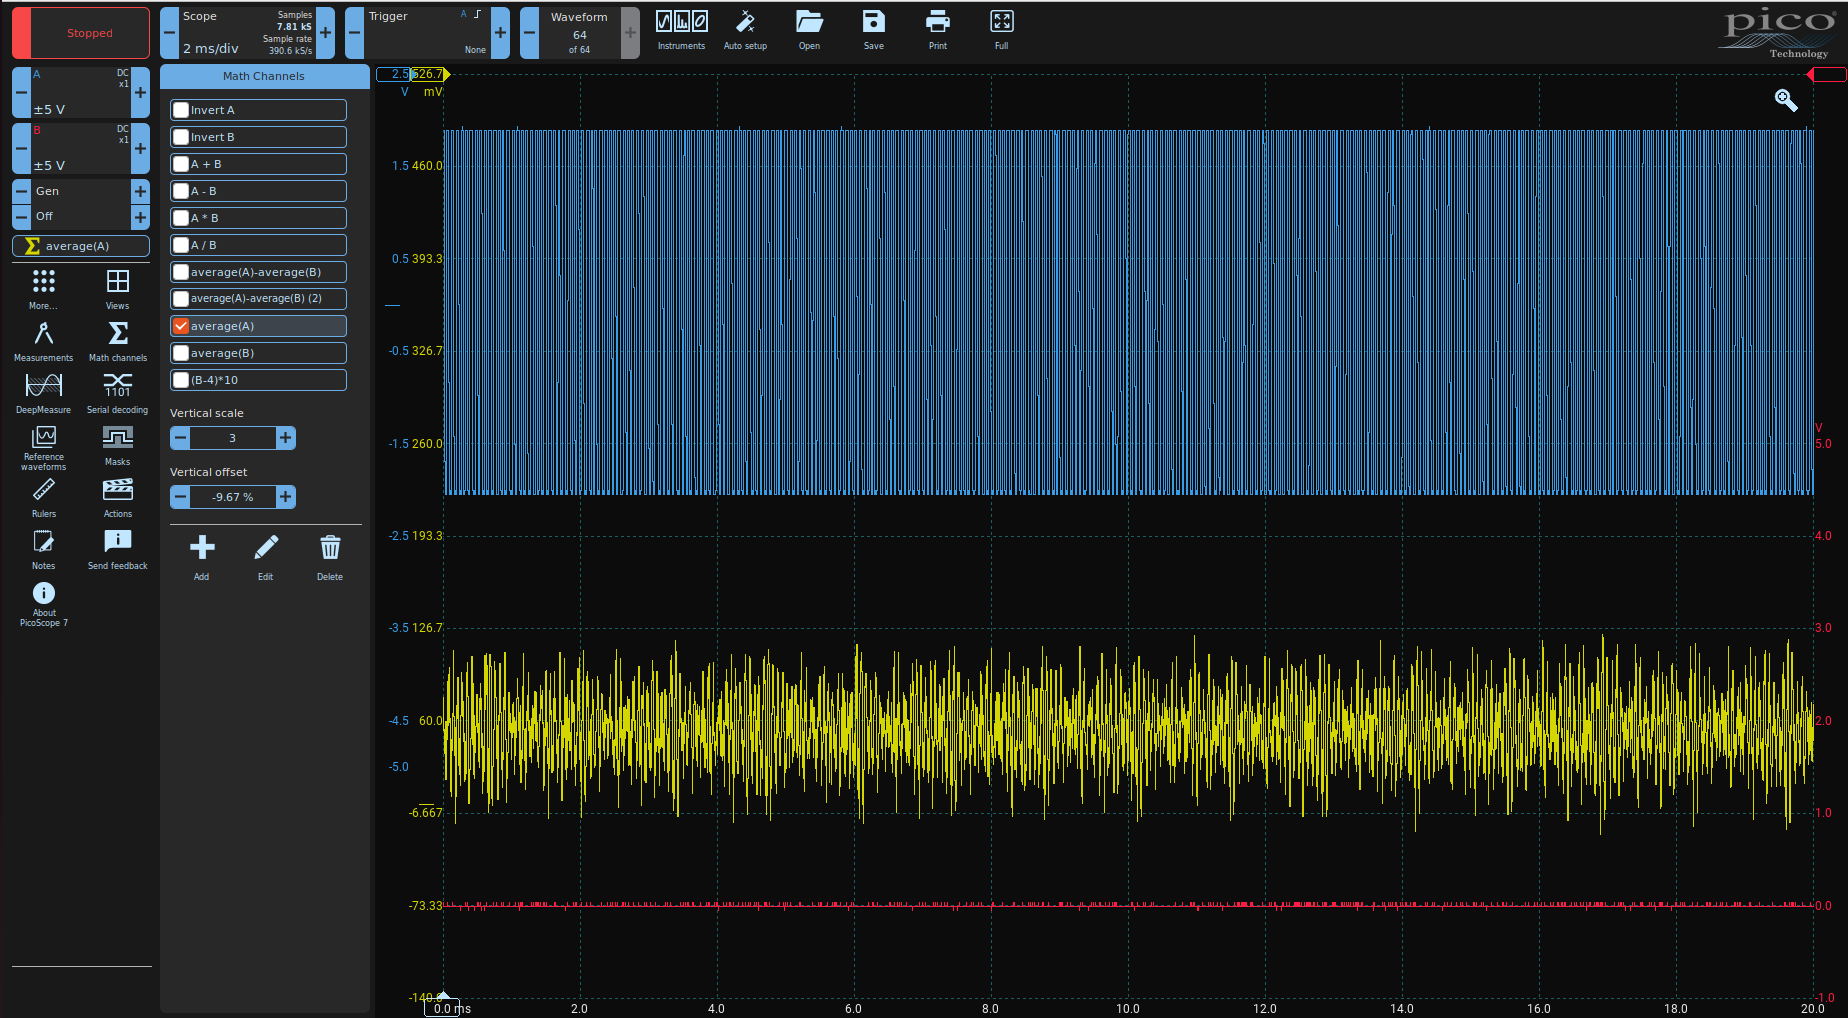
    I selected the TinyCurrent test module from I-Fuse for sensing the very small currents involved in this device. I liked the idea that it could be bolted right onto an oscilloscope and measure nA directly as mV. There are 3 dfferent settings on the TinyCurrent: nA, uA and mA (per mV). One word of warning though: DO NOT CONNECT ANY OTHER PROBE TO THE DEVICE CIRCUIT !!!!!! Trying to connect multiple probes causes some serious short circuiting and nasty smells.

    The TinyCurrent is easy to use and I started off on the nA setting with the AEMLION uninitialised (It needs a short flash of sunlight on the solar panels to boot up). In this state, the CMOS AND gate has no voltage on either input and the total current flow for the whole device was a meager 60 nA, which equates to a discharge time of about 1900 years on a 1000 mAh lithium battery. In real life the AEMLION energy harvester cuts off the voltage to the AND gate if the battery, for some reason, discharges below 3.6V, so it's actually quite useful.


    In the next test, I flashed a light onto the solar panels to initialise the AEMLION and the current shot up to a massive 240 nA, which equates to about 476 years life on the 1000 mAh battey.

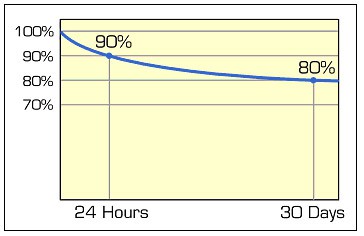
    Fantastic low power performance by any stretch. But what about the self discharge of the battery?

    Obviously, the self discharge characteristics of the battery far out weigh any of the advantages of the the elaborate low power design and using a super capacitor is about 10 times worse. So what's the point of all this effort?

    One thing to remember is that we're using an energy harvester which can pull out electrons from very low light levels and be enough to keep a 40 mAh rechargeable coin cell topped up. In this scenario, the current draw of the device is much more relevant than on, say, a 1000 mAh battery with plenty of juice from the solar panels. When the device is set up with a coin cell with a very limited light source, the low power performance of the device as a whole is more critical.

  • TPL5110 Timer Issues

    Capt. Flatus O'Flaherty ☠02/18/2023 at 17:25 0 comments

    Above is the recommended layout for the TPL5110 Timer, which is done like this to reduce parasitic capacitance which in turn will mess up programming of the timer. What is does not show is that the tracks to the MCU itself should also be as short as possible.
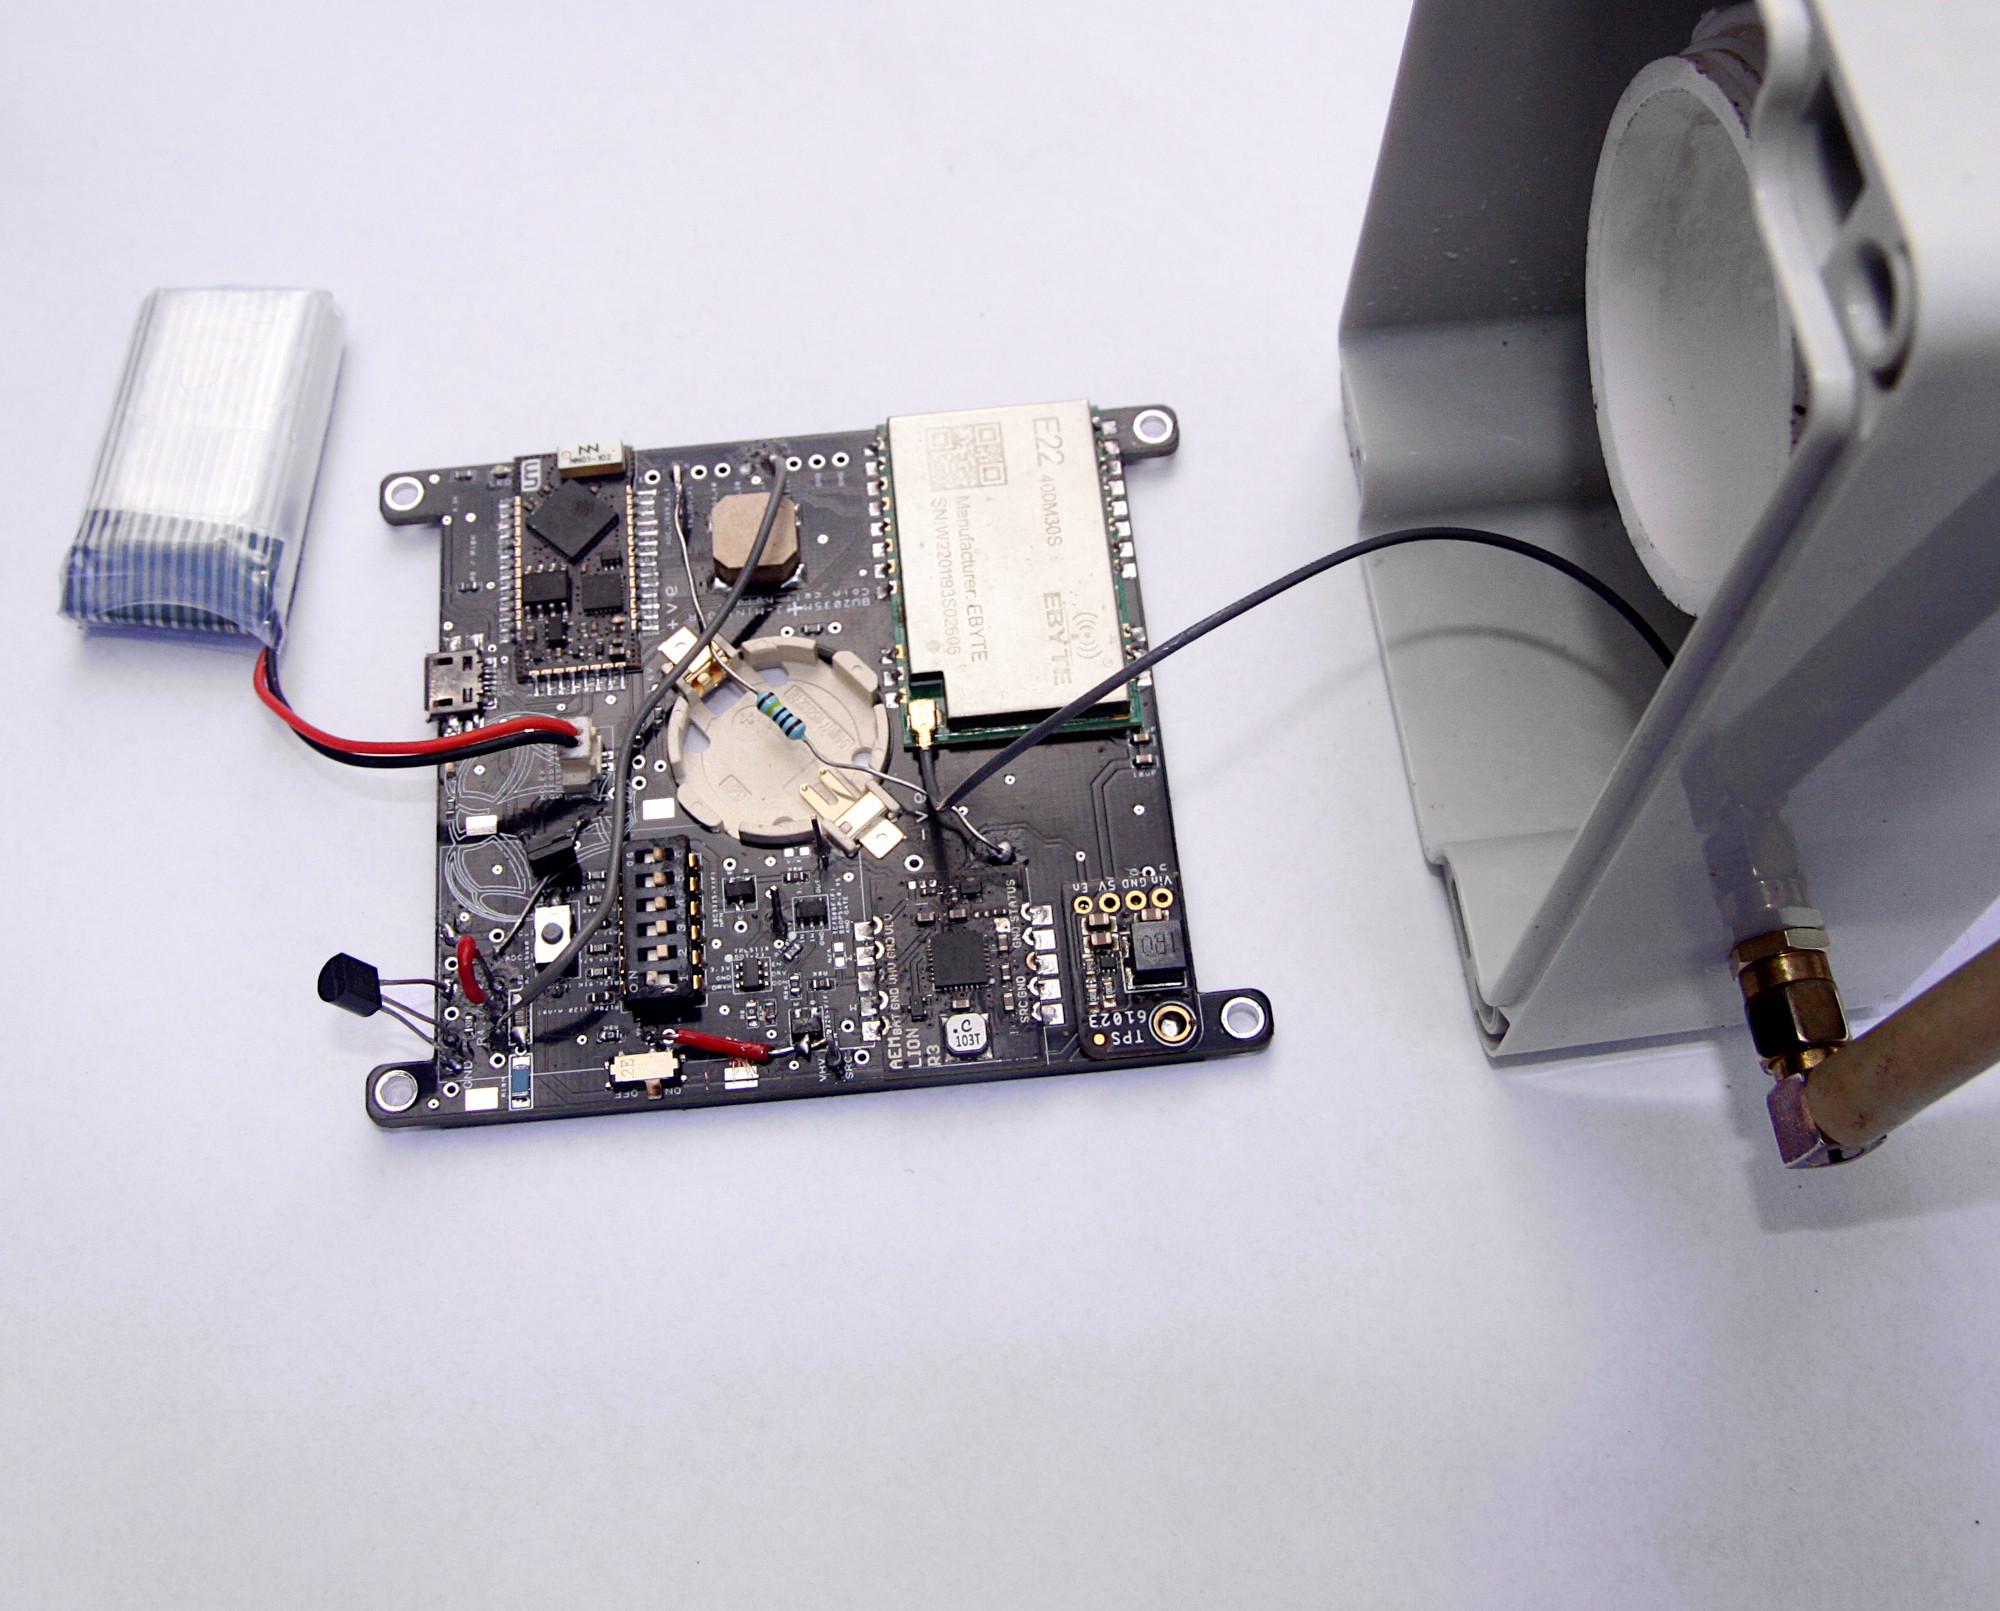
    In the current design there are some compromises as I've put in a wacking great big 6 way resistor selector switch which, even though it's right next to the timer chip, will add plenty of parasitic capacitance. Strangely, the timer chip can be still be programmed right up to 2 hours, but for some of the options, only work once! Also, the timer is fussy about how it's programmed and seems to prefer to be programmed in steps from the lowest value resistor progressively upwards. So to program a 40 minute time interval, it needs to be programmed firstly for 2 minutes, then for 10 minutes and then for 40 minutes or else it just refuses to work. 40 minutes seems to be the upper limit for the current configuration which can only be improved by getting rid of the resistor switch block and moving the timer chip and associated NPN transistor closer to the MCU. Some improvement might be achieved by changing to board material to a better dielectric specification and increasing the thickness of the board, but probably not worth the extra expense!

    If I wanted longer time intervals between transmits, I'd write a 'Death Counter' to the flash memory in the ESP32 and keep shutting the MCU down immediately until the Death Counter had reach to a proscribed number. The energy wasted in booting up the MCU for one second or so should be fairly low and it's only done once every 40 minutes.

  • New PCBs solve a few issues

    Capt. Flatus O'Flaherty ☠02/15/2023 at 10:47 0 comments

    One of the problems in the previous iteration of the design was that the TPL5110 timer chip could not be programmed properly with the connection to the MCU pin used to reset it in place. This current design allows a choice of a resistor or a NC momentary switch. I tried a few resistors, but none worked so resorted to the switch, which needs to be held down when the timer and gate circuit is turned on by the slide switch. Hey presto! I can now get a time interval of exactly 123 minutes, which is almost perfect. The problem with having to wait 3 hours before re-programming the timer chip was solved by simply making a connection to GND on the slide switch so that the timer and gate power supply is not only disconnected from the battery by the slide switch, but also connected to GND when turned off.
    I also decided to add a few extra features like monitoring the solar brightness and the temperature within the enclose as it could well get quite hot in full sun in the Summer. The connection from the solar source is currently a bit crude with a 1M Ohm resistor in series to a MCU pin, but it kind of works. The next iteration will have a proper bridge circuit.  The DS18B20 temperature sensor worked well although a surface mount alternative would be better. Just needed to remember not to connect it to pin 2 on the MCU as otherwise the MCU cant be programmed. Pin 2 is fine for LEDs, but not much else.

    Although a few problems were solved, I also managed to screw up the low power performance of the device by hacking a through hole NPN transistor into the battery voltage sensing circuit. I've currently no idea why it caused problems, but after it was removed, the battery no longer suffers from critical discharge and everything behaves as expected. It might be the type of transistor so the next PCB will have the option to include a SMT transistor or bypass it with a zero Ohm resistor. This way, if the transistor is still a problem, it can be removed without wrecking the design.

  • At last, some coherent results

    Capt. Flatus O'Flaherty ☠02/08/2023 at 15:23 0 comments

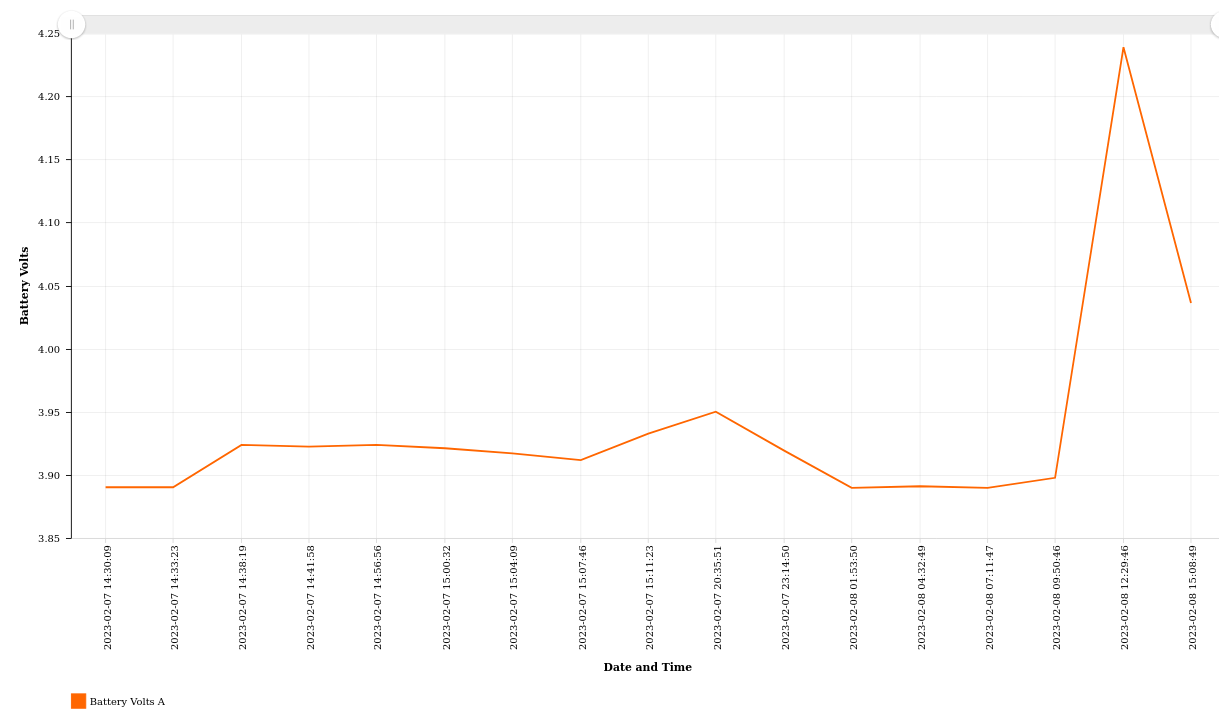
    It's been moderately sunny here, so the battery got a nice boost of charge up to 4.2 volts and did not over reach the MCU pin like before. Success! Not exactly sure why it was so difficult, but believe it's something to do with internal resistors in the ESP D4 chip . Testing this device is made more difficult by the TPL5110 timer chip which tends to throw a wobbly when parts of the circuit are changed. For example, it takes a full 3 hours of being left unconnected to the battery or any other power source, before the chip becomes resetable. Could be an internal capacitor holding onto the programmed time value and refusing to let go!
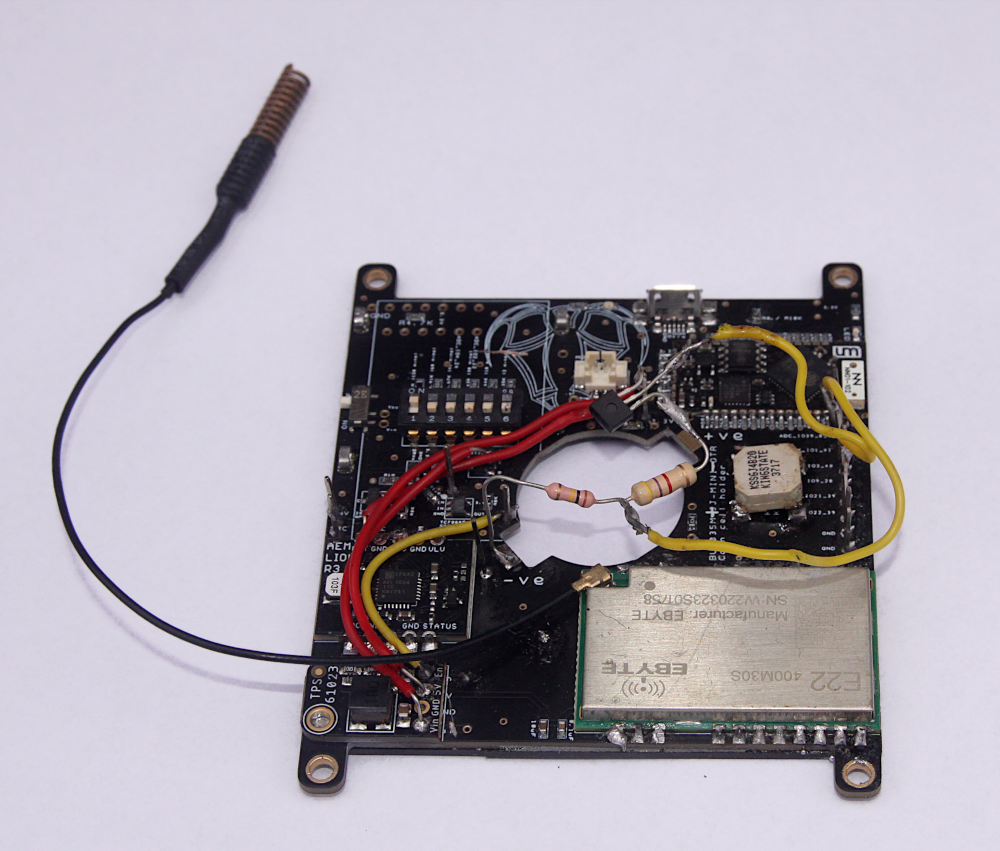
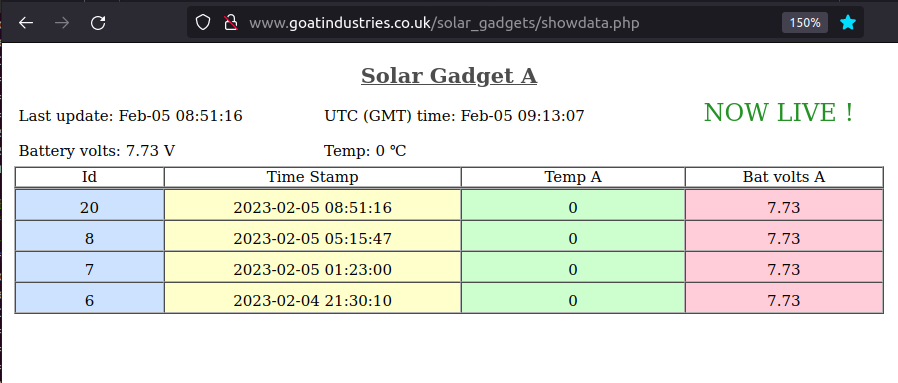
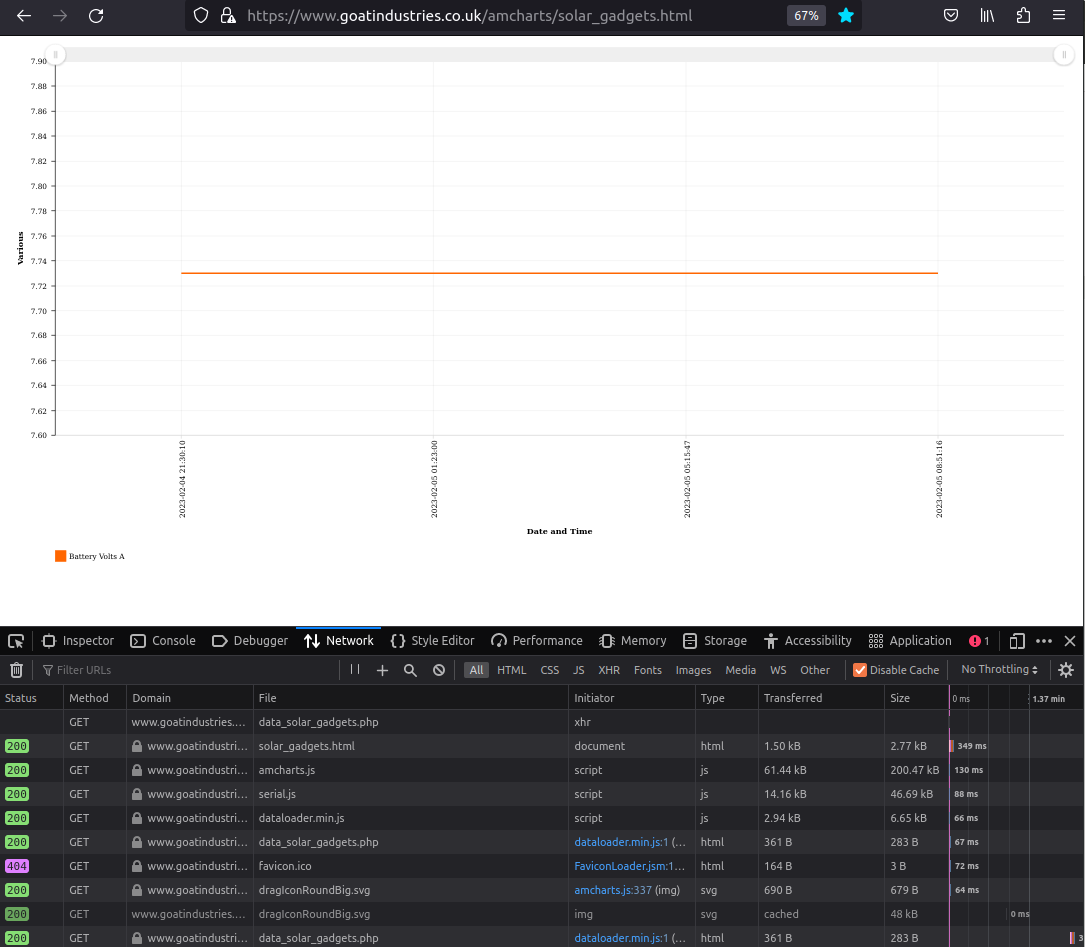
    Live results can be seen here: https://www.goatindustries.co.uk/amcharts/solar_gadgets.html ..... but dont forget to turn off the browser cache or it wont refresh.

  • Switching transistor added into battery voltage measuring circuit

    Capt. Flatus O'Flaherty ☠02/07/2023 at 15:46 0 comments

    Looking carefully at the photo below, there can be seen 2 resistors and a NPN transistor floating above the main board. Form the +ve battery terminal, there is the collector of the ZTX450 transistor with a 4.7K resistor soldered to the emitter. Then, there's a 100K resistor which goes to ground. The base of the transistor is activated by one of the MCU pins on one of the yellow wires and the voltage detected via the other yellow wire to another MCU pin. 3.925V gives a reading of 2923 out of a possible range of 4095 (12 bit) so there's plenty of head room for higher voltages, for example, 4.1 volts, which seems to be the maximum charge voltage on the battery.

    Thankfully, after a bit of trial and error in arriving at this configuration, no diodes were required !!!

  • Measuring battery volts​

    Capt. Flatus O'Flaherty ☠02/06/2023 at 15:45 0 comments

    Should be easy yeah? Well, turns out it's not that easy to do this in a low quiescent power context. With a basic resistor bridge set up using 2 x 1M Ohm resistors a small amount of current is continually wasted. A rough calculation suggests that this current = 4.1V / 2,000,000 = 2 uA, but in reality current also seems to flow back through the MCU analogue read pin to earth, so the current lost could be more like 4 uA. Does not sound like a lot, but it's continuous, regardless of whether the MCU is powered on or not.

    The second problem is that 1M Ohm is simply too high due to resistance on the MCU pin and means that the 3.3V threshold on the pin is exceeded. The obvious solution is to leave the 1M Ohm resistors in place but throw in a couple of diodes in series on the MCU pin thereby reducing the voltage. The technical term for this is 'forward bias voltage drop' which is an inherent characteristic of all diodes and is normally about 0.7V each, depending on the current. For a 1N4148 operating at about 4 uA the forward voltage was measured as 0.3 V, so  this being the case, we'd probably want 2 or 3 of them in series between the battery and the resistor bridge.

    But why not go one step further and stick a switching transistor in the mix? The transistor will also have a voltage drop across the collector and emitter, which will help improve the situation. If the transistor has low leakage, it should also be able to get rid of the continuous 4 uA current loss. So that's win, win .... hopefully.

    Fortunately, the new PCBs on their way from China can be easily hacked to insert a through hole transistor into the battery measuring circuit. Should also be able to include a diode as well, if necessary. Just luck really!

  • Online Graphical Monitoring

    Capt. Flatus O'Flaherty ☠02/05/2023 at 09:31 0 comments

    As promised, I created some online 'Cloud' style monitoring at: http://www.goatindustries.co.uk/solar_gadgets/showdata.php

    There's also a graph displaying battery volts on Gadget A, as below. This gadget's quite lonely at the moment as I'm waiting for more, updated, PCBs to arrive from PCBWay. Should have chosen express delivery. Never mind.

    Another thing to notice is that the actual reading for battery volts is wrong. I believe this is something to do with the ESP32 analogue read and that a look up table needs to be created for the ESP32 D4 chip. I not really too bothered about it at this stage as the new PCBs have extra high tolerance 10M chip resistors for voltage sensing and so the data will change when they start to get used. I did try putting some smaller resistors in the bridge circuit, but they would leak current back into the MCU and try to turn on some of the LEDs!

    For right now, the 3.7 V battery is fully charged at 4.1 V and is out in the sunshine absorbing electrons.

    Here's the link for the graph: https://www.goatindustries.co.uk/amcharts/solar_gadgets.html  Don't forget to disable the browser cache or else it will never update.

  • Now working for 10 consecutive days

    Capt. Flatus O'Flaherty ☠01/30/2023 at 08:33 0 comments

    The device has been outside and working now for 10 days, transmitting regularly through the day when solar power is available and through the night after a nice sunny day. However, most days it has been cloudy and even on bright days the sun just hovers on the horizon and bluntly refuses to rise any higher. It's a great test for the system as, other than on the North Pole, this is a great test environment. The AemLION did it's job well and after taking a few measurements by hand of the battery voltage every now and again, the voltage never dropped below 3.6V and so the battery was always well protected.

    The next step is to get the battery voltage data onto an online database and start drawing online graphs. There will also be some tinkering with the transistor and gate circuit to try and see if there is any leakage current over the collectors and emitters. There's some new circuit boards arriving although currently stuck amongst Year of the Rabbit celebrations and COVID in China and I'm hoping to do some side by side tests using different design parameters and look at the graphical outputs for performance evaluation.

View all 20 project logs

Enjoy this project?

Share

Discussions

TactiZity wrote 03/26/2023 at 18:20 point

Hi, did you finish ironing the small problems? I would like to replicate your project, I like it very much!

  Are you sure? yes | no

Capt. Flatus O'Flaherty ☠ wrote 03/26/2023 at 18:31 point

I think I've solved the problem. I've just ordered some PCBs from China-land so will do another test to check the problem is solved when they arrive.  I'll give you a shout when final testing is successful.

  Are you sure? yes | no

TactiZity wrote 04/01/2023 at 14:44 point

Thanks! Would love to build my own version. Thanks!

  Are you sure? yes | no

Capt. Flatus O'Flaherty ☠ wrote 04/10/2023 at 08:03 point

Problems with timer have now been solved and Gerber files for the PCBs available in the 'files' section.

  Are you sure? yes | no

Capt. Flatus O'Flaherty ☠ wrote 05/30/2023 at 18:21 point

Solved! Here are the Gerber files: for the PCBs: https://cdn.hackaday.io/files/1875748025166016/Solar_Harvester_v17_GERBERS.zip

  Are you sure? yes | no

Ivan Arakistain wrote 02/21/2023 at 13:59 point

Also, didn´t you think about using a LIC capacitor to store the solar harvested energy?

  Are you sure? yes | no

Capt. Flatus O'Flaherty ☠ wrote 02/21/2023 at 18:05 point

Yep, I did think about using a capacitor but concluded that I could store more energy relative to volume in a coin cell.

  Are you sure? yes | no

Ivan Arakistain wrote 02/21/2023 at 13:57 point

Hi! Great project. Is PCB design updated with latest changes? I would like to replicate your project.

  Are you sure? yes | no

Capt. Flatus O'Flaherty ☠ wrote 02/21/2023 at 18:06 point

No, not yet. There's still a few small problems so better to wait for a few more weeks until they are ironed.

  Are you sure? yes | no

Capt. Flatus O'Flaherty ☠ wrote 04/10/2023 at 08:03 point

Problems with timer have now been solved and Gerber files for the PCBs available in the 'files' section.

  Are you sure? yes | no

Ivan Arakistain wrote 04/10/2023 at 08:13 point

Thanks! Could you please add the final schematic?

  Are you sure? yes | no

Capt. Flatus O'Flaherty ☠ wrote 04/10/2023 at 08:27 point

I dont normally use schematics as I prefer to just work from the PCB layout although there is a schematic for the timer and gates circuit as it is a bit more complicated. You could create a schematic for the whole thing by uploading the Gerbers into PCB editing software and try telling it to create a schematic. I dont know which software can do this. Otherwise, you could do it manually, which would be quite useful for others. I'm too lazy to do it but let me know if you do it yourself !!

  Are you sure? yes | no

Capt. Flatus O'Flaherty ☠ wrote 05/30/2023 at 18:21 point

Solved! Here are the Gerber files: for the PCBs: https://cdn.hackaday.io/files/1875748025166016/Solar_Harvester_v17_GERBERS.zip

  Are you sure? yes | no

Similar Projects

Does this project spark your interest?

Become a member to follow this project and never miss any updates