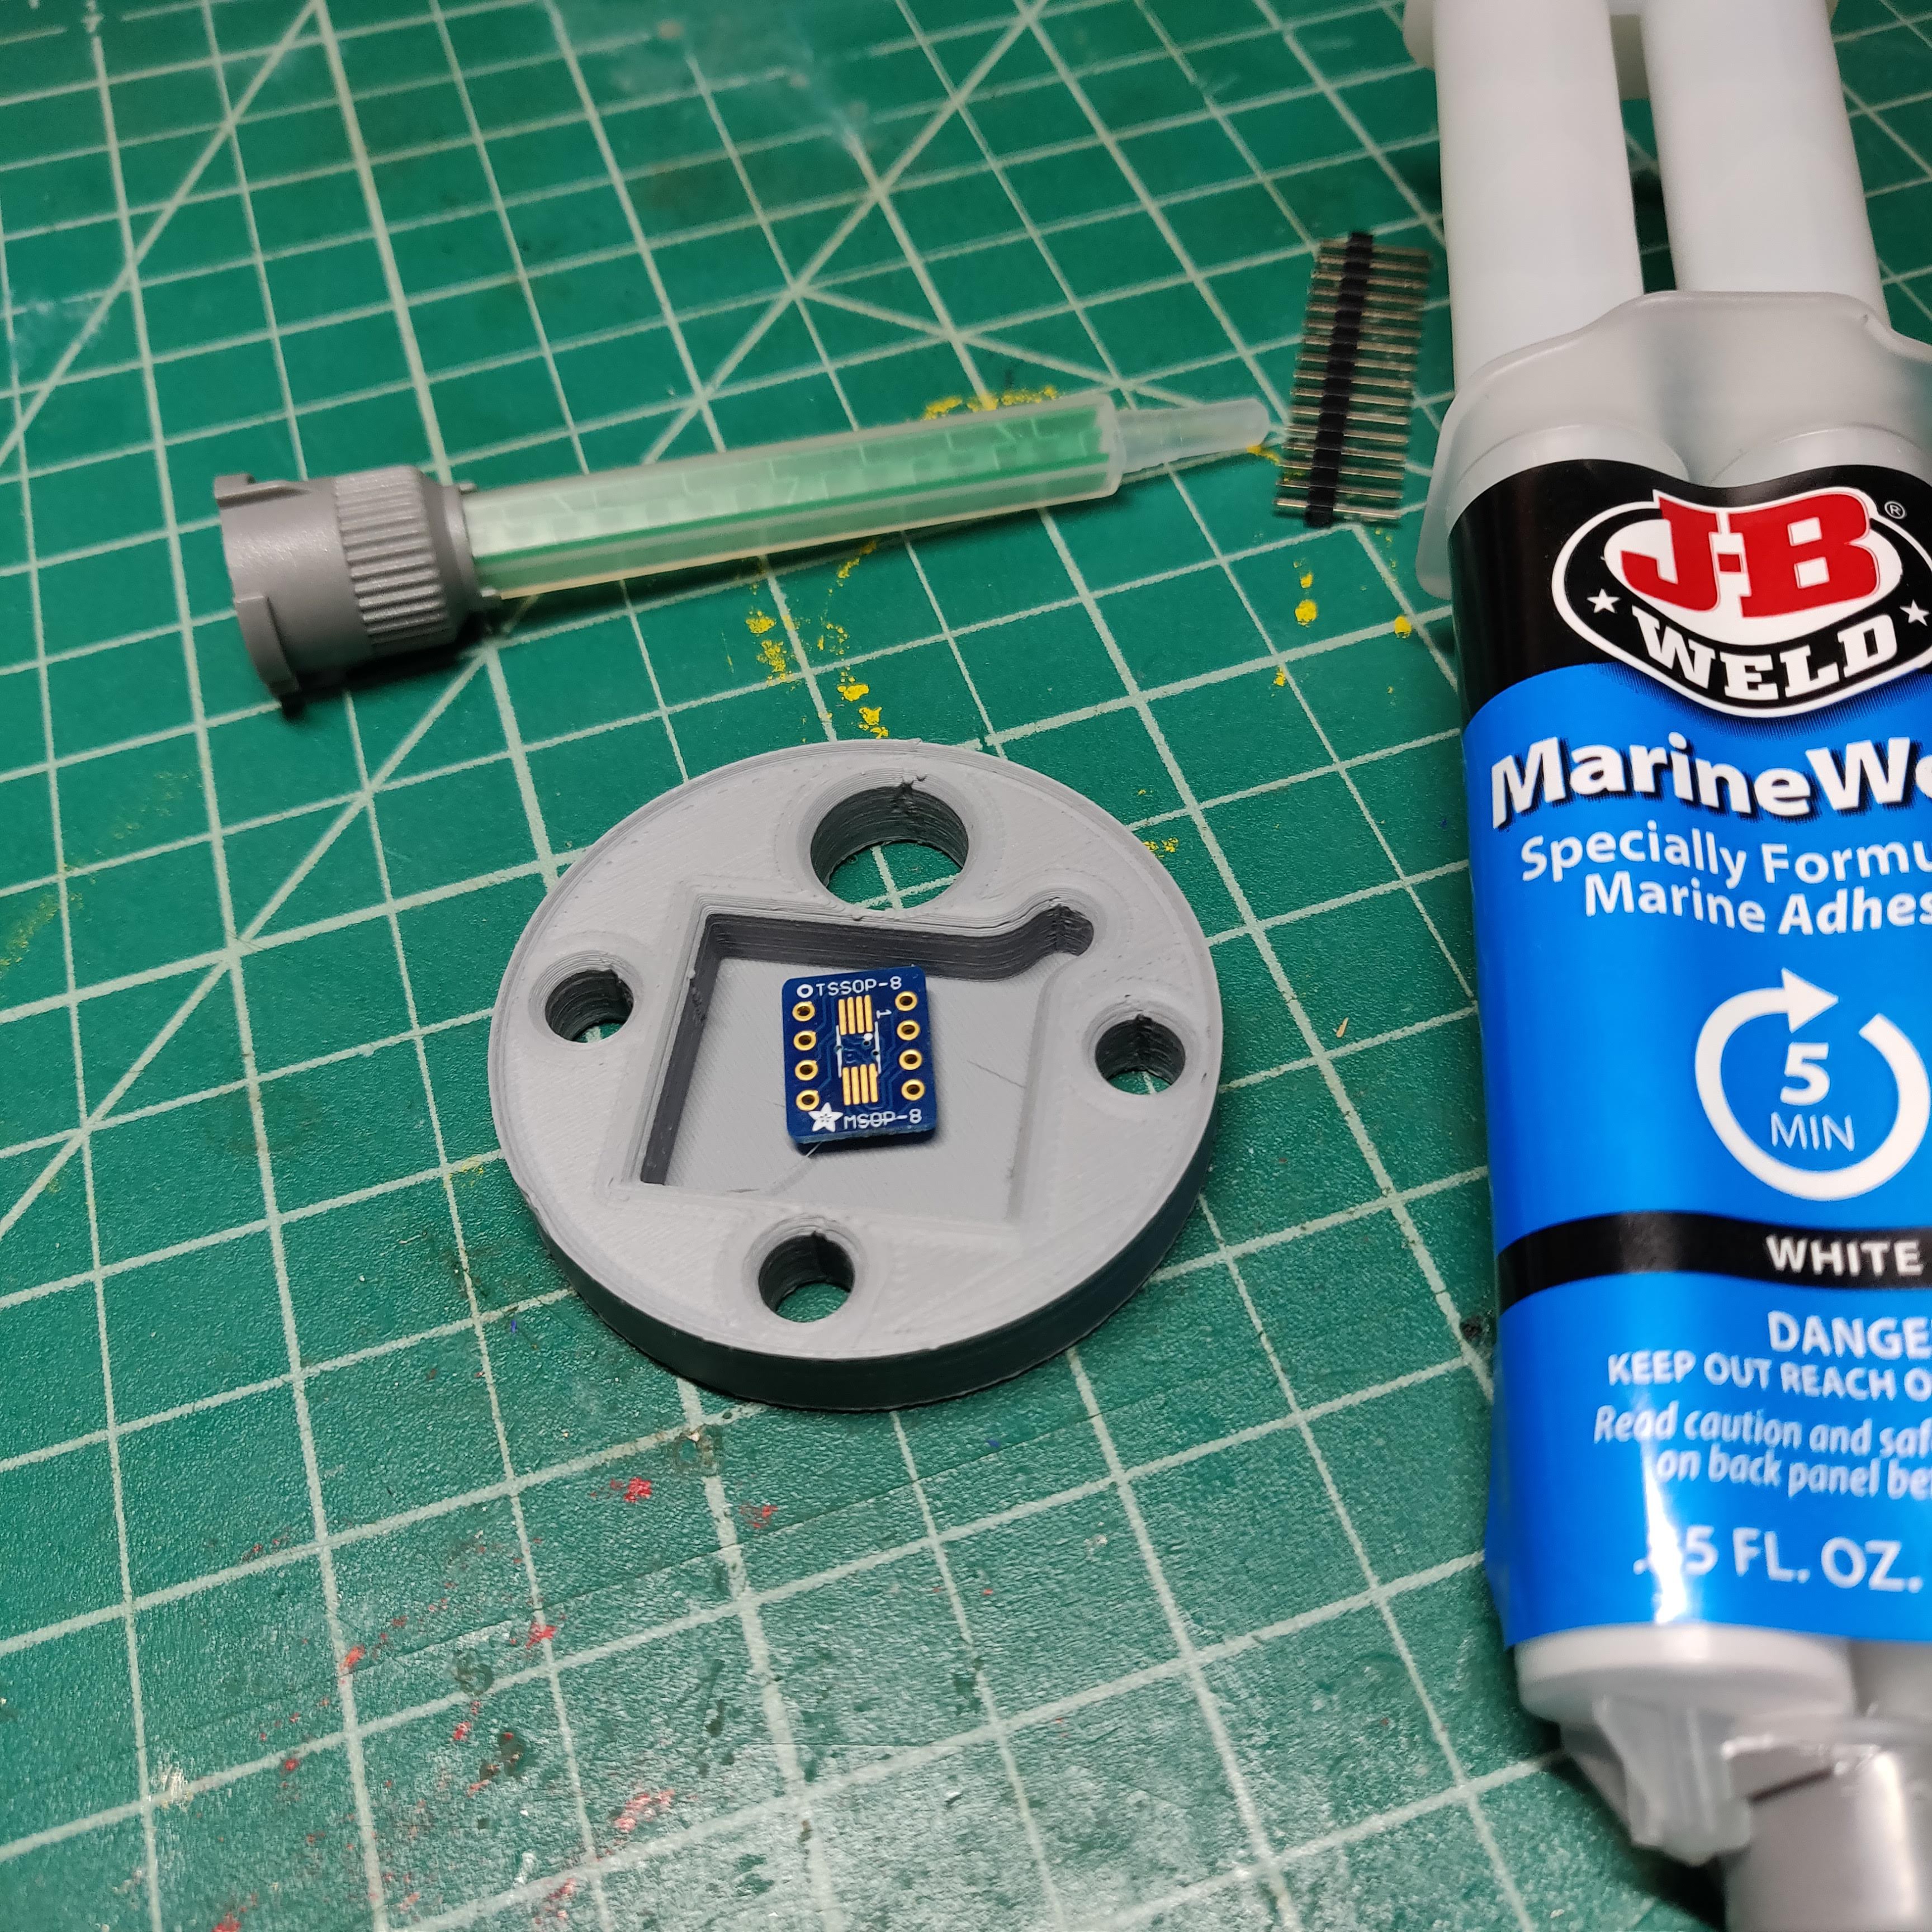
This funny little baseplate ties the entire OpenCTD together. It holds every sensor in a fixed position so that the PVC housing can be flooded with epoxy and sealed against the salty, salty sea. But a lot has to go right to get a good, clean seal. The sensors need to be just far enough away from the walls that the viscosity of the epoxy won't leave a void, but also away from each other. They have to sit just right to let epoxy flow around without allowing for piping up through the baseplate.
And, most importantly, the 5-minute epoxy for the pressure sensor has to flow below the board. Ideally, the four cutouts will let CTD builders get the nozzle of the epoxy mixer under the board and force the epoxy up into the voids.
What's funny and frustrating is that almost all of my CTDs work. Something like 15% fail after a few casts and I suspect that it's because of voids in the potting letting seawater into the pressure sensor. That's fine for me, while I'm prototyping. But in a classroom setting, 15% is far, far too high.
The sensor package is a little bit less complicated than the OpenCTD control unit, but it has several tricky bits that make it a bit more technically challenging. For normal CTDs, I shave off about $40 from the price by building my own pressure sensor breakouts for the board-mounted pressure chip, but for a student kit that needs to be accessible to high school students, I prefer to use an off-the-shelf solution from SparkFun.
Rounding out the package is a graphite conductivity probe from Atlas Scientific and three DS18B20 temperature sensors in a stainless steel cladding. Waterproofing heat shrink and heat shrink solder connectors for the connector round out the package.
One of the nice things about having plugged away at this project for so long is that there are multiple ways to build just about every part of it, but that creates a challenge for making a standardized kit. There has to be One True Build for the kit OpenCTD, which means there will always be a tradeoff. Working with students also means that every step of the build has to fit neatly into a clean, 45-minute window, which is why I went with heat shrink solder connectors to turn 2 steps into 1.
Of course, we also have a comprehensive build guide and the bill of materials has sourcing for all the alternatives, so there's always the option to go you own way.
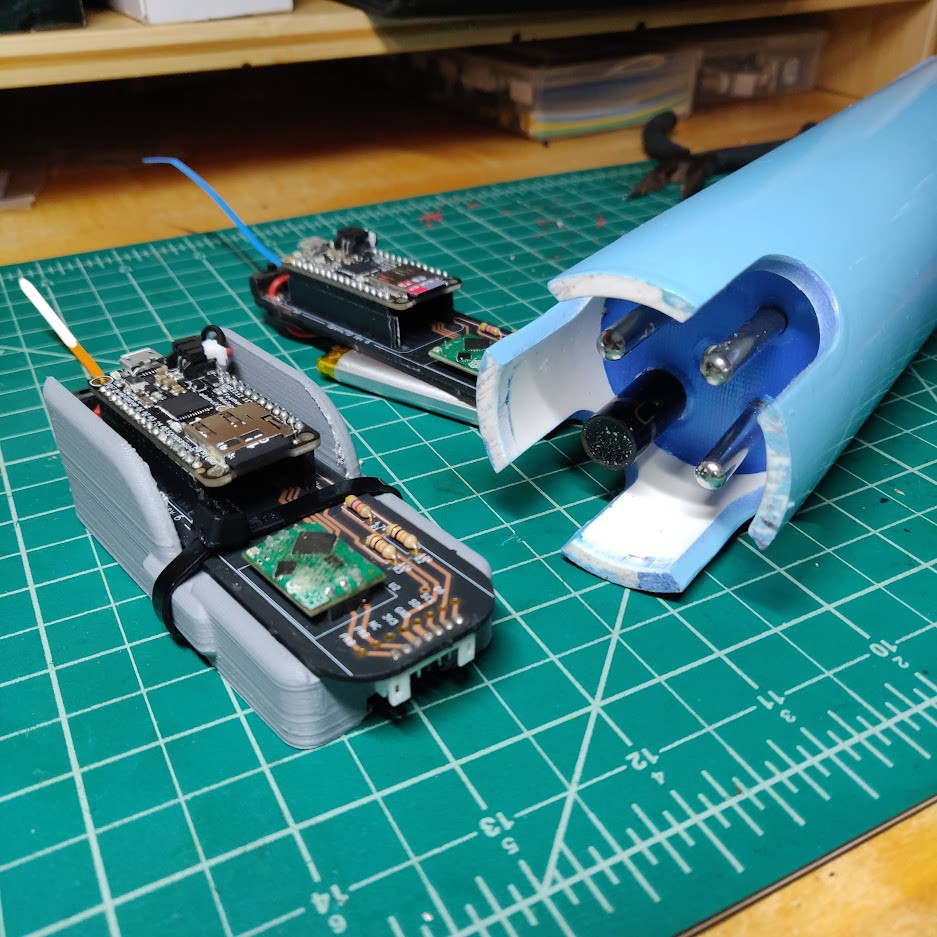
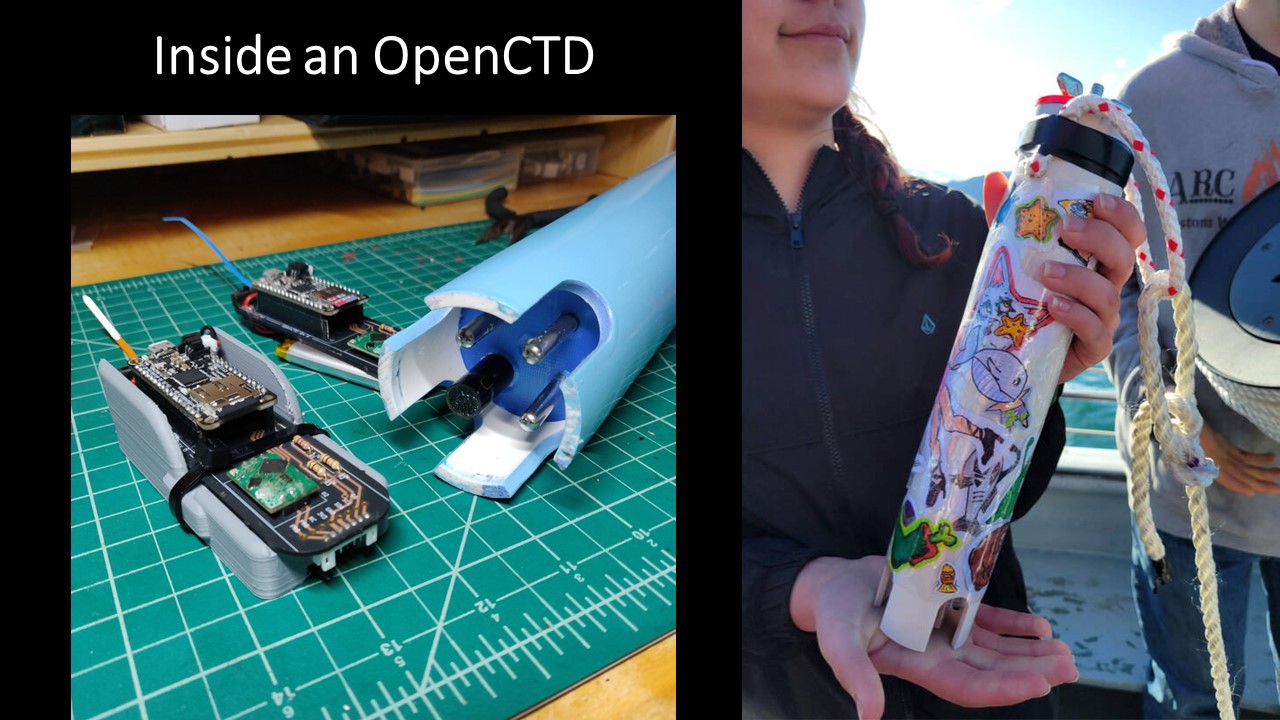
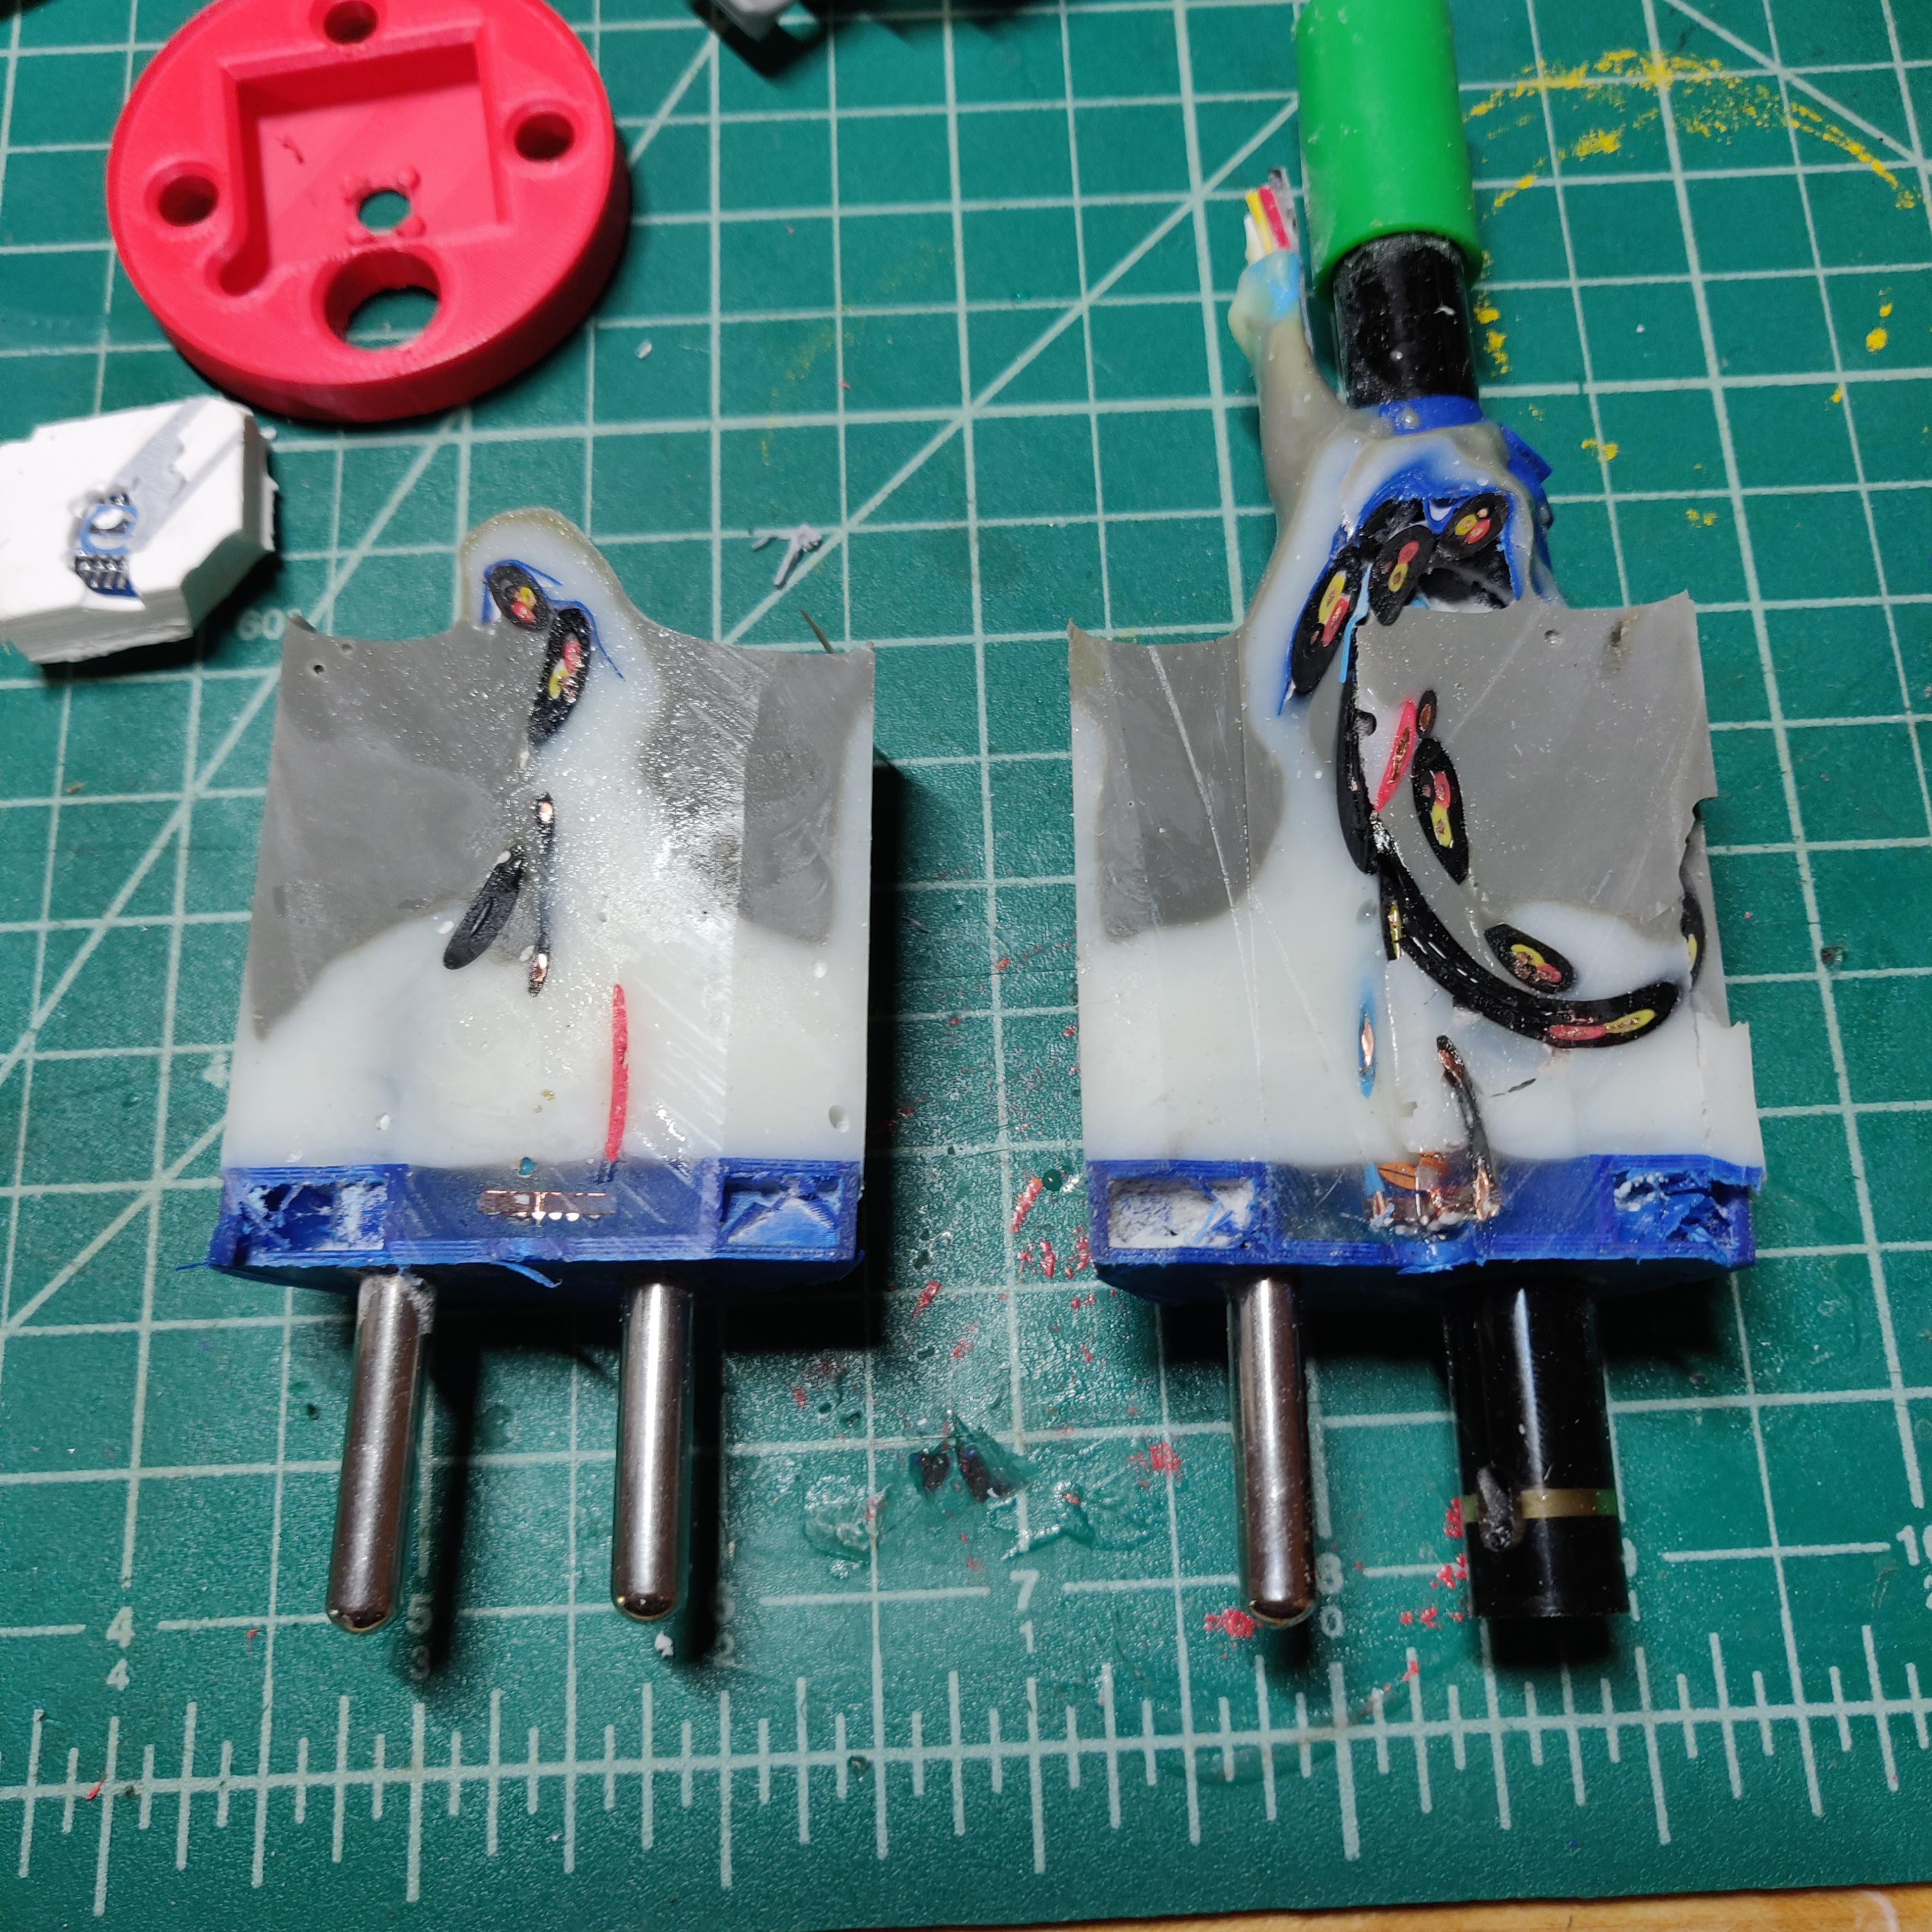
We just finished up a field season deploying OpenCTDs from commercial whale watching boats in New England, giving me a chance to discover all the new and novel ways for these devices to fail. After a summer of CTD casts, this unit finally gave up the ghost and the pressure sensor stopped logging. So I decided to cut it in half and get a look at things on the inside.
First note: this is one of our twice salvaged units from the 2020 field season, where we tested E-40HP (white) as the potting compound and discovered that it really sucked for this application, so there's a whole second layer of E-90FL (gray) in there, too. That was a rush fix and you can see how failed to fill some voids.
We go overkill on epoxy though, so as gnarly as this looks, it didn't leak.
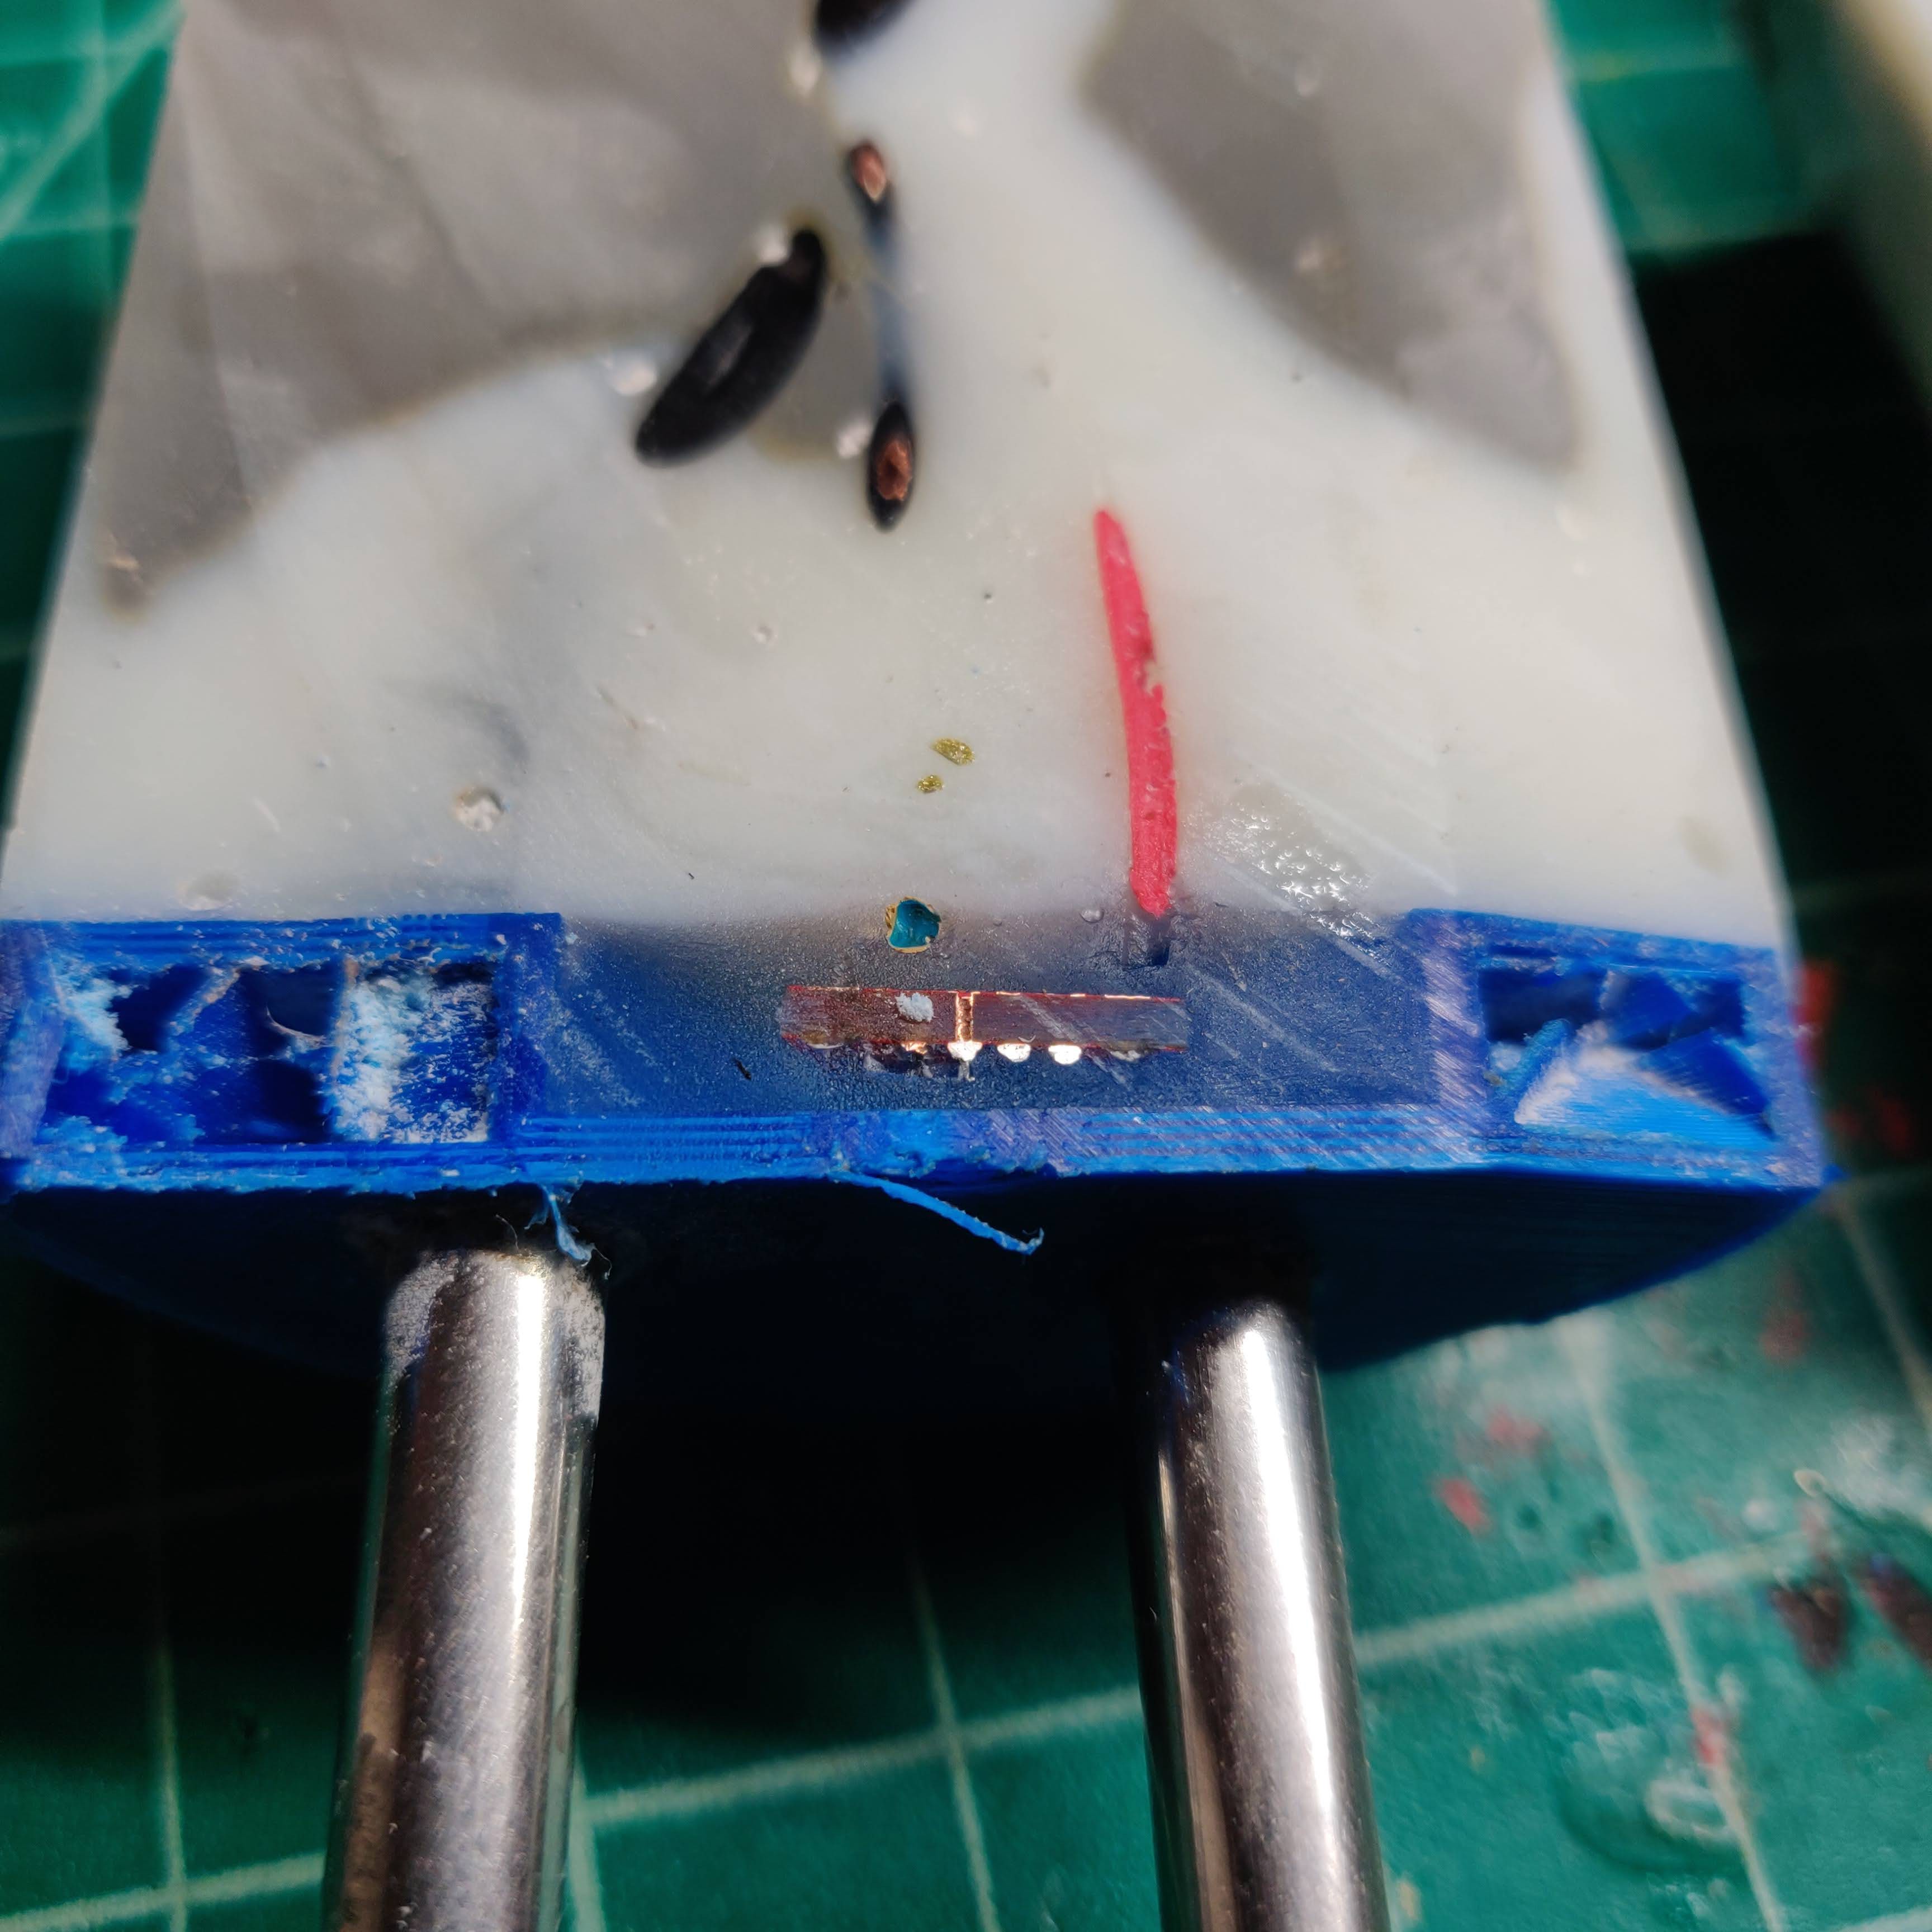
You can see that the infill on the 3d printed baseplate did fill with seawater, and there's tons of salt crystals in there. This isn't a structural component, but it seems sub-optimal, so we'll be printing this part with 100% infill from now on.
And you can see the other other layer of clear 5-minute epoxy that we use to waterproof the pressure sensor components. it looks like wit didn't completely fill the voids, which is a problem that I believe we've fixed with a redesign of the baseplate that changed how the pressure sensor sits and how the epoxy flows around it.
And yes, we're doing something about that tangle of wires.
I generally pot the OpenCTD with E-90FL epoxy, but because there are some fiddly bits around the pressure sensor, that component is usually potted separately, first, with various flavor of fast set epoxy. That secondary potting has been a failure point for several CTDs, and E-90FL is not always easy to find, so I've been experimenting other possible epoxies.
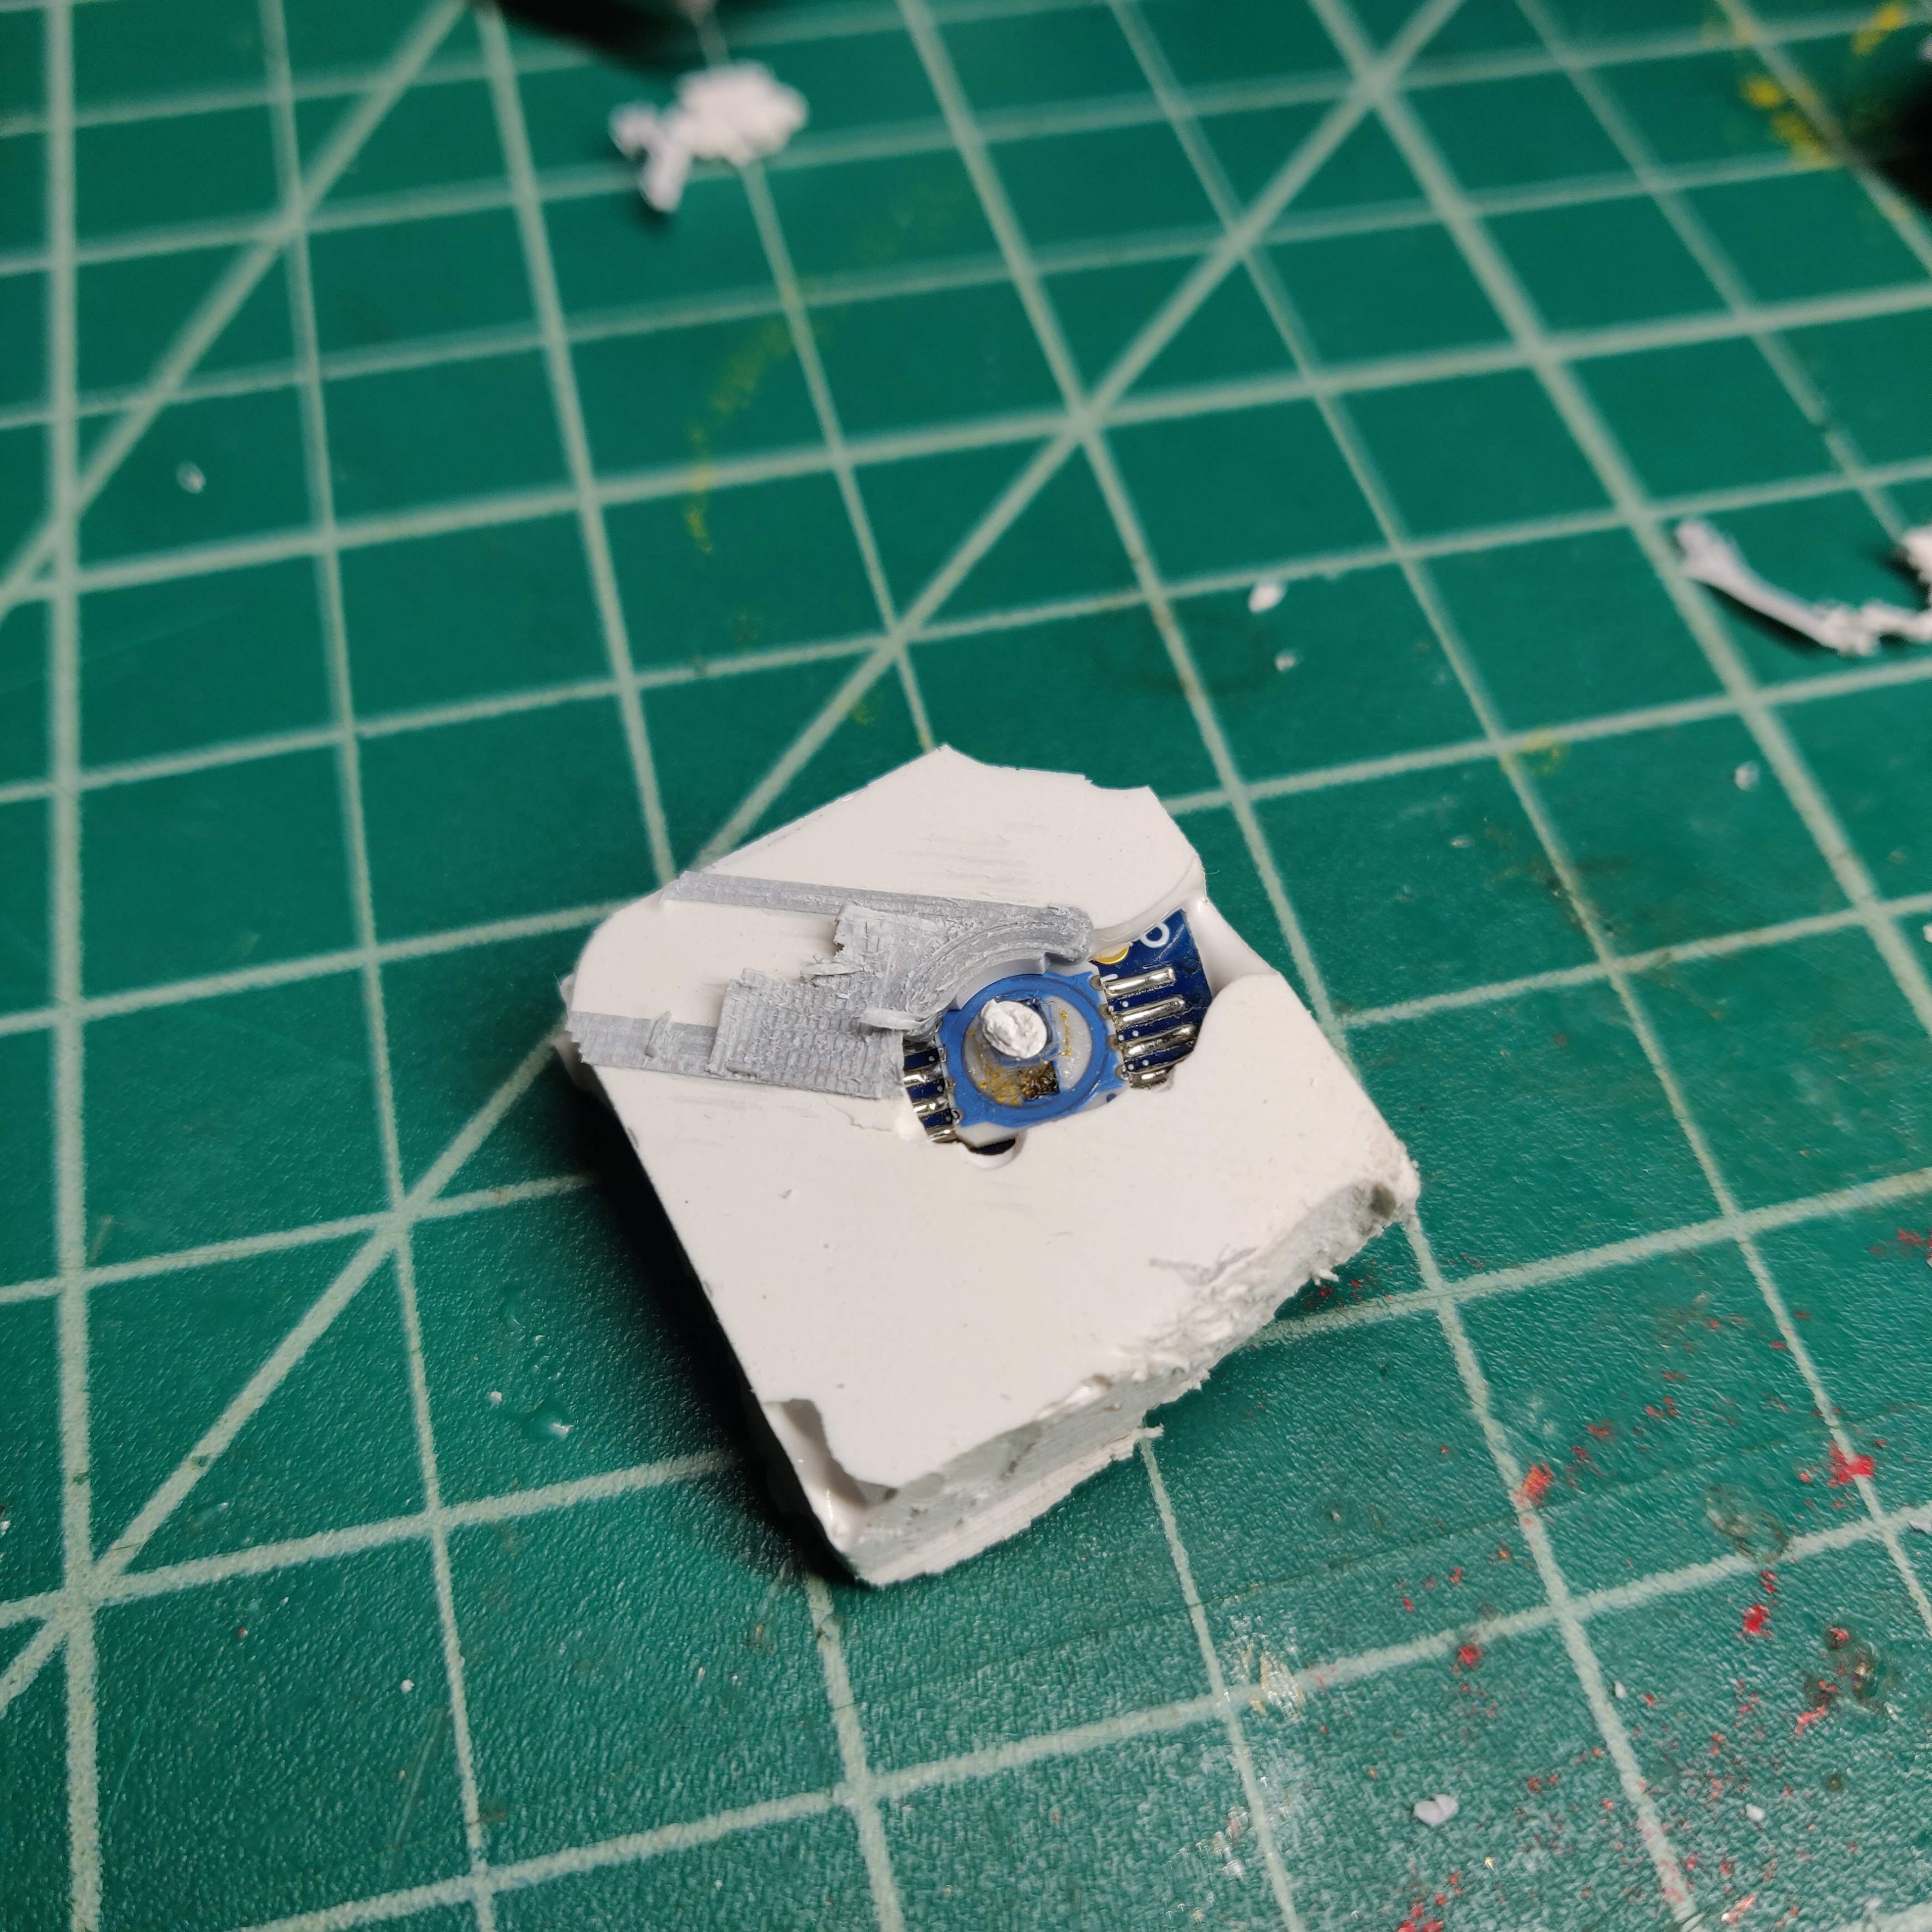
JB Weld MarineWeld is appealing because it's pretty inexpensive, easy to find, and easy to work with. Unfortunately, it turns out that it's just too viscous to e reach all the voids I need it to.
I did a test potting this week to see if MarineWeld could work in a pinch, but, as you can see, it left several voids under the pressure sensor that could contact seawater. And when we cut it open, it leaves a huge void around the sensor. Glad we sacrificed this one to get a look at the inside.
For the last several years I've been working with the Friends of the Mariana Trench to campaign on expanding the Mariana Trench Marine National Monument and creating a National Marine Sanctuary around the deepest feature in our ocean. As part of that effort, I've been working with a high school senior in Saipan to develop their senior project. Which means that the very first OpenCTD kit will be heading out to the Commonwealth of the Northern Mariana Islands next week, where it will be used to sample (the first 100 meters of) the Marianas Trench.
Shipping equipment to Saipan isn't easy, so I've spent the last few weeks making sure we have absolutely everything they'll need to build their own CTD. Any missing part means week of delay.
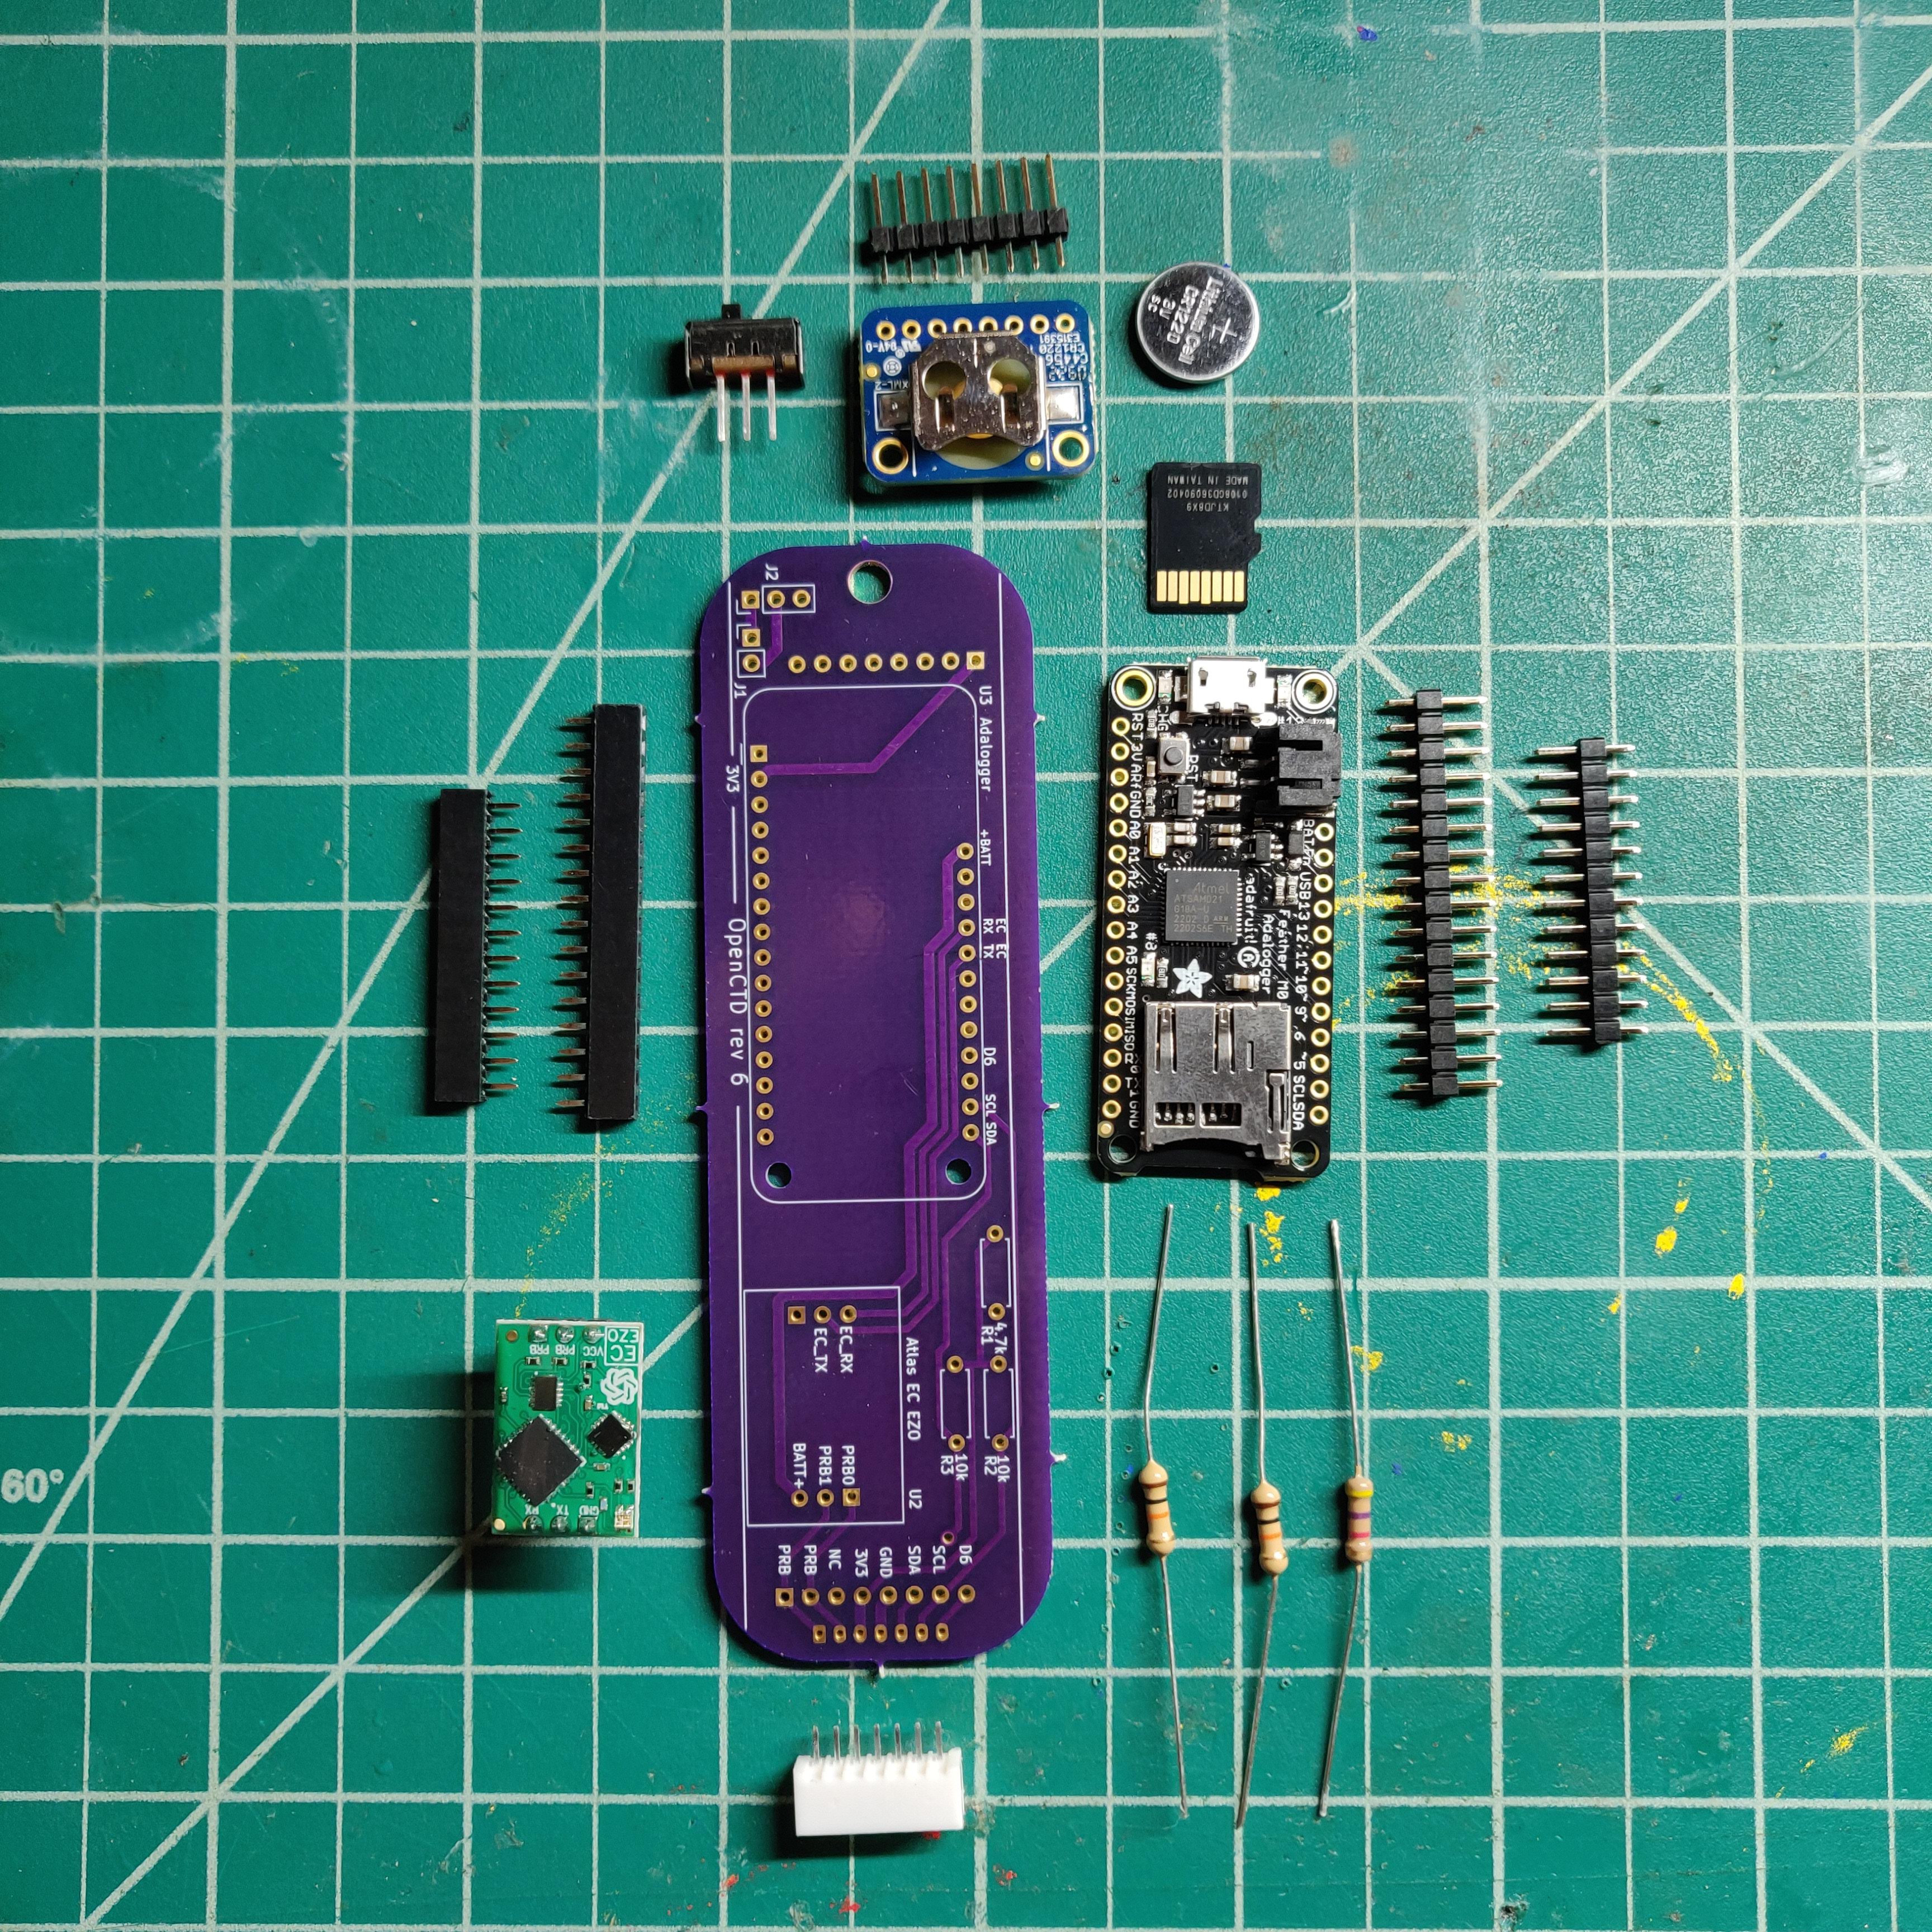
This morning, I went through everything we need to build the brain, including tools and consumables. This includes the custom PCB, headers, an Adalogger M0, real-time clock, conductivity module, a few resistors, a board mounted switch, SD card, and coin cell battery. A larger battery will be mounted to the board later, but I like to save that for the very last step before calibrating to minimize the amount of time a lipoly battery spends near a hot soldering iron.
Since we used a custom PCB, the brain is probably the easiest part of the entire build. There's a spot for each component and only one way to put it all together. But it took us a long time to
The goal of the OpenCTD student workshop is to provide high school or university students with a foundation in practical conservation technology by constructing an open-source oceanographic instrument. During this workshop, students will learn how to solder, build waterproof enclosures, code in the Arduino IDE, read data from and calibrate environmental sensors, and analyze environmental data produced from a scientific instrument that they built. Advanced students can expand upon the base OpenCTD, adding their own software, hardware, and sensors to customize the OpenCTD for their own needs.
Day 1 – construction of the sensor package, housing, and control unit
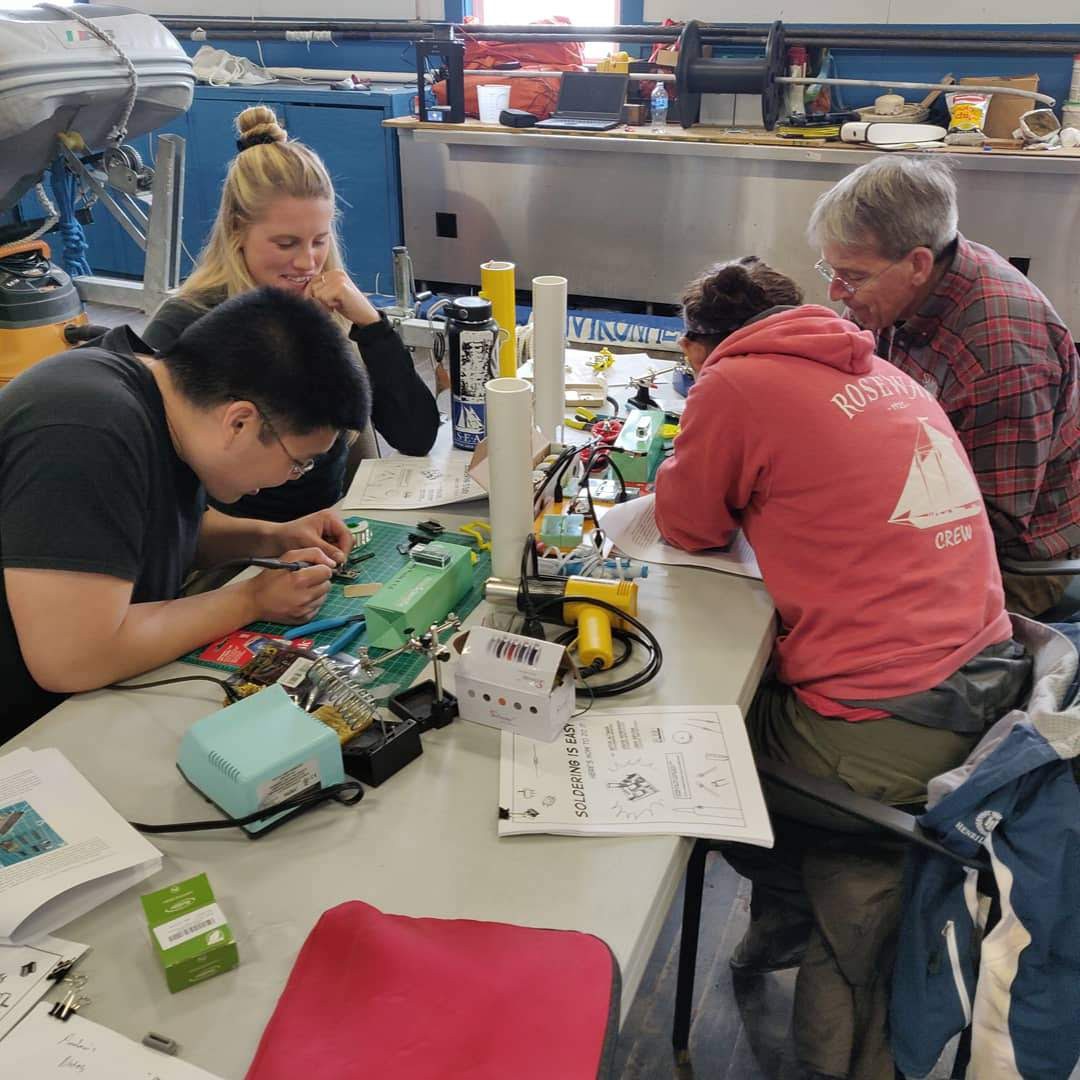
On the first day of the workshop, students will receive an introduction to the OpenCTD and, depending on access to an appropriate field site, have a change to see a completed OpenCTD in action and conduct an initial deployment. They will receive an introduction to solder and safe soldering practices. Students will then assemble the control unit of the OpenCTD, upload the Arduino software to the device, and confirm that the control unit is functioning properly. Students will also assemble the OpenCTD sensor package, building an array of three sensors to measure conductivity, temperature, and depth. Once the sensor package is tested in conjunction with the control unit, students will seal the sensors into a waterproof housing.
The epoxy used for potting the OpenCTD must cure for 24 hours before being submerged. Day 1 takes approximately six hours, depending on student experience.
Day 2 – completion of the CTD build, software programming and calibration, and wet test
On the second day, students will complete any tasks left incomplete from the first day. They will then complete the physical CTD build by installing the power supply, painting or otherwise decorating the housing, and installing deployment hardware. Once complete, students will review the OpenCTD source code and make any changes to the code to suite their particular use case. Students will then calibrate the temperature and conductivity sensors using standardized calibration solution and known temperatures. If sufficient time has passed, students will perform a wet test of the CTD housing, deploying the unit to 15 meters of depth without electronic components installed, to check for any leakage.
Day 2 takes approximately 4 hours, depending on student experience.
Day 3 – field expedition, data analysis, and data management
The third day is the capstone day for students. Depending on site availability, student will design a sampling regime to test hypotheses about their local waterways and then deploy their OpenCTD at those sampling sites. Students will then return to the classroom to analyze OpenCTD data using a pre-developed Excel spreadsheet that performs the necessary calculations to turn the raw CTD data into human-readable values. More advanced students can work through the underlying mathematics and develop their own R-code (or other common data-handling coding environments) to analyze data.
Students will then be introduced to ArcGIS Storymaps and given an opportunity to create a public-facing document of their data collection.
The timing of day 3 is highly dependent on availability of field sites and the complexity of the student’s sampling and analysis regime.
Alternative workflows
While the OpenCTD workshop is designed to be conducted over the course of three-days, each step of the build process has been compartmentalized into 45-minute to 1-hour units, so that the build process can be stretched out over several weeks if a 3-day block of time is not available. With advanced students who are already familiar with environmental sensing, coding, and soldering, an OpenCTD can be built in as little as 6 hours over two days.
Outcomes
At the conclusion of the workshop, students will have a firm understanding of environmental sensing as well as a suite of practical skills that are transferable to a variety of different disciplines and will have constructed their own oceanographic instrument which they can used for future student projects or as a component of a larger oceanographic or environmental science program.
The control unit is the brain of the OpenCTD. It's also the most vulnerable part. For the last two years, we've had volunteer naturalists deploy prototype OpenCTD during whale watching expeditions in order to help us streamline the end-user experience, provide feedback on the design, and find increasingly more creative ways to break the CTD.
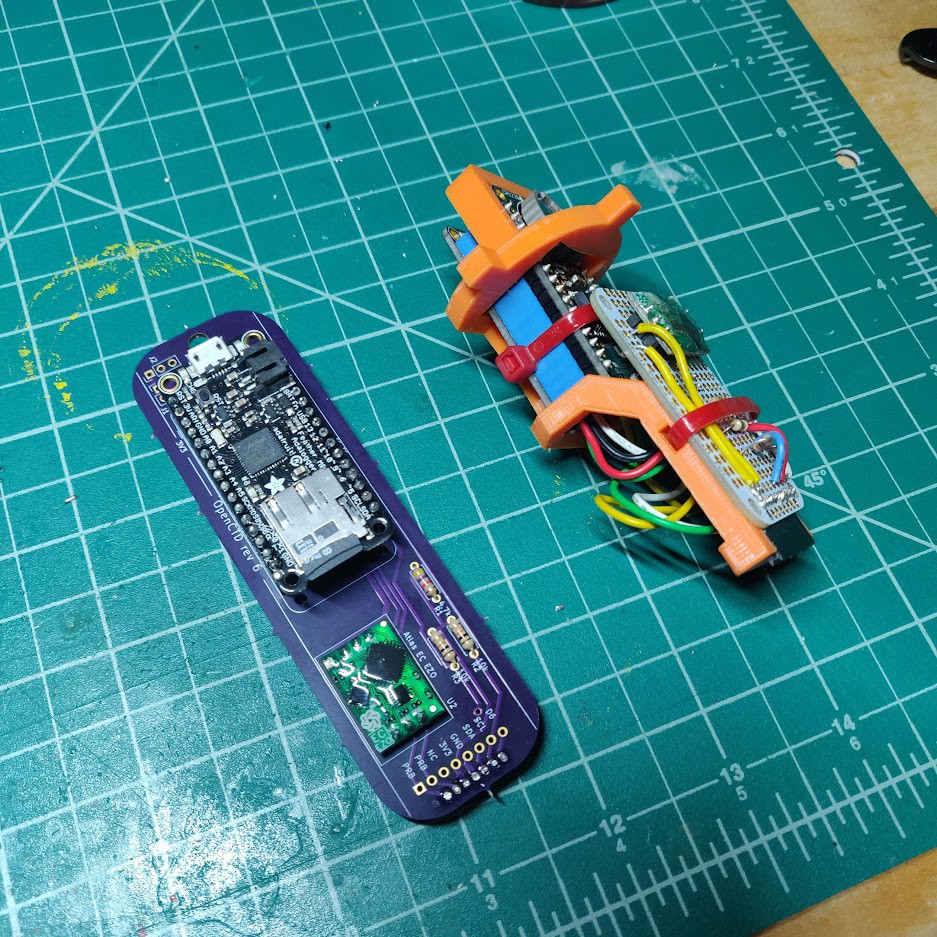
From that, we've evolved from a DIY control unit built into a small protoboard to a custom PCB, protected in a 3D printed shell that isolates the battery, keeps small leaks away from the precious electronics, and makes the entire system a little bit easier access.
The DIY control board, on the right, compared to the custom PCB control board, left.
But this presents a new problem. One of our missions is to minimize the number of custom parts in order to make the build as accessible to as many people as possible. The end result is that we now maintain two build pathways, one using a custom board, which is cheaper, faster, easier, and more reliable, and one using the old protoboard, which is available if you can't get a custom PCB.
Although, to be fair, at this point if you want to build an OpenCTD and provide feedback, I'll just mail you a board.
The OpenCTD has been on whirlwind of development over the last few years. Thanks to support from the Bureau of Ocean Energy Management, the National Marine Sanctuaries Foundation, and Patreon, we've be pushing hard to turn this DIY project into something durable, reliable, accurate, and inexpensive. The end result is Rev6 of the OpenCTD.
The new OpenCTD can be built in less than a day by experienced makers. But if you've never touched a soldering iron, you can still make a CTD over a long weekend. And despite a truly wild supply chain over the last 2 years, you can still build one for about $350.
And here's where we need you help: The OpenCTD has been a DIY project since its inception, but more and more school and university programs are asking for something to take the guesswork out of sourcing parts and standardizing OpenCTD assembly. In short, we need a kit, that people can buy and be guaranteed that they have everything they need to make their own CTD. We're testing workflows, creating and trialing a syllabus, and figuring out what needs to be assembled in advance to maximize the learning potential of an OpenCTD kit while working within the time constraints of an education program.
And that's what we need from the Hackaday Prize: expertise to get us from a program that has built and deployed CTDs around the world to one that can better assist ocean-loving communities to build their own standardized CTD that they can trust to collect oceanographic data.
 andrew.david.thaler
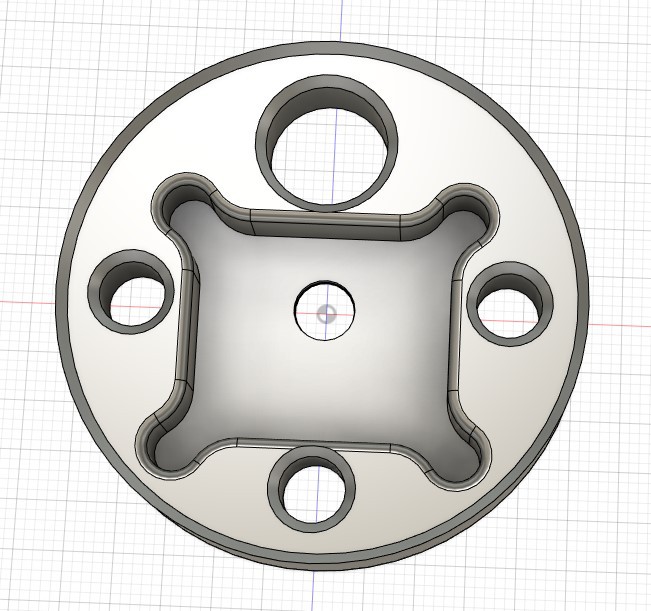


 I did a test potting this week to see if MarineWeld could work in a pinch, but, as you can see, it left several voids under the pressure sensor that could contact seawater.
 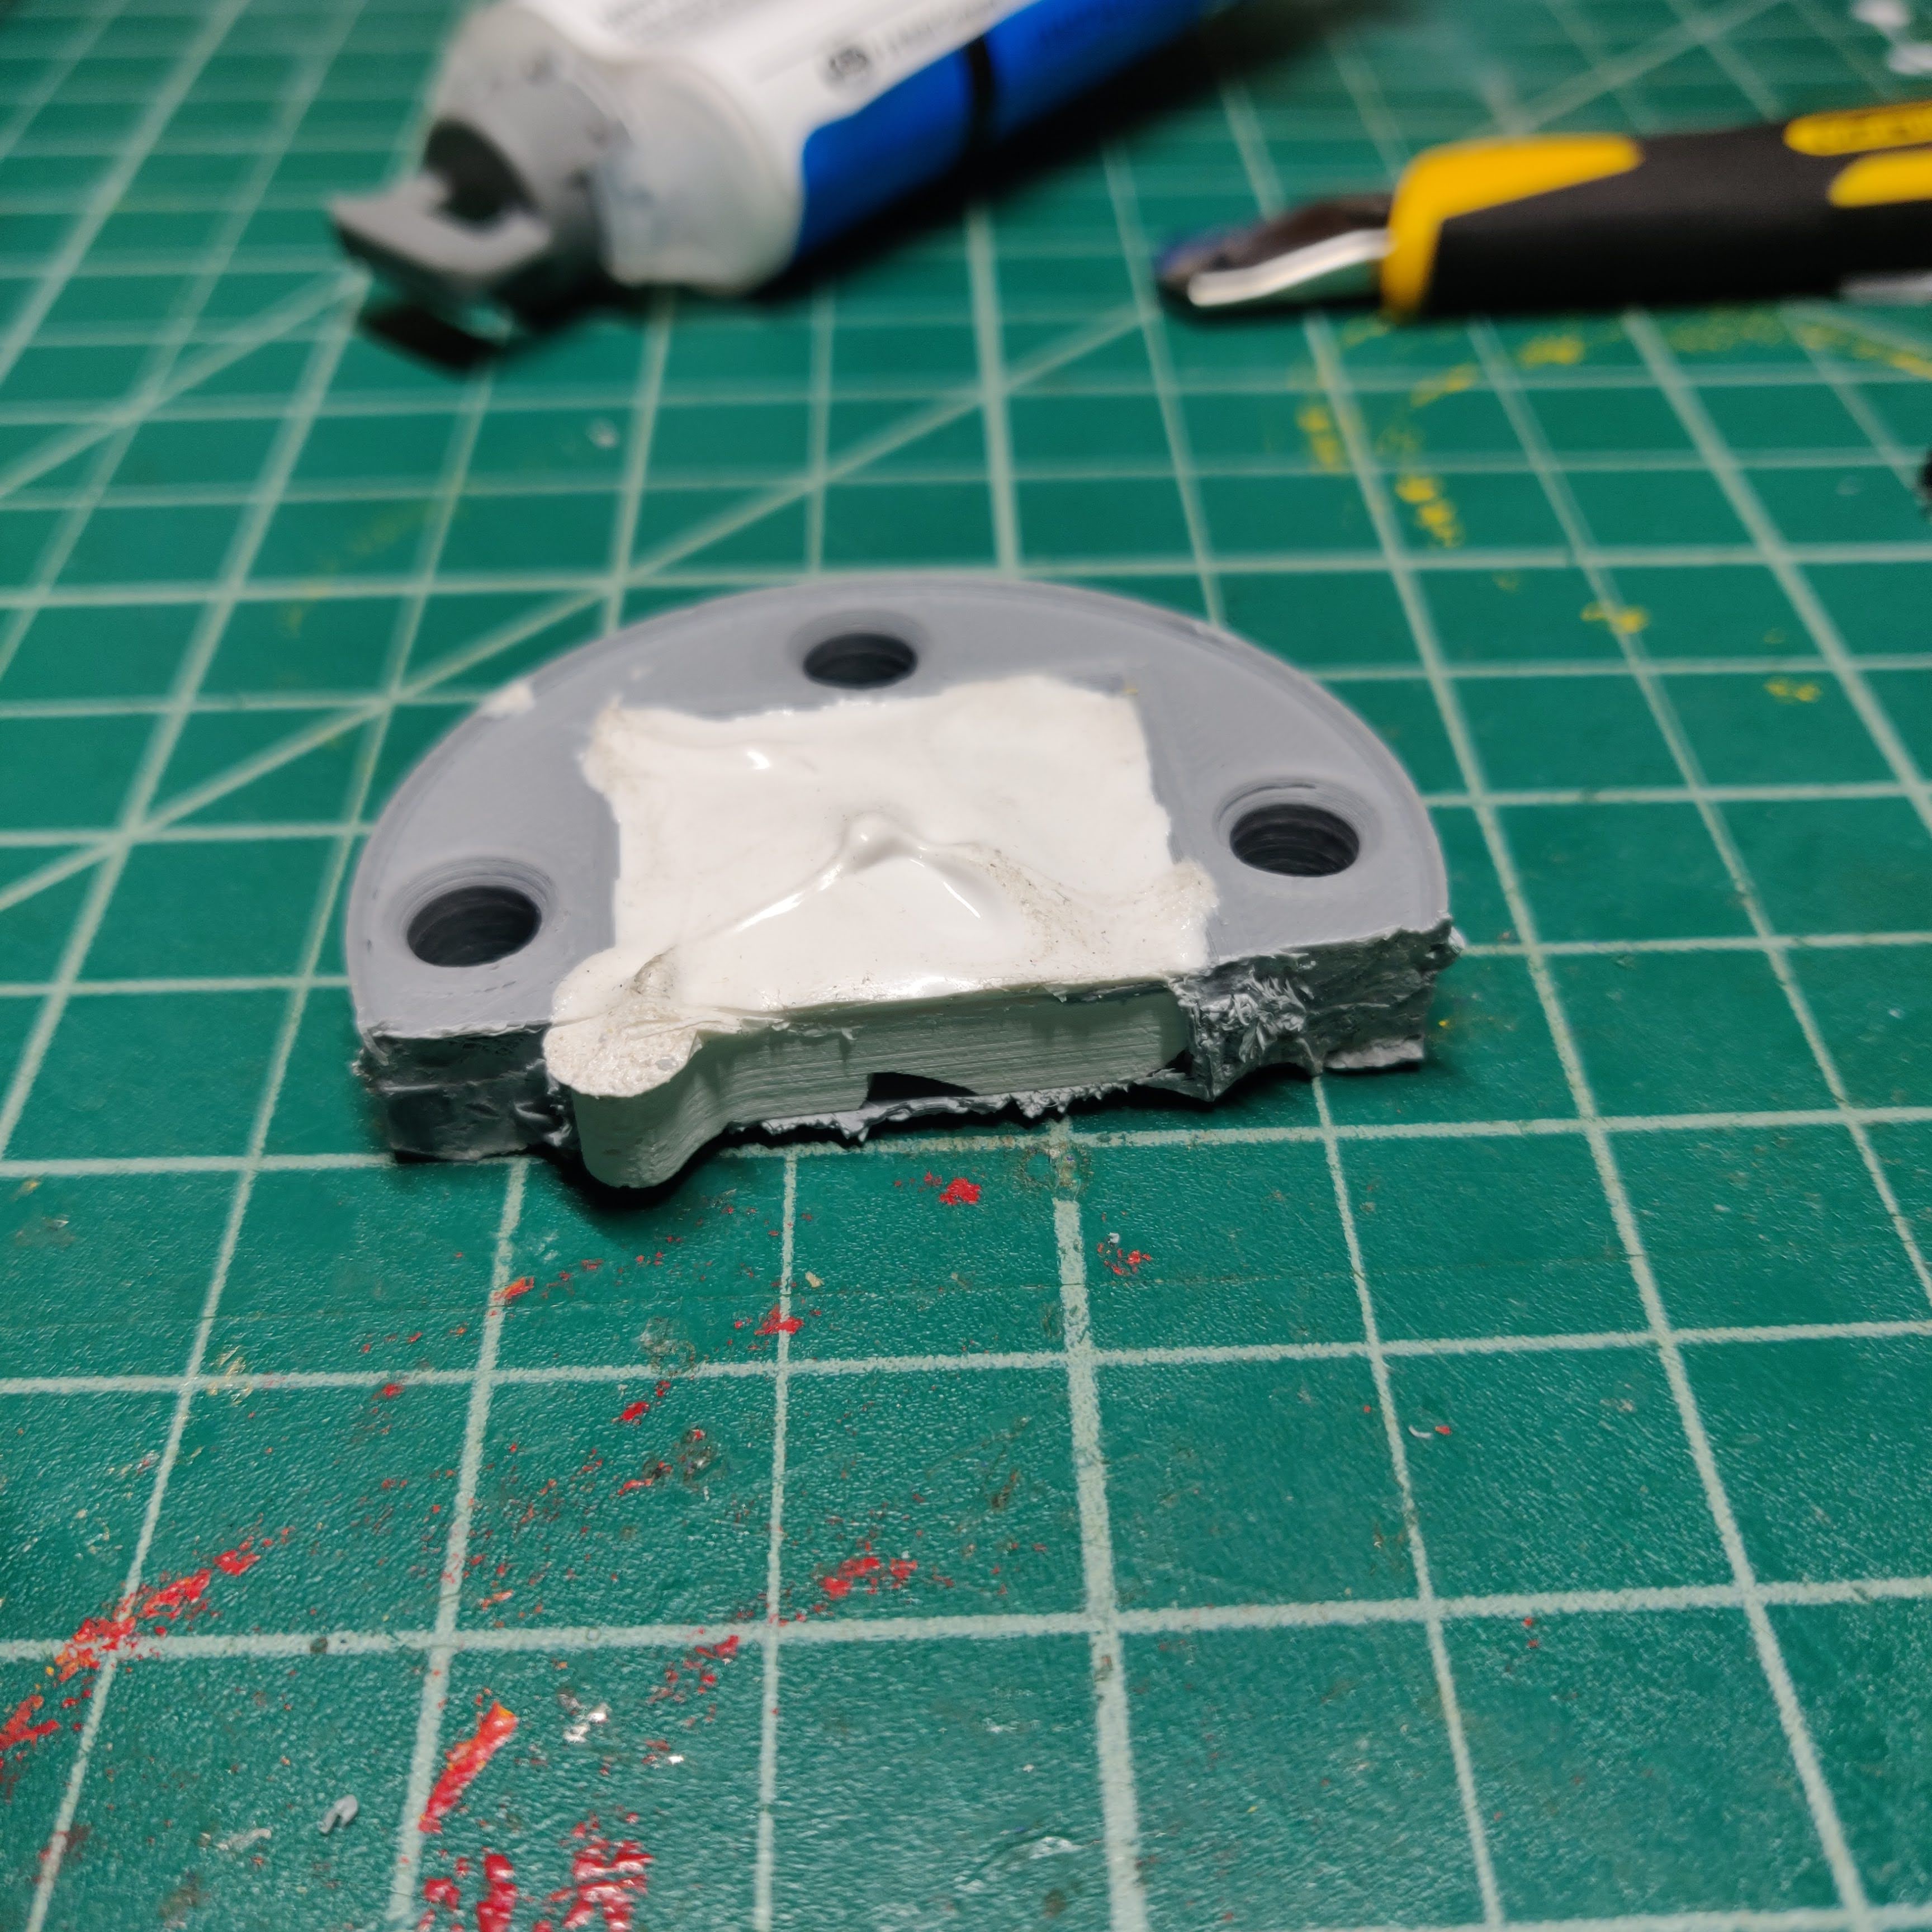 And when we cut it open, it leaves a huge void around the sensor. Glad we sacrificed this one to get a look at the inside.