 EmericB
-
1Create the database and a table to store the collected data.
For readers looking to test the project with a MySQL database without incurring any costs, there are several free MySQL database hosting services available. These services typically offer a limited amount of resources for free, but it will perfect for testing.
Here are a few options where you can find a free MySQL database hosting plan:
000Webhost - Offers a free web hosting package that includes MySQL database support. It's a good starting point for beginners to test their projects with PHP and MySQL.
InfinityFree - Another free hosting service that provides MySQL databases with its free plan. InfinityFree is known for having no ads and offers unlimited hosting, albeit with some limitations on usage.
Freemysqlhosting.net - Offers a free MySQL hosting plan that includes a database with 5MB of storage. But be sure that even with only 5MB of storage you will have enough storage to test Lean-C IOT.
These free services are great for learning, testing, and small projects, but for more significant development work or production environments, you may eventually need to look into paid hosting plans that offer more resources and better reliability.
![]()
In this project we’ll use phpMyAdmin, the free and open-source administration tool for MySQL and MariaDB.As a portable web application written primarily in PHP, it has become one of the most popular MySQL administration tools, especially for web hosting services.
phpMyAdmin provides a user-friendly web interface to manage databases, tables, columns, relations, indexes, users, permissions, and much more.
Through this interface, you can perform various tasks such as executing SQL statements, managing database keys, and exporting data to various formats.
It simplifies the management of MySQL over the web by allowing us to easily create, modify, or delete databases; execute SQL statements; and manage users and permissions.
So first step, we are going to create a testing a MySQL database insert a simple table using phpMyAdmin.
-
2Create Your MySQL Database
The first step is to set up a MySQL database. If you're using a web hosting service that provides phpMyAdmin, you can log into the phpMyAdmin interface from your hosting control panel.
Once you have your MySQL server set up and running, access phpMyAdmin.
In phpMyAdmin, you can create a new database by clicking on the "Databases" tab and entering a name for your database. After specifying the name, click the "Create" button.
-
3Create the ACTIVITY Table
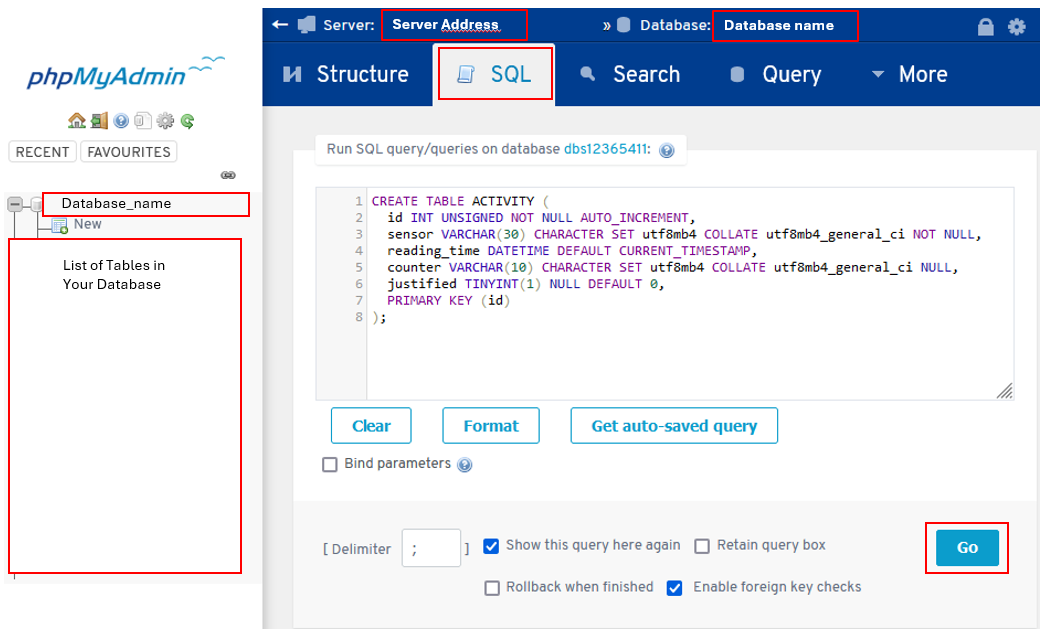
After creating your database, you need to create a table to store your testing data. To do this easily:
- Select your newly created database from the left pane to open it.
- Click on “SQL” in the top menu.
- Paste the following code into the SQL command text area:
![]()
CREATE TABLE ACTIVITY (
  id INT UNSIGNED NOT NULL AUTO_INCREMENT,
  sensor VARCHAR(30) CHARACTER SET utf8mb4 COLLATE utf8mb4_general_ci NOT NULL,
  reading_time DATETIME DEFAULT CURRENT_TIMESTAMP,
  counter VARCHAR(10) CHARACTER SET utf8mb4 COLLATE utf8mb4_general_ci NULL,
  justified TINYINT(1) NULL DEFAULT 0,
  PRIMARY KEY (id)
);
This table, named ACTIVITY, tracks sensor activities with fields for a unique ID, sensor name, reading time, counter value, and a boolean for justification. The id serves as the primary key and auto-increments. Sensor names are stored as strings, reading_time auto-records the current timestamp, counter is a nullable string, and justified is a boolean defaulting to 0, indicating false.
-
4INSERT and UPDATE Data in the Database Using POST Method.
![]()
Currently, we have a database with an empty table 'ACTIVITY'.
A crucial step in our project is to create a PHP page that utilizes the POST method to save data sent from our sensors.
For this project, we will create two pages:
- The first (post_sensor.php) will be used to insert new records. Specifically, each sensor will automatically send the count of items detected by its infrared beam, typically on a per-minute basis.
- The second page (update_sensor.php) will enable us to easily update an existing record in the database.
To do this, you can use the text editor of your choice, such as Atom or Notepad (on Windows).
For informational purposes, to aid in understanding the PHP page code we will discuss, note that our ESP32 program will send two pieces of information: the sensor's name and the number of objects detected over a 1-minute period.
The recording time will be automatically filled in by the database upon insertion. The 'justified' column is a boolean (0 or 1) that is also automatically filled in. We will discuss its purpose later on.
The 'ACTIVITY' table is designed to be simple. Advanced functionalities (such as detecting stops, restarts, slowdowns, and much more) will be achieved through dedicated SQL queries.
Generally, the table structure holding the information should be streamlined to ensure: fluidity and maintainability.
-
5post_sensor.php
Note: The code is intended to be instructional, and the examples provided will be commented on in as much detail as possible. Your feedback is welcome. Lean-C IOT remains an evolving software solution with much room for improvement!
<?php /* This page is used to insert a new record into the database. */ // Connection parameters // Often labeled as "MySQL server" or "Database server" in the hosting dashboard. $servername = 'the server where your database is hosted'; //When you created the database, you gave it a name, and that is what you should use here. $dbname = 'the name of the database'; // Ensure that this user has the necessary permissions to perform actions on the database. $username = 'your username'; // You have set this password when you created the database user. $password = 'your password'; // This key serves as a unique identifier to authenticate your ESP32 board. // For enhanced security, it's advisable to modify this key. Remember, if you make changes to this key, you must also update it in the second PHP page and the ESP32 program. $api_key_value = "YkYnyx93z3LFYFiX"; // Initializing variables as empty strings for later sanitizing and validating datas. $api_key = $sensor = $counter = ""; // Check if the incoming HTTP request method is a POST method. if ($_SERVER["REQUEST_METHOD"] == "POST") { //Function used to clean and validate input data. $api_key = test_input($_POST["api_key"]); if($api_key == $api_key_value) { $sensor = test_input($_POST["sensor"]); $counter = test_input($_POST["counter"]); // Declaring the connection to the server $conn = new mysqli($servername, $username, $password, $dbname); // Checking the database connection if ($conn->connect_error) { die("Connection failed: " . $conn->connect_error); } // Creating the SQL query $sql = "INSERT INTO ACTIVITY (sensor, counter) VALUES ('" . $sensor . "', '" . $counter . "')"; // Executing the SQL query if ($conn->query($sql) === TRUE) { echo "A new record has been created successfully."; } else { echo "Error: " . $sql . "<br>" . $conn->error; } $conn->close(); } else { echo "Incorrect API key provided."; } } else { echo "No data has been posted via HTTP POST."; } // Defines a function named 'test_input' that takes a single argument '$data'. function test_input($data) { // Removes whitespace from the beginning and end of the string. $data = trim($data); // Removes backslashes from the string to prevent escape sequencing. $data = stripslashes($data); // Converts special characters to HTML entities to prevent HTML injection. $data = htmlspecialchars($data); // Returns the sanitized string. return $data; } ?> -
6update_sensor.php
Note: This page is used when the counter value remains unchanged for more than 2 occurrences (2 cosecutives HTTP posts with the same values of counter).
In this situation, the ESP32 program - instead of creating a new line in the database - updates the reading time of the last record.
This improves readability and helps reduce the size of the database.<?php /* This page is used to update a existing record into the database. Emeric B */ // Connection parameters // Often labeled as "MySQL server" or "Database server" in the hosting dashboard. $servername = 'the server where your database is hosted'; //When you created the database, you gave it a name, and that is what you should use here. $dbname = 'the name of the database'; // Ensure that this user has the necessary permissions to perform actions on the database. $username = 'your username'; // You have set this password when you created the database user. $password = 'your password'; // This key serves as a unique identifier to authenticate your ESP32 board. // For enhanced security, it's advisable to modify this key. Remember, if you make changes to this key, you must also update it in the second PHP page and the ESP32 program. $api_key_value = "YkYnyx93z3LFYFiX"; // Initializing variables as empty strings for later sanitizing and validating datas. $api_key = $sensor = $counter = ""; // Check if the incoming HTTP request method is a POST method. if ($_SERVER["REQUEST_METHOD"] == "POST") { $api_key = test_input($_POST["api_key"]); if($api_key == $api_key_value) { $sensor = test_input($_POST["sensor"]); $counter = test_input($_POST["counter"]); // Declaring the connection to the server $conn = new mysqli($servername, $username, $password, $dbname); // Checking the database connection if ($conn->connect_error) { die("Connection failed: " . $conn->connect_error); } // Query to update the reading_time of the last record using CURRENT_TIMESTAMP, which returns the current date and time. $sql = "UPDATE ACTIVITY SET reading_time = CURRENT_TIMESTAMP WHERE sensor = '" . $sensor . "' ORDER BY reading_time DESC LIMIT 1"; if ($conn->query($sql) === TRUE) { echo "The last record has been successfully updated."; } else { echo "Error: " . $sql . "<br>" . $conn->error; } $conn->close(); } else { echo "Incorrect API key provided."; } } else { echo "No data has been posted via HTTP POST."; } // Defines a function named 'test_input' that takes a single argument '$data'. function test_input($data) { // Removes whitespace from the beginning and end of the string. $data = trim($data); // Removes backslashes from the string to prevent escape sequencing $data = stripslashes($data); // Converts special characters to HTML entities to prevent HTML injection. $data = htmlspecialchars($data); // Returns the sanitized string. return $data; } ?> -
7Uploading the two PHP files to your web server
It's now time to take an important step in your project: uploading the two PHP files you've created to your web server. This step is accomplished using the FTP (File Transfer Protocol), a standard network protocol used for the transfer of computer files from a client to a server on a computer network.
Here's why it's crucial:
Noting the Complete URL of Each File: After uploading these files, it's imperative to note the complete URL for each of them. These URLs are the web addresses where your PHP files are accessible after being uploaded. For example, if your website is http://www.example.com and you upload your PHP files to a folder named /LeanC, the URL to one of your PHP files might look something like https://www.example.com/LeanC/update_sensor.php
Why This Matters: In the next part of the project, when you're coding the ESP32 program, you will need to use these URLs. The ESP32 will send data to your PHP scripts located at these URLs. Ensuring you have the correct URLs is crucial for the successful communication between your ESP32 device and the server where your PHP files reside.
Steps to Upload:
- FTP Client: Use an FTP client (software that allows you to manage files on a server). Some popular FTP clients include FileZilla, WinSCP, and Cyberduck.
- Connect to Your Server: Open your FTP client and enter your server's FTP address, your username, and password to connect.
- Upload Files: Navigate to the directory where you want to upload your PHP files. Then, drag and drop your files from your local computer to the server.
Remember, this step is essential for the practical implementation of your project, allowing your ESP32 to interact with your database through the PHP scripts. Take the time to ensure that the URLs are correctly noted and accessible, setting the stage for the next phase of your project.
-
8Coding the ESP32 program ! with Arduino IDE or Visual Studio Code
We're moving on to an exciting phase of our project—coding the ESP32 program. The ESP32 is a versatile microcontroller that's particularly well-suited for networking and wireless purposes, which makes it perfect for our goal: to store and transmit data collected by an infrared sensor. Infrared sensors are widely used in factory production lines due to their reliability and precision in detecting objects and movements.
For writing and uploading the program to the ESP32, you can utilize the Arduino IDE or Visual Studio Code (VS Code)—two of the most popular development environments for this purpose. Both are user-friendly and support a wide range of libraries and boards, including the ESP32.
Before you start coding, it's important to set up your development environment correctly. If you choose the Arduino IDE, you'll need to install the Espressif Systems extension for Arduino, which will add support for ESP32 boards. For those opting for VS Code, you'll need to install the PlatformIO extension, which also supports the ESP32 and simplifies the process of compiling and uploading your programs.
This preparation ensures that you have all the necessary tools and libraries to create an efficient program for your infrared sensor data collection and communication. With your environment set up, you'll be ready to dive into the programming aspect of your IoT project.
-
9Source Code of the ESP32 Control Program
Note: The code is intentionally heavily commented to provide maximum assistance to those who wish it. You can also download the files (with fewer comments) from my GitHub.
// Enable WiFi connectivity and secure communication over the internet
#include <WiFi.h>
#include <WiFiClientSecure.h>
#include <HTTPClient.h>

//The pin number 33 on the ESP32 is being designated for use with your sensor
#define SENSOR 33

// The counter is initialized to zero when the ESP32 is powered on.
volatile int ObjectsCounter = 0;
volatile bool previousStateHigh = true;

// LastValue & PreviousToLastVal allow us to keep in local memory the last two counter values sent to the database.
// If they are different, then a new record is inserted. If they are identical, then the reading_time of the last recorded value in the database is updated.
// Thus, a production stop is systematically represented, regardless of its duration (2 minutes or a weekend) by two lines in the database.
// This will simplify the management of the system to determine the duration of each stop.
// At the same time, it limits the size of the database.
int LastValue = 0;
int PreviousToLastVal = 0;

WiFiClientSecure client;
// Currently, I have not yet succeeded in utilizing WPA-2 and WPA-3 Enterprise functions.
// Your help is welcome !
// Enter your SSID and the associated password.
const char* ssid = "Enter your SSID";
const char* password = "Enter the associated password";

// url of the Php page to insert a new record into the database.
const char* serverNameNew = "https://www.example.com/LeanC/post_sensor.php";

// url of the Php page to update a existing record into the database.
const char* serverNameUpdate = "https://www.example.com/LeanC/update_sensor.php";

// The API key (Application Programming Interface Key) is used to authenticate the device - in this case, the ESP32 board - making the request to the server.
// This allows the server to verify that the request comes from an authorized source.
// To improve the security of your development, please replace the value of 'apiKeyValue' here as well as in the PHP pages.
String apiKeyValue = "YkYnyx93z3LFYFiX";

// In the context of a system containing several sensors, it is necessary that this value be unique (unique key conflict).
String st_sensor = "DEMO SENSOR";

// These lines declare variables :
// - TaskCounting for counting operations
// - TaskSending for data sending operations
// The use of tasks in this code allows for the counting and sending of data to be executed in parallel without interruption.
TaskHandle_t TaskCounting;
TaskHandle_t TaskSending;

void setup() {
  Serial.begin(9600);
  // To detect a change in state on PIN 33
  pinMode(SENSOR, INPUT_PULLUP);

  // Bypass the verification of the server's SSL certificate (in the next version we could increase security by hashing the API key).
  client.setInsecure();

  // Creates a new tasks. This function is part of the FreeRTOS operating system, allowing for multitasking.
  xTaskCreate(
    countTask, "countTask", 10000, NULL, 2, &TaskCounting);
    xTaskCreate(
      SendingDataTask, "SendingDataTask", 10000, NULL, 1, &TaskSending);
    }

    void loop() {
      // The main loop is empty in a multitasking configuration.
    }

    void countTask(void *pvParameters) {
      // Infinite loop to continuously check the sensor state.
      for (;;) {
        // Reads the current state of the sensor (HIGH or LOW).
        int CurrentStateSensor = digitalRead(SENSOR);

        // This indicates the end of an object passing by the sensor.
        if (previousStateHigh && CurrentStateSensor == LOW) {
          // Sets the flag to false indicating the sensor state transitioned from HIGH to LOW.
          previousStateHigh = false;

          // This indicates the beginning of an object passing by the sensor.
        } else if (!previousStateHigh && CurrentStateSensor == HIGH) {

          // Increments the object counter as a new object is detected.
          ObjectsCounter++;

          // Prints the current object count to the serial port for debugging.
          Serial.println(ObjectsCounter);

          // Sets the flag to true indicating the sensor state transitioned from LOW to HIGH.
          previousStateHigh = true;
        }
        // The delay value needs to be adapted to your situation. The goal is to detect all objects without counting the same object multiple times.
        // In my case, I aim to detect objects measuring 13 cm at a pace of 400 objects per minute.
        // A delay of 150 milliseconds would be sufficient (400/60 objects per second).
        // Furthermore the control loop checking the LOW/HIGH/LOW sequence ensures that an object is only counted once.
        // It allows me to reduce it to 10 milliseconds without risk.
        delay(10);
      }
    }

    void SendingDataTask(void *pvParameters) {
      // Infinite loop to continuously check the sensor state.
      for (;;) {
        // Checks if the device is not connected to WiFi.
        if (WiFi.status() != WL_CONNECTED) {
          // Prints a message to the serial monitor indicating it's trying to reconnect to WiFi.
          Serial.println("Reconnecting to WiFi...");
          // Initiates connection to WiFi with the provided SSID and password.
          WiFi.begin(ssid, password);
          // Stores the current time to limit the connection attempt duration.
          unsigned long startTime = millis();
          // Keeps trying to connect to WiFi for up to 5 seconds.
          while (WiFi.status() != WL_CONNECTED && millis() - startTime < 5000) {
            // Pauses the loop for 500 milliseconds to prevent flooding the connection attempts.
            delay(500);
            // Prints a dot to the serial monitor for each attempt, providing a visual feedback.
            Serial.print(".");
          }
          // Checks if, after 5 seconds, the device is still not connected to WiFi.
          if (WiFi.status() != WL_CONNECTED) {
            // Prints a message to the serial monitor indicating failure to connect to WiFi.
            Serial.println("Failed to connect to WiFi");
            // Delays the next connection attempt for 10 seconds to avoid continuous immediate retries.
            vTaskDelay(10000 / portTICK_PERIOD_MS);
            continue;
          }
        }

        // Check if the counter is stuck on the same value before sending.
        // In this case, we consider that the flow of the production line has stopped.
        if (ObjectsCounter == LastValue && ObjectsCounter == PreviousToLastVal) {
          Serial.println("Counter stuck, updating the last record...");

          // Creates an HTTPClient object for making HTTPS requests (to update the last record linked to this sensor).
          HTTPClient httpsUpdate;
          httpsUpdate.begin(client, serverNameUpdate);
          httpsUpdate.addHeader("Content-Type", "application/x-www-form-urlencoded");

          // Prepares the data to be sent in the HTTP request.
          String httpRequestData = "api_key=" + apiKeyValue + "&sensor=" + st_sensor;

          // Sends the POST request and stores the HTTP response code.
          int httpResponseCode = httpsUpdate.POST(httpRequestData);

          // Checks if the response code is positive, indicating success.
          if (httpResponseCode > 0) {
            Serial.println("Last record updated successfully.");
          } else {
            // Prints an error message along with the response code
            Serial.println("Error, update impossible. : " + String(httpResponseCode));
          }

          httpsUpdate.end();
        } else {
          // Prints a message indicating connection to WiFi and data is being sent.
          Serial.println("Connected to WiFi, sending data...");

          // Creates an HTTPClient object for making HTTPS requests (to insert a new record for this sensor).
          HTTPClient https;
          https.begin(client, serverNameNew);
          https.addHeader("Content-Type", "application/x-www-form-urlencoded");

          // Prepares the data including the counter value this time.
          String httpRequestData = "api_key=" + apiKeyValue + "&sensor=" + st_sensor + "&counter=" + String(ObjectsCounter);

          // Sends the POST request and stores the HTTP response code.
          int httpResponseCode = https.POST(httpRequestData);

          // Checks if the response code is positive, indicating success.
          if (httpResponseCode > 0) {
            Serial.println("Data sent successfully");
          } else {
            // Prints an error message along with the response code
            Serial.println("Error in sending data: " + String(httpResponseCode));
          }

          https.end();

          // Updating the counter values
          PreviousToLastVal = LastValue;
          LastValue = ObjectsCounter;
        }

        // Sending data every minute
        vTaskDelay(60000 / portTICK_PERIOD_MS);
      }
    }
Once you've finished customizing the code with your details (SSID, password, APIKey, sensor name, URLs of your pages), the next step is to upload the code from the Arduino IDE or VSCode.
What's next? Let's take a break from the screen and move over to the workshop. It's the perfect moment to connect our sensor to the ESP32! Truly, it's fairly straightforward – connect the ground, power (5V), and the signal to PIN 33.
-
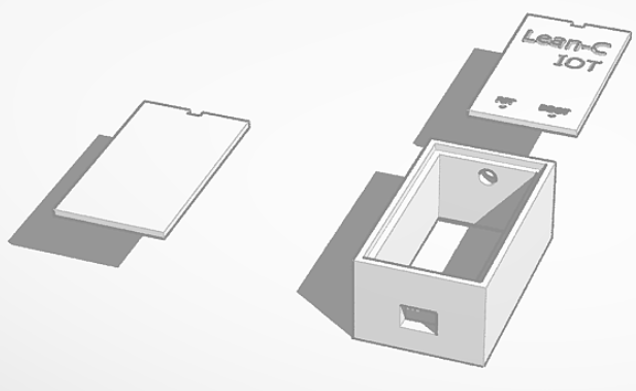
103D-printed casing to protect our ESP32 board
![]()
Before we dive into the hands-on part, it might be beneficial to consider making a 3D-printed casing to protect our ESP32 board. In the downloads section, you'll find the STL file for a case designed to comfortably house the electronic board.
This not only ensures your ESP32 is safe from physical damage but also gives your project a more polished and professional look. Happy building!
Industry 4.0: An economical SAAS MES part 1
An OpenSource MES that is easily implementable with resources accessible to everyone.


Discussions
Become a Hackaday.io Member
Create an account to leave a comment. Already have an account? Log In.