-
You know what this needs? LASERS!!
03/07/2017 at 15:02 • 0 commentsI decided that, although cool, there was something lacking. I just got a whack of little laser diodes in da mail, so it was just a matter of time before everything had lasers attached; arduino projects, flashlights, the baby... (I cannot condone the use of lasers on small humans, in fact all my children are too big to accessorize in that fashion)
Adding a laser seems like big medicine, however in actuality, it is super easy. All I needed was power and a switch (cause ya don't want it to be on all the time). The units I got were rated at 5V. Easy peasey cause I already gots 5V coming off the arduino. A tactile momentary switch and BOOM, thar she be.
Photos to follow...
-
Ok... Time to really geek it up.
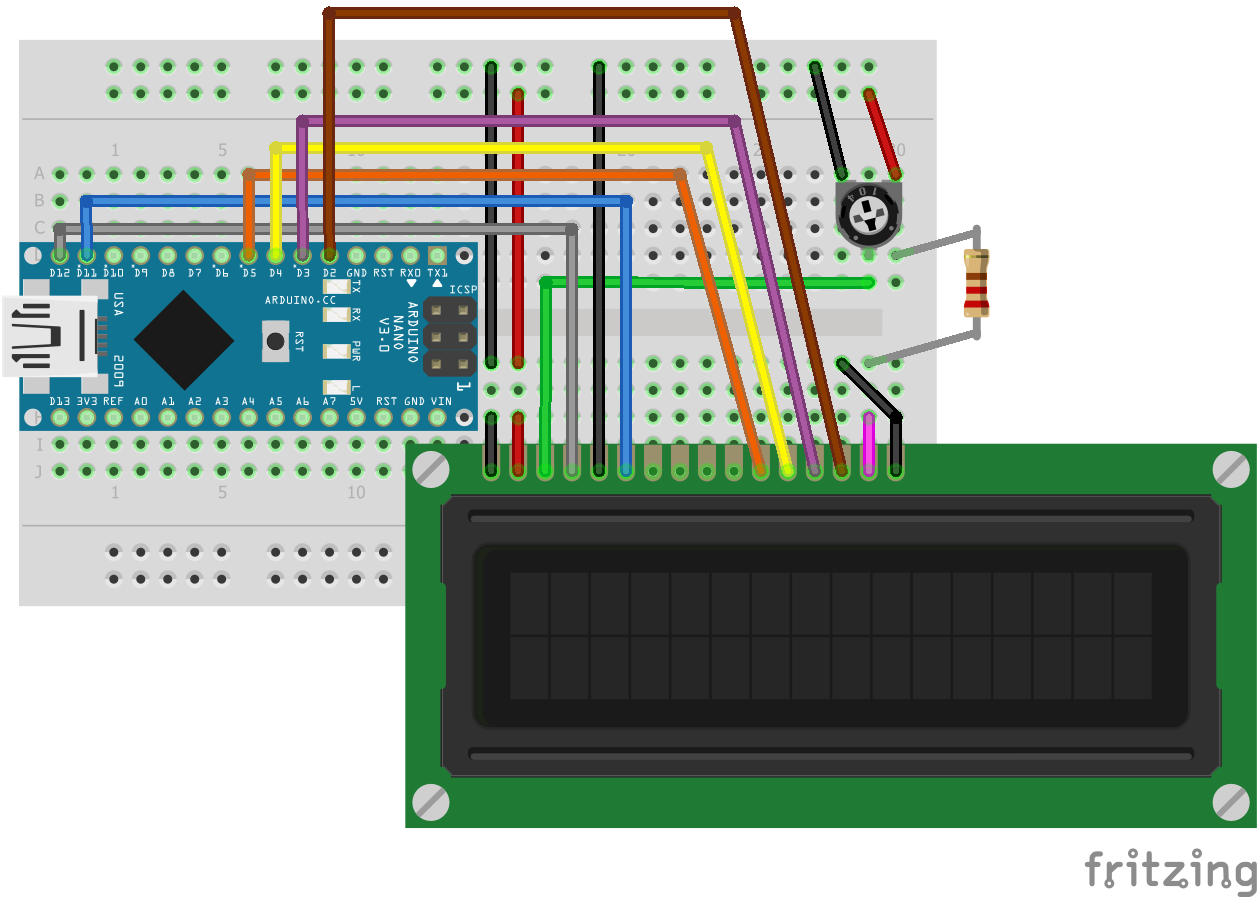
01/24/2017 at 01:00 • 0 commentsWant to know exactly how far away a DumDum is? I took the next step and wired in a 16 x 2 LCD that displays the distance in cm. It took a while to figure out the wiring for the LCD, but here it is. And the appropriate code too.
Code:
#include <LiquidCrystal.h> LiquidCrystal lcd(12, 11, 5, 4, 3, 2); int ledRed = 9; int ledGre = 6; int ledYel = 7; #define trigPin 10 #define echoPin 13 void setup() { pinMode(trigPin, OUTPUT); pinMode(echoPin, INPUT); pinMode(ledRed, OUTPUT); pinMode(ledYel, OUTPUT); pinMode(ledGre, OUTPUT); lcd.begin(16, 2); } void loop() { float duration, distance; digitalWrite(trigPin, LOW); delayMicroseconds(2); digitalWrite(trigPin, HIGH); delayMicroseconds(10); digitalWrite(trigPin, LOW); duration = pulseIn(echoPin, HIGH); distance = (duration / 2) * 0.0344; lcd.clear(); lcd.print("Distance = "); lcd.print(distance); lcd.print(" cm"); delay(100); if (distance <=400) { tone(8, ((150 - distance) * 10)); } else { tone(8, 0); analogWrite(ledGre, LOW); analogWrite(ledYel, LOW); analogWrite(ledRed, LOW); } if (distance >= 60 && distance < 200){ analogWrite(ledGre, 350); } else { analogWrite(ledGre, LOW); } if (distance > 30 && distance < 60){ analogWrite(ledYel, 600); } else { analogWrite(ledYel, LOW); } if (distance <= 30){ analogWrite(ledRed, 350); } else { analogWrite(ledRed, LOW); } delay(distance * 3); }Hardwares:![]()
Just a note: That resistor is a 220k and the potentiometer is a 10K...
*Please note: These fritzing diagrams are intended to show only the proper connections, not necessarily the proper routing of components and wires... Bear this in mind if you are trying to replicate this build.*
-
Next comes sound...
01/24/2017 at 00:35 • 0 commentsI played around a bit with static tones found in the 'pitches.h' library, with a different tone being played for each range step (ie. when the led changed). Kinda cool, kinda boring...
So I decide to spice it up and made the pitch vary as a function of the distance. Much more rewarding. Much more annoying... The closer you are, the high it screams.
Taking it another step into sonic oblivion, I made the delay an inverse function of distance. Now the closer you get, the higher it screams, AND it screams more often. Wow.
Code:
int ledRed = 9;
int ledGre = 6;
int ledYel = 7;

#define trigPin 10
#define echoPin 13

void setup() {

  pinMode(trigPin, OUTPUT);
  pinMode(echoPin, INPUT);
  pinMode(ledRed, OUTPUT);
  pinMode(ledYel, OUTPUT);
  pinMode(ledGre, OUTPUT);
}

void loop() {
  float duration, distance;
  digitalWrite(trigPin, LOW);
  delayMicroseconds(2);

  digitalWrite(trigPin, HIGH);
  delayMicroseconds(10);
  digitalWrite(trigPin, LOW);

  duration = pulseIn(echoPin, HIGH);
  distance = (duration / 2) * 0.0344;

  if (distance <=400) {
    tone(8, ((150 - distance) * 10));
  }
  else {
    tone(8, 0);
    analogWrite(ledGre, LOW);
    analogWrite(ledYel, LOW);
    analogWrite(ledRed, LOW);
  }
  if (distance >= 90 && distance < 200){
    analogWrite(ledGre, 350);

  }
  else {
    analogWrite(ledGre, LOW);
  }

 if (distance > 50 && distance < 90){
    analogWrite(ledYel, 600);

  }
  else {
      analogWrite(ledYel, LOW);
 }


  if (distance <= 50){
    analogWrite(ledRed, 350);

  }
    else {
    analogWrite(ledRed, LOW);
}

  delay(distance * 3);
}
Hardwares:
![]()
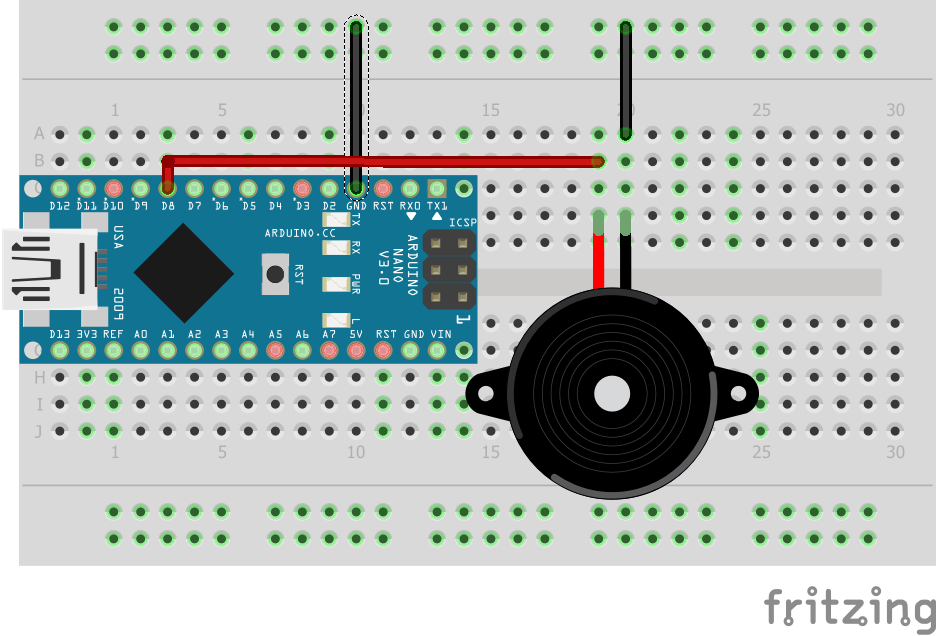
By default, pin D8 is audio out. I ended up throwing a pot in the positive line to limit the volume...
*Please note: These fritzing diagrams are intended to show only the proper connections, not necessarily the proper routing of components and wires... Bear this in mind if you are trying to replicate this build.*
-
Then there was light...
01/22/2017 at 07:02 • 0 commentsTo start my journey into this half-day project, I downloaded the Arduino programming tools and headed over to Adafruit to check out their tutorials. I found the infamous "Blink" program in the Example code and flashed it onto the Nano, and what do you know.... it blinked.
Went a little farther, using Adafruit tutorials as a hardware guide and example code included in the Arduino tools to make an 'external' LED fade. (See Fade example in Arduino Examples code)
Then I found this Circuit Basics tutorial on setting up the rangefinder. Everything worked great. Almost. One glitch, but it was my bad.
I thought, 'Hmmm... what can I do to make this a little more fun?' So I came up with the idea of indicator LEDs to show how far away something was.
Code:
int ledRed = 9;
int ledGre = 6;
int ledYel = 7;

#define trigPin 10
#define echoPin 13

void setup() {

  pinMode(trigPin, OUTPUT);
  pinMode(echoPin, INPUT);
  pinMode(ledRed, OUTPUT);
  pinMode(ledYel, OUTPUT);
  pinMode(ledGre, OUTPUT);
}

void loop() {
  float duration, distance;
  digitalWrite(trigPin, LOW);
  delayMicroseconds(2);

  digitalWrite(trigPin, HIGH);
  delayMicroseconds(10);
  digitalWrite(trigPin, LOW);

  duration = pulseIn(echoPin, HIGH);
  distance = (duration / 2) * 0.0344;

  if (distance >= 50){
    analogWrite(ledGre, HIGH);
  }
  else {
    analogWrite(ledGre, LOW);
  }

 if (distance > 20 && distance < 50){
    analogWrite(ledYel, HIGH);
  }
    else {
      analogWrite(ledYel, LOW);
 }

  if (distance <= 20){
    analogWrite(ledRed, HIGH);
  }
    else {
    analogWrite(ledRed, LOW);
}

  delay(500);
}
Hardwares:
![]()
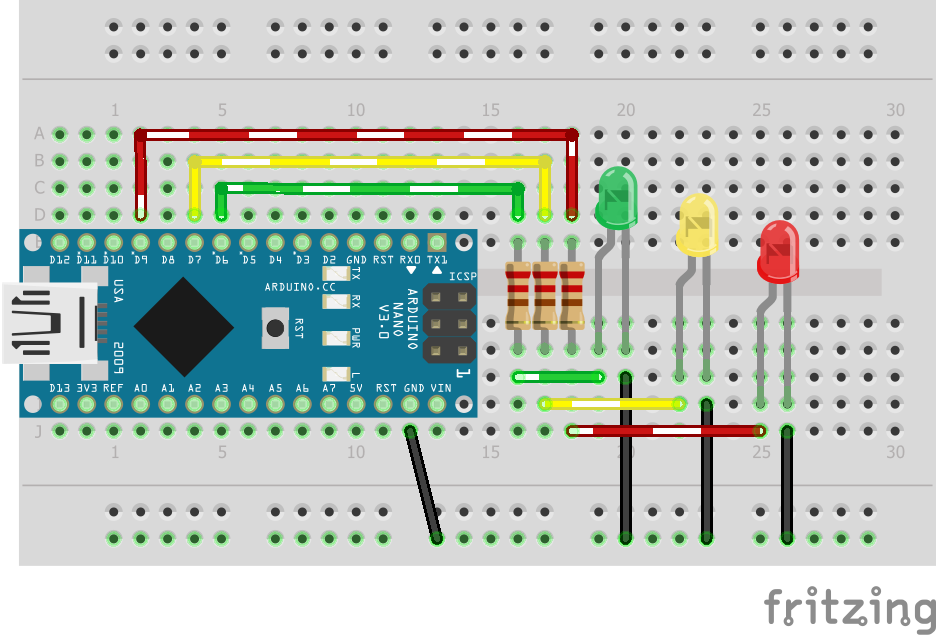
The LEDs glow a bit weak, but it works...
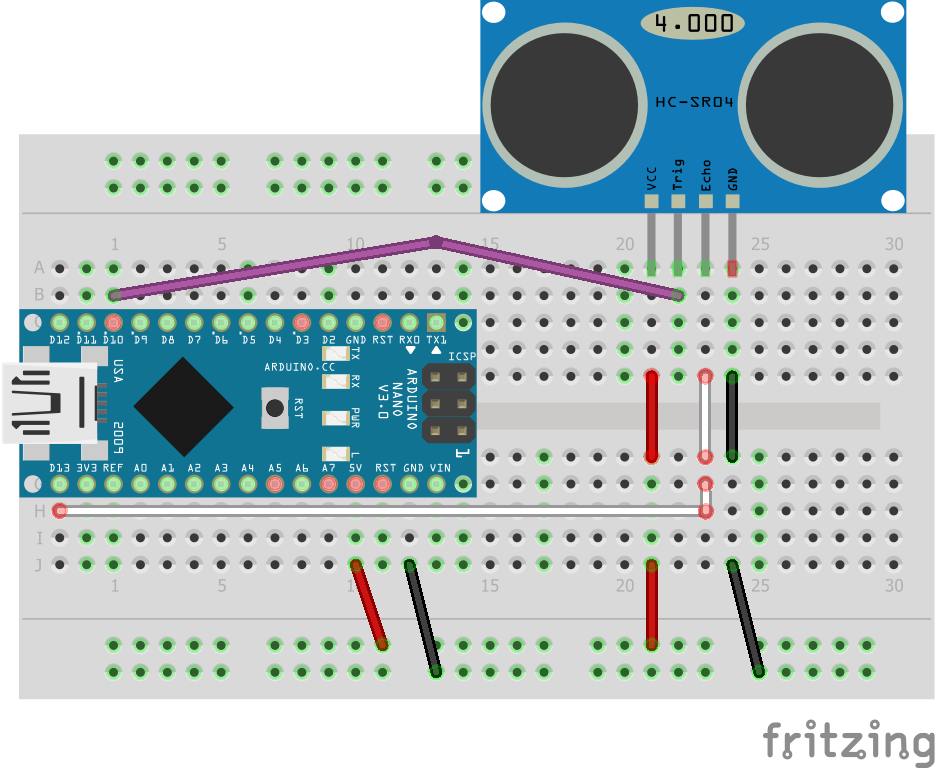
Here is the hookups for the rangefinder only...
![]()
*Please note: These fritzing diagrams are intended to show only the proper connections, not necessarily the proper routing of components and wires... Bear this in mind if you are trying to replicate this build.*
DumDum Detector
Arduino-based gag thing, when you point it at someone, it makes noise and flashes some LEDs.
 ken.do


