Close
0%
0%

PicoGlitcher v2

A hardware device to carry out voltage glitching attacks against microcontrollers with a Raspberry Pi Pico

Similar projects worth following
This project is intended to make fault injection attacks against microcontrollers accessible for hobbyists and to introduce the topic of voltage glitching. The software offers an easy entry point to carry out your own attacks against microcontrollers, SoCs and CPUs. With the provided and easy to use functions and classes, fault injection projects can be realized quickly.

Voltage glitching attacks are usually done with expensive hardware such as the ChipWhisperer Pro or Husky. However, for most of the attacks a Raspberry Pi Pico and a few other components are required. In order to achieve the best results, a circuit board was developed to combine the best of both worlds: cheap, easy to use and powerful.

The Pico Glitcher has recently been updated and new hardware and software features have been implemented. For example, a new multiplexing stage has been added, which makes it possible to switch quickly between several voltages. This method is called multiplexing fault injection.

Update: Now selling on tindie!

Update 2: Many thanks to Troed Sångberg who successfully built a PicoGlitcher. For his built, he made a parts list on Mouser which you can find in the project files.

Introduction

Voltage glitching attacks are a class of hardware attacks that exploit the vulnerability of electronic systems to sudden and brief changes in their power supply voltage. By intentionally introducing these abrupt voltage changes, or "glitches," attackers aim to disrupt the normal operation of the target device, causing it to malfunction in a controlled manner. This can result in the bypassing of security measures, corruption of data, or unintended execution of code. Voltage glitching is particularly relevant in the context of embedded systems, such as microcontrollers and smart cards, which are commonly used in secure applications including payment systems, access controls, and IoT devices.

The core concept behind voltage glitching is to induce faults at precise moments during the execution of critical operations within the device. These faults can lead to outcomes such as skipping security checks, extracting secret keys, or gaining unauthorized access to protected functions. The success of a voltage glitching attack relies on careful timing and an understanding of the target device's behavior under different power conditions. Attackers often use specialized equipment to generate and control these glitches with high precision, making this technique both sophisticated and powerful.

Previously featured projects

Glitching has been previously described on Hackaday for example here (everything you didn't know you need to know about glitching attacks) or here (Apple Airtags hacked and cloned with voltage glitching). The latter even describes attacking an Apple Airtag with a Raspberry Pi Pico and a mosfet. 

Existing hardware

Usually these attacks are carried out by expensive hardware such as the ChipWhisperer Pro, the ChipWhisperer Husky, or the devices from Riscure. As these devices are typically very expensive (several hundred Euros), they are not accessible for the hobby hacker. The ChipWhisperer Husky is even more inaccessible for hobby hackers since it has long shipping times up to several weeks.

The Pico Glitcher

It turns out, however, that voltage glitching attacks can easily be performed with cheap and available hardware like the Rapberry Pi Pico and some other components. The sampling rate of the Raspberry Pi Pico is fast enough to enable attacks against most common microcontrollers like the ESP32 or STM32 processors. To gain more insight into voltage glitching attacks and using only cheap components, the Pico Glitcher was born.
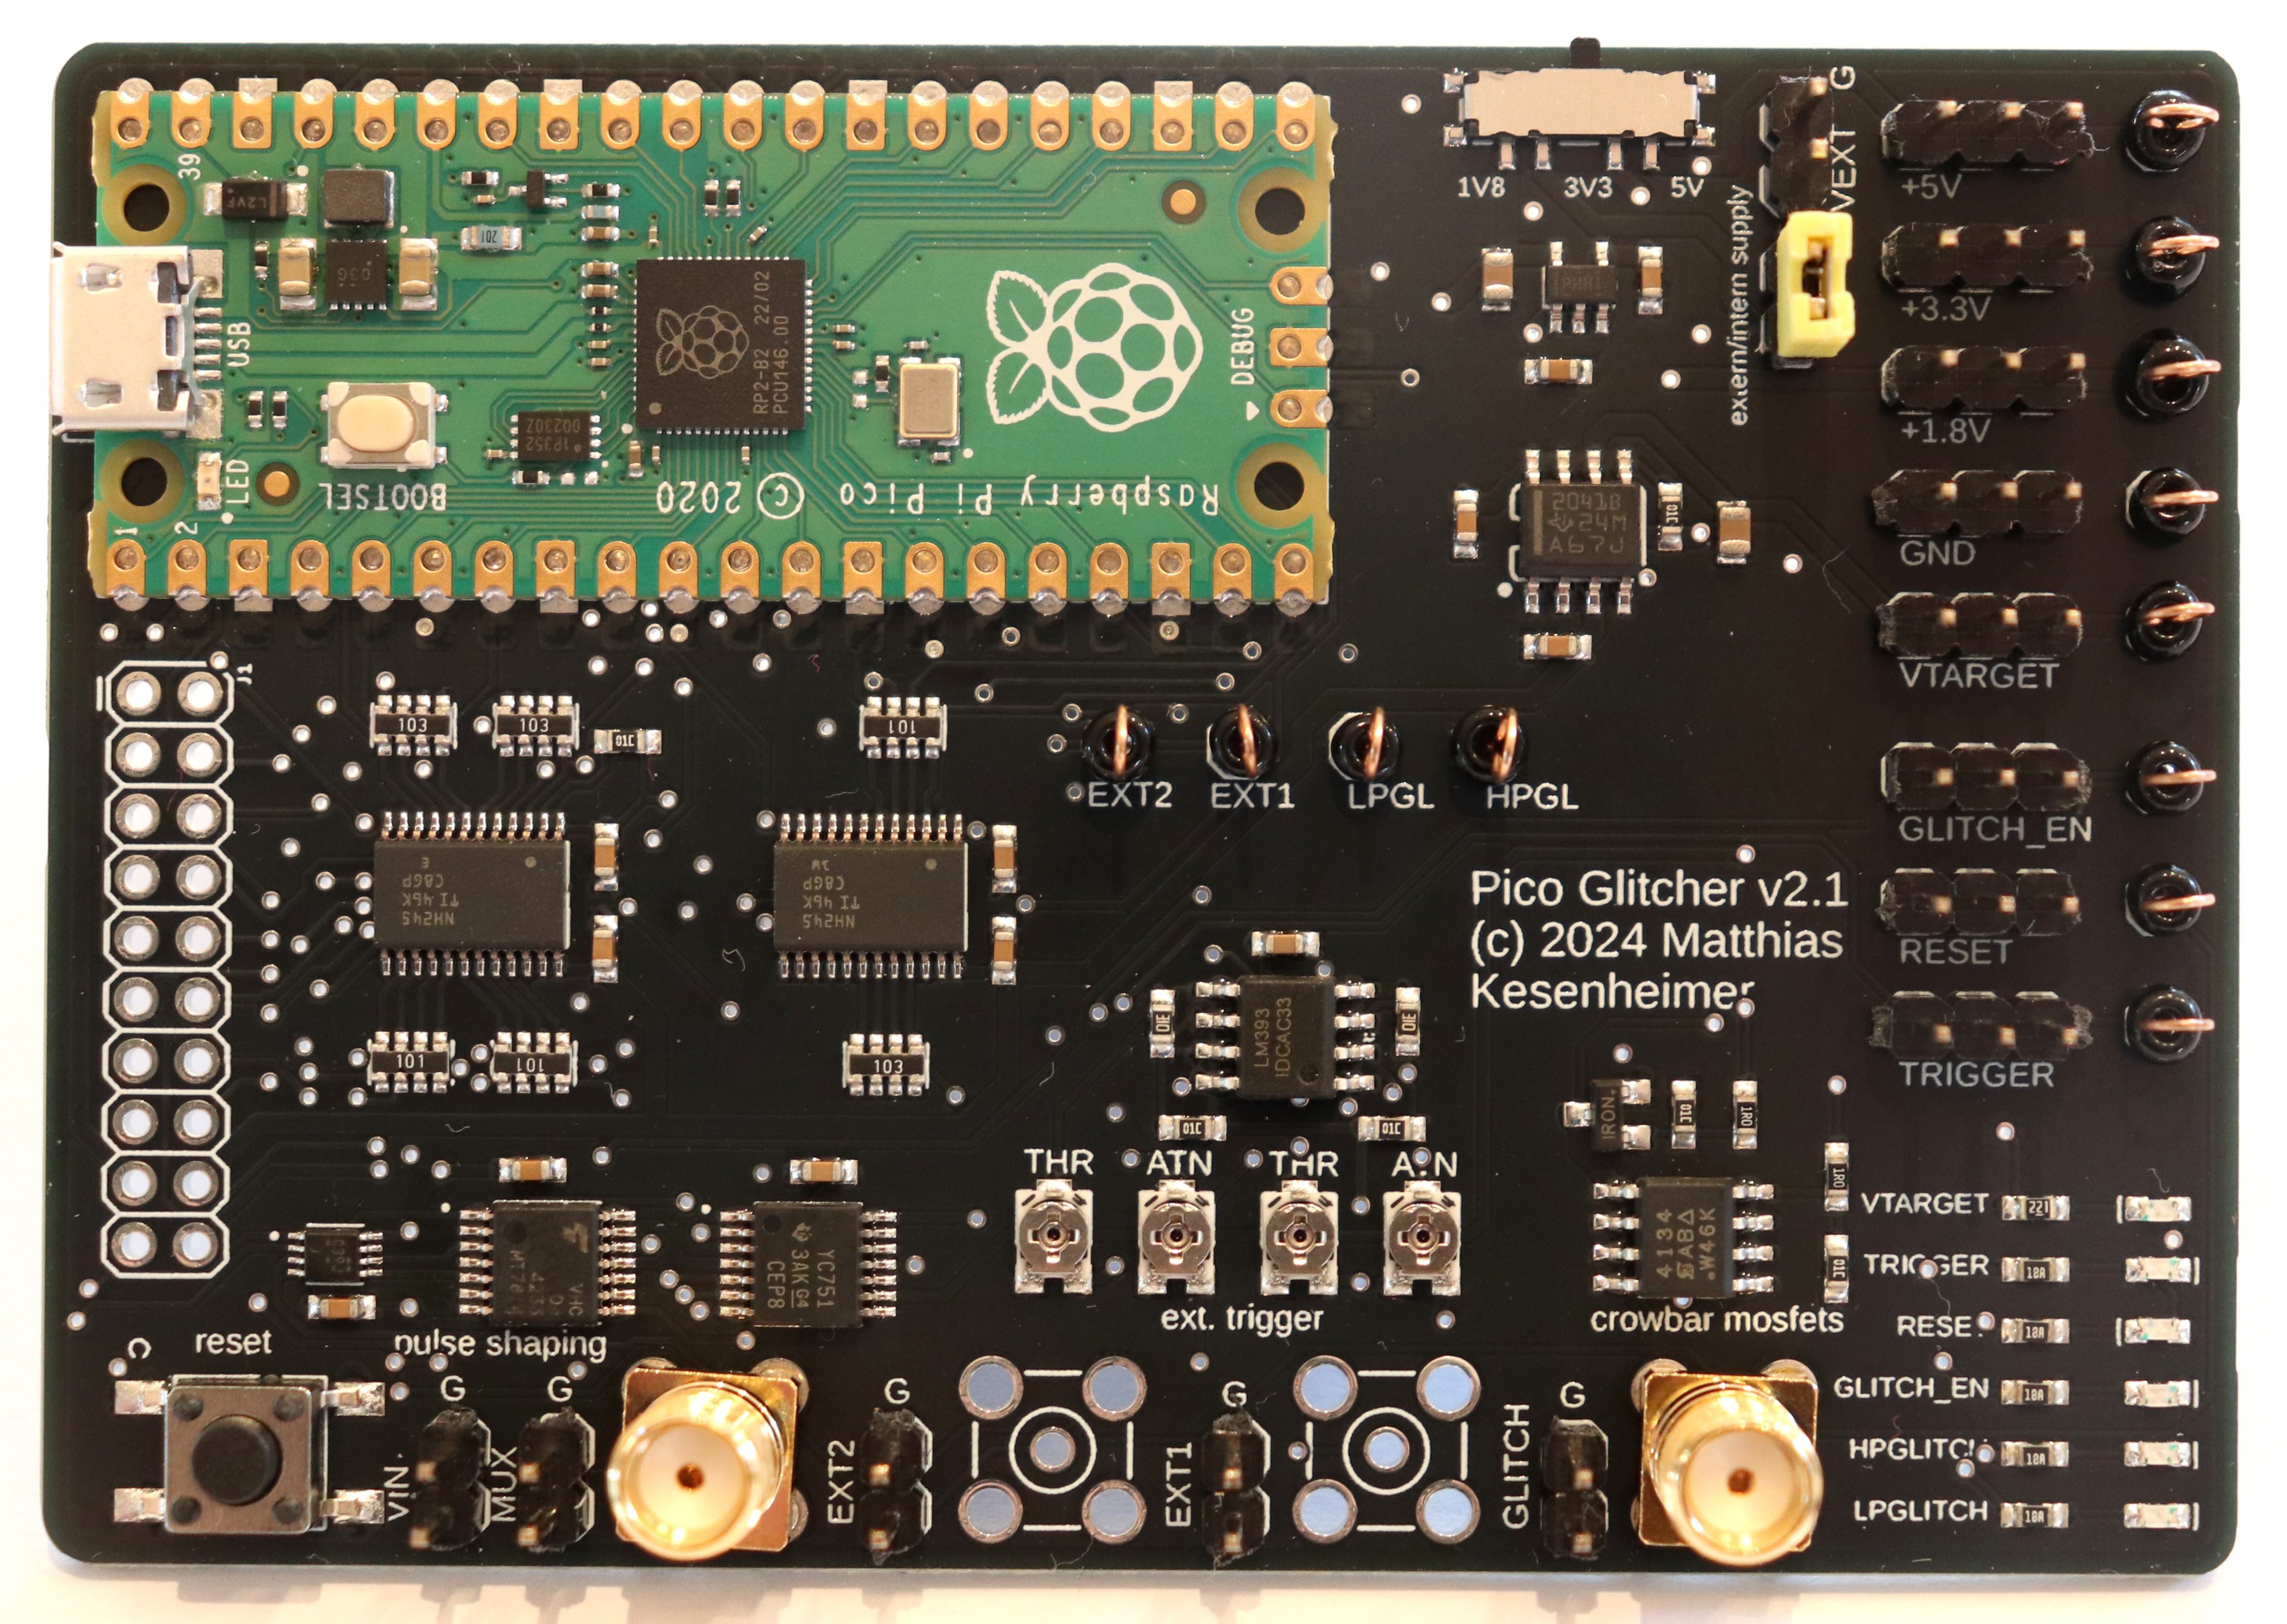
The hardware required for the Pico Glitcher involves, of course, a Raspberry Pi Pico and additional components for precise voltage control and monitoring. Specifically, it includes a power supply capable of switching the target on and off, and crowbar transistors that can switch up to 66 amps. The design of the voltage glitching stage of the PicoGlitcher is exactly the same as found in the ChipWhisperer Pro. Furthermore, the board provides several different voltages to supply all kinds of different target boards. A built-in level shifter translates between the fixed voltages of the Raspberry Pi Pico and the voltage levels of the target board. 

Glitches must be placed very precisely. The Pico Glitcher is able to trigger on various external events. For example, a rising or falling edge could be used to start the timers. Additionally, the PicoGlitcher can sniff on a UART communication and trigger if a specific word is sent.

To summarize:

  • The Pico Glitcher is cheap (less than 30€ for the components alone) in comparison to professional equipment
  • Various trigger capabilities: Rising or falling edge trigger, UART trigger, etc.
  • Level shifters to trigger on signals with different voltage level.
  • Low and high power crowbar mosfets to switch...
Read more »

Project_Sep13_0320AM.xls

Mouser BOM (thanks to Troed Sångberg!)

ms-excel - 24.00 kB - 09/13/2024 at 08:24

Download

  • January 02, 2025: Genetic Algorithm

    Matthias Kesenheimer01/02/2025 at 14:54 0 comments

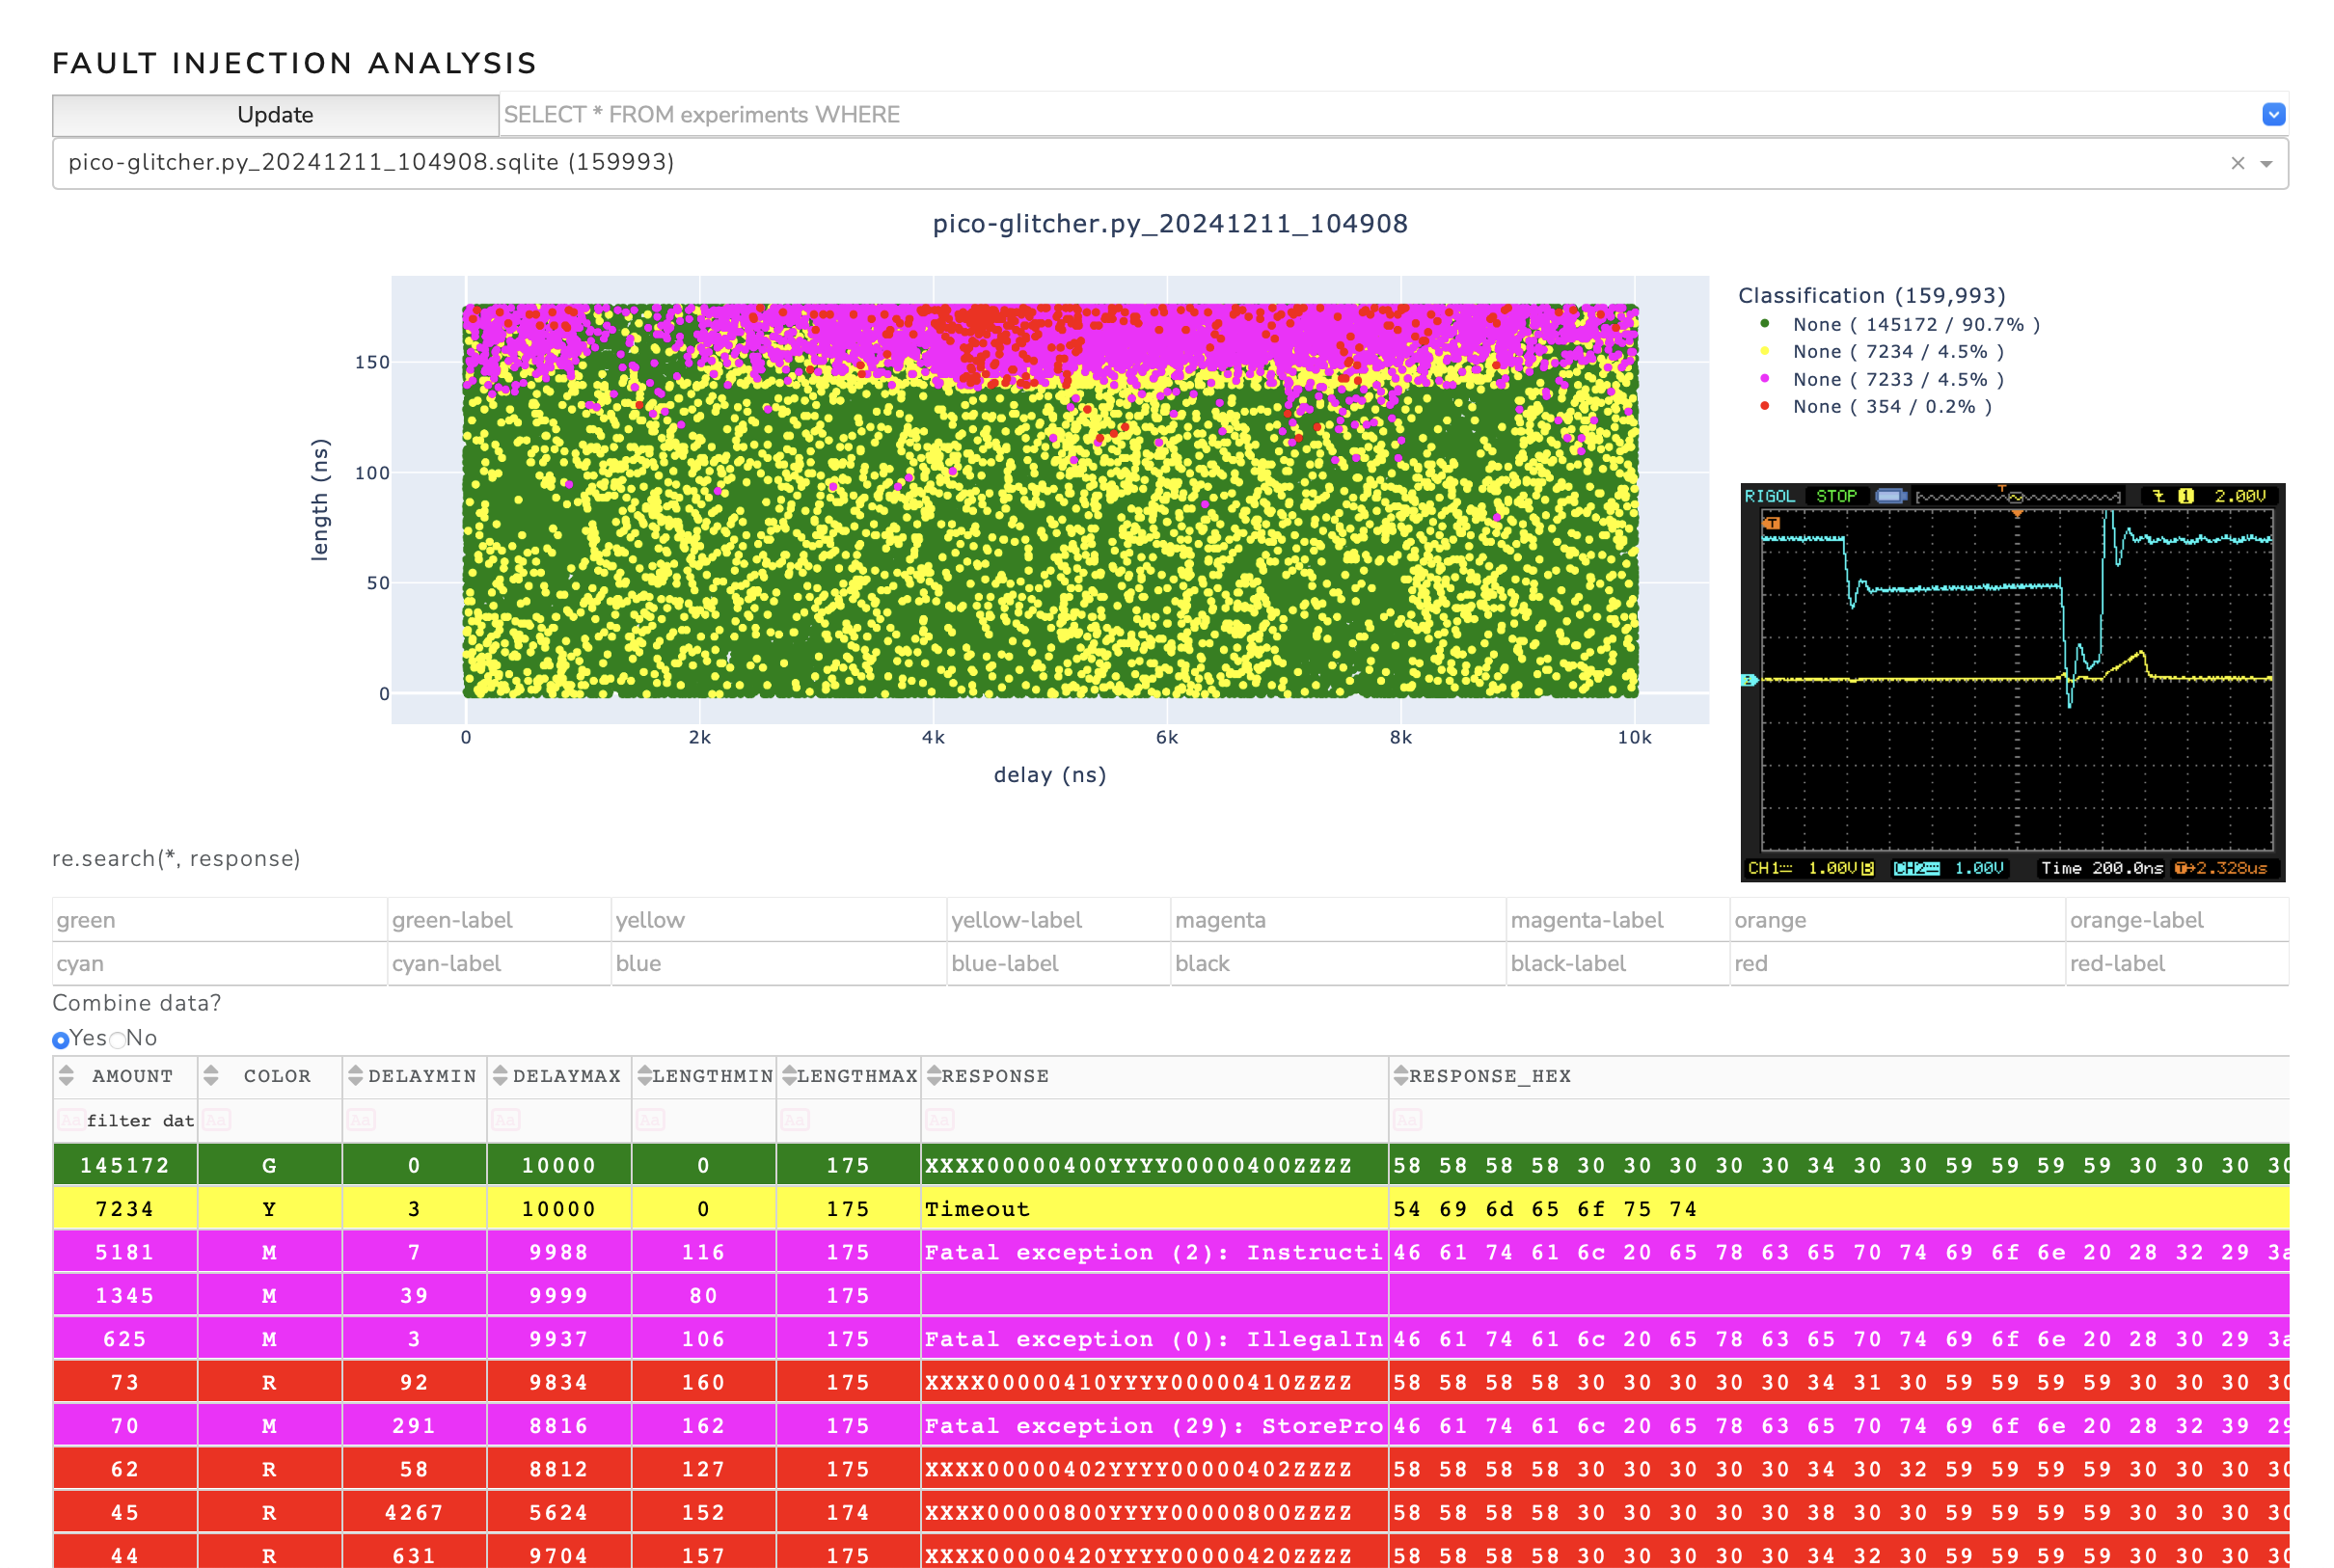
    In some cases, finding the parameters of a successful glitch can be quite tedious. Especially if the possible parameter space is large (see multiplexing and pulse-shaping). Therefore, the search for a suitable parameter point must be done somewhat more intelligently than with a brute force approach.

    In the case of the fault-injeciton-library, a genetic algorithm has been implemented that can be used to search for the optimum parameter points.

    If implemented correctly (and with a suitable configuration of the OptimizationController) you should expect clustering experiments around successful glitches. See the figure below for an example output of a glitching campaign. In this case, the ESP32v1.3 was glitched via the multiplexing method. More details can be found here.

  • January 2 2025: Components overview of the Pico Glitcher v2

    Matthias Kesenheimer01/02/2025 at 14:39 0 comments

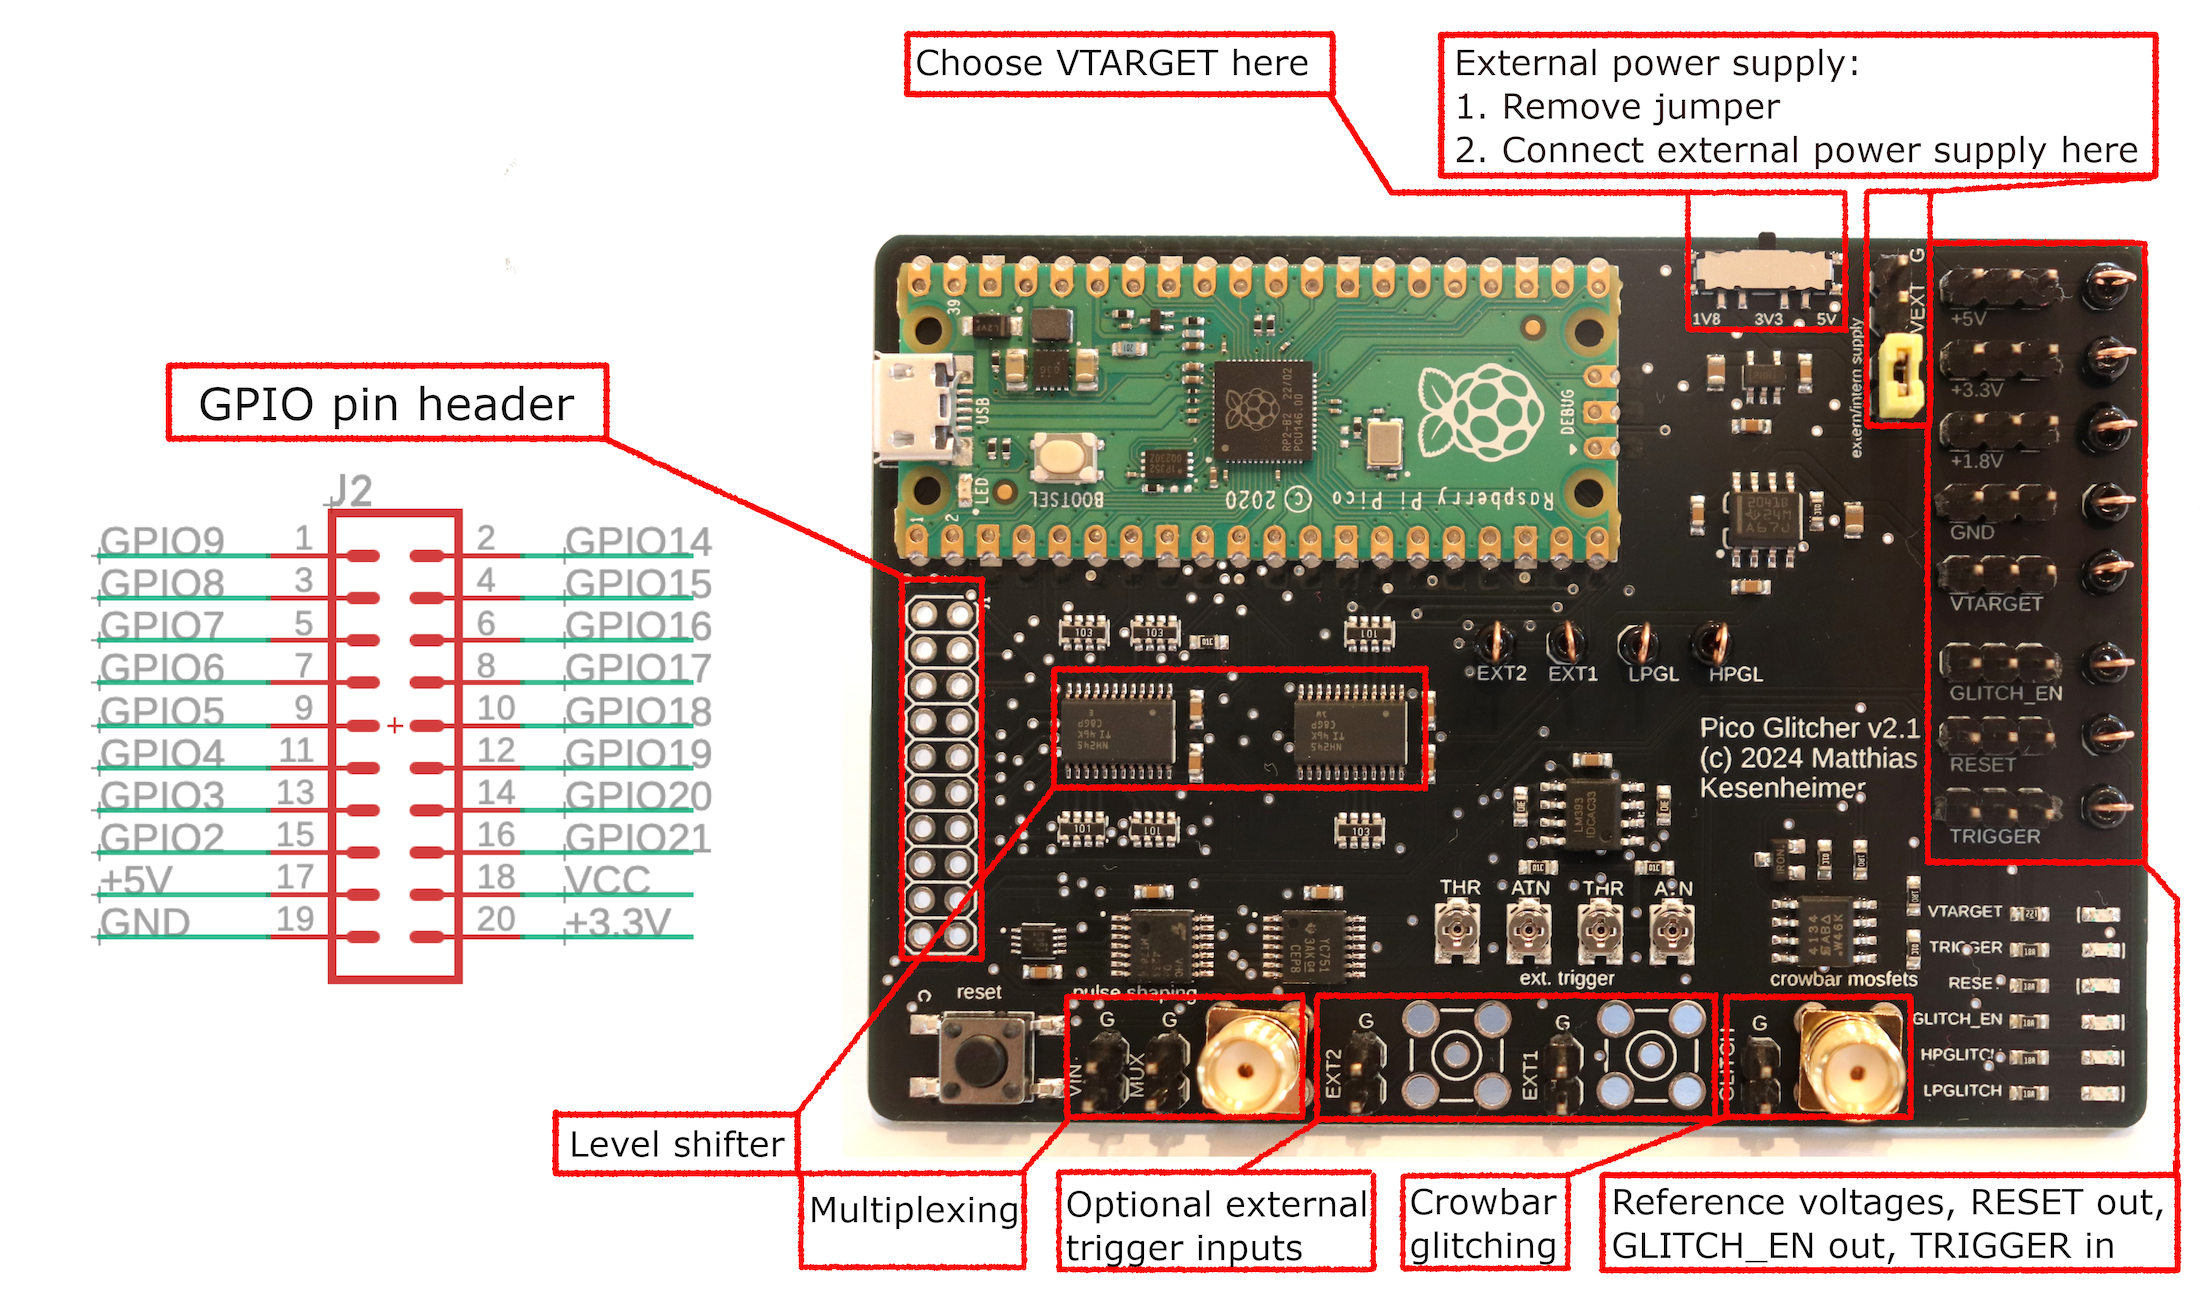
    The hardware is based on the Raspberry Pi Pico, two high-power MOSFETs for crowbar glitch generation, and two level shifters to ensure compatibility over a wide voltage range. A newly designed input stage (EXT1 and EXT2) can be used to filter out noise and other disturbances via adjustable Schmitt Triggers. The multiplexing output can be used to quickly switch between up to four different voltage levels and to supply the target board with power.

    The second revision of the Pico Glitcher can also be modified to suit your needs. The Pico Glitcher v2 is built from the following components:

  • December 15 2024: PicoGlitcher v1 sold out!

    Matthias Kesenheimer12/15/2024 at 16:13 0 comments

    Due to the high demand for the Pico-Glitcher, the first batch has been sold out. Many thanks to everyone who has supported me by purchasing a Pico-Glitcher. I am currently planning the second hardware version of the Pico-Glitcher, which will have some new features. For example, in version 2 it will be possible to define the glitch pulse shape by different voltages at certain time intervals (so-called pulse shaping). In addition, two separate inputs with preamplifier and Schmitt trigger will facilitate triggering to different voltages. Stay tuned!

  • October 29 2024: Project Documentation

    Matthias Kesenheimer10/29/2024 at 20:37 0 comments

    The documentation of the software and the hardware is now available under https://fault-injection-library.readthedocs.io/en/latest/.

    Any feedback is appreciated!

  • October 23 2024: Support by JLCPCB

    Matthias Kesenheimer10/23/2024 at 06:12 0 comments

    This projected was kindly supported by JLCPCB which is a PCB manufacturer trusted by 5.4M engineers worldwide. You can get high-quality PCB prototypes for just $2. If you use the following link to sign up, you can get up to $80 coupons: https://jlcpcb.com/?from=matthias

  • September 12 2024: Assembly of the updated PCBs

    Matthias Kesenheimer09/13/2024 at 07:54 0 comments

    After ten days I received my order from JLCPCB. As mentioned in the previous project log, generating the design files (gerber, CPL and BOM) was fairly straight forward.

    The finished PCBs are of high quality. I could not find any errors and the components are perfectly placed and soldered. I am really happy with the way the PicoGlitcher PCB turned out.

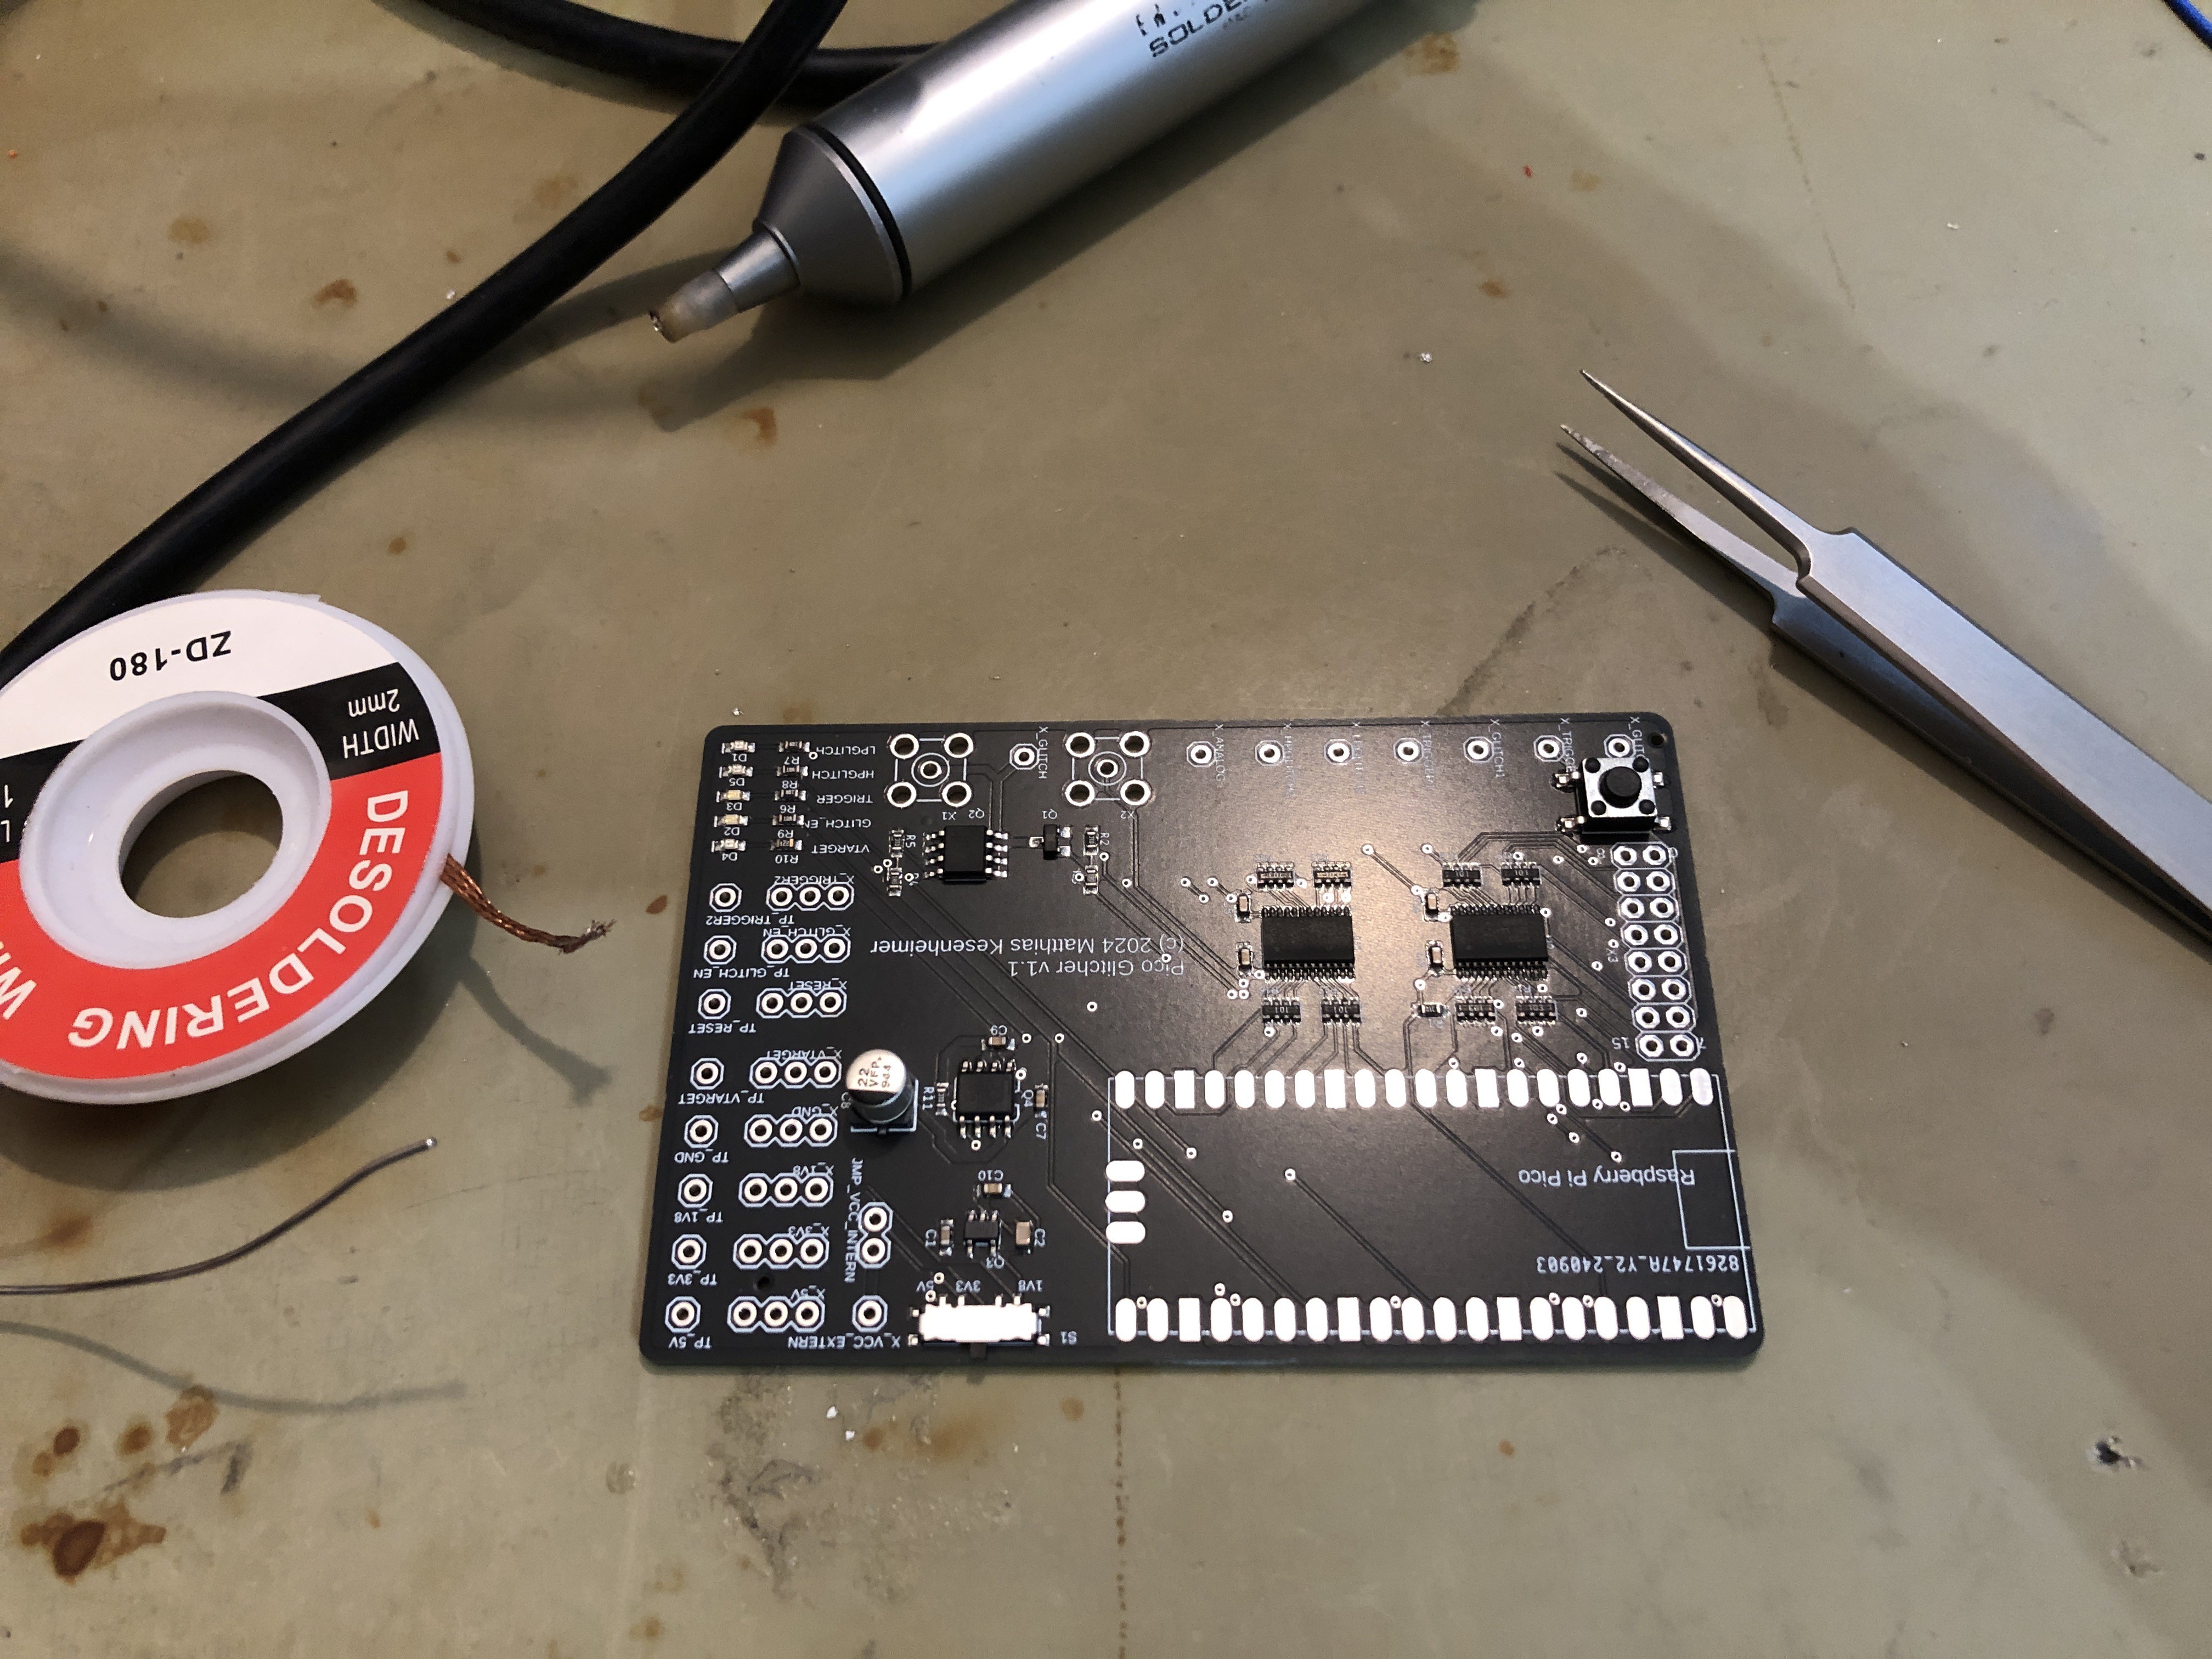
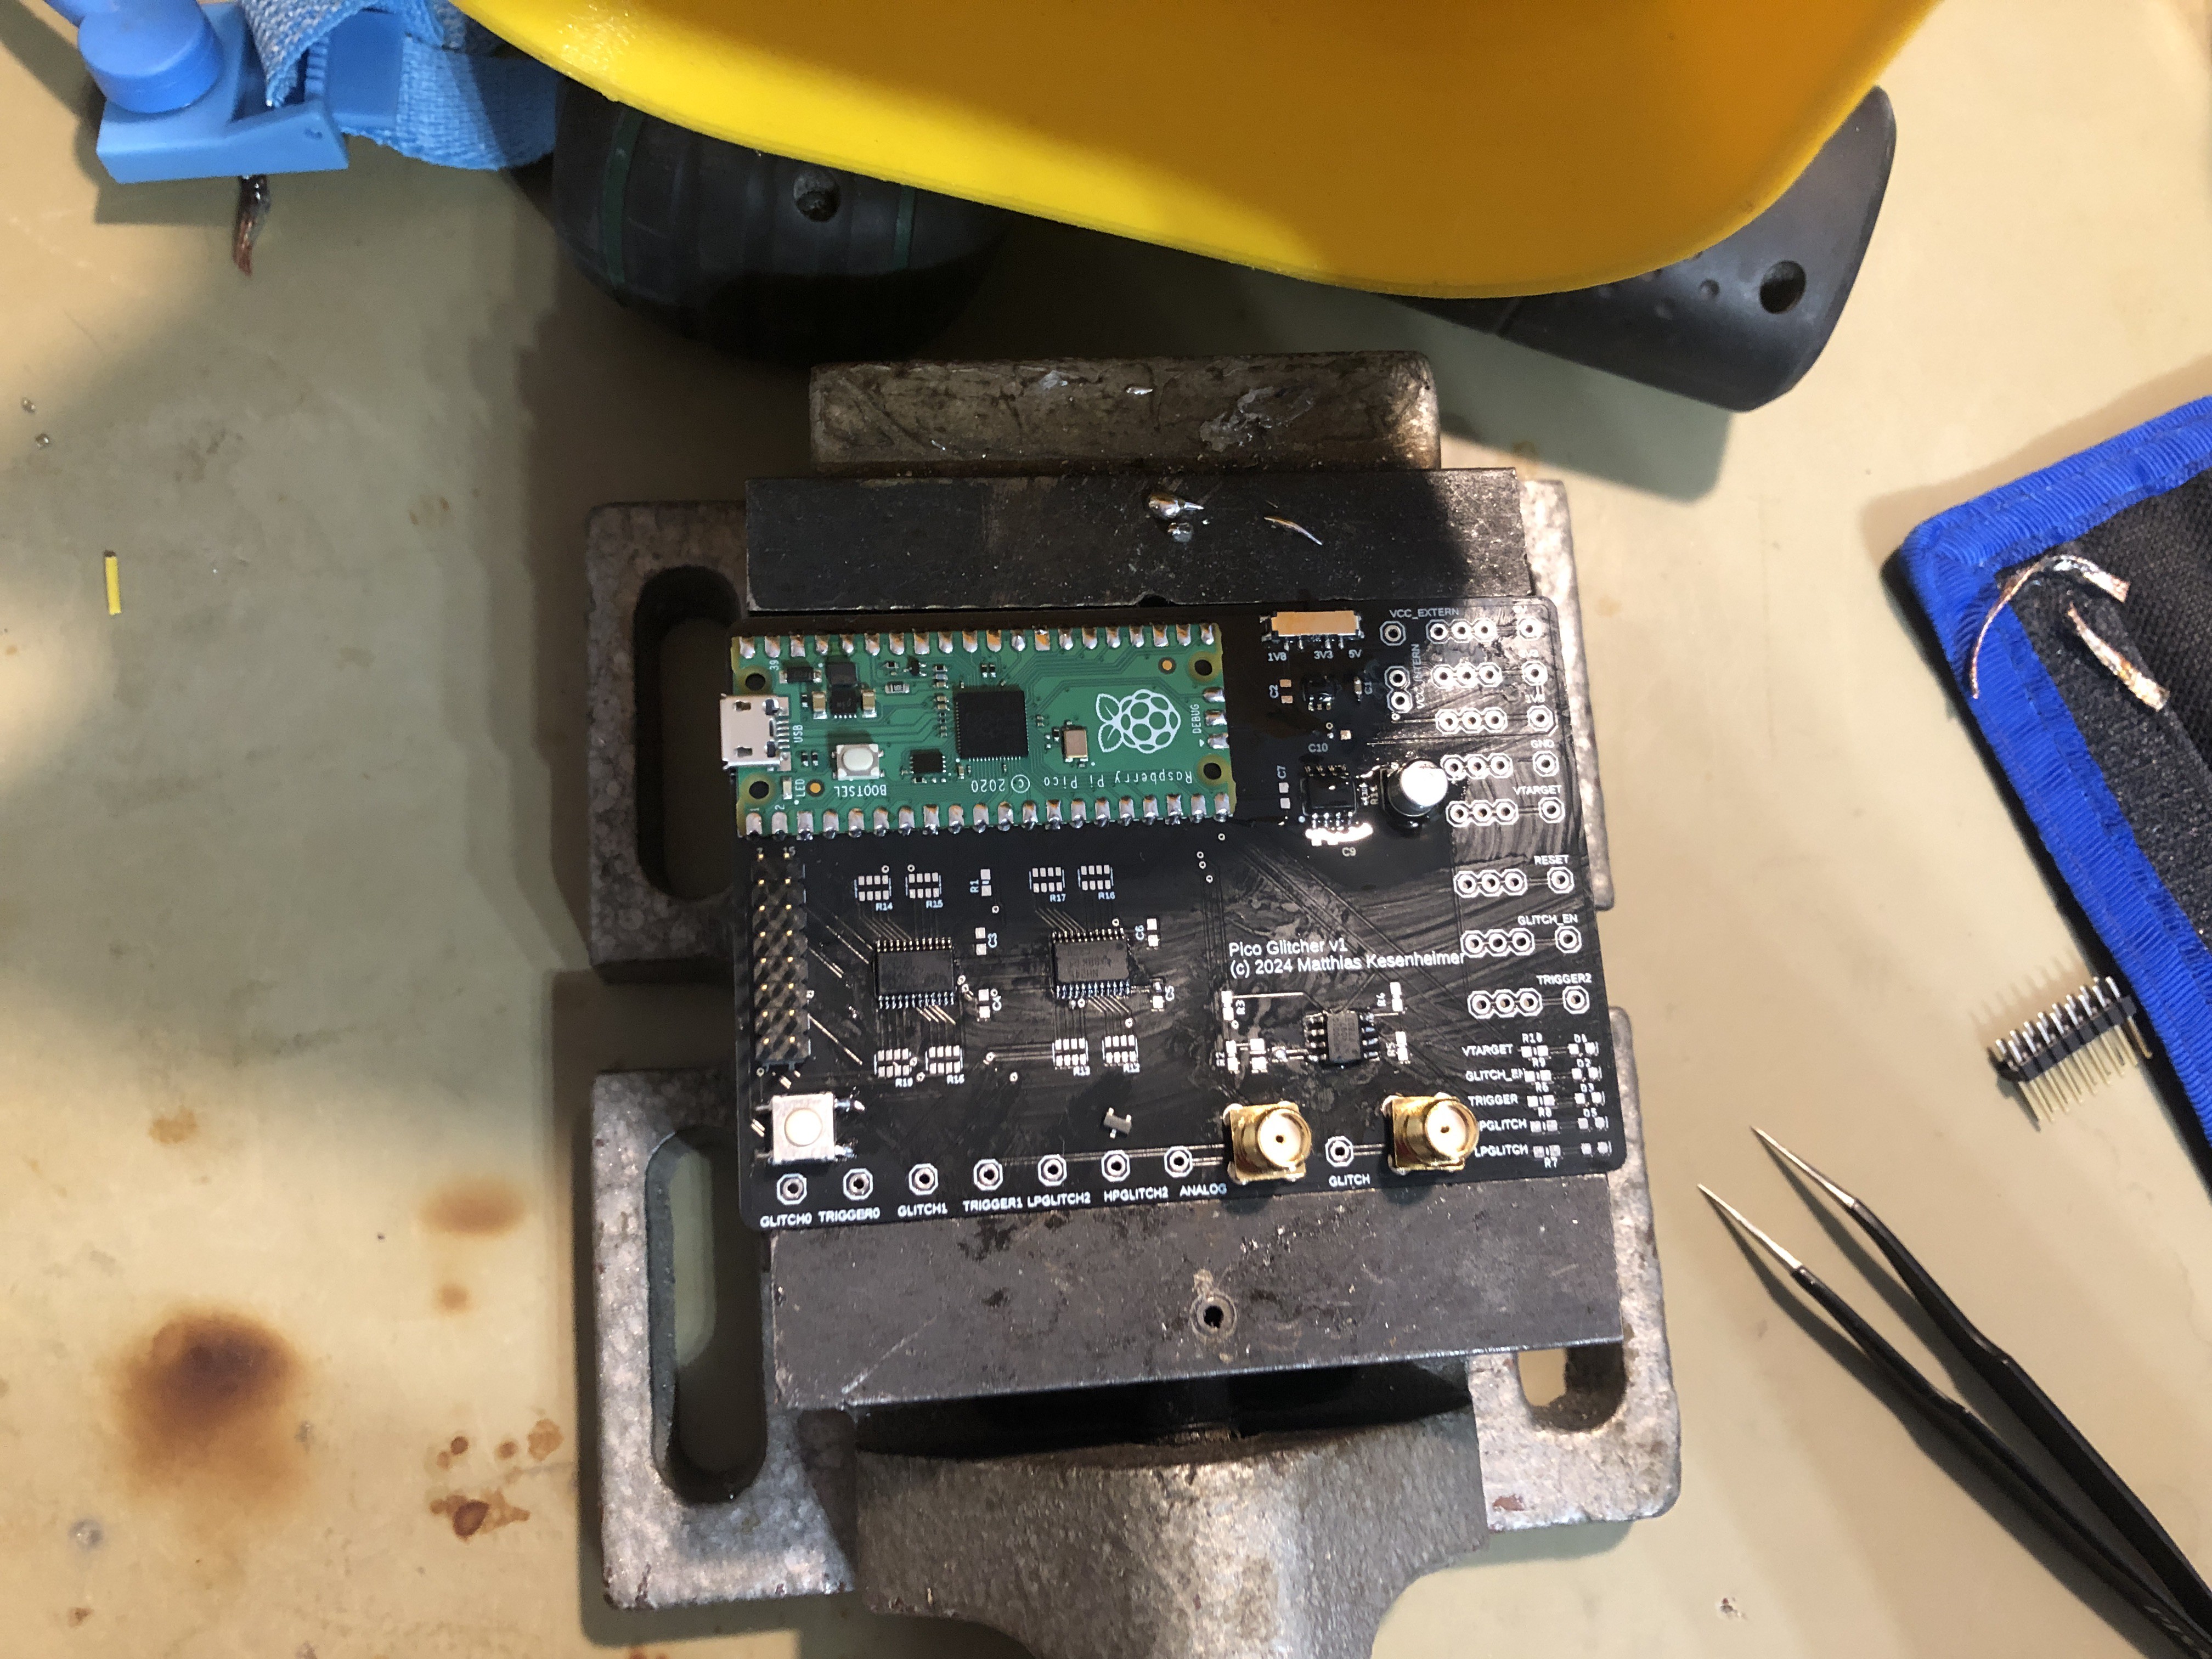
    The next step was to solder the rest of the components onto the board. For example, the Raspberry Pi Pico and some other through-hole components have to be soldered by hand. The finished board can be seen below.

    The new design also works flawlessly. I could generate reproducible glitches on a STM microcontroller within a few minutes.

  • September 3 2024: PCB updates

    Matthias Kesenheimer09/13/2024 at 07:33 0 comments

    First of all, the design of the PicoGlitcher is good and I have not found any major flaws yet. The PicoGlitcher works.

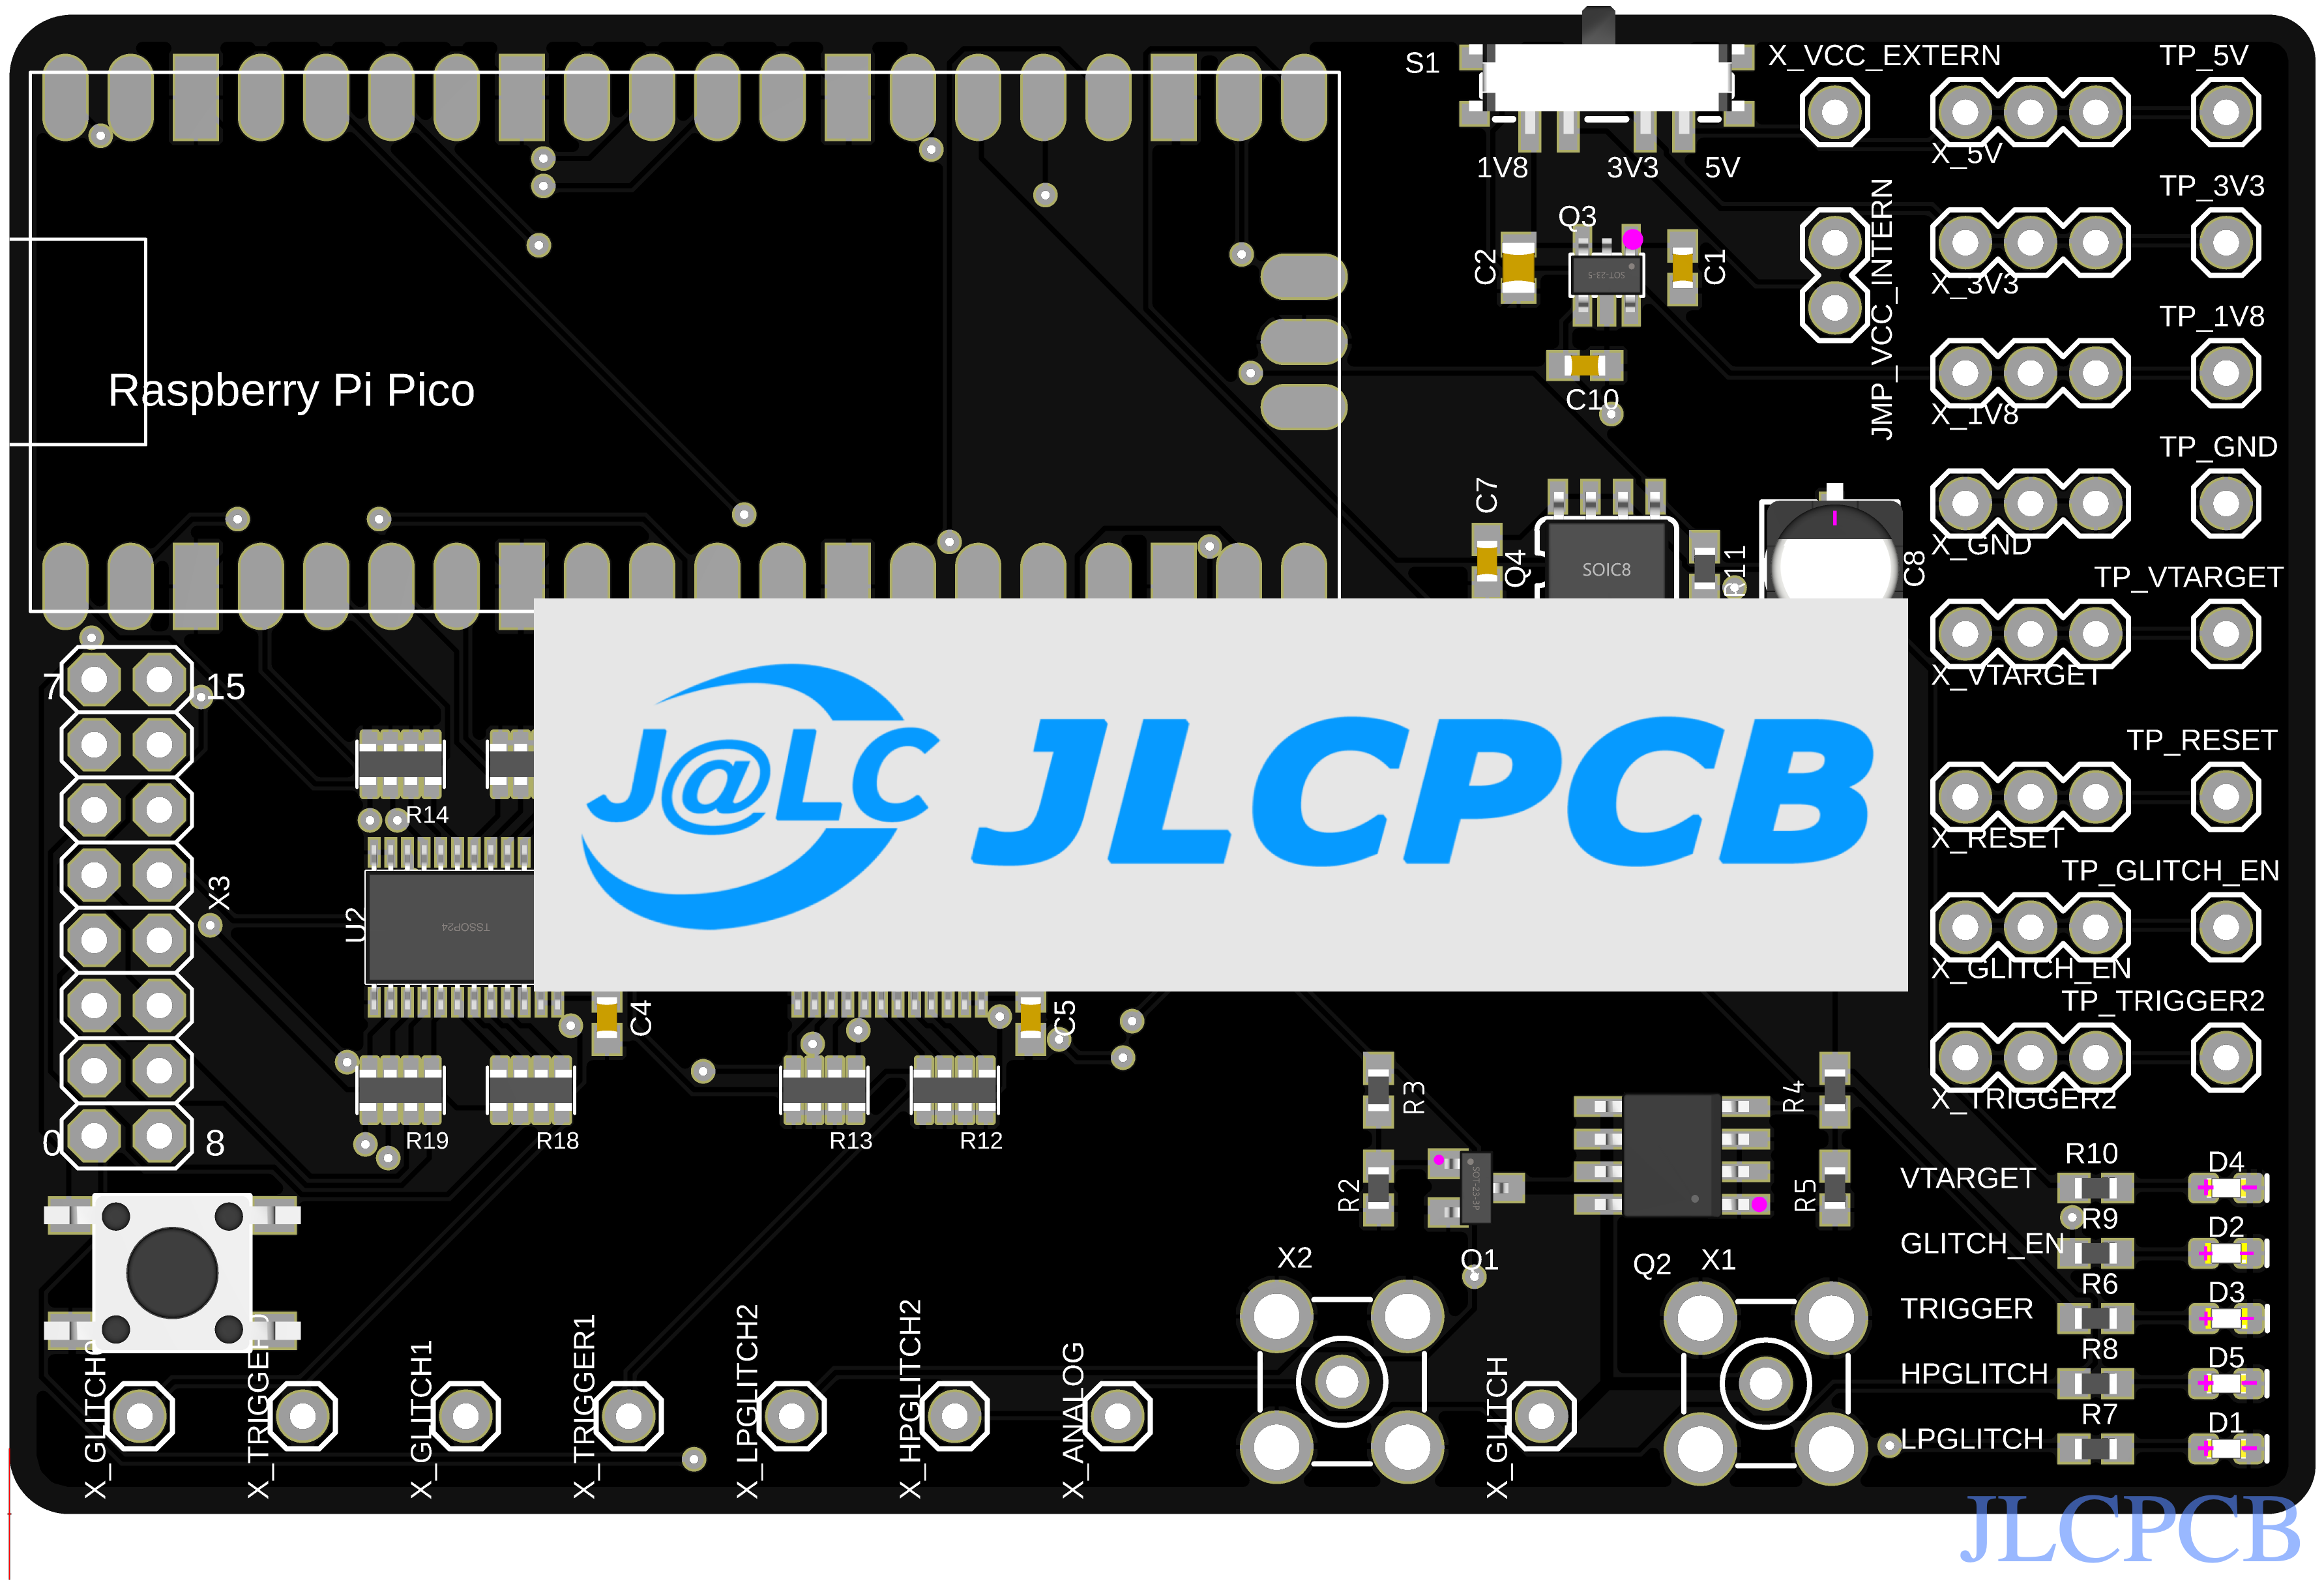
    However, I have noticed that some of the PCB markings are hard to read, and some are even missing. The component placement is also not optimal, so I decided to update the PCB files. Soldering the small SMD components by hand was difficult (for me at least), so I decided to give PCB manufacturing with component placement a try.

    I made a few changes to the design files, picked all the components from JLCPCB via the Assembly Parts Lib and uploaded the new gerber files. In order to automatically generate the BOM and the component placement file (CPL) in Fusion360, I used the library jlcpcb-eagle. With the gerber, the BOM and the CPL files ready, I was finally able to submit my order to JLCPCB. All the relevant files can be found on my github page. 

    I was surprised at how easy the whole procedure was. The JLCPCB parts library is huge and if an exact part is not available, there is always an alternative. What's more, every step of the process is easy to understand. The component placement is displayed in an online tool that allows you to check that all the components have been placed correctly. Manufacturing and shipping was fast. I received my order within ten days.

  • July 8 2024: PicoGlitcher in operation

    Matthias Kesenheimer08/05/2024 at 19:01 0 comments

    Here you can see a video of a running glitching campaign. The target gets reset, a glitch is emitted and the status of RDP is checked.

  • July 8 2024, later this day: Glitches!

    Matthias Kesenheimer08/05/2024 at 18:53 0 comments

    I am practiced in doing fine soldering work, but soldering the selected SMD components was nevertheless challenging. In the end, however, the soldering work was successful. The PicoGlitcher is working as expected and I am able to glitch targets. For a test if everything works, I ran a glitch against an STM32F4 microcontroller. Although RDP level 1 was activated, the target responds with an "ACK" after a few attempts when accessing the flash memory in bootloader mode.

    The PicoGlitcher v1 actually works!

  • July ​8 2024: Assembly

    Matthias Kesenheimer08/05/2024 at 18:46 0 comments

    All the parts have finally arrived and I can now assemble the circuit boards. The boards look amazingly well made, all the tracks are perfect and there are no visible faults. The black boards stand out really nice.

View all 14 project logs

Enjoy this project?

Share

Discussions

Grivus wrote 12/05/2024 at 23:13 point

Very interesting work, the non-stopping activity on code and samples are really good. I'm currently messing up with stm32f405 one, using some similiar project, having some difficulties though. Will order this one to try soon. 

  Are you sure? yes | no

Adam wrote 12/05/2024 at 21:23 point

hi I'm having some difficulty purchasing a ready made one from the tindie shop it seems to error or hangduring the payment process. I attempted the PayPal option and it doesn't seem to want to load either?  Bit strange. Thanks Adam 

  Are you sure? yes | no

ftregan wrote 09/23/2024 at 14:21 point

Hi. I've been starting to learn about glitching a few months ago, glitching a cc2510 with a rppico clone ( https://gitlab.com/FTregan/cc2510glitcher ). The glitch works fine, 10-30 seconds only are needed ( I started from the knowledge shared in https://zeus.ugent.be/blog/22-23/reverse_engineering_epaper/ which uses a mosfet instead of analog switch and needed a few days).
Would you like support for cc2510 added or do you prefer to concentrate on the board and keep the mcu specific code out of the project repo ?

  Are you sure? yes | no

Matthias Kesenheimer wrote 09/23/2024 at 15:58 point

Hey,

I am open for contribution and if you like to write an add-on and make a pull request, feel free to do so. Unfortunately, I do not own a cc2510, thus I can not verify any contribution.

  Are you sure? yes | no

balu.2019 wrote 08/20/2024 at 17:04 point

Great Project, any updated BOM list (168 ohm) resistors not available, any replacement for that

  Are you sure? yes | no

Matthias Kesenheimer wrote 09/13/2024 at 08:14 point

Thank you. You can use 150Ω resistors instead. I updated the design files.

  Are you sure? yes | no

Twisted wrote 08/11/2024 at 22:45 point

Great project but where on earth are you sourcing 168Ω resistors from? They seem non-existent.

  Are you sure? yes | no

Matthias Kesenheimer wrote 09/13/2024 at 08:13 point

Thanks. Yes you are right. I replaced the resistors with 150Ω resistors in the updated project. The exact value is not that important for these resistors.

  Are you sure? yes | no

Adam wrote 08/07/2024 at 20:55 point

Thanks for the upload of this project I can't wait to make it! (PCB ordered),  do you have an updated BOM list as some of the parts are not very easy to find or make out what the values are supposed to be.

  Are you sure? yes | no

Matthias Kesenheimer wrote 08/09/2024 at 06:46 point

Dear Adam,
another contributor currently works on a component list on Mouser. If you give us some time to sort out any issues, we can publish this list here.

  Are you sure? yes | no

Adam wrote 08/09/2024 at 20:02 point

thank you I'll keep an eye out,   in the mean time i have been attempting to find the parts on Farnell.  , i have so many modules to try this on. very existing. and well done!

  Are you sure? yes | no

Matthias Kesenheimer wrote 09/13/2024 at 08:33 point

Hey Adam,

the updated BOM can be found in the "files" section of this project. Also a more recently updated BOM with JLCPCB Part numbers can be found on my github page: https://github.com/MKesenheimer/fault-injection-library/blob/master/schematics/pico-glitcher-v1.1-BOM.xlsx

  Are you sure? yes | no

Adam wrote 09/14/2024 at 14:47 point

Thank you! 😊 although I think there might be somthing abit wrong, when I upload the BOM jlcpcb, it would appear to add 50 of each part making 5 pcbs thosands and thousands in cost. Is there a figure of each part which can be added too the BOM list?

  Are you sure? yes | no

Matthias Kesenheimer wrote 09/14/2024 at 14:55 point

Hmm, that's weird. There is no number of items in the excel sheet. The number is calculated automatically by the number of PCBs you want to produce.

  Are you sure? yes | no

Hasukyryo wrote 06/24/2024 at 07:50 point

Good time friend, great project, a tool that promises many expectations.

  Are you sure? yes | no

Similar Projects

Does this project spark your interest?

Become a member to follow this project and never miss any updates