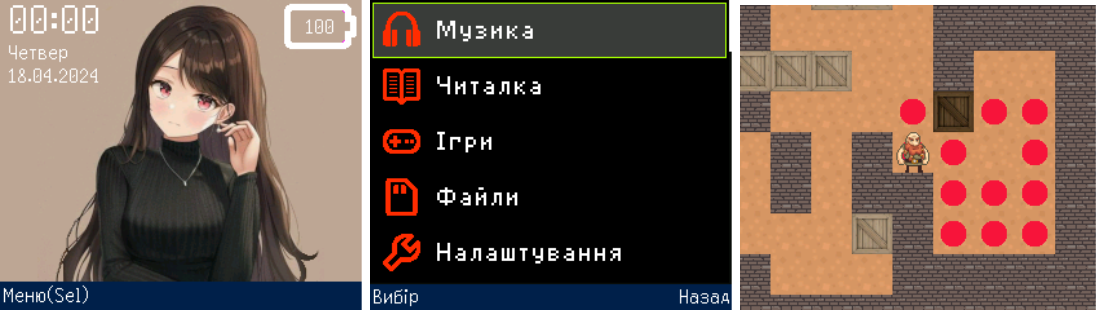
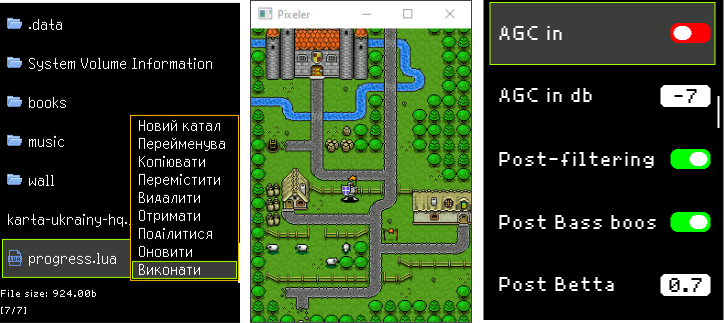
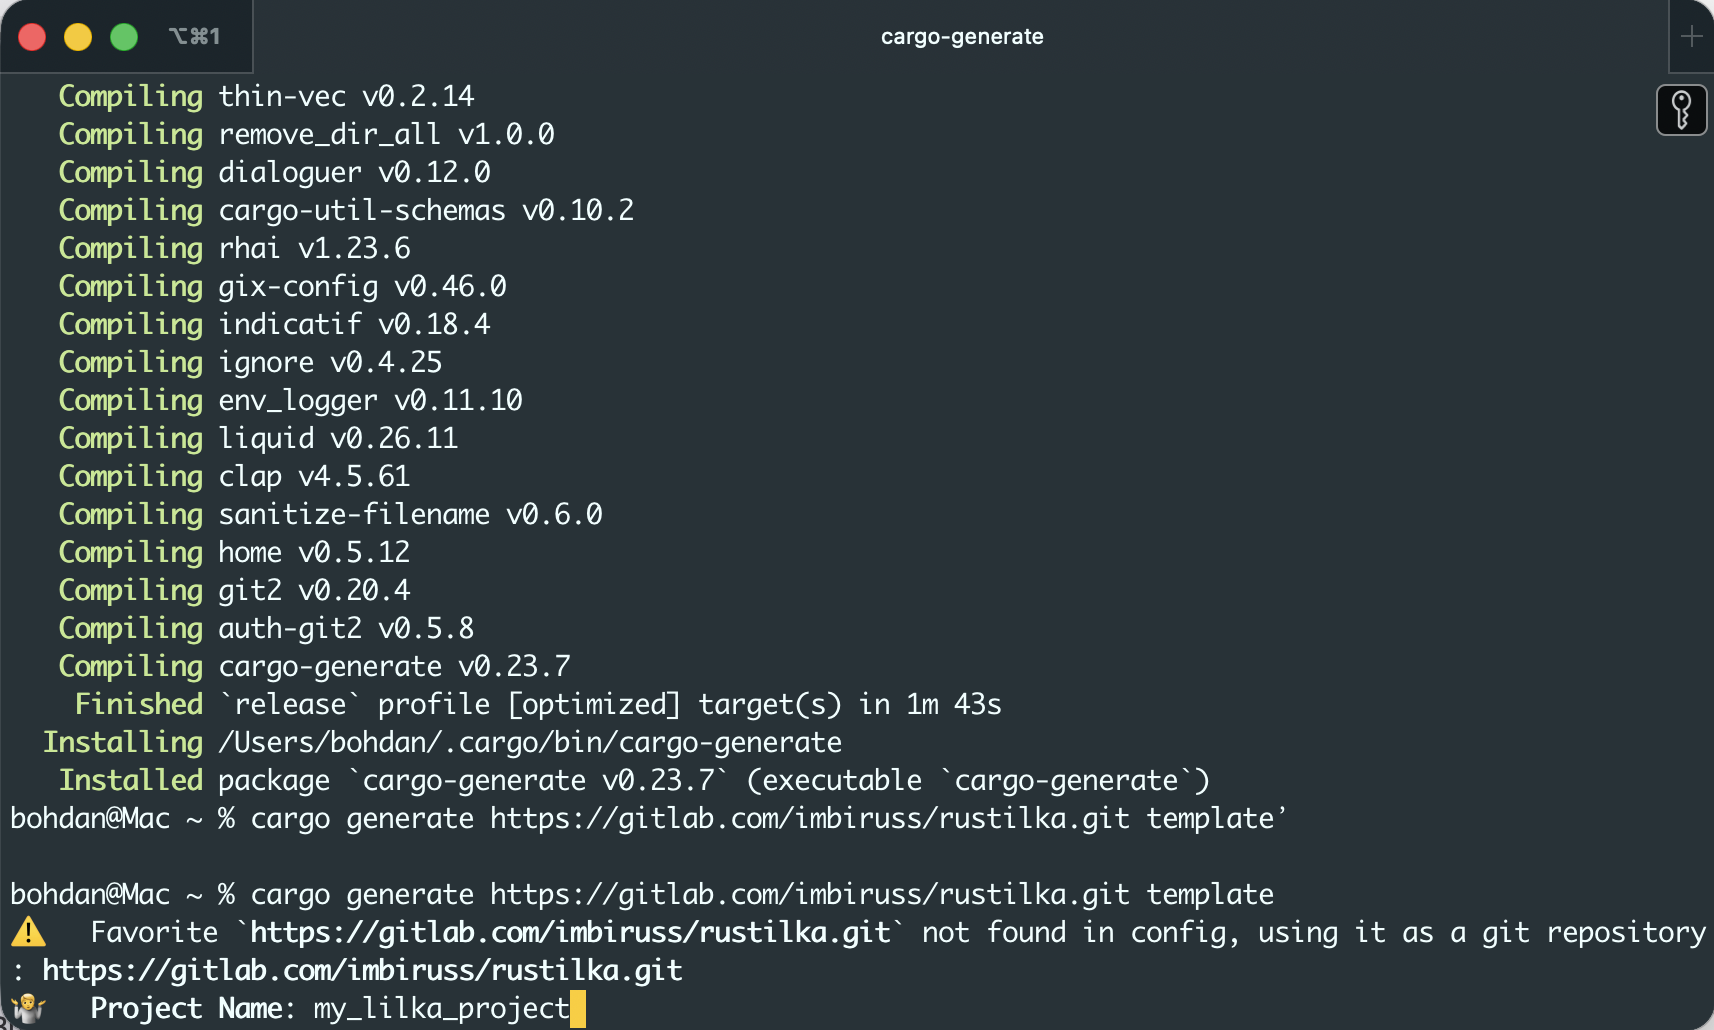
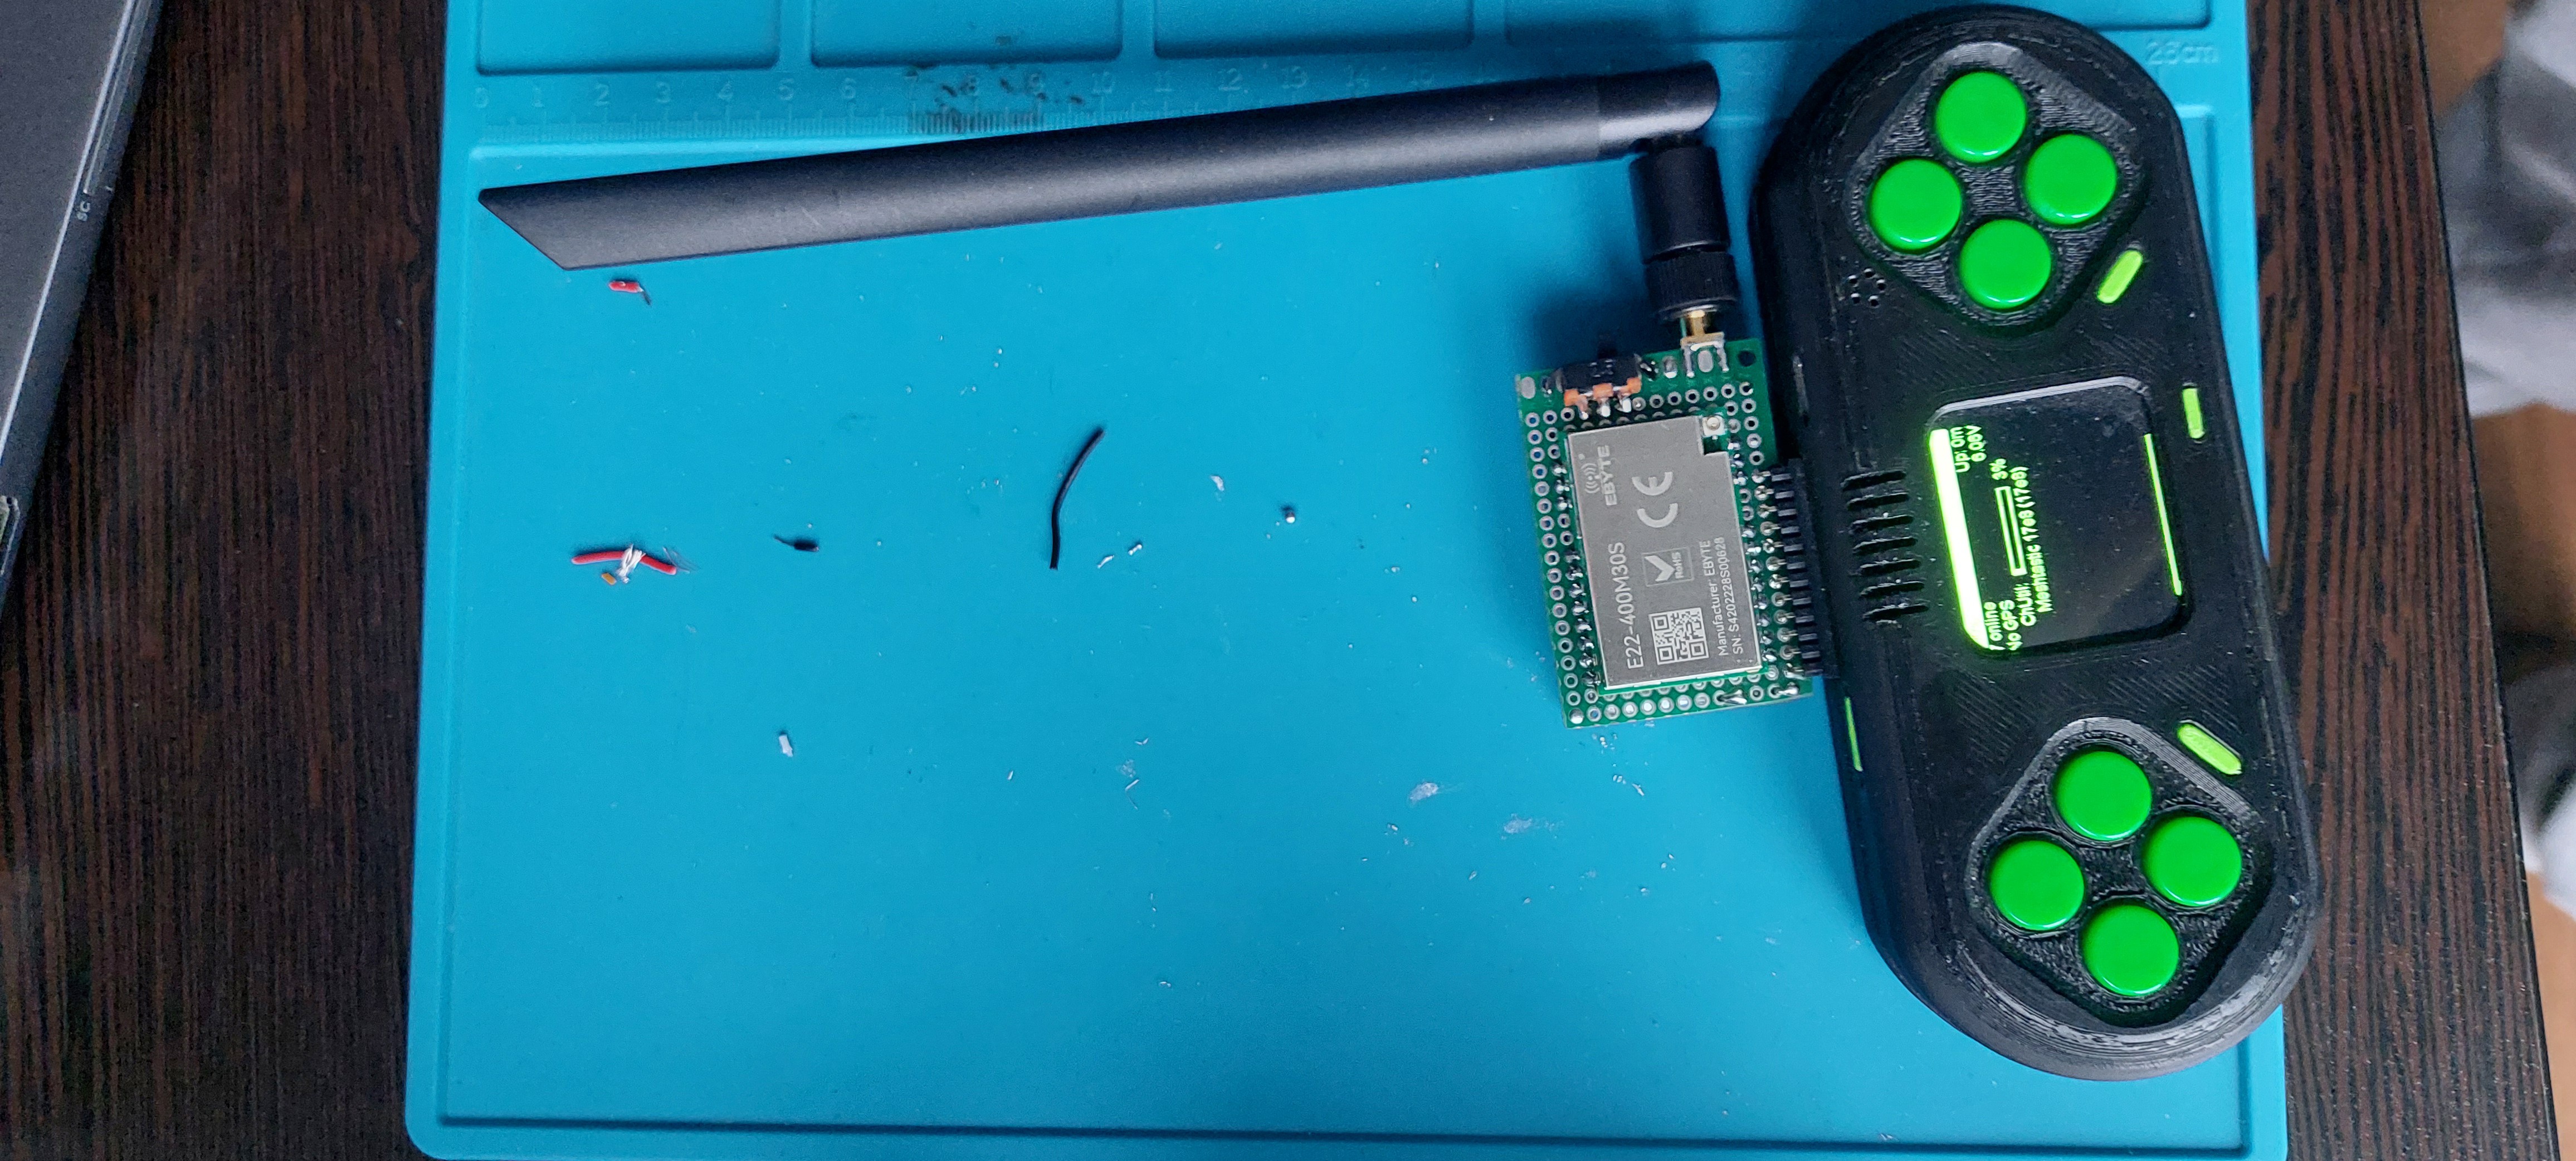
b.sverdlyuk
-
Doom on Lilka
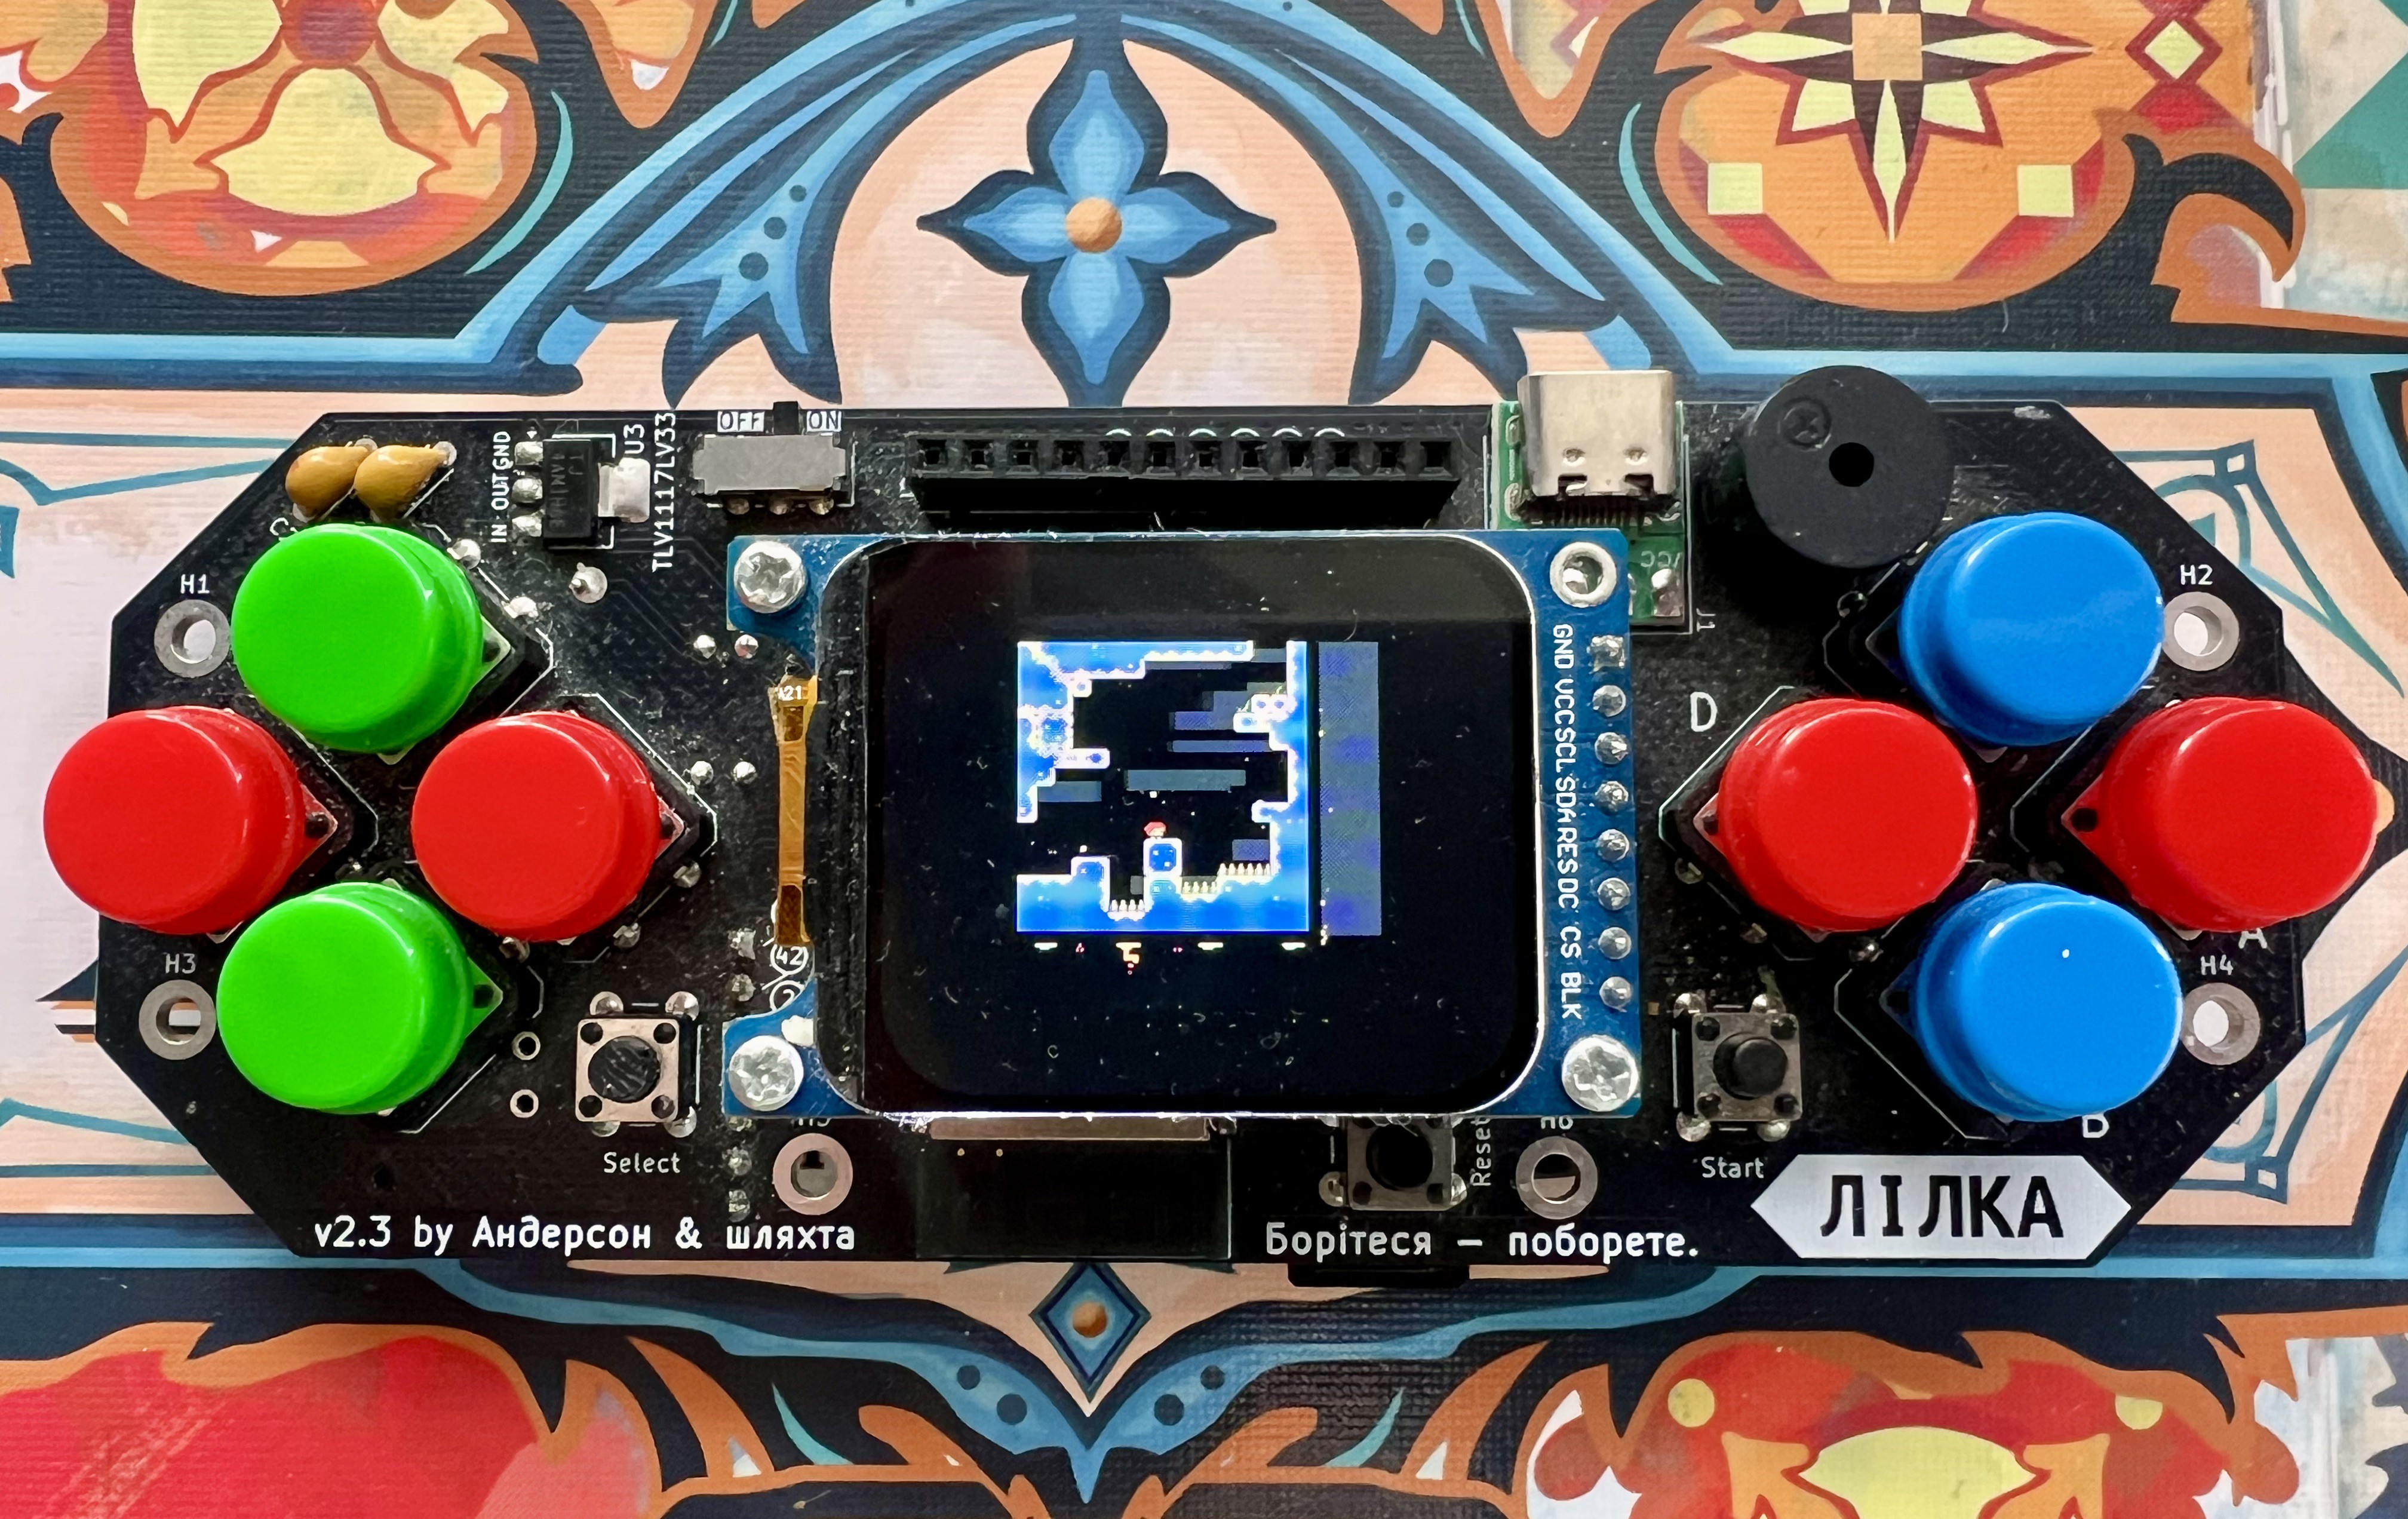
07/22/2026 at 12:20 • 0 commentsThere's an old meme: if a device has a screen, it should run Doom. People have run it on fridges, ATMs, and pregnancy tests. Now it's Lilka's turn — a Ukrainian DIY console built on the ESP32-S3. Here's where to legally get the game, what a WAD is, and what runs — and what doesn't.
How to run Doom on Lilka
You need two files on the SD card:
- The firmware — grab
doom.binfrom the doom_port releases page. - The game — a WAD file (see below where to get one). It must go in the root of the SD card and must be named
doom.wad(episode-based games: Doom 1, Freedoom Phase 1) ordoom2.wad(Doom II, Plutonia, Freedoom Phase 2) — other names won't be recognized. One WAD at a time: the port loads the firstdoom*.wadit finds.
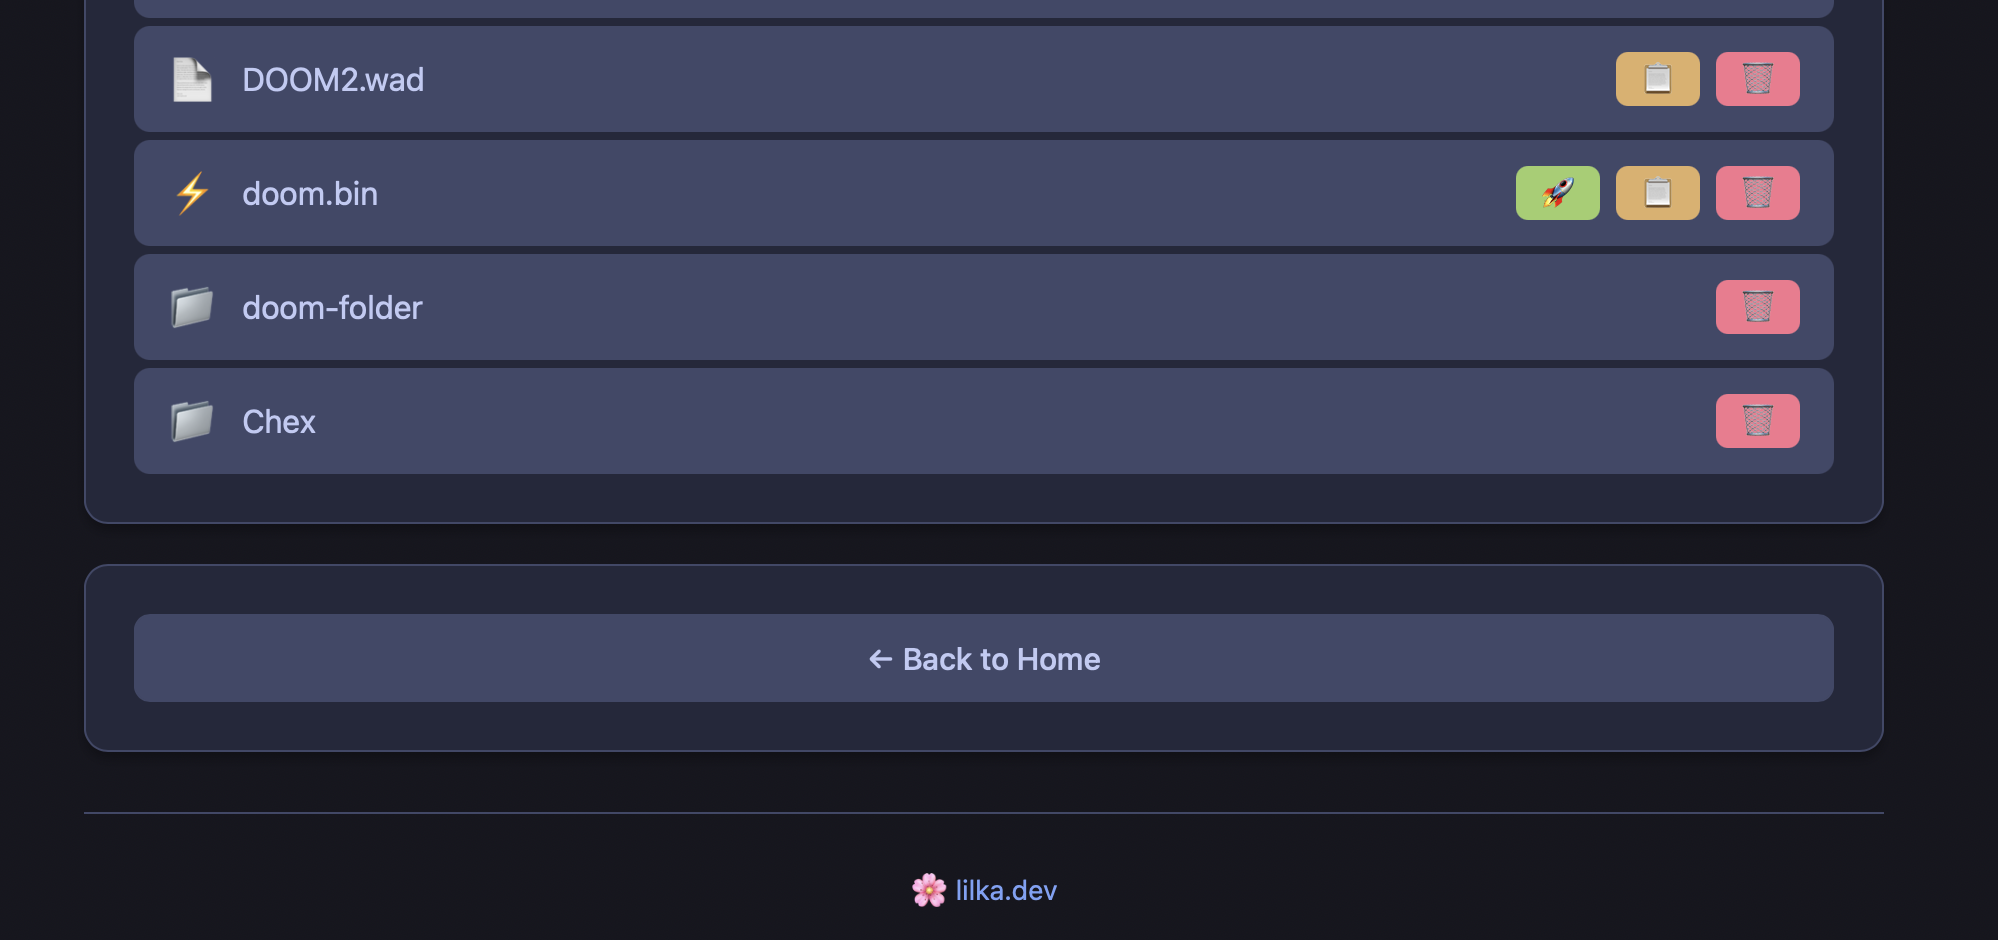
You can copy both files with a card reader or over Wi-Fi via Keira Web Manager. Then launch
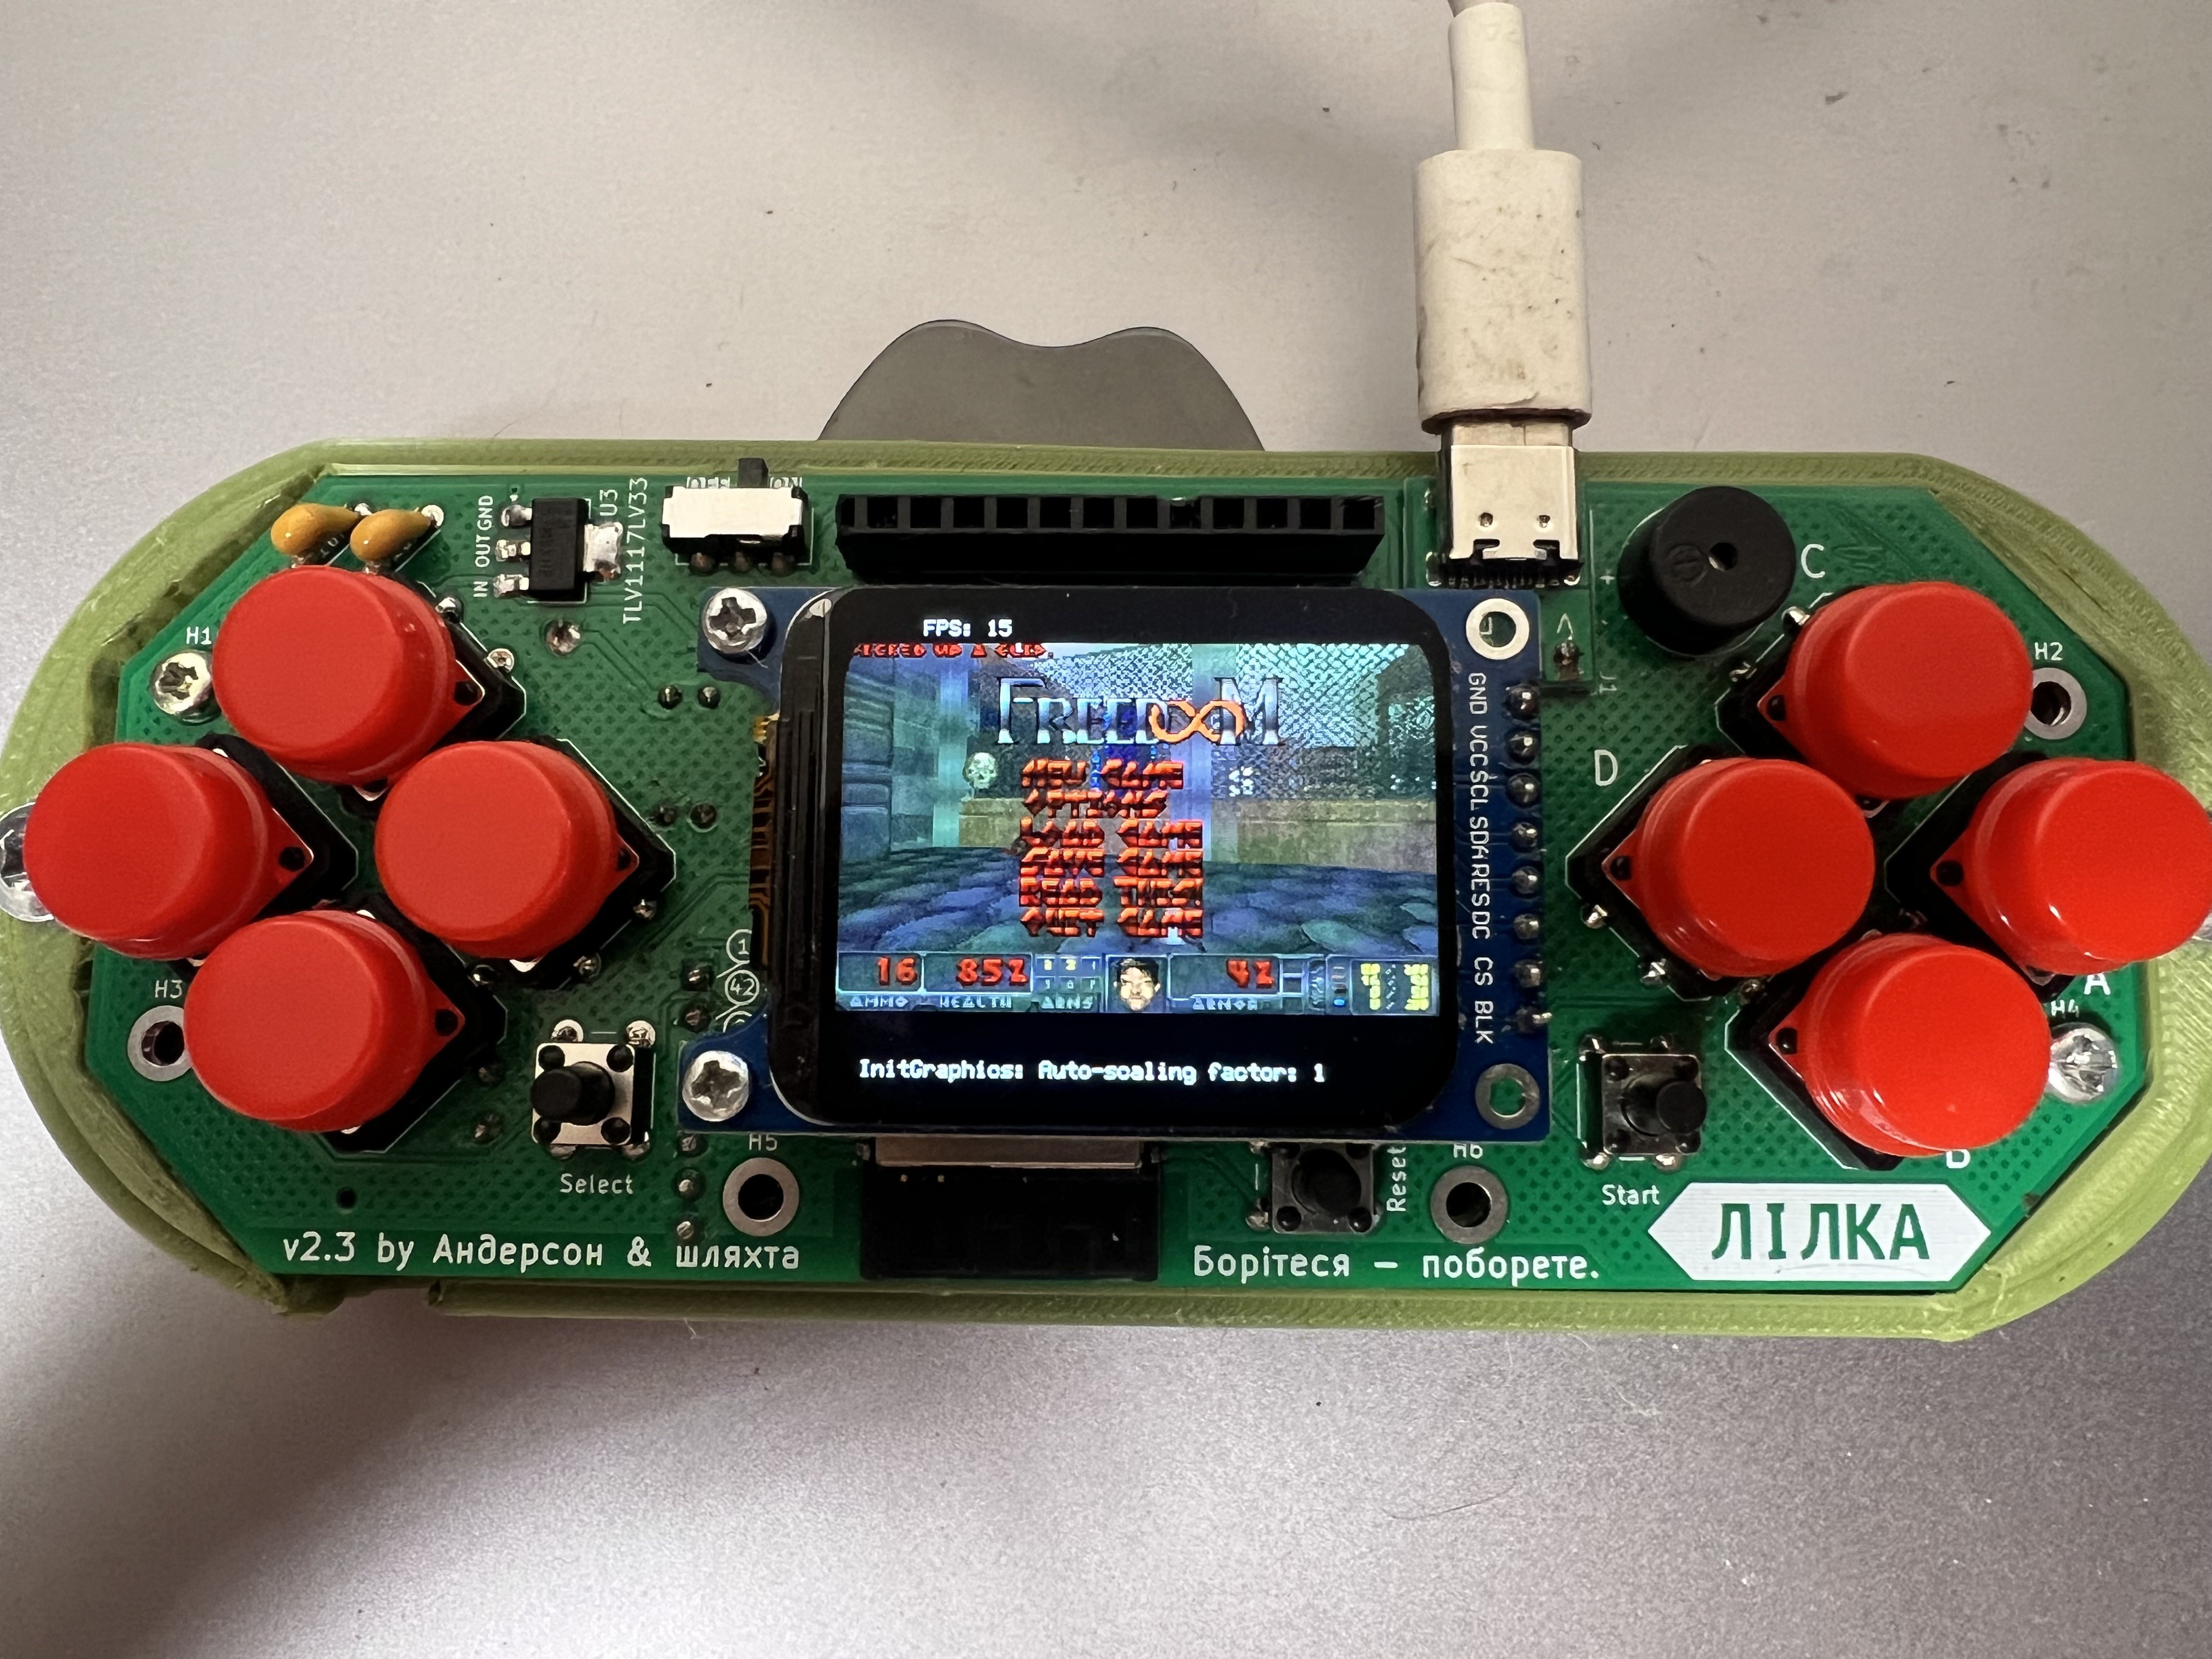
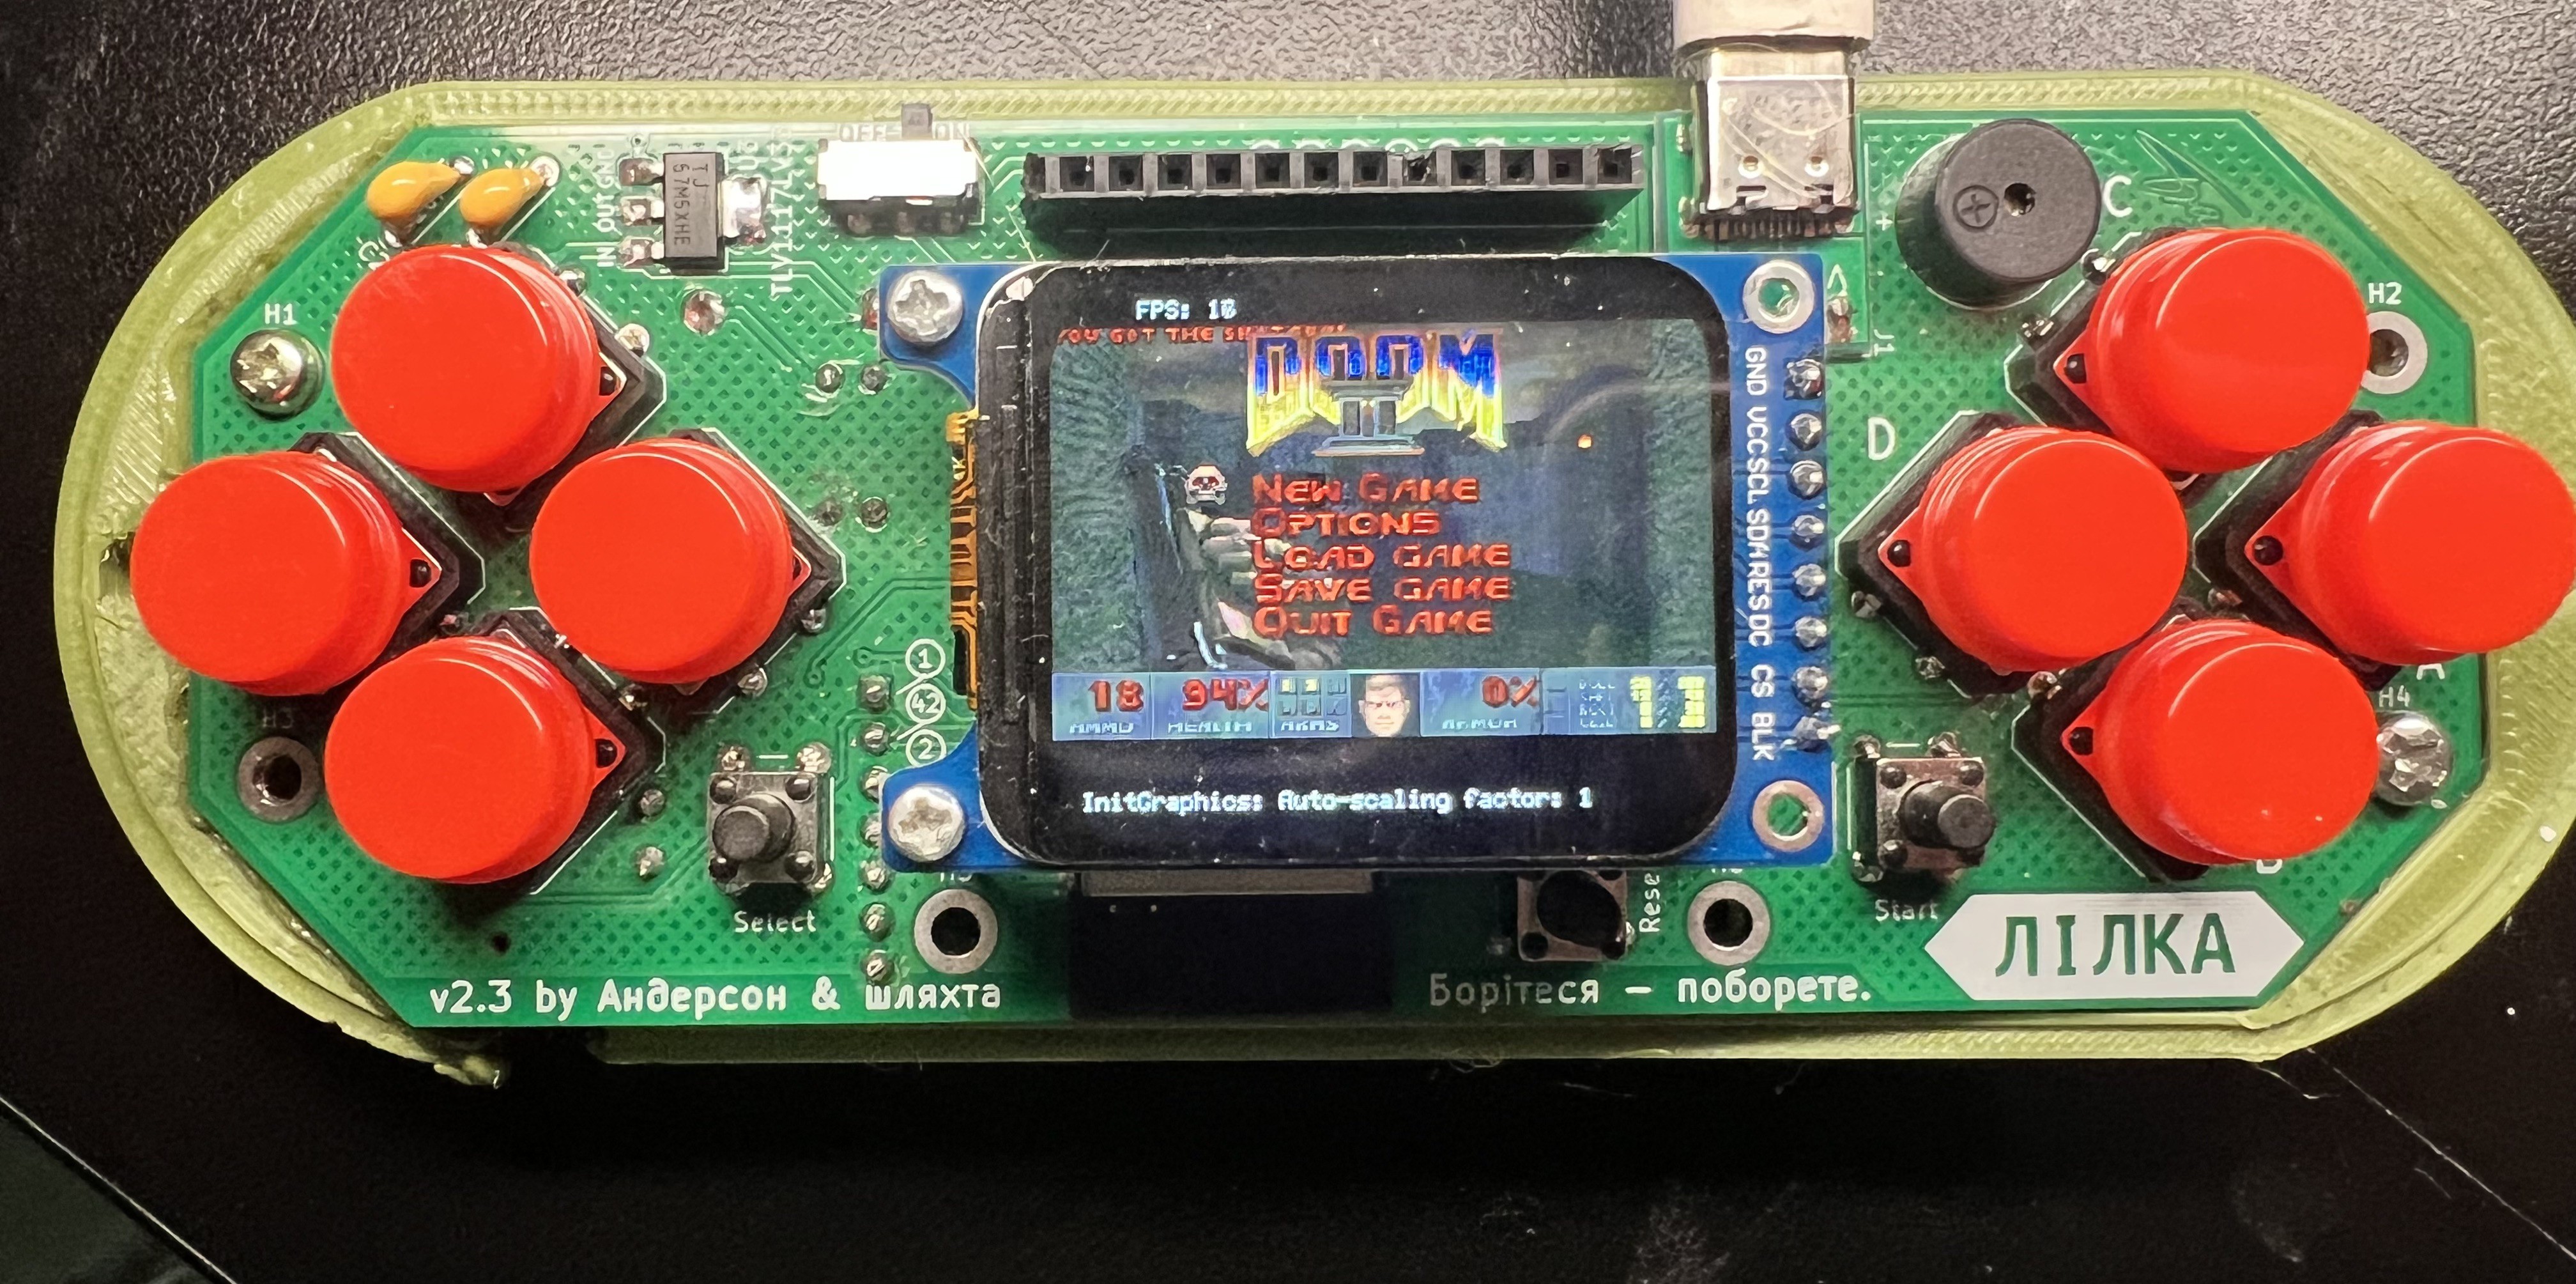
doom.binfrom the Keira menu on your Lilka — and rip and tear.![]()
WAD, IWAD, PWAD
The engine is just a "player". The actual game — levels, monsters, textures, sounds — lives in a single
.wadfile (Where's All the Data). An IWAD is a complete game; a PWAD is an add-on that only works on top of one. So "getting Doom" means getting an IWAD.Where to get games legally
- Doom Shareware (doom1.wad
) — the first episode, free since 1993
How to extract doom1.wad from the shareware archive. The official shareware release (doom19s.zip from /idgames) is a 1995 installer split for floppy disks, so you won't see the WAD file right away. The files
DOOMS_19.1andDOOMS_19.2are two halves of a regular zip archive. Join them and unpack.macOS / Linux (Terminal, in the folder with the files):
cat DOOMS_19.1 DOOMS_19.2 > dooms19.zip
unzip dooms19.zip
Windows (Command Prompt):
copy /b DOOMS_19.1+DOOMS_19.2 dooms19.zip
then unpack
dooms19.zipwith any archiver.Among the extracted DOS files you'll find
DOOM1.WAD(~4 MB) — that's the one we need. The rest (DOOM.EXE, SETUP.EXE, etc.) can be deleted. If you'd rather skip the hassle, the same WAD is available on the Internet Archive in plain form.- Freedoom — a free community-made game on the Doom engine. Phase 1 is episode-based like Doom 1, Phase 2 is like Doom II.
![]()
- DOOM + DOOM II on GOG or Steam — four classic games in one package: Doom, Doom II, and Final Doom (TNT + Plutonia).
When you buy DOOM + DOOM II on GOG, you get a Windows installer (
setup_doom_plus_doom_ii_...exe). The easiest way on Windows is to just install the game: the WADs will be in the installation folder, with the classic DOS versions in thedosdoom\base\subfolder.You can also skip the installation — the innoextract utility pulls files out of the installer like from a regular archive:
- Windows: download innoextract.exe (or
winget install innoextract), then in Command Prompt, in the folder with the installer:
innoextract setup_doom_plus_doom_ii_....exe
- macOS / Linux:
brew install innoextract(or use your package manager), then the same command.
The extracted folders will appear next to the installer — look for the WADs in
dosdoom/base/: the originalDOOM.WADandDOOM2.WADare there, with Plutonia and TNT in the neighboring subfolders.![]()
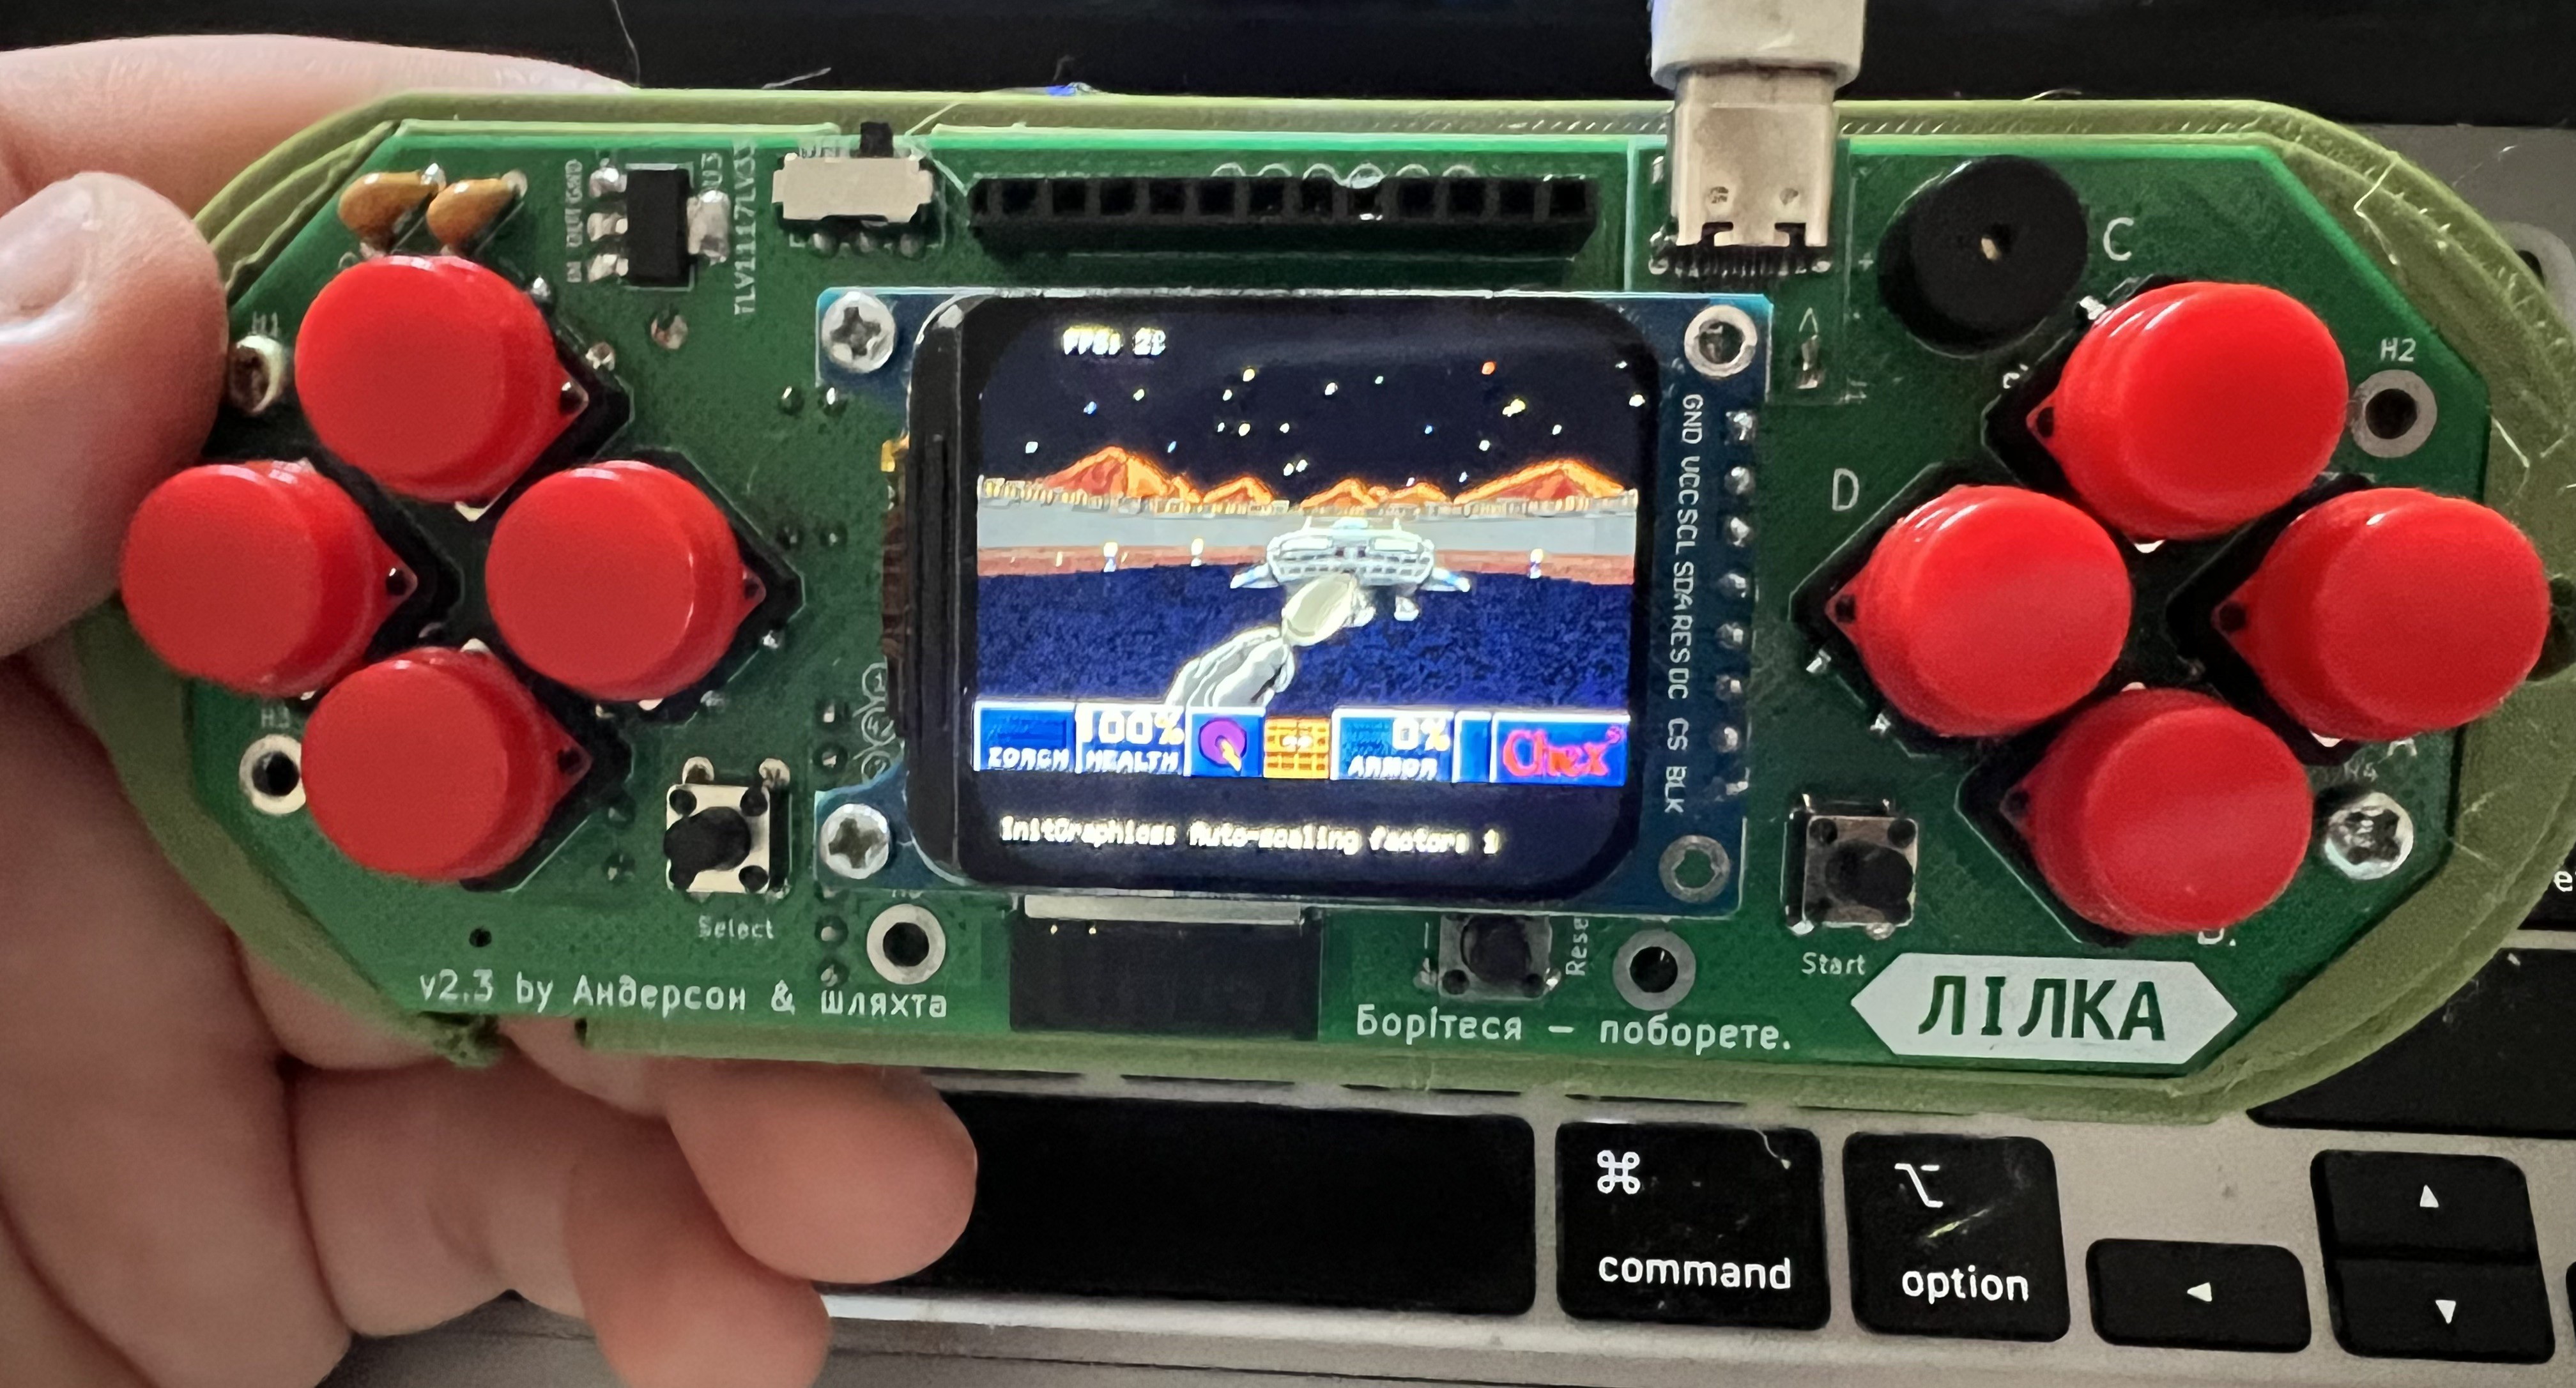
Chex Quest (1996) is probably the strangest game ever built on the Doom engine: a shooter given away for free in Chex cereal boxes as a promo. Instead of demons — slimy alien Flemoids; instead of guns — "zorchers" that don't kill enemies but teleport them back home: not a drop of blood, it's a kids' game after all. Underneath, though, it's a full-fledged Doom — and a cult classic today. Legally free; runs on Lilka. Grab the WAD from the Internet Archive and rename it to
doom.wad.![]()
What to do when something won't start
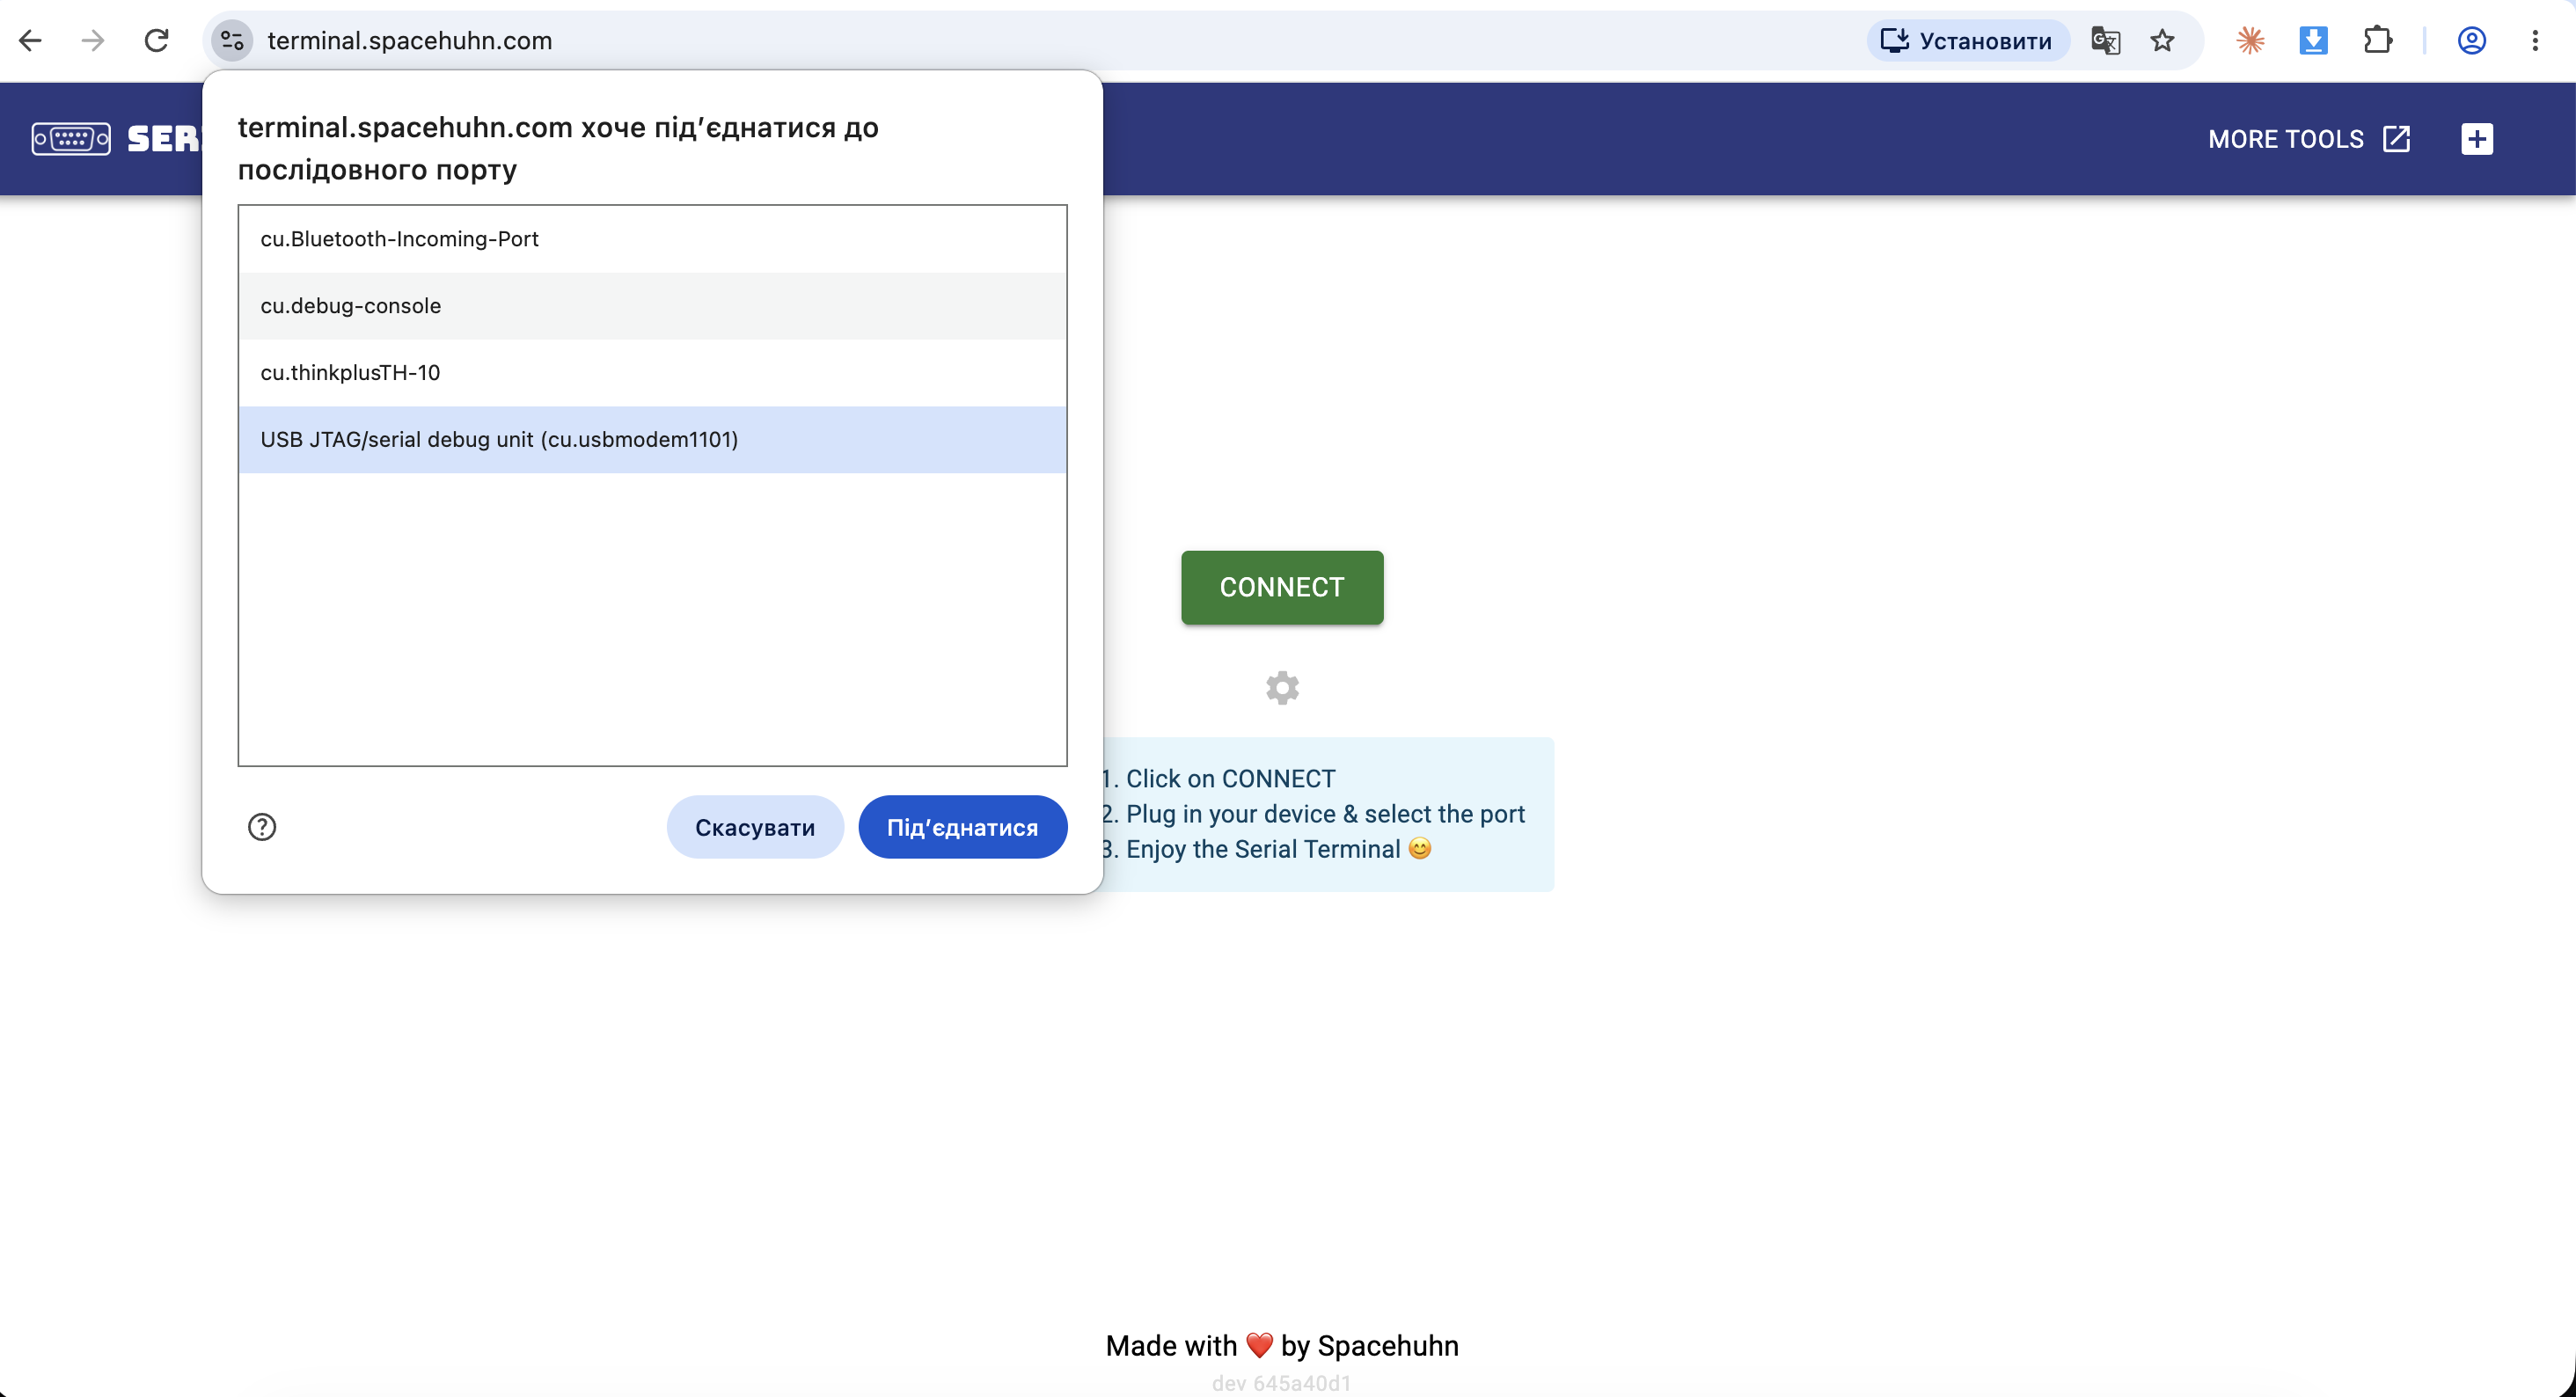
Your most valuable diagnostic tool is the serial log. Connect Lilka to your computer via USB and open serial.huhn.me in Chrome: click Connect, pick Lilka's port, set the speed to 115200 — nothing to install.
![]()
If you prefer a desktop app, the free CoolTerm (Mac/Win/Linux) does the same job; terminal fans can simply run
screen /dev/tty.usbmodem* 115200on macOS/Linux.The log captures everything the engine is thinking during startup: how much memory it allocated, which WAD it found on the card, where it stumbled. Errors that never make it to Lilka's screen are fully visible here.
For example, I tried to trick the engine by renaming a Heretic WAD to
doom.wad. It didn't fall for it — the engine checks the file's contents, not just the name, and politely replied in the log:adding /sd/DOOM.wad IWAD file with the doomgenericdoom binary. This isn't going to work. You probably want to use the doomgenericheretic binary.
"This isn't going to work, you want the heretic binary." Thirty years old, and still the politest error message around.
In place of a conclusion
The Doom engine is not one game — it's a whole world: it powered fantasy games with elves and wizards (Heretic, Hexen), a shooter-RPG with dialogues (Strife), a kids' game about cereal (Chex Quest), a Viking epic (REKKR) — and thousands of fan-made games and levels still being created today, thirty years on. The full list of IWAD games is on the Doom Wiki — grab one, experiment, and let Lilka show you what a 1993 engine can do. It runs Doom. And not only Doom.
- The firmware — grab
-
Programming Lilka in mJS
04/20/2026 at 05:48 • 0 commentsLilka is an open-source handheld console based on the ESP32, built by the Ukrainian maker community 🇺🇦. One of its nicest features is mJS support — which means programs for Lilka can be written in JavaScript, the same language that powers half of the modern web.
mJS is a tiny JavaScript engine from Cesanta, built specifically for microcontrollers. The syntax is familiar, but standard JS libraries (React, npm modules, and the like) aren't supported — only the basic language and Lilka's own APIs. For simple scripts, that's perfectly fine.
And the coolest part — no compilation, no reflashing. A script is just a
.jsfile on the SD card: pick it in the menu and it runs. Edit the code, save, launch again — the whole cycle takes seconds ⚡ That's what makes Lilka such a great platform for tinkering and learning to code.A quick note before we dive in: mJS support is a fairly fresh addition to KeiraOS, introduced in v2.6.5 and still actively being developed. Things mostly work, but you might run into the occasional rough edge — for example, an
error 2message that pops up every time you exit a script. It's harmless and doesn't affect anything else, just close it and move on. New mJS features and fixes are landing release after release, so the experience keeps getting smoother 🚀🐱 Cat App
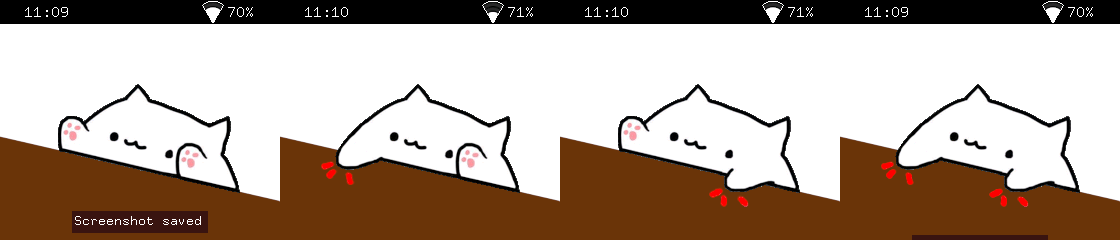
Cat.js Let's walk through a simple program in the style of Bongo Cat — a kitty that smacks its paws on the table when you press buttons 🥁 Press B — the cat claps with its right paw. D — with the left. Both at once — a double slap, just like in the real meme. And if you press C — a quick blink with a muffled "thunk" from the buzzer 💭
![]()
The whole "secret" is four BMP images on the SD card:
no.bmp(the calm cat),left.bmp,right.bmp, andboth.bmp. We load them once at the start viaresources.load_image(), and from there each frame we just decide which picture to draw on top based on the button state 🎨The logic is so simple it fits into about a dozen lines: first we draw the base image (
no), and then on top we overlay the "paw variant" — if the matching button is held. It's a classic layering trick: every frame starts from a clean base, and details get stacked on top ⚙️One neat detail —
buzzer.play(40, 100). 40 Hz is already near the edge of audibility, a deep low "thump". That's exactly why the paw slaps sound not like a beep but like a dull "tap-tap" — perfect for bongos 🔉// cat.js — Cat with ears controlled by buttons // Port of LUA/cat/cat.lua // Required: no.bmp, left.bmp, right.bmp, both.bmp in the same directory // Load images let no = resources.load_image("no.bmp"); let left = resources.load_image("left.bmp"); let right = resources.load_image("right.bmp"); let both = resources.load_image("both.bmp"); let running = true; while (running) { let state = controller.get_state(); // Play sound when ear buttons are just pressed if (state.b.just_pressed || state.d.just_pressed) { buzzer.play(40, 100); } // Exit on A button if (state.a.pressed) { running = false; } // Draw the appropriate image based on button state display.draw_image(no, 0, 0); if (state.d.pressed) { display.draw_image(left, 0, 0); } if (state.b.pressed) { display.draw_image(right, 0, 0); } if (state.b.pressed && state.d.pressed) { display.draw_image(both, 0, 0); } if (state.c.pressed) { util.sleep(0.1); display.draw_image(both, 0, 0); buzzer.play(40, 100); display.queue_draw(); util.sleep(0.1); display.draw_image(no, 0, 0); } display.queue_draw(); util.sleep(0.016); }And the best thing about this example is that it's not really a program — it's a template. Swap the four BMP files for your own, and in 10 minutes you've got your own character: a dog sticking out its tongue; a robot blinking its LEDs; your own photo pulling faces on command 📸 The code structure doesn't change by a single line — just different pictures. That's exactly where mJS wins: no reflashing the device, no building a project. Drop new BMPs onto the SD card — and you're already running a new character ⚡
🌌 Starfield App
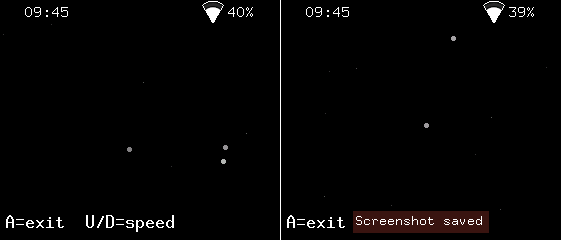
Starfield.js Let's recreate that classic "flying through space" effect — stars streaming past the camera, growing brighter as they get close, fading to tiny dots in the distance 🚀 A great example of how a 3D illusion can be built from very simple ingredients.

The smaller stars are visible on the Lilka screen, but not on the screenshot. Each star lives in three numbers:
sx,sy, andsz. The first two are its position on the screen, andszis the distance from the camera — its depth. Every frame we subtractspeedfromsz, which means the star gets a bit closer. Whenszreaches zero, the star has flown past the camera, so we send it back into the distance with fresh random coordinates and a maximumszagain ✨The whole 3D illusion comes down to a single line of math:
px = sx * 256 / sz + w / 2
This is called perspective projection — the closer the star (smaller
sz), the further from the center of the screen it ends up. That outward motion from the middle of the display is exactly what our eyes read as forward flight through space. The same trick scales size and brightness too: nearby stars become bright dots, distant ones fade to a single dim pixel. UP and DOWN change the speed live.// starfield.js — Classic starfield effect // Stars fly toward the camera. Press A to exit. let w = display.width; let h = display.height; let numStars = 80; // Initialize stars as arrays: [x, y, z] let sx = []; let sy = []; let sz = []; for (let i = 0; i < numStars; i++) { sx[i] = math.random(-w, w); sy[i] = math.random(-h, h); sz[i] = math.random(1, w); } let speed = 8; let running = true; while (running) { display.fill_screen(colors.black); for (let i = 0; i < numStars; i++) { sz[i] = sz[i] - speed; if (sz[i] <= 0) { sx[i] = math.random(-w, w); sy[i] = math.random(-h, h); sz[i] = w; } let px = math.round(sx[i] * 256 / sz[i] + w / 2); let py = math.round(sy[i] * 256 / sz[i] + h / 2); if (px >= 0 && px < w && py >= 0 && py < h) { let brightness = math.round(255 - sz[i] * 255 / w); brightness = math.clamp(brightness, 50, 255); let color = display.color565(brightness, brightness, brightness); let size = math.round(3 - sz[i] * 3 / w); if (size < 1) { size = 1; } if (size > 1) { display.fill_circle(px, py, size, color); } else { display.draw_pixel(px, py, color); } } } display.set_cursor(5, h - 12); display.set_text_color(colors.white); display.print("A=exit U/D=speed"); display.queue_draw(); let state = controller.get_state(); if (state.a.just_pressed) { running = false; } if (state.up.pressed) { speed = math.clamp(speed + 1, 1, 30); } if (state.down.pressed) { speed = math.clamp(speed - 1, 1, 30); } util.sleep(0.016); }🔴 Bouncing Ball App
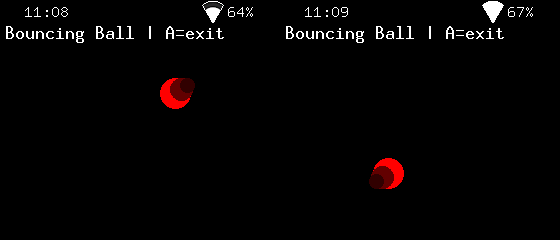
A red ball flies around the screen, bouncing off the walls, with a fiery trail behind it 🔥 A kind of "physics without physics" — the simplest example of how a single arithmetic rule, repeated 60 times a second, creates the feeling of living motion.
![]()
The whole logic boils down to two things. First — movement: every frame we add velocity to position (
x = x + vx), and the ball shifts. The bigger the velocity, the more it leaps across the screen — no acceleration formulas, no mass, just two numbersvxandvy. Second — bouncing: when the ball touches a wall, we flip the sign of the corresponding velocity (vx = -vx). Was moving right — now moving left, and vice versa. This trick is the foundation of every game with flying projectiles, from Pong to Breakout.The trail behind the ball is another simple trick: we draw two more circles slightly behind the main position (
x - vx * 2andx - vx * 4), with smaller radius and darker colors. The faster the ball flies, the longer and brighter the trail becomes, becausevx * 4turns into a bigger offset 💨The D-pad changes velocity in real time: UP slows down vertical motion, DOWN speeds it up; LEFT and RIGHT do the same horizontally. You can accelerate the ball to a frantic pace, or almost freeze it mid-air, watching the trail collapse into a single dot.
// bouncing_ball.js — A ball bouncing around the screen
// Use D-pad to change ball speed. Press A to exit.

let w = display.width;
let h = display.height;
let r = 15;

let x = w / 2;
let y = h / 2;
let vx = 3;
let vy = 2;

let running = true;

while (running) {    // Update position    x = x + vx;    y = y + vy;
    // Bounce off walls    if (x - r < 0 || x + r > w) {        vx = -vx;        x = math.clamp(x, r, w - r);    }    if (y - r < 0 || y + r > h) {        vy = -vy;        y = math.clamp(y, r, h - r);    }
    // Draw    display.fill_screen(colors.black);    display.fill_circle(math.round(x), math.round(y), r, colors.red);
    // Trail effect: smaller circles behind    display.fill_circle(math.round(x - vx * 2), math.round(y - vy * 2), r - 4, display.color565(100, 0, 0));    display.fill_circle(math.round(x - vx * 4), math.round(y - vy * 4), r - 8, display.color565(50, 0, 0));
    // HUD    display.set_cursor(5, 15);    display.set_text_color(colors.white);    display.print("Bouncing Ball | A=exit");
    display.queue_draw();
    // Input    let state = controller.get_state();    if (state.a.just_pressed) {        running = false;    }    if (state.up.pressed) {        vy = vy - 0.2;    }    if (state.down.pressed) {        vy = vy + 0.2;    }    if (state.left.pressed) {        vx = vx - 0.2;    }    if (state.right.pressed) {        vx = vx + 0.2;    }
    util.sleep(0.016);
}
The same mechanic powers half the games ever made — Pong, Arkanoid, Breakout, even the classic DVD-logo screensaver waiting for that one perfect corner hit 📐 Swap the ball for anything else: a spaceship sprite, an apple, a tennis ball — and you get an entirely different game on the very same skeleton ⚡
🟠 Bouncing DVD Logo App
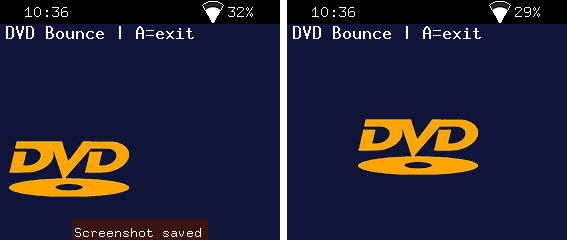
Replace the red ball with the legendary DVD logo, and you get that nostalgic 2000s screensaver everyone remembers 📺 The movement and bouncing logic stays exactly the same — but all the interesting stuff hides in working with the image itself.
![]()
🖼️ Loading images in mJS. You can add your own images to a Lilka program — photos, logos, game sprites. The code for it is minimal:
let dvd = resources.load_image("dvd-white.bmp", colors.black);
display.draw_image(dvd, x, y);
The
dvd-white.bmpfile should sit in the same SD-card folder as the.jsscript. Lilka resolves the relative path automatically.🎨 BMP format, 24-bit. Lilka works with plain uncompressed BMP — 8 bits per channel for R, G, B. Not 1-bit black-and-white, not 32-bit with alpha — exactly 24-bit RGB. You can verify a file with
sips -g all dvd-white.bmp: the output should showbitsPerSample: 8andsamplesPerPixel: 3.✨ Transparency through color, not an alpha channel. BMP doesn't support transparency directly, so Lilka handles it differently: at load time you specify "this color shouldn't be drawn." The second argument of
resources.load_image()is that transparencyColor. In the example above, the black background of the BMP becomes transparent and only the logo itself shows on screen. Pick a transparency color that doesn't appear in the image itself: black background for a white logo, white background for a black one.📐 Optimal size. The Lilka display is 240×280 pixels. Rough guidelines: 32×32 for small objects, 64×64 for the main character of a game, 128×128 and up for large central elements. For the DVD logo with its 2:1 aspect ratio, 240×108 works beautifully.
🪄 ImageMagick is a universal command-line tool for image processing, available on macOS (
brew install imagemagick), Linux (apt install imagemagick), and Windows. A single command can crop, invert, resize, and convert into the right format:magick dvd.jpg -fuzz 10% -trim +repage -fill black -opaque white \ -resize 240x -type TrueColor BMP3:dvd-white.bmp
-trimstrips the white margins around the logo,-opaque whitereplaces the white background with black (so transparency works),-resize 240xsets the width while preserving aspect ratio, andBMP3:guarantees the exact 24-bit BMP that Lilka expects 🎯What changed in the code compared to Bouncing Ball:
Instead of a single radius
r, there are now two variables —dvdWanddvdH— because the logo has different width and height. The wall bounce check is now computed separately for each axis:dvdW / 2for the left and right walls,dvdH / 2for top and bottom. The threefill_circlecalls (the ball plus two trail circles) are replaced with a singledisplay.draw_image()that draws the ready-made picture. And one small detail —draw_imagetakes coordinates of the top-left corner, not the center (unlikefill_circle), so we subtractdvdW / 2anddvdH / 2to keep the logo centered at point (x, y).// dvd_bounce.js — DVD logo bouncing around the screen // Use D-pad to change logo speed. Press A to exit. // Required: dvd-white.bmp on the SD card (24-bit BMP, e.g. 240x108). let w = display.width; let h = display.height; // Load DVD logo. Black is treated as transparent. let dvd = resources.load_image("dvd-white.bmp", colors.black); let dvdW = 240; let dvdH = 108; let x = w / 2; let y = h / 2; let vx = 3; let vy = 2; let running = true; while (running) { // Update position x = x + vx; y = y + vy; // Bounce off walls if (x - dvdW / 2 < 0 || x + dvdW / 2 > w) { vx = -vx; x = math.clamp(x, dvdW / 2, w - dvdW / 2); } if (y - dvdH / 2 < 0 || y + dvdH / 2 > h) { vy = -vy; y = math.clamp(y, dvdH / 2, h - dvdH / 2); } // Draw display.fill_screen(display.color565(20, 20, 60)); display.draw_image(dvd, math.round(x - dvdW / 2), math.round(y - dvdH / 2)); // HUD display.set_cursor(5, 15); display.set_text_color(colors.white); display.print("DVD Bounce | A=exit"); display.queue_draw(); // Input let state = controller.get_state(); if (state.a.just_pressed) { running = false; } if (state.up.pressed) { vy = vy - 0.2; } if (state.down.pressed) { vy = vy + 0.2; } if (state.left.pressed) { vx = vx - 0.2; } if (state.right.pressed) { vx = vx + 0.2; } util.sleep(0.016); }It's the very same template as
cat.js— a simple skeleton you can drop any image into. Swapdvd-white.bmpfor the logo of your favorite band, a photo of your pet, your friend's avatar — and in two minutes you've got a personal screensaver ⚡ And there's still that legendary moment to wait for: when the logo finally hits a corner of the screen exactly 📐🏓 Pong App
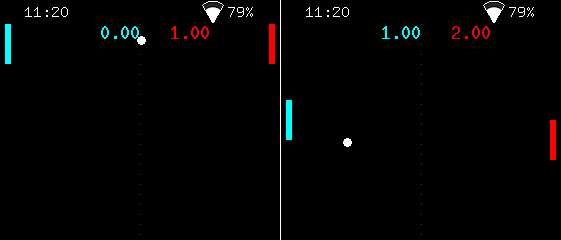
Pong.js The game that started the entire video game industry. Atari released Pong back in 1972, and it's the title that turned video games into a mass phenomenon. Two paddles, a ball, a black background, and a white dashed line down the middle — nothing more was needed to hook people for decades 🕹️
![]()
The player controls the left (cyan) paddle with UP/DOWN, and the right (red) one moves on its own. The ball flies between them, bouncing off the paddles and the top and bottom walls. If your opponent doesn't make it in time — you score a point. First to... actually no, the game runs forever, play as long as you can hold out 🏆
Half the code is the familiar mechanic from Bouncing Ball: the ball moves through
bx + bvx, bounces off the ceiling and floor by flipping the sign of its velocity. The paddles add everything interesting on top of that base.🎯 Ball-paddle collision. When the ball touches the left paddle, three conditions are checked at once: did it reach the paddle's x-coordinate (
bx - br <= pw + 5), is it at the paddle's height (by >= p1y && by <= p1y + ph), and is it actually flying toward the paddle (bvx < 0). Only if all three are true do we flipbvxand send the ball back. That last check matters more than it looks: without it, the ball would "stick" to the paddle, endlessly flipping direction.⚡ Speed-up on every hit. After a bounce,
bvxgets bumped by an additional 0.3. The longer the rally goes, the faster the ball flies — and the harder it is to keep up. A small detail that turns a sleepy back-and-forth into a real duel.🤖 The CPU opponent. The right paddle has the simplest AI in the world: every frame it looks at the ball's vertical position and moves toward it at 3 pixels per frame. That's deliberately slower than the player's 4 pixels — otherwise the computer would be unbeatable and the game would lose its fun. The
± 2pixel "dead zone" stops the paddle from jittering when the ball sits exactly opposite it.📊 Score counter. If
bx < 0— the ball flew past the left edge, point for the opponent. Ifbx > w— the other way around, point for the player. Either way, the ball returns to the center of the screen at its starting velocity, and the next rally begins.🎨 Black background, white center line, colored paddles. Stylistically the program quotes the original 1972 Pong — minimalism that's impossible to ruin. The center line is drawn by a
forloop placing one pixel every 10 units of height. Simple and effective ✨###b class="inline-flex items-center justify-center relative isolate shrink-0 can-focus select-none disabled:pointer-events-none disabled:opacity-50 disabled:shadow-none disabled:drop-shadow-none border-transparent transition font-base duration-300 ease-[cubic-bezier(0.165,0.85,0.45,1)] h-8 w-8 rounded-md backdrop-blur-md _fill_10ocf_9 _ghost_10ocf_96" type="button" aria-label="Copy to clipboard" data-state="closed"###
javascript
// pong.js — Simple Pong game for one player vs CPU
// Left paddle: D-pad UP/DOWN. Press A to exit.

let w = display.width;
let h = display.height;

// Ball
let bx = w / 2;
let by = h / 2;
let bvx = 3;
let bvy = 2;
let br = 4;

// Paddles
let pw = 6;
let ph = 40;
let p1y = h / 2 - ph / 2; // Player (left)
let p2y = h / 2 - ph / 2; // CPU (right)
let pSpeed = 4;

// Score
let score1 = 0;
let score2 = 0;

let running = true;

while (running) {    // --- Input ---    let ctrl = controller.get_state();    if (ctrl.a.just_pressed) {        running = false;    }    if (ctrl.up.pressed) {        p1y = p1y - pSpeed;    }    if (ctrl.down.pressed) {        p1y = p1y + pSpeed;    }    p1y = math.clamp(p1y, 0, h - ph);
    // --- CPU AI ---    let cpuTarget = by - ph / 2;    if (p2y < cpuTarget - 2) {        p2y = p2y + 3;    }    if (p2y > cpuTarget + 2) {        p2y = p2y - 3;    }    p2y = math.clamp(p2y, 0, h - ph);
    // --- Ball physics ---    bx = bx + bvx;    by = by + bvy;
    // Top/bottom bounce    if (by - br < 0 || by + br > h) {        bvy = -bvy;        by = math.clamp(by, br, h - br);    }
    // Left paddle collision    if (bx - br <= pw + 5 && by >= p1y && by <= p1y + ph && bvx < 0) {        bvx = -bvx;        bvx = bvx + 0.3;        bx = pw + 5 + br;    }
    // Right paddle collision    if (bx + br >= w - pw - 5 && by >= p2y && by <= p2y + ph && bvx > 0) {        bvx = -bvx;        bvx = bvx - 0.3;        bx = w - pw - 5 - br;    }
    // Score    if (bx < 0) {        score2 = score2 + 1;        bx = w / 2;        by = h / 2;        bvx = 3;        bvy = 2;    }    if (bx > w) {        score1 = score1 + 1;        bx = w / 2;        by = h / 2;        bvx = -3;        bvy = -2;    }
    // --- Draw ---    display.fill_screen(colors.black);
    // Center line    for (let dy = 0; dy < h; dy = dy + 10) {        display.draw_pixel(w / 2, dy, display.color565(60, 60, 60));    }
    // Paddles    display.fill_rect(5, math.round(p1y), pw, ph, colors.cyan);    display.fill_rect(w - pw - 5, math.round(p2y), pw, ph, colors.red);
    // Ball    display.fill_circle(math.round(bx), math.round(by), br, colors.white);
    // Score    display.set_cursor(w / 2 - 40, 15);    display.set_text_color(colors.cyan);    display.print(score1);    display.set_cursor(w / 2 + 30, 15);    display.set_text_color(colors.red);    display.print(score2);
    display.queue_draw();    util.sleep(0.016);
}
Pong is the perfect starting point for any kind of game experiment. Want Arkanoid? Replace the right paddle with a wall of bricks, and each ball hit knocks one out. Want Air Hockey for two players? Strip out the right paddle's AI and wire up the second player's controls to other buttons. Want soccer? Add another "paddle" and a goal 🥅 The skeleton is already there — the rest is just imagination ⚡
-
Inside KeiraOS: How Lilka Really Works?
04/18/2026 at 12:33 • 0 commentsLilka looks simple at first glance: a screen, some buttons, an SD card. But dig a little deeper and you'll find an entire ecosystem living inside — a microcontroller, an operating system, scripting engines, a dynamic app loader, and a web interface. In this article, we'll break down what it's all made of and how it works together.
📦 Repositories
The project used to live in a single monorepo. Today, the lilka-dev organization on GitHub hosts 16 repositories. The core ones are:
- keira — the operating system for the console
- sdk — the hardware-facing library
- lilka — schematics and documentation for the device itself
- examples — Lua code samples for beginners
- catalog — a website for browsing community apps
- flasher — a static site for flashing Lilka straight from a browser
- keira_dynapp — Example Dynamic app for KeiraOS
- There are also separate repositories for specific firmwares and apps:
- doom_port — a DOOM port
- arduino-nofrendo — an NES emulator with Lilka-specific fixes
- PicoPico — a Pico-8 fantasy console port for Lilka
- mpeg_stream_player — a video stream player
- BLE_Controller — a Bluetooth controller
- IR_module and RF_module — modules for working with infrared and radio signals
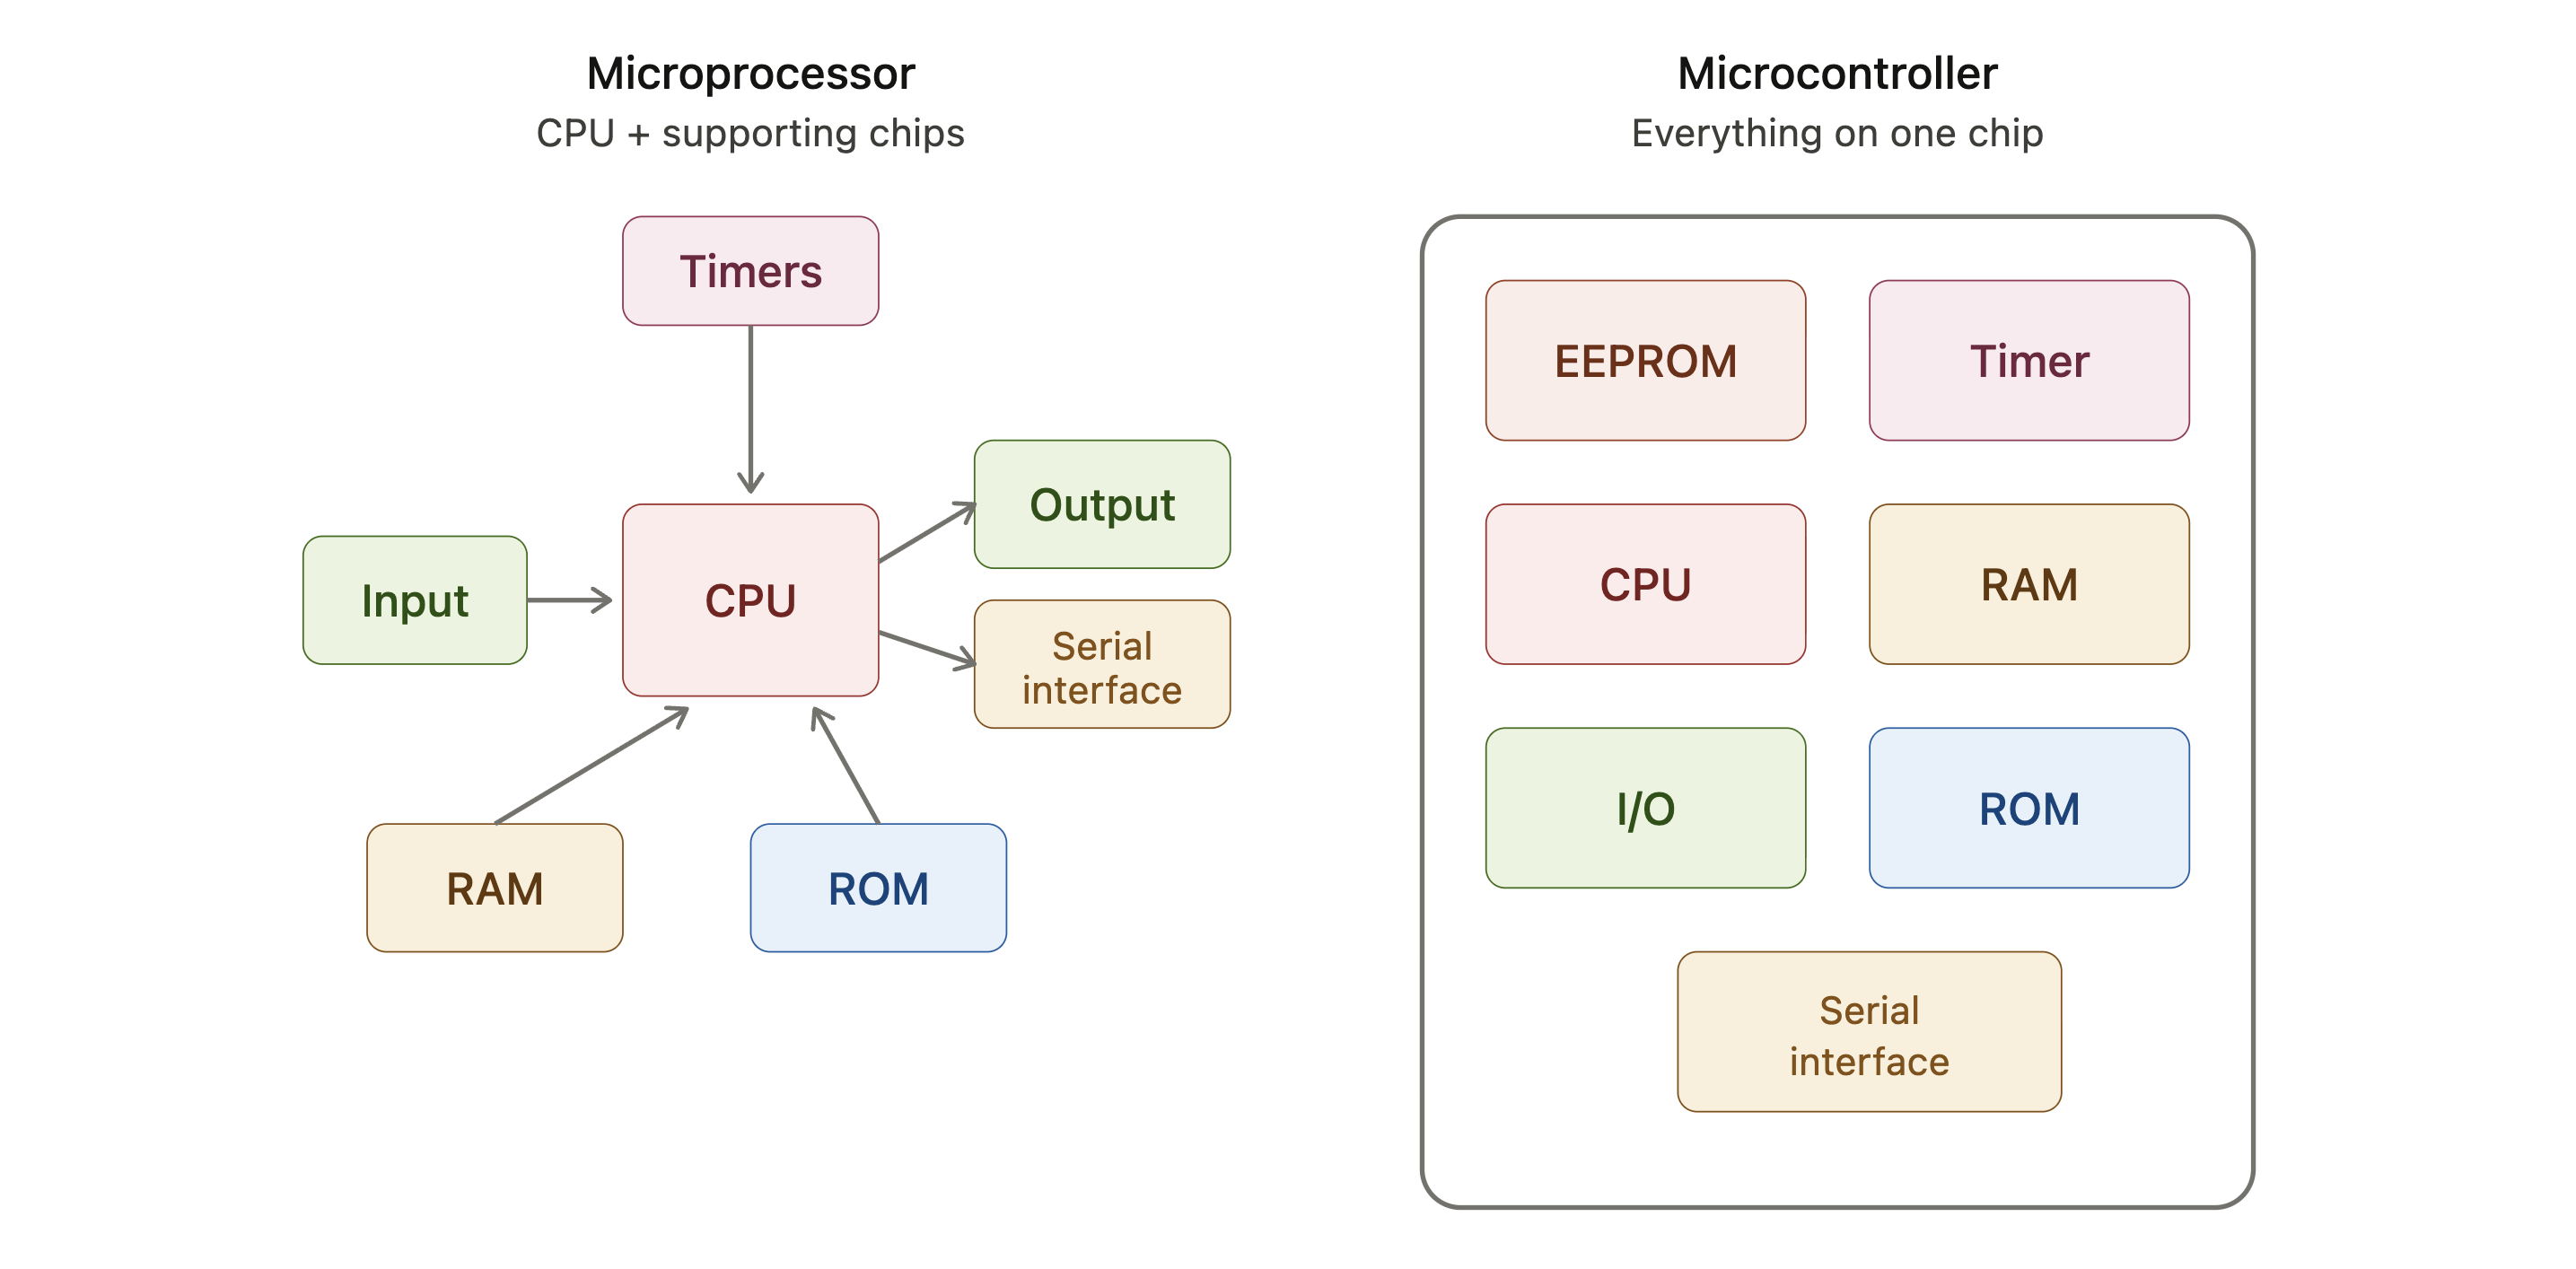
🤔 ESP32 and Raspberry Pi Are Not the Same Thing
This question comes up all the time, and Lilka's developer has a short answer: these are fundamentally different things, alike only in that both of them can be programmed.
ESP32 is a microcontroller made by the Chinese company Espressif. A small chip, cheap, low-power, boots in milliseconds. There's no operating system inside in the usual sense, no file system, no monitor, no keyboard. It just runs a single piece of code written into its flash memory — continuously. Lilka uses a specific version: the ESP32-S3-WROOM-1-N16R8, with two Xtensa LX7 cores at 240 MHz, 16 MB of flash, and 8 MB of PSRAM.
Raspberry Pi is a microcomputer. It runs a full Linux-like operating system, has an HDMI output, USB ports, and hundreds of megabytes of RAM. It's a good fit for tasks that need serious computing power: multimedia, web servers, computer vision. But it's significantly more expensive, physically larger, and draws far more power. It simply doesn't fit into a battery-powered device like a handheld console.
In short: ESP32 is for embedded systems and IoT, Raspberry Pi is for tasks that actually need a tiny computer.
![]()
⚙️ FreeRTOS and ESP-IDF
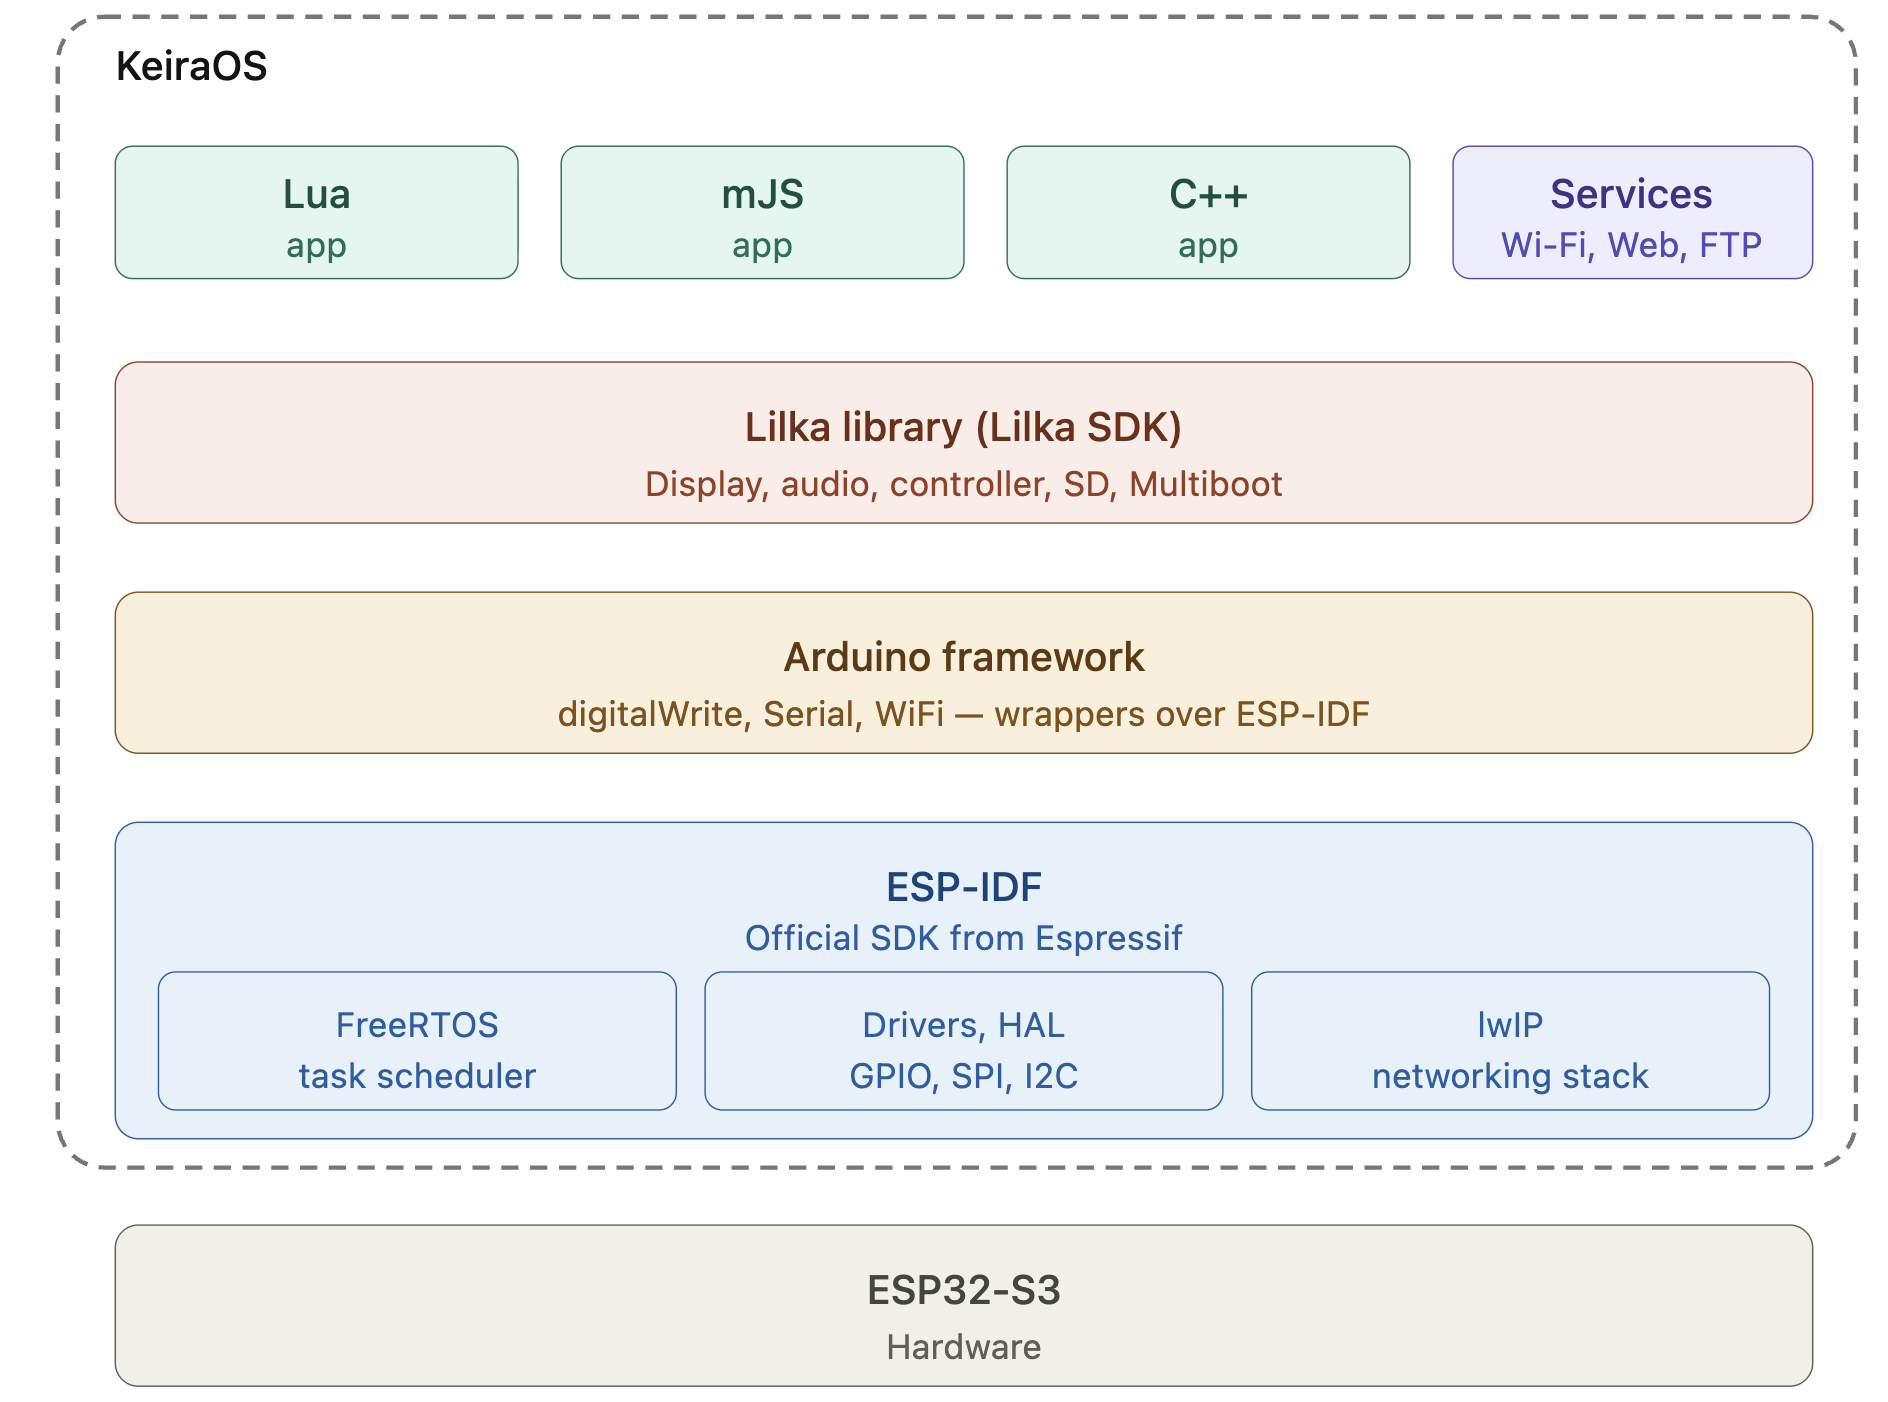
The chip on its own is just silicon. To actually work with it, you need a toolset. Espressif packaged one under the name ESP-IDF (Espressif IoT Development Framework) — the official SDK for ESP32 development. It bundles forks of several existing projects adapted to this chip: notably FreeRTOS for multitasking and lwIP for networking.
FreeRTOS is a small real-time operating system (RTOS). Its main job is to give developers the abstraction of threads (in FreeRTOS terminology they're called "tasks," but it's the same idea). Two pieces of code can run "in parallel," and the system handles switching between them.
🧵 How Multitasking Actually Works
The ESP32-S3 has two physical cores. This matters. One core handles screen rendering, the other runs user code. That's why even when your Lua script isn't doing anything special, the display still updates — a separate core takes care of that.
But even with two cores, each one runs multiple tasks in turn, not simultaneously. Switching is handled by the task scheduler — FreeRTOS's planner. Here's how it works: your code runs continuously until it hits a call to
sleep(),delay(), or something similar. That's the exact moment the scheduler gets a chance to hand control to another task. So having delays in your program isn't just a convenience — it's a hard requirement. Without them, other tasks will never get CPU time.One practical consequence:
sleep(100)does not guarantee exactly 100 ms. If there's a higher-priority task waiting, yours waits a bit longer. That's normal RTOS behavior.![]()
🛠️ Lilka SDK and KeiraOS
On top of ESP-IDF sits the Lilka SDK — a C++ library that abstracts away the console's hardware. Instead of manually initializing the ST7789 display over SPI or configuring I2S for the MAX98357A audio amplifier, the developer just calls
lilka::display.drawText()orlilka::audio.play(). The SDK takes care of all the details.![]()
KeiraOS is the operating system (firmware) for Lilka, built on top of FreeRTOS, ESP-IDF, and the Lilka SDK. The name is a tribute to the developer's cat 🐈. It's what the user sees when they power the device on: the menu, apps, file manager, Wi-Fi utilities.
KeiraOS's job, in the developer's own words, is more applied than systems-level: take everything that's available and turn it into something anyone can understand. All under tight memory constraints — 8 MB of PSRAM isn't as much as it sounds.
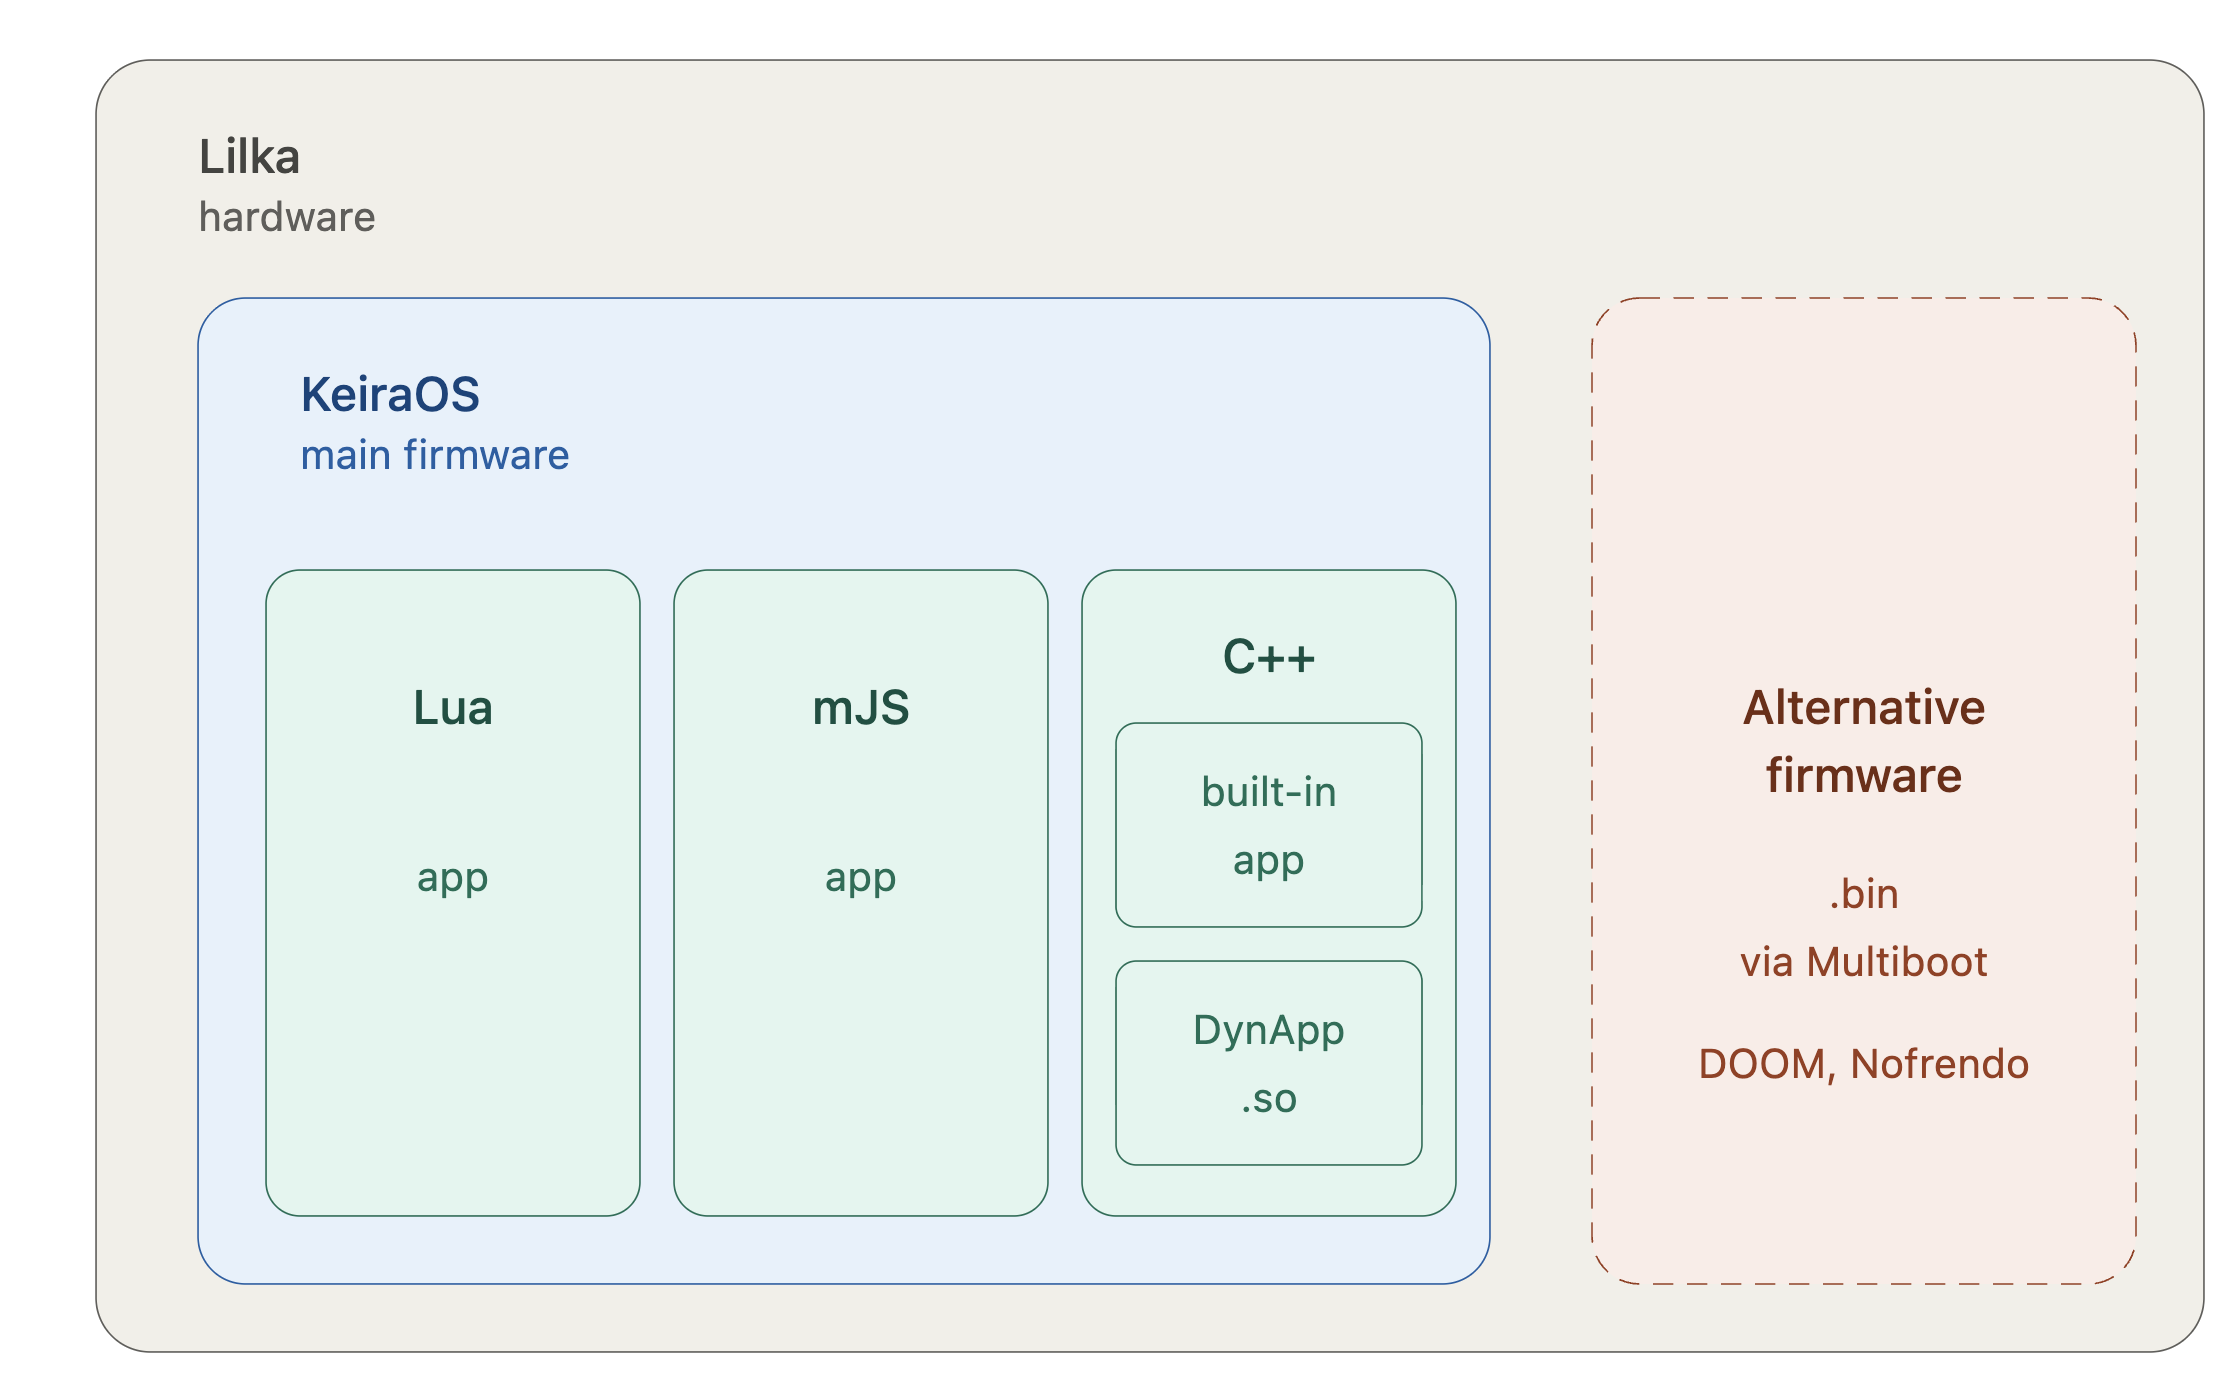
🧩 Apps, services and firmwares
KeiraOS has two core abstractions — app and service. Both are implemented as separate RTOS tasks. An app is what the user launches: a game, a utility, a script. It takes the foreground, reads button input, and draws to the screen. A service is a background task that runs in parallel. The Wi-Fi service keeps the network connection alive while the user plays a game. The web manager service handles HTTP requests from a browser. Services don't have a UI — they just run.
✍️ How to write an app
Apps for KeiraOS can be written in three languages:
Lua — the main and recommended option. Lua is a perfect fit for microcontrollers: fast, lightweight, minimal memory footprint. Write a .lua file in any text editor, drop it onto the SD card, and KeiraOS will run it immediately. Most of Lilka's API has Lua bindings.
mJS — a JavaScript engine from Mongoose OS. The syntax is familiar, but standard JS libraries (React, Node modules, and the like) aren't supported — only basic syntax and microcontroller-specific APIs. Perfectly fine for simple scripts.
C++ — the option for maximum performance. The app is written as a class that inherits from App, compiled together with Keira itself, and becomes part of it. After that, you have to reflash Lilka. Apps like these run the fastest and have full access to the Lilka library, the Arduino framework, and ESP-IDF.
🧪 DynApp — dynamic C++ loading
There's another approach for C++ that's currently in development — DynApp. Instead of compiling the app into Keira itself, you can build it separately as a .so file (Shared Object, as on Linux), drop it onto the SD card, and launch it from the file manager. No reflashing.
Here's how it works: a built-in ELF loader reads the .so from the card, loads it into PSRAM, links it against the system API, and executes it on the fly. When the app closes, the memory is freed. This is genuinely exciting, because it gives C++ developers the same convenience Lua offers: write, compile, drop the file, launch. The feature is still under active development, but it already works.
🚀 Multiboot — running third-party firmwares
Separately from apps, KeiraOS can launch full firmwares — monolithic .bin files that are technically a complete replacement for KeiraOS itself. For example, the DOOM port, Lilradio, Lilka Game Boy Printer, or the Nofrendo NES emulator.
Technically, these aren't apps: when such a firmware is launched, KeiraOS is fully unloaded, and the chip runs the new code as a single program. But from the user's perspective it looks like any other menu item: pick DOOM → play → exit → back to KeiraOS. The return happens through the OTA mechanism at the next reboot. So even though architecturally it's something entirely different, in practice Multiboot firmwares feel like just another kind of "app." More on specific firmwares in a separate article.
![]()
🔌 GPIO, PIN, and the Expansion Port
GPIO (General Purpose Input/Output) is the general name for a microcontroller's programmable pins. PIN is a specific physical contact on the chip or connector. The distinction is simple: the VBus pin, for instance, is just a power rail — it isn't a GPIO. A GPIO is specifically a pin you can assign a function to in software.
The ESP32-S3 has a so-called Pin Matrix — a flexible system that lets you assign different functions (I2C, SPI, UART, and others) to almost any physical pin. Every GPIO can be configured as a digital input or output, as an ADC (Analog-to-Digital Converter), a DAC (Digital-to-Analog), a PWM output (Pulse-Width Modulation), or as one of the serial interfaces.
A quick rundown of the protocols:
SPI (Serial Peripheral Interface) — a fast protocol for connecting a single peripheral: a display, an SD card. Uses four lines: MOSI, MISO, SCK, CS.
I2C (Inter-Integrated Circuit) — slower, but lets you connect many devices to a single bus (just two lines: SDA and SCL), each with its own unique address. Great for sensors.
UART (Universal Asynchronous Receiver-Transmitter) — a serial protocol for talking to a computer or another device. Two lines: TX and RX.
The expansion port on Lilka is a set of free GPIO pins routed to a connector. This is where external modules plug in: sensors, servos, relays, ultrasonic rangefinders, and the like.
📌 Console Pinout
Pin Function 46 Display power (GPIO output) 1 I2S LRCLK (audio) 42 I2S BCLK (audio) 2 I2S DOUT — audio output 3 ADC — battery voltage 18 SPI CLK — display 17 SPI MOSI — display 15 ST7789 DC 7 ST7789 CS 38 Button Up 41 Button Down 39 Button Left 40 Button Right 5 Button A 6 Button B 10 Button C 9 Button D 4 Button Start 0 Button Select Conclusion
Lilka isn't some magic box with a screen. It's an ESP32, with FreeRTOS running on it, ESP-IDF on top of that, then the Lilka SDK, and above everything else — KeiraOS, with its menu, apps, and web interface. Each layer has its own job, and once you understand what each one does, the rest of the documentation stops looking like a pile of cryptic jargon.
-
Connecting Sensors to Lilka with Lua
04/06/2026 at 07:10 • 0 commentsThis is the second article dedicated to Lua programming for Lilka. The first article can be found here. When you start working with sensors, you almost immediately run into strange terms like High and Low. It might sound complicated, but in reality, it’s much simpler Just imagine a regular light switch: it’s either on or off. In electronics, that’s exactly what High and Low mean.
High means there is voltage on the pin — in other words, the signal is “on” ⚡ For a microcontroller, this is usually a logical one. Low, on the other hand, means there is no voltage (or it’s very low), which corresponds to a logical zero. So any simple sensor communicates with your device using this same language: either “yes” or “no.”
On Lilka, this feels especially intuitive. Press a button — you get High Release it — Low. A motion sensor detects movement — High again. Nothing happens — Low Even though these terms are rooted in electrical concepts, it’s enough at the beginning to think of them as just two states your device constantly switches between.
This simple idea is the foundation for most of the examples that follow. Once you get it, working with sensors stops feeling complicated and starts to feel more like building with a constructor set where everything is logical and predictable.
Relay Control on Lilka 🔌
This program turns a CW-020 relay on and off using button A on the Lilka console. A relay is an electrical switch that can control external devices: a light bulb, a fan, and so on ⚡. The module has a low level trigger — it activates when the
INpin receives a low signal (~0V). That's why the program immediately setsHIGHon startup, so the relay doesn't accidentally switch on during boot. Button A toggles the relay, button B turns the relay off and exits the program. The screen shows the current state: green "State: ON" or red "State: OFF" 🟢🔴.Wiring:
Lilka CW-020 relay 3.3V VCC GND GND 12 IN local relay_pin = 12 local relay_on = false function lilka.init() gpio.set_mode(relay_pin, gpio.OUTPUT) gpio.write(relay_pin, gpio.HIGH) end function lilka.update(delta) local state = controller.get_state() if state.a.just_pressed then if relay_on then relay_on = false gpio.write(relay_pin, gpio.HIGH) else relay_on = true gpio.write(relay_pin, gpio.LOW) end end if state.b.just_pressed then gpio.write(relay_pin, gpio.HIGH) util.exit() end end function lilka.draw() display.fill_screen(display.color565(0, 0, 0)) display.set_text_color(display.color565(255, 255, 255)) display.set_cursor(10, 32) display.print("Relay control") if relay_on then display.set_text_color(display.color565(0, 200, 0)) else display.set_text_color(display.color565(200, 0, 0)) end display.set_cursor(10, 64) display.print(relay_on and "State: ON" or "State: OFF") display.set_text_color(display.color565(255, 255, 255)) display.set_cursor(10, 100) display.print("A - toggle") display.set_cursor(10, 120) display.print("B - exit") endHC-SR04P Distance Sensor on Lilka 📡
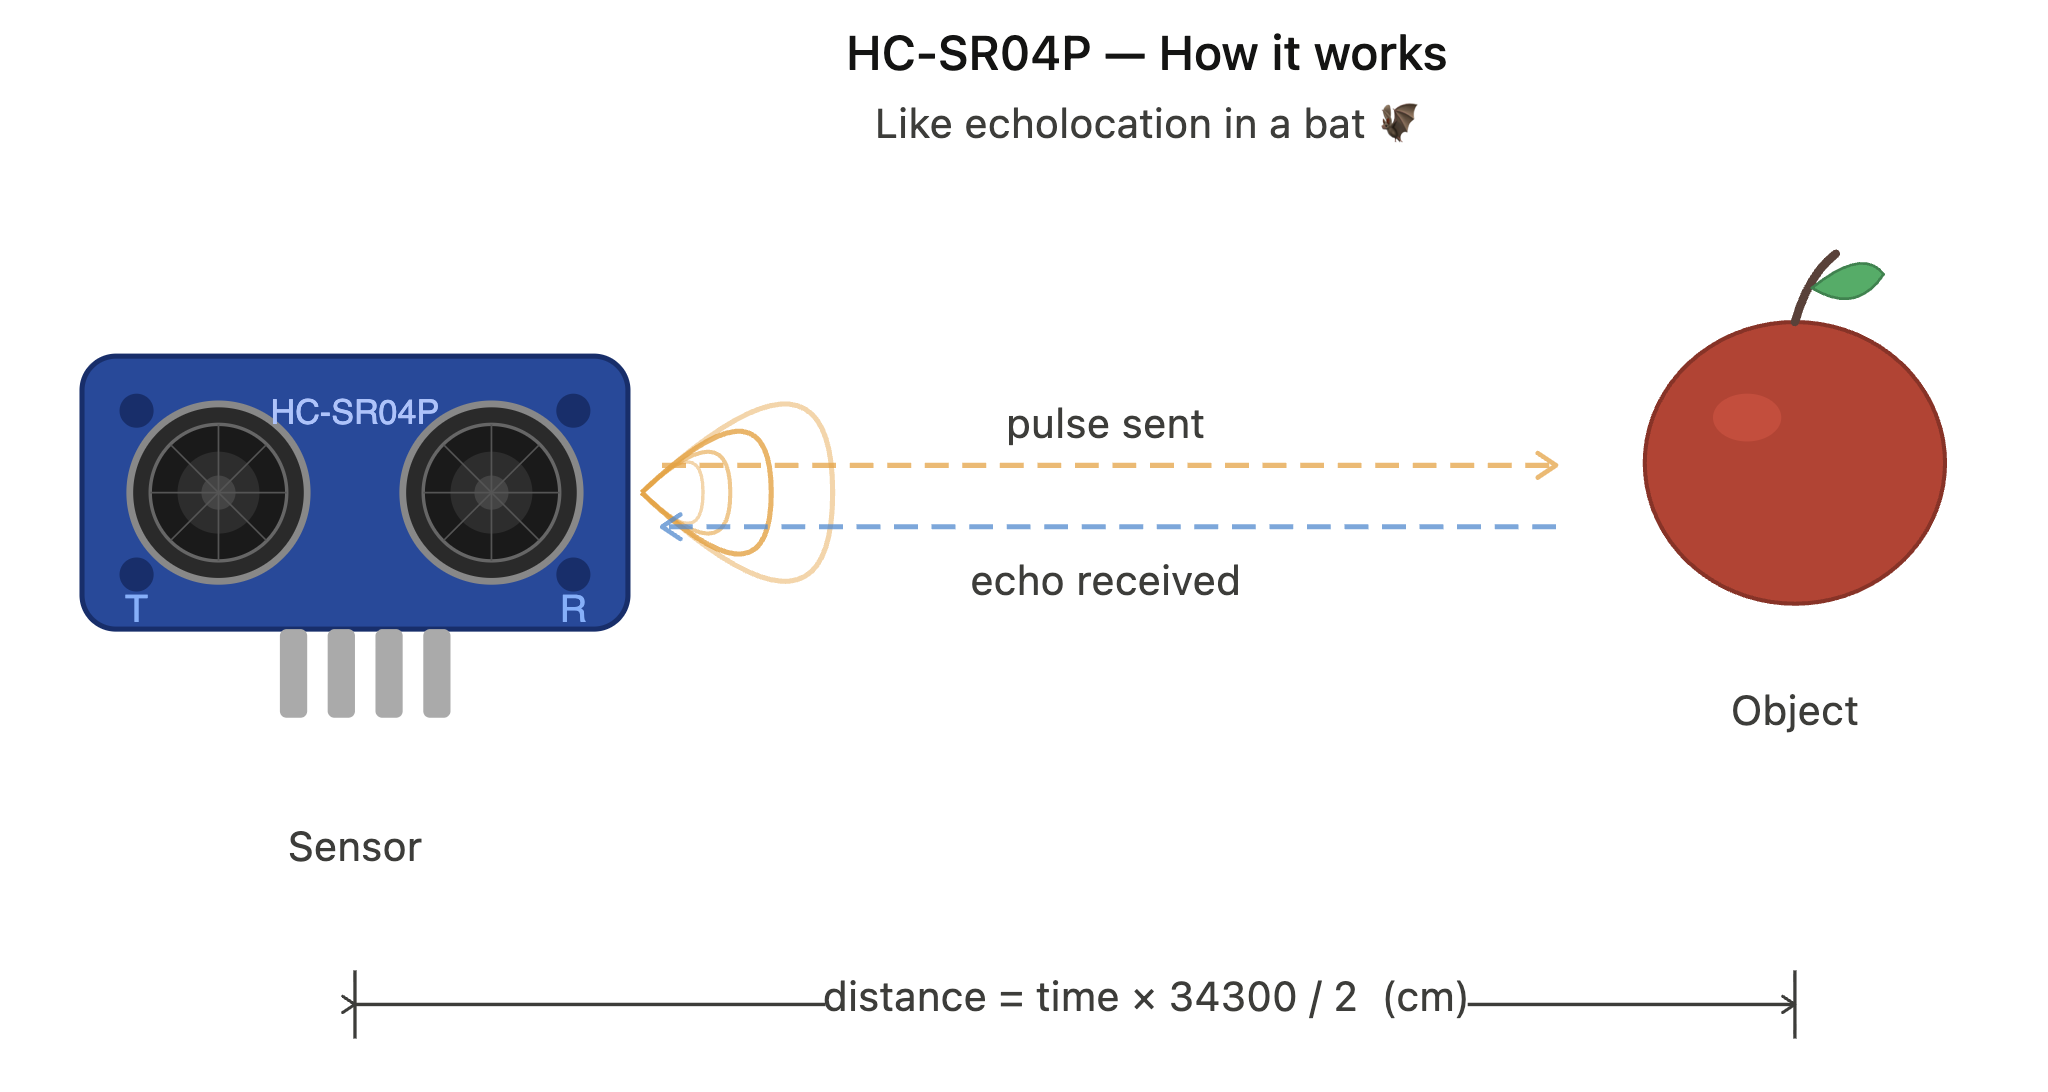
This program measures the distance to an object using the HC-SR04P ultrasonic sensor and displays the result in centimeters on the Lilka screen. The sensor works like a bat 🦇 — it sends an ultrasonic pulse and waits for the echo. The farther the object, the longer the sound travels. The program measures this time and converts it into centimeters.
![]()
The key technical challenge — Lua has no built-in microsecond delay, but the sensor requires one. The solution is simple:
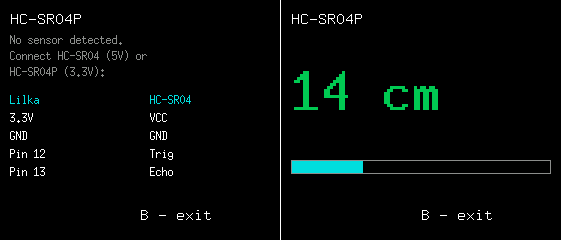
util.sleep(0.001)gives a 1ms pulse — 100× more than the required 10µs minimum, and perfectly stable ⚙️. Readings are smooth thanks to averaging of eight measurements and an outlier filter — no sudden jumps to 800 cm 🚫. If the sensor is not connected, the screen shows a wiring guide. Button B to exit.Lilka HC-SR04P 3.3V VCC GND GND Pin 12 Trig Pin 13 Echo ![]()
local TRIG = 12
local ECHO = 13

local BLACK = display.color565(0,   0,   0)
local WHITE = display.color565(255, 255, 255)
local GREEN = display.color565(0,   200, 80)
local CYAN  = display.color565(0,   220, 220)
local GRAY  = display.color565(140, 140, 140)

local SMOOTH_N = 8
local MISS_MAX = 16   -- consecutive misses before showing wiring guide
local JUMP_MAX = 40   -- max allowed change per measurement (cm)

local samples    = {}
local miss_count = 0
local distance   = nil

local function measure()
    -- Send TRIG pulse: LOW -> HIGH -> LOW
    -- 1ms = 1000us, sensor needs minimum 10us, so 1ms is well within spec
    gpio.write(TRIG, gpio.LOW)
    util.sleep(0.001)
    gpio.write(TRIG, gpio.HIGH)
    util.sleep(0.001)
    gpio.write(TRIG, gpio.LOW)

    -- Wait for ECHO to go HIGH (start of echo pulse)
    local t = util.time()
    while gpio.read(ECHO) == 0 do
        if util.time() - t > 0.1 then return nil end
    end

    -- Measure how long ECHO stays HIGH
    local t_start = util.time()
    while gpio.read(ECHO) == 1 do
        if util.time() - t_start > 0.1 then return nil end
    end

    -- distance (cm) = duration (s) x speed of sound (cm/s) / 2
    return (util.time() - t_start) * 34300 / 2
end

function lilka.init()
    gpio.set_mode(TRIG, gpio.OUTPUT)
    gpio.set_mode(ECHO, gpio.INPUT)
    gpio.write(TRIG, gpio.LOW)
end

function lilka.update(delta)
    if controller.get_state().b.just_pressed then util.exit() end

    local result = measure()

    if result then
        miss_count = 0

        -- Outlier filter: if new value differs from current by more than
        -- JUMP_MAX cm — ignore it. Buffer stays unchanged, display is stable.
        if distance and math.abs(result - distance) > JUMP_MAX then
            return
        end

        table.insert(samples, result)
        if #samples > SMOOTH_N then table.remove(samples, 1) end
        local sum = 0
        for _, v in ipairs(samples) do sum = sum + v end
        distance = math.floor(sum / #samples)
    else
        miss_count = miss_count + 1
        if miss_count >= MISS_MAX then
            samples  = {}
            distance = nil
        end
    end
end

local function draw_bar(dist)
    if not dist then return end
    local W = display.width
    local bar = dist * (W - 20) / 50
    if bar > W - 20 then bar = W - 20 end
    display.fill_rect(10, 160, bar, 14, CYAN)
    display.draw_rect(10, 160, W - 20, 14, GRAY)
end

function lilka.draw()
    local W = display.width
    local H = display.height
    display.fill_screen(BLACK)

    display.set_font("9x15")
    display.set_text_color(WHITE)
    display.set_cursor(10, 24)
    display.print("HC-SR04P")

    if distance then
        display.set_font("10x20")
        display.set_text_size(3)
        display.set_text_color(GREEN)
        display.set_cursor(10, 110)
        display.print(distance .. " cm")
        display.set_text_size(1)
    else
        local R = W // 2 + 10  -- right column (sensor)
        local L = 10            -- left column (lilka)

        display.set_font("6x13")
        display.set_text_color(GRAY)
        display.set_cursor(10, 44)
        display.print("No sensor detected.")
        display.set_cursor(10, 60)
        display.print("Connect HC-SR04 (5V) or")
        display.set_cursor(10, 76)
        display.print("HC-SR04P (3.3V):")

        -- Column headers
        display.set_font("6x13")
        display.set_text_color(CYAN)
        display.set_cursor(L, 104)
        display.print("Lilka")
        display.set_cursor(R, 104)
        display.print("HC-SR04")

        -- Wiring rows
        display.set_text_color(WHITE)
        local rows = {
            {"3.3V",  "VCC"},
            {"GND",   "GND"},
            {"Pin 12","Trig"},
            {"Pin 13","Echo"},
        }
        for i, row in ipairs(rows) do
            local y = 104 + i * 18
            display.set_cursor(L, y)
            display.print(row[1])
            display.set_cursor(R, y)
            display.print(row[2])
        end
    end

    draw_bar(distance)

    display.set_font("9x15")
    display.set_text_color(WHITE)
    display.set_cursor(W // 2, H - 20)
    display.print("B - exit")
end
🚦Traffic Light App
This program works with a three-color traffic light module — a black board with three large LEDs: red, yellow, and green 🔴🟡🟢. Button A on Lilka turns the red LED on or off, button B controls the yellow one, button D controls the green one, and button C exits the program.
At the start the program declares three variables:
led_pin_r = 21,led_pin_y = 47,led_pin_g = 48. These are convenient names for the pins on Lilka's expansion header where the module's signal wires are connected. Instead of writing the numbers 21, 47, and 48 everywhere, we give them readable names — r for red, y for yellow, g for green.A pin is a physical contact on the Lilka board 🔌. Each pin can work in two modes: sending voltage outward (OUTPUT) or measuring voltage from outside (INPUT). The
gpio.set_modefunction selects the mode. Thegpio.writefunction turns the voltage on or off. To use an analogy —gpio.set_modeis like hiring a worker and defining their role: a speaker (OUTPUT — sends a signal) or a listener (INPUT — receives a signal). Andgpio.writeis the specific command given to that worker:gpio.LOWmeans be silent (0 volts, LED off),gpio.HIGHmeans speak up (3.3 volts, LED on) ⚡.That is why at the beginning of the program
gpio.set_modeis called withgpio.OUTPUTfor each pin — configuring it as an output. Then immediatelygpio.writeis called withgpio.LOW— turning the voltage off. This guarantees that all three LEDs are off when the program starts 👍.After the setup the program enters an infinite
while true doloop ♾️. Lilka constantly checks the button states in a circle — very fast, hundreds of times per second. Each time it callscontroller.get_state()and checks whether a particular button is pressed.The most interesting line is
gpio.write(led_pin_r, 1 - gpio.read(led_pin_r))🧠. This is a simple math trick.gpio.readreads the current state of the pin and returns 1 if the LED is on, or 0 if it is off. Then1 - 1 = 0or1 - 0 = 1. So if the LED was on — it turns off, if it was off — it turns on. One button controls both turning on and turning off at the same time.Button C executes the
breakcommand which exits the loop and ends the program 👋. Without it the program would run forever.led_pin_r = 21 led_pin_y = 47 led_pin_g = 48 gpio.set_mode(led_pin_r, gpio.OUTPUT) gpio.write(led_pin_r, gpio.LOW) gpio.set_mode(led_pin_y, gpio.OUTPUT) gpio.write(led_pin_y, gpio.LOW) gpio.set_mode(led_pin_g, gpio.OUTPUT) gpio.write(led_pin_g, gpio.LOW) while true do if controller.get_state().a.pressed then gpio.write(led_pin_r, 1 - gpio.read(led_pin_r)) end if controller.get_state().b.pressed then gpio.write(led_pin_y, 1 - gpio.read(led_pin_y)) end if controller.get_state().d.pressed then gpio.write(led_pin_g, 1 - gpio.read(led_pin_g)) end if controller.get_state().c.pressed then break end endSimple Touch Sensor Button
This program is the simplest possible example of working with a touch sensor that behaves like a regular button. It continuously checks the state of a single pin connected to the sensor and simply displays the result on the Lilka screen.
When you touch the sensor, a signal appears on the pin — that’s the same as High. The program reads this value and understands that a touch has occurred, so it shows “TOUCHED” on the screen When you release it, the signal disappears (Low), and the screen displays “NOT TOUCHED”.
The logic here is as simple as it gets: there are only two states, constantly changing depending on whether you are touching the sensor or not. The program doesn’t store history, count presses, or add any complexity — it just “looks” at the pin right now and immediately shows the result.
This example clearly demonstrates the core idea of working with sensors: you read a value and react to it. It’s the first step toward more advanced projects, where instead of displaying text, you might control LEDs, servo motors, or even entire smart home systems.
touch_signal_pin = 12

gpio.set_mode(touch_signal_pin, gpio.INPUT)

function lilka.update()
    if controller.get_state().c.just_pressed then
        util.exit()
    end
end

function lilka.draw()
    display.fill_screen(display.color565(0, 0, 0))
    display.set_cursor(10, 32)
    local signal = gpio.read(touch_signal_pin)
    if signal == 1 then
        display.print("TOUCHED")
    else
        display.print("NOT TOUCHED")
    end
end
🌱 Soil Moisture Sensor
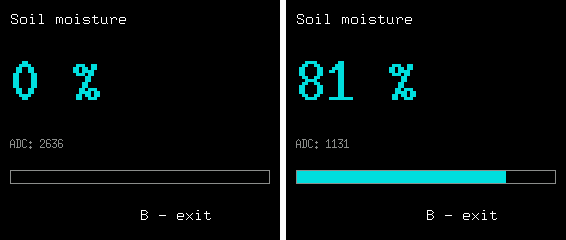
This program measures soil moisture using the Capacitive Soil Moisture Sensor v1.2 and displays the result as a percentage on the Lilka screen.
![]()
There are two common types of soil moisture sensors. Resistive sensors measure the resistance between two metal probes inserted into the soil — the more moisture, the lower the resistance. They are cheap but have a significant drawback: the metal probes rust in moist soil within just a few weeks 🦀. Capacitive sensors measure the dielectric permittivity of the soil without direct metal contact with moisture — so they last much longer and are a more reliable choice for permanent use.
The sensor connects to an analog pin on Lilka and returns a raw number from 0 to 4095 — this is the ADC value. The capacitive sensor has inverted logic: the lower the number, the more moisture is in the soil. The program converts this raw value into a percentage using a simple formula where
DRYis the value in dry air (0%) andWETis the value in water (100%). Both the percentage and the raw ADC value are shown on the screen — useful for calibrating to your specific module 🔧.Readings are smooth thanks to averaging of eight measurements — the number changes gradually without sudden jumps. On startup the program shows a wiring guide. Press A to start measuring. Button B to exit.
Pin 13 is used for analog reading. On ESP32-S3, the first 20 GPIO pins have a built-in ADC. Pins 12, 13 and 14 on Lilka's expansion header belong to this group — making them the natural choice for analog sensors.
Wiring 🔌
Lilka Sensor v1.2 3.3V VCC GND GND Pin 13 AOUT -- Capacitive Soil Moisture Sensor v1.2 -- Wiring: VCC=3.3V, GND=GND, AOUT=pin 13 -- -- Typical calibration values for v1.2 at 3.3V: -- DRY_AIR ~3400 (sensor in open air) -- WET ~800 (sensor fully submerged in water) -- Adjust these two constants if readings seem off. local SENSOR_PIN = 13 local DRY = 2634 -- ADC value in dry air = 0% local WET = 800 -- ADC value in water = 100% local BLACK = display.color565(0, 0, 0) local WHITE = display.color565(255, 255, 255) local CYAN = display.color565(0, 220, 220) local GRAY = display.color565(140, 140, 140) -- Smoothing: average of last SMOOTH_N readings local SMOOTH_N = 8 local samples = {} local raw = 0 -- latest raw ADC value local moisture = 0 -- smoothed moisture percent (0-100) local function read_moisture() local value = gpio.analog_read(SENSOR_PIN) -- Add to smoothing buffer table.insert(samples, value) if #samples > SMOOTH_N then table.remove(samples, 1) end -- Average the buffer local sum = 0 for _, v in ipairs(samples) do sum = sum + v end local avg = sum / #samples raw = math.floor(avg) -- Map ADC value to 0-100% -- Sensor is inverted: lower ADC = more moisture local pct = (DRY - avg) * 100 / (DRY - WET) if pct < 0 then pct = 0 end if pct > 100 then pct = 100 end moisture = math.floor(pct) end local function draw_bar(pct) local W = display.width local bar = pct * (W - 20) / 100 display.fill_rect(10, 170, bar, 14, CYAN) display.draw_rect(10, 170, W - 20, 14, GRAY) end function lilka.init() gpio.set_mode(SENSOR_PIN, gpio.INPUT) end function lilka.update(delta) if controller.get_state().b.just_pressed then util.exit() end read_moisture() end function lilka.draw() local W = display.width local H = display.height display.fill_screen(BLACK) -- Title display.set_font("9x15") display.set_text_color(WHITE) display.set_cursor(10, 24) display.print("Soil moisture") -- Large percent value display.set_font("10x20") display.set_text_size(3) display.set_text_color(CYAN) display.set_cursor(10, 100) display.print(moisture .. " %") display.set_text_size(1) -- Raw ADC value display.set_font("6x13") display.set_text_color(GRAY) display.set_cursor(10, 148) display.print("ADC: " .. raw) -- Bar draw_bar(moisture) -- Exit hint display.set_font("9x15") display.set_text_color(WHITE) display.set_cursor(W // 2, H - 20) display.print("B - exit") end -
How to Add Your App to the Lilka Catalog
03/31/2026 at 19:01 • 0 commentsLilka is an ESP32 console that makes it easy to create your own apps. Once your app is ready, you can publish it to the catalog at catalog.lilka.dev.
You will need a GitHub account. Fun fact: GitHub is built on Git, a protocol created by Linus Torvalds, the author of the Linux kernel. I will show you how to add an app directly through the browser, without installing any additional software.
1. Create Your Own Repository
First, you need a GitHub account. Go to github.com and sign up — it's free.
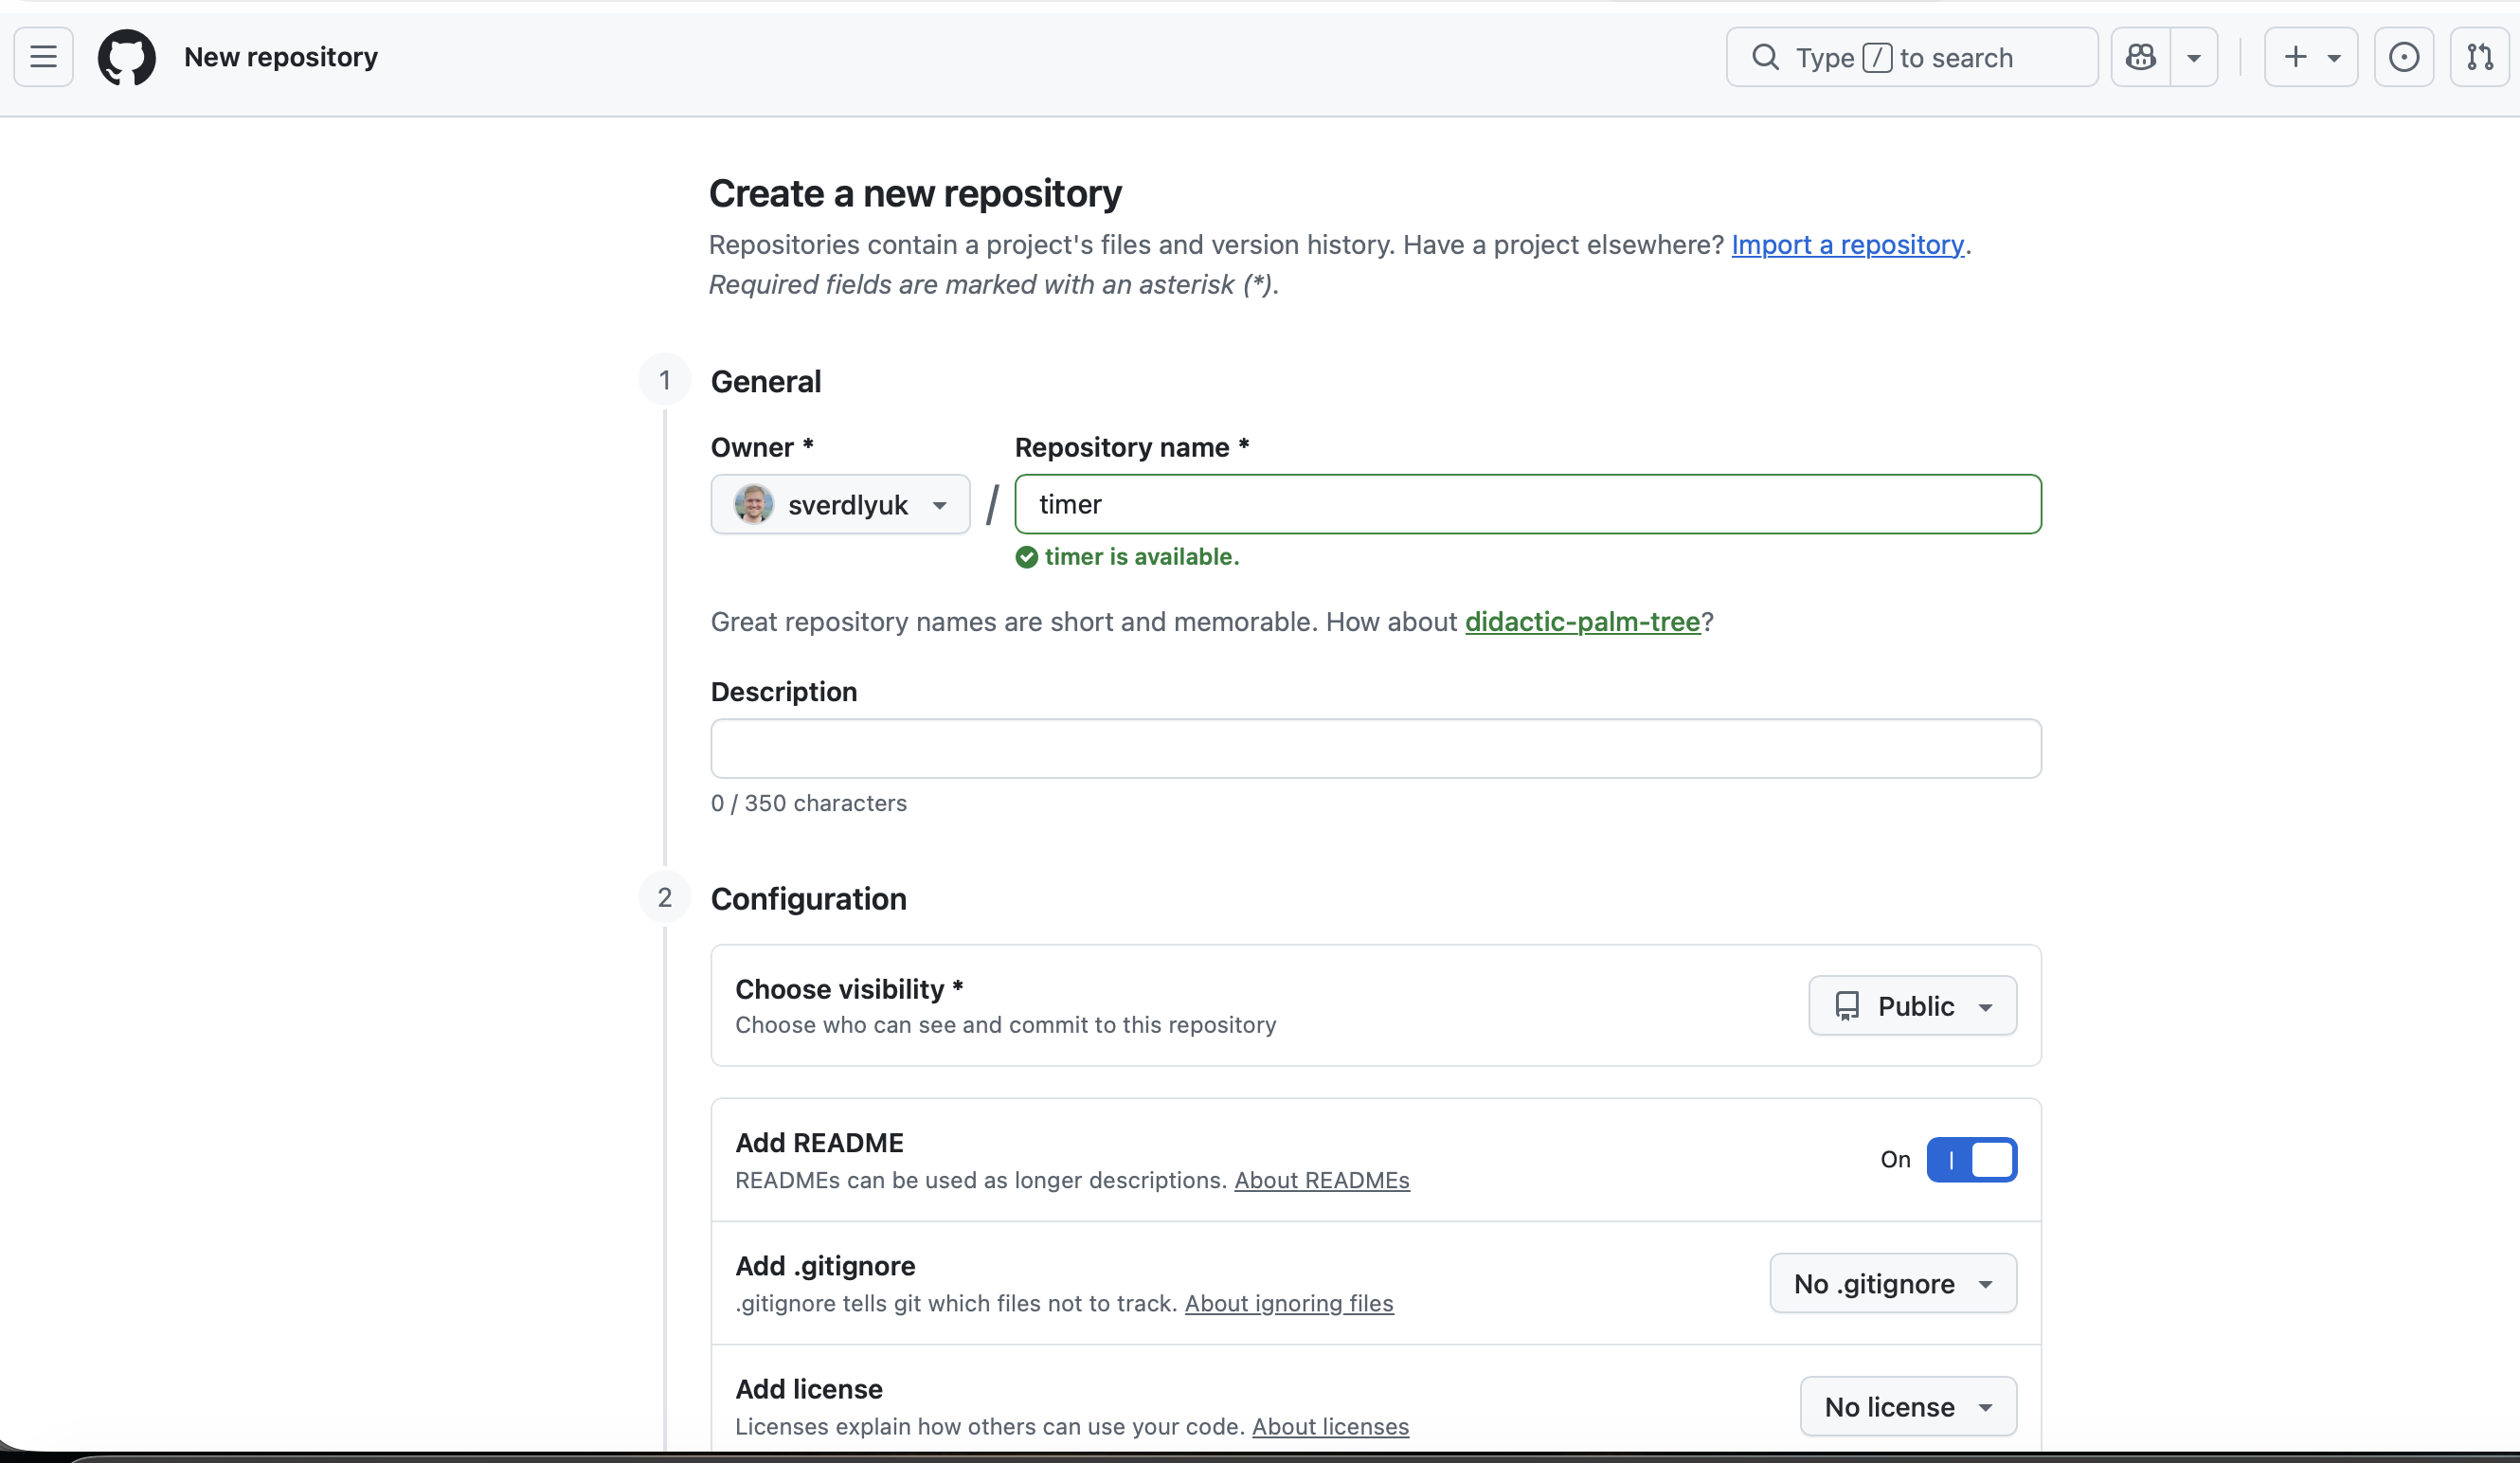
Once registered, create a repository for your app's code. Click New repository, choose a name, check Add a README file and click Create repository.
![]()
2. Add Files to Your Repository
Once the repository is created, you can edit the
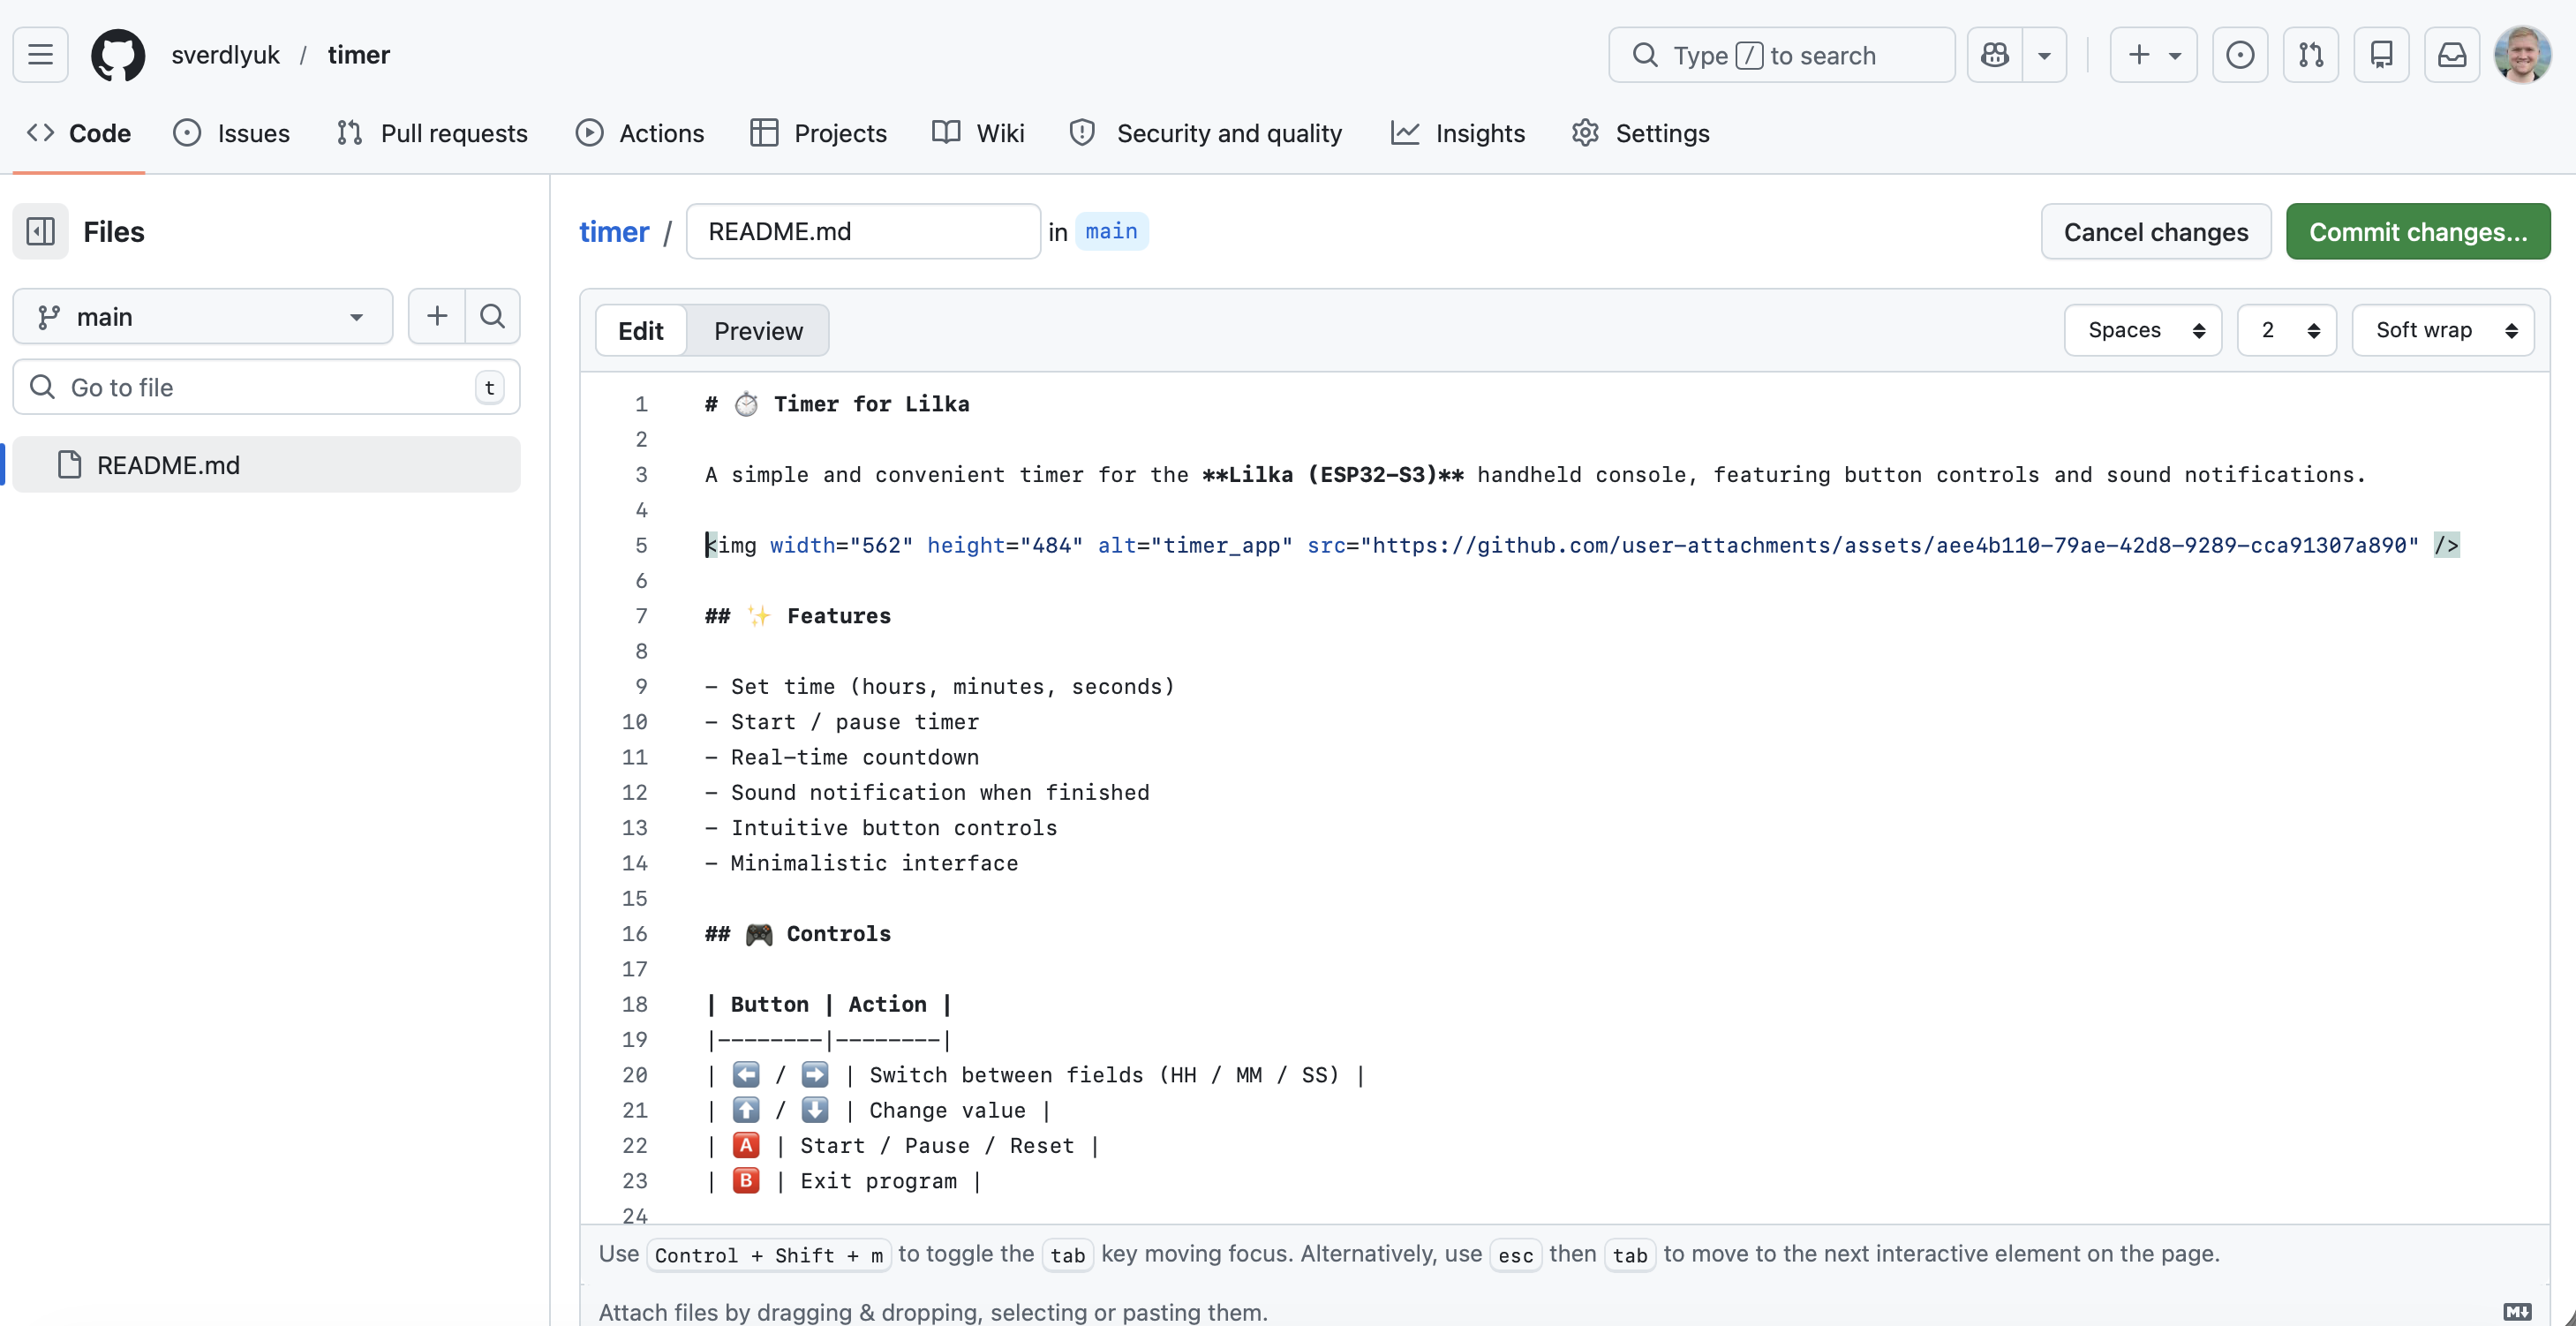
README.mdfile by clicking the pencil icon in the upper right corner — add a short description of your app. When done, click the green Commit changes button in the upper right corner to save. The README file uses Markdown format — a simple and easy-to-understand text markup language.You can write the description yourself, use an online editor like markdownlivepreview.com or stackedit.io, or ask an AI to generate a Markdown description for GitHub based on your code.
![]()
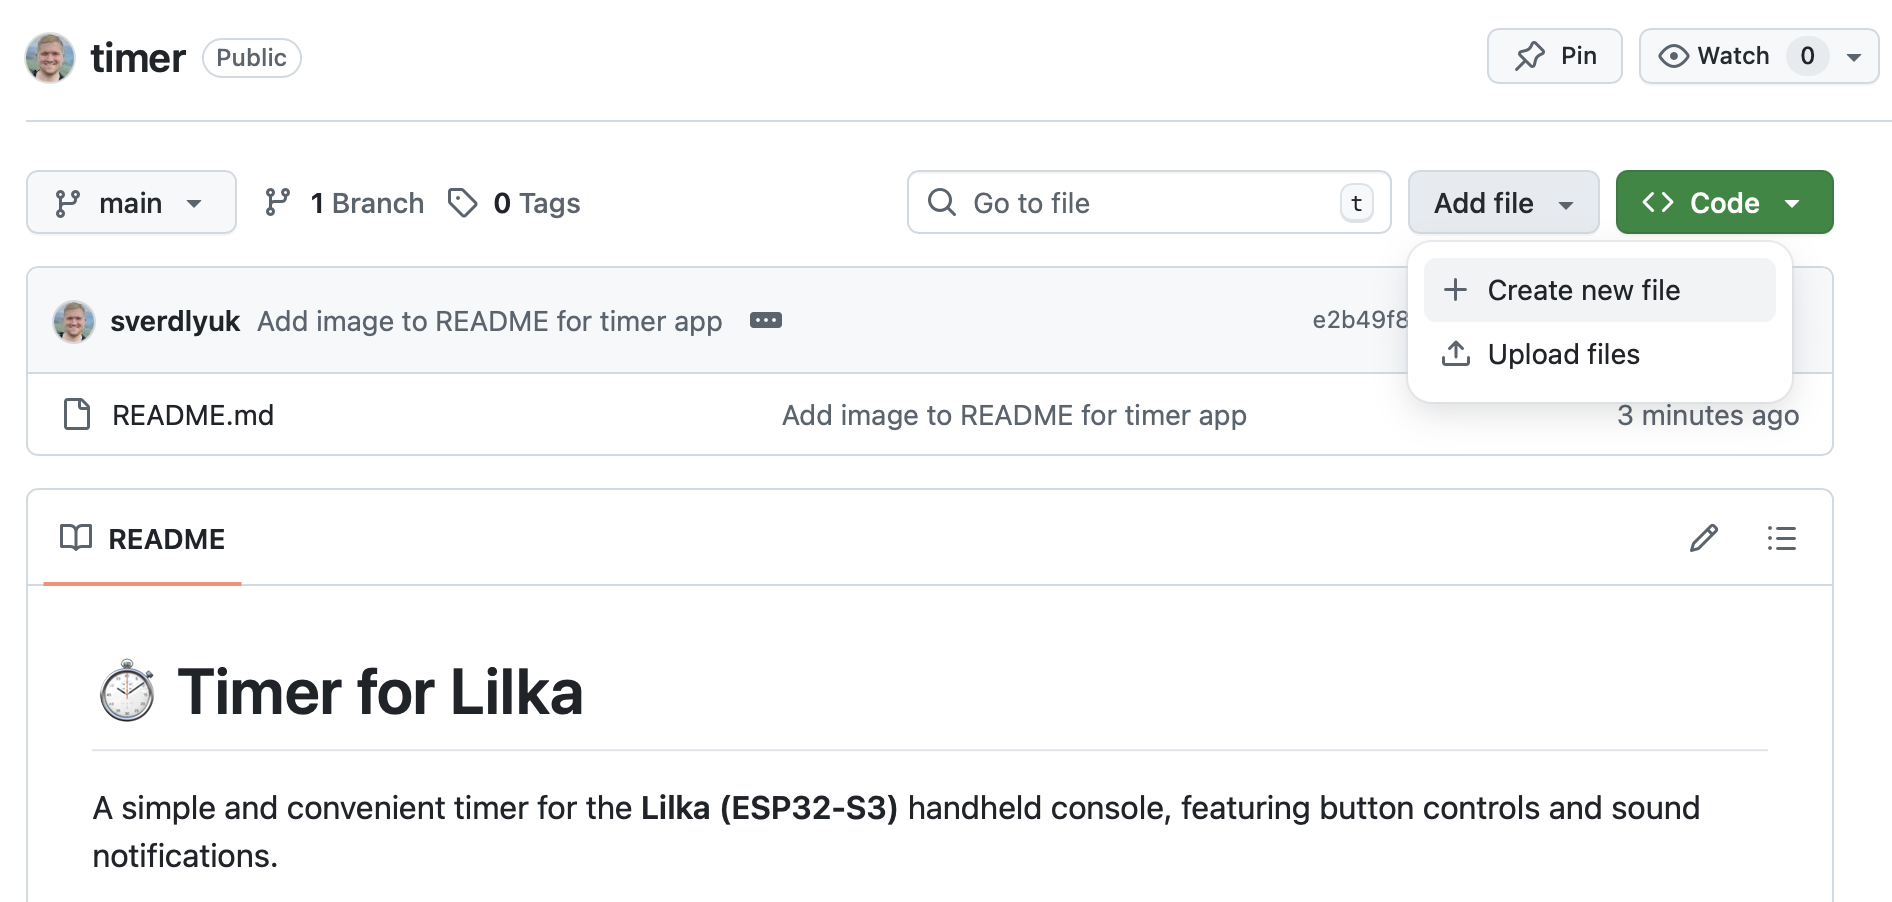
Add your code file by clicking Add file → Create new file in the upper right corner. At the top of the screen, enter the file name, for example
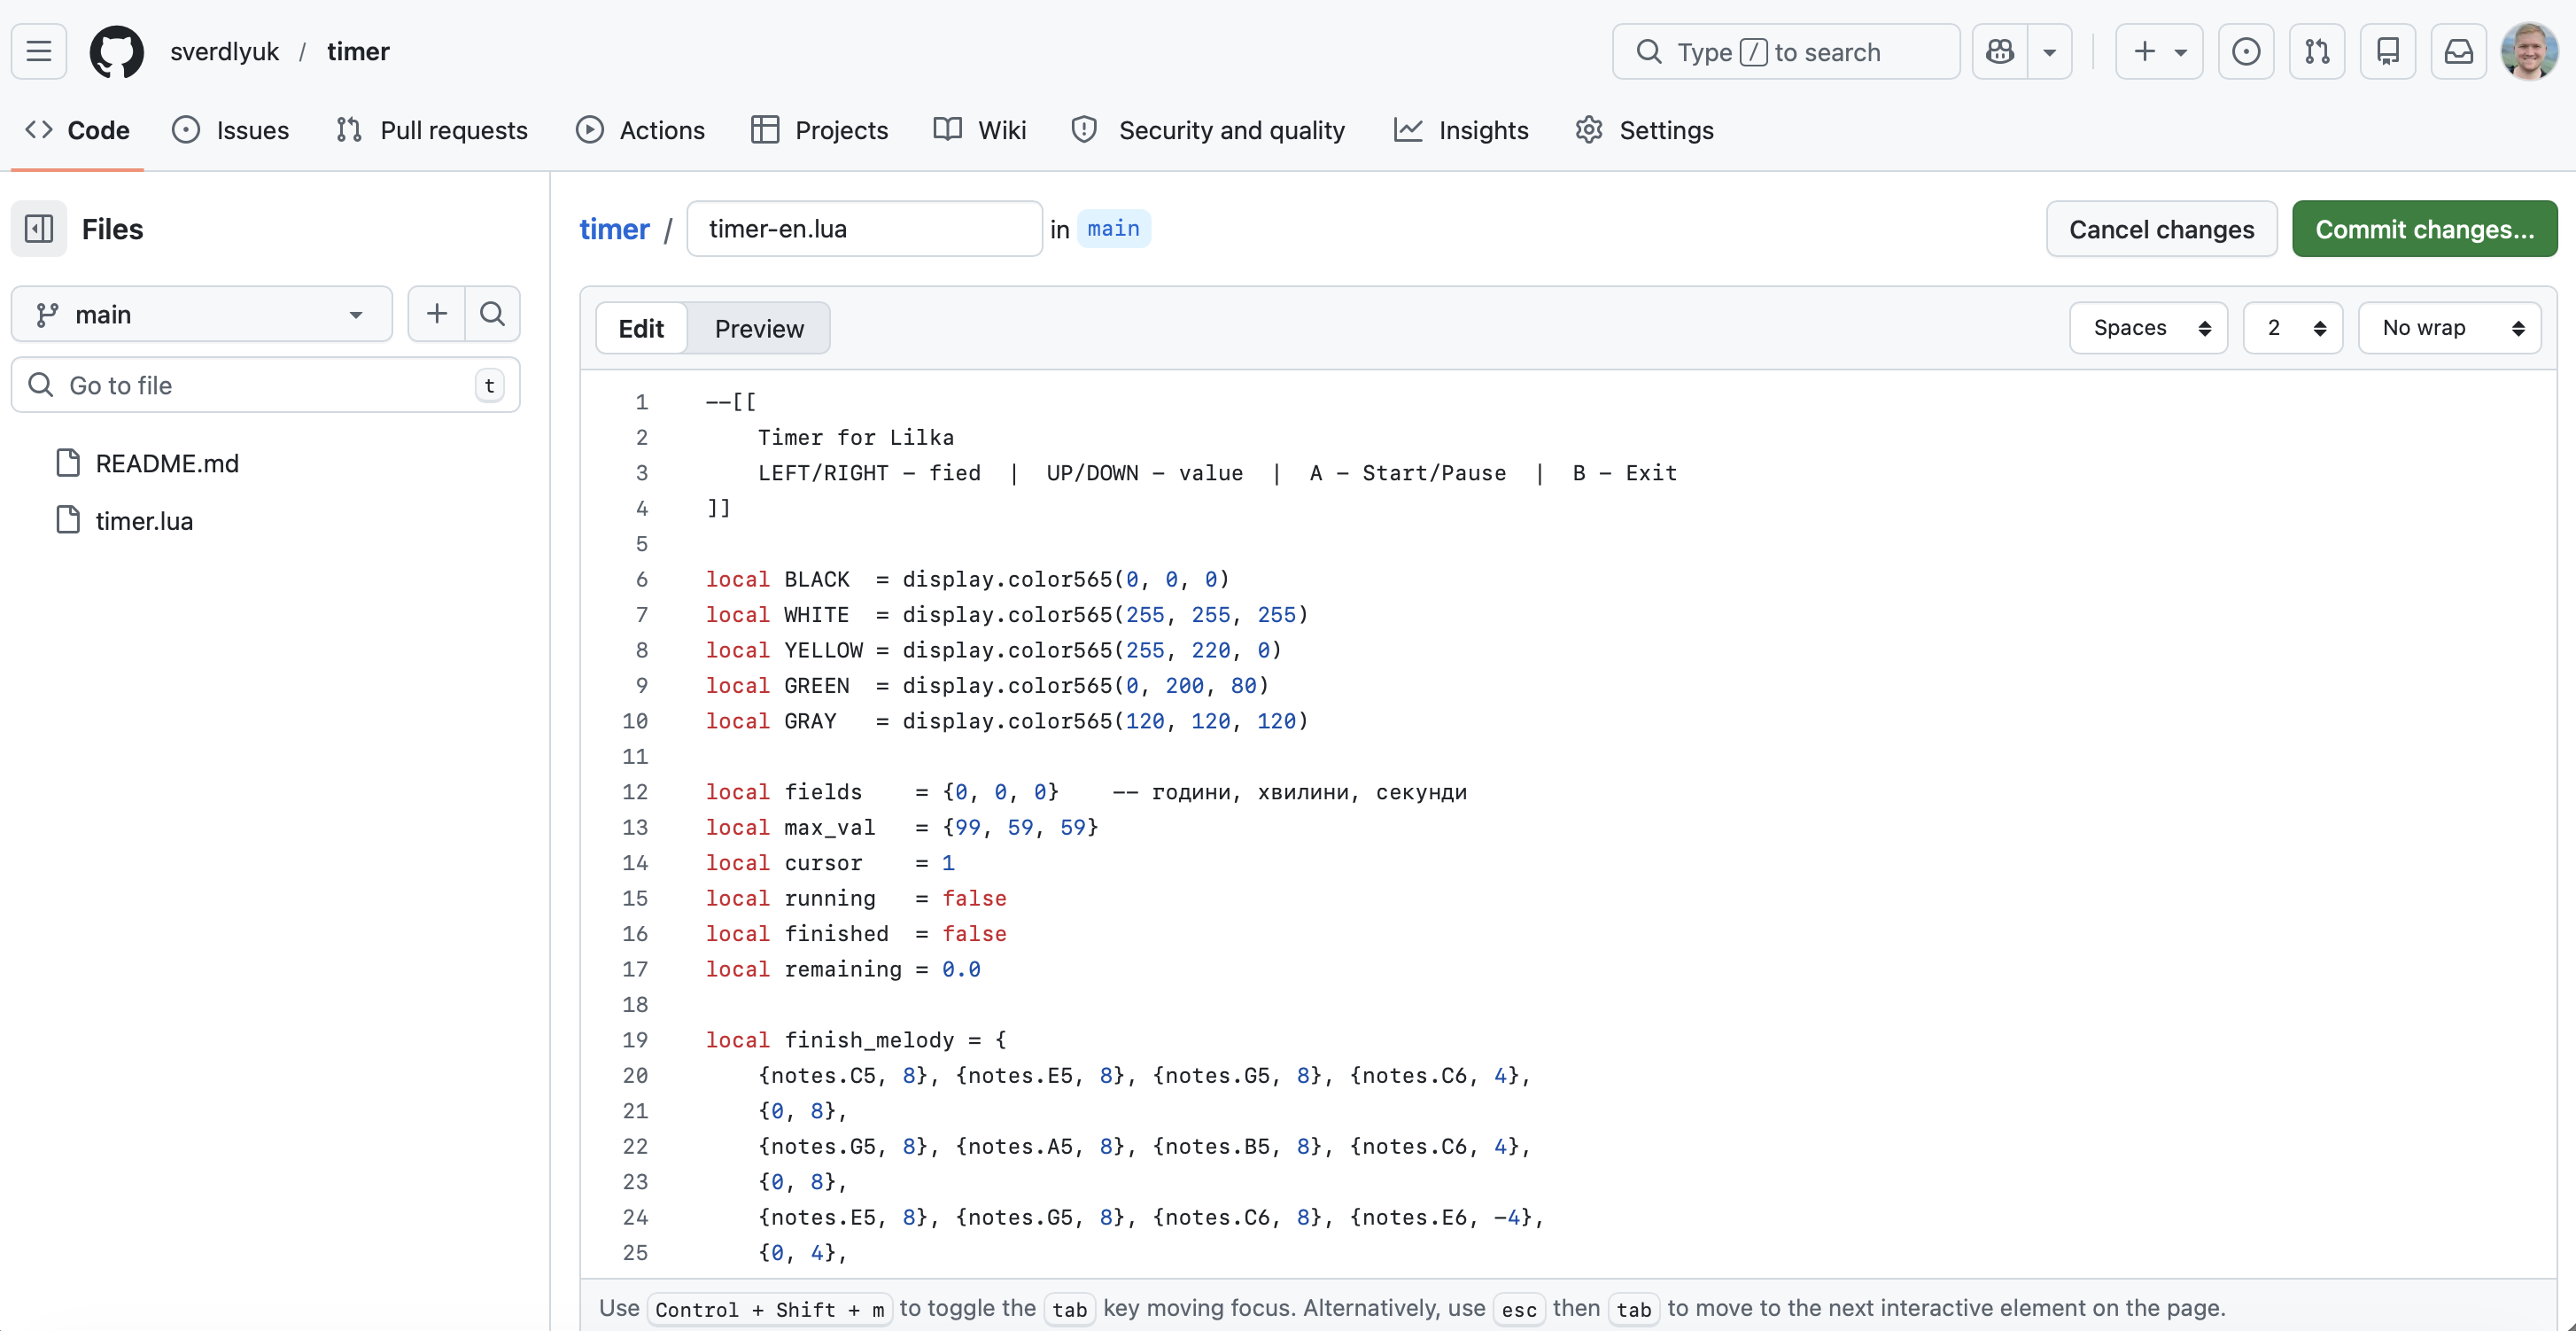
timer.lua, and paste your code. Then click the green Commit changes button in the upper right corner.![]()
![]()
3. Fork the Catalog Repository
To make changes to any existing repository, you need to copy it to your own space — create a fork — make your changes, and then send them for review to the repository owner.
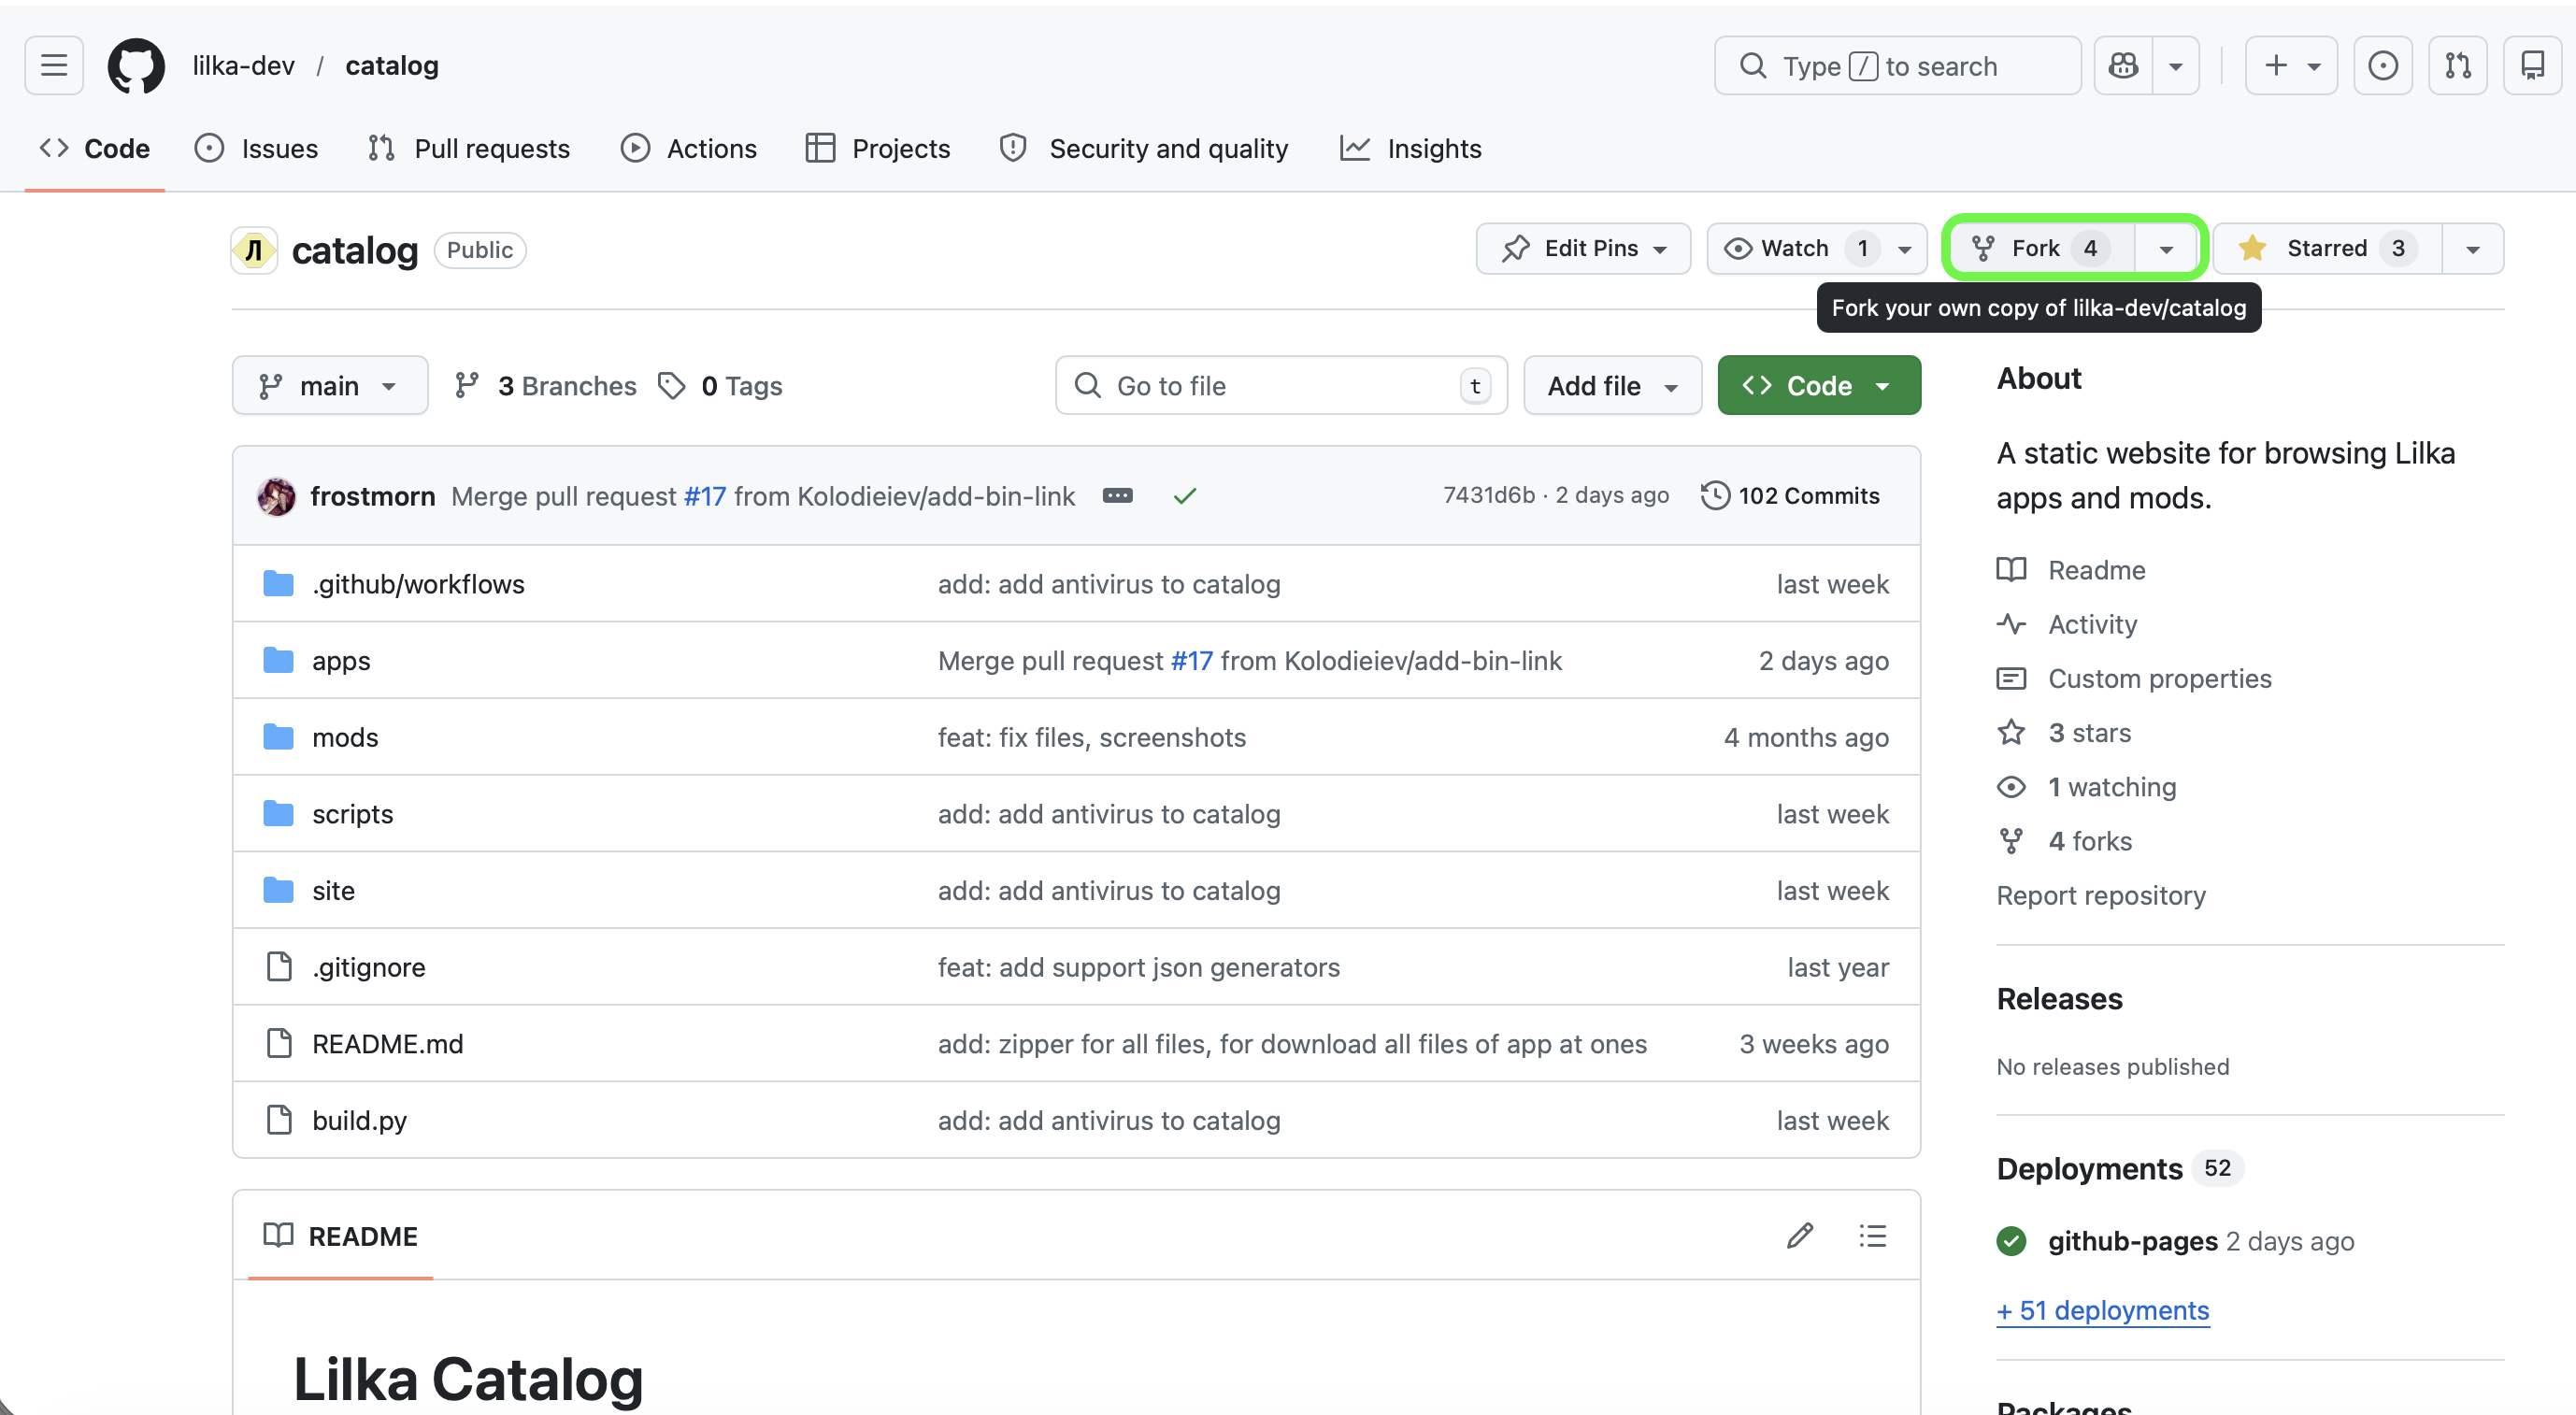
To fork the App Catalog, go to github.com/lilka-dev/catalog and click the Fork button with the fork icon in the upper left corner of the screen. This creates a copy of the catalog in your GitHub account.
![]()
4. Add DESCRIPTION.md
Once forked, the repository will appear in your repository list under the same name
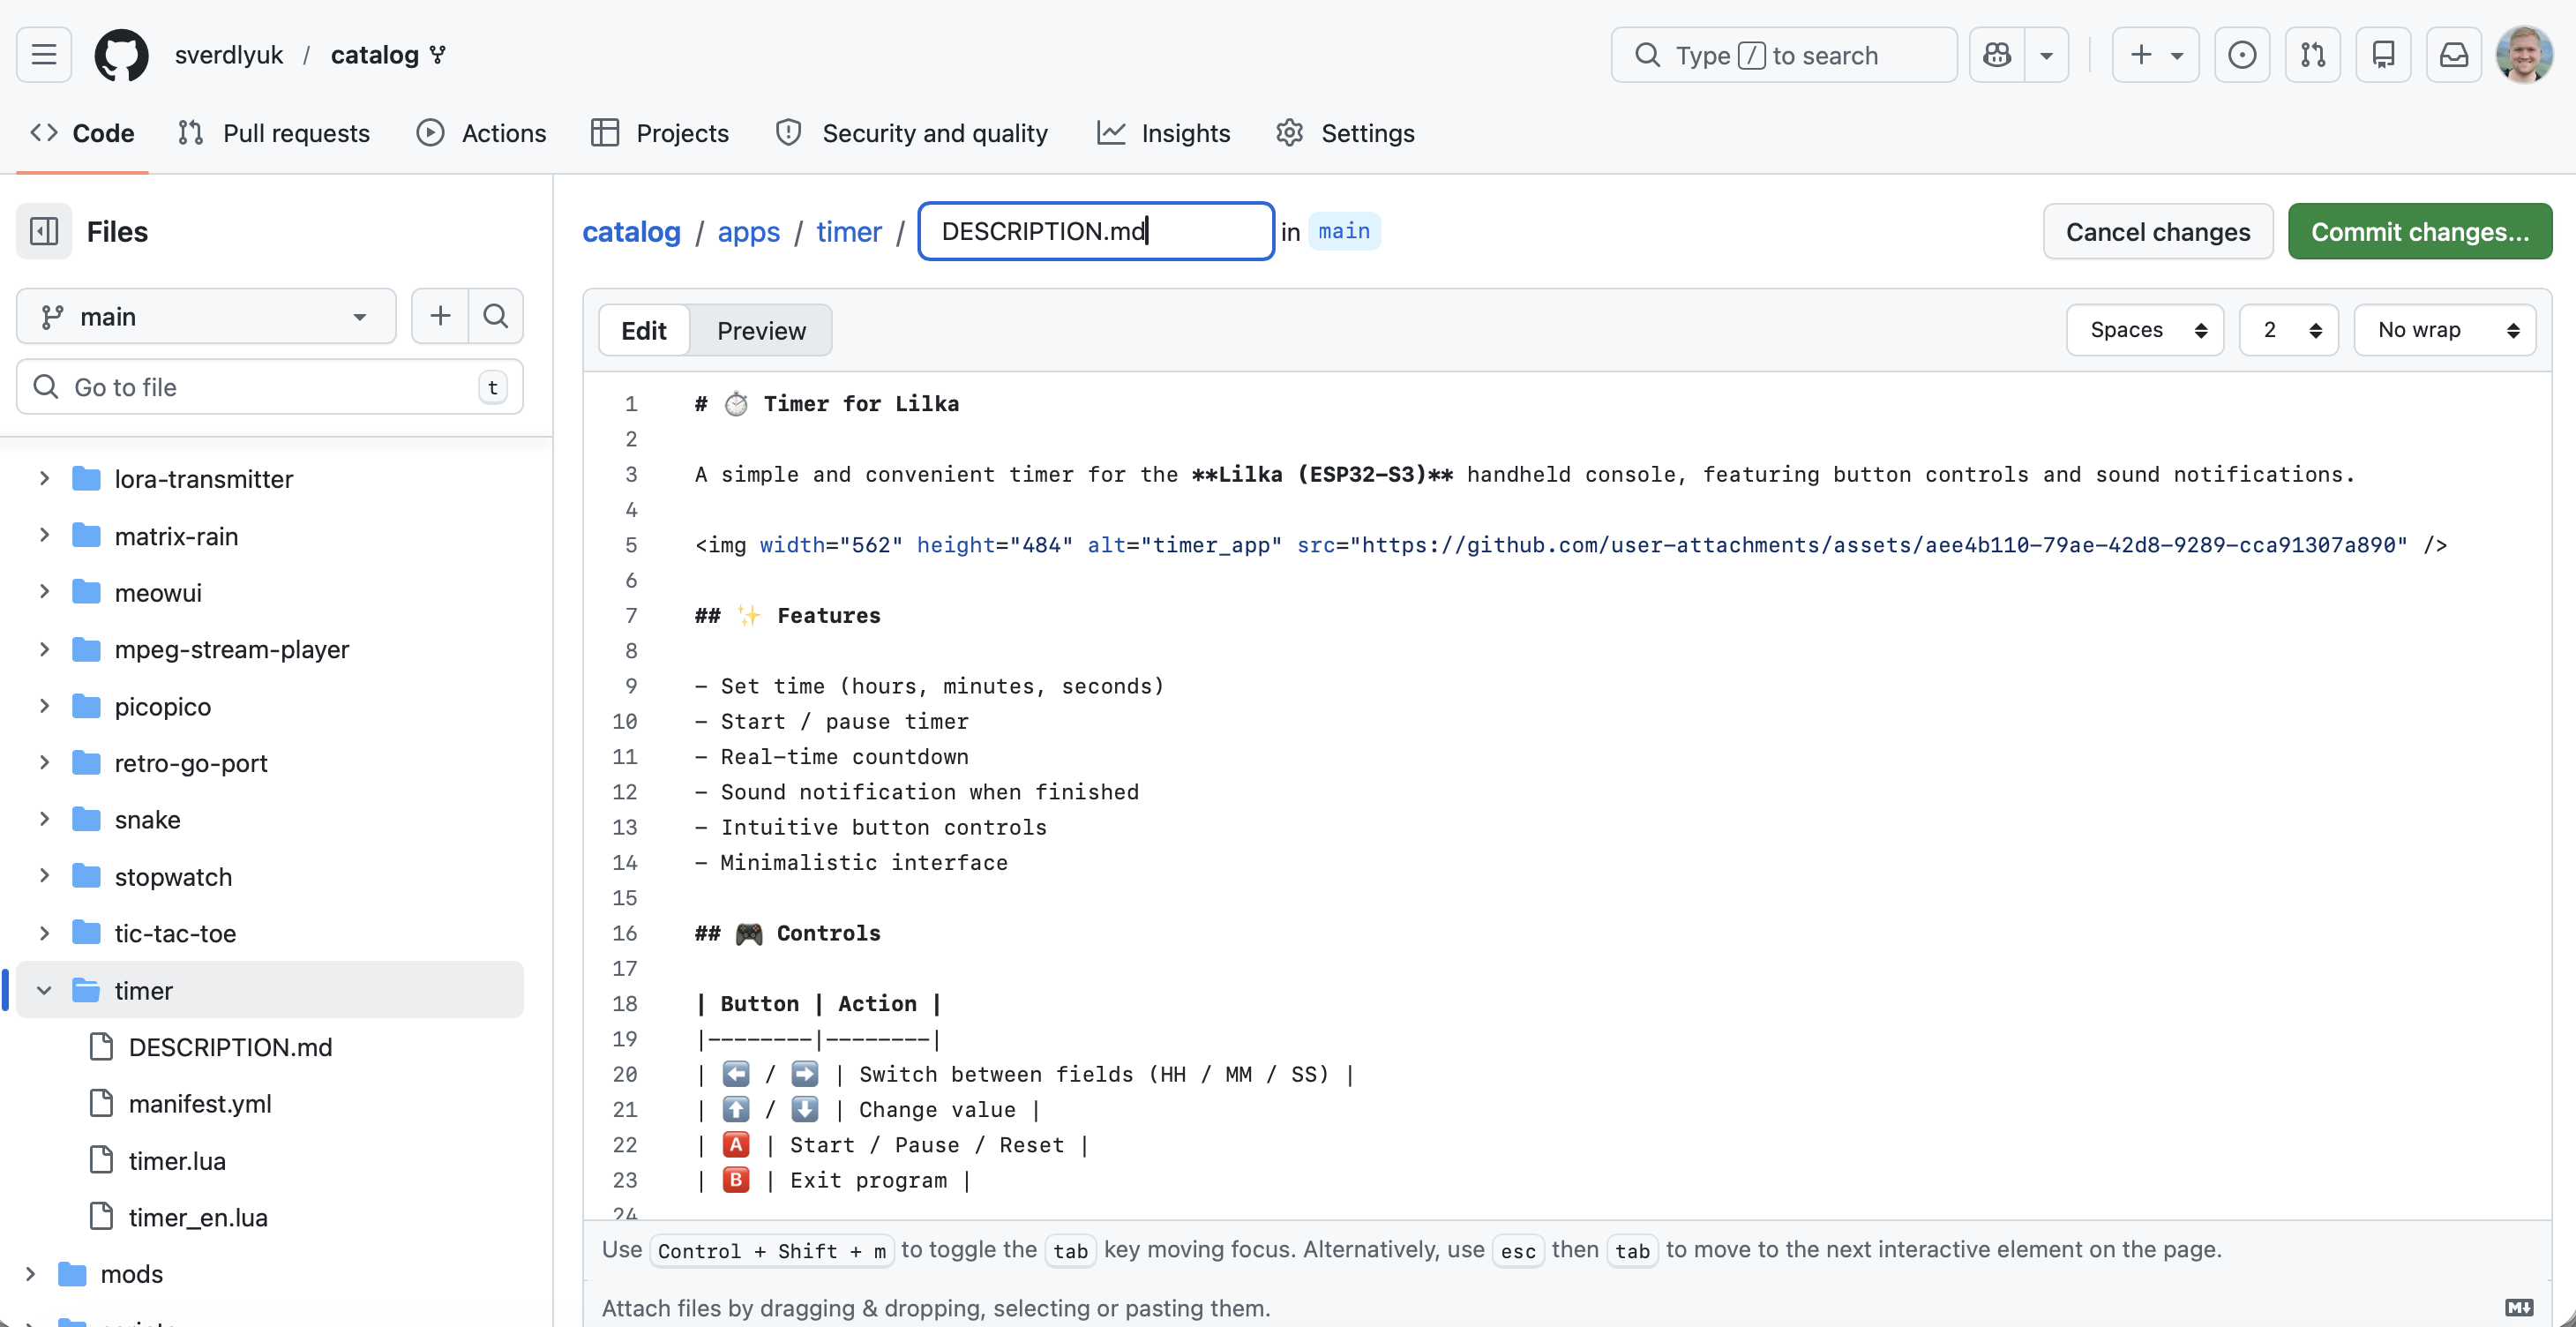
lilka-dev/catalog. Open it, navigate to theappsfolder and click Add file → Create new file in the upper right corner.Enter the file name as
timer/DESCRIPTION.md— this automatically creates a folder namedtimerwith the file inside. This file is the app description for the Lilka Catalog and can be a full copy of theREADME.mdfrom your own repository created earlier.![]()
5. Add manifest.yml
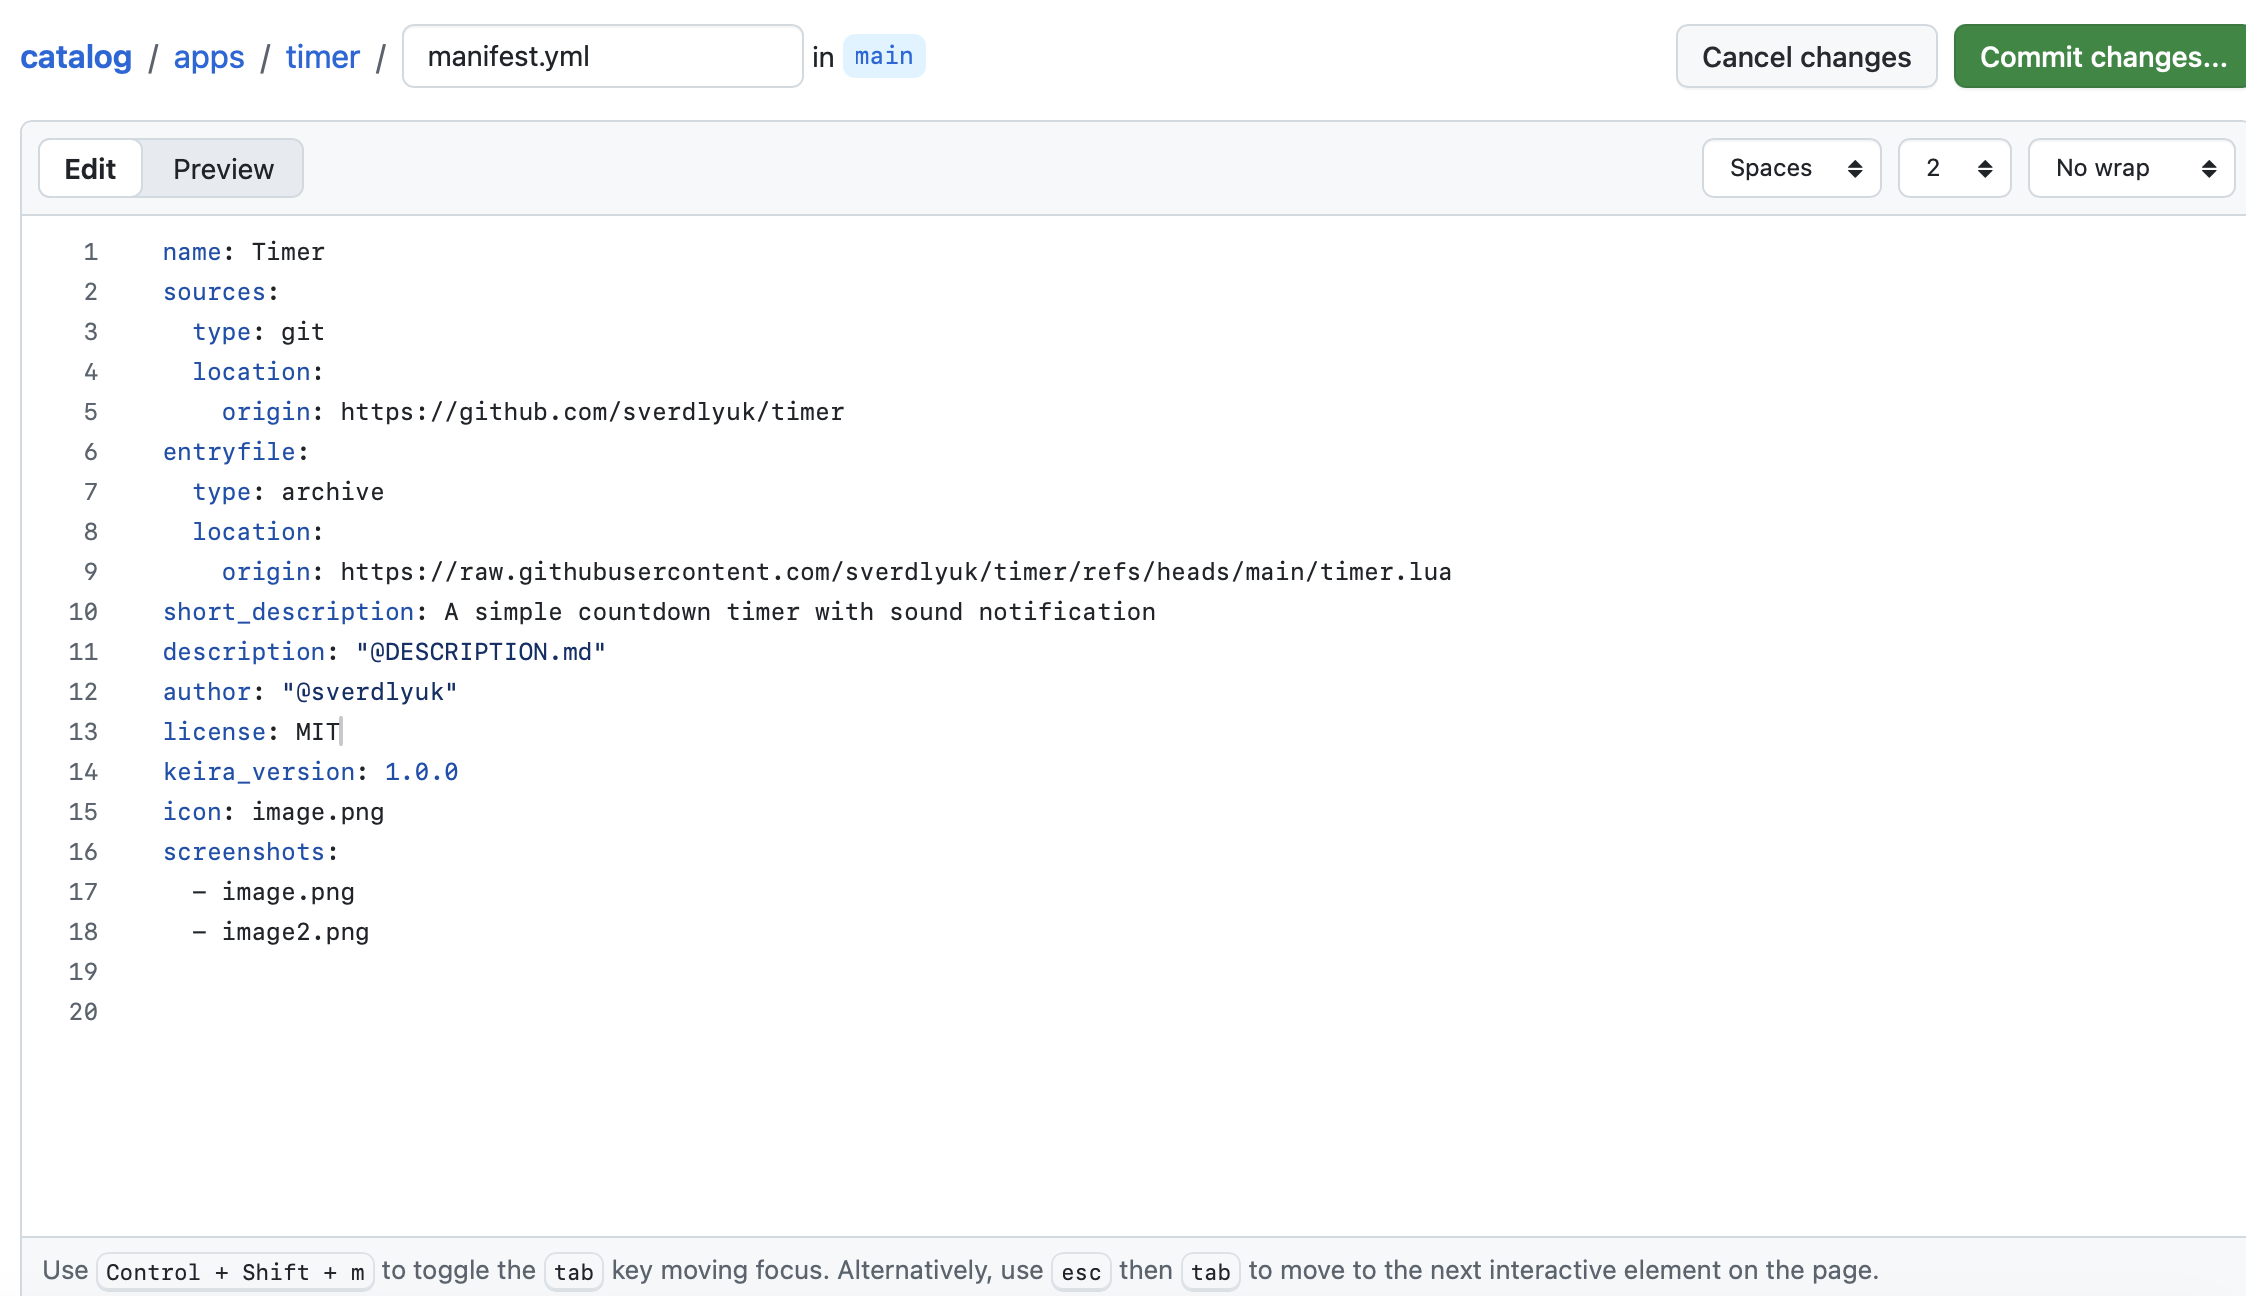
The last required file is
manifest.yml. It is essentially the app's passport: the catalog uses it to find out the name, author, where the code is located and which files need to be downloaded to the console. Without this file the app will not appear in the catalog.![]()
Create the file
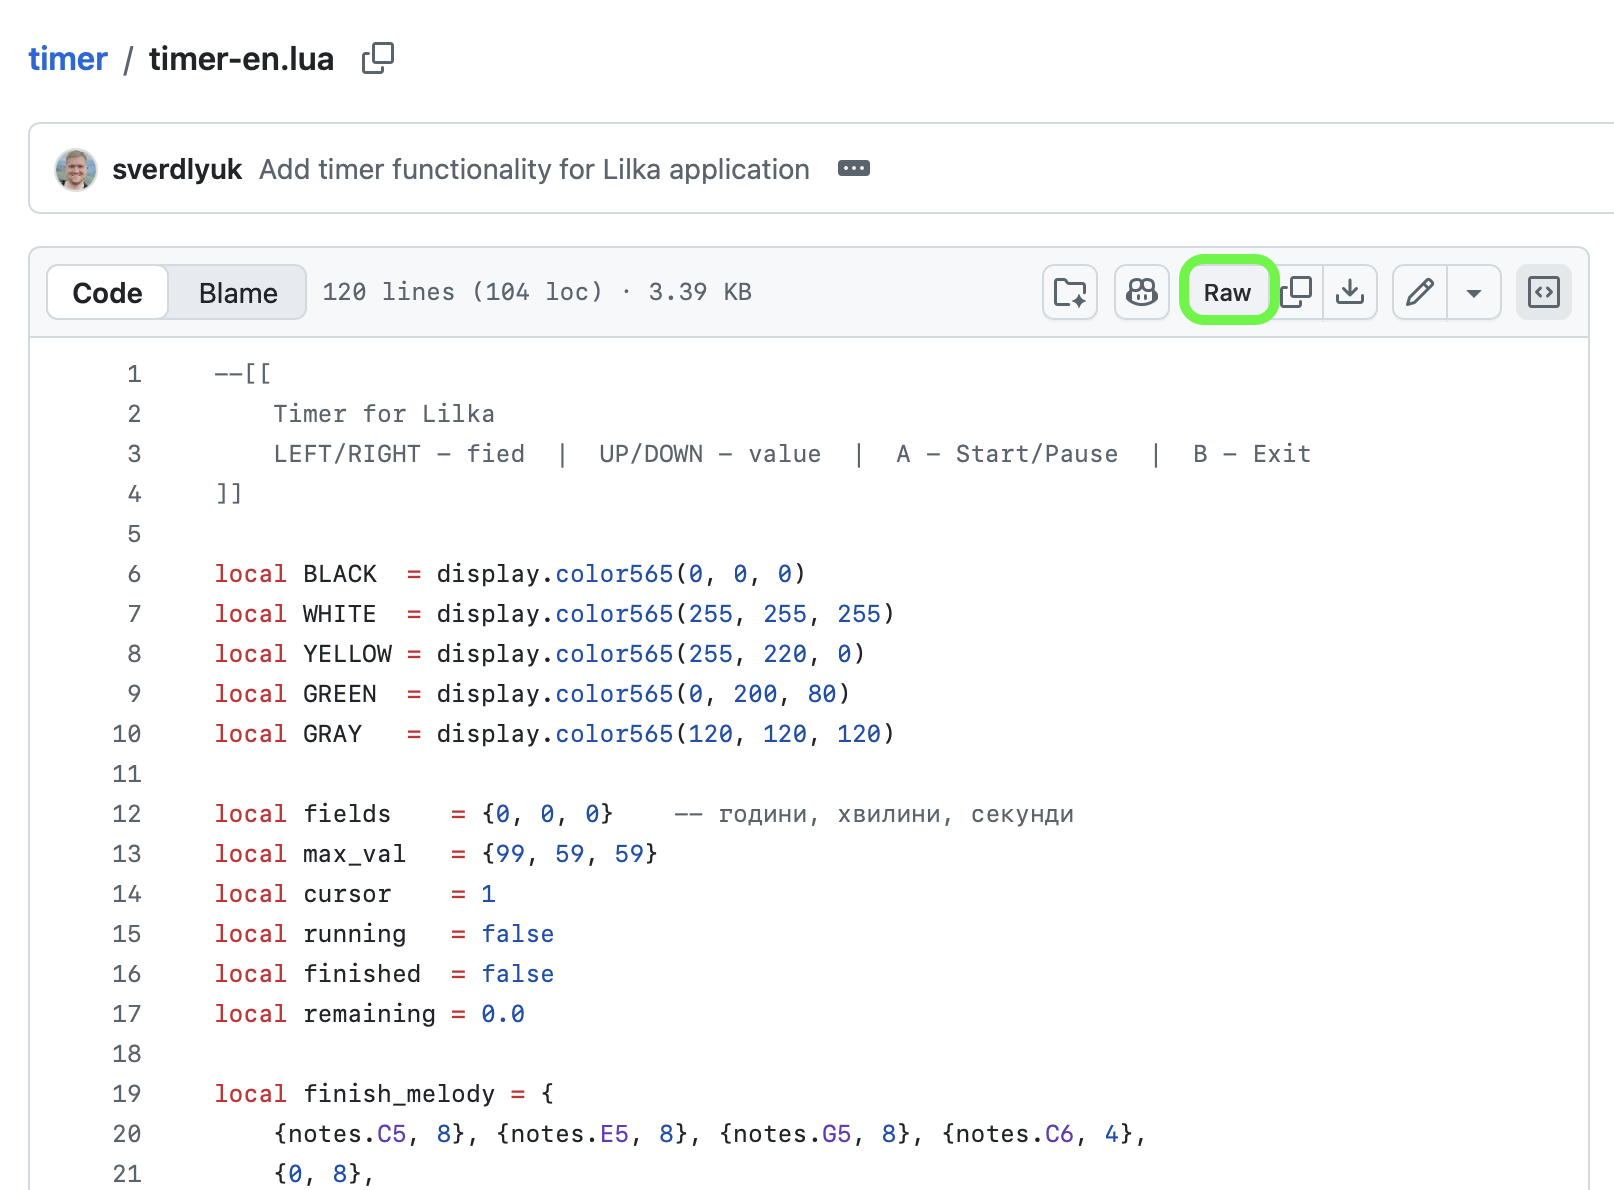
timer/manifest.ymlthe same way as the previous files — via Add file → Create new file. Below is an example for the timer and an explanation of each field:name— the app name as it appears in the catalogsources— link to the repository with the source code. This is the regular GitHub repository addressentryfile— a direct link to the main file that Lilka launches. To get the link, open the file in your repository and click the Raw button in the upper right corner — then copy the address from the browsershort_description— a short description visible in the catalog listdescription: "@DESCRIPTION.md"— means the full description is taken from theDESCRIPTION.mdfile in the same folderauthor— the author's GitHub username with the@signlicense— allows you to specify a license. You can use an open license so that other users can use and modify your code — for example MIT, GNU or any other.NONEmeans the author has not specified onekeira_version— the minimum Keira OS firmware version required to run the appicon— the main app image, displayed in the center of the page and used as a preview thumbnail in the catalogscreenshots— screenshots of the app, displayed below on the page in the Screenshots sectionname: Timer sources: type: git location: origin: https://github.com/sverdlyuk/timer entryfile: type: archive location: origin: https://raw.githubusercontent.com/sverdlyuk/timer/refs/heads/main/timer.lua short_description: A simple countdown timer with sound notification description: "@DESCRIPTION.md" author: "@sverdlyuk" license: MIT keira_version: 1.0.0 icon: image.png screenshots: - image.png - image2.pngOne thing that may not be immediately obvious is where to get the origin link for your Lua file. To do this, simply open your code file on GitHub and click the Raw button at the top, next to the Copilot icon. A new page will open — the URL of that page is exactly the link you need to use as the origin location.
![]()
6. Add Icon and Screenshots
To display images in the catalog, they must be placed in your app folder and their filenames must match the values specified in
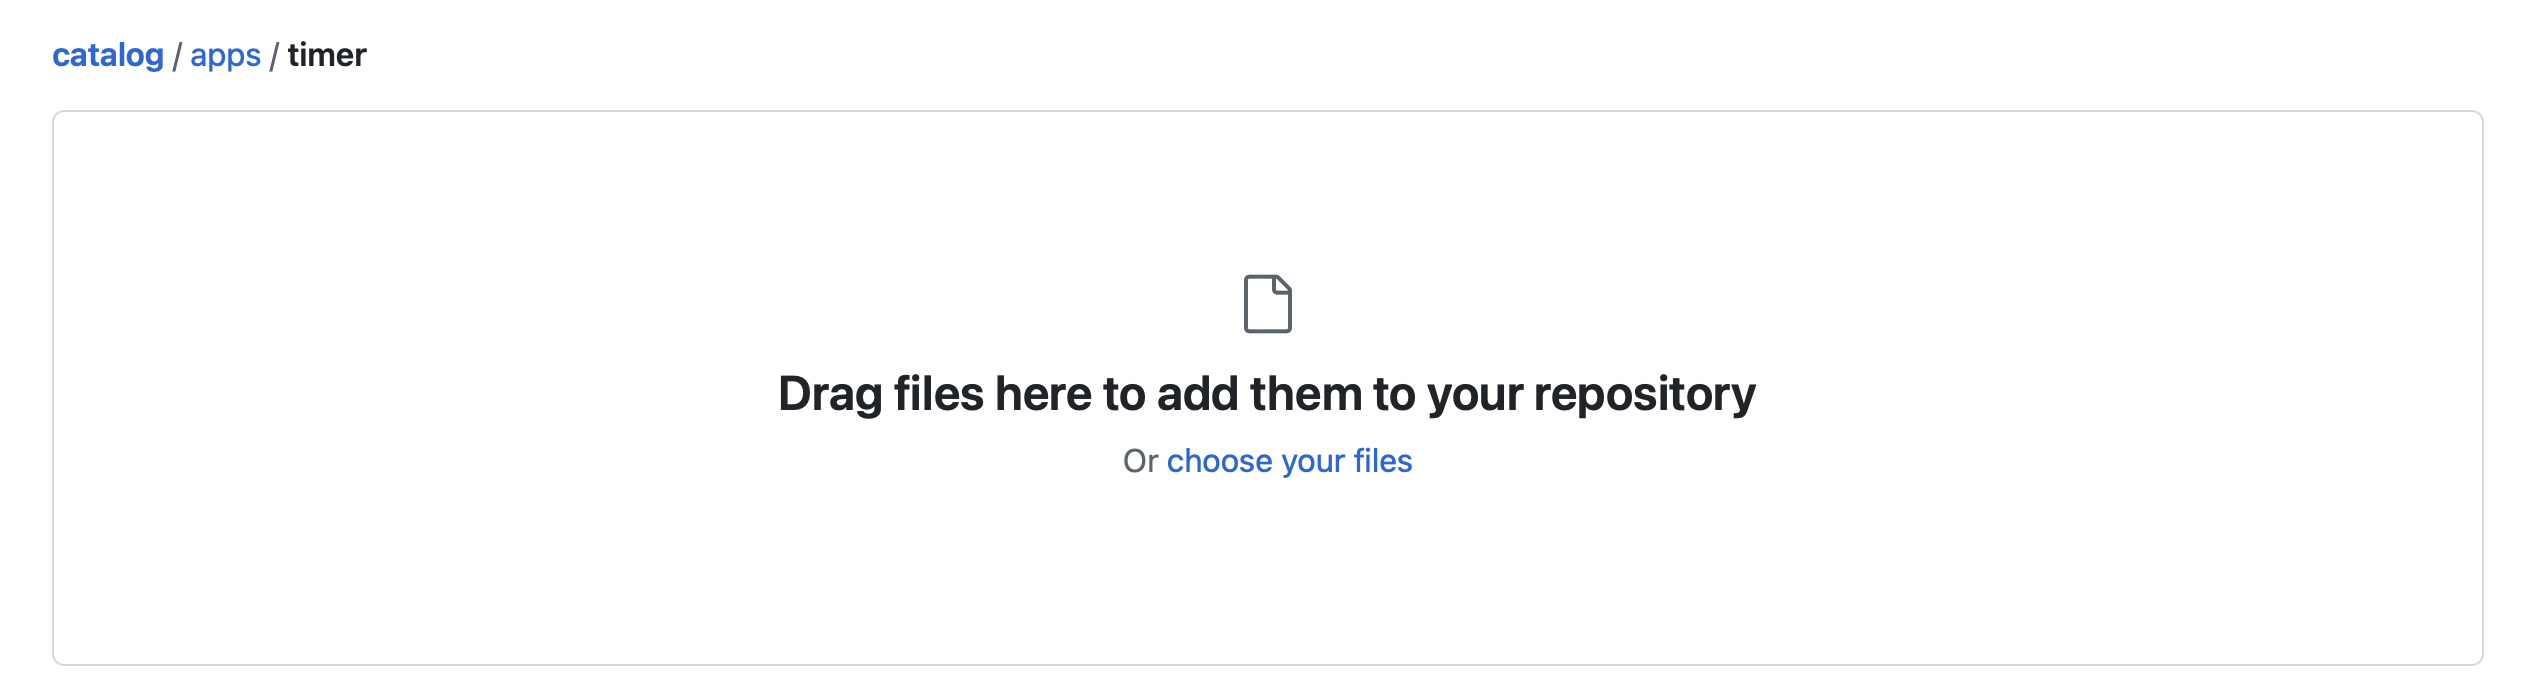
manifest.ymlundericonandscreenshots.Upload images the same way as other files — via Add file → Upload files in your app folder. For example, if your
manifest.ymlcontainsicon: image.pngandscreenshots: [image.png, image2.png], then files with exactly those names must be present in thetimer/folder.![]()
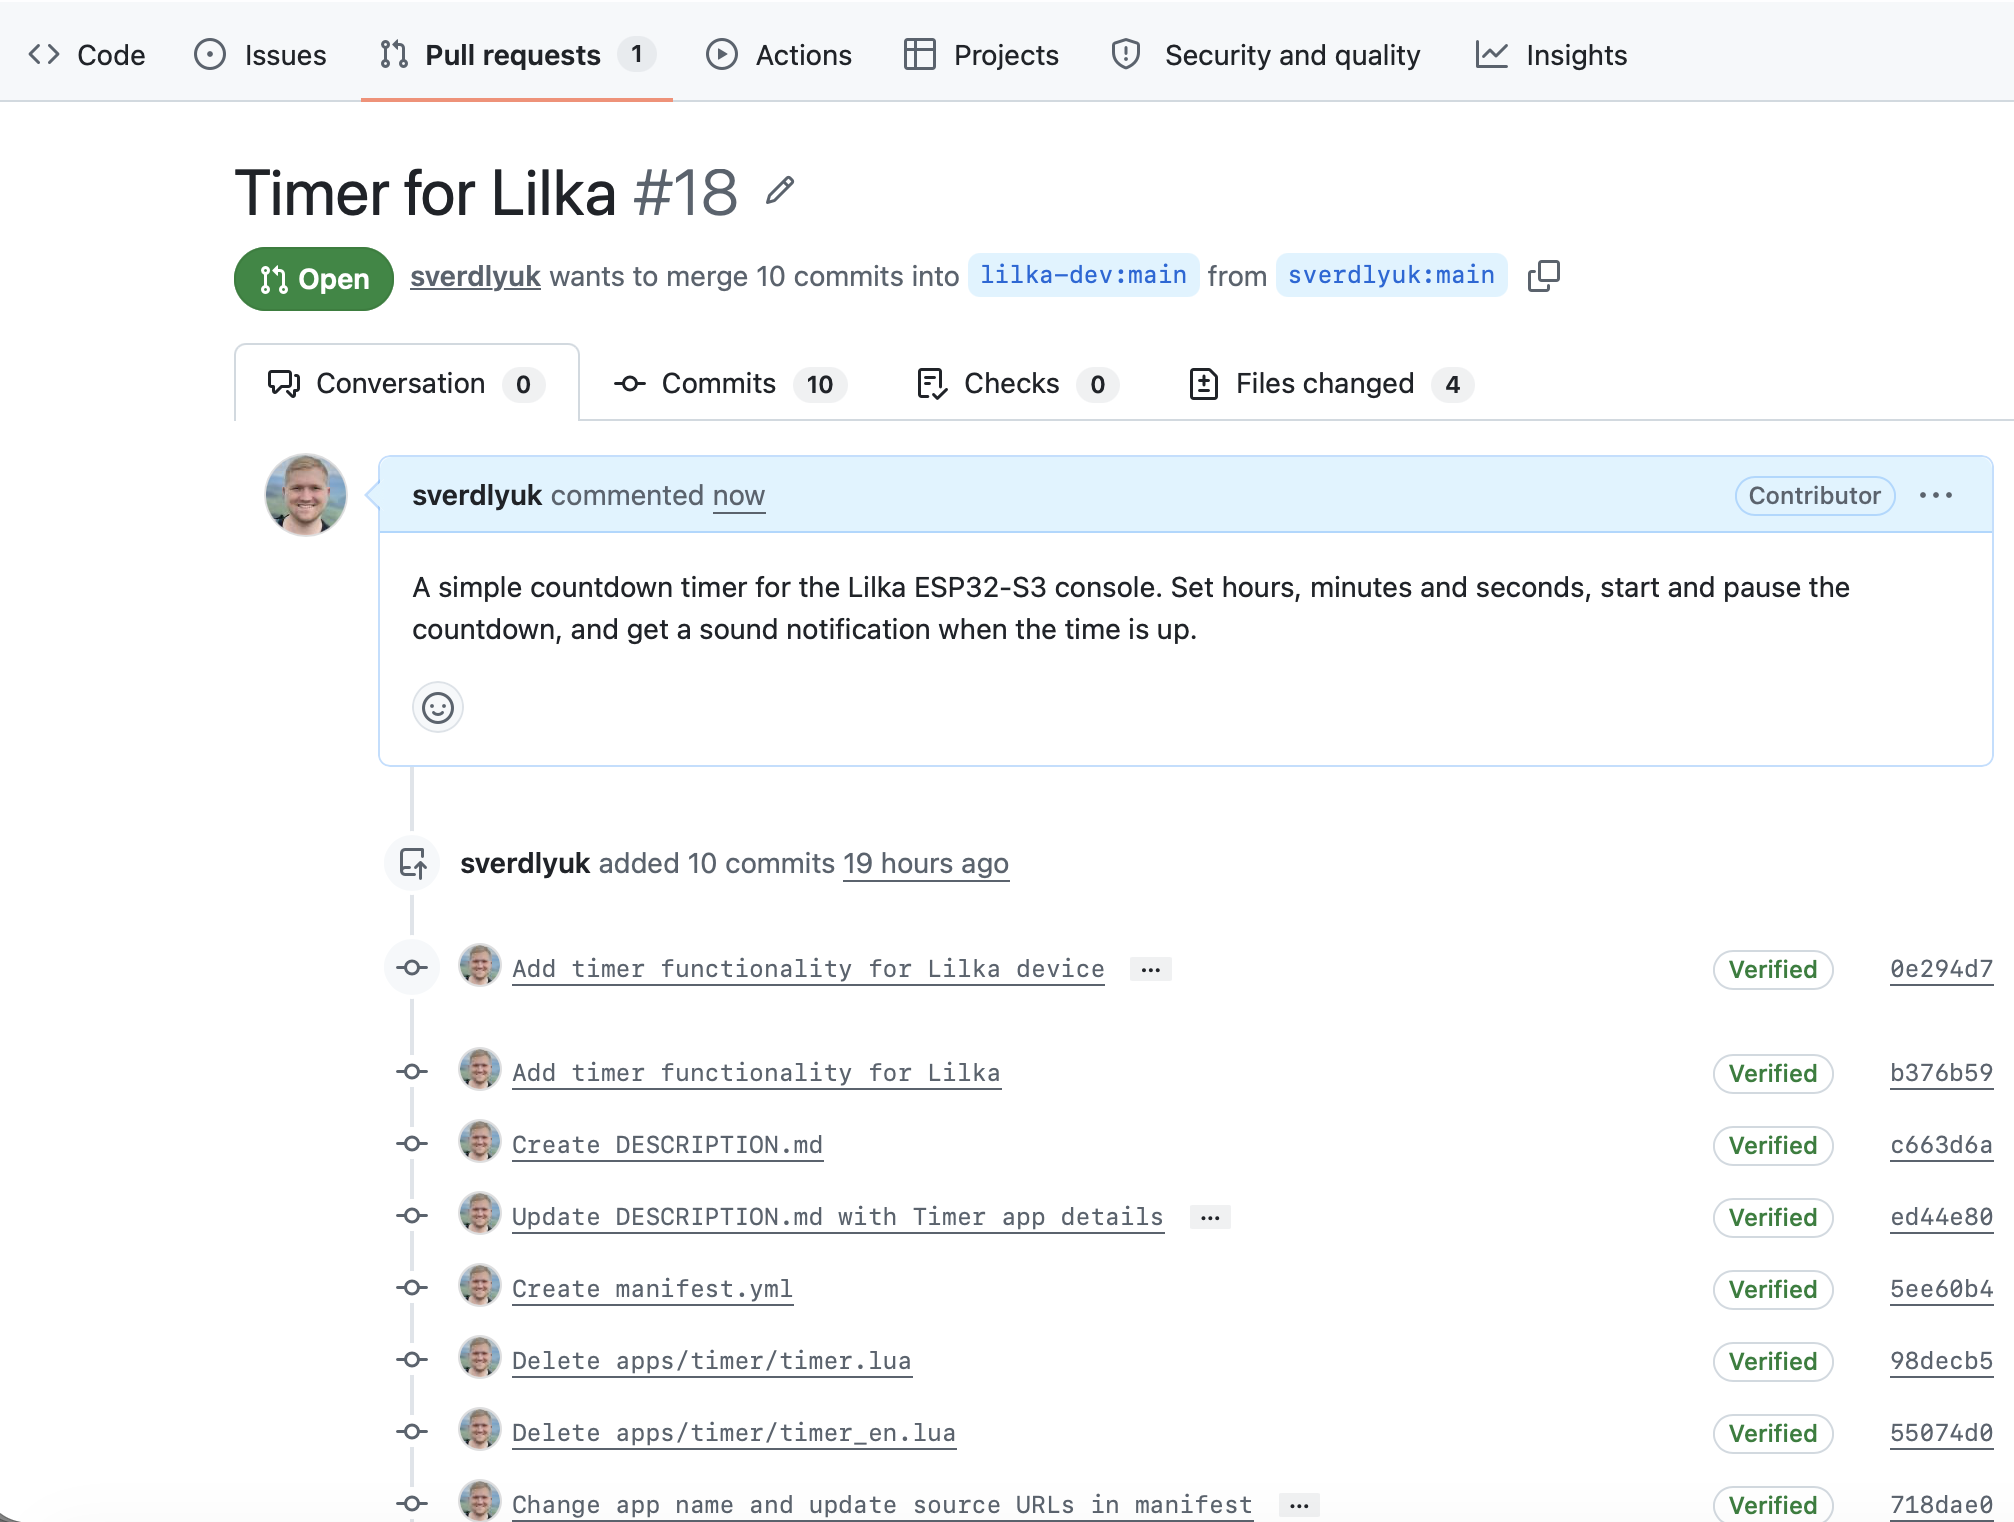
7. Open a Pull Request
Once the
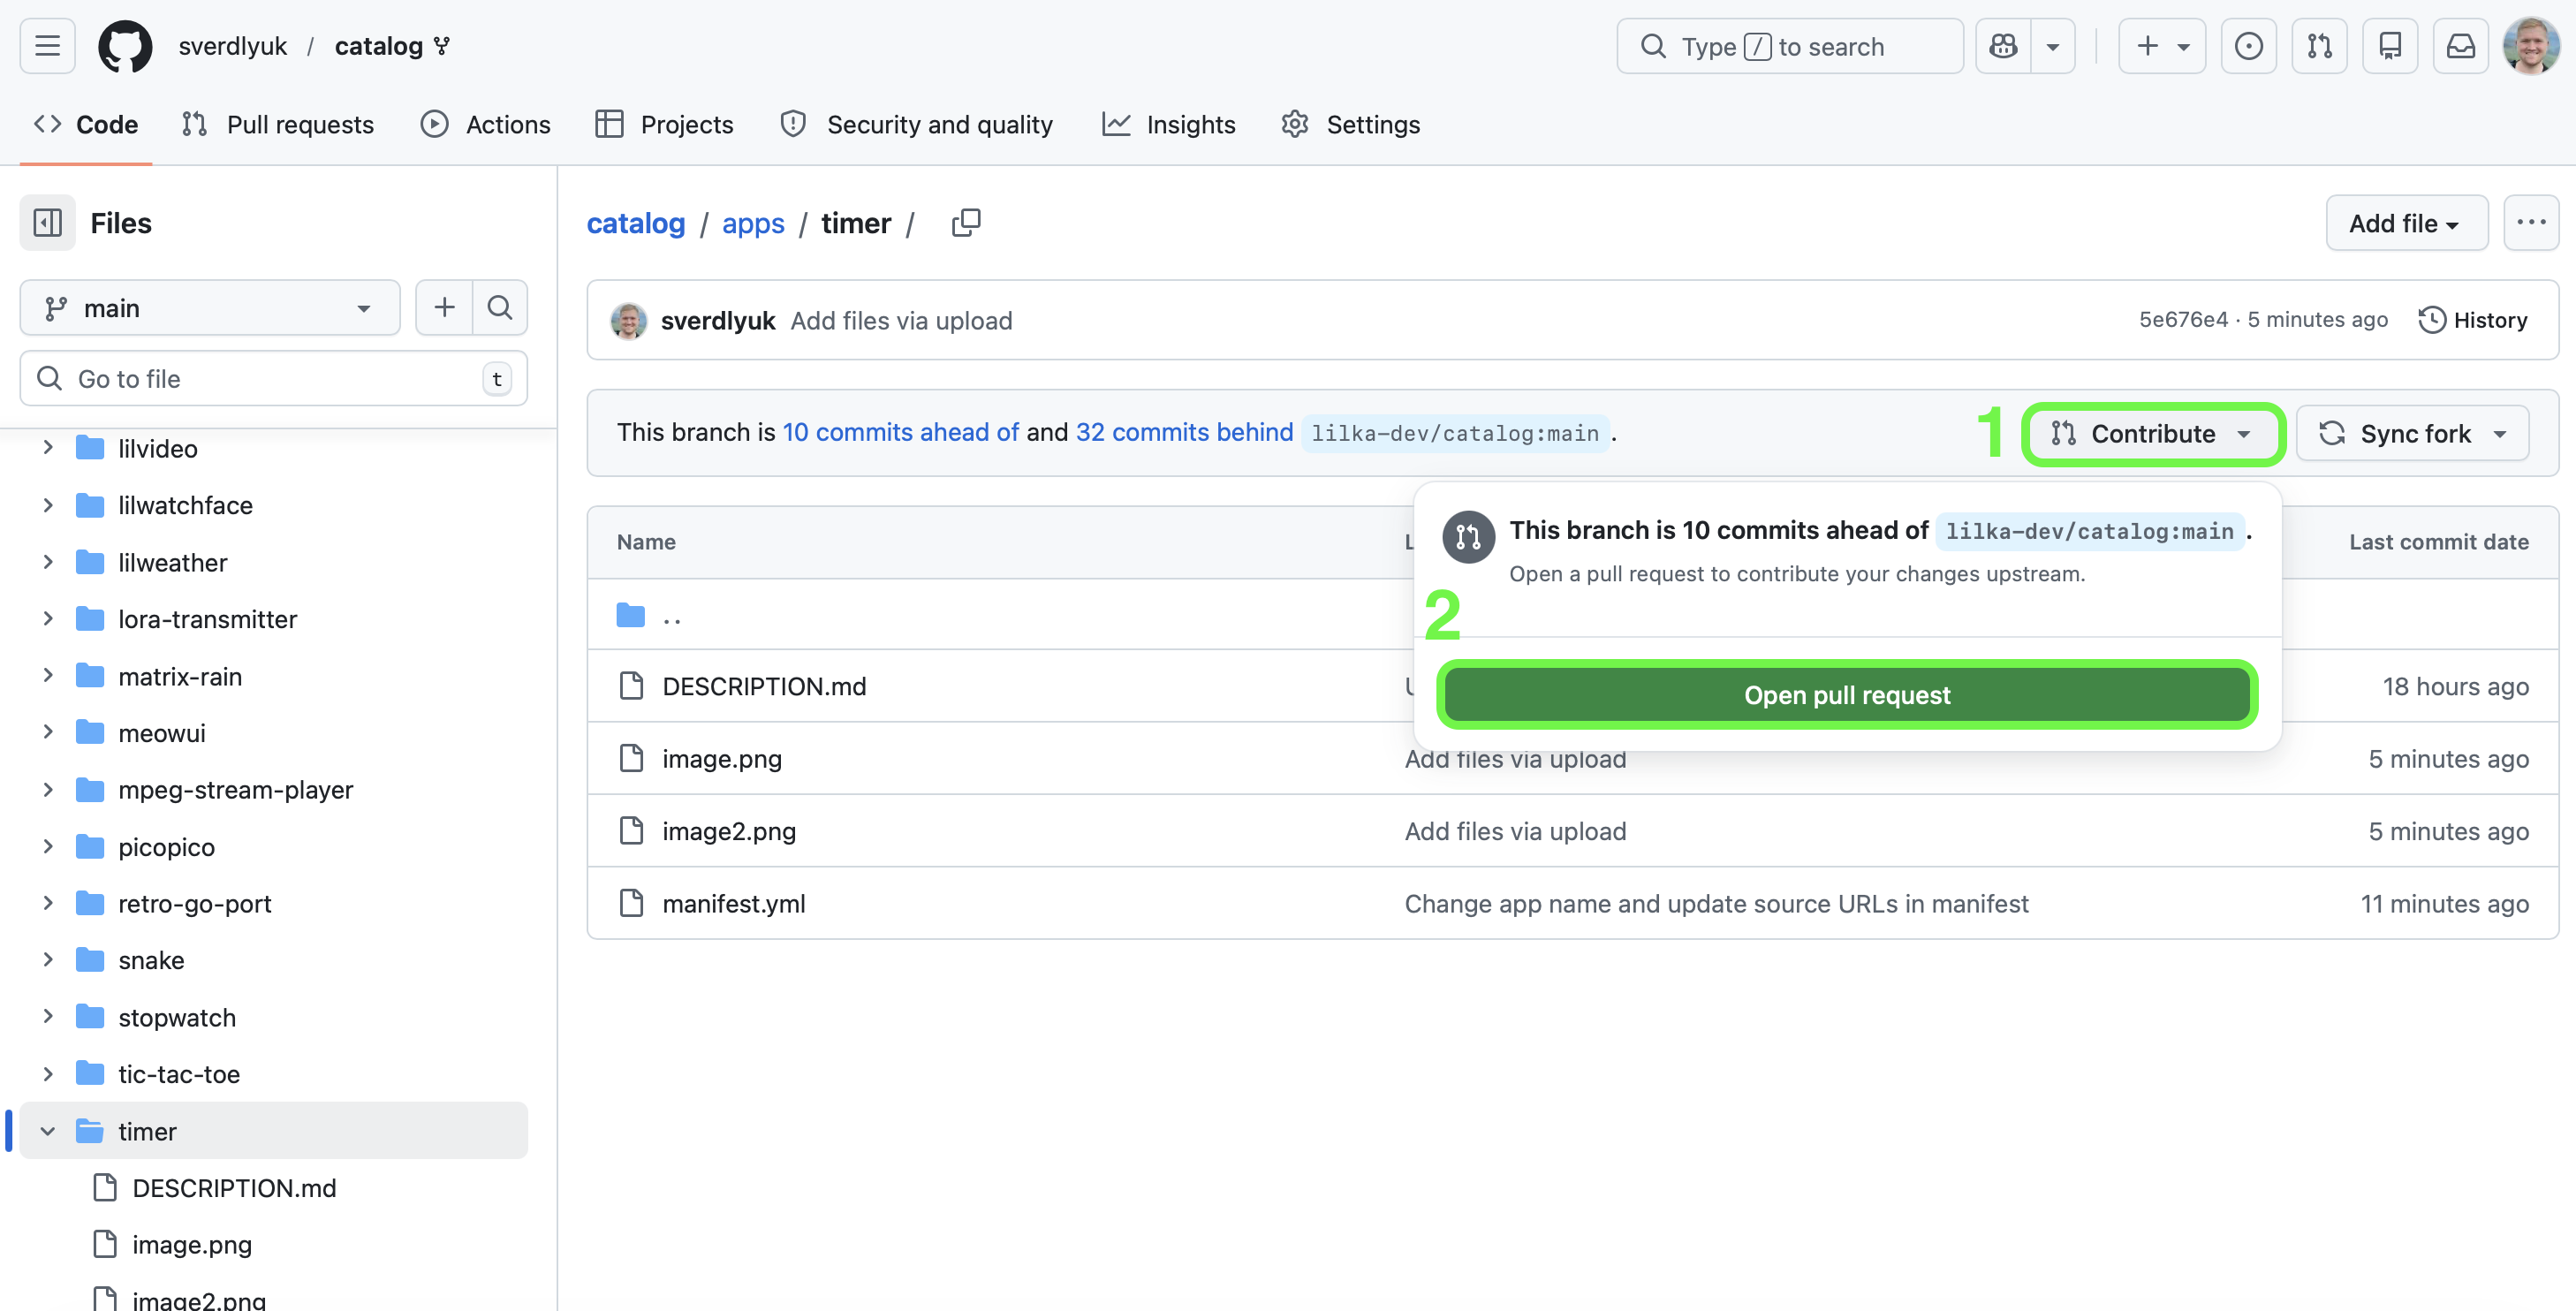
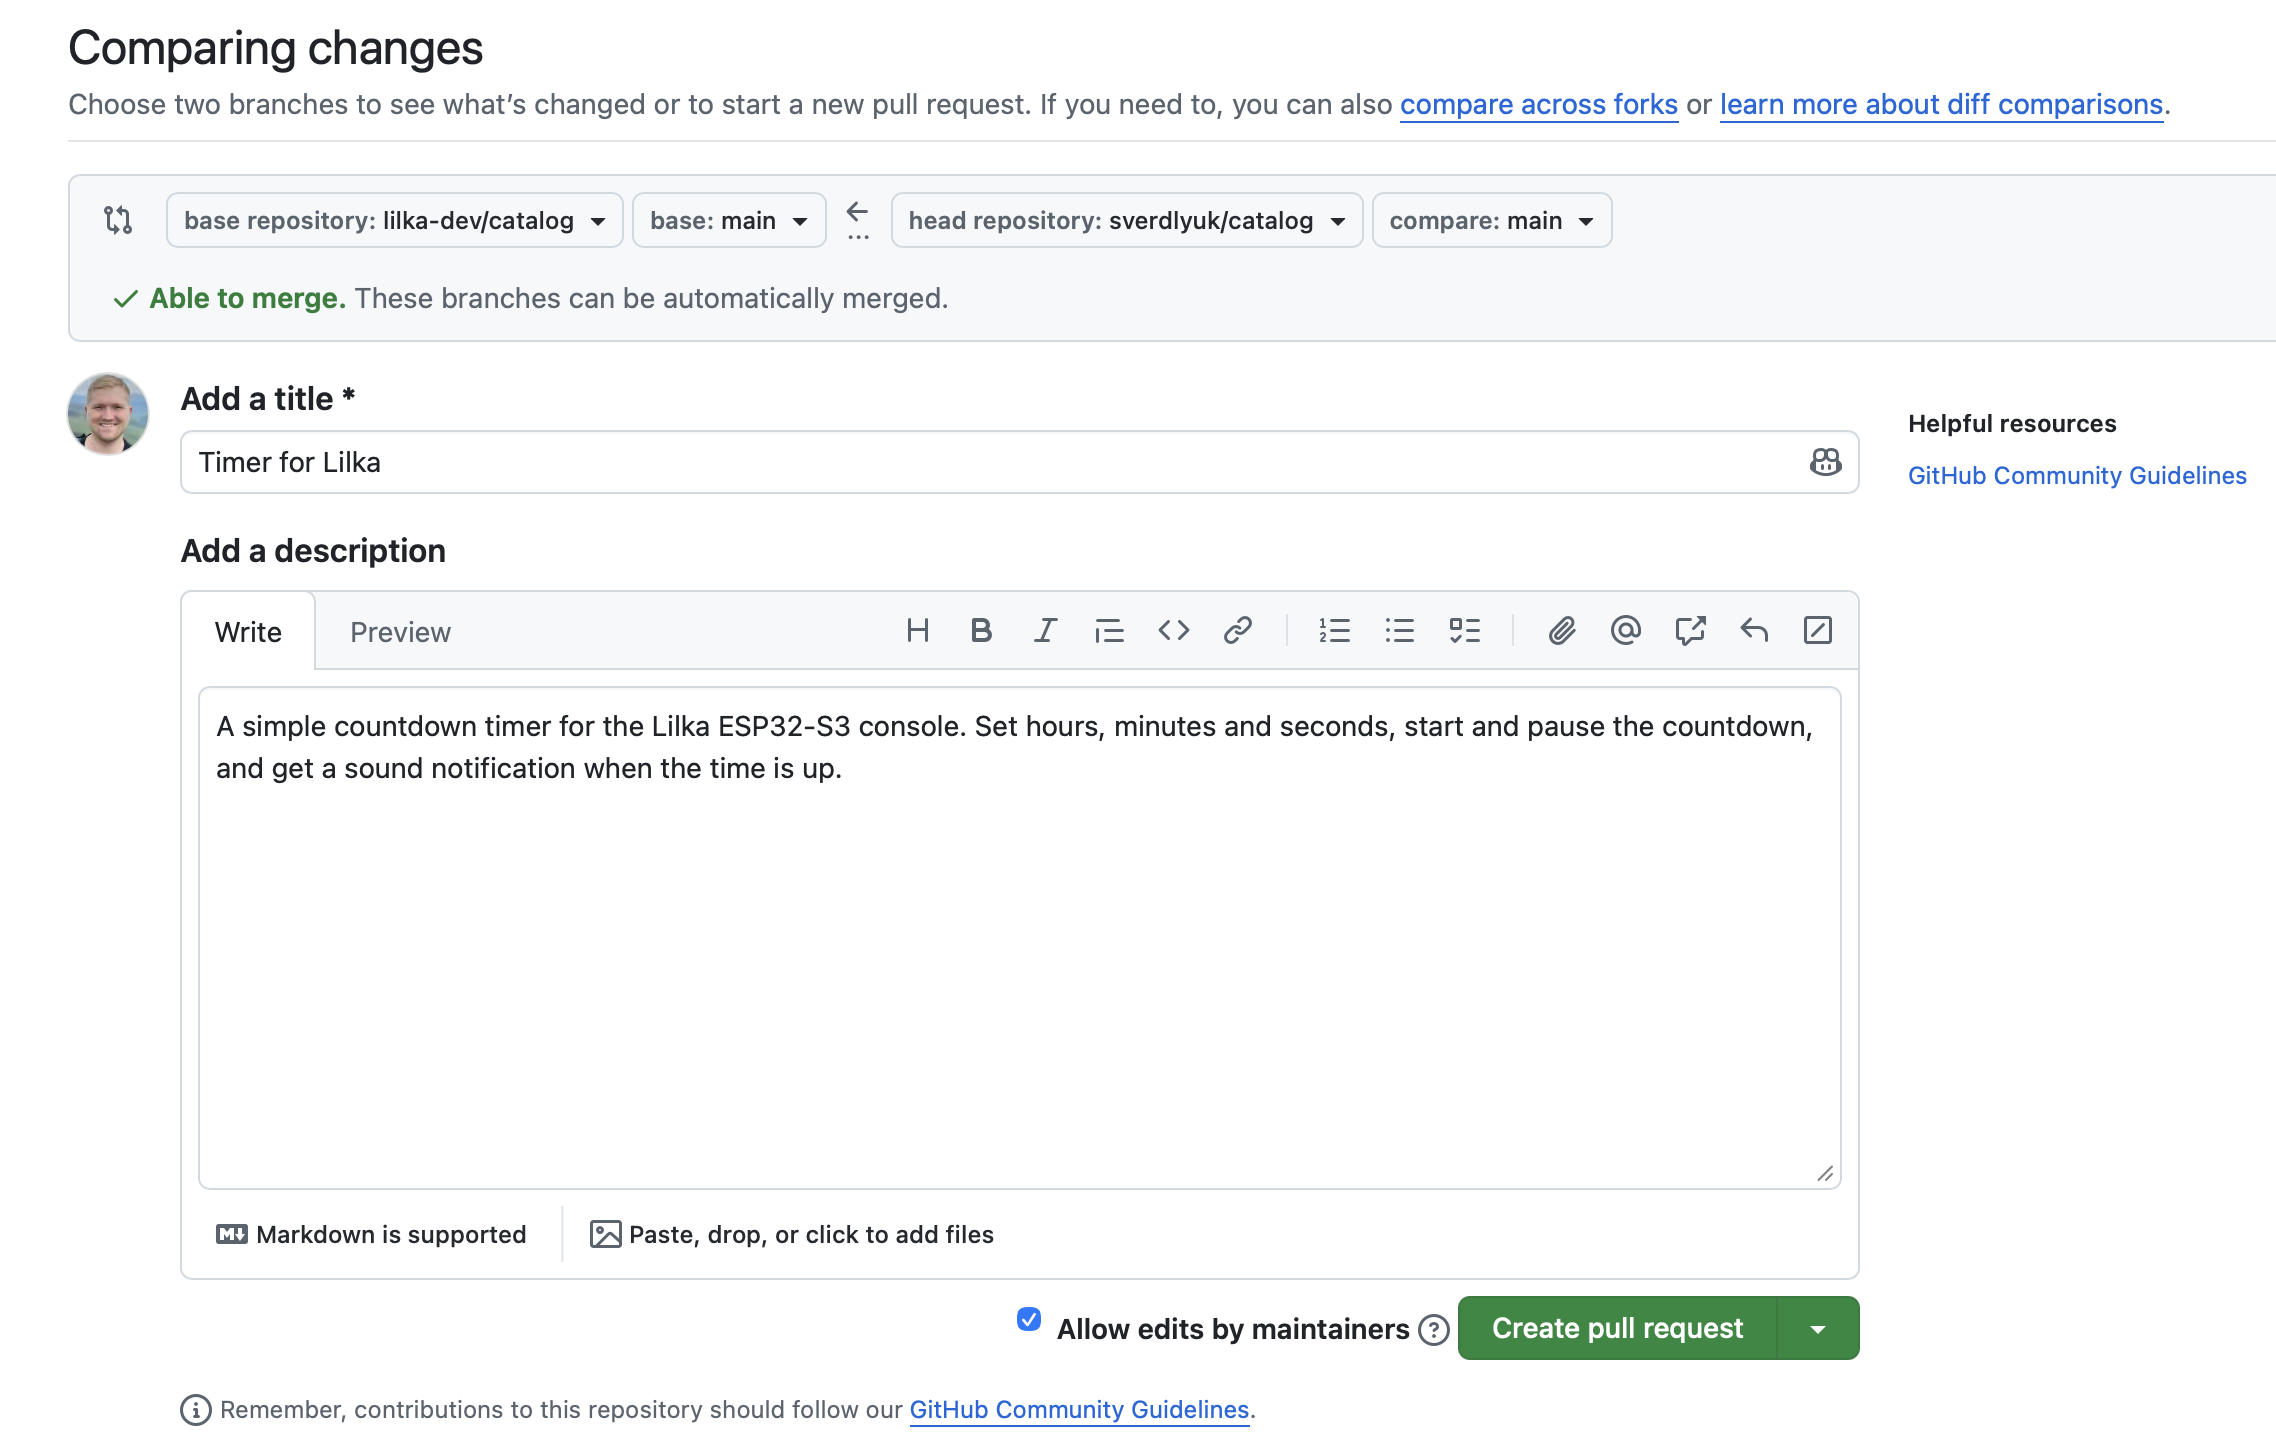
DESCRIPTION.mdandmanifest.ymlfiles are created and the screenshots are uploaded, you can send a request to add your changes to the main repository.It is very straightforward. Click the Contribute button — it has an icon that looks like a fork in the road, where two paths merge into one. That is exactly what happens: your changes are merged into the main repository. Then click the green Open pull request button, add a short description of your app and click Create pull request. After review by the moderators, your app will appear in the catalog at catalog.lilka.dev.
![]()
![]()
Leave the Allow edits by maintainers checkbox checked — this allows the moderators to make minor fixes if needed. Then click the green Create pull request button.
![]()
-
Programming Lilka in Lua
03/29/2026 at 12:05 • 0 commentsLua is one of those programming languages that just makes sense. The code reads almost like plain text — you don't need to wrestle with complex rules to understand what's happening. But what makes Lua especially exciting on Lilka is the total absence of compilation ⚡ You write your code, drop the file onto a microSD card, and run it. That's it. Want to try a new game, a small utility, or hook up a sensor? Just copy the file and go 🚀 No extra tools, no flashing, no waiting — the result is instantly in your hands.
Lilka provides a full set of modules for working with all the hardware. You draw on the screen with
display, read button states withcontroller, and play sounds and melodies withbuzzer. If you need resources from the card — there'sresourcesandsdcard. For math and geometry there are the correspondingmathandgeometrymodules. Want to connect an external sensor —gpiogives access to pins,serialto UART. And there's alsowififor networking,httpfor requests,cryptofor encryption, andstateto save program state between runs. All these modules load automatically — no manual imports needed.Any text editor works for Lua, but the most convenient is VS Code — it's free and has Lua extensions with syntax highlighting and autocompletion. Sublime Text and Notepad++ are also popular if you want something lighter. For Lilka specifically there's Live Lua support — you can send code directly to the device over USB without taking out the card, which is very handy during development.
🔁 Repeat App
How long a sequence can you remember? Four shapes sit on screen — each tied to a direction button, a color, and a musical note. Press A and the game lights up one shape while playing its note. Your job: repeat it with the matching arrow. Get it right and the sequence grows by one. Miss — and the screen shows your score and best result before resetting after two seconds.
All the logic lives in
lilka.update(delta), organized as a five-state machine:IDLE → SHOW → INPUT → WIN/LOSE. TheSHOWstate uses a countdown timer and alitvariable to highlight shapes one by one withbuzzer.play()in between.INPUTchecks each button press against the stored sequence array step by step.lilka.draw()knows nothing about the game logic — it just reads the current state andlit, and draws accordingly. Every frame the screen is cleared and redrawn from scratch. 🖥️![]()
--[[
    Simon Says for Lilka
    A - start / again  |  B - exit
]]

local BLACK = display.color565(0,0,0)
local WHITE = display.color565(255,255,255)
local GRAY  = display.color565(100,100,100)
local GREEN = display.color565(60,255,100)

local W, H  = display.width, display.height
local cx, cy = W/2, H/2 - 10

local buttons = {
    up    = { x=cx,    y=cy-55, note=notes.E5,
              dim=display.color565(0,0,100),   bright=display.color565(80,160,255),
              draw=function(x,y,c) display.fill_circle(x,y,28,c) end },
    down  = { x=cx,    y=cy+55, note=notes.G5,
              dim=display.color565(0,80,0),    bright=display.color565(60,255,100),
              draw=function(x,y,c) display.fill_rect(x-25,y-25,50,50,c) end },
    left  = { x=cx-55, y=cy,    note=notes.C5,
              dim=display.color565(100,80,0),  bright=display.color565(255,220,50),
              draw=function(x,y,c) display.fill_triangle(x-28,y+22,x+28,y+22,x,y-28,c) end },
    right = { x=cx+55, y=cy,    note=notes.B4,
              dim=display.color565(100,0,60),  bright=display.color565(255,80,180),
              draw=function(x,y,c)
                  display.fill_triangle(x,y-28,x+28,y,x,y+28,c)
                  display.fill_triangle(x,y-28,x-28,y,x,y+28,c)
              end },
}
local order = {"up","down","left","right"}

local IDLE, SHOW, INPUT, LOSE, WIN = 1,2,3,4,5
local SHOW_ON, SHOW_OFF = 0.5, 0.25

local state, sequence, step, score, best, lit, timer

local function reset()
    state=IDLE; sequence={}; step=1; score=0; lit=nil; timer=0
end

local function start_show()
    state=SHOW; step=1; lit=nil; timer=0.4
end

local function txt(col, x, y, s)
    display.set_text_color(col)
    display.set_cursor(x, y)
    display.print(s)
end

function lilka.init()
    reset()
    best = best or 0
end

function lilka.update(delta)
    local btn = controller.get_state()
    if btn.b.just_pressed then util.exit() end

    if state == IDLE then
        if btn.a.just_pressed then
            reset()
            table.insert(sequence, order[math.random(1,4)])
            start_show()
        end

    elseif state == SHOW then
        timer = timer - delta
        if timer > 0 then return end
        if lit then
            lit=nil; step=step+1; timer=SHOW_OFF
        elseif step > #sequence then
            state=INPUT; step=1; lit=nil
        else
            lit=sequence[step]; timer=SHOW_ON
            buzzer.play(buttons[lit].note, 400)
        end

    elseif state == INPUT then
        for _, name in ipairs(order) do
            if btn[name].just_pressed then
                lit=name; timer=0.15
                buzzer.play(buttons[name].note, 200)
                if name ~= sequence[step] then
                    score=#sequence-1
                    if score > best then best=score end
                    state=LOSE; timer=2.0
                else
                    step=step+1
                    if step > #sequence then state=WIN; timer=0.6 end
                end
                break
            end
        end
        if lit and state==INPUT then
            timer=timer-delta
            if timer<=0 then lit=nil end
        end

    elseif state == WIN then
        timer=timer-delta
        if timer<=0 then
            table.insert(sequence, order[math.random(1,4)])
            start_show()
        end

    elseif state == LOSE then
        timer=timer-delta
        if timer<=0 then reset() end
    end
end

function lilka.draw()
    display.fill_screen(BLACK)
    display.set_font("9x15")

    for _, name in ipairs(order) do
        local b = buttons[name]
        local col = (state==WIN) and GREEN
                 or (lit==name)  and b.bright
                 or b.dim
        b.draw(b.x, b.y, col)
    end

    if state == IDLE then
        txt(WHITE, cx-75, H-32, "Repeat the sequence!")
        txt(GRAY,  25,    H-10, "B: exit")
        txt(GRAY,  170,   H-10, "A: start")
    elseif state == SHOW then
        txt(GRAY, cx-54, H-28, "Watch!")
    elseif state == INPUT then
        txt(GRAY, cx-48, H-28, "Repeat!")
    elseif state == WIN then
        txt(GREEN, cx-48, H-28, "Correct!")
    elseif state == LOSE then
        txt(display.color565(255,80,80), cx-48, H-48, "Wrong!")
        txt(GRAY, cx-60, H-28, "Score: "..score.."  Best: "..best)
    end
end
🔢 Gues Number App
The program uses
math.random— a standard Lua math function — to pick a random integer from 0 to 100 at startup. No need to invent the generation logic yourself: Lua handles it. 🎲From there, Lilka's architecture takes over: Keira automatically calls
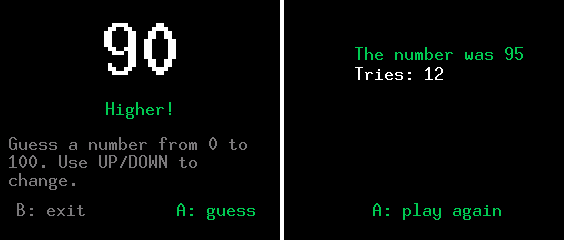
lilka.update()30 times per second to handle button input, andlilka.draw()immediately after — for rendering. So the game reacts to UP/DOWN instantly, with no manual delays needed. The player adjusts their guess, presses A — and the program compares it to the secret number, responding with "Higher!" or "Lower!" 🔼🔽When the number is guessed, the screen shows the result: how many tries it took, and a fun fact about that number — if one exists in the built-in
factsdictionary. Then pressing A starts a new game with a fresh random number. 🔄![]()
--[[
    Guess the number for Lilka
    UP/DOWN - change number  |  A - confirm guess  |  B - exit
]]

local BLACK  = display.color565(0, 0, 0)
local WHITE  = display.color565(255, 255, 255)
local GREEN  = display.color565(0, 200, 80)
local YELLOW = display.color565(255, 220, 0)
local GRAY   = display.color565(120, 120, 120)

local facts = {
    [7]  = "If you ask people to pick a number from 1 to 10, most will choose 7.",
    [42] = "In 'The Hitchhiker's Guide to the Galaxy' — the answer to life, the universe and everything.",
    [100] = "The word 'hundred' comes from Old Norse 'hundrath' — which actually meant 120.",
}

local secret = math.random(0, 100)
local guess  = 0
local tries  = 0
local won    = false
local hint   = ""

local function wrap(val)
    if val > 100 then return 0 end
    if val < 0   then return 100 end
    return val
end

local function wrap_text(text, max)
    local lines, line = {}, ""
    for word in text:gmatch("%S+") do
        if #line + #word + 1 > max then
            table.insert(lines, line); line = word
        else
            line = line == "" and word or line .. " " .. word
        end
    end
    if line ~= "" then table.insert(lines, line) end
    return lines
end

function lilka.update()
    local btn = controller.get_state()
    if btn.b.just_pressed then util.exit() end

    if won then
        if btn.a.just_pressed then
            secret = math.random(0, 100)
            guess = 0; tries = 0; won = false; hint = ""
        end
        return
    end

    if btn.up.just_pressed   then guess = wrap(guess + 1); hint = "" end
    if btn.down.just_pressed then guess = wrap(guess - 1); hint = "" end

    if btn.a.just_pressed then
        tries = tries + 1
        if guess == secret then
            won = true; hint = ""
        else
            hint = secret > guess and "Higher!" or "Lower!"
        end
    end
end

function lilka.draw()
    local W, H = display.width, display.height
    display.fill_screen(BLACK)

    if won then
        display.set_font("10x20")
        display.set_text_color(GREEN)
        local m1 = "The number was " .. secret
        local m2 = "Tries: " .. tries
        display.set_cursor(W/4, H/2 - 60)
        display.print(m1)
        display.set_text_color(WHITE)
        display.set_cursor(W/4, H/2 - 40)
        display.print(m2)

        local fact = facts[secret]
        if fact then
            display.set_font("10x20")
            display.set_text_color(WHITE)
            display.set_cursor(8, H/2 - 15)
            display.print("Number " .. secret .. ":")
            display.set_text_color(YELLOW)
            for i, line in ipairs(wrap_text(fact, 38)) do
                display.set_cursor(8, H/2 + 10 + (i-1) * 18)
                display.print(line)
            end
        end

        display.set_font("10x20")
        display.set_text_color(GREEN)
        display.set_cursor(W/2 - 52, H - 24)
        display.print("A: play again")
        return
    end

    -- Big number
    display.set_font("10x20")
    display.set_text_size(4)
    display.set_text_color(WHITE)
    local gstr = tostring(guess)
    display.set_cursor(W/2 - #gstr * 20, H/2 - 45)
    display.print(gstr)
    display.set_text_size(1)

    -- Hint
    if hint ~= "" then
        display.set_font("10x20")
        display.set_text_color(GREEN)
        display.set_cursor(W/2 - (#hint * 5), H/2 - 5)
        display.print(hint)
    end

    -- Bottom text
    display.set_font("10x20")
    display.set_text_color(GRAY)
    local bottom = "Guess a number from 0 to 100. Use UP/DOWN to change."
    local max_chars = math.floor((W - 16) / 10)
    for i, line in ipairs(wrap_text(bottom, max_chars)) do
        display.set_cursor(8, H - 90 + (i-1) * 18)
        display.print(line)
    end

    -- Footer
    display.set_cursor(16, H - 24)
    display.print("B: exit")
    display.set_text_color(GREEN)
    display.set_cursor(W - 104, H - 24)
    display.print("A: guess")
end
⏲️ Timer App
The timer counts down and plays a melody when time is up 🎵 At the start of the program we define colors and variables —
fieldsstores the three numbers you set with the buttons (hours, minutes, seconds),cursortells which field is currently active, andrunningandfinishedwork like switches — eithertrueorfalse.All the logic happens in
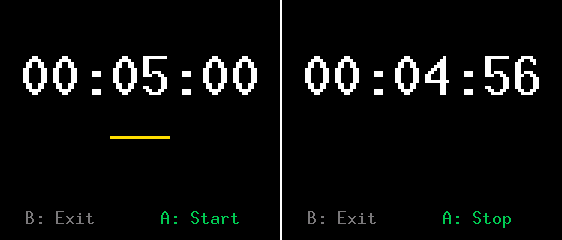
lilka.updatewhich is called ~30 times per second ⚙️ This is where buttons are checked and the countdown runs: every framedelta— a tiny slice of time — is subtracted fromremaining. Whenremainingreaches zero the melody plays and the program switches to thefinishedstate. The up/down buttons change the field value with automatic wraparound using the operator — after 59 seconds it rolls back to 0.The visual side is handled by lilka.draw — it clears the screen and redraws everything from scratch each frame 🖥️ Large digits in the center, a yellow line under the active field shows what's currently being edited, and button hints for A and B are always visible at the bottom.
![]()
--[[
    Timer for Lilka
    LEFT/RIGHT - fied  |  UP/DOWN - value  |  A - Start/Pause  |  B - Exit
]]

local BLACK  = display.color565(0, 0, 0)
local WHITE  = display.color565(255, 255, 255)
local YELLOW = display.color565(255, 220, 0)
local GREEN  = display.color565(0, 200, 80)
local GRAY   = display.color565(120, 120, 120)

local fields    = {0, 0, 0}    -- години, хвилини, секунди
local max_val   = {99, 59, 59}
local cursor    = 1
local running   = false
local finished  = false
local remaining = 0.0

local finish_melody = {
    {notes.C5, 8}, {notes.E5, 8}, {notes.G5, 8}, {notes.C6, 4},
    {0, 8},
    {notes.G5, 8}, {notes.A5, 8}, {notes.B5, 8}, {notes.C6, 4},
    {0, 8},
    {notes.E5, 8}, {notes.G5, 8}, {notes.C6, 8}, {notes.E6, -4},
    {0, 4},
    {notes.C6, 4}, {notes.G5, 4}, {notes.E5, 2},
}

local function total_secs()
    return fields[1] * 3600 + fields[2] * 60 + fields[3]
end

function lilka.update(delta)
    local btn = controller.get_state()

    if btn.b.just_pressed then util.exit() end

    if finished then
        if btn.a.just_pressed then
            finished = false; fields = {0,0,0}; remaining = 0; cursor = 1
            buzzer.stop()
        end
        return
    end

    if btn.a.just_pressed then
        if running then
            running = false
        elseif total_secs() > 0 then
            if remaining <= 0 then remaining = total_secs() end
            running = true
        end
    end

    if not running then
        if btn.left.just_pressed  then cursor = cursor == 1 and 3 or cursor - 1 end
        if btn.right.just_pressed then cursor = cursor == 3 and 1 or cursor + 1 end
        if btn.up.just_pressed then
            fields[cursor] = (fields[cursor] + 1) % (max_val[cursor] + 1)
            remaining = 0
        end
        if btn.down.just_pressed then
            fields[cursor] = (fields[cursor] - 1 + max_val[cursor] + 1) % (max_val[cursor] + 1)
            remaining = 0
        end
    end

    if running then
        remaining = remaining - delta
        if remaining <= 0 then
            remaining = 0; running = false; finished = true
            buzzer.play_melody(finish_melody, 200)
        end
    end
end

function lilka.draw()
    local W, H = display.width, display.height
    display.fill_screen(BLACK)

    -- Цифри
    local dh, dm, ds
    if running or finished then
        local t = math.floor(remaining)
        dh = math.floor(t/3600); dm = math.floor(t%3600/60); ds = t%60
    else
        dh, dm, ds = fields[1], fields[2], fields[3]
    end

    display.set_font("10x20")
    display.set_text_size(3)
    display.set_text_color(WHITE)
    display.set_cursor(W/2 - 120, H/2 - 25)
    display.print(string.format("%02d:%02d:%02d", dh, dm, ds))
    display.set_text_size(1)

    -- Underline active field
    if not running and not finished then
        local offsets = {W/2 - 120, W/2 - 120 + 90, W/2 - 120 + 180}
        display.fill_rect(offsets[cursor], H/2 + 16, 60, 3, YELLOW)
    end

    -- Footer: B on the left, A with signature on the right
    local a_label
    if finished then
        a_label = "A: Reset"
    elseif running then
        a_label = "A: Stop"
    else
        a_label = "A: Start"
    end

    display.set_font("10x20")
    display.set_text_color(GRAY)
    display.set_cursor(25, H - 16)
    display.print("B: Exit")
    display.set_text_color(GREEN)
    display.set_cursor(W/2 + 20, H - 16)
    display.print(a_label)
end
Conclusion
Coding is not just a useful skill — it's genuinely fun. The three programs in this article were written in a single evening, and each of them already does something real: counts down time, picks a number, tests your memory Lua on Lilka lets you turn an idea into a working program very quickly — no extra tools, no complex setup.
If you don't know how to code yet — that's not a problem. Just read the Lua API docs and ask an AI to help: explain a concept, write a template, or debug an error. 🤖
-
How to Flash Lilka
03/27/2026 at 20:23 • 0 commentsSometimes you need to update or replace the firmware on Lilka. Firmware can come in two forms: a ready-made compiled file (.bin or .img) that you simply upload to the device, or source code that you first need to build on your computer to get a file ready for flashing.
⚡ Lilka Flasher
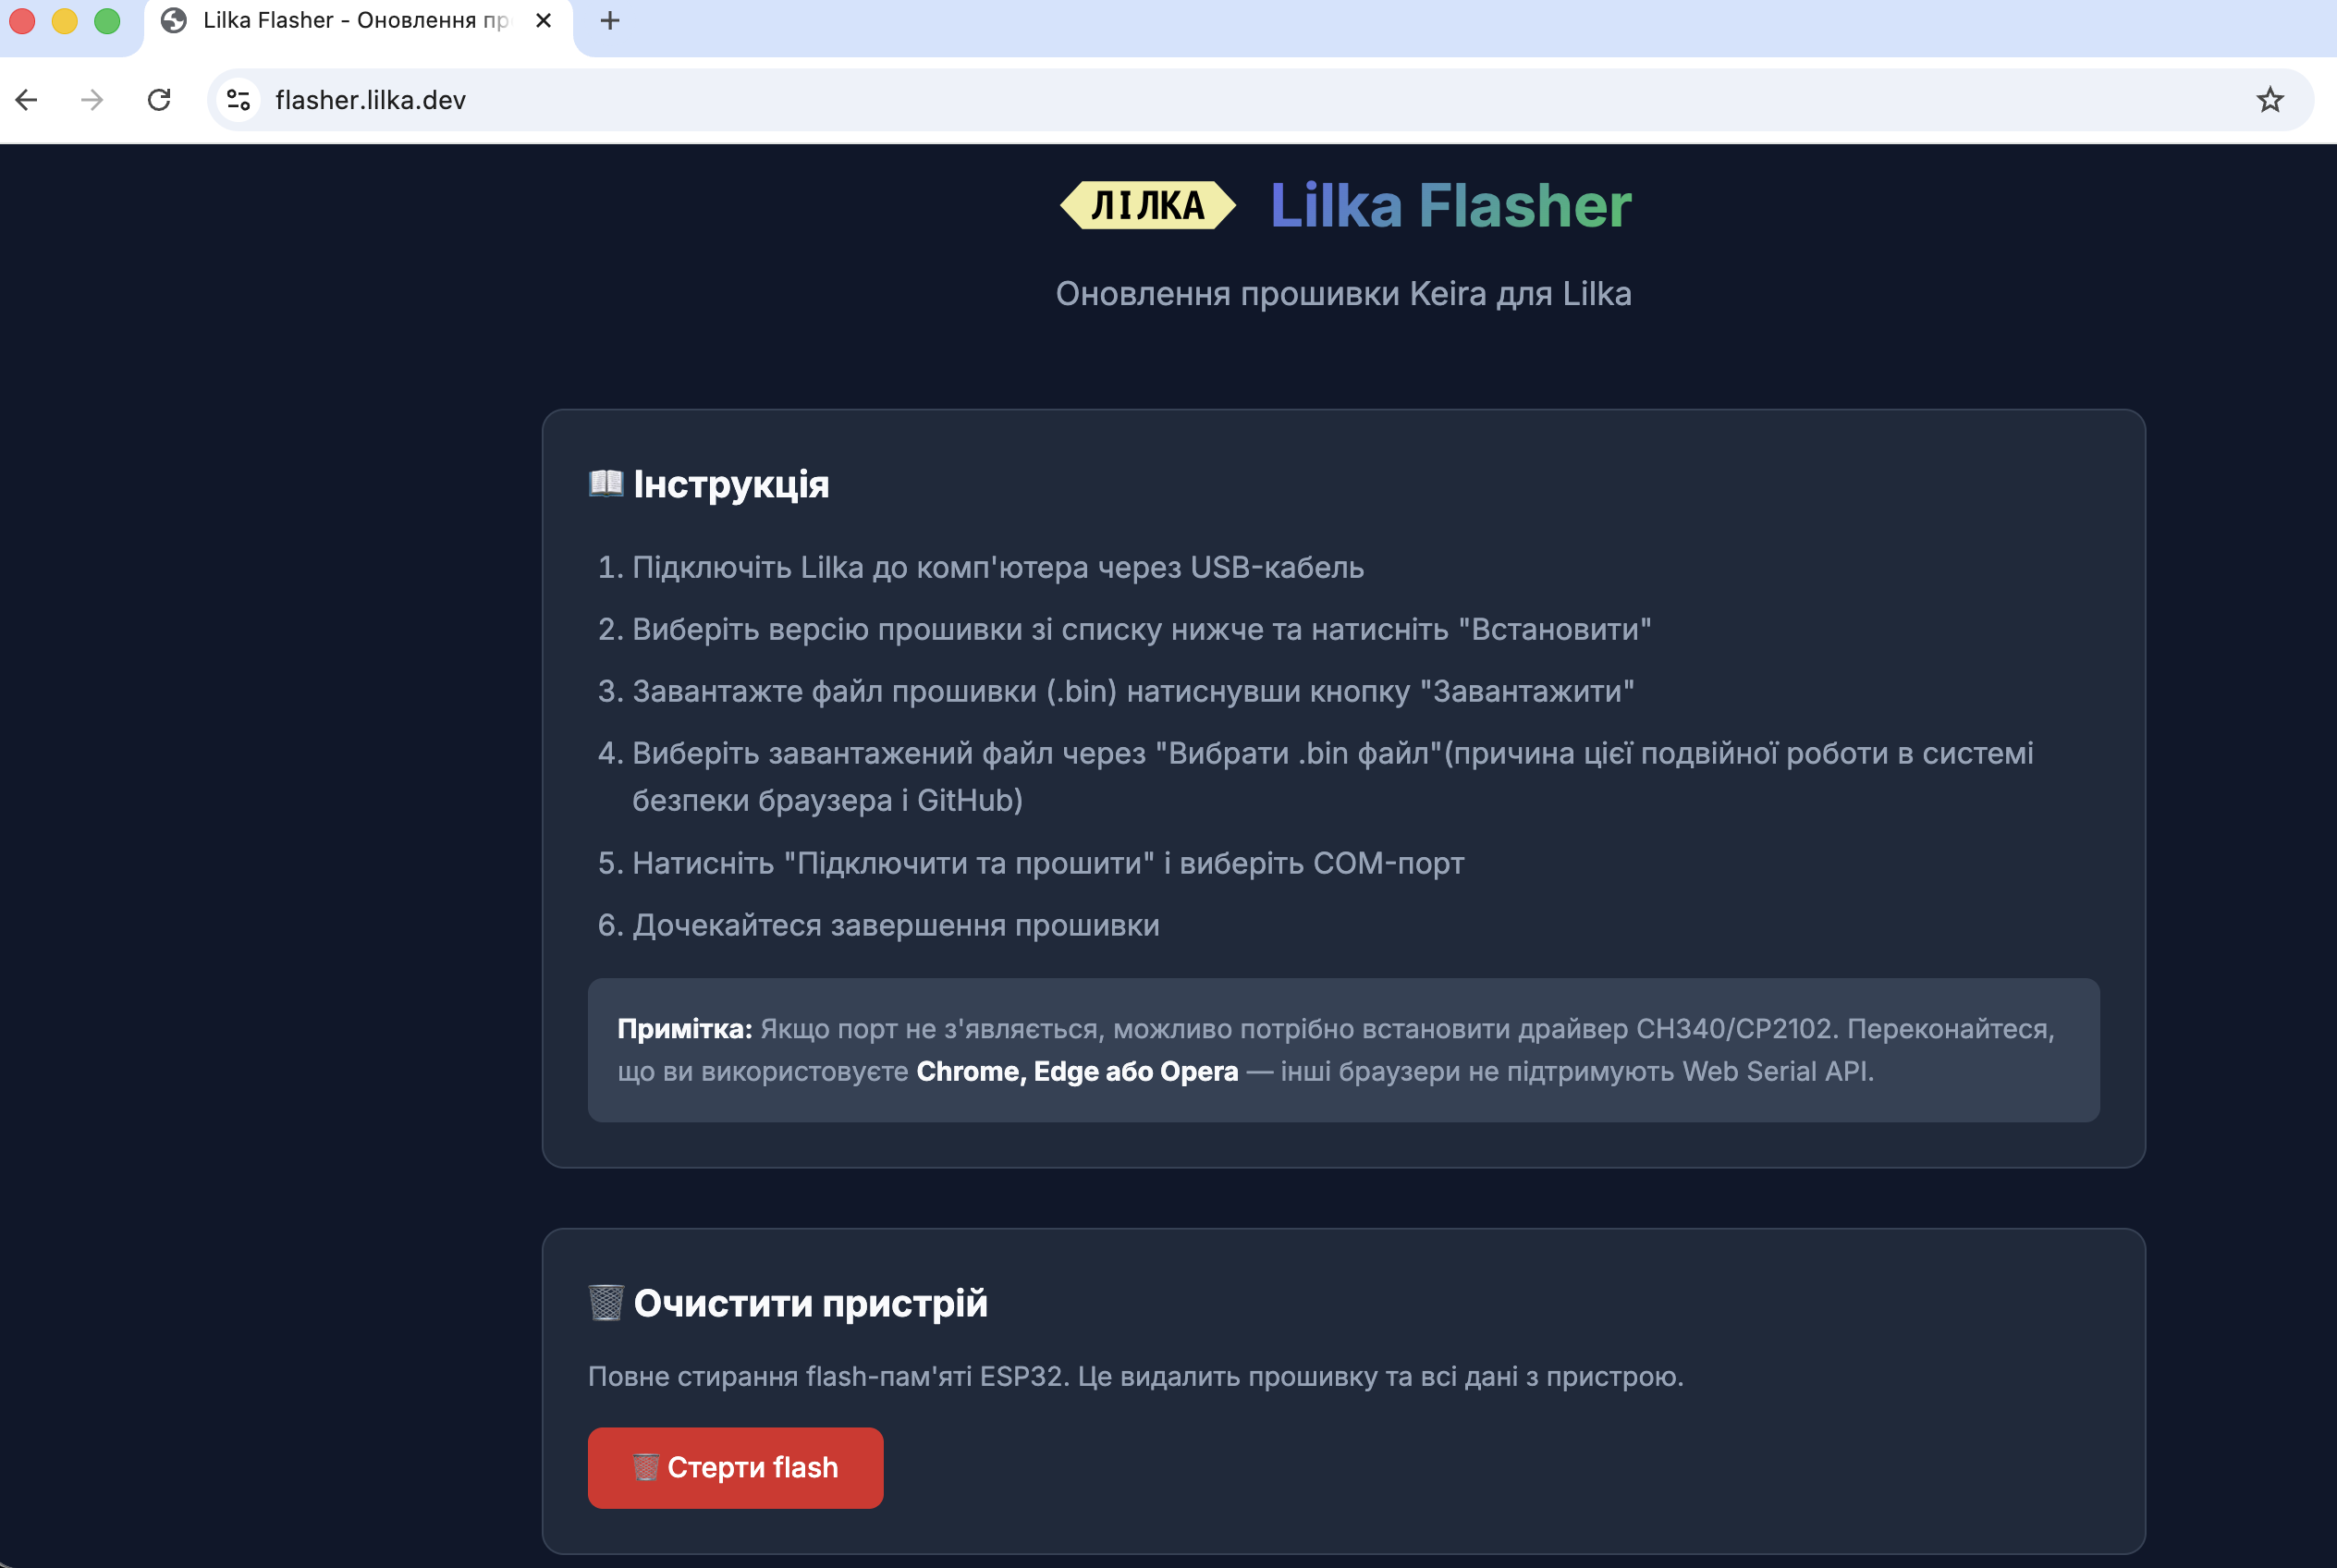
The easiest way is to use the official web flasher at. It runs directly in the browser, nothing to install, and the firmware is transferred to the device over a USB cable.
The flasher lets you install the official KeiraOS — with a choice of language, Ukrainian or English. Just connect Lilka with a cable, select the file, click "Connect and Flash", and choose the COM port. One important thing: the site uses the Web Serial API, so you'll need Chrome, Edge, or Opera. Firefox won't work.
![]()
🌐 Keira Web Manager
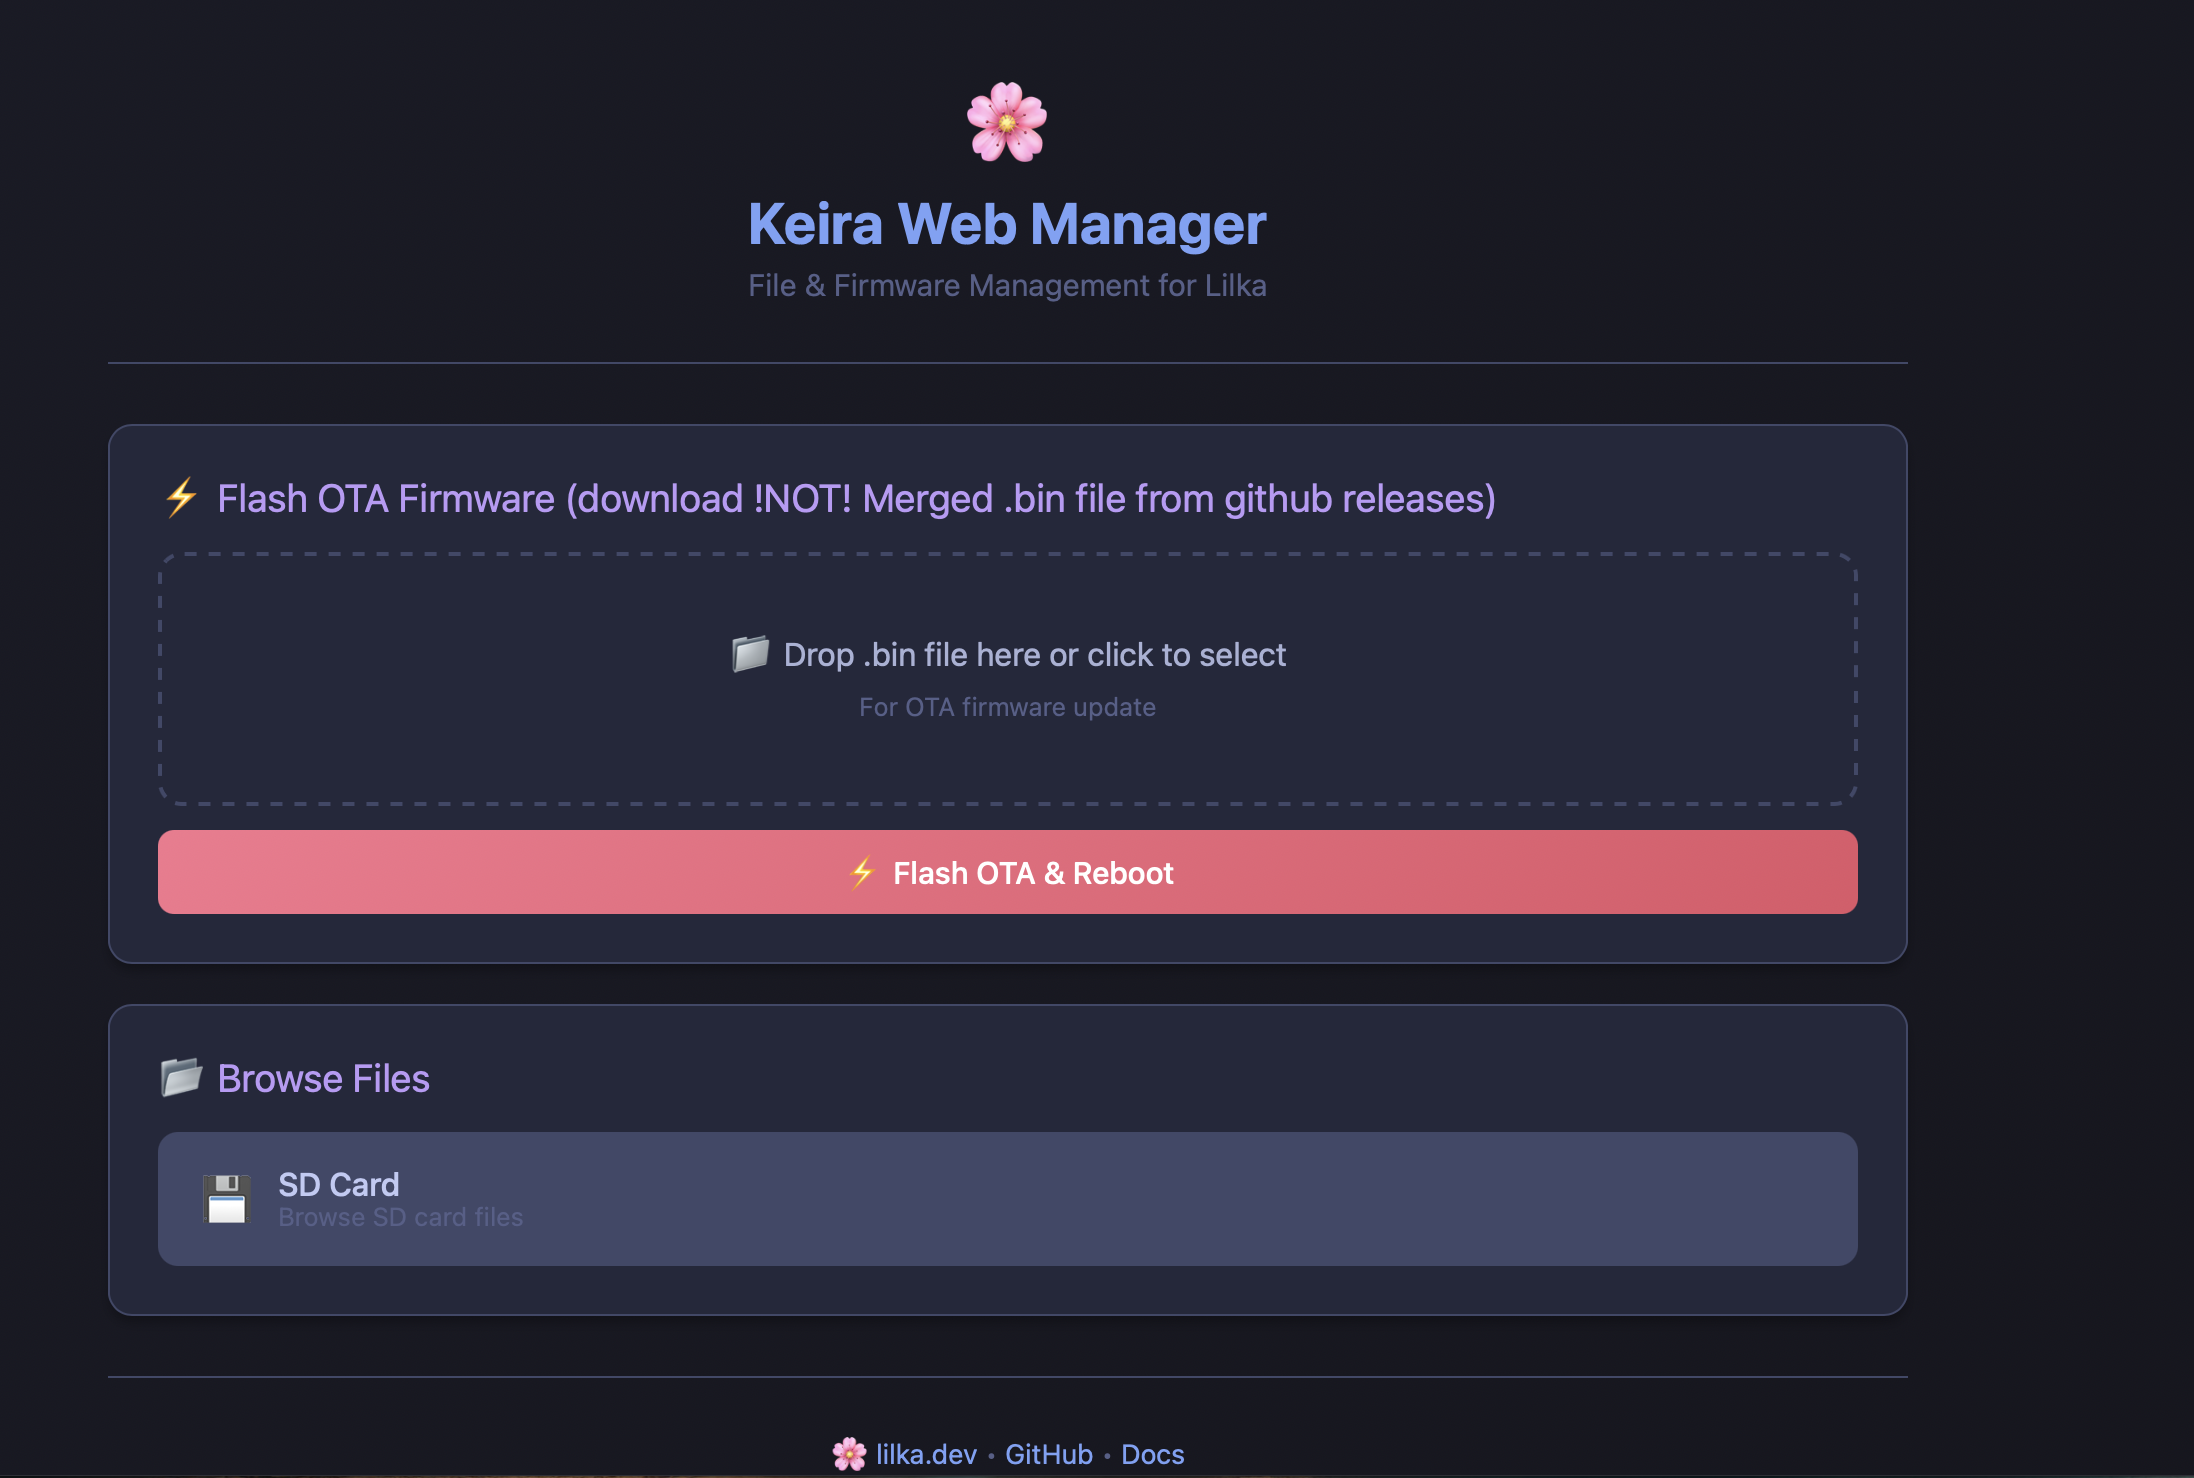
Keira Web Manager is a built-in web service inside KeiraOS itself. It runs directly on Lilka, and to use it you just open a browser on any device connected to the same Wi-Fi network and navigate to Lilka's IP address. No cable needed at all.
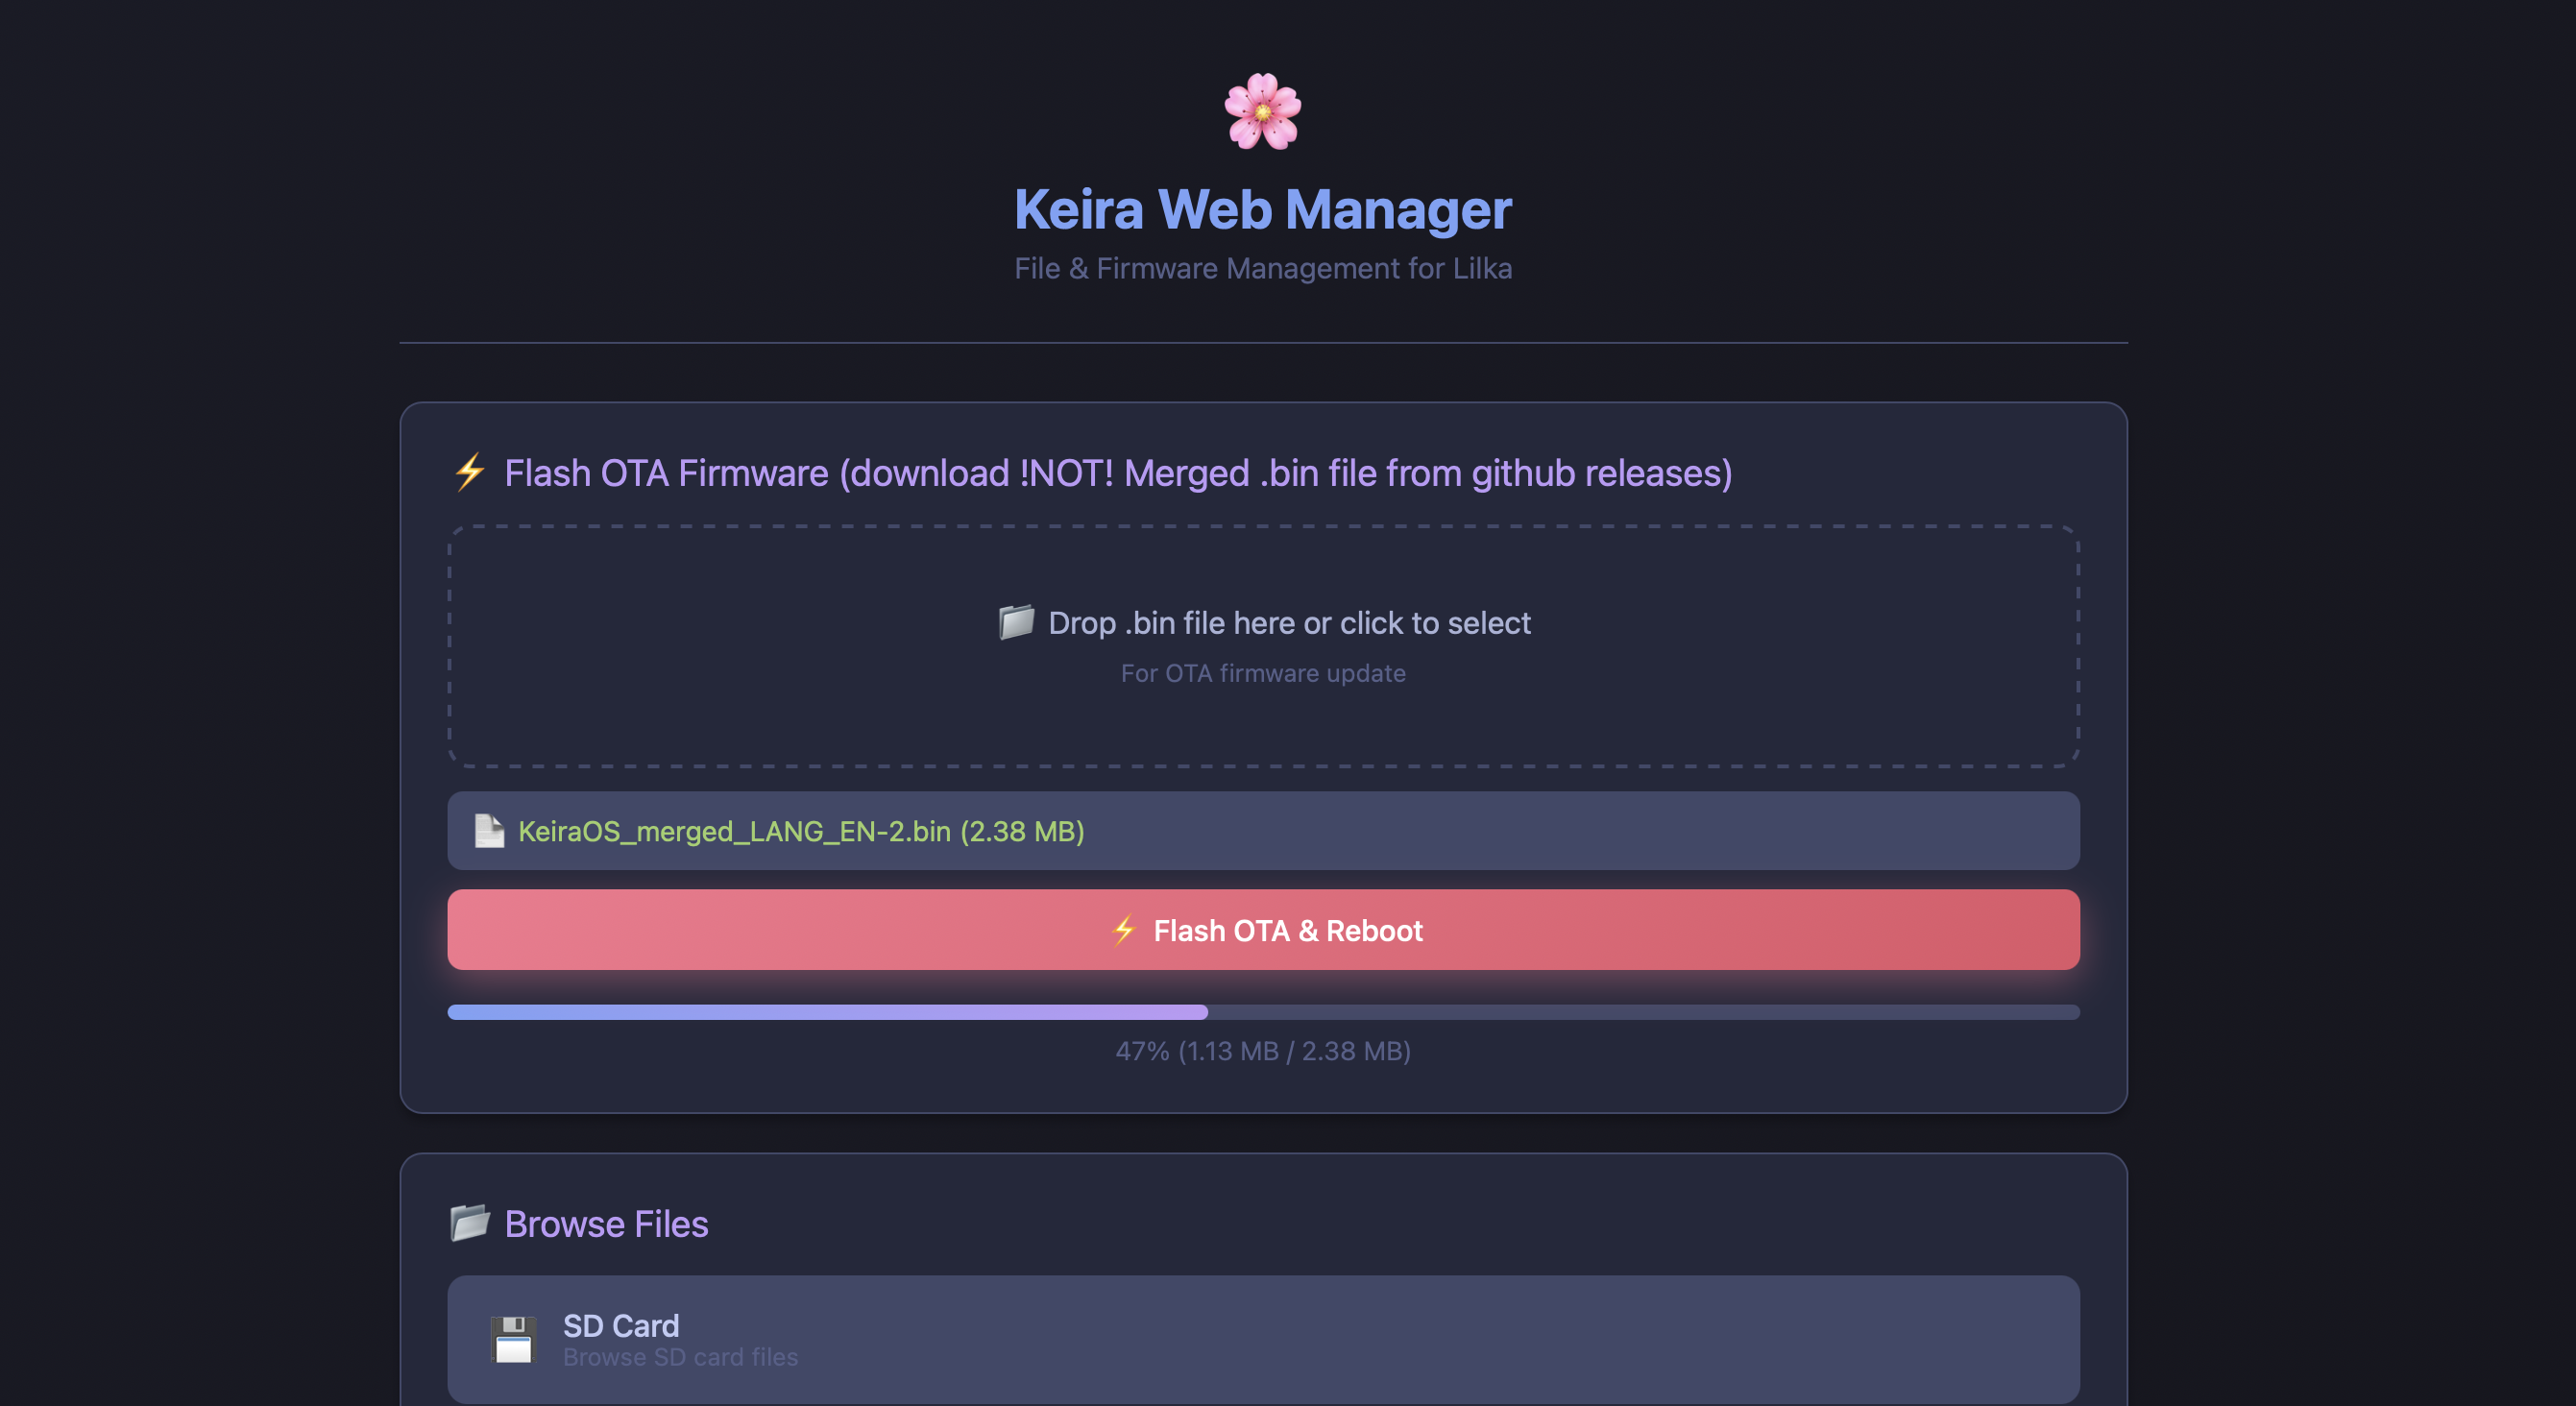
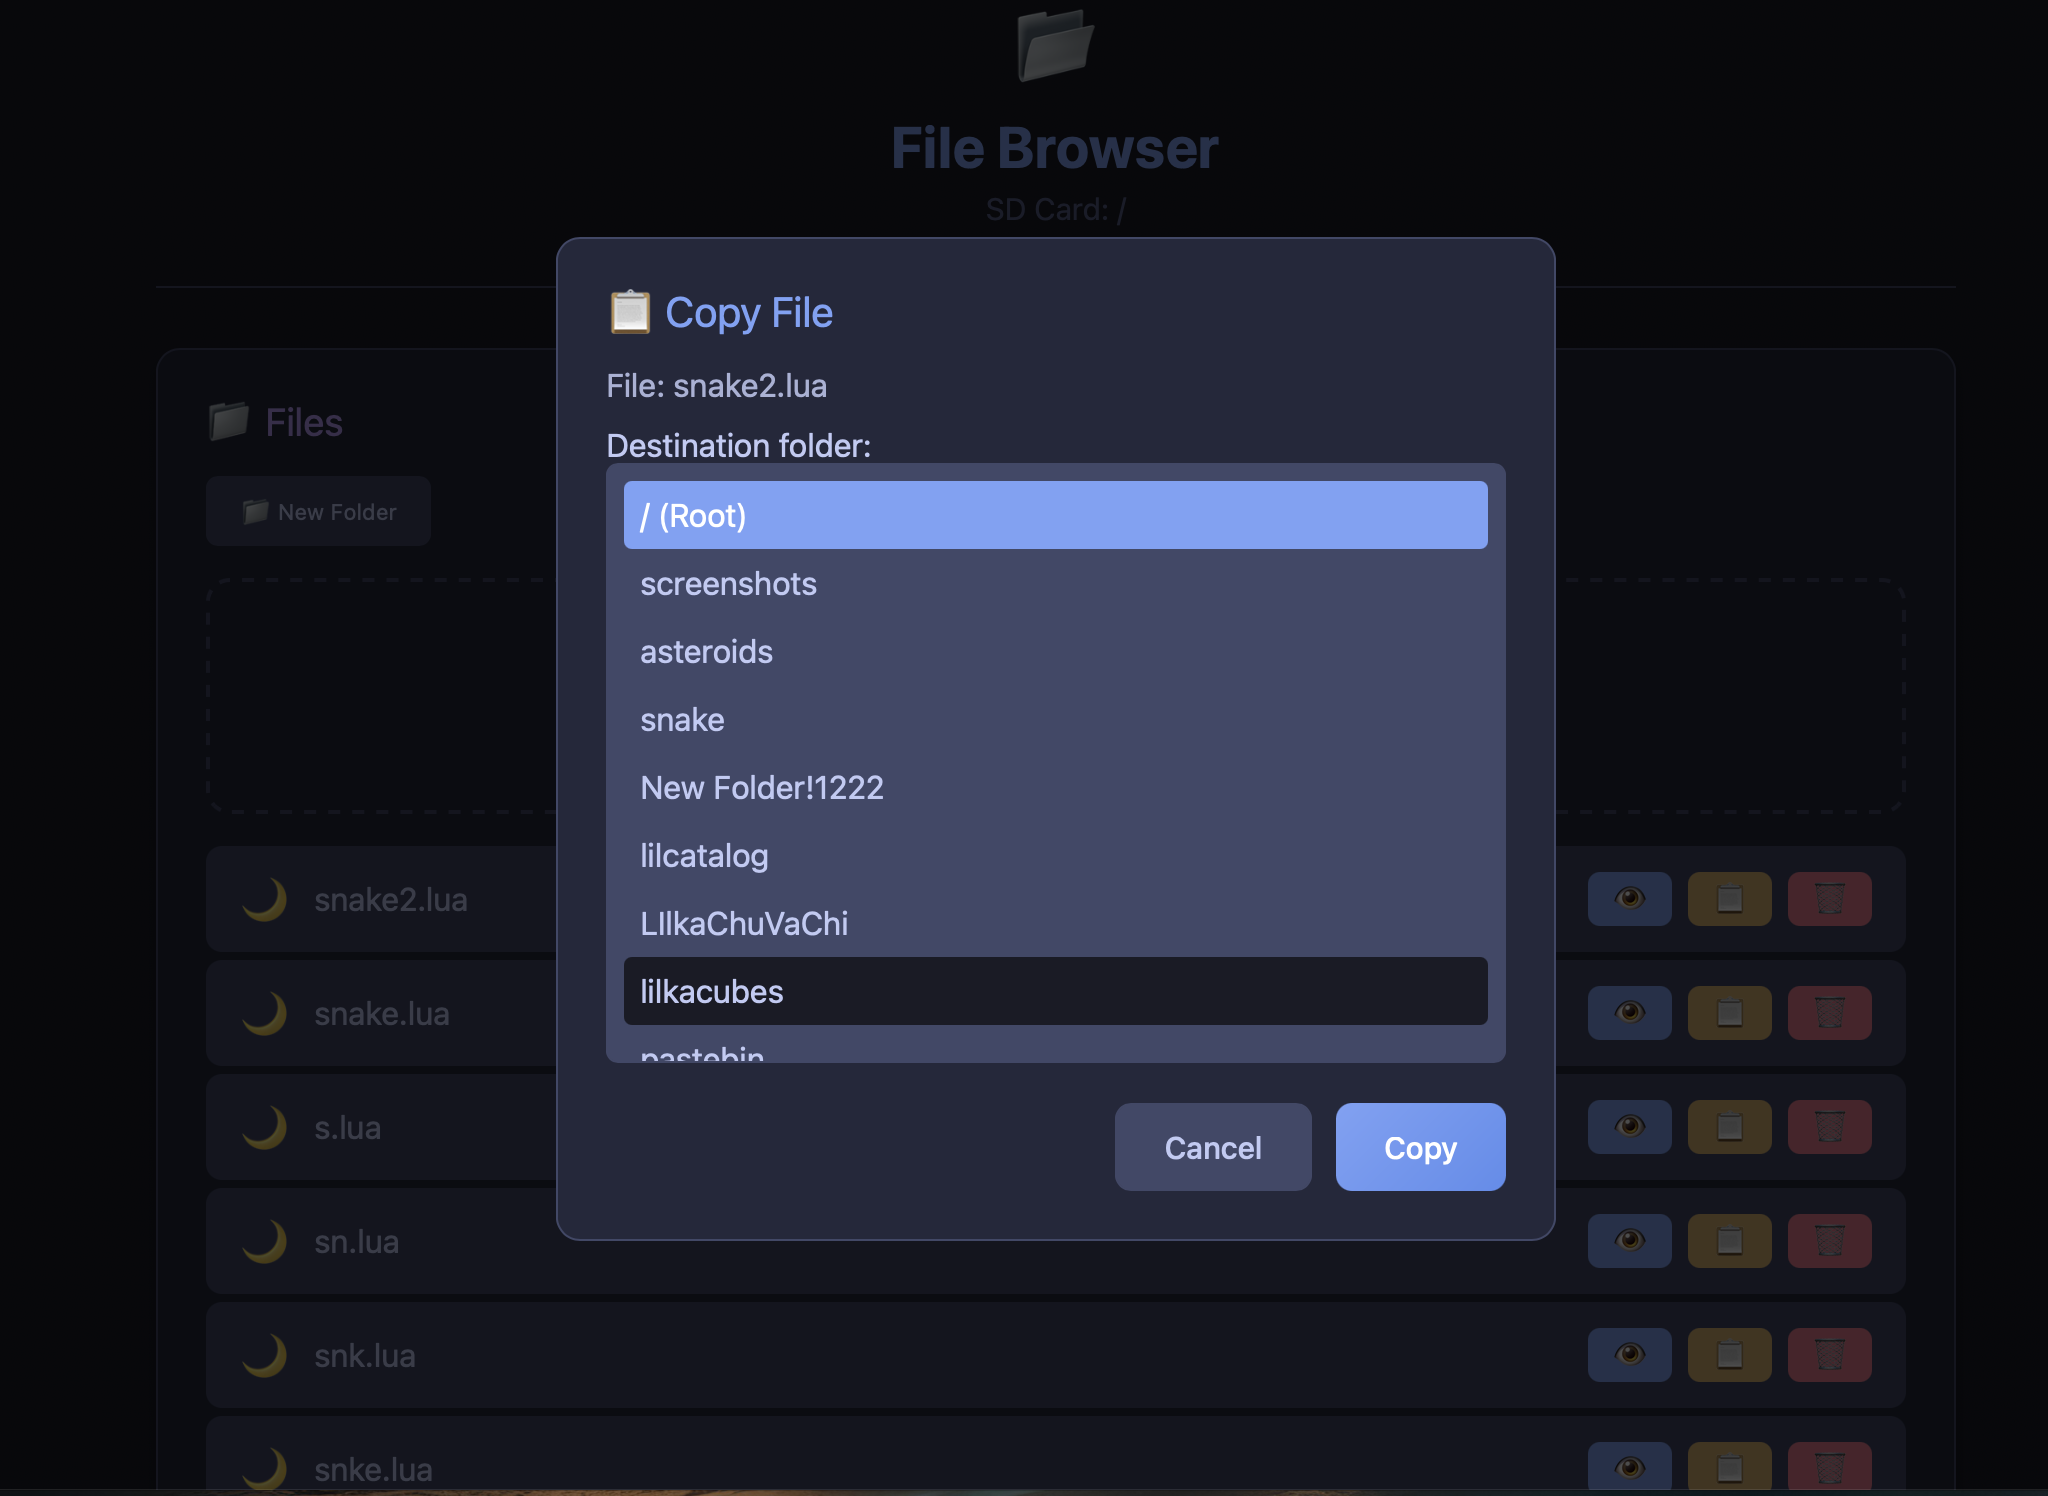
Through this interface you can browse files on the SD card, upload and download files, and copy them between folders. You can also update the firmware over-the-air (OTA) 📡 — just drag a .bin file into the browser and that's it. One important note though: only KeiraOS is supported, and you'll need a non-merged .bin file from the GitHub releases, not the merged one.
![]()
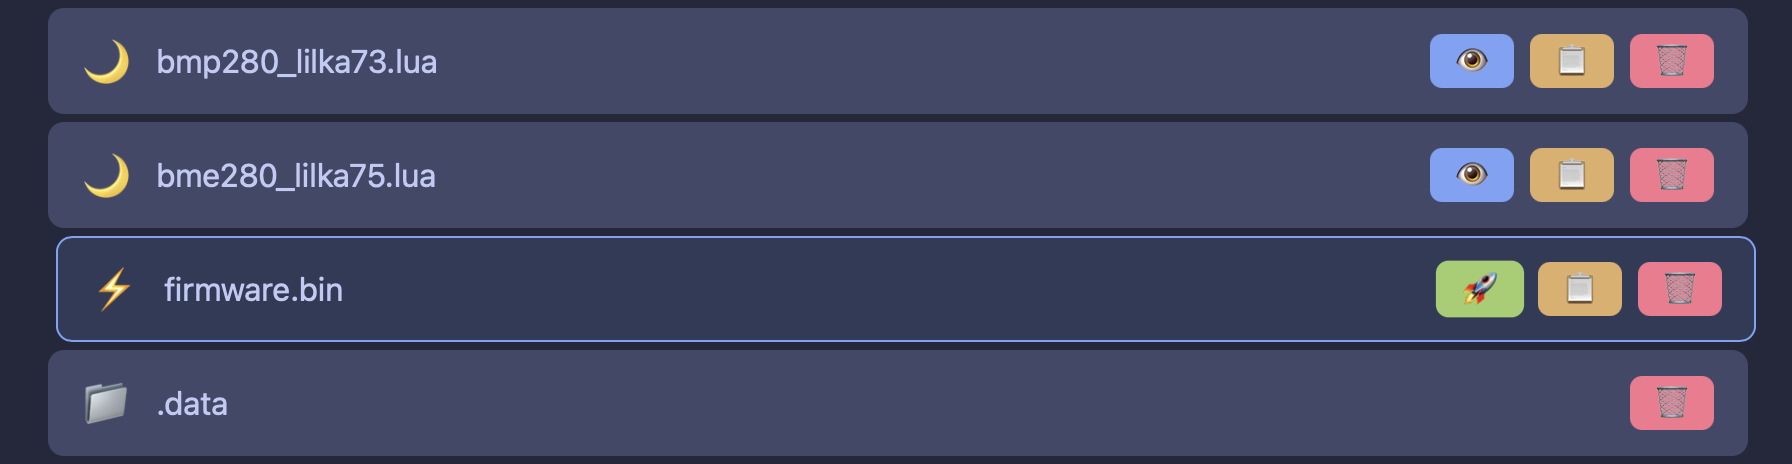
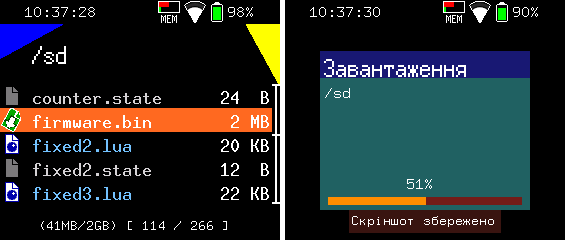
There's also a neat feature: you can launch firmware directly from the browser by clicking the rocket icon 🚀 next to any .bin file. A confirmation prompt will appear — "Boot this file via Multiboot?" — and after confirming, a progress bar shows up at the top while Lilka loads the new image. Very convenient. From experience though, some firmware files may simply refuse to launch — and if that's the case, they won't run either from Web Manager or from the File Manager on the device itself.
![]()
💻 Esptool CLI
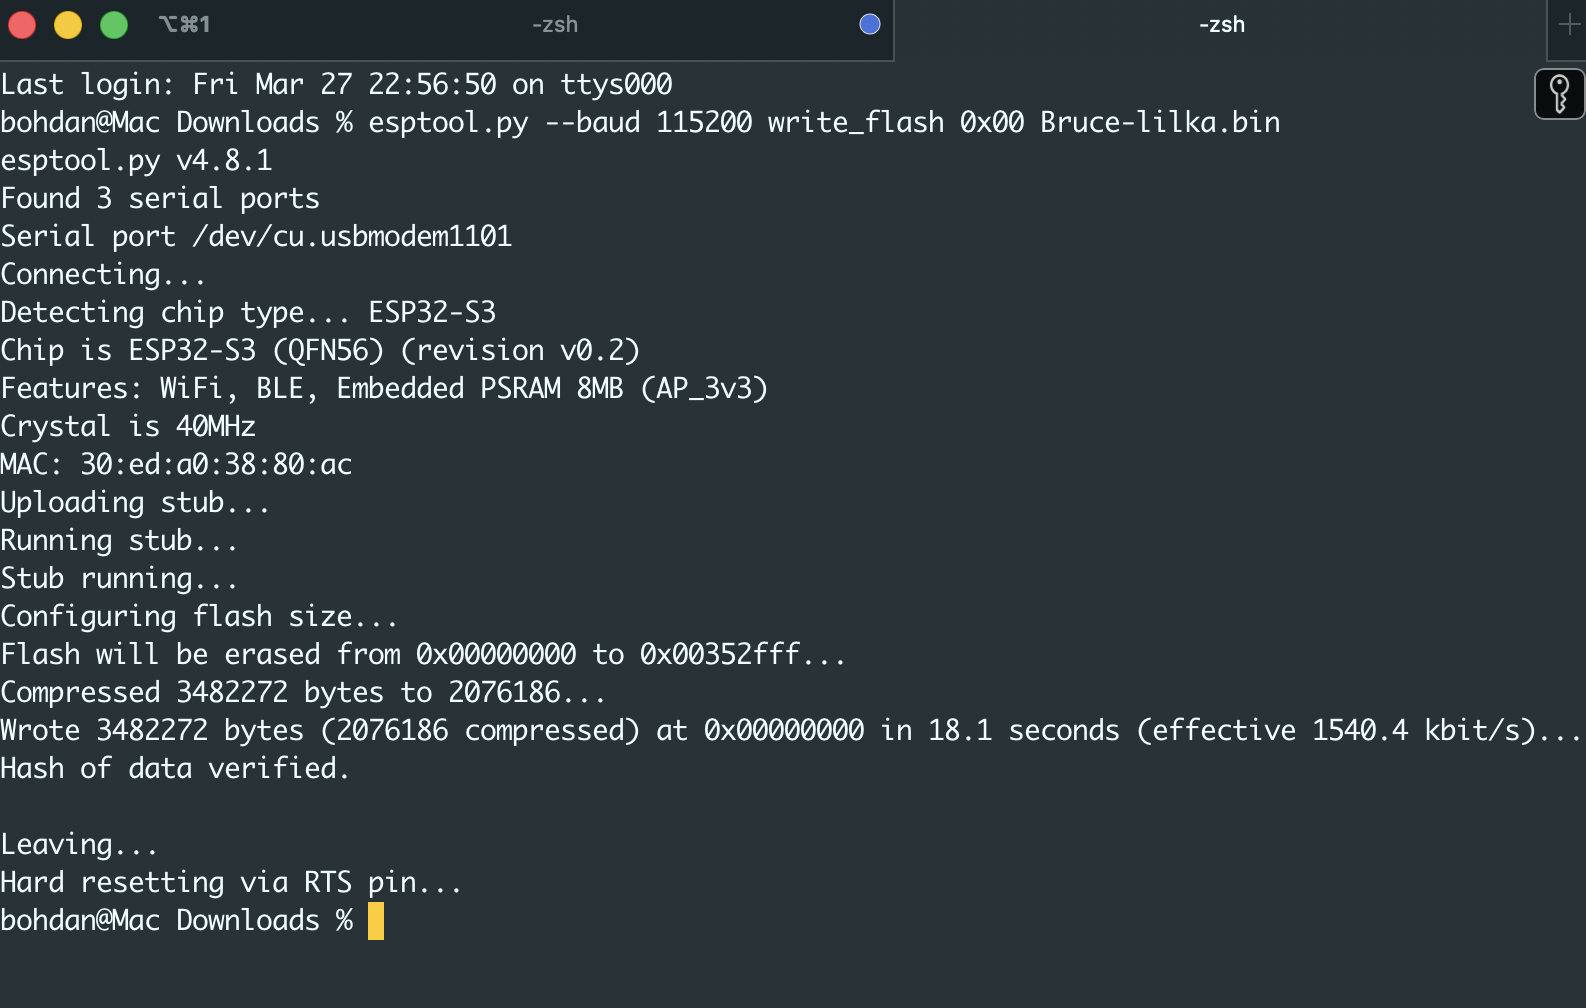
Esptool is the official utility from Espressif, the company behind the ESP32 chip that powers Lilka. It works through the command line: you open a terminal, type a command, and the firmware is flashed directly to the device over a USB cable.
What's interesting is that esptool actually runs under the hood of almost every other tool — PlatformIO, and even some web flashers. It's just hidden behind a graphical interface there. Here you interact with it directly, which gives you more flexibility: you can flash any .bin file, wipe the device's memory, or make a backup of the current firmware. But you'll need to get a little comfortable with the command line.
![]()
🌍 Esptool WEB
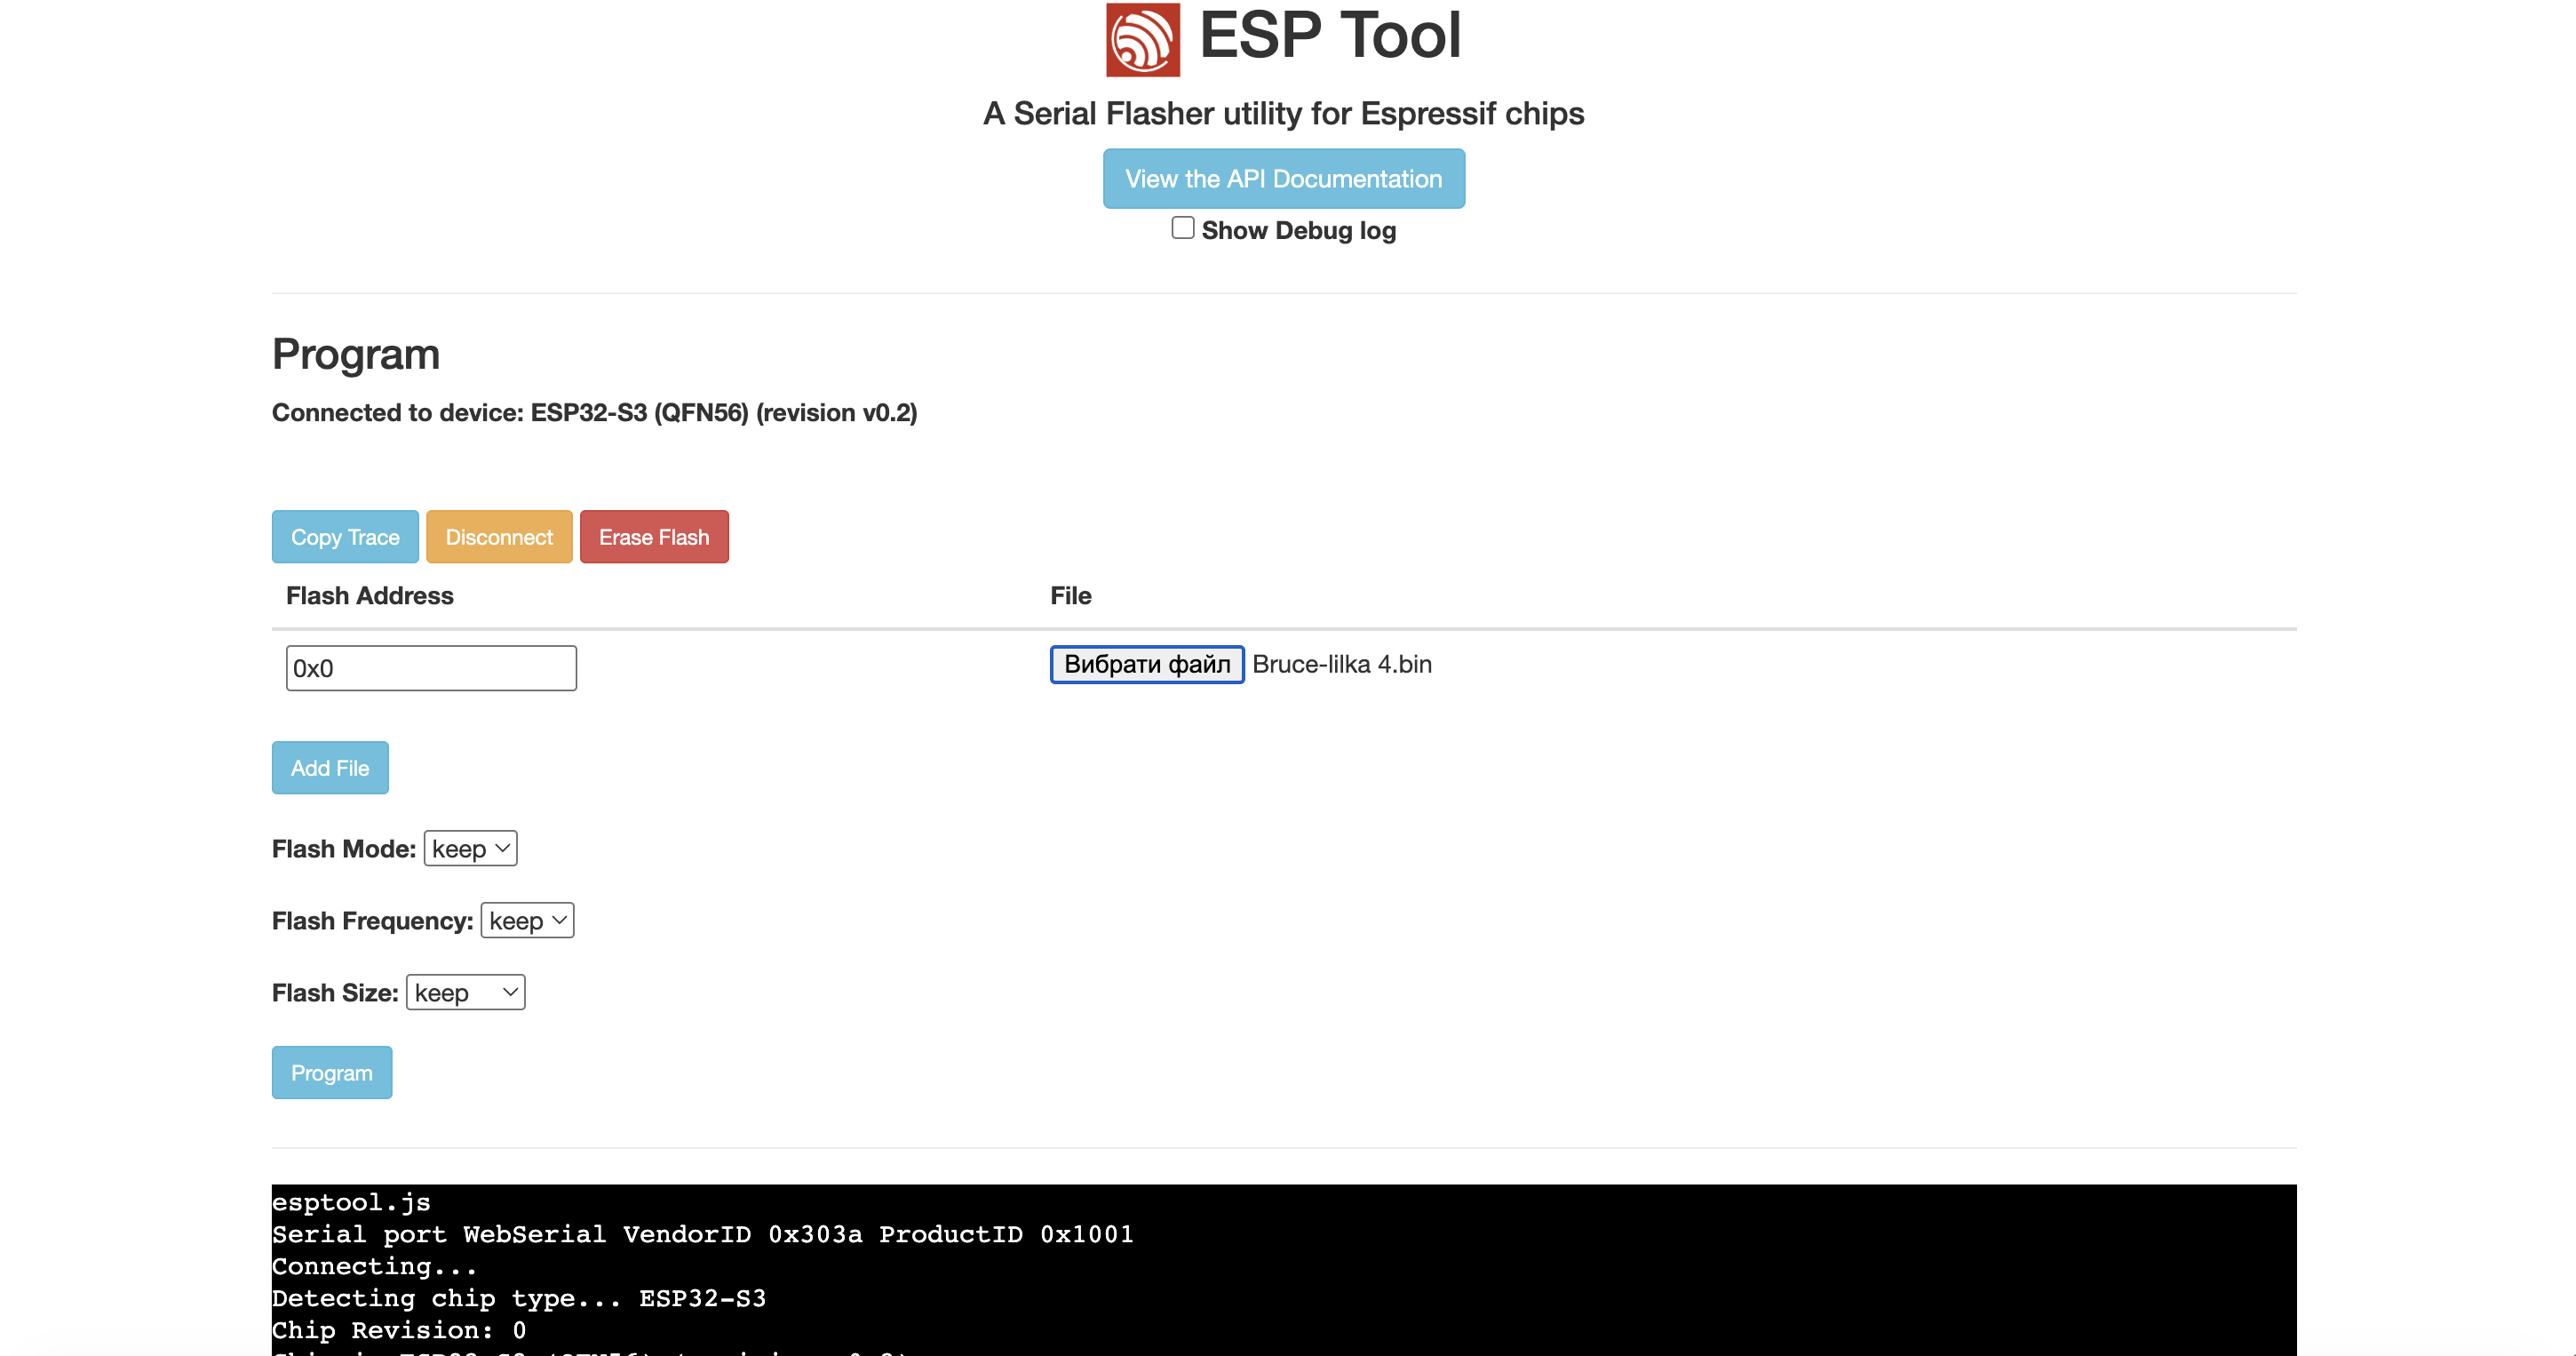
If you want to flash third-party firmware, there's a web-based tool from Espressif themselves: It's essentially esptool running in the browser — no installation needed, works over USB cable, and supports any .bin file. Like Lilka Flasher, it requires Chrome, Edge, or Opera.
![]()
🛠️ PlatformIO
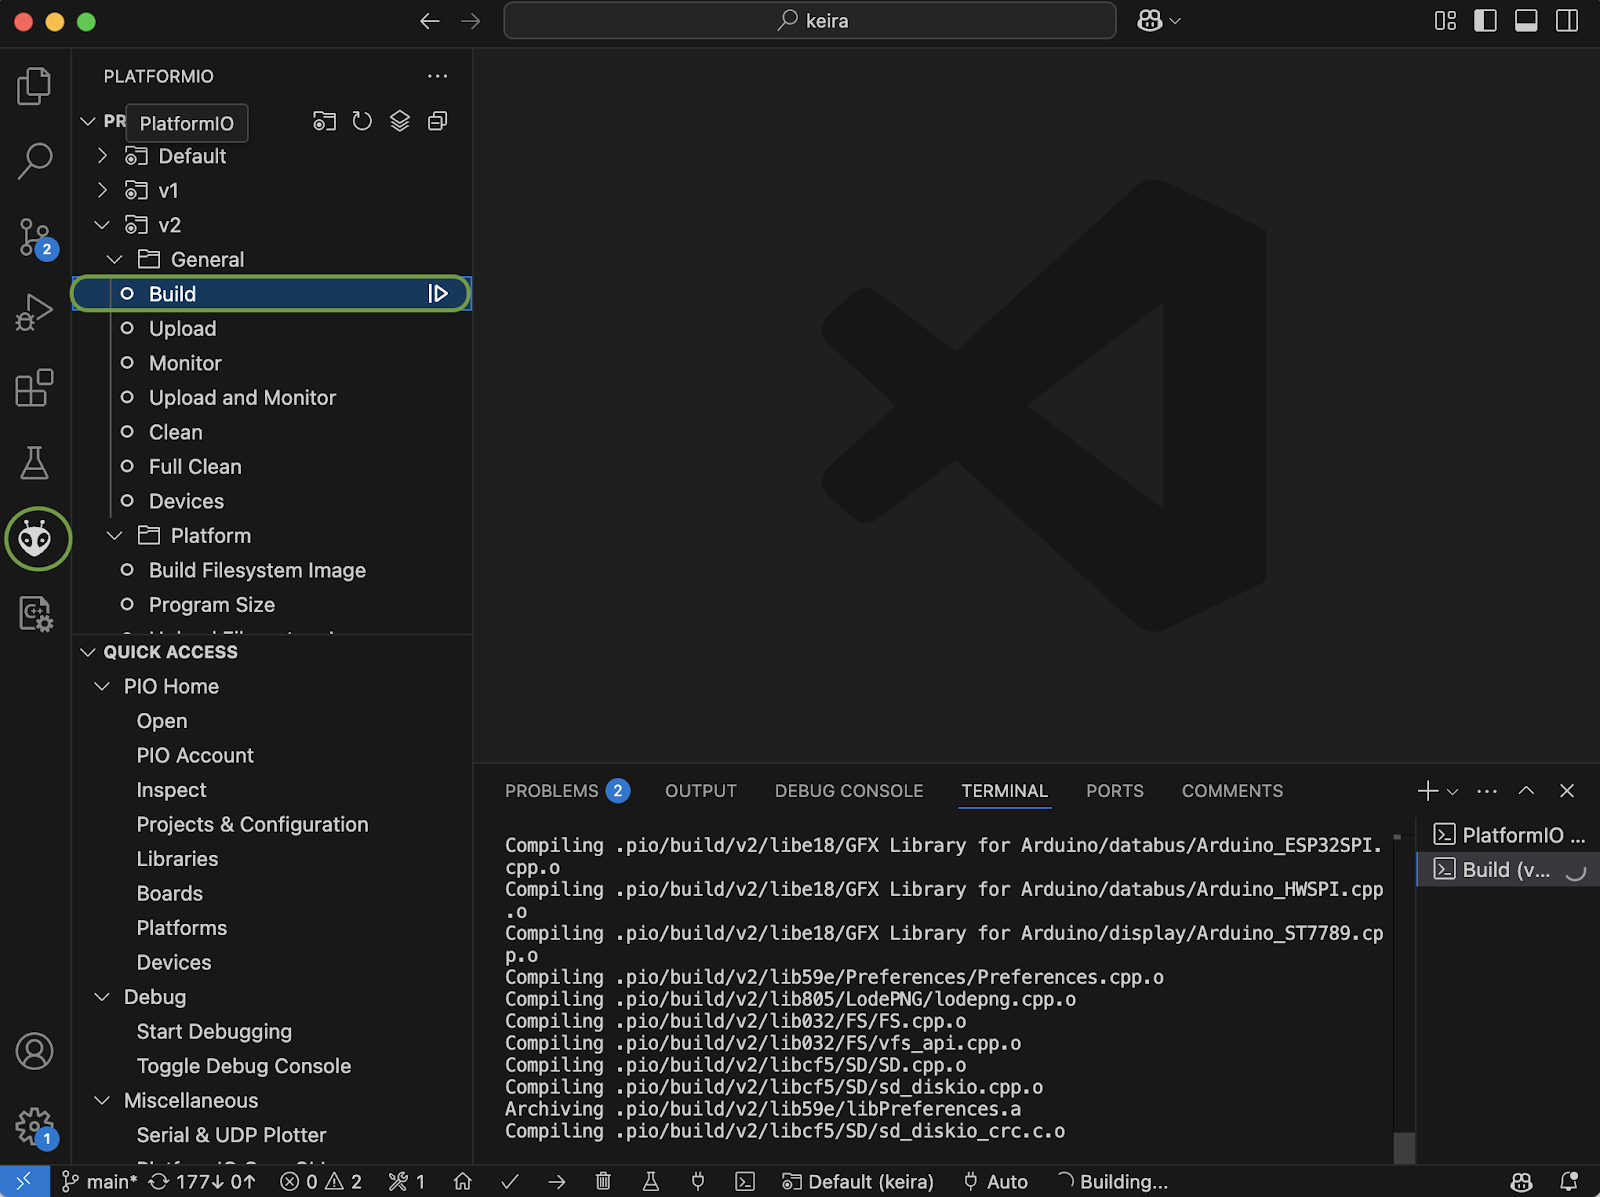
If you're writing your own program or want to build KeiraOS from source — use PlatformIO in Visual Studio Code. You clone the repository, open the project, connect Lilka with a cable (important: only Type-C → Type-A, USB 3.0 and Type-C → Type-C cables are not supported), put it into bootloader mode by holding the SELECT button while turning it on — and PlatformIO builds and uploads the firmware. Once done, press RESET and Lilka boots with the new firmware.
One neat detail: the first time you flash, a bootloader gets installed alongside the firmware. After that you no longer need to manually hold SELECT — PlatformIO will put Lilka into bootloader mode automatically on every subsequent Upload.
![]()
📁 Running firmware from File Manager
KeiraOS can run .bin files directly from the SD card — no cable, no reflashing. Just drop the file onto the card, open File Manager in KeiraOS and launch it from there.
After turning Lilka off and back on, it returns to KeiraOS — as if nothing happened. This is really handy when you just want to try out some firmware or use it once, without going through a full reflashing process.
![]()
-
Lilka Firmware Explained
03/24/2026 at 08:55 • 0 commentsLilka is a Ukrainian open-source DIY educational gaming console based on the ESP32-S3 microcontroller. It is designed so that even a beginner can assemble it using widely available modules.
KeiraOS
By itself, the console is just hardware: a screen, buttons, and a chip. To make everything work, it needs firmware — a software “control center”. The main firmware is KeiraOS (named after the developer’s cat). It is an open-source operating system based on FreeRTOS, written in C++, that controls the device and allows you to run games and applications.
![]()
You can develop apps for KeiraOS in several ways:
- 🧩 C++ — using PlatformIO and the Lilka library (requires compilation, similar to Arduino)
- ⚡ Lua and mJS — run directly from a microSD card without compilation, so you can see results almost instantly
You can find example apps in the Lilka Apps & Mods repository.
Lilka is not just for games. You can connect sensors and modules via GPIO and work with common interfaces:
- 🔌 I2C, UART, SPI
- 📊 ADC
- 🎛️ PWM
KeiraOS can also run retro games (.ROM and .NES) directly from an SD card using the Nofrendo emulator.
In addition to the main system, Lilka supports running third-party firmware in .bin format. This means you can:
- 📦 compile or download custom firmware
- 💾 copy it to an SD card
- 🚀 run it directly on the device
So Lilka is not just a single firmware, but a whole platform for experimentation, learning, and building your own projects.
Pixeler
Pixeler (formerly Meow UI) is an alternative firmware for Lilka, ported from the “Ideal Console” project.
Its main feature is the ability to develop graphical user interfaces for both the microcontroller and a PC using the same code. This means you can design and test your UI directly on a computer 💻 without reflashing the device every time, which significantly speeds up development.
![]()
The firmware is built on the Pixeler framework and written in C++. It includes ready-to-use GUI examples such as menus, settings screens, a file manager, Wi-Fi interface, MP3 player 🎵, and simple 2D games 🎮.
![]()
An interesting feature is support for server-based multiplayer games 🌐 — meaning you can play with friends on different devices.
Pixeler uses the Arduino_GFX graphics driver, which provides better display support, more built-in fonts (including Cyrillic), and overall greater flexibility compared to older solutions.
Since this is a port for Lilka, some UI elements may not render perfectly, and certain features may be limited.
The firmware can be launched directly from KeiraOS as a .bin file — just copy it to the SD card and run it on the device.
Important note: Pixeler is built using Pioarduino and is not compatible with standard PlatformIO.
![]()
Rustilka
Rustilka (Gitlab) is a small project that brings support for the Rust programming language to Lilka.
In simple terms, it’s an alternative way to write firmware for Lilka without using the standard SDK. To get started, you need to install a special firmware from rust.lilka.dev, after which you can develop applications in Rust 🦀.
Rustilka helps simplify project setup and provides a library for working with the hardware — the display, buttons, and other features of Lilka. However, it’s important to understand that this approach is better suited for those who already have some experience with Rust and basic knowledge of microcontrollers.
![]()
Rustilka and the standard SDK represent two different approaches:
- 🧩 SDK (C++ / Arduino) — simpler, lots of things work out of the box, great for beginners
- 🦀 Rustilka (Rust) — more flexible and modern, but more complex
In Rustilka, everything is written from scratch in Rust without relying on existing C/C++ libraries. It works directly with the hardware ⚡, without extra abstraction layers, which can make it faster and more lightweight — but it also requires a deeper understanding of what you’re doing.
It also uses a different approach to multitasking — instead of a traditional RTOS, it relies on async programming (embassy) ⏱️.
Another big advantage is memory safety 🛡️. Rust catches many errors at compile time, reducing the chances of critical bugs.
However, there are some downsides: setup is a bit more complicated, additional tools are required, and some familiar things don’t work the same way as in C/C++ 🤷
Mestastic
Meshtastic is firmware that turns Lilka into a device for sending messages without the internet 📡. It works together with a LoRa radio module (for example E22 or RA-02), which handles long-range communication.
After installing it, you get a standalone messenger 📬. You can connect to Lilka using the Meshtastic app on your phone, or control it directly with the buttons and send preset messages without a smartphone.
![]()
The main thing to understand is that it’s not “install and it just works”. You need to properly connect the radio module and configure the pins, otherwise there will be no communication. In most cases, issues come from incorrect wiring rather than the firmware itself.
For setup and troubleshooting, you can use Meshtastic CLI and check logs over USB to see if the radio is actually working.
![]()
In the end, Lilka becomes a fully functional offline communicator 🌐 that can work on its own or as part of a mesh network, and you can find more details, discussions, and ready-to-use builds in the community Discord channel.
ESPHome
ESPHome LVGL for Lilka is firmware that turns the device into a part of a smart home rather than just a console. It is built on ESPHome, a platform that allows you to create embedded devices using simple, easy-to-read YAML configuration instead of writing complex code, and uses the LVGL framework to create a full graphical interface directly on the device’s screen. This setup was developed specifically for Lilka, and the device itself is now officially listed among supported boards in ESPHome Devices.
![]()
After installation, you get a clean and user-friendly GUI 🖥️. The screen can display the state of devices from Home Assistant, for example whether a boiler is on or off, as well as the battery level. The interface is adaptive thanks to Flex Layout, so elements automatically adjust to the screen.
Beyond graphics, the firmware adds many smart features. Lilka can connect to Wi-Fi, update wirelessly via OTA, provide a web interface in the browser, and be discovered on the network via mDNS. Through the Native API, it integrates directly with Home Assistant and can both receive data and control devices.
![]()
It also includes Bluetooth support: Lilka can scan BLE devices and forward this data to Home Assistant, acting as a Bluetooth proxy. With I2S audio, it can also play sound, such as voice announcements or notifications 🔊. App catalog page.
Pico8
PICO-8 is a popular “fantasy console” used for learning and creating games 🎮. It is intentionally limited to make it easier to understand the basics of game development. The games look retro, but this is not emulation — it is a standalone environment with its own graphics, sound, and Lua-based language. PICO-8 is the property of Lexaloffle Games, and this project is an unofficial player not affiliated with them.
![]()
Picopico is an implementation of the PICO-8 concept for ESP32 ⚡. It allows you to run PICO-8–style games directly on Lilka without a computer. Internally, it uses a custom Lua engine and a lightweight graphics renderer adapted for limited memory 🧠.
Not all features are fully implemented, so some games may run with limitations or without sound. However, you can already run demos and even well-known projects like Celeste.
Controls are adapted to Lilka’s buttons 🎛️: the D-pad handles movement, A and B are action buttons, and Start and Select open the menu and pause. The firmware is built with PlatformIO and flashed like a regular .bin file.
Overall, it’s an experimental project 🧪 that shows how even a microcontroller can run a full game platform.
Retro-go
Retro-Go for Lilka 🎮 is firmware that turns the device into a full-fledged retro gaming console powered by ESP32. The Retro-Go project was originally created for the ODROID-GO console, and its key difference was that it was built around a microcontroller rather than a traditional processor. At the heart of ODROID-GO is a custom ESP32-WROVER module, which was an unusual approach for retro consoles but opened up new possibilities.
![]()
Thanks to the use of ESP32, the firmware is lightweight, highly optimized, and well suited to limited resources, while also being relatively easy to port to other devices based on the same chip. This is exactly why Retro-Go could be adapted for Lilka, taking into account its display, buttons, and microSD support.
As a result, Lilka gets a convenient launcher and a set of emulators that allow classic games to run directly on a microcontroller, including systems such as NES, SNES, Game Boy, Sega, NEC, Coleco, and Atari Lynx, as well as even DOOM.
The firmware is distributed as a .img image, so it needs to be flashed using the web flasher or via esptool. An app catalog page is also available.
Lilka BLE Conroller
Lilka BLE Controller is firmware for Lilka v2 that turns the device into a versatile Bluetooth HID controller 📡. It operates in three modes—gamepad, mouse, and keyboard—allowing Lilka to be used not just as a console, but as a full-featured input device for other systems.
In gamepad mode, it provides a D-pad and six buttons, making it compatible with games and emulators 🎮. In mouse mode, the D-pad controls the cursor, A and B handle clicks, C and D manage scrolling, and Start performs a middle click. The keyboard mode features an on-screen layout with multiple layers of characters, along with language switching via a shortcut similar to Win+Space ⌨️.
![]()
The firmware displays the battery level on screen and also reports it over Bluetooth, which is convenient when connected to a PC or smartphone 🔋. Mode switching is done by holding START and SELECT for a few seconds, making it simple and intuitive to use.
The project is open source and can be built from source or flashed using a prebuilt binary. Installation is done via the Web Flasher or esptool, after which the device is ready to connect over Bluetooth. App page.
Lilka Serial Modem
Serial Modem is a firmware for Lilka based on ESP32-S3 that turns it into a fully functional WiFi modem with a 90s vibe 📡. It is compatible with Hayes commands, so classic computers can connect to the internet via standard RS232 using familiar AT commands, just like an old dial-up modem.
![]()
The connection is made through an RS232-TTL converter (MAX3232 or equivalent), which links the TX/RX lines of Lilka to the serial port of the retro device. After that, you can "dial" not phone numbers, but directly hosts and ports — for example, BBS servers or other TCP/Telnet services 🌐.
The firmware supports a full PPP stack, which allows older systems such as Windows 95 or other devices with dial-up networking to access the internet over WiFi. To do this, simply dial "777" — and the modem automatically switches to PPP mode, completes negotiation with the client, and starts routing traffic.
![]()
In addition to connections, file transfer via XMODEM and YMODEM is implemented with saving to an SD card, as well as file system management through AT commands or a web interface 💾. The built-in HTTP server allows you to configure WiFi, change modem parameters, edit speed dial entries, and manage files directly from the browser.
![]()
The Lilka screen displays the modem status, active connections, IP address, and operating mode, and device control is also available through the on-screen menu and buttons. Speeds from 300 to 115200 baud are supported, but for stable operation the optimal speeds remain 9600 baud for connections and 19200 baud for file transfers.
As a result, Lilka becomes a bridge between modern WiFi and retro computers, allowing them to "get back online" without any changes to the software — as if the internet still ran over a phone line 📞. App page.
Lilka Game Boy Printer
Lilka Game Boy Printer is a firmware that turns Lilka into a Game Boy Printer emulator 🖨️. If you have a Game Boy Camera or any game with Game Boy Printer support, Lilka can receive images from it, display them on its screen, and save them to an SD card.
![]()
The firmware works in two modes. In Direct Mode, Lilka simply connects to the Game Boy via a cable, receives images in real time, and saves them in PNG format. In Web Mode, a web interface is added on top of that — after connecting to WiFi, you can open a browser, view received images, and download them directly to your device.
To connect, you will need a standard 6-pin Game Boy Link Cable and a four-channel 5V → 3.3V level shifter (for example, based on MAX3232). The level shifter is required — a direct connection will damage the ESP32. Through it, the SIN, SCK, and SOUT lines of the cable are connected to the corresponding GPIO pins of Lilka (21, 48, and 47) via the extension port.
![]()
Compatible with any Game Boy — DMG, Pocket, Color, or Advance. Supports Game Boy Camera, Pokémon Gold/Silver/Crystal, Super Mario Bros. Deluxe, and dozens of other games with printer support. An SD card is optional, but required if you want to save images locally. App page.
Lilka AI
Lilka AI is a firmware that turns Lilka into a portable AI assistant with OpenAI support 🤖. It allows you to have full conversations with ChatGPT directly on the device, keeping the conversation history throughout the session.
![]()
The firmware supports two operating modes. In chat mode, a virtual keyboard appears on the screen — you type your message, send it, and read the response right on the Lilka display. In Serial mode, you can connect any device with an RS-232 interface and chat with the AI through a terminal.
To use it, you need an OpenAI API key, which can be obtained from the OpenAI website. The key, model, and WiFi are configured through the built-in web interface — just open a browser on the same WiFi network and navigate to the IP address that Lilka shows on its screen. App page.
![]()
Li'l Video
Li'l Video is a small video player for Lilka that lets you watch videos with sound right on the device 🎬. Videos are stored on an SD card in a special format suited for the modest hardware of the ESP32.
To get started, simply download the ready-made player.bin file and place it on the SD card in the Video folder 📁. Then for each video you create a separate subfolder and put two files inside — the video track and the audio track separately. That is how the player tells different videos apart.
Videos need to be prepared in advance using a free program called ffmpeg 🛠️. It converts a regular mp4 into a format that Lilka can play back. The process is straightforward, but requires a few commands in the terminal — more details can be found in the project repository.
The controls are very simple. Launch player.bin through the SD card browser in Keira OS, use the up and down buttons to select a video, and press A to start playing it. During playback, the same buttons control the volume, and pressing A again brings you back to Keira OS. App page.
Bruce Firmware
Bruce is a firmware for ESP32 that turns the device into a tool for testing the security of networks and systems 🦈. It supports a wide range of features: WiFi attacks, Bluetooth, radio frequencies, RFID, infrared, and much more.
Bruce was originally developed as a more affordable alternative to Flipper Zero — a security testing device that costs quite a lot. An ESP32 running Bruce provides similar capabilities for significantly less money 💸.
![]()
The firmware supports a huge number of devices: Cardputer, M5StickC, T-Deck, T-Embed, and others. Lilka also received Bruce support thanks to community enthusiasts 🛠️.
Installing Bruce is very easy — just visit the official website bruce.computer and use the web flasher directly in the browser. No additional software needs to be installed.
It is important to remember that Bruce is a tool for legal security testing only ⚠️. It should only be used on your own devices and networks, or with the explicit permission of the owner. The developers take no responsibility for any misuse.
Conclusion
Lilka is not just a development board — it is a whole ecosystem 🌱. From retro games and an AI assistant to security testing and smart home integration — everyone will find something interesting. The community is actively growing, new firmware and projects keep appearing, and this is just the beginning.
And there is some great news 🎉 — Lilka is now available pre-assembled on eBay, so there is no longer any need to hunt for components and solder everything yourself. Just order it, power it on, and start experimenting!
-
File Transfer on Lilka
03/19/2026 at 16:10 • 0 commentsLilka (Keira OS) offers two wireless ways to work with files — and neither requires a cable or a card reader.
🌐 Keira Web Manager
Keira Web Manager is a built-in web service in Keira OS, aptly named File & Firmware Management for Lilka. Just open a browser on any device connected to the same Wi-Fi network, and you instantly get a clean, fully functional file management interface.
What it can do:
- Browse files and screenshots stored on the SD card directly in the browser
- Upload files to the device and download them to your computer or phone
- Copy files between folders
- Update firmware over-the-air (OTA) via drag & drop — just drop a
.binfile into the browser, and that's it
The design deserves a special mention — it's clean, intuitive, and genuinely pleasant to use. For a web interface running on a microcontroller, that's a rather delightful surprise.
![]()
![]()
📡 FTP
The FTP server built into Keira OS lets you connect to Lilka just like any regular file server. Any FTP client works — on a computer or a mobile phone.
On desktop, FileZilla is a great choice — free, straightforward, and battle-tested. On mobile, there are plenty of options: FTP Client Pro for iOS or AndFTP for Android, to name a few.
Once connected, you get full access to the SD card's file system: uploading, downloading, creating folders — just like working with any regular server.
![]()
📋 Bonus: Pastebin
Inside the Applications section of Keira OS, there's one more handy tool — the Pastebin app. It lets you fetch code directly from pastebin.com: just enter a link or a paste ID, and the script lands on your device instantly. Perfect for quickly trying out a Lua snippet you found online or received from a friend — no computer, no cables, right from the console.
![]()
-
Lilka App Store
03/12/2026 at 09:31 • 0 commentsOne of the most convenient features of Lilka is a full-featured app store, accessible both from a browser and directly on the console itself — no computer needed. The catalog is hosted at catalog.lilka.dev and contains two sections: Apps and Mods.
![]()
📦 Mods
The Mods section covers physical modifications for Lilka: cases, covers, and buttons. Shields to extend the console's capabilities are also planned to be added in the future. Each mod includes manufacturing files along with a description and photos.
🎮 Apps
All apps in the Apps tab are divided into three types:
Lua
Lua scripts are the most convenient way to run programs on Lilka. They require no compilation and run instantly directly from the file system. Just download the
.luafile to the device — and it's ready to go. Learn more about Lua on Lilka →Firmware (.bin)
Custom firmware also requires no compilation — it is loaded as a ready-made
.binfile and runs directly on the device. The key advantage: after restarting Lilka, you automatically return to the standard Keira OS operating system — so an alternative firmware doesn't replace the system permanently. This opens up interesting possibilities: firmware can be used as fully standalone programs or as part of applications within Keira OS. Learn more about custom firmware →C++
C++ applications are also present in the catalog — for reference and as examples for developers. However, they require compilation and cannot be run directly on the console without a prior build. Learn more about creating C++ apps →
![]()
![]()
➕ How to Add Your App
The process is straightforward even for beginners. Each app's catalog entry consists of just a few elements:
DESCRIPTION.md— a text description in Markdown formaticon.pngand screenshotsmanifest.yml— the main file with app metadata
To publish your app:
- Fork the lilka-dev/catalog repository
- Create a directory
apps/yourapp.app/inside theapps/folder — this can be done online directly in GitHub or via GitHub Desktop - Add the files:
manifest.yml,icon.png, andDESCRIPTION.md - Submit a Pull Request — GitHub Actions will automatically build the catalog and deploy it to GitHub Pages
Here is an example
manifest.ymlfrom a real app — the "ChuVaChi" rock-paper-scissors game:name: Game "ChuVaChi" rock-paper-scissors (LUA) sources: type: git location: origin: https://github.com/andrijpv/LIlkaChuVaChi entryfile: type: lua location: origin: https://raw.githubusercontent.com/andrijpv/LIlkaChuVaChi/refs/heads/main/filegame/lilkachuvachi.lua files: - type: image location: origin: https://raw.githubusercontent.com/andrijpv/LIlkaChuVaChi/refs/heads/main/filegame/paper.bmp description: Paper image - type: image location: origin: https://raw.githubusercontent.com/andrijpv/LIlkaChuVaChi/refs/heads/main/filegame/scissors.bmp description: Scissors image - type: image location: origin: https://raw.githubusercontent.com/andrijpv/LIlkaChuVaChi/refs/heads/main/filegame/stone.bmp description: Stone image short_description: Classic "ChuVaChi" rock-paper-scissors game for Keira OS description: "@DESCRIPTION.md" author: "@andrijpv" license: NONE keira_version: 1.0.0 icon: image.png screenshots: - image.pngThe manifest structure is intuitive:
entryfilepoints to the executable file (.lua,.bin, etc.),fileslists additional app resources (images, sounds), anddescriptioncan reference a separateDESCRIPTION.mdfile with the full description.
Lilka
Lilka: DIY ESP32-S3 Learning Console with NES Emulation, Lua & mJS Support