ken.do
-
First prototype - Shocking!
04/26/2017 at 18:02 • 0 commentsFor my first prototype, I will keep it simple; wired switch to the double ribbon version. You touch both wires while the switch is engaged and ZAP! Arcs should be visible, however the location of the arcs will be highly dependent upon inter-ribbon spacing variations.
The ribbons will be made of electrical fencing tape (I live on a farm), secured with stiching to a leather or pleather choker. It will fasten in the back with velcro (I know, I know. It's a proto... It was either velcro or zip ties.)
-
Possible Logos - ongoing list
04/26/2017 at 17:42 • 0 comments I also have a verion of this with a shield behind.
 -
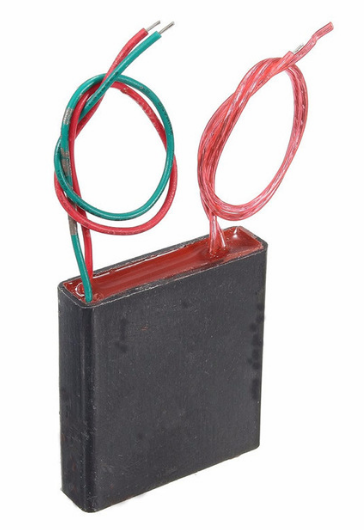
Sourced Arc Generator
04/26/2017 at 17:39 • 0 commentsThe arc generator I have chosen is flat. Most of the other generators I looked at are cylindrical. This 34mm x 41mm unit is a best fit in form factor, as the choker will also be flatish. It also generally matches the form factor of a low capacity LiPo.
-
Ribbon electrodes
04/05/2017 at 23:25 • 0 commentsContemplating the idea of using two conductive ribbons as the electrodes. Arc location will be randomish given perfect conditions. Place a small conductor between ribbons where you want more frequent discharges (dielectric grease spot?) Other ideas on randomization of arc strikes?
*edit 2017/04/27*
There are conductive foils that would work. Also decorative ribbons that include a wire, and electric fencing tape that also includes conductive wire. Is there a material that can be made more or less conductive on demand?
-
Sequencing Arcs II
04/05/2017 at 13:55 • 0 commentsThe maximum spark gap on the arc generator specified in this project, and all comparable generators for that matter, is 10 - 20 mm. Using this value, electrodes set up in a grid pattern (two rows, multiple columns) need to have the maximum distance between electrodes (horizontal or vertical, diagonal if desired) can be 20 mm. I will probably start with 15 mm spacing between electrodes as specs are often 'generous'.
For addressing, we should probably start with fixed polarity pairs, eventually moving to single electrodes with switchable polarity. These fixed polarity pairs should be the max spec distance plus margin away from other pairs, so about 25 - 30 mm will do. We should end up with no more than 10 pairs, and this many would only fit on the 'large' size. For a one size fits all, we should be looking more in the range of 8. This seems manageable.
-
Sequencing Arcs
03/26/2017 at 14:48 • 0 commentsA few ideas have popped into my mind whilst thinking about this project.
One big idea was that the electrodes on the choker surface could be in a grid, with each electrode having 3 states; positive, neutral, and negative. This way, an arc can be produced between any two (adjacent) electrodes allowing sequenced arcing for really cool chasing and design effects.
One of the questions is how to control the state of each electrode in a compact and switchable way. Perhaps something similar to the way that addressable SM LED strips are set up.
-
Design Considerations
03/24/2017 at 02:59 • 0 commentsPlacement of Components
A high voltage arc generator and LiPo batteries weigh quite a bit. This may lead to a redesign based on these components occupying a front-and-center location rather than the original idea of a rearward location. To accomodate this new location, instead of trying to hide the components, perhaps they should be a focal point.
*edit 2017/04/27*
Perhaps these heavier components could hang from the back of the choker. Some trial and error concerning balance, comfort and general wearability will be necessary.
Electrode Profile
The electrode profile described by the first rendering is not going to be the way things go down. Using a highly insulative 'fabric' to build the choker part, the electrodes could be surface or just above surface mounted. This would keep them from getting caught up in hair, clothing or piercings :0
Meowchware: Dangerous Wearables
Like a nerd bug zapper, the Meowchware Arc Choker is both attractive and dangerous.