Varun Suresh
-
Next prototype design and goals
07/23/2017 at 19:11 • 0 comments"Try and fail, but don't fail to try"
This is my first prototype that I have built till now. But I will keep working on it to make this prototype into a complete product for the advancement of industries.
As mentioned earlier, empowering Industrial Workers with Machine Learning for fault detection and testing is my current goal.
In my next prototype, I plan to design my own robot for this specific application and use a better resolution thermal camera which is expected to hit the market by the end of this year.
Meanwhile, I plan on working this further more and get it tested by an Industrial Professional in CPCL (Chennai Petroleum Corporation Limited)
With an advancement in Thermal camera and Robotics, I want to work with a great focus and fulfil this goal of mine.
-
Bluetooth App and Demo
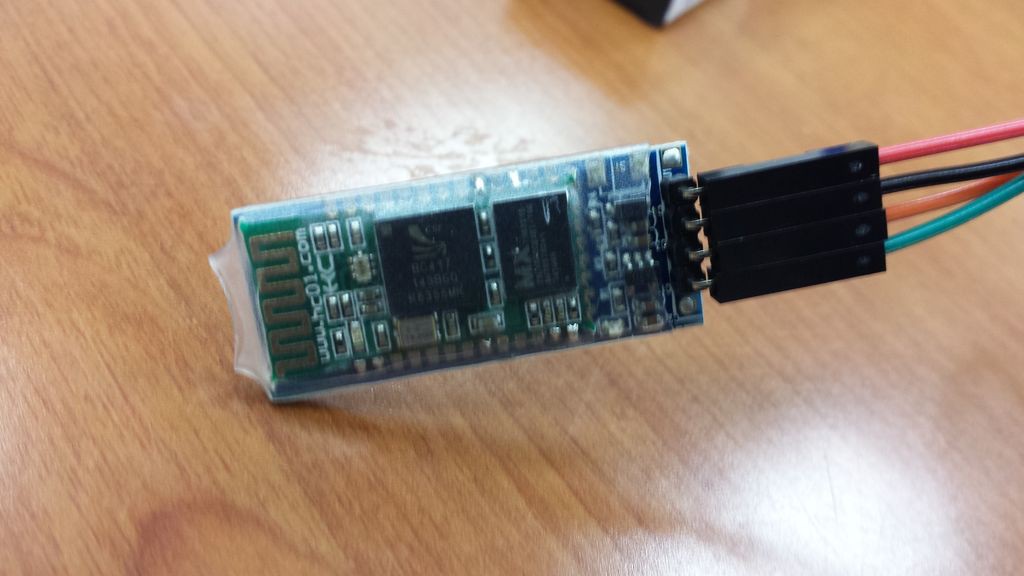
07/23/2017 at 18:57 • 0 commentsHC-05 :
I have used HC-05 Bluetooth module to control the rover's movements. HC-05 module is an easy to use Bluetooth SPP (Serial Port Protocol) module, designed for transparent wireless serial connection setup.
It works with MASTER/SLAVE application. By default the factory setting is SLAVE.The Role of the module (Master or Slave) can be configured only by AT COMMANDS.The slave modules cannot initiate a connection to another Bluetooth device, but can accept connections.Master module can initiate a connection to other devices.
![]()
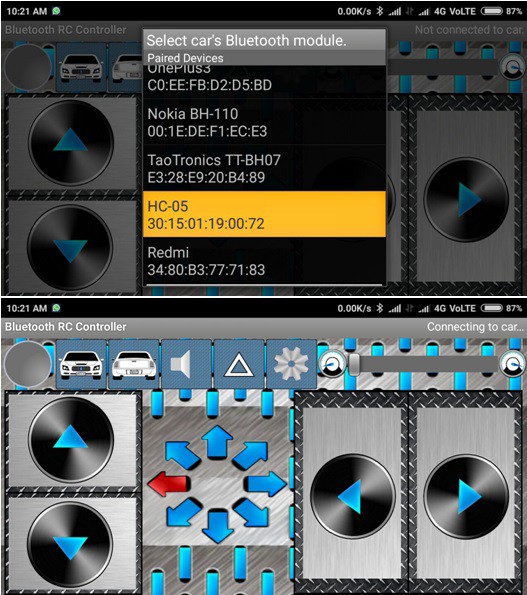
Controlling remotely with HC-05 :
Directional movement of the rover is controlled using an RC Controller application that is coupled through Bluetooth to the Bluetooth module HC-05.
You can download that application from the Google Play Store from this link.
The controller used is an Arduino Nano which is programmed as required.
![]()
-
Gas Sensor for detecting Leakage
07/23/2017 at 18:45 • 0 commentsIntroduction :
Detection of gas leaks is critical to ensuring the safety of human life and equipment investments at large industrial and public sites.
Gas leaks can be discovered by stationary gas sensors; however, manual inspection is much more effective. Trained staff members can inspect and scan gas equipment and pipes with a gas sensor.
Most of the accidents that occur in an oil and chemical industries are due to gas leaks which leads to a huge loss of human life and investment.
The gas leak detector basically detects whether there is any considerable amount of toxic or flammable gases such as Methane, Butane, Carbon-monoxide and LPG present in the air.
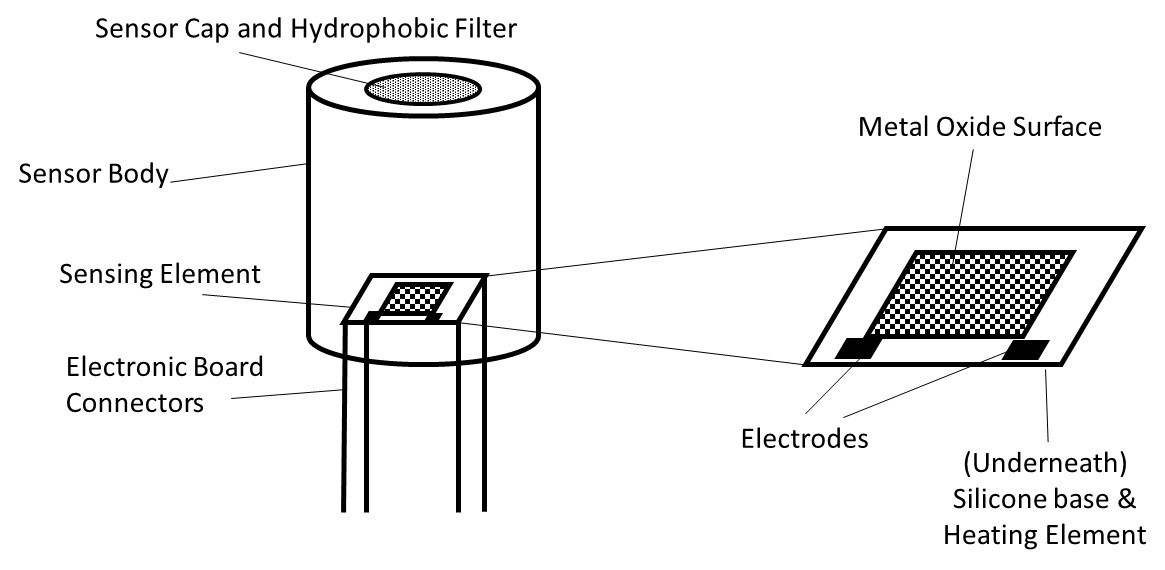
Gas Sensor Working :
When a gas interacts with this sensor, it is first ionized into its constituents and is then adsorbed by the sensing element. This adsorption creates a potential difference on the element which is conveyed to the processor unit through output pins in form of current.
The gas sensor module consists of a steel exoskeleton under which a sensing element is housed. This sensing element is subjected to current through connecting leads. This current is known as heating current through it, the gases coming close to the sensing element get ionized and are absorbed by the sensing element. This changes the resistance of the sensing element which alters the value of the current going out of it.
![]()
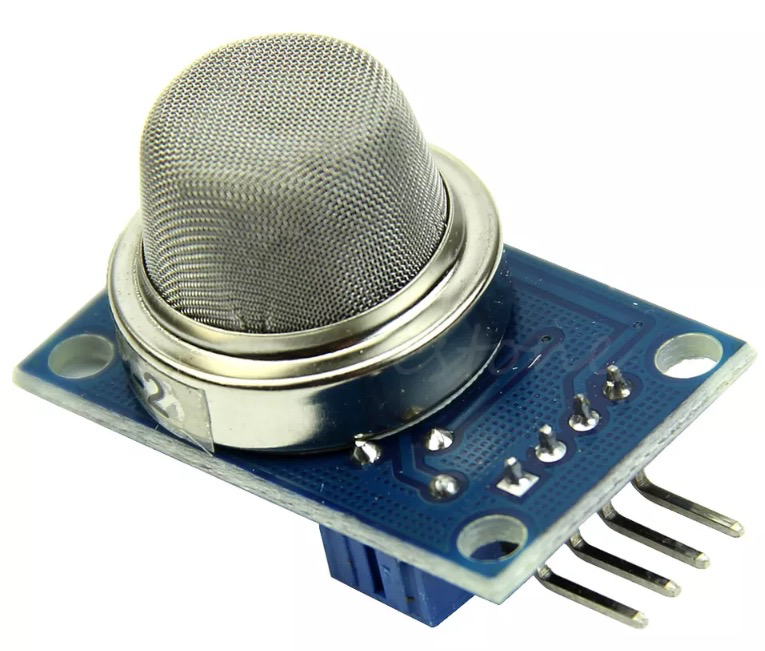
MQ2 Gas Sensor :
I am using a MEMS based MQ2 gas sensor which is sensitive to Carbon Monoxide, LPG, Butane, Methane & Smoke. The sensor is connected to Raspberry Pi using i2C connection.
![]()
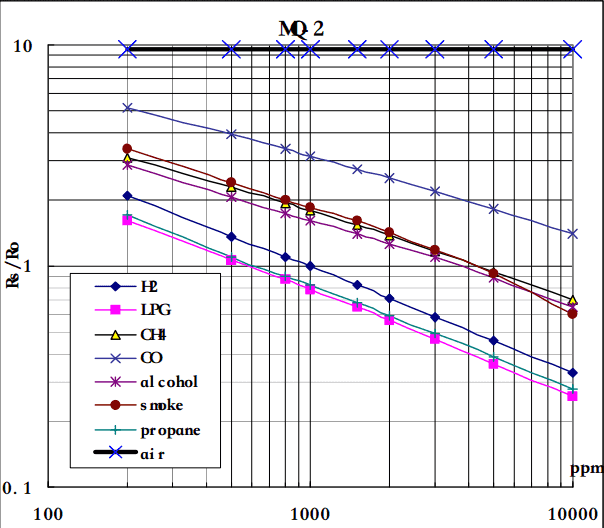
Datasheet :
The graph shows the sensitivity characteristics of MQ2 for several gases
![]()
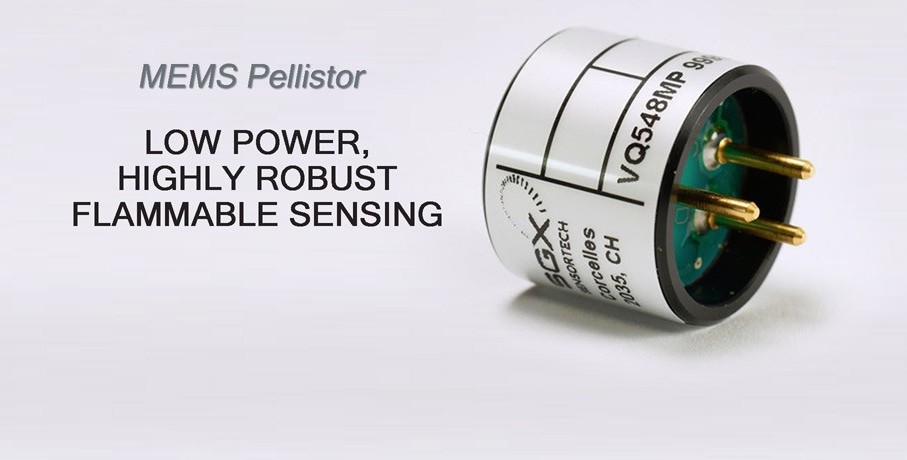
MEMS Pellistor Gas Sensors :
The MPEL is an industrial-suited MEMS (Micro Electro Mechanical System) pellistor which has been developed for a new generation of low-power and rugged sensors for the detection of combustible gases, in particular methane.
Innovative process technologies combined with optimised sensing and filter materials are engineered to achieve exceptional performance compared to existing products.
![]() In future, I plan to work on detecting more specific gases using MEMS based Pellistor sensors which are more specifically used for industrial grade sensing.
In future, I plan to work on detecting more specific gases using MEMS based Pellistor sensors which are more specifically used for industrial grade sensing. -
Rover details
07/06/2017 at 14:22 • 0 commentsIn order to mount the thermal camera on a autonomous rover, I decided to buy one instead making it.
The rover that I want must be compact, powerful and be capable of running in all terrains in order to meet the problems that I work on. It must also crawl under some critical areas. Hence, I bought Devastator Tank Mobile Platform from DF Robot.
It is compatible with Raspberry Pi and most other popular micro-controllers like Arduino, Beagle bone and so on.
The Devastator uses high strength aluminium alloy which makes it extremely solid and durable. The high speed motors and premium tracks also allows it to move swiftly everywhere. Its high performance suspension, enjoys an outstanding mobility across even the toughest terrains.
It has 2 DC motors whose characteristics are given below :
- Operating Voltage Range: 3~7.5V
- Rated Voltage: 6V
- Max. No-load Current(3V): 140 mA
- Max. No-load Current(6V): 170 mA
- No-load Speed(3V): 90 rpm
- No-load Speed(6V): 160 rpm
- Net Weight: 45 g
It comes in individual parts and can be easily assembled in few hours. Once done, it will look something like this.
![]()
Motor Driver :
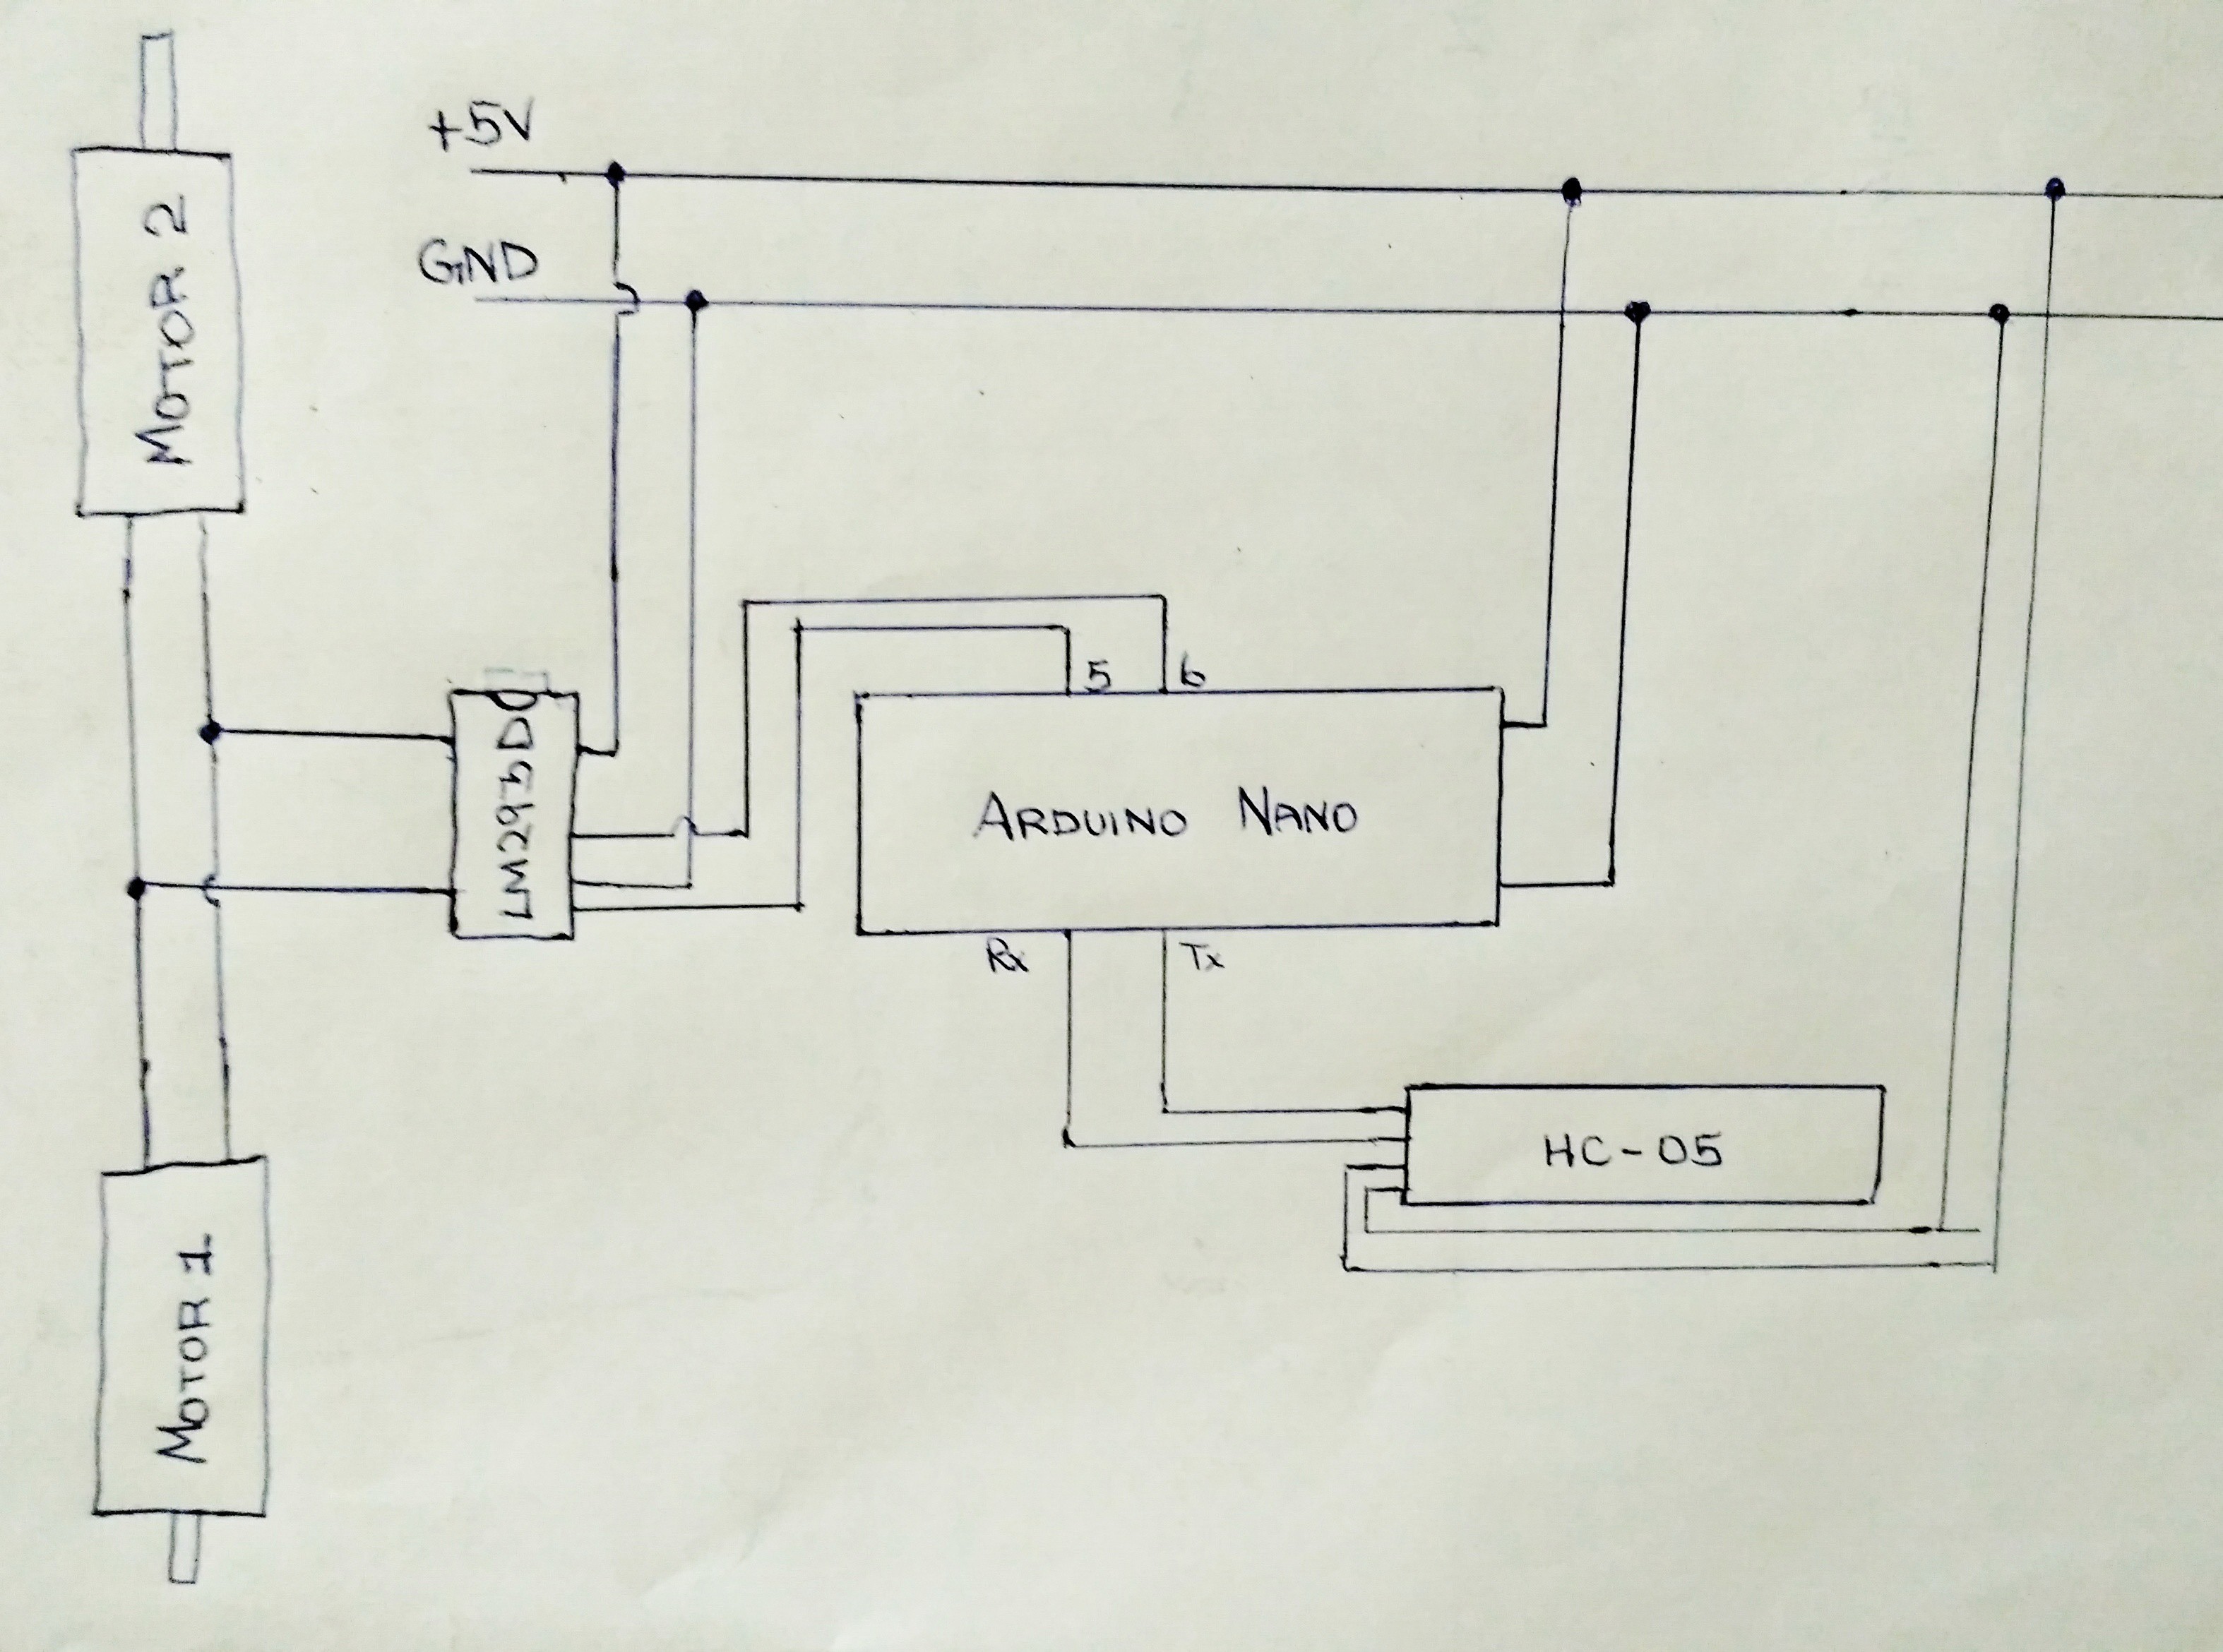
It uses L293D motor driver IC programmed using Arduino Nano.
The driver IC works on the concept of H-bridge. H-bridge is a circuit which allows the voltage to be flown in either direction. As you know voltage need to change its direction for being able to rotate the motor in clockwise or anticlockwise direction. Hence H-bridge IC are ideal for driving a DC motor.
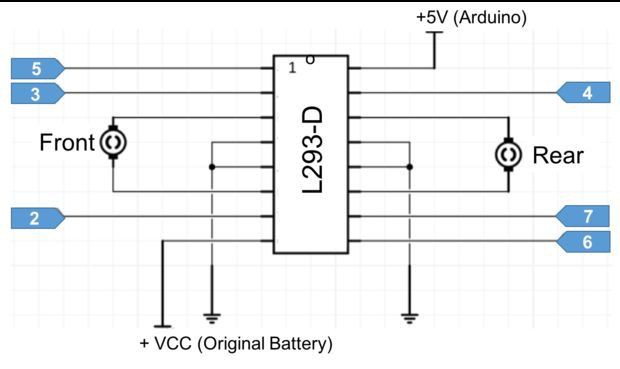
In a single L293D chip there are two H-Bridge circuit inside the IC which can rotate two dc motor independently. Given below is the pin diagram of a L293D motor controller.
![]()
There are two Enable pins on l293d. Pin 1 and pin 9, for being able to drive the motor, the pin 1 and 9 need to be high. For driving the motor with left H-bridge you need to enable pin 1 to high. And for right H-Bridge you need to make the pin 9 to high. If anyone of the either pin1 or pin9 goes low then the motor in the corresponding section will suspend working.
I have explained the connection with regards to the entire circuit in the form of a sketch below.
![]()
Once the connections are done, follow this link on my github repository for coding the Arduino Nano for Rover Control.
-
Thermal Camera interfacing with Raspberry Pi
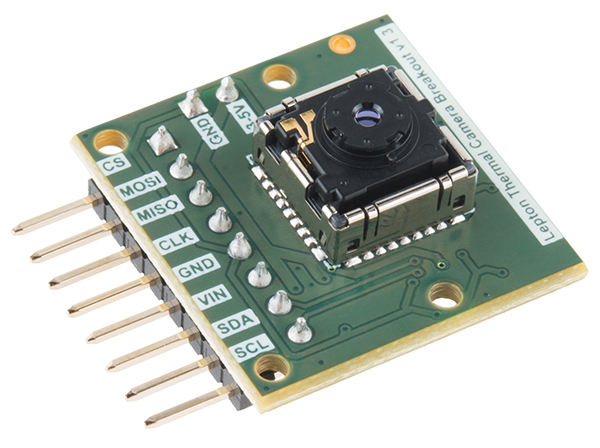
07/06/2017 at 14:18 • 0 commentsFLIR is the most expensive component used in our system. But it is a very vital element. The FLIR Lepton thermal camera is rather a new innovation which has brought down the cost of Thermal imaging by tenfold. This makes our vision of a normal tank-based mini rover, a reality.
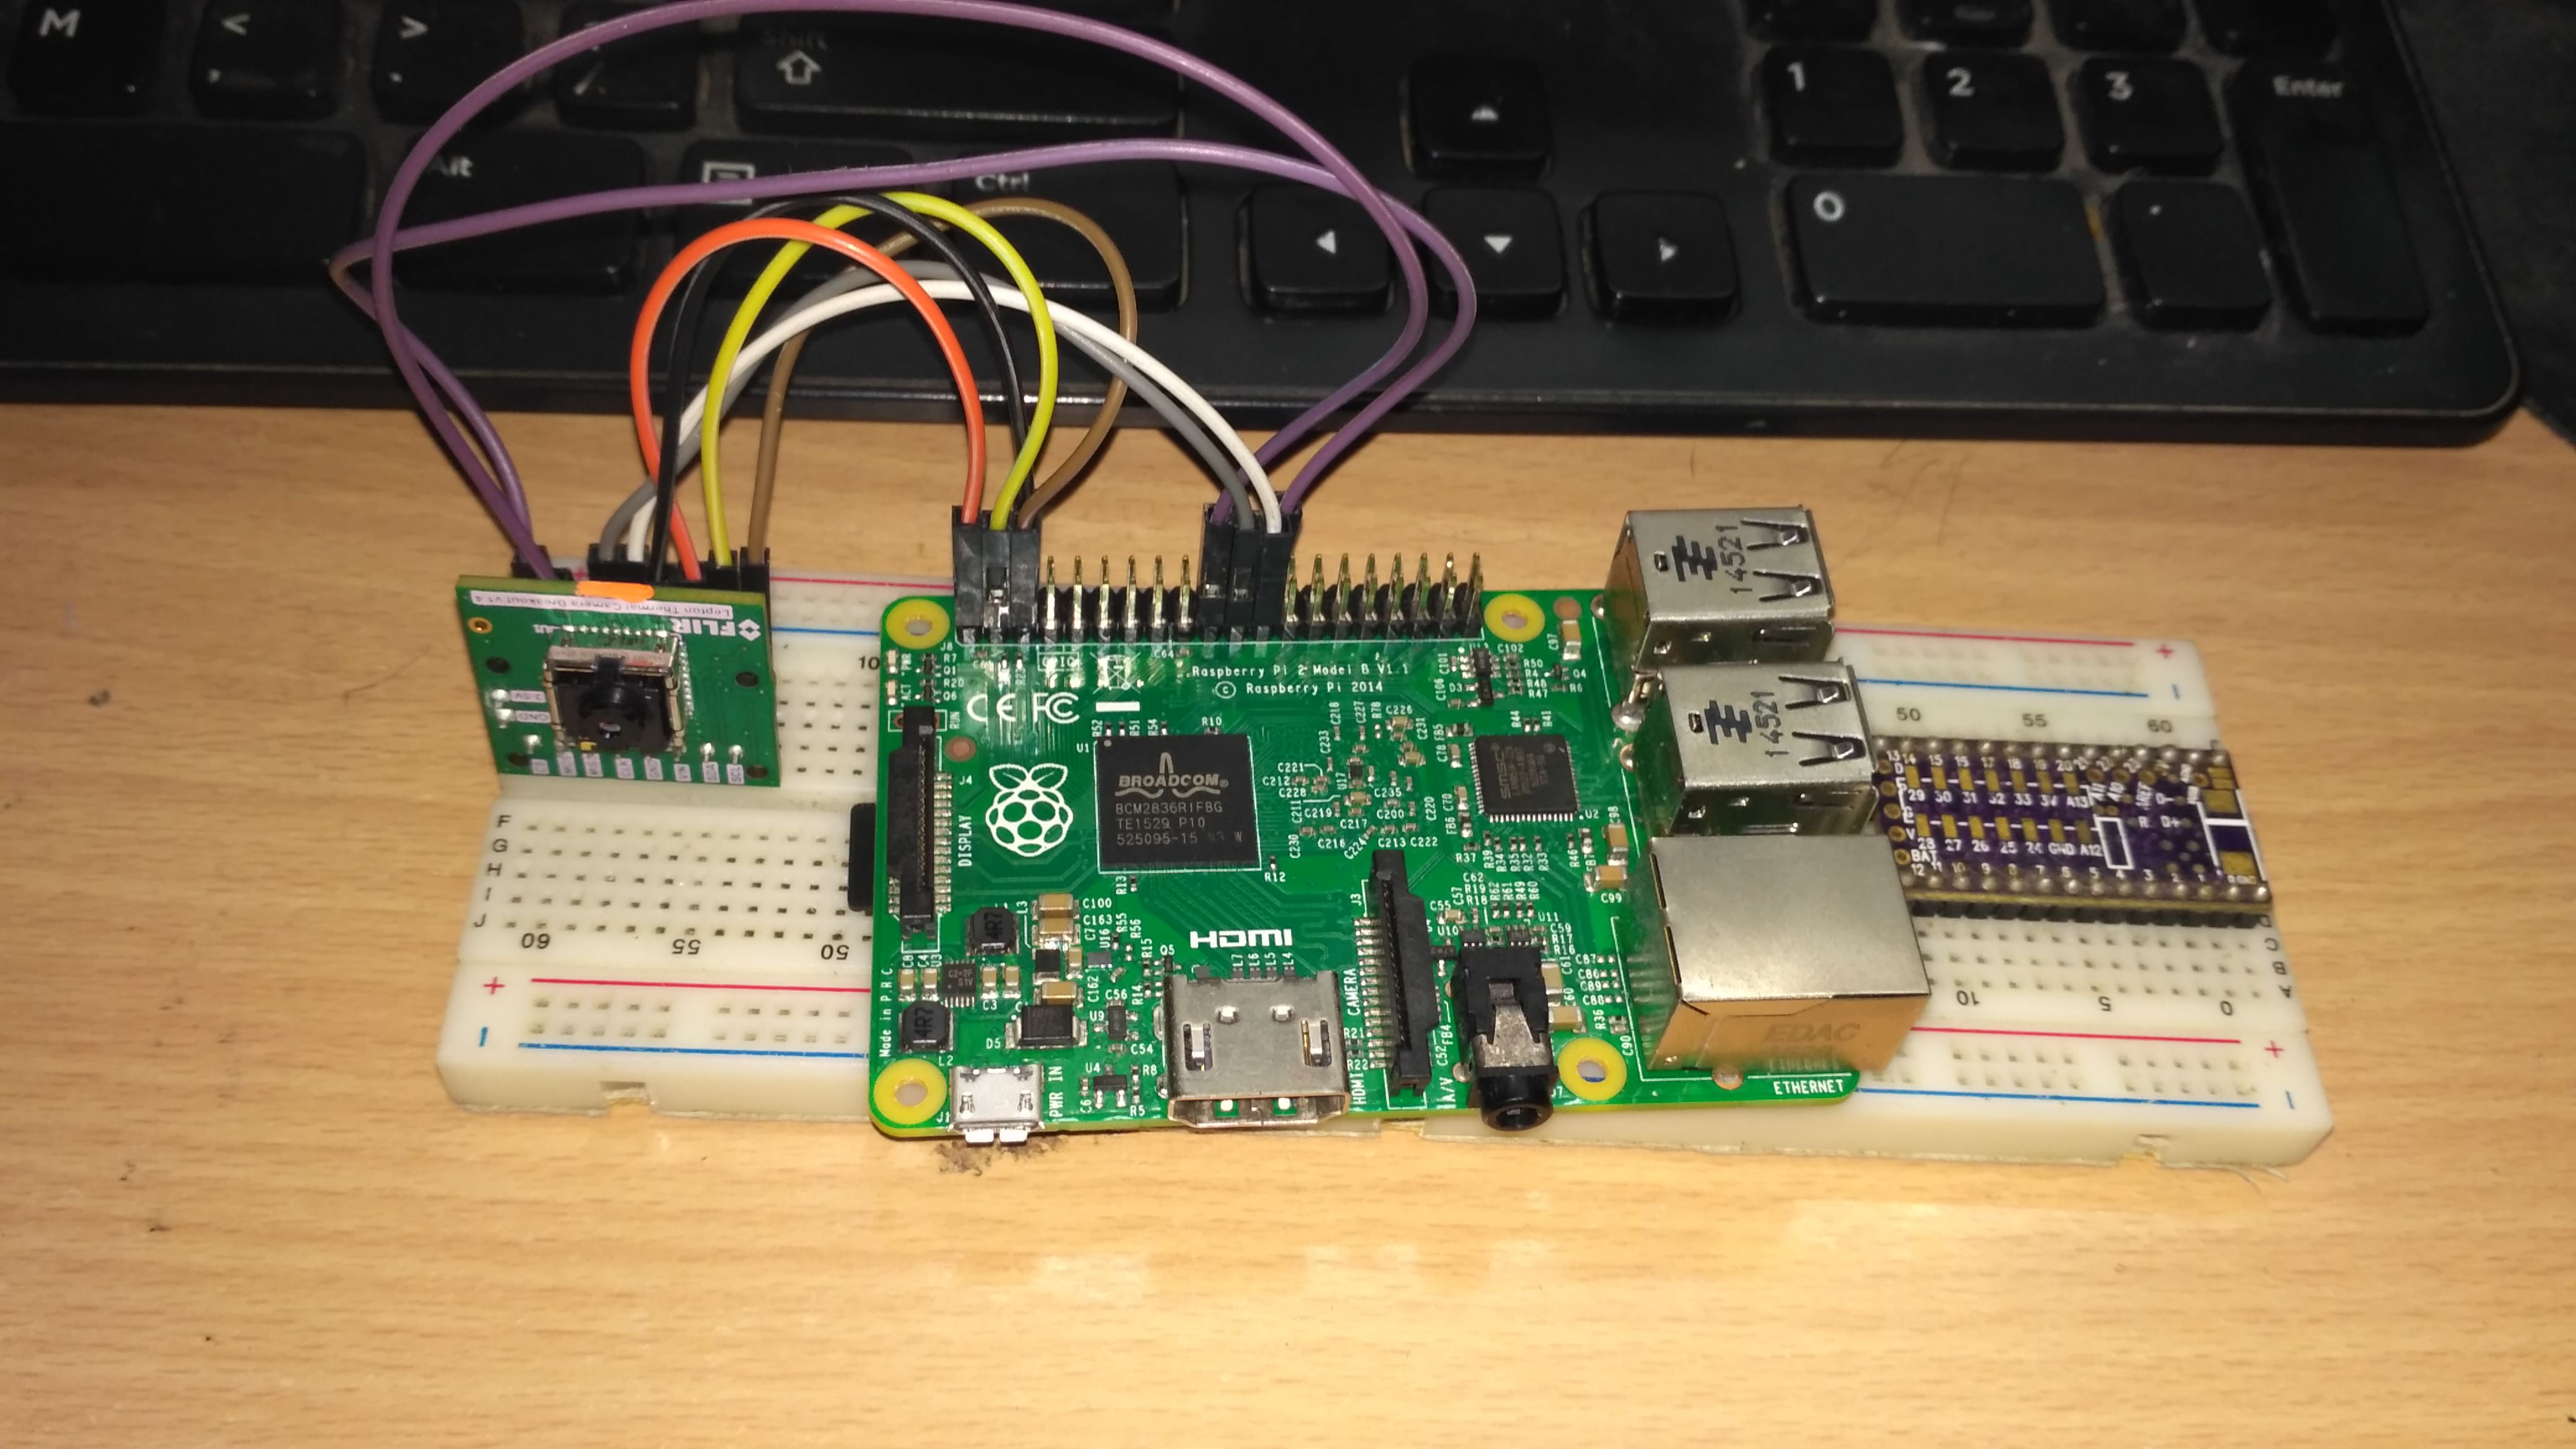
![FLIR Lepton]() Raspberry Pi is a core component of our system. I wanted to use the Raspberry Pi in this project because it is a miniature computer, designed for education which has more functions for a very reasonable price. I used Raspberry Pi micro-controller to program Thermal camera and Gas Sensor. FLIR Lepton Thermal Camera is connected to Raspberry Pi using I2C interface.
Raspberry Pi is a core component of our system. I wanted to use the Raspberry Pi in this project because it is a miniature computer, designed for education which has more functions for a very reasonable price. I used Raspberry Pi micro-controller to program Thermal camera and Gas Sensor. FLIR Lepton Thermal Camera is connected to Raspberry Pi using I2C interface.Connections: Connect SDA, SCL of ADC to the raspberry pi 2 respectively and Vin, Gnd to 3.3V and Gnd. Follow the instructions of the FLIR thermal module hookup instruction in Sparkfun.
Link : flir-lepton-hookup-guide
![]()
FLIR Lepton has 8 GPIO pins. As per the connection diagram, connect it with F/F jumper wires.
![]()
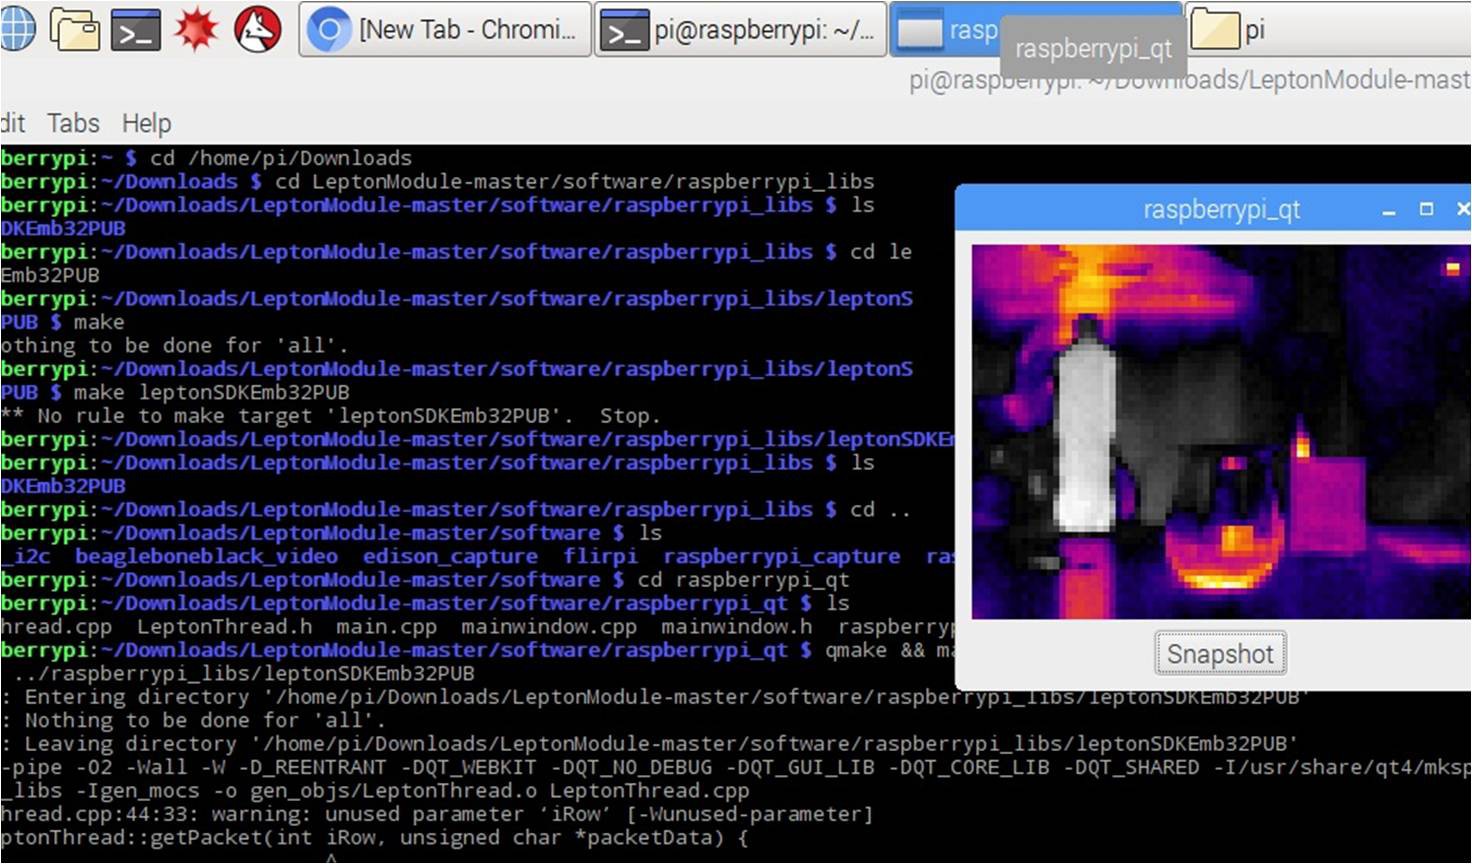
Software Prerequisites :
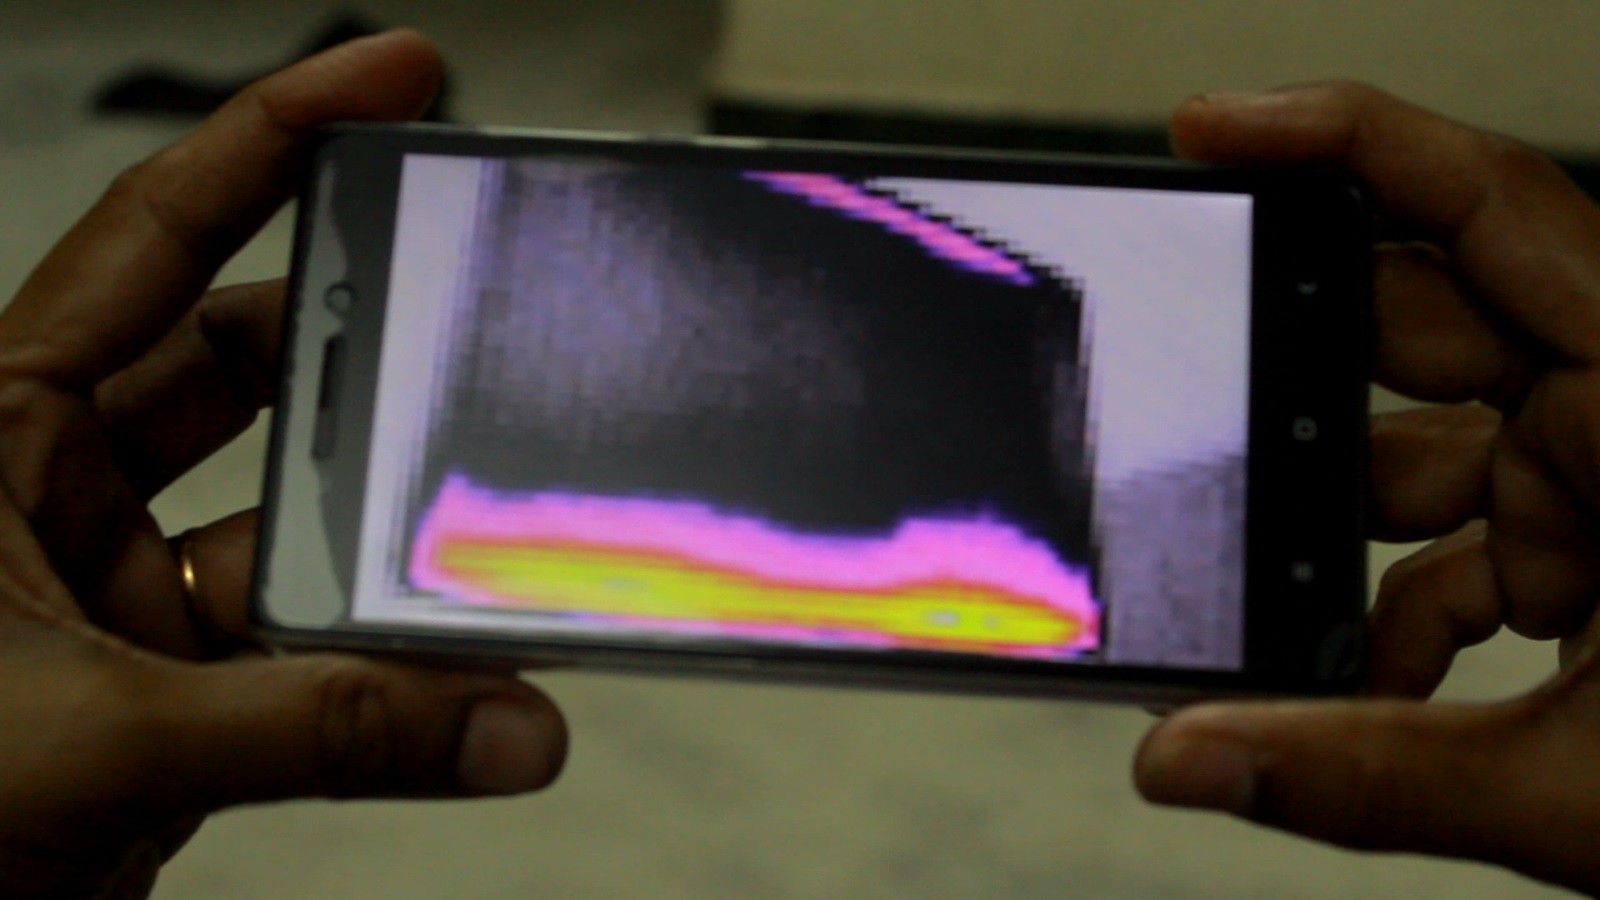
    1. Python 2.7
    2. Qt
    3. VNC
Once the coding part is done, a pop-up window displaying thermal image in 80x60 pixel resolution will be opened.
Unlike the mobile phone cameras, it has a bad resolution but the new models of FLIR are being launched with better price and better resolution.
![]() VNC :
VNC :The current best way to record the video produced by the FLIR Lepton camera is to connect the raspberry to a PC or laptop. That is easily achievable using VNC (Virtual Network Computing). VNC allows a user to remotely control the desktop interface of another computer. Other advantages of using VNC with Raspberry are:
- There are many open source screen recorder programs
- It will allow the user to control the raspberry using linux or windows system
- The recorded files will be saved in the user’s computer, therefore, it won't be necessary to store it in the Raspberry memory card
- Using VNC we can easily carry the thermal camera system
![]()
-
Idea and Concept
07/06/2017 at 14:09 • 0 commentsAfter designing an AR Worker Helmet, I presented my prototype to a Professional who validates my idea and gave me few inputs about thermal cameras. He also adds up about the difficulties in monitoring the Temperature and Gas in critical areas without the help of a human.
After seeing the unbelievable progress in Machine Learning and Robotics for the past few years, empowering Industrial Workers with Machine Learning for fault detection and testing is my current goal. Also,along the way I've read statistics on number of fire accidents that occur in chemical power plants and hence I wanted to do my path.
By integrating Thermal imaging with an All terrain robot, SafeRanger could be a next generation of workers. It delivers real-time thermal and gas data, direct to the user, enabling them to visualise and understand their world in ways never before imagined.
SafeRanger
Thermal vision and Gas sensor based rover to detect abnormal Temperature and Gas Leaks
 In future, I plan to work on detecting more specific gases using MEMS based Pellistor sensors which are more specifically used for industrial grade sensing.
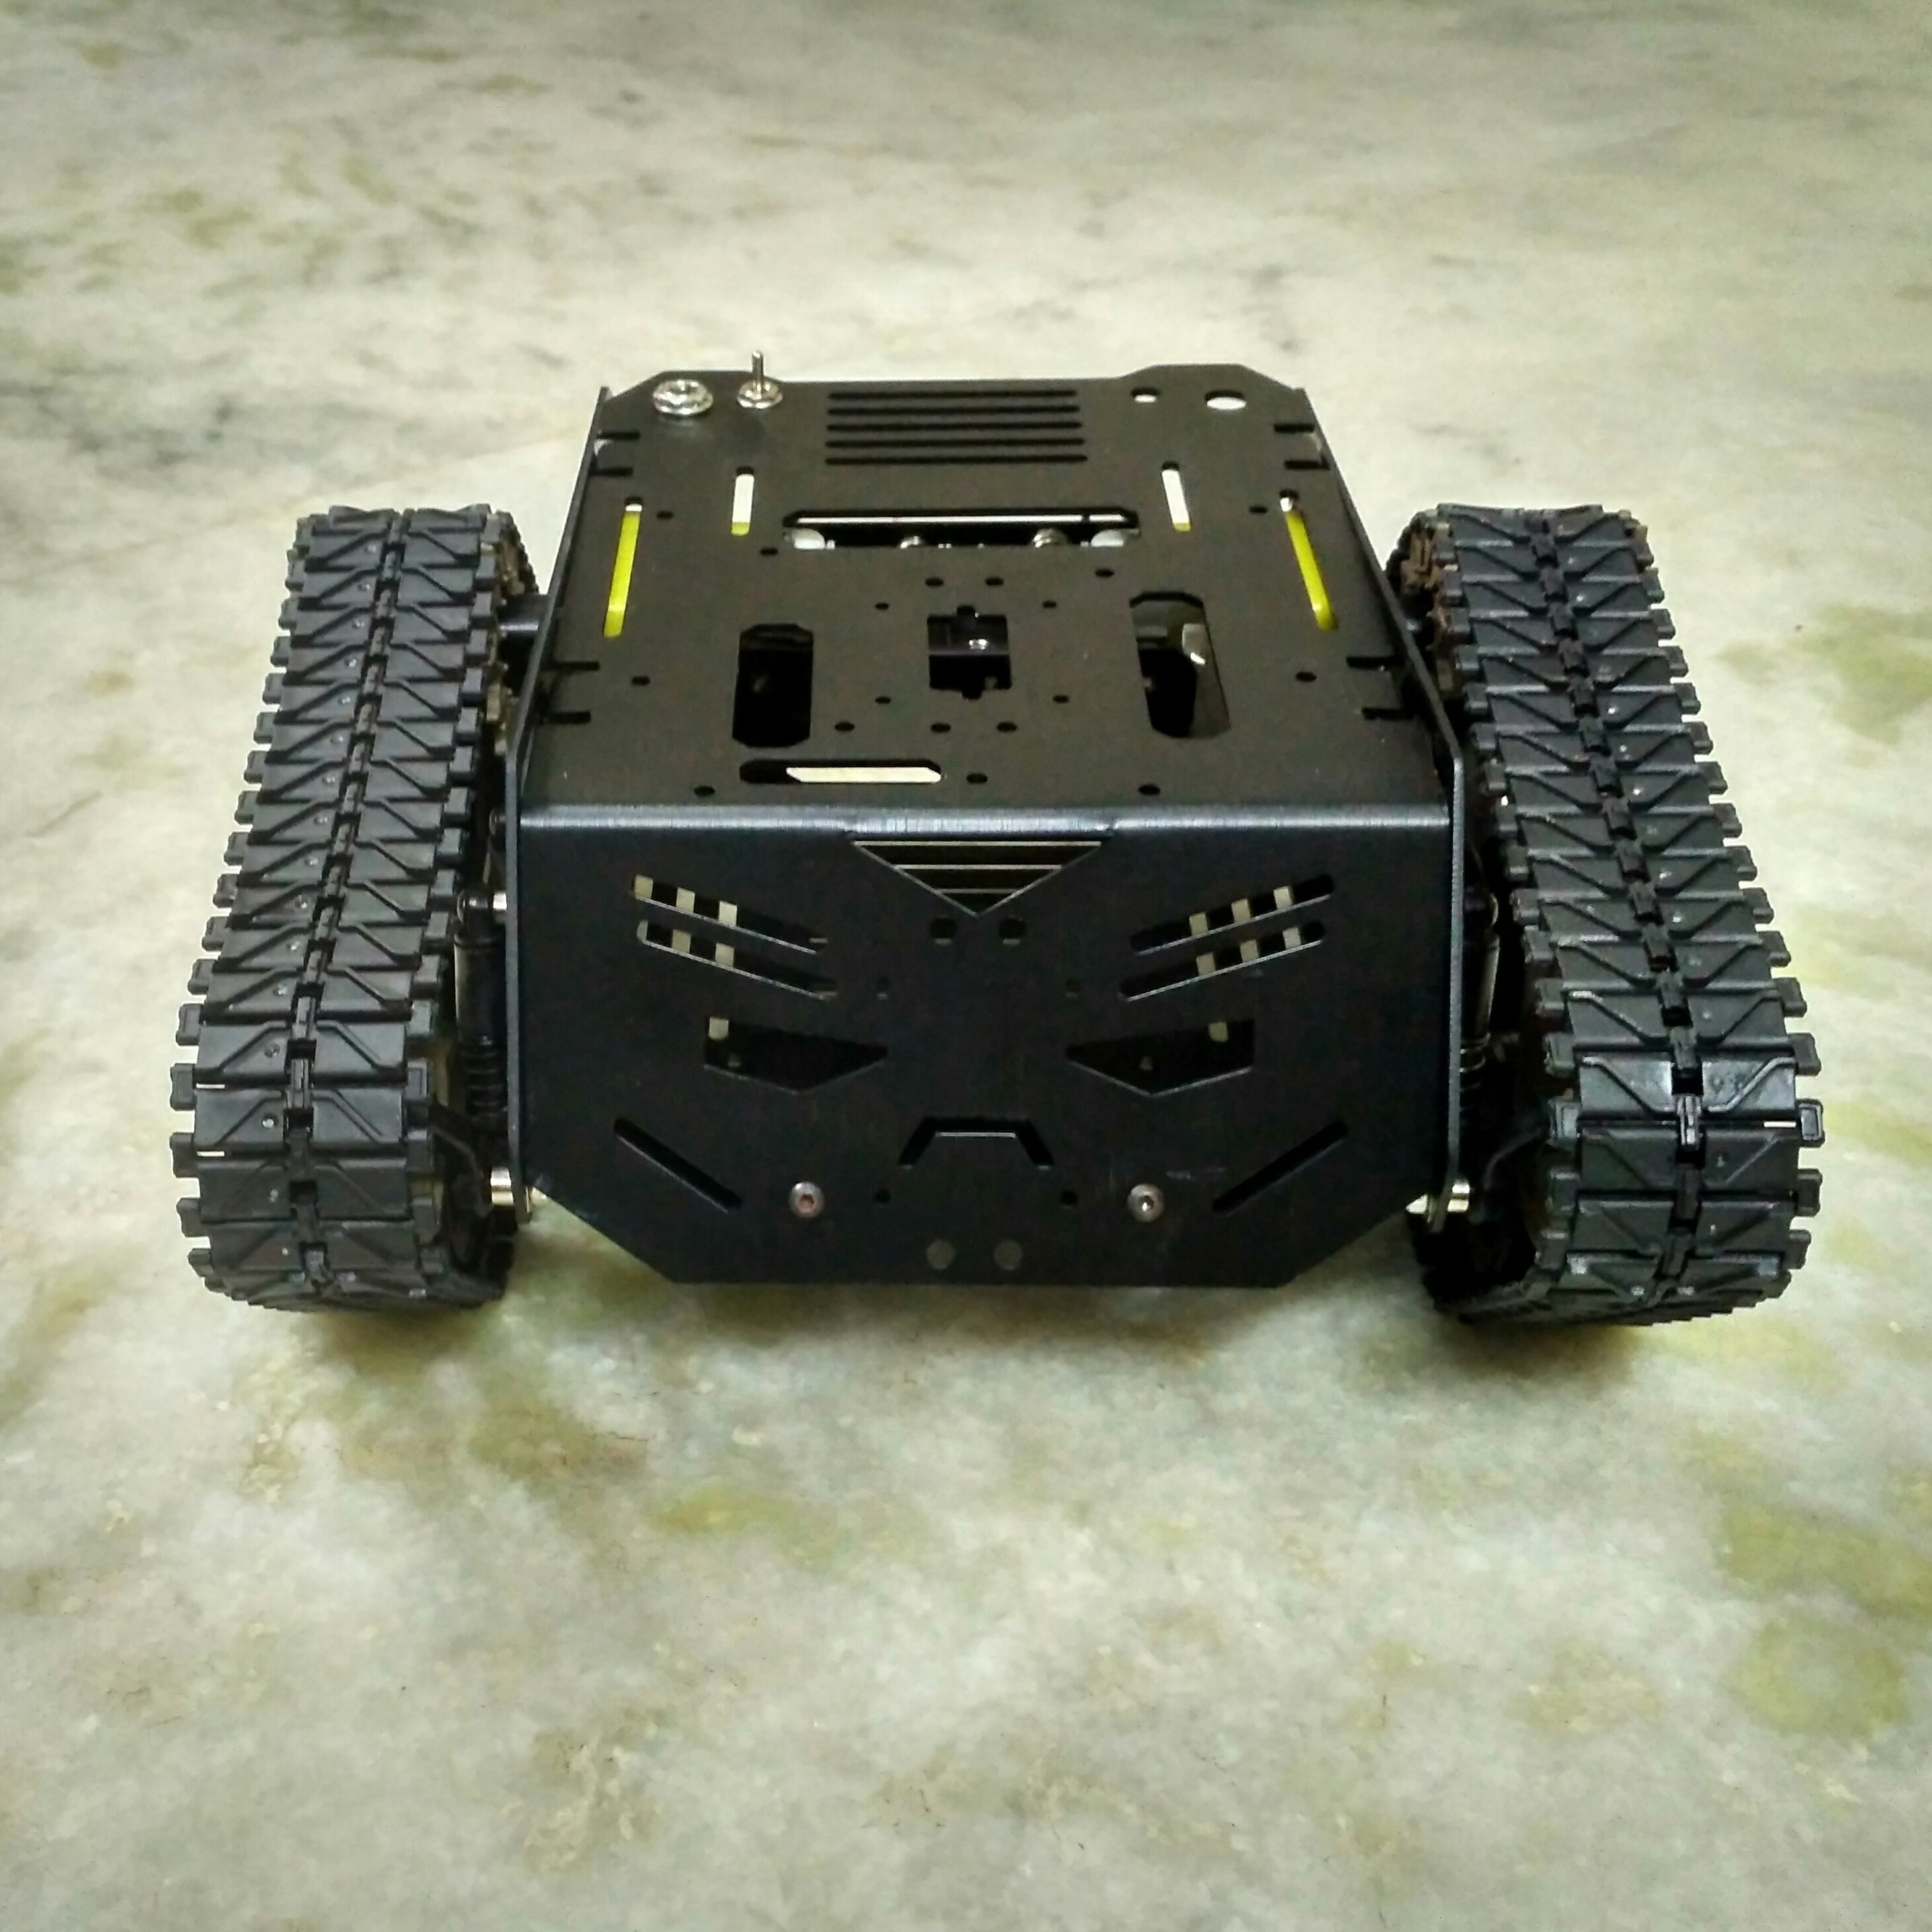
 Raspberry Pi is a core component of our system. I wanted to use the Raspberry Pi in this project because it is a miniature computer, designed for education which has more functions for a very reasonable price. I used Raspberry Pi micro-controller to program Thermal camera and Gas Sensor. FLIR Lepton Thermal Camera is connected to Raspberry Pi using I2C interface.
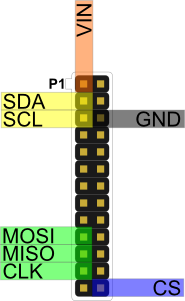
 VNC :
VNC :