Close
0%
0%

3D Printable Robot Arm

A printable robot arm, a little bigger than the usual hobby servo once.

Similar projects worth following
My printable robot arm is inspired by the well known industry robots, but printable.
The goal is to develop a open source robot arm to use in private or small businesses and make robot development available for every one.
The arm should lift about 2 kg enough to perform every day tasks. Currently robot arms are expensive or small and weak, or clumpy.
Industrial robots are expensive and dangerous and for that not suitable for using at home or schools.
A Open Source printable robot can build,used and developed by every one.
Robots are still expensive and hard to operate, but this must not longer be the case.
A cheap 3d printed robot arm could be used by disabled persons to manage their daily needs better and more independent. Operate at dangerous but not so developed places.
Remote controlled you could even us the robot to open your door if you forgot your keys.

The future Arm will include a moving base.

That's where I'm currently heading ( My 2019 ) :
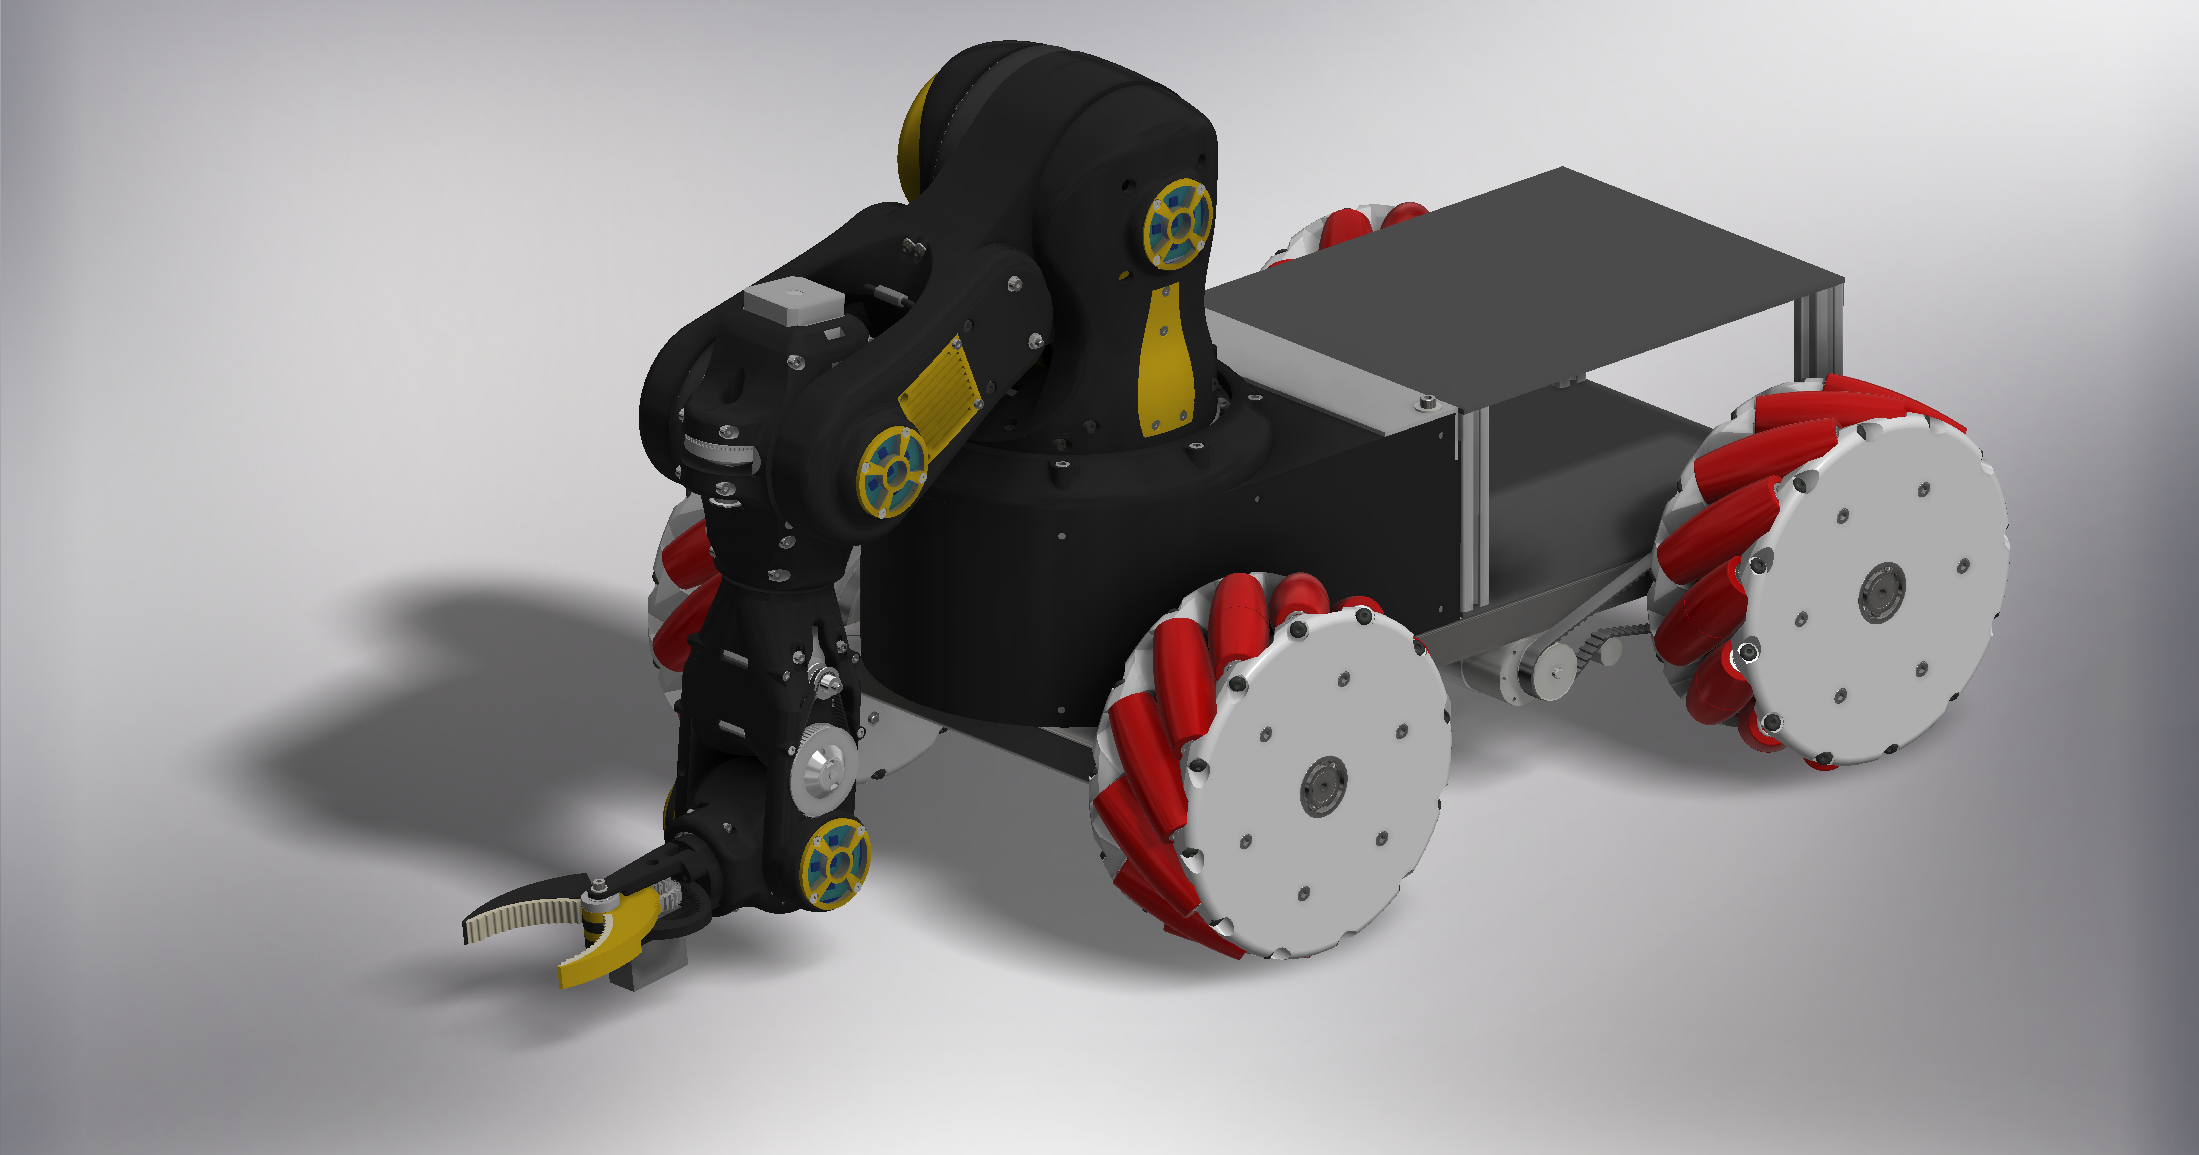
The four robots I build since this project started.
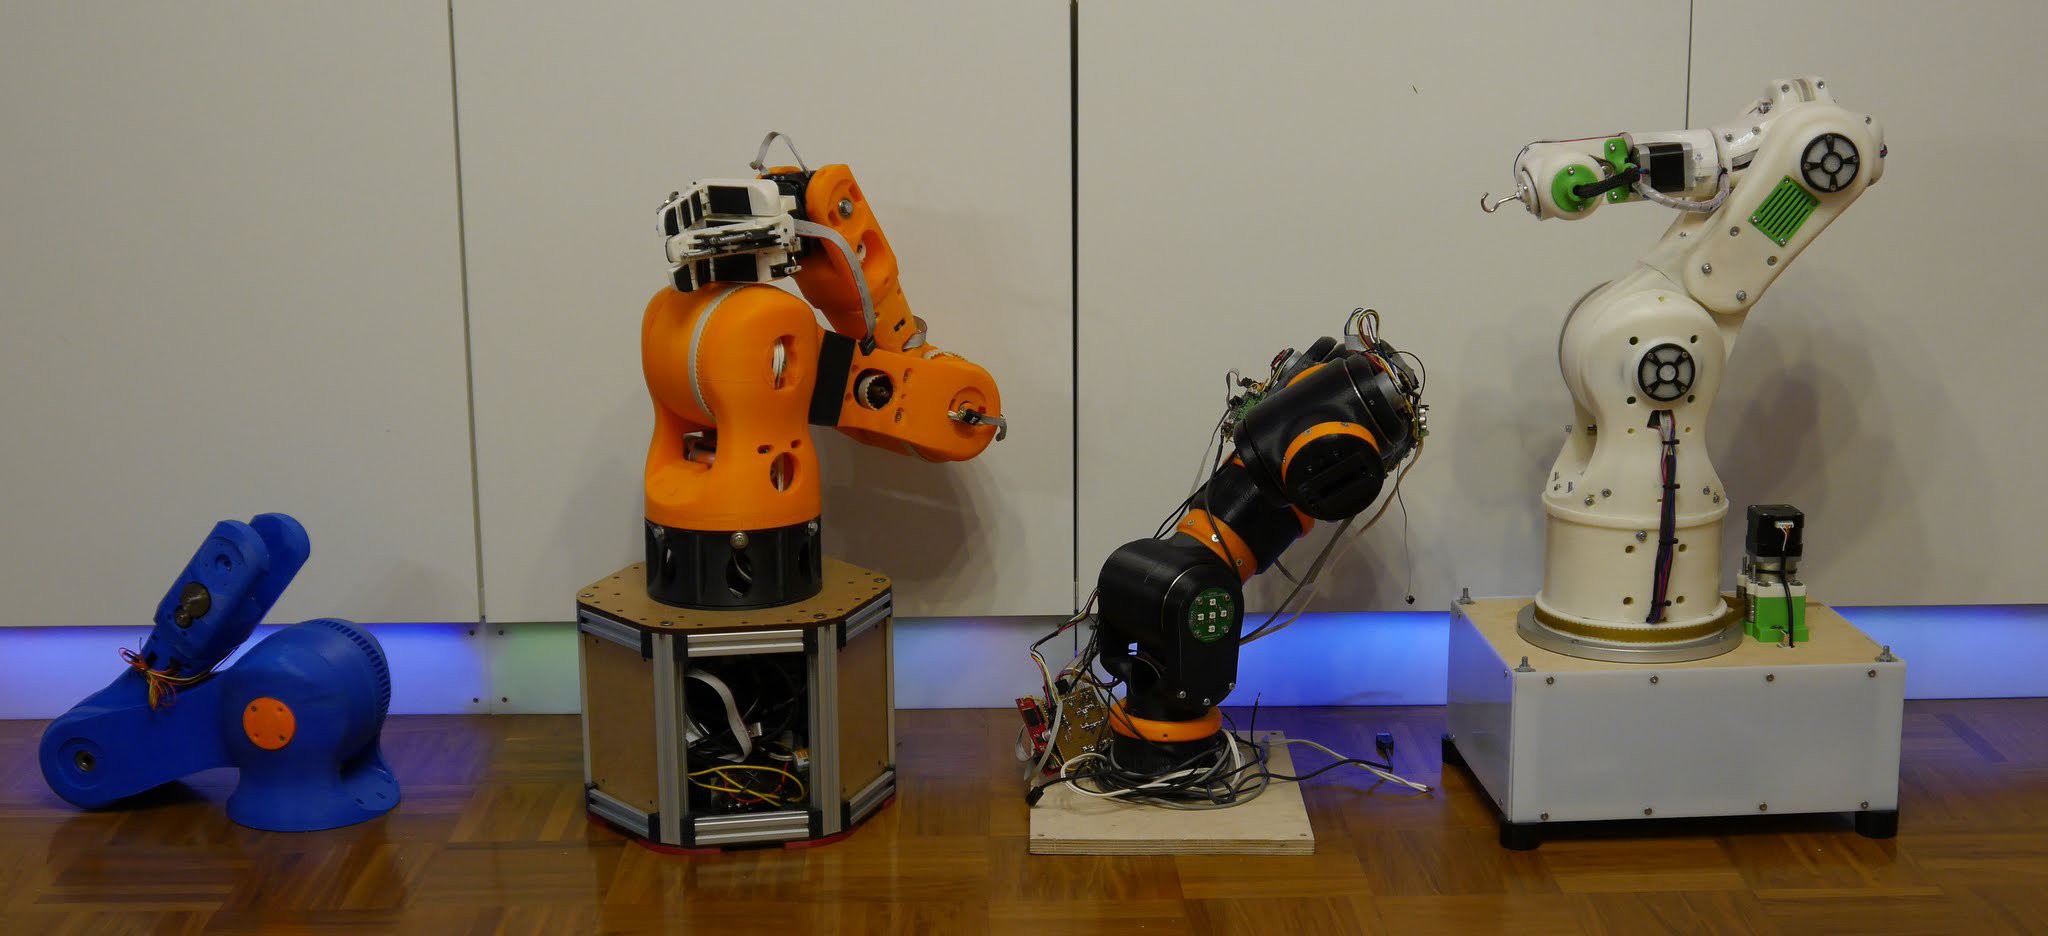
Version 4 now nearly done and in testing.

Take a look at the Gripper I designed for my Robots:

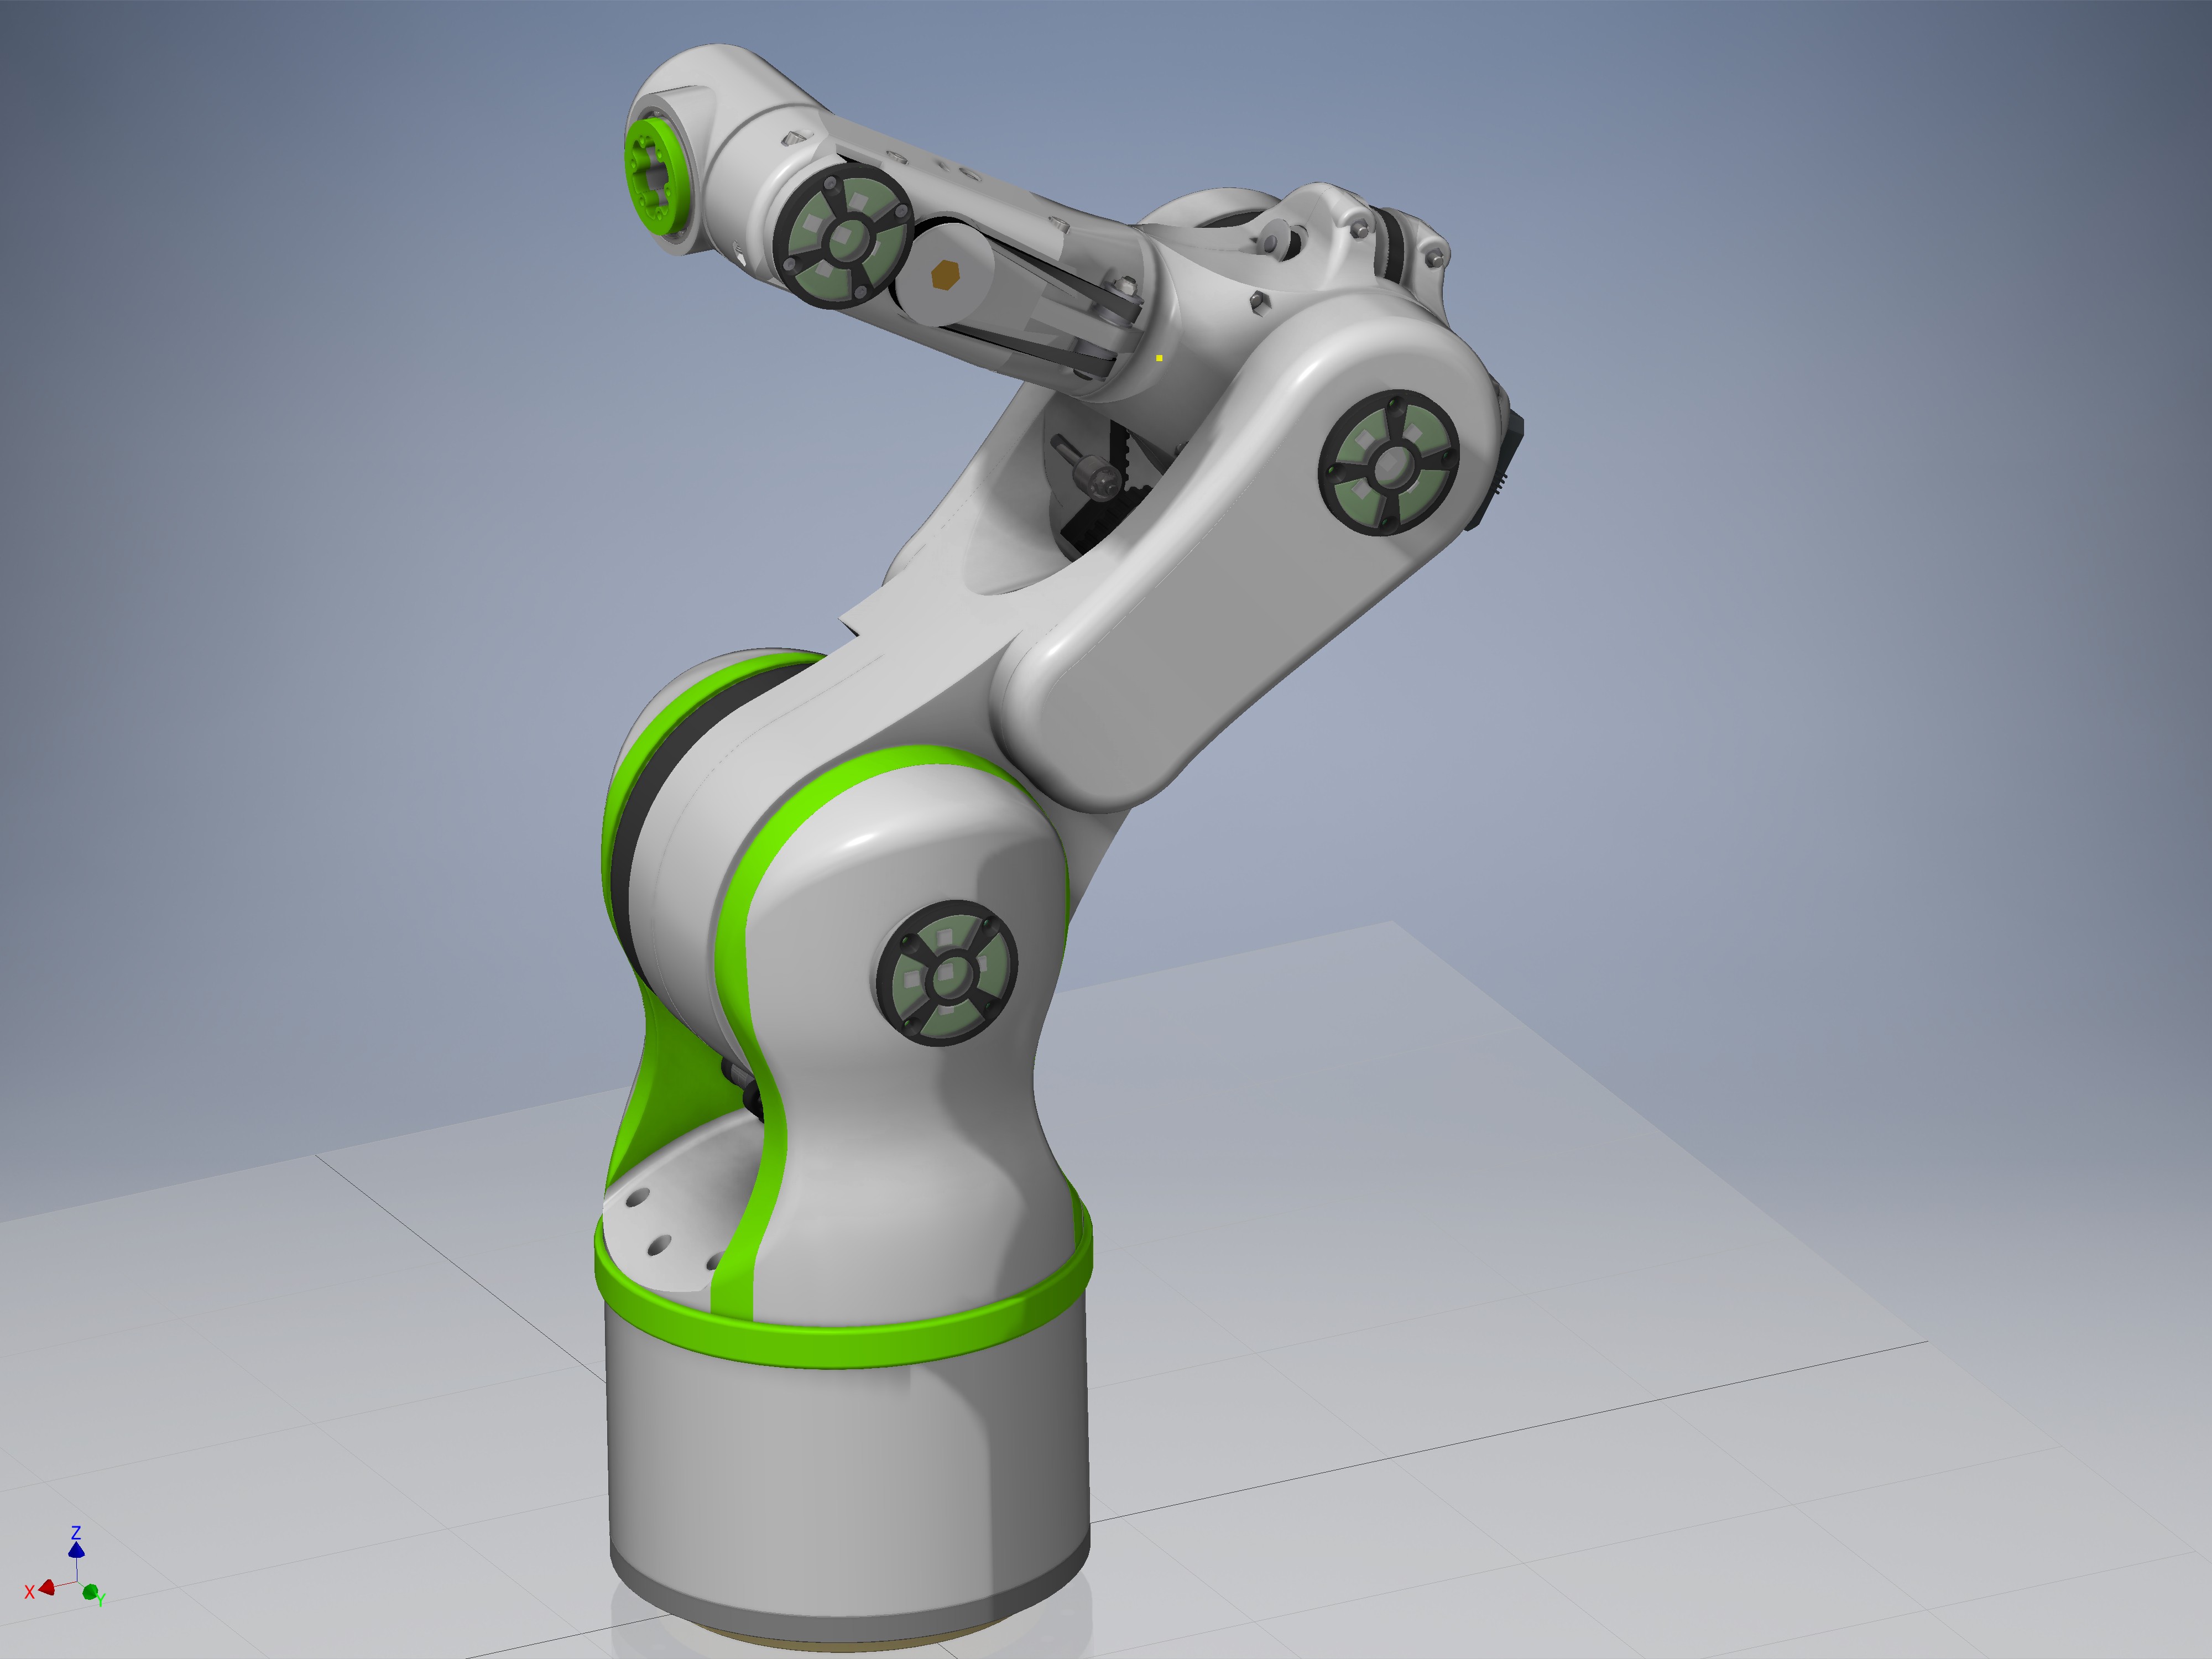
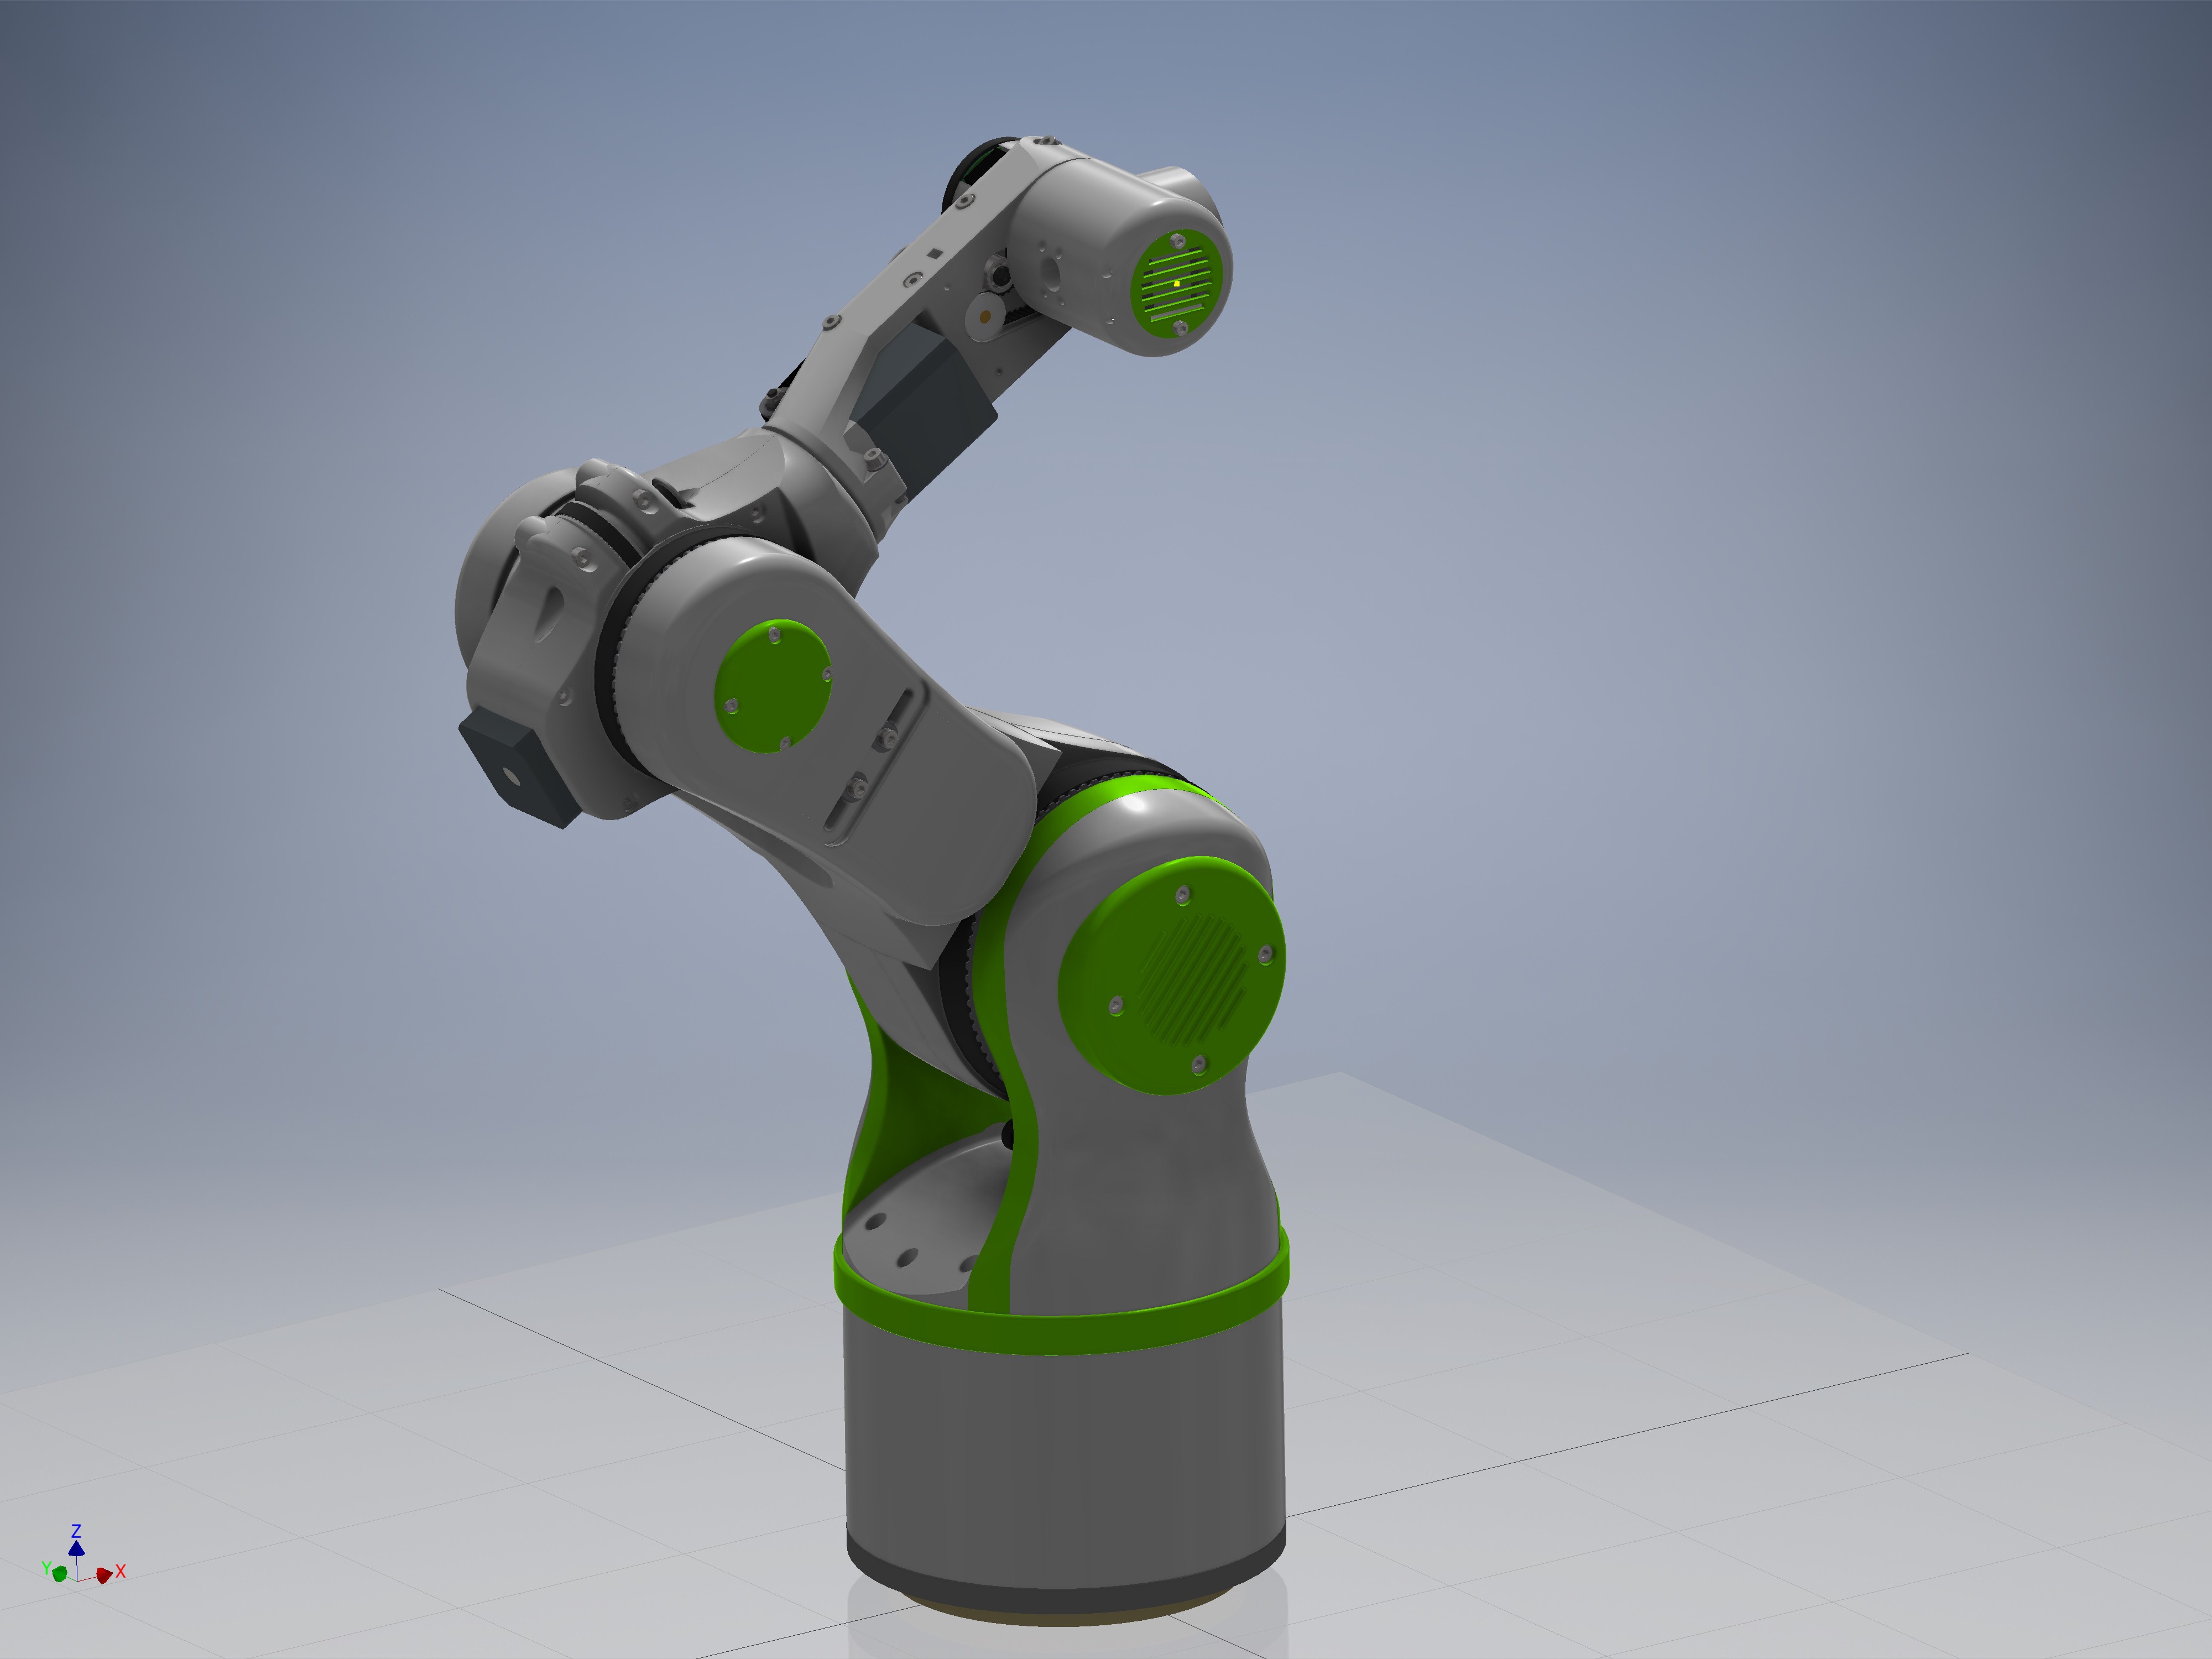
Version 4 is now nearly complete:

I also started uploading the files on github:

https://github.com/4ndreas/BetaBots-Robot-Arm-Project

And a components list for version 4:

http://1drv.ms/1NIofNR

  • 1 × Version 4 BOM see the link to the excel file: http://1drv.ms/1NIofNR
  • 1 × 24V - 200 Watts (or more) Power supply
  • 1 × Arduino due + Ramps+FD shield I use this until I have time to design my own shield
  • 5 × suitable stepper motor driver I used TB6560 Stepper Motor Driver Boards

  • 2019 Update

    Andreas Hoelldorfer05/12/2019 at 16:51 2 comments

    It's been 4 years since I started this project. Its had some downs and a lot of ups. Time to give you an update about whats going on.

    Notice: "No robots were harmed during making this video."

    I post regular updates on my Instagram feed if you are interested in faster updates: 
    https://www.instagram.com/4ndreash

  • Mantis IK in Robot Overlord

    Dan Royer05/10/2016 at 16:35 2 comments

    https://www.instagram.com/p/BFNmSFqofN_/?taken-by=imakerobots

    The link above is a video of the working inverse kinematics. Now I don't have the arm on my desk, so I can't write the firmware that ties the arm to RO. However! RO is ready to connect and talk with Mantis.

    My interest is drifting towards easier ways to move the arm in VR. The more I use RO the more I want to fly like an FPS game and push/pull the virtual model rather than click buttons on the side.

  • Robot Overlord support for Mantis

    Dan Royer05/04/2016 at 19:23 4 comments

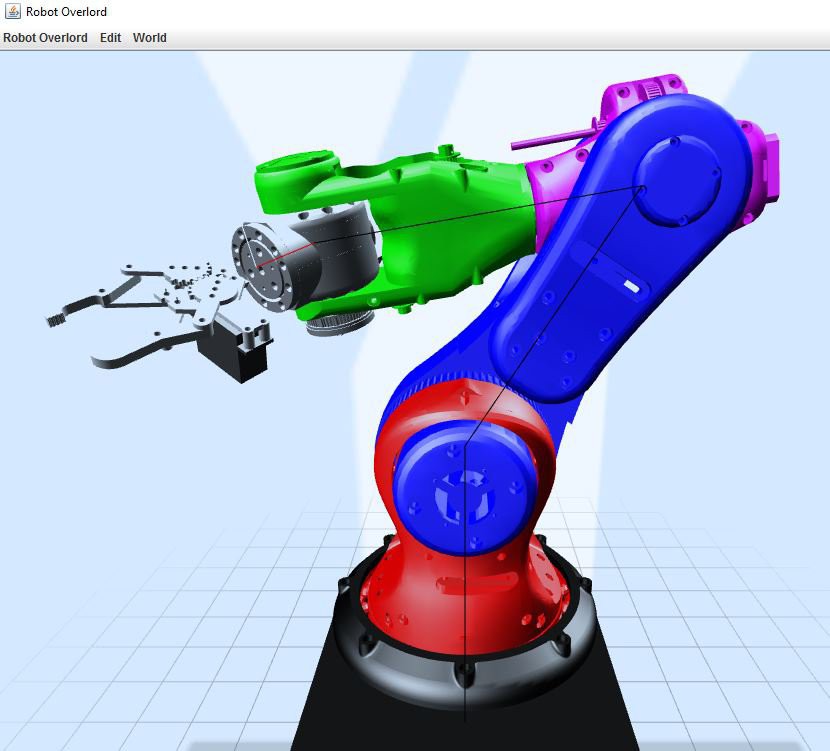
    Hello Everybody! Dan Royer here. You may know me from helping such projects as the PancakeBot and the Cypress Umbrella. Glad to be working with @Andreas Hoelldorfer. He's got the hardware and I've got the software, so it will make a good team. Above you see the latest version of Robot Overlord (RO) simulating the Mantis arm. RO is a robot simulation package I've written in Java. Think of it as my One Ring.

    First stage was to port the Inventor models into the system and animate them. The line you see running through the model is the software's mental model of the forward kinematics (FK). The FK informs the rendering engine where to draw the parts of the model AND it lets the software check for illegal/impossible arm moves. FK means "if my joints are at these angles, tell me where is the finger tip."

    Second stage will be to get the inverse kinematics (IK) working. IK is the other direction - "I know where the finger is, tell me where the joint angles need to be." It will be a naive solution full of singularities because I'm only marginally clever (MC). Sigularities are cases where there may be many valid solutions, and picking an answer is hard for a computer.

    Third stage will be firmware to make this arm talk with RO like all MC robots.

    More generally, MC is working on adding Vive VR support and record/playback to RO. That will mean telepresence work, gamification, and more.

    Dan out!

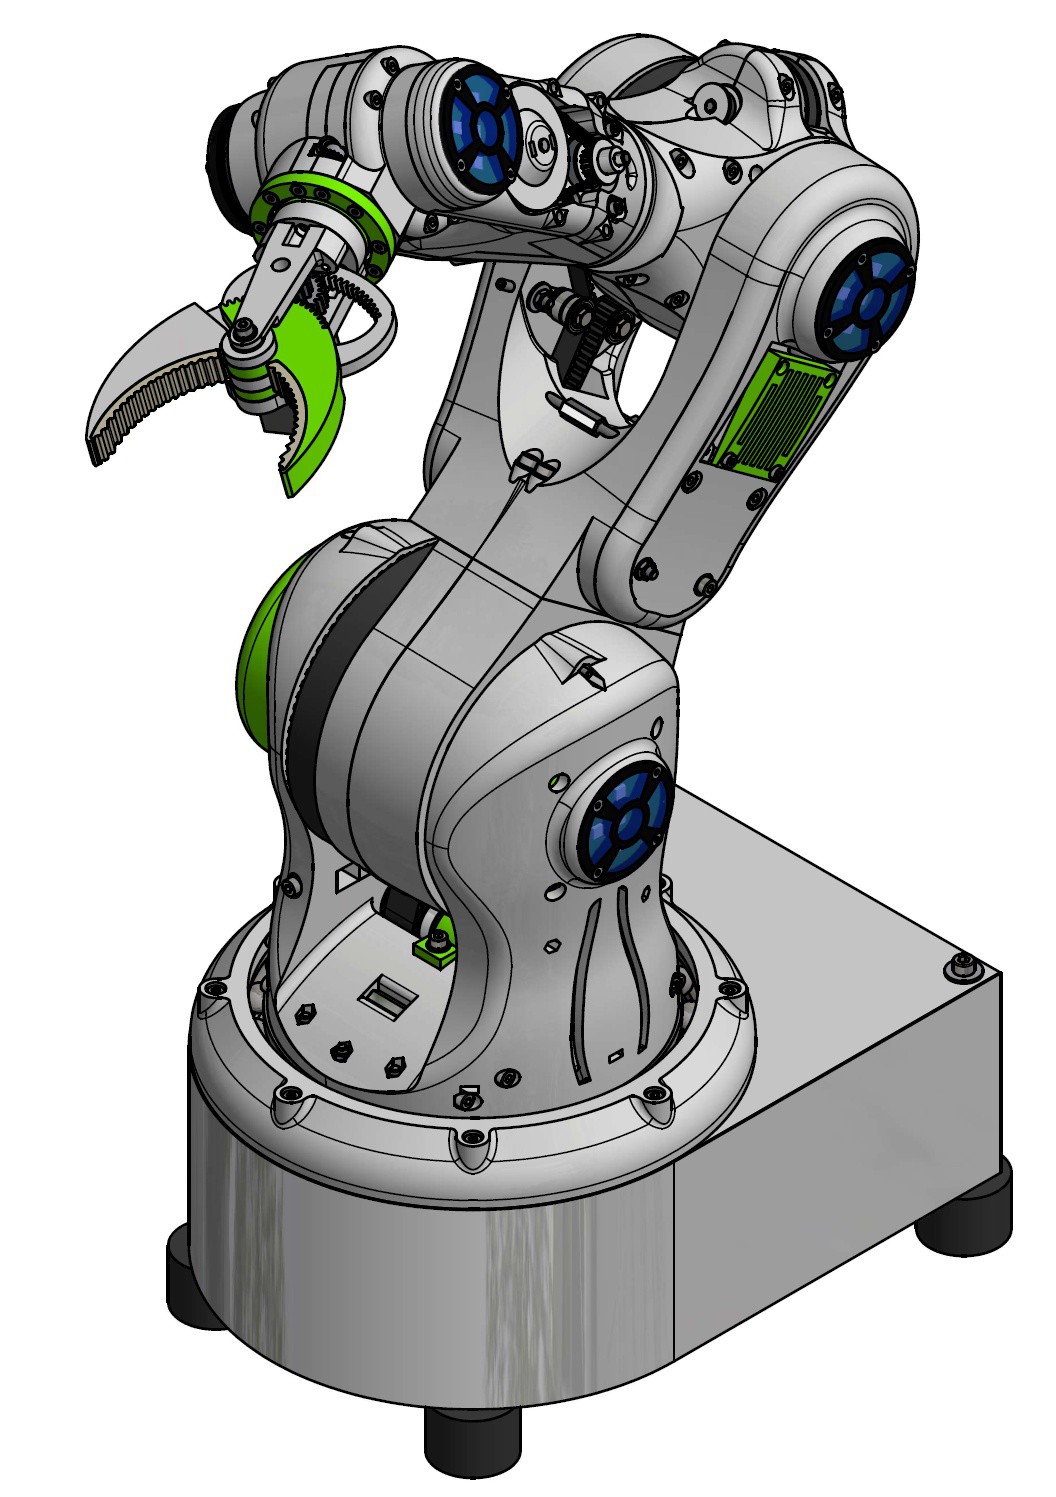
  • I started with a new version called Mantis

    Andreas Hoelldorfer04/13/2016 at 08:11 0 comments

    After version 4 (green) works quite well. I decided to stick with the basic design and improve this version instead of trying another approach.

    I started with the Gripper and will work from top to bottom down the robot arm

    http://chaozlabs.blogspot.com/2016/04/mantis-robot-arm-part-1-gripper.html

    I will post a video about the part and a small article on my blog where all the links and part lists will be.


  • Still here

    Andreas Hoelldorfer02/29/2016 at 17:32 2 comments

    I just posted a update about my 3d printed, 6-axis robot arm project:

  • All in motion

    Andreas Hoelldorfer10/19/2015 at 07:24 5 comments

    All six axis of my robot arm are moving now:

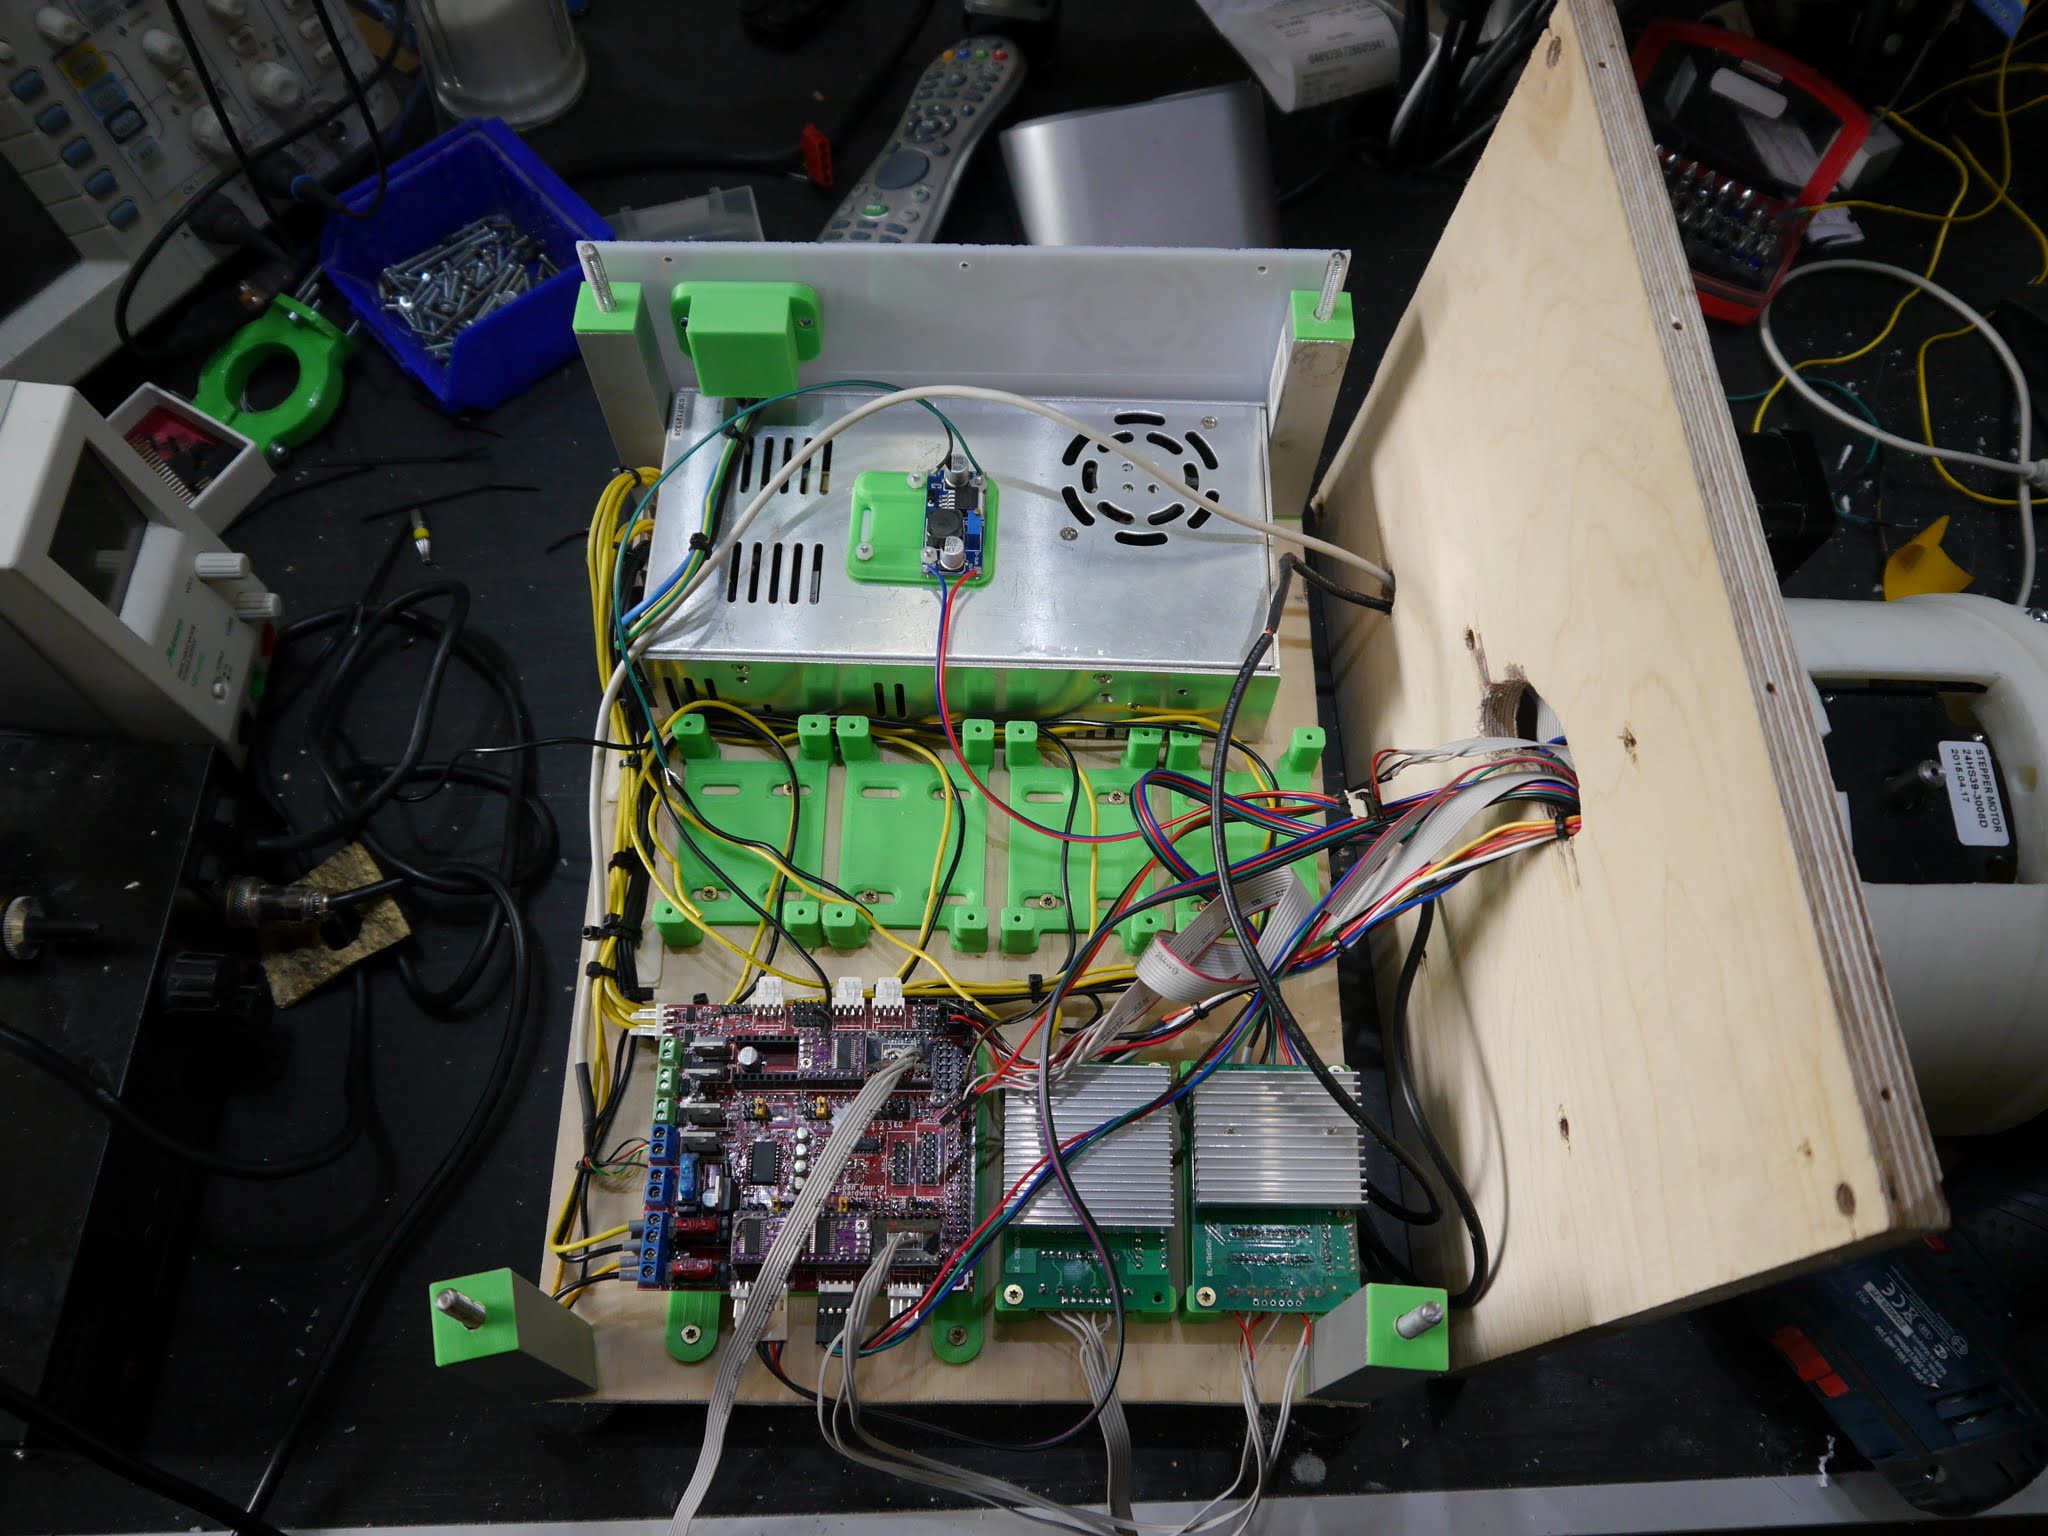
    I build a case for the electronics, nothing special but it will serve the puropse.

  • 3-Axis running and detailed description of the arm.

    Andreas Hoelldorfer10/04/2015 at 09:55 1 comment

  • Working on Version 4 - Progress

    Andreas Hoelldorfer09/24/2015 at 12:47 3 comments

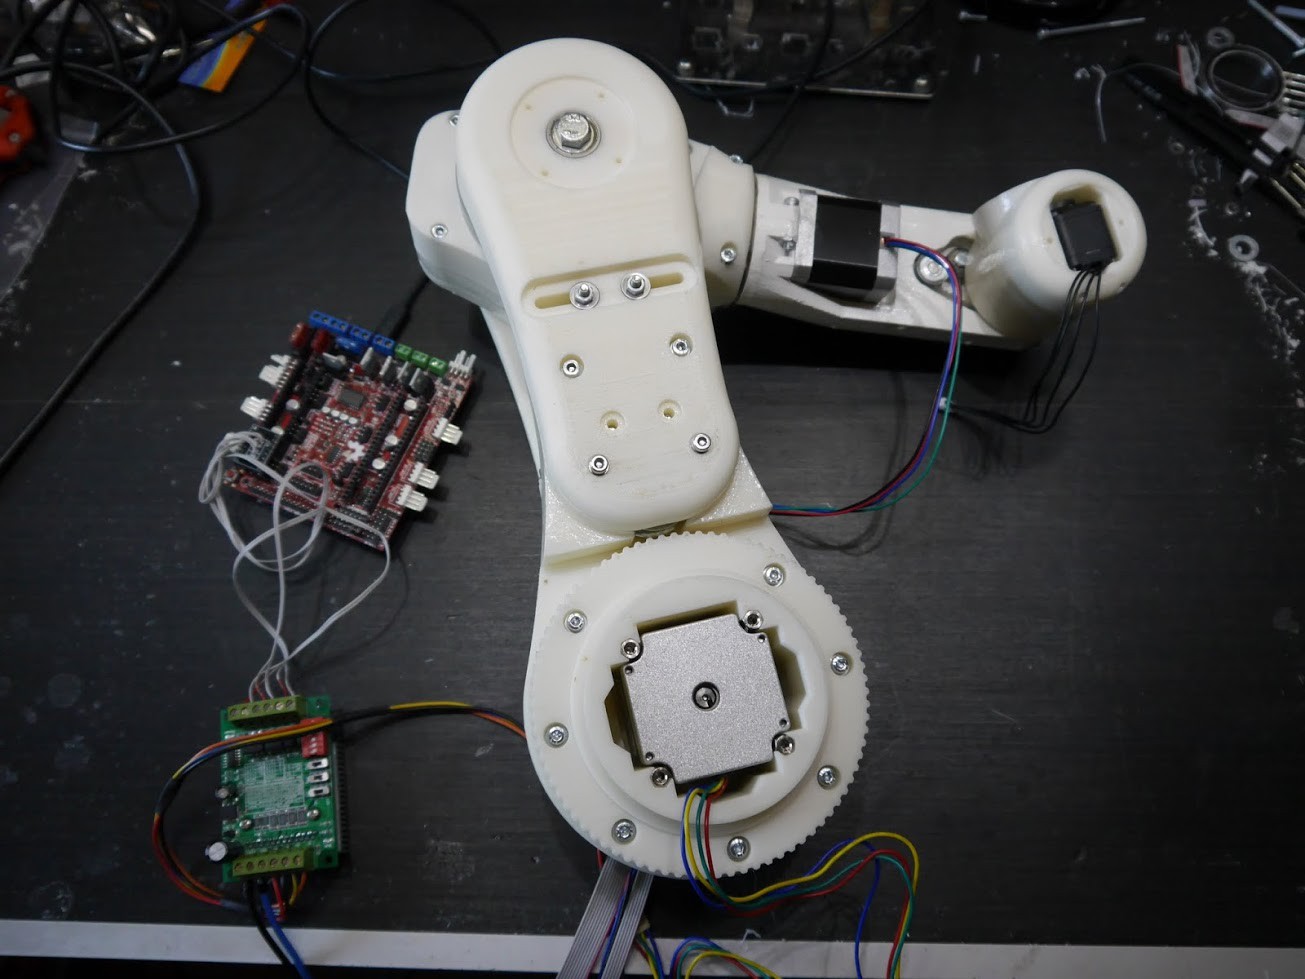
    I use now Nema23 steppers a high power stepper driver and a Arduino Due board with a Ramps-FD shield. I plan to build my own shield but this have to wait a little bit. I defiantly will stick to the Arduino Due. For now the Ramps-FD shield works fine and its quite cheap (25€).

    Currently I'm waiting for the large bearings to arrive, they are not so easy to find. In the meantime I started wiring all up, the cable tubes inside seams to work this time so less ugly cables.

    Everything looks very pomising now I'm very happy with the new design and looking forward to the all in action.

    The only thing left is the rotating base. I try to get the construciton done this weekend.

    I also uploaded step files on github so you can take a look on the arm.

    https://github.com/4ndreas/BetaBots-Robot-Arm-Project/tree/master/Green/step

    Also all other inventor files are online.

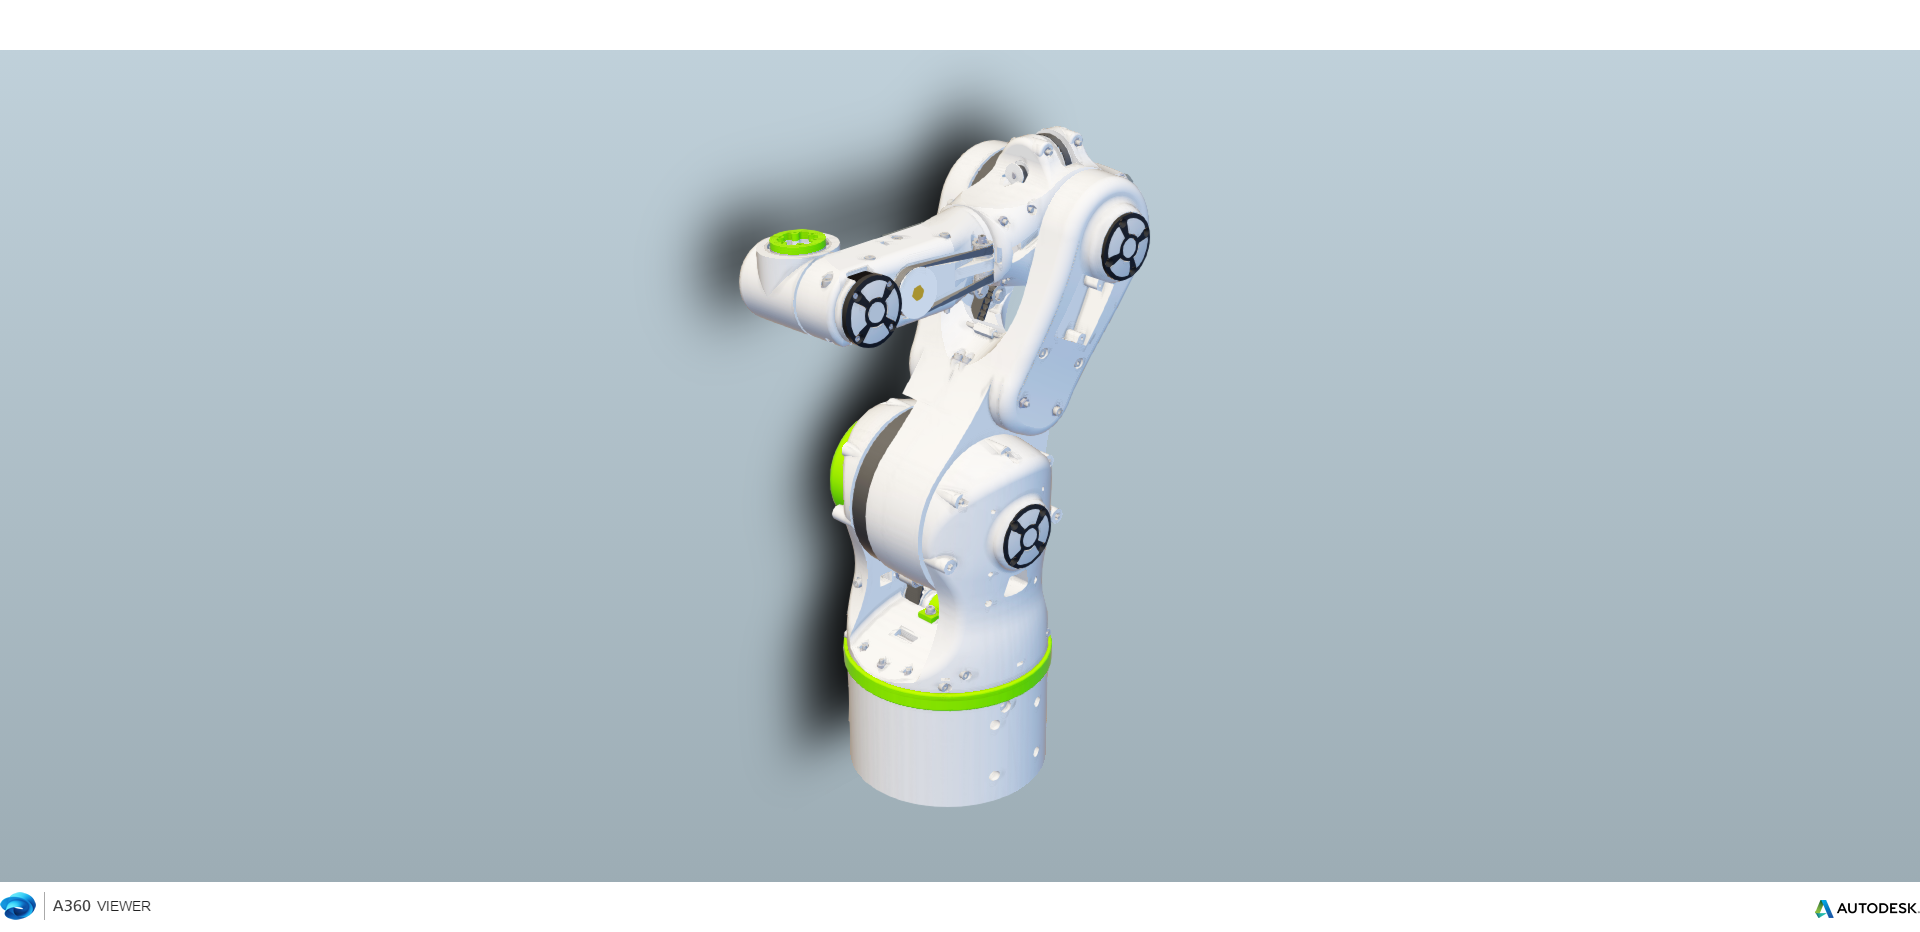
    For those who have no CAD I uploaded the robot A360Viewer an online cad viewer:

    http://a360.co/1gQUnjT

    I tried Onshape but it had a problem viewing all the parts???

    I regularly upload pictures in this here:

    https://goo.gl/photos/ZQA8tRJFSAAc8pZQ9

  • Working on version 4

    Andreas Hoelldorfer09/19/2015 at 11:36 6 comments

    Here is my new Video of the robot arm project:


    I also started uploading the cad files on github:

    https://github.com/4ndreas/BetaBots-Robot-Arm-Project

    Still a mess I try to clean it up in the next weeks.

  • Working on Version 4

    Andreas Hoelldorfer09/11/2015 at 20:46 9 comments

    I'm working on a new version based on the experience I made with the previous versions.

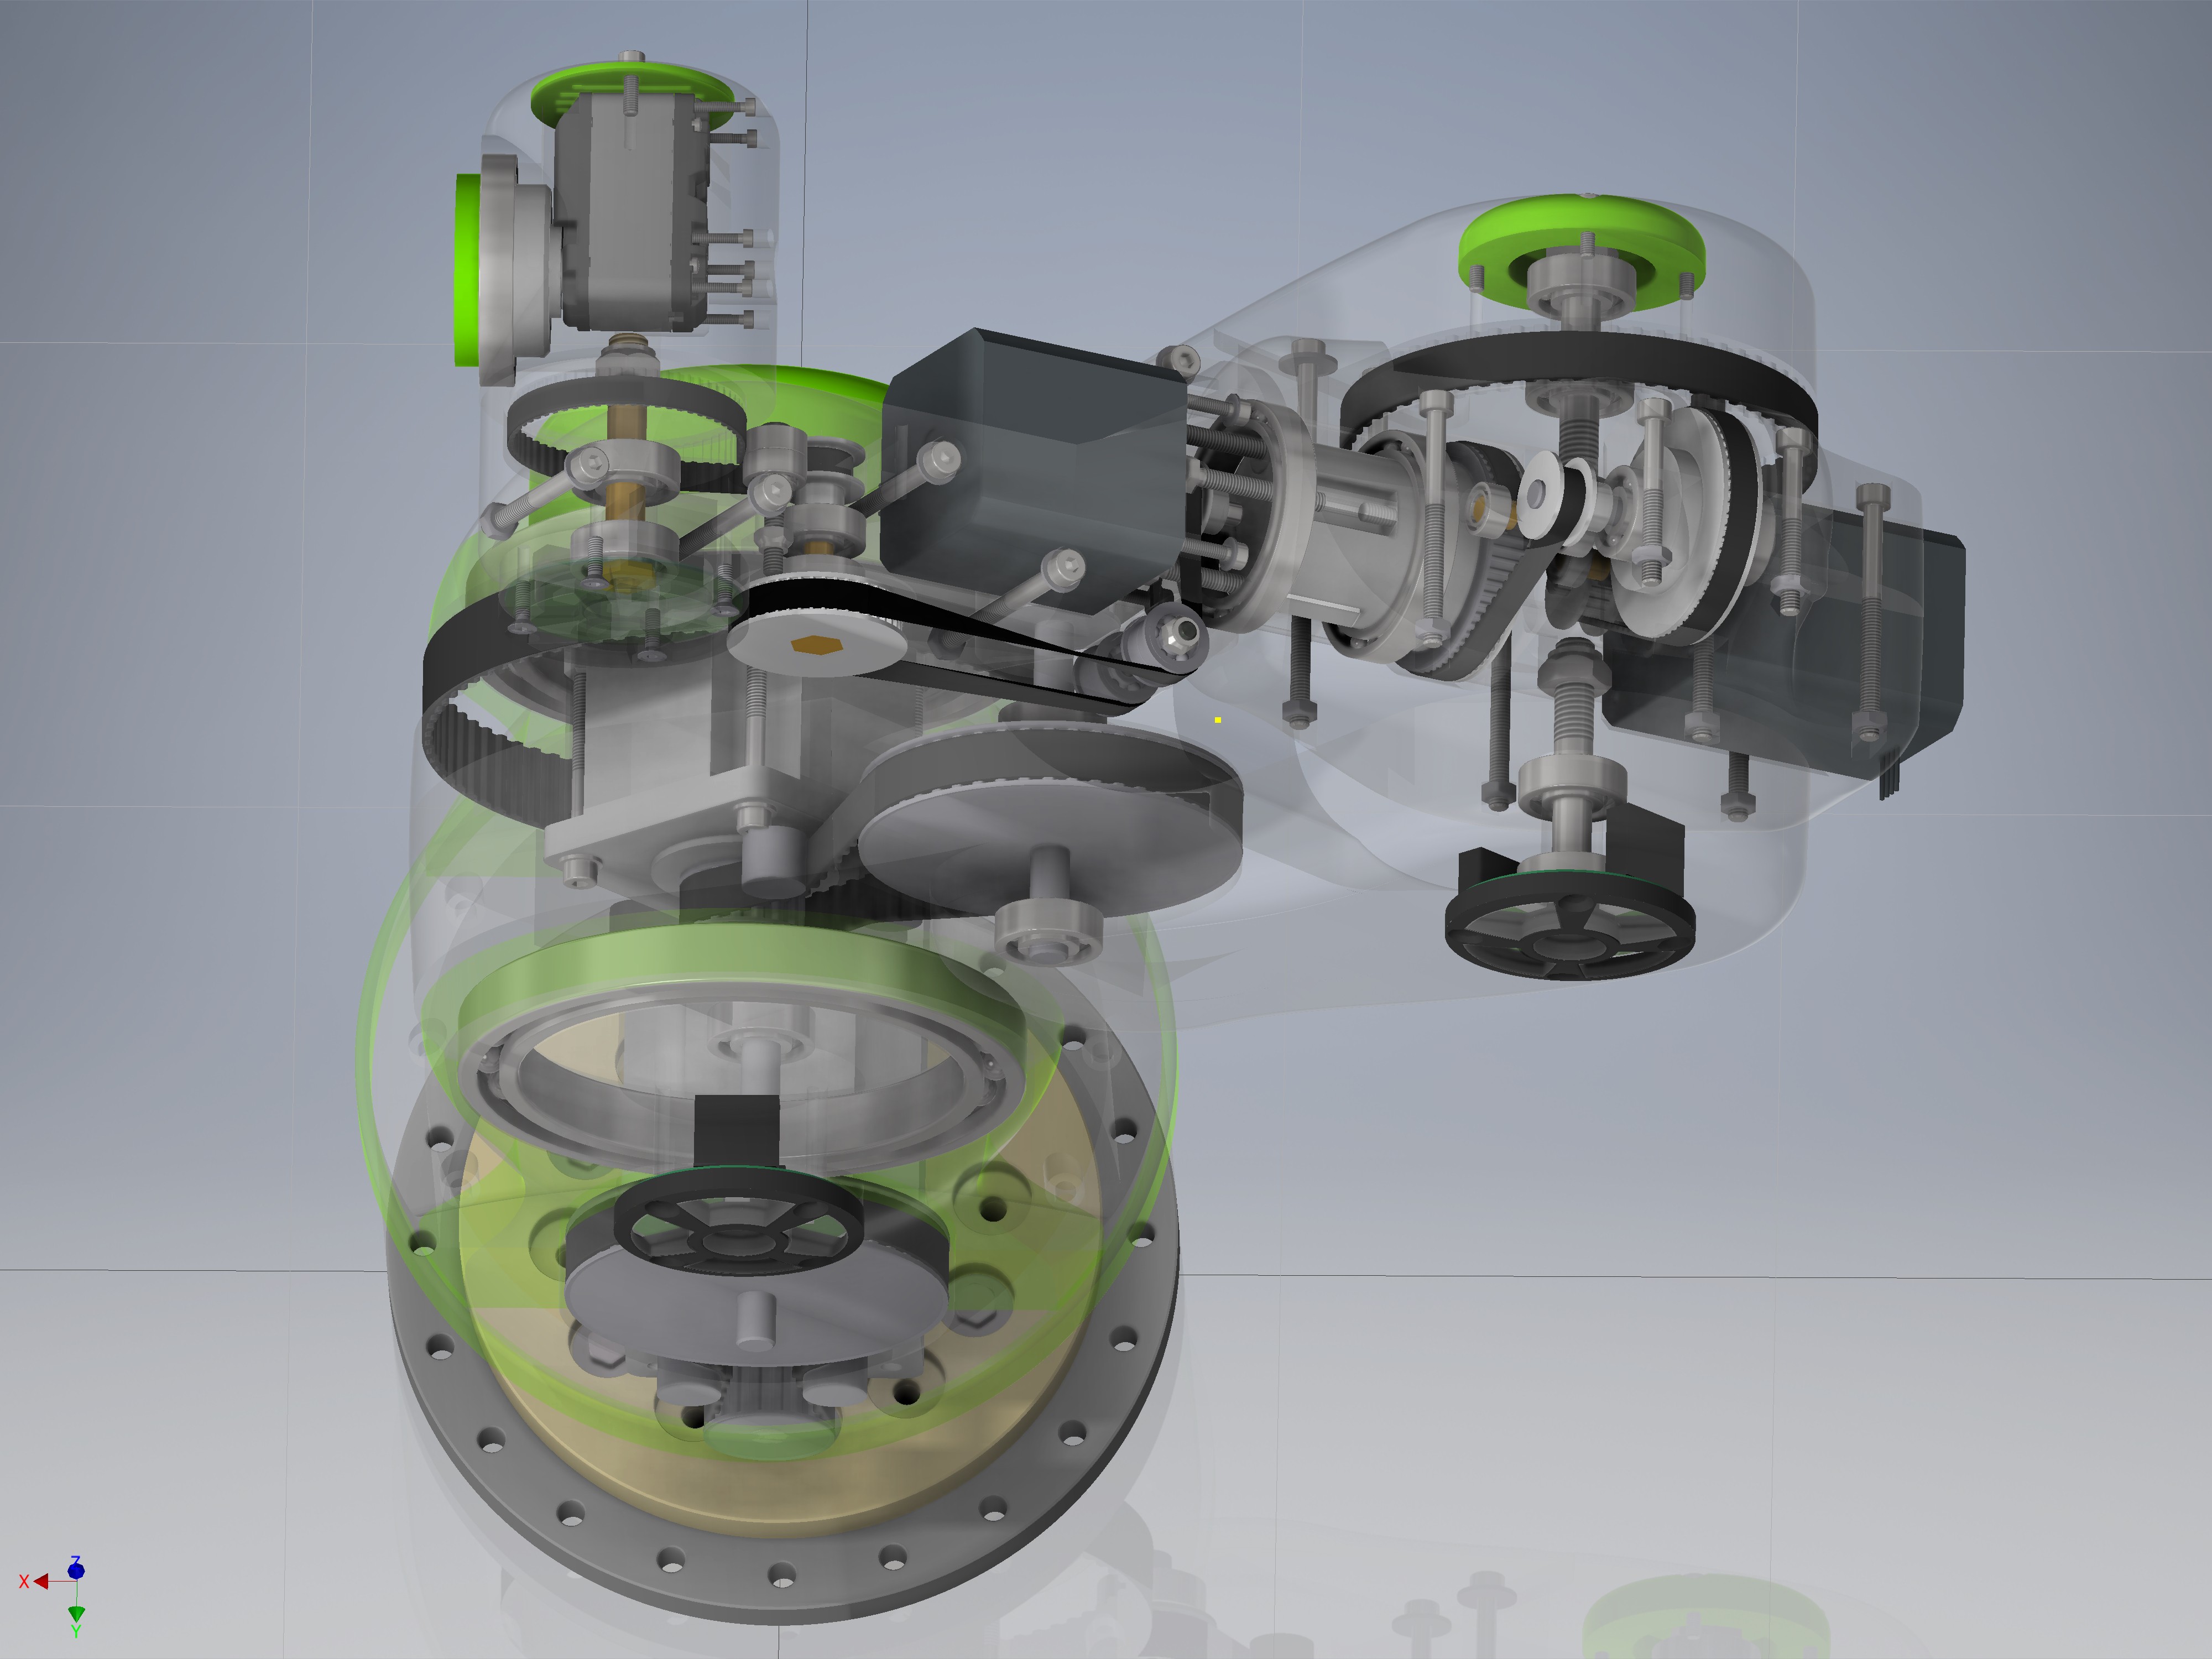
    The plan is to use stepper motors and timing belt gears.

    The plan is to use a Nema23 stepper for the rotary base,

    Joint one and two will be Nema24 ( this: http://www.omc-stepperonline.com/dual-shaft-cnc-stepper-motor-nema-24-100mm-4nm566-ozin-24hs393008d-p-388.html )

    Joint 3 and 4 Regular Nema17 stepper and for the 5 joint a HerkuleX DRS-0101 .

    But nothing is final now.

    Power supply will be 24V-36V I guess.

View all 19 project logs

  • 1
    Step 1

    Print all parts and assemble them ;)

View all instructions

Enjoy this project?

Share

Discussions

marekesz wrote 07/29/2016 at 09:29 point

Hi Andreas, Your design is quite impressive. You seam to have the problems with the software thaw. There are some programming platforms for the robots available, but they are too simple (like just few sliders and the timeline to store poses in relation to time nodes), or too complicated (like ROS RobotC or even Arduino solutions). In our  company (link below) we produce tobots for education (hardware) and we've created the software platform to run them. This platform (RobLAB) is inpired by the real - industrial robot software, but it's  dedicated for the education purposes, so it's not related to just one construction (kinematics) - in fact you can define any crazy kinematics you want and controll it the proper way. There's even reverse kinematics for most tipical constructions (Puma, Scara, Delta, Portal) to enable eazy programming and controlling. There are two REAL programming languages implemened - Melfa Basic (of Melfa/Mitsubishi robots) and ISO (G-code) - so if you learn how to program your own robot, you will be able to program the real thing (real industrial robot). There's even the 3D simulation available in the definable environment with the phisics. RobLAB was dedicated to our robot with our proprietarry controller, but we are working on moving to the Arduino platform to give the independent constructors oportunity to actually use their wonderfull constructions the right way. Please, let me know if You're interested in getting the demo version for testing. http://mechatronik.pl/programy-2/oprogramowanie-roblab-detail#filmy-i-foto

  Are you sure? yes | no

andrew.amos wrote 08/21/2016 at 15:47 point

Hello is this software free ?

  Are you sure? yes | no

marekesz wrote 08/24/2016 at 21:22 point

Hi, sorry for the delay (the holidays...). 

No, unfortunately it' not free. I've just proposed our newcomming version that we are working on to Andreas to test it as a beta tester. 

We are looking for betatesters. To qualify as a candidate, one have to be a good mechanical constructor (one that makes an effort to  construct something more advanced than a hotglued stick robot or have taken the 3D files from the net). So, their projects must be original and interesting. If You are a person like that, You'll have the chance to have the beta version of our program if You are not, soon the full version will be available to purchase or the demo version (with some restrictions like not being able to control the HW objects and some other restrictions) will be available to download.

  Are you sure? yes | no

valerio monticelli wrote 07/26/2016 at 08:51 point

beautiful I decided to build it and I assembled but do not understand that firmware and software used someone I can 'help ?

  Are you sure? yes | no

trevorjtclarke wrote 07/15/2016 at 20:47 point

Hello Andreas! Very excited to see what progress you've made lately!! Any updates?

  Are you sure? yes | no

Eric LeClair wrote 06/22/2016 at 20:44 point

Now this is what I call a real robotic arm! Great job :)

  Are you sure? yes | no

YuehChuan wrote 06/20/2016 at 20:26 point

Hey I'm curious which kind of encoder for Nema motor? thanks!

  Are you sure? yes | no

YuehChuan wrote 06/20/2016 at 20:16 point

Hey Andreas , I found a project for your mobile base. https://linorobot.org   basicly you can facility the ROS community to make Mantis more powerful !

  Are you sure? yes | no

Francesco wrote 06/18/2016 at 18:19 point

Thank you for this amazing project. Anyway do you make available the firmware to get this thing moving?

  Are you sure? yes | no

kk wrote 05/27/2016 at 11:45 point

First of all, deeply thx for sharing the amazing idea. I've been following the project for a long time. Now I'm concentrating on the controlling system. Have you ever considering about the ROS? ROS seems like a popular platform even though the ROS for Industry is still under development.

  Are you sure? yes | no

YuehChuan wrote 06/18/2016 at 01:29 point

Hi there! Thanks Andreas for this project ! u are so amazing  one man can do this job, i also think the suggestion for using ROS is good. Now my team and I going to make this robot also and build  a Rasberry Pi3 base controller with ROS interface for this bot.  I'll tell u if any progress!

  Are you sure? yes | no

tfolbrecht wrote 05/09/2016 at 09:48 point

The quick mount moving part is called a face cam. Awesome work dude!

  Are you sure? yes | no

Peter Walsh wrote 05/12/2016 at 19:16 point

tfolbrecht: I sent you a private message, it should be in your Hackaday.io page. Check the UL corner of your main page for the word-bubble icon.

  Are you sure? yes | no

ahmedrokba wrote 05/25/2016 at 11:27 point

Vielen Dank für deine tollle Arbeit und damit dieses Projekt.

one mobile

  Are you sure? yes | no

ahmedrokba wrote 05/25/2016 at 11:27 point

Vielen Dank für deine tollle Arbeit und damit dieses Projekt.

one mobile

  Are you sure? yes | no

Sri wrote 04/29/2016 at 06:54 point

Hello Andreas, great job!!!. I would like to print Green robot arm. I'm new to 3d printing, I planning to purchase a 3d printer. Can all parts of green arm be printed on average 3D printer? Can  you please let me know the dimensions of the largest part so I can buy appropriate printer so I can print all parts on the printer. 

  Are you sure? yes | no

87102076 wrote 04/23/2016 at 01:29 point

Hallo Andreas,  it is a great job you have done. Thanks for sharing.  How much did you pay for printing ?  Thanks

  Are you sure? yes | no

Thirkell wrote 04/20/2016 at 17:16 point

Great work. I have been following your project closely since the first Blue version. Will you be uploading the Invertor ipt files for the Mantis Gripper? 

Keep up the great work.

  Are you sure? yes | no

Dan Royer wrote 04/15/2016 at 22:29 point

Before I had a 3D printer in 2012.  Total cost of parts was ~$300 CAD.  For your vehicle base?

  Are you sure? yes | no

walter.betz wrote 04/08/2016 at 14:06 point

Hallo Andreas 

Vielen Dank für deine tollle Arbeit und damit dieses Projekt.

Mit welcher Steuerung machst du die closed loop?

Ich werde mich mal an den Nachbau geben

Gruss  

Bernd

  Are you sure? yes | no

Jochen Alt wrote 02/28/2016 at 22:01 point

Hallo Andreas,

Klasse Projekt! Eine Frage zu den Encodern, gibt es einen Grund für die 12bit Encoder?Es gibt beim gleichen Hersteller welche mit 14bit zum selben Preis: http://ams.com/eng/Products/Position-Sensors/Magnetic-Rotary-Position-Sensors/AS5048B

Welchen Magneten hast du denn genommen?

Viele Grüße

Jochen

  Are you sure? yes | no

Andreas Hoelldorfer wrote 03/01/2016 at 15:17 point
Danke, hmm die 14 bit version kann soviel ich das sehe kein daisy chain mode. Das erschwert die Verkabelung und außerdem hatte ich schon vor einigen Jahren was mit den 12bit Dingern gemacht da gabs die 14er noch nicht also hab ich erst mal die verwendet. MK2 bekommt aber die 14Bit wenn ich mir eine Lösung für die lästigen Kabel einfallen hab lassen. 

  Are you sure? yes | no

Peter wrote 01/15/2016 at 14:05 point

Happy 2016! Any chance you could export the "Green" file for the "Shoulder_nema12-v2-1"  assembly? I am ready to starting printing this project in PC. Thanks!

  Are you sure? yes | no

sunndey wrote 12/30/2015 at 01:34 point

hi there. I want one to pick fruit.

  Are you sure? yes | no

Peter wrote 12/29/2015 at 16:30 point

I am still having problems with the "Shoulder_nema12-v2-1" file, the external surfaces are suppressed in the  STEP file and I cannot generate a good STL file to print. Any chance you could re upload that file? I am looking forward to printing all of this! 

Thanks!

  Are you sure? yes | no

fosnigtr wrote 12/21/2015 at 01:39 point

What control software are you using for you robot arm? Kindest regards, Tyler

  Are you sure? yes | no

AmorphousEngineer wrote 10/28/2015 at 12:35 point

I see you selected the TB6560 as your NEMA 23 stepper motor driver. Aren't those usually buggy with in the micro-stepping settings?

If you encounter issues the THB6064AH (Typical 4 Amps operating current) might be an improvement (although a $35 kit really doesn't really compare price wise to the $5 pre-assembled TB5660.)

An open source PCB for the THB6064AH : http://www.massmind.org/Techref/io/stepper/THB6064/index.htm

However eBay does have some nice drivers based on the same Toshiba THB6064AH chip for $25 (with cheap capacitors that will fail eventually.)

  Are you sure? yes | no

Similar Projects

Does this project spark your interest?

Become a member to follow this project and never miss any updates