 eric
eric-
1Step 1
1) Gather the parts
Start with just enough to enable & test PCI Passthrough.
So you need :
VTD capable system board (Mini-ITX for the Game Console version)
I am currently using an Asrock H77M-ITX, which is hard to find now. The H81M-ITX/WiFi should work, as I have verified in the manual. I have been sticking with Asrock, they seem to reliably support VTD. The option is under "Chipset Configuration" in the bios, according to the manual here:
ftp://66.226.78.21/manual/H81M-ITXWiFi.pdf
The other thing to verify is that the GB Lan is supported (or has a workaround) by ESXi
The H81M-ITX/WiFi uses the RTL8111 which is NOT officially supported, but there is a workaround. If you intend to use another board, check the Lan interface and Google like this:
RTL8111 ESXi Vib
to verify a viable workaround, if it's not natively supported. VMware seems to adjust the list of natively supported NIC's to include a smaller set with each revision. So, you can use the driver from 5.0 in 5.5, etc. Intel NIC's are the most commonly supported, since this is a Datacenter product.
VTD capable Processor
If you use the Asrock board, check the "CPU Support List" and pick at least an i5.
Like the i5-4440 I have listed, just put i5-4440 in Google and pick the Intel ARK link:
And you see "Intel® Virtualization Technology for Directed I/O (VT-d) " under "Advanced Technologies" and "yes" in the right column.
Video Card - You can use an ATI Radeon as low as an HD-4650 for testing. I'm using an Nvidia Quadro FX3800, but I do have some HD 4650's and 6450's since I know they work. I was initially unsure of the Quadro. It helps to have a known working Mobo/Proc combo and known good GPU.
Obviously, some RAM (8GB), PSU, etc. Have another system nearby to run the VSphere client. A hard drive of at least 250GB for VM storage. You can install the Hypervisor to a USB stick of 2GB+, but it will boot slow from that. I am using a 2GB SSD. You don't need this, but it allows you to switch to bigger storage without re-installing the Hypervisor.
Download the VMware VSphere Hypervisor. I am using 6.0, which is still BETA.
I am using this because 5.1 and 5.5 have issues with USB passthrough & autostarting VM's. I would also like to be using the latest, rather than dropping back to 5.0.
6.0 does not have these issues, but you may not be able to get it yet unless you participate in the BETA. And I can't provide it here. SO if you can't get 6.0, get 5.0. You will be limited to 32GB of RAM with 5.0........
The Download will be an ISO, burn a cd from the bootable image. Have some extra blank cd's just in case.....
So you should have a VTD capable Mobo/Proc/GPU, a destination for your VM's & Hypervisor, and VSphere Hypervisor on CD and ISO.
You also should have a cd drive of some kind. A USB CDROM is what I used
-
2Step 2
2) Install VSphere Hypervisor
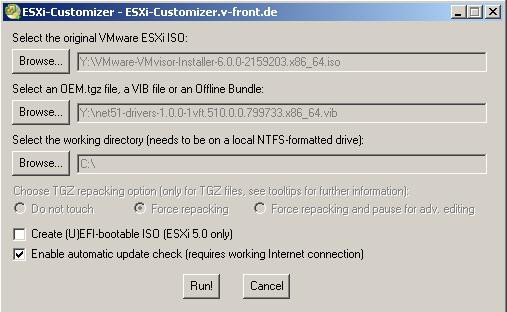
You may run into some trouble here......So you need to use a tool to inject the RTL8111 (or whatever) driver into your ISO. Get the "ESX Customizer" here:
http://vibsdepot.v-front.de/tools/ESXi-Customizer-v2.7.2.exe
And get the Vib for your NIC such as:
https://tinkertry.com/files/VMware_bootbank_net-r8168_8.013.00-3vmw.510.0.0.799733.vib
http://www.createinnova.com/Shares/net51-drivers-1.0.0-1vft.510.0.0.799733.x86_64.vib
and run the customizer:
![]()
And your new ISO with the NIC driver will be in the working directory you set.
Burn the CD and boot from it. Aim the install at the 2GB SSD (if you have one, if not the HDD is ok). The install is pretty self explanatory, just follow the steps and reboot like it says when you're done. It will require you set a password, don't go crazy here since it's a GAME machine after all. Install takes maybe 15 min.When it comes back up, press f2 and set a STATIC IP on your local NET (like 192.168.1.xx).
-
3Step 3
3) Set UP PCI-Passthrough
Reboot to the BIOS and set these items:
Onboard GPU must be OFF so disable:
IGPU Multi-Monitor
Render Standby
Deep Render Standby
For some reason the HDAUDIO must also be disabled
Set primary GPU to PCIE
Enable VTD
On your other PC go to the IP of your ESXi box in a browser and you will get this:
If you are using ESXi 5.5 or above, you will need Win7 or higher. There is a workaround for XP, but it's beyond the scope of these instructions.
![]()
Install and aim it at your static IP, login with root & the password you set.
-
4Step 4
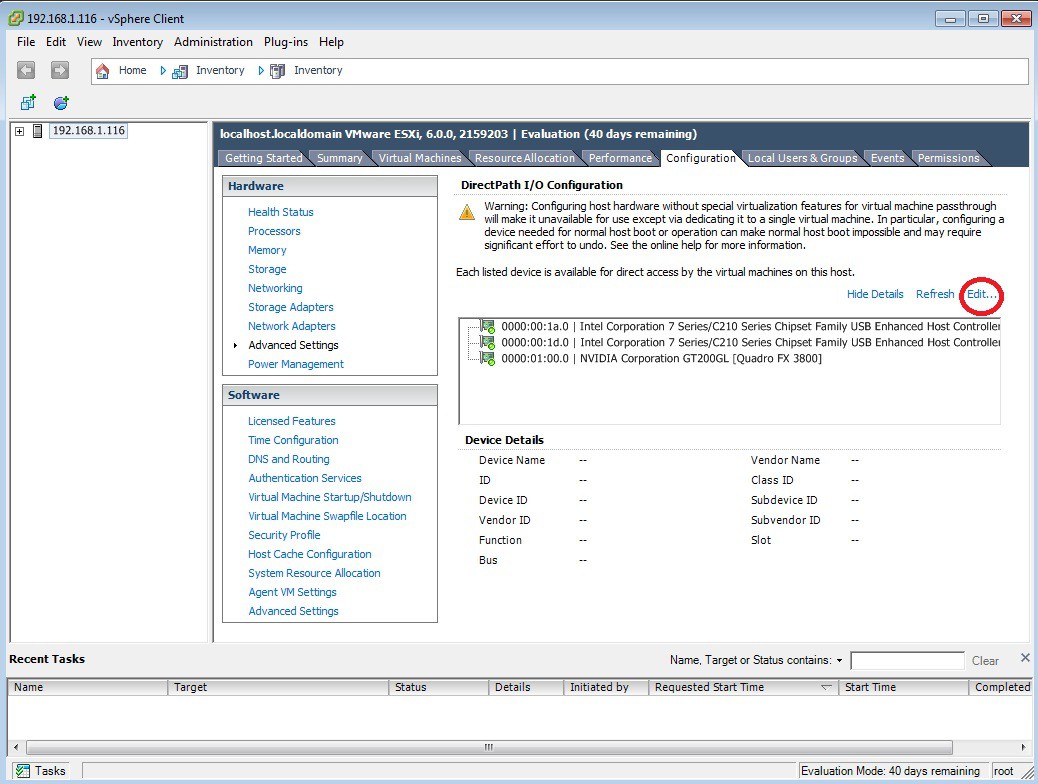
4) Change Ownership of the Devices
In the VSphere Client, select the Configuration tab & Advanced Settings:
![]()
You see my devices are marked for passthrough already.
Click "Edit"
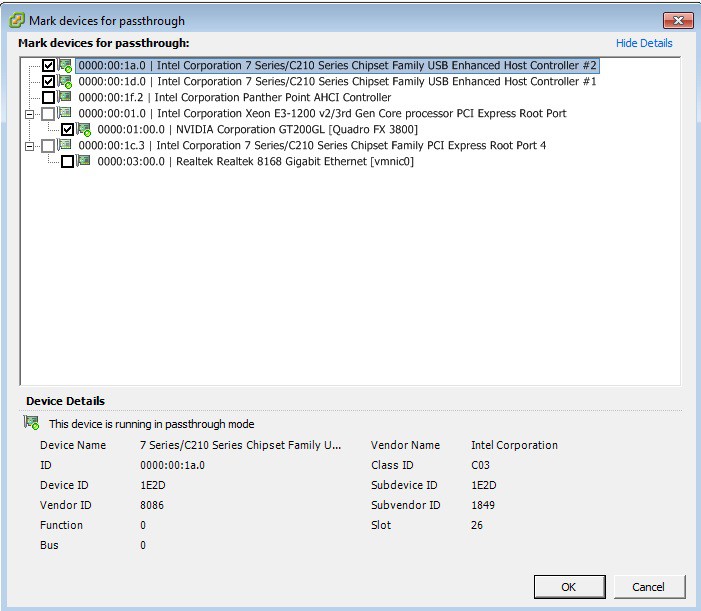
![]()
There is not much to select on a Mini-ITX board, just the USB's and the GPU. Click OK and reboot
You will notice now that the ESXi console "freezes" partway, that's because we STOLE the GPU from it.
If you have gotten this far, it's time to create a VM.....
-
5Step 5
5) Install a VM
Get your WINDOWS Install CD. SteamOS and Android are a little more difficult and don't just "install", you will need to modify some stuff. XP will work here, but we will use Win7 for this demo. Windows is pretty straightforward and good for testing your hardware's passthrough compatibility. Which is all we're doing right now.....
If you want to keep the VM, use one you have a KEY for
Get some utility to make an ISO if it's not in that format already. I use UtraISO, the free version should be able to do the job. Do this on your OTHER computer, the one with VSphere Client.
Upload the ISO to the Datastore - in VSphere Client, configuration tab, storage, right click the Datastore and Browse
Hover over the buttons at the top and select "upload files to this Datastore" and upload the windows install ISO.
Create a new VM, using mostly standard settings, just make sure to:
pick Custom, Name it what you want, Select your Datastore, Pick an OS (using win7 64 for this example), latest HW version, give it corresponding CPU (1 socket,4 cores), 4 GB RAM, E1000 Nic, scsi doesn't matter, New IDE drive of whatever size (growable) AND pick edit details.
You need to do a few things here:
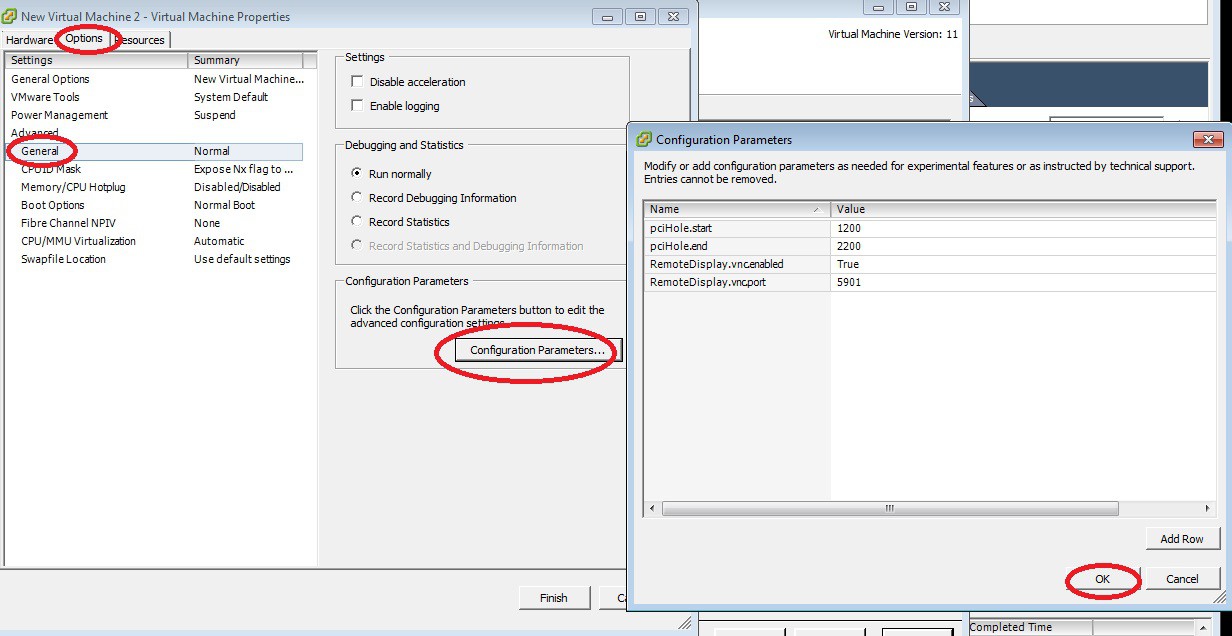
Under Options - General -Configuration parameters - Add 4 rows with these values ( NOTE these are CASE sensitive):
pciHole.start =1200 (these two allow you to have more than 2GB RAM in the VM when passing through)
pciHole.end = 2200
RemoteDisplay.vnc.enable = True (turns on remote control at the Hypervisor level)
RemoteDisplay.vnc.port = 5901 ( VNC Port is the same for ALL VMs)
![]()
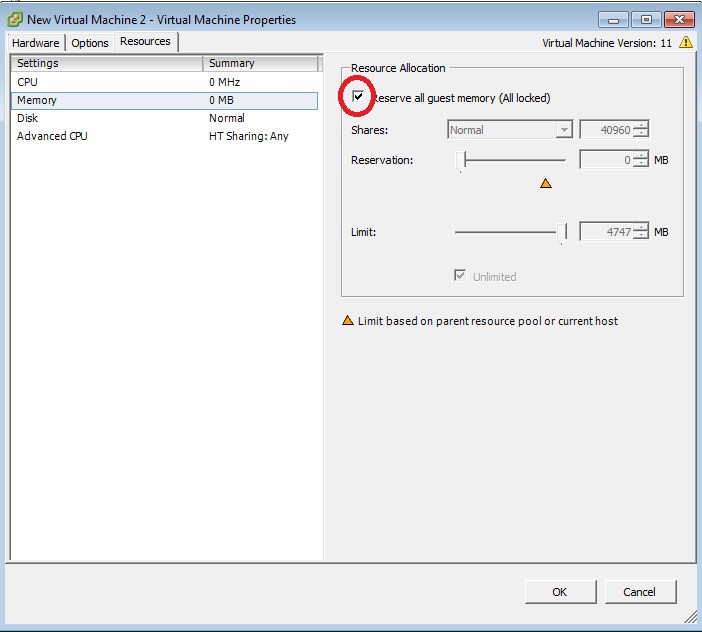
Under Resources - Memory - Tick Reserve all guest memory (VM's with passed through devices wont start without this)
![]()
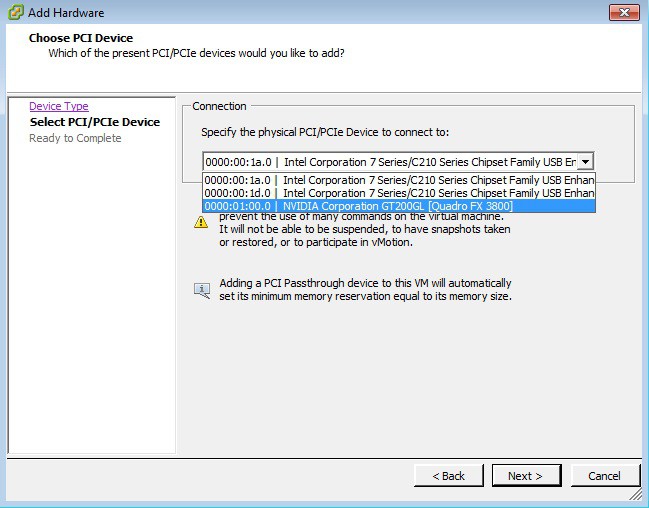
Add the PCIe Devices:
![]()
Pick ALL THREE devices, one at a time: (for a Linux OS like SteamOS, always maintain the same order of devices )
![]()
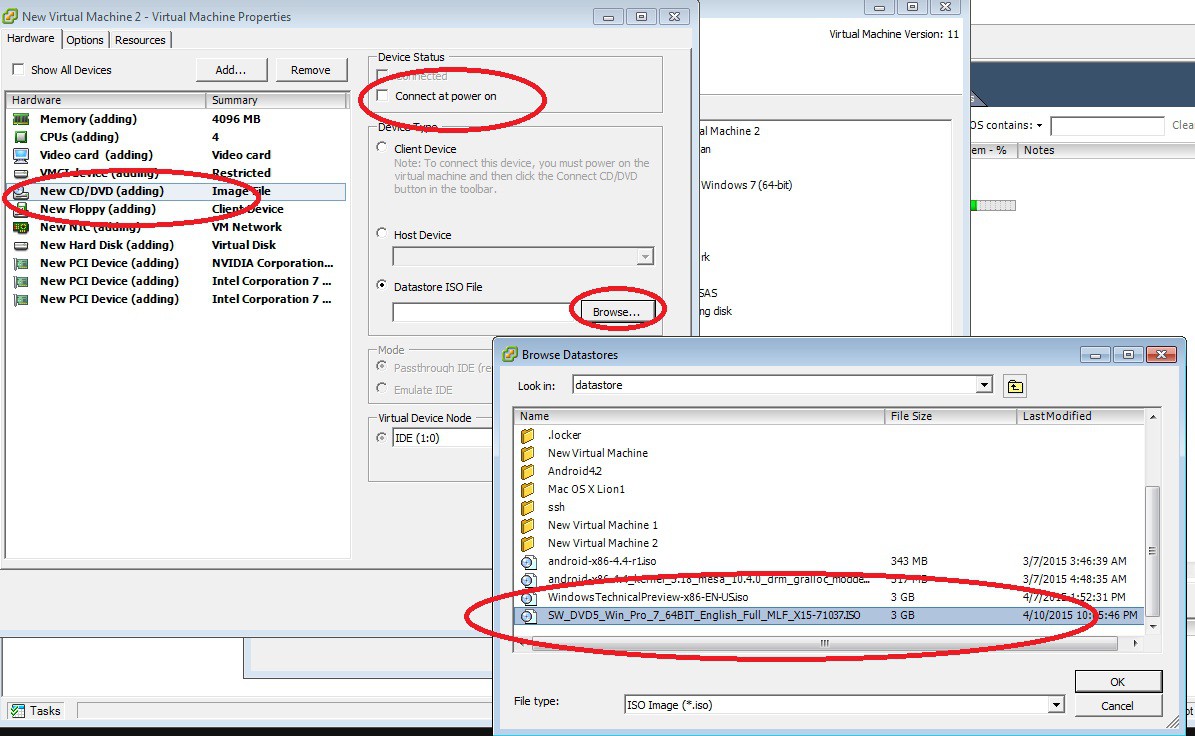
Last, select your install ISO & tic connect at power on ( you should pick the one you uploaded above)
![]()
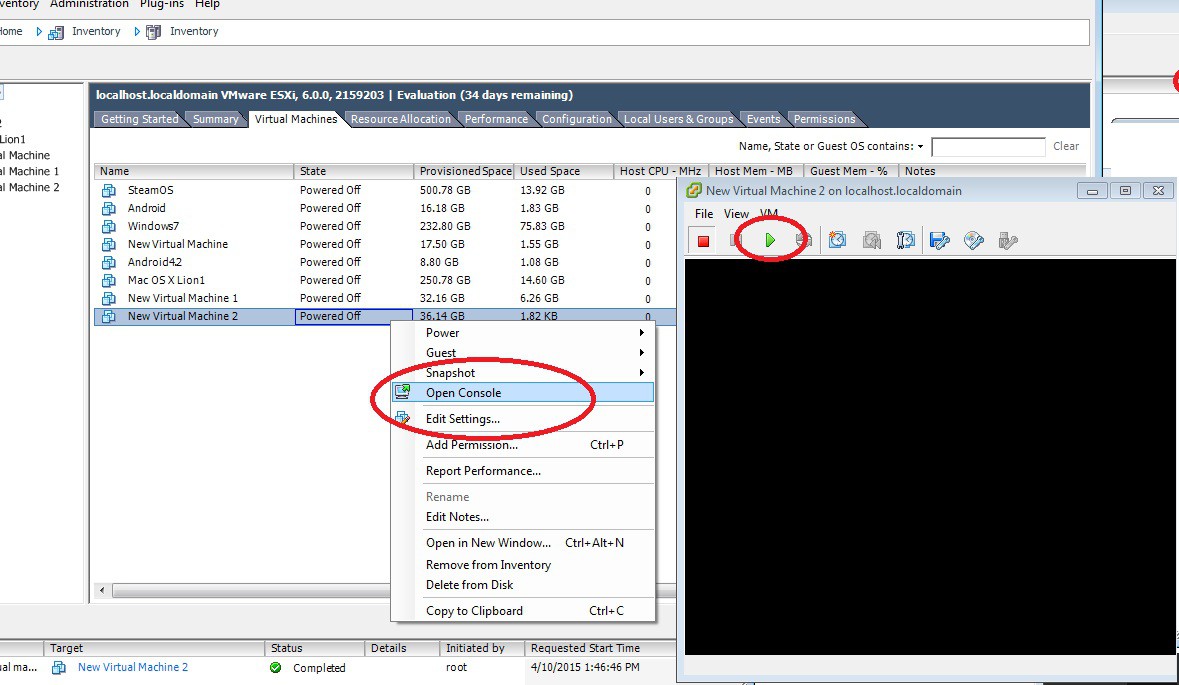
Close the VM Properties, open the console & power on. Proceed with the install as usual.
![]()
-
6Step 6
6) Test passthrough
You should now have a Win7 VM installed. Testing Passthrough is easy:
Install VMware Tools
Just select "install/Upgrade VMware Tools" in the console menu (while the machine is powered on)
Follow the prompts & take all the defaults
Install the NVidia Driver
I am using the Nvidia Quadro FX3800, you should get the corresponding Driver for your card. Just use IE from within the VM console. You will notice the mouse is working better since installing VMware Tools. IGNORE prompts to upgrade your browser, just get the driver from the Nvidia site & install. Once again, follow the prompts & REBOOT when finished like it wants. CONNECT A DISPLAY to the passed thru GPU, you should have 2 displays ( the console & GPU) after reboot.
Connect a Mouse & Keyboard and check it out !
Disable the 2nd screen if you like & play around with it.
IF everything works then you have verified your System Board/CPU/GPU combo supports passthrough.
The instructions so far were just for that, but also to get you some fast results.
You can use it like it is if you are comfortable with that
You can follow along and build the Game Console
You can build a multi-headed system, or maybe you would rather have a different OS, or experiment.
Hydra Multi OS Gaming Console & Controller
This is a game console sized Hydra with a single GPU, running SteamOS, Win7 & Android x86 KitKat. Gameplay & mgmt via modular controller


Discussions
Become a Hackaday.io Member
Create an account to leave a comment. Already have an account? Log In.