 GOAT INDUSTRIES
-
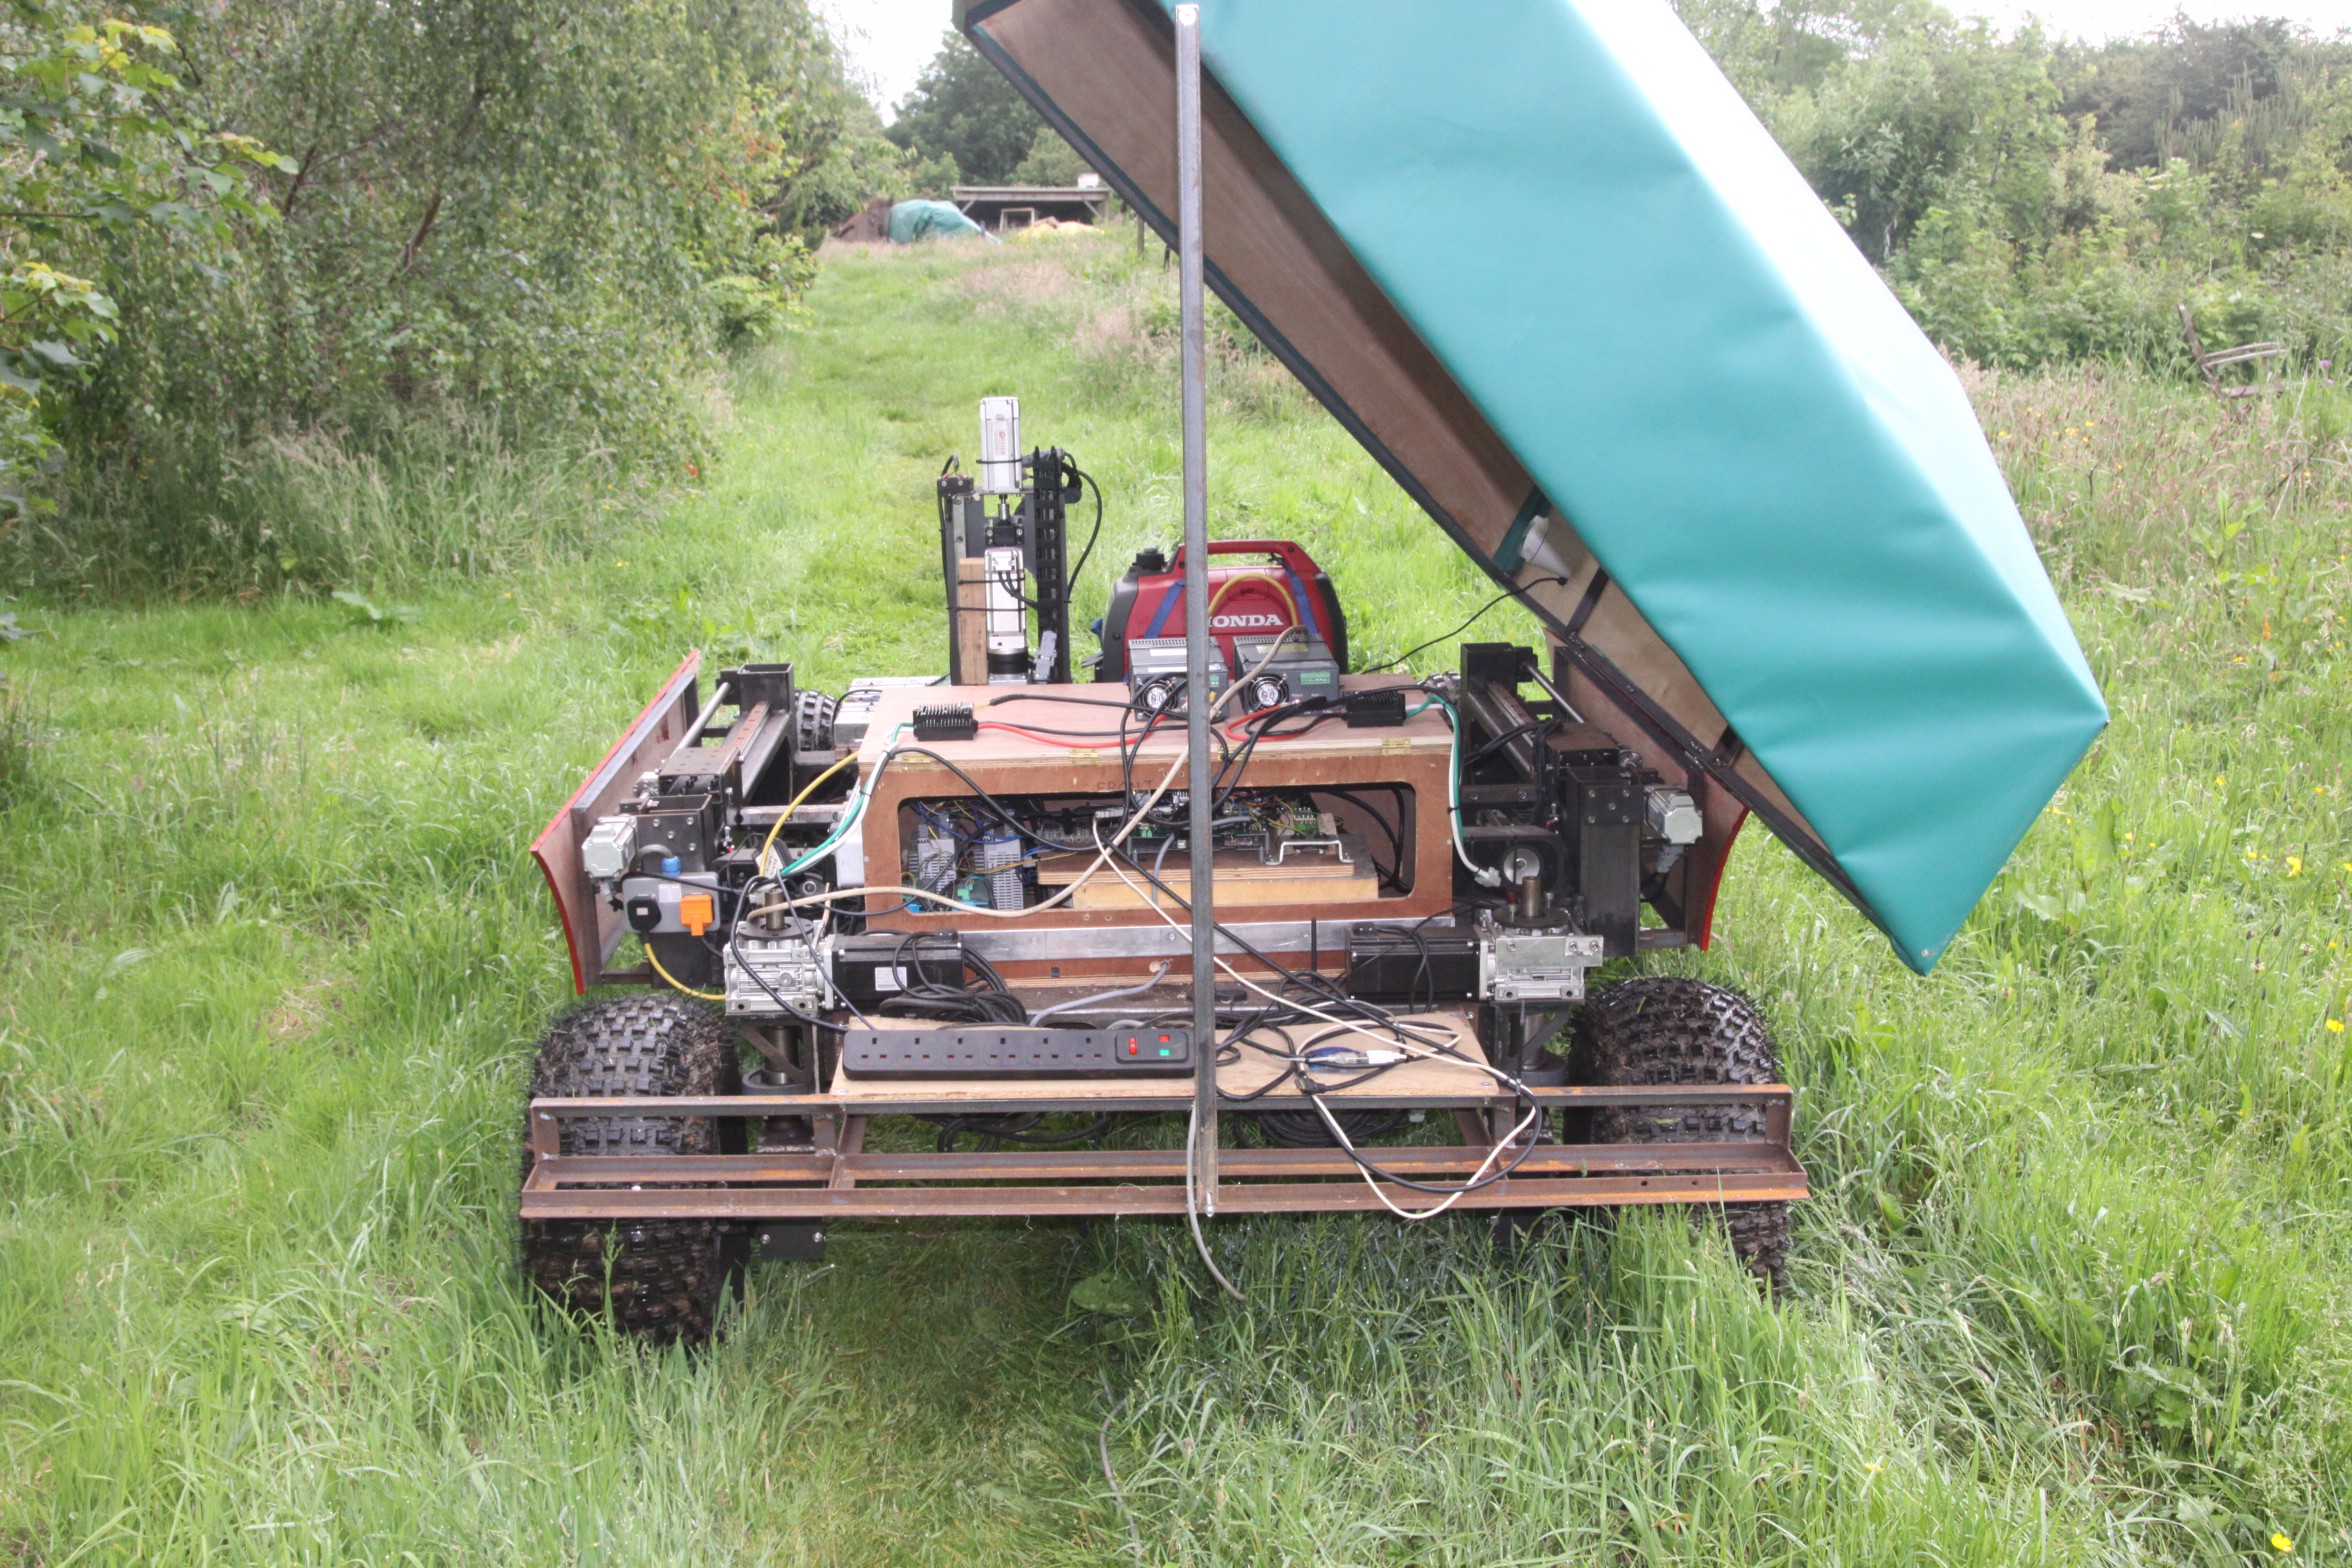
Front view
06/09/2019 at 13:04 • 0 comments![]()
-
More Field Tests
06/06/2019 at 12:37 • 0 comments![]()
The WEEDINATOR is positioned at the start of a row of beetroot as the swede plants are now too big, with their leaves overlapping to form a canopy over the soil. Even though the objection recognition model used was trained on swede, it still partially worked on beetroot. Fortunately, I've been taking plenty of photos of the beetroot over the last few weeks, so there's plenty to upload onto AWS to update the model.
-
Waterproofed
06/05/2019 at 16:44 • 0 comments![]()
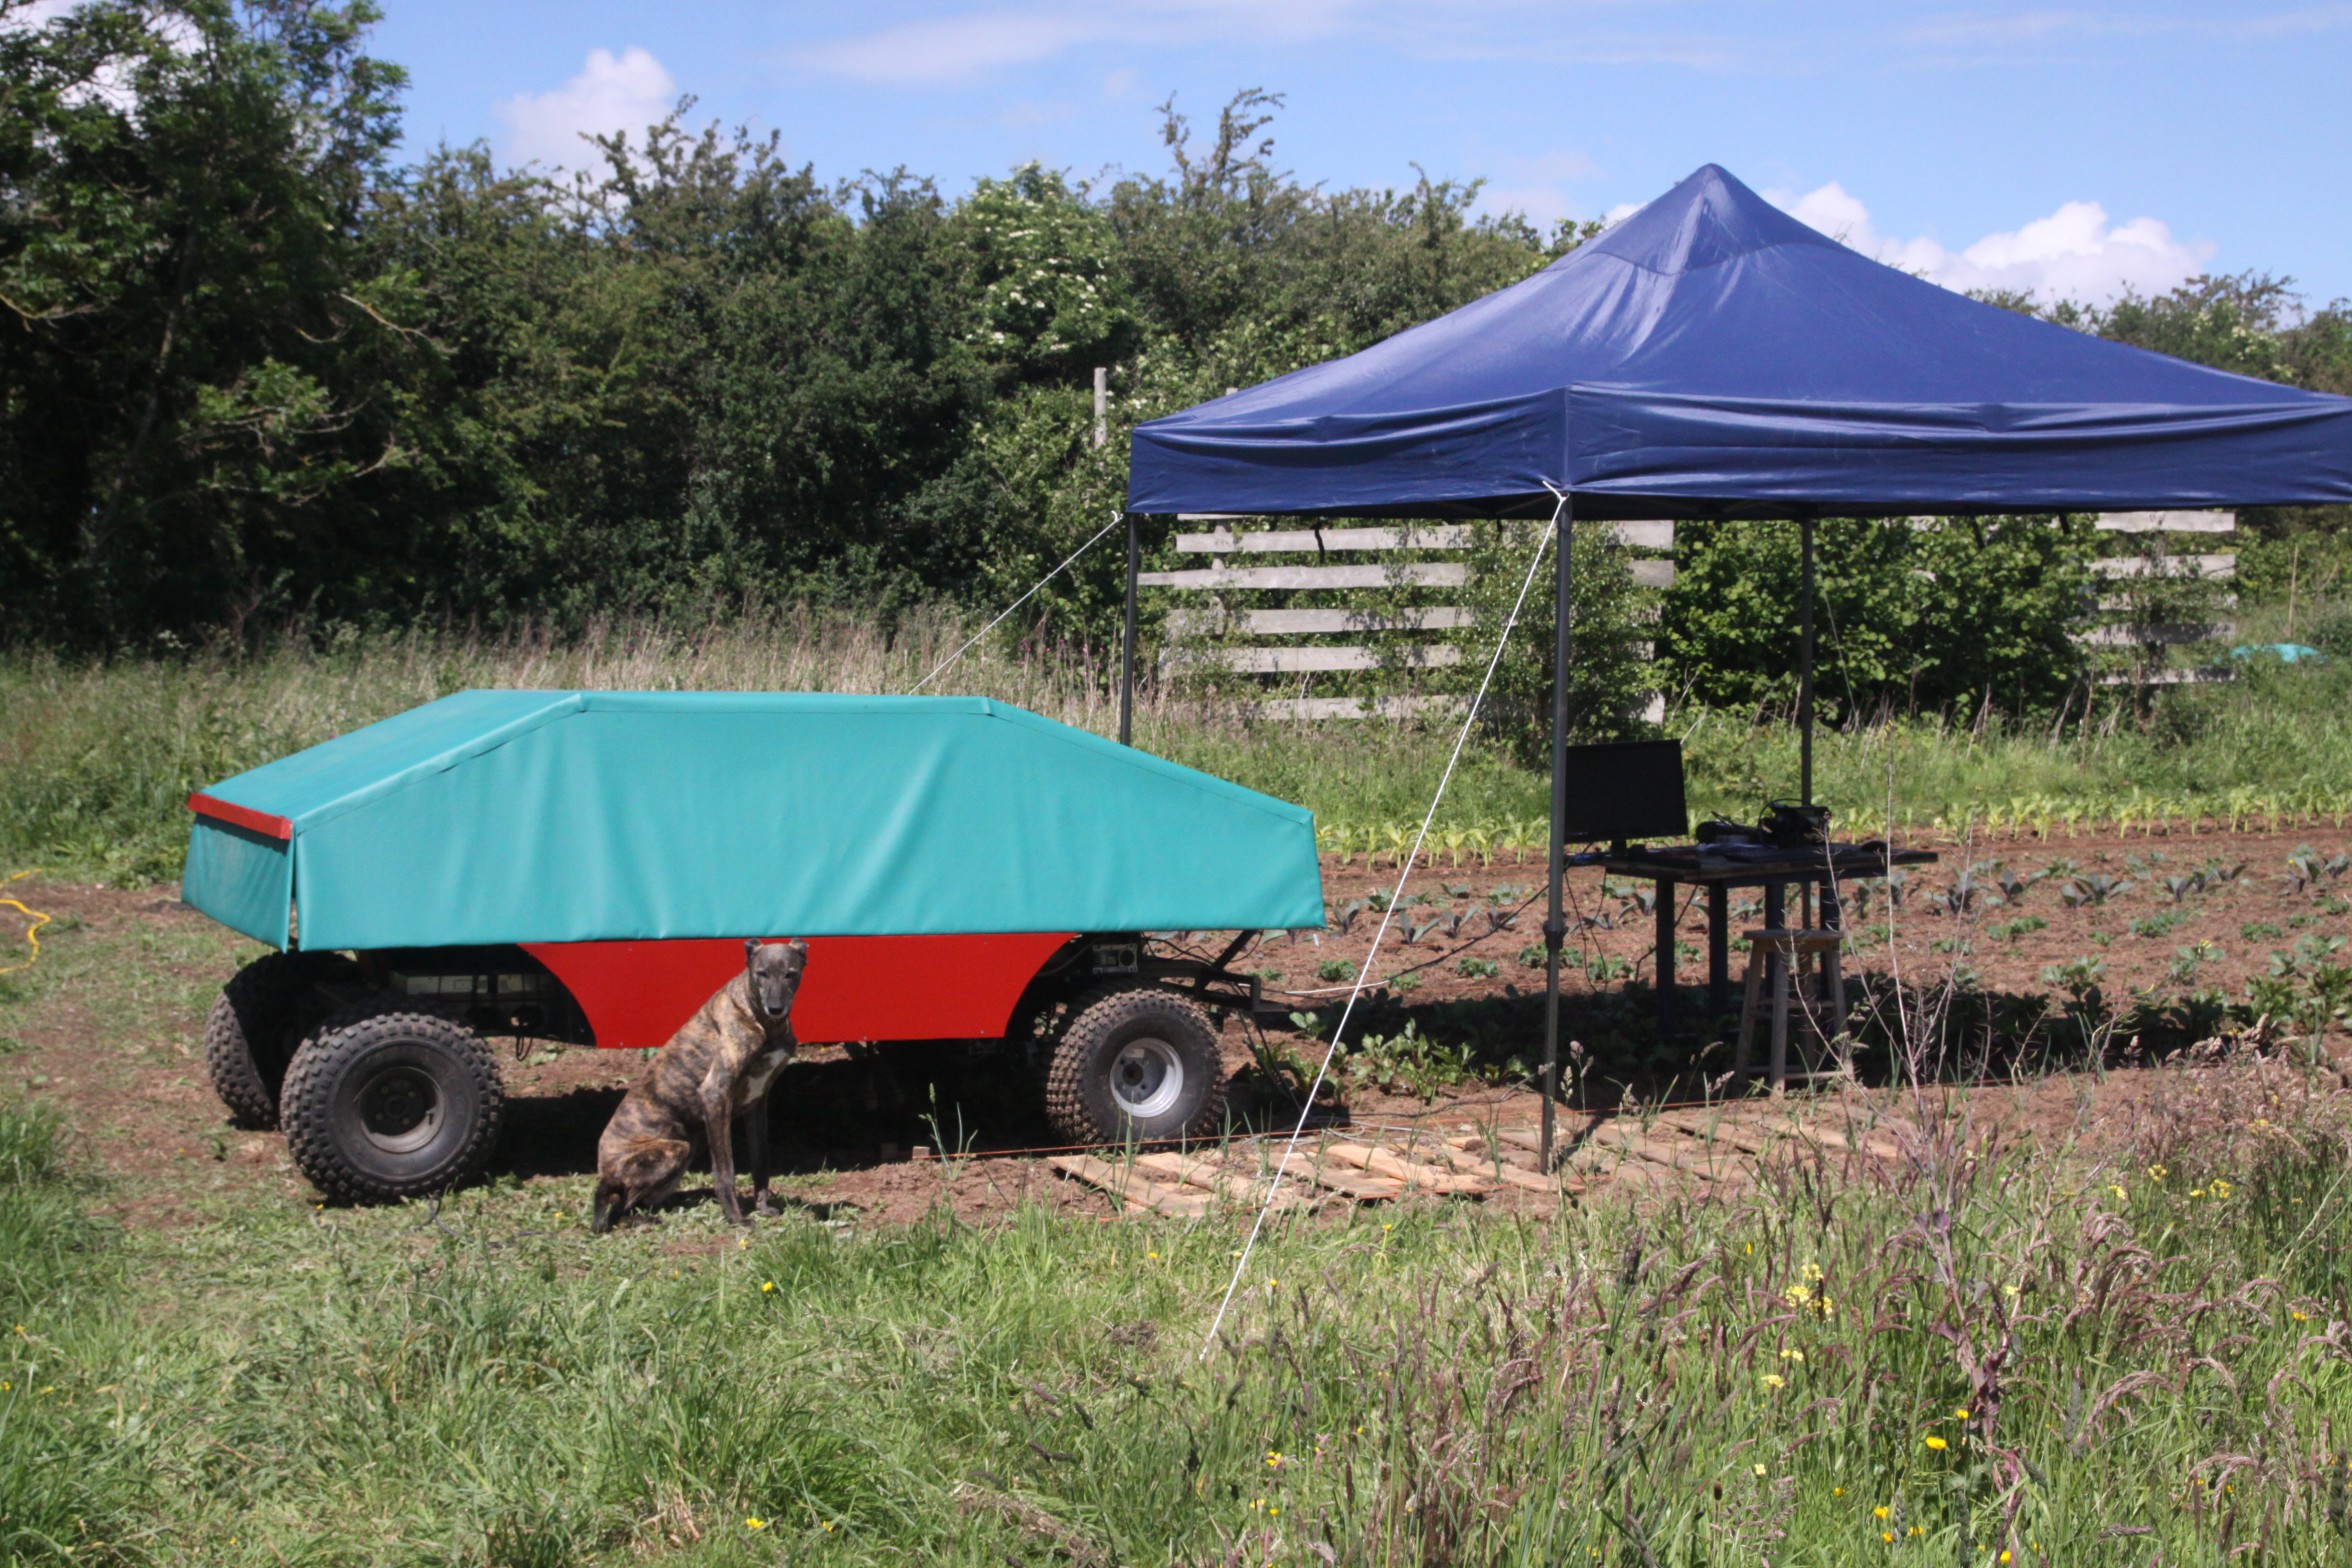
OK, so red is probably not the best colour for side panels, just happened to have that colour in stock. Black would have been better.
-
Skinning the WEEDINATOR
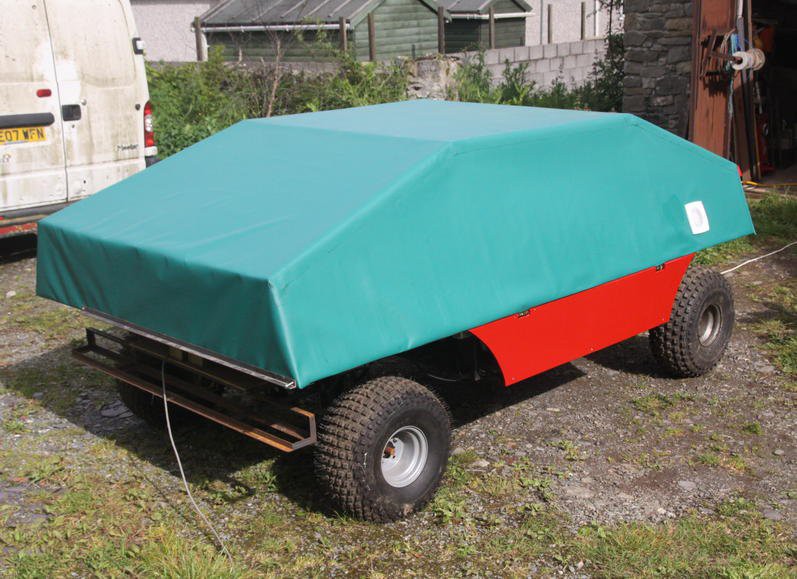
05/22/2019 at 17:56 • 0 commentsLast season, I found doing in the field tests with the machine rather stressful due to the fear of rain, which can come at any random time where I live here in the Irish sea.
Some kind of cover is essential to make testing more pleasant, even if it needs a tarpaulin over it to make it actually waterproof..
A hinging lightweight frame was constructed and clad with 3mm plywood. Additionally, this could be coated with carbon fibre, but for the meantime it will probably be PVC sheet cut and trimmed into section and glued on with contact adhesive.
![]()
-
WEEDINATOR Exhibited at Farm Hack Wales 2018
10/08/2018 at 07:56 • 0 comments![]()
Demonstrating the machine to a group of actual vegetable growers was interesting and the main questions seemed to revolve around scale - how big should these robots be? After a quick poll by a raising of hands, about 50% thought it was ok as it was and the other 50% thought it should be significantly smaller. The overall reception seemed to be positive and questions about 'robots stealing our jobs' did not really feature too much. The analogy of the domestic washing machine was quite useful - a simple 'robot' that we now take for granted and never really think about any more.
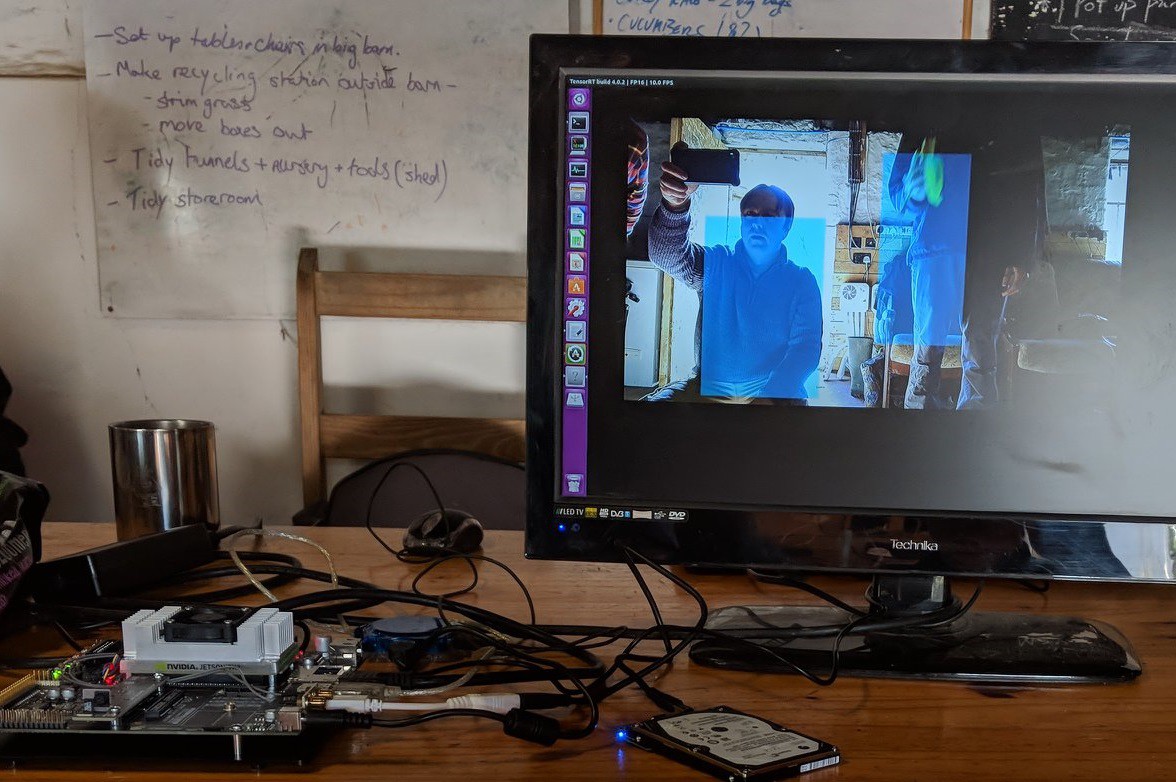
I also managed to demonstrate the Nvidia Jetson TX2 recognising people coming in through the door and draw bounding boxes around them:
![]() I had only previously got this feature working the day before the event and even then, it was not working properly. Fortunately, whilst setting up, I noticed a tiny plastic tab need the camera lens and it turned out that it had a rather opaque lens cap over the camera lens! After taking it off, it performed very much better and the system proved to be quite impressive.
I had only previously got this feature working the day before the event and even then, it was not working properly. Fortunately, whilst setting up, I noticed a tiny plastic tab need the camera lens and it turned out that it had a rather opaque lens cap over the camera lens! After taking it off, it performed very much better and the system proved to be quite impressive. -
Jupyter Notebook - 3 days to get a Photo of a Cat
09/21/2018 at 11:16 • 0 comments![]()
I think my pain threshold for using Ubuntu has now substantially increased as I can now install packages and their dependencies in some sort of tenuous quasi logical way. I made some notes of how and what I had to do below, which will make absolutely no sense to anyone unless they are trying to use Jupyter notebook. It seems that installing DIgits created an unsuitable environment for Jupyter and in retropect, it might even have been better to skip Digits and go straight to Jupiter:
AttributeError: 'Cycler' object has no attribute 'change_key'
sudo pip3 install --upgrade cycler
* The following required packages can not be built:
* freetype, png
* Try installing freetype with `apt-get install
* libfreetype6-dev` and pkg-config with `apt-get
* install pkg-config`
* Try installing png with `apt-get install
* libpng12-dev` and pkg-config with `apt-get install
* pkg-config`sudo apt-get install libfreetype6-dev
sudo apt-get install pkg-config
sudo apt-get install libpng12-dev
sudo apt-get install pkg-config
pip3 install -U matplotlib --userMatplotlib 3.0+ does not support Python 2.x, 3.0, 3.1, 3.2, 3.3, or 3.4.
Beginning with Matplotlib 3.0, Python 3.5 and above is required.
This may be due to an out of date pip.
Make sure you have pip >= 9.0.1.
digits 6.1.1 has requirement matplotlib<=1.5.2,>=1.3.1, but you'll have matplotlib 2.2.3 which is incompatible.
digits 6.1.1 has requirement protobuf<=3.2.0,>=2.5.0, but you'll have protobuf 3.6.1 which is incompatible.
----------------------------------------
Command "python setup.py egg_info" failed with error code 1 in /tmp/pip-build-CoCAUs/matplotlib/
You are using pip version 8.1.1, however version 18.0 is available.
You should consider upgrading via the 'pip install --upgrade pip' command.jupyter notebook
ipython notebookcaffe_root = '/home/nvidia/caffe/'
pip install pyyamlexport PATH=$PATH:/home/nvidia/.local/bin
pip install jupyter --user
pip3 install jupyter --userpip install -U matplotlib
pip3 install -U matplotlibAttributeError: 'module' object has no attribute 'to_rgba'
Matplotlib requires the following dependencies:
Python (>= 3.5)
FreeType (>= 2.3)
libpng (>= 1.2)
NumPy (>= 1.10.0)
setuptools
cycler (>= 0.10.0)
dateutil (>= 2.1)
kiwisolver (>= 1.0.0)
pyparsingsudo apt-get install python3-matplotlib
Matplotlib to_rgba jupyter notebook AttributeError: 'module' object has no attribute 'to_rgba'
python -mpip install -U pip
python -mpip install -U matplotlib
pip install --upgrade pipCould not install packages due to an EnvironmentError: [Errno 13] Permission denied: '/usr/local/bin/jupyter-run'
sudo chown -R $USER /usr/local/lib/python2.7
sudo chown -R $USER /usr/local/bin/jupyter-runCould not install packages due to an EnvironmentError: [Errno 13] Permission denied: '/usr/local/bin/jupyter-run'
Consider using the `--user` option or check the permissions.
pip install jupyter --userThe scripts jupyter-bundlerextension, jupyter-nbextension, jupyter-notebook and jupyter-serverextension are installed in '/home/nvidia/.local/bin' which is not on PATH.
Consider adding this directory to PATH or, if you prefer to suppress this warning, use --no-warn-script-location.
The script jupyter-console is installed in '/home/nvidia/.local/bin' which is not on PATH.
Consider adding this directory to PATH or, if you prefer to suppress this warning, use --no-warn-script-location. -
First Steps With Ai on Jetson TX2
09/16/2018 at 15:12 • 0 commentsI really thought that there could not be any more files to upload after the marathon 4 month Jetpack install debacle ..... But, as might be expected, there were still many tens of thousands more to go. The interweb points to using a program called 'DIGITS' to get started 'quickly' , yet this was later defined to be a mere '2 days' work !!!! Anyway, after following the instructions at: https://github.com/NVIDIA/DIGITS/blob/master/docs/BuildDigits.md I eventually had some success. Not surprisingly, DIGITS needed a huge load of dependancies and I had to back track through each one, through 'dependencies of dependencies of dependencies' ....... A dire task for a relative Ubuntu beginner like myself.
Fortunately, I had just about enough experience to spot the mistakes in each instruction set - usually a missing 'sudo' or failiure to cd into the right directory. A total beginner would have absolutely no chance ! For me, at least, deciphering the various error messages was extremely challenging. I made a note of most of the steps / problems pasted at the end of this log, which will probably make very little sense to anyone as very often I had to back track to get dependancies installed properly eg libprotobuf.so.12 .
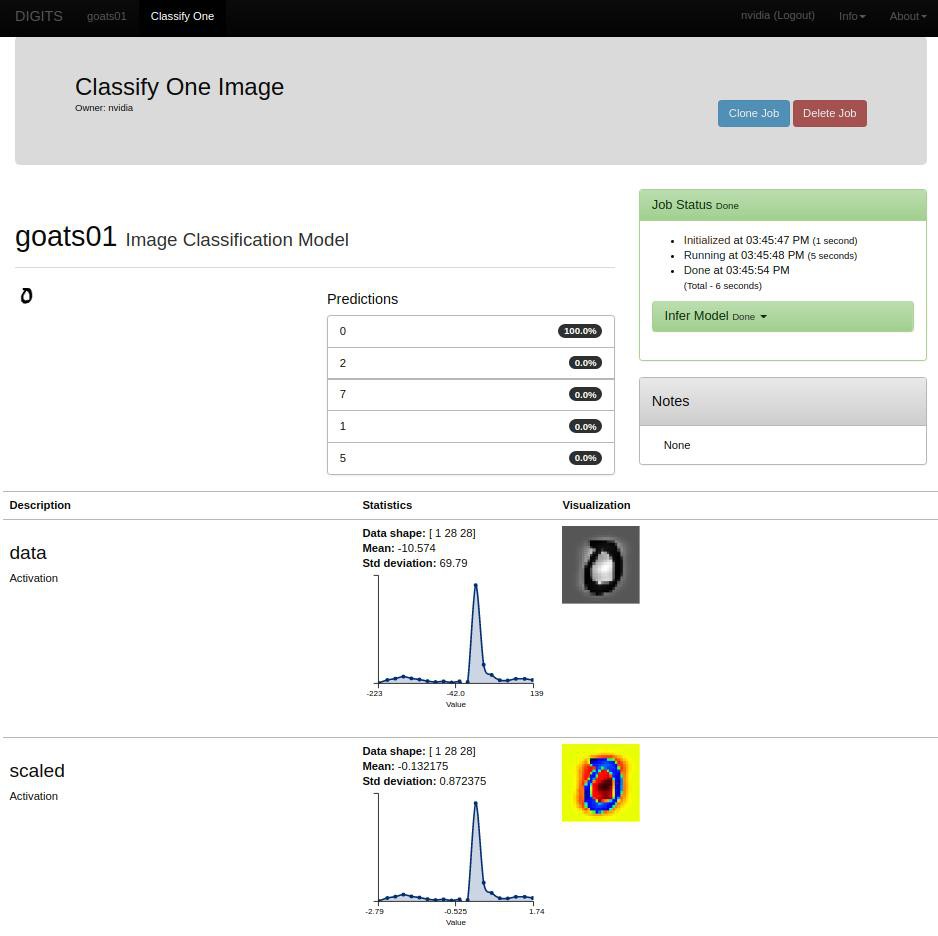
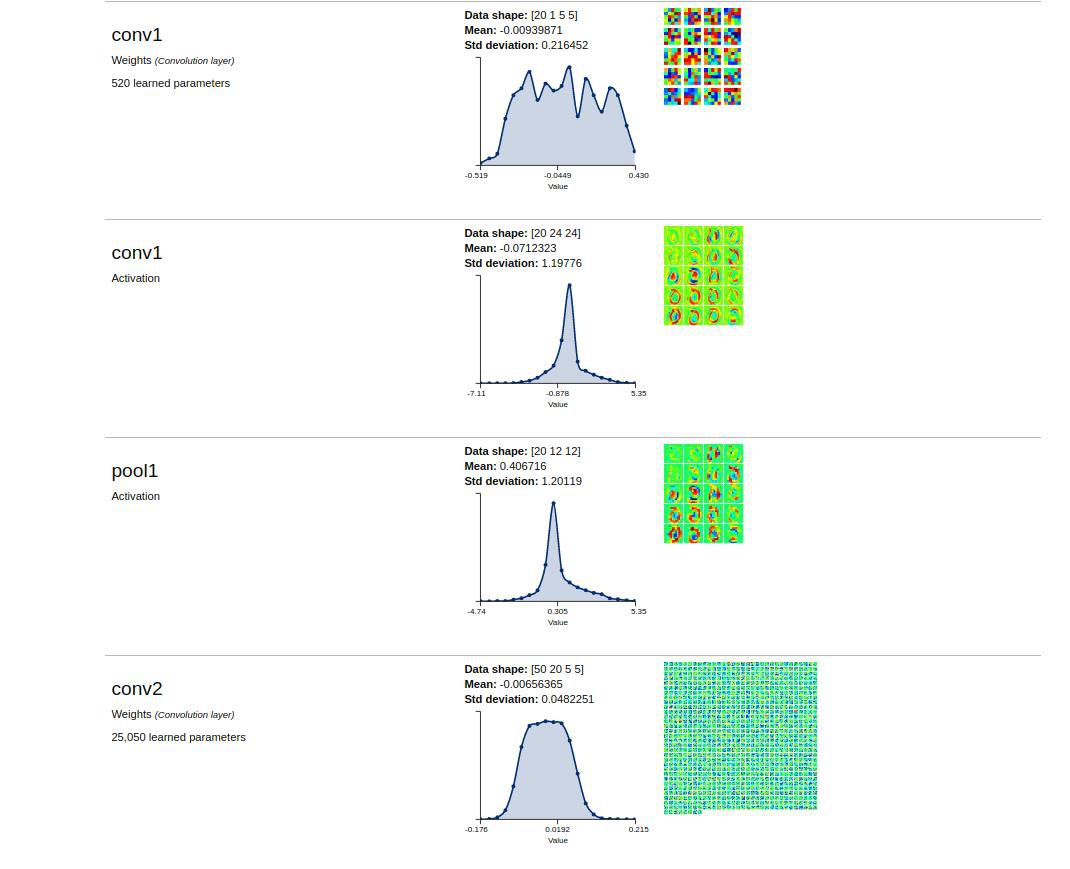
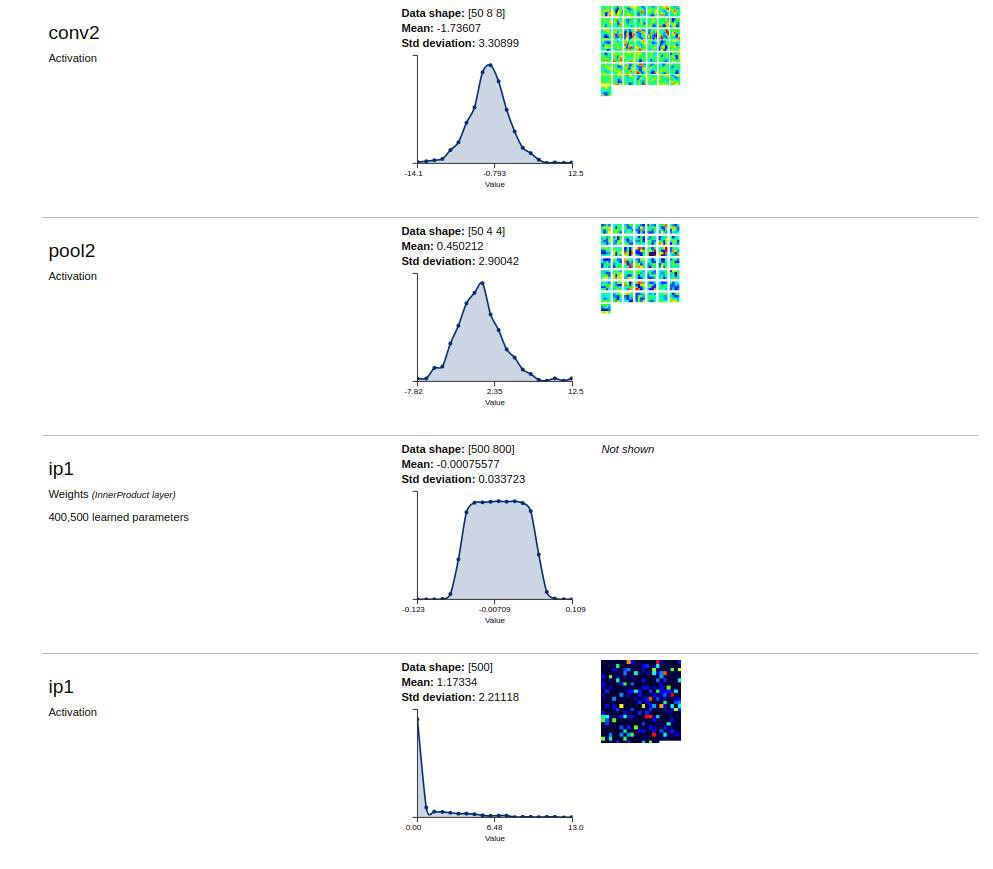
Anyway, here is my first adventure with Ai - recognising a O:
![]()
![]()
![]()
![]()
File "/usr/local/lib/python2.7/dist-packages/protobuf-3.2.0-py2.7-linux-aarch64.egg/google/protobuf/descriptor.py", line 46, in <module>
from google.protobuf.pyext import _message
ImportError: libprotobuf.so.12: cannot open shared object file: No such file or directoryProcedure:
# For Ubuntu 16.04
CUDA_REPO_PKG=http://developer.download.nvidia.com/compute/cuda/repos/ubuntu1604/x86_64/cuda-repo-ubuntu1604_8.0.61-1_amd64.deb# Install repo packages
wget "$CUDA_REPO_PKG" -O /tmp/cuda-repo.deb && sudo dpkg -i /tmp/cuda-repo.deb && rm -f /tmp/cuda-repo.debwget "$ML_REPO_PKG" -O /tmp/ml-repo.deb && sudo dpkg -i /tmp/ml-repo.deb && rm -f /tmp/ml-repo.deb
# Download new list of packages
sudo apt-get updatesudo apt-get install --no-install-recommends git graphviz python-dev python-flask python-flaskext.wtf python-gevent python-h5py python-numpy python-pil python-pip python-scipy python-tk
------------------DONE------------------------------
sudo apt-get install autoconf automake libtool curl make g++ git python-dev python-setuptools unzip
------------------DONE------------------------------
$ git clone https://github.com/protocolbuffers/protobuf.git
$ cd protobuf
$ git submodule update --init --recursive
$ ./autogen.sh
To build and install the C++ Protocol Buffer runtime and the Protocol Buffer compiler (protoc) execute the following:$ ./configure
$ make
$ make check
$ sudo make install
$ sudo ldconfig # refresh shared library cache.
cd python
sudo python setup.py install --cpp_implementationDownload Source
DIGITS is currently compatiable with Protobuf 3.2.x# example location - can be customized
export PROTOBUF_ROOT=~/protobuf
cd $PROTOBUF_ROOT
git clone https://github.com/google/protobuf.git $PROTOBUF_ROOT -b '3.2.x'
Building Protobuf
cd $PROTOBUF_ROOT
./autogen.sh
./configure
make "-j$(nproc)"
make install
ldconfig
cd python
sudo python setup.py install --cpp_implementation
This will ensure that Protobuf 3 is installed.------------------ DONE -------------------------
sudo apt-get install --no-install-recommends build-essential cmake git gfortran libatlas-base-dev libboost-filesystem-dev libboost-python-dev
----------- DONE -----------------------------------sudo apt-get install libboost-system-dev libboost-thread-dev libgflags-dev libgoogle-glog-dev libhdf5-serial-dev libleveldb-dev liblmdb-dev libopencv-dev libsnappy-dev python-all-dev python-dev python-h5py python-matplotlib python-numpy python-opencv python-pil python-pip python-pydot python-scipy python-skimage python-sklearn
----------------- DONE -------------------------------
export CAFFE_ROOT=~/caffe
git clone https://github.com/NVIDIA/caffe.git $CAFFE_ROOT -b 'caffe-0.15'------------- Done ------------------
sudo pip install -r $CAFFE_ROOT/python/requirements.txt
----------------- DONE with errors -------------------
????????????? pip install --upgrade pipapt-get install protobuf-compiler
cmake -DBLAS=opencd $CAFFE_ROOT
mkdir build
cd build
cmake .. -------------- originally Could NOT find Protobuf (missing: PROTOBUF_LIBRARY PROTOBUF_INCLUDE_DIR) but now corrected
make -j"$(nproc)" ---------------- /usr/include/c++/5/typeinfo:39:37: error: expected ‘}’ before end of lineI solved this problem by modifying CMakeList.txt
Orginal:# ---[ Flags
if(UNIX OR APPLE)
set(CMAKE_CXX_FLAGS "${CMAKE_CXX_FLAGS} -fPIC -Wall")
endif()if()Modified:
# ---[ Flags
if(UNIX OR APPLE)
set(CMAKE_CXX_FLAGS "${CMAKE_CXX_FLAGS} -fPIC -Wall -std=c++11")
endif()if()make install
DIGITS_ROOT=~/digits
git clone https://github.com/NVIDIA/DIGITS.git $DIGITS_ROOTsudo pip install -r $DIGITS_ROOT/requirements.txt
Traceback (most recent call last):
File "/usr/local/bin/pip", line 7, in <module>
from pip._internal import main
ImportError: No module named _internalsudo easy_install pip
sudo pip install -e $DIGITS_ROOT
Starting the server:
export CAFFE_ROOT=/home/mx/caffe/
cd digits
./digits-devserverValueError: Caffe executable not found in PATH ........... export CAFFE_ROOT=/home/mx/caffe/
echo "export CAFFE_ROOT=/home/nvidia/caffe/" >> ~/.profile
source ~/.profile
echo $CAFFE_ROOTImportError: libprotobuf.so.12: cannot open shared object file: No such file or directory
Starts a server at http://localhost:5000/.
python -m digits.download_data mnist ~/mnist
Other notes:
To fix the problem, all you need to do is to remove the lock files. You can do that easily using the commands below:
sudo rm /var/lib/apt/lists/lock
sudo rm /var/cache/apt/archives/lock
sudo rm /var/lib/dpkg/lock
After that, reconfigure the packagessudo dpkg --configure -a
The command to remove an apt repository is apt-add-repository with the -r option which will remove instead of add the repository. So in your case, the full command would be:
sudo add-apt-repository -r ppa:colingille/freshlight
-
Ai Object Based Navigation Takes One Step Forwards
09/14/2018 at 11:48 • 0 commentsAbout 4 months ago I bought the Jetson TX2 development board and tried to install the JetPack software to it …….. but after many hours of struggle, I got pretty much nowhere. Fortunately, the next release, JetPack 3.3, worked a lot better and I finally managed to get a working system up and running:
![]() The installation uses two computers running Ubuntu and the tricks that I used are:
The installation uses two computers running Ubuntu and the tricks that I used are:- Make a fresh install of Ubuntu 16.04 (2018) on the host computer
- Use the network settings panel to set up the USB interface, particularly the IPv4 settings. The documentation gives an address of 192.168.55.2, so enter this then 255.255.255.0 then 255.255.255.0 again. When the install itself asks for the address. use: 192.168.55.1.
- There must be an internet connection !
- Make sure the install knows which internet device to use eg Wi-Fi / Bluetooth / whatever. A router switch is NOT required as the install will automatically switch between the internet and USB connection whenever it needs to, as long as it was told before hand which connection to use.
The plan is to spend the colder Winter months developing an object based navigation system for the machine so, for example, it can use the plants themselves to enhance the overall navigation accuracy. We'll still be using GNSS, electrical cables, barcodes etc but will eventually give mathematical weighting to the techniques that prove to be more useful.
-
WEEDINATOR Frontend Human - Machine Inteface Explained
09/10/2018 at 08:30 • 0 commentsRafael has come from Brazil to the Land of Dragons to visit! Progress on the interface has been ongoing in the background and it's great to get a guided tour by the man himself on how it works:
WEEDINATOR 2019
The WEEDINATOR project continues .... The inevitability of robots working on farms draws ever nearer ....


 I had only previously got this feature working the day before the event and even then, it was not working properly. Fortunately, whilst setting up, I noticed a tiny plastic tab need the camera lens and it turned out that it had a rather opaque lens cap over the camera lens! After taking it off, it performed very much better and the system proved to be quite impressive.
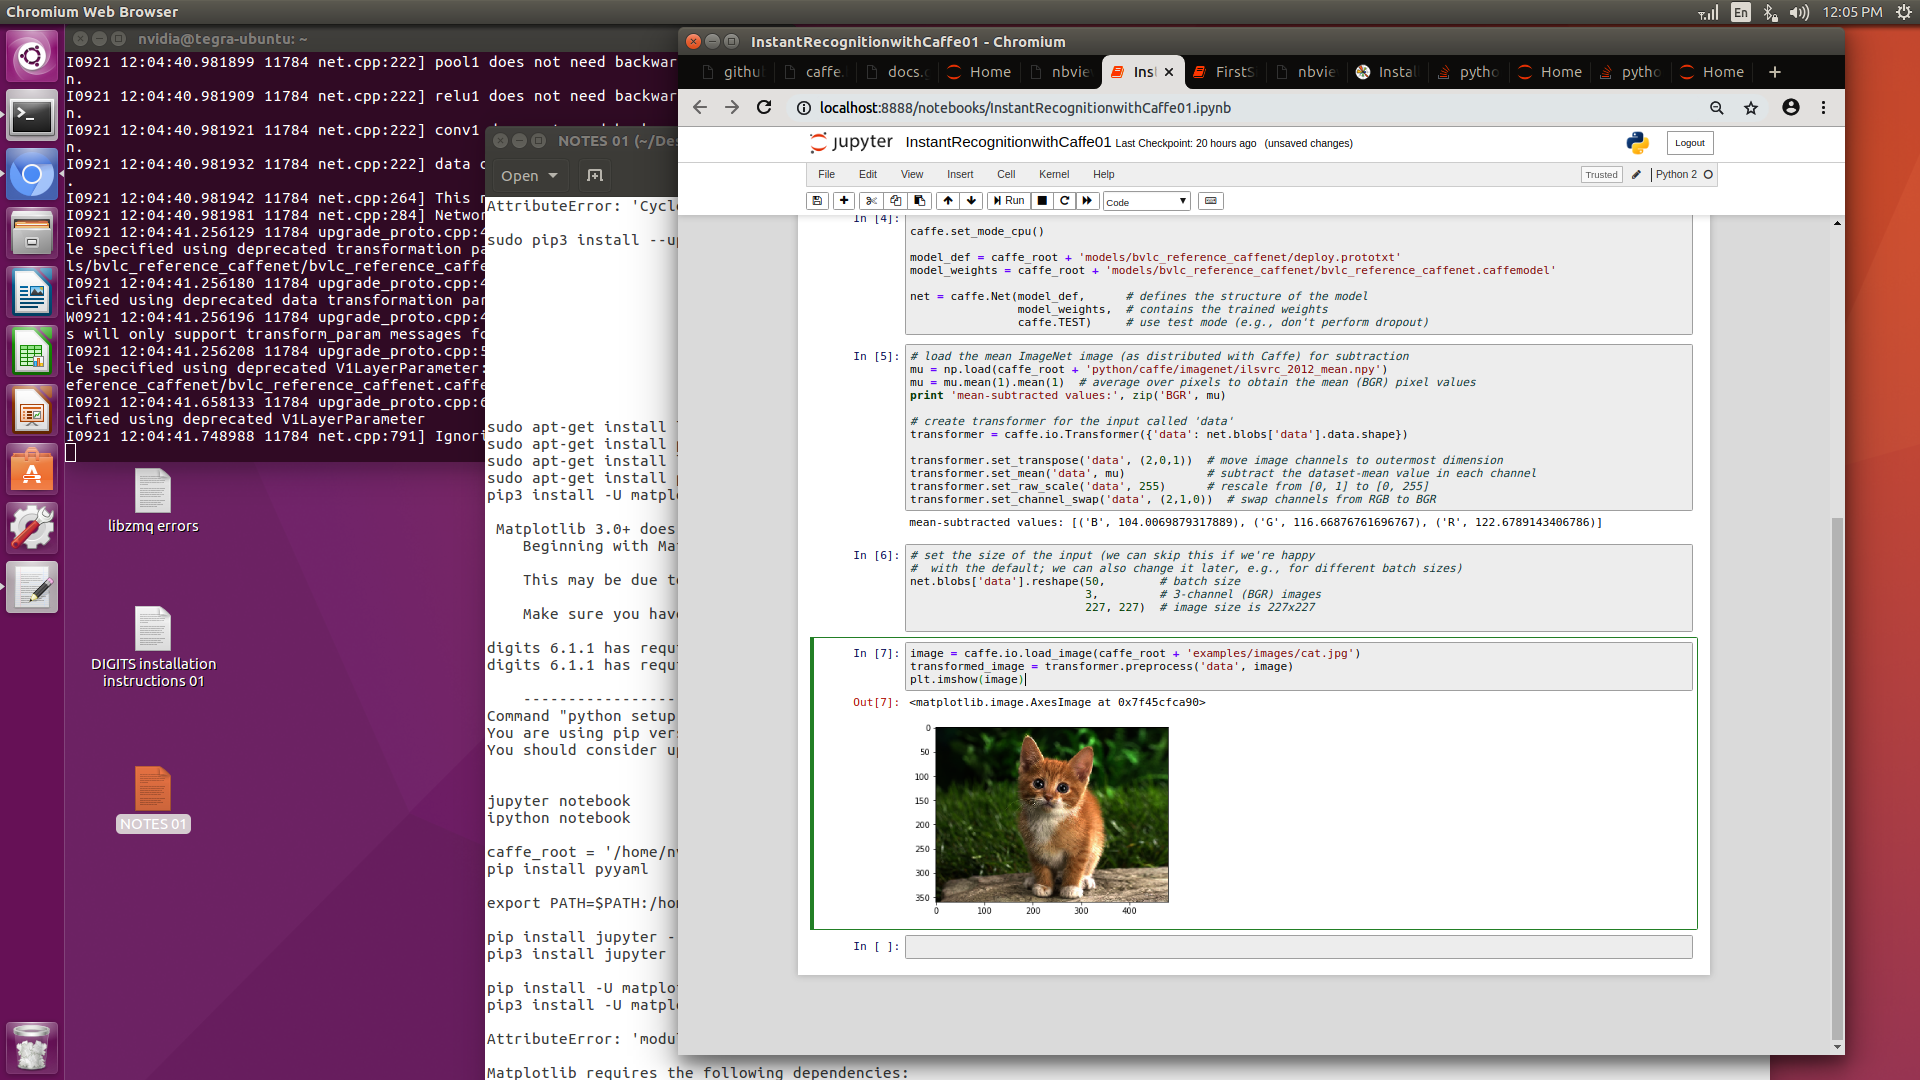
 The installation uses two computers running Ubuntu and the tricks that I used are: