Michael Ratcliffe
-
Good News For Cases
08/17/2015 at 17:44 • 0 commentsToday I got three unit housing from the factory to put my electronics inside, The next Step is Buying the components to poulate the housings and building a GUI.
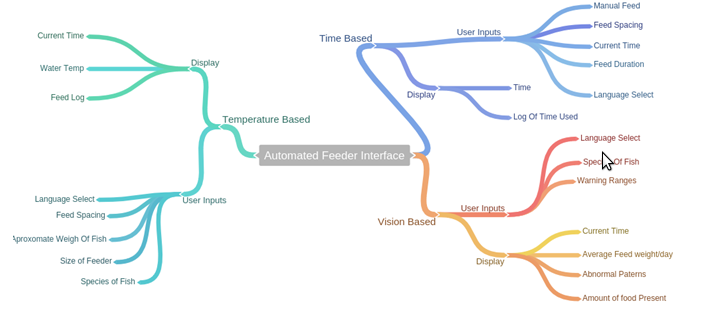
The key to the success of this product will be an easy to use product contained within quality housing with a great user interface. To keep this unit Simple it must be plug and play, the user will input a few key aspects of their setup and the mcu will take care of the rest. The inputs and outputs that can be accessed via the compact on board screen are summarized below:
![]()
The Unit will pull the time from a internal GPS module so the user wont have to set time and it will work anywhere in the world, the user will then input details about his system via the 5 button interface or view key logs/details of his unit by the on board screen:
![]()
Case
This Product must be durable and just as importantly portray a sense of quality. I really do like the heated bed controller I included in the parcel [I will be needing this back for testing].
ScreenFor the temperature compensated model a simple Alphanumeric LCD or Graphic Display will suffice, on standby it will list the time now, time of next feed and current water temperature, illuminating when any button is pressed and give acess to a log of recent water extreme temperatures and feed rates.
Vision control systems could also be packaged with this screen, displaying the food count as a number. Larger bespoke units would encorperate a true screen to show the
ButtonsThis is the interface by which the user will define his system, most selections will be made from pre set options.
VersionsIn order to reduce production costs I would like to keep the number of different versions limited, all utilizing the same main chassis/case and being available in 12v and mains power because we will need to be compatible with all commercial feed dispensers. Remember it is all about the control strategies and not the tiny mechanical feeders you have in front of you.
-
Vision Based Automated Fish Feeding
08/17/2015 at 15:34 • 0 commentsThis Is the Code for Finding fish food in a pond suing OpenCv and a raspberyPi.
Prerequisites:
>Raspberrypi 2b running OpenCV [Install Instructions Here]
>USB camera
>A Feeder, controlled by opto isolated relay {See instructions here}
This is a basic proof of Concept script, what it does it count the number of food particles in a Fish Pond.
It does this by:
>RaspberryPi request Image from USB Camera
>Turns Image into Gray Scale
>Turns grey scale into black and white
>Uses Blob detection on white image to identify food
The code below has been tested to work on a RaspberryPI 2b , running a Rasbian Image.
#!/usr/bin/python

##*********Explain a Little About the Codes Purpose *****************##
print("Vision Based Fish Feeder")
print("This code is the first of its kind, addresing fish feeding with an active feedback system")
print("Proof Of Concept Code, Submitted to HackaDay under  GNU etc")
print("10th/8/2015")
print("By Michael Ratcliffe")
print("Mike@MichaelRatcliffe.com")


##**********************Import Some Librays**************************##
import cv2
import numpy as np
import RPi.GPIO as GPIO
import time

print("Librarys Loaded")

##*** Creating Video Capture and Defining Pins and other variables **##
cap = cv2.VideoCapture(0)
butPin = 21 # Broadcom pin 21 (P1 pin xx)
motorPin = 18 # Broadcom pin 18 (P1 pin 12)
#dc = 20 # duty cycle (0-100) for PWM pin##not used unless pwm

GPIO.setmode(GPIO.BCM) # Broadcom pin-numbering scheme
GPIO.setup(motorPin, GPIO.OUT) # PWM pin set as output
#pwm = GPIO.PWM(pwmPin, 50)  # Initialize PWM on pwmPin 100Hz frequency
GPIO.setup(butPin, GPIO.IN, pull_up_down=GPIO.PUD_UP) # Button pin set as input w/ pull-up
#pwm.start(0)

print("Definitions Finished and Entering Main Loop")

##*********************** Main Loop **********************************##
##								      ##
## Runs Continuosly for testing purposes                              ##
## Eventualy It will Run every Hour 8am-8pm 			      ##
## Feeding the Fish as Much as thet Can Eat in 5-10 minutes	      ##
##********************************************************************##

while(1):


##**************** Capturing Image From Webcam ***********************##

    _,frame = cap.read()


##***************** Bluring Image to unify color *********************##

    frame = cv2.blur(frame,(3,3))


##**************** Converting To Gray Scale **************************##
##								      ##
##Simple Conversion Using RGB Works Empty Tank			      ##
##Convert from One Channel to Cancel Noise from Fish Color if Needed  ##
##********************************************************************##

    gray= cv2.cvtColor(frame,cv2.COLOR_BGR2GRAY)
    thresh = cv2.adaptiveThreshold(
    gray,255,cv2.ADAPTIVE_THRESH_GAUSSIAN_C,\
            cv2.THRESH_BINARY,75,20)


    thresh2 = thresh.copy()


##***************** Identify Pellets Of Food ************************##

    contours,hierarchy = cv2.findContours(thresh,cv2.RETR_LIST,cv2.CHAIN_APPROX_SIMPLE)


##************ Simple Logic to Feed Fish on Demand ******************##
##								     ##
##		PWM PIN Used Later As Project Evloves                ##
##		Most Likley Proportional+Intergral Control	     ##
##*******************************************************************##

    if (len(contours) > 7 or GPIO.input(butPin)):
	print("Waiting for Fish to Eat")
	GPIO.output(motorPin,False);

    else: # button is pressed:

	print("Adding Food")
	GPIO.output(motorPin,True)
        time.sleep(0.01)
        GPIO.output(motorPin,False);
##************ Print Some Useful Things to the Screen ***************##

    print'Amount Of Food:  ',len(contours)-1,'  Pellets'


    cv2.imshow('Normal',frame)
    cv2.imshow('Gray',gray)
    cv2.imshow('Pellets',thresh2)

    time.sleep(0.1)

##**************** Checks If User Has Asked to Leave *****************##

    if cv2.waitKey(33)== 27:
        break


##************** Clean up everything before leaving *****************##

GPIO.cleanup() # cleanup all GPIO
cap.release()
cv2.destroyAllWindows()
You Can download this file and an explanation on how to use it from:
www.MichaelRatcliffe.com/Projects
-either download the folder from the above link and unzip it into your home/pi folder. or paste the code from the above box into a text editor on the pi and save it as "ProofofConcept.py" in Home/Pi.
-Locate the File "ProofofConcept.py" Right Click on the File >Properties>Permissions and select everyone> OK
- because we are using the GPIO pins. Run it using:
cd home/pi
sudo python ProofofConcept.py
The Script should now run, it will output three windows and data to the command terminal about how much food it can see.
So it Works, what is left to do now:
>Improve immunity to noise in image processing
-Convert just main color into Gray Scale [ie red food, make a grey scale from just red component of image]
-Improve Blob Detection Implementation to stop groups of pellets being classed as a single pellet
>Calculate rate of food consumption or fish in tank
That is it for now, we have proved that it is possible to identify the pelleted food.
-
Working Out Feed-Rates for Use in Controller
08/17/2015 at 13:18 • 0 commentsTo implement the control systems we need an idea of how much our feeders are delivering in Grams/second.
To Do this:
>Run your feeder for 60 Seconds
>Collecting the feed it dispenses.
>Weigh the food it has dispensed in grams
>Divide by 60 to get grams/second.
Here is a Video Of me doing this with the 20 and 25mm Feeders we made in an earlier video [Link]:
Nothing Really Hard Here. Watch the main Fly Wars Blog for any Improvments and links to building the controller yourself.
-
Installing OpenCv on a Raspberry Pi - The Easy Way
08/16/2015 at 15:57 • 0 commentsFor This Project we will be using OpenCv on the Raspberry Pi quite a lot.
It it crazy Just How much miss information there is about opencv and the Raspberry pi
many tutorials will guide you thru a installation process that takes 12 hours+
and has library linked complexly.
Opencv 2.4.1 [CV2] is available in the default Rasbian Repository.
To Install on Rasbian, type the following into the command terminal:
sudo apt-get update

sudo apt-get upgrade

sudo apt-get install libcv-dev

sudo apt-get install python-opencv

sudo apt-get install libopencv-dev

sudo apt-get install libcv2.3

sudo apt-get install opencv-doc
Yet that is it, OpenCv is installed.
How To use:
>Open the File manager and go to your documents
>Right click>CreatNew>Empty File
>Add the line [#!/usr/bin/python] To the top of the file
>Save it as <FileName>.py
>Right Click on the File >Properties>Permisions and select everone> OK
>Doubble click on the file and execute in terminal
Hints:
>Remember it is a python based install of openCV 2
>Execute the python script as root if you want acess to the GPIO pins
>If the script doesnt work, Cd / into the directory and run python <Filename.py>
I will be including a test scrip in my next blog post to check that your installation will work with the raspbery Camera module and a USB camera.
-
Plans For DIY Mechanical Feeder [Small Aquaponics]
08/16/2015 at 15:50 • 0 commentsI have had a lot of requests for a how to on making the mechanical portion of the feeder. Well Here it is:
Spec's
20mm:
-federate [need to measure this]
-can handle food upto 4mm
25mm
-1L/min Federate with 50:1 ratio box
- can handle pelted food upto 6mm
What you will need:
Tools:
-Hand Drill
-Allen KEys
-Philips Screw Driver
25mm Feeder Parts
>25MM X 235MM SDS auger wood drill bit
>25mm Pvc Inspection Tee
>28mm metal saddels [28 mm MSBZP] two of these
> Aluminum Flexible Shaft Coupling 6mm to 10mm [SDS is 10mm, motor 6mm]
> MFA 919D 12v dc motor, 50:1 and lower gear ratio
>8 wood screws
>2’ Length of 3x2” wood
> 5cm length of 25mm PVC piping [for fitting the hopper]
As You can see the Motor is an expensive one, I had one of these knocking about but any similar power slow rotating [120 rpm and below] 12v motor should work. It is important to get one that has a shaft height [ie the heigh of the shaft above the mounting plate] of blow 14mm. If it is lower you can always mount the motor on a shim.
20mm Feeder Parts:
>20MM X 205MM SDS auger bit
>20mm Pvc Inspection Tee
>25mm Pvc Saddels [two of these]
> Aluminum Flexible Shaft Coupling 4mm to 10mm [SDS is 10mm, motor 4mm]
>Electric 2 Pin Connector DC12V 40-50mA 10RPM DC Geared Motor
>8 wood screws
Feel Free to use this design, modify it and make it better if you can see a way to do so.
Want to bring your fish feeding into the rest of the automated system, the next blog will be on controlling these feeders to optimise fish growth.
-
A Fast Postman: Prototype 1a and 1b
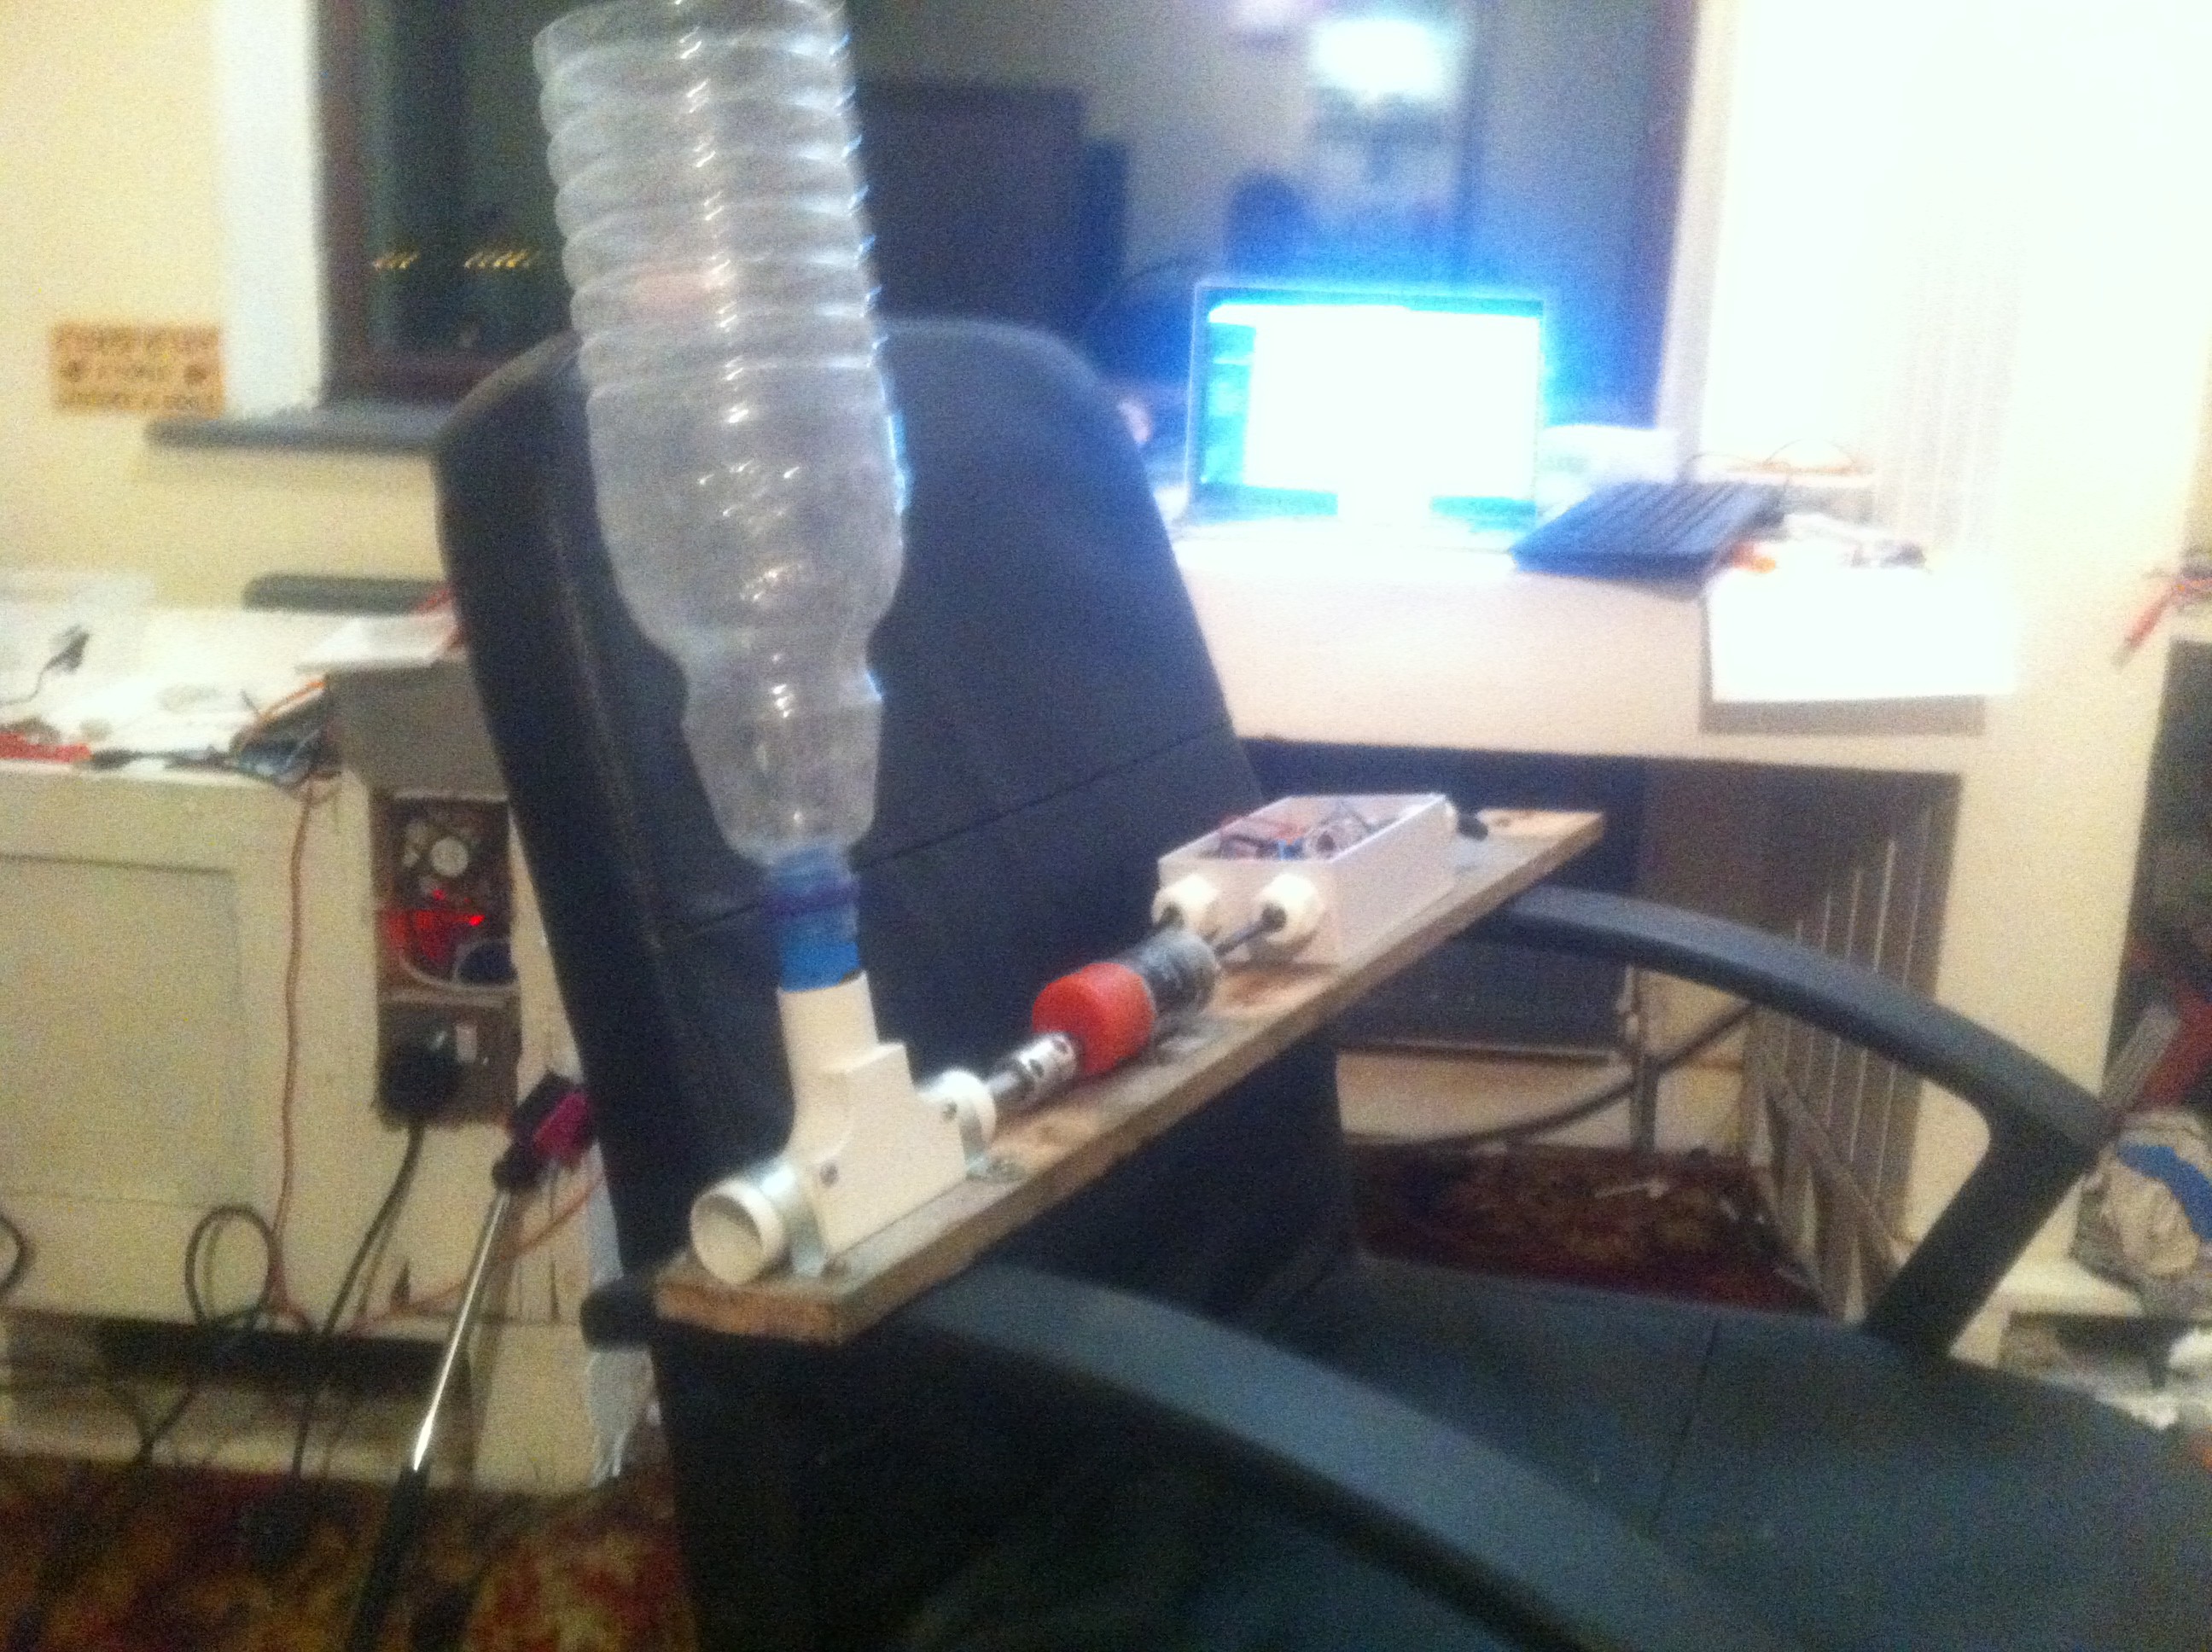
08/07/2015 at 23:02 • 0 commentsToday I received the parts needed to make an automated fish feeder. There are Two models. Here is a prototype:
![]()
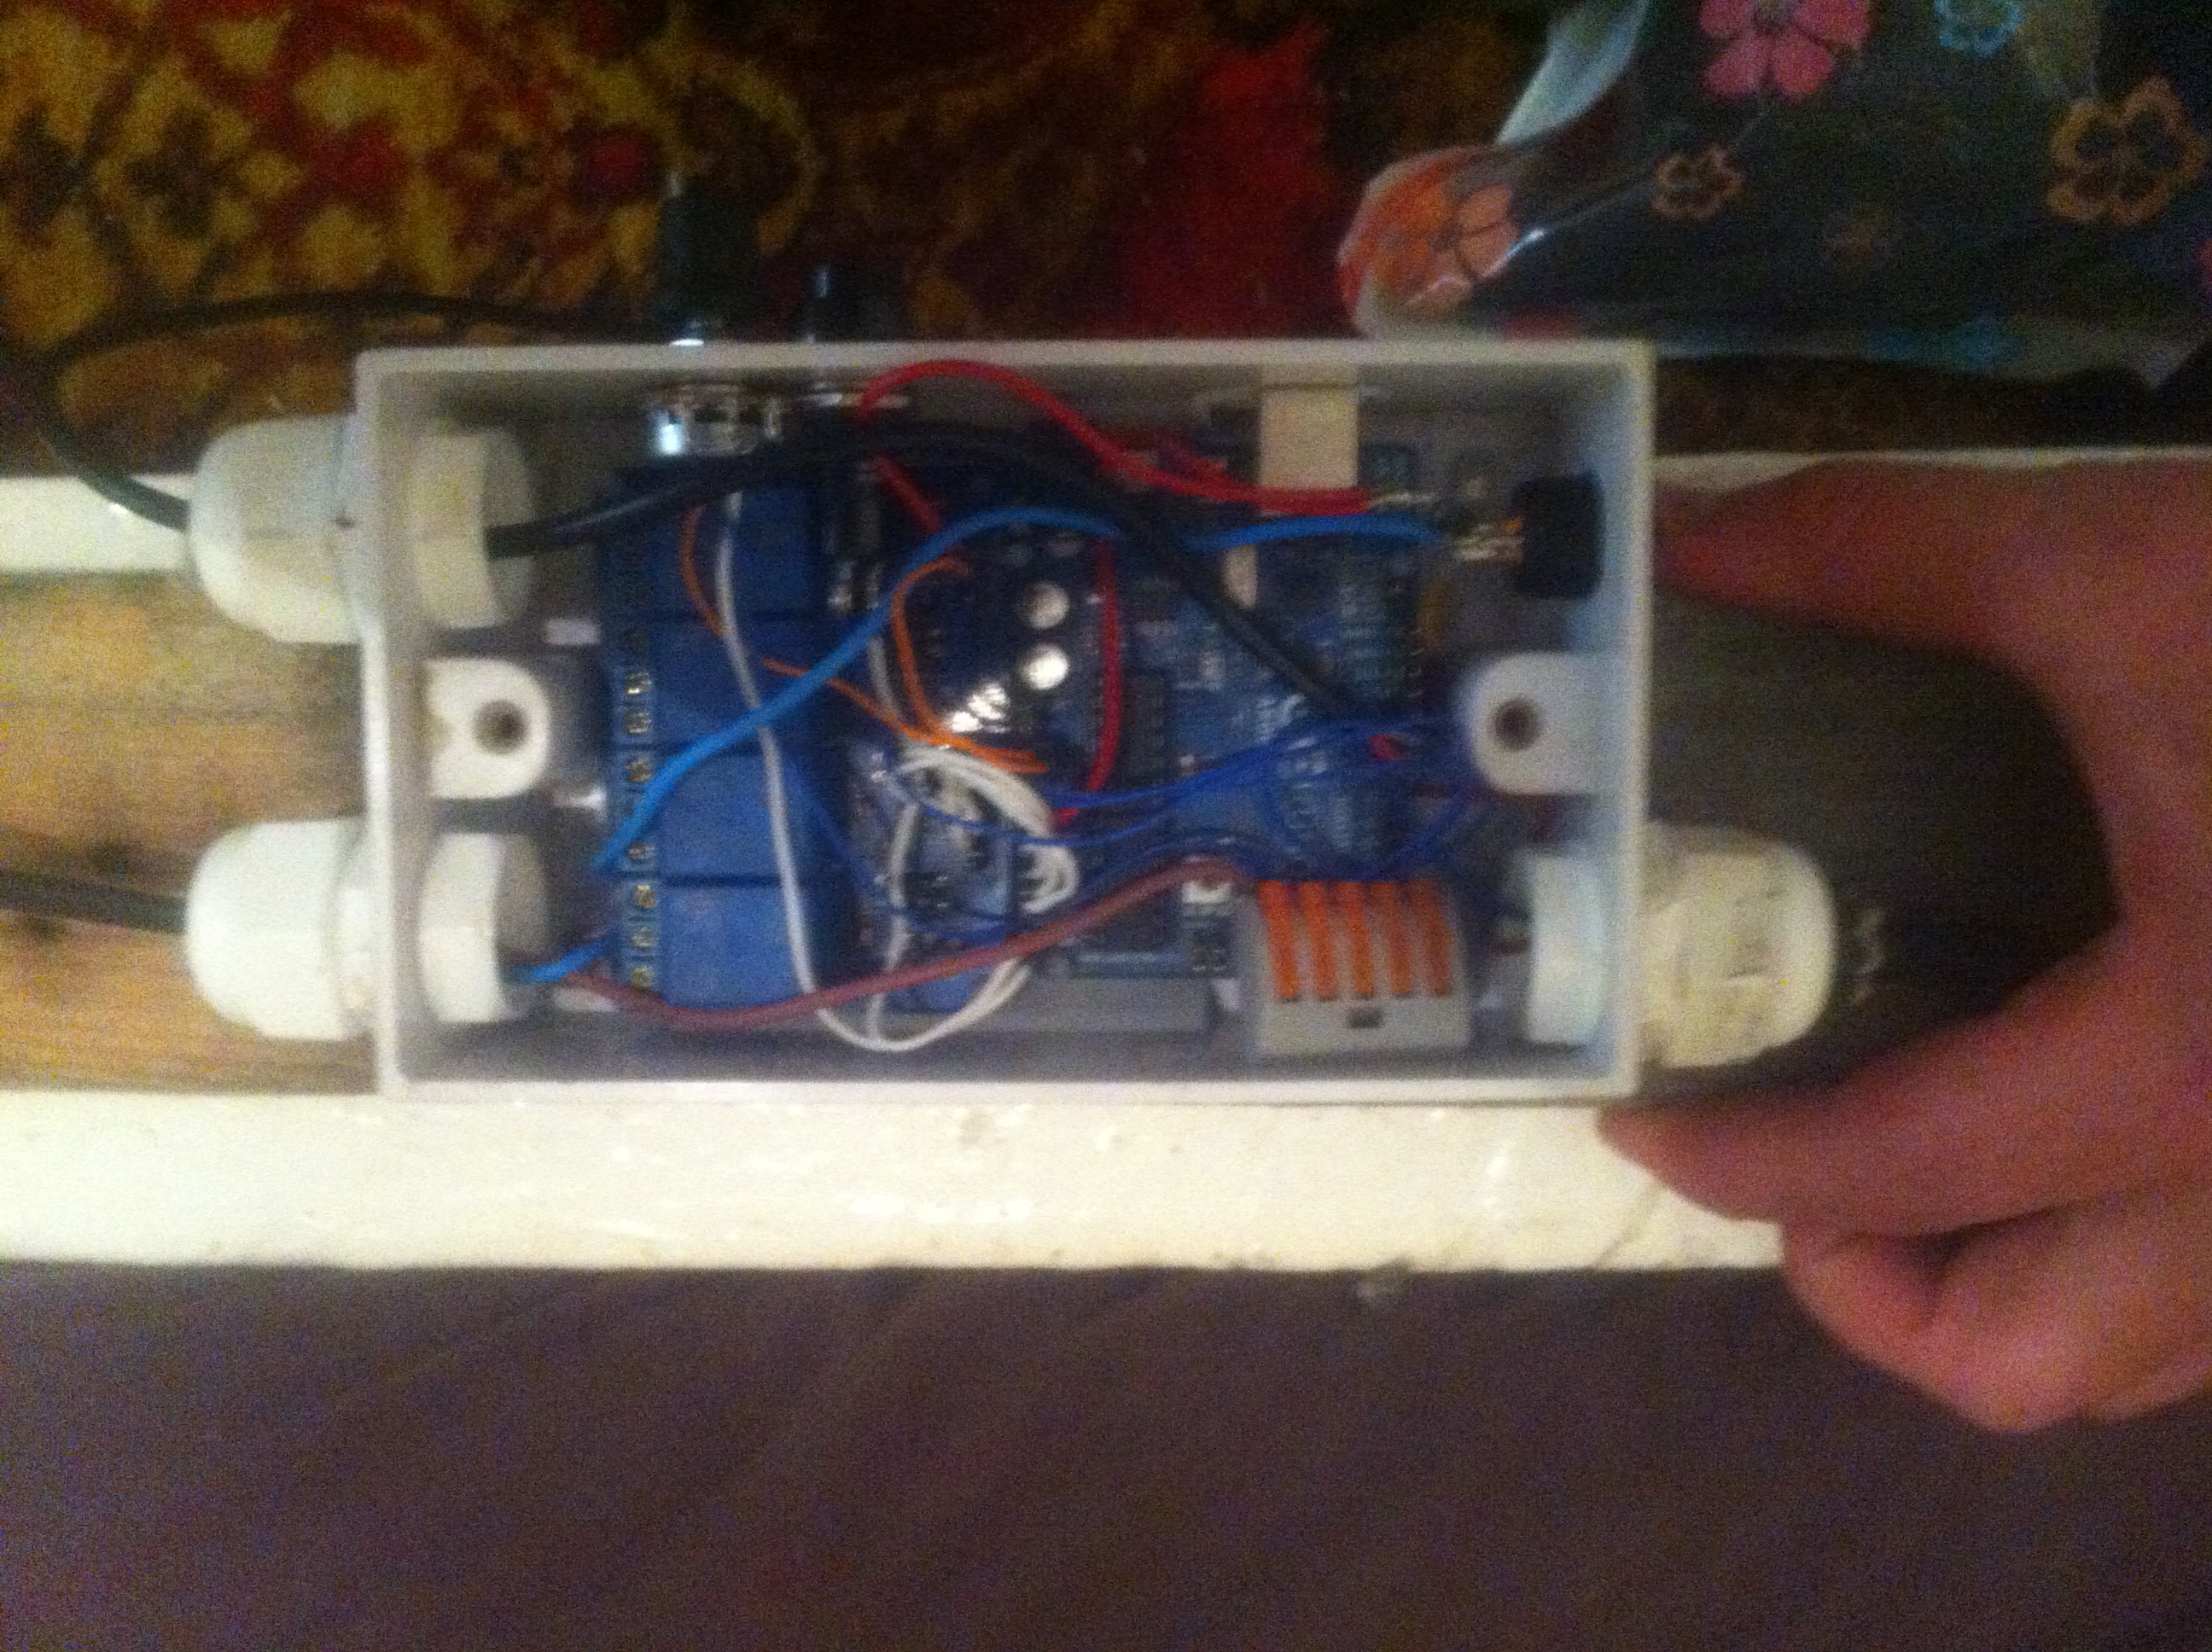
And the Control Box, that feeds the fish just as much as they need for the temperature of the water:
![]()
Early next week there will be a video Log of these Up and running [we will be testing what medium they can dispence].
-
Controlling Raspberry Pi GPIO Pins From Within Processing Environment
07/31/2015 at 07:03 • 0 commentsBefore you start, make sure you have a working Processing environment on your Pi. [See Tutorial-1]
This Tutorial Gave me a bit of a headache, I can not find much reliable information online using the GPIO pins from inside the Processing environment. Which is a shame because it is such a useful environment for those guys coming over from Arduino based electronics.
The only project I could find was this little snippet on git hub:
http://xseignard.github.io/2013/04/24/processing-and-gpios-on-raspberry-pi/
This tutorial implements the following steps to get GPIO’s working within Processing:
>Check System is up to date
>Download the Latest Pi4J library
>Unzip the library and rearrange its files into something Processing will accept
>Show us how to Run Processing as Root [Pi4j needs to be ran as root]
you are used to the Linux GUI and the use of Commands, then skip the Video and just read the tutorial. If this is your first time with a Raspberry Pi and are finding yourself a little lost making your way around the environment then use both the video and tutorial together.
Check System is up to date
Enter the following into the Command Terminal:
Sudo apt-get updateSudo apt-get upgradeDownloading the Latest Pi4j
Pi4j Has moved to: www.pi4j.com
Do not install it as recommended on the website, to make it work with processing you will have to follow the rest of the steps.
Download the : pi4j-1.0.zip [http://pi4j.com/download.html]
Re-structuring Pi4j
Once the Download has finished Copy the zip file into your:
Home/pi directory
The Run the Following command in the Terminal:
unzip pi4j-1.0.zipSince Processing is not happy when a lib have something else than letters and numbers in the lib name, you need to rename the unzipped folder:
(see http://wiki.processing.org/w/How_to_Install_a_Contributed_Library).
mv pi4j-1.0 pi4jThen you need to re-arrange files to stick with the Processing convention:
mv pi4j/lib pi4j/librarymv pi4j/library/pi4j-core.jar pi4j/library/pi4j.jarNow you can put the lib in the Processing library folder (defaults to ~/sketchbook/libraries).
mv pi4j sketchbook/librariesRunning as Root
cd ~/processing-2.2.1/sudo su./processing
Now that you are logged in to Processing, click on file>preferences
![]()
Make Sure the Sketchbook Location is /Home/PI/Sketchbook
Testing
Processing should start up, it is a good idea to check that the "clock" example will still compile and run before moving onto testing GPIO's.
Gpio Testing:
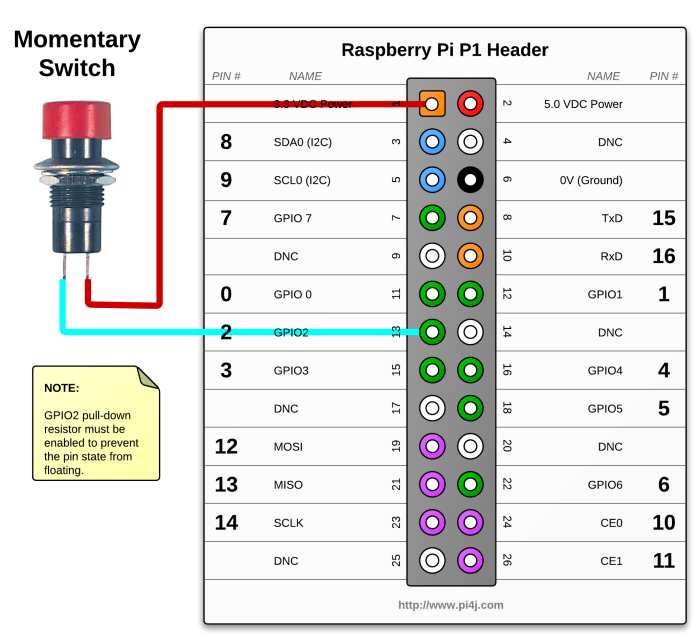
Connect a button as shown, or use some jumper wires to make the following circuit:
![]()
For an explanation of Pin-outs see: www.pi4j.com
Here is the Sketch that comes along the Image from above (borrowed from http://pi4j.com/).
Copy and Past This Code into a processing window and run it:
import com.pi4j.io.gpio.GpioController;
import com.pi4j.io.gpio.GpioFactory;
import com.pi4j.io.gpio.GpioPinDigitalInput;
import com.pi4j.io.gpio.PinPullResistance;
import com.pi4j.io.gpio.RaspiPin;

int WIDTH = 1280;
int HEIGHT = 1024;
GpioController gpio;
GpioPinDigitalInput button;

void setup() {
    size(WIDTH, HEIGHT);
    gpio = GpioFactory.getInstance();
    button = gpio.provisionDigitalInputPin(RaspiPin.GPIO_02, PinPullResistance.PULL_DOWN);
}

void draw() {
    if (button.isHigh()) {
        println("pressed");
        fill(int(random(255)), int(random(255)), int(random(255)));
        float x = random(WIDTH);
        float y = random(HEIGHT);
        ellipse(x, y, 80, 80);
    };
}
When You press the button [or bridge the correct pins with a jumper] A sphere should appear on the new screen, If it doesn't then check you have the correct sketch folder defined under file>preferences.
Dont Forget To like, Share and Get involved with the "Hackers Solution to World Hunger" Project. The next Tutorials:
>Raspberry Pi, Camera and Processing, Bringing Vision Based Control To Your Projects
>How To make an Image Useful To a Computer Program
-
Raspberry Pi 2 B and Processing 2.2.1
07/30/2015 at 23:50 • 0 commentsThe hackers Solution to World Hunger will require Vision based control, Processing is a Free and Powerful Tool when it comes to Vision based Control Systems. It turns out Installing Processing on The Raspberry Pi is a little more complicated than it should be, this tutorial will guide you through the installation process.
This Tutorial is based on a Scruss.com tutorial for processing 2.1 . If you are used to the Linux GUI and the use of Commands, then skip the Video and just read the tutorial. If this is your first time with a Raspberry Pi and are finding yourself a little lost making your way around the environment then use both the video and tutorial together.
In order to get a working version of Processing on the Raspberry Pi the following steps must be followed:
>Update the system
>Install and use the Java JDK 7
>Install Processing
>Replace the Java run time with Pi’s own version
Update the system
Check that you are connected to the internet, then open the terminal and follow the commands below:
sudo apt-get update

sudo apt-get dist-upgrade
Install Java
sudo apt-get install oracle-java7-jdkCheck if the right version is installed and being used.
java -versionjava version "1.7.0_40" is what you should get, if you dont then enter the following Command:
sudo update-alternatives --config javaThis command will ask for a specific version to be declared, you do this by inputting the corresponding table number into the task manager. Remember you want JDK 7.
Download & Install Processing
Go to www.Processing.Org
And Download the Linux 32-bit Version [around 100mb]
[If you have the funds to spare, Fund these guys. Their work is Awesome!]
Once it is downloaded click to open the file, it will ask you to extract the folder, extract it into the:
home/pi directory [as Below]
![]()
Next you need to Run the following two commands, it replaces the java with a compatible R-pi one [Check out Scruss.com if you want a better explanation] .
rm -rf ~/processing-2.2.1/java

ln -s /usr/lib/jvm/jdk-7-oracle-armhf ~/processing-2.2.1/java
That Is The End of The Tutorial
Now You should be able to navigate to the processing folder:
home/pi /Processing-2.2.1
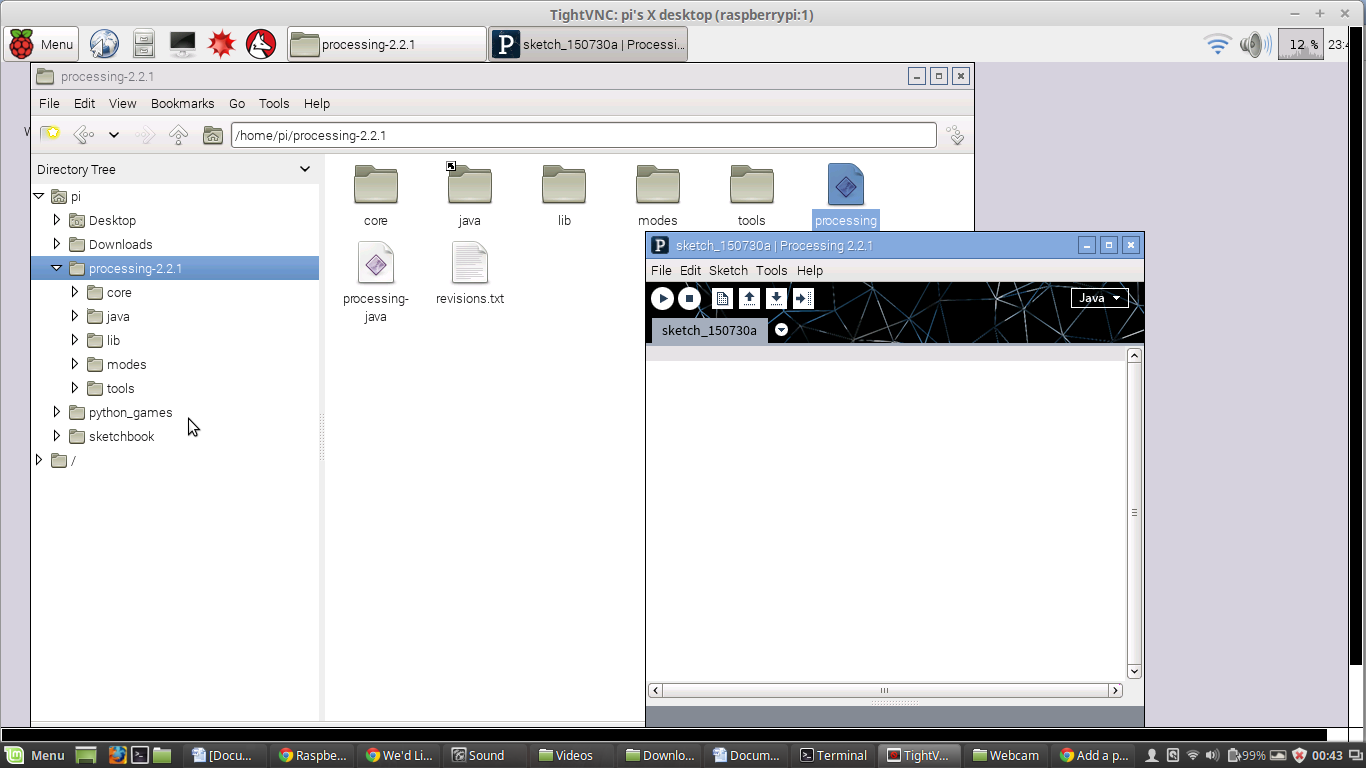
Click on the Processing Link in there, Execute and Processing should open like below:
![]()
Dont Forget To like, Share and Get involved with the "Hackers Solution to World Hunger" Project. The next Tutorials:
> Controlling Raspberry Pi GPIO Pins From Withing Processing Environment
>Raspberry Camera and Processing, Bringing Vision Based Control To Your Projects
Hacking the way to growing food
Using Technology And A Hackers Mindset To Grow Food. Last Updated [16/01/2021]