 Jim Shealy
-
1Step 1
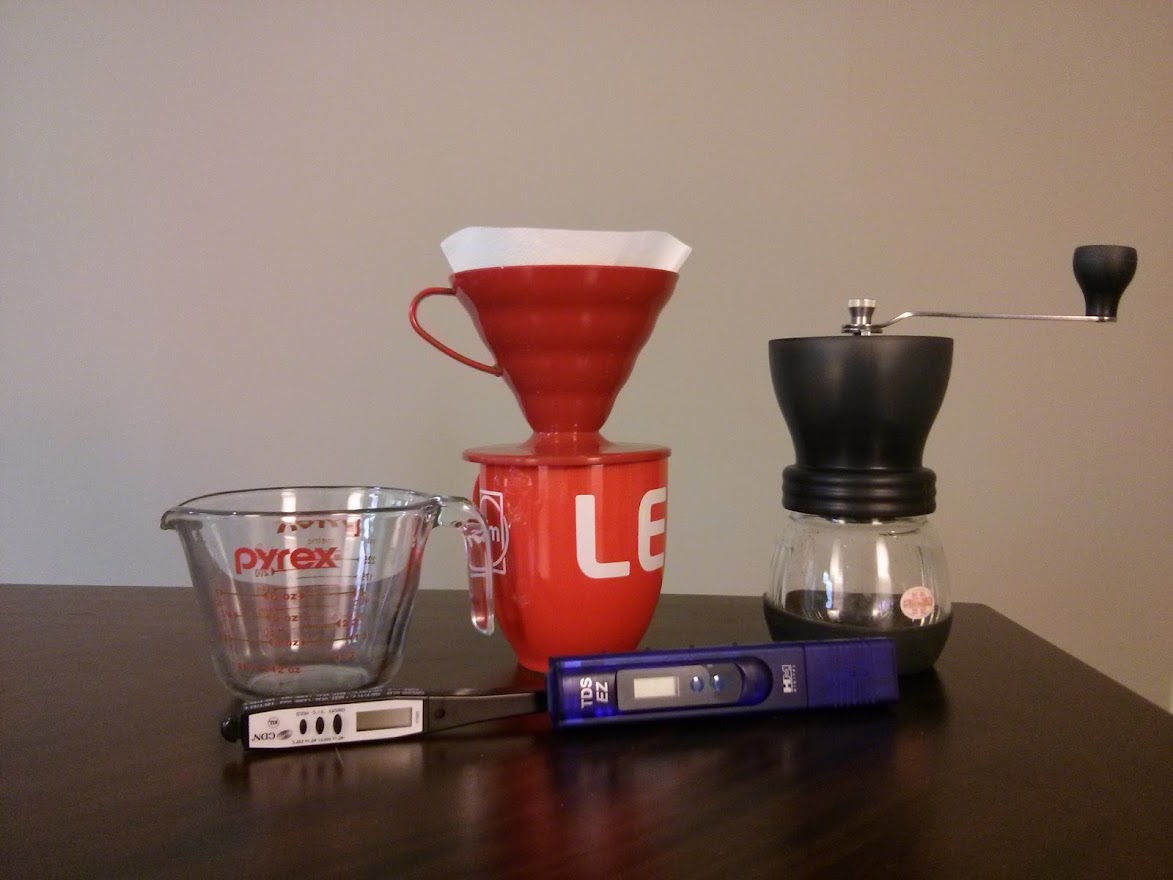
The first step to a good coffee brewing robot is to figure out how to brew good coffee. I've got some tips and tricks to brewing good coffee in the project logs ("A Dive Into the World of Coffee"), so I'll get directly into how I achieve good, full bodied coffee without much bitterness. I'm not usually able to drink coffee black, but when it's brewed right, it's pretty good and I think you'll be able to too! You'll need everything in the following Picture:
![]()
1x measuring Cup (at least 250cc, Pyrex brand pours very nicely which is important!)
1x Burr Grinder (I use the Hario Skerton. <$35 online)
1x Drip Cone (I use the Hario V60, ~$8 for a plastic cone, $25 for ceramic)
1x #02 Hario Filter ($5 for about 100)
1x Thermometer (preferably digital for quick reading)
1x Mug
~17g Coffee Beans
I've chosen these particular utensils because I want the robot arm to use implements humans typically interact with. Realize before you go much further that brewing coffee like this requires a bit of patience! You can't just push a button and walk away, but the results are worth it!
By the way, if you're following along, make sure your grinder is dialed in for drip brewed coffee. I'll put up a project log to describe how to do this and what it looks like on the Hario Skerton.
The Math: (skip to brewing if you don't care ;) )
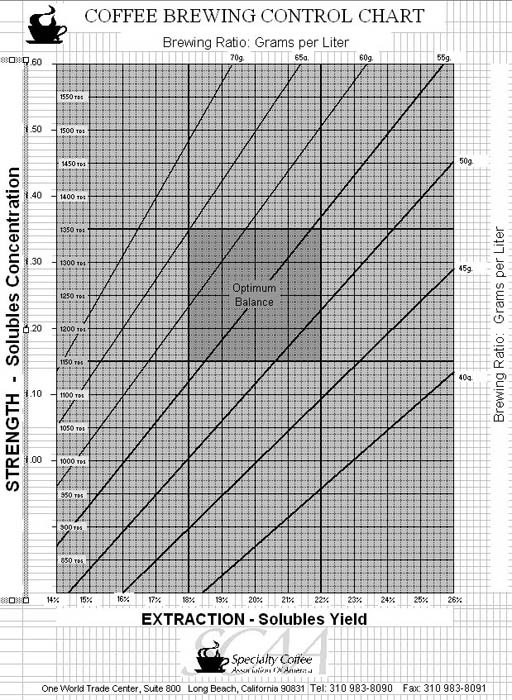
By international coffee standards, the following SCAA chart shows a good formula to follow when brewing coffee.
![]()
This chart provides a pretty good basis of how to figure out where your coffee brewing is. You start out with with weight of coffee to water volume (note the right side of the chart). To achieve optimal balance we'll want to follow the 55g per liter line. If we're using ~270cc of water, this turns into about 15g of coffee... Conveniently the size scoop the hario V60 comes with ;)
Ok, but what about the rest? Well, the X axis is the amount extracted into solution, and the Y axis is the concentration in the solution. Using a TDS meter (as shown in the picture as the clear blue gadget) or refractometer we can estimate the amount of solids dissolved in the brewed coffee on the Y axis, trace over to the grams/liter line we brewed at, and find our extraction as well as where in the optimum balance our particular brew landed. Every coffee blend is different, and the chart is no substitute for taste! It'll get you close enough that you'll start getting delicious coffee and enable you to refine the process until you get what you like best.
Brewing (My method)
Before beginning, get a #02 filter out and place it in the cone. You'll need to fold the seam down to help it retain it's conical shape. Go ahead and run some water through the filter to wet it and place it over your clean coffee mug.
Step 1- Put about 270cc water into the measuring cup and throw it into the microwave for 2-3 min. We want it to reach 195°F, but it's ok if it boils a bit.
Step 2- Take the scoop included with the Hario V60 (15-16g or I believe about 1 TBSP), throw it into the grinder, and get that grinder moving!
Step 3- Take your ground coffee and dump into the prepared filter
Step 4- Remove the water from the microwave (it should be just finishing) and stir with the thermometer. We're waiting for the water to cool to 195°F
Step 5- Gently pour water over the pile of grounds, evenly wetting all the grounds. We're looking for them to start foaming (freshly ground new coffee will foam!) and really to evenly saturate the grounds. Only pour 1/5th the water and then let it sit for ~30 seconds. This step is important to make sure the coffee extracts evenly. This is called the "bloom" because the coffee foams up!
Step 6- Begin slowly pouring the water (which has cooled to abut 191°F and should be perfect!) in a spiral pattern. We're looking for a stream that's just less than steady and you'll know if you're going too fast because the pouring will get significantly quieter! It should take about 1-2 minutes to pour completely. Avoid pouring on the sides! While we want to keep the coffee evenly agitated, we don't want to push all the coffee off the filter and allow the water to bypass the coffee altogether. The water level will likely rise up to about 1/2 or 2/3rds of the height of the cone, but if it starts to get higher you'll want to slow down.
Step 6- Let the coffee finish dripping, throw away the used filter, and clean up! you're ready to drink your delicious coffee! And hey, if you did it right you might even enjoy it black!
Now, you might notice that while it produces great coffee, it's a slow process and takes a lot of work for something that could (should!) be automated. That's the plan for this robot is to be able to perform all these tasks at the push of a button!
-
2Step 2
Effective Bardware Based Stepper Motor Control
In my quest to derive a robot control scheme from scratch, I've been working to figure out how to control a stepper motor. Stepper motors are great because they're cheap, relatively simple to control, and can maintain a constant torque without burning out. Unlike a hobby brushless motor or brushed motor, stepper motors don't burn out when they stall. They're designed to go to a position and stay there as long as it's below the rated torque. By changing the current going through the windings you make the motor "step" (hence "stepper motor") in a direction and stay there. You can see a simplified image below.
![]()
If you imagine driving the coils, the magnetic rotor will align with a set of coils. Energize the other ones and it'll "step" to align with the other coils. What's neat is that if you power the coils in various arrangements you can actually achieve fractional steps (albeit these steps tend to become less accurate as you divide them finer).
Why Not Use a Servo?
Servos are also (generally) meant to create large torques through a geared drivetrain. They also include control circuitry to go to a postion that you command, eliminating most of the control logic necessary. Albeit very convenient there's a few major disadvantages:
1- Jittery: Servos have a tendency to not hold an exact position and jitter. Cheap servos have control logic that makes them act like a really stiff spring from a commanded position. (This is proportional control; the force exerted is proportional to the distance from the desired target, IE a spring). Because cheap servos have a very low resolution they tend to jitter around the desired position due to their accuracy errors.
2- Inaccurate: Cheap servos don't necessarily go to the position commanded. Hysteresis (or the the inability to return to a state due to losses such as friction) and various loading conditions will prevent the servo from going all the way to the desired point. This is typically due to the proportional control lowering the output torque near the target position. While this doesn't make a difference on an RC system due to the human being able to compensate, on a robot arm these inaccuracies will be propagated, amplified, and compounded by the physical arm to result in very poor accuracy. This is not to say that there aren't accurate servos! they're just quite expensive (typically >$90)
3- Fragile: Servos definitely have higher holding torque per size than stepper motors. However, when a servo is over torqued and back driven, the gears have a tendency to break or strip. Stepper motors will instead just skip a magnetic pole and settle into the next allowable position. This is especially nice if for example the robot arm runs into an obstacle or is hit (ie bumped) by an object. These impacts are especially prone to breaking servos.
4- Expensive: Nice servos are expensive! There's a reason for this though, the accurate sensors, high speed, high torque drives cost more to produce.
5- Typically Limited range: Servos rarely are continuous rotation. This can present serious design challenges (and reduces the flexibility of the design!)
Now, that's all not to say that stepper motors are the god of all motors. Servos are extremely convenient and provide a very compact mechanical control package. They're very easy to control and if you're ok with low accuracy, they're definitely cost effective. The main difference here is that with a good mechanical design and control logic, stepper motors are more robust and potentially significantly cheaper. Especially with the proliferation of 3D printers that rely on stepper motors, it's become progressively cheaper and easier to use steppers.
-
3Step 3
Develop kinematics and robust control mechanisms
*Link to project page to be added*
-
4Step 4
Develop and prototype various grippers for grabbing all the utensils required for making coffee. Specifically, Grippers that grab things humans interact with
*Link to project page to be added*
-
5Step 5
Develop tools and rig to help make human friendly tools robot friendly
*Link to project page to be added*
RoboBarista: A Coffee Brewing Robot
A flexible, open source robot arm that grinds, pours, and serves only the best robotic brewed Coffee.

Discussions
Become a Hackaday.io Member
Create an account to leave a comment. Already have an account? Log In.